1
AEIS IT
Desktop
User Manual
Serving the Educational Community
AEIS IT Desktop User Manual
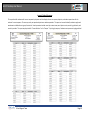
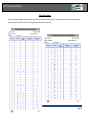
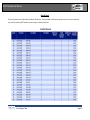
CONTENTS
Topic
Page Number
Welcome to AEIS IT
3
AEIS IT Program Installation
4
Opening AEIS IT
6
Closing AEIS IT
7
Setting Preferences
8
Importing Data (TAKS, TELPAS, Class Roster,
Scan) and Preparing Database Routine
Exporting Data: TAKS, TELPAS, Class Roster,
Scan
Advanced Export Editor and Opening Data in
Excel
Class Roster Export from RSCCC
9
12
15
20
Class Roster Export from Skyward
24
Creating Custom Test Keys
29
TAKS Data Table: Display Screen
33
TAKS Data Table: Individual Student Record
34
Selecting Student Subsets and Searches
(Quick Search and Field Search)
Saving and Accessing Saved Student Subsets
37
AEIS IT Reports
39
AEIS IT Graphs
72
Running 4D Tools
82
Additional Help and Support
83
School Support Team
38
Page 2
AEIS IT Desktop User Manual
Welcome to AEIS IT
AEIS IT is a comprehensive test data analysis tool for the Texas
accountability assessments including TAKS, TELPAS, and all state
alternative assessments. AEIS IT also has additional modules that
include PGP (Personal Graduation Plans) and SSI (Student Success
Initiative), Slug IT, and Scan IT. AEIS IT (pronounced “ace it,” stands for
Academic Excellence Indicator System for Improving TAKS.
AEIS IT was developed by Texas educators for Texas educators. The
program continues to evolve based upon the collaborative input of
teachers and administrators throughout Texas. The program is updated
yearly based upon users' suggestions and new state guidelines.
Because of its functionality and low cost, the user base continues to
grow each year providing more Texas educators with the data needed
to achieve better results. Using data driven decisions, greater student
success can be reached.
This manual will help users learn the basic navigation process of AEIS IT.
They will also learn about the various reports and graphs available for
data analysis through AEIS IT.
School Support Team
Page 3
AEIS IT Desktop User Manual
AEIS IT Program Installation
District and/or ESC Representatives will install the student database.
Some users might have access to only campus data while others will
have access to all district data. This will be dependent upon
administrative district decisions.
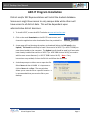
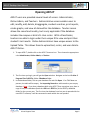
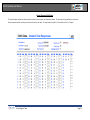
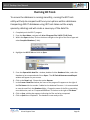
1. To install AEIS IT, access the AEIS IT website at www.aeisitonline.com.
2. Click on the word Downloads on the AEIS IT home screen, and
choose the application to be downloaded from the provided list.
3. A new page will load showing the options to download (either the Full Install or the
Update.) Full Install should only be used if that version of AEIS IT (i.e. AEIS IT 2008) has
never been loaded on the computer. The Update install should be used by all users who
have already installed that version of AEIS IT (i.e. AEIS 2008 Version 14.00), but need to
add the more recent features (i.e. AEIS IT 2008 Version 14.02). Note: If any
instructions are provided, click on the file link and follow the directions.
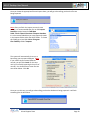
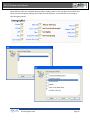
4. A window prompts to either save or open the file.
Select Save and then click OK. It is important to
click on Save and not Run. The save window
allows you to save the file to a specific location. It
is recommended that you save the file to your
desktop.
School Support Team
Page 4
AEIS IT Desktop User Manual
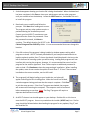
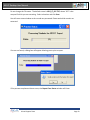
5. A window appears showing you that the file is being downloaded. When the download
has been completed, click Close to close your web browser and any other programs
until you are able to see the desktop. Locate the AEISIT.exe icon, and double click on it
to install the program.
6. Read each screen carefully and follow the
prompts. Click Next after reading each screen.
The program and any other updates require a
password during the installation process.
Contact your local AEIS IT consultant at your
Regional Service Center for passwords. Once
the password is entered, click Next to
continue. The default location for AEIS IT is the
C driveProgram FilesAEISITyr folder. It is not recommended that users change this
location.
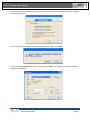
7. If the full version of the program is being installed, a window appears asking which
programs to install. AEIS IT is already checked but if you have purchased and wish to
load the optional module, Scan IT, then a checkmark should be placed in the box to the
left of the brand of scanning system you will be using. Loading both programs will not
interfere with running the program; however, it is recommended that users load the
program for the scanner type used. Scan IT does require an additional password in
order to load. Click Continue to have the program begin installation. When installing
the update, users do not receive the option to install Scan IT. If Scan IT has not been
installed on the current machine, use the full install.
8. The program(s) will begin loading to your hard drive, and a box will
appear indicating that this is taking place. When the install has finished,
a window appears letting you know that the setup is complete. Click Close
to exit the setup process. If the Scan IT program was loaded, the program
will recommend restarting the computer. The computer must be restarted
before attempting to scan data. Note: The Slug IT program will require a
separate download and install process.
9. An AEIS IT shortcut icon should appear on your desktop. Double click on this icon to
start the AEIS IT program. Users may now delete the installer (AEISIT.exe) icon. Similar
steps should be followed when downloading the program for any updates, Slug IT, and
the Read Me file.
School Support Team
Page 5
AEIS IT Desktop User Manual
Opening AEIS IT
AEIS IT users are provided several levels of access: Administrator,
Online Admin, and Teachers. Administrative access enables users to
edit, modify, add, delete, disaggregate, conduct searches, print reports,
create graphs, and view all data within the database. Teacher access
allows the same functionality, but is only applicable if the database
includes the campus or district’s class roster. With a Class Roster,
teachers are able to login under their unique ID to view and print their
student’s test results. Online Administrators have unique access to the
Upload Table. This allows them to upload test, roster, and user data to
AEIS IT Online.
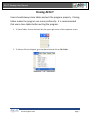
1. To open AEIS IT, double-click on the AEIS IT shortcut icon. Then choose the appropriate
role: Administrator, Online Admin, or Teacher.
2. The first time you login, you will get the Open window. Navigate to the local C drive
Program FilesAEISITyr folderDatabase folder.
3. In the database folder, click on your database file and click Open. If no TAKS data are
present, the table will be empty. See Importing Records to add records to your empty
database. Note: If you have a database built using AEIS IT from a previous year, place a
copy of last year’s database (both the .4DD and .4DR files) in the AEISITyr database
folder for the current year. The first time the database from last year is opened with the
new AEIS IT software, it will be converted to work within the new product.
School Support Team
Page 6
AEIS IT Desktop User Manual
Closing AEIS IT
Users should always close tables and exit the program properly. Closing
tables makes the program run more proficiently. It is recommended
that users close tables before exiting the program.
1. To Close Tables, click on the lower X in the upper right corner of the respective screen.
2. To Close or Exit the Program, go to the Menu Bar and click on FileQuit.
School Support Team
Page 7
AEIS IT Desktop User Manual
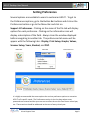
Setting Preferences
Several options are available to users to customize AEIS IT. To get to
the Preferences options, go to the Button Bar buttons and click on the
Preferences button or go to the Menu Bar and click on
SupportPreferences. Clicking on the name of the file tab will display
options for each preference. Clicking on the information icon will
display a description of the field. Always close the window displayed
before navigating to another tab. The preferences tab menu will be
appear with the following tabs: Display, Print Setup, Graphs, Values,
Scanner Setup, Years, Student, and PGP.
Button Bar
Menu Bar
Information Icon
It is highly recommended that users explore the various preference options to customize
AEIS IT to fit specific needs. The Preferences section is also the place where some
passwords are entered and the years are set to reflect the correct Class Roster school year,
etc. These sections should be addressed at the start of every school year.
School Support Team
Page 8
AEIS IT Desktop User Manual
Importing Data
Records can be easily imported into AEIS IT directly from the .DAT files
provided by the state (i.e. Pearson downloads or CDs) or from .TXT files
from other databases (i.e. previous year AEIS IT databases). Class
Rosters can be imported as .TXT files from the district’s student data
management software system (i.e. RSCCC, Skyward, etc.)
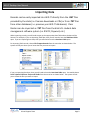
When importing records, you will need to open up the appropriate Data Table where the data will be
housed. For example, if you are importing TAKS data, then you will need to have the TAKS Data Table
open. If you are importing Scan data, then you will need to have the Scan Data Table open.
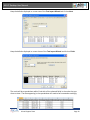
For importing TAKS records, choose FileImport Records from the menu bar as shown below. The
system will ask you where you to locate the files you want to import.
If you are importing Scan data, then you will need to have the Scan Data Table open. You would choose
ToolsSpecial FunctionsImport All Fields from the menu bar as shown below. The system will ask
you to locate the files you want to import.
School Support Team
Page 9
AEIS IT Desktop User Manual
Once you locate the appropriate files and import them, you will get a box telling you that the files are
being imported.
Note: After you finish the import process (as seen
below), it is recommended that you run the Prepare
Database routine located in TAKS Data
TableToolsSpecial FunctionsPrepare Database.
It is also recommended that you save imported records
in the Imports folder within the AEISIT folder. To locate
this folder go to local disk C driveProgram
FilesAEISITyr folderImports.
The system will automatically show you a
box asking you to prepare database. (Note:
If you need to import several different
records, you will click Cancel for this step
until you are finally importing the last set of
records.) You should have a screen like the
one shown below. Click OK.
Once you run this step, you will get a box telling you that the database is being prepared. It will look
something like the box below.
School Support Team
Page 10
AEIS IT Desktop User Manual
Another box will pop up asking you if you want to build averages for district and/or campuses. Check off
the appropriate boxes.
Next, a box will pop up asking if you want to validate your records. Choose OK.
Finally, when the Print Setup box appears, simply click on Cancel. You have now imported records and
prepared your database.
School Support Team
Page 11
AEIS IT Desktop User Manual
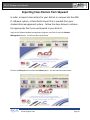
Exporting Data
AEIS IT provides users an opportunity to export all or selected student
records within a data table into a text file. Exporting student records
will not remove student records from the table. The records exported
are copies of the original student records. The most widely used export
is done using the Records button and selecting export. The second
option, Advanced Export Editor, allows the user to export records for
use only in other programs, such as Excel.
When exporting records, you will need to open up the appropriate Data Table where the data will be
housed. For example, if you are exporting TAKS data, then you will need to have the TAKS Data Table
open. If you are exporting Scan data, then you will need to have the Scan Data Table open.
School Support Team
Page 12
AEIS IT Desktop User Manual
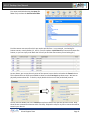
In order to export only certain files, you will have to conduct a Search using the appropriate criteria
fields. Remember that not all search fields need to be filled to conduct a search. See below to view the
images for a Quick Search within a TAKS Data Table and within a Scan Data Table.
School Support Team
Page 13
AEIS IT Desktop User Manual
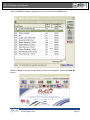
To export TAKS records, choose FileExport Records from the menu bar as shown below. The system
will ask you where you want to save the files you want to export.
To export Scan records, choose ToolsSpecial FunctionsExport All Fields from the menu bar as
shown below. The system will ask you where you want to save the files you want to export.
Your records are now saved in the location you indicated. It is recommended that you save these
records in the Exports folder within the AEISIT folder. To locate this folder go to local disk C Drive
Program FilesAEISITyrExports.
School Support Team
Page 14
AEIS IT Desktop User Manual
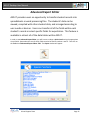
Advanced Export Editor
AEIS IT provides users an opportunity to transfer student records into
spreadsheets or word processing files. The students’ data can be
viewed, compiled with other student data, and arranged according to
user needs or desires. Users can transfer all of the fields within each
student’s record or select specific fields for exportation. This feature is
available in almost all of the data tables within AEIS IT.
In order to use Advanced Export Editor, you will have to conduct a Quick Search using the appropriate
criteria fields. Remember that not all search fields need to be filled to conduct a search. Then click on
the Tools iconAdvanced Export EditorOK. The Export window will appear.
School Support Team
Page 15
AEIS IT Desktop User Manual
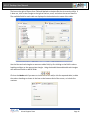
The box to the right of Export from Table will default to the data file that is currently visible. If
it does not, click on the triangle to the right of the box, scroll, and select the correct data file.
The available fields for each table are displayed in the box below the name of the table.
Use the blue and red triangles to remove or add a field, by first clicking on the field’s column
heading and then on the appropriate triangle. Using the double blue and double red triangles
will remove all fields or add all fields.
Click on the Header tab if you want to include a header and/or title for exported table, include
the column headings as shown in the box on the bottom third of the screen, or include line
numbers.
School Support Team
Page 16
AEIS IT Desktop User Manual
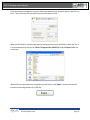
Click on Browse to navigate to a location where you would like to save your export, and click on
Save. This means you will save before you actually export the file.
When you hit Browse, a window will pop up asking you where you would like to save this file. It
is recommended that you save in C driveProgram FilesAEISITyr folderExports folder for
consistency.
When all these steps have been completed, you will click on the Export… button to finish the
process of exporting the data as a .TXT file.
School Support Team
Page 17
AEIS IT Desktop User Manual
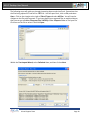
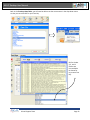
The following steps will guide you through importing data records into Excel. Remember that
the files being opened in Excel will be .TXT files. You will open Excel, click on File, and select
Open. Click on the triangle to the right of Files of Type and select All Files. You will need to
navigate to the file to be imported. If you have placed your exported files as explained above,
then you can go to C driveProgram FilesAEISITyr folderExports folder to find your file.
Click once on the file to select it and click Open.
Within the Text Import Wizard, select Delimited data, and then click on Next.
School Support Team
Page 18
AEIS IT Desktop User Manual
Keep the defaults displayed on screen two of the Text Import Wizard and click on Next.
Keep the defaults displayed on screen three of the Text Import Wizard and click on Finish.
The result will be a spreadsheet within Excel with all the selected fields in the order that you
chose to view. The data appearing in the spreadsheet will need to be formatted accordingly.
School Support Team
Page 19
AEIS IT Desktop User Manual
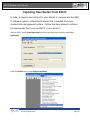
Exporting Class Rosters from RSCCC
In order to import class rosters for your district or campus into the AEIS
IT software system, a Class Roster Export File is needed from your
student data management system. Follow the steps below to retrieve
the appropriate file if you use RSCCC in your district.
Login to RSCCC, select Grade Reporting from the drop-down menu, and then select Run
Application.
From the Utilities menu, select Export Class Roster.
School Support Team
Page 20
AEIS IT Desktop User Manual
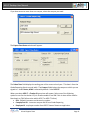
If you have access to more than one campus, select the campus you need.
The Export Class Roster window will appear.
The School Year field displays the ending year of the current school year. This data is from the
Grade Reporting district control table. The Campus field displays the campus to which you are
signed on. Under Roster, ADM is selected by default. Select AEIS IT.
When you select AEIS IT, a Teacher ID group box will appear. Select one of the following
options to use for the teacher ID (It is recommended to use SSN if this is what will be used for
Benchmark or TAKS Information within AEIS IT or AEIS IT Online):
• SSN - (Default) instructor social security number
• Campus/Instr ID - instructor campus and ID from Grade Reporting
• Employee ID - employee number from RSCCC Human Resources application
School Support Team
Page 21
AEIS IT Desktop User Manual
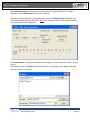
Select All Grade Levels field if you want to export data for all grade levels in the campus
displayed. All the Grade Level fields become selected.
Otherwise, if exporting only certain grade levels, leave the All Grade Levels field blank, and
select only the appropriate grade levels. Note: only the grade levels for the campus to which
you are signed on will be displayed.
Click Create Export. A dialog box will appear allowing you to select a location in which to save
the file.
(If needed, you can click Cancel to cancel the process. A message box will appear indicating
that the process is cancelled.)
School Support Team
Page 22
AEIS IT Desktop User Manual
Do not change the File name. The default name is: AEIS_IT_CCC.TXT, where ‘CCC’ is the
campus ID which you are extracting. Select a location and click Save.
You will see a status window as the records are processed. Please wait while records are
extracted.
If errors are found, a dialog box will appear allowing you to print a report.
If the process completes without errors, the Export Class Roster window will close.
School Support Team
Page 23
AEIS IT Desktop User Manual
Exporting Class Rosters from Skyward
In order to import class rosters for your district or campus into the AEIS
IT software system, a Class Roster Export File is needed from your
student data management system. Follow the steps below to retrieve
the appropriate file if you use Skyward in your district.
Login to the Skyward student management program, and then click on the Student
Management button. You will see the screen below.
Click on the Entity button to select the School option. You will see the screen below:
School Support Team
Page 24
AEIS IT Desktop User Manual
Once the Entity box appears, highlight the school and choose the Select button.
When the Entity screen goes away and the previous screen appears, click on the State Rpt
button.
School Support Team
Page 25
AEIS IT Desktop User Manual
Select the AEIS IT Class Roster File-CR button from within the File Creation-FC folder and then
click on Run.
School Support Team
Page 26
AEIS IT Desktop User Manual
The Class Roster file will appear. Choose a file name ending in .TXT. Decide where you want
the file saved, and also decide on an As-Of Date making sure your semester and dates fall
within your parameters.
The course selection box will appear when you click on the Add button. You will need to add
each course you want in your report because none will appear until you select them. It is
recommended to add all courses. There is no select all button so each must be added
individually. This can take some time.
School Support Team
Page 27
AEIS IT Desktop User Manual
Once all courses are selected, it is strongly recommended to save at this point using the Save
button. The Save Parameters box will appear. Insert a name in the Parameters name field
such as campus name and school year (ex. Campus0809).
Once the Class Roster File box appears, run the report by clicking Ok.
The Output Destination screen will appear. It is recommended to leave the default as On
Screen for it to appear on screen. These reports can be very lengthy so they can take several
minutes to run. Scroll through the pages to check for holes in your data. Click on Close. A
message box will appear to indicate a file has been created. The text file will be in the
designated location. Run this report again for the next campus.
School Support Team
Page 28
AEIS IT Desktop User Manual
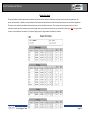
Creating Custom Test Keys
Many of the widely used Test Keys (i.e. State Released Tests) have
already been imported into the AEIS IT system. However, a feature also
exists for districts to enter their own custom-made test keys. Read
below to see how to enter new test keys and also to activate Student
Expectations (SEs) for Test Keys that may not already be active.
When working with Test Keys, you will need to open up the Test Keys Data Table where the data will be
housed. Choose Open file folder iconTest KeysOK. Then choose EnterAdd New Record from the
Menu Bar.
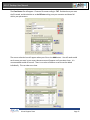
You will get a screen to input the Test Key Information. Note: It is very important to enter a unique Test
Name and Test Description. You will also have to enter Objectives, Test Month, Test Version, Test
Language, Content Area, Test Day, Test Number, Grade Level, and Test Year. The scoring of tests using
this test key will not work properly if any of the above information is missing. It is also important to
have a system in place to keep track of test key names used for benchmarking, etc to help in the scoring
process.
School Support Team
Page 29
AEIS IT Desktop User Manual
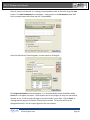
When inputting Student Expectations in Test Keys, you may come across a situation where the SE does
not appear in the drop down menu. This means the SE is inactive. To activate the needed SE, review
the example below.
Example: I want to create a test key for 5th Grade Science, but I want to include SEs from Grades 2, 3,
and 4 as well. However, when I try to choose these SEs from the drop down menu labeled Select
Student Expectations from: I do not see Science 2, 3, or 4.
{Drop-Down Menu to select SEs}
School Support Team
Page 30
AEIS IT Desktop User Manual
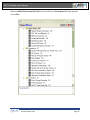
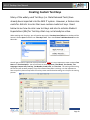
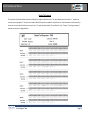
First steps would include using the Open (file
folder icon) to select the Courses Data Table.
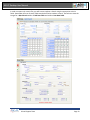
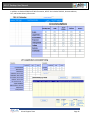
Find the content area name for which you need to pull SEs from. In my example, I am looking for
Science courses, namely Grades 2, 3, and 4. (You can conduct a Quick Search by Content Area Name like
Science, or you can simply scroll down the list until you find the course name you are looking for.)
As seen above, you can see that only some of the courses have a check mark under the Tested column.
This indicates that not all SEs are available to select from the Test Keys drop down menu. We have to
physically activate these SEs. To do this, simply double-click on one of the (unchecked) records.
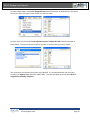
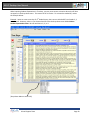
You will need to double-click in the Tested box to place a check mark, and then save the record. Now
these SEs are activated for selection within Test Keys. Repeat this step for any SEs in courses that will be
tested in your district.
School Support Team
Page 31
AEIS IT Desktop User Manual
Back in the Test Keys Data Table, you will now be able to see the course name in the drop down menu
so that you can select SEs for your Test Key.
SEs for Grades
2, 3, and 4
Science are
now available
to choose for
my custom Test
Key.
School Support Team
Page 32
AEIS IT Desktop User Manual
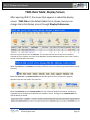
TAKS Data Table: Display Screen
After opening AEIS IT, the screen that appears is called the display
screen. TAKS Data is the default table that is shown, but you can
change the initial display screen through Display Preferences.
At the very top of the screen is the title bar. The title bar indicates the current version of AEIS IT
installed on your computer, the name of the database, the data table displayed on your screen, and the
number of records within the table.
Below the title bar is the menu bar consisting of different menus from which program operations can be
executed.
Below the menu bar is the button tool bar that provides quick and easy access to the program
operations that are also listed in the menu bar.
Below the button bar are the column headers for each column of student information, providing an
organized view of the data contained with each student’s record. Clicking on the column header will
sort the data by that field.
School Support Team
Page 33
AEIS IT Desktop User Manual
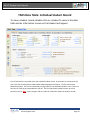
TAKS Data Table: Individual Student Record
To view a student record, double-click on a student’s name in the data
table and an information screen on that student will appear.
A lot of information is provided within the individual student record. Several tabs are contained in this
area. Each tab contains general student data and demographic information. The first tab contains
PEIMS information. The next six tabs display scoring results for the individual student’s tests. There are
also tabs for TAKS-Alt, Accommodations, and LAT. The final tab displays student history up to that
particular record. Note: never change or edit any codes or information within the student records.
School Support Team
Page 34
AEIS IT Desktop User Manual
Many different codes are used when looking inside a student record. If you click within some of the field
boxes, a menu box appears allowing you to view the code definition. Just remember not to change or
edit during this process.
School Support Team
Page 35
AEIS IT Desktop User Manual
In addition to Student PEIMS and TAKS Information, AEIS IT also includes TAKS-Alt, Accommodations,
LAT, and Student History Information.
School Support Team
Page 36
AEIS IT Desktop User Manual
Selecting Student Subsets and Searches
(Quick Search and Field Search)
Often times it is important to filter only a few records within a data
table. Searching is the most efficient way to find a records; however,
records can be manually selected consecutively or non-consecutively.
Consecutive records can be selected by clicking on the first record to be included, holding down the
Shift Key, and clicking on the last record to be included. Non-consecutive records can be selected by
holding down the Control Key and clicking on the individual student records to be selected. In either
instance, after the students are selected, you can show or omit these records from the table by clicking
on the Records button. Then choose Show Subset or Omit Subset.
AEIS IT provides several different search methods. These search methods are found in the menu bar
under Search or in the button tool bar under the magnifying glass labeled Search. We will focus on the
Quick Search and Field Search tools for this manual.
Quick Search (“Eyeball Search”) always searches all records in the database. It allows for the user to
click or fill in multiple fields at one time. Sometimes this takes a little longer to search since it is going
through all the records in the database.
Field Search will search within a selection or subset of records that a user conducted. It allows for one
additional field to be searched at a time. Usually a Quick Search is done first then a Field Search is done
next.
After specifying the field(s) to search, click on the green √ checkmark to execute the search,
or on the red X to exit without searching for the records. If the search was executed, the
records are displayed with the parameter(s) selected.
Important Things to Consider when Conducting Searches:
Accountability, Instructional, and AYP field boxes each perform different searches and could result in
different percentages for student subsets. Accountability will show the (first two) administrations that
count towards state accountability purposes. Instructional will only show the last record listed for
students (i.e. the last round of testing on record). AYP will only pull the grades and content areas that
count towards federal accountability purposes. Score Codes and Language Codes are usually important
field boxes to consider when running reports.
Remember: The main purpose of AEIS IT is to run reports and graphs on groups of student data.
However, in order to run these reports and graphs, a good search must be conducted to find the
appropriate group of students. Make sure you are taking appropriate steps to conduct a good search.
School Support Team
Page 37
AEIS IT Desktop User Manual
Saving and Accessing Saved Student Subsets
The purpose of the Set Operations function within Tools in AEIS IT is to
save sets created for quick and easy access. If a user references a
specific group of students on a regular basis, s/he may want to save
that group of students, thus eliminating the time needed to conduct
the search or create the subset repeatedly.
To Save a Subset of Students;
1. With a selected group of student records showing, click on Tools from the menu bar and then
click on the Set Operations button.
2. Within the Set Operations window, click on the Save Set button.
3. In the Save Set window, type a name for the set in the box to the right of Set Name. Notice the
number of records in the set to the right of Save Set with. Click OK after you have entered a
name for the set.
4. The first time a user saves a set, the system needs to map the location to save to. You can do
this by navigating to the location where the set is to be saved. Usually, this is C Drive
Program Files AEIS IT folder Sets. Then click OK. The saved set is automatically listed in
the Set Name field within the Set Operations window. Click OK to save the set and exit the
window.
To Access a Saved Subset of Students:
If AEIS IT has NOT been closed since creating the set, then
1. Click on Tools from the menu bar and then click on the Set Operations button.
2. Select the Set Name you wish to see, and click on the Use Set button to see the records.
If AEIS IT has been closed since creating the set, then
1. Click on Tools from the menu bar and then click on the Set Operations button.
2. Within the Set Operations window, click on the Load Set button. An Open window appears
asking you to select the set. Locate the previously saved set (usually, this is C Drive Program
Files AEIS IT folder Sets), select the set, and click Open.
3. The file to be opened should be highlighted under the Set Name column in the Set Operations
window. If it is not highlighted, click once to highlight the name of the set.
4. Click on the Use Set button, and the group of students is displayed on your screen.
School Support Team
Page 38
AEIS IT Desktop User Manual
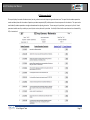
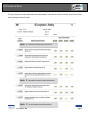
AEIS IT Reports
Reports on student data can be generated from TAKS data, TELPAS data, Scan (benchmark) data,
and Class Roster data. Reports are available in almost all other data tables based upon the content
of the table. Along with the unlimited search capacities within AEIS IT are the unique reporting
features. Users have an unlimited array of arranging student records to best review the strategic
curriculum goals and analyze the needs of students, grade levels, campuses, and district
populations.
Each pre-generated report requires a selected group of student records. Some reports require
current year data and others require the complete database. Once you have a subset of students
and have checked the parameters of the report according to the report chart, you are ready to
print the report.
Refer below to view samples of reports available from the TAKS Data Table. Note: Before printing any TAKS report, it is important that the
Prepare Database routine has been run.
School Support Team
Page 39
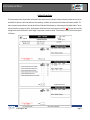
AEIS IT Desktop User Manual
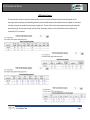
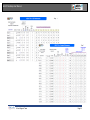
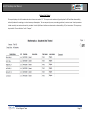
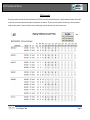
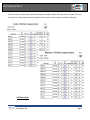
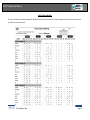
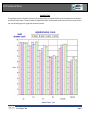
TAKS Test Administration Analysis
This report provides a multi-section analysis of: the number of test documents submitted and scored by grade level; the percentage of students meeting the
state standards by grade level; analysis of students meeting the state standards by ethnicity and grade level; and analysis of students meeting the state
standards by special program and grade level. This report is often used in district improvement planning and to help predict accountability ratings. Search
parameters include: search by test date, and search by content area. Use the Quick Search to focus on subsets such as Accountability, AYP, or Instructional.
This report may be printed for “Current Selection” or for “Campus” by clicking on the appropriate button within the print screen area.
School Support Team
Page 40
AEIS IT Desktop User Manual
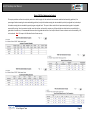
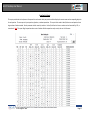
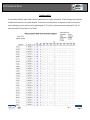
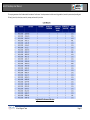
TAKS Analysis by Campus
This report provides a multi-section analysis by campus and content area of: the number of test documents submitted and scored by grade level; the
percentage of students meeting the state standards by grade level; analysis of students meeting the state standards by ethnicity and grade level; and analysis
of students meeting the state standards by special program and grade level. This report is often used in campus improvement planning and to help predict
accountability ratings. Search parameters include: search by test date, and search by content area. Use the Quick Search to focus on subsets such as
Accountability, AYP, or Instructional.
School Support Team
Page 41
AEIS IT Desktop User Manual
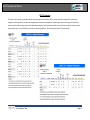
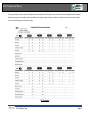
District TAKS Test Administration Analysis
This report provides a multi-section analysis by each district within a region of: the number of test documents submitted and scored by grade level; the
percentage of students meeting the state standards by grade level; analysis of students meeting the state standards by ethnicity and grade level; and analysis
of students meeting the state standards by special program and grade level. This report is often used in district improvement planning and to help predict
accountability ratings. Search parameters include: search by test date, and search by content area. When multiple test administrations are available for a
grade level or content area, it is recommended that users search by grade and test date. Use the Quick Search to focus on subsets such as Accountability, AYP,
or Instructional. Note: This report is for Education Service Center use only.
School Support Team
Page 42
AEIS IT Desktop User Manual
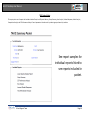
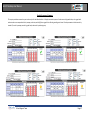
AEIS IT Pro Reporting
This report is really a reporting system with multiple reports and report options including: district, campus, and teacher comparisons for performance
categories, student expectations, and objectives; demographic performance by sub-populations; student progress analysis with ranges; class and teacher
report cards; and student summary reports with all performance categories. Search parameters include: search by test date, searcher by content area, and
search by school year. Use the Quick Search to narrow your student groups down. This report may be printed for “Current Selection.”
School Support Team
Page 43
AEIS IT Desktop User Manual
School Support Team
Page 44
AEIS IT Desktop User Manual
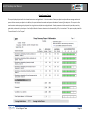
Item Analysis Report
This report provides the total and percent of responses for each answer choice per question and then displays the correct answer and corresponding objective
for each question. The user may sort by test question, objectives, or student expectation. This report is often used to identify distracters and questions that a
large number of students missed. Search parameters include: search by test date. Use the Quick Search to focus on subsets such as Accountability, AYP, or
Instructional. Note: This report flags the questions where a set of students failed to respond correctly as set by the user in Preferences.
School Support Team
Page 45
AEIS IT Desktop User Manual
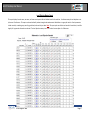
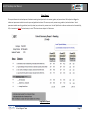
Group Summary Report
This report displays objectives for the selected content area and grade level. It lists the number of items per objective and provides an average number and
percent of items correct per objective. In addition, this report indicates the number and percent of students “mastering” the objective. This report is often
used to monitor student progress by objective for a single test or multiple tests and grade levels. Search parameters include: search by test date, search by
grade levels, and search by school years. Use the Quick Search to focus on subsets such as Accountability, AYP, or Instructional. This report may be printed for
“Current Selection” or for “Campus.”
School Support Team
Page 46
AEIS IT Desktop User Manual
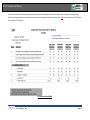
Local Objective Mastery Report
This report displays the scale score, raw score, and items correct percent for each student record in the selection. It indicates mastery of each objective as set
by the user in Preferences. This report can be used to identify student strengths and weaknesses to individualize or to group for tutorials. Search parameters
include: search by a student group, search by grade levels, and search by test date. Note: This report prints one line for each record in the selection; it could be
lengthy if a large number of records are selected. The local objective mastery is set at 70% unless the user adjusts it in Preferences.
School Support Team
Page 47
AEIS IT Desktop User Manual
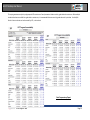
Incorrect Student Responses
This report identifies students with incorrect responses by objective and then displays the correct response, objective, and student expectation with the
students’ incorrect response. The user may sort by test question objectives or student expectation. This report can be used to identify student strengths and
weaknesses to individualize or to group for tutorials. Search parameters include: search by a content area, search by test version, search by grade levels, and
search by test date. This report may be printed for “Current Selection” or for “Campus.” If printing by campus, all students must represent a single grade level.
School Support Team
Page 48
AEIS IT Desktop User Manual
Student Test History
This report displays the student performance by content area for each data set selected. It displays the test type, school year, test date, grade level, test
version, and score code. In addition, the report indicates if the student met standard for the test and the items correct percent or scale score as appropriate.
This report can be used to show individual student performance on state and local assessments. The user may sort by test type or school year. Search
parameters include: search by a student group, search by grade levels, search by test date, search test type, and search by school year. Note: This report prints
a history for reach student in the selection. It could be a lengthy report if a large number of students are selected.
School Support Team
Page 49
AEIS IT Desktop User Manual
Student Test Responses
This report looks at individual student responses by objective for a single test date and version. This report displays correct items with a “+” as well as the
incorrect response by objective. This report can be used to identify the responses by student for this particular test. Search parameters include: search by a
test version and search by test date for current or prior year. This report may be printed for “Current Selection” or for “Campus.” If printing by campus, all
students must represent a single grade level.
School Support Team
Page 50
AEIS IT Desktop User Manual
Students Not Tested
This report displays a list of all students who do not have a score code of “S.” This report can be used to verify participation for AYP and State Accountability,
to identify students for retesting, or to check accuracy of exemptions. The user may sort by name, score code, grade level, or content area. Search parameters
include: search by test version and search by test date. Use the Quick Search to focus on subsets such as Accountability, AYP, or Instructional. This report may
be printed for “Current Selection” or for “Campus.”
School Support Team
Page 51
AEIS IT Desktop User Manual
Student Response Detail Report
This report displays the question number, objective number, correct answer, and response by student. The user may sort by grade level or content area.
Search parameters include: search by test version and search by test date. This report may be printed for “Current Selection” or for “Campus.”
School Support Team
Page 52
AEIS IT Desktop User Manual
SE Performance Analysis
This report displays the number of students tested, test key, and test version with objective type and content area. The report lists the student expectation
number and description with the number of questions per student expectation (SE) and the percent of correct responses for the selection. This report can be
used to identify student expectations strengths and weaknesses for adjusting instruction. The user may print by selection, by campus, or by district. Search
parameters include: search by a school year, search by test version, and search by test date. Use the Quick Search to focus on subsets such as Accountability,
AYP, or Instructional.
School Support Team
Page 53
AEIS IT Desktop User Manual
Confidential Student Report
This report provides a summary of each student’s performance for each content area and year selected. It displays the objective by subject area, items correct
and tested for the objective, as well as state performance status and scoring. In addition, the report indicates if the student met local mastery standard. This
report can be used in parent conferences, to provide data for Personal Graduation Plan development, or to discuss progress with individual students. The user
may print by selection, by campus, or by district. Search parameters include: search by test version and search by test date. Note: This report prints more than
one page for each record in the selection; it could be lengthy if a large number of records are selected. The local mastery is set at 70% unless the user adjusts it
in Preferences.
School Support Team
Page 54
AEIS IT Desktop User Manual
Composition Analysis
This report displays the Reader 1, Reader 2, Reader 3, and Final Composition Scores for all students in the selection. The Analysis Category scores are displayed
for students who scored less than a 2 on a written composition. The user may sort by last name and score. Search parameters include: search by test date,
search by student group, search by school year, search by grade level (grades 4, 7, 10, and 11 only), and search by content area (writing and ELA only). This
report may be printed for “Current Selection” or for “Campus.”
School Support Team
Page 55
AEIS IT Desktop User Manual
TAKS/Scan Growth
This report provides a comparison of student performance on the TAKS test and locally administered scan tests. It displays student performance for scan data
in a particular content area compared to the student’s performance on the state test. The user may sort by content area and test type. Search parameters
include: search by teacher ID, search by test date, search by student group, search by school year, and search by content area.
School Support Team
Page 56
AEIS IT Desktop User Manual
Cohort Report
This report indicates the total and percent of students mastering local objectives for the content, grades, and years selected. Each objective is flagged to
indicate an improvement or decline over the years and grade levels selected. The user may sort by content area, grade level, and cohort dates. Search
parameters include: search by grade level, search by school year, and search by content area. Use the Quick Search to focus on subsets such as Accountability,
AYP, or Instructional. Note: The local mastery is set at 70% unless the user adjusts it in Preferences.
Longitudinal Report
School Support Team
Page 57
AEIS IT Desktop User Manual
This report provides a look at local objective mastery which indicates historic improvement or decline for each objective, total and percent of mastery per
objective, and average scale score. Search parameters include: search by grade level and search by content area. Note: The local mastery is set at 70% unless
the user adjusts it in Preferences.
AYP Program Accountability
School Support Team
Page 58
AEIS IT Desktop User Manual
This report generates an analysis by sub-groups and AYP content areas. Search parameters include: search by grade level and content area. When multiple
test administrations are available for a grade level or content area, it is recommended that users search by grade and search by test date. Use the Quick
Search to focus on subsets such as Accountability, AYP, or Instructional.
State Compensatory Report
School Support Team
Page 59
AEIS IT Desktop User Manual
This report lists raw scores, the score required to meet the standard, percent met standard, and flags if a 110% rate was met for at-risk students. The user may
sort by content area. Search parameters include: search by grade level, search by content area, search by school year, and search by student group.
Lexile Measures Report
School Support Team
Page 60
AEIS IT Desktop User Manual
This report generates a list of students with the students’ Lexile score. Search parameters include: search by grade level, search by content area (reading and
ELA only), search by school year, search by campus, and search by test date.
Longitudinal Performance Indicators
School Support Team
Page 61
AEIS IT Desktop User Manual
This report provides a three year analysis of multiple performance indicators for all TAKS content areas. Performance indicators displayed include number of
students tested, percent met standard, percent commended, and average for groups, campuses, and districts. Search parameters include: search by grade
level, search by student group, and search by campus.
TGI Site Analysis
School Support Team
Page 62
AEIS IT Desktop User Manual
The Texas Growth Index is an estimate of district or campus academic growth over consecutive grades and consecutive years. This report displays for a three
year period and a single content area the total students tested, average TGI, percent exceeding expected growth, and percent meeting expected growth.
Search parameters include: search by grade level and search by content area.
TAKS SE Longitudinal
School Support Team
Page 63
AEIS IT Desktop User Manual
This report provides a four year analysis of performance on the student expectations. It will combine all test dates in the selection. Search parameters include:
search by student group and search by campus.
School Support Team
Page 64
AEIS IT Desktop User Manual
District/Campus Rankings
This report ranks districts or campuses based on Met Standard Percent for the selected content area. Search parameters include: search by content area and
any other search or multi-site search.
School Support Team
Page 65
AEIS IT Desktop User Manual
TAKS Student Packet
This report prints a set of reports that includes a Header Sheet, Local Objective Mastery, Group Summary, Item Analysis, Student Responses, Admin Analysis,
Composition Analysis, and SE Performance Analysis. Search parameters include: search by student group and search by test date.
See report samples for
individual reports listed to
see reports included in
packet.
School Support Team
Page 66
AEIS IT Desktop User Manual
Student Assessment Summary
This report provides a consecutive year trend analysis for individual students. It displays consecutive years of scale scores with growth index, a bar graph with
student scale score compared to district, campus, and state, and a Big Picture graphic for reflecting overall growth trend. Search parameters include: search by
teacher ID, search by campus, search by grade level, and search by student group.
School Support Team
Page 67
AEIS IT Desktop User Manual
Score Analysis Report
This report provides a breakdown of how many students got each raw and scale score for a given test. Search parameters include: search by student group,
search by test date, search by test version, search by grade level, and search by content area.
School Support Team
Page 68
AEIS IT Desktop User Manual
Quantile Report
This report generates a list of students with the students’ Quantile score. Search parameters include: search by grade level, search by content area (math
only), search by school year (2007 and later), search by campus, and search by test date.
School Support Team
Page 69
AEIS IT Desktop User Manual
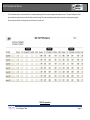
Met Standard/Commended
This report displays the number of students tested, percentage met standard, and percentage commended for all content areas selected by grade level for the
last three years. Search parameters include: search by student group, search by test date, search by test version, search by grade level, and search by content
area.
School Support Team
Page 70
AEIS IT Desktop User Manual
Student TAKS SE Summary
This report displays the total questions and items correct per objective for objective type, content area, and grade level for each student selected. Search
parameters include: search by school year, search by test date, and search by test version. When multiple test administrations are available for a grade level or
content area, it is recommended that users search by grade and search by test date.
School Support Team
Page 71
AEIS IT Desktop User Manual
AEIS IT Graphs
Along with the unlimited search capacities within AEIS IT, the program offers unique graphing and
charting features of TAKS, TELPAS, and Scan data. Users have various forms of arranging student
records to best review the strategic curriculum goals and analyze the needs of students, grade
levels, campuses, and district populations. Once the student data are identified, users can select
graphs to accompany printed data or customized graphs to meet specific needs.
Note: Whenever you are working in graphs, you are in a second program that has its own menu
bar. Remember to use the menu bar for the graphing window instead of the menu from the state
or scan data table.
Each graph requires a selected group of student records. Some reports require current year data
and others require the complete database. Refer to Searches for more detailed information on
AEIS IT’s search engines. Once the desired search has been conducted, users are provided the
option to Preview the graph to screen or send it directly to the printer.
Refer below to view samples of graphs available from the TAKS Data Table. Note: Before printing any TAKS graphs, it is important that the
Prepare Database routine has been run.
School Support Team
Page 72
AEIS IT Desktop User Manual
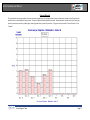
Local Objective Standards
This graph displays the percent of students within the selected content area who met the local mastery standard for each objective as set by the district.
Search parameters include: search by school year, search by content area, search by a student group, search by grade levels, and search by test date. Note:
The local objective mastery is set at 70% unless the user adjusts it in Preferences. This graph may be printed for “Current Selection” or for “Campus” or for
“District.”
School Support Team
Page 73
AEIS IT Desktop User Manual
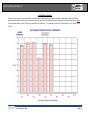
Performance Categories
This graph displays the percent of students within who scored within the ranges specified. Search parameters include: search by a student group, search by
teacher, search by grade levels, and search by test date. Use the Quick Search to focus on subsets such as Accountability, AYP, or Instructional.
Note: The local objective mastery is set at 70% unless the user adjusts it in Preferences. This graph may be printed for “Current Selection” or for “Campus” or
for “District.”
School Support Team
Page 74
AEIS IT Desktop User Manual
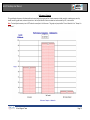
Performance by Demographics
This graph compares the percent of students meeting the standards to the percent of students who did not meet the standard(s) within a specific demographic
population. Search parameters include: search by a school year, search by content area, search by student group, search by grade levels, and search by test
date. Use the Quick Search to focus on subsets such as Accountability, AYP, or Instructional. This graph may be printed for “Current Selection” or for
“Campus” or for “District.”
School Support Team
Page 75
AEIS IT Desktop User Manual
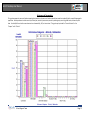
Met Standards
This graph displays the percent of students who met the current year standard for each content area. The user may choose to display the data for English
version only, Spanish version only, or cumulative to reflect data based on both versions. Two years of data will be displayed when available. Search
parameters include: search by a school year, search by content area, search by student group, search by grade levels, and search by test date. Use the Quick
Search to focus on subsets such as Accountability, AYP, or Instructional. This graph may be printed for “Current Selection” or for “Campus.”
Raw
School Support Team
Page 76
AEIS IT Desktop User Manual
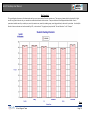
Score per Objective
This graph displays the average number of correct responses per objective or the average number of correct responses per content area by English version,
Spanish version, or cumulatively for both versions. Two years of data will be displayed when available. Search parameters include: search by a school year,
search by content area, search by student group, search by grade levels, and search by test date. This graph may be printed for “Current Selection” or for
“Campus.”
School Support Team
Page 77
AEIS IT Desktop User Manual
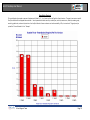
Remediation Required
This graph displays the number or percent of students who failed 0, 1, 2, 3, or 4 tests in either the English or Spanish version. The graph is not content specific.
Two years of data will be displayed when available. Search parameters include: search by a school year, search by content area, search by student group,
search by grade levels, and search by test date. Use the Quick Search to focus on subsets such as Accountability, AYP, or Instructional. This graph may be
printed for “Current Selection” or for “Campus.”
School Support Team
Page 78
AEIS IT Desktop User Manual
Composition Analysis
This graph displays the percent of students scoring 0, 1, 2, 3, or 4 on the writing or ELA composition portion of TAKS. Two years of data will be displayed when
available. Search parameters include: search by a school year, search by content area (reading or ELA only), search by student group, search by grade levels
(grades 4, 7, 10, and 11 only), and search by test date. This graph may be printed for “Current Selection” or for “Campus.”
School Support Team
Page 79
AEIS IT Desktop User Manual
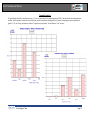
ELA/Reading Open Ended Analysis
This graph displays the percent of students scoring 0, 1, 2, or 3 on the open ended questions on the reading or ELA portion of TAKS. A second option allows
users to graph the average scores for open ended questions. Two years of data will be displayed when available. Search parameters include: search by a
school year, search by content area (reading or ELA only), search by student group, search by grade levels (grades 9, 10, and 11 only), and search by test date.
This graph may be printed for “Current Selection” or for “Campus.”
School Support Team
Page 80
AEIS IT Desktop User Manual
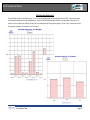
Longitudinal Graph
This graph displays the percent of students in the district within the selected content area and grade level who met minimum expectation for each objective as
set by the local mastery standard. Three years of data will be displayed when available. Search parameters include: search by a school year, search by content
area, search by student group, search by grade levels, and search by test date.
School Support Team
Page 81
AEIS IT Desktop User Manual
Running 4D Tools
To ensure the database is running smoothly, running the 4D Tools
utility will help to compact and fix any corruptions within a database.
Compacting AEIS IT databases using 4D Tools takes out the empty
spaces by deleting and will create a new copy of the data file.
1. Completely exit the AEIS IT program.
2. From the Start Menu, navigate to C driveProgram FilesAEIS IT4D Tools.
3. Within the Open window, click on the down triangle to the right of the files of type and
select Compiled Database (*.4dc).
4. Highlight the AEIS IT.4dc and click on Open.
5. From the Open which data file… window, double-click the Database folder, select the
database to be compacted and click on Open. The 4D Tools Maintenance and Repair
window will appear on your screen.
6. Click on the Repair tab. Choose the option Recover.
7. In the Create a data file window, the name of the program file appears to the right of
the File Name with the number 2 added to the database file name. It is recommended
to save the new file in the Database folder. Change the name of the file to something
more distinctive, such as “Compacted2008Data” in the box to the right of File Name.
8. Click on Save; a dialog box appears indicating the files are being compacted.
9. Click on Quit when completed. The database is now ready to use.
School Support Team
Page 82
AEIS IT Desktop User Manual
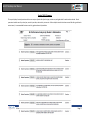
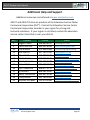
Additional Help and Support
Additional resources can be found at www.aeisitonline.com
AEIS IT and AEIS IT Online are products of the Education Service Center
Curriculum Cooperative (ESCcc). Contact the Education Service Center
Curriculum Cooperative member in your region for pricing and
technical assistance. If your region is not listed, contact the education
service center listed that is near your district.
ESC
1
9
10
11
12
13
14
15
16
17
18
19
20
Contact
Miguel Chuca
Laurie Morton
Lisa Watson
Edie Martin
Wynn Rolf
Arielle Arizpe
Christy Barnett
Donna Pohl
Valli Townsend
Ty Duncan
Nancy Donaldson
Cindy Mason
Stephen Enriquez
School Support Team
Phone
956.984.6197
940.322.6928
972.348.1084
817.740.7532
254.297.1138
512.919.5131
325.675.8690
325.658.6571
806.677.5170
806.281.5832
432.837.3146
915.780.5008
210.370.5486
Email
[email protected]
[email protected]
[email protected]
[email protected]
[email protected]
[email protected]
[email protected]
[email protected]
[email protected]
[email protected]
[email protected]
[email protected]
[email protected]
Page 83