1
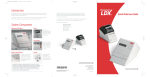
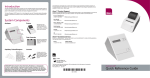
System Overview
The Cholestech L·D·X® System uses reflectance photometry to measure the concentration of
blood analytes, such as total cholesterol, HDL cholesterol, triglycerides, glucose & ALT (GPT).
The Analyzer is equipped with a replaceable ROM pack that allows the System to be
upgraded to expand the testing menu or add new functions or applications as they are
developed.
The Analyzer is very simple to use. By following the instructions on the LCD screen and
pressing three buttons, you can easily operate the system.
The RUN button opens the cassette drawer and starts a test after the cassette is inserted.
The DATA button allows the user to
view the last reported results and to obtain any
calculated results.
The STOP button closes the cassette drawer at the end of a testing period and allows you
to interrupt a test that is in progress.
Disposable test cassettes are used with the Analyzer. Each test cassette has two parts - the
main body and the reaction bar.
The main body contains the magnetic stripe and the sample well, where the blood sample
or control is dispensed.
The unique cassette technology separates out the red blood cells from the plasma. The
plasma then migrates out and is transferred to the pads on the reaction bar where it is
exposed to chemical reagents. Within minutes, the white pads on the reaction bar change
color. The darker the color, the more analyte present.
The magnetic stripe is read by the Analyzer, providing information on:
The type of cassette
The product expiration date
Cassette lot information and
Cassette calibration
Avoid touching the magnetic stripe.
The cassettes are packaged in sealed pouches.
Cassettes may be used until the date printed on the pouch when stored in a refrigerator
(2°-8°C, 36°-46°F).
Cassettes may be stored for up to 30 days at room temperature (less than 30°C, 86°F).
Once cassettes have been stored at room temperature, they should not be returned to the
refrigerator.
Cassettes must not be used beyond the printed expiration date.
Installation:
The Cholestech L·D·X® System is shipped in a specially designed packing box, which protects
the System from damage during shipping. We recommend using this box whenever
shipping the System from site to site. Don't throw the box away. Store it for future use.
Be sure to fill out the Warranty Registration Card when your Analyzer arrives. In addition to
registering your Analyzer, providing us with this information allows you to receive the most
current information on the Cholestech L·D·X System.
Be sure to have the appropriate blood collection and infection control supplies available
before you begin testing.
In addition to your Cholestech L·D·X and cassettes you will need:
Quality Control Material
Alcohol swabs and gauze
Lancets for capillary blood collection
Cholestech L·D·X Capillary Tubes
Cholestech L·D·X Plungers
Latex gloves
Biohazard waste containers
Cholestech Mini-Pet Pipette and tips
Vacuum collection tubes, needles and tube holder if sample is to be collected by
venipuncture
The Cholestech L·D·X System works best in an environment comfortable to humans:
Room temperature cool and dry
A stable surface
No direct heat
No direct light
You should become familiar with the features of the Analyzer:
One feature is the replaceable ROM pack held in place with a metallic clip.
Be sure you disconnect the Analyzer from the power source before removing the
ROM pack.
Failure to do so will make the Analyzer inoperable.
Printer:
When using the optional printer to record results, plug the printer cable into the printer
port, which is just above the ROM pack, into the printer.
Then plug in the power adapter cord.
The power adapter should be plugged into a standard 110-volt outlet where the circuit
won't be interrupted during use.
Cholestech can provide appropriate power supplies for international use.
Set-up and Configuration:
After plugging in the Cholestech L·D·X® System, TESTING MEMORY will appear on the LCD
screen. The Cholestech L·D·X System will be ready for use after a brief warm-up period.
The System will run a selftest, which ends with the message SELFTEST OK
Configuration Menu: Before using your Analyzer, set the information in the configuration
menu. To enter the configuration menu, hold the STOP Button down until the firmware
version appears.
The Configuration menu allows you to make changes in how the Cholestech L·D·X System
shows information such as:
Language
Units
Sample type
Printer options
Risk Assessment
Date and time
Press the DATA button to review your options for each of the menu items. When your choice
is shown, press RUN to set and go to the next menu item.
First screen: LANGUAGE will appear. The language options are English, Italian, Spanish,
German and French
Second screen: UNITS of measurement for the test results. Options are mg/dL & U/L or
mM/L & U/L
Third screen: SAMPLE - For venous whole blood or a capillary blood sample from a
fingerstick, the sample type should be set on whole blood. The Cholestech L·D·X is only CLIA
waived for fingerstick or venous whole blood. Check the control assay sheet for the sample
type to be used when running controls.
Fourth Screen: Printer - options are "on" or "off"
Fifth Screen: Num copies? - Options are 1 or 2 labels
Sixth Screen: Risk - Choose "Framingham" to run the risk assessment or "off" if you are not
going to run the Framingham Risk Assessment.
Seventh Screen: Day of the week, month, date, year
Eighth Screen: Time - hour, minutes and AM or PM.
Press STOP to exit the configuration menu at any time after you have made your choices.
Once the configuration menu is set it will not change unless you enter the menu and change
it.
Optics Check:
There are four optical channels inside the Cholestech L·D·X® System. An Optics Check
cassette confirms the correct operation of the optical system. The Optics Check cassette
must be run each day before patient samples are tested, and anytime after moving or
cleaning the Cholestech L·D·X System.
Handling of the Optics Check cassette:
Store the Optics Check cassette in its case, at room temperature, when not in use.
Keep it dry and clean.
If it becomes damaged or wet the optical readings may change.
Do not place any blood sample into the cassette.
To run an Optics Check Cassette:
Press RUN and confirm the Selftest OK message.
The cassette drawer will open and
the message: "Load cassette and press run" will
appear.
Put
the Optics Check cassette into the Analyzer.
Press the RUN button again and the Analyzer will automatically perform the Optics Check.
Record the optics check results in your optics check log. The results for the four channels
should fall within the 80-105 range. If the results fall within the 80-105 range, the Analyzer is
ready for use.
If the numbers fall outside the range the Analyzer will be disabled until another optics
check has been run that falls within range.
Call Cholestech Technical Service if the optics check readings do not fall within range.
Test Procedure:
Latex gloves should always be worn when handling blood samples or quality control
material.
Remove the number of cassettes you will need from the refrigerator and check to make sure
they have not expired.
Before use, the cassette pouch should be left unopened for at least 10 minutes to reach room
temperature.
Just before collecting a sample, remove one cassette from its pouch, and put it on a clean,
dry surface with the printed side up.
Quality Control:
In addition to the optics check, quality control verifies that the system is functioning
properly. The procedure for running the controls is the same as that for running a venous
sample.
Remove the cassette and control materials from
the refrigerator and allow them to reach
room temperature.
See the control assay sheet for information on the appropriate sample type setting in the
configuration menu.
The assay sheet also has complete information on stability and storage requirements.
Press RUN. The cassette
drawer will open and the message: "Load cassette and press
run." will appear.
Before opening the control material for the first time, write the date on the vial.
Check the expiration date and how long the vial has been in use before using the control.
Don't use it if either date has passed.
Mix the control by gentle inversion, 7-8 turns are sufficient.
Attach a tip firmly to the Mini-Pet pipettor.
The Mini-Pet pipettor provides the required
volume to run a test, a minimum of 35 microliters
Press the plunger completely down and insert the pipette tip into the control material.
Slowly release the plunger. The pipettor will automatically draw
up the sample.
Dispense all of the control material directly into the sample well of the cassette by pressing
the plunger.
To avoid drawing control material back into the pipettor, do not release the plunger
until the pipette tip has been moved out of the cassette sample well.
Hold the cassette horizontally and do not touch the black bar or the magnetic stripe.
Immediately load the cassette into the tray and press RUN
to start the test.
When the test is complete, the Analyzer will beep and the results will appear on the screen
Cholestech ships all control material with an expected range of results. Verify that the lot
number on the vial and the assay sheet agree.
Compare the results on the screen with those on the assay sheet then
record the results in
your Quality Control log.
Page 1/2
Quality Control:
Remove the cassette from the holder and discard it in a biohazardous waste container. The
Cholestech L·D·X® System is now ready for the next quality control test.
If results for all levels of quality control material are within established ranges, patient
samples may be tested.
If the controls are outside the range, see your
Cholestech L·D·X User Manual for corrective
action.
Be sure to record all control results even those which are out of range.
Note:
CLIA regulations require that customers follow manufacturer's recommendations.
Cholestech recommendations for quality control are:
Quality control material must be tested:
With each new shipment of cassettes (even if the cassettes are from the same lot previously
received.
With each new lot of cassettes.
As otherwise required by your
If you are not running
laboratory's standard quality control procedures.
the Cholestech L·D·X under CLIA waived status, or if your local or
state regulations require more frequent testing of quality control material, then quality
control must be performed in compliance with those regulations.
Good Laboratory Practice principles suggest that quality control must be run whenever the
laboratory director has any questions about test system integrity or operator technique (e.g.
when reagents may have been stored or handled in a way that can degrade their
performance or when operators have not performed a particular test in recent weeks).
Page 2/2
Fingerstick Procedure:
The most common method of sample collection for the Cholestech L·D·X® System is from a
fingerstick.
The patient should sit quietly for five minutes before the sample is collected.
Prepare a capillary tube by inserting the plunger into
the tube at the end with the red
marking.
The hand should be warm and relaxed.
There are several techniques which can be used to
increase the blood flow. Have the
patient wash their hands with soap and warm water or warm the hand with a heating pad or
warm compress. The heat used should not exceed normal body temperature by more than a
few degrees.
You can also gently massage the finger
from the base to the tip several times to help bring
blood to the fingertip.
Clean the fingertip with a solution of 70% isopropyl
Dry the finger with a gauze pad.
alcohol.
The finger should be clean and dry to avoid hemolysis
which could lead to an erroneous result and to remove any traces of glycerin based hand
lotion which could affect triglyceride results.
The best place to take a sample is the palmar side of the middle or
ring finger on either
hand. Select a site on the sides of the finger which is free of calluses and scar tissue.
Hold the finger securely to
Perform
prevent sudden movement.
a deep and firm puncture. Prick the finger across the ridges to create a free flowing
drop of blood.
Wipe off the first large drop.
Gently but firmly press the finger until a second large drop forms.
Hold the finger downward and gently apply pressure
to the surrounding tissue. This will
make the blood flow more freely.
Hold the capillary tube at a slightly descending angle to the drop of blood.
The tube will
fill.
Fill the tube up to the black mark quickly, within 10 seconds.
If necessary, gently massage the finger from
the base to the tip to get a large drop of blood.
Page 1/2
Fingerstick Procedure:
If there is poor blood flow, reopen the puncture site by wiping
firmly with a gauze pad.
Keeping the hand below the heart level will also increase blood flow.
After you've filled the tube, have the patient press a gauze pad on the puncture site for a
few moments until the bleeding stops.
When collecting a sample from a fingerstick, it's important to remember the
techniques NOT to use:
Avoid excessive squeezing
of the finger or "milking" because this will dilute the sample
with tissue fluid and may cause it to clot faster. This will also cause inaccurate results.
Don't allow the capillary tube to touch the skin and don't use it to scoop up the blood.
Avoid getting air bubbles in the tube.
If there is air in the capillary tube you may not have
enough sample.
Page 2/2
Running a Test:
Once you've collected the sample, you should dispense it into the cassette in less than five
minutes.
Dispense the sample toward the white material in the cassette well.
After the sample is placed in the sample well, the cassette should immediately be placed in
the Analyzer drawer.
Hold the cassette horizontally, and don't touch the black bar or the magnetic stripe.
Press RUN to close the drawer and the test will start.
Be sure to dispose of all supplies contaminated with blood in a biohazardous waste
container.
When the test is complete, the Cholestech L·D·X® System will beep and the result will
appear on the screen.
Press DATA to obtain the calculated results and record them on the patient result form.
After a test has been performed pressing
load a new cassette and start a new test.
the RUN button once brings up the prompt to
Framingham Risk Assessment:
You have the option of calculating a cardiac risk assessment for the patient based on the
total cholesterol and HDL cholesterol results.
Be sure you've selected Risk = Framingham in the configuration menu.
To perform a Risk Assessment on the patient you've just tested, press the DATA button a
second time to enter the Risk Assessment Program.
The DATA button shows your options and allows you to select data for the patient being
tested while the RUN button enters your choice and takes you to the next risk factor.
When you have responded to
all risk factor prompts, pressing the RUN button will calculate
and show the risk assessment percentage of developing coronary heart disease within the
number of years selected.
After a test has been performed pressing
the RUN button once brings up the prompt to
load a new cassette and start a new test.
After three minutes of inattention, a beep will sound and the message: SYSTEM TIMEOUT
RUN TO CONTINUE will appear.
After 15 seconds, the cassette drawer will
close and the screen will go blank.
Do not store a used cassette in the Analyzer. You should leave the cassette holder
empty when not in use.
tray
Troubleshooting:
An operator can troubleshoot the Cholestech L·D·X® System based upon a series of
messages which may appear on the screen.
Each message indicates a particular problem which can be corrected by taking the
recommended action as listed in the User Manual.
For
Instance, Warn 2 indicates that the expiration date of the cassette may have been
reached.
Check the expiration date on the cassette.
If it has not expired check the date in the
Cholestech L·D·X configuration menu to ensure that it is properly set.
Refer to your User Manual for assistance whenever you receive an error message or warning.
Maintenance:
The Cholestech L·D·X System
is very easy to use and maintain. Because of its design, no
calibration is required and no maintenance is necessary other than routine cleaning when
needed
Wipe the Analyzer with a clean damp cloth.
A mild detergent, a solution of isopropyl
alcohol or any commercially available disinfectant can also be used.
Periodically clean the cassette holder tray with alcohol, bleach or disinfectant. Be sure
to
dry the tray after cleaning it.
Service:
Cholestech provides full technical support to each Cholestech L·D·X System user. Any
questions regarding the operation of the Analyzer or the information contained in this video
can be answered by calling:
Cholestech Technical Service at
1-800-733-0404 or
1-510-732-7200