1
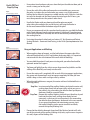
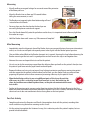
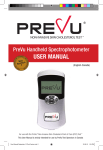
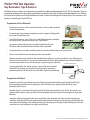
PreVu® POC Test Operator -
Key Reminders, Tips & Pointers
The following key reminders, tips and pointers are provided as additional information for PreVu® POC Test Operators. They are
intended to compliment the instructions and direction provided in the PreVu Handheld Spectrophotometer User Manual,
the PreVu Training Video, the PreVu Quick Reference Guide, and the PreVu Reagent Kit Package Insert. They encompass best
practices in delivering the PreVu POC Test.
Preparation of Test Materials
• Ensure your test area is clean and uncluttered, as well as professional and clinical in appearance.
Orderly Testing Station
• Ensure reagents are at room temperature; return reagents to fridge after testing or at end of clinic day.
• Turn PreVu Reader on; press “Begin Test” and follow directions provided
on display screen; pause once screen says “Prep Patient”.
• Set out one adhesive foam pad, one capillary blotting stick, one Wet-Nap® moist towelette and one alcohol swab as provided.
• Set out lint free tissues to be used during the test (scent and lotion free) and a paper towel.
• Have a waste basket on hand to dispose of test consumables.
• Remove caps from reagent bottles and wipe bottle tips with a tissue, being careful to use a different part of the tissue for each tip so as not to cross contaminate the fluids; place coloured caps in front of bottles to ensure correct bottles are used in their proper sequence (green, red, blue).
Seating Position Example
• A testing table off to the side for privacy is ideal, with chairs for both
the PreVu Test Operator and patient to sit on during the procedure; performing the test off the corner of a table offers optimum positioning.
RIGHT HANDED OPERATOR
Dominant hand testing
Patient
Preparation of Patient
PreVu Test Operator
• Vigorously scrub the area of the palm you will be placing the adhesive foam pad on with the Wet-Nap® moist towelette provided; then dry the palm with a lint free tissue; dispose of the Wet-Nap® moist
towelette and the tissue.
• Liberally wipe the same area of the palm with the alcohol swab provided; let air dry for 30 seconds; save alcohol swab for patient clean-up after the test; thorough palm cleansing will ensure optimum foam pad adhesion.
•
Apply the adhesive foam pad to the same area of the palm, diamond well closest to the ring finger, by peeling a small edge off from the protective backing and then placing this onto the palm, pulling back the
remainder of the backing as the adhesive foam pad is laid down on the palm; avoid handling the adhesive
underside so as not to diminish its ability to stick firmly.
PreVu® is a Registered Trademark of Miraculins Inc. All Rights Reserved. 2013
PreVu POC Test
Step-By-Step
Step 1:
Clean Palm Apply Foam Pad
• Have patient turn hand over and press down firmly on the adhesive foam pad to ensure a strong seal on the palm.
•
Ensure the wells of the adhesive foam pad are not straddling any creases on the palm; try to place the pad in between any creases so as to help prevent leaking later on when the reagents are added into the wells; if there is a leak the test must be aborted and that hand cannot be tested again for 24 hours; you must then proceed to test the patient’s other hand.
• Handle the Reader with your dominant hand for optimum control when taking the reading at the end of the test, and bring the Reader in for the measurement from the bottom edge of the palm.
Step 2:
Add Detector Reagent
•
Ensure you prepare and test the same hand on the patient as you hold the Reader with; if your dominant hand is right, test patient’s right hand; if your dominant hand is left, test patient’s left hand; this will ensure the best positioning to take the reading later on.
• For testing the patient’s other hand see Section 6.2: Test Operator and Patient Seating Positions - Dominant Hand Testing, in the PreVu Spectrophotometer User Manual.
Step 3:
Add Positive Control Reagent
Reagent Application and Blotting
• When applying drops of reagent, rest the bottle tip on the upper edge of the adhesive foam pad wells at a 45˚angle before dispensing drops; it is important not to touch the skin at the bottom of the wells with the bottle tip.
Step 4:
Blot Excess Reagents
•
•
You may hold the patient’s hand you are testing with your other free hand for optimum control and support.
Tap foam pad lightly from the side to ensure dispersion of any bubbles and the settling of the fluid fully and evenly into the wells.
• Ensure the center well is completely full on each of the two reagent applications; the square and diamond wells may not appear completely full after you have added a drop, as these wells are larger areas by volume.
Step 5:
Add Indicator Reagent
Step 6:
Read Degree of Color Hue
• When directed to blot excess reagent, the center well must be blotted first in a two-step process;
Step One: Insert one end of the capillary blotting stick into the center well, pushing down firmly but not excessively, so that you can see the patient’s skin surrounding the adhesive foam pad depress downward; hold for a count of three;
Step Two: Remove the capillary blotting stick and insert the other dry end back into the center well, pushing down firmly but not
excessively, so that you can see the patient’s skin surrounding the adhesive foam pad depress downward in the same manner.
As you are pushing down and maintaining pressure, twist the capillary blotting stick a quarter turn back and forth;
remove the capillary blotting stick.
• Proceed to then blot the diamond shaped well (the Positive Control well) with one of the wet ends of the capillary blotting stick, to dry up the excess reagent in this well; dispose of the blotting stick.
Measuring
• Visually confirm no reagent leakage has occurred around the perimeter
of the foam pad base.
Align shoe on pad
• Align the Reader shoe on foam pad 10 seconds before
taking the measurement, as cued.
• The Reader must approach palm from bottom edge of hand
instead of over the thumb.
Correct reading
Incorrect reading
• You may place your free hand under the hand you are measuring for optimum control and support.
• Press the Reader down fully onto the pad when cued to do so; it is important to not allow any light from the reader to escape.
• Hold the Reader down until screen says “Measurement Complete”.
After Measuring
• Immediately wipe the alignment shoe of the Reader, drying any reagent that may have come into contact with it, so as to ensure no liquid subsequently comes near or gets into the Reader optical aperture.
• Clear and blue colored fluid on the Reader shoe post-test is normal; cleaning the shoe before advancing the Reader screen to get the test result is a good practice and will ensure the step is not forgotten later.
• Advance the screen and report the test result to the patient.
• Use a tissue to dry the remaining reagent from the adhesive foam pad wells on the patient’s hand, or turn the patient’s palm over onto the paper towel to absorb liquids.
• Remove the foam pad using a tissue to peel it up, helping to minimize your fingers coming into contact with the reagent on the patient’s adhesive foam pad or hand; use the alcohol swab you retained from preparing the patient earlier to then remove any remaining adhesive; dry the patient’s hand.
•
•
Wipe the bottle tips with a tissue, using different parts of the tissue for each tip,
after every test; this is critical to ensure that from test-to-test, the bottle tips are
clean, dry and have no residual liquid on them, so they do not contaminate the next
test results.
Further to the previous point, you may notice from time to time that the Indicator Reagent in the blue bottle may have blue colored liquid on or around the tip after a test; this is normal, but needs to be wiped clean to ensure it does not contaminate the test being done on the next patient.
Post-Test Activity
• Complete and review the Overview and Results Interpretation sheet with the patient, recording their results and discussing their other screening results as well.
• Ask the patient to complete the Customer Survey; this is voluntary and at the patient’s option, but can provide valuable feedback.
PreVu® POC Skin Cholesterol Test - Individuals Eligible For Testing
Who is Eligible for the Test?
• Anyone 18 years of age and older, who is not included on the ineligible list below, and who has also been indentified as being under suspicion of significant risk of coronary artery disease as defined by the cleared Indications For Use, and determined through the In-Take Questionnaire evaluation process established.
Who is Ineligible for the Test?
• Individuals using topical medications or barrier creams on their hands.
• Individuals with skin disease on either hand such as eczema or psoriasis.
Note:
Individuals whose palms cannot retain the foam pad firmly enough to prevent leaking (due to palmar hyperhydrosis or excessive perspiration) may lead to aborted tests. This can only be determined once
the test has commenced and leakage is detected, and adhesion will vary among persons with this skin characteristic.
Protocol for PreVu Readers “Freezing”
Occasionally, a PreVu Reader may show an error message or freeze/lock-up during operation. If the Reader presents
an error message during operation, please follow Section 8: Solving Problems: Warnings and Error Messages, in the
PreVu Spectrophotometer User Manual, for further direction.
If the Reader “freezes” during operation without presenting any error codes, please follow the steps below to
resolve:
1.
2.
3.
4.
5.
6.
Turn the Reader off by holding down the OK button.
Remove both rechargeable batteries and hold down the OK button for a count of five in order to fully discharge the Reader.
Put both rechargeable batteries back into the Reader; connect the Reader to the charger. Assure that the red light is illuminated and then turn the Reader on.
If the Reader boots up and loads to the main menu screen, unplug the Reader from the charger and proceed with testing as per normal.
If the Reader continues to freeze, turn off the Reader, remove the batteries and replace them with new, fully charged batteries and turn the Reader back on. Proceed with testing as per normal.
If the Reader continues to freeze, discontinue use and contact PreVu Customer Service and Support for assistance at 1-888-928-7205.
Note: If the Reader freezes during a test, you must abort the test if you have already added reagent to the wells. Otherwise, you may return to testing the patient’s same hand after successfully addressing the freezing.
Please contact PreVu Customer Service and Support with any
questions related to the PreVu® POC Test at 1-888-928-7205.
Indication for Use: PreVu Non-Invasive Skin Cholesterol POC Test
Skin cholesterol as measured by the PreVu Non-Invasive Skin Cholesterol POC Test can be used as part of risk assessment for coronary heart disease in persons with
a history of myocardial infarction and/or persons suspected of having significant multi-vessel coronary artery disease (>50% stenosis in >1 vessel as diagnosed by
coronary angiography) where further diagnostic evaluation is being considered. Test results, when considered in conjunction with clinical evaluation, blood cholesterol
tests and other risk factors identified for coronary artery disease, will aid the physician in focusing diagnostic and patient management options.
Warnings: The safety and effectiveness of this device for use in screening the general population for coronary artery disease or for use as a substitute for blood
cholesterol tests or as a substitute for other risk factors for coronary artery disease has not been established.
PreVu® is a Registered Trademark of Miraculins Inc. All Rights Reserved. 2013
Printed in Canada
P113-MA-70-00