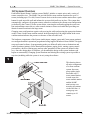
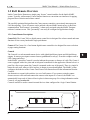
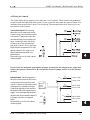
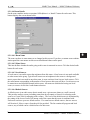
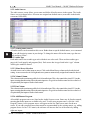
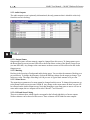
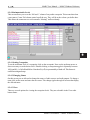
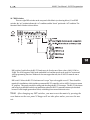
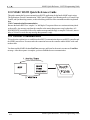
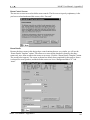
1
MARC Series
Room Combine Systems
User Manual
MARC User Manual — Introduction
Introduction
Congratulations on your purchase of the Intelix MARC Room Combine system.
This manual covers all aspects of the design, use, installation and programming of the Intelix MARC
system. Since the MARC system is a unique combination of hardware and software, Intelix strongly
advises the installation of an MARC system be undertaken only after the thorough reading of this
manual. Customer support is available through Intelix if you encounter problems with your MARC
system.
This manual contains several sections designed to help you install and program your MARC system
from any level of knowledge you possess.
Section 1: System Overview introduces the underlying architecture of the Intelix Matrix line and the
MARC matrix mixer specifically.
Section 2: Quick Start Outlines the process of installing and programmin your MARC matrix mixer.
Sections 3 and 4: Wiring Details and ReO Bus Details go into specifics and details of physically
installing the MARC matrix mixer.
Section 5: Installing and Starting the MARC Software shows you how to install and run the
MARC Deigner Software that allows system design.
Section 6: The Auto Design Wizard steps you through the process of designing a room combine
system, using the MARC Designer software.
Section 7: The Hardware Installation Wizard helps you install and test your design in the building.
Section 8: ReO bus modes explains and helps troubleshoot remote bus aspects of your MARC
design.
Section 9: MARC Windows Reference a full help section for using the MARC Designer software
Sections 10 and 11: RS232 Message Protocol and Quick Reference Guide sections introduce and
demonstrate the basics of RS232 programming of the MARC system.
Appendixes A-L: provide detailed technical information on a range of subjects and are referenced
from other sections.
The information below is filled out by the factory. Please keep it in a safe place for future reference.
Model/Serial Number
Software: 8 X 8 ROM
Application ROM
Communications ROM
PC Diskette
2222 Pleasant View Road
Middleton, WI 53562
(608) 831-0880
fax: (608) 831-1833
e-mail: [email protected]
Revision F 0203
2
MARC User Manual — Introduction
MARC User Manual — Table of Contents
Table of Contents
Introduction.................................................................................................................. 2
1.0 System Overview ............................................................................................................... 11
1.1 Matrix Mixer Overview ...................................................................................................... 12
1.2 ReO Remote Overview ...................................................................................................... 16
1.2.1 Comet Remote Descriptions ................................................................................ 16
1.2.2 Station Overview ................................................................................................. 17
1.2.2.1 Room Combine Station ......................................................................... 17
1.2.2.2 Room Control Station ........................................................................... 17
1.2.2.3 Logic Control Station ........................................................................... 17
1.3 Matrix Mixer Panels .......................................................................................................... 18
1.3.1 Matrix Front Panel ............................................................................................... 18
1.3.2 Matrix Rear Panel ............................................................................................... 18
2.0 Quick Start .......................................................................................................... 19
2.1 Hardware Installation .......................................................................................................... 20
2.1.1 Mount and power the MARC Matrix Mixer in the rack. ....................................... 20
2.1.2 Connect Audio Sources and Outputs ................................................................... 20
2.1.3 Install remote controls in their assigned locations on the ReO bus ........................ 20
2.2 Application Creation .......................................................................................................... 20
2.2.1 Connect the control PC to the MARC Matrix Mixer ............................................ 20
2.2.2 Install and start MARC Designer software on the controller PC ........................... 20
2.2.3 Define the System ................................................................................................ 20
2.2.4 Connect the ReO bus to the MARC Matrix Mixer. ............................................... 20
2.2.5 Perform remote recognition. ................................................................................. 21
2.2.6 Define and program the remotes .......................................................................... 21
2.2.7 Test and adjust the system .................................................................................... 21
3.0 Matrix Wiring Details ........................................................................................ 22
3.1 Mounting the MARC in the Rack ........................................................................................ 22
3.2 Connect the Power Supply ................................................................................................. 22
3.3 Connecting Audio Inputs and Outputs ................................................................................. 23
3.3.1 Audio Inputs ........................................................................................................ 23
3.3.2 Audio Outputs ..................................................................................................... 23
3.4 Recommended Input Wiring Methods ................................................................................. 24
3.5 Connecting the Control PC to the MARC ........................................................................... 25
3.5.1 DIP Switches ...................................................................................................... 26
4.0 ReO Bus and Comet remote Wiring Details ................................................... 27
4.1 Installation of ReO Bus ....................................................................................................... 28
4.1.1 Wire Type ........................................................................................................... 28
4.1.2 Connections ........................................................................................................ 28
4.1.3 ReO Bus Topology .............................................................................................. 29
4.1.4 Length of ReO Bus Connections .......................................................................... 30
4.1.5 Reflections ........................................................................................................... 30
MARC User Manual — Table of Contents
3
MARC User Manual — Table of Contents
4.1.6 Termination ...................................................................................................................... 30
4.1.7 Calculate the value of the terminating resistors ................................................................... 30
4.2 Power Connections to the ReO Bus .................................................................................... 31
4.2.1 Calculating Line Loss in ReO bus Power Supply .............................................................. 32
4.2.2 Grounding the ReO Bus ................................................................................................... 32
4.2.3 AC power supply ............................................................................................................ 33
4.2.4 DC power supply ............................................................................................................ 33
4.3 Installing ReO bus devices ................................................................................................. 34
4.4 Wiring the Comet-8 ............................................................................................................ 35
4.5 Wiring a Comet 8 for Wall Sensors ..................................................................................... 36
4.6 Wall Indicators ................................................................................................................... 37
5.0 Installing and starting the MARC software ............................................................ 38
5.1 Installing the MARC software ............................................................................................. 38
5.1.1 Installing the MARC software from the CDROM ................................................. 38
5.1.2 Installing the MARC software from floppies ......................................................... 38
5.1.3 Installing the MARC software from the Intelix Web site ........................................ 38
5.2 Running the MARC software .............................................................................................. 38
5.3 Connecting the Control PC to the MARC ........................................................................... 39
5.4 DIP Switches ..................................................................................................................... 40
6.0 Auto Design Wizard ........................................................................................... 41
6.1. Introduction to the Auto-Design Wizard ............................................................................. 41
6.1.1 Before Using the Auto-Design Wizard .................................................................. 41
6.1.2 Navigating in the Auto-Design Wizard .................................................................. 41
6.1.3 Starting the Auto Design Wizard ........................................................................... 41
6.2 Naming the Project ............................................................................................................. 41
6.3 Room Groups Screen ......................................................................................................... 42
6.4 Room Name Screen ........................................................................................................... 43
6.4.1 Assign names to rooms ........................................................................................ 43
6.4.2 Printing the room combine station screen .............................................................. 43
6.4.3 Changing the Room Group name .......................................................................... 43
6.4.4 The What is button .............................................................................................. 43
6.4.5 Panel/Wall Sensor Selector .................................................................................. 43
6.5 Program Sources ................................................................................................................ 44
6.5.1 Naming Program Sources .................................................................................... 44
6.5.2 Adding/Deleting Program Sources ........................................................................ 44
6.6 Room Details ..................................................................................................................... 45
6.6.1 Naming the room ................................................................................................. 45
6.6.2 Mono/Stereo ....................................................................................................... 45
6.6.3 Local Sources. .................................................................................................... 46
6.6.3.1 Number of Local Sources. .................................................................... 46
6.6.3.2 Characteristics of Local Sources. .......................................................... 46
6.6.4 Default Sources. .................................................................................................. 46
6.7 Paging Sources ................................................................................................................... 47
4
MARC User Manual — Table of Contents
MARC User Manual — Table of Contents
6.7.1 Naming Paging Sources ....................................................................................... 47
6.8 The Room Control Station screen ....................................................................................... 48
6.8.1 Adding/Deleting remotes ...................................................................................... 48
6.8.2 Remote Viewing Options ..................................................................................... 49
6.8.3 Unassigned view .................................................................................................. 49
6.8.4 Other Room Control screen features .................................................................... 49
6.9 DC Control Screen ............................................................................................................. 50
6.9.1 Number and DB-25 pin columns .......................................................................... 50
6.9.2 Page Source columns ........................................................................................... 50
6.9.3 Page Destination Columns .................................................................................... 50
6.9.4 Page Trigger State column .................................................................................... 50
6.9.5 Indicator State Table ............................................................................................ 50
6.10 Finish the Auto Design Wizard .......................................................................................... 51
6.12 Station Explanations .......................................................................................................... 52
6.12.1 Room Combine Station ...................................................................................... 52
6.12.2 Room Control Station ........................................................................................ 52
7.0 The Hardware Installation Wizard .................................................................. 53
7.1 Hardware Wizard Introduction ............................................................................................ 53
7.1.1 Wizard Outline ..................................................................................................... 53
7.1.2 Accessing the Install Wizard ................................................................................ 53
7.1.3 Maneuvering through the Wizard ......................................................................... 53
7.1.4 Introductory screen .............................................................................................. 54
7.2. The Hardware Wizard Start screen .................................................................................... 54
7.3 Audio Wiring Test ............................................................................................................... 55
7.4 Audio Path Test .................................................................................................................. 56
7.5 Remote Discovery Setup Screen ......................................................................................... 57
7.6 The Remote Discovery Process .......................................................................................... 58
7.7 Unassigned Remote Screen ................................................................................................ 58
7.8 Room Combine Station ....................................................................................................... 59
7.9 Unassigned Remote Screen ................................................................................................. 59
7.10 Room Control Stations ..................................................................................................... 60
7.11 The remote naming window ............................................................................................... 60
7.12 DC Control ...................................................................................................................... 61
7.12.1 Page Trigger State column .............................................................................................. 61
7.12.2 Indicator State column ................................................................................................... 61
8.0 ReO Bus Modes .................................................................................................. 62
8.1 Bus Modes ......................................................................................................................... 62
8.2 Changing bus modes ........................................................................................................... 62
8.3 Run Mode .......................................................................................................................... 62
8.4 Discovery Mode ................................................................................................................. 62
8.4.1 Using Discovery Mode ........................................................................................ 63
8.4.2 Why Naming and Discovery Sequence are Critical ............................................... 63
8.5 Non Responding Remotes .................................................................................................. 64
8.5.1 Searching for a lost remote ................................................................................... 64
8.5.2 Retracting a mistaken drag and drop .................................................................... 64
MARC User Manual — Table of Contents
5
MARC User Manual — Table of Contents
8.6 Testing remotes with a two person team .............................................................................. 64
8.7 Remote Blink Codes ........................................................................................................... 64
9.0 MARC Windows® Reference ........................................................................... 65
9.1 The File Menu .................................................................................................................... 66
9.1.1 The New Item ..................................................................................................... 66
9.1.2 The Open Item .................................................................................................... 66
9.1.3 The Save Item ..................................................................................................... 66
9.1.4 The Save As... Item ............................................................................................. 66
9.1.5 The Web Update Item ......................................................................................... 66
9.1.6 The Exit Item ....................................................................................................... 66
9.2 The Configuration Menu ..................................................................................................... 67
9.2.1 Room Groups ...................................................................................................... 67
9.2.1.1 Naming Room Groups .......................................................................... 68
9.2.1.2 Adding/Deleting Room Groups ............................................................ 68
9.2.1.3 Changing Topology ............................................................................... 68
9.2.1.4 The Room Combine Screen .................................................................. 69
9.2.1.4.1 Wall/Panel Selector ................................................................ 69
9.2.1.4.2 Room Numbers and Wall Numbers ........................................ 69
9.2.1.4.3 The Room Control Screen .................................................... 70
9.2.1.4.3.1 Adding/Deleting Remotes ........................................ 70
9.2.1.4.3.2 Naming Remotes .................................................... 70
9.2.1.4.3.3 View Options ......................................................... 71
9.2.1.4.4 Room Details ......................................................................... 72
9.2.1.4.4.1 Room Name ........................................................... 72
9.2.1.4.4.2 Mono/Stereo .......................................................... 72
9.2.1.4.4.3 Local Sources ........................................................ 72
9.2.1.4.4.4 Default Sources ...................................................... 72
9.2.2 Audio Sources ..................................................................................................... 73
9.2.2.1 Naming Audio Sources ......................................................................... 73
9.2.2.2 Audio Type .......................................................................................... 73
9.2.2.3 Mono/Stereo Selection ......................................................................... 73
9.2.2.4 Add/Remove Program .......................................................................... 73
9.2.2.5 Adding/Deleting Mic/Line Cards ........................................................... 74
9.2.2.6 Normal/Emergency Page ...................................................................... 74
7.2.2.7 The Pan Column ................................................................................... 74
9.2.3 Audio Outputs ..................................................................................................... 75
9.2.3.1 Output Names ...................................................................................... 75
9.2.3.2 Ducking ................................................................................................ 75
9.2.3.3 Mono/Stereo ........................................................................................ 75
9.2.3.4 L/R and Stereo Pairing .......................................................................... 75
9.2.4 Maximum Audio Levels ....................................................................................... 76
9.2.4.1 Setting Crosspoints ............................................................................... 76
9.2.4.2 Changing Names .................................................................................. 76
9.2.4.3 Views ................................................................................................... 76
9.2.5 Paging Ramp Times Screen ................................................................................. 77
9.2.5.1 Changing the paging ramp time parameters ............................................ 77
6
MARC User Manual — Table of Contents
MARC User Manual — Table of Contents
9.2.6 DC Control ......................................................................................................... 78
9.2.6.1 Number and DB-25 pin columns ........................................................... 78
9.2.6.2 Page Source columns ............................................................................ 78
9.2.6.3 Page Destination Columns ..................................................................... 78
9.2.6.4 Page Trigger State column ..................................................................... 78
9.2.6.5 Indicator State column .......................................................................... 78
9.3 Report Menu ...................................................................................................................... 79
9.3.1 Sales Order ......................................................................................................... 79
9.3.2 Wiring Submenu .................................................................................................. 80
9.3.2.1 Audio Sources Wiring ........................................................................... 80
9.3.2.2 Audio Output Wiring ............................................................................. 80
9.3.2.3 DC Connector ...................................................................................... 80
9.3.2.4 All Wiring Reports ................................................................................ 80
9.3.4 Remote Discovery List ......................................................................................... 80
9.3.5 All Reports .......................................................................................................... 80
9.4 Installation Menu ................................................................................................................ 81
9.4.1 Upload/Download ............................................................................................... 81
9.4.1.1 Read Data From MARC device ........................................................... 81
9.4.1.2 Write Data To MARC Device ............................................................... 82
9.4.2 Installation Wizard ............................................................................................... 82
9.4.3 Password ............................................................................................................ 82
9.4.3.1 Enabling/Disabling the Password ........................................................... 82
9.5 The Diagnostics Menu ....................................................................................................... 83
9.5.1 Are You There ..................................................................................................... 83
9.5.2 RS232 Test Manager ........................................................................................... 84
9.5.2.1 Comm Port .......................................................................................... 84
9.5.2.2 Use Escape and Checksum ................................................................... 84
9.5.2.3 Baud Rate ............................................................................................ 84
9.5.2.4 Open Comm Port ................................................................................. 84
9.5.2.5 Close Comm Port ................................................................................. 84
9.5.2.6 The Message Buffer .............................................................................. 85
9.5.2.6.1 Clear Buffer ........................................................................... 85
9.5.2.7 Transmit RS232 Message ..................................................................... 85
9.5.2.8 Communication Icons ........................................................................... 86
9.5.3 Live Crosspoints .................................................................................................. 87
9.5.3.1 Changing crosspoint values ................................................................... 87
9.5.3.2 Views ................................................................................................... 87
9.5.3.2.1 Percent View ......................................................................... 87
9.5.3.2.2 dB View ................................................................................ 87
9.5.3.2.3 Vertical/Horizontal Bars ......................................................... 87
9.5.3.2.4 Source Volume/Output Volume .............................................. 87
9.5.4 Device Information ............................................................................................. 88
9.5.4.1 The name of the matrix .......................................................................... 88
9.5.4.2 Device information ................................................................................ 88
9.5.4.3 ReO Bus status ..................................................................................... 88
9.5.4.4 Application Software ............................................................................ 88
MARC User Manual — Table of Contents
7
MARC User Manual — Table of Contents
9.5.4.5 Memory Reset ...................................................................................... 88
9.5.4.6 Internal Hardware Item ......................................................................... 89
9.5.4.6.1 Crosspoint Board status ......................................................... 89
9.5.4.6.2 Mic/line status ....................................................................... 90
9.5.5 Reset MARC Device Item .................................................................................. 90
9.5.5.1 Cancel, do nothing ................................................................................ 90
9.5.5.2 Reset Matrix Mixer ............................................................................... 90
9.5.5.3 Reset Matrix Mixer and Clear Matrix Memory ...................................... 90
9.6 Help Menu ......................................................................................................................... 91
9.6.1 Help .................................................................................................................... 91
9.6.2 Contents .............................................................................................................. 91
9.6.3 About .................................................................................................................. 91
10.0 RS-232 Message Protocol ............................................................................... 92
10.1 RS232 Message Fields ..................................................................................................... 92
10.2 RS-232 Reserved Bytes ................................................................................................... 93
10.3 RS-232 Timing ................................................................................................................. 93
10.4 Hexadecimal Transmission ................................................................................................ 94
10.4.1 Commercial controllers ..................................................................................... 94
10.4.2 ASCII values ..................................................................................................... 94
10.5 Decimal to Hex conversion table ....................................................................................... 95
10.6 Byte Escape Sequence ..................................................................................................... 96
10.7 DIP Switches ................................................................................................................... 97
10.8 Introduction to using the RS-232 Commands .................................................................... 98
10.8.1 Are You There ................................................................................................... 98
10.8.2 I Am Here ......................................................................................................... 98
10.8.3 Set Current Value .............................................................................................. 99
10.9 Communication Recommendation ..................................................................................... 99
11.0 Designing an External Control System for MARC .................................... 100
11.1 Connecting the Control PC to the MARC ....................................................................... 101
11.2 RS232 Message Protocol ............................................................................................... 102
11.2.1 RS232 Message Fields .................................................................................... 102
11.2.1.1 Start Byte ......................................................................................... 102
11.2.1.2 Length Bytes ..................................................................................... 102
11.2.1.3 Data Bytes ........................................................................................ 102
11.2.1.4 Checksum Field ................................................................................ 102
11.2.1.5 Acknowledge Byte ........................................................................... 102
12.0 MARC RS232 Quick Reference Guide ...................................................................................... 104
12.0.1 Communication Recommendation .................................................................... 104
12.1 General Communication .................................................................................................. 104
12.1.1 Are You There ................................................................................................. 105
12.1.2 I Am Here ....................................................................................................... 105
12.2.1 Communication Recommendation .................................................................... 106
8
MARC User Manual — Table of Contents
MARC User Manual — Table of Contents
12.2 Wall Control Application ................................................................................................. 106
12.2.2 Get All Wall Positions ...................................................................................... 106
12.2.3 Report All Wall Positions ................................................................................ 107
12.2.4 Goto Wall Positions ......................................................................................... 107
12.3 Program/Local Routing and Level Control ....................................................................... 109
12.3.1 Goto Program Zone/Room Select ................................................................... 109
12.3.2 Goto Program/Local Deselect .......................................................................... 110
12.3.3 Goto Room Program Volume ........................................................................... 110
12.3.4 Goto Room Local Volume ................................................................................ 111
12.3.5 Get Zone/Room Details .................................................................................... 111
12.3.6 Report Zone/Room Details .............................................................................. 112
12.3.7 Goto I/O Volume ............................................................................................. 112
12.4 Paging Control in MARC ................................................................................................ 113
12.4.1 Select Zone/room ........................................................................................... 113
12.4.2 Report Zone/Room Selection ........................................................................... 113
12.4.3 Begin Page ...................................................................................................... 114
12.4.4 End Page ......................................................................................................... 114
12.4.5 Cancel Page .................................................................................................... 114
12.5 Synchronizing the RS232 controller and Reo remotes ...................................................... 116
12.5.1 Communication Recommendation .................................................................... 116
12.5.2 Set Remote Polling .......................................................................................... 116
12.5.3 Remote Single Output Report .......................................................................... 117
12.5.4 Goto Remote Single Input Status .................................................................... 118
12.5.5 Set Remote Single Output ................................................................................ 119
Appendix A: Using an external power supply ...................................................... 120
Appendix B: Power Supplies and Grounding ...................................................... 122
Appendix C: Signal-to-Noise Considerations ...................................................... 125
Appendix D: MARC Reset Sequence.................................................................... 127
Appendix E : Comet Remote Devices ................................................................... 128
Appendix F: Technical Information....................................................................... 131
Appendix G: MARC Training Facility Design Example .................................... 133
Appendix H : MARC Conference Center Design Example ............................... 147
Appendix J: The Mic/Line Card ............................................................................ 152
Appendix L: Troubleshooting RS232 Communication ....................................... 153
Index..........................................................................................................................155
MARC User Manual — Table of Contents
9
MARC User Manual — Table of Contents
10
MARC User Manual — Table of Contents
MARC User Manual — System Overview
1.0 System Overview
Each Intelix Matrix Room Combine system (MARC) includes a matrix mixer, and a variety of
remote control devices. The MARC can provide flexible room combine functions for up to 16
rooms (including up to 32 walls).Comet-8 remote devices in the room combine station have a push
button for each moveable wall and informs the system which walls are in place. The system then
automatically configures all program remote controls to conform to the current room configuration
(as defined by the Comet-8). In the system below, removing the wall and toggling the room combine station button causes the two room control stations to mirror each other thus providing two
identical control locations in the large room.
Changing room configurations requires only moving the walls and pressing the appropriate buttons
on the Comet-8 in the room combine station. In the drawing below, the single button in the room
combine station indicates the presence or absence of the moveable wall.
The hardware components of the System (audio inputs, outputs, zones and Comet remote stations)
are configured and their operations programmed using supplied Windows® based MARC Designer
setup and control software. In programming mode you define all audio sources destinations and
control locations (stations). Exact functional descriptions, paging levels, routing, remote control
personalities, duck level during page and any other parameters of the system are defined in this
way. Once the design phase is complete, you download the design to the system hardware and
begins to run normally. Changing system functions and altering the existing system is possible at
any time (including while the system is in use), using the software.
This drawing shows
all major components
of a room combine
system: the room
group with a single
moveable wall, a
room control station
in each room, the
room combine station
and the MARC
matrix mixer connected to all stations
via the ReO bus. A
room group can
contain up to 16
rooms.
MARC User Manual — System Overview
11
MARC User Manual — Matrix Mixer Overview
1.1 Matrix Mixer Overview
At the heart of the MARC Matrix Mixer is the application CPU, which routes data and contains the
software that “runs” the device. The application CPU also contains several “device-level” pieces of
information and is responsible for RS-232 communication. As shown in the drawing below, the
application CPU off-loads many real-time tasks to other CPUs. These multiple CPUs are tightly
coupled to provide real time processing and fast response time.
The audio crosspoint CPUs routes and mixes the audio signals from audio inputs and outputs. Because these functions are distributed among several processors, it is possible to perform complex
tasks, such as independent crosspoint ramping, slewing, and implementing nonlinear response
curves. These tasks are used by the application CPU to implement higher-level functions such as
show control, multi-zone paging, and room combining.
The ReO devices are the user I/O interfaces. The ReO bus has its own CPU (the “Communication
CPU”) which constantly polls the remotes on the bus and reports to the application CPU. The
remote devices are logically grouped together into “stations” to provide flexible, coordinated control
locations for audio source selection, volume control, and room combining.
The Matrix Mixer contains a 25-pin connection, capable of carrying 8 binary inputs and 8 binary
outputs. This I/O is used to trigger normal and emergency pages.
12
MARC User Manual — Matrix Mixer Overview
MARC User Manual — Matrix Mixer Overview
1.1 Matrix Mixer Overview continued
Audio Matrix
The audio matrix is the heart of the MARC used to route and mixes audio signals from multiple
sources to multiple destinations. The audio matrix is designed so that audio inputs can be independently mixed to all outputs simultaneously.
Each “row” of the matrix represents an individual audio input, and each “column” of the matrix
represents an individual audio output. As shown in the sketch of an 8 X 8 Matrix below there is
voltage controlled attenuator (VCA) at every crosspoint, and “virtual” VCAs on each input and
output, giving maximum control flexibility.
On the following pages appear more detailed drawings of individual crosspoints, showing the parameters available for controlling each crosspoint.
MARC User Manual — Matrix Mixer Overview
13
MARC User Manual — Matrix Mixer Overview
1.1 Matrix Mixer Overview continued
This drawing shows how the
matrix is actually wired. Each
input and output is independent
of each crosspoint; i.e. a
crosspoint affects only a single
input/output pair.
14
MARC User Manual — Matrix Mixer Overview
MARC User Manual — Matrix Mixer Overview
1.0 System Overview continued
This drawing shows the a typical audio signal path (input 4 to output 3) and the parameters that
control each crosspoint in the matrix mixer’s grid of crosspoints. Note that each crosspoint has
multiple controlling parameters.
MARC User Manual — Matrix Mixer Overview
15
MARC User Manual — Matrix Mixer Overview
1.2 ReO Remote Overview
Intelix Comet Series Remotes are single gang “decora” control modules for the Intelix MARC
system. Typically wall-mounted, Comet remotes function as convenient user interfaces for paging,
program source selection and volume control.
The carefully optimized design allows the Comet remote controls to conveniently interconnect in
LAN bus topology. Up to 64 remotes can be utilized with one MARC matrix mixer via ReO bus
communication. Each remote’s “personality” is then easily assigned using the MARC Designer
software’s stations screen. This “personality” can easily be reassigned as applications change.
1.2.1 Comet Remote Descriptions
Comet Tail: The Comet Tail is a digital remote control device designed for volume control and mute
functions. It has a rotary knob and a single push button.
Comet-4: The Comet-4 is a four button digital remote control device designed for source selection
or page routing functions.
Comet-8
The Comet-8 is a rack mounted remote device with eight digital binary inputs and 8 digital binary
outputs. It can accept as inputs contact closures (pushbuttons or relays). It can drive outputs such as
LED , lamps and relays.
In the MARC system the Comet-8 is used to indicate the presence or absence of walls. The Comet-8
comes equipped with a face plate and switch panel customized for the application. Shown below is a
panel for a four room system (the Comet-8 is mounted on the rear of the panel). There is a single lit
button for each wall; when a wall is in place, its button is pressed and lighted. The MARC system
configures the behavior of the Comet-4 and Comet Tail remotes based on the information from the
Comet-8.
An alternative to a panel with switches is a set of wall sensors. If you connect a simple contact
closure sensor to each wall and connect the sensors to the inputs of a Comet 8, the MARC can
automatically keep track of what wall are in place in that room group. For wiring information on the
Comet 8, see page section 4.4.
Comet-8 can also be used to control external devices when configured in a Logic Control Station.
16
MARC User Manual — Matrix Mixer Overview
MARC User Manual — System Overview
1.2.2 Station Overview
A station is a logical grouping of Comet remotes (Comet-4s and/or Comet Tails). There can be up to
32 remotes in a single station, and up to 64 stations in a single system. The remotes are described in
detail in Appendix F. In the MARC there are three types of stations as shown below:
1.2.2.1 Room Combine Station
The room combine station has only a single purpose. It informs the matrix mixer of changes to the
up/down status of moveable walls in the room combine system. The standard method of performing
this function is to use one or two Comet-8 ReO remotes for each room grouping. The Comet-8
interfaces momentary push button switches to the matrix mixer. Each moveable wall in the system
has a push button. When a wall is raised or lowered, its button is pressed, thus alerting the matrix to
its status change.
Typically the Comet-8 has a custom faceplate to hold the switches in a template representing the
walls. Each switch has a lighted indicator to clarify whether the wall should be considered up/down.
Alternatively wall sensors can provide wall up/down information to the MARC through a Comet 8.
It is also possible to use a custom touch panel as a room combine station. In this case, RS-232
messages are used to inform the matrix of status changes.
1.2.2.2 Room Control Station
The room control station contains an array of ReO remote devices which provide direct user control
of audio selection and levels in each room. Normally a room control station consists of Comet-4
remotes for program source selection and Comet-Tail remotes for audio level adjustment.
1.2.2.3 Logic Control Station
The logic control station is a specialized station type that uses Comet-8s and Comet-4s to provide
remote control of relays in a system. Relays can be controlled from several remote locations and
relays can be grouped for control purposes. Uses of the logic control station includes relays, lighting
control, head table audio control etc.
MARC User Manual — System Overview
17
MARC User Manual — System Overview
1.3 Matrix Mixer Panels
1.3.1 Matrix Front Panel
There is one red LED on the front panel. This LED when lit indicates that there is power to the
matrix. There is no power on/off switch on the Matrix.
1.3.2 Matrix Rear Panel
Ground Lift Jumper Access - Access to ground lift jumper, which connects the chassis to
electronic ground.
18 VCT 4-pin DIN receptacle - for connection to an AC supply. Power status is indicated by
the red LED on the front panel. This is the only means of powering down the matrix.
DC power receptacle - for connection to a DC supply (+, - 18 VDC) or batteries
Reset button - Restarts Matrix microprocessors, does not reset program information.
LED/DIP switch position:
“Power” (red) LED, when lit, indicates that the Matrix CPU is powered.
“Status” (green) LED, whose function depends upon settings made in software.
DIP switches:“up” position indicates the “on” condition “down” position indicates the “off” condition. (see section 4.1)
DC Control - DB-25, 25-pin (female) receptacle for contact closure input/output driver
connections. (See Appendix A.)
RS232 - DB-9, 9-pin (female) receptacle through which the Matrix is linked to computer (PC)
and other RS232 devices. (See section 4.0)
ReO Bus - 6-wire, modular jack receptacle, similar to RJ11 or RJ12, through which the
Matrix is linked to the ReO remote unit(s). The communication link is synchronous and serial. (2
ground wires, 2 clock wires, 2 data wires). The wiring connections to all the remote units are direct
pin to pin. Any new connection must have the same pin order to be functional. (See section 12.1.2)
Audio Inputs
Audio Outputs -Strips of screw-terminal (“Phoenix-type”) plug receptacles
(male). Each block accommodates four triplet plugs.
18
MARC User Manual — System Overview
MARC User Manual — Quick Start
2.0 Quick Start
This section will explain two major concepts: how to physically install the MARC system, and how
to program it to create the required application.
The Hardware Installation section takes you from the installation of the MARC hardware components through an audio test of the completed hardware installation. It assumes that the job site has
been completely and correctly wired.
The Application Creation section shows you how to use the installed MARC hardware and Designer software to program and test your customer’s application. It assumes that your customer’s
application has been designed and documented. This manual provides a set of application design
templates in Appendix J-Conference Center Design.
The figure below shows the basic components and interconnections of a MARC system. Shown is a
mixture of Intelix supplied and contractor supplied components: Intelix supplies the MARC matrix
mixer, the Comet remotes, PC software, and optionally, the ReO bus power supply and microphone
preamps. Contractor must supply microphones, program sources, external amplifiers, speakers, and
PC (needed for setup only).
MARC User Manual — Quick Start
19
MARC User Manual — Quick Start
2.1 Hardware Installation
The physical installation section will guide you from the point at which you begin installation of the
matrix mixer and ReO remote controls through an audio test of the installed system. It is assumed
that the job site is wired at this point, i.e. all wiring for audio and the REO bus is complete. If the
building is not wired see the section 4.0 (“Wiring the Building”). You will follow these steps:
2.1.1 Mount and power the MARC Matrix Mixer in the rack.
There should be at least 1-2” of free air space at the sides of the matrix mixer for proper ventilation.
Do not install directly above a power amplifier or other significant heat source. If you have unusual
grounding requirements, see Appendix B. Ensure that the ReO bus is not plugged into the matrix
mixer.
2.1.2 Connect Audio Sources and Outputs
All audio sources and outputs should be connected to the matrix mixer via the (removable) Phoenix
connectors on the rear panel. All inputs are line level (except those connected through the optional
mic/line card. Paging microphones must be preamplified to line level. Recommended input connection methods are shown in section 3.4.
2.1.3 Install remote controls in their assigned locations on the ReO bus
The locations for the remotes should be a part of your design documentation. Install each
remote in its correct position. Plug in the power connection, verify that the LED single blinks
at a rate of about once per two seconds. Now plug the REO bus connection (the RJ12 plug)
into each remote. The ReO bus should still not be connected to the matrix mixer.
2.2 Application Creation
This section begins with section 6.0 and will guide you from the end of the physical installation
section through a final test and balance of the end user’s system.
2.2.1 Connect the control PC to the MARC Matrix Mixer
Connect a DB-9 cable between your PC serial port and the female DB-9 receptacle on the matrix
mixer (labelled “RS232”). The cable should be a “null modem” configuration. For details on this
connection see section 3.5.
2.2.2 Install and start MARC Designer software on the controller PC
See section 5.0 for program installation. For connection details see section 3.5.
2.2.3 Define the System
Use MARC Designer software to define audio inputs, outputs, and ReO remote stations. For details
see section 6.0.
2.2.4 Connect the ReO bus to the MARC Matrix Mixer.
For the first time connect the ReO bus to the matrix mixer by connecting the RJ12 connector on the
ReO bus into the RJ12 connector on the back of the matrix mixer as shown in the drawing in section
1.1.
20
MARC User Manual — Quick Start
MARC User Manual — Quick Start
2.2.5 Perform remote recognition.
Since your remotes have already been programmed, either at the factory on the bench, you may now
put the matrix in “Run” mode and begin testing the system. If you are using Discovery Mode for
remote recognition, go to section 8.4.
2.2.6 Define and program the remotes
The programming of the remotes is done through the MARC software and is guided by the definition
of remote functions in your design. See the section “Defining Controls”.
2.2.7 Test and adjust the system
To perform a system test you will need to have connected and turned on all audio sources. Also the
MARC matrix mixer must be in Run mode (see section 8.1). Testing is be done by exercising each
remote and listening to verify correct operation.
MARC User Manual — Quick Start
21
MARC User Manual — Matrix Wiring Details
3.0 Matrix Wiring Details
3.1 Mounting the MARC in the Rack
The MARC matrix mixer mounts in a standard width rack. The number of rack spaces required
depends on the number of I/Os in your particular matrix mixer (standard configurations are 2RU).
Because the MARC generates heat at an industrial level, it is important to meet the following ventilating requirements.
1) Make sure that there is at least 2 inches of free air space on both sides of the matrix mixer.
The mixer’s ventilation slots are on the side of the chassis, so a free air column is required to
keep proper ventilation to the matrix.
2) All matrix mixers larger than 8 outputs are equipped with a front-mounted fan. The fan
must be unobstructed in the front of the matrix, so ensure there are no closeable doors on the
rack that might seal the fan from a steady supply of fresh air.
3) Intelix recommends that you not mount the matrix mixer next to a power amplifier or any
other source of significant heat. Leave an empty rack space above and below the matrix
mixer.
3.2 Connect the Power Supply
1) Plug the power DIN connector into the back of the matrix mixer as shown below.
2) Plug the power supply into a standard 120 VAC outlet.
3) The power LED on the front of the matrix mixer should now be lit.
There is no power switch on the matrix mixer. For information on grounding of the
matrix mixer see Appendix B. For information on using a DC power supply, see Appendix A.
Intelix supplies an 18 Volt, 3.0 Amp center-tapped transformer to power the mixer. Large matrix
mixers may require a larger power supply. If another AC supply is used instead, it should be of equal
voltage and have at least a 60 Volt-Amp rating. The details of the AC Power Jack on the rear panel
are as shown in the following figure.
4-pin DIN Connector,
viewed from the rear of
the Matrix.
22
MARC User Manual — Matrix Wiring Details
MARC User Manual — Matrix Wiring Details
3.3 Connecting Audio Inputs and Outputs
3.3.1 Audio Inputs
Any line-level audio input can be routed and mixed using the MARC. The inputs are connected to
the Matrix via removable screw-terminal (“Phoenix-type”) plug receptacles. The audio input to the
Matrix can be either electronically balanced (impedance of 20 KΩ) or you can unbalanced it to 10
KΩ. The correct way to unbalance the input is to “float” it, i.e. leave the unused pin open, as shown
below. (For other methods of wiring Inputs see the following page.)
These drawings show how balanced and unbalanced inputs should be connected to the Matrix audio
inputs.
Matrix Input
Connector
Matrix Input
Connector
3.3.2 Audio Outputs
Audio output devices are connected to the Matrix via removable screw-terminal (“Phoenix-type”)
plug receptacles. The audio output from the Matrix is electronically balanced (impedance of 440 Ω),
but it can be unbalanced (impedance of 220 Ω) by the user. The correct way to unbalance the output
is to tie the negative leg to ground, as shown below.
The Matrix is designed to give a 6 dB boost (which compensates for the signal-level loss due to
unbalancing) to a signal unbalanced in this way. Therefore this method of unbalancing is preferable
to floating one side of the pair of leads to unbalance it.
Matrix output connections for balanced and unbalanced output devices.
Matrix Output
Connector
MARC User Manual — Matrix Wiring Details
Matrix Output
Connector
23
MARC User Manual — Matrix Wiring Details
3.4 Recommended Input Wiring Methods
These are the best ways to connect sources to your Intelix mixer. The mixer input is always balanced. From the drawings below choose the wiring method for your input device (either balanced or
unbalanced).
Balanced Source to Balanced Input - normal
Shown below is the normal wiring method for a balanced source device. It has +6 dB gain and
excellent ground current and noise rejection.
Balanced Source to Balanced Input - method 2
If the method above does not work in your application, use the wiring shown below. This method
can solve certain ground loop problems. It has +6 dB gain and good noise and ground loop rejection.
Unbalanced Source to Balanced Input - method 1
For an unbalanced source device, the drawing below shows the best wiring method. Because of the
design of the Intelix mixer, this wiring provides a slight (+6 dB) boost, and moderate noise and
ground loop rejection.
Unbalanced Source to Balanced Input -method 2
For an unbalanced source device, the drawing below shows an alternative wiring method. Because
the grounding of the minus input is not to the mixer ground, this method does not provide the +6 dB
boost. Ground current and noise rejection is good.
24
MARC User Manual — Matrix Wiring Details
MARC User Manual — Matrix Wiring Details
3.5 Connecting the Control PC to the MARC
Before you can program your Matrix Mixer, you need to have a personal computer (desktop or
laptop) capable of running the MARC program. Your computer must meet these requirements:
√ PC computer (Pentium 133MHz and 32M RAM or better) with a CD ROM drive
√ Windows ‘95®
√ Serial port connected to RS232 connector on Matrix Mixer
√ a null modem cable
The connection between the MARC matrix mixer and your control PC is made with a “null modem”
cable with a DB-9 connector on the matrix end as shown below. The wiring diagram for a null
modem cable is at the bottom of the page. The drawing you use will depend on the connector on your
PC. Most PCs have either a DB-9 or a DB-25 on the serial port. The cable wiring for both connectors
are shown.
Note: Some devices require that Clear to Send and Ready to send (pins 7 and 8) be tied together.
RS232 DB9 to DB9 connections for a
null modem cable.
Matrix
female
DB9
2
3
5
2
3
5
Controller
DB9
RS-232 DB9 to DB-25 connections
for a null modem cable.
Matrix
female
DB9
2
3
5
2
3
7
Controller
DB-25
The connections of the
2 3
5
MARC’s DB9 connector for RS-232 commuReceive
nication.
Transmit Ground
MARC User Manual — Matrix Wiring Details
25
MARC User Manual — Matrix Wiring Details
Communication Icons
All MARC screens carry a communication icon in the lower left corner. The icon in the lower left
corner will indicate the current state of communication. There are three communication icons:
This icon indicates that the PC is not attempting to communicate with an
MARC matrix mixer. In this mode you can create new files and design
systems for later transfer to an MARC. In PC alone mode some functions
may be disabled.
This icon indicates correct communication between the PC and the MARC.
You can transfer files, monitor the MARC or make live real time changes in
this mode.
This icon indicates a communication failure. Common causes are incorrect
communication port selected, incorrect baud rate, or cabling errors.
3.5.1 DIP Switches
There are eight DIP switches on the rear panel of the Matrix (see drawing below). For all DIP
switches, the “up” position indicates the “on” condition, and the “down” position the “off” condition.
The function of these switches is shown below.
DIP switches 5 and 6 allow the RS-232 baud rate to be fixed at one of three values: 9600, 19200 or
38400. The Windows MARC software does not support 38400 baud, but that speed can be used by
AMX, Crestron and custom controllers.
DIP switch 7 allows the RS-232 checksum and “escape” byte to be toggled on or off. These should
be turned off in installations which include a permanent RS-232 controller, such as AMX, Crestron
or custom PC program. The RS-232 checksum and escape byte should be turned on in installations
where the RS-232 communication may be hindered because of cable length (greater than 50 feet) or
lack of shielding from external electronic noise.Note: After changing any DIP switches, you must
resest the matrix by pressing the reset button on the rear panel. Changes will not take place unless
you reset the matrix.
26
MARC User Manual — Matrix Wiring Details
MARC User Manual—ReO Bus and Comet Wiring
4.0 ReO Bus and Comet remote Wiring Details
This section is concerned with the wiring of Comet remote devices, including data (ReO bus) and
power to the remotes. Data and power should be run with separate cabling to avoid interference.
Whether the system is being installed into a new building or retrofit into an existing one, you must
allow for several kinds of wiring.
a) The ReO bus. This is the data bus for all remote devices, which are
serially connected to the Matrix ReO port.
b) Power to the remotes. The ReO devices are powered by 9-18V AC or DC.
MARC User Manual—ReO Bus and Comet Wiring
27
MARC User Manual—ReO Bus and Comet Wiring
4.1 Installation of ReO Bus
4.1.1 Wire Type
Category 3 or 5 (10 Megabits/sec) or better.
Examples are West Penn WP52995 and Belden 1245A (4 pair unshielded solid 24 gauge).
The ReO bus, which interconnects the remote control devices and the Matrix uses a six conductor
wire terminated in an RJ12 modular connector on the matrix end, and a Phoenix plug on the remote
end. The bus contains two twisted pairs: clock, and data, plus two non-twisted grounds.
4.1.2 Connections
Cables are terminated in an RJ12 modular connector on the matrix end, and a Phoenix plug on the
remote end.
The ReO bus is a parallel bus, i.e. all pins of a particular number are wired together as shown below.
This is a common cause of ReO bus error. Make sure that each cable is wired correctly on both ends.
Note that twisted pairs should be placed on pins 2 and 3 (data), 4 and 5 (clock).
1
2
3
4
G
C ND
C LK
D LK +
D ata U ata +
nu se
d
ReO Bus Wiring
NC Brown**
Brown/white
Green
Green/white
Blue
Blue/white
GND
CLK+
CLKDATA +
DATA -
To more Remotes
6
2
3
4
5
**Note:
Crimp the brown conductor in the
RJ12, but cut it off after crimping
. This will provide a more reliable
crimp.
G
C N
C L D
D L K
K
A
D T -+
A A
T
A +
-
RJ12 connector to matrix.
View has tab side down.
RJ12 top view
Phoenix connection
to remote
The Phoenix connector
allow the daisy chaining of
REO bus remotes as shown
at the right. Multiple wires
inserted in one remote
connection should be soldered together. Wire can be
released by pressing the
orange button for the connection.
28
MARC User Manual—ReO Bus and Comet Wiring
MARC User Manual—ReO Bus and Comet Wiring
4.1.3 ReO Bus Topology
The topology of the ReO bus connections can take many forms to accommodate almost any application. Among the most commonly used forms are T-connections; daisy chains and stars. Each of these
connection types are shown below.
Note: Because of its advantages in troubleshooting and maintenance, Intelix strongly recommends
using the star topology whenever possible.
Comet Remote
T-connection
MZP Matrix
Data Connection
Junction
Daisy chain connection
Star connection.
There is only one forbidden topology: the ring. This is because the ring topology contains redundant
paths among remotes. Redundant paths can cause data collision and communication failures. An
illegal ring topology is shown below.
MARC User Manual—ReO Bus and Comet Wiring
29
MARC User Manual—ReO Bus and Comet Wiring
4.1.4 Length of ReO Bus Connections
The maximum length of total ReO bus possible is 12,000 feet. With a bus length over 3000
feet, reflections become an issue and it may become necessary to terminate the bus at several points,
by adding termination resistors as explained below. For bus lengths over 6000 you must terminate
the bus.
4.1.5 Reflections
Reflections are returning signals bouncing back from an impedance mismatch on the ReO bus and
causing phase cancellation.
Reflection typically manifests itself as intermittent transmission failures in remotes in the
middle of long runs of bus. Often the remotes before and after the problem remote will work correctly. Moving the problem remote to a location that is known to work will isolate a remote hardware
problem from a bus problem. Some of these symptoms also appear when a bus has excessive noise
present. The solution for all these problems is to terminate the bus as explained in section 4.1.64.1.7.
4.1.6 Termination
Termination is a technique for correcting the impendance of a ReO bus to eliminate problems arising
from bus reflections and noise problems. Terminating the bus is accomplished by adding resistors at
the ends of the bus legs, thus reducing the total impedance of the bus to a level that eliminates
reflection. The value of termination resistors depends on the topology of the system. In general you
must lower the overall impedance of the bus to 50 Ω. This is done as shown below.
4.1.7 Calculate the value of the terminating resistors
Nlegs = Number of legs in the system. Legs are defined as the number of home runs plus any sub legs
over 500 feet..
Nremotes = Total number of remotes in system.
X = the resistor value to be added to each leg to lower the system impedance to 50 Ω. The equation
below yields X. Examples appear below.
Nlegs
XΩ =
[.02 -(.004545 + (Nremotes/ 48 KΩ))]
After you have found the value for X, add a resistor of that value across the clock lines and data
lines at the remote at the end of every leg. Because
the system impedance must stay above 50 Ω, the
resistor you select should be the next size higher
than the theoretical value. These resistors are
most easily added at the terminal block where each
remote is connected to the bus (shown at right).
30
MARC User Manual—ReO Bus and Comet Wiring
MARC User Manual—ReO Bus and Comet Wiring
Example 1:
Your system has a total length of 4000 feet of ReO bus wire arranged in a star configuration
with three home runs.There are four remotes on each run. The number of bus legs is three and the
total number of remotes is 12. This bus falls in the range that may require termination. Using these
values in the equation of section 4.1.7 results in a resistor value of 197 Ω. Select the next highest
standard value 200 Ω. Install the terminating resistors at the remotes marked by an ‘X’.
Example 2
Example 1
Example 2:
Your system has a total length of 9000 feet of ReO bus wire arranged in a daisy chain. There
are twelve total remotes. The number of bus legs is three and the total number of remotes is 12. This
bus must be terminated. Using the equation of section 4.1.7 results in a resistor value of 415 Ω.
Select the next highest standard value 417 Ω. Install the terminating resistors at the remote marked
with an ‘X’.
4.2 Power Connections to the ReO Bus
The ReO devices are not powered by the Matrix. They must be powered externally. This
power must be 9 to 18 V either AC or DC. It should be distributed by stranded wire, 18 gauge or
heavier. The Intelix connector is designed for 18 gauge wire, so if a smaller gauge is used, other
connectors will be needed.
A single Comet device draws 100 mA. A single supply can service more than one remote but some
systems may require multiple supplies. The voltage at any ReO bus device must not fall below 9
volts. Multiple supplies can easily be connected using the Intelix three conductor receptacle.
Rear View of the Comet 4 and Comet Tail devices showing
Power Connection. Both AC and DC can be connected to
pins 1 and 3. Either pin may be designated as plus, as the
remotes all have full-wave bridge rectifiers. However for
consistency and easier troubleshooting, all remotes should
be wired in the same way.
The location of the power supplies with respect to the remotes determines the amount of line loss in
the power connections.
Note: If the remotes are located nearer to each other than to the main rack, the line loss can be
reduced by locating the power supply closer to the remotes, and not in the main rack.
To calculate line loss apply the formula on the next page.
MARC User Manual—ReO Bus and Comet Wiring
31
MARC User Manual—ReO Bus and Comet Wiring
4.2.1 Calculating Line Loss in ReO bus Power Supply
Power Supply Voltage = Vloss + (9 to 18 V)
Example:
In most systems the remotes will be located at various distances from each other and from the main
rack. To estimate the loss in such Systems, simply add the losses of the remotes at each distance:
e.g. for a system with 11 remotes, 8 remotes at 1200 feet, 2 at 600 feet and 1 at 1500 feet:
600 feet
600 feet
2 Remotes
300 feet
8 Remotes 1 Remote
Vloss = ir = (0.1 A/remote X 11 remotes) (6.2 W/1000 ft. X 600 ft.)
+ (0.1 A/remote X 9 remotes) (6.2 W/1000 ft. X 600 ft.)
+ (0.1 A/remote X 1 remote) (6.2 W/1000 ft. X 300 ft.)
= 4.092 + 3.348 + 0.186 = 7.626 V.
This sum should always be less than 20 V. If it is greater than 20 V, then the distance between the
power supply and the remotes must be reduced or the wire gauge increased. Otherwise, the voltage
experienced by the first remote in the chain will approach the breakdown voltage of the regulator
inside the remote.
4.2.2 Grounding the ReO Bus
Note: Whether the power supply to the ReO remotes is AC or DC, controlled grounding is
impossible if either the data connection (LAN) ground or any of the power-supply
wires is shorted to the building or conduit ground. Take care to make sure that
such shorts do not occur.
32
MARC User Manual—ReO Bus and Comet Wiring
MARC User Manual—ReO Bus and Comet Wiring
4.2.3 AC power supply
Usually ReO devices are powered by a 12 VAC transformer. The transformer secondary is connected
in parallel to all the remotes in the System at pins 1 and 3 of their power connections. The remotes’
electronics are grounded to the Matrix via the data connection ground. This is connected to neither
the building nor conduit grounds.
4.2.4 DC power supply
If the ReO devices are powered by a DC voltage supply, and the DC supply has floating or isolated
outputs, then the grounding connections to the ReO remotes should be the same as for an AC supply,
as described above.
If one side of the DC supply output is grounded, the installation of ground lift jumper should be
avoided. This configuration, in the presence of the ground lift jumper, can result in ground loops or
large common-mode voltages between the ground of the supply and that of the data connections.
Note: When using a grounded DC supply, the presence of the bridge rectifiers in the remotes will
cause there to be a 0.7 V common-mode difference between the DC supply ground and the remote
ground. This difference is negligible compared to the common-mode rejection capabilities of the
RS485 transceivers.
MARC User Manual—ReO Bus and Comet Wiring
33
MARC User Manual—ReO Bus and Comet Wiring
4.3 Installing ReO bus devices
Each ReO remote device required by your installation should be installed in its final location. When
doing the initial installation; i.e. before remote recognition takes place, do not connect the ReO bus
to the remotes.
1) Connect the power connector as shown below, then install the remote devices in their wall box,
panel or other final destination. The bottom LED on each remote will blink at about once per 2
seconds, indicating that the remote has power and has not received a message from the matrix. If the
remote does not single blink, troubleshoot the power supply with a voltmeter. The voltage at the
remote should be in the range 9-18 VDC or AC.
2) If you have selected discovery mode as a remote recognition scheme, or if your remotes are
already programmed (either by the factory or on your bench), plug the ReO bus (RJ12 connector)
into each remote. Do not yet connect the ReO bus to the matrix mixer.
Note: Because the remotes contains a full bridge rectifier, the power connection can be made with
the power plug in either orientation. But for ease of troubleshooting, we recommend that the all
plugs be oriented the same way.
This drawing shows the back of a
typical REO remote and indicates
how to connect the ReO bus power
connector.
Re
a
RE r of
O typ
rem ic
ote al
Fro
m
po Re
we O
sup r
ply
34
To
n
remext
ote ReO
MARC User Manual—ReO Bus and Comet Wiring
MARC User Manual—ReO Bus and Comet Wiring
4.4 Wiring the Comet-8
The Comet-8 ReO device requires a face plate and a set of switches. There must be one pushbutton
switch for each moveable wall in the system. If your system has more than one group of rooms to be
combined; there must be one Comet-8 for each group. The drawings below show how to wire contact closures to the Comet-8.
Non-isolated Inputs: This drawing
shows the correct connections for the
Comet-8 using contact closures such as
wall sensors. Connect one side of the
switch to the Input Low terminal of an
input. Connect the othe side of the
switch to one of the ground terminals of the Comet-8. Leave the Input
High terminal unconnected. Be sure
that the channel’s P3 jumper is in
place in the internal position as explained below.
Repeat this process for each contact
closure required.
If you wish to use automatic optoisolation of inputs, you must use an external power supply and
connect the inputs as shown below. Be sure that the channel’s jumper at P3is set to the external
position.
Isolated Inputs: This drawing shows
the correct connections for the Comet8 using contact closures such as wall
sensors. Connect one side of the switch
to the Input Low terminal of an input.
Connect the othe side of the switch to
the negative side of the external power
supply.. Leave the Input High terminal
unconnected. Be sure that the channel’s
P4 jumper is in place as explained
below.
Repeat this process for each contact
closure required.
R
+V
Input 1 High
.
.
Input 1 Low
+V
External
Power
Supply
R
Input x High
Input x Low
-V
P3
INT
EXT
MARC User Manual—ReO Bus and Comet Wiring
+V
R
.
.
Input 8 High
Input 8 Low
Ground
35
MARC User Manual—ReO Bus and Comet Wiring
Outputs (non-isolated): The drawing
below shows correct wiring for >LED
outputs on the Comet 8. Jumper P4 for
each channel must be disconnected.
Relays, and logic devices may also be
driven with Comet 8 outputs, see the
Comet 8 user manual (at
www.intelix.com).
4.5 Wiring a Comet 8 for Wall Sensors
When using wall sensors to indicate the up/down state of walls, the sensors must be wired to a
Comet 8 in a specific way. Each sensor is wired to a Comet 8 input low input and ground as shown
in the drawing above. The specific pin numbers to wire the sensors to is obtained from the MARC
Designer ® software. After you have designed your room groups and specified them as using wall
sensors, print the room group report (main -> Reports -> room groups). This report will associate
wall sensors with Comet 8 pins.
This picture shows the Comet-8
PCB and the location of jumper
block P3. For each channel using
a contact closure, the corresponding P3 jumper must be in place.
This connects the internal power
supply to the selected inputs.
36
MARC User Manual—ReO Bus and Comet Wiring
MARC User Manual—ReO Bus and Comet Wiring
The Comet-8 has a three pin power connector that is
best wired using a Panduit MAS-CON MRT-156F
punch down tool.
4.6 Wall Indicators
If you wish, you can add wall sensor indicators to aid in the correct closure of wall by facility personnel. This indicator is an LED mounted near the wall closure that will be lit if the wall is closed and
dark if the wall is open. A wiring diagram for the indicator is shown below. The indicator is driven
by the output of the Comet-8 whose input takes the wall sensor. That is, if the wall sensor is connected to Comet-8 input #2 then the indicator will be driven by Comet-8 output #2.
MARC User Manual—ReO Bus and Comet Wiring
37
MARC User Manual — Software Installation
5.0 Installing and starting the MARC software
5.1 Installing the MARC software
There are three main sources for the MARC Designer® software: the Intelix CDROM, Intelix floppy
discs, and the zipped downloadable file from the Intelix web site. Instructions for installing from
these sources are shown below.
5.1.1 Installing the MARC software from the CDROM
1) Run the file “MARC.exe”
2) From the main screen click on “MARC designer”, then click on “Install MARC Designer Software”.
5.1.2 Installing the MARC software from floppies
1) Insert the first floppy disc.
2) Run the file setup.exe;
3) follow the directions on screen.
5.1.3 Installing the MARC software from the Intelix Web site
1) Download the file www.Intelix.com -> Tech ->Software -> MARC.zip
2) unzip the file using PKunzip.
3) Run the file setup.exe
4) Follow the directions on screen.
5.2 Running the MARC software
Open the MARC software from the Program files option in the Windows Start menu (Intelix
MARC). The main screen appears:
38
MARC User Manual — Software Installation
MARC User Manual — Software Installation
5.3 Connecting the Control PC to the MARC
Before you can program your Matrix Mixer, you need to have a personal computer (desktop or
laptop) capable of running the MARC program. Your computer must meet these requirements:
√ PC computer (Pentium 133 MHz and 32 Mb RAM or better) with a CD ROM drive
√ Windows ® 95/97/NT
√ Serial port connected to RS232 connector on Matrix Mixer
√ a null modem cable
The connection between the MARC matrix mixer and your control PC is made with a “null modem” cable with a DB-9 connector on the matrix end as shown below. The wiring diagram for a
null modem cable is at the bottom of the page. The drawing you use will depend on the connector
on your PC. Most PCs have either a DB-9 or a DB-25 on the serial port. The cable wiring for both
connectors are shown.
Note: Some devices require that Clear to Send and Ready to send (pins 7 and 8) be tied together.
RS232 DB-9 to DB-9 connections for
a null modem cable.
Matrix
female
DB-9
2
3
5
2
3
5
Controller
DB-9
RS-232 DB-9 to DB-25 connections for a null modem cable.
Matrix
female
DB-9
2
3
5
2
3
7
Controller
DB-25
The connections of the
2 3
5
MARC’s DB-9 connector for RS-232 commuReceive
nication.
Transmit Ground
MARC User Manual — Software Installation
39
MARC User Manual — Software Installation
5.4 DIP Switches
There are eight DIP switches on the rear panel of the Matrix (see drawing below). For all DIP
switches, the “up” position indicates the “on” condition, and the “down” position the “off” condition.
The function of these switches is shown below.
DIP switches 5 and 6 allow the RS-232 baud rate to be fixed at one of three values: 9600, 19200 or
38400. The Windows MARC software does not support 38400 baud. But that speed can be used by
AMX, Crestron and custom controllers.
DIP switch 7 allows the RS-232 checksum and “escape” byte to be toggled on or off. These should
be turned off in installations which include a permanent RS-232 controller, such as AMX, Crestron
or custom PC program. The RS-232 checksum and escape byte should be turned on in installations
where the RS-232 communication may be hindered because of cable length (greater than 50 feet) or
lack of shielding from external electronic noise.
Note:
After changing any DIP switches, you must resest the matrix by pressing the
reset button on the rear panel. Changes will not take place unless you reset the matrix.
40
MARC User Manual — Software Installation
MARC User Manual — MARC Auto Design Wizard
6.0 Auto Design Wizard
6.1. Introduction to the Auto-Design Wizard
This section will walk you through the Windows® screens needed to produce a new MARC design.
The software automatically begins this design sequence when you select “New File”. You should
already have designed your system on paper.
6.1.1 Before Using the Auto-Design Wizard
Before beginning your design you should determine certain basic characteristics of the design. They
include the following:
1) The number of room groups. A room group is an area that can be subdivided into several
rooms with moveable walls. A room group includes all areas that can be included in an open
space when all walls are removed.
2) The topologies of the room groups. A topology is the physical arrangement of the rooms in
a room group when all walls are in place. To see a catalog of available topologies in the
MARC system see section 9.2.1.3.
6.1.2 Navigating in the Auto-Design Wizard
If you have made an error, or wish to change some part of the design while using the auto-design
Wizard, you can move forward and backwards in the Wizard sequence using the “Forward” and
“Back” buttons on each Wizard screen. Changes can then be made as desired.
6.1.3 Starting the Auto Design Wizard
At the New File prompt you will be asked if you wish to run the Audio Design Wizard. Click OK.
You will then be guided through a series of topics (some topics require multiple screens).
6.2 Naming the Project
Enter a name for your project. This name will become the default name for the file in which the
design is stored at the end of the wizard. The screen below shows the project name screen with the
name “Training Facility” filled in. Click the “Forward” button.
MARC User Manual — MARC Auto Design Wizard
41
MARC User Manual — MARC Auto Design Wizard
6.3 Room Groups Screen
You will be shown the informational screen for Room Groups. After you have read and understood
the instructions, click “Forward”.
The room group screen will initially shows two room groups in the design. Two buttons: “Add
Group” and “Delete Group” allow you to set the number of groups in your design. To delete a room
group, click it (it highlights). Then click the “Delete Group” button. To add a room group, click the
“Add Group” button.
After you have specified the number of room groups in your project with the Add Group and Delete
Group buttons, you must specify their topology. Topology is the way that the rooms are arranged in
the group. Select a room group by clicking on it (it highlights). Then click the “Change Topology”
button. You will see a catalog of all room topologies available to your system. Select the correct
topology by clicking it. Then click OK. Repeat these steps for each room group in your system.
There can be up to eight room groups as desired with any topology so long as the total number of
walls does not exceed 16. A wall counter at the bottom of the screen helps you keep track of how
many rooms you have specified.
If you make changes that you wish to reverse, click the Cancel button.
When you have selected the correct number of room groups and set their topologies, Click the
“Forward” button.
This screen shot shows the room group screen
with a single room group in place. The Delete
group button has been used to remove the other
default group. The remaining group has the
default group name and topology.
This screen shot shows the topology catalog that
appears when you click the “Change Topology”
button. A four room topology is shown highlighted.
42
MARC User Manual — MARC Auto Design Wizard
MARC User Manual — MARC Auto Design Wizard
6.4 Room Name Screen
The next screen will be an instructional screen for MARC room names. After you have read and
understood it, click the “Forward” button. You will see the room combine screen as shown below.
The room combine station contains a Comet-8 remote which interfaces the wall switches to the
MARC matrix. The MARC then keeps track of the wall configuration at all times, enabling it to
correctly configure the audio control for each room.
At this stage of the wizard, all that is required is that you name each room in each group, as explained below.
When you have finished naming the rooms, click either the “Room Details Template” button (if your
rooms controls are similar) or the “Individual Room Details” button (if your room controls are very
different.).
6.4.1 Assign names to rooms
Click in the name label (initially containing a default name) and type the new name. Make the name
as descriptive as possible within the twenty character limit.
6.4.2 Printing the room combine station screen
For your documentation convenience, a print screen button is provided on this screen. It sends your
room combine configuration to your local printer.
6.4.3 Changing the Room Group name
To change the name of the room group, click in the text box labelled “Room Group” and type the
new name.
6.4.4 The What is button
To learn more about room combine stations, click the button marked “What is a Room Combine
Station”.
6.4.5 Panel/Wall Sensor Selector
At the bottom of the room combine station screen are two selection buttons: panel and sensors. If
your design uses a room combine panel, make sure the “panel” check box is checked. If instead you
are using wall sensors to directly sense the up/down state of walls, check that selection. If panel is
selected you may then choose the “mirror” option which creates a parallel panel for control from
dual locations. This second panel may be chosen to have Comet 8(s) only to provide external triggers
to Crestron or AMX style controllers. If “Wall sensor” is selected, you may select the polarity of the
sensor by double-clicking on the “polarity” control.
MARC User Manual — MARC Auto Design Wizard
43
MARC User Manual — MARC Auto Design Wizard
6.5 Program Sources
This screen allows you to specify the number of program sources your design requires. A program
source is an audio source that is available to all audio outputs in the design. Usually program sources
are background music.
Use direct text entry or the up/down arrows to set the number of program sources.
6.5.1 Naming Program Sources
To change the name of a program source, click on the name to be changed, type the new name and
press Enter.
6.5.2 Adding/Deleting Program Sources
To add a program source, click the “Add Source” button. A new program source with a default name
will appear. Change its name as desired. To delete a program source, select the source by clicking on
it, the click the “Remove Source” button.
44
MARC User Manual — MARC Auto Design Wizard
MARC User Manual — MARC Auto Design Wizard
6.6 Room Details
The next screen is an instructional screen for Room details. After you have read and understood it,
click either “Room Details Templates” or “Individual Room Details”. If a number of rooms in your
design have similar room details, click the “Room Details Template” button. Fill out the template
with the details for your design.
If your design has little similarity among room details, then go directly to “Individual Room Details”
without using the template feature.
Shown below is the Room Details screen. This screen is the same whether you get to it from the
Template or Individual button.
6.6.1 Naming the room
Click on the Room name text box and enter the name of the room. Note that this name is different
than the name of the room group. Think of this naming like the Corvette. It is a Chevrolet called a
Corvette. Similarly, you can have a room group called Great Lakes and a room called the Michigan
Room. This screen is the place to name the individual room.
6.6.2 Mono/Stereo
This selection box determines whether this room will have stereo or monaural audio routed to it.
Click on the desired selection.
MARC User Manual — MARC Auto Design Wizard
45
MARC User Manual — MARC Auto Design Wizard
Auto Design Wizard cont.
6.6.3 Local Sources.
A local source is an audio source that originates from the room itself, such as a microphone. When
an audio source is specified as a local source, it is unavailable to other rooms. While it is possible to
change a local source to a program source you should decide carefully in advance which sources will
be local. Usually, local sources are the microphone and line jacks in the room.
6.6.3.1 Number of Local Sources.
Each room can have 0, 1 or 2 local sources. Click the appropriate selection button for your room.
6.6.3.2 Characteristics of Local Sources.
After you have selected the number of local sources for the room, the correct number of name boxes
will be available on this screen. Type in the names of the sources you want.
Next to each name box is a selection for mono/stereo of each local source. Select the appropriate
choice.
6.6.4 Default Sources.
A default source is an audio source that is turned on to a given room whenever a wall is moved.
This provides audio to rooms, including rooms that do not contain a Comet 4 for selecting audio
sources. The level of the default source is determined by the setting of the lowest Comet Tail among
each of the rooms that this room is combined with. Each room can have up to two default sources. If
a room has two default sources, the two sources will be mixed. Select a source from the pick list
provided. The list contains all program and local sources, any of which can be a default source for
this room.
46
MARC User Manual — MARC Auto Design Wizard
MARC User Manual — MARC Auto Design Wizard
6.7 Paging Sources
MARC supports two types of paging sources: normal and emergency. They differ only in priority
level. A norma page ducks (reduces in volume) all program sources during the normal page to make
the page more audible. The emergency page mutes all other audio sources – including normal pages
– for maximum audibility. By clicking in their respective check boxes, you can include/exclude
either or both audio types depending on your design requirements.
6.7.1 Naming Paging Sources
To name or rename a paging source, click on the name to be changed, type the new name and press
Enter.
MARC User Manual — MARC Auto Design Wizard
47
MARC User Manual — MARC Auto Design Wizard
Auto Design Wizard cont.
6.8 The Room Control Station screen
You will see the Room Control Instruction screen. After you have read and understood it, click on
either the “Room Controls Template” button or the “Individual Room Controls” button.
Both paths lead to the same screen as described below.
If a number of rooms in your design have similar room control station, click the “Room Control
Template” button. Fill out the template with the details for your design. Now click the “Individual
Room Controls” button on the template screen. You will now step through each room individually
where you can alter the controls for rooms that do not exactly match the template.
If your design has little similarity among room control stations, then go directly to “Individual Room
Details” without using the template feature.
The room control statio defines what controls are available to the user in each room of a room group.
Each room can have different controls if desired. An individual room control screen is shown below.
6.8.1 Adding/Deleting remotes
To add a remote to the room control station, use the “Add Comet 4” or “Add Comet Tail” buttons.
To delete a remote, highlight the remote by clicking on it, then click the “Remove Remote” button.
48
MARC User Manual — MARC Auto Design Wizard
MARC User Manual — MARC Auto Design Wizard
Auto Design Wizard cont.
6.8.2 Remote Viewing Options
The remotes in a station can be viewed in two ways: full or icon. These ways differ in the size each
remote is displayed. In a station with a large number of remotes, you may wish to use icon view so
that all the remotes are visible.
6.8.3 Unassigned view
When you select the “unassigned” viewing option., the window splits into two panes. The right pane
shows the physical remotes in the system that have not yet been programmed. The left pane will
show the virtual remotes that you have programmed in your design. Both full and icon view will
work in unassigned view. You will wish to use unassigned view option when transferring programming to your physical remotes.
6.8.4 Other Room Control screen features
The button “What is a room control station” explains the details of a room control station. The
forward and back buttons allow you to maneuver through the design wizard. The print button generates a report in Microsoft® Word. The communication icon reflects the state of communication
between the matrix and the control PC. The screen shot button sends the screen to your local printer.
MARC User Manual — MARC Auto Design Wizard
49
MARC User Manual — MARC Auto Design Wizard
6.9 DC Control Screen
The DC control screen displays the current configuration of paging inputs and destinations on the
DB-25 connector on the rear panel of the MARC. The DC input pins 1-8 can be configured to trigger
pages into arbitrary destinations, and the DC output pins can be configured to drive external devices
(LEDs, relays, logic etc.).
6.9.1 Number and DB-25 pin columns
There are eight page trigger inputs numbered 1-8, and eight output indicators numbered 1-8. Each
trigger and each indicator is wired to a specific pin on the DB-25 connector. This pin is shown in the
DB-25 pin column.
6.9.2 Page Source columns
The page source column allows the selection of any or none of the two paging sources. A pick list
containing “none”, “normal page”, or “emergency page” appears when you doubleclick the page
source column.
6.9.3 Page Destination Columns
The page destination column routes the page to any or all rooms in the design. If rooms are combined that have a page routed to them, they will both receive the page routed to either.
6.9.4 Page Trigger State column
If your PC is connected to a MARC matrix mixer, you can simulate a trigger closure by doubleclicking on the trigger’s state column. This acts exactly as if you had pressed a contact closure on
that trigger pin. You can thereby simulate a trigger activation even before the contact closure hardware is in place.
6.9.5 Indicator State Table
If your PC is connected to a MARC matrix mixer, you can activate an output indictor by doubleclicking on that indicator’s state column. This enables you to test DB-25 connecter to external
devices wiring .
50
MARC User Manual — MARC Auto Design Wizard
MARC User Manual — MARC Auto Design Wizard
6.10 Finish the Auto Design Wizard
You have finished the MARC auto-design wizard. You are prompted for a name for your project.
The default name is the name you gave the design in its first screen. After you have saved the project
to file, you are given the choice of returning to the main MARC menu, checking the sales report
generated by the design, advancing to the wiring report, or running the hardware installation wizard.
Click on the button of your choice.
MARC User Manual — MARC Auto Design Wizard
51
MARC User Manual — MARC Auto Design Wizard
6.12 Station Explanations
A station is a logical grouping of Comet remotes [Comet 4(s), Comet Tails and/or Comet 8(s)]
which control the routing and volume of audio inputs into output zones. There can be up to 32
remotes in a single station and up to 64 stations in a single system. There is however a maximum
limit of 64 remotes in a system. There are two types of stations in a MARC design: room combine, and
room control as shown below.
6.12.1 Room Combine Station
The room combine station has a single function. It allows and reports changes in the status of wall in
a room group. To prevent tampering, the room combine station is located in a secure control rack.
Intelix recommends the use of the Intelix Comet 8 ReO device as the interface in a room combine
station, but other interface devices such as Crestron or AMX touch panels are supported.
A Comet 8 in a room combine station will have a face plate engraved with the topology (layout) of
the room group being combined with a lighted push button for each moveable wall. A lit button
indicates that a wall is in place, an unlit button indicates that the wall has been removed. The MARC
matrix polls the Comet 8 steadily and uses its responses to update its internal wall list. The matrix
uses this list to program the Reo remotes in each rooms room control stations. When walls are
removed creating new rooms, the audio control remotes mirror each other so that the audio in the
new room(s) can be control correctly.
Each Comet 8 can handle a single room group; each room group requires its own room combine
station and associated face plate.
Comet 8s and touch panels can be combined in a single room combine station, but care must be
taken to keep the two devices in synchronization.
6.12.2 Room Control Station
The MARC room control station is a collection of ReO remote devices which provide user control of
audio sources and volume levels. Typically a room’s station contains Comet-4s for source selection
and Comet Tails for source volume. Each remote button has a corresponding indicator LED.
A room control station can contain up to 32 remotes. This allows for the selection from a large
number of audio sources.
If a Room Combine system includes default routes or local sources they too can be controlled with
remotes in the room control station.
Room control stations are automatically altered when walls are moved in the room combine system.
The matrix learns of these wall changes from the room combine station as explained above. It then
examines the topology to determine what room control stations are involved in the change. If two
rooms are combined that both had room control stations, those two stations will now both control the
audio into the combined rooms. They will automatically stay in synchronization; e.g. they will mirror
each other.
52
MARC User Manual — MARC Auto Design Wizard
MARC User Manual — MARC Hardware Installation Wizard
7.0 The Hardware Installation Wizard
7.1 Hardware Wizard Introduction
The Hardware Wizard is an integral part of the MARC Windows design software. There are two
principle uses of the wizard:
1)writing a new .mrc file to the MARC matrix mixer.
2)reading an existing .mrc file from the MARC matrix mixer for examination or modification.
7.1.1 Wizard Outline
The Hardware Wizard will consist of six major divisions:
1) Read – Write selection
2) Audio Wiring Test
3) Audio Path Test
4) Remote Discovery Setup
5) Remote Discovery Process
6) Remote Assignment
7) DC Control
7.1.2 Accessing the Install Wizard
1) For users of the auto-designer, the button labelled “Hardware Installation” on the popup at the end
of the auto-design Wizard will start the Hardware Install Wizard.
2) For other users there is a “Hardware Installation Wizard” item under the Installation menu (Main > Installation -> Installation Wizard).
7.1.3 Maneuvering through the Wizard
To make your way through the Installation Wizard use the “Forward” and “Back” buttons. At
any time you can exit the Wizard with the “Cancel” button. If you decide you have made a
mistake, or forgot an instruction on a previous screen, you can move to that screen and back
again using “Forward” and “Back”.
MARC User Manual — MARC Hardware Installation Wizard
53
MARC User Manual — MARC Hardware Installation Wizard
Hardware Installation Wizard cont.
7.1.4 Introductory screen
The wizard’s first screen is informational only. I explains the overall intent of the wizard. When you
have read and understood it, click the “Forward” button.
7.2. The Hardware Wizard Start screen
The next screen of the Hardware Wizard functions as a data select screen. You must know how you
will use the Wizard:
If you need to open an existing .mrc file, click the “Open a file for installation” button.
If you are writing a new .MARC file from the auto-design sequence to the MARC matrix, you will
press the “Write data to MARC device” button.
54
MARC User Manual — MARC Hardware Installation Wizard
MARC User Manual — MARC Hardware Installation Wizard
7.3 Audio Wiring Test
This screen requires you to view the audio sources and outputs in your design, so that you can verify
that they match the physical wiring to the matrix. Below is the wizard Audio Wiring Test Screen.
Below is the Audio Sources and Outputs screen. All audio sources and outputs are represented on
this screen.
MARC User Manual — MARC Hardware Installation Wizard
55
MARC User Manual — MARC Hardware Installation Wizard
Hardware Installation Wizard cont.
7.4 Audio Path Test
The Audio Path screen lists instructions to test all audio wiring. Follow the instructions on the
screen. Part of these instructions is to open the live crosspoint screen; that screen is shown below the
instructional screen. When you have completed these instructions, all audio wiring, sources and
outputs will have been tested.
Audio Path Test screen. Follow
these instructions to test audio paths.
The Live Crosspoint screen.
56
MARC User Manual — MARC Hardware Installation Wizard
MARC User Manual — MARC Hardware Installation Wizard
Hardware Installation Wizard cont.
7.5 Remote Discovery Setup Screen
The next five screens implement the process of discovering and programming the ReO remote
devices in your system. The first three screens are primarily informational. They contain instructions
for the Discovery process, and the first provides a button by which to obtain the remote discovery list
as shown below. Intelix recommends that you use the “Print” button to print the remote discovery
list to assist you in the discovery process to come.
This screen is instructional and shows the first steps in discovering system remotes. Follow all the
steps to the letter to simplify the later stages of the discovery process.
MARC User Manual — MARC Hardware Installation Wizard
57
MARC User Manual — MARC Hardware Installation Wizard
Hardware Installation Wizard cont.
7.6 The Remote Discovery Process
This screen gives further directions that allow you to establish communication between the matrix
and the remotes.
7.7 Unassigned Remote Screen
This screen shows all physical remotes that have been discovered by the system. The screen below
shows the Comet 8 and one Comet Tail. If other remotes are present, they can be viewed either by
scrolling to the right or clicking the “icon” view button. In following steps the physical remotes will
be assigned to your programmed virtual remotes.
58
MARC User Manual — MARC Hardware Installation Wizard
MARC User Manual — MARC Hardware Installation Wizard
7.8 Room Combine Station
The screen below demonstrates the assignment of a Comet 8 remote to the room combine panel. The
Comet 8 (visible at the right of the screen is dragged and dropped onto the button on the panel. This
causes the Comet 8 to be automatically configured for the panel onto which it was dropped.
7.9 Unassigned Remote Screen
This is an updated version of the screen shown in section 7.7. The Comet 8 is now gone from this
screen since it was assigned in section 7.8. Remaining unassigned remotes are Comet Tails and
Comet 4s which will be assigned to room control stations in following steps.
MARC User Manual — MARC Hardware Installation Wizard
59
MARC User Manual — MARC Hardware Installation Wizard
7.10 Room Control Stations
This screen shows a room control station consisting of a single Comet Tail and a Comet 4. The two
physical remotes in the right pane will be dragged and dropped onto the two virtual remotes in the
left pane. The cursor will indicate as you drag a remote where you may drop it. When you drop a
remote in an appropriate spot, a window will appear allowing you the choice of how to name the
remote. This window is shown at the bottom of this page.
As you proceed through the wizard, you will see this screen repeated for each room control station in
the design. For each room, drag and drop the physical remotes onto the virtual remotes to program
them with your design.
7.11 The remote naming window
This window appears each time you drop a physical remote onto a virtual one. Your choices for
naming the remote are:
1) retain the name assigned to the virtual remote (the default)
2) retain the name assigned to the physical remote.
3) Give the remote a new name (type the new name in the text box and click OK)
60
MARC User Manual — MARC Hardware Installation Wizard
MARC User Manual — MARC Hardware Installation Wizard
Hardware Installation Wizard cont.
7.12 DC Control
The next screen is an instructional one to explain the configuration of DC control functions. After
you have read and understood it, click on the “Forward” button. You will see the DC control screen
shown at the bottom. DC control is the final step in the Hardware Installation Wizard.
The DC Control Instructional Screen
The DC Control Screen
7.12.1 Page Trigger State column
If your PC is connected to a MARC matrix mixer, you can simulate a trigger closure by doubleclicking on the trigger’s state column. This acts exactly as if you had pressed a contact closure on
that trigger pin. If you are using an external device to trigger pages via the DB-25 connector, you can
test all paging functions before your triggering device is connected. Simply doubleclick the state
column and verify that the corresponding page is triggered.
7.12.2 Indicator State column
If your PC is connected to a MARC matrix mixer, you can activate an output indictor by doubleclicking on that indicator’s state column. If your design has external equipment with indicators; i.e. a
touch panel to trigger pages that has page indicator LEDs. You can test the LED connections. Simply
doubleclick on the Indicator state column and verify that the corresponsing LED toggles.
MARC User Manual — MARC Hardware Installation Wizard
61
MARC User Manual — ReO Bus Modes
8.0 ReO Bus Modes
8.1 Bus Modes
There are two modes in which the MARC system can operate, Run mode and Discovery mode.
8.2 Changing bus modes
To change between Run and Discovery modes:
1) go to the Room Combine station (main -> room groups)
2) doubleclick on any room group; the room combine station for that group appears.
3) click the check box labelled “unassigned.” The radio buttons labelled “Bus Mode” will
appear. Select either Run or Discovery mode as required.
8.3 Run Mode
Run mode allows the system to function normally, i.e. it polls each remote in the system on a roundrobin basis and processes the remote commands. This is the mode in which the system must
be left after programming.
Run mode also allows system alteration to a limited degree. If a single remote control is added to the
system while it is in Run mode, that remote will be recognized and correctly added to the system. If
multiple remotes are to be added at one time, the system should be put in Discovery mode as explained below.
8.4 Discovery Mode
Discovery mode allows the addition of multiple ReO remotes at a time, as when a new system is first
programmed. Each remote so added must be exercised in a known sequence to allow them to be
correctly discovered by the MARC matrix.
Discovery mode is normally used only during initial setup and programming of a system.
In the discovery process, the MARC will be told to discover and report all ReO remote devices
connected to it. Remotes are discovered in the order they are exercised (a knob turn or button press),
so it is critical to have an ordered list in which you will exercise them. As each remote is discovered
it is displayed on the Unassigned Remotes screen. They can then be assigned to the stations in your
design by clicking and dragging on screen. After discovery and assignment are complete, you will
put the MARC in Run mode to test operation of the system.
62
MARC User Manual — ReO Bus Modes
MARC User Manual — ReO Bus Modes
8.4.1 Using Discovery Mode
To use discovery mode take the following steps:
1) Select Discovery Mode as explained in section 8.2.
2) Print the ordered remote list from the menu item :
( main -> Reports -> Remote Discovery List ->Print).
3) Using the list go to each physical remote and take these steps:
a) Verify that the remote’s LED is in double blink mode (see Blink Code list in section 8.3.2).
b) Locate the remote on your ordered list of remotes. The list should contain a virtual remote
with a name that corresponds to the physical remote’s location. Mark this remote in the
visitation order column, so that you can determine the order you exercised the remotes.
c) Exercise the remote ( press a button or turn a knob).
d) Verify that the remote’s LED goes to steady off, indicating that the remote has been recognized.
4) Repeat steps 3a-3d for all remotes. After all remotes have been exercised and have appeared as
“responding” on the right pane of the room control station screen.
5) Return to the PC. You should now name each remote on the unassigned remote screen with an
indicator of its physical location, e.g. “west side of Room A”.
The process of programming the physical remotes consists of dragging the image of the physical
remote from the Unassigned remote screen and dropping it on the corresponding
virtual remote in the station screen.
If the names of the physical and virtual remotes are a good match; i.e. are easy to match with one
another, this process can go very quickly. If the names do not correspond well, you may need to do
some searching to determine which ones correspond. The Intelix software provides a number of
diagnostic tools to simplify this process.
8.4.2 Why Naming and Discovery Sequence are Critical
Remotes are discovered by the MARC in the order that they are exercised. When remotes are first
discovered by an MARC matrix, the remotes are undifferentiated; that is the matrix cannot tell the
difference between one Comet 4 and another. In order for the installer to assign physical remotes to
correct virtual remotes in the design program on the PC, there must be a way to differentiate the
remotes.
As you visits rooms and stations, the remotes you exercises are recognized and appear on the PC
screen in the order visited. They will appear in the Unassigned Remotes window in order of discovery, left to right and top to bottom.
When you return to the PC to assign virtual remotes to the newly recognized physical remotes, you
must be able to distinguish among the remotes on the screen.
There are two things you should do to make this process simple. First carry the Remote Installer’s
list (generated from Reports -> Stations -> List -> Print). Every time you exercise a remote, mark on
the list its physical location and its sequence number; that is for the first remote visited, mark it as
sequence #1, and an appropriate name; e.g. “west side of Ballroom”.
MARC User Manual — ReO Bus Modes
63
MARC User Manual — ReO Bus Modes
The second thing to do is to make sure that you have given good descriptive names to both the
physical remote ( like “west side of ballroom” above) and to the virtual remotes in the design program on the PC. Ideally, the virtual names should be the same as the physical ones. Names of virtual
remotes can be changed at any time, right up to Discovery. Spend some time now to ensure that you
have descriptive, useful names for all remotes.
8.5 Non Responding Remotes
If any remotes in the Unassigned Remotes window have a status indicator reading “Not responding”
they have lost communication since you exercised them and should be repaired before proceeding.
There are two main causes for the problem: power and ReO bus. Pull and replug the power plug. The
remote’s LED should go to single blink, then double blink. This indicates that communication has
been restored. If the remote still does not respond, there is a problem in the ReO bus; either an
intermittent problem in the ReO connector at that remote, or noise and reflections on the bus.
8.5.1 Searching for a lost remote
If you have a physical remote in the unassigned remotes screen that you cannot match with a virtual
remote on the PC screen, double click on an LED of the mystery remote in the unassigned remote
screen. This will cause that LED to blink at about .5 Hz both on the PC screen and on the remote in
the real world. Now leave the PC and search for a remote with its LED blinking at that rate. When
you find it note its location, return to the PC and rename it in the Unassigned remote screen with a
name that makes its location obvious. You can now assign it to its corresponding virtual remote.
8.5.2 Retracting a mistaken drag and drop
If you accidentally drag and drop a physical remote to a virtual one, and realize that you have
dropped it on the wrong remote, you can undo the error, simply by dragging and dropping the remote
back to the unassigned remote screen. It is now unprogrammed again and ready to be dropped on the
correct virtual remote.
8.6 Testing remotes with a two person team
If there are two people available to test the system, it is efficient to do as follows: On the PC bring up
the station to be tested (Paging station or program station screen) send the second person to the
physical remote, and have him press the buttons and turn the knob (if any). The actions at the physical remote will appear on the PC screen, verifying that the remote is working correctly.
8.7 Remote Blink Codes
The LEDs on remotes have 5 main blink codes that assist you with determining the state of a remote
(these codes appear only on the physical remotes, not on the PC screen):
a) All LEDs off: either not powered or normal run state; if new system check power supply
to remote.
b) Single blink: powered but no communication. ReO data bus problem or not yet exercised.
If new system, there is a problem in the ReO bus to that remote.
c) Double blink: powered up and received a message from the Matrix.
d) Triple blink: This state means that a message has been lost between the Matrix and the
remote. ReO bus problem. Check for noise or reflection conditions on the bus
(see Appendix K).
e) Steady on: custom programmed state, unknown meaning.
Remember that for correct operation of the system you must go to Run mode after all
modifications are complete.
64
MARC User Manual — ReO Bus Modes
MARC User Manual — MARC Windows Reference
9.0 MARC Windows® Reference
This section is organized by menu items. For each item on the main MARC menu there is a section
detailing the uses of the selections under that item. The main menu is at the top of the MARC main
screen as shown below. The major items are:
1) File
2) Configuration
3) Reports
4) Installation
4) Diagnostics
5) Help
MARC User Manual — MARC Windows Reference
65
MARC User Manual — MARC Windows Reference
9.1 The File Menu
9.1.1 The New Item
Selecting the New item from the file menu causes a prompt for the path and name of the new file to
be created. After you have specified a name and path, the software starts the auto-design process,
which is a series of screens presented in sequence to guide you through the design process. You are
informed that auto-design is about to begin. If you click OK, the auto-design process begins. During
auto-design the new file is automatically saved after every window in the sequence. If you click
Cancel you are returned to the MARC main screen.
9.1.2 The Open Item
Selecting the Open item from the file menu causes the software to prompt you for the path and name
of the file you wish to open. After you have specified the path and filename, the software opens that
file, showing progress as it does so. On a fast machine or a small file, this progress indicator may be
barely visible.
9.1.3 The Save Item
Choosing the Save item from the File menu causes the software to save the currently open file to
disk. All changes since the last save are updated.
9.1.4 The Save As... Item
Selecting Save as from the File menu allows the user to create new file based on existing ones. If a
new program requires only a single change to an existing file, open that file with the Open item,
make the change and select the Save As.. Item. You will be prompted for a path and filename. The
new file will then be saved under the new name and the original file unchanged under the old
filename.
9.1.5 The Web Update Item
Selecting the Web Update Item instructs you how to go to the Intelix web site, where the newest versions of
Intelix software can be downloaded. Read the instructions on the screen to reach the download site.
9.1.6 The Exit Item
Selecting the Exit item from the file menu closes the MARC software and returns you to the desktop.
If you have made changes to a file, the program will ask you if you wish to save the changes.
66
MARC User Manual — MARC Windows Reference
MARC User Manual — MARC Windows Reference
9.2 The Configuration Menu
9.2.1 Room Groups
This screen shot shows the room groups
screen, with default names and topologies.
This chart demonstrates how the design screens
are accessed from the room groups screen. Note
that each room group has its own room combine
station and that each room combine station
leads to an individual control station and details
for each room in the group.
MARC User Manual — MARC Windows Reference
67
MARC User Manual — MARC Windows Reference
9.2.1.1 Naming Room Groups
In the text box below each room group icon, you can click and enter the desired name for that group.
The names shown are the default names “Room Group 1” and Room “Group 2.”
9.2.1.2 Adding/Deleting Room Groups
To add a room group, click on the “Add Group” button; a default 2 room group will appear. To delete
a room group, select the group to be deleted (it highlights) and click the “Delete Group” button.
9.2.1.3 Changing Topology
To change the topology for a group, click on the group (it highlights) then click the “Change Topology” button. You will see the screen shown below. Select the topology you want and click OK. You
will be returned to the room group screen and the selected topology will be visible. Repeat for each
room group to be changed. If your combination of room groups and topologies exceed 16 rooms you
will be warned to reduce your design.
68
MARC User Manual — MARC Windows Reference
MARC User Manual — MARC Windows Reference
9.2.1.4 The Room Combine Screen
Each room group you have specified will have an associated room combine station. To reach the
room combine station screen for a room group, doubleclick the room group. The room combine
station for that group appears. Clicking on the wall switches will toggle their state. These switches
are “live”. This means that you will see the switch’s LED go on/off, and the matrix will be notified
that the wall has been erected/lowered. This has exactly the same effect as actually pressing the
button on the room combine panel.
9.2.1.4.1 Wall/Panel Selector
At the bottom of the room combine station screen are two selection buttons: panel and sensors. If
your design uses a room combine panel, make sure the “panel” check box is checked. If instead you
are using wall sensors to directly sense the up/down state of walls, check that selection. If panel is
selected you may then choose the “mirror” option which creates a parallel panel for control from
dual locations. This second panel may be chosen to have Comet 8(s) only to provide external triggers
to Crestron or AMX style controllers. If “Wall sensor” is selected, you may select the polarity of the
sensor by double-clicking on the “polarity control.
If your system is “out of sync” because you designed with this check box incorrectly set. First read the
MARC system, and save it as a file. Now open that file and check the correct check box for panel/wall
sensor. Cycle the power on the remote panel. Now reload the modified file back to the MARC system. The
system should now be in sync again.
9.2.1.4.2 Room Numbers and Wall Numbers
In the MARC software, each room and each wall in a room group is assigned a number. To use
certain control messages you will need to know the room/wall number. These numbers are displayed
on the room combine screen. The room number appears in the lower left corner of each room. The
wall number appears as a white on black number on each wall. See the picture above for an example
— the rooms are numbered 1 and 2, while the wall is numbered 1.
MARC User Manual — MARC Windows Reference
69
MARC User Manual — MARC Windows Reference
9.2.1.4.3 The Room Control Screen
Each room in a group will have an associated room control station. This station contains the remotes
used to control audio in the room.
To reach the room control station screen for a room from the room combine screen, click the
icon in the room combine screen. The room control station for that group appears. A typical default
room control station is shown below.
9.2.1.4.3.1 Adding/Deleting Remotes
To add a remote to a room control station, click either the “Add Comet 4” or the “Add Comet Tail”
button. The remote will be added to the station. To delete a remote, select the remote to be deleted (it
highlights), then click the “Remove Remote” button. The remote disappears.
9.2.1.4.3.2 Naming Remotes
To name a remote, click on the box labelled “Click Here to Change Name” and type the new name.
70
MARC User Manual — MARC Windows Reference
MARC User Manual — MARC Windows Reference
9.2.1.4.3.3 View Options
There are two separate ways to view the remotes in the room control station: full and icon. They vary
only in the displayed size of the remotes. Normally you should use full view, but when working with
a station containing a large number of remotes, it may be more convenient to use icon view.
The “Unassigned” selection in the view panel causes the window to split into two panes. The left
pane shows the virtual remotes in the station. The right pane shows all unassigned remotes that have
been discovered in the system. You can assigned the program in the virtual remotes to the unassigned
remotes, by dragging and dropping from the right pane to the left. After you drop an unassigned
remote on a virtual remote, the unassigned remote is immediately programmed with the characteristics of the virtual remote. If you have made a drag and drop error and wish to undo the operation,
simply drag the remote back from the left pane to the right pane, and the remote’s programming is
undone.
This screen shot shows the room control station with the “unassigned” view selection active. Note
that each pane of the window has its own scroll bars, and that full or icon views can be chosen
(shown is full). Programming is done by clicking and dragging a physical remote from the right pane
and dropping it on the correct virtual remote in the left pane.
MARC User Manual — MARC Windows Reference
71
MARC User Manual — MARC Windows Reference
9.2.1.4.4 Room Details
On the room combine station screen (sec. 9.2.1.4) there is a “details” button for each room. This
button displays the screen shown below.
9.2.1.4.4.1 Room Name
The room can have its room name set or changed on this screen. If you have a custom room combine
station panel the room names on this screen should match those on the panel.
9.2.1.4.4.2 Mono/Stereo
This item defines whether the audio going to this room is monaural or stereo. Click the desired radio
button for each room.
9.2.1.4.4.3 Local Sources
A local source is an audio source that originates from this room. A local source is not made available
to other rooms in the group. Typical local sources are microphones in the room or a background
music source that is not used in any other room. A room can have from 0 to two local sources. Click
the radio button corresponding to the number of local sources this room will have. Local sources can
be mono/stereo and should be named in this screen. All rooms are defaulted to having one local
source; to remove it click the 0 radio button selection.
9.2.1.4.4.4 Default Sources
A default source is an audio source that is turned on to a given room whenever a wall is moved.
This provides audio to rooms, including rooms that do not contain a Comet 4 for selecting audio
sources or Comet Tails for adjusting audio volume.. The level of the default source is determined by
the setting of the lowest Comet Tail among each of the rooms that this room is combined with.
Each room can have up to two default sources. If a room has two default sources, the two sources
will be mixed. Select a source from the pick list provided. The list contains all program and local
sources, any of which can be a default source for this room.
72
MARC User Manual — MARC Windows Reference
MARC User Manual — MARC Windows Reference
9.2.2 Audio Sources
The audio sources screen allows you to name and define all audio sources in the system. The Audio
Source screen is shown below. All rooms are assigned one default source (removable in the details
screen sec. 9.2.1.4.2.3)
9.2.2.1 Naming Audio Sources
All audio sources can be named on this screen. Rather than accept the default names, we recommend
that you add descriptive names in your design. To change the name click on the name, type the new
name and press “Enter”.
9.2.2.2 Audio Type
Each audio source has an audio type each with their own color code. There are three audio types:
page (red), local (purple) and program (blue). Each source has its type listed in the “type” column.
Audio types cannot be altered.
9.2.2.3 Mono/Stereo Selection
An audio source can be either mono or stereo. Click on the Mono/Stereo column and select the desired
setting. A stereo source has its Left/right and stereo partners automatically assigned and cannot be altered.
9.2.2.4 Volume Column
This column sets the maximum possible level of an audio input. This value controls the virtual VCA on the
input, meaning that this setting effects the entire input row. A typical use for this control is to lower the level
of a particularly hot input across the whole matrix.
9.2.2.5 Pan Column
This column sets the maximum possible level of an audio input. This value controls the virtual VCA on the
input, meaning that this setting effects the entire input row. A typical use for this control is to lower the level
of a particularly hot input across the whole matrix.
9.2.2.4 Add/Remove Program
All available program sources are listed on the Audio Sources screen. Some may be listed as unused,
meaning that audio inputs are available to be used. To add a new program source, click the “Add
Program” button. A new program source will appear on the list. Enter a new name for the new
source. If you add a program source that cannot be accommodated by the existing matrix; e.g. adding
program source 9 to an 8 X 8 matrix, the software will increase the size of the matrix by adding
eight new inputs.
MARC User Manual — MARC Windows Reference
73
MARC User Manual — MARC Windows Reference
9.2.2.5 Adding/Deleting Mic/Line Cards
A mic/line card is an optional eight channel preamplifier card which can be added to your design if
low level signals are used as sources. To add a mic/line card, click on the “gain” column of the input
needing the card, then click the “Add Mic/Line” button. To remove a mic/line card, click on the gain
column for the input whose card is to be removed, then click the “Delete Mic/Line” button.
Note that mic/line cards must be added from the top down and removed from the bottom up (in
groups of eight). If the “Remove Mic/Line” will not become active it is because of this restriction.
9.2.2.6 Normal/Emergency Page
These check boxes allow you to include two kinds of paging in the MARC system. They differ in
priority only. The normal page ducks non-page audio sources during a page, while the emergency
page mutes all audio sources (including normal pages). The MARC comes defaulted to both page
types. To change the default click on the desired check boxes. The paging sources will automatically
be assigned to the appropriate DB-25 pins. These pin assignments cannot be changed.
7.2.2.7 The Pan Column
Each audio input has a pan control. Click on the pan column for that input and the pan control screen
appears. Click and move the slider to the desired level, the range is 1-255. This value determines the way
the input is sent to the outputs. For a mono input the control is a simple pan value with presets at left, center
and right as shown below left. For a stereo input the control is width which determines how the siides of the
input pair are distributed to the left and right side of a stereo output. The width control has presets at stereo,
center and reverse stereo, as shown below right.
74
MARC User Manual — MARC Windows Reference
MARC User Manual — MARC Windows Reference
9.2.3 Audio Outputs
The audio outputs screen is primarily informational; the only parameter that is alterable exclusively
from this screen is ducking.
9.2.3.1 Output Names
Output names (same as Room names) cannot be changed from this screen. To change names go to
the Room Details screen (see sec. 9.2.1.4.2) or the Room Name section of the Room Group screen
(see sec. 9.2.1.4.2). Any change to the room names on those screens will be reflected on the Audio
Output screen.
9.2.3.2 Ducking
Ducking is the lowering of background audio during pages. You can alter the amount of ducking on a
per room basis. To change duck amount, click on the ducking column for the output to change. Type
in the new value. The range of ducking is 0-100 per cent. A typical duck amount is 20 per cent.
9.2.3.3 Mono/Stereo
The mono/stereo parameter of a room cannot be changed on this screen. To change this parameter go
to the Room Details screen (see sec. 9.2.1.4.2) Any change to the room names on those screens will
be reflected on the Audio Output screen. Note that changing a room from mono to stereo will use an
extra audio output; the two outputs will be titled “Room L” and “Room R”.
9.2.3.4 L/R and Stereo Pairing
These two columns show which signals correspond to the left and right halves of stereo outputs.
Neither columns can be altered on this screen. These columns will be blank for mono outputs.
MARC User Manual — MARC Windows Reference
75
MARC User Manual — MARC Windows Reference
9.2.4 Maximum Audio Levels
This screen allows you to set the “full scale” volume of any audio crosspoint. This means that when
a user turns a Comet Tail volume control up all the way. They will be at the volume you define here.
This allows the contractor to avoid customers “blasting” audio accidently.
9.2.4.1 Setting Crosspoints
To set the maximum level of a crosspoint, click on the crosspoint. Now use the up/down arrows or
direct text entry to set the desired level. Double-clicking a crosspoint toggles it repeatedly between
100% and 0%; i.e. full off and full on. Note that 0% (off) is represented by a blank cell. This feature is
useful for testing and setup.
9.2.4.2 Changing Names
On this screen you are allowed to change the names of audio sources and audio outputs. To change a
name click on the name and enter the new name. This change ripples through all screens that display
the affected name.
9.2.4.3 Views
There are several options for viewing the crosspoint levels. They are selectable in the View radio
button frame.
76
MARC User Manual — MARC Windows Reference
MARC User Manual — MARC Windows Reference
9.2.5 Paging Ramp Times Screen
After the system is assembled, the remotes are programmed, and page and program levels set, there
are two items left to adjust before testing: duck amounts and ramp times. MARC implements autoducking, meaning that pages into a zone automatically duck (reduce) the volume of program material, so that the page can be more clearly heard. This section explains how to set the parameters
associated with ducking: duck amount (how much the program material is reduced during a page),
ramp up and ramp down times (the rates at which the program material is ducked), and page ramp
times. There are four parameters associated with ramp times:
1) Program source duck time. The amount of time the program material ramps
down when a page becomes active.
2) Program source return time. The time the program material takes to return to its
prepage level after a page.
3) Page source ramp up. The time for a page input to reach full paging volume.
4) Page source ramp down. The time a page input to return to zero volume after a page.
As shown below the screen allows entry of values for all four parameters. An interactive graph
shows the magnitude and relationship among the four parameters. The parameters are limited to
values between 0 and 30 seconds.
The “Set Duck Amount” button allows you to change the amount of ducking for each output from
this screen. Duck amounts can also be set in the Audio Output screen.
9.2.5.1 Changing the paging ramp time parameters
1) Either click and hold down the up/down arrows on the spin boxes, or make direct text
entry into the boxes. If you use the arrow method, you can watch the graph interactively
change to the new values.
2) If you wish to alter ducking amounts, click the “duck amount” button, and enter the new
values in the resulting screen.
MARC User Manual — MARC Windows Reference
77
MARC User Manual — MARC Windows Reference
9.2.6 DC Control
This screen provides information and debugging capabilities for the DB-25 connector on the rear
panel of the MARC chassis.
9.2.6.1 Number and DB-25 pin columns
There are eight page trigger inputs numbered 1-8, and eight output indicators numbered 1-8. Each
trigger and each indicator is wired to a specific pin on the DB-25 connector. This pin is shown in the
DB-25 pin column.
9.2.6.2 Page Source columns
The page source column allows the selection of any or none of the two paging sources. A pick list
containing “none”, “normal page”, or “emergency page” appears when you doubleclick the page
source column.
9.2.6.3 Page Destination Columns
As shown in the graphic above, the page destination column offers a pick list that routes the page to
any or all rooms in the design. If rooms are combined that have a page routed to them, they will both
receive the page routed to either.
9.2.6.4 Page Trigger State column
If your PC is connected to a MARC matrix mixer, you can simulate a trigger closure by doubleclicking on the trigger’s state column. This acts exactly as if you had pressed a contact closure on
that trigger pin. You can thereby simulate a trigger activation even before the contact closure hardware is in place.
9.2.6.5 Indicator State column
If your PC is connected to a MARC matrix mixer, you can activate an output indictor by doubleclicking on that indicator’s state column. This enables you to test DB-25 connector to external
devices wiring .
78
MARC User Manual — MARC Windows Reference
MARC User Manual — MARC Windows Reference
9.3 Report Menu
9.3.1 Sales Order
This form provides a convenient way to order an MARC system and related equipment from Intelix.
The “To” field is automatically filled out to route your order to the proper Intelix department. After
the first time you fill out the "Bill to" field, it will be filled out automatically. The “Ship To” field
defaults to the same as the “Bill To” field.
Note: Changes to the “Bill To” field are stored in your computer and will be used for subsequent
files. The “Ship To” field affects only the current file.
The “Part Number” fields will be filled in with the components required for the design you have
completed.
You need fill out only the Purchase Order (PO) number at the top of the form, the ship to address (if
different from the default). Then print the form and FAX directly to Intelix.
MARC User Manual — MARC Windows Reference
79
MARC User Manual — MARC Windows Reference
9.3.2 Wiring Submenu
The wiring submenu allows you to examine and print wiring lists for all part of your design (sources,
outputs and DC control), either individually or all at once.
9.3.2.1 Audio Sources Wiring
This item prints the report showing all audio inputs with their names and attributes.
9.3.2.2 Audio Output Wiring
This item prints the report showing all audio outputs with their names and attributes.
9.3.2.3 DC Connector
This item prints a report showing all DC connector pin assignments including page sources and
destinations.
9.3.2.4 All Wiring Reports
This item prints all reports, including audio source wiring, audio output wiring, and DC connector
pinout.
9.3.4 Remote Discovery List
This item prints a list of all remotes in the system. A copy of this list is imperative when the remote
discovery process is begun. You will visit and exercise remotes in the order specified by this list.
9.3.5 All Reports
This item prints all reports in the report menu. This is a useful selection when doing final documentation for a design, since the entire design can be printed and filed for future needs.
80
MARC User Manual — MARC Windows Reference
MARC User Manual — MARC Windows Reference
9.4 Installation Menu
The installation menu allows access to screens used in installing and debugging the MARC system.
9.4.1 Upload/Download
This item brings up the screen below and allows uploading/downloading (to and from the MARC)
and resetting the matrix..
9.4.1.1 Read Data From MARC device
This item allows the user to load the currently open file with the data from an MARC hooked up to
the PC. For this option to work, the PC must have already established communication with the
MARC. After communication is established, the MARC will transfer all its programming to the PC.
The data will be stored in whatever file is open when the “MARC device to PC” command is issued.
This can be an existing file or a new one, as the user wishes. A typical use of upload is to modify an
existing MARC application. The user would transfer the file to the PC; make the modification, and
use “PC to MARC device” (described below) to send the new configuration back to the MARC.
MARC User Manual — MARC Windows Reference
81
MARC User Manual — MARC Windows Reference
9.4.1.2 Write Data To MARC Device
This item allows the user to transfer the current file on the PC to the MARC connected to the PC.
After establishing communication between the PC and the MARC, the PC will send the currently
open file to the MARC, which will store it in its local memory. After transfer, the MARC can be put
in discovery mode and configured to run the new program. A typical use of PC to MARC device is
to send a new design to the MARC.
9.4.2 Installation Wizard
The Installation Wizard is treated separately in section 7.0.
9.4.3 Password
The MARC system is provided with password control for user who will use the MARC Designer software
to control the system. The password function allows users to make live changes to audio, while preventing
them from altering names and audio types. This feature can be enabled/disabled by the installer.
9.4.3.1 Enabling/Disabling the Password
9.4.3.1.1 Enabling the Password
To enable password protection, click on the "Password Enabled" check box. Type the password (the
password is case sensitive). Press <Enter>. Now the entire program is available and password protection is disabled. To re-enable password protection, open the password screen and click the “Enable Password” check box. The program will tell you that the password is enabled.
9.4.3.1.2 Changing the Password
To change the password, Open the password screen (Main -> Installation -> Password), and follow these
steps:
1) Click the “Change Password” button.
2) Type the new password in the text field.
3) Click OK.
4) Check/uncheck “Enable password” as desired.
82
MARC User Manual — MARC Windows Reference
MARC User Manual — MARC Windows Reference
9.5 The Diagnostics Menu
Selecting the Diagnostic menu gives access to the informational and diagnostic function as shown below.
9.5.1 Are You There
A clock in the M-series software periodically (every three seconds) sends a message (Are You There) to
the matrix. This feature allows the software to continually verify the correct communication between the
software and the matrix hardware. When the correct Acknowledgment message (I Am Here) is received,
the software refreshes the communication OK icon in the lower left of the window. If the I Am Here message is not received, the software assumes a communication failure has occurred and displays the broken
link icon.
Normally, the Are You There item should remain active (checked). However when you are doing diagnostic
troubleshooting using the Test manager, you may find that the Are You There messages are filling up the
communication buffer. In this case, simply uncheck the Are You There item for as long as you use the
message buffer, then turn it back on.
MARC User Manual — MARC Windows Reference
83
MARC User Manual — MARC Windows Reference
9.5.2 RS232 Test Manager
The RS232 Test Manager (shown below) is a grouping of Designer Software functions useful in troubleshooting problems with the matrix hardware software or application. It contains all communication setup
control, and manual RS232 messaging capability.
9.5.2.1 Comm Port
The port you select from the comm port picklist must be present in your system and unused by any other
peripheral in your system. If you choose a nonexistent or in-use port, a warning will appear.
9.5.2.2 Use Escape and Checksum
If your controller allows it, using escape and checksum can minimize the error rate over your communication
link. If your controller does not allow the use of escape and checksum, uncheck this item.
9.5.2.3 Baud Rate
There are three available baud rates: 9600,19,200 and 38400. Choose whichever rate best suits your
system. The rate you choose must be matched by the DIP switches on the back of the M-series. See
section 3.1 for DIP switch details).
9.5.2.4 Open Comm Port
This button activates the communication port you have selected. To begin communication with the M-series
you must open the port. If your settings selections have been correct, the communication icon in the lower
left of the screen will change to OK; if the M-series does not respond the icon will show the broken link.
9.5.2.5 Close Comm Port
No settings can be altered while the communication port is open. If you need to change any settings to the
port, you must first close it. Click the “Close port” button, make the changes and click “Open port”. Be
sure to recheck the communication icon to ensure that communication is correctly established.
84
MARC User Manual — MARC Windows Reference
MARC User Manual — MARC Windows Reference
9.5.2.6 The Message Buffer
The lower part of the RS232 Test Manager comprises the RS232 Message Buffer and its controls. The
buffer displays the RS232 messages that are sent and recieved by the matrix. This function can be extremely
useful in creating and debugging applications for the Intelix matrix.
9.5.2.6.1 Clear Buffer
The “Clear Buffer” button deletes the contents of the RS232 message buffer window. The operation has
no effecton the operation of the matrix. Clearing the buffer becomes necessary when the messages of
interest are scrolled outside of the window’s range.
9.5.2.7 Transmit RS232 Message
The “Transmit RS232 Message” button causes the Designer Software to transmit the contents of the
message window out the currently selected communication port to the matrix. The message window requires the message format shown below.
Message Format:
first number: class number (one decimal number) followed by a space.
second number: message ID: (one decimal number) followed by a space.
third and subsequent numbers: message parameters (one decimal number each) each followed by a space.
Note: All numbers are decimal and must be delineated by spaces. Messages with their classes, IDs and
parameters are detailed in this manual.
Shown below is an example of a message typed into the message window ready to send by clicking the
Transmit RS232 Message button.
This example message represents Class 1, ID 9 Goto I/O Volume. The parameters are i/o flag = 0 (output)
i/o number = 2 and new volume = 255. When the Transmit RS232 Message button is preset this message will be sent to the matrix.
MARC User Manual — MARC Windows Reference
85
MARC User Manual — MARC Windows Reference
9.5.2.8 Communication Icons
All screens carry a communication icon in the lower left corner. The icon in the lower left corner will
indicate the current state of communication. There are three communication icons:
This icon indicates that the PC is not attempting to communicate with an MARC
matrix mixer. In this mode you can create new files and design systems for later
transfer to an MARC. In PC alone mode some functions may be disabled.
This icon indicates correct communication between the PC and the MARC. You
can transfer files, monitor the MARC or make live real time changes in this mode.
This icon indicates a communication failure. Common causes are incorrect communication port selected, incorrect baud rate, or cabling errors.
86
MARC User Manual — MARC Windows Reference
MARC User Manual — MARC Windows Reference
9.5.3 Live Crosspoints
The live crosspoint screen allows you to adjust the audio levels at individual crosspoints from your control
PC. Although most level control is typically done with the use of room control station ReO remote devices
by users, the live crosspoint screen is particularly useful in testing a finished installation. A typical live
crosspoint screen is shown below.
9.5.3.1 Changing crosspoint values
To change the value of a crosspoint, click on it. The use the up/down arrows or direct text entry to set
the desired level. Double-clicking on a crosspoint toggles its value between 0% and 100%; i.e. full
off to full on. This is useful during the system test phase.
9.5.3.2 Views
Several different ways to view the crosspoint levels are available as radio button choices in the View
frame.
9.5.3.2.1 Percent View
This view choice displays crosspoint values as a percent of full volume. The range is 0% (full off) to
100% (full on).
9.5.3.2.2 dB View
This view choice displays crosspoint values in decibels. The range is -100 dB (full off) to 0 dB (full
on).
9.5.3.2.3 Vertical/Horizontal Bars
These views offer a choice of vertical or horizontal graph representations. They have no numerical
relationships to the number values and are for reference purposes only.
9.5.3.2.4 Source Volume/Output Volume
You can choose whether or not to view the source/output level VCAs. The source column and the
output row display or disappear as you check/uncheck these boxes.
MARC User Manual — MARC Windows Reference
87
MARC User Manual — MARC Windows Reference
9.5.4 Device Information
The device information screen (Installation -> Device Information), shown below, presents information general to the MARC system including:
9.5.4.1 The name of the matrix
The matrix name is a text string of up to 32 characters. You can change thename by clicking on the
name, and entering the new name.
9.5.4.2 Device information
Displays the model number, hardware and software version numbers: not alterable by the user.
9.5.4.3 ReO Bus status
Shows the current status (present or absent) of the ReO bus and bus state (run or discovery ). and
version number. If the ReO bus is not present, the “ReO bus version” and “ReO bus State” fields are
grayed out.
9.5.4.4 Application Software
Any special application software present on the machine will be displayed in the “Special
Application” area.
9.5.4.5 Memory Reset
Pressing the “Reset” button leads the user to a screen allowing the erasing of the matrix’s
memory, or resetting the MARC device.
88
MARC User Manual — MARC Windows Reference
MARC User Manual — MARC Windows Reference
9.5.4.6 Internal Hardware Item
The “hardware configuration” button shows the user what audio crosspoint boards and
mic/line cards are present in the system. Each cell represents an 8 X 8 crosspoint card. Non-responding boards are shown in red, while responding board are shown in green. The window is scrollable to
show all areas of the potential 128 X 128 matrix.
9.5.4.6.1 Crosspoint Board status
This window appears when the user doubleclicks on a cell in the internal hardware screen. It displays
information about the crosspoint board at the address selected.
The information on the screen includes the addresses covered by the board, the hardware and software versions of the board (blank if the board is not responding), whether or not the board is responding, and the necessary DIP switch settings for the installation of a board at that address. The
addressing DIP switches will appear identical on adjacent cells, since a single 16 X 8 board covers
two sequential addresses.
Note that this screen appears whether the selected cell actually contains a board or not. If you select
a cell that has no board, it will say “Not Responding” in red letters (shown above). If the board exists
and is operating properly, the window will say “Responding” in green letters.
MARC User Manual — MARC Windows Reference
89
MARC User Manual — MARC Windows Reference
9.5.4.6.2 Mic/line status
This screen appears as a response to doubleclicking on the mic/line column of the internal hardware
screen. It shows input range, hardware and software versions (blank if board is not responding),
whether or not the board is responding, and the necessary DIP switch settings for the installation of a
mic/line board at that address.
9.5.5 Reset MARC Device Item
This button brings up the screen shown below. There are three choices from this screen: cancel, reset
with memory clear and reset without memory clear.
9.5.5.1 Cancel, do nothing
This takes no action. It is exactly as if you never called this screen.
9.5.5.2 Reset Matrix Mixer
This button causes the MARC matrix to reset its hardware but leaves the system program intact.
9.5.5.3 Reset Matrix Mixer and Clear Matrix Memory
This button erases all matrix memory and resets the matrix hardware. All system programming will
be lost. We highly recommend that you back up your system file before using this function, otherwise valuable time and programming effort may be lost.
90
MARC User Manual — MARC Windows Reference
MARC User Manual — MARC Windows Reference
9.6 Help Menu
The Help Menu contains three item, help, contents and about.
9.6.1 Help
This item takes you to the normal Windows® style help screen. Doubleclick on a volume to open it.
9.6.2 Contents
This item displays an index search screen for the MARC help system. Enter the first few letters of
the desired topic to find the topic.
9.6.3 About
The About item displays the software version number and credits for the MARC product.
MARC User Manual — MARC Windows Reference
91
MARC User Manual – RS232 Programming
10.0 RS-232 Message Protocol
10.1 RS232 Message Fields
All RS232 messages, whether they are transmitted to or from the Matrix Mixer, use the same message
format. Each RS232 message contains five fields. All values are transmitted in hexadecimal format
e.g. 0Ah. For an explanation of transmitting in hexadecimal, please refer to section 10.3.
RS232_START
length (2 bytes MSB first)
data (1-n bytes) checksum
... ack
transmitted by
message recipient
RS-232 Message Fields
The first field of a message is always the RS232_START byte (FAh).
The second field is a 2-byte length, transmitted most significant byte first. The value of the length field is the
number of bytes in the third field, the data field e.g. (00h, 07h).
The third field, the data field, holds the parameters of the message e.g.
(02h, 03h, 02h, 05h, F2h, 13h, 88h).
The fourth field is a one-byte checksum. The value of the checksum is the additive sum of the bytes in the
first three fields, modulo 256 (the least significant byte).
For example, if the data portion (3rd field) of a message is (2, 3, 2, 5, 239, 19, 136), the length field is (0,
7). The additive sum of the first three fields is (250 + 0 + 7 + 2 + 3 + 2 + 5 + 239 + 19 + 136) = 663 =
297h. The checksum is 663 modulo 256 = 151= 97h.
The checksum feature can be turned off when necessary by setting DIP switch #7 to the down position.
This is recommended to simplify programming when using Crestron or AMX controllers. See section 3.1.
The fifth field is a one-byte acknowledgment field, which is sent by the device which receives the message.
The value of this field is either RS232_ACK (FCh), RS232_BUSY (FDh), or RS232_ERROR (FEh).
92
MARC User Manual – RS232 Programming
MARC User Manual – RS232 Programming
10.2 RS-232 Reserved Bytes
The following table lists the bytes which have special meaning in the Intelix Matrix Mixer RS-232 protocol.
Name
RS232_ESCAPE
reserved
RS232_Start_V3
reserved
RS232_ACK
RS232_BUSY
RS232_ERROR
unused
Value
F0h
F1h-F9h
FAh
FB
FCh
FDh
FEh
FFh
Meaning
used to transmit data values 240-255
reserved for future RS232 needs.
first byte of all messasges in version 3.
reserved
message received and processed
message received but not processed.
checksum incorrect, message ignored.
unused value never transmitted.
10.3 RS-232 Timing
After a message has been transmitted to the matrix, the matrix will respond with an RS-232_ACK byte
after a delay of 2 milliseconds. If the sent message requires the matrix to return a reply message, the start of
the reply message will begin 1-20 milliseconds after the RS-232_ACK byte. The exact amount of time is
variable depending on the nature of the reply message. These times are independent of baud rate.
To avoid collisions with reply messages, Intelix recommends that your RS-232 controller insert a delay of
approximately 10 milliseconds after messages which do not generate a reply message, and 50 milliseconds
between messages which do.
MARC User Manual – RS232 Programming
93
MARC User Manual – RS232 Programming
10.4 Hexadecimal Transmission
The Intelix Matrix Mixer must receive all message in hexadecimal number code. If messages are transmitted in decimal or ASCII codes, they will fail to work.
Hexadecimal is a base 16 number code that uses numerals 0-10 and letters A, B, C, D, E, F. On the next
page is a conversion table from decimal numbers to hexadecimal. In this document hex numbers are represented in the form “xxh”, where xx are the two hex characters.
10.4.1 Commercial controllers
Most commercial controllers require the use of special codes to represent hex numbers for transmission.
For example, Crestron controllers require the sequence “\xnn” where nn is the hex byte to be sent.
10.4.2 ASCII values
Because computers deal only with numbers, letters must be assigned a numeric code. This code is
called ASCII. When you send commands to the Intelix Matrix Mixer, there is one and only one case when
you use ASCII codes. That case is when you send names. Whenever a name field appears in an example in
this manual, the example is enclosed in quotation marks. Any other use of ASCII values will cause the
command to fail.
For example the command Set Matrix Mixer Name uses as an example name field
“Emmanual Lutheran Church”. The quotes indicate that this data should be sent as ASCII values.
To do this use an ASCII table to obtain the hex value for each character, and transmit these values.
Never transmit the quotation marks.
10.4.2.1 ASCII values of the alphabet.
This is not a complete ASCII table since it does not contain codes for numbers, punctuation or special
characters.
A = 41h
B = 42h
C = 43h
D = 44h
E = 45h
F = 46h
G = 47h
H = 48h
I = 49h
J = 4Ah
K = 4Bh
L = 4Ch
M = 4Dh
N = 4Eh
94
O = 4Fh
P = 50h
Q = 51h
R = 52h
S = 53h
T = 54h
U = 55h
V = 56h
W = 57h
X = 58h
Y = 59h
Z = 5Ah
a = 61h
b = 62h
c = 63h
d = 64h
e = 65h
f = 66h
g = 67h
h = 68h
i = 69h
j = 6Ah
k = 6Bh
l = 6Ch
m = 6Dh
n = 6Eh
o = 6Fh
p = 70h
q = 71h
r = 72h
s = 73h
t = 74h
u = 75h
v = 76h
w = 77h
x = 78h
y = 79h
z = 7Ah
MARC User Manual – RS232 Programming
MARC User Manual – RS232 Programming
10.5 Decimal to Hex conversion table
The table below shows the hex equivalent of decimal numbers from 0-255. Starting with Windows ’95, the
calculator has a hex conversion function.
81-51h 97-61h
00-00h 17-11h 33-21h 49-31h 65-41h
113-71h
82-52h 98-62h
01-01h 18-12h 34-22h 50-32h 66-42h
114-72h
83-53h 99-63h
02-02h 29-13h 35-23h 51-33h 67-43h
115-73h
84-54h 100-64h 116-74h
03-03h 20-14h 36-24h 52-34h 68-44h
85-55h 101-65h 117-75h
04-04h 21-15h 37-25h 53-35h 69-45h
86-56h 102-66h 118-76h
05-05h 22-16h 38-26h 54-36h 70-46h
87-57h 103-67h 119-77h
06-06h 23-17h 39-27h 55-37h 71-47h
88-58h 104-68h 120-78h
07-07h 24-18h 40-28h 56-38h 72-48h
89-59h 105-69h 121-79h
08-08h 25-19h 41-29h 57-39h 73-49h
90-6Ah 106-6Ah 122-7Ah
09-09h 26-1Ah 42-2Ah 58-3Ah 74-4Ah
91-6Bh 107-6Bh 123-7Bh
10-0Ah 27-1Bh 43-2Bh 59-3Bh 75-4Bh
92-6Ch 108-6Ch 124-7Ch
11-0Bh 28-1Ch 44-2Ch 60-3Ch 76-4Ch
93-6Dh 109-6Dh 125-7Dh
12-0Ch 29-1Dh 45-2Dh 61-3Dh 77-4Dh
94-6Eh 110-6Eh 126-7Eh
13-0Dh 30-1Eh 46-2Eh 62-3Eh 78-4Eh
95-6Fh 111-6Fh 127-7Fh
14-0Eh 31-1Fh 47-2Fh 63-3Fh 79-4Fh
96-70h 112-70h 128-80h
15-0Fh 32-20h 48-30h 64-40h 80-50h
16-10h
129-81h
130-82h
131-83h
132-84h
133-85h
134-86h
135-87h
136-88h
137-89h
138-8Ah
139-8Bh
140-8Ch
141-8Dh
142-8Eh
143-8Fh
144-90
145-91h
146-92h
147-93h
148-94h
149-95h
150-96h
151-97h
152-98h
153-99h
154-9Ah
155-9Bh
156-9Ch
157-9Dh
158-9Eh
159-9Fh
160-A0h
161-A1h
162-A2h
163-A3h
164-A4h
165-A5h
166-A6h
167-A7
168-A8h
169-A9h
170-AAh
171-ABh
172-ACh
173-ADh
174-AEh
175-AFh
176-B0h
177-B1h
178-B2h
179-B3h
180-B4h
181-B5h
182-B6h
183-B7h
184-B8h
185-B9h
186-BAh
187-BBh
188-BCh
189-BDh
190-BEh
191-BFh
192-C0h
MARC User Manual – RS232 Programming
193-C1h
194-C2h
195-C3h
196-C4h
197-C5h
198-C6h
199-C7h
200-C8h
201-C9h
202-CAh
203-CBh
204-CCh
205-CDh
206-CEh
207-CFh
208-D0h
209-D1h
210-D2h
211-D3h
212-D4h
213-D5h
214-D6h
215-D7h
216-D8h
217-D9h
218-DAh
219-DBh
220-DCh
221-DDh
222-DEh
223-DFh
224-E0h
225-E1h
226-E2h
227-E3h
228-E4h
229-E5h
230-E6h
231-E7h
232-E8h
233-E9h
234-EAh
235-EBh
236-ECh
237-EDh
238-EEh
239-EFh
240-F0h
241-F1h
242-F2h
243-F3h
244-F4h
245-F5h
246-F6h
247-F7h
248-F8h
249-F9h
250-FAh
251-FBh
252-FCh
253-FDh
254-FEh
255-FFh
95
MARC User Manual – RS232 Programming
10.6 Byte Escape Sequence
If a byte in the length, data, or checksum fields falls within the range 240h through 255h inclusive, an
escape sequence is used to transmit the value, since those single byte values are reserved (see section 10.2.)
The value is translated by the sending device into two bytes: the RS232_ESCAPE byte (240) itself, followed by the difference between the value and the RS232_ESCAPE byte.
value => RS232_ESCAPE, (value - RS232_ESCAPE)
These two bytes are transmitted instead of the single, large-value byte. The receiving device converts the
two bytes back into the original single byte value through simple addition. These operations do not affect
the values of the length or checksum fields.
Note: The escape sequence feature can be disabled if necessary, by putting DIP switch #7 in the
down position. This is recommended when using Crestron or AMX controllers, since it simplifies programming. See section 10.6.
In the following example, the data field of a message is (2, 3, 3, 6, 255). The byte 255 must be “escaped”
into the RS232_ESCAPE byte (240) followed by the difference between 255 and RS232_ESCAPE (255
- 240 = 15 = 0Fh). The bytes actually transmitted are:
Start Length Class ID Input Output Target Volume Checksum
FAh 00h, 05h 02h 03h 03h
06h
F0h, 0Fh
0Ch
Since the second byte of an escape sequence must fall within the range 0 through 15 inclusive, any second
byte outside of that range indicates that a transmission error has occurred, and the message should be
acknowledged by the receiver with RS232_ERROR and ignored.
96
MARC User Manual – RS232 Programming
MARC User Manual – RS232 Programming
10.7 DIP Switches
There are eight DIP switches on the rear panel of the Matrix (see drawing below). For all DIP
switches, the “up” position indicates the “on” condition, and the “down” position the “off” condition. The
function of these switches is shown below.
DIP switches 5 and 6 allow the RS-232 baud rate to be fixed at one of three values: 9600, 19200 or
38400. The AVM supports 38400 at the embedded level and that speed can be used for Crestron and
AMX programming, but since Windows® does not support that rate, the AVM GUI cannot be run at
38400.
DIP switch 7 allows the RS-232 checksum and “escape” byte to be toggled on or off. These should be
turned off in installations which include a permanent RS-232 controller, such as AMX, Crestron or custom
PC program. This greatly simplifies coding (and decoding) the RS-232 messages. The RS-232 checksum
and escape byte should be turned on in installations where the RS-232 communication may be hindered
because of cable length (greater than 50 feet) or shielding from external electronic noise.
Note:
After changing any DIP switches, you must resest the matrix by pressing the
reset button on the rear panel. Changes will not take place unless you reset the matrix.
MARC User Manual – RS232 Programming
97
MARC User Manual – RS232 Programming
10.8 Introduction to using the RS-232 Commands
This section introduces three RS-232 commands that are needed to begin programing the MARC. The
commands are chosen to get you started programming the Intelix matrix. Two of the three commands
establish communication, and the third exerts control over a chosen audio crosspoint. After these three
commands are usable you should be able to use the rest of this manual to implement your application.
1) Are You There: This command is sent by the controller to check for the existence of a matrix. If the
matrix receives this message it replies with an I Am Here message.
2) I Am Here: This message is sent by the matrix as a response to the receipt of an Are You There
message. The matrix sends an I Am Here message whenever it is powered up or reset. This fact can be
used as a diagnostic tool when troubleshooting communication, since the matrix can be relied upon to send
the I Am Here message when reset.
3) Set Current Value: This message sets the attenuation level of an audio crosspoint, and demonstrates
control over the audio matrix after communication has been established.
10.8.1 Are You There
Shown below is the contents of the Are You There message. The format of the message is explained in
section 10.1. The message has no parameters, the length is 2 bytes (1 byte for class, 1 byte for message
ID). The checksum is the sum of all fields: FAh + 2h = FCh.
Since FCh is greater than the RS232 _ESCAPE value of 240, the checksum is “escaped” into
2 bytes (F0h, 0Ch). The escape byte does not effect the length field. The escape process is explained in
section 10.6. Transmitting this message consists of sending the following string of 7 bytes: FAh, 00h, 02h,
00h, 00h, F0h, 0Ch.
data fields
RS232_START
FAh
length
class
00h 02h
00h
Checksum
message ID
F0h 0Ch
00h
10.8.2 I Am Here
Shown below is the contents of the I Am Here message. This message is also sent by the matrix in
response to an Are You There message. This message is sent whenever the matrix is powered up or reset.
The format of the message is explained in section 10.1. The message has no parameters, the length
is 2 bytes (1 byte for class, 1 byte for message ID). The checksum is the sum of all fields: FAh + 2h + 1h =
FDh. The checksum will be escaped when transmitted by the matrix (see section 10.6). Receiving this
message consists of recognizing the following string of 6 bytes: FAh, 00h, 02h, 00h, 01h, F0h, 0Dh.
data fields
RS232_START
FAh
98
length
00h 02h
class
00h
Checksum
message ID
01h
F0h, 0Dh
MARC User Manual – RS232 Programming
MARC User Manual – RS232 Programming
10.8.3 Set Current Value
The Set Current Value message allows direct control over the attenuation at a single crosspoint. Set
Current Value cannot be used to set audio levels of a crosspoint that has been defined as part of an
A/V group (for grouped audio use the class 12 Route Video message).
To use this message as a control test, select a crosspoint to be set and encode it in the input output pair.
The example below sets the current value of the crosspoint at input 2 and output 5. The value to which the
current value is set is encoded in the current value parameter. This value can be any value from 0 (full off) to
255 (full on). The example below sets the crosspoint to 255. Since 255 is hex FF the value is escaped into
two bytes F0h,and 0Fh (see section 10.6). Sending this message consists of transmitting the following ten
bytes: FAh, 00h, 05h, 02h, 0Dh, 02h, 05h, F0h, 0Fh, and 15h.
When this message is properly received by the matrix, the current value will be immediately affected, since
this command bypasses ramp time and slew rate. You should immediately hear the change in the level of the
crosspoint. Be sure that your audio source, amplifiers and speakers are all powered and working.
data fields
RS232_START
FAh
output
05h
length
00h 05h
class
02h
message ID
0Dh
data fields
current value (escaped)
F0h, 0Fh
input
02h
checksum
15h
10.9 Communication Recommendation
Because the Intelix RS232 is a “simplex” or “half duplex” bus protocol there are certain restrictions placed
on bus traffic. Any message sent from the controller to the matrix that generates a reply other than <ACKNOWLEDGE> must not be followed by another message until the reply is complete. To be safe, insert a
delay of 100 milliseconds after any message that generates a reply.
MARC User Manual – RS232 Programming
99
MARC Quick Reference – RS232 Programming Guide
11.0 Designing an External Control System for MARC
MARC has embedded logic to handle the bulk of room combining logic, leaving a much simpler environment for external control system programmers. Every MARC matrix must be configured using the MARC
Designer® software before using an external control system such as Panja/Crestron. Below is a synopsis of
the elements need to write an external control system for MARC.
I.
Room Combining
II.
Local/Program Routing
III.
Volume Controls
Other topics covered in this guide are paging and synchronizing Intelix remote controls with
external control systems.
I.
Room Combining — The MARC system is topology based, and the opening and closing of walls
creates room combinations. Changing a wall state is done with the Goto Wall Position message.
Note: Any time a wall position is changed, all sources routed to the effected rooms will be
deselected.
Note: There are two default sources per room (configured in the Designer software.) Default
sources are always routed to a room and will automatically reroute to a room or
combined area after a wall state change.
The external room combine interface can maintain real-time feedback by using the Get All Wall
Positions and Report All Wall Positions messages.
II.
Local/Program Routing — There are two input types in the MARC system, local and program
sources (selected in the Designer software.) The purpose of the two input types is to allow indepen
dent volume control for local vs. program sources. Both input types are activated and deactivated
with the same messages, Goto Program/Local Select and Goto Program/Local Deselect.
Note: If a source is selected/deselected to a room it will be subject to the room combination;
e.g. if Rooms A and B are combined and a source is selected into room A, it will automatically
be routed to the AB room combination.
III.
Volume Control — The MARC system has separate control of local and program sources. The
messages used are Goto Room Program Volume and Goto Room Local Volume.
Note: If there is no need for separate volume controls, Intelix recommends that all sources be
defined as program (done in the Designer software.)
Note: If rooms are combined, a volume control in one room will effect all rooms in the combi
nation.
The external volume control interface can maintain real-time feedback by using the Get Room
Details and Report Room Details messages.
100
MARC Quick Reference – RS232 Programming Guide
MARC Quick Reference – RS232 Programming Guide
11.1 Connecting the Control PC to the MARC
Before you can program your Matrix Mixer, you need to have a personal computer (desktop or laptop)
capable of running the MARC program. Your computer must meet these requirements:
√
√
√
Pentium (133 MHz), 32 Mb RAM or better
Windows® ‘95 or NT
Serial port connected to RS232 connector on Matrix Mixer
The connection between the MARC matrix mixer and your control PC is made with a “null modem” cable
with a DB-9 connector on the matrix end as shown below. The wiring diagram for a null modem cable is at
the bottom of the page. The drawing you use will depend on the connector on your PC. Most PCs have
either a DB-9 or a DB-25 on the serial port. The cable wiring for both connectors are shown.
RS232 DB-9 to DB-9 connections for
a null modem cable.
2
2
Matrix
Controller
3
3
female DBDB-25
5
7
9
Note: Some devices may require that the Clear to Send and Ready to Send pins (pins 7 and 8) be tied
together for correct operation.
Matrix
female DB9
2
3
5
2
3
5
RS232 DB-9 to DB-25 connections
for a null modem cable.
Controller
DB-9
The connections of the
2 3
5
MARC’s DB-9 connector for RS-232 communiReceive
cation.
Transmit Ground
MARC Quick Reference – RS232 Programming Guide
101
MARC Quick Reference – RS232 Programming Guide
11.2 RS232 Message Protocol
11.2.1 RS232 Message Fields
All RS232 messages, whether they are transmitted to or from the Matrix Mixer, use the same message
format. Each RS232 message contains five fields. All values are transmitted in hexadecimal format
e.g. 0Ah. For an explanation of transmitting in hexadecimal, please refer to the following page.
RS232_START
length (2 bytes MSB first)
data (1-n bytes) checksum
... ack
transmitted by
message recipient
11.2.1.1 Start Byte
The first field of a message is always the RS232_START byte (FAh).
11.2.1.2 Length Bytes
The second field is a 2-byte length, transmitted most significant byte first. The value of the length field is the
number of bytes in the third field, the data field. The length field does not include the check sum or any
escape bytes. The length field is not affected by escape bytes.
11.2.1.3 Data Bytes
The third field, the data field, holds the contents of the message e.g. (02h, 03h, 02h, 05h, F2h, 13h, 88h).
All message parameters are in the data field.
11.2.1.4 Checksum Field
The fourth field is a one-byte checksum. The value of the checksum is the additive sum of the bytes in the
first three fields (start byte, length bytes, and data bytes); modulo 256 (the least significant byte). For
example, if the data portion of a message is (2, 3, 2, 5, 239, 19, 136), the length field is (0, 7). The additive
sum of the first three fields is (251 + 0 + 7 + 2 + 3 + 2 + 5 + 239 + 19 + 136) = 664. The checksum is
664 modulo 256 = 151= 97h.
The checksum feature can be turned off when necessary by setting DIP switch #7 to the down position.
This is recommended to simplify programming when using Crestron or AMX controllers.
The checksum is not included in and does not affect the length field.
11.2.1.5 Acknowledge Byte
The fifth field is a one-byte acknowledgment field, which is sent by the device which receives the message.
The value of this field is either RS232_ACK (FCh), RS232_BUSY (FDh), or RS232_ERROR (FEh).
102
MARC Quick Reference – RS232 Programming Guide
MARC Quick Reference – RS232 Programming Guide
3.2 Byte Escape Sequence
If a byte in the length, data, or checksum fields falls within the range 240 through 255 inclusive, an escape
sequence is used to transmit the value, since those single byte values are reserved. The value is translated
by the sending device into two bytes: the RS232_ESCAPE byte (240) itself, followed by the difference
between the value and the RS232_ESCAPE byte.
value => RS232_ESCAPE, (value - RS232_ESCAPE)
These two bytes are transmitted instead of the single, large-value byte. The receiving device converts the
two bytes back into the original single byte value through simple addition. These operations do not affect
the values of the length or checksum fields
Note: The escape sequence feature can be disabled if necessary, by put DIP switch #7 in the down position. This is recommended when using Crestron or AMX controllers, since it simplifies programming.
In the following example, the data field of a message is (2, 3, 3, 10, 241). The byte 241 must be “escaped”
into the RS232_ESCAPE byte (240) followed by the difference between 241 and RS232_ESCAPE (241
- 240 = 1).
Start Length Class ID Input Output Target Volume Checksum
FAh 00h, 05h 02h 03h 03h
0Ah
F0h, 01h
00h
Since the second byte of an escape sequence must fall within the range 0 through 15 inclusive, any second
byte outside of that range indicates that a transmission error has occurred, and the message should be
acknowledged by the receiver with RS232_ERROR and ignored.
MARC Quick Reference – RS232 Programming Guide
103
MARC Quick Reference – RS232 Programming Guide
12.0 MARC RS232 Quick Reference Guide
This guide contains the five most commonly used RS232 applications for the Intelix MARC matrix mixer.
The applications, General Communication, Wall Control, Program/Local Routing and Level Control, Page
Control, and Synchronizing remotes, are described along with a list of the commands needed to implement
them.
12.0.1 Communication Recommendation
Because the Intelix RS232 is a “simplex” or “half duplex” bus protocol there are certain restrictions placed
on bus traffic. Any message sent from the controller to the matrix that generates a reply other than <ACKNOWLEDGE> must not be followed by another message until the reply is complete. To be safe, insert a
delay of 100 milliseconds after any message that generates a reply.
12.1 General Communication
This application explains how to establish and test RS232 communication between an RS232 controller and
the MARC matrix mixer. You must make the connection between the controller and the MARC with a null
modem cable.
You then send the MARC the Are You There message, and listen for the matrix to return an I Am Here
message. After this sequence is complete, you have established correct communication.
104
MARC Quick Reference – RS232 Programming Guide
MARC Quick Reference – RS232 Programming Guide
12.1.1 Are You There
This message contains no parameters.
data fields
RS232_START
length
class
FAh
00h, 02h
00h
message ID
00h
Checksum
(escaped)
F0h, 0Ch
12.1.2 I Am Here
This message contains no parameters. The MARC matrix mixer will send this message as a response to the
reception of an Are You There message. It is also sent by the matrix on any reset or power cycle. This
makes it useful for triggering start-up and power failure command sequences on an external controller.
When this message is received you have correctly verified communication.
data fields
RS232_START
length
class
FAh
00h, 02h
00h
MARC Quick Reference – RS232 Programming Guide
message ID
01h
Checksum
(escaped)
F0h, 0Dh
105
MARC Quick Reference – RS232 Programming Guide
12.2 Wall Control Application
The first major application considered is the communication of wall positions in a room combine group to
the MARC mixer. This application shows how to program a touch panel to send wall placement changes to
the mixer so that audio control is correctly configured for any combination of rooms in a group. To do this
we will use three messages: Get All Wall Positions, Report All Wall Positions , and Goto Wall Positions. Our example has three rooms with three moveable walls (the so called “3SQ” topology– shown
below.) All three walls have been lowered. When discussing wall positions, down means lowered or
open, and up means raised or closed.
12.2.1 Communication Recommendation
Because the Intelix RS232 is a “simplex” or “half duplex” bus protocol there are certain restrictions placed
on bus traffic. Any message sent from the controller to the matrix that generates a reply other than <ACKNOWLEDGE> must not be followed by another message until the reply is complete. To be safe, insert a
delay of 100 milliseconds after any message that generates a reply. This is particularly important in the case
of synchronizing REO remotes, since remote polling tends to generate a large amount of bus traffic. Intelix
recommends placing a 100 millisecond delay before all Set Remote Polling messages.
12.2.2 Get All Wall Positions
This message requests that the MARC matrix mixer report the position of all walls in the room group. The
message has no parameters.
RS232_START
length
class
FAh
00h, 02h
0Dh
data fields
Checksum
message ID
03h
0Ch
A diagram of the 3-SQ topology. The three
interior wall are movable.
106
MARC Quick Reference – RS232 Programming Guide
MARC Quick Reference – RS232 Programming Guide
12.2.3 Report All Wall Positions
This message is the MARC matrix’s response to a Get All Wall Positions message. It will send you a
number of data bytes that depend on how many wall are in this room group. Our example has three walls
(see the drawingat the bottom of the previous page.) All three walls have been lowered, making the group
one large room. The parameters returned by this message and their values are shown below:
wn= 3
w1 = 0
w2 = 0
w3 = 0
data fields
RS232_START
length
FAh
00h 07h
wall 1
00h
class
message ID
0Dh
04h
wall 2
data fields
wall 3
00h
01h
wallnum
03h
checksum
17h
12.2.4 Goto Wall Positions
This message sets the up/down variable for a specific wall in the room group. In this example we set the
position of wall 1 to up (in position). The message has two parameters:
wn = the number of the wall to be set
p = position; 0 means open (down); 1 means closed (up)
data fields
RS232_START length
FAh
class
00h 04h 0Dh
message ID
05h
wall
01h
position Checksum
01h
12h
The diagrams on the next page demonstrate the flow of messages for the wall position application.
MARC Quick Reference – RS232 Programming Guide
107
MARC Quick Reference – RS232 Programming Guide
This diagram shows the flow of the Get All Wall Positions and Report All Wall Positions messages.
This sequence is used any time the controller needs to discover the current state of reality, for example on
power up. After initialization this sequence need never be repeated. If a system has a default powerup state
this sequence need not be used.
1: Get All Wall Positions
MZP
Touch
Panel
Controller
3: Update display
Touch
Panel
2: Report All Wall Positions
Thediagram below shows the flow of the Goto Wall Position message. This sequence is used any time a
wall statechange is indicated either by a button press on the touch screen or by the state change of a wall
sensor.
2: Goto Wall Positions
MZP
1a: Wall button press
Touch
Panel
Controller
Touch
Panel
1b: Wall sensor change
108
MARC Quick Reference – RS232 Programming Guide
MARC Quick Reference – RS232 Programming Guide
12.3 Program/Local Routing and Level Control
One of MARC’s primary functions is routing and level control of audio program/local material. Program/
local material is background music; e.g. CD players, tuners, tape players etc. This application shows how
to route program/local inputs to a particular room, and how to set its level in the room. There are five
commands needed to accomplish this. The drawing below shows how the commands relate to the matrix
structure.
If REO devices such as Comet remotes are present in your system and need to mirror the actions of the
RS232 controller, you will also need to use the Set Remote Polling and Simulate Remote Single Input
commands as explained in section 9.0.
Control output volumes with messages in
sections 7.3-7.6.
Vol
Control input volumes
with messages in
section 7.7.
Vol
Vol
Vol
Vol
on/off on/off on/off
Vol
on/off on/off on/off on/off
Vol
on/off on/off on/off on/off
Vol
on/off
Control on/off with
messages
in sections 7.1-7.2
on/off on/off on/off on/off
12.3.1 Goto Program Zone/Room Select
This message selects a program audio source for routing into a room.This example routes program source
number 1 into room number 2. This message has two parameters:
rn = room number into which to route the source
ps = program source to select
data fields
RS232_START
FAh
length
00h 04h
class
09h
message ID
data fields
room number
02h
program source
01h
MARC Quick Reference – RS232 Programming Guide
00h
checksum
0Ah
109
MARC Quick Reference – RS232 Programming Guide
12.3.2 Goto Program/Local Deselect
This message deselects a program source.This example routes program source number 1 into room number
2. This message has two parameters:
rn = room number
ps = program source to deselect
data fields
RS232_START
length
FAh
00h 04h
class
message ID
09h
01h
data fields
room number
02h
checksum
program source
01h
0Bh
12.3.3 Goto Room Program Volume
This message sets the audio level of all program inputs routed to the specified room. This example sets the
volume of room 1 to FFh. The message has two parameters:
rn = room number being controlled
pv = program volume(a value from 0 – 255 representing the range of -100 dB attenuation to 0 dB
attenuation)
data fields
RS232_START
length
class
message ID
FAh
00h, 04h
0Ah
04h
Rroom number
01h
110
data fields
Prog Volume (escaped)
checksum
0Ch
F0h, 0Fh
MARC Quick Reference – RS232 Programming Guide
MARC Quick Reference – RS232 Programming Guide
12.3.4 Goto Room Local Volume
This message sets the audio level of all local audio inputs routed to the specified room. This example sets
the local volume of room 1 to FFh. The message has two parameters:
rn = room number being controlled
lv = local volume (a value from 0 – 255 representing the range of -100 dB attenuation to 0 dB
attenuation)
data fields
RS232_START
length
class
message ID
FAh
00h, 04h
0Ah
09h
data fields
Local Volume(escaped)
Room number
checksum
11h
F0h, 0Fh
01h
12.3.5 Get Zone/Room Details
This message requests all details of a single room. This example requests the details of room number 1. This
message has one parameter:
rn = room number to be queried.
data fields
RS232_START
FAh
length
00h 03h
class
0Ah
message ID
00h
MARC Quick Reference – RS232 Programming Guide
room number
01h
Checksum
08h
111
MARC Quick Reference – RS232 Programming Guide
12.3.6 Report Zone/Room Details
This message reports all details of a single room. It is a response to a Get Zone/Room Details message.
This message returns six parameters:
rn = room number to be queried.
pgv = paging volume
prv = program volume
nm = room name
rm = room members; a bitmap of the outputs that are part of this room.
lv = local volume
data fields
RS232_START
FAh
length
class
message ID
00h 29h
0Ah
01h
data fields
PageVolume
F0h, 0Fh
Room number
01h
Prog Volume
F0h, 0Fh
data fields
Room Name
Room Members
“Zone 3”
01h
checksum
Locak Volume
??h
F0h, 0Fh
12.3.7 Goto I/O Volume
This message sets the volume of a single I/O VCA. This example sets output number 3 to FF. This message
has three parameters:
flag = i/o flag; 1 = input
ion = i/o number
vol = new volume
data fields
RS232_START
length
class
message ID
FAh
00h 05h
01h
09h
data fields
i/o flag
00h
112
i/o num
03h
checksum
Volume
F0h, 0Fh
0Bh
MARC Quick Reference – RS232 Programming Guide
MARC Quick Reference – RS232 Programming Guide
12.4 Paging Control in MARC
This application explains how to set up, start and end a page in the MARC system. Five messages are used:
Select Zone/Room, Report Zone/Room Selection, Begin Page, End Page and Cancel Page. A flow
diagram for paging control is shown on the following pages.
12.4.1 Select Zone/room
This message requests a zone/room for paging. In this example paging source number 1 requests room 2 for
paging . The message has three parameters:
ps = paging source making the request
rn = target room number
pr = priority
data fields
RS232_START
length
00h 05h
FAh
message ID
02h
class
09h
data fields
priority
zone/room
paging source
01h
01h
checksum
0Ch
00h
12.4.2 Report Zone/Room Selection
This message reports the result of a zone/room select message. It has four parameters:
ps = paging source making the request
rn = target room number
p = priority; 0 = normal, 1 = emergency
r = result; 0 = failure, 1 = success
data fields
RS232_START
FAh
length
00h 06h
message ID
class
09h
03h
Checksum
Data fields
paging source
01h
room number
01h
priority
00h00h
result
01h
MARC Quick Reference – RS232 Programming Guide
0Fh
113
MARC Quick Reference – RS232 Programming Guide
12.4.3 Begin Page
This message begins a page into all rooms selected by a paging source. This example has paging source 1
initiate a page into all rooms which have previously been selected. This message has one parameter:
ps = paging source making the request
data fields
RS232_START
length
class
message ID
FAh
00h 03h
09h
04h
paging source
01h
Checksum
0Bh
12.4.4 End Page
This message ends a page into all rooms selected by a paging source. This example has paging source 1
end its page into all rooms which have previously been selected. It has one parameter:
ps = paging source making the request
data fields
RS232_START
length
FAh
00h 03h
class
09h
message ID
05h
paging source
01h
Checksum
0Ch
12.4.5 Cancel Page
This message cancels all page requests by a paging source. This example has paging source 1 cancel its
page into all rooms which have previously been selected. This message has one parameter:
ps = paging source making the request
data fields
RS232_START
length
class
FAh
00h 03h
09h
114
message ID
06h
paging source
01h
Checksum
0Dh
MARC Quick Reference – RS232 Programming Guide
MARC Quick Reference – RS232 Programming Guide
The flow diagram below shows a successful page; i.e. the Zone Select result is 1. The panel indication of
this condition is up to the designer.
The flow diagram below shows an unsuccessful page; i.e. the Zone Select result is 0. The panel indication of
this condition is up to the designer.
MARC Quick Reference – RS232 Programming Guide
115
MARC Quick Reference – RS232 Programming Guide
12.5 Synchronizing the RS232 controller and Reo remotes
When there are ReO remotes in a program distribution system controlled by an RS232 controller, synchronization of the controller and the remotes becomes an issue. The controller needs to be able to read
and alter the output states of the remotes. This is accomplished with four commands: Set Remote Polling ,
Remote Single Output Report, Simulate Remote Single Input and Set Remote Single Output .
The first two messages are ReO to controller commands, while the second two messages are controller to
ReO commands.
12.5.1 Communication Recommendation
Because the Intelix RS232 is a “simplex” or “half duplex” bus protocol there are certain restrictions placed
on bus traffic. Any message sent from the controller to the matrix that generates a reply other than <ACKNOWLEDGE> must not be followed by another message until the reply is complete. To be safe, insert a
delay of 100 milliseconds after any message that generates a reply. This is particularly important in the case
of synchronizing REO remotes, since remote polling tends to generate a large amount of bus traffic. Intelix
recommends placing a 100 millisecond delay before all Set Remote Polling messages.
12.5.2 Set Remote Polling
This message sets the automatic polling of ReO remote devices by the matrix mixer. It is used to receive
updates when a remote device’s outputs change. To reset polling after a reset or power cycle, trigger this
message (Set Remote Polling) on receipt of an I Am Here message. The matrix mixer will transmit the I
Am Here message as a response to any reset or power cycle. This command has two parameters:
ad = the address of the ReO remote to be set.
po = polling mode; Set this to 3 (report output changes only.)
data fields
RS232_START
00h 04h
FAh
address
05h
116
length
message ID
class
06h
07h
data fields
polling
03h
checksum
13h
MARC Quick Reference – RS232 Programming Guide
MARC Quick Reference – RS232 Programming Guide
12.5.3 Remote Single Output Report
This message reports the value of a single remote’s output. When you have set automatic polling to mode 3,
this message will be received for any change of output in the remotes being polled. It reports the values of
indicator LEDs and Comet Tail bar graphs. This message will send you three parameters:
ad = the address of the ReO remote reporting.
out = which output is being reported
val = the state of buttons, LEDs and bar graphs
data fields
RS232_START
FAh
length
00h 05h
message ID
10h
class
06h
data fields
address
05h
output
01h
value
28h
checksum
checksum
43h
The flow diagram below shows a simple example of synchronizing an RS232 controller with a ReO remote
device. The example assumes that you have already set Remote Polling to mode 3 on the Comet Tail. Step
4 below uses the message Remote Single Output Report. More complex applications may require the
messages on the next page also.
MARC Quick Reference – RS232 Programming Guide
117
MARC Quick Reference – RS232 Programming Guide
12.5.4 Goto Remote Single Input Status
This message simulates a ReO remote input. It is exactly as if that input has been simulated in the real world,
a button press or knob turn. This message should be used to synchronize the action of a Comet 4 device.
To synchronize a Comet Tail see Set Remote Single Output below. If the remote’s output is changed by
this action, the a report will be generated (if automatic input polling is turned on). This command has three
parameters:
ad = the address of the ReO remote to be set.
in = input number to be stimulated.
val = new value for remote’s input.
data fields
RS232_START
FAh
length
00h 05h
message ID
11h
class
06h
data fields
address
05h
118
input
01h
checksum
value
01h
checksum
1Dh
MARC Quick Reference – RS232 Programming Guide
MARC Quick Reference – RS232 Programming Guide
12.5.5 Set Remote Single Output
This message is used to synchronize the output bar graph of a Comet Tail to the action of the controller.
This command has three parameters:
ad = the address of the ReO remote to be set.
out = output to be set. On Comet Tail, 1 = bar graph and 2 = status LED.
val 1 = new value of output (0-255);
val2 = For Comet Tail bar graph, this byte is 00h. For Comet 4 = LED blink rate
00h 06h
0Ah
06h
Checksum
Data fields
address
05h
output
01h
value 1
01h
value 2
00h
17h
The flow chart below show the sequence of events when using touch panel up/down buttons to control a
volume bar graph. This sequence will keep the Comet Tail bar graph and the touch panel bar graph synchronized.
MARC Quick Reference – RS232 Programming Guide
119
MARC User Manual—Appendix A
Appendix A: Using an external power supply
For powering external devices through the DB25 connector there are two choices. If your devices
can be run on +5VDC with a total current draw of 500 mA or less, then you can use the internal
power supply, which is brought out to pin 25 of the DB25 connector. If you use the internal supply
with an inductive load, you must change the jumper setting to the internal setting on P8 as shown
below (for location of P8 see next page). If your devices require a higher voltage or current, you can
use an external supply. This requires the following steps:
1) connect your supply, (up to +50 VDC) to pin 24 of the DB25 connector.
2) change the setting of the power supply jumper to the external setting as shown below.
Note: The factory default setting has the jumper in the external position.
This drawing shows the equivalent
circuit of a binary output with the
jumpers for selecting internal or
external flyback protection. The
jumpers shown are on jumper block
P8 (see next page). Each of the 8
binary outputs has this circuit. If the
jumper setting uses the internal
flybacks, the shown external
flyback is not needed.
Jumpers
p 19
on P8
p 17
p 20
p 18
AB 1 Warning
Placing jumpers in both positions will short out and destroy the internal power supply! For
internal flyback use the jumper should be between pins 17 and 18 on the jumper block. For
external flybacks, the jumper should be between pins 19 and 20. There should be a jumper in
one or the other of these positions NEVER BOTH!
120
MARC User Manual—Appendix A
MARC User Manual—Appendix A
The drawing below shows the circuit board with the bottom of the chassis removed, exposing the
location of the jumpers for internal and external flyback selections. For external flybacks, place the
jumper between pins 19 and 20 of P8 (shown). For internal flybacks, place the jumper between pins
17 and 18 on P8. Never place jumpers in both positions!
Caution — component U13 may be HOT!
Warning: Placing jumpers in both positions will short out and destroy the internal power
supply! For internal flyback use the jumper should be between pins 17 and 18 on the jumper
block. For external flybacks, the jumper should be between pins 19 and 20. There should be a
jumper in one or the other of these positions NEVER BOTH!
MARC User Manual—Appendix A
121
MARC User Manual—Appendix B
Appendix B: Power Supplies and Grounding
AC power supply
Usually ReO devices are powered by a 12 VAC transformer. The transformer secondary is connected
in parallel to all the remotes in the System at pins 1 and 3 of their power connections. (See page
57.) As the ground lift jumpers (J1) of the remotes are not present, the ground return for the data
signals is provided by pins 1 and 6 of the RJ11/12 connector (see page 57). In the absence of the
ground lift jumper, the remotes’ electronics are grounded to the Matrix via the data connection
ground. This is connected to neither the building nor conduit grounds.
Ground Lift Jumper
ReO remotes previously used a ground lift jumper, if your remotes have a ground lift jumper (J2)
leave the pins open, i.e. do not install a jumper. Newer ReO remotes do not have a ground lift
jumper.
DC power supply
If the ReO devices are powered by a DC voltage supply, and the DC supply has floating or isolated
outputs, then the grounding connections to the ReO remotes should be the same as for an AC supply,
as described above.
If one side of the DC supply output is grounded, the installation of ground lift jumper should be
avoided. This configuration, in the presence of the ground lift jumper, can result in ground loops or
large common-mode voltages between the ground of the supply and that of the data connections.
Note: When using a grounded DC supply, the presence of the bridge rectifiers in the remotes will
cause there to be a 0.7 V common-mode difference between the DC supply ground and the remote
ground. This difference is negligible compared to the common-mode rejection capabilities of the
RS485 transceivers.
122
MARC User Manual—Appendix B
MARC User Manual—Appendix B
Matrix AC Power Connection
The manufacturer supplies an 18 Volt, 3.0 Amp center-tapped transformer to power the mixer. If
another AC supply is used instead, it should be of equal voltage and have at least a 60 Volt-Amp
rating. The details of the AC Power Jack on the rear panel are as shown in the following figure.
18V Center Tapped Transformer Connector Wiring
4-pin DIN Connector, viewed from the rear of the Matrix.
Matrix DC Power Connection
The mixer can also be connected to a DC power supply, via the Phoenix-style DC Power Jack on
the rear panel. The DC supply can be used as:
1) the sole power source; or,
2) an on-line backup.
Note: If the DC supply is used as backup, it must meet the following voltage requirements:
♦a regulated supply (e.g. battery) must be 18 volts or less (using a voltage of less than 17V will
reduce the dynamic range of the mixer, when the main supply is off.)
♦an unregulated supply (e.g. generator) must be between 17 and 18 volts.
Otherwise, the mixer will draw from the backup supply even when AC power is supplied. The
current supplied must not be less than 3.0 A. The wire configuration, voltage and current requirements are as shown in the right-hand figure below.
Rear Panel View
MARC User Manual—Appendix B
123
MARC User Manual—Appendix B
Matrix Grounding
The chassis for the Matrix provides the main ground for all internal PC boards. There is also a
wire ground system to each board to ensure ground connection in the event the chassis is disassembled.
Note: There is no connection to the building ground via the AC power supply. Building
ground can be supplied through the chassis or shield connections, or through the
ground pins on the DC power connector.
ReO Power and Grounding
1 12V
2 g ro u n d
3 12V
1 12V
2 g ro un d
3 12V
This drawing shows the relative positions, within the Comet Tail and the Comet 4, of the three pins
of the ReO power connections. Pin 2 is always grounded, Pins 1 and 3 are powered (12 V, AC or
DC).
124
MARC User Manual—Appendix B
MARC User Manual—Appendix C
Appendix C: Signal-to-Noise Considerations
The MARC Matrix is an attenuation only device, i.e. it cannot amplify signals passing through it.
When all the level controls are fully on, there is unity gain, and when fully off, there is attenuation of
–100dB. To obtain optimum audio performance of the Matrix, provide it with input signals of +4dB
or greater. Depending on whether the input is balanced or unbalanced, the maximum input level
should be no more than approximately +25dB.
To maximize the signal-to-noise ratio, and to take full advantage of the performance of the Matrix, it
is important to balance the system levels with most of the gain occurring before the signal enters the
Matrix, rather than in the power amplifier afterwards. The Matrix has an absolute noise floor of
approximately –80 dB. Proper level balancing, using the signal source capability of +26 dB, can
result in signal-to-noise ratios of more than 100 dB. Using the power amp to raise signal levels,
rather than a pre-Matrix amplifier or the Matrix itself, diminishes this high level of performance.
The Intelix VC series mixers can be used as eight-channel, in-line preamps, boosting input signals of
less than +4dB to the optimum levels for the Matrix.
System Balancing
To take full advantage of the Matrix’s high signal-to-noise performance take the following steps:
♦ Drive the Matrix inputs with a signal of +4dBm to +26dBm.
♦ Set all Matrix VCAs at 225 ( linear scale) or 132 (log scale).This is
12dB of attenuation, and allows for a signal level increase of 12dB and a decrease of
88dB.
♦ Adjust the post Matrix system i.e. power amplifiers to produce the desired listening levels in
the room or zone with this nominal setting of the Matrix.
MARC User Manual—Appendix C
125
MARC User Manual—Appendix C
Fig. 12. The drawing below shows the signal-to noise performance when the user attenuates a +4dB
signal by 50 dB through the Matrix. This scenario commonly occurs when the user sets the matrix
attenuation controls at the nominal mid-point in an effort to have maximum adjustment range.
However, since the control is attenuation only, the nominal midpoint is actually 50dB of attenuation.
This setting results in the relatively poor signal-to noise ratio seen here.
Audio
Source
Matrix
Mixer
Amplifier
+40 dB
Signal Curve
SN = 40 dB
0 dB
-20 dB
-50 dB
Noise Curve
-90dB
Fig. 13. This drawing shows the result of correctly following the system balancing procedure
detailed above. The input signal is in the range of +4dB to +26 dB. With the Matrix attenuation
controls set to -12dB the input signal is attenuated to -8dB. The resulting signal-to-noise ratio
is improved to more than 80dB.
Audio
Source
+40 dB
+20dB
0 dB
Matrix
Mixer
Amplifier
Signal Curve
Input range: +4dB-+26dB
SN = 80 dB
-20 dB
-50 dB
-90dB
126
Noise Curve
MARC User Manual—Appendix C
MARC User Manual—Appendix D
Appendix D: MARC Reset Sequence
Reset Sequence
This section describes the power cycle reset of all Intelix Matrix products, including the M series, the
MARC and the Psychologist products. This cycle is the same whether the reset comes as a result of a
power failure, or a reset button press.
1) Power goes down, reset button is pressed or a software reset command is received.
2) Within a half second the Matrix stops passing audio.
3) If power has failed, the Matrix memory is switched to battery backup, preserving the current
settings.
4) Power returns to normal levels.
5) The Matrix begins to restore the current settings of crosspoints across a five second ramp up.
6) After the five second ramp time all crosspoints have been restored to their pre reset levels.
At no time will audio levels rise above the level just before the power failure.
Note: If during the five second reset ramp the Matrix receives an external message from a psychologist remote, a Comet 4, a Comet Tail or any RS232 controller, the external message will override the
five second ramp time.
AC power
Audio Outputs
Battery Backup
5 seco
<.5 sec.
MARC User Manual—Appendix D
127
MZP User Manual—Appendix F
Appendix F: Comet Remote Devices
Intelix Comet Series Remotes are single gang “decora” control modules for the Intelix MZP
system. Typically wall-mounted, Comet remotes function as convenient user interfaces for paging,
program source selection and volume control.
The carefully optimized design allows the Comet remote controls to conveniently interconnect
in LAN bus topology. Up to 128 remotes can be utilized with one MZP matrix mixer via ReO bus
communication. Each remote’s “personality” is then easily assigned using the MZP setup and
control software. This “personality” can easily be reassigned as applications change.
AF1 Comet Tail
The Comet Tail is a digital remote control device designed for volume control and mute functions. The volume function takes advantage of a rotary encoder, giving the user a knob as the
control device. The volume knob is encircled by eight red LEDs to indicate level status. The LEDs
move in a clockwise direction with the brightest LED indicating the current level position. The
mute function is controlled via a momentary button and corresponding red status LED. The mute
function is latching as dictated by software and “LED-on” indicates the mute function is active.
AF2 Comet 4
The Comet 4 is a digital remote control device designed for source selection or page routing
functions. Each remote has four momentary buttons and four corresponding red status LEDs to
indicate when a selection has been activated.
Using the MZP setup and control software, a Comet 4 can be programmed to function as a
program selector. In this mode, each of its four buttons enables users to select one of four audio
sources for a given zone. Multiple remotes can be used if more than 4 sources are required in a
program selection station.
A Comet 4 can also be programmed to function as a paging station. In this mode, each of the
four buttons selects the room or zone to which a page will be routed. Multiple remotes can be used
if more than four destinations are required. LEDs indicate when a page is successful, or blink to
indicate a zone is already being paged into from another location.
128
MZP User Manual—Appendix F
MZP User Manual—Appendix F
AF3 Comet 0-I/O
General Description
Circuit Board Description
The Comet 0 I/O is a version of the Intelix
Comet-4 remote control module that has no buttons
or LEDs. The Comet 0 I/O is a control module for
the MZP (Multi-Zone Paging and Program Distribution System) that is used when external contact
closures or +5 V logic signals need to be used to
trigger the MZP to react to an external device.
The carefully optimized design allows the
Comet 0 I/O to conveniently interconnect with
standard Comet devices in LAN bus topology. Up to
128 Comet devices can be utilized with one MZP
matrix mixer via ReO bus communication. Each
Comet can be easily assigned to perform its defined
functions using the MZP setup software.
The Comet 0 I/O makes the MZP an ideal
choice for zone paging and program routing applications where external devices such as relays, message
repeaters, emergency systems, and other devices are
capable of producing contact closures or 5V logic
signals.
The above printed circuit board drawing shows the necessary contact points for 4
contact closures and their 4 corresponding
LED contacts.
Contact closures
The contact closures can be activated
by either a SPST switch or a +5V logic low
signal. A logic signal must be active low. 0
Volts activates the contact, whereas +5 Volts is
used for an inactive status. A typical logic
connection to switch input 1 is shown in the
above drawing.
Output drivers
The 4 output driver contacts can be
connected to any 5 VDC devices operated with
a current sink capacity of 10 mA or less. The
outputs are controlled by the system software,
which typically turns an LED on when its
switch contacts are active. These signals can
be used for external indicators (LEDs or
lamps). In standard software the outputs track
the state of their respective contacts; that is if
switch #1 contacts are active, the LED #1
output will be high.
MZP User Manual—Appendix F
129
MZP User Manual—Appendix F
G
C ND
C LK
D LK +
D ata U ata +
nu se
d
Data connection topology
Phase critical, parallel wiring, twisted pair data and
Engineering Device Description
The Comet0-I/O is a wall mountable, programmable digital clock.
ReO Bus Wiring
remote control devices with unique ID capable of communiBrown/white
GND
Green
CLK+
Green/white
CLKcating status information via RS485 communications from
To more Remotes
Blue
DATA +
Blue/white
DATA the Intelix MZP Matrix Mixer. The Comet0-I/O is supplied
NC Brown**
1
with the same four hole face plate as all Intelix Comet
2
3
4
remotes.
Technical Specifications
G
C N
C L D
D L K
D AT K- +
A A
T
A +
6
3
4
5
**Note:
Crimp the brown conductor in the
RJ12, but cut it off after crimping
. This will provide a more reliable
crimp.
2
Power requirements
9 - 18 Volts (AC or DC) One power
supply required per 12 remotes.
Current draw: 100 mA
RJ12 connector to matrix.
View has tab side down.
Phoenix connection
to remote
Power connector type
3 pin - IDC, Phase tolerant, (Use Panduit MRT- Data Connection Topology
T-connections, daisy-chain, and star acceptable
156F connector tool.)
Power Connector
Matrix
Daisy chain connection
Matrix
Matrix
PC board power
receptacle
Recommended power wire
2 conductor stranded, 18 AWG
Max. powerwire length
(18 AWG Belden 8461, West Penn 224)
Number of
Remotes
1
4
8
16
32
64
128
12VDC
supply voltage
4000 ft
1220 m.
1200 ft.
366 m.
600 ft
183 m.
300 ft.
91 m.
150 ft
46 m.
18VDC
supply voltage
12000 ft.
3660 m
3600 ft.
1098 m.
1800 ft.
549 m.
900 ft.
275 m.
450 ft.
137 m.
75 ft.
23 m.
33 ft.
10 m.
225 ft.
68 m.
112 ft.
34 m.
T-connection
Star connection
Recommended data wire
Category 3 e.g. Belden 1245A or West Penn
WP52995
Maximum data wire length
12000 feet (4000 m)
Supplied Accessories
2 - 6/32' mounting screws
1 - female 3 pin IDC power connector
Dimensions
Data communication
RS485 ReO bus
Data connector
6 pin - RJ12 modular jack connector
130
MZP User Manual—Appendix F
MARC User Manual—Appendix F
Appendix F: Technical Information
SPECIFICATIONS
Signal-to noise Ref +26 dBV, 8X8 system
Frequency Response
+0, -3 dB from 10 Hz to 30 kHz
Crosstalk
Gain Control Range (attenuation only)
Gain Control Resolution
Inputs
Input Impedance
(electronically balanced)
(unbalanced)
Nominal Source Impedance
Nominal Input Level
Maximum Input Level (balanced)
Outputs
Output Impedance (electronically balanced)
(unbalanced)
Nominal Load Impedance
Nominal Output Level
Maximum Output Level (balanced)
(unbalanced)
POWER REQUIREMENTS
8x8 to 16x16
DIMENSIONS
Matrix: (Standard models, 2U chassis)
SHIPPING WEIGHT
Matrix (8 x 8 units, more for other models)
MARC User Manual—Appendix F
100dB
± 1 2 dB from 20 Hz to 20 kHz
Better than -80 dB
100 dB
0.4 dB (256 steps)
20 kΩ
10 kΩ
150 Ω
+4 dBV RMS
+26 dBV RMS
440 Ω
600 Ω
220 Ω
+ 4 dBV RMS
+26 dBV RMS
+20 dBV RMS
18 VAC center-tapped,
3 A, 54 VA
±18 - 24 VDC, 3 A
19" x 3.5" x 14"
(48.2 cm x 35.6 cm x 8.9 cm)
20.3 lb. (9.20 kg)
131
MARC User Manual—Appendix F
Servicing
All repair and other service of Matrix Mixers and Remotes should be provided only by qualified
service personnel. Contact Intelix for a list of authorized service agents. Other attempts at service
or repair may void the warranty.
Warranty
Intelix products are guaranteed against malfunction due to defects in materials or workmanship for
two years. If such malfunction occurs during the specified period, this product will be repaired or
replaced, at our option, without charge. Further, a product which has been repaired/replaced is itself
guaranteed for six months. This six-month guarantee applies even if the warranty repair/replacement
occurs within less than six months of the end of the original two-year warranty period.
This warranty does not cover: (1) malfunction resulting from use of the product other than as specified in the user manual; (2) malfunction resulting from abuse or misuse of the product; (3) exterior
chassis appearance; or (4) malfunction occurring after repairs have been made by anyone other than
Intelix or any of its authorized service representatives.
132
MARC User Manual—Appendix F
MARC User Manual—Appendix G
Appendix G: MARC Training Facility Design Example
This appendix will present two design examples; one simple and the other relatively complex. The
simple example is a small training facility and the complex one a conference center. Both designs are
shown in their entirety.
Defining the Training Facility
This example shows the design of a small training facility. There is one room group of three rooms
with the following topology:
There are three moveable walls. This means that the room group can be set up to be a single large
space (two ways), three small spaces, or two spaces with the same or differing sizes. These eight
configurations are shown below:
*
*
*
*
*All starred layouts are identical from the audio point of view. They are included for completeness
only.
The definitions of the sources and controls required by the training facility are listed below.
MARC User Manual—Appendix G
133
MARC User Manual—Appendix G
This drawing shows schematically the controls and audio sources in the training facility.
134
MARC User Manual—Appendix G
MARC User Manual—Appendix G
Controls for Training Facility
Room 1:
1 Comet-4: selects one of two Background sources, room 1 local mic or local training audio.
2 Comet Tails: Program volume and local volume.
Room 2:
1 Comet-4: selects one of two Background sources, room 2 local mic, and one unused button.
2 Comet Tails: Program volume and local volume.
Room 3:
1 Comet-4: selects one of two Background sources, room 3 local mic, and one unused button.
2 Comet Tails: Program volume and local volume.
Listing of All Audio Sources for the Training Facility:
Room 1:
Program Sources: BGM #1 and BGM #2 (both stereo)
Local Sources: Room 1 local microphone and training audio
default source: BGM #1
Room 2:
Program Sources: BGM #1 and BGM #2 (both stereo)
Local Sources: Room 2 local microphone
default source: BGM #1
Room 3:
Program Sources: BGM #1 and BGM #2 (both stereo)
Local Sources: Room 3 local microphone
default source: BGM #1
General:
Normal Page input (mono)
Emergency Page (mono)
Paging inputs are on the DB-25 connector on the Matrix rear panel.
MARC User Manual—Appendix G
135
MARC User Manual—Appendix G
Room Control Stations
Each room has a Comet-4 remote for audio source selection, and a two Comet Tails remotes to
control program and local source volume. The stations are shown schematically below:
Room 1: The buttons on the Comet-4
can select either (or both mixed) of
the two Background Music sources,
or one of the two local sources (room
1 local mic or training audio). The
button on the program volume control
is the station keylock. While active,
the key lock prevents the station from
being changed. The button of the
local volume control toggles the page
privacy feature. When page privacy is
active, this room will receive no
pages except emergency pages.
Room 2: The buttons on the Comet-4
can select either of the two Background Music sources, or the local
microphone. The button on the
program volume control is the station
keylock. While active the key lock
prevents the station from being
changed. The button of the local
volume control toggles the page
privacy feature. When page privacy is
active, this room will receive no
pages, except emergency pages.
Room 3: The buttons on the Comet-4
can select either of the two Background Music sources, the local
microphone or the local training
audio The button on the program
volume control is the station keylock.
While active the key lock prevents
the station from being changed. The
button of the local volume control
toggles the page privacy feature.
When page privacy is active, this
room will receive no pages, except
emergency pages.
Default Sources
All three rooms use the same default source: Background Music #1. The default source become
active when a wall is raised or lowered and can be any program or local source.
136
MARC User Manual—Appendix G
MARC User Manual—Appendix G
Using the MARC Designer Software® Wizard to Implement the Training Facility Design
Start the Design Wizard
The design wizard starts when you select File -> New. You will be asked if you wish to use the
wizard, Click OK.
Name the Project
The first wizard screen has explanatory text and a name field, after you have entered the
project name (shown here as “Training Facility”) click “Forward”.
MARC User Manual—Appendix G
137
MARC User Manual—Appendix G
The Page and Program Source Screen
On this screen you name the page and program sources. To change the default names, click on the
name, type the new name and click Enter. Repeat for each name to be changed. You can change the
names of the two paging sources if you wish. As shown below, in this example we leave the paging
source names alone, and set two program source names as Background Musi #1 and Background
Music #2. The other two default sources are removed my clicking on them, then clicking the “Remove Source” button. When you have filled in this form, click “Forward”.
Defining Room Groups
The next screen in the wizard is an instruction only explanation of Room Groups. After you have
read and understood the explantion of Room Groups, click “Forward”.
138
MARC User Manual—Appendix G
MARC User Manual—Appendix G
The Room Group Screens
On the room group screen you will delete the excess room group, and choose the approriate topology
for the remaining room group. The room group screen before any changes is shown below.
Delete the Extra Room Group
The wizard defaults to two room groups. Since the Training Facility only needs one, delete the extra
group as follows: Click on either group (it highlights). Click the “Remove Group” button. The extra
group is deleted.
Change Topology
This example needs the topology shown in the project definition. To change the group to the correct
topology, follow these steps:
1) Click the room group (it highlights). This stage is shown below left.
2) Click the “Change Topology” button.
3) Select the topology desired as shown in the picture below right.
4) Click OK, and the new topology will be displayed.
MARC User Manual—Appendix G
139
MARC User Manual—Appendix G
Name the Rooms
The next screens are concerned with naming the rooms in the Training Facility. The first screen is
instructional only. When you have read and understood the instructions, click the “Forward” button.
The Room Combine Station Screen
From this screen you will name each room in the design. Using the names from the design definition,
enter the room names in each text block. Since this design uses a room combine panel, click the
“panel” radio button at the bottom of the screen. When you have named the rooms, click “Forward.”
140
MARC User Manual—Appendix G
MARC User Manual—Appendix G
Room Control Screens
The next two screens are used to define room controls. The first screen is purely explanatory. After
you have read and understood this screen, click “Forward.”
Room Details
Because the three rooms in this design have control stations that are very similar, we will use the
“Room Details Template” option. This allows us to enter all the data that is shared by the three
rooms only once, then customize the rooms as necessary. Click the “Room Details Template” button.
The screen below appears. The screen as shown has already been completed for this project. Stereo
is selected for room speakers, and the defaulat sources are set to “Background Music #1” and
“none”.
MARC User Manual—Appendix G
141
MARC User Manual—Appendix G
Room Details, cont.
Individual Room Details
Now that we have defined all the room details that are common to all rooms in the group, we will
define the details that differ among them. Click on the “Individual Room Details” button. The details
screen for room 1 will appear. The only details that needs to be changed is that Room 1 has two local
sources instead of one. Change the number of local sources to two by clicking the radio button for
that selection. Now click Forward repeatedly skipping through rooms 2 and 3 to reach the Room
Control screens.
142
MARC User Manual—Appendix G
MARC User Manual—Appendix G
Room Control Stations
There are two room control screens. The first is explantory only (shown below), when you have read
and understood the screen, click “Forward.”
Room Control Template
Because the three rooms in this design are similar, we will use a template to define the common
elements. The screen below shows the template after these common items have been entered. Each
station has two Comet Tails and one Comet 4. The buttons are defined as shown in the project
definition. Only Room 1 differs from the template, since it has two local sources. This details will be
changed in the next step. Click the “Individual Room Controls” button.
MARC User Manual—Appendix G
143
MARC User Manual—Appendix G
This screen shows the change to Room 1’s room control station. The Comet 4 button that was labelled “unused” in the template is now assigned to the local source “Training Audio.”
The Audio Sources Screen
This scren allows you to alter the characteristics of the audio sources in the project. You can change
names, you can change the mono/stereo variable, you can add/delete program sources, you can add/
delete mic/line cards. In this example we need do none of these functions. Press “Forward.”
144
MARC User Manual—Appendix G
MARC User Manual—Appendix G
Audio Output Screen
This screen is primarily informational, but allows the modification of the name and duck amounts of
outputs. Duck amount is the amount that program sources will be lowered when a page occurs. This
amount can be set on a per output basis. Click on the duck amount, type the new value and press
Enter. For this example we accept the default levels and leave the names unchanged. Click “Forward.”
DC Control
This screen allows you to direct paging sources to selected areas of the design. In this example we
are leaving normal and emergency pages as “all call”; i.e. all pages are routed to all rooms. The state
columns allow simulation of contact closures when you are connected to a MARC matrix mixer.
MARC User Manual—Appendix G
145
MARC User Manual—Appendix G
Logic Control
The logic control screen is used to add hardware to a system that requires triggering of external
equipment; e.g. relays, lighting equipment etc. Our example requires no logic control stations. Click
“Forward.”
Saving the File
You will now be prompted for a file name. We have used “Training Facility” for this example. Click
OK.
Completing the Design Wizard
You have now completed the MARC design wizard. You may return to the main menu, view the
sales report or proceed to the hardware installation wizard.
146
MARC User Manual—Appendix G
MARC User Manual — Appendix H
Appendix H : MARC Conference Center Design Example
This design example demonstrates how to use the MARC designer software to implement a more complex
design. This design is for a conference cent which contains three room groups (an RC-2, an RC-3row and
an RC-7) as shown below. On the next page are the design specifications.
By totalling the inputs (24) and outputs (14) from the specification sheet, we see that the design will require
a MARC24L16L matrix mixer.
The system will require three separate room combine panels; one for each room group.
MARC User Manual — Appendix H
147
MARC User Manual — Appendix H
Conference Center Specifications
Program Sources:
1) Background Music #1
2) Background Music #2
3) Normal Page
3) Emergency Page
Total Program inputs: 4
Local Sources:
Meeting Rooms 1-3, 5-7: two monaural local source each
Meeting Room 4: one monaural local source
Seminar Rooms 1-3: one monaural local source each
Media Rooms 1-2: two stereo local sources each
Total local source inputs:
12
1
3
4
20
I/O Totals
Total all audio inputs: 24 (20 local sources, 4 program sources)
Total all audio outputs: 14 ( meetings suite 7, seminar suite 3, media suite 4)
Room Control Stations:
Meeting Rooms 1-7
Local Volume control
Program Volume control
Four source selection buttons
Station Key Lock
Page Privacy
Seminar Rooms 1-3
Local Volume control
Program Volume control
Four source selection buttons
Station Key Lock
Page Privacy
1 Comet Tail
1 Comet Tail
1 Comet 4
1 Comet Tail
1 Comet Tail
1 Comet 4
Media Rooms 1-2
Local Volume control
1 Comet Tail
Program Volume control 1 Comet Tail
Four source selection buttons
1 Comet 4
Station Key Lock
Page Privacy
Default Sources:
Meeting Rooms 1-7 — Background Music #1
Seminar Rooms 1-3 — local sources
Media Rooms 1-2 — Background Music #1
148
MARC User Manual — Appendix H
MARC User Manual — Appendix H
Implementing the Conference Center with the Auto Design Wizard
1) Start the MARC Designer Software
2) From the File Menu, select “New”. You will be asked to confirm the running of the Wizard. Click OK.
Below are the steps in the design wizard with illustrative screens shown.
Name the project by typing the name in the
name box. At right you see the screen with the
name “Conference Center” filled in. Click the
“Forward” button.
The page and program source screen allows the
selecting and naming of sources. Here we check
normal page and emergency page as specified in the
project specifications. We name the two background music sources, and delete the two unused
program sources, using the “Delete Source” button.
The Room Groups screen allows the selection of
topologies for each of the three room groups. As
shown on the first page of this example, there is an
RC-2, an RC-3row and an RC-7 group. Select
each group and change its topology to the required
one (with the “Change Topology” button). You will
need to add a third group, using the “Add Group”
button. Name each group by typing its name in the
name box. The completed room groups screen is
shown at right.
MARC User Manual — Appendix H
149
MARC User Manual — Appendix H
Name the rooms in each group,
using unique names to avoid later
confusion. Type the name in each
name box. As you finish each
group, click “Forward” and the
next group will appear. The name
screen for the Meeting group is
shown at right. Seminar and
Media names are not shown.
Click the “Forward” button.
We have taken the “Room Details Template” path in this design. As can be seen
from the specification page, most rooms
have similar details. We will set up those
details as a template for all rooms, then
change the exceptions in the next step. The
finished template is shown at right. From
this screen we will skip to “Individual
Room Details” which is where we can alter
the rooms whose details do not conform to
the template.
This screen shows Meeting Room 4 which unlike all the
other Meeting Group rooms has only one local source.
We have stepped through Meeting Group rooms 1-3
without change to get to this room that requires a
change from the template. After this we must change the
Seminar Room details which require that the default
sources are the local sources. Also the Media Group
rooms have stereo speakers and local sources.
150
MARC User Manual — Appendix H
MARC User Manual — Appendix H
Similarly to the room details process,
we select the Templates option for
room control stations. All of our room
control stations contain two Comet
Tails and one Comet 4 (as per the
specification page). The template
screen at right shows the template
with all functions configured. This
configuration can be used unmodified
for Meeting and Media groups, but
must be modified for the Seminar
Group (shown in the next step). Click
on the “Individual Room Controls”
button.
This screen shows the finished room
control group for Seminar Room 1.
All three Seminar rooms have their
room control stations configured like
this. Rooms in the Media group can
use the control station template intact,
and so do not need to be changed.
Neither the Audio Inputs screen nor the Audio Outputs screens need to be changed in this design. All
pages, both normal and emergency are routed to all rooms, so no change is needed on the DC control
screen. Likewise this design does not contain any logic control stations, so click the “Finish” button on the
logic control screen. You will be prompted for a file name in which to save your design. This name can be
different than the design’s name on the first screen, but that name is used as a default. After the save is
complete, the design is complete and you may choose the main screen, the hardware installation wizard or
Sales report.
MARC User Manual — Appendix H
151
MARC User Manual — Appendix J
Appendix J: The Mic/Line Card
The mic/line card is a hardware option for the Intelix matrix mixer product line. It provides an 8 channel
preamplifier with software controllable characteristics. Among these characteristics are:
1) Four gain ranges
a) “line” range: no amplification
b) “aux” range: +20 dB amplification
c) “mic” range: +60 db amplification
d) “manual” range: screwdriver adjustment 0db – +60db
2) Phantom power available on a per channel basis (+15V)
3) Signal present and signal peak LEDs on a per channel basis.
4) Each channel has a signal sensor which is capable of sensing -20 to +24 dB. This sensor is readable in
software.
The mic/line card has auto-sensing capabilities. This means that when put in auto mode, the card examines
the specified input and sets its input range to the optimum settings for that input and notifies the user of the
new settings.
Software provides a signal meter for each of the 8 channels.
This screen shot shows the MARC control software for the mic/line card. Note the selectable range,
phantom power, auto setup selection signal level meter, and signal present and clip LEDs.
152
MARC User Manual — Appendix J
MARC User Manual —Appendix L
Appendix L: Troubleshooting RS232 Communication
Use the following procedures to troubleshoot communication problems between the PC and the
MARC matrix mixer.
Be sure that you have completed the steps below:
1) Install the MARC software from the supplied CDROM to your PC.
2) Start the MARC software (see section 5.0). From the main menu select
Communication -> Communication Setup.
3) Configure the PC Communication port for details see sections 5.3-5.6.
Communication Icons
All MARC screens carry a communication icon in the lower left corner. The icon in the lower left
corner will indicate the current state of communication. There are three communication icons:
This icon indicates that the PC is not attempting to communicate with an
MARC matrix mixer. In this mode you can create new files and design
systems for later transfer to an MARC. In PC alone mode some functions
may be disabled.
This icon indicates correct communication between the PC and the MARC.
You can transfer files, monitor the MARC or make live real time changes in
this mode.
This icon indicates a communication failure. Common causes are incorrect
communication port selected, incorrect baud rate, or cabling errors.
DIP Switches
The settings of the DIP switches on the rear of the matrix mixer (shown below) must agree with the
baud rate setting in software (Main -> Communication -> Settings -> Baud Rate).
MARC User Manual —Appendix L
153
MARC User Manual —Appendix L
Testing Communication in the MARC
To test communication in an MARC in unknown condition, take the following steps:
1) Start MARC software.
2) From the opening screen select New File, and give a file name at the prompt, click Save.
3) Click Cancel for auto-design wizard query.
4) Open the communication menu (main -> Communication). Click on the “Show Details”Item.
5) Go back to the communication menu (main -> Communication). Click on
the“Communication Setup” button
6) Verify that the baud rate selected matches the baud rate selected by the DIP switches on the
rear panel of the MARC chassis. (see drawing below)
7) Verify that the Escape byte and checksum item selected matches thechoice selected by the
DIP switches on the rear panel of the MARC chassis. (see drawing below)
8) Verify that the selected port number is correct.
9) Click “Open Comm port” button.
If communication is correctly established, messages will start to receive messages RX.
If communication fails, there will be transmit messages only, with no acknowlege. In this
case click the “Close comm port button” change the comm port number, click the
“Open comm port” button and recheck communication.
Once proper communication is initiated, the communication icon in the lower left corner of
each window will show OK.
Cabling Information
The MARC should be connected to the control PC with a “null modem” cable. Wiring diagrams are
shown below.
RS232 DB9 to DB9 connections for a
null modem cable.
Matrix
female
DB9
2
3
5
2
3
5
The connections of the
MARC’s DB9 connector for RS-232 communication.
RS-232 DB9 to DB-25 connections
for a null modem cable.
Matrix
female
DB9
Controller
DB9
2
3
2
3
7
Controller
DB-25
5
Receive
Transmit
154
2
3
5
Ground
MARC User Manual —Appendix L
MARC User Manual— Index
Index
Symbols
1.0 Designing an External Control, designing 100
A
AC power supply 122
Acknowledge Byte 102
Acknowledgment field 92
acknowledgment field 102
application creation 19
Are You There 98, 105
ASCII values of capital characters 94
ASCII values, table 94
audio input screen 43
audio inputs 23
audio inputs and outputs, connecting 23
audio matrix 12, 13
Audio Outputs 75
audio outputs 23
audio path test 56
audio sources 73
audio wiring test 55
auto-ducking 77
B
baud rate 26, 40, 97
Begin Page 114
Blink codes, remote 64
building wiring 27
Byte Escape Sequence 103
C
Cancel Page 114
checksum 102
Checksum Field 102
checksum field 92
Comet 8 for Wall Sensors, wiring 36
Comet 8, in room combine station 52
Comet 8, wiring 35
Comet Remote Devices 128
Comet Tail 16
Comet-0 129
Comet-4 16
Comet-8 16
Commercial controllers 94
Communication Icons 26, 86, 153
Communication Menu
communication icons 86
Communication setup
Close Port item 84
Upload/Download 81
Communication Recommendation 104
Communication setup
Baud Rate 84
Configuration Menu
Audio Matrix Size Item 67, 68
configuration Menu 67
Room Groups 67
configure the PC Communication port 153
Connect Audio Sources and Outputs 20
Contact closures 129
Control PC, connecting 101
conversion table, decimal to hexadecimal 95
CPU, application 12
CPU, Communication 12
crosspoint board status 89
crosspoint values, changing 87
crosspoint, wiring 14
crosspoints,setting maximum 76
D
Data Bytes 102
DB9 connector for RS-232 communication. 25
DC Control 18, 50, 78
DC power supply 18, 122
Decimal to Hex conversion table 95
Default Sources 46, 72
Design Example, Conference Center 147
Conference Center Specifications 148
Implementing 149
design example, MARC 133, 147
Design Example, Training Facility 133
DIP Switches 18, 26, 40, 97
Discovery Process 62
Duck amounts, setting 77
Duck time, program source 77
E
End Page 114
escape byte 26
Escape Sequence 96, 103
exercising the remotes 64
external power supply, using 120
F
fan, MARC 22
MARC User Manual— Index
155
MARC User Manual— Index
File Menu 66
Exit Item 66
New Item 66
Open Item 66
Save As... Item 66
Save Item 66
floating a balanced input 23
flyback protection 120
forbidden topology 29
Front Panel 18
G
General Communication Application 104
Get All Wall Positions 106
Get Zone/Room Details 111
Goto Remote Single Input Status 118
Goto I/O Volume 112
Goto Program Zone/Room Select 109, 113
Goto Program/Local Deselect 110
Goto Room Local Volume 111
Goto Room Program Volume 110
Goto Wall Positions 107
Ground Lift Jumper 18, 122
Grounding 122, 124
H
Hardware Installation 20
Hardware Installation Wizard 53
Help Menu 91
Hex conversion table 95
Hexadecimal Transmission 94
Commercial controllers 94
I
I Am Here 98, 105
Input Wiring Methods, recommended 24
Installation Menu 81
Crosspoint board status 89
device information 88
internal hardware item 89
Introduction to using the RS232 Commands 98
J
Jedi Mind Control 21
L
Length Bytes 102
Level Control Application 109
Live Crosspoints 87
Live Crosspoints screen 87
Local Sources 46, 72
Local/Program Routing 100
156
Logic Control Station 17
M
MARC Auto Design Wizard 41
MARC software, installing and running 38
Matrix AC Power Connection 123
matrix name 88
maximum audio levels 76
memory reset 88
mesage delay 93
Message Fields 92, 102
Mic/Line Card 152
Mic/Line Cards, adding/removing 74
Mic/line status 90
mirror panel option 43, 69
Mounting the MARC 20, 22
MZP software, installing 38
N
New Item 66
Non Responding Remotes 64
null modem 20, 25, 39, 101
null modem cable 101
null modem cable, wiring for 25
Numbers, room and wall 69
O
Open Item 66
outputs, audio 23
P
Page Destination 50
Page Source 50
Paging Control Application 113
paging ramp time parameters, changing 77
Paging Ramp Times Screen 77
paging ramp times screen 77
Paging, types 74
Password 82
changing 82
enabling/disabling 82
Password, changing 82
Password, enabling 82
PC, connecting to the MARC 39
PC, control, connecting to MARC 25
PC requirements 25
personal computer, requirements 25, 39, 101
Phoenix connectors 20
physical installation 19
power cycle reset 127
power jack, AC 22
power on/off switch 18
MARC User Manual— Index
MARC User Manual— Index
power supplies 122
Power Supplies and grounding 122
AC power supply 122
DC power supply 122
ground lift jumper 122
Matrix AC Power Connection 123
Matrix DC Power Connection 123
Matrix Grounding 124
ReO Power and Grounding 124
power supply, connecting 22
power supply, external 120
Program Select 109
R
ramp down time page source 77
ramp times 77
ramp up time page source 77
ramp up time program source 77
reflections 30
reflections in REO bus 30
relays 129
Remote Blink Codes 64
Remote Discovery 57
Remote Discovery Process 58
Remote Discovery Sequence, importance of 63
Remote Polling, setting 116
Remote Power Connections 33
remote power connections 122
remote recognition 21
Remote, simulate, single input 118
Remote Single Output Report 117
ReO power supply DC 33
ReO bus 18, 27
ReO bus connections 28
ReO bus devices, installing 34
ReO bus, Discovery Mode 62
ReO Bus grounding 32
ReO Bus, Installation 28
ReO bus installation 28
ReO Bus, length of wire 30
ReO bus line loss calculation 32
ReO bus mode, using Discovery Mode 63
ReO bus power 34
ReO Bus power connection 31
REO bus remotes, daisy chaining 28
ReO bus, Run Mode 62
ReO bus termination 30
ReO Bus Topology 29
ReO bus, wire type 28
ReO power supply AC 33
ReO remote, Blink Codes 64
ReO remote, lost 64
ReO Remote Overview 16
MARC User Manual— Index
ReO remotes, power to 27
ReO wire type 28
Report All Wall Positions 107
Report Menu 79
Sales Order 79
Wiring submenu 80
Report Zone/Room Details 112
Report Zone/Room Selection 113
Reserved Bytes 93
reset memory 88
Reset Sequence 127
Resyncronizing sensors 69
return time, program source 77
ring topology 29
Room Combine Screen 69
Room Combine Station 17, 43, 52
Room Control Screen 70
Room Control Station 17, 48, 52
Room Control Template 48
Room Details 45, 72
Room Details Template 45
Room Groups flow chart 67
Room Groups Screen 42
Room Numbers 69
RS-232 baud rate 26
RS-232 checksum and escape bytes 26
RS-232 communication, wiring for 25
RS232 12, 18
RS232 baud rate 26, 40, 97
RS232 Commands, introduction 98
RS232 Commands, introduction to
Are You There 98
I Am Here 98
Set Current Value 99
RS232, communication troubleshooting 153
RS232 Message Fields 92, 102
RS232 Message Protocol 92, 102
RS232 Reserved Bytes 93
S
servicing 132
Set Current Value 99
set duck amount button 77
Set Remote Single Output 119
Signal-to-Noise 125
System Balancing 125
Signal-to-Noise Considerations 125
simulate a page trigger 50
Sources, default 46
Sources, local 46
Start Byte 102
start byte 92
Station Explanations 52
Station Overview 17
157
MARC User Manual— Index
Stereo Pairing 75
Synchronizing controller Application 116
system overview 11
T
Technical Information 131
Dimensions 131
Inputs 131
Outputs 131
Power Requirements 131
Servicing 132
Warranty 132
Template, room control 45, 48
Termination 30
timing delay, message 93
Topology, changing 42, 68
Topology, definition 42
transformer 22
Troubleshooting RS232 Communication 153
Cabling Information 154
Communication Icons 153
DIP Switches 153
Testing Communication 154
U
unbalance an output 23
unbalancing an input 23
V
VCA 13
ventilation 20
version numbers, hardware and software 88
Volume Control 100
W
Wall Control Application 106
Wall Numbers 69
wall sensor 43, 69
polarity control 43
Warranty 132
Web Update 66
Windows® Reference, MARC 65
Wiring Methods, recommended 24
Wiring Reports 80
Z
Zone Select 113
158
MARC User Manual— Index