1
Caracas.bk Seite 1 Donnerstag, 11. April 2002 4:22 16
s
HiPath Hotel Entry
Reception telephone
User manual
Caracas.bk Seite 2 Donnerstag, 11. April 2002 4:22 16
Area of application:
HiPath 3000
Hicom 150 E/H
2
Caracas.bk Seite 3 Donnerstag, 11. April 2002 4:22 16
Contents
Contents
Notes on security and functions ....................................................................... 5
Notes on security .................................................................................................. 5
Notes on functions .................................................................................................. 6
HiPath Hotel Entry for reception and guests ................................................... 7
Key to symbols ........................................................................................................ 9
Control panel of the reception telephone – optiset E memory ............................. 11
Control panel of the reception telephone – optiset E key module ........................ 12
Control panel of the reception telephone – key assignment ............................... 13
The guest arrives (check-in) ............................................................................. 14
Checking in a guest ............................................................................................. 14
Checking in a group ............................................................................................. 16
The guest leaves (check-out) ........................................................................... 18
Checking out a guest ........................................................................................... 18
Call charge administration ............................................................................... 20
Payment of charges (interim bill) ......................................................................... 20
Setting , changing, and cancelling .................................................................. 22
From the reception telephone ............................................................................... 23
Setting up or changing wakeup service ......................................................... 23
Cancelling wakeup service .............................................................................. 25
Checking wakeup lists .................................................................................... 26
From the guest’s telephone ................................................................................ 27
Setting, changing and cancelling .................................................................... 27
Enabling/disabling payphones ........................................................................ 28
Enabling payphones for one call .......................................................................... 28
Enabling payphones for more than one call .......................................................... 29
Disabling payphones for external calls ................................................................ 29
Sending/deleting messages ............................................................................. 30
Sending a message ............................................................................................. 30
Deleting a message ............................................................................................... 31
3
Caracas.bk Seite 4 Donnerstag, 11. April 2002 4:22 16
Contents
Checking and changing features ..................................................................... 32
Checking all rooms .............................................................................................. 32
Checking individual rooms ..................................................................................... 34
Changing guest’s data ........................................................................................... 35
Changing guest’s name .................................................................................. 35
Changing guest’s language ............................................................................ 36
Defining outgoing trunk access ............................................................................. 38
Marking rooms "cleaned" ....................................................................................... 39
From the reception telephone ........................................................................ 39
From the guest’s telephone ............................................................................ 40
Settings for HiPath Hotel Entry ....................................................................... 41
Disabling the reception telephone ....................................................................... 41
Enabling the reception telephone ........................................................................ 41
Changing the password for the reception telephone ............................................ 42
Clearing call charge counters ................................................................................. 44
Changing passwords for call charge counters ....................................................... 46
Deactivating/retaining trunk access following payment ........................................ 48
Changing call charge rate ...................................................................................... 50
Changing minimum charges .................................................................................. 52
Changing check-in default settings ........................................................................ 54
Changing check-out default settings ..................................................................... 55
Changing display format ........................................................................................ 56
Changing VAT rate ................................................................................................. 58
Changing currency ................................................................................................. 60
Changing exchange rate ........................................................................................ 62
Changing password for charge settings ................................................................ 64
Loading room buttons ........................................................................................... 66
Printer settings ...................................................................................................... 67
Printing onto single sheets or continuous paper ............................................ 67
Defining print start .......................................................................................... 68
Activating/deactivating automatic query ................................................................ 69
Setting the default language ................................................................................. 70
Activating/deactivating acoustic alarm ................................................................... 71
Changing hotel data ............................................................................................... 72
Changing the basic settings .................................................................................. 73
Alarm messages ................................................................................................ 74
Deleting alarm message ...................................................................................... 75
Notes .................................................................................................................. 76
"Incorrect code" display ....................................................................................... 76
Index ................................................................................................................... 77
4
Caracas.bk Seite 5 Donnerstag, 11. April 2002 4:22 16
Notes on security and functions
Notes on security and functions
Notes on security
HiPath Hotel Entry complies with the relevant approval and safety regulations. All instruments fulfill
the requirements contained in EU guideline 89/
336/EWG and bear the CE symbol.
All sections which can only be opened with the aid
of tools are maintenance areas. If such a section is
opened or repair work undertaken without proper
authorization, the user may be exposed to physical
danger.
Install the lines so that no one will step on them or
trip over them.
Never insert any objects into the openings in the
equipment.
Make sure that no liquids enter the interior of the
telephone set, as this can cause electric shocks or
short-circuits.
The manufacturer cannot be held liable for indirect
damage, e. g. charges incurred for a connection
which was not properly cleared down.
Lines must never be connected or disconnected
during thunderstorms.
5
Caracas.bk Seite 6 Donnerstag, 11. April 2002 4:22 16
Notes on security and functions
Notes on functions
The reception telephone is not designed for direct
connection to the telecom network. This connection must be made via HiPath system.
Do not operate the reception telephone in the immediate vicinity of radio equipment or mobile
phones.
The telephone must be kept out of range of sources of electrical or magnetic interference, e. g. motors or magnets.
Place the telephone on flat, even surface.
Do not situate the telephone in the vicinity of heat
sources and avoid exposure to direct sunlight.
The telephone must not be installed in rooms in
which large quantities of dust accumulate.
The telephone must not be subjected to severe
shocks or vibrations; do not install the telephone at
an inclined angle.
The outlets for the speaker and the handsfree microphone must always be kept free.
The plastic feet are liable to leave unsightly marks,
especially on lacquered and polished items of
furniture. You are therefore advised always to use
a non-slip underlay on sensitive surfaces.
Clean the telephone with a slightly damp cloth or
with an antistatic cloth. Never use a dry cloth. Do
not use any abrasive cleaning agents.
If your communication platform does not have a
un-interuptible power supply, the reception telephone cannot be operated in the event of a power
failure.
6
Caracas.bk Seite 7 Donnerstag, 11. April 2002 4:22 16
HiPath Hotel Entry for reception and guests
HiPath Hotel Entry for reception and guests
Your reception telephone offers you not only normal voice communication but also special, easy-touse hotel functions.
Using guest/room telephones, you can make internal and/or external calls or access the hotel services on offer (e.g. wake-up call).
Standard DTMF telephones can be installed as
guest telephones.
This manual only describes specific hotel
features e.g. "check-in" and "check-out" or "wakeup".
The necessary control panel with the different key
functions is illustrated on → page 13.
You can continue to use your communication platform functions (→ appropriate user manual).
Aim
To enable you to understand all the functions of the
reception telephone and to activate and use these
functions with the aid of the prompts on the display.
Target group
This user manual is intended primarily for hotel reception personnel , who for example require an
overview of all call data for charging purposes.
7
Caracas.bk Seite 8 Donnerstag, 11. April 2002 4:22 16
HiPath Hotel Entry for reception and guests
Prerequisite
You are familiar with the hotel trade and the use of
display and dialog keys.
If the reception telephone is busy, not all
functions of HiPath Hotel Entry will be
available (e. g. check-in).
8
Caracas.bk Seite 9 Donnerstag, 11. April 2002 4:22 16
HiPath Hotel Entry for reception and guests
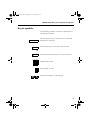
Key to symbols
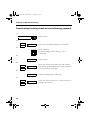
The following symbols are used to represent the
operating procedures:
Press dialog key "Yes"; the function is confirmed,
executed or activated
Press dialog key "Forward" to scroll forward
or
Press dialog key "Backward" to scroll backward
A B CD
E F GH
I J K L
Alphanumeric input
Dial number or code
9
2
Dial these numbers on the keypad
9
Caracas.bk Seite 10 Donnerstag, 11. April 2002 4:22 16
HiPath Hotel Entry for reception and guests
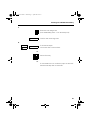
Service menu
Press the key
Press the flashing key
Replace the handset (in the guest’s room)
Lift the handset (in the guest’s room)
Attention! Important note.
Additional information.
(➔ 13) Page reference to further information.
10
Caracas.bk Seite 11 Donnerstag, 11. April 2002 4:22 16
HiPath Hotel Entry for reception and guests
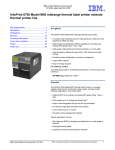
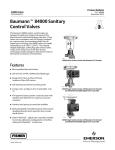
Control panel of the reception telephone – optiset E
memory
Speaker for
tones, open
listening
Keys for telephone settings
Display, 8 rows of
24 characters
Handset
Dialling keypad
ABC
+
GHI
PQRS
–
DEF
MNO
TUV
4 pre-assigned
function keys
8 configurable
keys for telephone
numbers or functions (can’t be pro
grammed as room
keys)
ABC
2
3
GHI
JKL
MNO
4
5
6
PQRS
TUV
WXYZ
7
8
9
0
Service
DEF
1
Number redial
Extension or
Microphone On/Off
0
Speaker
LEDs
W
E
R
T
Y
U
I
O
P
$
A
S
D
F
G
H
J
K
L
[
]
DEL
Z
X
C
V
B
N
M
←
→
EDIT
ALT
↑
↓
CARD
Hands free
microphone
←
Q
Dialog key "Yes" for
confirming
functions
MENU
↵
END
DIAL
Alphanumeric
keypad with
special function
keys
Dialog keys “Forward”
and "Backward" for
scrolling through functions
11
Caracas.bk Seite 12 Donnerstag, 11. April 2002 4:22 16
HiPath Hotel Entry for reception and guests
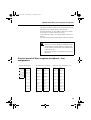
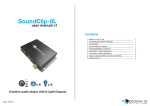
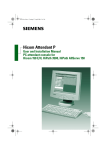
Control panel of the reception telephone – optiset E key
module
A maximum of 4 add-on devices (optiset E key
module) can be connected.
16 keys equipped with:
HiPath Hotel Entry functions
Room numbers
System functions/call numbers
Labelling panels
LEDs
The first add-on device (key module 1) is equipped
with HiPath Hotel Entry functions.
Add-on devices 2 to 4 each have 16 pre-assigned
keys for room numbers (room keys).
If necessary, the keys on add-on devices 2 and 3
(key modules 2 and 3) can be configured with system functions (e.g. call forwarding) instead of with
call numbers.
The keys on add-on device 4 can only be configured with room numbers.
12
Caracas.bk Seite 13 Donnerstag, 11. April 2002 4:22 16
HiPath Hotel Entry for reception and guests
The keys on add-on devices 2, 3 and 4 can be configured on two levels (level 1 and level 2).
Use the Shift key on the add-on device to switch
from level 1 to level 2 and vice versa.
If the Shift key LED is not illuminated = level 1 is
active.
If the Shift key LED is illuminated = level 2 is active.
When you are not performing any hotel
functions on your reception telephone, the
illuminated room key LEDs on add-on devices 2 and 3 indicate the room telephones
currently in use.
Ongoing calls are not indicated on add-on
device 4.
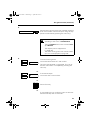
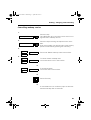
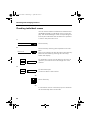
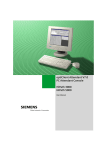
Control panel of the reception telephone – key
assignment
optiset E memory
optiset E key module
optiset E key module 2, 3,4
Service
Check-in
Trunk yes
Room no.
Room no.
Number redial
Check-out
Trunk no
Room no.
Room no.
Extension or
Micro. on/off
Payment
Message ON
Room no.
Room no.
Speaker
Room cleaned
Message OFF
Room no.
Room no.
Wakeup ON
Payphone 1
Room no.
Room no.
Wakeup OFF
Payphone 2
Room no.
Room no.
Shift
Settings
Room no.
Room no.
Query
Alarm
Room no.
Room no.
13
Caracas.bk Seite 14 Donnerstag, 11. April 2002 4:22 16
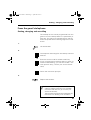
The guest arrives (check-in)
The guest arrives (check-in)
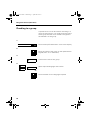
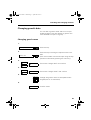
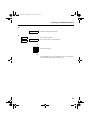
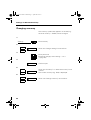
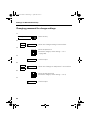
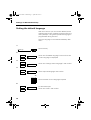
Checking in a guest
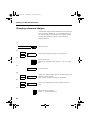
When a new guest arrives, you enter his or her
name, preferred language, and room number.
1.
Press the key. LED illuminates. Look at the display.
Check-in
2.
A B CD
E F GH
I J K L
Enter the guest’s name on the alphanumeric keypad (max. of 17 characters).
3.
Confirm the name
4.
Select the required language and confirm.
or
A B CD
E F GH
I J K L
14
Press the letter for the language required.
Caracas.bk Seite 15 Donnerstag, 11. April 2002 4:22 16
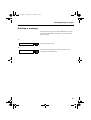
The guest arrives (check-in)
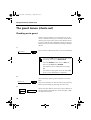
5.
Press the key showing the room number required.
(The room number can also be input using the keypad and confirmed by pressing the "Yes" key.)
Room 16
If a room is occupied, the light corresponding to that room is illuminated.
The light flashes if the room is free but not
yet cleaned.
This display can be suppressed
(→ page 69).
The status of any given room can be called
up if it is not displayed (→ page 34).
6.
To enter further guests:
scroll until "Next Check-in?" and confirm.
The last name entered is suggested. This can either be overwritten or accepted by pressing the
"Yes" key.
or
To terminate input:
scroll until "Quit?" and confirm.
or
A B CD
E F GH
I J K L
Press "End" key.
or
If commands are not confirmed, input is terminated automatically after 10 seconds.
15
Caracas.bk Seite 16 Donnerstag, 11. April 2002 4:22 16
The guest arrives (check-in)
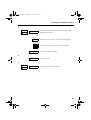
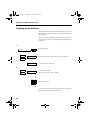
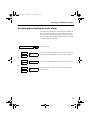
Checking in a group
A special short-cut can be used for checking in a
group of hotel guests. You simply enter the name
of the group and the room numbers assigned to
the members of the group.
1.
Press the key.LED illuminates. Look at the display.
Check-In
2.
A BCD
E F GH
I J K L
Enter the name of the group on the alphanumeric
keypad (max. of 17 characters).
3.
Confirm the name of the group.
4.
Select required language and confirm.
or
A B CD
E F GH
I J K L
16
Press the letter for the language required.
Caracas.bk Seite 17 Donnerstag, 11. April 2002 4:22 16
The guest arrives (check-in)
5.
Press the key with the required room number
(in this case the room number cannot be entered
using the keypad).
Room 16
6.
Press the key with the required room number
(in this case the room number cannot be entered
using the keypad)
Room 17
Enter additional rooms/guests as required.
7.
To enter further guests:
scroll until "Next Check-in?" and confirm.
The name last entered is suggested. This can either be overwritten or accepted by pressing the
"Yes" key.
or
To terminate input:
scroll until "Quit?" and confirm.
or
A B CD
E F GH
I J K L
Press "End" key.
or
If commands are not confirmed, input is terminated automatically after 10 seconds.
17
Caracas.bk Seite 18 Donnerstag, 11. April 2002 4:22 16
The guest leaves (check-out)
The guest leaves (check-out)
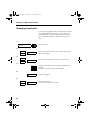
Checking out a guest
When a guest checks out of the hotel, his or her
room is marked as being "not cleaned". All features
relating to the guest are reset to the default values
(e.g.the wake-up call is deleted). All the necessary
barring functions are activated according to default
values.
1.
Check-out
Press the key. LED illuminates. Look at the display.
If a room is free, the LED beside the corresponding room key is illuminated.
The LED flashes if the room is free, but
has not yet not been cleaned.
The display can be suppressed (→ page
69).
The status of any given room can be called
up if it is not displayed (→ page 34).
2.
Room 16
Press the keys showing the required room numbers.
(The room number can also be input using the keypad and confirmed by pressing the "Yes" key.)
3.
Scroll until the display shows the type of billing required ("With intemised bill", "With total bill", "Without bill") and confirm.
18
Caracas.bk Seite 19 Donnerstag, 11. April 2002 4:22 16
The guest leaves (check-out)
4.
To check further guests out:
scroll until "Next Check-out?" and confirm.
or
To terminate input:
scroll until "Quit?" and confirm.
or
A B CD
E F GH
I J K L
Press "End" key.
or
If commands are not confirmed, input is terminated automatically after 10 seconds.
To check out additional guests, including
those belonging to a group, you can press
further room keys or enter and confirm the
required room numbers via the keypad.
The telephone charges are displayed as a
total value.
The telephone bill can be printed out.
If the room telephone is still in use, you can
either cancel or proceed with the checkout operation. Regardless of which option
is chosen, the additional call charges incurred are assigned to the checked-out
room.
A separate bill is then issued for the call in
question (→ page 20).
The cancel check-out option is not available
if a room key was not assigned to the room.
19
Caracas.bk Seite 20 Donnerstag, 11. April 2002 4:22 16
Call charge administration
Call charge administration
The call charge records automatically transferred to
HiPath Hotel Entry contain the room number, date,
time, charges incurred, and the telephone number
of the external called party (depending on the setting).
Up to 4,500 data records can be stored. An alarm
message (→ page 74) is issued at the reception telephone when 80% of this storage capacity has
been reached.
An alarm message is also issued when the call
charge memory is full (→ page 74) and the data is
compressed.
Payment of charges (interim bill)
For interim bills, the telephone charges are printed
out either as a total bill or as an itemized bill.
The telephone charges are reset.
1.
Pay
2.
Room16
3.
Press the key.
Press the keys showing the required room numbers.
(The room number can also be input using the keypad and confirmed by pressing the "Yes" key.)
Scroll until the display shows the type of billing required("With item
ized bill", "With total bill", "Without bill") and confirm.
20
Caracas.bk Seite 21 Donnerstag, 11. April 2002 4:22 16
Call charge administration
4.
To terminate input:
scroll until "Quit?" and confirm.
or
A B CD
E F GH
I J K L
Confirm "Quit?".
or
If commands are not confirmed, input is terminated automatically after 10 seconds.
Depending on the setting, trunk access either remains unchanged or is deactivated
(→ page 48) once an interim bill has been
output.
Reception is informed if a call is made from
the guest’s telephone. The remaining
charges must be calculated when the
guest checks out.
21
Caracas.bk Seite 22 Donnerstag, 11. April 2002 4:22 16
Setting , changing, and cancelling
Setting , changing, and cancelling
The guest is awoken with a wakeup call in the language of his or her choice (specified at check-in).
If the guest does not answer, the wakeup call is
aborted after 30 seconds and then repeated five
minutes later.
After two unsuccessful attempts, the wakeup call
is abandoned and an advisory message sent to the
reception telephone. This message must be
confirmed by personnel at reception.
The wakeup service can be set at reception for
between one and 9 days (min.) for daily wakeup.
But if wakeup is programmed from the guest’s
room, wakeup can only be requested for one specific day or for every day of the week.
22
Caracas.bk Seite 23 Donnerstag, 11. April 2002 4:22 16
Setting , changing, and cancelling
From the reception telephone
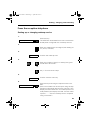
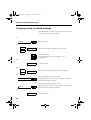
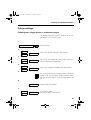
Setting up or changing wakeup service
1.
Press the key.
The LEDS are illuminated for all rooms which have
already been configured with a wakeup service.
Wakeup ON
2.
Enter the wakeup time as 4 digits (with leading zeros, hours, minutes).
3.
Confirm the wake-up time.
4.
1
...
9
Enter the number of days (1 to 9 days) the guest
would like to be woken.
or
5.
*
Key "∗" for more than 9 days.
Confirm with the "Yes" key.
6.
Room 16
Press the keys showing the required room numbers.
(The room number can also be input using the keypad and confirmed by pressing the "Yes" key.) The
display will read "Alarm set". If a wakeup time is already entered, the display will read: "Current wakeup time: .. : .." The new wakeup time is accepted
using "Overwrite?".
23
Caracas.bk Seite 24 Donnerstag, 11. April 2002 4:22 16
Setting , changing, and cancelling
7.
To enter further wakeup calls for other rooms:
scroll until "Next wakeup order?" and confirm.
The last time entered is suggested. This can either
be overwritten or accepted by pressing the "Yes"
key.
or
To terminate input:
scroll until "Quit?" and confirm.
or
A B CD
E F GH
I J K L
Press "End" key.
or
If commands are not confirmed, input is terminated automatically after 10 seconds
24
Caracas.bk Seite 25 Donnerstag, 11. April 2002 4:22 16
Setting , changing, and cancelling
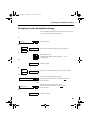
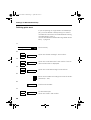
Cancelling wakeup service
1.
Press the key.
The LEDS light up for all rooms which are not configured with a wakeup service.
Wakeup OFF
2.
Press the keys showing the required room numbers.
(The room number can also be input using the keypad and confirmed by pressing the "Yes" key.)
Room 16
3.
Scroll until "Delete wake-up order" and confirm.
4.
To cancel further wakeup calls:
scroll until "Next room?" and confirm.
or
To terminate input:
scroll until "Quit?" and confirm.
or
A B CD
E F GH
I J K L
Press "End" key.
or
If commands are not confirmed, input is terminated automatically after 10 seconds.
25
Caracas.bk Seite 26 Donnerstag, 11. April 2002 4:22 16
Setting , changing, and cancelling
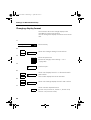
Checking wakeup lists
You can use this function to display the three wakeup lists (successful, unsuccessful, or current).
1.
Press the key.
Query
2.
Scroll until "Wakeup list?" and confirm.
3.
Scroll until required wakeup list ("Successful orders?", "Unsuccessful orders?", "Current orders?")
and confirm.
4.
To terminate input:
scroll until "Quit?" and confirm.
or
A B CD
E F GH
I J K L
Press "End" key.
or
If commands are not confirmed, input is terminated automatically after 10 seconds
26
Caracas.bk Seite 27 Donnerstag, 11. April 2002 4:22 16
Setting , changing, and cancelling
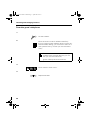
From the guest’s telephone
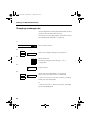
Setting, changing and cancelling
The wakeup service can be programmed from the
guest’s room for wakeup either on a specific day or
each day. The guest is prompted step by step by
means of spoken texts in the language of his or her
choice.
1.
Lift the handset
2.
Call reception and arrange for the wakeup call to be
entered.
or
Enter the access code for HiPath Hotel Entry
(if your communication platform does not have "automatic DTMF dialling", you will have to add "∗ 5 3"
with optiset E entry; consult your service technician!).
Follow the instruction prompts
3.
Replace the handset.
The number for reception and the access
code for HiPath Hotel Entry are available
from the hotel directory (or consult your
service technician).
These codes should also be included in the
instructions for dialling room numbers!
27
Caracas.bk Seite 28 Donnerstag, 11. April 2002 4:22 16
Enabling/disabling payphones
Enabling/disabling payphones
The payphone enabling feature must be activated
to provide guests with external trunk access via
the payphone.
You can enable each payphone for one outside call
or for more than one outside call.
●
In the case of authorisation for one external
call, this feature is automatically disabled after this call and a bill is printed out.
●
In the case of authorisation for more than one
external call, this feature must be disabled
manually. The bill is not printed out until the
feature has been deactivated.
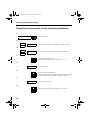
Enabling payphones for one call
Prerequisite: the LED on the key assigned to the
payphone is not illuminated, the payphone is disabled for external calls.
1.
Payphone ..
Press the "payphone" key - LED lights up. The payphone is enabled for one external toll call.
Once the call has been completed, the LED goes
out, external trunk access is automatically cancelled and a bill is automatically printed out.
28
Caracas.bk Seite 29 Donnerstag, 11. April 2002 4:22 16
Enabling/disabling payphones
Enabling payphones for more than one call
Prerequisite: the LED on the key assigned to the
payphone is not illuminated, the payphone is disabled for external calls.
1.
Payphone ..
Press the "payphone" key twice within one second
- LED flashes.
The payphone is enabled for an unlimited number
of external toll calls.
Disabling payphones for external calls
Prerequisite: the LED on the key assigned to the
payphone is illuminated or flashing, i.e. the payphone is enabled for one or more external calls.
1.
Payphone ..
Press the "payphone" key - LED goes out. The payphone is now disabled for external toll calls.
A bill is automatically printed out once the payphone has been disabled.
29
Caracas.bk Seite 30 Donnerstag, 11. April 2002 4:22 16
Sending/deleting messages
Sending/deleting messages
You can signal that a message is waiting at reception on a guest’s room telephone.
Depending on the type of room telephone used,
this is signalled either by an illuminated (message)
LED or by a message on the display.
Sending a message
1.
Message ON
Press the key shown.
(MWL=Message Waiting Lamp)
2.
Room 16
Press the key assigned to the required room. A
light immediately lights up on the room telephone
to signal that a message is waiting.
Active message waiting signals are saved
for each room and are included on the
room list printout (→ page 32) under the
heading MWL ("Message Waiting Lamp").
30
Caracas.bk Seite 31 Donnerstag, 11. April 2002 4:22 16
Sending/deleting messages
Deleting a message
The message signal should be deleted once the
guest has called back reception or has received
the message.
1.
Message OFF
Press the key shown.
2.
Room 16
Press the key assigned to the required room.
The signal is deactivated.
31
Caracas.bk Seite 32 Donnerstag, 11. April 2002 4:22 16
Checking and changing features
Checking and changing features
Checking all rooms
You can check the features programmed on the
display and with the illuminated room key LEDs.
●
The illuminated LEDs on the corresponding
room keys show that the feature is programmed for the relevant room.
●
The numbers of all rooms for which the feature is programmed is displayed.
You can activate the following features by pressing
the appropriate keys:
32
●
Room cleaned → uncleaned room
●
Trunk yes →
Room with outside trunk access
●
Trunk no →
Room without outside trunk access
●
Wakeup ON →
Room with programmed wakeup request
●
Wakeup OFF →
Room without programmed wakeup request
●
Payment →
Room with outstanding bill, charges
●
Check-in →
Occupied and free-but-not-cleaned room
●
Check-out →
Free to be occupied, free-but-not-cleaned room
●
Massage ON →
Room with message waiting
●
Message OFF →
Room with no message waiting
Caracas.bk Seite 33 Donnerstag, 11. April 2002 4:22 16
Checking and changing features
1.
Press the key.
Query
2.
Press the keys for the features required, e.g.
"Room cleaned". Rooms that have not been
cleaned will be displayed.
Room cleaned
To print out lists of the features required: scroll until
"Print list?" and confirm.
3.
To terminate input:
scroll until "Quit?" and confirm.
or
A B CD
E F GH
I J K L
Press "End" key.
or
If commands are not confirmed, input is terminated automatically after 10 seconds.
33
Caracas.bk Seite 34 Donnerstag, 11. April 2002 4:22 16
Checking and changing features
Checking individual rooms
You can check whether all features have been activated/deactivated for individual rooms on the display. The illuminated light at the corresponding feature key also indicates that the feature in question
is set for that particular room.
1.
Press the key.
Query
2.
Press the keys showing the required rroom numbers.
(The room number can also be input using the keypad and confirmed by pressing the "Yes" key.)
Check the display.
Room 16
For example, to print out call data for the room in
question, scroll until "Print call charge list?" and
confirm.
3.
To terminate input:
scroll until "Quit?" and confirm.
or
A B CD
E F GH
I J K L
Press "End" key.
or
If commands are not confirmed, input is terminated automatically after 10 seconds.
34
Caracas.bk Seite 35 Donnerstag, 11. April 2002 4:22 16
Checking and changing features
Changing guest’s data
You can alter a guest’s name and his or her preferred language. This also applies to guests who
have checked in as part of a group.
Changing guest’s name
1.
Press the key.
Query
2.
Press the keys showing the required room numbers
(The room number can also be input using the keypad and confirmed by pressing the "Yes" key.)
Room 16
3.
Scroll until "Change data?" and confirm.
4.
Scroll until "Change name?" and confirm.
5.
A B CD
E F GH
I J K L
Change the guest’s name on the alphanumeric
keypad (max.of 17 characters).
6.
Confirm name.
35
Caracas.bk Seite 36 Donnerstag, 11. April 2002 4:22 16
Checking and changing features
7.
Confirm "Quit?" .
8.
To terminate input:
scroll until "Quit?" and confirm.
or
A B CD
E F GH
I J K L
Press "End" key.
or
If commands are not confirmed, input is terminated automatically after 10 seconds.
Changing guest’s language
1.
Query
2.
Room 16
Press the key.
Press the keys showing the required room numbers.
(The room number can also be input using the keypad and confirmed by pressing the "Yes" key.)
3.
Scroll until "Change data?" and confirm
36
Caracas.bk Seite 37 Donnerstag, 11. April 2002 4:22 16
Checking and changing features
4.
Scroll until "Change language?" and confirm.
5.
Select the required language and confirm.
or
A B CD
E F GH
I J K L
Press the letters for the required language.
6.
Confirm "Quit?".
7.
To terminate input:
scroll until "Quit?" and confirm.
or
A B CD
E F GH
I J K L
Press "End" key.
or
If commands are not confirmed, input is terminated automatically after 10 seconds.
37
Caracas.bk Seite 38 Donnerstag, 11. April 2002 4:22 16
Checking and changing features
Defining outgoing trunk access
You can change the general trunk access preset for
each room → page 54.
1.
Press the required function keys
Trunk no
or
Trunk yes
2.
Room 16
38
Press the required function keys
Press the keys showing the required room numbers.
(The room number can also be input using the keypad and confirmed by pressing the "Yes" key.)
Caracas.bk Seite 39 Donnerstag, 11. April 2002 4:22 16
Checking and changing features
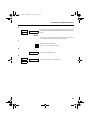
Marking rooms "cleaned"
When a room has been vacated and then cleaned
for the next guest(s), you can mark it as being
"cleaned". You can do this using either the reception telephone or the guest’s telephone.
From the reception telephone
1.
Press key.
Room cleaned
2.
Press the keys showing the required room numbers.
(The room number can also be input using the keypad and confirmed by pressing the "Yes" key.)
Room 16
3.
To terminate input:
scroll until "Quit?" and confirm.
or
A B CD
E F GH
I J K L
Press "End" key.
or
If commands are not confirmed, input is terminated automatically after 10 seconds.
39
Caracas.bk Seite 40 Donnerstag, 11. April 2002 4:22 16
Checking and changing features
From the guest’s telephone
1.
Lift the handset.
2.
Enter the access code for HiPath Hotel Entry
(if your communication platform does not have "automatic DTMF dialling", you will have to add "∗ 5 3"
with optiset E entry; consult your service technician!).
The access code for HiPath Hotel Entry is
available from the hotel directory (or consult your service technician).
Ignore wakeup call announcement.
3.
9
1
Enter code for "Clean room".
4.
Replace handset.
40
Caracas.bk Seite 41 Donnerstag, 11. April 2002 4:22 16
Settings for HiPath Hotel Entry
Settings for HiPath Hotel Entry
Disabling the reception telephone
1.
Press the key.
Settings
2.
Scroll until "Reception telephone?" and confirm.
3.
Scroll until "Lock telephone?" and confirm.
Enabling the reception telephone
1.
A BCD
E F GH
I J K L
Press any digit key.
Look at the display.
A BCD
E F GH
I J K L
Enter the password for the reception telephone
(maximum 5 digits, basic setting = 1 2 3
→ page 42).
2.
3.
Confirm input.
You have any number of attempts
to enter the password correctly.
41
Caracas.bk Seite 42 Donnerstag, 11. April 2002 4:22 16
Settings for HiPath Hotel Entry
Changing the password for the reception telephone
1.
Press the key.
Settings
2.
Scroll until "Reception telephone?" and confirm.
3.
Scroll until "Change password?" and confirm.
4.
A BCD
E F GH
I J K L
Enter the old password
(maximum 5 digits, basic setting = 1 2 3).
5.
Confirm input.
6.
A BCD
E F GH
I J K L
Enter the new password
(max. 5 digits: check letters, numbers, and special
characters observing upper and lower case).
7.
Confirm password.
8.
A BCD
E F GH
I J K L
42
Enter the new password again to confirm it.
Caracas.bk Seite 43 Donnerstag, 11. April 2002 4:22 16
Settings for HiPath Hotel Entry
9.
Confirm input.
10.
To terminate input:
scroll until "Quit?" and confirm.
or
A B CD
E F GH
I J K L
Press "End" key.
or
If commands are not confirmed, input is terminated automatically after 10 seconds.
You have any number of attempts
to enter the password correctly.
43
Caracas.bk Seite 44 Donnerstag, 11. April 2002 4:22 16
Settings for HiPath Hotel Entry
Clearing call charge counters
HiPath Hotel Entry has three call charge counters
which continually register call charges incurred.
Two of the three counters can be cleared or reset
as required. The total call charge counter cannot be
cleared.
1.
Press the key.
Settings
2.
Scroll until "Call charge counters?" and confirm.
3.
Scroll until the counter required.
e.g. "Delete transfer total?" or "Delete accounting
total?" and confirm.
4.
A BCD
E F GH
I J K L
Enter the password for transfer total or accounting
total
(maximum 5 digits, basic setting = 1 2 3
→ page 46).
5.
Confirm input.
44
Caracas.bk Seite 45 Donnerstag, 11. April 2002 4:22 16
Settings for HiPath Hotel Entry
6.
To terminate input:
scroll until "Quit?" and confirm.
or
A B CD
E F GH
I J K L
Press "End" key.
or
If commands are not confirmed, input is terminated automatically after 10 seconds.
You have any number of attempts
to enter the password correctly.
The total call charge counter cannot be
cleared.
45
Caracas.bk Seite 46 Donnerstag, 11. April 2002 4:22 16
Settings for HiPath Hotel Entry
Changing passwords for call charge counters
1.
Press the key.
Settings
2.
Scroll until "Call charge counters?" and confirm.
3.
Scroll until "Change TT password?" or "Change AT
password?" and confirm.
4.
A BCD
E F GH
I J K L
Enter the old password
(maximum 5 digits, basic setting = 1 2 3).
5.
Confirm input.
6.
A BCD
E F GH
I J K L
Enter the new password
(maximum 5 digits: check letters, numbers, and
special characters observing upper and lower
7.
Confirm input.
8.
A BCD
E F GH
I J K L
46
Enter the new password again to confirm it.
Caracas.bk Seite 47 Donnerstag, 11. April 2002 4:22 16
Settings for HiPath Hotel Entry
9.
Confirm input.
10.
To terminate input:
scroll until "Quit?" and confirm.
or
A B CD
E F GH
I J K L
Press "End" key.
or
If commands are not confirmed, input is terminated automatically after 10 seconds.
You have any number of attempts
to enter the password correctly.
47
Caracas.bk Seite 48 Donnerstag, 11. April 2002 4:22 16
Settings for HiPath Hotel Entry
Deactivating/retaining trunk access following payment
1.
Press the key.
Settings
2.
Scroll until "Call charge settings?" and confirm.
3.
A BCD
E F GH
I J K L
Enter password
(maximum 5 digits, basic setting = 1 2 3
→ page 62).
4.
Confirm input.
5.
Scroll until "Trunk access after pay" and confirm.
The setting will be displayed as: "Trunk access:no"
or "Trung access: unchanged" .
6.
Confirm "Change access after pay" .
7.
Scroll until "Trunk access:no" or "Trunk access: unchanged" and confirm.
48
Caracas.bk Seite 49 Donnerstag, 11. April 2002 4:22 16
Settings for HiPath Hotel Entry
8.
To terminate input:
scroll until "Quit?" and confirm.
or
A B CD
E F GH
I J K L
Press "End" key.
or
If commands are not confirmed, input is terminated automatically after 10 seconds.
49
Caracas.bk Seite 50 Donnerstag, 11. April 2002 4:22 16
Settings for HiPath Hotel Entry
Changing call charge rate
If necessary, you can define a factor which is used
for multiplying the metering pulses (charge per
metering pulse). Three different call charge factors
can be defined, e. g. for the guest’s telephones
(guest), telephone booths (booth) or management
telephones (management).
1.
Press the key.
Settings
2.
Scroll until "Charge settings?" and confirm.
3.
A BCD
E F GH
I J K L
Enter password
(maximum 5 digits, basic setting = 1 2 3
→ page 62).
4.
Confirm input.
5.
Scroll until "Charge rate: guest?" or "Charge rate:
payphone?" or "charge rate: mgmt?" and confirm.
The current factor is displayed.
6.
Scroll until "Change rate?" and confirm.
50
Caracas.bk Seite 51 Donnerstag, 11. April 2002 4:22 16
Settings for HiPath Hotel Entry
7.
Enter the call charge rate
(max. 9999.999; press "∗" for decimal point).
Confirm the call charge rate.
8.
To terminate input:
scroll until "Quit?" and confirm.
or
A B CD
E F GH
I J K L
Press "End" key.
or
If commands are not confirmed, input is terminated automatically after 10 seconds.
51
Caracas.bk Seite 52 Donnerstag, 11. April 2002 4:22 16
Settings for HiPath Hotel Entry
Changing minimum charges
A minimum charge can be defined for every toll call
from a guest’s telephone or a hotel payphone. If
the call charges are lower than this figure, the bill
will be calculated according to the minimum
charge entered.
1.
Press the key.
Settings
2.
Scroll until "Charge settings?" and confirm.
3.
A BCD
E F GH
I J K L
Enter password
(maximum 5 digits, basic setting = 1 2 3 → page
62).
4.
Confirm input.
5.
Scroll until "Min charge: guest?" or "Min charge: payphone?" and confirm.
The current minimum charge is displayed.
6.
Scroll until "Change minimum charge?" and confirm.
7.
Enter minimum charge
(press "∗" for decimal point).
52
Caracas.bk Seite 53 Donnerstag, 11. April 2002 4:22 16
Settings for HiPath Hotel Entry
8.
Confirm minimum charge.
9.
To terminate input:
scroll until "Quit?" and confirm.
or
A B CD
E F GH
I J K L
Press "End" key.
or
If commands are not confirmed, input is terminated automatically after 10 seconds.
53
Caracas.bk Seite 54 Donnerstag, 11. April 2002 4:22 16
Settings for HiPath Hotel Entry
Changing check-in default settings
You can define whether trunk access is set to yes
or no when the guest checks in.
1.
Press the key.
Settings
2.
Scroll until "Charge settings?" and confirm.
3.
A BCD
E F GH
I J K L
Enter password
(maximum 5 digits, basic setting = 1 2 3
→ page 62).
4.
Confirm input.
5.
Scroll until "Standard Check-in?" and confirm.
6.
Press the required function keys.
The guests have trunk access. The key will flash
when this setting is active.
Trunk yes
or
Trunk no
Press the required function keys.
The guests do not have trunk access. The key will
flash when this setting is active.
7.
Confirm "Quit?".
54
Caracas.bk Seite 55 Donnerstag, 11. April 2002 4:22 16
Settings for HiPath Hotel Entry
Changing check-out default settings
You can define whether trunk access is set to yes
or no when the guest checks out.
1.
Press the key.
Settings
2.
Scroll until "Charge settings?" and confirm.
3.
A BCD
E F GH
I J K L
Enter password
(maximum 5 digits, basic setting = 1 2 3
→ page 62).
4.
Confirm input.
5.
Scroll until "Standard Check-out?" and confirm.
6.
Press the required function keys.
Following check-out the room does not have
trunk access.
Trunk no
or
Trunk yes
Press the required function keys.
Following check-out the room still has
trunk access.
7.
Confirm "Quit?".
55
Caracas.bk Seite 56 Donnerstag, 11. April 2002 4:22 16
Settings for HiPath Hotel Entry
Changing display format
This function allows the charge display to be
rounded off in the local currency.
You can change the display format for both currencies.
1.
Press the key.
Settings
2.
Scroll until "Charge settings?" and confirm.
3.
A BCD
E F GH
I J K L
Enter the password
(maximum 5 digits, basic setting = 1 2 3
→ page 62).
4.
Confirm input .
5.
Scroll until "Display format?" or "Second format?"
and confirm.
The current display format can be seen.
6.
Scroll until "Change display format?" and confirm.
7.
Scroll until the required format
(format: 100; format: 10; format: 1; format: 0.10;
format: 0.01; format: 0.001).
56
Caracas.bk Seite 57 Donnerstag, 11. April 2002 4:22 16
Settings for HiPath Hotel Entry
8.
Confirm format.
9.
Scroll until "Quit?" and confirm.
57
Caracas.bk Seite 58 Donnerstag, 11. April 2002 4:22 16
Settings for HiPath Hotel Entry
Changing VAT rate
1.
Press the key.
Settings
2.
Scroll until "Charge settings?" and confirm.
3.
A BCD
E F GH
I J K L
Enter the password
(maximum 5 digits, basic setting = 1 2 3 → page
62).
4.
Confirm input.
5.
Scroll until "VAT rate ?" and confirm.
The current rate is displayed.
6.
Scroll until "Change VAT rate ?" and confirm.
7.
Enter VAT rate
(max. 9999.999; press "∗" for decimal point).
8.
Confirm VAT rate.
9.
58
Caracas.bk Seite 59 Donnerstag, 11. April 2002 4:22 16
Settings for HiPath Hotel Entry
Scroll until "Quit?" and confirm.
59
Caracas.bk Seite 60 Donnerstag, 11. April 2002 4:22 16
Settings for HiPath Hotel Entry
Changing currency
The currency symbol that appears on the bill (e.g.
the local currency + EURO) can be changed.
1.
Press the key.
Settings
2.
Scroll until "Charge settings?" and confirm.
3.
A BCD
E F GH
I J K L
Enter password
(maximum 5 digits, basic setting = 1 2 3
→ page 62).
4.
Confirm input.
5.
Scroll until "Currency?" or "Alternate currency?" and
confirm.
The current currency (e.g. DM) is displayed.
6.
Scroll until "Change currency?" and confirm.
60
Caracas.bk Seite 61 Donnerstag, 11. April 2002 4:22 16
Settings for HiPath Hotel Entry
7.
Scroll until the required currency symbol is displayed and confirm.
or
Scroll until no currency symbols are displayed.
A BCD
E F GH
I J K L
Enter currency symbol (maximum 3 digits).
Confirm currency symbol.
8.
Confirm input.
9.
Scroll until "Quit?" and confirm.
61
Caracas.bk Seite 62 Donnerstag, 11. April 2002 4:22 16
Settings for HiPath Hotel Entry
Changing exchange rate
You can define the exchange rate between the first
currency and the alternate currency.
This function is only applicable if a second currency
has already been defined (→ page 60).
1.
Press the key shown.
Settings
2.
Scroll until "Charge settings?" and confirm.
3.
A BCD
E F GH
I J K L
Enter password
(maximum 5 digits, basic setting = 1 2 3
→ page 62).
4.
Confirm input.
5.
Scroll until "Exchange Rate?" and confirm.
The current conversion factor is displayed:
"∗ rate: xxxx.xxxxx" (= the first currency is multiplied by the rate displayed).
or
"/ rate: xxxx.xxxxx" (= the first currency is divided
by the rate displayed).
62
Caracas.bk Seite 63 Donnerstag, 11. April 2002 4:22 16
Settings for HiPath Hotel Entry
6.
Scroll until "*rate?" (=multiplication) to change the
calculation method displayed (multiplication or division)
and/or
Scroll until "Change conversion rate?" and confirm
to change the conversion rate displayed.
7.
Enter the exchange rate
(press "∗" for decimal point).
8.
Confirm exchange rate.
9.
Scroll until "Quit?" and confirm.
63
Caracas.bk Seite 64 Donnerstag, 11. April 2002 4:22 16
Settings for HiPath Hotel Entry
Changing password for charge settings
1.
Press the key.
Settings
2.
Scroll until "Charge settings?" and confirm.
3.
A BCD
E F GH
I J K L
Enter the password
(maximum 5 digits, basic setting = 1 2 3
→ page 62).
4.
Confirm input.
5.
Scroll until "Change ch. def.passw.?" and confirm.
6.
A BCD
E F GH
I J K L
Enter the old password
(maximum 5 digits, basic setting = 1 2 3).
7.
Confirm input.
64
Caracas.bk Seite 65 Donnerstag, 11. April 2002 4:22 16
Settings for HiPath Hotel Entry
8.
A BCD
E F GH
I J K L
Enter the new password
(maximum 5 digits: check letters, numbers, and
special characters observing upper and lower
9.
Confirm password.
10.
A BCD
E F GH
I J K L
Enter the new password again to confirm it.
11.
Confirm input.
12.
To terminate input:
Scroll until "Quit?" and confirm.
or
A B CD
E F GH
I J K L
Press "End" key.
or
If commands are not confirmed, input is terminated automatically after 10 seconds.
You have any number of attempts
to enter the password correctly.
65
Caracas.bk Seite 66 Donnerstag, 11. April 2002 4:22 16
Settings for HiPath Hotel Entry
Loading room buttons
This procedure synchronizes the functions of the
optiset E key module keys with your communication platform.
You only need to perform this function if you have
assigned new keys or changed the existing key assignment.
1.
Press the key.
Settings
2.
Scroll until "Load room buttons?" and confirm.
3.
Confirm using "Yes" key.
4.
To terminate input:
Scroll until "Quit?" and confirm.
or
A B CD
E F GH
I J K L
Press "End" key.
or
If commands are not confirmed, input is terminated automatically after 10 seconds.
66
Caracas.bk Seite 67 Donnerstag, 11. April 2002 4:22 16
Settings for HiPath Hotel Entry
Printer settings
Printing onto single sheets or continuous paper
The HiPath Hotel Entry printer must be set to single sheets or continuous paper.
1.
Settings
Press the key.
2.
Scroll until "Printer settings?" and confirm.
3.
Scroll until "Line feed end?" and confirm. The current line feed end is displayed.
4.
Scroll until "Change line feed end?" and confirm.
5.
For printing on continuous paper, enter a figure between 0..99. This specifies the line number where
the next printout begins. To print single sheets, enter "∗".
6.
Confirm the line number.
7.
To terminate input:
Scroll until "Quit?" and confirm.
67
Caracas.bk Seite 68 Donnerstag, 11. April 2002 4:22 16
Settings for HiPath Hotel Entry
Defining print start
If you are printing on single sheets of headed paper, you must define where printing is to start in
accordance with the size of the letterhead. Printing
normally begins at line 1.
You can also define a letterhead using HiPath Hotel
Entry. → page 72.
1.
Settings
Press the key.
2.
Scroll until "Printer settings?" and confirm.
3.
Scroll until "Line feed start?" and confirm. The current line feed start is displayed.
4.
Scroll until "Line feed change?" and confirm.
5.
Enter a line number according to the size of the letterhead (0 ... 99).
6.
Confirm line number.
7.
To terminate input:
Scroll until "Quit?" and confirm.
68
Caracas.bk Seite 69 Donnerstag, 11. April 2002 4:22 16
Settings for HiPath Hotel Entry
Activating/deactivating automatic query
During check-in or check-out, the room button
lights on the optiset E key modules automatically
indicate if a room is free or occupied.
●
At check-in
LED on = room is occupied.
LED flashing= room is free but has not yet
been cleaned.
LED out = room free.
●
At check-out
LED on = room is free.
LED flashing= room is free but has not yet
been cleaned.
LED out = room occupied.
When you press the feature keys, corresponding
LEDs are also automatically activated → page 32,
page 34.
The automatic display can be switched on or off as
required.
1.
Settings
Press the key.
2.
Scroll until "Automatic query?" and confirm. The
current setting is displayed. "Automatic query: yes/
no" .
3.
Scroll until "Change automatic query?" and confirm.
4.
To switch over to "Yes" or "No": Scroll until "Quit?"
and confirm.
69
Caracas.bk Seite 70 Donnerstag, 11. April 2002 4:22 16
Settings for HiPath Hotel Entry
Setting the default language
With this function you can set the default (standard) language for the complete system and for the
menu prompts. The guest’s preferred language is
programmed during check-in.
The new language is activated immediately after
"Quit".
1.
Press the key.
Settings
2.
Scroll until "Standard language?" and confirm the
current language is displayed.
3.
Scroll until "Change stand. language?" and confirm.
4.
Select required language and confirm.
or
A B CD
E F GH
I J K L
Press the letter for the language required.
5.
To terminate input:
Scroll until "Quit?" and confirm.
70
Caracas.bk Seite 71 Donnerstag, 11. April 2002 4:22 16
Settings for HiPath Hotel Entry
Activating/deactivating acoustic alarm
The alarm key flashes on the reception telephone
during alarm messages (→ page 74) and a corresponding message is displayed. The alarm signal is
also sounded. This audible signal can be activated
or deactivated as required.
1.
Settings
Press the key.
2.
Scroll until "Acoustic alarm?" and confirm. The current setting is displayed. "Acoustic alarm yes/no".
3.
Scroll until "Change acoustic alarm?" and confirm.
4.
To switch over to "Yes" or "No": Scroll until "Quit?"
and confirm.
71
Caracas.bk Seite 72 Donnerstag, 11. April 2002 4:22 16
Settings for HiPath Hotel Entry
Changing hotel data
If you are using paper with no letterhead or continuous feed paper for printing, you can enter your
own letterhead with hotel data (name, address,
etc.). The letterhead then appears on your printouts.
1.
Press the key.
Settings
2.
Scroll until "Hotel name?" and confirm.The hotel
data is displayed.
3.
Scroll until "Change hotel name?" and confirm.
4.
A BCD
E F GH
I J K L
Change the hotel name, using the alphanumeric
keypad
(maximum 4 lines each with 24 digits).
5.
Confirm changes.
6.
To terminate input:
Scroll until "Quit?" and confirm.
72
Caracas.bk Seite 73 Donnerstag, 11. April 2002 4:22 16
Settings for HiPath Hotel Entry
Changing the basic settings
Your service technician can program additional HiPath Hotel Entry functions using the "Basic settings?" menu.
To do this, your service technician must enter a
password that only he/she knows. This is not the
same as the conventional passwords used inHiPath Hotel Entry (e.g. for charge settings).
73
Caracas.bk Seite 74 Donnerstag, 11. April 2002 4:22 16
Alarm messages
Alarm messages
The alarm key light flashes on the reception telephone during alarm messages and the corresponding message is displayed. An alarm signal is also
sounded. This audible signal can be activated or
deactivated as required (→ page 71).
The following alarm messages may occur during
operation:
Alarm message:
Possible cause:
Corrective measure:
Printer is not responding
The printer is
switched off.
Switch the printer on.
The printer is not
connected.
Connect the printer and switch it on.
The printer is offline. Switch the printer to online (if necessary, check why the printer is offline,
e.g. because of a paper blockage).
Wakeup unsuccessful
74
There is no paper in
the printer.
Insert paper, switch the printer to
online.
The guest has not
responded to the
wakeup signal.
Waken the guest.
Caracas.bk Seite 75 Donnerstag, 11. April 2002 4:22 16
Alarm messages
Alarm message:
Possible cause:
Corrective measure:
Call charge memory 80% full
– alerting signal
There are more than You can create memory space by issu3,600 data records in ing interim bills.
the call charge memory, with the result
that it is 80% full.
Call charge memory full
There are 4,500 data
records in the call
charge memory, with
the result that it is
full.
The data records belonging to unoccupied rooms are erased automatically.
If necessary, the data records for all
calls already paid for are deleted.
If this is not sufficient to create memory space, instead of itemized charge
registration only the number of calls
and their total amounts are metered for
each hotel room.
As soon as sufficient data records
become available again, the system
reverts automatically to itemized registration.
Deleting alarm message
1.
Alarm
Press the flashing key. The corresponding message is displayed(→ page 74).
2.
Scroll until "Delete message?" and confirm to delete message.
3.
To terminate input:
scroll until "Quit?" and confirm.
75
Caracas.bk Seite 76 Donnerstag, 11. April 2002 4:22 16
Notes
Notes
"Incorrect code" display
If your HiPath Hotel Entry is connected to a Hicom
150 E Office (version 2.2) system and "Incorrect
code" appears on the reception telephone during
check-in or check-out and an advisory beep
sounds, your communication platform password
does not correspond to the HiPath Hotel Entry
password.
Please contact a service technician.
76
Caracas.bk Seite 77 Donnerstag, 11. April 2002 4:22 16
Index
Index
A
Acoustic alarm on/off ....................... 71
Alarm messages ............................... 74
Alternate currency ............................ 60
display format .............................. 56
exchange rate .............................. 62
Automatic query on/off ..................... 69
B
Basic settings ................................... 73
Bill ..................................................... 21
C
Call charge counters ......................... 46
clearing ........................................ 44
password ..................................... 46
Call charge memory 80% full ........... 75
Call charge memory full .................... 75
Call charge meters
password ..................................... 46
Call charge rate ................................. 50
Call charge setting password ........... 64
Changing .......................................... 60
Changing guest’s data ...................... 35
Changing guest’s language .............. 36
Changing guest’s name .................... 35
Check-in ............................................ 14
changing default setting .............. 54
Checking in ....................................... 14
group ........................................... 16
Checking in group ............................. 16
Checking in guest ............................. 14
Checking out .................................... 18
Checking out guest .......................... 18
Checking rooms
all ................................................. 32
individually ................................... 34
Checking wakeup service ................. 26
Checking/changing features ............. 32
changing guest’s data ................. 35
changing guest’s language .......... 36
changing guest’s name ............... 35
checking individual rooms ........... 34
Check-out ......................................... 18
changing default setting .............. 55
Continuous paper printout ................ 67
Control panel of reception telephone 13
Cost factor (call charge rate) ............. 50
Currency ........................................... 60
alternate currency ........................ 60
display format .............................. 56
Currency exchange rate
alternate currency ........................ 62
D
Default language for reception
telephone ......................................... 70
Default setting
changing check-in ........................ 54
changing check-out ..................... 55
Display format .................................. 56
currency/alternate currency ......... 56
E
External trunk access, defining
payphones ................................... 28
F
Features, checking/changing
checking all rooms ....................... 32
G
Guest telephone=room telephone .. 27,
40
H
HiPath Hotel Entry settings .............. 41
Hotel data ......................................... 72
I
Incorrect code ................................... 76
Interim bill ......................................... 20
77
Caracas.bk Seite 78 Donnerstag, 11. April 2002 4:22 16
Index
K
Key assignment of reception telephone
13
Key labeling of reception telephone . 13
L
Labeling reception telephone ........... 13
Line feed
end .............................................. 67
start ............................................. 68
Loading room buttons ...................... 66
M
Marking rooms "cleaned"
from guest telephone .................. 40
from reception telephone ............ 39
Message
deleting ....................................... 31
sending ........................................ 30
Minimum charge (cost) .................... 52
Minimum cost (charge) .................... 52
N
Notes ................................................ 76
O
Outgoing trunk access, defining ....... 38
P
Password
call charge counters .................... 46
call charge setting ....................... 64
reception telephone .................... 42
Payment ........................................... 20
Payment of charges (interim bill) ...... 20
Payphones, locking ........................... 29
Payphones, unlocking
for one call ................................... 28
more than one call ....................... 29
Printer not ready ............................... 74
Printer settings ................................. 67
78
Printing
continuous paper ......................... 67
single sheets ............................... 67
R
Reception telephone
default language .......................... 70
key assignment ........................... 13
locking ......................................... 41
password ..................................... 42
unlocking ..................................... 41
Room telephone=guest telephone .. 27,
40
S
Single sheet printout ........................ 67
defining start ............................... 68
T
Total bill ............................................ 20
Trunk access following payment ...... 48
Trunk access, defining ...................... 38
Trunk access, defining outgoing ....... 38
U
Unsuccessful wakeup ...................... 74
V
VAT ................................................... 58
W
Wakeup service ................................ 22
cancelling ............................... 25, 27
setting up or changing ................. 23
Wakeup unsuccessful ...................... 74
*1PA31003-E1320-B682-3-7619*
1P A31003-E1320-B682-3-7619
The information in this document contains general descriptions of the technical options
available, which do not always have to be present in individual cases.
The required features should therefore be specified in each individual case at the time of
closing the contract.
Ref. No.: A31003-E1320-B682-3-7619 • Printed in the Federal Republic of Germany • BA 20.03.2002
Subject to availability. Right of modification reserved.
Caracas.bk Seite 79 Donnerstag, 11. April 2002 4:22 16
© Siemens AG 2002 • Information and Communication Networks • Hofmannstr. 51 • D-81359 Munich •