1
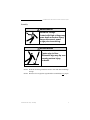
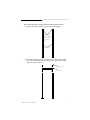
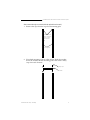
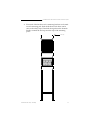
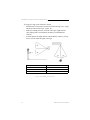
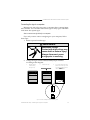
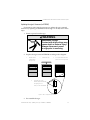
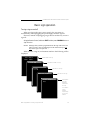
in
A
ru ss
ct em
io b
ns ly
in
si
de
st
U s e r M a nu a l
for ALPHA ™ Director
with Smart Alec option
The
ALPHA Director
with Smart Alec
option
Display up to
26 pages of
information
© 1997 Adaptive Micro Systems
Form No. 9705-1008
12/10/97
i
NOTE:
Due to continuing product innovation, specifications in
this document are subject to change without notice.
Copyright © 1997 Adaptive Micro Systems, Inc. All rights reserved.
Trademarked names appear throughout this document. Rather than list the names and
entities that own the trademarks or insert a trademark symbol with each mention of the
trademarked name, the publisher states that it is using the names for editorial purposes and
to the benefit of the trademark owner with no intention of improperly using the trademark.
BETA-BRITE and BIG DOT are trademarks of Adaptive Micro Systems, Inc. registered in the
United States Patent and Trademark Office.
ALPHA, AlphaNET, AlphaNET plus, AlphaNET plus II, ALPHAVISION, Automode, EZ KEY II,
EZ95, PrintPak, TimeNet, AlphaLert, SMART ALEC, and Director are trademarks of Adaptive
Micro Systems, Inc.
ii
Contents
Installation and setup....................................................................................... 1
Description...........................................................................................................1
Technical specifications.......................................................................................2
EMI compliance....................................................................................................2
Assembly..............................................................................................................3
How to mount the sign on a wall..................................................................4
How to mount the sign on a stand (without the optional brochure rack) .....5
How to mount the sign on a stand (with the optional brochure rack) ..........9
Using the Remote Control ..................................................................................13
Connecting the sign to a computer ....................................................................15
Updating the sign’s firmware (or EPROM)..........................................................17
Basic sign operation....................................................................................... 19
Turning a sign on and off ...................................................................................19
Setting a sign’s serial address...........................................................................20
iii
Warranty
Adaptive Micro Systems, Inc. warrants to the original purchaser that
the sign, keyboard and power supply will be free of defects in
workmanship and materials for a period of one year from the date of
purchase.
Adaptive Micro Systems, Inc. will without charge, repair or replace,
at its option, defective product or component parts upon delivery to the
factory service department accompanied by proof of the date of
purchase in the form of a sales receipt.
This warranty does not apply in the event of any misuse or abuse of
the product, or as a result of any unauthorized repairs or alterations.
This warranty does not apply if the serial number is altered, defaced or
removed from the sign. Incandescent lamps used in incandescent
products are not covered by this warranty.
The purchase price of this product does not include, from Adaptive
Micro Systems, Inc., any on-site support, service or maintenance.
Local ordinances prohibiting the use of flashing signs may exist in
some locations. Compliance with local ordinances is the sole
responsibility of the customer.
To obtain warranty coverage, this product must be registered. Please
complete the enclosed warranty registration card and mail it to Adaptive
Micro Systems, Inc.
How to obtain warranty service
1.
2.
3.
4.
iv
Contact the dealer/distributor from whom the sign was purchased.
If you do not know where the product was purchased, contact
Adaptive Micro Systems Customer Service at 414-357-2020.
If the dealer/distributor cannot service the product, obtain a Return
Merchandise Authorization (RMA) number through that company.
An RMA number is required to obtain warranty service.
Fill out the Return Merchandise Authorization (RMA) Form on the
following page. To obtain warranty service, this form including the
RMA number must accompany the product.
Follow return instructions on the RMA form to return to Adaptive
Micro Systems, Inc.
Return Merchandise Authorization (RMA) form
RMA Number:__________________________
Date of Purchase: _________________________________
Company Name: _________________________________
Contact Person: _________________________________
Address:
_________________________________
_________________________________
Phone Number: _________________________________
Description of Problem: _____________________________
_____________________________________________
_____________________________________________
_____________________________________________
_____________________________________________
Return Instructions:
Step 1:
Obtain an RMA number from your dealer/distributor.
Step 2:
Fill out this form and include proof of purchase receipt if product is under warranty.
Step 3:
Pack this form, the sign, keyboard and transformer in the original carton (or a suitable
replacement). Please write the RMA number on the outside of the package. Any damage to
the product during shipment is the responsibility of the freight company or the owner of the
sign.
Step 4:
Ship the package, postage/shipping prepaid to:
Adaptive Micro Systems, Inc.
Attn: RMA No. ___________
7840 North 86th Street
Milwaukee, WI 53224
PLEASE WRITE THE RMA NUMBER ON THE LABEL OF THE SHIPPING BOX - THANK YOU.
v
vi
User Manual for ALPHA Director with Smart Alec option
Installation and setup
The ALPHA Director with Smart Alec option is an indoor LED sign
that can display up to eight 16-character rows of text. The sign can either
be hung from a wall or mounted on a stand. Also, when mounted on a
stand, an optional magazine rack can be placed beneath the sign.
Description
D
A
Top view
E
B
C
Front and back
views
(without stand)
Front view
(with stand)
Front view
(with stand and
magazine rack)
Side view
(with stand and
magazine rack)
Item
Name
Description
A
ALPHA Director with Smart Alec
option
An LED sign which can display up to eight, 16-character rows of text.
The sign can store up to 26 “pages” or screens of text information.
B
Wall mounting bracket
This is a factory-installed option.
C
RS232/RS485 jacks
The bottom panel flips up to expose the RS232/RS485 jacks which
are used to connect the sign to a computer or a network of signs.
See the manual Network Configurations (9708-8046) for more
information on connecting the sign to a network.
D
Floor mount brackets
This is a factory-installed option.
E
Brochure rack
This is a factory-installed option.
Installation and setup: Description
1
User Manual for ALPHA Director with Smart Alec option
Technical specifications
Part
number
Description
Input
VAC
Input
power
Dimensions in inches
Weight in
pounds
1022-1112
ALPHA Director with
Smart Alec option
120
150 W
22.5L x 3.12D x 27H
(57.2L x 7.9D x 68.6H cm)
31.1 (14.1 kg)
0022-0001
ALPHA Director with
Smart Alec option
230
150 W
22.5L x 3.12D x 27H
(57.2L x 7.9D x 68.6H cm)
31.1 (14.1 kg)
Brochure rack option
—
—
Wall mounting kit
option
—
—
Floor stand kit option
—
—
Factoryinstalled
options
27L x 18D x 61H
58.7 (26.6 kg)
(68.6L x 45.7D x 154.9H cm) with brochure
with brochure rack and stand rack and stand
EMI compliance
This equipment has been tested and found to comply with the limits
for a Class A digital Device, pursuant to Part 15 of the FCC Rules. These
limits are designated to provide reasonable protection against harmful
interference when the equipment is operated in a commercial
environment. This equipment generates, uses and can radiate radio
frequency energy and, if not installed and used in accordance with the
instruction manual, may cause harmful interference to radio
communications. Operation of this equipment in a residential area is
likely to cause harmful interference in which case the user will be
required to correct the interference at his own expense.
2
Installation and setup: Technical specifications
User Manual for ALPHA Director with Smart Alec option
Assembly
WARNING
Hazardous voltage.
Contact with high voltage may
cause death or serious injury.
Always disconnect power
to sign prior to servicing.
WARNING
Fasten sign to floor.
Otherwise sign may tip over
causing serious injury
or death.
NOTE: Do NOT use this sign outdoors because water and dust will damage
the sign.
NOTE: Because of its weight, this sign should be assembled by two people.
Installation and setup: Assembly
3
User Manual for ALPHA Director with Smart Alec option
How to mount the sign on a wall
1. Make sure one wall mounting bracket is attached to the back of
the sign:
Wall mounting bracket
(factory installed)
2.
Attach another wall mounting bracket (supplied) to a wall. Then
hang the sign from this bracket.
NOTE: Only hang the sign from a wall capable of supporting
116 pounds (52.5 kg).
Attach a wall mounting
bracket to a wall
3.
4
To mount the sign, interlock
the two brackets.
Route the power cord from the sign in such a way that the cord is
not in an area where people will be walking.
Installation and setup: Assembly
User Manual for ALPHA Director with Smart Alec option
How to mount the sign on a stand (without the optional brochure rack)
1. Remove the caps from the top of each mounting pole:
Remove each end
cap by unfastening
the two screws
that hold each
cap.
Mounting poles
2.
Place both mounting poles on a flat surface. Slide the crossbar
down the channels on the mounting poles. Then slide a safety
stop down each channel:
Safety stops
Crossbar
Installation and setup: Assembly
5
User Manual for ALPHA Director with Smart Alec option
3.
Fasten the crossbar to each mounting pole with the four set
screws. Then fasten each safety stop with the two set screws:
Safety stop
Crossbar
Fasten each safety
stop with two screws.
25.5
inches
(63.5 cm)
Fasten with two
screws on each side.
Mounting notch — line up the bottom
of the crossbar with this notch.
NOTE: Screws should be securely tightened
(18 to 20-inch/pounds of torque
recommended).
6
Installation and setup: Assembly
User Manual for ALPHA Director with Smart Alec option
4.
Place each of the sign’s mounting brackets in a channel on each
mounting pole. Then slide the sign down until it rests on the
safety stops. Finally, re-attach the end caps onto the tops of the
mounting poles:
End caps
Installation and setup: Assembly
7
User Manual for ALPHA Director with Smart Alec option
5.
Fasten the sign to the floor using four bolts or screws in the
locations shown below:
Top view of sign
6.
Route the power cord from the sign in such a way that the cord is
not in an area where people will be walking.
Run the power cord along
one of the mounting poles.
Use the supplied cable ties
to fasten the power cord to
the mounting pole.
Fasten the power cord to
the floor in such a way
(e.g., tape) to prevent
someone from tripping over
the cord.
Cable ties
Power cord
Completed assembly of sign
8
Installation and setup: Assembly
User Manual for ALPHA Director with Smart Alec option
How to mount the sign on a stand (with the optional brochure rack)
1. Remove the caps from the top of each mounting pole:
Remove each end
cap by unfastening
the two screws
that hold each
cap.
Mounting poles
2.
Place both mounting poles on a flat surface. Slide the crossbar
down the channels on the mounting poles. Then slide a safety
stop down each channel:
Safety stops
Crossbar
Installation and setup: Assembly
9
User Manual for ALPHA Director with Smart Alec option
3.
Fasten the crossbar to each mounting pole with the four set
screws. Then fasten each safety stop with the two set screws:
43.5 inches
(110.5 cm)
Safety stop
Crossbar
Fasten each safety
stop with two screws.
Fasten the crossbar
with two screws on
each side.
Mounting notch — line up the bottom
of the crossbar with this notch.
NOTE: Screws should be securely tightened
(18 to 20-inch/pounds of torque
recommended).
10
Installation and setup: Assembly
User Manual for ALPHA Director with Smart Alec option
4.
Place each of the brochure rack’s mounting brackets in a channel
on each mounting pole. Slide the brochure rack down until it
rests on the safety stops. Then slide the sign down the channels.
Finally, re-attach the end caps onto the tops of the mounting
poles:
End caps
Installation and setup: Assembly
11
User Manual for ALPHA Director with Smart Alec option
5.
Fasten the sign to the floor using four bolts or screws in the
locations shown below:
Top view of sign
6.
Route the power cord from the sign in such a way that the cord is
not in an area where people will be walking.
Plastic case
Run the power cord along
one of the mounting
poles.
The plastic case can hold different
sizes of literature.
Use the supplied cable
ties to fasten the power
cord to the mounting
pole.
Use the supplied plastic dividers to
adjust for these sizes.
Fasten the power cord to
the floor in such a way
(e.g., tape) to prevent
someone from tripping
over the cord.
Cable ties
Crossbar
Power cord
To remove the plastic case:
1.
Un-screw the 4 screws from the
crossbar.
2.
Slip the crossbar down.
3.
Loosen the two screws on the
inside bottom of the brochure
rack.
4.
Remove the wood bottom of the
brochure rack.
5.
Remove the plastic case from
the brochure rack.
6.
Re-assemble the brochure rack.
Completed assembly of sign
12
Installation and setup: Assembly
User Manual for ALPHA Director with Smart Alec option
Using the Remote Control
A Remote Control can be used to turn a sign off and on or to set its
serial address.
A Remote Control is a hand-held keyboard which emits infrared light
and is used to program a sign. A Remote Control needs four AAA
batteries to operate.
Point this end of the Remote Control at a sign.
Press PROGRAM to put
the sign into programming
mode. (This mode is used
to change the sign’s serial
address.)
Press RUN once to exit
programming mode.
REMOTE CONTROL
ON - OFF
SOUND
PROGRAM
RUN
APPEND CURSOR SPECIAL FONT
WIPE
1
2
3
4
AUTO
SPEED
TIME
DOT
7
8
9
0
B
A
¢
#
<
N
:
;
T
S
’
*
K
L
-
R
Q
.
,
V
F
E
P
U
6
+
/
”
COLOR
ROTATE
5
&
J
O
WIDTH
HOLD
SELECT
D
%
I
=
>
M
?
C
$
H
G
To turn the sign off or on,
hold down SHIFT and
then press PROGRAM.
SCROLL FLASH
ROLL
W
X
!
Y
Z
SHIFT
INSERT
SPACE
RETURN
CAPS
SHIFT
BACK
ADV
DELETE
Figure 1: Infrared (IR) Remote Control keyboard
Installation and setup: Assembly
13
User Manual for ALPHA Director with Smart Alec option
To program a sign with a Remote Control:
• Stand at least 5 feet and no more than 30 feet from the sign. (See “Using
a Remote Control with a sign” on page 14.)
• Make sure nothing reflective is in front of the sign. (Light from the
sign’s display that is reflected back can interfere with the Remote
Control.)
• If nearby fluorescent lights interfere with the Remote Control, you may
have to relocate either the lights or the sign.
If a sign is this far from the floor...
...then hold a Remote Control this far away:
10 feet
from 10 to 30 feet
15 feet
from 19 to 30 feet
20 feet
from 25 to 30 feet
Figure 2: Using a Remote Control with a sign
14
Installation and setup: Assembly
User Manual for ALPHA Director with Smart Alec option
Connecting the sign to a computer
Messages are sent to the sign using a computer that is running Smart
Alec software. You can either connect one sign or many types of ALPHA
with Smart Alec option signs.
How to connect one sign directly to a computer
If you only want to connect a single sign to your computer, follow
these steps:
1. Remove power from the sign.
WARNING
Hazardous voltage.
Contact with high voltage may
cause death or serious injury.
Always disconnect power
to sign prior to servicing.
Change the sign’s internal RS232/RS485 jumper to RS232
according to this diagram:
Remove the two
screws holding
the signs’ cap.
2.
Remove the cap.
3.
232
1.
Pull up and remove the clear
plastic lens on the sign’s front.
Then set the jumper over the
two left (RS232) pins.
485
2.
Figure 3: How to change the RS232/RS485 jumper
Installation and setup: Connecting the sign to a computer
15
User Manual for ALPHA Director with Smart Alec option
3.
4.
Re-assemble the sign.
Connect a personal computer to the sign as follows:
A
B
To the sign’s RS232/RS485 jack
(under the back lower panel of
the sign)
Item
A
B
C
Part #
—
1088-8625
1088-8627
4370-0001C
1088-9108
C
To one of the
PC’s COM
(RS232) ports
PC running
Smart Alec
software
Description
Ferrite (ferrite end towards sign)
25-foot 6-conductor RS232 data cable
50-foot 6-conductor RS232 data cable
25 pin sub-D/to 6 pos. RJ11 adapter
9 pin sub-D/to 6 pos. RJ11 adapter
How to connect multiple signs into a network
For this type of networking, the sign’s internal RS232/RS485 jumper
must be set to RS485. (See “How to change the RS232/RS485 jumper” on
page 15.)
Because there is such a wide variety of ways (e.g., LAN, wireless, etc.)
to connect signs, see the manual Network Configurations (9708-8046) for
more details.
16
Installation and setup: Connecting the sign to a computer
User Manual for ALPHA Director with Smart Alec option
Updating the sign’s firmware (or EPROM)
From time to time it may be necessary to update the sign’s internal
firmware by replacing an EPROM inside the sign. To do this, follow these
steps:
1. Remove power from the sign.
WARNING
Hazardous voltage.
Contact with high voltage may
cause death or serious injury.
Always disconnect power
to sign prior to servicing.
2.
Replace the sign’s internal EPROM according to this diagram:
1.
Remove the two
screws holding
the signs’ cap.
4.
2.
Remove the cap.
3.
Pull up and remove the clear
plastic lens on the sign’s front.
To remove the current
EPROM, grasp these two tabs
and gently pull it out.
485
232
Then put in the new EPROM.
Figure 4: How to change the sign’s EPROM
3.
Re-assemble the sign.
Installation and setup: Updating the sign’s firmware (or EPROM)
17
User Manual for ALPHA Director with Smart Alec option
18
Installation and setup: Updating the sign’s firmware (or EPROM)
User Manual for ALPHA Director with Smart Alec option
Basic sign operation
Turning a sign on and off
When you plug in the sign’s power supply, the sign starts up
automatically, and unplugging the power supply turns the sign off.
However, instead of unplugging a sign, there is another way to turn a
sign off:
Using the Remote Control, hold down SHIFT and then press PROGRAM to turn a
sign off and on.
NOTE: Messages that you have programmed into the sign will not be lost
when you turn a sign off. Messages will be retained for up to 30
days if the sign is not powered.
When you turn a sign on, information similar to the following will be
displayed:
Model number of the sign.
1022-6801A
16X8C SMART
Total amount of RAM in the sign.
64K RAM
TUESDAY
3:12 PM
The time set in the sign.
APRIL 15, 1997
SERIAL ADDRESS =
000
The date set in the sign.
Serial address
of the sign
(typically a
number from
00 to 99).
This number is
used to
provide a
unique identity
to a sign on a
network.
Basic sign operation: Turning a sign on and off
19
User Manual for ALPHA Director with Smart Alec option
Setting a sign’s serial address
The serial address is a number that you can assign to a sign.
Typically, this feature would be used for a sign that is connected to other
signs on a network. Giving a unique serial address to a sign allows you to
send messages to that particular sign.
See the document Network Configurations (part number 9708-8046)
for more detailed information on networking signs.
Step
When you do this...
1
Press PROGRAM.
1
Press ADV.
You see this...
SET SERIAL
ADDRESS
SERIAL ADDRESS =
000
SERIAL ADDRESS =
010
Type a number, like 010.
NOTE:
A serial address is a number from 0 to
255.
NOTE:
When a sign leaves the factory, its serial
address is set to 000.
4
5
20
Press RUN once to set the new serial address and return the sign to normal operation.
Basic sign operation: Setting a sign’s serial address