1
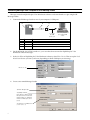
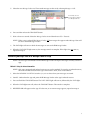
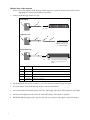
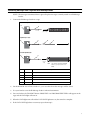
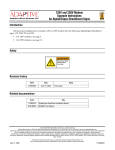
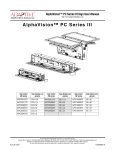
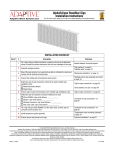
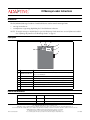
IR Message Loader Instructions
Introduction
The IR (InfraRed) Message Loader is a hand-held device used to transfer messages from:
•
•
one sign to another or
a computer to a sign using AlphaNet plus™ for Windows® software.
NOTE: To transfer messages to AlphaEclipse™ signs, the IR Message Loader must have version H firmware installed.
(See “Updating the firmware in an IR Message Loader” on page 6.)
Description
B
C
D
E
DATA VALID
A
DATA
1 2 3
MEMORY LOCATION
BAT.LOW
F
MESSAGE
LOADER
TRANSMIT
G
Item
Name
Description
A
MEMORY LOCATION switch
Selects into which memory location (1, 2, or 3) messages will be stored. Each memory location
can store up to 10,000 bytes.
B
DATA VALID light
Typically indicates when messages have been successfully sent or received.
C
Infrared transmitter
Sends messages to a sign that is not connected by cable to the IR Message Loader.
D
DATA light
When lit, indicates when data is sent to or received from the IR Message Loader.
E
BAT. LOW light
When lit, indicates that the IR Message Loader’s 9V battery should be replaced.
F
TRANSMIT button
Sends or receives messages.
G
Serial port
Connects to a computer to receive messages, or to a sign to send or receive messages.
Related documentation
Document name
Part #
AlphaNet plus™ for Windows® User Manual
9708-8081
TechMemo #01-0004
–
Description
How to use the messaging software
How to use the IR Message Loader with an AlphaEclipse™ sign
© Copyright 2001 Adaptive Micro Systems, Inc. All rights reserved.
Adaptive Micro Systems • 7840 North 86th Street • Milwaukee, WI 53224 USA • 414-357-2020 • 414-357-2029 (fax) • http://www.adaptivedisplays.com
The following are trademarks of Adaptive Micro Systems: Adaptive, Alpha, AlphaNet plus, AlphaEclipse, AlphaPremiere, AlphaTicker, AlphaVision, AlphaVision InfoTracker, Automode,
BetaBrite, BetaBrite Director, BetaBrite Messaging Software, Big Dot, PPD, Smart Alec, Solar, TimeNet.
The distinctive Trade Dress of this product is a trademark claimed by Adaptive Micro Systems, Inc.
Revision date: 11/13/2001
Due to continuing product innovation, specifications in this manual are subject to change without notice.
9707-1003D
1
Transferring messages from a computer to an IR Message Loader
Messages created on AlphaNet plus™ for Windows® software can be transferred to a sign using the IR
Message Loader:
1.
Connect the IR Message Loader to one of your computer’s COM ports:
B
A
DATA VALID
DATA
1 2 3
MEMORY LOCATION
C
BAT.LOW
MESSAGE
LOADER
TRANSMIT
To one of the
PC’s COM
(RS232) ports
Item
Part #
Description
A
1071-1113
IR Message Loader
B
1088-8621
3-foot RS485 data cable
C
1088-9108
9 pin-to-RJ11 adapter (a 25-pin adapter is also available, pn 4370-0001C)
2.
Set the MEMORY LOCATION switch to 1, 2, or 3 to select where to store the AlphaNet plus™ for
Windows® software messages.
3.
In the Site Editor of AlphaNet plus™ for Windows® software, select Edit > Device. Then set up the Local
Wired Com 1 device (or Com 2, and so on, depending on which COM port you are using):
Must be set to 7E2
4.
Create a site named Message Loader:
Site Name = Message Loader
Compatibility = EZ KEY II
Can be Alpha 1.0 or Alpha 2.0 if the IR
Message Loader has version G or later
firmware installed. (See “Updating the
firmware in an IR Message Loader” on
page 6.)
Connect Device = Local Wired Com 1
(or Com 2, and so on)
2
PC running AlphaNet
plus™ for Windows®
software
5.
Select the new Message Loader site. Then attach messages to this site by selecting Messages > Add:
In this example, these two
messages have been attached
to the Message Loader site.
6.
Press and then release the TRANSMIT button.
7.
Wait at least two seconds. Select the Message Loader site and then choose File > Transmit.
NOTE: When a site is selected (like Message Loader), all the messages that appear under Message Name will
be sent to the IR Message Loader.
8.
The DATA light will turn on while the messages are sent to the IR Message Loader.
9.
When the DATA VALID light turns on, the message transfer is complete. If this light does not turn on,
repeat from step 5.
Transferring messages from an IR Message Loader to a sign
NOTE: The messages transmitted from the IR Message Loader will replace messages currently stored in a
sign.
Method 1: Using the infrared transmitter
NOTE: Only signs equipped with infrared receivers can use this method. If a sign has an infrared receiver,
the receiver will be located on the sign’s front under a small, clear or red window.
1.
Move the MEMORY LOCATION switch to 1, 2, or 3 to select where your messages are stored.
2.
Stand 5 - 30 feet from the sign and point the IR Message Loader at the sign’s infrared receiver.
3.
Press and hold the TRANSMIT button. The DATA VALID light will turn on, followed by the DATA light.
4.
When the DATA light turns off, release the TRANSMIT button. The transfer is complete.
5.
RECEIVED OK will appear on the sign. If it does not, or an error message appears, repeat from step 2.
3
Method 2: Using a cable connection
NOTE: To use this method, the IR Message Loader must have version G or later (version H or later for
AlphaEclipse™ signs) internal firmware installed.
1.
Connect an IR Message Loader to a sign:
BetaBrite® sign:
A
DATA VALID
DATA
1 2 3
MEMORY LOCATION
BAT.LOW
B
MESSAGE
LOADER
TRANSMIT
to RS232
jack on sign
AlphaEclipse™ sign:
A
DATA VALID
DATA
1 2 3
MEMORY LOCATION
BAT.LOW
D
C
E
MESSAGE
LOADER
TRANSMIT
to AlphaEclipse™ sign
(Must be set to baud rate of
2400 and data format of 7E2.
See TechMemo 01-0004.)
All other Alpha® signs:
A
DATA VALID
DATA
1 2 3
MEMORY LOCATION
BAT.LOW
C
MESSAGE
LOADER
TRANSMIT
to RS485
jack on
sign
4
NOTE:
Signs that have internal RS232/RS485
switches (or jumpers) must be set to
RS485.
Item
Part #
Description
A
1071-1113
IR Message Loader
B
1088-8628
3-foot BetaBrite® cable
C
1088-8621
3-foot RS485 data cable
D
4331-0602
Modular Network Adapter (enclose in a waterproof housing)
E
7122-0284
RS485 outdoor-rated cable
2.
Set the MEMORY LOCATION switch to 1, 2, or 3 to select where your messages are stored.
3.
Use your hand to cover the IR Message Loader’s infrared transmitters.
4.
Press and hold the TRANSMIT button. The DATA VALID light will turn on, followed by the DATA light.
5.
When the DATA light turns off, release the TRANSMIT button. The transfer is complete.
6.
RECEIVED OK will appear on the sign. If it does not, or an error message appears, repeat from step 3.
Transferring messages from a sign into the IR Message Loader
NOTE: The messages transmitted from a sign will replace messages currently stored in an IR Message
Loader.
1.
Connect the IR Message Loader to a sign:
BetaBrite® sign:
A
DATA VALID
DATA
1 2 3
MEMORY LOCATION
BAT.LOW
B
MESSAGE
LOADER
TRANSMIT
to RS232
jack on sign
AlphaEclipse™ sign:
A
DATA VALID
DATA
1 2 3
MEMORY LOCATION
BAT.LOW
D
C
E
MESSAGE
LOADER
TRANSMIT
to AlphaEclipse™ sign
All other Alpha® signs:
A
DATA VALID
DATA
1 2 3
MEMORY LOCATION
BAT.LOW
C
MESSAGE
LOADER
TRANSMIT
to RS485
jack on
sign
NOTE:
Signs that have internal RS232/RS485
switches (or jumpers) must be set to
RS485.
Item
Part #
Description
A
1071-1113
IR Message Loader
B
1088-8628
3-foot BetaBrite® cable
C
1088-8621
3-foot RS485 data cable
D
4331-0602
Modular Network Adapter (enclose in a waterproof housing)
E
7122-0284
RS485 outdoor-rated cable
2.
Set the MEMORY LOCATION switch to 1, 2, or 3 to select where the messages will be stored.
3.
Use your hand to cover the IR Message Loader’s infrared transmitters.
4.
Press and release the TRANSMIT button. PROG TEXT A or PROGRAM TEXT FILE A will appear on the
sign, and the DATA light will turn on.
5.
When the DATA light turns off and the DATA VALID light turns on, the transfer is complete.
6.
If the DATA VALID light does not turn on, repeat from step 3.
5
Updating the firmware in an IR Message Loader
Firmware is the operating system for the IR Message Loader and is contained in a small chip inside the unit.
From time to time, it may be necessary for you to update the firmware by replacing this chip.
To update the firmware (or to see what version of firmware you currently have), follow these steps:
1.
Disconnect the battery from the IR Message Loader.
2.
Remove the four screws from the back of the unit.
3.
Pull the top of the unit off to expose the firmware chip:
Firmware version (“F” in this case)
6
4.
Place the tip of a small screwdriver under the firmware chip and gently pry the chip out of its socket.
5.
Place the new firmware chip in the socket and press it into place.
6.
Reattach the unit’s cover.
7.
Connect the unit’s battery.