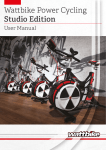
1
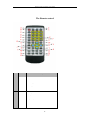
Remote Control Programming User Manual
The Remote control
Press
Description
c
EDIT
Enter into edit mode
d
NEW
New text
A
RESET
Return to disply mode
B
ON/OFF
Turn the sign on or off.
C
DATE
Insert
D
TIME
Insert time.
E
ºc/ºF
Insert temperature
F
SYMBOL
Insert symbol
G
CLEAR
Delete character.
H
DOTS
Insert pictures you have created.
I
LINE
start a new line.
J
ESC
Return to f ather menu.
K
PICTURE
Insert custom PICTURE
date.
1
Remote Control Programming User Manual
L
MODE
change
display mode,
M
brightness
change
display brightness
N
ALIGN
change
align mode.
O
FONT
Select character FONT.
P
COLOR
Select the required color.
Q
STOP TIME
change
R
SHIFT
Switch between characters and interpunction
S
SPEED
change speed mode.
T
CAPS
Select either upper or lowercase.
stop time mode.
move Cursor
U
and
V
ENTER
Enter menu.
W
SETUP
Change system parameters such as Time , width,, and so on.
Example 1--Creating text
Step
Follow as below:
1
Press NEW.
2
Press ENTER.
The sign show as below:
2
Remote Control Programming User Manual
Example 1--Editing text
Step
Follow as below:
The sign show as below:
Press EDIT.
1
or
Press
to
choice subject text.
Press ENTER.
2
You can press 0-9 to input character just
like editing message in mobile telephone.
For example, you enter “EU LED”.
If you want to move the cursor, press
or
;
Note: You can also press the
HOME/END to switch cursor
position between the front and the
end of the line.
3
If you want to delete a character, move
the cursor just to the right of it, then
press CLEAR;
If your want to add a blank, then press
SPACE;
If you want to start a new line, press
LINE;
If you want to switch between upper and
lowercase, press CAPS;
If you want to enter an alternative
character on a key, press SHIFT.
Press ENTER
4
Press or
to
select display mode like align ,
5
Speed ,and stop time.
Press ENTER go to disply or Press
6
ESC to exit editing,
Or
RESET to display mode
3
Remote Control Programming User Manual
Example 2--Setting the font and color
Press EDIT.
1
Press
3
or
to
choice
subject text.
Press ENTER.
2
Press COLOR and/or FONT
4
several times to select the
required one.
Press ENTER
5
Press
or
to select text
6
parameter ,
Speed ,and stop time.
Press ENTER go to disply
mode or Press
ESC
to exit
7
editing,Or
RESET
to
display mode
There are 23 fonts currently available; the table below shows the availability of fonts in different sized signs.
Font
SS7
Description
Seven
dots
Sign Size
in
One, two, three, or four-line signs
in
One, two, three, or four-line signs
in
One, two, three, or four-line signs
Seven dots in Height-
One, two, three, or four-line signs
Height-Normal
ST7
Seven
dots
Height-Shade
WD7
Seven
dots
Height-Wide
WS7
Wide+Shade
SDS
Seven
dots
in
One, two, three, or four-line signs
Seven dots in Height-
One, two, three, or four-line signs
Height-Color+Shade
SRF
Normal
STF
Seven dots in Height-
One, two, three, or four-line signs
Shade
WDF
Seven dots in Height-
One, two, three, or four-line signs
Wide
4
Remote Control Programming User Manual
WSF
Seven dots in Height-
One, two, three, or four-line signs
Wide+Shade
in
One, two, three, or four-line signs
in
Two, three, or four-line signs
ST10
Ten dots in Height-Shade
Two, three, or four-line signs
WD10
Ten dots in Height-Wide
Two, three, or four-line signs
WS10
Ten dots in Height- Wide
Two, three, or four-line signs
SDF
Seven
dots
Height-Color+Shade
SS10
Ten
dots
Height-Normal
+Shade
SS15
Fifteen
dots
in
Two, three, or four-line signs
in
Two, three, or four-line signs
dots
in
Two, three, or four-line signs
dots
in
Two, three, or four-line signs
Height-Normal
ST15
Fifteen
dots
Height-Shade
WD15
Fifteen
Height-Wide
WS15
Fifteen
Height-Wide+Shade
SML
Seven dots in Height
SS5
Five
One, two, three, or four-line signs
dots
in
One, two, three, or four-line signs
in
One, two, three, or four-line signs
WD5
Five dots in Height-Wide
One, two, three, or four-line signs
WS5
Five
One, two, three, or four-line signs
Height-Normal
ST5
Five
dots
Height-Shade
dots
in
Height-Wide+Shade
Example 5-Inserting predefined pictures
Step
Follow as below:
The sign show as below:
Press EDIT.
1
Press
3
or
to
choice
subject text.
Press ENTER.
2
Press
4
PICTURE
once
to
insert symbol.
5
Remote Control Programming User Manual
Press
or
to
5
select
the
required symbol.
Press ENTER.
6
Press ENTER
6
Example 6--Inserting time and date
Step
Follow as below:
The sign show as below:
Press EDIT.
1
Press
or
3
to choice ,
subject text
Press ENTER.
2
Press Date.
1
Press
or
2
to
select
the
required format.
Press ENTER.
6
Press ENTER
6
Example 7--Setting the time and date
Step
Follow as below:
Press SETUP.
The sign show as below:
.
1
2
Press
several
times to choose Clock Setup.
Press ENTER.
3
4
Press
to choose
H&M&S.
6
Remote Control Programming User Manual
Press
ENTER
then
press
or
and
5
or
to set time.
For example, set “T: 16:26:22”.
Press . ENTER
6
Press RESET
7
Example 8--selecting diplay No.
Step
Follow as below:
The sign show as below:
On deiplay mode Press +10 to
choose
text
numbers
digit.
1
Switch between one ,two and
three digit.
Press
2
1-9
or
or
Press
to
choice subject text.
Press ENTER just playing one
text which having choicd.
3
of course you can Press RESET
to playing all text.
Note:
Example 8--Setting message moving speed
Step
Follow as below:
The sign show as below:
1
Press SPEED.
Press
or
2
to
select
the
required speeed mode.
Press ENTER
3
NOTE:-Setting message pause time and align mode jist like Setting message moving speed.
Example 11-- Deleting text
Step
Follow as below:
The sign show as below:
7
Remote Control Programming User Manual
On deiplay mode Press +10 to
choose
text
numbers
digit.
1
Switch between one ,two and
three digit.
Press
1-9
2
or
Press
or
to
choice subject text.
Press ENTER
3
Press CLEAR
1
Press ENTER. Dellete text,or
2
PressESC cancel operation.
Example 12--Deleting all text
Step
Follow as below:
Press SETUP.
The sign show as below:
.
1
Press
2
or
to choose Del
all text?
Press ENTER.
3
Press RESET .
7
8