1
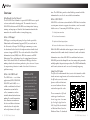
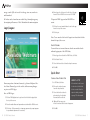
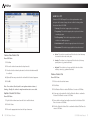
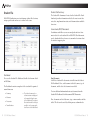
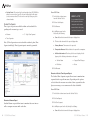
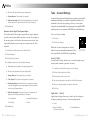
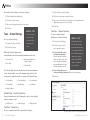
User’s Manual Version 5.1 | January 2014 How to Find Help This manual is your first step for ISIS-SWIS support. Can’t find the information you need? Contact your ISIS-SWIS Facilitator. My ISIS-SWIS Facilitator Information Facilitator Name: Phone Number: Email Address: For More Information Are you still stuck? Visit the PBISApps support website online at support.pbisapps.org There you will find answers to many common questions, a searchable knowledge base and discussion forum, and ways to contact PBISApps to ask your question directly. User’s Manual Version 5.1 | January 2014 Table of Contents Overview . . . . . . . . . . . . . . . . . . . . . . . . . . . . . . . . . . . . . . . . . . . . . . 4 Who Should Use this Manual? . . . . . . . . . . . . . . . . . . . . . . . . . . . . . . . . . . . . . 4 What is PBISApps? . . . . . . . . . . . . . . . . . . . . . . . . . . . . . . . . . . . . . . . . . . . . . . 4 What is the SWIS Suite? . . . . . . . . . . . . . . . . . . . . . . . . . . . . . . . . . . . . . . . . . . 4 What is ISIS-SWIS? . . . . . . . . . . . . . . . . . . . . . . . . . . . . . . . . . . . . . . . . . . . . . . 5 About the QR Codes . . . . . . . . . . . . . . . . . . . . . . . . . . . . . . . . . . . . . . . . . . . . . 5 Login/Logout . . . . . . . . . . . . . . . . . . . . . . . . . . . . . . . . . . . . . . . . . . . 6 Switch Schools . . . . . . . . . . . . . . . . . . . . . . . . . . . . . . . . . . . . . . . . . . . . . . . . . . 7 Quick Start . . . . . . . . . . . . . . . . . . . . . . . . . . . . . . . . . . . . . . . . . . . . . 7 Create a New Student File . . . . . . . . . . . . . . . . . . . . . . . . . . . . . . . . . . . . . . . . . 7 Add a New Team Member . . . . . . . . . . . . . . . . . . . . . . . . . . . . . . . . . . . . . . . . . 8 Add a Measure . . . . . . . . . . . . . . . . . . . . . . . . . . . . . . . . . . . . . . . . . . . . . . . . . . 8 View Reports . . . . . . . . . . . . . . . . . . . . . . . . . . . . . . . . . . . . . . . . . . . . . . . . . . . . 9 ISIS Main . . . . . . . . . . . . . . . . . . . . . . . . . . . . . . . . . . . . . . . . . . . . . . 9 Open Student File . . . . . . . . . . . . . . . . . . . . . . . . . . . . . . . . . . . . . . . . . . . . . . . . 9 Create a New Student File . . . . . . . . . . . . . . . . . . . . . . . . . . . . . . . . . . . . . . . . 10 Update a Student File Status . . . . . . . . . . . . . . . . . . . . . . . . . . . . . . . . . . . . . 10 Delete a Student File . . . . . . . . . . . . . . . . . . . . . . . . . . . . . . . . . . . . . . . . . . . . 11 Student File . . . . . . . . . . . . . . . . . . . . . . . . . . . . . . . . . . . . . . . . . . . . 12 Dashboard . . . . . . . . . . . . . . . . . . . . . . . . . . . . . . . . . . . . . . . . . . . . . . . . . . . . . 12 Student File Summary . . . . . . . . . . . . . . . . . . . . . . . . . . . . . . . . . . . . . . . . . . . 13 Assessments/BSP/Documents . . . . . . . . . . . . . . . . . . . . . . . . . . . . . . . . . . . 13 View Documents . . . . . . . . . . . . . . . . . . . . . . . . . . . . . . . . . . . . . . . . . . . . . . . . . . . 13 Add a Document . . . . . . . . . . . . . . . . . . . . . . . . . . . . . . . . . . . . . . . . . . . . . . . . . . . 14 Edit a Document . . . . . . . . . . . . . . . . . . . . . . . . . . . . . . . . . . . . . . . . . . . . . . . . . . . 15 Delete a Document . . . . . . . . . . . . . . . . . . . . . . . . . . . . . . . . . . . . . . . . . . . . . . . . . 15 Available Document Templates . . . . . . . . . . . . . . . . . . . . . . . . . . . . . . . . . . . . . 15 Measures . . . . . . . . . . . . . . . . . . . . . . . . . . . . . . . . . . . . . . . . . . . . . . . . . . . . . . 15 View Measures . . . . . . . . . . . . . . . . . . . . . . . . . . . . . . . . . . . . . . . . . . . . . . . . . . . . . 16 Update a Measure Status . . . . . . . . . . . . . . . . . . . . . . . . . . . . . . . . . . . . . . . . . . . 16 Add a New Measure . . . . . . . . . . . . . . . . . . . . . . . . . . . . . . . . . . . . . . . . . . . . . . . . 17 Edit a Measure . . . . . . . . . . . . . . . . . . . . . . . . . . . . . . . . . . . . . . . . . . . . . . . . . . . . . 21 Delete a Measure . . . . . . . . . . . . . . . . . . . . . . . . . . . . . . . . . . . . . . . . . . . . . . . . . . . 21 Team Members . . . . . . . . . . . . . . . . . . . . . . . . . . . . . . . . . . . . . . . . . . . . . . . . 22 View Team Members . . . . . . . . . . . . . . . . . . . . . . . . . . . . . . . . . . . . . . . . . . . . . . 22 Add a Team Member . . . . . . . . . . . . . . . . . . . . . . . . . . . . . . . . . . . . . . . . . . . . . . 23 2 ISIS-SWIS User’s Manual Edit a Team Member Role or Access Level . . . . . . . . . . . . . . . . . . . . . . . . . Remove a Team Member . . . . . . . . . . . . . . . . . . . . . . . . . . . . . . . . . . . . . . . . . . Send a Team Email . . . . . . . . . . . . . . . . . . . . . . . . . . . . . . . . . . . . . . . . . . . . . . . . Assign a New Coordinator . . . . . . . . . . . . . . . . . . . . . . . . . . . . . . . . . . . . . . . . . 23 24 24 24 Data Entry . . . . . . . . . . . . . . . . . . . . . . . . . . . . . . . . . . . . . . . . . . . . 25 Enter Measure Data . . . . . . . . . . . . . . . . . . . . . . . . . . . . . . . . . . . . . . . . . . . . 25 View Reports . . . . . . . . . . . . . . . . . . . . . . . . . . . . . . . . . . . . . . . . . . 26 School-Wide Reports . . . . . . . . . . . . . . . . . . . . . . . . . . . . . . . . . . . . . . . . . . . 26 Student File Reports . . . . . . . . . . . . . . . . . . . . . . . . . . . . . . . . . . . . . . . . . . . . 28 Generate a Measure Report . . . . . . . . . . . . . . . . . . . . . . . . . . . . . . . . . . . . . . . . 28 Generate a Student Time Segment Report . . . . . . . . . . . . . . . . . . . . . . . . . 29 Generate a Student Single Time Segment Report . . . . . . . . . . . . . . . . . . . 30 Tools – Account Settings . . . . . . . . . . . . . . . . . . . . . . . . . . . . . . . . 31 Account Profile . . . . . . . . . . . . . . . . . . . . . . . . . . . . . . . . . . . . . . . . . . . . . . . . . 31 Applications - General . . . . . . . . . . . . . . . . . . . . . . . . . . . . . . . . . . . . . . . . . . . 31 Tools – School Settings . . . . . . . . . . . . . . . . . . . . . . . . . . . . . . . . . 32 School Profile – Contact Information . . . . . . . . . . . . . . . . . . . . . . . . . . . . . Core Data – School Days . . . . . . . . . . . . . . . . . . . . . . . . . . . . . . . . . . . . . . . Core Data – School Enrollment . . . . . . . . . . . . . . . . . . . . . . . . . . . . . . . . . . Applications - General . . . . . . . . . . . . . . . . . . . . . . . . . . . . . . . . . . . . . . . . . Start Month . . . . . . . . . . . . . . . . . . . . . . . . . . . . . . . . . . . . . . . . . . . . . . . . . . . . . . . Use 24-Hour Time . . . . . . . . . . . . . . . . . . . . . . . . . . . . . . . . . . . . . . . . . . . . . . . . Use 504 . . . . . . . . . . . . . . . . . . . . . . . . . . . . . . . . . . . . . . . . . . . . . . . . . . . . . . . . . . Use Ethnicity . . . . . . . . . . . . . . . . . . . . . . . . . . . . . . . . . . . . . . . . . . . . . . . . . . . . . . Use IEP . . . . . . . . . . . . . . . . . . . . . . . . . . . . . . . . . . . . . . . . . . . . . . . . . . . . . . . . . . . Require Staff and Require Student District IDs . . . . . . . . . . . . . . . . . . . . . . 32 32 33 34 34 34 35 35 35 36 Person Management . . . . . . . . . . . . . . . . . . . . . . . . . . . . . . . . . . . 36 Add a New Record . . . . . . . . . . . . . . . . . . . . . . . . . . . . . . . . . . . . . . . . . . . . . . 37 Merge Duplicate Records . . . . . . . . . . . . . . . . . . . . . . . . . . . . . . . . . . . . . . . 38 Revise a Record . . . . . . . . . . . . . . . . . . . . . . . . . . . . . . . . . . . . . . . . . . . . . . . . 38 Delete a Record . . . . . . . . . . . . . . . . . . . . . . . . . . . . . . . . . . . . . . . . . . . . . . . . 39 Update a Record Status . . . . . . . . . . . . . . . . . . . . . . . . . . . . . . . . . . . . . . . . . 39 Student Dashboard . . . . . . . . . . . . . . . . . . . . . . . . . . . . . . . . . . . . . 40 Appendix A - ISIS-SWIS Data Entry and Reporting Schedule . . . . . . . . . . . . . . Inside Back Cover ISIS-SWIS User’s Manual 3 Overview time. The SWIS Suite provides school/facility personnel with the information they need to be successful decision makers. Who Should Use this Manual? The ISIS-SWIS User’s Manual is to provide ISIS-SWIS users a quick reference and trouble-shooting guide. The manual is for use by ISIS-SWIS facilitators and ISIS-SWIS users during initial start-up, training, and ongoing use. Much of the information found in this manual is also available online at www.pbisapps.org. 4 What is ISIS-SWIS? ISIS-SWIS is a decision system within the SWIS Suite for students receiving more intensive supports for academic, social, or mental health services. Teams using ISIS-SWIS have a place to: 1. Identify team members What is PBISApps? 2. Store formal assessments PBISApps is a not-for-profit group, developed and operated by Educational and Community Supports (ECS), a research unit at the University of Oregon. The PBISApps team manages a series of educational tools related to the implementation of multi-tiered systems of support (MTSS). These tools include the School-Wide Information System (SWIS) Suite, PBIS Assessment, and PBIS Evaluation. These applications have been implemented in more than 25,000 schools in the US and abroad. PBISApps has been making schools safer and more productive places for over 10 years by empowering educators to make data-based decisions as problems emerge. 3. Update individual support plans What is the SWIS Suite? HERE ’S A T I P The SWIS Suite — a set of four applications (SWIS, CICO-SWIS, ISIS-SWIS, and SAMI) — is a reliable, confidential, web-based information system built to collect, summarize, and use Some aspects of ISIS-SWIS may be inaccessible based on your access level. Please contact your facilitator to have your access modified. For more information about student behavior data for decision making. Research demonstrates that educators can make more effective and efficient decisions when they have the right data in the right format at the right access levels, see the support article on PBISApps. ISIS-SWIS User’s Manual 4. Assess the effectiveness of the interventions With ISIS-SWIS individual student support teams are organized, informed, and able to make timely decisions to benefit each student. Information entered into ISIS-SWIS is confidential and secure. ISIS-SWIS protects data through the use of account-specific passwords and high-quality data protection procedures. The SWIS Confidentiality and Security statement can be accessed at www.pbisapps.org. About the QR Codes The QR codes in this manual direct you to video tutorials or additional content as supplements to the written instructions. To use the QR codes you need a smartphone or tablet with internet access and software that can read and interpret the codes. There are many free QR code reader apps found in your device’s app store - for example, the Apple App Store for iOS, Google Play for Android, or Windows Phone Store for Windows Phone. To download An example of a QR code. ISIS-SWIS User’s Manual 5 an app, search “QR code reader” in the app store on your device and download. All videos can be found on our website http://www.pbisapps.org by navigating to Resources > Video Tutorials in the main navigation. 4. Once logged in, slide over to the left side of the app bar and click on SWIS Suite to access ISIS-SWIS. To logout of PBIS Apps and an ISIS-SWIS account: 1. Click on the user’s email address located in the app bar at the top of the screen. Login/Logout Scan for video tutorial For instructions see page 5 2. Click Logout. Note: Users can also click on the Logout icon located in the blue bar at the top of the screen. Switch Schools Users with access to more than one school can switch schools without logging out of the SWIS Suite. 1. Once logged in and inside the SWIS Suite, click Tools. 2. Click Switch School. 3. Select the desired school from the drop-down menu. 4. Click OK. Quick Start The login is located in the black bar at the top of the screen. From your preferred internet browser (e.g.,Internet Explorer, Firefox, Safari, Chrome) type in the website address www.pbisapps. org to access PBIS Apps. Once at PBIS Apps: 1. Click on PBIS Applications Login located in the black bar (app bar) at the top of the screen. 2. Enter the email address and password associated with the SWIS account. 3. Click Login. (If the password is a temporary password, a prompt appears for a permanent password to be created.) 6 ISIS-SWIS User’s Manual Create a New Student File 1. In ISIS Main, click New. 2. Choose the student’s name from the drop-down list. 3. Select the date the student’s plan started, or the first date data was/will be collected. H E RE ’S A TI P If the student to add is new to the school, click the Not In List icon and follow the steps for adding a student on page 36 in this manual. 4. (Optional) Enter any notes about the student file for historical purposes. 5. Click OK. ISIS-SWIS User’s Manual 7 Add a New Team Member 8. Click OK to save the schedule. From the Student File Dashboard, 9. Click Add in Goals and enter the set goal for the measure. 1. Click the Add icon. 10.Click Ok to save the goal. 2. Select the correct Person Type from the drop-down menu. 11. Click OK to save the measure. Click OK & New to save the measure and add another. 3. Select the team member by name from the drop-down list. 4. Type the team member’s role on the team in the Team Member Role field. Note: The Team Member Role is specific to the relationship or support tasks related to the identified student. This is not necessarily the person’s position title. 5. From the Access Level drop-down menu, select the access the team member will have to the student’s file. 6. Click OK to save the new team member. Click OK & New to save the team member and enter another. a. If assigning the team member access, enter a temporary password for the team member’s login information in the Temp Password field. b. Re-enter the temporary password in the Confirm Temp Password field. c. Click Ok. Add a Measure From the Student Dashboard: 1. Click Measures. 2. Click Add. 3. Select a type from the Measure Type drop-down menu. HERE ’S A T I P For more information about metric types and optional time segments, see page 18. 4. Type a name for the measure. 5. Type a start date or select the start date using the calendar icon. 6. Select a Metric Type from the drop-down menu. 7. Click Add in Data Collection Schedule and select a weekly or monthly schedule for data collection. 8 ISIS-SWIS User’s Manual View Reports To access the School-Wide Report: 1. Click ISIS Main. 2. Click School-Wide Reports. 3. (Optional) Click Refresh Report at any time to update with new data entered. ISIS Main The main page of ISIS-SWIS contains a list of student files available in ISIS-SWIS. By default, the student file list includes both active and inactive student files. This list can be modified based on search/filter criteria and information about the status of the student’s record. User access to student information will vary. Clicking once on a name from the Student Files list displays summary and history information for the selected record. Open Student File To open a student file in ISIS-SWIS: 1. Click ISIS Main. 2. Locate the student file to open from the list. 3. Double-click the student’s name. H E RE ’S A TI P If a padlock icon is displayed to the left of the student name, the file is one you cannot access. Contact your ISIS-SWIS coordinator for additional access. ISIS-SWIS User’s Manual 9 HERE ’S A TI P Students in ISIS-SWIS may fall in one of five implementation status categories. As the status changes, be sure to reflect the change within the student’s file in ISIS-SWIS. 1. Starting: The student’s support plan is in early stages 2. Progressing: The student’s support plan is in place and student is making progress 3. Not Progressing: The student’s support plan is in place but student is not making progress 4. Needs Revision: The student’s support plan needs to be revised 5. Discontinued: The student’s support plan has been discontinued Create a New Student File The ISIS Main Dashboard From ISIS Main: 1. Click New. 2. Choose the student’s name from the drop-down list. 3. Select the date the student’s plan started, or the first date data was/will be collected. 4. (Optional) Enter any notes about the student file for historical purposes. 5. Click OK. Note: New student files default to an implementation status of Starting. Modify the student’s implementation status as needed. Update a Student File Status From ISIS Main: 1. Right-click the student name from the list of enrolled students. 2. Click Set Status. 3. Choose the appropriate status from the drop-down menu. 10 ISIS-SWIS User’s Manual a. Active: The student is currently enrolled in the school and data may be entered for the student at any time. b. Inactive: The student is no longer enrolled in the school, but may possibly return (e.g., transfer students). c. Archived: The student is no longer enrolled in the school and is unlikely to return (e.g., graduated students). Delete a Student File From ISIS Main: 1. Click to select the student’s name. 2. Click Delete. 3. Click Confirm Delete to confirm. Click Cancel to return to ISIS Main. 4. If data exist in the student file, click Yes, Delete the Data to confirm the deletion. Click Cancel to return to ISIS Main. 5. Enter a deletion date and optionally notes related to the deletion. Click Cancel to return to ISIS Main. 6. Click Yes, Delete the Student File to confirm the deletion. Click Cancel to return to ISIS Main. ISIS-SWIS User’s Manual 11 Student File Student File Summary ISIS-SWIS Coordinators create and manage student files, but may assign specific tasks and access to others on the team. The Student File Summary is located on the Student File Dashboard and provides information related to the most recent data entry date, implementation status, and documentation available for review. Assessments/BSP/Documents Coordinators and full-access users can upload and store documents related to each student file in ISIS-SWIS. Each document can be downloaded for reference as teams make decisions about the student’s support plan. The Student File Dashboard. The Student File > Assessment/BSP/Documents tab. Dashboard To access the Student File Dashboard, double-click a name listed in ISIS Main. The Dashboard contains a snapshot of the student file organized around four areas Summary Measures Documents Team Members 12 ISIS-SWIS User’s Manual The student’s name and coordinator name are displayed in the upper left-hand corner of the dashboard. The student file start-date and the ability to modify it is in the upper righthand corner of the dashboard. View Documents A full list of student file documents is visible from the Student File Dashboard. Here, each document is listed by name, type of document, and the date the document was added. To view additional information about any document, from the Student File Dashboard, click Assessments/BSP/Documents. Here, documents are listed by name, type, version number, and date added. The list can be sorted by clicking on any column header. ISIS-SWIS User’s Manual 13 Add a Document From the Student File Dashboard: 1. Click Assessments/ BSP/Documents. 2. Click Add. 3. Type a title for the document in the Title field. Edit a Document HERE ’S A T I P When naming a document, it should be clear enough to easily identify the document, but generic if you plan to upload additional versions later. 4. Click on Browse button next to the File field to locate the electronic file to be uploaded. 5. Select the type of file you are adding from the Type drop-down menu. 6. Click OK. 2. Click to select a file. 3. Click Add Version. 4. Click the Browse button next to the File field to locate the electronic file to be uploaded. 5. Click OK. The new version appears at the top of the version list on the right side of the Document list. 14 ISIS-SWIS User’s Manual From the Student File Dashboard: 1. Click Assessments/BSP/Documents. 2. Click to select the file to be updated. 3. Click Edit. 4. Modify the Title, File, or Document Type as needed. 5. Click OK. From the Student File Dashboard: As modifications occur to any document, a new version of the document can be uploaded into ISIS-SWIS. Uploading a new version maintains the document’s history. 1. Click Assessments/ BSP/Documents. type can also be edited. Delete a Document Add a New Document Version From the Student File Dashboard: As modifications occur to any document, edit the master copy and upload it to replace the current file. The title and the document HERE ’S A T I P Document management procedures should be determined before uploading files into ISIS-SWIS. It is recommended to save master copies on a single team member’s computer, shared drive, or other secure location. Identify a single person to make edits or updates to master files and to upload files into ISIS-SWIS. 1. Click Assessments/BSP/Documents. 2. Click to select the file to be removed. 3. Click Delete. 4. Click Delete to confirm the deletion. Click Cancel to return to the document list. Available Document Templates Three templates for common document types are available at the bottom of the Assessment/BSP/Document tab. Behavior Support Plan Support Team Plan FACTS Click any template to download a copy. Schools/facilities need not use the templates provided within ISIS-SWIS if local alternatives are available. Measures Measures within ISIS-SWIS are set up to monitor the fidelity of ISIS-SWIS User’s Manual 15 implementation and student progress as identified within a student’s support plan. Measures establish the data entry screen and data entry schedule. There are two types of measures to select from when establishing measures for each student file: 1. Fidelity: Fidelity measures monitor the level at which staff implement the student support plan. Each student file requires collecting at least one fidelity measure. 2. Outcome: Outcome measures monitor the impact of the support plan on the student’s academic or social behavior. Each student file requires at least one outcome measure. View Measures The Student File Dashboard displays all measures associated with the student plan. For more information on each measure, click Measures from the Student File Dashboard. measure associated with a student file: Active: Data are currently collected. Inactive: Data are not collected at this time. Archived: The measure has been discontinued. To update a measure’s status, from the Student Dashboard: 1. Click Measures. 2. Right-click the measure to be updated. 3. Choose Set Status. 4. Select the correct status. 5. If inactive or archived: Type the measure’s end date or select one from the calendar icon. 6. Click Ok to update the status. Click Cancel to return to the Measures tab. Add a New Measure From the Student Dashboard: 1. Click Measures. 2. Click Add. 3. Select a type from the Measure Type drop-down menu. 4. Type a name for the measure. The Student File > Measures tab. The Measure tab displays both active and inactive student measures. Filter the list to include active, inactive and/or archived measures by selecting or unselecting the filter from the Measures tab. Sort the list by clicking on any column header. Update a Measure Status As the student’s plan changes, updates to individual measures will need to be updated. There are three statuses available for each 16 ISIS-SWIS User’s Manual 5. Type a start date or select the start date using the calendar icon. 6. Select a Metric Type from the drop-down menu. H E RE ’S A TI P Once data have been saved to an ISIS-SWIS measure, the Metric Type cannot be modified. It is important to carefully review measures shortly after set-up to ensure the measure fit data entry, reporting, and decision-making needs 7. Click Add in Data Collection Schedule and select a weekly or monthly schedule for data collection. 8. Click OK to save the schedule. ISIS-SWIS User’s Manual 17 9. Click Add in Goals and enter the set goal for the measure. Scale: Enter a number based on the established scale. 10.Click Ok to save the goal. Rate: Enter the number of times the behavior is observed per length of time. 11. Click OK to save the measure or click OK & New to save the measure and add another. Metric Type Examples Metric Type Basic Information Measure Name: A short, descriptive title of what you want to measure (e.g., Rate of Disrespect). Description: A description detailing what you want to know, how you will measure it, and how often. Start Date: The earliest date for data collection to begin. Metric Type The Metric Type identifies how data will be collected and summarized. Below is a list of how data will be entered given the metric type chosen. Percent What percentage of the class period did Jason complete without a disruptive outburst? Calculated Percent How many times did Emily use her “ask the teacher a question” skill out of four opportunities? Out of five possible, how many periods did Lizbet arrive on time? Point/ Count/ Duration Ben will earn two points each time he shares with a peer. Record the number of points earned per day. Record the number of minutes it takes Emile from ending lunch to initiating instruction. Scale Enter the extent to which we believe we have implemented Megan’s plan with fidelity on a scale from 1 = low, to 5 = high Measure Jace’s temperament on a scale from 1 = disturbed, 2 = mild agitation, 3 = calm, 4 = engaged, and 5 = happy Rate Record the median number of words read correctly per min during literacy progress monitoring. Record the number of Emmitt’s social initiations per number of minutes at recess. Percent: Enter percent values between 0-100%. Calculated Percent: Enter # of attempts / # of possible attempts. ISISSWIS calculates the percent. Point/Count/ Duration: Enter # of points, count of something, or duration of event for each time segment. 18 ISIS-SWIS User’s Manual HERE ’S A TI P The Student File Set-Up Checklist contains a metric set-up worksheet for how to use each metric type. Explore the ISIS-SWIS Demo account and practice in your ISISSWIS facilitator’s account for examples within the application. Example B What percentage of math problems did Matt complete each day? HERE ’S A T I P The Data Collection Schedule start date as well as the Goals start date default to the measure’s Start Date. The measure’s Start Date cannot pre-date the Student File Start Date. Example A Time Segments (optional) Adding time segments allows the option for collecting data across multiple periods. This is an optional component for adding measures. ISIS-SWIS User’s Manual 19 To use time segments for a measure, check the Use Time Segments box in the Time Segments section of the Add Measure workspace. Uncheck the box to opt out of time segments for the measure. Notes: Additional information about this goal. Edit a Measure Data Collection Schedules The Data Collection Schedule establishes when the data are to be entered in ISIS-SWIS. A Student File should contain one or more Data Collection Schedules. Teams may opt to collect data using an ad hoc schedule as needed. Ad Hoc: Allows data entry as needed in addition to any established data collection schedule. From the Student Dashboard: 1. Click Measures. 2. Double-click the measure to edit. 3. Edit the following information as needed: a. Basic Information Start Date: The earliest date for data collection to begin. b. Metric (if no data have been entered and saved End Date (optional): The last date for data collection using this schedule. c. Time Segments Weekly: Data collection occurs on a weekly schedule. Check the boxes next to the appropriate weekdays or utilize the quick selections: weekdays, all, none. d. Data Collection Monthly: Data collection occurs on a monthly schedule based on a day or week of the month. Measure goals entered in ISIS-SWIS are based on criteria identified within the student’s plan, benchmarks, and/or team agreements. ISIS-SWIS allows one goal at a time per measure. Operator: The comparative indicator of performance (e.g., greater than >, less than or equal to ≤). Target: Numerical criteria of performance. Start Date: The earliest date the goal was implemented or monitored. ISIS-SWIS User’s Manual e. Goals 4. Click OK to save the changes. Click Cancel to return to the Measures tab. Delete a Measure Goals 20 End Date: The last date the goal was implemented or monitored. Measures should be deleted only if the measure was set up incorrectly, HERE ’S A TI P Editing some information will not have an impact on previously entered data. HERE ’S A T I P To track a student’s goal history, use the start and end dates as the goal changes. Using start and end dates, the goal line stair-steps to show how the goal shifted across time. Time Segments: Editing the Time Segments of a Measure does not change previously saved data. Previous data will use the old time segments. Future data will be entered using the new Time Segments. Data Collection Schedule: Editing the Data Collection Schedule(s) does not change previously entered data. To maintain a history of Data Collection Schedules, enter an End Date into the old schedule, and then add a new schedule to start on the appropriate date. ISIS-SWIS User’s Manual 21 and/or if the team has determined that this measure was not appropriate and should not be included in the student’s case history. 1. In the Measures tab, click to select the measure to be removed. This view lists team members by name along with team role, access level, email address, and type. Sort the list by clicking any column header. Add a Team Member 2. Click Delete. 3. Click Yes, Delete the Data to confirm the deletion. Click Cancel to return to the Measures tab. Team Members For each student file, coordinators organize team members, assign team member access, and communicate with team members by email. From the Student File Dashboard: 1. Click the Add icon. 2. Select the correct Person Type from the drop-down menu. 3. Select the team member by name from the drop-down list. 4. Type the team member’s role on the team in the Team Member Role field. Note: The Team Member Role is specific to the relationship or support tasks related to the identified student. This is not necessarily the person’s position title. The Student File > Team Members tab. H E R E ’S A T I P View Team Members While all student team members should be listed for each file, not all team members will have the same access to student file information. Team members may have full access, data entry access, read-only access, or no access to individual student files. A full list of team members is visible from the Student File Dashboard. This view lists each team member by name along with type, team role, and access level displayed. To view additional information about Team Members, from the Student File Dashboard, click Team Members. H E RE ’S A TI P Access should be assigned to team members with specific tasks related to entering data, generating reports, and/or assisting the coordinator in Student File management. In general, non-staff team members should be given “No Access” to ISIS-SWIS. 5. From the Access Level drop-down menu, select the access the team member will have to the student’s file. 6. Click OK to save the new team member. Click OK & New to save the team member and enter another. a. If assigning the team member access, enter a temporary password for the team member’s login information in the Temp Password field. b. Re-enter the temporary password in the Confirm Temp Password field. c. Click Ok. Edit a Team Member Role or Access Level As team member information changes, updates can be made directly within ISIS-SWIS. From the Student File Dashboard: 1. Click Team Members. 2. Double-click the name of the team member to edit. 22 ISIS-SWIS User’s Manual ISIS-SWIS User’s Manual 23 3. Modify the team member’s role or access level. 1. Click Team Members. 4. Click OK. Remove a Team Member 2. Click Assign Coordinator. From the Student File Dashboard: 3. Select a coordinator from the list of identified coordinators. 1. Click Team Members. 2. Click to select the team member to remove. 3. Click Remove. 4. Click Remove to confirm the removal. Click Cancel to return to the Team Member tab. HERE ’S A T I P Use Person Management to edit a team member’s name, type, or email address. See page 38 for more information. 4. Click Assign. Note: ISIS-SWIS facilitators setup coordinators. After clicking Assign Coordinator, if a message appears stating there are no active coordinators, contact your facilitator and ask to have the new coordinator entered. Data Entry Note: Removing a team member in ISIS-SWIS removes the team member from, and his/her access to, the student file. The team member’s name remains on the related student/staff/non-staff roster. All data associated with the team member remains in the application. Data Entry is based on the measures set up for the individual student file. Please use the Data Entry Workspace screenshot to identify the location of each corresponding step in the ISIS-SWIS Data Entry workspace. Send a Team Email From ISIS Main From the Student File Dashboard: 1. Click Team Members. 2. Click Email Team to open an email to all team members in your default email program. 3. Click any team member’s individual email address to open an email to that team member using your default email program. Assign a New Coordinator ISIS-SWIS coordinators may transfer management responsibilities for one or more student files to another ISIS-SWIS coordinator either temporarily or permanently. Each student file must be assigned to a coordinator. Only transfer Student Files with the new coordinator’s permission. 24 From the Student File Dashboard: ISIS-SWIS User’s Manual Enter Measure Data 1. Double-click the student’s name from the Student File list (not shown in screenshot). 2. From the Student Dashboard, click on Data Entry. 3. Use the Calendar to select the appropriate data entry date as needed. (Today is selected by default.) 4. Set the student’s status for the day using the Student Status drop-down menu. (Present is selected by default.) 5. Set the student’s status for the measure using the Student Status dropdown within the appropriate measure. (Present is selected by default.) 6. Enter scheduled measure data as indicated in ISIS-SWIS. ISIS-SWIS User’s Manual 25 7. Optional data to enter: a. Ad hoc data: Click on the Ad hoc button to the right of the measure name. b. Notes by day: Click the Notes icon next to the day’s Student Status drop-down menu. c. Notes by measure: Click the Notes icon to the right of the measure’s Student Status drop-down menu. d. Support Plan Change: Type the change in the Support Plan Change field. 8. Click Save All. 4 displays information about the overall implementation of Tier III supports monitored across the SWIS Suite. User access to the School-Wide Report will vary. To access the School-Wide Report: 1. Click ISIS Main. 2. Click School-Wide Reports. 3. (Optional) Click Refresh Report at any time to update with new data entered. 7b 7a 5 3 7c 6 7d 8 View Reports The Data Entry Workspace. Numbers included correspond to the steps outlined in Enter Measure Data. Data collected in ISIS-SWIS are available for review within the Reports section. Tailor reports for efficient, effective decision making. School-Wide Reports The School-Wide Report is available from ISIS Main. The report 26 ISIS-SWIS User’s Manual Example of the School-Wide Report. The School-Wide Report has three sections: School Year: This section contains a summary of student data collected across the SWIS Suite for the current school year. Current: This section contains a current snapshot of todays’ student data. ISIS-SWIS User’s Manual 27 Student Status: This section lists the students who have ISIS-SWIS files within the current school year. The list can be filtered by the file status (active, inactive, archived). The list can be sorted by clicking any of the column headers. From ISIS Main: 1. Double-click a student name from the Student File list. Student File Reports 2. Click on View Reports. Three types of reports are available within each student file depending on the measure types used. 3. Click Measure. Measure 3. Single Time Segment 4. In the Options panel on the left, identify the following: H E RE ’S A TI P It is recommended to review fidelity measure data as a comparison with outcome measure data to identify any correlation between the two. a. From: Earliest date from which the report displays data. Time Segments Note: If Time Segments are not used within a student’s plan, Time Segment and Single Time Segment reports cannot be generated. b. To: Latest date from which the report displays data. c. Primary Measure: The measure to be reported. d. Comparative Measure: Additional data to be reported for comparison. e. Additional information: Check any of the boxes to display/not display any of the following information on the report Student Name Support Plan Changes Goal Lines Notes 5. Click Generate. Generate a Student Time Segment Report The Student Time Segments report allows teams to monitor time segment data for a specific measure. Depending on the options selected when the measure was activated, time segment data displays as an average or as a sum across the dates identified. From ISIS Main: 1. Double-click a student name from the Student File list. Example of the Measure Report Generate a Measure Report Student Measure reports allow teams to monitor data over time as well as compare measures with each other. 2. Click View Reports. 3. Click Time Segment. 4. In the Options panel on the left, identify the following: a. From: Earliest date from which the report displays data. 28 ISIS-SWIS User’s Manual ISIS-SWIS User’s Manual 29 b. To: Latest date from which the report displays data. c. Primary Measure: The measure to be reported. d. Additional Information: Check the Student Name box to include the student name on the report. Uncheck it to hide the information. 5. Click Generate. Generate a Student Single Time Segment Report The Student Single Time Segment report allows teams to monitor a specific time segment within a measure over time. Depending on the metric options selected when the measure was activated, time segment data displays as an average or as a sum across the dates identified. 1. Double-click a student name from the Student File list. 2. Click View Reports. 4. In the Options panel on the left, identify the following: a. From: Earliest date from which the report displays data. b. To: Latest date from which the report displays data. c. Primary Measure: The measure data to be reported. d. Time Segment: The specific time segment to be reported. e. Comparative Measure: Additional data to be reported for comparison. Note: Comparative data are not specific to the time segment selected in the Primary Measure. f. Additional information: Check any of the boxes to display/not display any of the following information on the report: 30 Student Name Support Plan Changes Goal Lines Notes ISIS-SWIS User’s Manual Account Settings allow an individual user to update personal profile information and update personalized application settings to accommodate data entry or reporting preferences. An account’s settings are stored individually for each password accessing ISIS-SWIS, allowing each user to customize ISIS-SWIS for individual usage. To access Account Settings: 1. Click Tools. 2. Click Account Settings. Within the Account Settings menu, schools/ facilities can view and modify information related to Account Profile and SWIS Suite Applications. Scan for video tutorial For instructions see page 5 Account Profile 3. Click Single Time Segment. 5. Click Generate. Tools – Account Settings Account Profile Settings allow a user to verify and update name, contact email, username, password, or avatar. 1. To modify Account Profile Settings, in Account Settings: 2. Click on Profile under Account Profile. 3. Click the name of the section to edit. 4. Type the new information to modify Account Profile information. 5. Enter your current password for changes to take effect. 6. Click Save. Applications - General Applications settings allow users to enable specific settings according to personal preference. General settings include: Locale Name Sort Order (First Last vs Last First) Default Graph Size ISIS-SWIS User’s Manual 31 To modify General settings, in Account Settings: 1. Click School Days under Core Data. 1. Click on General under Applications. 2. Click on the school year to expand the menu. 2. Select the setting to modify. 3. Type or select the number of schools days for each calendar month (Early release days count as one full day). 3. Type or select the preferred option for the setting. 4. Click Save. 4. Click Save. HERE ’S A T I P Core Data – School Enrollment School Settings are set for the entire school and will be the same for all users. To enter or modify School Enrollment, in School Settings: Within the School Settings menu, schools/facilities can view and modify information related to: 3. If the school/facility collects race/ethnicity information: Enter the number of students within each ethnic group. Total School Enrollment calculates automatically based on the race/ ethnicity enrollment entered. Tools – School Settings To access School Settings: 1. From the ISIS Main, click Tools. 2. Click School Settings. School Profile General and ApplicationSpecific Settings Core Data School Profile The School Profile includes all physical and contact information for the school/facility. Any of the information provided in this section can be updated with the exception of the District Name: District Name Physical Address Phone Number School Name Grade Range Fax Number 1. Click on School Enrollment. 2. Click on the correct school year to expand the menu. H E RE ’S A TI P Enrollment data should be entered at the same time as the annual census count (typically by October 1st). Enrollment totals only change during a school year if a large (10-20%) change in enrollment occurs mid-year. 4. If the school/facility does not collect race/ethnicity information: Enter the total enrollment 5. Click Save. Mailing Address School Profile – Contact Information Contact information for the following roles can be located and/or edited as changes occur. SWIS Contact Admin Contact Billing Contact Core Data – School Days To enter or modify School Days, from School Settings: 32 ISIS-SWIS User’s Manual The School Settings > Core Data > School Enrollment settings. ISIS-SWIS User’s Manual 33 Note: In order to generate the School-Wide Reports, ISIS-SWIS requires details about School Enrollment. Applications - General To enter or modify General Settings, in School Settings: Use 504 Default: Enabled Schools/Facilities may opt to collect data about individual students’ 504 status. To disable this feature: 1. Click General. 1. Select No from the drop-down menu. 2. Click anywhere within the row of the appropriate field to expand the menu. 2. Click Save 3. Choose Yes to enable the identified feature. 4. Choose No to disable the feature. 5. Click Save. 6. Close School Settings by clicking on the red X icon in the upper right corner of the screen. HERE ’S A TI P The federal government requires schools, districts, and states to collect individual-level race and ethnicity data and report aggregated data in the following ways: Start Month Individual students must report both his/her ethnicity as well as race. Default: August Students may identify more than one race. This setting sets which month is considered the start of the year for reporting and decision-making purposes. To modify the Start Month: 1. Select the appropriate month from the drop-down menu. 2. Click Save. Use 24-Hour Time Default: Disabled This setting allows schools/facilities to track data within a typical school day (8:00 am-5:00 pm) or within a 24-hour clock. 1. To enable the use of a 24-hour clock: 2. Select Yes from the drop-down menu. 3. Click Save. Multi-Racial is listed only as a category for aggregate reporting purposes. Use Ethnicity Default: Enabled When Use Ethnicity is enabled, the SWIS Suite will require race/ ethnicity data to be entered. To disable ethnicity as a required field, in School Settings: 1. Select No from the drop-down menu. 2. Click Save. For more information about entering individual student ethnicity and race information, please refer to the Person Management section on page 36. Use IEP Default: Enabled 34 ISIS-SWIS User’s Manual ISIS-SWIS User’s Manual 35 When enabled, users will identify each student’s IEP status and disability category. To disable this setting: To see all currently active person records, check only the Active box from the filters. The first 15 active records display in the result set. Use the navigation at the bottom of the screen to tab through the list and view additional records. 1. Select No from the drop-down menu. 2. Click Save. Click on a name to display the person’s information to the right of the list. Require Staff and Require Student District IDs Staff District ID Default: Enabled Student District ID Default: Enabled The SWIS Suite allows the school/facility to utilize district/internal identification numbers for staff in addition to the SWIS assigned ID number. If disabled, the staff and/or student SWIS ids are displayed on reports. To disable this feature: 1. Select No from the drop-down menu. 2. Click Save. Person Management Person Management allows schools/facilities to organize students, staff, and non-staff records associated with SWIS Suite data. To access Person Management: Scan for video tutorial For instructions see page 5 1. Click Tools. 1. In the Tools menu, click Person Management. 2. Under the Person Management header, select the appropriate list (Student, Staff, Non-Staff) to review or modify. 2. Click on the correct tab: Students, Staff, Non-Staff. Note: Person Management is also located in the top right-hand corner of the application next to the Logout icon. Within Person Management, only records with a status matching the selected filters will be displayed. The filters Active, Inactive, and Archived can be checked and unchecked to display or hide a name from the list. 36 Add a New Record ISIS-SWIS User’s Manual 3. Click Add. 4. Enter all required information about the person. 5. Click OK to save or click OK and New to save and open a new form to continue adding new person records. The Person Management workspace. H E RE ’S A TI P For students on an IEP, a disability category must be selected. “To Be Obtained” should only be selected when a record urgently needs to be recorded but the disability category is not available. It is critical to update this information to keep records current for reporting and decision making. ISIS-SWIS User’s Manual 37 Merge Duplicate Records Merging two names will move all data from the “Student/Staff/ Non-Staff to Delete” to the “Student/Staff/Non-Staff to Retain.” 1. Check the Active, Inactive, and Archived filter boxes to display all person records associated with the account. 2. Locate the name of the person to be retained by typing the name in the Search field. 3. Click the Search icon. 4. Click to select the name of the record to retain. 5. Click Merge. 6. In the Student/ Staff/Non-Staff to Delete field type the name of the person record to delete. All data from The Edit Student workspace. this record will be moved to the Student/Staff/Non-Staff record chosen to be retained. 7. Click to select the name of the record to delete. Delete a Record 1. Type the name of the record to be deleted in the Search field. 2. Click the Search icon. 3. Click to select the record to delete. 4. Click the Delete button. 5. Click Delete to confirm. Click Cancel to return to the roster. H E RE ’S A TI P The SWIS Suite prevents deleting person records attached to data. If there are duplicate person records and each has data, merging the two records is recommended over deleting. Update a Record Status 1. Check the Active, Inactive, and Archived filter boxes to display all persons associated with the SWIS account. 2. Type the name of the record to update in the Search field. Click the search icon. 3. Right-click on the record and select Set Status. Select the appropriate status for the record: Active: the person is currently associated with the school. Inactive: the person is not currently associated with the school, but may return (e.g., transfer students). Archived: the person is not currently associated with the school and will not be returning (e.g., graduated students). 8. Click Merge. Revise a Record 1. In the Search field, type name of the record to modify. 2. Click the Search icon. 4. Click OK. 3. In the result set, double click on the record to revise. 4. Revise the necessary information. 5. Click OK. The Person Management workspace with Set Status menu. 38 ISIS-SWIS User’s Manual ISIS-SWIS User’s Manual 39 Student Dashboard The Student Dashboard provides school/ facility personnel with a comprehensive report for an individual student with data in SWIS, CICO-SWIS, and/or ISIS-SWIS. Scan for video tutorial For instructions see page 5 To access the Student Dashboard: 1. Click Tools, then click Student Dashboard. 2. Select a student to view from the Find a Student drop-down menu or the Students with Referrals list. Clicking the name will open the dashboard for the selected student. Student Dashboard reports include: Summary Referrals By Time Latest Referrals—the student’s 10 most recent referrals. Referrals By Problem Behavior Referrals Per Year Suspension/Expulsion Referrals By Motivation 40 ISIS-SWIS User’s Manual Referrals By Location Referrals By Day Of Week Average Referrals Per Day Per Month Appendix A - ISIS-SWIS Data Entry and Reporting Schedule School: Date: Team: Team Coordinator: Data Entry Student Name Entry Staff Measures Schedule Report Generated Student Name Entry Staff Measures Schedule