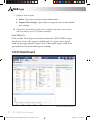
1
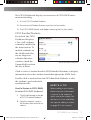
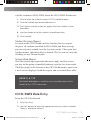
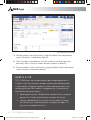
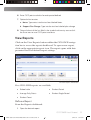
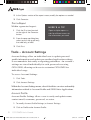
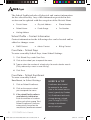
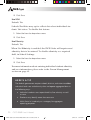
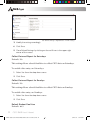
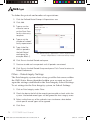
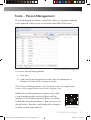
User’s Manual Version 5.5 | August 2015 How to Find Help This manual is your first step for CICO-SWIS support. Can’t find the information you need? Contact your CICO-SWIS Facilitator. My CICO-SWIS Facilitator Information Facilitator Name: Phone Number: Email Address: For More Information Are you still stuck? Visit the PBISApps support website online at support.pbisapps.org There you will find answers to many common questions, a searchable knowledge base and discussion forum, and ways to contact PBISApps to ask your question directly. User’s Manual Version 5.5 | August 2015 CICO-SWIS Users Manual B&W with Color Screenshots.indd 1 8/24/2015 1:11:24 PM Table of Contents Overview . . . . . . . . . . . . . . . . . . . . . . . . . . . . . . . . . . . . . . . . . . . . . . 4 Who Should Use this Manual? . . . . . . . . . . . . . . . . . . . . . . . . . . . . . . . . . . . . . 4 What is PBISApps? . . . . . . . . . . . . . . . . . . . . . . . . . . . . . . . . . . . . . . . . . . . . . . 4 What is the SWIS Suite? . . . . . . . . . . . . . . . . . . . . . . . . . . . . . . . . . . . . . . . . . . 4 What is CICO-SWIS? . . . . . . . . . . . . . . . . . . . . . . . . . . . . . . . . . . . . . . . . . . . . . 5 About the QR Codes . . . . . . . . . . . . . . . . . . . . . . . . . . . . . . . . . . . . . . . . . . . . . 5 Login/Logout . . . . . . . . . . . . . . . . . . . . . . . . . . . . . . . . . . . . . . . . . . . 6 School Select Menu . . . . . . . . . . . . . . . . . . . . . . . . . . . . . . . . . . . . . . . . . . . . . . 7 Select School Menu Feature Overview . . . . . . . . . . . . . . . . . . . . . . . . . . . . . . . 7 School Details Information Menu Feature Overview . . . . . . . . . . . . . . . . . . . 7 Switch Schools . . . . . . . . . . . . . . . . . . . . . . . . . . . . . . . . . . . . . . . . . . . . . . . . . . 8 Quick Start . . . . . . . . . . . . . . . . . . . . . . . . . . . . . . . . . . . . . . . . . . . . 8 Configure the CICO-SWIS Account . . . . . . . . . . . . . . . . . . . . . . . . . . . . . . . . 8 Enroll a New Student . . . . . . . . . . . . . . . . . . . . . . . . . . . . . . . . . . . . . . . . . . . . . 8 Enter CICO Data . . . . . . . . . . . . . . . . . . . . . . . . . . . . . . . . . . . . . . . . . . . . . . . . . 9 View Reports . . . . . . . . . . . . . . . . . . . . . . . . . . . . . . . . . . . . . . . . . . . . . . . . . . . 10 CICO Dashboard . . . . . . . . . . . . . . . . . . . . . . . . . . . . . . . . . . . . . . . 10 CICO Enrolled Students . . . . . . . . . . . . . . . . . . . . . . . . . . . . . . . . . . . . . . . . . 11 Enroll a Student in CICO-SWIS . . . . . . . . . . . . . . . . . . . . . . . . . . . . . . . . . . . . . 11 Reenroll an Unenrolled Student in CICO-SWIS . . . . . . . . . . . . . . . . . . . . . . 12 Update an Enrolled Student: . . . . . . . . . . . . . . . . . . . . . . . . . . . . . . . . . . . . . . . . 12 Unenroll a Student: . . . . . . . . . . . . . . . . . . . . . . . . . . . . . . . . . . . . . . . . . . . . . . . . . 12 Student Success Report . . . . . . . . . . . . . . . . . . . . . . . . . . . . . . . . . . . . . . . . . 13 School-Wide Report . . . . . . . . . . . . . . . . . . . . . . . . . . . . . . . . . . . . . . . . . . . . . 13 CICO-SWIS Data Entry . . . . . . . . . . . . . . . . . . . . . . . . . . . . . . . . . . 13 View Reports . . . . . . . . . . . . . . . . . . . . . . . . . . . . . . . . . . . . . . . . . . 15 Refine a Report . . . . . . . . . . . . . . . . . . . . . . . . . . . . . . . . . . . . . . . . . . . . . . . . . 15 Print a Report . . . . . . . . . . . . . . . . . . . . . . . . . . . . . . . . . . . . . . . . . . . . . . . . . . 16 Tools – Account Settings . . . . . . . . . . . . . . . . . . . . . . . . . . . . . . . 16 Account Profile . . . . . . . . . . . . . . . . . . . . . . . . . . . . . . . . . . . . . . . . . . . . . . . . . 16 Applications - General . . . . . . . . . . . . . . . . . . . . . . . . . . . . . . . . . . . . . . . . . . . 17 Tools – School Settings . . . . . . . . . . . . . . . . . . . . . . . . . . . . . . . . . . 17 2 CICO-SWIS User’s Manual CICO-SWIS Users Manual B&W with Color Screenshots.indd 2 8/24/2015 1:11:24 PM School Profile – Contact Information . . . . . . . . . . . . . . . . . . . . . . . . . . . . . . 18 Core Data – School Days . . . . . . . . . . . . . . . . . . . . . . . . . . . . . . . . . . . . . . . . 18 Core Data – School Enrollment . . . . . . . . . . . . . . . . . . . . . . . . . . . . . . . . . . . 18 Applications - General . . . . . . . . . . . . . . . . . . . . . . . . . . . . . . . . . . . . . . . . . . 19 Start Month . . . . . . . . . . . . . . . . . . . . . . . . . . . . . . . . . . . . . . . . . . . . . . . . . . . . . . . . 19 Use 504 . . . . . . . . . . . . . . . . . . . . . . . . . . . . . . . . . . . . . . . . . . . . . . . . . . . . . . . . . . 20 Use Ethnicity . . . . . . . . . . . . . . . . . . . . . . . . . . . . . . . . . . . . . . . . . . . . . . . . . . . . . . 20 Use IEP . . . . . . . . . . . . . . . . . . . . . . . . . . . . . . . . . . . . . . . . . . . . . . . . . . . . . . . . . . . . 21 Use Person Import . . . . . . . . . . . . . . . . . . . . . . . . . . . . . . . . . . . . . . . . . . . . . . . . . 21 Require Staff and Require Student District IDs . . . . . . . . . . . . . . . . . . . . . . . 21 Applications - CICO . . . . . . . . . . . . . . . . . . . . . . . . . . . . . . . . . . . . . . . . . . . . 21 Collect Data and Report for Saturdays . . . . . . . . . . . . . . . . . . . . . . . . . . . . . 22 Collect Data and Report for Sundays . . . . . . . . . . . . . . . . . . . . . . . . . . . . . . . 22 Default Student Goal Line . . . . . . . . . . . . . . . . . . . . . . . . . . . . . . . . . . . . . . . . . 22 Defined Period Groups & Expectations . . . . . . . . . . . . . . . . . . . . . . . . . . . . . 23 Other – Data Integrity Settings . . . . . . . . . . . . . . . . . . . . . . . . . . . . . . . . . . 24 Tools – Person Management . . . . . . . . . . . . . . . . . . . . . . . . . . . . 25 Add a New Record . . . . . . . . . . . . . . . . . . . . . . . . . . . . . . . . . . . . . . . . . . . . . 26 Merge Duplicate Records . . . . . . . . . . . . . . . . . . . . . . . . . . . . . . . . . . . . . . . 26 Revise a Record . . . . . . . . . . . . . . . . . . . . . . . . . . . . . . . . . . . . . . . . . . . . . . . . . 27 Delete a Record . . . . . . . . . . . . . . . . . . . . . . . . . . . . . . . . . . . . . . . . . . . . . . . . . 27 Update a Record Status . . . . . . . . . . . . . . . . . . . . . . . . . . . . . . . . . . . . . . . . . 28 Update Multiple Records . . . . . . . . . . . . . . . . . . . . . . . . . . . . . . . . . . . . . . . . 28 Tools – Data . . . . . . . . . . . . . . . . . . . . . . . . . . . . . . . . . . . . . . . . . . 29 Data Integrity . . . . . . . . . . . . . . . . . . . . . . . . . . . . . . . . . . . . . . . . . . . . . . . . . . 29 Person Import . . . . . . . . . . . . . . . . . . . . . . . . . . . . . . . . . . . . . . . . . . . . . . . . . 30 Student Dashboard . . . . . . . . . . . . . . . . . . . . . . . . . . . . . . . . . . . . . . . . . . . . . . 31 Tools – Support . . . . . . . . . . . . . . . . . . . . . . . . . . . . . . . . . . . . . . . 32 Tools – Subscriptions . . . . . . . . . . . . . . . . . . . . . . . . . . . . . . . . . . 32 View, Print, or Pay an Invoice . . . . . . . . . . . . . . . . . . . . . . . . . . . . . . . . . . . . . . . 32 Appendix A - CICO-SWIS Data Entry and Reporting Schedule . . . . . . . . . . . . . . Inside Back Cover CICO-SWIS User’s Manual CICO-SWIS Users Manual B&W with Color Screenshots.indd 3 3 8/24/2015 1:11:24 PM Overview Who Should Use this Manual? The purpose of the CICO-SWIS User’s Manual is to provide CICO-SWIS users a quick reference and trouble-shooting guide. The manual is for use by CICO-SWIS facilitators and CICO-SWIS users during initial start-up, training, and ongoing use. Much of the information found in this manual is also available online at www.pbisapps.org. What is PBISApps? PBISApps is a not-for-profit group, developed and operated by Educational and Community Supports (ECS), a research unit at the University of Oregon. The PBISApps team manages a series of educational tools related to the implementation of multi-tiered systems of support (MTSS). These tools include the School-Wide Information System (SWIS) Suite, PBIS Assessment, and PBIS Evaluation. These applications have been implemented in more than 25,000 schools in the US and abroad. PBISApps has been making schools safer and more productive places for over 10 years by empowering educators to make data-based decisions as problems emerge. What is the SWIS Suite? The SWIS Suite — a set of four applications (SWIS, CICO-SWIS, ISIS-SWIS, and SAMI) — is a reliable, confidential, web-based information system built to collect, summarize, and use student behavior data for decision making. Research demonstrates that educators can make more effective and efficient decisions when they have the right data in the right format at the right 4 HERE ’S A T I P Some aspects of CICO-SWIS may be inaccessible based on your access level. Please contact your facilitator to have your access modified. For more information about access levels, see the support article on PBISApps. CICO-SWIS User’s Manual CICO-SWIS Users Manual B&W with Color Screenshots.indd 4 8/24/2015 1:11:24 PM time. The SWIS Suite provides school/facility personnel with the information they need to be successful decision makers. What is CICO-SWIS? Check-in Check-Out (CICO-SWIS) is a web-based decision system providing school/facility personnel with an online space to enter Check-In Check-Out (CICO) point card data easily and efficiently. Teams using CICO-SWIS have a place to 1. Monitor individual student progress in the intervention 2. Review the overall integrity and fidelity of the program. Information entered into CICO-SWIS is confidential and secure. CICO-SWIS protects data through the use of account-specific passwords and high-quality data protection procedures. The Confidentiality & Security Statement can be accessed at www.pbisapps.org. About the QR Codes The QR codes in this manual direct you to video tutorials or additional content as supplements to the written instructions. To use the QR codes you need a smartphone or tablet with internet access and software that can read and interpret the codes. There are many free QR code reader apps found in your device’s app store - for example, the Apple App Store for iOS, Google Play for Android, or Windows Phone Store for Windows Phone. To download an app, search “QR code reader” in the app store on your device and download. All videos can be found on our website www.pbisapps.org by navigating to Resources > Video Tutorials in the main navigation. An example of a QR code. CICO-SWIS User’s Manual CICO-SWIS Users Manual B&W with Color Screenshots.indd 5 5 8/24/2015 1:11:24 PM Login/Logout From your preferred internet browser (e.g., Internet Explorer, Firefox, Safari, Chrome) type in the website address www.pbisapps. org to access PBISApps. The login is located in the black bar at the top of the screen. Once at PBISApps: 1. Click on PBIS Applications Login located in the black bar (app bar) at the top of the screen. 2. Enter the email address and password associated with the CICO-SWIS account. 3. Click Login. (If the password is a temporary password, a prompt appears for a permanent password to be created.) 4. Once logged in, slide over to the left side of the app bar and click on SWIS Suite to access CICO-SWIS. 6 CICO-SWIS User’s Manual CICO-SWIS Users Manual B&W with Color Screenshots.indd 6 8/24/2015 1:11:25 PM To logout of PBISApps and an CICO-SWIS account: 1. Click on the user’s email address located in the app bar at the top of the screen. Scan for video tutorial For instructions see page 5 2. Click Logout. Note: Users can also click on the Logout icon located in the blue bar at the top of the screen. School Select Menu Users with access to more than one school’s account see a menu displaying each school’s name. The School Select menu provides basic overview information without logging directly into the school’s account. Select School Menu Feature Overview Search: Type the name of a school on your list to jump directly to that account. Favorites List Filter: Click to display only schools marked as your favorites. DataLink Schools List Filter: Click to display only schools participating in DataLink to upload data. Favorite: Click the star to mark the school as a favorite. Info: Click to access additional information about the account. Login: Click to login to the school’s account. School Details Information Menu Feature Overview School Information: See which applications the school accesses, the school’s grade range, and a full list of users along with their last login dates and times. School Contact Information: View the schools mailing and physical addresses, phone number, and fax number. SWIS Information: Access the SWIS contact’s name and email, SWIS facilitator’s name and contact information, and see whether the school CICO-SWIS User’s Manual CICO-SWIS Users Manual B&W with Color Screenshots.indd 7 7 8/24/2015 1:11:25 PM uses the SWIS Person Import feature. DataLink Information: This section provides information about whether the school uploads data using DataLink and what the latest upload file contained. Switch Schools Users with access to more than one school can switch schools without logging out of CICO-SWIS. Note: Users with access to a single school’s account will not have access to this feature in the Tools menu. 1. Once logged in and inside the SWIS Suite, click Tools. 2. Click Switch School. 3. Select the desired school from the drop-down menu. 4. Click OK. Quick Start Configure the CICO-SWIS Account 1. From the CICO Dashboard click Tools. 7. Type or set the number of school/facility expectations. 2. Click School Settings. 3. Click CICO. 8. Type a label for the first period in the Add Period workspace. (for example: Block 1). 4. Click the Defined Period Groups & Expectations row. 9. Click Save in the Add Period workspace. 5. Click Add. 10.Continue to add and save periods until all periods are entered. 6. Type or use the calendar icon to set the Start Date for this data entry template. 11. Click Save in the Add Period Group workspace. Click Cancel to return to School Preferences. Enroll a New Student From the CICO Dashboard 1. Click Enroll located at the top of CICO Enrolled Students. 8 CICO-SWIS User’s Manual CICO-SWIS Users Manual B&W with Color Screenshots.indd 8 8/24/2015 1:11:25 PM HE R E ’S A TI P If a data entry template is already defined, you can edit the template by double-clicking it from the list. Edit the information and click Save. Some edits will render the template incompatible with previously entered data. CICO-SWIS will prompt you when this is the case and ask you to confirm any data deletion. If you’ve made changes to your CICO point card, and want to maintain a history from the previous card, simply add a new template in CICO-SWIS and save the old one. Previous data will remain in CICO-SWIS; new data can be entered based on the new template. 2. Type the student’s name in the Student field and click to select it. 3. Type the student’s goal in the % Goal field. 4. Type or use the calendar icon to set the student’s enrollment date. 5. Click Save to save or Cancel to return to the CICO Dashboard. Enter CICO Data From the CICO Dashboard: 1. Click Data Entry. 2. Use the Calendar to select the appropriate data entry date as needed. (Today is selected by default.) 3. Set the school’s status for the day using the School Status drop-down menu. (School In is selected by default.) 4. Click anywhere in the blue bar with the student’s name to expan the data entry form. (The first student on the list opens by default.) 5. Set the student’s status for the day using the Student Status drop-down menu. (Present is elected by default.) 6. Enter CICO point card data for each period defined. CICO-SWIS User’s Manual CICO-SWIS Users Manual B&W with Color Screenshots.indd 9 9 8/24/2015 1:11:25 PM 7. Optional data to enter: a. Notes: Type notes into the text box labeled Notes. b. Support Plan Change: Type the plan change into the text box labeled plan change 8. Tab or click out of the last field in the student’s data entry row or click the Save icon to save CICO point card data. View Reports Click on the View Reports button within the CICO-SWIS navigation bar to access the reports dashboard. To open a new report, click on the appropriate report icon. The report opens with data presented based on default report settings. CICO Dashboard The CICO-SWIS Dashboard. 10 CICO-SWIS User’s Manual CICO-SWIS Users Manual B&W with Color Screenshots.indd 10 8/24/2015 1:11:25 PM The CICO Dashboard displays an overview of CICO-SWIS information including: 1. A list of CICO Enrolled Students 2. An overview of Student Success over the last four weeks 3. The CICO-SWIS School-wide Report spanning the last four weeks CICO Enrolled Students By default, the CICO Dashboard displays a list of all students currently enrolled in the intervention. To include students on the Dashboard who are no longer enrolled in the intervention, check the Unenrolled box from the list of filters. The Enroll Student workspace. Click to select a student listed in CICO Enrolled Students to display information about the student found throughout the SWIS Suite. Double-click a student listed in CICO Enrolled Students to edit the student’s goal and initial enrollment date. Enroll a Student in CICO-SWIS From the CICO-SWIS Dashboard 1. Click Enroll located at the top of CICO Enrolled Students. 2. Type the student’s name in the Student field and click to select it. HERE’ S A T IP Before adding a new student, check to be sure if the record is inactive. If the student to add is new to the school, click the Not In List icon and follow the steps for adding a student on page 26 in this manual. CICO-SWIS User’s Manual CICO-SWIS Users Manual B&W with Color Screenshots.indd 11 11 8/24/2015 1:11:26 PM 3. Type the student’s goal in the % Goal field. 4. Type an enrollment date or select the enrollment date using the calendar icon. 5. Click Save to save or Cancel to return to the CICO Dashboard. Reenroll an Unenrolled Student in CICO-SWIS When a previously unenrolled student returns to CICO, reenroll the student in CICO-SWIS. From the CICO-SWIS Dashboard: 1. Check the Unenrolled filter from the list of Filters in CICO Enrolled Students. 2. Click to select the student’s name in CICO Enrolled Students. 3. Click Reenroll located at the top of the CICO Enrolled Students list. 4. Type the student’s goal in the % Goal field. 5. Type an enrollment date or select the enrollment date using the calendar icon. 6. Click Save to save or Cancel to return to the CICO Dashboard. Update an Enrolled Student: From the CICO-SWIS Dashboard 1. Double click on the name of the student to be updated in CICO Enrolled Students. 2. Type the student’s goal in the % Goal field. 3. Type or use the calendar icon to select an enrollment date. HERE ’ S A T IP To edit an enrolled student’s name or other identifying information, use Person Management. Follow the steps for revising a record in person management on page 27. 4. Click OK to save or Cancel to return to the CICO Dashboard. Unenroll a Student: As students graduate from the CICO intervention, be sure to unen12 CICO-SWIS User’s Manual CICO-SWIS Users Manual B&W with Color Screenshots.indd 12 8/24/2015 1:11:26 PM roll the student in CICO-SWIS. From the CICO-SWIS Dashboard: 1. Click to select the student’s name in CICO Enrolled Students. 2. Click the Unenroll icon located above the list. 3. The Confirm Unenroll screen will appear. Verify the student is to be unenrolled. 4. Use the calendar to set the student’s unenrollment date. 5. Click Unenroll. Student Success Report Located on the CICO Dashboard, the Student Success report displays all students enrolled in CICO-SWIS and their average percent of points earned over the last four weeks. The report lists student names alphabetically by default. The list can be sorted by clicking on any column header. School-Wide Report The School-wide report provides the mean, high, and low scores per day for the group of enrolled students over the last four weeks. Click the graph at the bottom of the CICO Dashboard to open it in a new screen displayed with the report and associated data table. HE R E ’ S A TI P The School-Wide Report is useful to assess the effectiveness of the school/facility’s CICO intervention. CICO-SWIS Data Entry From the CICO Dashboard: 1. Click Data Entry. 2. Use the Calendar to select the appropriate data entry date as needed. (Today is selected by default.) CICO-SWIS User’s Manual CICO-SWIS Users Manual B&W with Color Screenshots.indd 13 13 8/24/2015 1:11:26 PM The Data Entry workspace. 3. Set the school’s status for the day using the School Status drop-down menu. (School In is selected by default.) 4. Click anywhere in the blue bar with the student’s name to expan the data entry form. (The first student on the list opens by default.) 5. Set the student’s status for the day using the Student Status drop-down menu. (Present is elected by default.) HE R E ’S A TI P CICO-SWIS bases the number of points possible per period on a 0, 1, 2 point scale. The maximum number of points possible per period is calculated by taking the number of school-wide expectations and multiplying by two. Each student’s average per day is automatically calculated as data entry occurs. Selecting No Data for a School Status, Student Status, or period equates to a 0 when calculating the averages for the day. Leaving a period blank will not count in the student’s average for the day. Days with blank periods will appear on reports as days with incomplete data entry. 14 CICO-SWIS User’s Manual CICO-SWIS Users Manual B&W with Color Screenshots.indd 14 8/24/2015 1:11:26 PM 6. Enter CICO point card data for each period defined. 7. Optional data to enter: a. Notes: Type notes into the text box labeled Notes. b. Support Plan Change: Type into the text box labeled plan change 8. Tab or click out of the last field in the student’s data entry row or click the Save icon to save CICO point card data. View Reports Click on the View Reports button within the CICO-SWIS navigation bar to access the reports dashboard. To open a new report, click on the appropriate report icon. The report opens with data presented based on default report settings. The View Reports Dashboard Five CICO-SWIS reports are available: School-wide Student Period Average Daily Points Student Single Period Student Count Refine a Report From the Reports dashboard: 1. Open the desired report. CICO-SWIS User’s Manual CICO-SWIS Users Manual B&W with Color Screenshots.indd 15 15 8/24/2015 1:11:26 PM 2. In the Options section of the report screen, modify the options as needed. 3. Click Generate. Print a Report Within a generated report: 1. Click the Print icon located to the right of the Generate button. HERE’ S A T IP Open multiple reports in tabs for efficient access to the information you need. 2. From the pop-up dialog box, select to print the graph only, the table only, or both. 3. Click Print. Tools – Account Settings Account Settings allow an individual user to update personal profile information and update personalized application settings to accommodate data entry or reporting preferences. An account’s settings are stored individually for each password accessing CICO-SWIS, allowing each user to customize CICO-SWIS for individual usage. To access Account Settings: 1. Click Tools. 2. Click Account Settings. Within the Account Settings menu, schools/facilities can view and modify information related to Account Profile and SWIS Suite Applications. Account Profile Account Profile Settings allow a user to verify and update name, contact email, username, password, or avatar. 1. To modify Account Profile Settings, in Account Settings: 2. Click on Profile under Account Profile. 16 CICO-SWIS User’s Manual CICO-SWIS Users Manual B&W with Color Screenshots.indd 16 8/24/2015 1:11:26 PM 3. Click the name of the section to edit. 4. Type the new information to modify Account Profile information. 5. Enter your current password for changes to take effect. 6. Click Save. Applications - General Applications settings allow users to enable specific settings according to personal preference. General settings include: Locale Name Sort Order (First Last vs Last First) Default Graph Size To modify General settings, in Account Settings: 1. Click on General under Applications. 2. Select the setting to modify. 3. Type or select the preferred option for the setting. 4. Click Save. Tools – School Settings To access School Settings: 1. From the CICO-SWIS Dashboard click Tools. 2. Click School Settings. HERE ’S A T I P School Settings are set for the entire school and will be the same for all users. Within the School Settings menu, schools/facilities can view and modify information related to: School Profile Core Data General and ApplicationSpecific Settings Data Integrity settings CICO-SWIS User’s Manual CICO-SWIS Users Manual B&W with Color Screenshots.indd 17 17 8/24/2015 1:11:26 PM The School Profile includes all physical and contact information for the school/facility. Any of the information provided in this section can be updated with the exception of the District Name: District Name Physical Address Phone Number School Name Grade Range Fax Number Mailing Address School Profile – Contact Information Contact information for the following roles can be located and/or edited as changes occur. SWIS Contact Admin Contact Billing Contact Core Data – School Days To enter or modify School Days, from School Settings: 1. Click School Days under Core Data. 2. Click on the school year to expand the menu. 3. Type or select the number of schools days for each calendar month (Early release days count as one full day). 4. Click Save. Core Data – School Enrollment To enter or modify School Enrollment, in School Settings: 1. Click on School Enrollment. 2. Click on the correct school year to expand the menu. 3. If the school/facility collects race/ethnicity information: Enter the number of students within each ethnic group. Total School Enrollment calculates automatically based on the race/ethnicity enrollment entered. 18 HERE ’S A T I P Enrollment data should be entered at the same time as the annual census count (typically by October 1st). Enrollment totals only change during a school year if a large (10-20%) change in enrollment occurs mid-year. CICO-SWIS User’s Manual CICO-SWIS Users Manual B&W with Color Screenshots.indd 18 8/24/2015 1:11:26 PM The School Settings > Core Data > School Enrollment settings. 4. If the school/facility does not collect race/ethnicity information: Enter the total enrollment 5. Click Save. Applications - General To enter or modify General Settings, in School Settings: 1. Click General. 2. Click anywhere within the row of the appropriate field to expand the menu. 3. Choose Yes to enable the identified feature. 4. Choose No to disable the feature. 5. Click Save. 6. Close School Settings by clicking on the red X icon in the upper right corner of the screen. Start Month Default: August This setting sets which month is considered the start of the year for reporting and decision-making purposes. To modify the Start Month: 1. Select the appropriate month from the drop-down menu. CICO-SWIS User’s Manual CICO-SWIS Users Manual B&W with Color Screenshots.indd 19 19 8/24/2015 1:11:26 PM 2. Click Save. Use 504 Default: Yes Schools/Facilities may opt to collect data about individual students’ 504 status. To disable this feature: 1. Select No from the drop-down menu. 2. Click Save Use Ethnicity Default: Yes When Use Ethnicity is enabled, the SWIS Suite will require race/ ethnicity data to be entered. To disable ethnicity as a required field, in School Settings: 1. Select No from the drop-down menu. 2. Click Save. For more information about entering individual student ethnicity and race information, please refer to the Person Management section on page 25. HE R E ’S A TI P The federal government requires schools, districts, and states to collect individual-level race and ethnicity data and report aggregated data in the following ways: Individual students must report both his/her ethnicity as well as race. Students may identify more than one race. Multi-Racial is listed only as a category for aggregate reporting purposes. 20 CICO-SWIS User’s Manual CICO-SWIS Users Manual B&W with Color Screenshots.indd 20 8/24/2015 1:11:26 PM Use IEP Default: Yes When enabled, users will identify each student’s IEP status and disability category. To disable this setting: 1. Select No from the drop-down menu. 2. Click Save. Use Person Import Default: Disabled When enabled, users have the ability to import student and staff lists directly into SWIS. To enable this setting: 1. Select Yes from the drop-down menu. 2. Click Save. Require Staff and Require Student District IDs Staff District ID Default: Yes Student District ID Default: Yes SWIS allows the school/facility to utilize district/internal identification numbers for staff in addition to the SWIS assigned ID number. If disabled, the staff and/or student SWIS ids are displayed on reports. To disable this feature: 1. Select No from the drop-down menu. 2. Click Save. Applications - CICO To enter or modify CICO-SWIS settings and data entry configuration, in School Settings: 1. Click CICO. 2. Click anywhere within the row of the appropriate field to expand the menu. CICO-SWIS User’s Manual CICO-SWIS Users Manual B&W with Color Screenshots.indd 21 21 8/24/2015 1:11:26 PM The School Settings > Applications > CICO settings. 3. Modify the setting accordingly. 4. Click Save. 5. Close School Settings by clicking on the red X icon in the upper right corner of the screen. Collect Data and Report for Saturdays Default: No This setting allows schools/facilities to collect CICO data on Saturdays. To enable data entry on Saturdays: 1. Select Yes from the drop-down menu. 2. Click Save. Collect Data and Report for Sundays Default: No This setting allows schools/facilities to collect CICO data on Sundays. To enable data entry on Sundays: 1. Select Yes from the drop-down menu. 2. Click Save. Default Student Goal Line Default: 80% 22 CICO-SWIS User’s Manual CICO-SWIS Users Manual B&W with Color Screenshots.indd 22 8/24/2015 1:11:26 PM This settings allows schools/facilities to set a default percent goal for the overall CICO intervention. The goal line on school-wide CICO reports will default to the value set here. To modify the default goal line: 1. Type or use the arrows to set the goal. 2. Click Save. HE R E ’ S A TI P While this setting establishes the school-wide goal line, individual student goals can be updated throughout the year by following the steps outlined on page 12 of this manual. Additionally, goal lines can be changed as a report option on most CICO-SWIS reports. Defined Period Groups & Expectations Default: Undefined Schools/Facilities design the CICO-SWIS data-entry screen by defining the number of times students check in during the day (periods) and the number of expectations at the school. Schools may define their CICO system by establishing 3-5 expectations and 10 or fewer periods. Both the expectations and periods should match the information displayed on the school’s CICO daily progress report. HE R E ’ S A TI P The data entry template established in CICO-SWIS is a standard template for all students enrolled in CICO and should be based upon team agreements. If all students check-in the same number of times during the day, but each student’s check-in happens in a unique class period, name each period generically. For example: Period 1, Period 2, etc.. CICO-SWIS User’s Manual CICO-SWIS Users Manual B&W with Color Screenshots.indd 23 23 8/24/2015 1:11:26 PM To define the periods and number of expectations: 1. Click the Defined Period Groups & Expectations row. 2. Click Add. 3. Type or use the calendar icon to set the Start Date for this data entry template. 4. Type or set the number of school/ facility expectations. 5. Type a label for the first period in the Add Period workspace (for example: Block 1). The School Settings > Applications > CICO > Defined Period Groups & Expectations > Edit Period Group settings. 6. Click Save in the Add Period workspace. 7. Continue to add and save periods until all periods are entered. 8. Click Save in the Add Period Group workspace. Click Cancel to return to School Preferences. Other – Data Integrity Settings The Data Integrity system alerts of any possible data errors within the SWIS Suite. Errors identified within your account are based upon the settings established in the Data Integrity School Settings. To set settings for the Data Integrity system, in School Settings: 1. Click on Data Integrity under Other. 2. Check the box to the left of the record type to enable a check within the system. Unchecked record types will be ignored for data integrity errors. 3. Select a date from any of the calendar icons to choose a date before which specific record types will be ignored. 4. Click Save. 24 CICO-SWIS User’s Manual CICO-SWIS Users Manual B&W with Color Screenshots.indd 24 8/24/2015 1:11:27 PM Tools – Person Management Person Management allows schools/facilities to organize students, staff, and non-staff records associated with SWIS Suite data. The Person Management workspace. To access Person Management: 1. Click Tools. 2. Under the Person Management header, select the appropriate list (Student, Staff, Non-Staff) to review or modify. Note: Person Management is also located in the top right-hand corner of the application next to the Logout icon. Within Person Management, only records with a status matching the selected filters will be displayed. First select from the filters available within the drop-down menu. Then, check or uncheck Active, Inactive, and Archived to display or hide a name from the list. Scan for video tutorial For instructions see page 5 CICO-SWIS User’s Manual CICO-SWIS Users Manual B&W with Color Screenshots.indd 25 25 8/24/2015 1:11:27 PM To see all currently active person records, check only the Active box from the filters. The first 15 active records display in the result set. Use the navigation at the bottom of the screen to tab through the list and view additional records. Click on a name to display the person’s information to the right of the list. Add a New Record 1. In the Tools menu, click Person Management. 2. Click on the correct tab: Students, Staff, Non-Staff. 3. Click Add. 4. Enter all required information about the person. 5. Click Save to save or click Save & New to save and open a new form to continue adding new person records. HE R E ’S A TI P For students on an IEP, a disability category must be selected. “To Be Obtained” should only be selected when a record urgently needs to be recorded but the disability category is not available. It is critical to update this information to keep records current for reporting and decision making. Student records marked with an IEP disability category To Be Obtained will appear as data to correct within the Data Integrity system. Merge Duplicate Records Merging two names will move all referrals from the “Student/ Staff/Non-Staff to Delete” to the “Student/Staff/Non-Staff to Retain.” 1. Check the Active, Inactive, and Archived filter boxes to display all person records associated with the SWIS account. 2. Locate the name of the person to be retained by typing the name in the Search field. 26 CICO-SWIS User’s Manual CICO-SWIS Users Manual B&W with Color Screenshots.indd 26 8/24/2015 1:11:27 PM 3. Click the Search icon. 4. Click to select the name of the record to retain. 5. Click Merge. 6. In the Student/Staff/Non-Staff to Delete field type the name of the person record to delete. All referrals from this record will be moved to the Student/Staff/Non-Staff record chosen to be retained. 7. Click to select the name of the label to delete. 8. Click Merge. Revise a Record 1. In the Search field, type name of the record to modify. 2. Click the Search icon. 3. In the result set, double click on the record to revise. The Edit Student workspace. 4. Revise the necessary information. 5. Click Save. Delete a Record 1. Type the name of the record to be deleted in the Search field. 2. Click the Search icon. 3. Click to select the record to delete. 4. Click the Delete button. 5. Click Delete to confirm. Click Cancel to return to the roster. HERE ’S A T I P The SWIS Suite prevents deleting person records attached to data. If there are duplicate person records and each has data, merging the two records is recommended over deleting. CICO-SWIS User’s Manual CICO-SWIS Users Manual B&W with Color Screenshots.indd 27 27 8/24/2015 1:11:27 PM Update a Record Status 1. Check the Active, Inactive, and Archived filter boxes to display all persons associated with the SWIS account. 2.Type the name of the record to update in the Search field. Click the search icon. 3.Right-click on the record and select Set Status. Select the appropriate status for the record: The Person Management workspace with Set Status menu. a.Active: the person is currently associated with the school. b. Inactive: the person is not currently associated with the school, but may return (e.g., transfer students). c. Archived: the person is not currently associated with the school and will not be returning (e.g., graduated students). Update Multiple Records Multiple person records may be selected within the same page to update to the same status all at once. To update multiple records with one click: 1. When the Person Management list opens, scroll to the page with multiple records to update. 2. Check the box to the left of each record to update. 3. Click the Set Status button located at the top of the list. 4. Select the appropriate status for the records. 28 CICO-SWIS User’s Manual CICO-SWIS Users Manual B&W with Color Screenshots.indd 28 8/24/2015 1:11:27 PM Tools – Data Data Integrity To access the Data Integrity system: 1. From the CICO-SWIS Dashboard click Tools. 2. Click Data Integrity. The Summary at the top of the report identifies the number of possible errors within the account in each record type. Below the Summary are two columns. Good Data lists the record types without identified errors. Problematic Data lists each record type with an itemized list of possible errors. The full report checks for the following: Any staff, non-staff, or students missing district ids Duplicate staff, non-staff, or student records Staff, non-staff, or students with duplicate district ids School Days data out of range (months with more days than possible weekdays) Missing/Incomplete School Enrollment data Duplicate referrals School Enrollment data out of range (greater than 2500 students) Referrals out of date range (referrals before 1997 or with future dates) Students with a Disability Category marked as To be Obtained Referrals out of time range (based on the Time Range setting established in School Settings) Referrals with Action Pending marked as the Action Taken Missing or incomplete School Days data Students on an IEP with no Disability identified Inactive/Archived students enrolled in CICO-SWIS Inactive/Archived students in ISIS-SWIS with open student files CICO-SWIS User’s Manual CICO-SWIS Users Manual B&W with Color Screenshots.indd 29 29 8/24/2015 1:11:27 PM To correct any of the records listed in Problematic Data: 1. Double-click the record to correct. 2. Correct the information. 3. Click Save. Person Import Person Import allows any SWIS Suite school to import a list of students or staff from a Student Information System into the SWIS application. Importing these records reduces the amount of time schools spend manually entering data already available in another system. Schools’ data must meet certain requirements to ensure a clean import of person records. These requirements ensure the import process is accurate without creating duplicate records. All schools utilizing Person Import must have: Student and staff district ids required in School Settings All active and inactive students and staff identified with a district id. (The process ignores archived students and staff.) All unique district ids. No two student records, no two staff records have the same district ids. The ability to generate an import file matching the required format. To use the Person Import feature: 1. From the Tools menu, click Person Import. 2. Correct the data integrity errors identified in the Issues Preventing Import section to the right. Once all data integrity errors are corrected, the sections will appear green with a checkmark. 3. Create the student or staff export from your student information system based on the technical specification. 4. Go to https://sandbox.swis.org to import the roster(s) in your sandbox account. The sandbox is for testing purposes. It refreshes every night 30 CICO-SWIS User’s Manual CICO-SWIS Users Manual B&W with Color Screenshots.indd 30 8/24/2015 1:11:27 PM with data from your real SWIS account and gives you a secure place to test your import process. Use the sandbox account to test any new file prior to importing data into your real SWIS account. 5. Follow the Person Import Wizard to upload the file to your sandbox account. HERE ’S A T I P Visit the Data Integration section of PBISApps.org for more information on the pros and cons related to Person Import. 6. Once your test file uploads successfully, log back into your live SWIS account and navigate back to the Person Import section. It may take as long as 15 minutes for the live site to register your successful sandbox upload. 7. Click the Enable Person Import button in the notification located at the top right corner of the Person Import screen. 8. Follow the Person Import Wizard to upload the tested roster to your live account. Student Dashboard The Student Dashboard provides school/facility personnel with a comprehensive report for an individual student with data in SWIS, CICO-SWIS, and/or ISIS-SWIS. To access the Student Dashboard: Scan for video tutorial For instructions see page 5 1. Click Tools, then Click Student Dashboard. 2. Double-click the student record to select a student to view from the Select a Student list. 3. The Student Dashboard opens with data from the current school year. 4. Select another year from the drop-down menu located next to the student’s name to display data from previous school year. Note: CICO-SWIS data will not appear in the Student Dashboard when previous years are selected. CICO-SWIS User’s Manual CICO-SWIS Users Manual B&W with Color Screenshots.indd 31 31 8/24/2015 1:11:27 PM Student Dashboard reports include: Summary Referrals By Problem Behavior Latest Referrals—the student’s 10 most recent referrals. Referrals By Location Referrals Per Year Suspension/Expulsion Referrals By Motivation Referrals By Time Referrals By Day Of Week Average Referrals Per Day Per Month CICO-SWIS Individual Student Count Tools – Support As questions come up about how to use SWIS, it is recommended to refer to the PBISApps Support page for the answers. Access the Support page by clicking Support under the Tools menu. The page will open in a new tab. Search the page for answers to your frequently asked questions. Tools – Subscriptions The status of any SWIS Suite subscription and associated invoice is available in the section labeled Subscriptions located in Tools. From this section, you can view, print, and pay the invoice(s) associated with the school’s subscription(s). View, Print, or Pay an Invoice 1. From the Tools menu, click Subscriptions. 2. A window appears with all possible applications listed along the top with their current subscription status. Green + : Subscription is current and invoice is paid. Yellow + !: Subscription is due and invoice is unpaid. 32 CICO-SWIS User’s Manual CICO-SWIS Users Manual B&W with Color Screenshots.indd 32 8/24/2015 1:11:27 PM Red + ! : Subscription is more than 30 days past due and invoice is unpaid. Gray + : No subscription 3. Click any of the invoice numbers listed on the left-hand side of the window to view a copy. Note: Only invoices from the current subscription year will display in this section. 4. Click Print to print a copy of the invoice. 5. Click Pay Invoice and the application opens a new window to the online portal to pay your invoice with a credit card. HE R E ’ S A TI P A quick view of the subscription status is also available on any application’s dashboard. The notification’s color is an indication of the subscription’s status: Yellow: Due Red: More than 30 days past due No Notification: Paid CICO-SWIS User’s Manual CICO-SWIS Users Manual B&W with Color Screenshots.indd 33 33 8/24/2015 1:11:28 PM Appendix A - CICO-SWIS Data Entry and Reporting Schedule School: Facilitator: CICO Admin: Data Entry Who What When CICO-SWIS Points Accuracy Checks Report Generated Who What When