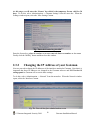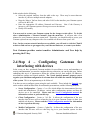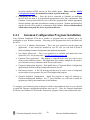
1
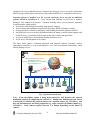
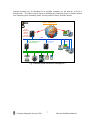
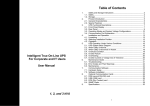
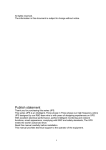
Gateman Installation Manual Copyright © Gateman Integrated Security All rights reserved. Version: 7.2.0 Date: August 15th, 2010 Author: Glenn Baptista © Gateman Integrated Security 2010. 2 Gateman Installation Manual NOTICE This manual is subject to change without notice and should not be construed to be a commitment in any form by Gateman Integrated Security. Gateman Integrated Security reserves the right to make improvements to the product at any time. It is understood that the delivered product will be of the latest possible design and that it may not be exactly as stated herein. This manual may contain descriptions of functions not implemented at the time of distribution, unless prior contractual arrangements have been made, to include these functions. Gateman Integrated Security reserves the right to modify or revise the content of this manual. It is further understood that, in consideration of the receipt or purchase of this manual, the recipient or purchaser agrees not to reproduce, disseminate the information herein, or copy it by any means whatsoever, nor to permit such actions by others, for any purpose, without the written consent of Gateman Integrated Security. © Gateman Integrated Security 2010. 3 Gateman Installation Manual Table of Contents 1 Introduction ................................................................................................................5 1.1 Gateman Overview ................................................................................................5 2 Installation ..................................................................................................................8 2.1 Step 1 – Selecting suitable hardware.....................................................................8 2.2 Step 2 – Installing Gateman software ...................................................................8 2.3 Step 3 - Post Installation Steps ............................................................................14 2.3.1 Changing the License of your Gateman .......................................................16 2.3.2 Changing the IP Address of your Gateman .................................................18 2.4 Step 4 – Configuring Gateman for interfacing with devices ...............................19 2.4.1 Gateman Configuration Program Installation ..............................................20 2.5 Step 5 – Performing administrative tasks ............................................................22 2.5.1 Backing Up Your Gateman Data .................................................................22 3 Using Gateman .........................................................................................................23 3.1 Through a PC ......................................................................................................23 3.1.1 Using your browser ......................................................................................23 3.1.2 Using the Gateman application ....................................................................23 3.2 Through a Mobile Phone .....................................................................................24 3.2.1 The Gateman Phone Menu...........................................................................24 4 License Agreement ...................................................................................................25 © Gateman Integrated Security 2010. 4 Gateman Installation Manual 1 Introduction This manual is intended for IT professionals who wish to install a Gateman system. It defines all the tasks necessary to be carried out and manuals required to be read to successfully install, configure and administer your Gateman system. In order to successfully install and commission a Gateman system, you must complete the following steps (see also the Tutorial menu of the mygateman.org website): 1. Select suitable hardware 2. Install your Gateman OS Install your PC using the Gateman DVD containing the ‘Open Source’ Linux OS (CentOS 5.3) and Gateman software. 3. After installation is complete, reboot the system and complete the initial configuration to get your Gateman system on the network Login to Linux and open the web browser on your Gateman server Log into your Gateman server on the loopback interface (127.0.0.1) Enter your Gateman license (temporary license) Configure your Gateman’s Network settings Your Gateman server is now ready for use as a Firewall and Proxy Server, Email Server and File Server after configuration of these sections. See the online Administration help for information on how to perform these tasks. 4. Install the Gateman Configuration Programs (Server, Client and Mobile Configuration) from the installation DVD onto your Windows machine. These programs allow you to generate configuration files that are uploaded onto your Gateman server. Note this step is only necessary if you have purchased the Surveillance, Access and Attendance or Security and Automation modules. Server Configuration – Defines the various devices and how they are controlled Client Configuration – Used to customize the Client applet GUI Mobile Configuration – Used to customize Gateman’s HTML pages to be displayed on a Javascript enabled HTML 4.01 compatible mobile browser Device Configuration – Each of the devices must themselves be configured using the programs supplied by the manufacturer. 5. Perform the various administrator tasks. See the online Administration help for information on how to perform these tasks. Configure the network, firewall, internet proxy, email, file server and other Gateman settings Add users and give them the required privileges 1.1 Gateman Overview Gateman is an integrated security device that provides communications functions essential to business and home premises. Gateman incorporates features for surveillance, security, e-mail, automation, a firewall and proxy facilities. Access to information from all these systems is available to the user from anywhere in the world via the LAN or internet through any computer © Gateman Integrated Security 2010. 5 Gateman Installation Manual equipped with a Java enabled browser. Gateman also allows a user to access the information directly using a mobile phone with an Java script enabled xHTML 4.01 compatible web browser. Gateman software is installed on a PC reserved exclusively for its use and no additional software should be installed on it. Users interact with Gateman via the LAN or Internet, through a Java enabled web browser. Gateman licensing allows you to purchase separately licensed modules which include: Surveillance with intelligent recording using network cameras Access control and attendance using network Proximity, RFID or biometric readers Security and device control by integrating with Building Automation Systems and PLCs An IMAP mail server to provide synchronized email on laptop or mobile phone together with an SMTP server. It includes a built in auto-update virus scanner and spam filter. A Firewall with Failover or Bandwidth Sharing and Proxy server A File server with integrated virus scanner The figure below shows a Gateman interfaced with Network cameras, Proximity readers, input/output controllers, as well as providing PCs on a LAN with Internet connectivity, email and file sharing services. Retail Store or SOHO Segment Gateway, Firewall, Proxy Server Email and File Server Security, Surveillance, Access, Attendance and Automation Server Internet LAN Clients Fig: Typical Gateman System Note: If the surveillance option is being used extensively, and therefore the network bandwidth required for supporting the cameras is > 10mbps on a 100mbps network, then it is preferable to install all the network cameras on a separate subnet (e.g. 192.168.2.x), and have the Gateman users and other peripherals (e.g. swipe card unit) on another subnet (e.g. 192.168.2.x). Each camera requires between 2 to 4mbps depending on the model of camera. © Gateman Integrated Security 2010. 6 Gateman Installation Manual Gateman modules may be distributed over multiple computers on the network, each for a different task. This option may be chosen to distribute the computing load or to further insulate your Gateman system containing Email, Security and File Shares, from the internet. SME Segment Load Balancing or Fail-over Gateway, Firewall, Proxy Server Internet LAN Security, Surveillance, Access, Attendance and Automation Server Email and File Server Clients Fig: Gateman system distributed on multiple PCs © Gateman Integrated Security 2010. 7 Gateman Installation Manual 2 Installation This chapter discusses in detail the software installation procedure for your Gateman system. After installation of the system, further administrative steps or configuration files may be required; these are detailed in separate manuals. 2.1 Step 1 – Selecting suitable hardware Your Gateman 6.0.0 (onwards) DVD installs the Open Source CEntOS 5.3 operating system. In order for your system to work effectively, drivers must be able to detect the hardware installed in your system. Please review the Centos Hardware forum for details on the peripherals and motherboards supported. CEntOS is one of the most robust well supported Linux Enterprise Class Operating systems. A typical Gateman hardware configuration consists of: A suitable motherboard with typically 2 GB RAM. A large number of motherboard are supported; please check the Centos Hardware forum for details At least one Ethernet interface; often two or more network interfaces. In the event wireless interfaces are to be used, they are best incorporated using a Wireless Access Point. Separate interfaces (network cards) may be used for: o Network peripherals (if there is a large amount of video traffic slowing the office or home network) o Network users o Internet connectivity (if you wish to use Gateman as a firewall) A 250GB or larger SATA disk depending on the application and modules selected. Since version 6.0.0 Gateman is installed on a logical disk. A DVD drive to install the software A UPS. Supported manufacturers include APC, Powercom and those having Megatec based protocols. 2.2 Step 2 – Installing Gateman software To install a Gateman server, place the Gateman DVD in your drive and reboot the system. Gateman must be installed on a hard disk reserved exclusively for Gateman and will not co-exist with any other OS or partitions. The Gateman DVD consists of the CEntOS 5.3 OS with pre-configured selections for installation of the required software, and includes the installation of additional software required for your Gateman to function. The following install options available for you to choose from: The first is for a fresh Gateman installation © Gateman Integrated Security 2010. 8 Gateman Installation Manual The second is used if you just wish to install CEntOS 5.3. A third option ‘rescue’ is also available in case you wish to boot into CEntOS directly in rescue mode. This option is only for advanced users who know how to use Linux in the event the hard disk has a problem. Fig: Type ‘gateman’ to install the OS and Gateman software To install Gateman, type ‘gateman’ and then press the <Enter> key. It is important to remember that all data on the hard disk will be lost. Currently Gateman must be installed on a fresh disk and may not co-exist with any other software. The system searches for your hardware and after a while you will be asked to read the terms of the Gateman License agreement. Hit <Enter> to move from one screen to the next, finally accepting or rejecting the terms of the license agreement. If you accept the terms the program installation will continue. © Gateman Integrated Security 2010. 9 Gateman Installation Manual Fig: Hit <Enter> to go through the License Agreement Fig: At the end press ‘y’ and press <Enter> to accept the agreement. Your Gateman system creates a number of logical partitions (using LVM) on the hard disk. One is created for the OS, another for Swap space, another for Gateman and camera pictures and another for File Sharing. The system then prompts you to enter the size of the partition used to store video. © Gateman Integrated Security 2010. 10 Gateman Installation Manual Your Gateman disk is partitioned as follows: Base OS - 20GB essential reserved Swap - 4GB essential reserved Gateman program, databases, video storage - YOU MUST ALLOCATE at least 10GB File Share area - Rest of the space On a 500GB disk if you enter 200, 25GB will be utilized for the base OS and swap space, 200GB used for Gateman program and camera pictures, and 275GB will be allocated to File Sharing. Fig: Type the size of the partition to store snapshots and video Tip: On a 500GB disk, the max amount you can allocate for Gateman + video storage is 475GB (no space is reserved for File Storage and 20GB is used for the OS). The minimum amount is 10GB required to hold Gateman programs and databases (all the rest is used for file storage and OS). The line about 15 lines above the bottom of the page indicates the size of your disk Disk /dev/sda: 80.0 GB, …. Note: Allocating too much space (more than the available disk space) will cause your installation to fail. © Gateman Integrated Security 2010. 11 Gateman Installation Manual Keep the Boot Loader option as is already selected. Use the Tab key to select the OK button Fig: The Boot Loader Configuration option No special Boot Loader options are required; Tab to the OK button Fig: The Boot Loader Special options No Boot Loader password is required. However for higher security, one may be given. Fig: The Boot Loader Password © Gateman Integrated Security 2010. 12 Gateman Installation Manual Install the Boot Loader in the MBR. Tab to OK. Fig: The Boot Loader must be installed in the MBR Next choose a suitable time zone from the list. Fig: Time zone selection While installing the system, the user is asked to Select the root password – Choose a suitable password which has at least one Uppercase letter, one lowercase letter and one number. You must always remember this password, without which you will be unable to log in to your Gateman server. If you forget this password, you will need to re-install your OS. © Gateman Integrated Security 2010. 13 Gateman Installation Manual Fig: Enter Password screen At the end of the install process, remember to eject the DVD after selecting the Reboot button otherwise the system will re-install itself again on reboot!! Fig: Gateman and CEnt OS installation completed While this completes the installation of Gateman and CEntOS 5.3, there are still some post installation steps to be performed before your Gateman system is on the network. 2.3 Step 3 - Post Installation Steps After the OS has been installed, remove your Gateman install DVD and reboot the system. Your Gateman system will begin to boot up and you will finally be left with ‘Gateman started successfully’; now press the ‘Enter’ key and you will get a Linux login command prompt. You now need to log in to the system as root. At the login command prompt type the user name ‘root’ and then press enter. At the password prompt type the password you entered. © Gateman Integrated Security 2010. 14 Gateman Installation Manual Fig: The Login command prompt Thereafter type the command ‘startx’ to start the GUI system. Fig: After Logging in, type startx This now opens a GUI screen. You may re-arrange this screen to suit your taste. We now need to: Change the IP address of the Gateman server so that it is available on the LAN Enter the required software license key (temporary license until the product is registered) for Gateman © Gateman Integrated Security 2010. 15 Gateman Installation Manual 2.3.1 Changing the License of your Gateman First open the web browser which is found on the ‘Application Launch’ bar at the top of the screen. Fig:Click on the Browser icon at the top Next type ‘127.0.0.1’ in the address bar and hit enter. Fig: The local loopback is 127.0.0.1 The following screen is returned. Now click on the ‘Administration’ button. Fig: Initial html page returned by gateman © Gateman Integrated Security 2010. 16 Gateman Installation Manual At the login screen (applet), use the default ‘Administrator’ name and password: Name = admin Password= password Fig:The Gateman login applet The system will now verify your credentials and provide you with an applet shown below. Fig: First screen after logging in successfully Click on the OK button and proceed to change the License key. This license is a temporary license provided when you first purchase your Gateman software, or get a trial copy of the software. It will allow you to utilize the software for 30 days within which you must register your software to activate it. (This license will allow you to use the software for up to 30 days before which you must register it using the ‘Gateman Registration’ button found on the ‘Administration -> Dashboard’ menu.) © Gateman Integrated Security 2010. 17 Gateman Installation Manual At this stage we will enter the ‘License’ key which is the temporary license valid for 30 days. To do this, select ‘Administration -> Gateman Settings’ from the menu bar. When the Settings window opens, select the ‘Misc Settings’ button. Fig: Enter the License key provided Enter the license key; please be cautious so as not to enter the letters as numbers or vice versa. Finally click the ‘Modify’ button and then close this window. 2.3.2 Changing the IP Address of your Gateman Next we proceed to change the IP addresses of the interfaces attached to Gateman. Note that it is important that these IP addresses are changed in the Gateman software and NOT in the OS settings panel as Gateman will overwrite these settings. To do this, select ‘Administration -> Network’ from the menu bar. When the Network window opens, select the ‘Interfaces’ button. Fig: The Network Interfaces administration screen © Gateman Integrated Security 2010. 18 Gateman Installation Manual In this window do the following: Select the required interface from the table at the top. There may be more than one interface if you have multiple network adaptors. Drop the ‘Map to’ list box down, and select LAN1 as the interface your Gateman system will use for the LAN. Enter the appropriate IP address, Netmask and Gateway. Note if the Gateway is incorrect, your Gateman system will not get access to the internet. Finally click modify You now need to restart your Gateman system for the changes to take effect. To do this select ‘Administration -> Restart Gateman’ from the menu bar. It will now take a few minutes for your Gateman system to restart itself. Thereafter, you should be able to access your Gateman system from any computer with a Java enabled web browser from your LAN. Note: In the event no network interfaces are available, you will need to visit the CEntOS website to find out how to get support for your Ethernet hardware, or contact your dealer. Note Gateman provides context sensitive Administrator and User help by pressing the F1 key. 2.4 Step 4 – Configuring Gateman for interfacing with devices In the event you have purchased Gateman modules for surveillance, access and attendance or security and automation, you need to complete this step; otherwise you can skip this step. Before embarking this step it is important to define the various devices, their models, IP addresses, miscellaneous settings and control methods. The ‘Needs Analysis manual’ prepares you to organise your Gateman configuration in a format that will enable the smooth configuration of the system. This is an important step to be followed. You then set out to configure system using the tools available. These include the Tutorial page on the website which includes links for multimedia presentations, and the following manuals: Server Configuration - Creates a *.srv file which defines the interconnected devices, model and manufacturer, IP address, various other configuration options, and how the devices are to be controlled. Please read the Server Configuration manual for information on how to perform this step. Client Configuration – Creates a *.cli file. It allows the configuration of the user interface that all users will see when they log in to your Gateman system via their Java enabled web browser. Please read the Client Configuration manual for information on how to perform this step. Mobile Configuration – Creates a *.phn file. It allows the configuration of the user interface that all users will see when they log in to your Gateman system via their © Gateman Integrated Security 2010. 19 Gateman Installation Manual Javascript enabled xHTML browser on their mobile phone. Please read the Mobile Configuration manual for information on how to perform this step. Configuring the devices – Since the devices connected to Gateman are intelligent devices, they also need to be programmed appropriately before they communicate with Gateman. For most network devices you will need to program them with the appropriate Network settings, and other miscellaneous settings as required. Without performing this step the devices will be unable to communicate with Gateman. Please read the manual which comes along with the device to perform this task. 2.4.1 Gateman Configuration Program Installation Your Gateman Installation DVD has a number of programs that are available on it for installation on your Windows machine. Following are the programs that can be installed from the DVD. Java 1.6.0_11 Runtime Environment – This is the java required to run the applet and applications. It may already be installed on your PC, else you will need to install it before installing Gateman Configuration and Application programs. Java Media Framework – This is not required to be installed and instead has been replaced by VLC for playing video. See this document for more info. Gateman Client Application – This program is required in the event you wish to run a client session without a browser. This application once suitably configured will attach to your Gateman server(s) without the need for any web browser. Gateman Configuration Program – This installs Server, Client and Mobile Configuration applications described in the preceding subsection on your PC. Envisioneer Express – A free 3D drawing tool that may be used to create a background screen similar to your premises for your Client Application program. Gateman Peripheral Configuration – Install this program to assign IP addresses to Gateman manufactured hardware. For 3rd party hardware you will need to install the program provided by the manufacturer of the hardware. To configure your Gateman system to integrate with the various hardware devices, you will need to install the Gateman configuration programs onto your PC. Place the Gateman Installation DVD into your Windows PC and run the ‘autorun.bat’ program if it does not automatically start. © Gateman Integrated Security 2010. 20 Gateman Installation Manual Fig: The Gateman Presentation DVD first screen When the first screen appears, click on the ‘Programs’ button. Fig: The Gateman Programs menu page Select the ‘Gateman Configuration x.x.x’ or other suitable version hyperlink to install the required configuration programs. You will need administrator privileges to install your Gateman programs. Remember it is essential that Java is installed on your PC before you install the Gateman Configuration program. This too is provided on the DVD. After installation you will see that 3 additional icons have been placed on your desktop. In versions of Windows such as Vista and Windows 7, you will need to run these programs as an Administrator. © Gateman Integrated Security 2010. 21 Gateman Installation Manual After completing the configuration, you will need to upload the configuration into Gateman. Please see the Administration Manual for details on how to perform this task. The default login name and password is: User name: admin Password: password 2.5 Step 5 – Performing administrative tasks After completion of installation of your Gateman system, and successfully getting it onto the LAN, you will need to configure various modules (e.g. email, internet proxy, file server, etc) and the users and their privileges. For this purpose you will need to open a browser and connect to your gateman system by typing its IP address in the browser address bar. Select the ‘Administration’ option and log in to the system. All the administrative tasks to be performed are found under the ‘Administration’ menu option. For details on the various administrative tasks, please see the ‘Administration Manual’ also available online via your Gateman server. 2.5.1 Backing Up Your Gateman Data One of the most important Administrative Tasks is ‘Backing Up Your System Information’. Gateman has a manual and automated processes for backup. It is important that you set up the Automated Backup process (Administration -> Gateman Settings -> Backup) to back up the required data at the required time, since some extremely important data is being held on your Gateman system, including email, attendance, files, etc. Gateman provides you with all the tools and strategies to complete this setup in just a few minutes © Gateman Integrated Security 2010. 22 Gateman Installation Manual 3 Using Gateman The following two sections describe how the user can access the various features provided by Gateman. For details of the user interface and interaction with the system please refer to the 'Gateman User Manual' that is also available online. 3.1 Through a PC After the Gateman system has been connected and configured the user will have access to all the devices connected to Gateman either from any computer on the local network or any computer in the world through the Internet. If Gateman has been configured to receive e-mail from different mailboxes then all user mail may be viewed from Gateman and the user does not need to check multiple accounts. Gateman can be used to control a number of devices such as lights, fans, camera's, sensors (e.g. motion, smoke) etc. A user can access and monitor the working of all these devices remotely. For example if a user plans to stay away from work for an extended period of time, the user will still be able to view the office remotely through any cameras connected to Gateman. The user will also be informed if any alarm has gone off via an SMS or e-mail message. The SMS or email message can be sent out to multiple persons and the user has the option to change them at any time. Only the condition for which an SMS message is sent out must be set during system configuration. 3.1.1 Using your browser You can get access to your Gateman PC from any Java enabled web browser. Comprehensive interaction and administration is available through this method. You may also require VLC for streaming video. See this document for more info. 3.1.2 Using the Gateman application Install your Gateman application from the Gateman Installation DVD as described in the previous chapter. After installation, click with the right mouse button on the Application icon and select ‘Edit’ to edit the batch file. In the batch file search for the following statements SET GATEMAN_IP=192.168.2.1 SET GATEMAN_PORT=80 Replace the IP address (192.168.2.1) with the IP address or domain name of your Gateman server. Also replace the Gateman port (80) if required with the port on which your Gateman server is running. © Gateman Integrated Security 2010. 23 Gateman Installation Manual 3.2 Through a Mobile Phone In addition to viewing Gateman on your PC or Laptop via the Internet, you can also view your Gateman via a mobile phone. Some PDAs and Java based mobile phones can directly run the Client Applet described in the previous subsection. Others may be able to use Gateman’s HTML based web interface via the Javascript enabled ‘xHTML Browser’ on the mobile phone. Most modern phones have these browsers. To access your Gateman simply type your domain name for Gateman followed by ‘/gateman’ (e.g. www.mybusiness.com/gateman or www.mybusiness.com/phone). You will be provided with a user name and password screen and asked to log in. On successful login, you will be provided with an intuitive screen which will allow you to access all Gateman’s user facilities. 3.2.1 The Gateman Phone Menu The gateman application is extremely intuitive and allows you to access to all Gateman’s User functions. The menu screen that first pops up has the following options: 1. Camera – From this list you can select the cameras to be viewed. After selection of the camera you will view live pictures frame by frame. The speed of frames is determined by your service provider’s bandwidth. From within the camera view you can choose additional options to Pan/Tilt/Zoom the camera, or view recorded video or to trigger recording. 2. E-mail – Select this item to view your email. A list of your mail boxes is first displayed. Select the appropriate mail box to view the mail headers one by one. You can view the details of the email by selecting the appropriate header. You can also reply or compose new mail. 3. User Configured Pages – Besides the above static pages, user defined pages containing information on sensors, security and electrical devices are available. Each page is named appropriately and has a list of related devices. Selecting the appropriate page lists the devices and their current state. To control a device, select the device and choose the appropriate value in case of a digital or enumerated object (door lock, lamp On/Off), or set the value from the keypad for an analog object (e.g. lamp intensity). © Gateman Integrated Security 2010. 24 Gateman Installation Manual 4 License Agreement IMPORTANT- READ CAREFULLY This Gateman Integrated Security End-User License Agreement (EULA) is a legal agreement between you (either an individual or a single entity) and Gateman Integrated Security accompanying this EULA, which includes computer software and may include associated media, printed materials, and online or electronic documentation (SYSTEM). By exercising your rights to make and use the SYSTEM, you agree to be bound by the terms of this EULA. If you do not agree to the terms of this EULA, you may not use the PRODUCT. PRODUCT LICENSE The SYSTEM is protected by copyright laws and international copyright treaties, as well as other intellectual property laws and treaties. The SYSTEM is licensed, not sold. GRANT OF LICENSE Installation And Use. You may use the SYSTEM as purchased without any modifications. Reproduction And Distribution. You will not reproduce and distribute copies of the SYSTEM. Software. You may use the SYSTEM only with the hardware registered for its use and may not be transferred without the express permission of Gateman Integrated Security. Storage / Network Use. You may not store or copy the SYSTEM on a storage device, such as a network server, or run the SYSTEM on your other computers over an internal network. You must acquire and dedicate a license for each separate Gateman on which the SYSTEM is installed or run. A license for the SYSTEM may not be shared or transferred on different computers. DESCRIPTION OF OTHER RIGHTS AND LIMITATIONS Limitations On Reverse Engineering, Decompilation, And Disassembly. You may not reverse engineer, decompile, or disassemble the SYSTEM, except and only to the extent that such activity is expressly permitted by applicable law notwithstanding this limitation. Separation Of Components. The SYSTEM is licensed as a single product. Its component parts may not be separated for use on more than one computer. Transfer. You may permanently transfer all of your rights under this EULA, provided the recipient agrees to the terms of this EULA. Termination. Without prejudice to any other rights, Gateman Integrated Security may terminate this EULA if you fail to comply with the terms and conditions of this © Gateman Integrated Security 2010. 25 Gateman Installation Manual EULA. Rental. You may not rent or lease or lend the SYSTEM. DAMAGES Law Applicable. The Law applicable would be the existing laws of the particular country where the system is installed and as same would vary as and when the law changes. Damages. With regards to Damages, in no event shall Gateman Integrated Security or its Dealers be liable for any consequential, incidental, direct, indirect, special, punitive or other damages for any injury to person or property. Loss Of Profits. Damages for loss of profits, business interruption, loss of business information, for loss of privacy for failure to meet any duty including of good faith or of reasonable care, for negligence, and for any pecuniary or other loss whatsoever arising out of or in any way related to the use of or inability to use the SYSTEM, even if Gateman Integrated Security or any of its Dealers has been advised of the possibility of such Damages. Effectiveness. This exclusion of Damages shall be effective even if any Remedy fails of its essential purpose. LIMITED WARRANTY No Warranties. Gateman Integrated Security expressly disclaims any warranty for the SYSTEM. The SYSTEM and any related documentation is provided as is without warranty of any kind, either express or implied, including, without limitation, the implied warranties or merchantability, fitness for a particular purpose, or non-infringement. The entire risk arising out of use or performance of the SYSTEM remains with you. No Liability For Consequential Damages. In no event shall Gateman Integrated Security or its Dealers shall be liable for any damages whatsoever (including, without limitation, damages for loss of business profits, business interruption, loss of business information, or any other pecuniary loss) arising out of the use of or inability to use this SYSTEM, even if Gateman Integrated Security has been advised of the possibility of such damages. Because some states/jurisdictions do not allow the exclusion or limitation of liability for consequential or incidental damages, the above limitation may not apply to you. COPYRIGHT All title and copyrights in and to the SYSTEM (including but not limited to any images, photographs, animations, video, audio, music, text, and applets incorporated into the SYSTEM), the accompanying printed materials, and any copies of the SYSTEM are owned by Gateman Integrated Security. The SYSTEM is protected by copyright laws and international treaty provisions. Therefore, you must treat the SYSTEM like any other copyrighted material. © Gateman Integrated Security 2010. 26 Gateman Installation Manual MISCELLANEOUS The laws of the state where the SYSTEM is installed will be applicable. Should you have any questions concerning this EULA, please contact the Gateman Integrated Security dealer in your country. © Gateman Integrated Security 2010. 27 Gateman Installation Manual