1
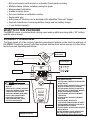
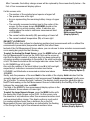
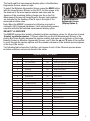
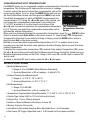
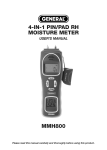
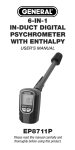
PRECISION MULTI-SPECIES WOOD MOISTURE METER USER’S MANUAL MMD8P Please read this manual carefully and thoroughly before using this product. TABLE OF CONTENTS Introduction . . . . . . . . . . . . . . . . . . . . . . . . . . . . . . . . . . . . . . . . . . . . . . . . . 2 Key Features. . . . . . . . . . . . . . . . . . . . . . . . . . . . . . . . . . . . . . . . . . . . . . 2 – 3 What’s in the Package . . . . . . . . . . . . . . . . . . . . . . . . . . . . . . . . . . . . . . . . . 3 Product Overview . . . . . . . . . . . . . . . . . . . . . . . . . . . . . . . . . . . . . . . . . . . . . 3 Setup Instructions . . . . . . . . . . . . . . . . . . . . . . . . . . . . . . . . . . . . . . . . . 4 – 5 Install Battery. . . . . . . . . . . . . . . . . . . . . . . . . . . . . . . . . . . . . . . . . . 4 Advanced Setup . . . . . . . . . . . . . . . . . . . . . . . . . . . . . . . . . . . . 4 – 5 Operating Instructions . . . . . . . . . . . . . . . . . . . . . . . . . . . . . . . . . . . . . 5 – 10 Select a Display . . . . . . . . . . . . . . . . . . . . . . . . . . . . . . . . . . . . . 6 – 7 Select a Species . . . . . . . . . . . . . . . . . . . . . . . . . . . . . . . . . . . . 7 – 8 Making Measurements . . . . . . . . . . . . . . . . . . . . . . . . . . . . . . . . . . 8 Storing Records . . . . . . . . . . . . . . . . . . . . . . . . . . . . . . . . . . . . . 8 – 9 Recalling and Deleting Records . . . . . . . . . . . . . . . . . . . . . . . . . . . . 9 Compensating for Temperature . . . . . . . . . . . . . . . . . . . . . . . . 9 – 10 Specifications . . . . . . . . . . . . . . . . . . . . . . . . . . . . . . . . . . . . . . . . . . . 10 – 11 Operating & Maintenance Tips . . . . . . . . . . . . . . . . . . . . . . . . . . . . . . . . . . 11 Warranty Information . . . . . . . . . . . . . . . . . . . . . . . . . . . . . . . . . . . . . 11 – 12 Return for Repair Policy . . . . . . . . . . . . . . . . . . . . . . . . . . . . . . . . . . . . . . . 12 INTRODUCTION Thank you for purchasing General Tools & Instruments’ MMD8P Precision Multi-Species Wood Moisture Meter. Please read this user’s manual carefully and thoroughly before using the meter. The MMD8P is tailored for use in woodworking and lumber purchasing. Examples include: • Measuring the moisture content of wood before painting, wallpapering, sealing, treating or joining • Selecting dry lumber The meter infers the moisture level of a piece of wood by measuring the electrical resistance it presents between the meter’s test pins. The electrical resistance of any material can be used as a proxy for its moisture level. The wetter a material, the lower its resistance. The measurements made by the MMD8P mostly represent surface moisture content because: 1) Moisture close to the surface has a greater effect on a reading than moisture deep below it; and 2) At a length of 0.2 in. (5mm), the pins at the top of the MMD8P are too short to be driven deep into a hard material. KEY FEATURES • Readings are species-specific, derived from industry-standard moisture-resistance curves for 48 popular species of wood • Joystick makes species selection fast and easy • Also measures and displays ambient temperature (in °F or °C) and RH • Measurements can be compensated for ambient temperature, improving precision • Super-bright yellow OLED (organic light-emitting diode) dot matrix display 2 • 99 record memory with manual or automatic (time-based) recording • Multiple display options, including analog bar graph • Measurement hold button • Audible moisture alarm • Pin cover doubles as calibration checker • Replaceable pins • Auto power off function (can be disabled) with adjustable “time-out” trigger • Separate indications of remaining battery charge and low battery charge • 1 year limited warranty WHAT’S IN THE PACKAGE The MMD8P comes in a custom hard carrying case inside a white box along with a “9V” battery and this user’s manual. PRODUCT OVERVIEW The figure shows all of the controls, indicators and physical features on the front, top and back of the MMD8P. Familiarize yourself with their positions and functions before moving on to the Setup Instructions and Operating Instructions. CALIBRATION CHECK HOLES PIN COVER TEMPERATURE & RH SENSORS TEST PINS FULL 66% 33% LOW BATTERY OLED DISPLAY (MR MC) MULTI-FUNCTION BUTTON 1. PRESS AND HOLD TO POWER METER ON & OFF 2. PRESS BRIEFLY TO HOLD READING 3. PRESSED IN MEMORY STORE MODE, STORES DISPLAYED RECORD 4. PRESSED IN MEMORY VIEW MODE, DELETES DISPLAYED RECORD 5. PRESSED IN TEMPERATURE COMPENSATION MODE, SAVES SELECTED TEMPERATURE JOYSTICK BATTERY COMPARTMENT (ON BACK OF METER) MODE (SELECT) MULTI-FUNCTION BUTTON IN REAL-TIME MEASUREMENT MODE (WITH INITIAL DIGITAL DISPLAY): 1. PRESSED ONCE, SWITCHES TO ANALOG BAR GRAPH DISPLAY 2. PRESSED AGAIN, SWITCHES TO FULL-SCREEN DISPLAY OF MOISTURE LEVEL READING 3. PRESSED AGAIN, SWITCHES TO DISPLAY OF MOISTURE LEVEL READING ABOVE AMBIENT RH AND TEMPERATURE READINGS 4. PRESSED AGAIN, SWITCHES TO MEMORY STORE MODE 5. PRESSED AGAIN, SWITCHES TO MEMORY VIEW MODE 6. PRESSED AGAIN, SWITCHES TO TEMPERATURE COMPENSATION SET MODE 7. PRESSED AGAIN, SWITCHES TO DISPLAY OF REMAINING BATTERY CHARGE 8. PRESSED AGAIN, SWITCHES BACK TO INITIAL DIGITAL DISPLAY PRESSED IN MEMORY STORE, MEMORY VIEW AND TEMPERATURE COMPENSATION SET MODES, ADVANCES TO NEXT DISPLAY MODE 3 SETUP INSTRUCTIONS INSTALL BATTERY To open the battery compartment, turn the meter over and lift the tab on the bottom of the battery compartment cover. Remove the cover and set it aside. Then plug the included “9V” battery into the wired socket inside the compartment. The terminals of the battery and the socket mate in only one way, with the smaller male terminal plugging into the larger female terminal. Close the battery compartment by replacing its cover and snapping it shut. ADVANCED SETUP Before using the meter, General recommends that you adjust five operating and “housekeeping” parameters to your preferences. They are: 1. The Auto Power Off (APO) “time out” trigger point, and whether the function is enabled 2. The low threshold of the moisture level alarm (beeper), and whether the alarm is enabled 3. Whether the meter’s memory is activated, and if so the number of moisturemeasurement records to provide space for 4. Whether records are stored manually or automatically. If automatic storage is chosen, how often readings are stored 5. The temperature measurement unit (°F or °C) It is not necessary to enter Advanced Setup mode if you are willing to use the default settings for each of the above five parameters. The default settings are: 1. APO: ON, with a 2-minute “time out” trigger point (2 minutes of inactivity at the frontpanel buttons) 2. Moisture alarm: OFF 3. Memory storage: OFF 4. Memory timer: MANUAL 5. Temperature unit: °F To enter Advanced Setup mode, power on the meter in a special way by pressing and holding the MODE button as you press and hold the button. The following setup screen will appear, showing the default settings. On the right side of the top (APO) line, 2Mins. will initially be flashing. SETTING APO. 2Mins. Alarm OFF Store Mem. OFF Mem. Timer MANUAL Temp Unit °F EXIT To change any of these operating and housekeeping settings: A. Navigate to its line by pressing the ▲ and ▼ pads of the joystick ( button). When a setting is ready to be changed, it will begin to flash. B. Use the and/or pads to select a new value. C. Press the MODE button to save the selection (or selections, if you change more than one setting), exit Advanced Setup Mode, and enter real-time measurement mode. 4 Following are the setting options for each of the five parameters: 1. APO: OFF, or 1 to 99 minutes of front-panel inactivity, in 1-minute increments. Be aware that by disabling the APO function, you run the risk of discharging the meter’s battery if you forget to power the meter off each time you finish using it. 2. Alarm: OFF, or a repeating beep for any moisture reading above a threshold of 0.1 to 99.9% WME, in increments of 0.1% 3. Store Mem.: OFF, or 1 to 100 memory records, in 1-record increments. As a practical matter, there is no reason not to enable memory storage, and no reason not to select the maximum memory capacity available—100 records. 4. Mem. Timer: MANUAL (on-screen records can be stored manually—by pressing the (MR MC) button)—or automatically at a sampling rate from once per second to once every 99 seconds, in 1-second increments. During setup, these automatic storage options appear on-screen as 1s(AUTO), 2s(AUTO), etc. through 99s(AUTO). 5. Temp Unit: °F or °C Advanced Setup Hints: • Pressing and holding the or pad for more than 5 seconds increases the increment of change from one digit to 10 or more. Doing so can make it faster to make a change to a new value far from an old one. • You can use the and pads to “wrap around” the low or high end of a setting range, making it faster to dial up a new value for selection. For example, pressing the pad four times with the APO trigger showing 2Mins. would produce the following displays in turn: 1Min., OFF, 99Mins and 98Mins. • When pressing the and pads, be sure not to apply any vertical force. If the joystick detects any vertical force, the meter’s firmware will assume that you want to switch to the parameter above or below the one currently flashing. Once you have reset any or all of the five parameters, remember to press the MODE button to save your selection(s), exit Advanced Setup Mode, and enter real-time measurement mode with the Full Measurement Screen (see next section) on the OLED. OPERATING INSTRUCTIONS To power on the meter, press the button and hold it for at least three seconds. (To power off the meter, follow the same instruction.) You will know that the meter has powered on when you see the “welcome” screen at right. Two seconds after it appears, the welcome screen will be replaced by the screen at right, (which indicates remaining battery charge) for 2 seconds. 5 After 2 seconds, the battery-charge screen will be replaced by the screen directly below—the first of four measurement display options. On this screen, note: • The number of the selected wood species at upper left • The species name at its right • An icon representing the remaining battery charge at upper right • The currently measured moisture level in the center of the screen. (On the screen shown, 99.9%WME should not be mistaken for an actual reading; rather, it indicates any A typical Full reading above the meter’s maximum measurement level Measurement Screen of 40%WME.) (Display Option 1) • The current relative humidity (RH) percentage at lower left • The current ambient temperature (TA.) at lower right SELECT A DISPLAY The MMD8P offers four options for displaying moisture level measurements with or without the environmental parameters (temperature and RH) that affect them. Instead of the Full Measurement Screen above, you can choose to show moisture measurements on an analog bar graph like the following. To select the Analog Bar Graph Screen, press the MODE button with the Full Measurement Screen on the OLED. Note on the screen at right that the digital readout of moisture level has been replaced by an analog reading corresponding to the width of the white rectangle at left. The linear scale below the rectangle indicates values from 5.3 to 40.0%WME from left to right. Also note the addition of the small letters L and H at left and right, A typical Analog Bar Graph respectively. L indicates a measured moisture level below Screen (Display Option 2) 5.3%WME, and H indicates a measured moisture level above 40%WME. Finally, note the presence of the word Hold in the middle of the display. Hold indicates that the currently displayed level represents a held measurement. To hold a measurement, briefly press the button. To release the hold (“unfreeze” the display), briefly press the button again. Note: A held reading on the Full Measurement Screen is indicated by the flashing of the % sign between the measured value and WME. The third of the MMD8P’s four measurement display options is the Large Numeric Screen shown at lower right. To select the Large Numeric Screen, press the MODE button with the Analog Bar Graph Screen on the OLED. On this screen, note the absence of any indications other than measured moisture level and remaining battery charge. This display option is most useful for reading moisture levels from a distance. As on the Full Measurement Screen, held readings are indicated by the flashing A typical Large Numeric of the % sign to the right of the measured moisture value. Screen (Display Option 3) 6 The fourth and final measurement display option is the MoistureHygrometer Screen, shown at right. To select the Moisture-Hygrometer Screen, press the MODE button with the Large Numeric Screen on the OLED. On this screen, note the absence of the wood species number and name and the absence of the remaining battery charge icon. As on the Full Measurement Screen and Large Numeric Screen, held readings A typical Moistureare indicated by the flashing of the % sign to the right of the Hygrometer Screen measured moisture value. (Display Option 4) Note: When the MMD8P is powered on following a manual or automatic (APO-triggered) shutdown, it will automatically resume operation with the last selected measurement display option. SELECT A SPECIES The MMD8P incorporates industry-standard moisture-resistance curves for 48 species of wood. To select a particular species: 1) Choose either the use the Full Measurement Screen or the Analog Bar Graph Screen (because the species number and name are not shown on the Large Numeric Screen or Moisture-Hygrometer Screen); and 2) Use the ▲ and ▼ pads of the joystick to scroll through the species options until the number and name of the desired species appears at the top of the screen. The following table shows the Code Nos. and names of each of the 48 wood species whose moisture-resistance curves are stored in the meter. Species Code Ch art Co de No . Wo od Species Co de No. 25 Wo o d Species 1 Fir,Douglas 2 Pine,Southern 26 Mahogany,African (also Khaya) 3 SPF 27 Mahogany,Honduras 4 Alder 28 Mahogany,Philippine 5 Apitong 29 Maple,Hard/Soft 6 Aspen 30 Meranti,Dark Red 7 Ash,White 31 Oak,Red 8 Basswood 32 Oak,White 9 Birch 33 Pecan 10 Cedar,Eastern Red 34 Pine,Longleaf 11 Cedar,Incense 35 Pine,Ponderosa 12 Cherry 36 Pine,Shortleaf 13 Cottonwood 37 Pine,Sugar 14 Cypress 38 Pine,White 15 Elm,American 39 Poplar,Yellow 16 Fir,Red 40 Ramin 17 Fir,White 41 Radiata Pine 18 Gum,Black 42 Redwood 19 Gum,Red 43 Spruce,Sitka 20 Hemlock,Western 44 SPF,COFI 21 Hackberry 45 Teak 22 Hickory 46 Virola 23 Keruing 47 Walnut,Black 24 Larch 48 Western Hemlock-COFI Magnolia 7 Note: Unlike in Setup mode, pressing and holding the or pad of the joystick will not increase the increment of change in Code Nos. However, as in Setup mode, you can use the and pads to “wrap around” the low or high end of the code range. Specifically, pressing the pad with Code No. 1 selected will change the selected code to Code No. 48, and pressing the pad with Code No. 48 selected will change the selected code to Code No. 1. MAKING MEASUREMENTS To measure the surface moisture level of a wood sample, first select its species using the instructions in the previous section. Then carefully remove the cover protecting the test pins at the top of the meter. Take care not to stab yourself with the sharp points. Read the moisture level on any of the four screens described above as Display Options 1 through 4. General recommends that you check the calibration of the MMD8P prior to every measurement session. To check the calibration: 1) Select the Douglas Fir Species (Code No. 1); 2) Make sure that the Compensation Temperature is set to the default value of 70°F (see page 9); 3) Remove the pin cover, turn it over and insert the test pins into the holes on the top of the cap. A reading of 15.9% ±3%WME indicates a properly calibrated meter. STORING RECORDS If you enabled the meter’s memory as part of the Advanced Setup procedure, you can store and recall up to 100 moisture measurement records. During Advanced Setup, you can also choose how much memory to allocate for record storage. As mentioned earlier, as a practical matter there is no reason not to enable memory storage, and no reason not to select the maximum memory capacity available—100 records. Each moisture-measurement record (see example below right) contains the following information: • The record number (7 out of 100 available locations) on the top line • The moisture level measurement itself (MoistureRead. in the example below) • The number and name of the wood species tested (No. 3 SPF) • The ambient temperature and relative humidity at the time of measurement (59.9°F and 60.0%RH) • Any temperature compensation applied (0.0°F) • An indication (Record at lower left) that the record is available for storage. If you have enabled memory storage, the Store Mem. Screen shown above is added to the sequence of screens made available A typical moisture by pressing the MODE button. It follows the Moisture-Hygrometer measurement record, Screen in the sequence. ready for storage There are two different procedures for storing moisture measurement records, depending on whether you choose manual or automatic storage. To store a record in manual mode: 1. Make a measurement and view it on any of the four display screens. 2. If necessary, press the MODE button until you see the Moisture-Hygrometer Screen. 3. Press the MODE button once to display the Store Mem. Screen. The terms Record and Exit on the bottom line will both flash. 4. Assuming that you have enabled manual storage, press the (MR MC) button— directly under Record— once. This stores the record in memory. Note that pressing the button increments the record number counter at the upper right of the OLED. 8 5. To exit record storage mode and advance to the View/Delete Mem screen, press the MODE button—directly under Exit. To store one or more records in automatic mode: 1. Make a measurement and view it on any of the four display screens. 2. If necessary, press the MODE button until you see the Moisture-Hygrometer Screen. 3. Press the MODE button once to display the Store Mem. Screen. 4. Assuming that you have enabled automatic storage, press the (MR MC) button once. Doing so begins storing complete moisture measurement records at the sampling rate you selected during the Advanced Setup procedure. Note that the record number at upper right will continue to increment automatically at the selected sampling rate. Also note that the word Stop will appear at the lower left of the display, directly above the (MR MC) button. 5. To stop automatic recording, press the (MR MC) button again. In manual or automatic storage mode, when the space allocated for records has been used up the Store Mem. Screen will advise the following: MEM. FULL! RECALLING AND DELETING RECORDS To recall one or more stored moisture measurement records: 1. Use the MODE button to navigate to the View/Delete Mem Screen (see photo at right). The terms Delete and Exit will flash on the bottom line. 2. Use the and/or pads to navigate to the record of interest. The record number appears at the upper right of the OLED. In the example at right, the record displayed is No. 1 of a total of six stored (indicated by 1/6 on the display). A typical moisture measurement record To recall additional records, use the and/or pads. Unlike in during recall Setup mode, you cannot use the or pads to fast-forward or fast-rewind through record numbers. However, as in Setup mode, you can use the and pads to “wrap around” the low and high ends of the range of stored record numbers. To delete an individual record, press the (MR MC) button (which is directly below Delete on the View/Delete Mem Screen) with the record on-screen. The next screen will ask “Are You Sure To Delete?”, with the options Yes and Exit, flashing, on the bottom line. Pressing the (MR MC) button to answer “Yes” takes you to another screen that asks “All Delete?” and the options No and Yes, flashing, on the bottom line. Pressing the (MR MC) button to answer “No” deletes only the selected record. Note that doing so decrements (decreases by one) the number of stored records—the number following the slash at upper right. Deleting a single record does not change the number before the slash. However, that number now represents a different record—the one you saved just before the record that you just deleted. Pressing the MODE button to answer “Yes” to “All Delete?” deletes all stored records and calls up a special View/Delete Mem Screen with: 1) no Record No./Record Count display in the upper right corner; 2) only the term Exit, flashing, in the lower right corner; and 3) the message File not found! in the middle of the screen. Pressing the MODE button to Exit the View/Delete Mem Screen opens the Temperature Compensation Adjustment Screen (see next section). 9 COMPENSATING FOR TEMPERATURE The MMD8P allows you to compensate moisture measurements for the effect of ambient temperature. This feature greatly improves the accuracy of readings. To select and set the level of temperature compensation, call up the screen shown below. To do so, press the MODE button until you see the View/Delete Mem Screen, and then press the MODE once more. The default temperature for which all MMD8P measurements are compensated is 70°F. Using the and pads of the joystick, you can change the compensation temperature to any value from 0° to 255°F divisible by 5. In other words, each press of the or pad increases or decreases the compensation temperature The Temperature Compensation Selection by 5°F. Typically, you adjust the compensation temperature until it Screen matches the ambient temperature. When you have finished adjusting the compensation temperature, press the (MR MC) button (which is directly below Save & Exit on the above screen). To “pass through” the Temperature Compensation Selection Screen without making a change, press the MODE button (which is directly below Exit on the above screen). Whether you use the default compensation temperature of 70°F or another value of your choosing, you can read the actual value applied on the three Display Option screens that show ambient temperature. To display the compensation temperature (TC.) instead of the ambient temperature (TA.), press the or pad of the joystick with the Full Measurement Screen, Analog Bar Graph Screen or Moisture-Hygrometer Screen on the OLED. Doing so will cause TC. and its value to replace TA. and its value. To return to showing TA. and its value, press the or pad again. SPECIFICATIONS • Moisture Measurement: Range: 5.3 to 40%WME (Wood Moisture Equivalent) Accuracy/Resolution: ±(3% of reading + 5 digits)/0.1% • Ambient Temperature Measurement: Range: 0° to 176°F (-18° to 80°C) Accuracy/Resolution: ±1.8°F (1°C)/ 0.1° • RH Measurement: Range: 20 to 95%RH Accuracy/Resolution: ±5% of reading/ 1% • Temperature Compensation Range/Resolution: 0° to 255°F (-18° to 124°C)/ 5°F • Display Type: Yellow OLED in 128 x 64 dot matrix format • Display Size: 1.54 in. (39mm) diagonal • Number of Species Moisture-Resistance Curves: 48 • Memory Capacity: 99 records • Auto Memory Recording Sampling Rate: Adjustable from 1 to 99 seconds • Auto Power Off Trigger: Adjustable from 1 to 99 minutes of front-panel inactivity 10 • Pin Length: 0.2 in. (5mm) • Low Battery Indication: <6.5VDC • Operating Temperature: 32° to 122°F (0° to 50°C) • Calibration Check Point: 15.9% ±3%WME • Dimensions: 6.6 x 2.7 x 1.25 in. (168 x 69 x 32mm) • Weight (including battery): 4.6 oz. (130g) • Power Source: (1) “9V” battery (included) OPERATING & MAINTENANCE TIPS When the battery icon (visible on all four display screens as well as the Temperature Compensation Selection Screen) indicates a charge of 33% or less, it’s time to replace the “9V” battery that powers the MMD8P (although measurements will remain valid for several hours after the icon first appears). To replace the battery, follow the Setup Instructions on p. 4. This equipment has been tested and found to comply with the limits for Class B digital devices, pursuant to Part 15 of the FCC Rules. These limits are designed to provide reasonable protection against harmful interference in a residential installation. This equipment generates, uses and can radiate radio frequency energy and, if not installed and used in accordance with the instructions, may cause harmful interference to radio or television reception, which can be determined by turning the equipment off and on. The user is encouraged to try to correct the interference by one or more of the following measures: -Reorient or relocate the receiving antenna. -Increase the separation between the equipment and the receiver. -Connect the equipment into an outlet on a circuit different from that to which the receiver is connected. -Consult the dealer or an experienced radio/TV technician for help. This device complies with Part 15 of the FCC Rules. Operation is subject to the following two conditions: 1) This device may not cause harmful interference, and 2) This device must accept any interference received, including interference that may cause undesired operation. WARNING: Any changes of modifications to this unit not expressly approved by the party responsible for compliance could void the user's authority to operate the equipment. Remove the battery when storing the meter for an extended period of time. Never drop or disassemble the meter or immerse it in water. WARRANTY INFORMATION General Tools & Instruments’ (General’s) MMD8P Precision Multi-Species Wood Moisture Meter is warranted to the original purchaser to be free from defects in material and workmanship for a period of one year. Subject to certain restrictions, General will repair or replace this instrument if, after examination, the company determines it to be defective in material or workmanship. The warranty period begins on the date of purchase. You are encouraged to register your product online. General will extend your warranty an additional 60 days if you register at www.generaltools.com/ProductRegistry. This warranty does not apply to damages that General determines to be from an attempted repair by non-authorized personnel or misuse, alterations, normal wear and tear, or accidental damage. The defective unit must be returned to General Tools & Instruments or to a General-authorized service center, freight prepaid and insured. 11 Acceptance of the exclusive repair and replacement remedies described herein is a condition of the contract for purchase of this product. In no event shall General be liable for any incidental, special, consequential or punitive damages, or for any cost, attorneys’ fees, expenses, or losses alleged to be a consequence of any damage due to failure of, or defect in any product including, but not limited to, any claims for loss of profits. Register now at www.generaltools.com/ProductRegistry to receive a 60-day extension to your warranty. RETURN FOR REPAIR POLICY Every effort has been made to provide you with a reliable product of superior quality. However, in the event your instrument requires repair, please contact our Customer Service to obtain an RGA (Return Goods Authorization) number before forwarding the unit via prepaid freight to the attention of our Service Center at this address: General Tools & Instruments 80 White Street New York, NY 10013 212-431-6100 Remember to include a copy of your proof of purchase, your return address, and your phone number and/or e-mail address. GENERAL TOOLS & INSTRUMENTS 80 White Street New York, NY 10013-3567 PHONE (212) 431-6100 FAX (212) 431-6499 TOLL FREE (800) 697-8665 e-mail: [email protected] www.generaltools.com MMD8P User’s Manual Specifications subject to change without notice ©2013 GENERAL TOOLS & INSTRUMENTS NOTICE - WE ARE NOT RESPONSIBLE FOR TYPOGRAPHICAL ERRORS. MAN# MMD8P 10/29/13