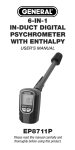
1
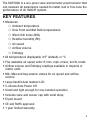
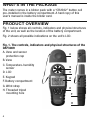
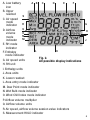
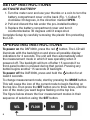
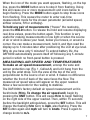
MINI ANEMOMETERPSYCHROMETER WITH CFM/CMM & ENTHALPY USER’S MANUAL DAF3009 Please read this manual carefully and thoroughly before using this product. TABLE OF CONTENTS Introduction . . . . . . . . . . . . . . . . . . . . . . . . . . . . . . . . . 2 – 3 Key Features . . . . . . . . . . . . . . . . . . . . . . . . . . . . . . . . . . . 3 What’s In the Package . . . . . . . . . . . . . . . . . . . . . . . . . . . 4 Product Overview . . . . . . . . . . . . . . . . . . . . . . . . . . . . 4 – 5 Setup Instructions . . . . . . . . . . . . . . . . . . . . . . . . . . . . . . . 6 Activate Battery . . . . . . . . . . . . . . . . . . . . . . . . . . . . 6 Operating Instructions . . . . . . . . . . . . . . . . . . . . . . . 6 – 12 Measuring Air Speed and Temperatures . . . . . . . 7 – 9 Measuring Airflow Volume . . . . . . . . . . . . . . . . 9 – 10 Displaying Min/Max/Avg Air Speeds and Airflow Volumes . . . . . . . . . . . . . . . . . . 10 – 11 Measuring Relative Humidity (RH) . . . . . . . . . . . . . 11 Measuring Enthalpy . . . . . . . . . . . . . . . . . . . . . . . . 12 Specifications . . . . . . . . . . . . . . . . . . . . . . . . . . . . . 12 – 13 Maintenance Tips . . . . . . . . . . . . . . . . . . . . . . . . . . . . . . 14 Warranty Information . . . . . . . . . . . . . . . . . . . . . . . 14 – 15 Return for Repair Policy . . . . . . . . . . . . . . . . . . . . . . . . . 15 INTRODUCTION Thank you for purchasing General Tools & Instruments’ DAF3009 Mini Anemometer-Psychrometer with CFM/CMM & Enthalpy. Please read this user’s manual carefully and thoroughly before using the product. 2 The DAF3009 is a one-piece vane anemometer-psychrometer that can measure all parameters needed to install, test or fine-tune the performance of an HVAC/R system. KEY FEATURES • Measures: Ambient temperature Dew Point and Wet Bulb temperatures Wind Chill Index (WCI) Relative humidity (RH) Air speed Airflow volume Enthalpy • All temperatures displayable in°F (default) or °C • Five available air speed units: ft./min, mph, m/sec, km/hr, knots • Airflow volume and Enthalpy readings available in Imperial or metric units • Min, Max and Avg session values for air speed and airflow volume • Large backlit dual readout LCD • 5-minute Auto Power Off • Small and light enough for one-handed operation • Includes vane and sensor cap with wrist strap • Tripod mount • CE and RoHS approved • 1 year limited warranty 3 WHAT’S IN THE PACKAGE The meter comes in a blister pack with a “CR2032” button cell pre-installed in the battery compartment. A hard copy of this user’s manual is inside the blister card. PRODUCT OVERVIEW Fig. 1 below shows all controls, indicators and physical structures of the unit, as well as the location of the battery compartment. Fig. 2 shows all possible indications on the unit’s LCD. Fig. 1. The controls, indicators and physical structures of the DAF3009 A. Vane and sensor A protection cap B. Vane C. Temperature-humidity B sensor C D. LCD E. Keypad D F. Battery compartment G. Wrist strap E H. Threaded tripod mounting hole F H 4 A B C D E F A. Low battery icon B. Upper readout S C. Air speed mode R indicator Q D. Airflow P O volume N mode indicator M E. RH mode indicator K L F. Enthalpy mode indicator Fig. 2. G. Air speed units All possible display indications H. RH unit I. Enthalpy units J. Area units K. Lower readout L. Area entry mode indicator M. Dew Point mode indicator N. Wet Bulb mode indicator O. Wind Chill Index mode indicator P. Airflow volume multiplier Q. Airflow volume units R. Air speed, airflow volume session value indicators S. Measurement HOLD indicator G H I J 5 SETUP INSTRUCTIONS ACTIVATE BATTERY 1. Turn the meter over and use your thumbs or a coin to turn the battery compartment cover on the back (Fig. 1, Callout F) clockwise 30 degrees, in the direction marked OPEN. 2. Pull and discard the tab under the pre-installed battery. 3. Replace the battery compartment cover and turn it counterclockwise 30 degrees until it snaps shut. Complete Setup by carefully removing the plastic film protecting the LCD. OPERATING INSTRUCTIONS To power on the DAF3009, press the red button. The LCD will illuminate with the backlight on and show all possible display indications for 2 seconds. The unit will then automatically enter the measurement mode in which it was operating when it powered off. The backlight will turn off after 15 seconds if no front-panel button is pressed during that period. Pressing any button begins another 15 seconds of backlight. To power off the DAF3009, press and hold the button for at least 2 seconds. To change measurement mode, start by pressing the MODE button. This will cause the icon of the current mode to begin flashing on the top line. Then press the SET button one to three times, until the icon of the mode you want begins flashing on the top line. The figure below shows the four measurement modes in their sequence of selection using the SET button. VEL 6 FLOW RH BTU When the icon of the mode you want appears, flashing, on the top line, press the MODE button once to stop it from flashing. Doing this will cause one or more measurement unit icons below to begin flashing. Press the MODE button again to stop those icons from flashing. This causes the meter to enter real-time measurement mode for the chosen parameter (air/wind speed, airflow volume, RH or enthalpy). To hold any pair of measurements (“freeze” the readouts), press the HOLD button. To release the hold and resume displaying real-time values, press the button again. This function is very useful for making measurements in low light or when the source of air or wind is above your head, below your knees, or around a corner. You can make a measurement, hold it, and then read the display up to 5 minutes later after positioning the LCD at eye level. Why do you have only 5 minutes? To extend battery life, the DAF3009 automatically powers itself off following any 5-minute period in which no front-panel button is pressed. MEASURING AIR SPEED AND TEMPERATURES To make an air speed measurement, unsnap the vane and sensor protection cap (Fig. 1, Callout A) and let it hang from the unit by the wrist strap. Turn the vane at the top of the unit perpendicular to the source of air or wind. It makes no difference whether the front of back of the vane faces the flow. The measured air speed value will appear on the upper readout. Allow a few seconds for the reading to stabilize. The DAF3009’s factory default air speed measurement unit is feet/minute (ft/m). To change the air speed unit, begin by pressing the UNIT button. This will cause ft/m to begin flashing on the right side of the upper readout. Then, within 15 seconds (before the backlight extinguishes), press the SET button. This will change the flashing ft/m term to mph, also flashing. Press the SET button again and mph will turn to knots. Press it again to change knots to m/s. 7 Press the SET button as many times as necessary until the air speed unit you prefer appears, flashing, on the right side of the upper readout. To save this unit, press the UNIT button. The figure at right shows the five available air speed units in their selection sequence. When you press the UNIT button to save your preferred air speed unit, °F—the DAF3009’s factory default temperature measurement unit—will begin flashing on the right side of the lower readout. To keep °F as the temperature measurement unit, begin by pressing the UNIT button. This will cause °F to stop flashing and the meter to resume displaying realtime air speed and temperature measurements. To change the temperature unit to °C, press the SET button, followed by the UNIT button to save the selection. The DAF3009 will “remember” the air speed and temperature units (as well as its operating mode and other selected units and parameters) in use each time it powers off and will resume operating in that mode and with those units upon restart. So if you always use ft/m and °F for air speed and temperature measurements, you need not perform any of the above steps. And if you always use the same air speed and temperature units (other than ft/m and °F), you need only perform the above procedure once. Unlike many instruments, changing the battery does not reset all units to their factory default. As mentioned earlier, the DAF3009 automatically begins measuring and displaying ambient temperature upon startup. To display other temperatures whose calculation includes the effect of wind speed or humidity (Wind Chill Index, or Wet Bulb and Dew Point temperatures, respectively), begin by pressing the 8 MODE button with the meter operating in air speed mode (with VEL appearing on the top line of the LCD). This will cause VEL to begin flashing. Then press the MODE button again. On meters that have come fresh from the factory, this will cause the three terms WCI, WET and DEW to appear, flashing, on the left side of the LCD. Within 15 seconds (before the backlight turns off), press the SET button as many times as necessary until the temperature you want appears by itself, flashing, on the left side. Note that the temperature on the lower readout changes with each press of the SET button. To save the temperature you want, press the MODE button while its abbreviated term (WCI, WET or DEW) is flashing. As with air speed units, the type of temperature you select and save becomes the display default until you change it. When operating in Wind Chill Index mode, make sure the vane is perpendicular to the wind direction. MEASURING AIRFLOW VOLUME To enter airflow volume measurement mode, begin by pressing the MODE button with the meter operating in air speed mode (with VEL appearing on the top line of the LCD). This will cause VEL to begin flashing. Then press the SET button. This will cause the flashing term FLOW to replace the flashing term VEL on the top line of the LCD. To stop FLOW from flashing, press the MODE button. Note that the term AREA now appears at the left of the lower readout. To calculate airflow volume, the DAF3009 must “know” the area of the grille or duct through which air is passing. Before entering that area, you should enter your preference for using the metric or Imperial unit for airflow volume—cubic meters/minute (CMM) or cubic feet/minute (CFM), respectively. To change CMM to CFM, begin by pressing the UNIT button. This will cause CMM to begin flashing. Then press the SET button, followed by the UNIT button to save the selection. 9 You can now measure the area of your grille and duct and enter it into the DAF3009. The meter can accept any area from 0.1 ft2 to 99.9 ft2. Users of metric units must convert their cm2 measurements to ft2 before entering them. To begin, press the AREA button. This will cause the left (most significant) digit on the lower readout to begin flashing. Press the SET button as many times as necessary until the left digit matches the left digit of your grille or duct area. Then press the AREA button to save that digit. This will cause the second digit from the left to begin flashing. Again, press the SET button as many times as necessary until the second digit from the left on the display matches the second digit from the left of your grille or duct area. Press the AREA button to save that digit. Repeat the process for the right (least significant) digit. To return to any digit to change its value, press the AREA button once, twice or three times. To measure the volume of air exiting a grille or duct, remove the vane and sensor protection cap and enter airflow volume mode (with FLOW appearing on the top line of the LCD). Turn the vane at the top of the unit perpendicular to the source of air or wind. It makes no difference whether the front of back of the vane faces the flow. Allow a few seconds for the reading to stabilize. For airflow volumes less than 9999 CFM or CMM, the value on the upper readout represents a true measurement. For airflow volumes between 10,000 and 99,999 CFM or CMM, the indication X10 below and to the left of the upper readout is a reminder to multiply the value shown by 10 for a true measurement. For airflow volumes above 99,999 CFM, the indication X100 is a reminder to multiply the value shown by 100 for a true measurement. DISPLAYING MIN/MAX/AVG AIR SPEEDS AND AIRFLOW VOLUMES The DAF3009 keeps track of the maximum and minimum (fastest and slowest) and average air speed and airflow volume values 10 recorded over a measurement “session”—the period of time during which you measure speeds at multiple locations and/or speeds of multiple devices. The session begins when you power on the DAF3009; it typically ends 5 minutes after you finish making measurements with the activation of the APO function. The value of being able to quickly determine the fastest and slowest fans of a group, or the average of a group of fans, should be obvious. To display the maximum, minimum or average air speed during a measurement session, briefly press the DISP button as many times as necessary until the label of the desired value (Max, Min or Avg) appears at the left of the LCD (Fig. 2, Callout R). The figure at right shows the three available session parameters in their selection sequence relative to real-time measurement mode. MEASURING RELATIVE HUMIDITY (RH) To enter RH mode, press the SET button with FLOW flashing on the top line of the LCD. This will change the flashing term to RH. To stop RH from flashing, press the MODE button. The DAF3009 will now display real-time RH values on the upper readout and the current Wind Chill Index or Dew Point or Wet Bulb temperature on the lower readout. To change the unit of temperature measurement to or from °F or °C, press the SET button, followed by the UNIT button to save the selection. To leave the unit unchanged, press the UNIT button. 11 MEASURING ENTHALPY Enthalpy is a measure of the amount of energy needed to change the state of a substance from a solid to a liquid or from a liquid to a gas. The most common application for the DAF3009’s enthalpycalculating algorithm is measuring the enthalpy of vaporization of air in an HVAC/R system duct. To enter Enthalpy mode, press the SET button with RH flashing on the top line of the LCD. This will change the flashing term to BTU. To stop BTU from flashing, press the MODE button. You can now enter your preference for using the metric or Imperial unit for Enthalpy—kiloJoules per kilogram (KJ/kg) or British thermal units per pound (BTU/lb), respectively. To change KJ/kg to BTU/lb, begin by pressing the UNIT button. This will cause KJ/kg to begin flashing. Then press the SET button, followed by the UNIT button to save the selection. Selecting the Enthalpy unit will cause the default temperature unit at the right of the lower readout to begin flashing. To change the unit, press the SET button, followed by the UNIT button to save the selection. To leave the unit unchanged, press the UNIT button. To make an Enthalpy measurement, remove the vane and sensor protection cap and enter Enthalpy mode (with BTU appearing on the top line of the LCD). Turn the vane at the top of the unit perpendicular to the source of air or wind. It makes no difference whether the front of back of the vane faces the flow. The measured Enthalpy value will appear on the upper readout. Allow a few seconds for the reading to stabilize. SPECIFICATIONS Air Speed Measurement Range: 80 to 5910 ft./min (0.4 to 30 m/s) Air Speed Measurement Accuracy: ±(3% of full-scale value + 40 ft./min (0.2 m/s)) 12 Air Speed Measurement Resolutions: 1 ft./min (0.1 m/s) Temperature Measurement Range: 32° to 122°F (0° to 50°C) Temperature Measurement Accuracy: ±1.8°F (1°C) from 68° to 104°F (20° to 40°C); ±3.6°F (2°C) elsewhere in range Temperature Measurement Resolution: 0.1° Airflow Volume Measurement Range: 0 to 591,000 CFM (0 to 16,740 CMM) Relative Humidity (RH) Measurement Range: 0 to 100% RH Measurement Accuracy: ±3% from 20 to 80%RH; ±5% elsewhere Dew Point Measurement Range: -67° to 122°F (-55° to 50°C) Wet Bulb Measurement Range: -31° to 122°F (-35° to 50°C) Enthalpy Measurement Range: -8 to 318 Btu/lb. (-19 to 740kJ/kg) Response Time:<2 seconds for air speed Display Size: 1.34 x 0.94 in. (34 x 24mm) Auto Power Off Trigger: 5 minutes of front-panel inactivity Backlight Duration: 15 seconds (without front-panel activity) Current Consumption: <3 mA with backlight off, <10 mA with backlight on Operating Temperature: 32° to 122°F (0° to 50°C) @ <85%RH Storage Temperature (without battery): -22° to 140°F (-30° to 60°C) @ <85%RH Dimensions: 5.83 x 2.08 x 0.87 in. (148 x 53 x 22mm) Weight (without battery): 2.86 oz. (81g) Power Source: (1) “CR2032” battery (pre-installed) 13 MAINTENANCE TIPS When the icon appears in the upper left corner of the LCD, it’s time to change the anemometer’s “CR2032” battery (although measurements will remain valid for several hours after the icon first appears). To change the battery, follow the Setup Instructions on p. 6. Install the new battery so the side with the text and + marking faces up. Remove the battery if you do not expect to use the DAF3009 for an extended period of time (months or years). Replace the vane and sensor protection cap (Fig. 1, Callout A) following each measurement session. Do not drop or disassemble the unit or immerse it in water. Do not operate the DAF3009: • Near a magnet • Near equipment like arc welders and induction heaters that generate an electromagnetic field • In environments full of water vapor, dust or static electricity To clean the housing or LCD, use a dry or damp cloth. Avoid using chemical cleaners. WARRANTY INFORMATION General Tools & Instruments’ (General’s) DAF3009 Mini Anemometer-Psychrometer with CFM/CMM and Enthalpy is warranted to the original purchaser to be free from defects in material and workmanship for a period of one year. Subject to certain restrictions, General will repair or replace this instrument if, after examination, the company determines it to be defective in material or workmanship. The warranty period begins on the date of purchase. You are encouraged to register your product online. 14 General will extend your warranty an additional 60 days if you register at www.generaltools.com/ProductRegistry. This limited warranty does not apply to damages that General determines to be from an attempted repair by non-authorized personnel or misuse, alterations, normal wear and tear, or accidental damage. The defective unit must be returned to General Tools & Instruments or to a General-authorized service center, freight prepaid and insured. Acceptance of the exclusive repair and replacement remedies described herein is a condition of the contract for purchase of this product. In no event shall General be liable for any incidental, special, consequential or punitive damages, or for any cost, attorneys’ fees, expenses, or losses alleged to be a consequence of any damage due to failure of, or defect in any product including, but not limited to, any claims for loss of profits. Register now at www.generaltools.com/ProductRegistry to receive a 60-day extension to your warranty. RETURN FOR REPAIR POLICY Every effort has been made to provide you with a reliable product of superior quality. However, in the event your instrument requires repair, please contact our Customer Service to obtain an RGA (Return Goods Authorization) number before forwarding the unit via prepaid freight to the attention of our Service Center at this address: General Tools & Instruments 80 White Street New York, NY 10013 212-431-6100 Remember to include a copy of your proof of purchase, your return address, and your phone number and/or e-mail address. 15 GENERAL TOOLS & INSTRUMENTS 80 White Street New York, NY 10013-3567 PHONE (212) 431-6100 FAX (212) 431-6499 TOLL FREE (800) 697-8665 e-mail: [email protected] www.generaltools.com DAF3009 User’s Manual Specifications subject to change without notice ©2014 GENERAL TOOLS & INSTRUMENTS NOTICE - WE ARE NOT RESPONSIBLE FOR TYPOGRAPHICAL ERRORS. MAN# DAF3009 9/2/14 General Tools & Instruments GeneralToolsNYC