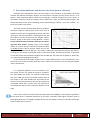
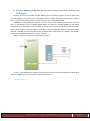
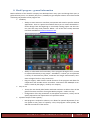
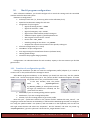
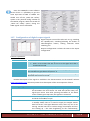
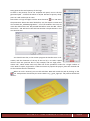
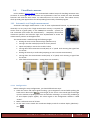
1
6 Axis CNC Controller CSMIO IP-S User guide Applies to hardware version: v1 and v2 Applies to firmware version: v1.07 Rev 1.2 © copyright 2011 – CS-Lab s.c. Index 1. General ................................................................................................................................................................... 4 Signs used in this guide ................................................................................................................................. 4 Contents ........................................................................................................................................................ 5 Standards compliance ................................................................................................................................... 6 Specifications ................................................................................................................................................ 6 2. Safety ...................................................................................................................................................................... 7 2.1 Example of E-Stop Signal connection ............................................................................................................ 8 3. Recommendations for mechanical installation ....................................................................................................... 9 4. Connectors, controls and electrical installation of the device .............................................................................. 10 4.1 Connectors arrangements on the device .................................................................................................... 10 4.2 STEP/DIR controlling signals connector (CSMIO/IP-S v1) ............................................................................ 11 4.3 STEP/DIR controlling signals connector (CSMIO/IP-S v2) ............................................................................ 12 4.4 Digital outputs connector (0-15) (CSMIO/IP-S v1) ....................................................................................... 13 4.5 Digital outputs connector (0-15) (CSMIO/IP-S v2) ....................................................................................... 14 4.6 Digital inputs connector (0-15) (CSMIO/IP-S v1) ......................................................................................... 15 4.7 Digital inputs connector (16-31) (CSMIO/IP-S v1) ....................................................................................... 16 4.8 Digital inputs connector (0-15) (CSMIO/IP-S v2) ......................................................................................... 17 4.9 Digital inputs connector (16-31) (CSMIO/IP-S v2) ....................................................................................... 18 4.10 Analog inputs/outputs connector ............................................................................................................... 19 4.11 Expansion modules connector .................................................................................................................... 19 4.12 Power connector ......................................................................................................................................... 20 4.13 Communication connector – Ethernet ........................................................................................................ 20 4.14 Recommended cables ................................................................................................................................. 21 4.15 Installation examples................................................................................................................................... 22 4.15.1 The simplest inverter connection with the use of the analog output................................................ 22 4.15.2 Illustrative diagram of XYZ plotter (CSMIO/IP-S v1)........................................................................... 23 4.15.3 Illustrative diagram of XYZ plotter (CSMIO/IP-S v2)........................................................................... 24 4.15.4 Automatic control of drives power supply (HV) ................................................................................ 26 4.16 LED lights meaning ...................................................................................................................................... 27 4.16.1 Types and location of the LEDs .......................................................................................................... 27 4.16.2 State diodes description - STATx........................................................................................................ 28 5. Recommendations and drives selection (motors drives) ...................................................................................... 30 6. Precise homing with use of the servo drive and the encoder INDEX signal .......................................................... 32 7. LAN connection and configuration........................................................................................................................ 34 7.1 Direct connection to the PC ........................................................................................................................ 34 7.2 Local network with router and DHCP. ......................................................................................................... 36 8. Mach3 program – general information ................................................................................................................. 37 8.1 Recommended PC configuration ................................................................................................................. 39 9. Software installation ............................................................................................................................................. 40 9.1 Mach3 installation ....................................................................................................................................... 40 9.2 Microsoft® .Net installation (older operating systems) ............................................................................... 41 9.3 Installation of the plug-in for Mach3 program ............................................................................................ 41 9.4 Administrator rights in Windows® Vista and Windows® 7 .......................................................................... 42 10. Mach3 program configuration .............................................................................................................................. 43 10.1 Creation of configuration profile ................................................................................................................. 43 10.2 The first run ................................................................................................................................................. 44 10.3 Configuration of axes used in the machine ................................................................................................. 45 10.4 Configuration of the digital input signals .................................................................................................... 46 10.5 Configuration of digital output signals ........................................................................................................ 48 10.6 Configuration of spindle and cooling controlling ........................................................................................ 50 10.7 Configuration of the resolution, speed and acceleration of the axes ......................................................... 52 10.8 Configuration of motion directions, homing and software limits. .............................................................. 53 10.9 Additional configuration functions in the plug-in window .......................................................................... 54 10.9.1 The Servo drive fault signals tab – servo drives fault signals ............................................................. 54 10.9.2 Override sources tab, selection of the source of the feed correction speed and spindle revs .......... 55 1.1 1.2 1.3 1.4 CS-Lab s.c. –CNC CSMIO/IP-S Controller Page 2 10.9.3 The Spindle tab, selection of the analog output that controls the spindle revs ................................ 55 10.9.4 Special functions tab, configuration of the special outputs HVEnable and ServoReset.................... 56 10.9.5 HW Slave Axis – autonomous support settings. ................................................................................ 57 10.10 Selection of inch/mm units..................................................................................................................... 58 10.11 Parameters in the window General Config. ............................................................................................ 58 11. First tests ............................................................................................................................................................... 60 11.1 Checking the input signals ........................................................................................................................... 60 11.2 Verification of axes scaling and motion directions ...................................................................................... 61 11.3 HOMING and software limit switches test .................................................................................................. 62 11.3.1 First homing ....................................................................................................................................... 62 11.3.2 SoftLimit switches. ............................................................................................................................. 62 11.4 Test of spindle and cooling. ......................................................................................................................... 63 12. Sample processing step by step ............................................................................................................................ 64 12.1 Preparation of project and G-Code files. ..................................................................................................... 64 12.2 Preparation of the machine and the Mach program ................................................................................... 68 12.3 We begin the work ...................................................................................................................................... 70 13. A few practical notes about the Mach3 program and CSMIO/ IP-S ...................................................................... 72 ® 14. VisualBasic macros ............................................................................................................................................... 74 14.1 Automatic tool-length measurement .......................................................................................................... 74 14.1.1 Configuration ..................................................................................................................................... 74 14.2 Automatic tool change macro ..................................................................................................................... 76 Addition A – Slave axis configuration example ............................................................................................................... 77 Defining axes to be used in the Mach3 program ....................................................................................................... 77 Axis scaling and configuration .................................................................................................................................... 77 Switching and the choice of axis used as a slave ........................................................................................................ 77 LIMIT and HOMING switches ..................................................................................................................................... 77 Axis direction settings ................................................................................................................................................ 78 Manual feed test ........................................................................................................................................................ 78 Automatic reading of the HOME switches position difference .................................................................................. 78 Switching the geometry correction mode .................................................................................................................. 78 Addition B – CSMIO/IP-S software updating ................................................................................................................... 79 How to check your software version .......................................................................................................................... 79 Updating application (uploader) ................................................................................................................................ 79 Plugins file update ...................................................................................................................................................... 80 Checking the update .................................................................................................................................................. 80 CS-Lab s.c. –CNC CSMIO/IP-S Controller Page 3 1. General CSMIO/IP-S product was designed for professional customers, who want to equip their machine tool with an efficient, stable and flexible CNC control system for reasonable price. The main designing assumption was working stability – hence the PC connection via Ethernet (its physical layer is galvanically isolated and protocols we use ensure reliable and fast transmission even in tough industrial environment). Practically any others interfaces do not provide the continuity and reliability of transmission on such a high level as the ETHERNET. That is why it is currently the worldwide standard for high-speed digital communication. Another important assumption was simplicity of installation. CSMIO/IP-S does not require any external electronics for proper operation. Inputs/outputs signals are inside optically isolated, filtered, protected against short circuit, overheating etc. All signals are adjusted to industry standard 24V. The device is enclosed in a compact cover, mounted on a DIN-rail, what makes that the mechanical and electronic installation in the control cabinet takes less time and is even simpler. CSMIO/IP-S product works with Mach3 program because of its low price, popularity and enormous ability to adapt to specific requirements. As a drives control interface the choice was a popular step/direction (step / dir) standard. It allows controlling both the stepper motor drives and the most modern servo drives. The frequency of stop signal that reaches to 4MHz allows for taking maximum advantage of the stepper division in the stepper motors the same reducing the resonance and significantly improving the performance of the propulsion system. It also allows for taking full advantage of the encoders with large number of pulses per rotation in the servodrives, letting to achieve such a precision and speed, which previously were unavailable in this price sector. 1.1 Signs used in this guide __________________________________________________________________________________ Potential danger, possible injury risk. __________________________________________________________________________________ Useful information, tips __________________________________________________________________________________ Warning, failure to comply with these warnings may lead to inappropriate functioning or damage of the device __________________________________________________________________________________ CS-Lab s.c. –CNC CSMIO/IP-S Controller Page 4 1.2 Contents CSMIO/IP-S Device is placed in the cartoon box with the DB->Terminal Block adapters for easier wires connection in the control cabinet. More content details below: • CNC CSMIO/IP-S Controller • 2xDB25 -> Terminal Block adapter • 2xDB25 + 1xDB9 -> Terminal Block adapter • Ethernet connection wire • 4xDB25 connection tape • DB9 connection tape • „Phoenix” 3 pin power plug • CD with electronic version of the user guide and software In case of lack of any elements listed above, please contact your distributor. CS-Lab s.c. –CNC CSMIO/IP-S Controller Page 5 1.3 Standards compliance CSMIO/IP-S controllers were designed and made in accordance with the national and international standards for industrial control systems based on electronic components: • Detailed requirements for programmable controllers: working characteristics, shock resistance, safety etc. EN61131-2 (IEC1131-2), CSA 22.2, UL508 • Compliance with European Guidelines (low voltage, the level of electromagnetic interference Electromagnetic Compability), the CE marking. • Electrical and non-combustible properties of insulation materials: UL 746C, UL 94, etc. • The Product made in lead-free technology, RoHS compliant. 1.4 Specifications Parameter Number of digital inputs Number of digital outputs Number of analog inputs Number of analog outputs Supply voltage Power consumption Maximum voltage on the in/out lines Maximum load of output line The voltage range of analog inputs Maximal load of analog output Axis Drives control type Maximum frequency of the STEP signal Fill factor of the STEP signal PC connection Ambient temperature range Relative humidity Value 32 16 4 2 24VDC +/-10% 5W 30VDC 250mA 0-10VDC 5mA (STEP/DIR) 4MHz 50% Ethernet 10/100Mb 0oC to +60oC 10% do 95% (without condensation) The STEP outputs signals frequency are in no way limited by the „Kernel speed” settings in Mach3 program. While using the CSMIO/IP-S controller this Mach’s configuration parameter is unused and can be set on any value. CS-Lab s.c. –CNC CSMIO/IP-S Controller Page 6 2. Safety The CSMIO / IP-S device is powered by 24V safe voltage. I / O control lines are optically isolated, also the PC connection is galvanically isolated. The device does not constitute a direct threat to the health and life of the user. Designing a complete control system (control cabinet), you should draw attention to several issues, so that the entire system does not pose any hazard during use. Always use the NC contacts for limit switches and safety switch. Thanks to it - a wiring fault or i.e. plug-ins disconnection will stop the machine. Pay special attention to the emergency stop circuit. The control system must be designed in such a way that when you press the emergency stop mushroom, controlled machine stops immediately in all axes. You should also take into account the possibility of failure of particular system components such as the main controller, or axis drives. Best way is, to use for that purpose a standard safety relay (i.e. from PILZ Company). The safety switch mushroom, FAULT signals of the drives and inverter and eventually other alarm signals – you should connect to the input circuits. The output or outputs should be connected to the CSMIO/IP-S controller, and defined as the emergency stop. Outputs of the security module should be also connected to the axis drives, inverters, etc. This way we get double protection – if, by inappropriate configuration or CSMIO/IP-S controller failure - the emergency would not work, the information goes to the axis drives, which can properly respond to it. It works both sides: if the drives would not react, you always have the controller. CSMIO-IP/S Controller in the active state on the input line - defined as E-Stop, blocks the STEP signals within 0.0005 s. It happens autonomously, without Mach3 program and thus the machine stops very fast. The same happens with reaction to signals from limit switches. CS-Lab s.c. –CNC CSMIO/IP-S Controller Page 7 2.1 Example of E-Stop Signal connection PILZ PNOZ X7 24 V The simple example above shows the E-Stop signal connection to the CSMIO/IP-S controller and to the axis drives, using Pilz company safety relay (PNOZ X7 24V symbol). S1 is a reset button (safety relay switching on), S2 is an emergency stop. This module has one input, and due to it, all the alarm sources are connected to this input (A1). In addition to the mentioned emergency stop (S2) there are NC contacts - NC1 and NC2, which may be, i.e. opening sensors for the cover and the control cabinet. Moreover, there are drives’ FAULT signals connected in series. Two outputs of the safety relay were used as an E-Stop signal for the CSMIO/IP-S controller and axis drives. This combination assures the machine stops in case of failure on any axis (FAULT signals of the drives), by pressing emergency stop mushroom and opening of the cabinet or cover. Separation of the safety relay output channels gives double protection for the system and significantly increases the reliability of the entire system. CS-Lab s.c. –CNC CSMIO/IP-S Controller Page 8 3. Recommendations for mechanical installation CSMIO/IP-S controller and DB->Terminal block connection modules were designed to be installed on standard DIN-rail. It’s the quickest and best way of installation. The Controller uses a small amount of electricity and creates a negligible amount of heat. Aluminum housing provides adequate cooling for the electronics inside, even if the ambient temperature reaches 40OC. As for the same controller, there are no special precautions for ventilation and the minimum distances. However, usually, next to the controller in the control cabinet, there are also inverters, power supplies, motor drives - these components emit a lot of heat, so you should always remember about their proper location and proper ventilation of the cabinet. Here is an example - components arrangement in the control cabinet. Caution is advised during the mechanical and electrical installation. Poorly tightened cable may cause many problems, it’s also very difficult to find such a defect while launching/using the system. CS-Lab s.c. –CNC CSMIO/IP-S Controller Page 9 4. Connectors, controls and electrical installation of the device 4.1 Connectors arrangements on the device Digital inputs 16-31 Signals that control the drives (STEP/DIR) Analog inputs and outputs (0-10V) Expansion modules connector Power connector Digital inputs 0-15 Digital outputs 0-15 Communication connector (ETHERNET) Detailed description of signals on individual connectors is placed in next sections. DB->Terminal block modules have the same pin numbers as DB connectors in CSMIO/IP-S device. In example: 15 pin of DB25 connector match with the 15 pin on the terminal block. There were some hardware improvements made in the CSMIO/IP-S v2 controllers therefore the pin topology on the STEP/DIR, DIGITAL OUTPUTS and DIGITAL INPUTS connectors is different for version v1 and v2. To define your version of the controller read the first 4 figures of the serial number. • Numbers starting with 1119… and below means version v1 • Numbers starting with 1120… and above means version v2 CS-Lab s.c. –CNC CSMIO/IP-S Controller Page 10 4.2 STEP/DIR controlling signals connector (CSMIO/IP-S v1) CSMIO/IP-S controllers v1 has the serial number starting with 1119… and below. PIN number 1 2 3 4 5 6 7 8 9 10 11 12 13 14 15 16 17 18 19 20 21 22 23 24 25 DIR[0] STEP[0] DIR[1] STEP[1] DIR[2] STEP[2] DIR[3] STEP[3] DIR[4] STEP[4] DIR[5] STEP[5] GND GND 5V GND 5V GND 5V GND 5V GND 5V GND 5V Details The 5V power which is available on this connector has low permissible load (50mA / pin) and serves only to control the LEDs in the optically isolated inputs of motor drivers. Pay special attention for your device version. When you are connecting the STEP/DIR signals to the drive (both servo and stepper drives) pay attention which STEP edge is active. The active edge in the drive is the falling edge – namely STEP signal change: the logic “1” (5V) to logic “0” (0V). While connecting the controller– e.g. of the M542 stepper motor, you should connect the PUL+ signal to the 5V power and CSMIO/IP-S STEP output to the PUL- of the drive. This way switching on the optocoupler in the M542 will be followed by the falling edge of the CSMIO/IP-S STEP signal. If the connection is incorrect, 1 step will be lost during every direction change. After a long work, it may accumulate large position error. CS-Lab s.c. –CNC CSMIO/IP-S Controller Page 11 4.3 STEP/DIR controlling signals connector (CSMIO/IP-S v2) CSMIO/IP-S controllers v2 has the serial number starting with 1120… and above. PIN number 1 2 3 4 5 6 7 8 9 10 11 12 13 14 15 16 17 18 19 20 21 22 23 24 25 DIR[0]+ STEP[0]+ DIR[1]+ STEP[1]+ DIR[2]+ STEP[2]+ DIR[3]+ STEP[3]+ DIR[4]+ STEP[4]+ DIR[5]+ STEP[5]+ GND DIR[0]STEP[0]DIR[1]STEP[1]DIR[2]STEP[2]DIR[3]STEP[3]DIR[4]STEP[4]DIR[5]STEP[5]- Details The differential outputs, which are available on this connector, have low permissible load (50mA) and serves only to control the LEDs in the optically isolated inputs of motor controller. Pay special attention for your device version. When you are connecting the STEP/DIR signals to the drive (both servo and stepper drives) pay attention which STEP edge is active. The active edge in the controller is the falling edge – namely change of the STEP signal from logic “1” state (5V) to logic “0” (0V). While connecting the controller– e.g. of the M542 stepper motor, you should connect the PUL+ signal to the 5V power and CSMIO/IP-S STEP output to the PUL- of the drive. This way switching on the optocoupler in the M542 will be followed by the falling edge of the CSMIO/IP-S STEP signal. If the connection is incorrect, 1 step will be lost during every direction change. After a long work, it may accumulate large position error. CS-Lab s.c. –CNC CSMIO/IP-S Controller Page 12 4.4 Digital outputs connector (0-15) (CSMIO/IP-S v1) CSMIO/IP-S controllers v1 has the serial number starting with 1119… and below. PIN number 1 2 3 4 5 6 7 8 9 10 11 12 13 14 15 16 17 18 19 20 21 22 23 24 25 Details Output 0 24V power supply for 0 and 1 outputs Output 3 Output 4 24V power supply for 4 and 5 outputs Output 7 Output 8 24V power supply for 8 and 9 outputs Output 11 Output 12 24V power supply for 12 and 13 outputs Output 15 GND Output 1 Output 2 24V power supply for 2 and 3 outputs Output 5 Output 6 24V power supply for 6 and 7 outputs Output 9 Output 10 24V power supply for 10 and 11 outputs Output 13 Output 14 24V power supply for 14 and 15 outputs The outputs have 250mA permissible load. Pay attention - if you connec large inductance you may need to use an additional surge led, preferably as close to the coil as possible. CS-Lab s.c. –CNC CSMIO/IP-S Controller Page 13 4.5 Digital outputs connector (0-15) (CSMIO/IP-S v2) CSMIO/IP-S controllers v2 has the serial number starting with 1120… and above. PIN number 1 2 3 4 5 6 7 8 9 10 11 12 13 14 15 16 17 18 19 20 21 22 23 24 25 Details 24V power supply for 0-3 outputs Output 0 Output 2 24V power supply for 4-7 outputs Output 4 Output 6 24V power supply for 8-11 outputs Output 8 Output 10 24V power supply for 12-15 outputs Output 12 Output 14 GND (not in use) Power supply 0V for 0-3 outputs Output 1 Output 3 Power supply 0V for 4-7 outputs Output 5 Output 7 Power supply 0V for 8-11 outputs Output 9 Output 11 Power supply 0V for 12-15 outputs Output 13 Output 15 The outputs have 250mA permissible load. Pay attention if you are connected to a large inductance you may need to use an additional surge led, preferably as close to the coil as possible. CS-Lab s.c. –CNC CSMIO/IP-S Controller Page 14 4.6 Digital inputs connector (0-15) (CSMIO/IP-S v1) CSMIO/IP-S controllers v1 has the serial number starting with 1119… and below. PIN number 1 2 3 4 5 6 7 8 9 10 11 12 13 14 15 16 17 18 19 20 21 22 23 24 25 Input 0 GND Input 3 Input 4 GND Input 7 Input 8 GND Input 11 Input 12 GND Input 15 GND Input 1 Input 2 GND Input 5 Input 6 GND Input 9 Input 10 GND Input 13 Input 14 GND Details Pay special attention to not exceed the permissible voltage (30VDC) on the inputs lines. It may cause the device damage. CS-Lab s.c. –CNC CSMIO/IP-S Controller Page 15 4.7 Digital inputs connector (16-31) (CSMIO/IP-S v1) CSMIO/IP-S controllers v1 has the serial number starting with 1119… and below. PIN number 1 2 3 4 5 6 7 8 9 10 11 12 13 14 15 16 17 18 19 20 21 22 23 24 25 Input 16 GND Input 19 Input 20 GND Input 23 Input 24 GND Input 27 Input 28 GND Input 31 GND Input 17 Input 18 GND Input 21 Input 22 GND Input 25 Input 26 GND Input 29 Input 30 GND Details Pay special attention to not exceed the permissible voltage (30VDC) on the inputs lines. It may cause the device damage. CS-Lab s.c. –CNC CSMIO/IP-S Controller Page 16 4.8 Digital inputs connector (0-15) (CSMIO/IP-S v2) CSMIO/IP-S controllers v2 has the serial number starting with 1120… and above. PIN number 1 2 3 4 5 6 7 8 9 10 11 12 13 14 15 16 17 18 19 20 21 22 23 24 25 Details Input 0 (+) Input 2 (+) Input 4 (+) Input 6 (+) Inputs 0-7 (-) Input 8 (-) Input 9 (-) Input 10 (-) Input 11 (-) Input 12 (-) Input 13 (-) Input 14 (-) Input 15 (-) Input 1 (+) Input 3 (+) Input 5 (+) Input 7 (+) Input 8 (+) Input 9 (+) Input 10 (+) Input 11 (+) Input 12 (+) Input 13 (+) Input 14 (+) Input 15 (+) Pay special attention to not exceed the permissible voltage (30VDC) on the inputs lines. It may cause the device damage. CS-Lab s.c. –CNC CSMIO/IP-S Controller Page 17 4.9 Digital inputs connector (16-31) (CSMIO/IP-S v2) CSMIO/IP-S controllers v2 has the serial number starting with 1120… and above. PIN number 1 2 3 4 5 6 7 8 9 10 11 12 13 14 15 16 17 18 19 20 21 22 23 24 25 Details Input 16 (+) Input 18 (+) Input 20 (+) Input 22 (+) Input 16-23 (-) Input 24 (-) Input 25 (-) Input 26 (-) Input 27 (-) Input 28 (-) Input 29 (-) Input 30 (-) Input 31 (-) Input 17 (+) Input 19 (+) Input 21 (+) Input 23 (+) Input 24 (+) Input 25 (+) Input 26 (+) Input 27 (+) Input 28 (+) Input 29 (+) Input 30 (+) Input 31 (+) Pay special attention to not exceed the permissible voltage (30VDC) on the inputs lines. It may cause the device damage. CS-Lab s.c. –CNC CSMIO/IP-S Controller Page 18 4.10 Analog inputs/outputs connector PIN number 1 2 3 4 5 6 7 8 9 Details Analog output 0 GND Analog input 1 Analog input 2 10V (max. 50mA) Analog output 1 Analog input 0 GND Analog input 3 Pay special attention to not exceed the permissible voltage (10VDC) on the inputs lines. It may cause damage of the device. 10V output has 50mA load and serves only to supply the potentiometers, if you want to connect the potentiometers, such as regulation of feed rate or spindle speed correction. 4.11 Expansion modules connector PIN number 1 2 3 4 5 6 7 8 9 details CAN H RS232 RxD RS232 TxD GND CAN L RS485 BRS485 A+ - Connector serves only for CS-Lab s.c. expansion modules. Do not plug it into any other devices, PC, etc. CS-Lab s.c. –CNC CSMIO/IP-S Controller Page 19 4.12 Power connector Pin number 1 2 3 Details Power – 24V DC GND ground View of the plug from the side of connecting wires Pay special attention to not exceed the permissible voltage (30VDC) on the inputs lines. It may cause damage of the device. If you use in the system such inductive loads as electromagnets, solenoids, electromagnetic clutches – it’s recommended to use a separate 24V power supply for the above receivers and separate for CSMIO / IP-S. 4.13 Communication connector – Ethernet PIN number 1 2 3 4 5 6 7 8 TX+ TXRx+ RX- Detail It’s recommended to use wire-screen FTP or STP cat.6. The network interface has no Auto MDI-MDIX function. So, while connecting CSMIO/IP-S directly to a computer we should use so-called crossover cable. If you connect it to the network switch or router - use a non-crossover cable. CS-Lab s.c. –CNC CSMIO/IP-S Controller Page 20 4.14 Recommended cables Connections type Digital In/out Analog In/out Drives controlling CSMIO/IP-S v1 Drives controlling CSMIO/IP-S v2 (STEP/DIR) (STEP/DIR) Ethernet Communication wire Power CAN expansion modules Recommended cable Minimum cross-section 0,25mm2 Cross-section 0,25mm2 best - shielded or pair of signal-tomass weirs twisted together along the entire length Cross-section 0,25mm2 best - shielded or pair of signal-tomass weirs twisted together along the entire length Cross-section 0,25mm2 best - shielded–twisted. You can possibly use the FTP computer cable. Please note that pairs of signals (e.g., STEP + / STEP-) you should always lead by twisted pair of cables. Standard Power cable, shielded - FTP, cat. 6. Min. Cross-section 0,5mm2 If modules are mounted on the same DIN rail, next to the controller you can use DB9 plugins clenched on the 9-wire tape (if further – shielded twisted pair). During mechanical and electrical montage – particular caution is adviced. Poorly tightened cable may cause many troubles, it’s also very difficult to find such a defect while launching/using the system. CS-Lab s.c. –CNC CSMIO/IP-S Controller Page 21 4.15 Installation examples 4.15.1 The simplest inverter connection with the use of the analog output. CSMIO/IP-S v1 CSMIO/IP-S v2 This example above shows the simplest connection of the inverter to operate e.g spindles in the engraving plotter. CSMIO/IP-S device outputs in use: CSMIO/IP-S signal Connector on CSMIO/IP-S The combination of the analog mass Power mass of the digital outputs Analog outputs 0 DB9 – Analog I/O Outputs 4 and 5 power Digital output 4 DB25 – Digital outputs (0-15) DB25 – Digital outputs (0-15) DB25 – Digital outputs (0-15) Digital output 5 DB25 – Digital outputs (0-15) DB9 – Analog I/O PIN number in CSMIO/IP-S v1 connector 2 PIN number in CSMIO/IP-S v2 connector 2 Inverter function mass –reference potential for analog input of the speed command - 17 1 1 5 4 Voltage input 0-10V of the speed command Output 24V for controlling signals 4 5 Right revs switching 17 18 Left revs switching Do no forget to set the configuration parameters of the inverter properly. Incorrect settings may cause - in the best case - an inverter error, at worst - the spindle motor would becomes permanently damaged (such damage is not covered under warranty). Mach3 program configuration, concerning use of the spindle with speed control was described in a chapter 10 - "Mach3 Configuration". CS-Lab s.c. –CNC CSMIO/IP-S Controller Page 22 4.15.2 Illustrative diagram of XYZ plotter (CSMIO/IP-S v1) CS-Lab s.c. –CNC CSMIO/IP-S Controller Page 23 4.15.3 Illustrative diagram of XYZ plotter (CSMIO/IP-S v2) CS-Lab s.c. –CNC CSMIO/IP-S Controller Page 24 A scheme presented in this section is the simplest implementation of 3axis plotter (XYZ). Two power supplies were used: 24V to supply the CSMIO/IP-S controller and 80V for the stepper motors drives. Switches used: NC switches for axis homing (HOME) and limit switches (LIMIT). In practice, it’s necessary to build more complex systems, however the example above shows the main rule. CS-Lab s.c. –CNC CSMIO/IP-S Controller Page 25 4.15.4 Automatic control of drives power supply (HV) CSMIO/IP-S controller allows for automatic control of drives power supply and also some other devices. Switching on this function was described in 10th Chapter. The logic of the output working, define as so called „HV Enable” is very easy. The voltage is switched on at the moment of requesting “Reset” by Mach program and stays “on” till one of the following conditions exist: • FAULT signal from any axis drive • E-Stop signal (the emergency stop mushroom pressing) • Turning on the limit switch • Loss of communication with the Mach3 program • Error of inside position/speed regulators in CSMIO/IP-S Here is an example of connected outputs used as „HV Enable”. The output number is irrelevant, it’s defined in the configuration window of the Mach3 program. When you use large contactors for switching off the power, check if the coil doesn’t take more than 250mA. If so, use smaller transmitter and turn on the bigger one with it. With a large contactor it’s good to have a diode and noise-suppression condenser to eliminate the overvoltages generated during switching off the coil. The „HV Enable” voltage control function is made automatically by the CSMIO/IP-S controller. Response time for the events that cause the disconnection is less than 0,0005s. CS-Lab s.c. –CNC CSMIO/IP-S Controller Page 26 4.16 LED lights meaning On the front panel of CSMIO/IP-S device, there are groups of LED lights that simplify verifying the correctness of electric installation and diagnostic of the components such as HOME switches, LIMIT switches and safety switches (E-Stop) etc. 4.16.1 Types and location of the LEDs Digital inputs 16-31 lights and communication ports activity Digital inputs 0-15 lights and error signalization (ERRx) • • • • • • • Digital output 0-15 lights and device status signalization (STATx) Digital inputs and outputs lights do not require more explanations. For example, if you give the signal to the input no. 5, the IN5 LED lights up. Similarly, if you switch on the output no. 2 – OUT2 LED lights up. CAN diode lights up when at least one expansion module is connected and when the communication on the CAN rail is correct. RS485 diode lights up if there is a communication on the RS485 rail. RS232 diode lights up if there is a communication on the RS232 port. ETHERNET diode lights up if the controller communicates with the PC computer. ERR0-ERR3 diodes indicate controller faults. During normal operation, any of these diodes shouldn’t light up. If one of them lights up you should contact your service – find “contact” on the website http://www.cs-lab.eu STAT0-STAT3 diodes indicate controller status, information about the status is very helpful information that the service should get if there are any problems during the device work. Below you find a detailed description of the lights meaning. CS-Lab s.c. –CNC CSMIO/IP-S Controller Page 27 4.16.2 State diodes description - STATx Diodes state STATx Description Standby, waiting for the transmission of the configuration parameters from the computer. It’s a default state after switching power on, before it communicate with Mach3 program. Readiness state. It means that the device works correctly, there are no alarm signals, such as E-Stop or LIMIT. CSMIO/IP-S waits for the commands from the PC. It means that one or more of the axes are currently on the manual motion mode (JOG). It means that one or more of the axes are homing at the moment (HOMING). Buffering the movement trajectory data. In practice, it’s so quickly that it is almost impossible to notice this status. The controller is on the G31 command mode (ride on the tool measurement sensor, scanning etc). Mode of the interpolated motion on the trajectory– it means CNC program or MDI command performing. Also movement commands from the script level (macro) of Mach3 program causes this state. Emergency stop. It means active state on the input line defined as the EStop. It means that, while motion - at least one of the axes drove over the LIMIT switch. It means that during the interpolated motion on the trajectory (CNC program performing) at least one of the axes was outside the permitted area, defined by, so-called software limit switches (SOFT-LIMIT). CS-Lab s.c. –CNC CSMIO/IP-S Controller Page 28 One or more motors drives reported an error by setting the active state on the FAULT line. This might mean e.g. axis overload or collision. Power system reported an error. If power supply of the drives has the state line you can connect it to the CSMIO/IP-S controller. If the power supply will be overload or fail then the controller stops the work and turns to the described state. It means general software error. During normal operation of the device this state shouldn’t occur. If it does, it means failure and you need to contact with the service. Undefined state. Generally, this state shouldn’t occur during normal work. In some cases, it may mean device breakdown. Explanations: LED light is off LED lights continuously LED light flashes CS-Lab s.c. –CNC CSMIO/IP-S Controller Page 29 5. Recommendations and drives selection (motors drives) Selection of the appropriate motors to the machine is very individual. In this chapter, we briefly describe the difference between stepper and servomotors. Designer practice shows there is a dilemma – what solution should be chosen. Not so long ago – because of high prices of servo drives, in the simpler machines usually the stepper motors were used. Today, the technological progress and the dissemination of the servo technology causes that building a machine – even like a hobby – it’s worth to consider servo drives. The most common mistake while decision-making is the power selection (and torque) of the servo drive. It happens because we are suggested by torque and holding torque. The first parameter is usually given with the servo drives and the second with the stepper motors. Both are usually in the same unit Nm (Newton – meter). Do not compare these parameters when you are choosing servo drive power. Holding torque in the stepper motors is a power that the shaft of the powered motor in standby mode is held in position. When the revs are very low – something about 200 rpm - the torque is almost the same (pictures below), but with increasing revs the torque, actually the power on the motor shaft), decreases drastically. It decreases to such low values that sometimes happens that at 1000 rpm. the motor has no power to work itself, not saying about propelling the machine. In the simple words: the 3Nm stepper motor, reaches 3Nm torque on very low (200 rpm.) revs, when the revs increase its power decrease to zero. Above, on the left you can see example stepper motor characteristic. It is completely different in the servomotors. First, the torque and the rev speed are nominal. Therefore, the 1Nm/ 2000 rpm motor can operate continuously with revs: 2000 rpm. and at this speed provides 1Nm of the torque on the shaft. Besides the servomotors have another one important feature: they can be temporarily overloaded. What does it mean? That the 1Nm motor can temporarily deliver even 2,5-4Nm (it depends on the type). If we use the motion controller with fast STEP outputs like CSMIO/IP-S, the important parameter of the motor drive is maximum frequency of the steps. Controllers with higher frequency limit of STEP signal allow you to use higher stepper division (for the stepper motors) or encoders with larger pulses number per rev (servo). CS-Lab s.c. –CNC CSMIO/IP-S Controller Page 30 However, everything has its pros and cons. So what are the disadvantages of servo drives? They are certainly more expensive - how much, it depends what kind of stepper and servo drives you compare. There are e.g. stepper motors controllers that cost 800 USD and there are some other that cost 40 USD (with the same power!). Generally we can conclude that the servo motor + drive package is more expensive. Other disadvantage of the servo drives is necessity for PID controllers tuning and wiring that is more complicated. That will be the end of the disadvantages. Great advantage of the servo drives is that - thanks to the feedback - the servo drive indicates the overload and positioning error. When the CSMIO/IP-S receives this signal immediately stops the axes. In the stepper motors there is no feedback like this one, so even if one of the axis because of e.g. overload will not keep the set trajectory, the machine will continue the work – breaking the same entire processed detail. In sum – we recommend the servo drives. Their disadvantages are negligible in comparison to the benefits they offer. Please note that the servo drive can have much lower nominal torque than holding torque of the stepper motor. When we compare the 3Nm stepper drive and 3Nm servo drive – the price difference may be significant. However, if we compare the 3Nm stepper drive with the 1Nm servo drive, the price distance is not so big. Practice shows that sometimes - mechanically identical machines are sold in two versions, with 3Nm stepper and 1Nm servo drives. The machine with the stepper motor reaches max 7,5m/min feed rate and 0,1g. acceleration. The machine with the servo drive reaches 20m/min feed rate and 0,4g. acceleration. If we add the feedback, which was mentioned before, further comparing is pointless. The choice is in your hands of course, in some solutions the stepper motors are adequate and work very well. Thanks to perfectly precise STEP signal timing of the CSMIO/IP-S controller the stepper motors behave much better then while controlling from e.g. the LPT port. We can use a higher stepper division, so the motors will work quieter, smoother and they get higher revs by reducing the resonance. CS-Lab s.c. –CNC CSMIO/IP-S Controller Page 31 6. Precise homing with use of the servo drive and the encoder INDEX signal Homing with use of so-called encoder INDEX signal is another argument for servo drives. This type of homing is very precise even if the HOME switch has large toleration of the set point. In practice, homing with the INDEX allows to eliminate inaccuracy of the HOME switch. CSMIO/IP-S is STEP/DIR type controller and does not have the encoder input. It does not mean that it is impossible to base on INDEX. Digital inputs are defined as homing (HOME) in the Mach3 program and are operated in the controller in special way, to eliminate all delays and ensure the highest work precision and repeatability. To do the homing on INDEX we need the servo drive with a function of HOME signal and encoder index synchronization. Offered by our company the ARBAHServo and the MioServo-DSP drives have this function. Below – the rule of connection with homing on index. In case, if you would like to choose the servo drive and see if it will be possible to do homing on index, the HOME signal synchronization should look like this: (see next page…) CS-Lab s.c. –CNC CSMIO/IP-S Controller Page 32 •HOME switch off -inactive •HOME output of the drive - inactive 1.Homing start 2. Ride on the HOME sensor •HOME switch off - activ •HOME output of the drive - active •HOME switch off - inactiv 3. Ride off of the •HOME output of the drive - activ HOME sensor HOME (before the index) 4. Ride off of the HOME sensor (at the index moment) •HOME switch off - inactive •HOME output of the drive - inactive ( in this momen the CSMIO/IP-S resets the axis position) As shown on the diagram above, the drive should extend the active state on the HOME output until it step on the encoder index. During the tests with ARBAH drive the achieved homing accuracy at 2000mm/min speed and encoder’s 10000imp/rev - ranged +/-1 imp. of the encoder. That detailed homing is useful in practice, because after power failure or E-Stop pressing or any other incident that causes that we need to re-home, we are sure that there will be no trace in place where the process was continued. Homing algorithm in the CSMIO/IP-S is made in such way, that the base point does not change even after acceleration and/or speed for the axis changed. It gives the possibility to adjust the acceleration parameter during the process (requires a temporary stop, configuration parameters change and rehoming). You should note that at the moment of ride off of the HOME switch, the rotor should be turned about 180o to the index point, because - if the index would be very close to the ride off point then homing dispersion may occure. In case the ride off point and the index are to close, you have to adjust the HOME switch position. Do not regulate on the encoder! CS-Lab s.c. –CNC CSMIO/IP-S Controller Page 33 7. LAN connection and configuration 7.1 Direct connection to the PC CSMIO/IP-S controller can be connected directly to the PC computer without any switches or routers. In this connection, you should remember to use the crossover cable. This cable is attached to the controller. Below – how to perform the wiring. Plug-in 1 Cable color Plug-in 2 1 white-orange 3 2 orange 6 3 white-green 1 4 blue 7 5 white-blue 8 6 green 2 7 white-brown 4 8 brown 5 In the direct connection, you should set on your computer static IP address: 10.1.1.1 and mask: 255.255.255.0. In Windows®XP you perform it like this: • Click right mouse button on the „My Network Places” icon and select the „Properties” position from the menu. You will see the window with the icons/icon of network connections. • Click right mouse button on the icon of the connection we want to use to communicate with CSMIO/IP-S (usually it is a “local connection”) – then choose the „Properties”. CS-Lab s.c. –CNC CSMIO/IP-S Controller Page 34 • In this window – select the „Internet protocol (TCP/IP)” position and click left mouse button on the „Properties”. • In this window enter the IP address: 10.1.1.1 and a mask: • • 255.255.255.0. Click “OK”. Close the window. The network is now set to work with CSMIO/IP-S. CSMIO/IP-S controller after turn on automatically sets the IP address (it sends request to the DHCP sever). After three failed attempts, without response from the server- the default IP address is set: 10.1.1.2. It does not last longer than 10 sec. but you should remember to wait 10 sec. after switching the power on, to let the controller communicate with the device. Remember to use shielded cables. Ethernet connection is highly resistant to interference but shielded cable should be used, especialy if you use serves or spindles with large power. CS-Lab s.c. –CNC CSMIO/IP-S Controller Page 35 7.2 Local network with router and DHCP. If we plug in the CSMIO/IP-S controller to the computer network where is a router that allocates the IP addresses, the device automatically downloads the address and network mask settings. Usually there is no need to know what IP address was assigned to the device because the plug-in and the application that updates the controller software automatically searches the CSMIO/IP-S in the network. However if you want to know what IP address the controller has, you can find out from the router’s configuration page (the controller is called CSMIO-IP-xxxx, where xxxx are the last four figures of the MAC’s hardware address). Here is an example screenshot of the DHCP server where you can see the CSMIO/IP device in the network. If you connect the CSMIO/IP-S controller to the network with router, you should use the noncrossover cable (so called Straight Thru, or 1:1). The way of wiring is shown in the tab. below: Plug-in 1 Cable color Plug-in 2 1 white-orange 1 2 orange 2 3 white-green 3 4 blue 4 5 white-blue 5 6 green 6 7 White-brown 7 8 brown 8 In most cases, the crossover cable attached to the device will also work, because most routers have the cable type auto-detect function, so called AutoMDX. In any case, there will be no damage, even if the router does not have the function mentioned above. Remember to use shielded cables. Ethernet connection is highly resistant to interference but the shielded cable should be used, especialy if you use serves or spindles with large power. CS-Lab s.c. –CNC CSMIO/IP-S Controller Page 36 8. Mach3 program – general information Mach3 software of the ArtSoft® Company has developed over many years and during these years, it gathered many users. For relatively low price (~170USD) we get complete solution for multi-axis CNC machining. Key benefits of the program are: • Flexibility o Ability to create own user interfaces, transparent and suited to specific machine applications. There is a special visual editor where you can create the Mach3 interface design from the beginning or use already existing project. On the internet, there are many ready solutions. Below – one of the most visually attractive interfaces available on www.machmotion.com. Ability to self-extend the functionality of the program through macros, written in simple and known by many people - VisualBasic®. It allows you to implement a variety of measurement probes, automatic tool length measurement, automatic storage of tools in many variants etc. o Plug-ins support, which further extend functions of the program and allows for cooperation with outside motion controllers. Connection with CSMIO/IP-S controller is made by that plug-in, made by our company. Easy to use o Those, who are already little familiar with CNC machines are able to learn all the general functions and rules of using the Mach3 program – within one day. o Configuration of the key parameters is transparent and intuitive, so they can be quickly adjusted to the requirements of a specific machine. Dynamic analysis of the trajectory o CNC program is analyzed in advance, so it allows for optimal adjustment of motion speed at every point of trajectory. Thus, the program is done quickly, but with full smoothness of the motion. o • • CS-Lab s.c. –CNC CSMIO/IP-S Controller Page 37 The CS-Lab company is an authorized distributor of the Mach3 program in Poland. If you would like to buy the license, please contact us: [email protected]. If you order the CSMIO/IP-S controller and you want to order the license right away, please note it in your order and specify person/company, the license should be issued. Please note that the Mach3 program is only to operate the machine - it is not possible to design, draw, etc. Indeed, there are functions that allow for generating the CNC code for simple operations, but it is better to have CAM types program, like e.g. ArtCam, MasterCam etc. CS-Lab s.c. –CNC CSMIO/IP-S Controller Page 38 8.1 Recommended PC configuration The Mach3 program has no unreasonable requirements about the PC computer, unless the tool paths you use take a few or even tens of megabytes – then we rather recommend faster computer. Even simulation of the runtime with so large paths will follow more efficiently on faster PC computer. Minimum configuration Intel Pentium IV 1GHz 512MB RAM Graphics card 64MB Recommended configuration Intel CoreDuo 2GHz 2GB RAM Graphics card 512MB On the computer used to control the machine there shouldn’t be installed any other software, except Windows® and Mach3 program. Designing and all other tasks should be done on other computer. The computer used to control the machine may be connected to computer network, but remember about good anti-virus security. It is recommended to turn off all the visual effects in the Windows® system, also the screensaver. Set the power scheme – “always on” If the computer is placed with the rest of control system in the control cabinet – then remember to close the Windows® system before turning off the power. Otherwise, soon it may be necessary to reinstall the operating system. CS-Lab s.c. –CNC CSMIO/IP-S Controller Page 39 9. Software installation Before we begin the work, we should install on the PC computer the Mach3 software and plugin that ensures proper cooperation of the program and the CSMIO/IP-S controller. 9.1 Mach3 installation The latest version of Mach3 program can be downloaded from the ArtSoft® website: http://www.machsupport.com/downloads.php After the file is downloaded, you should launch it and follow the instructions on the screen. Generally, you should just press the „Next” button. In the window with components to install selection – uncheck the „Parallel Port Driver” position. It is a parallel port driver that is unused with CSMIO/IP-S controller. Next, we can create a configuration profile, which we will use. You can also create the configuration profile later. If we want to do this during the installation, then – click on (select your machine type): • • • Mill profile Turn profile Plasma - milling machine lathe plasma or gas cutter CS-Lab s.c. –CNC CSMIO/IP-S Controller Page 40 After you click on one of the buttons, you will see the window where you can name your configuration profile, e.g. “MyMillingMachine_400x250_CSMIO_IP”. Avoid spaces and special signs (an underscore is allowed). 9.2 Microsoft® .Net installation (older operating systems) If you use OS older than Windows® 7, it may be necessary to install Microsoft® .Net. This program is available on Microsoft® website and on CS-Lab Company website: http://www.cs-lab.eu/artykul-11CSMIOIPS_Download.html For proper installation, you have to be connected with Internet. The installation is automatic, you should only approve next steps and restart your computer when it finishes. 9.3 Installation of the plug-in for Mach3 program The plug-in installation comes down to copying a single file. • • • • Open the directory (or archive) with CSMIO/IP-S software (download is available on CSLab website). Click the right mouse button on the „csmio_ip_p_plugin.dll” file and select from the menu “Copy” position, or select the file and press CTRL+C on the keyboard. Open the „C:\Mach3\PlugIns\” directory Click on the window with right mouse button and select „Paste” or press CTRL+V on your keyboard. The plug-in and the CSMIO/IP-S firmware must be the same version. Update the controller firmware if needed. The update process is described in the addition section - „CSMIO/IP-S software updating”. CS-Lab s.c. –CNC CSMIO/IP-S Controller Page 41 9.4 Administrator rights in Windows® Vista and Windows® 7 It is recommended to launch the Mach3 program in OS Windows® Vista and 7 with an administrator rights. Open the „C:\Mach3” directory, find the Mach3.exe file and click right mouse button. In the menu select the “Properties” position, and next in the window select the „Compatibility” tab. Next, select the „Launch this program as administrator” and click „OK”. From now, the Mach3 program will always run with the administrator rights. CS-Lab s.c. –CNC CSMIO/IP-S Controller Page 42 10. Mach3 program configuration After software installation, you should configure all to match the settings and the controlled machine with all its electrical system. Elements to configuration: • Scale-up of each axis (i.e., how many pulses on the millimeter/inch). • Speed and acceleration settings for each axis. • Assignment of in/out signals: o Signals of homing sensors – HOME o Signals of axis limits – LIMIT o Signal of emergency stop – ESTOP o Signal of tool measurement probe/ homing etc. o Additional inputs signals e.g. desktop buttons etc. o Alarm signals of servo drives – FAULT o Drives reset – DRV_RESET o Switching voltage on the drives – HV_ENABLE o Outputs that controls the activation of the spindle, cooling etc. • Slave axis configuration (if it is used). • VisualBasic® scripts configuration. • Axis range settings for the SoftLimit function (software limits). • Homing speed settings • Customize the program design (possible). Configuration is an individual matter for each machine, anyway in the next sections you find the general rules. 10.1 Creation of configuration profile If during the installation you did not create the configuration profile (Chapter 9), it is worth to create it now. In this profile will all the settings be saved. After Mach3 program installation, on the desktop you should see new icons, also the „Mach3 Loader” icon - launch the program clicking on it. The „Session Profile” window will appear. To create the profile click on the „Create Profile” button. In the next window, enter the profile name e.g. „MyMillingMachineka_400x250_CSMIO_IP. Avoid spaces and special signs (an underscore is allowed). On the „Clone from” list select: • Mach3Mill, if you are creating milling machine profile. • Mach3Turn, if you are creating lathe profile. • Plasma, if you are creating plasma or gas cutter profile. Next click „OK” – profile was created. In the „Session Profile” window click now „Cancel” – we are going to create the shortcut on the desktop, it will launch the Mach3 program with our configuration. Copy the „Mach3 Loader” icon (CTRL+C, and next CTRL+V on the keyboard). Click on this icon with right mouse button and select the “Properties”. On the “General” tab enter any name e.g. “MyMillingMachine”, go to the „Shortcut” tab and in the „Target element” enter: CS-Lab s.c. –CNC CSMIO/IP-S Controller Page 43 C:\Mach3\Mach3.exe /p MojaFrezarka_400x250_CSMIO_IP Be careful to type the special signs „/”and „\” in appropriate places. You can type any other name of course but it must be identical as the created profile name. After all click „OK” and now, you can launch the program using the created shortcut. 10.2 The first run Before starting that test connect the controllers Ethernet cable with the computer or plug it into the computer network. You must turn on the power of the controller at least 10 seconds earlier. After you launch the program for the first time, you will see a window of license approval. You should fill in the check box and agree by clicking the button as shown in the picture. If the plug-in that supports the CSMIO/IP-S controller was installed correctly as described in chapter 9 there should this window appear: Select the motion controller type – „CSMIO_IP/P_CS-Lab_s.c.” and fill in the check box: „Don’t ask me again”, so the Mach3 program in this configuration profile will always use the CSMIO/IP-S controller. Confirm your selection with “OK”. Before you start the configuration of the other parameters, you can verify if the communication with the controller is correct. Click on the „Plugin Control” top menu and select the „CSMIO_IP_P_plugin” position. CS-Lab s.c. –CNC CSMIO/IP-S Controller Page 44 The diagnostic window of the CSMIO/IP-S ler will appear and you will see „Connection status” light. If the light is green it means that the software is installed correctly and the communication between the Mach3 program and CSMIO/IP-S controller is also correct. If during launching the Mach3 program, the „CSMIO/IP-S connection” window will appear, and the „Connection status” light in the diagnostic window flashes red, it means that the CSMIO/IP-S was not found in the network. In that case, check some possible reasons: • The Ethernet cable must be connected to the device before turning on the power. If it was not – quit the Mach3 program and turn the CSMIO/IP-S power off, connect the Ethernet cable, wait 10 seconds and launch the Mach3 program again. • If the CSMIO/IP-S is connected directly to the PC, verify if the network settings are correct – described in chapter 7. Quit the Mach3 program, verify the setting and change if necessary, then launch the program again. • If at least 10 seconds have not passed since turning on the device power until Mach3 launching – then quit the program and launch it again. • You can try to use a different network cable. If these tips did not help and there is still no connection, you should contact your distributor or the CS-Lab company. 10.3 Configuration of axes used in the machine At the beginning, you should activate support of the axis, which you are going to use. Select the „Port and Pins” position from the „Config” menu, and next go to the „Motor Outputs” tab. Select the axes, we are using by clicking on „Enabled” the green ticks will appear next to them. • • Example 1: 3 axis plotter X, Y, Z. o Activate the X, Y, Z-axes. Example 2: 3 axis plotter + rotary A axis, Y-axis on two drives (slave axis). o Activate the X, Y, Z, A axes (the slave axis shouldn’t be activated here). CS-Lab s.c. –CNC CSMIO/IP-S Controller Page 45 10.4 Configuration of the digital input signals Configuration of the input signals is selected in the „Config” menu, the „Ports and Pins” position, by selecting the „Input Signals” tab. The list of the standard input signals will appear and you can assign these signals to the hardware inputs of the CSMIO/IP-S controller. Columns explanation: Name of the column Enabled Port # Pin Number Active Low Emulated HotKey Details • • Green tick means we use the signal. Red X cross means that we do not use the signal and that it should not be used. Input port number – for the CSMIO/IP-S it is port no. 10. Pin number, means the CSMIO/IP-S input number, e.g. input no. 14 of the controller we give here as the pin no. 14. Changing the polarity of the signal, it is a choice – whether the signal should be active at 0V or at 24V. Signal emulation by keyboard shortcut. In the CSMIO/IP-S controller, only some signals may be emulated: „THC On”, „THC Up”, „THC Dn” and „Probe”. Keyboard shortcut for the signal emulation. Detailed description of the signals is available in the documentation on the ArtSoft® website: www.machsupport.com, below we present short description of the most important of them. Signal sign X++, Y++, Z++, A++, B++, C++ X--, Y--, Z--, A--, B--, C-X Home, Y Home, Z Home, A Home, B Home, C Home INPUT1 – INPUT4 Probe Index Limit Ovrd EStop THC On Description Signals of hardware positive limits. The machine stops immediately when one of the signals becomes active. Signals of hardware negative limits. The machine stops immediately when one of the signals becomes active. Signals of axis homing. Input signals for general use. They can be used e.g. in the VisualBasic® scripts. Signals of the measurement probe, e.g. tool length measurement sensor. The spindle index for the rotational/threading speed measurement. Motion forcing, if one of the LIMITS signals is active. It is useful to let to ride off from the limit switch. If we are using the Auto Limit Override function – this signal is useless. The emergency stop. You should pay special attention to set this signal correctly and test its function. For the plasma cutters. During the plasma cutting the machine CS-Lab s.c. –CNC CSMIO/IP-S Controller Page 46 THC Up THC Down OEM Trig 1-15 JOG X++, JOG Y++, JOG Z++, JOG A++ JOG X--, JOG Y--, JOG Z--, JOG A-- stops automatically, when this signal becomes inactive. For the plasma cutters. Signal of automatic torch high control, the active state causes the Z-axis raising. For the plasma cutters. Signal of the automatic torch high control, the active state causes the Z-axis lowering. Using these signals, you can e.g. start the program using a button on the machines desktop. Signals that allows for the movement of each axis in the manual mode (movement in the positive direction). Signals that allows for the movement of each axis in the manual mode (movement in the negative direction). If you are not sure on which input in the CSMIO/IP-S is one of the signals connected, then you can open the diagnostic window from the „Plugin Control/CSMIO_IP_P_plugin” menu, go to the „Digital IO” tab and in the „Digital inputs” area there is a preview of all controller inputs state. Then just e.g. while pressing the SW limit switch look at the screen, and see, which input changed its state. You can also watch the LEDs located on the controller. After the configuration of all input signals it's worth to check, whether it has been done correctly. To do so, close the configuration window, approving with „OK” and then go to the „Diagnostics” screen (top button bar in the Mach3 program window). Under the „Input Signals current State”, there are controls, which show current state of the input signals of the Mach3 program. Now you can press the emergency stop button, the „Emergency” LED should start flashing. The same way you can check other signals, e.g. pressing manually the limit and homing switches etc. Check carefully the E-STOP signal working before you precede further installation. Very important is the possibility to stop the machine immediately, especially during the first run and configuration! In the CSMIO/IP-S controller, there was additionally implemented fault signals support (FAULT) from the servo drives. Details in the „CSMIO/IP-S special functions configuration” chapter. CS-Lab s.c. –CNC CSMIO/IP-S Controller Page 47 Since the CSMIO/IP-S v1.07 software version there is a possibility to give the same input PIN as LIMIT or HOME. You should turn off the „Home Sw. Safety” option in the „General Config” window of the Mach3 program. With the turned off „Home Sw. Safety” option, during the LIMIT signals are not monitored. 10.5 Configuration of digital output signals Digital outputs are used for tasks such as e.g. switching the spindle/torch, switching/releasing the brakes of electromagnetic motors, cooling, solenoids valves switching, etc. Outputs configuration is almost the same as the inputs configuration. Columns explanation: Name of the column Enabled Port # Pin Number Active Low Description • • Green tick means we use the signal. Red X cross means that we do not use the signal and that it should not be used. Input port number – for the CSMIO/IP-S it’s port no. 10. Pin number, means the CSMIO/IP-S output number, e.g. output no. 5 of the controller we give here as the pin no. 5. Changing the polarity of the signal, it is a choice – whether the signal should be active at 0V or at 24V. Detailed description of the signals is available in the documentation on the ArtSoft® website: www.machsupport.com, below we present short description of the most important of them. Signal sign ENABLE1-6 OUTPUT1-20 Current Hi/Low Description Signals of axis switching. They can be used e.g. as signals switching the ServoON in the servo drives. For used axes (section 10.3), the signals pass active state after pressing the RESET on the Mach screen. If Mach goes stop state, the signals are turned off. Universal outputs. They can be used to control the spindle, cooling and level of VisualBasic scripts. Current limit output for stepper motors. If axes of the machine are in standby mode, there is no need to supply the stepper motors with full current. This signal becomes active, when any axis is not moving. Current limit lets to reduce energy consumption and motors heating up – the same lengthening its life. Unfortunately, CS-Lab s.c. –CNC CSMIO/IP-S Controller Page 48 many controllers of the stepper motors do not have correct input to connect this signal. Again, during the system startup the diagnostic window from the “PlugIn Control” menu may be helpful. In the „Digital IO” tab, you can view the current output signals state and assess if any problems result from the wrong configuration or from the incorrect electrical connection. CS-Lab s.c. –CNC CSMIO/IP-S Controller Page 49 10.6 Configuration of spindle and cooling controlling First of all, you must configure the output signals. To do this select from the menu the „Config/Ports and Pins” position and go to the „Spindle setup” tab. In the „Relay control” group set the Mach output signals numbers (those are not the numbers of CSMIO/IP outputs, see previous section about output signals configuration). Here you can choose the OUTPUT1-6 signals. It should be taken into account during electrical diagram designing. Two choices are given: for the right revs (M3) and left revs (M4). We must of course uncheck the „Disable Spindle Relays” box that means no support for the spindle switching. In the „Flood Mist Control” group placed below, we configure in the same way the cooling switching. Here you can also give the OUTPUT1-6 signals. If we want to use the control function of cooling switching, we must uncheck the „Disable Flood/Mist Relays” box. Two cooling modes are possible: fog (M7) and stream (M8). For each mode, we give the correct output signal. You can also give for both modes the same signal, so then it will be switched with both the M7 and M8 command from the G-Code. Additionally in the „Delay” area, you can also set the delay, which is expected after cooling switching, before the working process begun. In addition, important parameters are time delay settings while switching on and off the spindle. In particular, the high-revs spindles need a little time after switching to speed up to the required speed. In the „General Parameters” group, we can define independently the acceleration and deceleration time for the right and left revs. CW Delay Spin UP CCW Delay Spin UP CW Delay Spin DOWN CCW Delay Spin DOWN Acceleration time for right revs Acceleration time for left revs Deceleration time for right revs Deceleration time for left revs The last things we configure in the „Ports and Pins” window are parameters related with controlling of the rotational speed through the digital input of CSMIO/IP-S. In the „ModBus Spindle – use step/dir as well” group we select the „Enabled” area, in the „Reg” box enter the 64 value, and in the „Max ADC count” – 4095. Now you can close the configuration window „Port and Pins”, click „Apply” and „OK.” For correct control of the revs you have to specify what range of the revs our spindle has (taking into account the inverter settings and eventually the ratio). Select the „Config/Spindle Pulleys..” menu position. If we use one ratio then enter „Min” and „Max” revs. Approve it CS-Lab s.c. –CNC CSMIO/IP-S Controller Page 50 with „OK.” Last thing related with revs controlling is the choice of analog output, which will be used. Select from the menu the „Config/Config PlugIns”, and next in the window click the „CONFIG” next to the „CSMIO/IP”. Go to the „Spindle” tab, in the „Spindle DAC” group, select „Enable” and on the „Select Analog Output” list select the analog output. Again, during the startup the diagnostic window may be helpful. In the „Analog IO” tab, you can view the current voltages on the analog inputs and outputs. When we configure the spindle, then in the MDI tab you can enter e.g. M3 (enter), S2000 (enter). It should cause the spindle switching on (right revs) and the revs setting: 2000 rpm. In the diagnostic window, you can see switched digital outputs and the voltage on analog output. Check carefully the inverter settings before switching the spindle, incorrect configuration may cause permanent damage of the spindle, which the warranty does not cover. Pay attention if the left/right revs are switched correctly – starting the work with incorrect revs directory may cause tool damage. CS-Lab s.c. –CNC CSMIO/IP-S Controller Page 51 10.7 Configuration of the resolution, speed and acceleration of the axes Before starting the work, it is necessary to set correctly the resolution (called scaling) of the axis and to set their max. speed and accelerations -in the Mach3 program - „Config/Motor Tuning” menu. In the window, first select the axis you want to configure, next enter the parameters and click on „SAVE AXIS SETTINGS”. Now you can select and set the next axis. If we forget to click on „SAVE AXIS SETTINGS” all entered changes will not be saved. For the correct axis scaling you must know how many steps falls on a unit (millimeter, inch or degree). To understand how to calculate it, look at the example below: • The line axis is powered by the servomotor with 10000 rpm encoder. • The servo drive is configured without the multiplier and electronic gear, so the 10000 STEP pulses cause a 1 rev of the motor. • To transfer the drive there was used a ball screw - pitch 10mm. • No ratio between the motor and the screw. Per motor rev there is 10000 pulses and feed rate - 10mm. Dividing this value 10000p/10mm we get the 1000p/mm value, which we enter into the „Steps Per” box in the configuration window. In the „Velocity”, we set the axis speed. If we are using the millimeters as an unit then the speed is shown in mm/min, if we use degrees - degree/min, if inch - inch/min. The max. speed value is very individual it depends what motors, drives etc. were used. For the first tests, we recommend entering relatively small value e.g. 2000mm/min, in case something went wrong, we would always have enough time to press the emergency stop E-STOP. In the „Acceleration” area, we define the acceleration for the axis. At the beginning, we recommend to enter something about 500mm/s2. Later you can set this parameter experimentally by assessing the machine working. Remember that after finished edition for each axis you should click on „SAVE AXIS SETTINGS”. Do the configuration in the following order: Open the „Motor Tuning” window Select the axis („Axis Selection”) Enter the parameters”SAVE AXIS SETTINGS”Select the next axisetc. Click „OK” and close the window. „Step pulse” and „dir pulse” areas do not matter for CSMIO/IP-S. They are used to control via the LPT port and they define the width and the STEP/DIR pulse time. The CSMIO/IP-S controller provides the signal with the 50% fulfillment and STEP to DIR delay (10 us), which is the most optimal variant. CS-Lab s.c. –CNC CSMIO/IP-S Controller Page 52 Due to connecting the STEP/DIR signals to the drive (both servo and stepper drives) pay attention which STEP's edge is active. The active edge in the drive is the falling edge – namely STEP signal change: logic “1” (5V) to logic “0” (0V). While connecting the controller– e.g. for the M542 stepper motor you should connect the PUL+ signal to the 5V power and CSMIO/IP-S STEP output to the PULof the drive. This way – switching on the optocoupler in the M542 will be followed by the falling edge of the CSMIO/IP-S STEP signal. If the connection is incorrect, 1 step will be lost during every direction change. After a long work, it may accumulate large position error. 10.8 Configuration of motion directions, homing and software limits. When the axes are scaled and set, it is important to set correct directions. Useful function is possibility to indicate the software limits - the machine working range. Select from the menu the „Config/Homing/Limits” position. In the window, we have the configuration parameters for each axis: Column name Reversed Soft Max Soft Min Slow Zone Home Off. Home Neg Auto Zero Speed % Description Switching on or off this box, you cause direction change of axis motion. Maximum range of motion in positive direction Maximum range of motion in negative direction In the CSMIO/IP-S, this box is unused. In the LPT, it is used to define the section for braking near to the end of working range. CSMIO/IP-S controller automatically calculates the braking distance including defined for the axis acceleration. Best way is to enter 0 in this box. Starting software v1.07 version –if the switch is placed at any other position than at the extreme end the distance can be entered in the Home Off . This tells Mach3 to set the Machine Coordinate for the axis to this value instead of zero. Normally the homed axis is in negative direction. Z-axis however is usually homed to the top, and move-down is usually motion in negative direction. Therefore, you have to home the Z-axis in positive direction. Home Neg is to choose homing direction. This area is not used on the CSMIO/IP-S controller. After homing – the axis is always zero. Homing speed. It is shown as percent of maximum speed defined in the„Motor Tuning”. For the first tests we recommend 10%. Attention! – you can switch the software limits on and off. If they are switched off, the program cannot control the working area overrun. The only securities are the hardware LIMIT switches. CS-Lab s.c. –CNC CSMIO/IP-S Controller Page 53 If the software limits option is set („Soft Limit” on the Mach main screen), the CSMIO/IP-S controller does not let for any move if axes of the machine are not homed. The current status of the function is shown with the green light around the „Soft Limit” button. 10.9 Additional configuration functions in the plug-in window The configuration window of the plug-in is switched by the „Config/Config Plugins” menu position, click the „CONFIG” next to the CSMIO/IP. Below you find the description of the options in each tab. 10.9.1 The Servo drive fault signals tab – servo drives fault signals The CSMIO/IP-S controller has a possibility of autonomous reaction to the fault signals from the servo drives. The drive may generate a fault e.g. in case of overload or when the position error exceeds the allowable tolerance. For any axis we can select if that signal should be supported – „Enabled” area. The „Negated” specifies that the signal is active in the low status. The „Input Pin” specifies the input number on the CSMIO/IP-S controller. If the fault signal will appear the CSMIO/IP-S stops all axis within 0,0005s. It’s worth to configure in the servo drives the dynamic brake function, which will reduce the distance that the axis move with the power if inertia. CS-Lab s.c. –CNC CSMIO/IP-S Controller Page 54 10.9.2 Override sources tab, selection of the source of the feed correction speed and spindle revs The Mach3 program allows you to change the feed rate and rotational speed of the spindle during the work. Normally it is made by two sliders on the main screen. If the machine is equipped in additional desktop with the buttons etc., using the CSMIO/IP-S controller you can control the feed rate and spindle rotations by the potentiometers connected to the analog inputs. In the „Override sources” tab of the plug-in you can configure – if the speed control should be done by the Mach screen or by the analog inputs. If so, which one? „Feed rate override” refers to the feed rate, and the „Spindle speed override” refers to the spindle revs. An available options: • Mach/Other – controlling from the Mach window • AIN0-3 number of analog input in the CSMIO/IP 10.9.3 The Spindle tab, selection of the analog output that controls the spindle revs In the tab, you should define the analog output number for the spindle revs controlling and whether this output should be used (see the 10.6 section about the spindle configuration). CS-Lab s.c. –CNC CSMIO/IP-S Controller Page 55 10.9.4 Special functions tab, configuration of the special outputs HVEnable and ServoReset. In some systems, the high voltage on some components is turned off in case of E-STOP pressing or when error occurs such as e.g. LIMIT or FAULT from the servo drive. It is usually made by the contactor. To control this contactor you can use one of the output signals „ENABLE1-6” in the Mach. The disadvantage in this solution is some time delay. If this output is going to be controlled autonomously and immediately – you can define any CSMIO/IP-S digital output as the HVEnable. Another issue is the RESET signal for the servo drives. If e.g. as a result of overload or collision any of the drives will turn off, the machine will stop (if the FAULT signals were configured correctly). Mach3 program does not support the RESET signal of the servo drives. For this purpose in the CSMIO/IP-S you can define the digital output as a „Servo drive RESET”. After pressing RESET in the Mach, the signal is activated for about 1 second and then goes inactive. Both solutions are configured the same way: • Enabled – switching the function on/off. • Negated – selecting it causes that the active state on the output will be „0”. • Output Pin – CSMIO/IP output number The „GMove smoother” option will be used in future versions of the CSMIO/IP software and will cause the speed profile smoothing to the delicate “S” shape, which will cause in even better smoothness of the move. CS-Lab s.c. –CNC CSMIO/IP-S Controller Page 56 10.9.5 HW Slave Axis – autonomous support settings. In the large machines are often used two motors to support a single axis – one on each side. Although in the Mach3 program - „Config” menu – is a position to configure the slave axes – the autonomous support for the function was used, to increase the reliability level. The slave axis settings are kept in the controller flash memory, what prevents from data losing in case of e.g. your PC hard disk failure. Some users make the slave axis by linking the STEP/Dir signals of two drives and connecting them to one channel of the controller or they use the slave axis function, which is available in some servodrives. The slave axis making through the CSMIO/IP-S has a significant advantage – available function of machine geometry correction. It is more specifically described in the addition „Slave axis configuration example”. In brief – for each X, Y, Z-axis you can define one slave axis. The slave axes can be A, B and C. The following parameters are available: • Slaved Axis – selection of the axis which will be slaved to X, Y or Z (depending on where we are making the settings) • Mode – slave axis work status o „No correction” – mode without machine geometry correction – the axes all the time works as connected o „Read index diff.” – this mode is used to preliminary specify the difference of homing posit ion for master and slave axes. It is very helpful and it is good to turn it on o do the homing before we set the correction mode. o „Slave correction” – mode with geometry correction. In this mode, during homing, the axes for a moment work independently. • Slave correction – in this area enter the difference of homing position between slave and master axes. If you want to use the slave axis function – read the addition „Slave axis configuration example”. CS-Lab Company made every effort to ensure the reliability of the CSMIO / IP-S controller. However, the company does not take any responsibility for any mechanics damage as a result of wrong configuration and any eventual failure or software errors of CSMIO PLC / IP-S controller. We strongly discourage making the slave axis on the stepper motors. The stepper motors don’t have the feedback and it’s easy to damage the machine mechanics, e.g. when one of the motors seizured and the other was still working. CS-Lab s.c. –CNC CSMIO/IP-S Controller Page 57 10.10 Selection of inch/mm units Selection of the units by which the axes in „Motor Tuning” are scaled is set in the „Config/Select Native Units” menu position. Select the unit in the window and close „OK”. 10.11 Parameters in the window General Config. In the „Config/General Config” menu, you find basic configuration parameters of Mach3. Many of them don’t need any modifications, but some of them it’s worth to change. In the picture below, you can see the table with the most important (in our opinion) parameters and a short description of each one. Parameter/group name Tool Change Angular Properties Pgm end or M30 or Rewind Motion Mode IJ Mode Active Plane of Movement Jog increments In cycle mode Home Sw. Safety Details Configuration of the automatic tool changer. An important issue: even if we do not have an automatic tool changer but we use the tool measurement sensor - the Auto Tool Changer should be selected. Otherwise, the Mach3 program will not take into account the tool length. Checking the box, we select, if A, B, or C axis works as angular. Unchecked box means that the axis works as linear. It means behavior at the end of the program, M30 or REWIND command. Motion mode selection: Constant Velocity or Exact Stop. The Exact Stop mode may be more precise in some cases but much more slower. Constant Velocity ode is used in 99% of cases. Data format for circular interpolation. After loading the trajectory, generated with CAM program, if there are problems with circular interpolation (large circles in the 3D preview), you can try to switch to the „Absolute” and then G-Code again. The default plane for circular interpolation G2/G3. Usually X-Y. The default step size. Homing mode. When this mode is turned off the homing process is less restrictive. It allows for e.g. homing start when the axis is on HOME switch off. While homing CS-Lab s.c. –CNC CSMIO/IP-S Controller Page 58 Look Ahead Run Macro Pump Home slave master axis with G04 Dwell in ms Use watchdogs CV Control Rotational Enhanced pulsing Screen control also LIMIT signals aren’t taken into account. With this option selected safe homing is made, LIMITs are all the time taken into account. Mach3 makes dynamic trajectory analysis in advance, to adjust motion speed in every trajectory place. In the „Look Ahead” area, you can enter number of G-Code lines, which should be analyzed in advance. Usually 500 value is enough for the motion smoothness even while making dynamic and fast programs. When this option is selected in the catalogue with VisualBasic scripts you can create a file macropump.m1s, it contains macro, which will be called out cyclically several times per second. The intention of Mach’s creators is an option, which switch on/off slave axis and master axis homing. In the CSMIO/IP-S controller, the slave axis is always homed with master axis. With this option selected the delay for G04 is count in milliseconds. It is useful when you need precise delay e.g. in plasma cutters. Do not use – this function should theoretically „watch” various modules of the program and in case switch the emergency STOP. In practice, it doesn’t work properly and may cause problems. In the CSMIO/IP-S software, there are special algorithms, which autonomously monitor the communication and whole controlling system work. Parameters for the mode of working with constant speed – Constant Velocity. It is rather for advanced users. In case of any doubts, it is better to uncheck all boxes in that group. Parameters in this group relate to the angular axes (rotary). „Rot 360 rollover” decides if there should be rollover after crossing 360 degrees. „Rotational soft limit” parameter decides if for the rotary axes should be soft limit switches taken into account. This parameter improves generation of STEP signal in the LPT controlling. Does not matter with CSMIO/IP-S. Selection in this group of parameters „Hi-Res screens” and „Auto screen enlarge” causes enlarging of the Mach screen to fit its size to the screen resolution. CS-Lab s.c. –CNC CSMIO/IP-S Controller Page 59 11. First tests 11.1 Checking the input signals Before starting the tests in motion, you should first check the main input signals, such as: • Homing sensors – HOME • Limit switches – LIMIT • Emergency stop – ESTOP After running Mach3, go to „Diagnostics” tab. In the „Input signals current state” the input signals controls are shown. During the test, any of the machine’s axes should not be on the limit switch or homing sensor. You should manually, sequentially switch on the HOME sensors and verify if correct controls light up. At the input signals controls the axes are marked as M1, M2, M3, M4, M5, M6 what corresponds in order to X, Y, Z, A, B, C. After HOME switches checking you should verify LIMIT switches. Again - manually switch on the LIMITs on each axis and check on the screen, if correct controls light up. If the control/s lights up constantly and after switching the LIMIT is off, it means wrong polarization – you must change the configuration in the „Ports and pins” window (see previous sections). If on all axes the HOME and LIMIT sensors works fine, it is time to check again the emergency stop signal (Emergency). After switching the EStop – the control should flash red light. When you release it - it should light off. If everything works correctly, then press RESET on the screen and go to the next section. If there is no response for the signals, you should check if program communicates correctly with the CSMIO/IP-S controller. In the diagnostics window (from the „PlugIn Control/CSMIO_IP_P_Plugin” menu) you can check the connection status. If the control lights are red you can try to quit and run Mach3 again. If it doesn't help see again the sections about configuration and installation. CS-Lab s.c. –CNC CSMIO/IP-S Controller Page 60 11.2 Verification of axes scaling and motion directions First control of the motion should be made at low speed. After pressing Tab key on the keyboard – the manual feed rate panel should open. In the „Slow Jog Rate” enter e.g. 10%. It means that the motion will have 10% of the maximum speed, defined in the Motor Tuning. For these test the SoftLimit should be switched off. Find the button on the Mach3 main screen – if there is a green light around it then click this button to switch it off. If necessary press RESET on the main screen, the Mach3 program will be in standby mode. A green light should be around the button . You can control the XY-axes by arrow keys on the keyboard, Z-axis by „Page Down” and „Page Up”. You can also use the buttons from the manual feed rate window. You should check each axis if: • Motion direction is changing. If not, it may mean that connection of DIR Signal to the driver – is wrong. • Directions aren’t reversed. If so, you should change the axis direction in the „Config/Homing/Limits” menu. When all axes have correctly configured directions – you can specify homing directions. For 3axis machine XYZ - most common configuration is homing of the XY-axes in the negative direction and Z- axis in the positive direction. In the „Config/Home/Limits” for Z axis there should be selected the „Home Neg”. Before further tests, you should check scaling of the axes. Best is to use dial gauge or other precise measurement tool. In the manual feed rate panel set the Jog Mode and step size - 1mm. „Slow Jog Rate” does not apply to motion in the positional mode (step motion) so the speed is set on the main screen in the „Feedrate” area. For this test, you should enter low value e.g. 100mm/min. Now, after pressing e.g. right arrow on the keyboard the X-axis goes 1mm right. You should go this way at least 10mm (each axis), verifying with dial gauge the distance actually made by axis. The dial gauge should be reset after 1mm. If you see clear difference between the positions (requested and actual), it means that that the parameter „Steps Per” in the Motor Tuning window is incorrectly set. You should go back to the sections about configuration and verify your settings. Always approve your settings on the Mach screen by pressing ENTER. Otherwise your changes will not be saved. CS-Lab s.c. –CNC CSMIO/IP-S Controller Page 61 11.3 HOMING and software limit switches test 11.3.1 First homing When the axes are scaled correctly and the motion directions are correct – it’s time to make first machine’s homing. During normal work most comfortable is to use the button of all axes homing („Ref All Home” on the main screen). While the tests it’s better to home the axes individual from the Mach’s Diagnostic screen. On the Diagnostic screen of Mach3 you will see group of buttons for each axis homing. Before you press one be prepared for emergency stop by EStop pressing or on the Mach screen. Every time you press Ref... verify homing of each axis. After correct homing – the light control next to the button should light green. If the motion while homing is wrong you can change the configuration in „Config/Homing/Limits”. If axis homing is correct you can experiment with increasing homing speed in the „Config/Homing/Limits”. 11.3.2 SoftLimit switches. Now you can turn on and check the software limit switches. Click on the „Jog Mode” in the manual feed rate panel and set „Cont.”. „Slow Jog Rate” set on e.g. 40%. It’s worth to turn on the machine directions view by pressing on the Mach’s main screen. Then, in the manual mode go e.g. with X-axis-5mm before hardware switch limit and write down from the screen - the X coordinate. Repeat this action for all axes. Open the „Config/Homing/Limits” window and enter correct values into SoftMax and SoftMin. For X and Y axes it is usually SoftMin=0. Close „Homing/Limits”, press and do the homing again. Click on , to see the green light around. You can try and go each axis to the coordinates specified in the SoftMax/SoftMin. The machine should smoothly brake and shouldn’t cross any border of the working area. After successful test you can turn the coordinates off by pressing . After parameters change – the controller goes automatically into the emergency stop mode, it is correct. After configuration change, you should press „Ref All Home” on the Mach’s main screen. and make all axes homing by pressing CS-Lab s.c. –CNC CSMIO/IP-S Controller Page 62 11.4 Test of spindle and cooling. At this stage, almost all major elements of the system were set and the tool machine is almost ready to work. One important issue left – spindle test. Mach should be in the active mode. The quickest way to test the spindle is MDI mode. In the top bar press MDI. This mode lets you to manual enter G-Code commands: • Enter S command, type requested spindle revs e.g. „S2000” – that is 2000 rpm speed. Approve with <enter>. • Enter M3 command (right revs) and approve with <enter>. The spindle should start turning right with requested speed. • Enter M5 command (stopping) and approve with <enter>. The spindle should stop. • Enter M4 command (left revs) and approve with <enter>. The spindle should start turning left with requested speed. • Stop with M5 command. • Turn on cooling with M7, turn off - M30. • Turn on cooling M8, turn off - M30. It is good to check various values of the revs. If you don’t use the inverter braking resistor it may turn out that, while braking at high revs speed – the inverter will report an error. Then you will have to get a resistor or lengthen braking time. In case of any problems, check again configuration settings and eventually the inverter settings. Almost always the inverters have various control modes. Without proper configuration, the inverter will not respond for outside signals. Before switching on the spindle make sure if there is no loose collet. While braking at high revs speed the tightening nut may unscrew and rotating collet may cause injury risk. CS-Lab s.c. –CNC CSMIO/IP-S Controller Page 63 12. Sample processing step by step To look closer for the rules of using the machine equipped with the CSMIO/IP-S control system – here is an example of a simple work. An example includes the area planning and milling the logo in the 30.6x30.6x48mm size cube made of hard aluminum alloy. Project and G-Code file generating will be made with popular program ArtCam®. Logo file has AI format which works very well in the data transmission between different programs. Assumptions: • Planned area will be on 0,2mm depth cylindrical cutter with an 8mm diameter. • To set the base will be used a roller made of carbide with 6mm diameter, filed on half of diameter. • The logo will be milled by engraving cutter 20 degree/0.6mm – on 0,3mm depth. 12.1 Preparation of project and G-Code files. We create a new project in the ArtCam program. Enter the dimension of the cube. In this example, the resolution is not very important so you can set it low. Select the Import Vector Data command in the Art Cam program and in the window that pops up – option that will set our logo in the middle of defined area. Next, we draw an object, which we use to planning the area. It would be good if the object were larger than our cube, so that the cylindrical cutter will go during the work with its whole diameter out of the material. First, selecting an icon from the Vector tab, draw a rectangle with the same size like our cube. In the Width and Height boxes type 48 and 30.6 size. Next click „Create” and „Close”. Now you must set the object position. Press the right mouse button on it and select „Transform Vectors”. Select the lower left corner of the object and enter the 0,0 position. Then press „Apply” and „Close”. CS-Lab s.c. –CNC CSMIO/IP-S Controller Page 64 The newly created object coincides exactly on the position and size with the working area. Now you should add the mentioned additional enlargement, so that the milling cutter will go with its whole diameter out of the material – thus we get a better surface. We click on our object and select the „Vectors/Offset” menu position. The milling cutter diameter is 8mm - we should give it a little supply by entering as an Offset Distance the 8.5mm value. We are giving the Offset Direction as Outwards – that is on the outside. Offset corners – irrelevant here. Select - Delete original vectors, because we do not need to save the original object. At this stage, our project looks like this: You can now generate the trajectories for the tools. First, the tool path for planning the surface. Select the object we create and select the Area Clearance icon from the Toolpath tab. In the Finish Depth box, enter the treatment depth, 0.2mm this case. In toleration area, enter 0,01mm. As practice shows, it is not worth to overdo with the toleration value. Of course, if you have a high-class mechanics, granite construction, all is thermally stabilized, and you execute precise jobs – you can set the toleration more detailed. The Safe Z parameter you can set at 5mm, Home Position at [0, 0, 10]. You can also select the „Add Ramping Moves” on default parameters, the result is smoother entry into the material. CS-Lab s.c. –CNC CSMIO/IP-S Controller Page 65 You should inform the program what kind of tool you use. Below the Tool List click the Add button. In the tool-base window, click the Add Tool, to add a new tool. Enter the parameters as the picture shows. Some parameters like description or diameter are obvious. Step-down is a maximum depth the tool gets. Stepover is a working density. The bigger the density, the generally better surface, but here it is also not worth to overdo because you can only unnecessarily make the treatment lasted longer. Feed Rate is a feed on XY surface, and the Plunge Rate means speed with which the tool will get into the material. Tool Type is a tool shape type. Here the drawing, displayed after shape type selecting, is helpful. In the end press „OK”, choose our tool from the list and click Select. In the Tool List box, in the Area Clearance configuration panel there should our tool appear, now only press Calculate: Now in the bottom of the panel, in the preview of the working area there should the calculated tool trajectory appear. We can switch to a 3D view to look closer. It should look something like this: Now we record the trajectory, go to the Toolpaths tab and click the In the record window select so-called postprocessor, thus define the output data format suitable for our control system. In the ArtCam we recommend the „G-Code Arcs (mm) (*.tap)”. It’s basic G-Code format suitable for Mach3 program. When you select the format pres „Save” and save our trajectory as e.g. „planning.tap”. icon. CS-Lab s.c. –CNC CSMIO/IP-S Controller Page 66 Next, generate the tool trajectory for the logo. Go back to 2D preview, and in the Toolpaths tab panel, next to the last generated path – uncheck the Show In 2D|3D. Previous trajectory disappears so it will not disrupt our view. Now select our logo and again click the Area Clearance icon. We enter the parameters almost the same like before, only the depth is 0.3mm and also uncheck the „Add Ramping Moves” – won’t be needed in this case, we must also define other tool. We proceed like before. Press the Add - below the tool list - and Add Tool in the tool base window. The parameters in this case look like this. You should note that, in the ArtCam program the handle size is its diameter, and the dimension of the tip of the tool (F) is its radius. Speed values in here are quite low but it’s only example, and not “high performance ride”, which makes sense only when we do the production orders for a larger number of units. With so simple, single works it takes more time to prepare the project, place the material and set the machine than the treatment. When our tool is entered, you can click Calculate: Now and record the path by clicking on the icon. Postprocessor should stay the same. Name it e.g. „graw_logo.tap”. 3D preview should look like this: CS-Lab s.c. –CNC CSMIO/IP-S Controller Page 67 12.2 Preparation of the machine and the Mach program When files are ready, you only need to place and base the material. First launch the Mach3 program and make the reference ride of all axes pressing „Ref All Home” button on the main screen. Place the material securely, to avoid the risk of its shifting or breaking during the process. As it was mentioned at the beginning – to set the material base we are going to use the carbide roller, filed precisely on half of diameter. If we use the tool length measurement, then enter the tool number “1” in the „Tool” box in the Mach program and start the measurement by pressing the „Auto Tool Zero” button. In the manual feed rate panel set the continuous ride mode and 25% speed. Right away, you can type the stepper work feeds in the Feed rate box, we will use it in a moment -1000 mm/min. Now use the arrow keys or keys on the machines desktop, reach the left edge of the material. Zaxis is below the material level. Next, change the feed mode for stepper mode and set the step on 0.1mm. Working with 0.1mm step we get close to the material and then switch on 0.025mm step – enter that value in the text box and press <enter>. Make the half of the filed roller to contact with the side surface of the material. If we will try to move the spindle with a finger to any side – we will be able to do that only to a small extent. The roller edges won’t let us more. Go by 0.025mm step until you won’t be able to move the spindle at all – it means that the material surfaces and the filed roller clung to each other. CS-Lab s.c. –CNC CSMIO/IP-S Controller Page 68 At this point, we can set the material base in the X-axis by clicking „Zero X” button on the Mach screen. Coordinate X on the screen will be reset. Switch the feed rate mode on continuous one, „Slow Jog Rate” speed – e.g. 2% because we are very close to the material and the same way we set the Y base on the lower edge of the cube. This way of homing seems to be a little troublesome but with a little practice this can be done very quickly, besides it’s quite precise. Work is underway on the extension module for CSMIO/IP-S to connect the laser sensor, which in addition to scanning the 3D surface will enable very fast and precise material homing in the three axes. CSMIO-SCAN module will be available in the second half of 2011. When the position is set on the lower edge of the material then click „Zero Y”, to reset the Y coordinate at this point. If we do not use the automatic tool length measurement, setting the base at this point makes no sense. You should set it if we place the right tool. However, we assume that such a sensor is installed in the machine. In the Z-axis, we set the base much like XY, raising the axis a little higher above the material level, next on the stepper mode lowering it until the lower roller surface touches the material. Now click the „Zero Z” to reset the Z coordinate at this point. The material base is already set so you can place the correct milling cutter – to plan the surface measure it and to load the trajectory file. After we placed the tool, we measure it clicking the „Auto Tool Zero” button. CS-Lab s.c. –CNC CSMIO/IP-S Controller Page 69 12.3 We begin the work In Mach program, we select „File/Load G-Code” menu position or click the „Load G-Code” button on the main screen. Select a created earlier file: „planing.tap”. When the file is loaded, we can initially set the machine over the material and enter on the MDI screen. • G0G53 Z0 <enter> • G0 X0 Y0 <enter> The firs command causes the Z axis rises maximum high, the second one is to set the machines tool XY axes in the earlier defined zero point of the material. Go to the main screen again and click the „Cycle Start” button – starting the work. Below photo taken during the work: You can change the tool for an engraving cutter and load the previously generated a second trajectory. Before processing, there is one important detail. While planning the surface we lowered its level, the engraving logo would be 0.1mm depth, and not 0.3mm like the one we had assumed. “This can be easily remedied by reducing the zero point level about 0.2mm (planned depth). Click on the text box that displays the current Z position and type on your keyboard "0.2 <enter>. CS-Lab s.c. –CNC CSMIO/IP-S Controller Page 70 After this operation, we can start the work from the second file not forgetting about the measurement after tool change („Auto Tool Zero” button). When the file is loaded, and the tool is measured we can set the axes again over the material with the MDI like before. Press „Cycle Start” and start the process. Photos below show the workpiece during the process, after work and after removal from the machine – after gentle sanding with emery paper. CS-Lab s.c. –CNC CSMIO/IP-S Controller Page 71 13. A few practical notes about the Mach3 program and CSMIO/ IP-S Here are a few tips that can help people unfamiliar with the Mach3 program. 1. Computer keyboard. a. Do not use a wireless keyboard, sometimes this keyboard record keystroke, but does not notice releasing it, which can be very dangerous while controlling the machine. b. Also – the USB keyboard can behave in unpredictable ways. The USB port is not resistant to interference therefore, especially on machines with servo drives and higher power spindles. We definitely not recommend a USB keyboard. c. The surest solution is the PS2 keyboard or to connect the industrial buttons to the CSMIO / IP-S digital inputs and define it correctly in the Mach3 program. 2. Remember that writing down the value in any text boxes on the Mach screen - always confirm it by pressing ENTER. 3. If you are doing CNC programs at high speeds and sometimes the movement loses its smoothness, check the „LookAhead” parameter in the "Config / General config". It is responsible for forward analyzed sections of the trajectory. Set this parameter to 500. 4. 3D trajectory preview on the Mach screen can significantly burden the computer when the files are large. While the machine runs, do not do operations such as zooming, rotation, etc. For very large files, we recommend to turn of the 3D preview - Diagnostics screen, click "Toolpath on / off." 5. If the machine has entered the hardware LIMIT switch, you can leave it by switching on the Settings screen "OveRride Limits" button. It is also convenience to switch "Auto LimitOverRide" - this will cause that while the raid on SW limit switch the machine will stop, but you can click RESET and leave the limit switches without any additional operations. 6. Manual control (JOG). a. Do not forget that pressing TAB key causes that additional side panel appears, where you can set speed, continuous or step mode – it makes that controlling the axes and setting material base precise easier. b. By pressing the combination of feed rate key (i.e. right arrow) and the SHIFT key, the movement is on continuous mode with 100% speed - regardless of the current settings. c. By pressing the combination of the feed rate key and CTRL key – the movement is always on step mode with the speed set in the FEEDRATE area. 7. Mach3 always starts with chosen tool „0”, if you use the tools changer and some tool left in the handle while turning of, after Mach restart, you must enter this tool number (of Tool Information group on the main screen, the "Tool"). CS-Lab s.c. –CNC CSMIO/IP-S Controller Page 72 a. If you do not use the tool changer but you have the automatic tool-length measurement sensor, after starting Mach program always enter “1” in the pole “Tool”. 8. STOP button on the Mach3 screen stops the machine instantly. With the stepper motors it may cause motor will fall out from the position, with the servodrives the motors controllers may report an overload error or overstaying error and you will need to re-base the machine. Recommended way to stop the work is pressing pause first („Feed Hold”), and after it stopped – STOP key. 9. To restart the CNC program from a specified location - set in the G-code window, the desired position (line), then press "Run From Here" and then "Cycle Start". 10. It is worth to know the basic commands of G-Code. In many situations, a very useful tool becomes the MDI Mach screen, where you can manually type the commands that are executed immediately. 11. If you have a tool magazine and/or automatic tool-length measurement sensor, remember that any manipulation/repositioning / disassembly-HOME based switches can cause machines absolute zero position shift and then recalibration of the magazine position and the correction sensor is necessary. 12. If you set the zero point (material base) and you use the automatic tool measurement – always make the tool measurement first, and then set the zero point. Setting the zero point with the unmeasured tool causes that the level of processing shifts when we secure another tool and elicit the measurement. 13. PC computer you use to control the machine should be treated like an integral part of the control system and should not be use to any other tasks. It means that, this computer should have only the operation system, Mach3 program and nothing else (eventually text editor and file manager such as TotalCommander). For any other tasks such as designing, you should use other computer. 14. On the controlling computer turn of all visual effects of your desktop, screen saver, and turn the power profile on “always on”. CS-Lab s.c. –CNC CSMIO/IP-S Controller Page 73 14. VisualBasic® macros On the website: www.cs-lab.eu you can download standard scripts for handling automatic measurement of tool-length and for automatic tool replacement. These are usually the most desirable functions and make the work easier. For advanced users we invite to learn more about macros, which provide great opportunities for self-expanding functionality of Mach3 program. 14.1 Automatic tool-length measurement Automatic tool-length measurement is one of most implemented function, e.g. because mechanically it is very easy to do. If high measurement accuracy is required, the sensor must be a good quality. In the CSMIO/IP-S controller – specialy for G31 command (used while the measurement) – completely autonomous movement operation and ultra-fast logic were implemented to assure the measurement precision at the highest level. The measurement is made through the following stages: • Raising the Z axis at the maximum high (absolute zero) • Driving in the fast mode (G0) at the XY sensor position. • Quick exit (G0) by Z-axis to the so-called. safe Z • Driving down the measurement mode (G31) at "1" speed until receiving the signal from the sensor. • Raising the Z-axis by a small value (preparing to more accurate measurement). • Driving down the measurement mode (G31) at "2"speed, until receiving a signal from the sensor. • After finished measurement – raising the Z-axis maximally. 14.1.1 Configuration Before starting the script configuration, you should follow these steps: 1. Check the sensor and inputs signals working – go to Diagnostics area and while pushing the hand sensor observe the control light on the screen. The control light should light up in the moment of pushing the sensor and off after releasing it. In case of any problems go to 10.4 chapter (inputs signals). The sensor signal in the configuration window is called “Probe”. 2. Make a reference move of all axes. 3. On the main screen switch the coordinates display mode for machine display (absolute) – icon . CS-Lab s.c. –CNC CSMIO/IP-S Controller Page 74 4. Secure the tool in the spindle holder (for the firsts test – the cheapest is the best). 5. On the manual feed mode move to the center of the sensor’s measuring surface. Note the XY coordinates. 6. On the stepper mode slowly lower the Z axis until the signal from the sensor appears and note the Z coordinate. 7. Go with Z-axis up to a level you consider safe. A small explanation here - as written above, while measurement there is rapid slide down to some level by G0 command first. You have to assess to what Z-axis level it can slide down quickly. It depends on the maximum length of the tools that will be measured. You can also enter "0" as the safe Z and then the measurement starts from the top position. 8. Move the XY axes to set them somewhere above the working table. 9. Using the stepper mode, slowly slide the tool down to the working table surface and note the Z coordinate. 10. Turn off the absolute coordinates mode by clicking icon. When you have noted all necessary data, open the downloaded file toollenght.m1s in any text editor (e.g. notepad). Then select all using mouse or by pressing "CTRL + A" and copy to clipboard "CTRL + C". In the Mach standard graphical interface, on the main screen there is an "Auto Tool Zero" button. This button is default defined as eliciting a macro, so there is no need to add a new button in the graphical editor. To hook the mentioned above button into our macro, select in the menu: "The operator / Edit Button Script". The "Auto Tool Zero" button and several others should start to blink. Click on it and open a Mach3 text editor. Sometimes there is a single text line, if so - you must delete it, and then press CTRL + V to paste our macro. Now just enter a few parameters based on the coordinates, which we noted earlier. All configuration data can be found under the "Configuration parameters" line. CS-Lab s.c. –CNC CSMIO/IP-S Controller Page 75 Parameter SENS_Z Details SENS_X/SENS_Y MAX_DTRAVEL [Z coordinate of sensor response] – [Z coordinate of table level]. If you e.g. reaching the table Z=-122.070mm, and sensor gave an active signal at Z=-110.656mm – the entered value should be 11.414. It’s parameter describing what height the Z axis can slide down fast (G0). If we have doubts how long tools will be measured it’s safer to enter „0”. X and Y position of the sensor in the machine tool working area. SPD_FAST SPD_FINE Z_LIFT Second precise measurement speed (mm/min). Z_SAFE Z_PARK Maximum distance the axis slide down in the measurement mode. If in the measurement mode the Z-axis run this distance, and the sensor signal does not appear – the measurement failed. With this parameter, you can protect yourself from the situation when the measurement was elicited while the tool was not clamped. First measurement speed (mm/min). Determines how to raise the Z-axis before the second measurement. The value should be large enough to change the sensor inactive again while rising. Z-level, on which the axis was set before the measurement and after the measurement is finished. Usually – “0”. The macro should be saved in the „File/Save” menu, close the window. Best after this operation is to also close and restart the Mach3 program to make sure that the settings have been saved. That is all. Just click the „Auto Tool Zero” button, and the tool will be automatically measured. Exactly why the table level was checked? It’s because adding the data the way was showed above – after correct measurement the zero of Z axis is set on the working table level. Now if we want to define the zero point of the workpiece, and its thickness is e.g. 10.150mm we can enter this value directly into the „Offsets”. In short, the processing offset in the Z-axis is counted from the level of the working table. 14.2 Automatic tool change macro On Company website http://www.cs-lab.eu there is available a sample macro that supports the automatic tool change (m6Start.m1s). Unfortunately, due to the higher degree of complexity and the fact that often spindles from different producers have different information signals logistic – there is often required a strict adjustment to a concrete machine tool. CS-Lab S.C. Company provides services for launching, configuration and adaptation of the control system for specific needs. We also offer complete solutions - the entire control box preparation, launching, configuration and preparation of the macro for specialized tasks, etc. If you are interested in our offer - please let us know at e-mail address: [email protected] or call us: +48 52 374 74 34. CS-Lab s.c. –CNC CSMIO/IP-S Controller Page 76 Addition A – Slave axis configuration example With a bigger machines you often need to use so called – slave axis, when the physical axis of the machine is powered by two motors. In the CSMIO/IP-S device there was implemented the slave axes function with the additional option to adjust the geometry of the machine. Geometry regulation is very useful if you want to set perpendicular axes precisely. To understand the rule of slave axis configuration we will use a very common example • XYZ 3 axis plotter • Transmission of the drive - racks • X-axis controlled by two motors both sides with the gears. • Used phrases: master axis (main) and slave axis (slave). Defining axes to be used in the Mach3 program In the „Config/Ports and Pins” menu, switch on the X, Y and Z-axes. The slave axes are A, B or C. We do not switch the slave axes in the menu - CSMIO/IP-S controller supports the slave axis autonomously and switching it as a normal axis may cause conflicts. Axis scaling and configuration We assume that the machines configuration is proper as it was described in the 10 chapter. In the „Config/Motor tuning” menu we configure only the Y-axis (master), the slave axis is configured automatically. It’s important that master and slave axes have the same steps number per millimeter, so you cannot use the motors with different encoders and different gears. Switching and the choice of axis used as a slave Slave axis function is set in the plugin configuration window – „Config/Config PlugIns” menu by clicking on the „config” next to the CSMIO-IP position. In this example the X-axis has two drives and the B is the slave axis (A-axis is free, if we would need a rotary axis in the future). In the „Axis X slave config” group we choose the B as the „Slaved axis”, leave the mode to „No correction” for now. LIMIT and HOMING switches Both – slave and master axes side – there should be separate LIMIT and HOME switches. The signals should be set in the Mach program properly („Config/Ports and Pins”). Before next steps it is necessary to verify if the signals are correctly configured (DIAGNOSTICS tab Pay special attention to whether HOMING switches are not replaced. Pressing by hand the switch HOME on the motor „X” side the M1HOME should light up, presiing HOME switch on the motor „B” side -the M5HOME should light up. CS-Lab s.c. –CNC CSMIO/IP-S Controller Page 77 Axis direction settings One of the most important issues is the proper setting of the movement directions for master and slave axes. In our example, the drive is transmitted by racks. In this case, usually there is a need to change the slave axis direction. We can do it in the „Config/Homing/Limits” by setting the „Reversed” at „B” axis. The direction can be also changed in the servo drive – it’s a user decision. If the drive would be on the screws, there usually is no need to change the axis direction. Manual feed test When these described above steps are already done, you can attempt to test the axis working on the manual feed. A small note: At the beginning, the best is to set a very low speed - up to 0.5%. You should first verify whether the motors are working on both sides and whether the feed rate movement is in good directions. Automatic reading of the HOME switches position difference Before we turn on the mode of slave axis with geometry correction, you should know what is the position difference of HOME switches on “X” and “B” side. In the plug in configuration window for the “X” axis, turn on the „Read index diff.” mode. After this, start homing. After homing is finished, open the plugin’s configuration window again and in the „slave correction” area there should be value read while measuring. Switching the geometry correction mode After proper measurement of HOME switches position difference, you can switch on in the configuration window the „Slave correction” mode for „X” axis. Since now on, we can adjust the perpendicularity by modifying the "slave correction" value. For perpendicularity measurement, we recommend Renishaw® Ballbar system. Fir slave axis you should not use the stepper motors. Lack of position feedback causes the risk of destroying the machines mechanics. With servo-drives, you should always have the FAULT signals configured properly. CS-Lab Company made every effort to ensure the reliability of the CSMIO / IP-S controller. However, the company does not take any responsibility for any mechanics damage because of wrong configuration and any eventual failure or software errors of CSMIO PLC / IP-S controller. CS-Lab s.c. –CNC CSMIO/IP-S Controller Page 78 Addition B – CSMIO/IP-S software updating We invite you to visit our website: http://www.cs-lab.eu for the CSMIO/IP-S software updates in the „download” section. The controller updates includes corrections and often enrich the device with new features so it is worth to update the controller regular. How to check your software version The controllers’ current software version you can check in the diagnostics window from the „PlugIn Control/CSMIO_IP_P_plugin” menu. The current version is shown on the bottom bar. Updating application (uploader) After you download archiwum.zip with update package, you should unzip the contents i.e. to your desktop. Open the directory and start the „CSMIO_PC_FW_Uploader.exe”. 4 5 1 2 3 After starting the program, proceed as in the picture above, namely: • Choose the controller type selecting the „IP”. • Click the “Discover” button – our controller will be found automatically. • If you have more than one controller in the local network, select from the list the one you want to update. • Click the „Open App. File” button and select the firmware file - „CSMIO_IP_SVx_xxx.csapp” (where „x” is the version). • Click the „Flash Program” button – the controller programming will start. CS-Lab s.c. –CNC CSMIO/IP-S Controller Page 79 CSMIO/IP-S controller is protected if the programming will fail. There is always the possibility of reprogramming the uploader application. Before updating – close the Mach3 program. Plugins file update Last update step is to copy the new plugin version to the file directory: „C:\Mach3\PlugIns”. In the update package, the plugins file is called „CSMIO_IP_P_plugin.dll”. You should copy this file to the file directory: „C:\Mach3\PlugIns”. When the system asks - overwrite the file. Checking the update After software updating start the Mach3 program and open the diagnostics window. In the bottom bar, you should see your version of the updated software. CS-Lab s.c. –CNC CSMIO/IP-S Controller Page 80