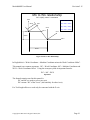
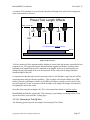
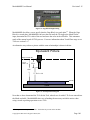
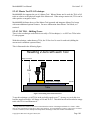
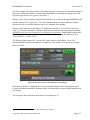
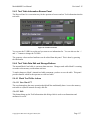
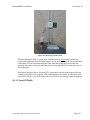
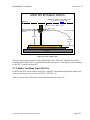
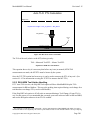
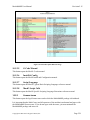
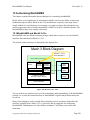
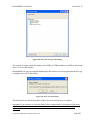
1
Using the MachStdMill Screen Set with Mach3 V3 For MachStdMill (v2.0.0 and later) Calypso Ventures, Inc. March 30th, 2015 Copyright © 2009-2015 Calypso Ventures, Inc. All Rights Reserved. MachStdMill User Manual Revision 2.15 Table of Contents 1 Introduction ..............................................................................................................................21 1.1 Scope of the Manual ........................................................................................................21 1.2 MachStdMill Project History ...........................................................................................22 1.2.1 MachStdMill Questions & Feedback .......................................................................22 1.2.1.1 Support .................................................................................................................22 1.2.2 Change Notice..........................................................................................................22 1.3 Glossary ...........................................................................................................................23 1.4 Installing MachStdMill ....................................................................................................24 1.4.1 Best Visual Appearance ...........................................................................................25 1.4.1.1 Windows Task Bar...............................................................................................25 1.5 MachStdMill Editions ......................................................................................................25 1.5.1 MachStdMill Trial Usage.........................................................................................25 1.5.2 Licensed Editions .....................................................................................................27 1.5.2.1 Personal Edition ...................................................................................................27 1.5.2.2 Professional Edition .............................................................................................28 1.5.3 MachStdMill Alpha, Beta & Eval Releases.............................................................29 1.6 MachStdMill Installation .................................................................................................29 1.7 MachStdMill Online/Proxy Activation vs. Operation .....................................................29 1.7.1 Activation:................................................................................................................29 1.7.1.1 Online Activation & Deactivation .......................................................................29 1.7.1.2 Proxy Activation & Deactivation.........................................................................29 1.7.2 MachStdMill Online/Offline Operation:..................................................................30 1.8 User guidance re TLO techniques and optional hardware. ..............................................30 2 MachStdMill User Interface Controls......................................................................................33 2.1 Conventions and Common Controls ................................................................................33 2.1.1 Visual Consistency...................................................................................................33 2.1.1.1 MachStdMill Screen Set Resolutions...................................................................33 2.1.1.1.1 Four, Five and Six Axis Support....................................................................33 2.1.2 Separation & Grouping of Functions .......................................................................34 2.1.2.1 Control Groupings................................................................................................34 2.1.3 Basic MachStdMill Control types............................................................................35 2.1.3.1 Buttons .................................................................................................................35 2.1.3.1.1 Action Buttons: ..............................................................................................35 2.1.3.1.2 State Buttons ..................................................................................................35 2.1.3.2 Lights / LEDs .......................................................................................................35 2.1.3.3 Information Displays............................................................................................36 2.1.3.3.1 Text ................................................................................................................36 2.1.3.3.2 Numeric Values..............................................................................................36 2.2 Exploring Common Controls ...........................................................................................37 2.2.1 Standard Windows Controls ....................................................................................37 2.2.2 Page Navigation Buttons & Tabs.............................................................................38 2.2.2.1 Work setup and G-code Execution Pages ............................................................39 2.2.2.2 User Extensibility.................................................................................................39 2.2.2.3 Machine Configuration and Reference Pages ......................................................39 2.2.2.4 Sub Pages .............................................................................................................39 2.2.3 Common Controls: Work setup and G-code Execution Pages ................................39 Copyright © 2009-2015 Calypso Ventures, Inc. Page 3 MachStdMill User Manual Revision 2.15 2.2.3.1 Mach Message Displays.......................................................................................39 2.2.3.1.1 Error / Message display..................................................................................40 2.2.3.1.2 Status Display ................................................................................................40 2.2.3.1.3 Display history buttons ..................................................................................40 2.2.3.2 Mach Reset Button...............................................................................................40 2.2.3.3 MDI Input ............................................................................................................41 2.2.3.4 G-code mode status ..............................................................................................42 2.2.3.5 Jogging Controls ..................................................................................................42 2.2.3.5.1 Jogging On/Off ..............................................................................................43 2.2.3.5.2 Continuous Jogging........................................................................................43 2.2.3.5.3 Step Jogging ...................................................................................................43 2.2.3.5.4 Cycle Incr Button ...........................................................................................43 2.2.3.5.5 MPG Jogging .................................................................................................43 2.2.3.5.6 Fly Out Jogging controls................................................................................44 2.2.4 Hot keys ...................................................................................................................45 3 Tutorial: Loading, Previewing and Running G-code...............................................................47 3.1 General Work Flow..........................................................................................................47 3.1.1 Starting the Mill .......................................................................................................47 3.1.2 Loading Code ...........................................................................................................47 3.1.2.1 G-code Window & G-code Filename ..................................................................48 3.1.2.2 G-code Button Panel ............................................................................................49 3.1.2.3 Load Button..........................................................................................................49 3.1.2.4 Recent Button.......................................................................................................49 3.1.2.5 Edit Button ...........................................................................................................49 3.1.2.6 Close Button.........................................................................................................49 3.1.2.7 Wizard Buttons ....................................................................................................49 3.1.2.8 G-Code Utility Button..........................................................................................50 3.1.2.9 Tool Path Display Window..................................................................................50 3.1.2.10 Referencing the Axes .......................................................................................51 3.1.2.11 Loading Sample G-code...................................................................................52 3.1.2.11.1 G-code Window and Mach3 Line Numbers ................................................54 3.1.2.11.2 Tool Path Display Manipulation ..................................................................55 3.1.2.12 Simulating the code..........................................................................................56 3.1.3 Setting Work Coordinate Offsets .............................................................................56 3.1.3.1 Work Coordinate Offset Selection Panel .............................................................57 3.1.3.2 Work Coordinate Panel ........................................................................................58 3.1.4 Setting up Tools .......................................................................................................60 3.1.4.1 Current Tool Information Panel ...........................................................................60 3.1.5 Run Pages: Running G-code ....................................................................................61 3.1.6 Run Page ..................................................................................................................61 3.1.7 Simplified Run Page ................................................................................................65 3.1.7.1 Run Button Panel. ................................................................................................65 3.1.7.1.1 Rewind ...........................................................................................................66 3.1.7.1.2 Single Block ...................................................................................................66 3.1.7.1.3 Inhibited LED.................................................................................................66 3.1.7.1.4 Run (Cycle Start)............................................................................................66 3.1.7.1.5 Pause (Feed Hold) ..........................................................................................66 3.1.7.1.6 Stop ................................................................................................................67 Copyright © 2009-2015 Calypso Ventures, Inc. Page 4 MachStdMill User Manual Revision 2.15 3.1.7.1.7 Run in Reverse ...............................................................................................67 3.1.7.2 Run Condition LEDs Panel..................................................................................67 3.1.7.2.1 Tool Change (TC) LED .................................................................................68 3.1.7.2.2 Tool Length Offset (TLO) LED.....................................................................68 3.1.7.2.3 Dwell LED .....................................................................................................68 3.1.7.2.4 Spindle RPM OverRide (SRO) LED .............................................................68 3.1.7.2.5 Feed Rate OverRide (FRO) LED...................................................................68 3.1.7.2.6 Elapsed RUN Time (ET) DRO ......................................................................68 3.1.7.3 Current Coordinates DRO Panel..........................................................................68 3.1.7.3.1 Coordinate DROs ...........................................................................................68 3.1.7.3.2 Machine Coordinate System DRO Display Selection Button........................68 3.1.8 Full Run Page...........................................................................................................71 3.1.8.1 Run block panel ...................................................................................................72 3.1.8.1.1 Coolant Control Group...................................................................................72 3.1.8.1.2 Spindle Control Group ...................................................................................72 3.1.8.1.3 Run Options Group ........................................................................................73 3.1.8.2 Current Coordinates Panel ...................................................................................73 3.1.8.2.1 Axis zero actions ............................................................................................73 3.1.8.2.2 Multimode DROs ...........................................................................................73 3.1.8.2.3 Reference buttons...........................................................................................74 3.1.8.2.4 Soft Limits Button..........................................................................................74 3.1.8.2.5 Axis scale DROs and LEDs ...........................................................................74 3.1.8.3 Misc. G-code status and control panel .................................................................74 3.1.8.3.1 Tooling Status Group .....................................................................................74 3.1.8.3.2 Spindle info Group.........................................................................................75 3.1.8.3.3 Feed rate info Group ......................................................................................75 3.1.8.3.4 RRO LED.......................................................................................................76 3.1.8.3.5 Dwell LED .....................................................................................................76 3.1.8.3.6 X/Y Rotd LED & DRO..................................................................................76 3.1.8.3.7 CV & ES Buttons ...........................................................................................76 3.1.8.3.8 WC DRO........................................................................................................76 3.1.8.3.9 Z Inhibit Group ..............................................................................................76 3.1.8.3.10 ET DRO .......................................................................................................76 3.1.8.3.11 Teach Button ................................................................................................76 4 Work Coordinate Offsets .........................................................................................................77 4.1 Work Coordinate Systems................................................................................................77 4.2 Setting WCOs Manually ..................................................................................................80 4.2.1 Coordinate and Offset Values Panel ........................................................................80 4.3 Touch Off .........................................................................................................................80 4.3.1 Touch block panel ....................................................................................................80 4.3.1.1 Touching to Set a WC Axis Zero.........................................................................81 4.3.1.1.1 X/Y Zero from Edge Finder...........................................................................81 4.3.1.1.2 Z Zero from Fixed Length Tool and Gage Block ..........................................82 4.3.1.1.3 Z Zero from Dial Gage Touch Tool...............................................................83 4.3.1.2 X,Y No Radius Offset Button ..............................................................................84 4.3.1.3 T-Plate Active LED .............................................................................................84 4.3.1.4 MasterT Mode LED .............................................................................................85 4.3.1.5 WC Z Zero Setting ...............................................................................................85 Copyright © 2009-2015 Calypso Ventures, Inc. Page 5 MachStdMill User Manual Revision 2.15 4.3.1.5.1 Gage Block Height.........................................................................................85 4.3.2 Current Tool Information Panel ...............................................................................85 4.3.3 Work Coordinate Selection Panel ............................................................................85 4.3.3.1 Edit .......................................................................................................................85 4.3.3.2 Save ......................................................................................................................86 4.3.3.3 Save As ................................................................................................................86 4.3.3.4 Load .....................................................................................................................86 4.3.3.5 Report...................................................................................................................86 5 Tool Handling ..........................................................................................................................87 5.1 MachStdMill concepts: Tools, Holders and Changers.....................................................87 5.1.1 Human Tool Changers .............................................................................................87 5.1.2 Tooling Types & Holders ........................................................................................87 5.1.2.1 Non-repeatable Height Holders............................................................................87 5.1.2.2 Repeatable Height Tool Holders..........................................................................87 5.1.2.3 Mixed Tool Holders .............................................................................................88 5.1.3 Auto Tool Changer models ......................................................................................88 5.1.3.1 Fixed Tool Selection model .................................................................................88 5.1.3.2 Mapped Tool Number Selection Model...............................................................88 5.1.3.3 MachStdMill Auto Tool Change Model support .................................................88 5.1.4 Mach Tool Change modes .......................................................................................89 5.1.4.1 “Ignoring Tool Changes” Mode...........................................................................89 5.1.4.2 “Stop & Wait” (for user to continue) Mode.........................................................89 5.1.4.3 Auto Tool Changer mode.....................................................................................89 5.2 Tool Changes and TLO measurements ............................................................................90 5.2.1 WCO and TLOs .......................................................................................................90 5.2.2 TLO Setting Techniques ..........................................................................................94 5.2.3 Off-Machine Tool Length Setting............................................................................94 5.2.3.1 Preset Tool Length ...............................................................................................94 5.2.3.1.1 Measuring a Tool Off-Line ............................................................................95 5.2.4 On-Machine Tool Length Setting ............................................................................99 5.2.4.1 TLO by Touch Off to Part Z0 ..............................................................................99 5.2.4.2 Master Tool TLO Technique .............................................................................108 5.2.4.3 NO TLO – Shifting Z-zero.................................................................................108 5.3 Offset Registers & Data storage.....................................................................................110 5.4 Intro to the Tooling Page ...............................................................................................111 5.4.1 Current Tool Panel .................................................................................................111 5.4.1.1 Current Tool # ....................................................................................................112 5.4.1.2 Setup Units Indicator .........................................................................................112 5.4.1.3 G43 & G49.........................................................................................................112 5.4.1.4 TLO Active LED ...............................................................................................112 5.4.1.5 Tool Geometry ...................................................................................................112 5.4.1.5.1 TL Offset......................................................................................................113 5.4.1.5.2 Wear Length.................................................................................................113 5.4.1.5.3 Diameter Offsets ..........................................................................................113 5.4.1.5.4 Diameter.......................................................................................................113 5.4.1.5.5 Wear Diameter .............................................................................................113 5.4.1.6 Tool description .................................................................................................113 5.4.1.6.1 Edit Button ...................................................................................................113 Copyright © 2009-2015 Calypso Ventures, Inc. Page 6 MachStdMill User Manual Revision 2.15 5.4.1.7 Empty LED ........................................................................................................113 5.4.1.8 RH / NRH LED..................................................................................................113 5.4.1.9 Tool Changes .....................................................................................................114 5.4.1.9.1 Tool Change Status ......................................................................................114 5.4.1.9.2 Tool Change LED ........................................................................................114 5.4.1.9.3 Dynamic Panel Information and Run/Cycle-Start Button ...........................114 5.4.2 Next Tool Panel .....................................................................................................116 5.4.2.1 Setup Units Indicator .........................................................................................116 5.4.3 Tool Table Information Browse Panel...................................................................117 5.4.4 Tool Table Data Edit and Storage Buttons ............................................................117 5.4.4.1 Mach Tool Table Actions ..................................................................................117 5.4.4.1.1 Save Mach TT ..............................................................................................117 5.4.4.1.2 Edit ...............................................................................................................117 5.4.4.2 Enhanced Tool Table Actions............................................................................119 5.4.4.2.1 Load .............................................................................................................120 5.4.4.2.2 Save As ........................................................................................................120 5.4.4.2.3 Report...........................................................................................................120 5.4.5 Current Position Panel ...........................................................................................121 5.4.5.1 M-Coords ...........................................................................................................121 5.4.5.2 Save Pos’n..........................................................................................................121 5.4.5.3 Return Pos’n.......................................................................................................121 5.4.6 TC Position Panel...................................................................................................121 5.4.6.1 TC Position DROs .............................................................................................122 5.4.6.2 Go TC Pos’n.......................................................................................................122 5.4.6.3 CPos’n to TCP ...................................................................................................122 5.4.7 TLO Setting Panel..................................................................................................122 5.4.7.1 Set G-Blk TLO...................................................................................................122 5.4.7.1.1 Tutorial: Setting TLOs via touch off to a gage block on part ......................122 5.4.7.1.2 Tutorial: Using a tool with known TLO to touch and set Z-Zero................124 5.4.7.2 Set TP TLO ........................................................................................................124 5.4.7.2.1 Tutorial: Setting TLOs via touch off to a mobile touch plate ......................125 5.4.8 TC Options & Master Tool Mode Panel ................................................................126 6 Optional Hardware Support ...................................................................................................128 6.1 Probe Signal Input..........................................................................................................128 6.1.1 Active Probe...........................................................................................................128 6.1.2 Touch Off Plate ......................................................................................................129 6.1.3 Both Plate(s) and Probe..........................................................................................131 6.1.3.1 One Signal Interface...........................................................................................132 6.1.3.2 Two signal Interface...........................................................................................133 6.1.3.2.1 Technical Notes about Two Signal Interfaceing:.........................................134 6.2 Optional Hardware and Advanced Features ..................................................................137 6.2.1 Mobile TP: .............................................................................................................137 6.2.2 TCP TP...................................................................................................................137 6.2.2.1 TCP TP Setup and Calibration...........................................................................137 6.2.3 Home Switches ......................................................................................................137 6.2.4 3D Active Probe.....................................................................................................137 6.3 Interfacing Probes to Break Out Boards ........................................................................138 6.3.1 Probe Switch Action ..............................................................................................138 Copyright © 2009-2015 Calypso Ventures, Inc. Page 7 MachStdMill User Manual Revision 2.15 6.3.2 Control Interface Problem Symptoms:...................................................................138 6.3.2.1 Test Approach: ...................................................................................................138 6.3.2.2 (Semi) Technical Explanation:...........................................................................139 6.3.2.3 Typical Fix Approach: .......................................................................................143 7 Advanced Tool Change Options ............................................................................................145 7.1.1 TC Options & Master Tool Mode Panel ................................................................145 7.1.2 WC Offset ..............................................................................................................145 7.1.3 TC & Master Tool Mode Options..........................................................................145 7.1.3.1 TLO and PTL .....................................................................................................145 7.1.3.2 TC Auto TCP .....................................................................................................146 7.1.3.3 TC Auto TLO: Automatic On-Machine Tooling Measurements.......................146 7.1.3.3.1 TLO = PTL Option Button...........................................................................146 7.1.3.4 Skip RH Tools....................................................................................................147 7.1.3.5 Measure Tool Button .........................................................................................147 7.1.3.6 Master Tool Mode..............................................................................................148 7.1.3.7 Master Tool # .....................................................................................................148 7.1.3.7.1 Master Tool PTL ..........................................................................................148 7.1.4 TCP TP Configuration and Set Up. .......................................................................150 7.1.4.1 TCP TP Installed Button ....................................................................................150 7.1.4.2 Rnd Diam DRO..................................................................................................150 7.1.4.3 Max Distance DRO ............................................................................................151 7.1.4.4 Set TCP TP MCz Button....................................................................................151 7.1.4.5 TCP TP MCz DRO ............................................................................................152 8 Advanced WCO operations: Probing.....................................................................................154 8.1 Probe Tool Tip Geometry ..............................................................................................154 8.2 Work Coordinate Panel ..................................................................................................155 8.3 Work Coordinate Selection Panel ..................................................................................156 8.4 Probe Operation Graphic Block Panels..........................................................................156 8.5 Probing Operation Parameters Panel .............................................................................160 8.5.1 Common Probing Operation Parameters ...............................................................160 8.5.1.1 Probe Tool #.......................................................................................................160 8.5.1.1.1 Probe TLOs ..................................................................................................160 8.5.1.2 Step Off Width ...................................................................................................161 8.5.1.3 Probing Depth ....................................................................................................162 8.5.1.4 Probe Fast FR (Feed Rate) .................................................................................163 8.5.1.5 Probe Slow FR (Feed Rate) ...............................................................................163 8.5.1.6 Max X/Y Distance .............................................................................................163 8.5.1.7 X/Y Clearance....................................................................................................163 8.5.1.8 Max Z Distance ..................................................................................................164 8.5.1.9 Z Clearance ........................................................................................................164 8.5.1.10 Extra Probe Depth ..........................................................................................164 8.5.2 Edge Finding Specific Probing Operation Parameters...........................................164 8.5.2.1 Edge Width ........................................................................................................164 8.6 Edge Finding Probe Operation Group ...........................................................................164 8.6.1 Probing Operation Group Selection buttons ..........................................................165 8.6.2 Edge Finding Probe Action “Graphic Buttons” .....................................................165 8.6.2.1 Vertical Surface Probe Operations.....................................................................165 8.6.2.2 Z-Zero Probe Operation .....................................................................................165 Copyright © 2009-2015 Calypso Ventures, Inc. Page 8 MachStdMill User Manual Revision 2.15 8.6.2.3 3D Corner Probe Operation ...............................................................................166 8.6.2.4 Corner with Edge Angle Measurement Probe ...................................................168 8.6.2.5 Edge Angle Only Measurement Probe...............................................................170 8.6.3 Buttons ...................................................................................................................170 8.6.3.1 Probe Only Button .............................................................................................170 8.6.4 Edge Finding Probe Operation Results ..................................................................170 8.6.5 X Probed Position: .................................................................................................171 8.6.6 Y Probed Position: .................................................................................................171 8.6.7 Z Probed Position:..................................................................................................171 8.6.8 Edge measurement results:.....................................................................................171 8.6.8.1 Edge Angle:........................................................................................................171 8.6.8.2 Edge Delta:.........................................................................................................171 8.6.9 Probing Operation Status LEDs .............................................................................171 8.6.9.1 Probing Op LED ................................................................................................171 8.6.9.2 Probing Error LED.............................................................................................171 8.6.10 Probe Op Reset Button...........................................................................................171 8.6.10.1.1 Probe Only & Measurement Resolution ....................................................173 8.6.11 LEDs ......................................................................................................................173 8.6.11.1 Probe Active...................................................................................................173 8.6.11.2 Master Tool Mode..........................................................................................173 8.7 Ridge and Valley Probing Operation Group..................................................................173 8.7.1 Ridge and Valley Action “Graphic Buttons” .........................................................174 8.7.1.1 X Direction Valley Probe...................................................................................174 8.7.1.2 Y Direction Valley Probe...................................................................................174 8.7.1.3 X Direction Ridge Probe....................................................................................175 8.7.1.3.1 X Hint DRO .................................................................................................175 8.7.1.4 Y Direction Ridge Probe....................................................................................175 8.7.1.4.1 Y Hint DRO .................................................................................................175 8.7.1.5 Probe Z-..............................................................................................................176 8.7.2 Ridge and Valley Group buttons............................................................................176 8.7.2.1 Z Action Options................................................................................................176 8.7.2.1.1 First Z...........................................................................................................176 8.7.2.1.2 Last Z ..........................................................................................................176 8.7.3 Ridge and Valley Group Results............................................................................177 8.8 Pocket and Post Probing Operation Group ....................................................................177 8.8.1 Pocket and Post Action “Graphic Buttons” ...........................................................178 8.8.1.1 Probe Z-..............................................................................................................178 8.8.1.2 Rectangular Post Center Probe Operation..........................................................178 8.8.1.2.1 X, Y Hint DROs...........................................................................................178 8.8.1.3 Rectangular Pocket Center Probe Operation......................................................179 8.8.1.4 Circular Post Center Probe Operation................................................................179 8.8.1.4.1 Diameter Hint DRO .....................................................................................179 8.8.1.5 Circular Pocket Center Probe Operation............................................................179 8.8.2 Pocket and Post Group buttons ..............................................................................180 8.8.2.1 Calibration..........................................................................................................180 8.8.2.2 Z Action Options................................................................................................180 8.8.2.2.1 First Z...........................................................................................................180 8.8.2.2.2 Last Z ..........................................................................................................180 Copyright © 2009-2015 Calypso Ventures, Inc. Page 9 MachStdMill User Manual Revision 2.15 8.8.3 Pocket and Post Group Results ..............................................................................181 8.9 Rotary Axis Probing Groups..........................................................................................181 8.9.1 The A Axis Group..................................................................................................181 8.9.1.1 Cylinder center and Cylinder Alignment “Graphic Buttons” ............................182 8.9.1.1.1 A-Center Operation......................................................................................182 8.9.1.1.2 YZ Zero Option Graphic buttons .................................................................183 8.9.1.1.3 A-Axis Edge Operation................................................................................184 8.9.1.1.4 A-Axis Rotation Angle Operation ...............................................................184 8.9.1.1.5 A-Axis Results Panel ...................................................................................185 8.9.2 The B Axis Group ..................................................................................................185 8.9.2.1 Cylinder center and Cylinder Alignment “Graphic Buttons” ............................186 8.9.2.1.1 B-Center Operation ......................................................................................186 8.9.2.1.2 XZ Zero Option Graphic buttons .................................................................187 8.9.2.1.3 B-Axis Edge Operation ................................................................................187 8.9.2.1.4 B-Axis Rotation Angle Operation................................................................188 8.9.2.1.5 B-Axis Results Panel ...................................................................................189 8.10 Probe Calibration and Accuracy ....................................................................................189 8.10.1 Probe Calibration ...................................................................................................189 8.10.1.1 Calibration Button..........................................................................................189 8.10.1.2 Other Probing Accuracy Considerations........................................................190 8.10.1.2.1 Centering the probe tip...............................................................................190 8.10.1.2.2 Probe Mounting..........................................................................................190 8.10.1.2.3 Probe Travel Errors ....................................................................................190 8.10.1.2.4 Cosine Errors..............................................................................................192 8.10.1.2.5 Misc Accuracy Considerations ..................................................................193 8.11 Tutorial: Getting started with probing ...........................................................................194 8.11.1 Check Probe input line ...........................................................................................194 8.11.1.1 Probing and Signal noise................................................................................195 8.11.2 Set the geometry for the probe tool........................................................................197 8.11.3 Test simple XY direction probes. ..........................................................................197 8.11.4 Test Z direction probing.........................................................................................198 8.11.5 The First XY Probing Operations ..........................................................................198 8.11.6 The First Z Probing Operation ...............................................................................199 8.11.7 Down and Over Operations....................................................................................199 8.11.8 A Corner Probe Operation .....................................................................................199 8.11.9 Edge Measurements ...............................................................................................199 8.11.10 Circular Pocket Center Probing .........................................................................199 8.11.11 Checking for noise sensitivity............................................................................200 8.11.12 Dual feed rate probing........................................................................................200 8.11.13 Set TLO for the probe tool .................................................................................200 9 Advanced Tool Handling: Master Tool Mode .......................................................................201 9.1 Master Tool Mode..........................................................................................................201 9.1.1 Master Tool Mode SetZ0 Actions..........................................................................201 9.1.2 Master Tool Mode Touch Off TLOs......................................................................204 9.1.3 Master Tool Mode Advantages..............................................................................206 9.1.4 Master Tool Mode Tool Set TLO Set Up Process .................................................207 9.1.4.1 Measuring the MT PTL with the TCP TP..........................................................207 9.1.4.2 MTM TLOs using TCP TP ................................................................................207 Copyright © 2009-2015 Calypso Ventures, Inc. Page 10 MachStdMill User Manual Revision 2.15 9.1.4.3 Other MTM techniques ......................................................................................208 9.1.4.3.1 MTM TLO Setting Using a Gage-Blk or Mobile Touch Plate ....................208 9.2 MTM Tool Change Options...........................................................................................208 9.2.1 MTM Auto TLO Measurement Support ................................................................208 9.2.2 RH & NRH Tool Holder Handling ........................................................................209 9.3 Using the Probe as the Master Tool ...............................................................................211 9.4 Tutorial: Probe tool = Master Tool with Auto Tool Measurements ..............................211 9.5 Tutorial: Touch Plates only with NRH Tool Holders ....................................................216 10 MachStdMill Configuration, Hardware and Reference Pages...........................................221 10.1 Fly out ............................................................................................................................221 10.1.1 Graphic Jogging Arrow Buttons ............................................................................222 10.1.2 Auto OR Limits......................................................................................................223 10.1.3 Shuttle ....................................................................................................................223 10.1.4 Z Inhibit Panel........................................................................................................223 10.1.5 Spindle and Coolant Panel .....................................................................................223 10.1.6 Override Panels ......................................................................................................223 10.1.6.1 Spindle Override Panel ..................................................................................223 10.1.6.2 Feed Rate Override Panel ..............................................................................223 10.1.7 Rapid Rate Panel ....................................................................................................224 10.1.8 G-code Run, Pause, Stop Panel..............................................................................224 10.1.9 Current Mach3 Loaded Profile...............................................................................224 10.2 User Exts ........................................................................................................................224 10.3 Settings Pages ................................................................................................................225 10.3.1 Settings – Common ................................................................................................225 10.3.1.1 General Settings Control Group.....................................................................226 10.3.1.1.1 Load Screen................................................................................................226 10.3.1.1.2 Clone Screen ..............................................................................................226 10.3.1.1.3 M-Code Copy.............................................................................................227 10.3.1.1.4 Control On-line ..........................................................................................227 10.3.1.1.5 Menu Bar On/Off .......................................................................................227 10.3.1.2 Motion Settings Control Group......................................................................227 10.3.1.2.1 CV Dist ......................................................................................................227 10.3.1.2.2 CV Feed .....................................................................................................227 10.3.1.2.3 CJog % Incr................................................................................................227 10.3.1.2.4 Safe Z Height .............................................................................................227 10.3.1.2.5 G73 Pullback..............................................................................................227 10.3.1.2.6 Rapid Max..................................................................................................227 10.3.1.3 Axes Enabled Controls Group .......................................................................228 10.3.1.3.1 X-Z & A-C & Spindle Enable buttons......................................................228 10.3.1.3.2 Verify Axes Buttons...................................................................................228 10.3.1.3.3 Rotation Radii DROs .................................................................................228 10.3.1.3.4 De-Ref All button.......................................................................................228 10.3.1.4 Overrides Control Group ...............................................................................228 10.3.1.4.1 Limit Switch Override ...............................................................................228 10.3.1.4.2 Auto Limit Switch Override.......................................................................228 10.3.1.5 Special Functions Control Group...................................................................228 10.3.1.5.1 In-4 Single Step..........................................................................................228 10.3.1.5.2 Run Maint Script ........................................................................................228 Copyright © 2009-2015 Calypso Ventures, Inc. Page 11 MachStdMill User Manual Revision 2.15 10.3.1.6 Misc Config Control Group ...........................................................................229 10.3.1.6.1 Reset Interpreter .........................................................................................229 10.3.1.6.2 Set Utility Paths .........................................................................................229 10.3.1.7 Probing Controls Group .................................................................................229 10.3.1.7.1 Probing Version .........................................................................................229 10.3.1.7.2 Probing Debug Setup .................................................................................229 10.3.1.7.3 TLO G-BLk is TP Button ..........................................................................229 10.3.1.7.4 TC Position TP Configuration Group ........................................................230 10.3.1.8 Encoder DRO Setting.....................................................................................230 10.3.1.9 Reference Point Settings ................................................................................230 10.3.1.10 Set Ref Point ..................................................................................................230 10.3.1.11 Go Home Pos’n ..............................................................................................230 10.3.1.12 Go Ref Point...................................................................................................230 10.3.1.13 Go Ref via Mid ..............................................................................................231 10.3.2 Settings - Spindle ...................................................................................................231 10.3.3 Rotating Spindle Pulley Panel................................................................................231 10.3.4 Tangential Knife Control Panel .............................................................................231 10.3.5 Laser Settings Panel ...............................................................................................232 10.3.6 Plasma Settings Panel ............................................................................................232 10.4 Hardware Specific Pages ...............................................................................................232 10.4.1 Logical Signals Page ..............................................................................................232 10.4.2 Parallel Port Driver Diagnostics ............................................................................233 10.4.2.1 PP2 Configuration..........................................................................................234 10.4.3 Utilities...................................................................................................................234 10.4.4 Mach Driver Metrics ..............................................................................................235 10.5 Reference Pages .............................................................................................................235 10.5.1 License and Activation buttons..............................................................................235 10.5.1.1 License Info....................................................................................................235 10.5.1.2 Activation.......................................................................................................236 10.5.2 Documentation Buttons..........................................................................................236 10.5.2.1 User Manual ...................................................................................................236 10.5.2.2 User Forum ....................................................................................................236 10.5.2.3 Release Notes .................................................................................................236 10.5.2.4 G&M Code Quick Ref ...................................................................................236 10.5.2.5 G-Code Manual..............................................................................................238 10.5.2.6 Install & Config .............................................................................................238 10.5.2.7 Script Language .............................................................................................238 10.5.2.8 Mach3 Script Calls.........................................................................................238 10.5.3 License terms .........................................................................................................238 10.5.4 Credits ....................................................................................................................239 11 Wizards ..............................................................................................................................241 12 Installing MachStdMill ......................................................................................................243 13 MachStdMill Operational Changes from Mach3 V3 with 1024.set ..................................245 13.1 Geometry for “special tools”..........................................................................................245 13.1.1 Tool geometry always comes from the tool table ..................................................245 13.1.2 Special tool geometry DROs deprecated ...............................................................245 13.2 Tool Changes .................................................................................................................245 13.2.1 Tool Changes & G-code Modes.............................................................................245 Copyright © 2009-2015 Calypso Ventures, Inc. Page 12 MachStdMill User Manual Revision 2.15 13.2.2 Tool Change Positioning........................................................................................245 13.2.2.1 Auto TCP .......................................................................................................245 13.2.2.2 TC M6End Movements..................................................................................246 13.3 Profile Dependant M-Code Macros ...............................................................................247 13.3.1 M-code Macro Updates..........................................................................................247 13.3.2 Profiles and different screen sets ...........................................................................247 13.4 Old Mach habits to avoid ...............................................................................................248 13.4.1 Wiping the Mach install directory..........................................................................248 13.4.2 Changing screens ...................................................................................................248 14 MachStdMill Resource Information ..................................................................................249 15 Customizing MachStdMill .................................................................................................250 15.1 MachStdMill and Mach3 3.43.x ....................................................................................250 15.2 Tension Between Updates and Customization...............................................................251 15.2.1 Master and Customized Files. ................................................................................251 15.2.1.1 Master Files....................................................................................................251 15.2.1.2 User Customized Files ...................................................................................252 15.2.1.3 MachStdMill Directory Structure Conventions .............................................252 15.3 Mach3 V3, Hardware Configurations, Profiles and MachStdMill Screen Sets.............252 15.3.1 Profiles ...................................................................................................................253 15.4 Key Mach3 Application Programming Interfaces (APIs)..............................................253 15.4.1 RunScript().............................................................................................................254 15.4.1.1 Summary: .......................................................................................................254 15.4.2 #Expand Pre-Processing ........................................................................................254 15.4.2.1 Summary ........................................................................................................254 15.5 MachStdMill .Set Files ..................................................................................................254 15.5.1 Customizing MachStdMill .Set Files .....................................................................255 15.5.2 MachStdMill Set File locations..............................................................................256 15.5.3 Loading a .Set file with MachStdMill....................................................................256 15.5.3.1 Bug Report Verification.................................................................................257 15.6 Customizing Button Actions ..........................................................................................257 15.6.1 Direct button code ..................................................................................................257 15.6.2 Indirect Button Code ..............................................................................................259 15.6.2.1 User Customized MachStdMill Buttons ........................................................260 15.7 Finding a Desired Master Script File .............................................................................260 15.7.1 MachStdMill Master Scripts location ....................................................................261 15.7.2 #Expand Expansion................................................................................................261 15.7.3 MachStdMill Script Name Conventions ................................................................262 15.7.4 Example: Changing the RefAllHome Action ........................................................262 15.8 Modifying MachStdMill M-Code Macros .....................................................................268 15.9 Supported MachStdMill Interfaces ................................................................................268 15.9.1 Run Time User Script Calls ...................................................................................268 15.9.1.1 M6 Tool Change Sequence ............................................................................268 15.9.1.1.1 Auto Tool Changers: M6ATC ..................................................................268 15.9.1.1.2 M3, M4 & M5 Customization Hooks ........................................................269 15.9.1.1.3 M6Start and M6End User Customization Hooks.......................................270 15.9.1.1.4 Pre-AutoTLO Measurement ......................................................................270 15.9.1.2 MachStdMill Initialization & Exit .................................................................271 15.9.1.2.1 ScreenSetLoad ...........................................................................................271 Copyright © 2009-2015 Calypso Ventures, Inc. Page 13 MachStdMill User Manual Revision 2.15 15.9.1.2.2 ScreenSetUnload ........................................................................................271 15.9.2 Pre-Implemented Button Action Options ..............................................................272 15.9.2.1 GotoZero Button Action ................................................................................272 15.9.2.2 G-Code Utility Button....................................................................................272 15.9.3 MSM scripting APIs ..............................................................................................273 15.9.3.1 MSMAPI_GetToolDesc.................................................................................273 15.9.3.2 MSMAPI_SetToolDesc .................................................................................274 15.9.3.3 MSMAPI_RSCall ..........................................................................................275 15.9.4 MachStdMill M1706: Tool Changes and TLO application sequence ...................275 16 MachStdMill Licensing & Activation................................................................................278 16.1.1 Purchasing a MachStdMill License .......................................................................278 16.1.1.1 Check Time and Date.....................................................................................278 16.1.1.2 Licensing Dialog ............................................................................................278 16.1.1.3 Online Activation ...........................................................................................279 16.1.1.3.1 Online License Purchase ............................................................................280 16.1.2 Activating a License...............................................................................................280 16.1.2.1 Online Activation ...........................................................................................281 16.1.2.2 Installation Deactivation ................................................................................282 16.1.2.3 Manual Activation..........................................................................................282 16.1.2.4 Proxy (Offline) Activation .............................................................................283 16.1.2.4.1 Proxy Activation ........................................................................................284 16.1.2.4.2 Proxy Deactivation.....................................................................................292 16.1.2.5 Trouble shooting ............................................................................................295 16.1.2.5.1 Common Activation Error Codes ..............................................................295 16.1.3 The Bundled License Free Update Period .............................................................296 16.1.3.1 Example: Updating a license’s update period................................................297 16.1.4 Uninstall / Deactivation considerations .................................................................299 16.1.5 Viewing License Information ................................................................................300 16.1.6 Invoking Activation Actions ..................................................................................301 16.1.7 Activation After Edition Upgrade..........................................................................302 17 Six Axis Screen Shots ........................................................................................................303 Copyright © 2009-2015 Calypso Ventures, Inc. Page 14 MachStdMill User Manual Revision 2.15 Table of Figures Figure 1: Mach3 Simple Block Diagram .........................................................................................21 Figure 2: Trial Mode Indication.......................................................................................................26 Figure 3: Trial Period Probing Page.................................................................................................26 Figure 4: Professional Edition Probing Page ...................................................................................27 Figure 5: MachStdMill Personal Edition Indication ........................................................................28 Figure 6: MachStdMill Professional Edition Indication ..................................................................28 Figure 7: Standard Window Controls ..............................................................................................38 Figure 8: Main Page Navigation Buttons.........................................................................................38 Figure 9: User Extensions Page .......................................................................................................39 Figure 10: Tabbed Subpage Example ..............................................................................................39 Figure 11: Mach Message Displays .................................................................................................40 Figure 12: Mach Reset button –Reset State .....................................................................................41 Figure 13: Mach Reset Button – NOT Reset State ..........................................................................41 Figure 14: MDI Input – Control Inactive.........................................................................................41 Figure 15: MDI Input – Control Active ...........................................................................................42 Figure 16: G-code Mode Status .......................................................................................................42 Figure 17: Jogging Controls Panel...................................................................................................43 Figure 18: Load Page on start up .....................................................................................................48 Figure 19: G-code Window and Filename .......................................................................................49 Figure 20: Tool Path Window and Buttons .....................................................................................50 Figure 21: Axes not referenced ........................................................................................................51 Figure 22: Axes Referenced.............................................................................................................52 Figure 23: G-code error on load.......................................................................................................53 Figure 24: Happy Face loaded .........................................................................................................54 Figure 25: Mach3 G-code Line Numbers ........................................................................................55 Figure 26: Estimated run time shown ..............................................................................................56 Figure 27: Work Coordinate Offset - Touch Page ...........................................................................57 Figure 28: WC selection panel.........................................................................................................57 Figure 29: WC offset detail panel ....................................................................................................58 Figure 30: Current Tool Information Panel .....................................................................................60 Figure 31: Happy Face Tool 1 data..................................................................................................61 Figure 32: Happy Face tool 2 data ...................................................................................................61 Figure 33: Happy Face – 10x7 Run Page ........................................................................................63 Figure 34: Happy Face 12x9 Run page............................................................................................64 Figure 35: Happy Face large path run page .....................................................................................65 Figure 36: Simple G-code Program Run Control Panel...................................................................65 Figure 37: Run Conditions LED Panel ............................................................................................67 Figure 38: Current Coordinates Panel..............................................................................................68 Figure 39: Happy Face Rewound.....................................................................................................69 Figure 40: Happy Face during execution .........................................................................................70 Figure 41: Happy Face Program Finished .......................................................................................71 Figure 42: 10x7 Run Page................................................................................................................72 Figure 43: Machine Coordinate Axes ..............................................................................................77 Figure 44: MC and a WC system.....................................................................................................78 Figure 45: WC, WCO and MC Relationship ...................................................................................79 Figure 46: WC Offsets - Touch Off Page ........................................................................................79 Copyright © 2009-2015 Calypso Ventures, Inc. Page 15 MachStdMill User Manual Revision 2.15 Figure 47: WC Offsets Detail Panel ................................................................................................80 Figure 48: WC Offset Detail Panel Exception Condition................................................................80 Figure 49: WC Touch Off Graphic Button Panel ............................................................................81 Figure 50: Edge Finder ....................................................................................................................82 Figure 51: Fixed Length Tool Z Touch Off .....................................................................................83 Figure 52: Z Zero from Dial Gage Touch Tool ...............................................................................84 Figure 53: Work Coordinate Selection Panel...................................................................................85 Figure 54: MC to WC Relationship .................................................................................................91 Figure 55: WCOx = WCOy = 0 .....................................................................................................92 Figure 56: WCz to MCz...................................................................................................................92 Figure 57: Basic TLO Z Relationship..............................................................................................93 Figure 58: WC Tool Position Examples ..........................................................................................93 Figure 59: Z Axis Relationships ......................................................................................................94 Figure 60: Preset TLOs ....................................................................................................................95 Figure 61: Setting TLO Zero to the Gage Line................................................................................96 Figure 62: Tool Holder Gage Line...................................................................................................97 Figure 63: End Mill TLO Measurement ..........................................................................................98 Figure 64: Drill Bit TLO Measurement ...........................................................................................98 Figure 65: Dial Gage Touch Tool TLO Measurement.....................................................................99 Figure 66: Example Tools..............................................................................................................100 Figure 67: Tool at TCP ..................................................................................................................101 Figure 68: TLO with WCOz = 0....................................................................................................102 Figure 69: PartZ0 Z Used, Yet Unknown ......................................................................................103 Figure 70: TLO with WCOz <> 0..................................................................................................104 Figure 71: Using a Gage Block for Touch Off ..............................................................................105 Figure 72: Gage Block Height Setting ...........................................................................................106 Figure 73: TLO Equivalent Diagram .............................................................................................106 Figure 74: H Registers store TLO Values......................................................................................107 Figure 75: Resetting Z Zero Instead of TLO .................................................................................108 Figure 76: Gage/Plate Height Setting ............................................................................................109 Figure 77: Set Z Zero Arrow..........................................................................................................110 Figure 78: Tooling Page................................................................................................................111 Figure 79: Current Tool Panel........................................................................................................112 Figure 80: Tool Change Panel........................................................................................................114 Figure 81: M6Start TC status.........................................................................................................114 Figure 82: Current Tool & TC Panel During V3 Tool Change .....................................................115 Figure 83: Current Tool Panel at end of TC ..................................................................................116 Figure 84: Next Tool Panel ............................................................................................................116 Figure 85: Tool Browse Panel .......................................................................................................117 Figure 86: Tool Edit Dialog ...........................................................................................................118 Figure 87: Current Position Panel ..................................................................................................121 Figure 88: Tool Change Position Panel .........................................................................................122 Figure 89: Set TLO Panel ..............................................................................................................122 Figure 90: Using a Gage Block to set a tool’s TLO.......................................................................123 Figure 91: TLO G-Blk Controls.....................................................................................................125 Figure 92: Using a Mobile TP to touch for TLO ...........................................................................126 Figure 93: TC Options & Master Tool Mode Panel ......................................................................126 Figure 94: 3D Probe .......................................................................................................................128 Copyright © 2009-2015 Calypso Ventures, Inc. Page 16 MachStdMill User Manual Revision 2.15 Figure 95: Simple Touch Plate.......................................................................................................129 Figure 96: Touch plate serving as Gage Block ..............................................................................130 Figure 97: TCP Touch Plate Example ...........................................................................................130 Figure 98: TCP TP being used to measure Drill Bit TLO .............................................................131 Figure 99: Jumper test results for probe input ...............................................................................139 Figure 100: Probe test results of probe input line ..........................................................................139 Figure 101: G540 Opto Inputs .......................................................................................................140 Figure 102: Switch/Jumper ............................................................................................................140 Figure 103: Composite Opto Input and Probe Switch ...................................................................141 Figure 104: Typical Probe with LED.............................................................................................142 Figure 105: Addition of Pull Up Resistor ......................................................................................143 Figure 106: TC Options & Master Tool Mode Panel ....................................................................145 Figure 107: PTL Only Measurement .............................................................................................147 Figure 108: TLO = PTL Option Settings .......................................................................................148 Figure 109: Master Tool Mode Option Settings ...........................................................................148 Figure 110: TCP TP Configuration Controls.................................................................................150 Figure 111: Calculating TCP TP Top Position ..............................................................................151 Figure 112: WCO Probing Page ....................................................................................................154 Figure 113: Probe Tool Tip Geometry...........................................................................................155 Figure 114: Work Coordinate Offset Panel ...................................................................................155 Figure 115: 10x7 Probing WC Selection Panel .............................................................................156 Figure 116: 12x9 Probing WC Selection Panel .............................................................................156 Figure 117: Edge Finding Probing Operations ..............................................................................157 Figure 118: Ridge and Valley Probing Operations ........................................................................158 Figure 119: Pocket and Post Probing Operations ..........................................................................158 Figure 120: A Axis Probing Operations ........................................................................................159 Figure 121: B Axis Probing Operations.........................................................................................159 Figure 122: Edge Finding Probing Op Parameters Panel ..............................................................160 Figure 123: Measuring a Probe’s PTL ...........................................................................................161 Figure 124: Step Off Width ...........................................................................................................162 Figure 125: Probing Depth.............................................................................................................163 Figure 126: Edge Finding Probe Operation Arrows & Buttons.....................................................165 Figure 127: WC Aligned Corner Probe .........................................................................................166 Figure 128: Corners Probes and Step Off Width ...........................................................................167 Figure 129: Corner Probe Movement Sequence ............................................................................168 Figure 130: Rotated Block Corner Operation ...............................................................................168 Figure 131: Starting touch spots for Angled Block Corner Probes. ..............................................169 Figure 132: Edge Angle Measurements........................................................................................170 Figure 133: Edge Finding Results..................................................................................................171 Figure 134: Ridge and Valley Probe Results .................................................................................177 Figure 135: Pocket & Post Results ................................................................................................181 Figure 136: A Axis Probing Panel .................................................................................................182 Figure 137: YZ Zero Option Graphic Buttons...............................................................................183 Figure 138: A Axis Probing Results ..............................................................................................185 Figure 139: B Axis Probing Panel .................................................................................................186 Figure 140: XZ Zero Option Graphic Buttons...............................................................................187 Figure 141: A Axis Probing Results ..............................................................................................189 Figure 142: Ideal Probe Action ......................................................................................................191 Copyright © 2009-2015 Calypso Ventures, Inc. Page 17 MachStdMill User Manual Revision 2.15 Figure 143: Probe Trigger Point Error ...........................................................................................191 Figure 144: Perpendicular Probe Movement .................................................................................192 Figure 145: Cosine Error................................................................................................................193 Figure 146: Imperial Probing Tutorial Parameter Settings ............................................................195 Figure 147: Metric Probing Tutorial Parameters ...........................................................................195 Figure 148: Master Tool Mode Button ..........................................................................................201 Figure 149: MT at MC Z0..............................................................................................................202 Figure 150: MT touching Part Z0 via G-Blk .................................................................................203 Figure 151: Before Set Z0 action ...................................................................................................203 Figure 152: After Set Z0 Action ....................................................................................................204 Figure 153: MT at WC Z0 .............................................................................................................205 Figure 154: MTM TLOs Relative to MT.......................................................................................206 Figure 155: MT TLOs relative to MT PTL....................................................................................209 Figure 156: PT = MT and ALTO Option settings .........................................................................213 Figure 157: Fly Out Page ...............................................................................................................222 Figure 158: User Exts page ............................................................................................................225 Figure 159: Settings - Common Page ............................................................................................226 Figure 160: Settings - Spindle Page ...............................................................................................231 Figure 161: Logical Signals Page ..................................................................................................232 Figure 162: Parallel Port Driver Diagnostics Page ........................................................................233 Figure 163: PP2 Input Display.......................................................................................................234 Figure 164: PP2 Output Display ....................................................................................................234 Figure 165: Main Reference page ..................................................................................................235 Figure 166: G-code Quick Reference Page....................................................................................237 Figure 167: M-Codes Quick Reference Page.................................................................................238 Figure 168: Mach3 V3.43.x APIs ..................................................................................................250 Figure 169: Direct Button Code.....................................................................................................258 Figure 170: Editing Direct Button Code ........................................................................................258 Figure 171: Linking to a User Customized Script .........................................................................260 Figure 172: Activation Methods Dialog ........................................................................................279 Figure 173: MachStdMill Licensing Dialog .................................................................................279 Figure 174: Activation Methods Dialog ........................................................................................280 Figure 175: Online Activation Dialog ...........................................................................................281 Figure 176: Successful Activation .................................................................................................282 Figure 177: Proxy Activation Steps ...............................................................................................283 Figure 178: Proxy Activation Start ................................................................................................283 Figure 179: Proxy Activation License Information .......................................................................284 Figure 180: Proxy data storage location dialog .............................................................................285 Figure 181: Proxy Activation Pause ..............................................................................................285 Figure 182: Proxy Activation Files ................................................................................................286 Figure 183: Proxy Activation Utility Setup Files ..........................................................................287 Figure 184: Proxy Utility Start Menu Item ....................................................................................288 Figure 185: Proxy Utility Browse Window ...................................................................................288 Figure 186: Proxy Utility Activation Example ..............................................................................289 Figure 187: Successful Proxy Activation.......................................................................................290 Figure 188: ProxyActivationResponse File ...................................................................................290 Figure 189: Proxy Activation Pause ..............................................................................................291 Figure 190: Browse for Activation Response File.........................................................................291 Copyright © 2009-2015 Calypso Ventures, Inc. Page 18 MachStdMill User Manual Revision 2.15 Figure 191: Proxy Deactivation Confirmation Dialog...................................................................292 Figure 192: Installation Deactivated Confirmation .......................................................................292 Figure 193: Browsing for the ProxyDeactivation file....................................................................293 Figure 194: Proxy Deactivation Example ......................................................................................294 Figure 195: Deactivation Confirmation .........................................................................................294 Figure 196: CVI support web page ................................................................................................297 Figure 197: Customer Service Login .............................................................................................298 Figure 198: Upgrades & Updates Options .....................................................................................299 Figure 199: License Info Button ....................................................................................................300 Figure 200: License Information Dialog........................................................................................301 Figure 201: The Activation Button ................................................................................................301 Figure 202: Activation Action Dialog ...........................................................................................302 Figure 203: 6 Axis Load page........................................................................................................303 Figure 204: 6 Axis WC Offset Touch Off page.............................................................................304 Figure 205: 6 Axis WC Offset Probing page .................................................................................305 Figure 206: 6 Axis Run page .........................................................................................................305 Figure 207: 6 Axis Run/Path page .................................................................................................306 Copyright © 2009-2015 Calypso Ventures, Inc. Page 19 MachStdMill User Manual 1 Revision 2.15 Introduction Welcome to MachStdMill screen set for use with Mach3 V3. 1.1 Scope of the Manual This manual describes the MachStdMill package as it appears when running on Mach3 V3. The following figure shows a simple functional block diagram of Mach3. Mach 3 Block Diagram User Interface (Screen Set) Mach “kernel” User File storage G-Code Interpreter Loaded Tool Table Tool Tables Basic Script Interpreter Loaded WCO Table WCO Tables “Brains” engine Hardware Interfaces (PP driver, Device Plug-in) MSM Config Control Hardware Figure 1: Mach3 Simple Block Diagram This manual covers the MachStdMill screen set user interface and explains how to use MachStdMill. The manual 1) Introduces the reader to the MachStdMill User Interface, and 2) Provides contextual and background information about the design of the MachStdMill enhancement package. This manual covers core Mach3 functionality as portrayed by MachStdMill, as well as additional features which MachStdMill provides on top of Mach3, and is intended primarily for the Mach3 end user/operator. MachStdMill has been extended by CVI to include support for Turning operations. This includes Turning operations on a CNC lathe (“MachStdMill Turn”) and the ability to use a Mill for turning operations (“MachStdMill Mill-Turn”). The Lathe support extensions are covered in a separate, supplementary Lathe user manual. Copyright © 2009-2015 Calypso Ventures, Inc. Page 21 MachStdMill User Manual Revision 2.15 This manual is not intended to cover the following topics and assumes the reader already has a working familiarity with these subjects: G-code language and programming 1. The differences between CAD, CAM, Post Processors, CNC control software (e.g. Mach3), and CNC control hardware. This manual does not cover technical details of the MachStdMill screen set implementation, the supporting macros which are bundled with the screen set, modifications of the screen set, or the use of the Mach3 script application programming interfaces (APIs). 1.2 MachStdMill Project History The MachStdMill screen set package was first developed specifically for Mach3 Version 4.x as a prototype to provide both an updated User Interface (UI) and support for Mach3 V4 functionality. As the MSM project progressed, and Mach3 V4 slipped further behind schedule, a version of the MachStdMill package was created for use with Mach3 V3. After a successful MachStdMill alpha and beta test period, it was decided to create a Mach3 V3 specific version of the MachStdMill package and to release it for use with Mach3 V3. With MachStdMill Version 2.0.x, full support was added for Lathes and the Mill-Turn module was added to enable turning operations to be performed on a vertical mill 2. 1.2.1 MachStdMill Questions & Feedback Comments about MachStdMill should be directed to the MachStdMill forum. 1.2.1.1 Support The best resource for MachStdMill support are the MachStdMill user forums at http://CalypsoVentures.Proboards.com Please direct questions and comments about MachStdMill to the forums. Calypso Ventures monitors the web forum and responds to correspondence and questions regarding MachStdMill. As is the case with most boutique products, we are grateful for the user community that helps support the product via the web forum 3. We ask users to understand that we are a small firm, with multiple business obligations and as much as we’d like to, we can not guarantee our response time to questions posted on the forum. 1.2.2 Change Notice Nothing in this document is to be interpreted as a commitment by Calypso Ventures, Inc.. Any and all information in this document, and any features and operations of MachStdMill are subject to change without notice. 1 To learn G-code and it’s associated concepts, the reader is referred to books on G-code programming. One example is “CNC Programming Handbook” by Peter Smid. 2 See the Supplementary MachStdMill Lathe User Manual for more information. 3 Alternative support business arrangements are available for customized packages and OEMs. Please contact Calypso Ventures, Inc. for more information. Copyright © 2009-2015 Calypso Ventures, Inc. Page 22 MachStdMill User Manual Revision 2.15 1.3 Glossary Technical topics are prone to the use of abbreviations and Mach and MachStdMill are not exceptions. The following is a lost of some o f the more common abbreviation used within this manual. Block Del Block Delete Curr Position Current Position CPos’n Current Position Cyc Incr Cycle Increment CV Constant Velocity De-Ref De-reference Diam Diameter Dist Distance ES Exact Stop G-Blk Gauge block J follow Jog Follow MC or M Coords Machine Coordinate(s) MDI Manual Data Input MPG Manual Pulse Generator MT Master Tool MTM Master Tool Mode NRH Non-Repeatable Height O’Ride Override PTL Physical Tool Length Pos’n Position Ref Reference Copyright © 2009-2015 Calypso Ventures, Inc. Page 23 MachStdMill User Manual Revision 2.15 Regen Regenerate (tool path) RH Repeatable Height Rot’d Rotated Sgl Block Single Block Sim Simulate T Path Tool Path TC Tool Change TCP Tool Change Position TLO Tool Length Offset TP Touch Plate TCP TP Tool Change Position Touch Plate THC Torch Height Control WC Work Coordinate WCO Work Coordinate Offset Ver Version V’fy Verify 1.4 Installing MachStdMill If you are reading this manual, you probably have already installed the software. It is best to have MachStdMill installed before reading the manual, so that the screen set package can be used while following the examples within the manual. Installing MachStdMill is accomplished by running the MachStdMill installer. The MachStdMill README file contains the latest instructions to install the software and should be considered the latest source for installation instructions. Copyright © 2009-2015 Calypso Ventures, Inc. Page 24 MachStdMill User Manual Revision 2.15 1.4.1 Best Visual Appearance While MachStdMill will happily run with whatever combinations of Mach settings you use, we do recommended settings for a couple of the “Mach General config” options. To see the designed MachStdMill appearance, in the Mach General config dialog box (accessible from the Mach menu bar) set: Auto Screen Enlarge = Off Boxed DROs and Graphics = Off Hi-res screens = Off 1.4.1.1 Windows Task Bar If you are running MSM with a 1204x768 resolution monitor, the MSM screens will entirely fill all of the monitor as the screen pages are designed to be 1024x768. This means that to see all of the screens, you need to set the windows task bar to “auto hide” when using a 1024x768 monitor. Otherwise, the task bar will cover part of the mach window. Since the default position for the task bar is at the bottom of the screen ( though it can be docked at any edge), this can cause the task bar to cover part or all of the MSM page change buttons. To set the task bar to auto hide, right click the task bar, select properties, and check “Auto hide the task bar”. The use of auto-hide is optional if you are running the 12x9 MSM screens on a 1280x1024 monitor as the larger monitors have enough physical space to fit both the MSM screens and the task bar simultaneously. 1.5 MachStdMill Editions MachStdMill operates either as a timed trial demo, or as a licensed edition. MachStdMill licenses are available for two editions: The Personal Edition and the Professional Edition. The Personal and Professional Editions of MachStdMill provide different levels of functionality. In addition, there are edition dependent differences in the EULA permitted usage for MachStdMill. A key difference is that MachStdMill Personal Edition is restricted to noncommercial personal use, while the Professional Edition allows commercial usage. With the release of MSM 2.0., CVI started offering the Personal Edition for a $0 license fee. It is important to understand that while a MSM Personal Edition can be "license fee free"; this does not mean that the MachStdMill Personal Edtiion software is not subject to license terms. It only means that the applicable Personal Edition software license does not require payment of a license fee. All users of any MachStdMill Edition are required to agree to the End User License Agreement (EULA) as a condition of installation and use of the software. See the EULA document for more information. 1.5.1 MachStdMill Trial Usage MachStdMill installs as a fully functional timed trial demo. At the end of the demo period, the software requires a valid, activated MachStdMill license to continue running. Copyright © 2009-2015 Calypso Ventures, Inc. Page 25 MachStdMill User Manual Revision 2.15 During the trial period, all MachStdMill production release functionality is available for evaluation. When in trial mode, MachStdMill indicates this by displaying the trial status in the upper right hand corner of each page as shown here: Figure 2: Trial Mode Indication So that the user may evaluate the differences between the editions, MachStdMill buttons which are functional in the Professional Edition, and not in the Personal Edition, are underlined. Below are examples of the probing page for a Personal Edition and the Professional Edition: Figure 3: Trial Period Probing Page Copyright © 2009-2015 Calypso Ventures, Inc. Page 26 MachStdMill User Manual Revision 2.15 Figure 4: Professional Edition Probing Page During the MachStdMill trial period, while the Professional Edition features are marked, they are fully functional for the trial period. 1.5.2 Licensed Editions Whether running in trial mode, or licensed, the MachStdMill version information and current license information is displayed on the reference page. 1.5.2.1 Personal Edition The MachStdMill Personal Edition, provides support for the core Mach3 functionality and is made available using the MachStdMill user interface. Both of the MachStdMill supported screen set resolutions are included in the Personal Edition. The MachStdMill 2 axis (X&Z) Lathe operations available with the Personal Edition are documented in the MachStdMill Lathe User Manual. A MachStdMill Personal Edition license is indicated in the upper right hand corner of each page as shown here: Copyright © 2009-2015 Calypso Ventures, Inc. Page 27 MachStdMill User Manual Revision 2.15 Figure 5: MachStdMill Personal Edition Indication A Personal Edition installation marks the Professional edition buttons (just as they are marked during the trial period), so that the operator will know that the button functions are unavailable. Professional Edition functionality is not activated with a Personal Edition license. 1.5.2.2 Professional Edition The MachStdMill Professional Edition, includes all the features of the Personal Edition. In addition, the Professional Edition also provides enhanced functionality not otherwise available with Mach3 V3. Key Professional Edition features include: Integrated Probing & Touch Plate Operations X & Y faces Z Surface Corner finding Vertical Edge and A& B Axis alignment measurement Pocket & post center finding Tool & WCO Tables Load, SaveAs, Report Advanced modes Measure TLO, Master Tool, TC Auto TLO, Skip RH Tools Mill-Turn Operations The ability to run Lateh G-Code with a mill is covered within the MachStdMill Lathe User Manual. A MachStdMill Professional Edition license is indicated in the upper right hand corner of each page as shown here: Figure 6: MachStdMill Professional Edition Indication A Professional Edition installation does not mark the Professional edition buttons (as all functions are available with this edition). This User Manual is written for the Professional Edition and describes all the functionality available with MachStdMill. Copyright © 2009-2015 Calypso Ventures, Inc. Page 28 MachStdMill User Manual Revision 2.15 1.5.3 MachStdMill Alpha, Beta & Eval Releases Calypso Ventures sometimes makes interim development Alpha and Beta or evaluation (“Eval”)Releases available to licensed MachStdMill users. By definition, Alpha, Beta and Eval Releases are not considered suitable for use in a production environment. MachStdMill Alpha releases will NOT run on a MSM trial installation. The PC must be activated with a valid MSM license to enable running an Alpha release. Development and evaluation releases are intended for testing and customer feedback and are not designed for ongoing use. Currently Alpha, Beta and Eval releases are set to expire a number of days after their release date. Expired development releases will not load after their expiration dates. This prevents development and evaluation releases from hanging around and becoming ongoing support issues. 1.6 MachStdMill Installation The installation process of MachStdMill is covered in the README file. Installation is the process of placing the MachStdMill files onto a PC which has Mach3 already installed. Please note that “Installation” is not the same as “Activation”. 1.7 MachStdMill Online/Proxy Activation vs. Operation Before reading further, the reader should be aware that “Activation” and “Operation” are also two different topics. 1.7.1 Activation: Activation is the process by which a trial installation is converted into a licensed installation or a deactivated installation is restored to licensed service after a move from one PC to another, or after changes to a system’s hardware configuration have performed on a deactivated installation’s PC. Activation or deactivation requires interaction with the 24/7 online license service. This interaction can either be direct (“Online activation”) or indirect via another PC (“Proxy Activation”). These processes are detailed in section 16. 1.7.1.1 Online Activation & Deactivation With online activation, the PC with the installation being activated communicates over the net directly to the license service. This is the quickest, most convenient method for activation (typically a 5-10 second fully automated process). Use of Online activation does require that the installation PC be online (at least for the online activation process duration). 1.7.1.2 Proxy Activation & Deactivation This method does not require the installation PC to be directly connected to the network. The use of offline activation allows you to avoid any need for a net connection to the PC running MachStdMill. The trade off is that utilizing offline activation requires some additional effort by the user (as MachStdMill can no longer provide online activation automation). Copyright © 2009-2015 Calypso Ventures, Inc. Page 29 MachStdMill User Manual Revision 2.15 1.7.2 MachStdMill Online/Offline Operation: A network connection is not required for MachStdMill to operate. For those that feel a religious fervor about either having, or not having, a net connection to a CNC control PC, the choice is yours to make. However, without a net connection you will not be able to utilize net oriented features. MSM will take advantage of a network connection if it is present. MachStdMill uses a network connection to enhance convenience and to provide access to network enabled features. Some examples of network enabled features are: Automated checking for software updates and update notification by email, and direct access to the MachStdMill user forum. Additional online oriented features are expected over time. However, they are not anticipated to be required for MSM operation. 1.8 User guidance re TLO techniques and optional hardware. As you read through the User Manual, you will encounter features which require support from optional hardware. Note: This section refers to topics covered within the body of the Manual and uses terms and abbreviations defined within those sections. The first time reader may want to return here after they have perused the rest of the manual at least once. The new MSM user often asks questions about “what combination is best for me?”. MachStdMill supports all the possible combinations of a) At least three different TLO techniques, b) Gage blocks, c) Two different touch plates, and d) An active probe tool. That makes for a lot of combinations. Explaining and documenting all these in the user manual was a non-trivial task. While the result is a manual which covers all the potential combinations, the number of combination can be confusing for the user new to MachStdMill. New MachStdMill users tend to wonder, what should I be doing first? Which of these combinations of TLO techniques & Optional hardware will really be the most useful to me? To help with these questions, here is the author’s (presumably informed) opinion: In order of increasing initial effort & expense: 1) Forget all about Probes and touch plates, just stick to doing what you’ve been doing before you ever heard of MSM. a. Pro: Copyright © 2009-2015 Calypso Ventures, Inc. Page 30 MachStdMill User Manual Revision 2.15 i. Least hardware effort and cost. ii. This is what the MSM Personal Edition supports. b. Con: i. You keep doing work for the control instead of having the control work for you. 2) Add a single TCP TP to the system. a. Pro: i. This gets you the ability to measure Tools as part of a tool change. 1. This is probably the most desired ability expressed by the beginningintermediate Mach user. 2. You can now handle mixed RH and NRH holders. ii. It’s cheap. The cost is a couple of dollars for a piece of PCB and some wire. iii. One TP input maps to the one Mach probe input an does not require electronics to interface both a probe and TP at the same time. b. Recommended TLO technique: i. Master Tool Mode! c. Con: i. You need the Professional Edition of MSM to get Probing operation support. Once you are using MSM Pro, you are all set (since the control support for both the TCP TP and MTM is built in). 3) Add a mobile TP for use with the TCP TP. a. Pro: i. This lets you stop using gage blocks and manual touch operations. ii. Still cheap. The 2nd TP may cost you nothing – the first piece of PCB you bought for the TCP TP probably has enough left over to make the Mobile TP. iii. Two Touch Plates can be interfaced easily to the single mach probe input as they are wired “in parallel”. b. Recommended TLO technique: i. Master Tool Mode. 4) Add an active 3d probe a. Pro: i. You suddenly gain all the MSM probing abilities. This will make your job setup effort immensely easier. b. Con: i. Cost is dependant on the probe tool you get. The range is $100 on up. ii. Now you need the control electronics changes to interface the TPS and Probe to the single mach probe input simultaneously. c. Recommended TLO technique: i. Master Tool Mode with the Probe Tool being the master tool. OK, do you see the pattern here? Master Tool Mode is the preferred operating approach. Copyright © 2009-2015 Calypso Ventures, Inc. Page 31 MachStdMill User Manual Copyright © 2009-2015 Calypso Ventures, Inc. Revision 2.15 Page 32 MachStdMill User Manual Revision 2.15 2 MachStdMill User Interface Controls 2.1 Conventions and Common Controls 2.1.1 Visual Consistency The MachStdMill visual design tries to meet the following UI goals: Consistent appearance of controls. Visually differentiated screen controls o So that users are not lead to try to click labels etc. To provide a cleaner, less cluttered appearance. o As compared to Mach3 V3 1024 screen set. Use of a non-distracting color scheme. o Avoidance of red/green state indications to assist users with red/green color blindness. Minimal use of flashing, rotating, texture changing, swirling graphic animation. o Except for a very few cases where that is required (ex: Mach Reset/Not Reset indication). 2.1.1.1 MachStdMill Screen Set Resolutions The MachStdMill package includes support for two different physical screen set resolutions: 1024x768 screens o An active Mach window area of about 1016x722, referred to as the “10x7 set”. 1280x1024 screens o An active Mach window area of approximately 1208x946, which is referred to as the “12x9 set”. MachStdMill installs the 10x7 resolution set by default. See the Settings-Common section of the manual for information about how to change the actively running resolution. This manual uses screen shots of the MachStdMill screen pages. While The 10x7 and 12x9 modes may appear slightly visually different (due to control spacing etc), the controls are the same and perform identical functions in all supported resolutions. Note: Do not attempt to load a resolution greater than the physical resolution of the monitor. If you do attempt to install the 12x9 screen on a 10x7 monitor, the controls necessary to change back to the 10x7 screen may be off the viewable portion of the monitor. A reinstall of MachStdMill will reset MachStdMill back to the 10x7 resolution (the smaller resolution 10x7 set is the default for new installs). 2.1.1.1.1 Four, Five and Six Axis Support The User manual illustrations use the MachStdMill 4 axis screens. MachStdMill also includes support for 5 and 6 Axis Mills. The 6 Axis screens are only available in the 12x9 resolution due to the screen space required for the additional 2 axes. Also the 6 axis 12x9 Run page removes the Copyright © 2009-2015 Calypso Ventures, Inc. Page 33 MachStdMill User Manual Revision 2.15 FRO And SRO sliders to accommodate the extra DROs. The override sliders are available on the flyout page (just as when using the 10x4 4 axis screens). Anne 2.1.2 Separation & Grouping of Functions The “Cleaner, less cluttered” design goal lead MachStdMill to separate and then group functionality by screen page. With MachStdMill, The G-Code “creating / loading / editing” functions are separated from the “running Gcode” functions. Work Coordinate Offset (fixture set up) operations are separated from tooling management. Mach’s logical I/O signals are separated from hardware signaling o Abstract logical signals (“probe active”) are distinct from interface hardware dependant signals (“the logical probe signal is physically an active low signal on pin “x” of port “y”). The MachStdMill page layout supports 8 main pages. Four of the main pages are used for the core working pages of the screen set. The additional pages are allocated to user expansion, and the less frequently used configuration settings and reference information. 2.1.2.1 Control Groupings The MachStdMill screen set is implemented via multiple pages which are accessed by page navigation buttons. Within a page, controls are grouped together into logical groupings which are denoted visually by “panels”. Here is an example of a panel with multiple controls: Copyright © 2009-2015 Calypso Ventures, Inc. Page 34 MachStdMill User Manual Revision 2.15 2.1.3 Basic MachStdMill Control types 2.1.3.1 Buttons All buttons in MachStdMill have a consistent visual style: Buttons are visually raised and appear to stand out from the panel background. MachStdMill buttons are a shaded grey when in the “off” state. Two button sub-types are used within MachStdMill: Action Buttons and State Buttons. 2.1.3.1.1 Action Buttons: Action buttons perform an action when pressed. This is indicated visually (by Mach) via an effect where the button “shrinks toward its center” when pressed, and returns to normal appearance when released. Here is an example of an action button: Here is the same button when depressed: 2.1.3.1.2 State Buttons State buttons indicate an “off/on” state. They are grey when “off” and a different color when “on”. Here is an example of a state button when “off”: And the same button when “on”: The color used for “on” is most often green (indicating that an option/control is “on”). A few buttons use yellow or orange as the “on” color – these denote conditions which are viewed as worth drawing the Operator’s attention to when they are “on”. 2.1.3.2 Lights / LEDs Mach provides indication of the state of many objects via the MachStdMill UI. These objects are not “settable” by the operator. This state information is conveyed visually as an illuminated indicator. Traditionally, this type of control is referred to as a “LED”, where “LED” is a term which denotes a visual control used to display an (On/Off) state 4. The practice of using the term 4 Mach3 V3 also uses LED as the name of a type of internal Mach information object which is available via the scripting interface. Copyright © 2009-2015 Calypso Ventures, Inc. Page 35 MachStdMill User Manual Revision 2.15 “LED” to indicate an On/Off state has become wide spread in the Mach community and this manual continues that vernacular usage. MachStdMill LEDs are flat in appearance, slightly raised or flush with the panel they are in. They are visually distinct from Buttons and are not “press-able”. All MachStdMill LEDs are grey in color when off and another color when on. Like buttons, the “on” color is most often green. Some LEDs are yellow or orange when on to indicate things that deserve a extra attention from the operator. For example, here is the Tool Length Offset active LED (Off state, i.e. TLO compensation not active): Here is the Tool Length Offset active LED in the ON state (i.e. TLO compensation active): MachStdMill uses “positive logic” so that the English text of a LED is generally consistent with the state indicated by the LED. 2.1.3.3 Information Displays A Mach3 user interface also needs to convey numeric and text information to/from the user. 2.1.3.3.1 Text Text information is conveyed to a user via a screen control called a “label”. A “label” is a screen control which displays text to the user. Here is an example of a Text label which displays the description of a tool in the tool table: All text label displays in MachStdMill have this visual appearance: inset or appearing as if they are behind the panel they are in. In general, Mach V3 only supports text output (from Mach to the User) via labels. Because of this, MachStdMill places an edit button “inside the label” for text items which can be changed by the user. Dialog boxes are used for handling user text input. There is an exception to this general rule. The Mach3 MDI control is special in that it handles user input as part of the control (See description of the MDI control in section 2.2.3.3). 2.1.3.3.2 Numeric Values Copyright © 2009-2015 Calypso Ventures, Inc. Page 36 MachStdMill User Manual Revision 2.15 Mach conveys numeric variable values to the user via the Screen Set. Numeric Values are displayed by MachStdMill in screen controls which are referred to as DROs (Digital Read Outs) 5. DROs are used for both input and output of numeric values. 2.1.3.3.2.1 Output Only Values (User Read Only) Some numeric values are not settable by the user, these are displayed in Read-Only (RO) DROs. For the V3 version of MachStdMill, a RO DRO is indicated by the lack of a DRO inner green outline 6. Here is an example of a RO DRO: 2.1.3.3.2.2 Input/Output Values (User Read/Write) MachStdMill shows numeric values which can be set by the user with read-write (RW) DROs. Here is an example of a RW DRO which displays a coordinate value: DROs which can be set by the user have a green edge highlight to indicate that they are R/W. MachStdMill labels DROs with “inset panel text” to identify the value being displayed. Clicking on the DRO value, will select and highlight the value, enabling the value to be changed. The Enter key sets the DRO value when you are done editing it. 2.2 Exploring Common Controls 2.2.1 Standard Windows Controls Since Mach3 is a windows program, the main Mach3 window has the standard Windows controls: 5 In Mach3 V3, a DRO is a data type in the scripting interface. Mach3 V3 does not natively implement the concept of a RO DRO. Any DRO can be selected by the operator and a value entered. However, for “RO” DROs (those which do not take an input value from the operator), Mach will overwrite the value entered by the user. 6 Copyright © 2009-2015 Calypso Ventures, Inc. Page 37 MachStdMill User Manual Revision 2.15 Figure 7: Standard Window Controls This figure shows the default windows controls 7. 2.2.2 Page Navigation Buttons & Tabs The primary MachStdMill screen pages are accessed via page navigation buttons which are located in a panel at the bottom of each screen page. Figure 8: Main Page Navigation Buttons This panel is common to all MachStdMill screen pages. Clicking on a page button will take you to the corresponding page. For example, if you select the User Exts button, you will see this page: 7 Note: The appearance of the title and menu bar will vary with the version of windows Mach is running on. Additionally, the menu bar may be absent as MachStdMill allows the user to turn off the Windows menus bar, see section 10.3.1 Copyright © 2009-2015 Calypso Ventures, Inc. Page 38 MachStdMill User Manual Revision 2.15 Figure 9: User Extensions Page The User Extensions page is a simple page which we will use to introduce some common MachStdMill controls and conventions. We start with the Page navigation panel at the bottom of the page. Notice that the current page is indicated by the button for the current page being illuminated. 2.2.2.1 Work setup and G-code Execution Pages The left four page buttons are the pages for Work setup and G-code Execution: Load WC Offset Tooling Run 2.2.2.2 User Extensibility MachStdMill provides a page with only the common work setup and execution controls. This is the “User Exts” page. The page is intentionally left mostly blank and is intended as a place where users can make/add modifications to include custom functionality. The presence of this page removes the need for a user to figure out how to create and integrate a new page into the screen set before being able to add a control with a screen designer. 2.2.2.3 Machine Configuration and Reference Pages The right three page buttons are the pages for Machine configuration and reference information: Settings Hardware Reference 2.2.2.4 Sub Pages Several of the main pages also have sub pages. Sub pages are accessed via tabs in the upper left portion of the page. Here is an example from the Run page: Figure 10: Tabbed Subpage Example All Page Navigation buttons and tabs are Grey when Off, and Green when On. 2.2.3 Common Controls: Work setup and G-code Execution Pages Several control groups are common to multiple MachStdMill pages. 2.2.3.1 Mach Message Displays Copyright © 2009-2015 Calypso Ventures, Inc. Page 39 MachStdMill User Manual Revision 2.15 Error / message Area Message History Mach Status Ticker Figure 11: Mach Message Displays 2.2.3.1.1 Error / Message display This text area is used by Mach to display multiple messages. Some examples include: G-code Comments as a G-code program is executed. Error messages from Mach. Strings passed to the Scripting Message() function. 2.2.3.1.2 Status Display This area is used by Mach3 to display error messages which are not displayed in the Error/Message display. The Status display is a scrolling ticker so that messages longer than the status display’s width can be seen. 2.2.3.1.3 Display history buttons 2.2.3.1.3.1 Clear History Button This button will clear the last/current message from the error/message display line and return the line to a blank condition. 2.2.3.1.3.2 View History Button This button will open the Mach3 log file of error/messages and display the log file using the nonG-code editor. For information about how to configure or change the default non-G-code editor, see section 10.3.1. This control provides a convenient way to view the history log, including messages which may have gone by too fast to read. 2.2.3.2 Mach Reset Button The Mach3 Reset button is an important control as it indicates to the Operator whether Mach is ready (i.e. is Reset) to control the machine. This control also indicates (indirectly) the state of the Mach E-Stop input signal (if E-Stop is active, Mach cannot enter the Reset state). Many of Mach’s capabilities are disabled unless Mach is “Reset” (e.g. ability to run G-code, jogging, IO handling). When Mach is in the Reset condition, the Reset Button will appear as: Copyright © 2009-2015 Calypso Ventures, Inc. Page 40 MachStdMill User Manual Revision 2.15 Figure 12: Mach Reset button –Reset State When Mach is not Reset, the Reset Button will blink – the animation makes the button blink “NOT Ready” 8: Figure 13: Mach Reset Button – NOT Reset State The appearance of this button is intentionally designed to alert the operator of a “not Reset” condition. Many people arrange their control hardware so that putting Mach into the Not Reset condition will (with a delay) cause an E-stop. For safety reasons the Mach Reset button should NEVER be relied upon to create an E-Stop condition in an emergency situation. E-Stop circuits are safety controls and should be appropriately implemented via fail safe hardware. 2.2.3.3 MDI Input MDI is an industry abbreviation for “Manual Data Input”. The MDI control allows the operator to enter G-code words, to create a G-code block, and then execute the block 9. The MDI control is activated by clicking in the MDI input area. The “Enter” key will toggle the MDI control between active and inactive. Here is the MDI control when inactive: Figure 14: MDI Input – Control Inactive 8 The picture is a static depiction of an animated, flashing button. For a detailed explanation of G-code syntax including Words, Blocks and EOB, see a G-code reference book such as “CNC Programming Handbook” by Peter Smid. 9 Copyright © 2009-2015 Calypso Ventures, Inc. Page 41 MachStdMill User Manual Revision 2.15 Here is the MDI control when active: Figure 15: MDI Input – Control Active When the MDI control is active, the white pop up area displays the MDI blocks which have been previously executed. To execute a G-code block via MDI, activate the MDI control, enter the desired G-code words and then press the Enter key. Pressing the Enter key is the equivalent of supplying the G-code EOB (End of Block) and causes the G-code block to be executed. When the MDI control is active, the Enter key does not deactivate the MDI control. This allows the operator to enter and execute multiple G-code blocks without deactivating the control. If the MDI control label is Yellow instead of Black, this is a warning indicator that the MDI action will not be executed immediately, but will be queued (due to the special Mach3 “inhibit” input signal being active). For more information on this topic see the discussion of the Inhibit LED in section 3.1.7.1. 2.2.3.4 G-code mode status It is often important to know the state of the Mach G-code interpreter, MachStdMill displays this information in the G-code status line. Figure 16: G-code Mode Status 2.2.3.5 Jogging Controls The jogging panel provides the commonly needed jogging controls. The panel supports keyboard and arrow key jogging modes as well as the use of MPGs. Since Jogging is a common operator action, the jogging panel is provided on all the Work Setup and G-code execution pages 10. 10 Note: Mach3 only allows jogging to occur from a page that has the jogging button, Since the jogging panel includes the jogging button, you may jog while on any page with this panel. This significantly mitigates an issue common to prior screen sets where a user tries to jog but is not able to because the jogging button is missing from the current screen page. Copyright © 2009-2015 Calypso Ventures, Inc. Page 42 MachStdMill User Manual Revision 2.15 Figure 17: Jogging Controls Panel 2.2.3.5.1 Jogging On/Off Jogging is disabled/enabled with the Jogging button. An axis can only be jogged when Jogging is enabled. When Jogging is enabled, the current jog mode button is also enabled. There are three primary jog modes supported by Mach3: Continuous, Step and MPG. The three jogging modes are mutually exclusive and Mach allows the selection of only one Jogging mode at a time. 2.2.3.5.2 Continuous Jogging Continuous Jogging mode is selected by the “Cont” button shown in the panel. When active, the jogging hot keys will move the corresponding axis as long as the key is depressed. The Jogging speed is set by the DRO to the right of the Cont Jog Mode button. The speed is entered into the DRO as a % of the rapid speed. You can also increase or decrease the jogging speed by pressing the “-“ or “+” buttons. 2.2.3.5.2.1 Fast Jog indication The “%” will be orange when “fast jogging” is selected (a shift key is active). To “fast jog”, press shift + a jog key or arrow. 2.2.3.5.3 Step Jogging In Step Jogging mode, the selected axis will be moved a fixed amount each time a jog key is pressed. The amount of movement is entered in the DRO to the right of the Step Jog mode button. Mach also allows the configuration of a set of jog steps in the Mach menu Config/General Config dialog box. 2.2.3.5.4 Cycle Incr Button The Cycle Increment button is multi-functional: 1. In Continuous Jogging Mode it will increment the “Jog speed %” by a fixed amount. The Jog Speed is cycled modulo 100%. This button can be used to quickly adjust the jog speed through its range. The amount of the increment is controlled by a configuration setting on the Settings-Common page. 2. In Step Jogging mode, the button will cycle thru the pre-specified step values each time the button is pressed. 2.2.3.5.5 MPG Jogging Copyright © 2009-2015 Calypso Ventures, Inc. Page 43 MachStdMill User Manual Revision 2.15 MPG jogging is selected by the “MPG” button. When MPG jogging mode is active, additional controls in the jogging panel become active: MPG axis and MPG Mode. 2.2.3.5.5.1 MPG Jog Axis This set of buttons is used to select the axis that the MPG will move. The buttons are mutually exclusive and only one axis at a time may be selected. 2.2.3.5.5.2 MPG Jog Mode There are four MPG jog modes supported by Mach3: Velocity – selected by the “V” button. Step/Velocity – selected by the “S/V” button. Single step – selected by the “S” button. Multi-step – selected by the “M” button. 2.2.3.5.5.3 MPG Feed Rate For the V and S/V MPG modes, the jogging feed rate is set with the Feed DRO positioned between the Axis and MPG Mode buttons. 2.2.3.5.6 Fly Out Jogging controls Some Mach3 users prefer to jog by clicking and holding a “Jog Arrow” key rather than by using a keyboard jogging key. This is supported via the jogging control section of the Fly Out panel (the Fly Out panel appearance is toggled by the Tab key). This portion of the Fly Out panel duplicates the Jog enable and Jogging mode select buttons and also provides Arrow action buttons to jog each axis. 2.2.3.5.6.1 Fast Jog indication The Fast Jog led indicates if “fast jogging” is selected. Press shift + a jog key or arrow, to get fast jogging mode. For an explanation of additional controls on the Fly Out panel, see section 10.1 Copyright © 2009-2015 Calypso Ventures, Inc. Page 44 MachStdMill User Manual Revision 2.15 2.2.4 Hot keys MachStdMill hot keys generally follow the windows convention of alt-<key letter> (where the key letter is related to the name of the function being invoked) 11. MachStdMill has the following hot key assignments: MachStdMill Function MachStdMill Hotkey Spindle CW (M3) Alt 3 Spindle CCW (M4) Alt 4 Spindle Stop (M5) Alt 5 Flood toggle (M7) Alt 7 Mist Toggle (M8) Alt 8 Block Delete toggle Alt B Jog increment Cycle Alt C Jogging On/Off toggle Alt J Load G-code Alt L Optional M1 Stop switch Alt M toggle Run / Cycle start Alt R Stop Alt S Single Step Alt T Rewind Alt W Pause (Feed Hold) Space 11 Note: In recognition of the entrenched key stroke habits within the Mach3 user base, the Feed hold hotkey assignment (Space bar) does not follow this convention. Copyright © 2009-2015 Calypso Ventures, Inc. Page 45 MachStdMill User Manual Revision 2.15 3 Tutorial: Loading, Previewing and Running G-code 3.1 General Work Flow A typical sequence of events when machining a part is: 1) Startup the machine 2) Load (for hand coded G-code or CAM output) or create (if using wizards) the needed G-code. 3) Simulate the program to have Mach3 check for errors and estimate run times. 4) Set up Work Coordinate offsets to support fixtures/stock 5) Set up tool table information for the tools to be used 6) Run the G-code program. The main MachStdMill screen pages correspond to the steps of this sequence. A note to new Mach3 users: If you are just learning Mach3, you can do all the actions in this section in what is known as “sim mode”. Simulation mode is what Mach3 provides when loaded on a PC without the parallel port driver or an external motion control device plug-in. This is a recommended, safe way to learn how Mach3 operates; any mistakes made while learning are much less likely to result in physically mangled metal. 3.1.1 Starting the Mill When Mach3 starts, it loads the default/last loaded Screen set. If you have installed MachStdMill, Mach should be set to load MachStdMill upon start up. MachStdMill starts up on the Load page so that you are ready to reference the machine and load G-code. 3.1.2 Loading Code Below is the Load page as it will typically appear once the machine is running and reset out of Estop so that Mach is Reset. Copyright © 2009-2015 Calypso Ventures, Inc. Page 47 MachStdMill User Manual Revision 2.15 Figure 18: Load Page on start up Many of the controls on the Load page have already been covered in section 2.2. Let’s look at the additional controls on the Load page. 3.1.2.1 G-code Window & G-code Filename The left hand side of the page shows a G-code window which displays the loaded G-code. Just below that is a Text display area which provides the name of the loaded G-code file. Copyright © 2009-2015 Calypso Ventures, Inc. Page 48 MachStdMill User Manual Revision 2.15 Figure 19: G-code Window and Filename Since no G-code is yet loaded, the G-code window is blank when Mach starts up. 3.1.2.2 G-code Button Panel To the right of the G-code window is a panel with action buttons to load or create G-code files. The buttons in this panel are: 3.1.2.3 Load Button This button opens a file dialog box and allows you to select and load a G-code file. 3.1.2.4 Recent Button This Button opens a dialog box that displays a list of the most recent G-code files loaded into Mach. 3.1.2.5 Edit Button When G-code is already loaded into Mach, this button sends the Loaded G-code to the configured G-code editor. The G-code editor can be used to make G-code changes. When the editor is closed the revised G-code is transferred back into Mach. Use the Mach3 Menu Config/General Config dialog box to set the G-code editor you wish to use. 3.1.2.6 Close Button This button unloads and closes the currently open G-code file. 3.1.2.7 Wizard Buttons The lower two buttons in the panel are: Last Wizard Copyright © 2009-2015 Calypso Ventures, Inc. Page 49 MachStdMill User Manual Revision 2.15 Pick Wizard These buttons are used to invoke Wizards to create G-code. For more information about the use of Wizards, see section 1. 3.1.2.8 G-Code Utility Button This button can be configured to invoke any Windows program which the user may like to use when creating G-Code. For more information, please refer to Section 15.9.2.2. 3.1.2.9 Tool Path Display Window Further to the right, next to the G-code Button Panel is the Tool Path display window and Tool Path control button panel. Figure 20: Tool Path Window and Buttons The Tool Path window shows a plot of the G-code tool path and Tool tip Z height. Mach supports panning, zooming and rotation of the tool path within the window, for more information see section 3.1.2.11.1 Copyright © 2009-2015 Calypso Ventures, Inc. Page 50 MachStdMill User Manual Revision 2.15 For now, set the “T Path” buttons to on (Green); this will enable display of the tool path when a Gcode file is loaded. See section 3.1.2.11.1 for explanation of the additional controls in the Tool Path button panel. 3.1.2.10 Referencing the Axes When a machine is first turned on, it has no way to know where the spindle is. It learns this by performing a reference operation. A common first operation after start up is to reference the axes so that the spindle is in a known location. During a reference operation, the machine moves each Axis until the Home switches are activated. Once the home position for each axis is found, the machine knows where the spindle is (within the Machine Coordinate system) along that axis and Mach3 then considers that axis to be “referenced”. Axis labels visually indicate the state of an Axis. If an axis is disabled, it’s label will be grey (this makes the label blend into the background and makes it easier to visually skip disabled axes when glancing at the screen). Enabled axis labels will be either yellow or green. Upon start up, you will note that the enabled axes labels are yellow in color. This indicates that the axes are not referenced and therefore Mach does not know the absolute position of the spindle along that axis. The following figure shows the Load page current coordinate position panel before any axes have been referenced. Figure 21: Axes not referenced The referencing operation is usually done when the machine is started and an action button is provided on the Load page to reference the axes. Pressing the “REF ALL” button will cause Mach to reference all enabled axes. When an axis has been referenced, the Axis label for that Axis changes to green to indicate that the axis is referenced. The following figure shows the same panel with all four axes referenced. Copyright © 2009-2015 Calypso Ventures, Inc. Page 51 MachStdMill User Manual Revision 2.15 Figure 22: Axes Referenced While Mach can be run with the axes unreferenced, it is not recommended. Many Mach operations implicitly assume that Mach knows the absolute position of the spindle wrt the machine coordinate system 12. Performing various operations with unreferenced axes can result in unexpected spindle movements. The example steps within this section assume that your machine has home switches. Press the “REF ALL” button to reference your axes before continuing 13. 3.1.2.11 Loading Sample G-code Now that we have identified all the controls on the Load page, let’s load a G-code program. When a G-code program is loaded several things occur. One of the actions Mach performs is a check of the G-code for syntax errors. If the loaded program contains errors they will be shown as they are found in the Error/Message bar. If you see an error message, you may use the History button to open the error log file. The following is a screen shot from a simple one line G-code program with an error: 12 This is not unique to MachStdMill, but is a characteristic of Mach3 v3. The same potential for problems exists when using other Mach3 v3 screen sets. MachStdMill decided not to prohibit operations with un-referenced axes as it was felt that this would impose too large a change from current Mach3 behavior. Instead, MachStdMill indicates that the axes are unreferenced. 13 Machines without configured home switches can be “referenced” manually to an arbitrary machine coordinate position by moving to the desired machine coordinate reference point and then pressing “REF ALL”. Copyright © 2009-2015 Calypso Ventures, Inc. Page 52 MachStdMill User Manual Revision 2.15 Figure 23: G-code error on load Note that the error is called out on the error line. (Line numbers within the G-code window can be toggled On/Off by double clicking inside the G-code window). Use the Load button to load up the MSM Happy Face sample G-code file (located in the mach3\gcode directory). Copyright © 2009-2015 Calypso Ventures, Inc. Page 53 MachStdMill User Manual Revision 2.15 Figure 24: Happy Face loaded Since the sample program has no errors, you should not see any error messages and your screen will look like the figure above. The G-code window now shows the loaded G-code. The highlighted line is always the current Gcode block within the program (i.e. the next block to be executed). Mach has also plotted the tool path of the program and displayed it in the Tool Path window. By default red lines are rapid moves, blue lines are feed rate moves and purple lines are circular arcs. The right side of the Window uses the scale and Green arrow to indicate tool tip height/depth. 3.1.2.11.1 G-code Window and Mach3 Line Numbers There are two types of line numbers which can be displayed in the G-code window. The Figure below shows “G-code N line numbers”. The “N line numbers are part of G-code syntax and may or may not be present in a specific G-code program (they are optional). There are also “Mach3 G-code line numbers”. Some error messages may refer to a Mach3 G-code line number. These line numbers can be toggled On/Off by double clicking in the G-code window. Copyright © 2009-2015 Calypso Ventures, Inc. Page 54 MachStdMill User Manual Revision 2.15 The next figure shows the G-code window for Happy Face with the Mach3 line numbers toggled on. Figure 25: Mach3 G-code Line Numbers 3.1.2.11.2 Tool Path Display Manipulation The tool path display can be manipulated to show areas of the path of interest to the operator. To rotate the Tool path display, left-click and drag the mouse cursor while holding down the mouse button. To pan the tool path display, right-click and drag the mouse cursor while holding down the mouse button. To zoom the tool path display, shift then left-click and drag the mouse cursor while holding down the mouse button. Double-clicking the tool path will reset the display to the initial state. To return the tool path the initial display, press the “Regen” action button. This will regenerate the tool path. Now notice the Coordinates panel: While loading the G-code, Mach3 also scanned all the movement in the program and determined the minimum and maximum extents of the program for each axis. You can use these values to check whether the program is going to try to move beyond the working envelope of your machine. Copyright © 2009-2015 Calypso Ventures, Inc. Page 55 MachStdMill User Manual 3.1.2.12 Revision 2.15 Simulating the code We now have a pretty good initial idea of what the program will do when run, but how long will it take to run the program? Click the “Sim” (for simulation) button under the tool path display. Mach will make a pass thru the program and (using the configured values for rapid and feed rate moves) will estimate the time the program will take to run. The result is shown in the DRO next to the Sim button. One should realize that the simulation result is only an estimate. The actual run time will be dependant external events such as the time taken for tool changes 14. Figure 26: Estimated run time shown 3.1.3 Setting Work Coordinate Offsets Now, use the page navigation buttons at the bottom of the page to change to the WC Offset page. 14 The Mach3 simulation calculations assume tool changes are instantaneous. Copyright © 2009-2015 Calypso Ventures, Inc. Page 56 MachStdMill User Manual Revision 2.15 Figure 27: Work Coordinate Offset - Touch Page Let’s briefly examine some of the WC Offset–Touch Off page panels which we have not seen before. For information on additional panels on the page, see section 3.1.8. 3.1.3.1 Work Coordinate Offset Selection Panel Figure 28: WC selection panel Mach supports the use of multiple Work Coordinate (WC) offsets. This panel allows you to select the Work Coordinate Offset (WCO) you want to use. It also allows you to save and load WCO tables as well as create a report of the current WC offsets. Copyright © 2009-2015 Calypso Ventures, Inc. Page 57 MachStdMill User Manual Revision 2.15 The Happy Face program uses the default WCO (G54). If G54 is not already shown in the WCO DRO, press the “G54” button. 3.1.3.2 Work Coordinate Panel This panel provides detailed information about the calculation of the current WC from Machine Coordinates (MC). It also provides controls to set the WC zero of each axis. Figure 29: WC offset detail panel Notice that the WC zeros are currently the same as the MC zeros. This is because a) the reference operation sets the Machine Coordinate zero as each axis is referenced and b) the WC offsets are equal to 0. I.e. the WC axes are currently positioned in the same physical places as the MC axes. Now consider the extents that Mach calculated for the Happy Face program: X = +0.0000 to +3.7375 Y = -3.7375 to +0.0000 Z = -0.1250 to +1.0000 The X and Y extents tell us that the program was coded to cut in Work Coordinate Quadrant 4 15. This is convenient as most milling machines are setup so that the Machine coordinates are in Quadrant 4. We need to tell Mach where the WC X,Y zeros are (i.e. the WC offsets) before running the program. Usually, this is accomplished by setting the WC zero to a corner of the raw stock. MachStdMill provides support for multiple methods of doing this and the relevant methods are covered in detail later in the manual. 15 This exercise assumes the machine’s machine coordinates are physically in Quadrant 4. If not, you may need to adjust where the XYZ zero is set for this exercise. For those that may not be familiar with the “quadrant terminology used for Cartesian coordinates in math, think of a the X axis as the East-West line on a compass and the Y axis as North-South line. Quadrant 1 is then the North-East quarter circle of the compass, Quadrant 2 is the North-West, Quadrant 3 the SouthWest and Quadrant 4 the South-East. Section 4 provides more explanation of coordinate systems. Copyright © 2009-2015 Calypso Ventures, Inc. Page 58 MachStdMill User Manual Revision 2.15 For this exercise, we will be “cutting” in air and so we don’t need to be precise about where we set the X,Y zero – we simply want the WC offsets set such that the Happy Face program will not hit the machine limits. We will use the MDI line to move the spindle to where we want to place the X,Y zero. Using the MDI line, enter the following G-code Block: G53 G90 G00 Y-1.0 X1.0 The WCO panel should now look like this 16: Press the Zero button for the X and Y axes to set X,Y zero to the current MC position. The WCO panel will then look like this: We have just set up the X,Y WCO needed for the Happy Face. What about the Z zero? We see that the Z extents are -0.1250 to +1.0000. We need at least 1.1250 (1.0000+0.1250) of Z height to run the program. Let’s arbitrarily move the spindle down 2.000 in Z and set the WC Z0 there – that will give us plenty of room (As long as there is more than 0.1250 between that spot and the part surface). Use MDI to enter G53 G90 G00 Z-2.0 and then (when movement is finished) press the Z Zero button. The WCO panel will then look like this: 16 One may notice that we moved to Y-1.0 and the DRO shows -0.9999. The actual position internal to Mach3 contains many more digits than are displayed in the DRO. Also remember that axes are positioned in steps and therefore not every commanded position is perfectly achievable. These are just two reasons that Mach3 may a value that is very close but not exactly equal to the commanded position. Do not be concerned about the difference for this tutorial. Copyright © 2009-2015 Calypso Ventures, Inc. Page 59 MachStdMill User Manual Revision 2.15 We have now set up a WCO appropriate for the program. 3.1.4 Setting up Tools The sample Happy Face program uses two tools. We are not going to actually cut the happy face as we work thru the tutorial – i.e. we will not be physically mounting the tools when they are called for. This allows us to skip (for the moment) the details of Tool setup and the controls on the Tooling Page. For now just follow the instructions here step by step. Tool handling is covered in detail in later sections. 3.1.4.1 Current Tool Information Panel This panel shows information about the currently loaded tool. Figure 30: Current Tool Information Panel We will be running the Happy Face program which uses two tools. Next we will put the info for the needed tools into the tool table. In the If your current tool is not 1, click the tool number DRO, enter 1 and then the enter key. Now that you have the information for tool 1 showing, set the values as show below: Copyright © 2009-2015 Calypso Ventures, Inc. Page 60 MachStdMill User Manual Revision 2.15 Figure 31: Happy Face Tool 1 data Now change to tool 2 and set it’s data as shown below: Figure 32: Happy Face tool 2 data You have just set up the tool information for the Happy Face. 3.1.5 Run Pages: Running G-code We have now Loaded and simulated the G-code program (Load page) Set the WC zero point to our (imaginary) stock (WC Offset - Touch Page) Set up the needed tools (2 tools in this case) (via the WC Offsets Touch Page) You may have noticed that the general work flow transverses the main page buttons in order from left to right – this is typical for many jobs, and the MachStdMill pages were ordered to facilitate this general work flow. Next we will examine the pages used to start, stop and control the running of G-code Programs. 3.1.6 Run Page Now use the page navigation buttons at the bottom of the page to change to the Run page. Copyright © 2009-2015 Calypso Ventures, Inc. Page 61 MachStdMill User Manual Copyright © 2009-2015 Calypso Ventures, Inc. Revision 2.15 Page 62 MachStdMill User Manual Revision 2.15 Figure 33: Happy Face – 10x7 Run Page The Run pages have some slight differences between the 10x7 and 12x9 resolutions. The 12x9 resolution has sufficient screen space to include vertical speed & feed override sliders, while the 10x7 screen does not have space for the sliders (they are available on the fly out page). Other than this difference and some minor variation in the placement of the page’s controls, the pages have the same functionality. Copyright © 2009-2015 Calypso Ventures, Inc. Page 63 MachStdMill User Manual Revision 2.15 Figure 34: Happy Face 12x9 Run page On the Run page we see the same code (we just changed the page view of the currently loaded Gcode file), but the G-code and Tool path displays are smaller in size. The smaller control size is necessary to make space on the page for the various controls which are used to control Mach3’s execution of a running G-code program. While there are many controls on this page, there are only 3 panels that we have not looked at previously: The Run Button panel, which controls starting, pausing and stopping G-code execution, The coordinate display panel, which displays the current Tool position, and The Run status panel which contains controls for tool changes, overrides, and other misc. controls. All of these controls are covered in detail in other sections of the manual. To run the Happy Face, we only need to learn a few more basic controls, all of which are present on the alternate run page. We will use the alternate (simplified) run page to describe the core controls. Click the sub-page tab labeled “Path” (near the top of the page) to change from the full run page to the simplified or “big path” run page. Copyright © 2009-2015 Calypso Ventures, Inc. Page 64 MachStdMill User Manual Revision 2.15 3.1.7 Simplified Run Page Figure 35: Happy Face large path run page Let’s take a brief look at the controls on the page which we have not seen before. 3.1.7.1 Run Button Panel. There is a panel for starting, pausing and stopping G-code programs: Figure 36: Simple G-code Program Run Control Panel Copyright © 2009-2015 Calypso Ventures, Inc. Page 65 MachStdMill User Manual Revision 2.15 3.1.7.1.1 Rewind Rewind is an example of an Action Button – when pressed the button will “rewind” the program to the start. 3.1.7.1.2 Single Block Sgl Block is an example of a State Button. When Sgl Block is on, Mach will execute only one Gcode block (the G-code words shown in the highlighted line in the G-code windows) each time that the run (Cycle Start) button is pressed. This facility allows you to step thru a program to execute it block by block. Click the Sgl Block button to see how the button indicates that the option is now active. Click it again to turn it off (we won’t use Single block mode for the example program). 3.1.7.1.3 Inhibited LED In between the Single block and rewind buttons is a LED: “Inhibited”. Mach has a feature where an external input signal can “inhibit” execution of G-code until the signal is inactive. This LED indicates if that input option is currently active. If it is, the G-code will not run even though the Run/Cycle-Start button has been pressed. The inhibited signal is often controlled by safety switches, for example a door switch on the door to an enclosed mill. Warning: Mach’s “inhibited” state does not cause Mach to ignore commands and controls activated while in the inhibited state. Instead, the commands are queued up for execution whenever the inhibited state is deactivated. Thus, if nothing is happening when you are pressing buttons, Mach may be “inhibited”… but it will become very “uninhibited” and start executing queued up commands when the inhibit signal goes inactive…. This has been known to be a surprise to more than one Mach3 user. The inhibited led is located near the primary Run buttons where the operator is more likely to see it. Note: The inhibit action also applies to the use of the MDI control. When Mach is inhibited, MachStdMill changes the MDI Label from Black to Yellow as a warning. 3.1.7.1.4 Run (Cycle Start) This button starts execution of the loaded G-code program. (Cycle Start is a common industry name for this button). 3.1.7.1.5 Pause (Feed Hold) Copyright © 2009-2015 Calypso Ventures, Inc. Page 66 MachStdMill User Manual Revision 2.15 This button pauses execution of the loaded G-code program. (Feed Hold is a common industry name for this button). Note that since Mach internally uses a buffered control architecture, pausing is not an instantaneous action (the already buffered information must be completed before the program will pause). 3.1.7.1.6 Stop This button stops the execution of the loaded G-code program. Stop is an immediate action. Mach’s Stop action does not do controlled deceleration of movements, it just stops motion immediately. Depending on the machine hardware and the conditions when Stop is pressed, this may result in a loss of absolute position accuracy and it may be necessary to re-home the machine after a stop operation. 3.1.7.1.7 Run in Reverse This button runs the loaded G-code in reverse 17. It is easiest to think of this as a button which does two sequential actions: set the run direction to reverse, followed by the Run button. 3.1.7.2 Run Condition LEDs Panel This panel indicates some key running states/conditions of the G-code program and machine. Figure 37: Run Conditions LED Panel 17 There is a long unresolved bug report that Mach3 fails to put the cut material back on the stock when running in reverse… Copyright © 2009-2015 Calypso Ventures, Inc. Page 67 MachStdMill User Manual Revision 2.15 3.1.7.2.1 Tool Change (TC) LED This LED indicates if a tool change sequence is active. 3.1.7.2.2 Tool Length Offset (TLO) LED This LED indicates if a Tool Length Offset is applied. 3.1.7.2.3 Dwell LED This LED indicates when Mach is waiting for a Dwell time to complete. 3.1.7.2.4 Spindle RPM OverRide (SRO) LED This LED indicates when the Spindle RPM has been overridden. 3.1.7.2.5 Feed Rate OverRide (FRO) LED This LED indicates when the Feed rate has been overridden. 3.1.7.2.6 Elapsed RUN Time (ET) DRO This DRO provides the current elapsed run time of the program. 3.1.7.3 Current Coordinates DRO Panel 3.1.7.3.1 Coordinate DROs These DROs display the current coordinate of the tool path. These DROs are “multi-modal”, the values displayed can be either Work Coordinates (the default) or Machine Coordinates. Figure 38: Current Coordinates Panel 3.1.7.3.2 Machine Coordinate System DRO Display Selection Button This button selects the display of either Work Coordinates or Machine coordinates. At this point, the program is rewound, ready to go and the run page should look like this: Copyright © 2009-2015 Calypso Ventures, Inc. Page 68 MachStdMill User Manual Revision 2.15 Figure 39: Happy Face Rewound As Mach runs G-code, Mach will dynamically update information on the screen to show G-code status. E.g. The current position DROs update as the tool moves and the Tool Path is highlighted (white dots) as it is cut. Now that we are familiar with the controls on the simplified Run page, it’s time to make a Happy Face… Press the Run/Cycle-Start button and the program will start running. Copyright © 2009-2015 Calypso Ventures, Inc. Page 69 MachStdMill User Manual Revision 2.15 Figure 40: Happy Face during execution Note: the above screen shot was taken with the path display rotated a bit - just to make it easier to execution progress. When the program is finished, it will stop at the end and your screen will look like this: Copyright © 2009-2015 Calypso Ventures, Inc. Page 70 MachStdMill User Manual Revision 2.15 Figure 41: Happy Face Program Finished Congratulations, you’ve just used MachStdMill with Mach3 to draw the Happy Face. 3.1.8 Full Run Page This section details the additional set of G-code running controls, available on the full run page, which have not already been described. Copyright © 2009-2015 Calypso Ventures, Inc. Page 71 MachStdMill User Manual Revision 2.15 Figure 42: 10x7 Run Page 3.1.8.1 Run block panel 3.1.8.1.1 Coolant Control Group 3.1.8.1.1.1 Flood This button toggles On/Off the Mach3 Flood coolant output signal. 3.1.8.1.1.2 Mist This button toggles On/Off the Mach3 Mist coolant output signal. 3.1.8.1.2 Spindle Control Group 3.1.8.1.2.1 CW This button starts the spindle rotating in the Clockwise (CW) direction. 3.1.8.1.2.2 Off This button stops spindle rotation. Copyright © 2009-2015 Calypso Ventures, Inc. Page 72 MachStdMill User Manual Revision 2.15 3.1.8.1.2.3 CCW This button starts the spindle rotating in the Counter-Clockwise (CCW) direction. 3.1.8.1.3 Run Options Group 3.1.8.1.3.1 Edit This button opens the currently loaded G-code program with the G-code editor. 3.1.8.1.3.2 Inhibited LED See Section 3.1.7.1.3. 3.1.8.1.3.3 Rewind See Section 3.1.7.1.1. 3.1.8.1.3.4 Single Block See section 3.1.7.1.2. 3.1.8.1.3.5 Block Del This button activates the Block Delete option. When Block Delete is active, G-code blocks preceded by a forward slash (/) are not executed. 3.1.8.1.3.6 M1 Stop This button activates the M1 Stop option. When M1 Stop is active, G-code execution will stop when an M1 is encountered. 3.1.8.1.3.7 Set Next Line This action button sets the next line of the G-code to execute. The next line number to execute is set via the corresponding DRO in the panel 18. 3.1.8.1.3.8 Run From Here This action button sets the next block to execute. The next block is the one shown in the highlighted line of the G-code window. 3.1.8.2 Current Coordinates Panel 3.1.8.2.1 Axis zero actions 3.1.8.2.1.1 Goto Zero This action button moves the spindle to the current work coordinate system origin. 3.1.8.2.1.2 Zero These action buttons set the zero point for the corresponding axis to the current position of the axis. 3.1.8.2.2 Multimode DROs 18 To be more precise, this could have been called “Set Next Block”. Copyright © 2009-2015 Calypso Ventures, Inc. Page 73 MachStdMill User Manual Revision 2.15 The DROs in the panel display coordinate information about the tool tip location. The information displayed is controlled by the “Machine Coords” and “Dist to Go” buttons. When both buttons are off, the DROs display the current position of the tool in the current Work Coordinate system. 3.1.8.2.2.1 Machine Coords Button When this button is on, the DRO will display position in machine coordinate system. 3.1.8.2.2.2 Dist To Go Button When this button is on, the DRO will display “distance to go” in the current WC system. This is the distance the tool has to move to get to the next G-code destination location. 3.1.8.2.3 Reference buttons 3.1.8.2.3.1 Ref Button These action buttons initiate a reference operation for the corresponding axis. 3.1.8.2.3.2 Ref All Button This action button initiates a sequenced reference operation for all axes. 3.1.8.2.4 Soft Limits Button This button toggles On/Off the Mach3 Soft Limits checking feature. Refer to the Install & Config manual for more information about how to configure this feature. 3.1.8.2.5 Axis scale DROs and LEDs Each Axis can be independently scaled. A scale factor of 1.0 means the axis movements are not being scaled. The DROs are used to enter the desired scaling factor for the corresponding axis. If the scale factor is not equal to 1.0, the corresponding axis scale LED will be activated to inform the operator that a scaling factor is active 19. 3.1.8.3 Misc. G-code status and control panel This panel provides G-code run time status and misc controls. 3.1.8.3.1 Tooling Status Group 3.1.8.3.1.1 Curr Tool This DRO displays the number of the current tool. 3.1.8.3.1.2 TC LED This LED indicates when a Tool Change operation is in progress. 3.1.8.3.1.3 TLO LED This LED indicates when a Tool Length Offset (TLO) is active. 19 Note, a negative scale factor will reverse the axis. E.g. a scale factor of -0.5 will both make the image half as large in X and flip it symmetrically about the Y axis. Copyright © 2009-2015 Calypso Ventures, Inc. Page 74 MachStdMill User Manual Revision 2.15 3.1.8.3.1.4 H Index This DRO displays the H register index value for the current TLO. This is generally the number given by the last H G-code word. A value of 0 indicates that no offset index is selected. NOTE: This DRO requires the use of Mach versions 3.43.66 and later. Earlier Mach versions did not have the API needed for this DRO, and therefore on earlier versions the DRO will always show a 0 value. 3.1.8.3.2 Spindle info Group 3.1.8.3.2.1 S DRO This DRO shows the requested Spindle RPM as set by the G-code S Word. It can also be used to set the S word value. 3.1.8.3.2.2 RPM DRO This DRO shows the actual spindle RPM 20. 3.1.8.3.2.3 SRO LED Whenever the SRO % DRO is not set to 100%, the SRO led will be on to indicate that a Spindle RPM Override condition exists. 3.1.8.3.2.4 SRO % DRO The SRO % DRO and the vertical slider control can both be used to manually adjust the spindle RPM from the S Word value. The slider can be dragged up/down to adjust the RPM, and the DRO will show the % of adjustment. A percentage may also be entered directly into the SRO % DRO. For the 10x7 resolution the Slider is accessed via the Fly out page (refer to section 10.1). For the 12x9 resolution the Slider is present on both the full run page and the Fly out. 3.1.8.3.3 Feed rate info Group 3.1.8.3.3.1 F DRO This DRO shows the requested Feed rate as set by the G-code F Word. It can also be used to set the F word value. The label for the F DRO is “smart” – it will display “in” or “mm” depending on the current units mode (G20 or G21). 3.1.8.3.3.2 Feed DRO This DRO shows the actual current Feed Rate. 3.1.8.3.3.3 Radius Correction LED This LED indicates when the blended feed rate is including corrections for the A axis radius. 3.1.8.3.3.4 FRO LED 20 This DRO requires that the Mach Index signal be used and configured in Ports&Pins. Copyright © 2009-2015 Calypso Ventures, Inc. Page 75 MachStdMill User Manual Revision 2.15 Whenever the FRO % DRO is not set to 100%, the FRO led will be on to indicate that a Feed Rate Override condition exists. 3.1.8.3.3.5 FRO % DRO The FRO % DRO and the vertical slider control can both be used to manually adjust the Feed rate from the F Word value. The slider can be dragged up/down to adjust the rate, and the DRO will show the % of adjustment. A percentage may also be entered directly into the FRO % DRO. For the 10x7 resolution the Slider is accessed via the Fly out page (refer to section 10.1). For the 12x9 resolution the Slider is present on both the full run page and the Fly out. 3.1.8.3.4 RRO LED Whenever the Rapid rate is not set to 100%, this LED will be on to indicate that a Rapid Rate Override condition exists. 3.1.8.3.5 Dwell LED This LED will be on whenever Mach is executing a dwell period. 3.1.8.3.6 X/Y Rotd LED & DRO This LED will be on whenever the current coordinate system is rotated to an angle other than 0 degrees. The coordinate rotation amount is shown in the corresponding DRO. 3.1.8.3.7 CV & ES Buttons These action buttons select either Mach’s Constant Velocity (CV) or Exact Stop (ES) mode. They also indicate which mode is active. The two modes are mutually exclusive, selecting one, will turn the other one off. 3.1.8.3.8 WC DRO This DRO shows the current work coordinate system. 3.1.8.3.9 Z Inhibit Group See section 10.1.4 for a description of these controls. 3.1.8.3.10 ET DRO This DRO shows the total elapsed running time of the current G-code program. 3.1.8.3.11 Teach Button This button activates the Mach3 “teach” facility. When this button is activated, G-code commands and movements are “recorded” and captured in file. When the button is deactivated, capture stops and the file is closed. The captured commands can be used to “learn” and repeat a sequence of commands. For more information refer to the Mach3 Install & Config manual. Copyright © 2009-2015 Calypso Ventures, Inc. Page 76 MachStdMill User Manual Revision 2.15 4 Work Coordinate Offsets When a G-code program is setup to run on a machine, one of the major purposes of the setup process is to locate the stock/material and tell the machine were the G-code program’s X,Y,Z zero point is. This is accomplished by setting appropriate Work Coordinate Offsets (WCOs). This section reviews the concepts of Work Coordinate systems and the facilities provided by MachStdMill for setting Work Coordinate Offsets. 4.1 Work Coordinate Systems The machine coordinate system is fixed in location. The size and location of the machine coordinate system is determined by the machine’s physical hardware. Machine Coordinate (MC) System MC Z MC Y MC X Figure 43: Machine Coordinate Axes Mach3 supports the use of multiple Work Coordinate systems. Their spatial locations are generally different than the Machine coordinate system. Copyright © 2009-2015 Calypso Ventures, Inc. Page 77 MachStdMill User Manual Revision 2.15 MC & WC MC Z MC Y WC Z MC X WC Y WC X Figure 44: MC and a WC system The WC axes are a simple spatial shift of the machine coordinate (MC) axes 21. The amount of shift in a given direction is referred to as the Work Coordinate Offset. Each axis may have a different amount of shift (Offset). MC to WC relationship WC = f(MC); where f = translation MC Z WC = MC - WCO WCOy MC Y WCx = MCx - WCOx WCy = MCy - WCOy WC Z WCz = MCz - WCOz MC X WC Y WCOz WC X WCOx 21 This is true most of the time – a WC can also be rotated wrt to the MC, ignore that for this discussion Copyright © 2009-2015 Calypso Ventures, Inc. Page 78 MachStdMill User Manual Revision 2.15 Figure 45: WC, WCO and MC Relationship By setting the Work Coordinate Offset (WCO) values, you are positioning the WC Zero point to the position in space you want to use as WC zero. The WC Zero point is the often set to be a corner of the raw material stock for a part. The MachStdMill facilities for setting WCOs, both manually and via “touch off” operations, are described in this section. Touch off operations include the ability to use a touch plate for the gage block when setting Z-Zero. For a description of WCO setting via MachStdMill’s probing support, see section 6.2. The following figure shows the WC Offsets Page, Touch Off sub page. Figure 46: WC Offsets - Touch Off Page This page supports manual setting of WC Offsets and setting WC Offsets by performing “Touch” Operations. Copyright © 2009-2015 Calypso Ventures, Inc. Page 79 MachStdMill User Manual Revision 2.15 4.2 Setting WCOs Manually 4.2.1 Coordinate and Offset Values Panel For the currently selected work current offset, this panel provides details of the coordinate and offset values that result in the current position location. Figure 47: WC Offsets Detail Panel Offsets for the current WC may be entered manually into the DROs in the WC Offset Column of this panel. The panel is designed to display, in a row, the WC calculations for each axis. Due to the internal structure of Mach, the WC Curr Position column of the row equation, for the X and Y axes may not be correct in all circumstances. The X and Y WC Curr position values are displayed by mach’s Work Coordinate DROs) and therefore their values will not match the panel equation under the following conditions: 1. A G68 XY plane rotation is in effect. Figure 48: WC Offset Detail Panel Exception Condition When these conditions are true, the equal sign in the panel changes as shown above to let you know that panel equation is incomplete / incorrect. 4.3 Touch Off 4.3.1 Touch block panel This panel has a graphic that illustrates the available touch off operations. The blue arrows on this panel are graphic action buttons. Copyright © 2009-2015 Calypso Ventures, Inc. Page 80 MachStdMill User Manual Revision 2.15 Figure 49: WC Touch Off Graphic Button Panel To use the graphic buttons to set a WC Offset, position the current tool on a surface (vertical surface for X,Y Offsets, horizontal top surface for Z Offset) and then click the corresponding Arrow button graphic within the panel. The offset for that axis will be set from the current position of the tool (using the tool table geometry of the current tool). 4.3.1.1 Touching to Set a WC Axis Zero 4.3.1.1.1 X/Y Zero from Edge Finder The following figure shows a traditional edge finder being used to locate an X axis edge. Copyright © 2009-2015 Calypso Ventures, Inc. Page 81 MachStdMill User Manual Revision 2.15 Figure 50: Edge Finder When the edge finder is just touching the part edge, click the blue Touch X+ arrow to set X zero to the edge. The radius offset amount used is taken from the tool table geometry for the current tool. Therefore it is important the diameter of the edge finder has been accurately entered into the tool table before doing this operation. 4.3.1.1.2 Z Zero from Fixed Length Tool and Gage Block The following figure show an example of using a fixed length tool and a gage block to set Z zero to the top surface of the part. Copyright © 2009-2015 Calypso Ventures, Inc. Page 82 MachStdMill User Manual Revision 2.15 Figure 51: Fixed Length Tool Z Touch Off This gage block happens to be of the indicating type that lights up when the tool tip touches the top of the block. The gage block height has to have been configured prior to use of the gage block. The TLO used is taken from the tool table geometry for the current tool. Therefore it is important that the TLO for the tool has been accurately entered into the tool table before doing this operation. 4.3.1.1.3 Z Zero from Dial Gage Touch Tool The following figure shows an example of using a dial gage touch tool to Set Z Zero to the top surface of the part. The use of a dial gage touch tool avoids the need for a gage block (since sharp tool tips are not used to touch the part there is no chance of overshooting and marring the part or the tool’s cutting edges). As a gage block is not typically used with a dial gage touch tool, the gage block height will normally be set to 0. Copyright © 2009-2015 Calypso Ventures, Inc. Page 83 MachStdMill User Manual Revision 2.15 Figure 52: Z Zero from Dial Gage Touch Tool The dial gage touch tool is lowered to the part until the dial gage reads zero. This make the physical length of the dial gage tool the same as when it’s TLO was measured (See section 5.2.3.1.1.1). When the touch tool’s dial is reading zero, click the Set Z Zero blue arrow to set the zero height. The TLO used is taken from the tool table geometry for the current tool. Therefore it is important that the TLO for the tool has been accurately entered into the tool table before doing this operation. 4.3.1.2 X,Y No Radius Offset Button This button controls whether the Offset is set from the edge of the current tool or from the center of the current tool. Off: The diameter of the current tool is used in the offset set calculation. On: The offset is set to the position of the center of the current tool (tool diameter is ignored). 4.3.1.3 T-Plate Active LED This LED indicates when the touch plate is active. If you are using a “mobile” touch plate as your gage block, you can touch the plate to the tool and see this LED activate 22. This is commonly done to verify operation of the touch plate before using it in a probing operation. 22 This is ONLY true if using the “one signal” interface. This will not work when using the “two signal” interface. See section 6.1.3 for more information. Copyright © 2009-2015 Calypso Ventures, Inc. Page 84 MachStdMill User Manual Revision 2.15 4.3.1.4 MasterT Mode LED This LED indicates that Master Tool Mode is active. Master Tool Mode is described later in the manual. 4.3.1.5 WC Z Zero Setting For Z-Zero setting, the tool’s length will be accounted for if TLO is active when the “Set Z Zero” button is used. 4.3.1.5.1 Gage Block Height The gage block height used is the value configured for the G-Blk height on the Settings-common page. 4.3.2 Current Tool Information Panel This panel provides geometry information for the current tool (the current tool is always used for the touch off operations). 4.3.3 Work Coordinate Selection Panel This panel shows the current offset name (of the offset that will be altered by a touch off operation). It also allows selection of a different offset (by changing the current offset to the one desired). Figure 53: Work Coordinate Selection Panel Direct buttons are provided for G54-G59 (these are the most commonly used coordinate systems). Other coordinate offset sets may also be used and are selected via G-code (entered in the MDI panel or by a G-code program). The panel also provides buttons to edit, load, save and create a report of the current Work Coordinate offset table. 4.3.3.1 Edit This button opens the Mach3 Dialog box that allows you to directly edit the WCO values in Mach’s internal control memory. The dialog also allows you to make any WCO active by selecting the desired WCO entry from the table. Saving from this dialog will save any changes into the Mach3 Control memory. Copyright © 2009-2015 Calypso Ventures, Inc. Page 85 MachStdMill User Manual Revision 2.15 4.3.3.2 Save This button saves the current WCO values to a persistent internal Mach storage location. Depending on the option setting in Mach’s General Config menu, WCOs can be automatically reloaded when Mach is restarted. 4.3.3.3 Save As This button allows you to save the current control memory WCO values to an external disk file. This allows you to setup offsets for physical tooling fixtures and save them for later reuse with the fixture. 4.3.3.4 Load This button allows you to load the WCO table from a previously saved WCO table disk file. 4.3.3.5 Report This button creates a report of the current WCO values, and loads and opens it with the non-Gcode editor. Copyright © 2009-2015 Calypso Ventures, Inc. Page 86 MachStdMill User Manual Revision 2.15 5 Tool Handling 5.1 MachStdMill concepts: Tools, Holders and Changers 5.1.1 Human Tool Changers Mach3 users typically don’t have hardware auto-tool change capability. Yet, the typical Mach3 controlled mill is used with multiple tools in the course of a job. Effectively, this means that the most common Mach3 usage model is: “Mill/Router with human tool change accessory”. MachStdMill includes features to make Tool Change handling easier for the “human tool changer”. 5.1.2 Tooling Types & Holders Mach3 users utilize a wide variety of tooling. The tooling used has both English and Metric native measurements and G-code programs are not restricted to tools using only one measurement system. The type of tool holders used can either facilitate or impede common machining practices. MachStdMill includes the concept of different types of tool holders and currently supports two types: Repeatable Height Holders (RH) and Non-Repeatable Height tool holders (NRH). 5.1.2.1 Non-repeatable Height Holders This is the most common type of tool holder in use within the Mach3 user community. A nonrepeatable tool holder is one that does not provide the same physical tool length each time the tool and holder are mounted in the spindle. The type of tool holder used is often determined by the machine’s spindle bore. Commonly available spindles (R8 is a common example) may not natively support RH holders. Price (R8 holders are inexpensive). Availability (R8 holders are easy to obtain and CNC converted manual machines will have tooling from it’s manual operation days). Independent of spindle bore, some tool holders are inherently non-repeatable with respect to height. Examples include collets and drill chucks. To make the use of NRH holders more convenient, MachStdMill can be configured to automatically measure the TLO of a newly mounted tool as part of the tool change process 23. 5.1.2.2 Repeatable Height Tool Holders A repeatable tool holder is one that does provide the same physical tool length each time the tool and holder are mounted in the spindle. This can either be from the use of special tool holder sets 23 Requires use of the optional TCP Touch Plate. Copyright © 2009-2015 Calypso Ventures, Inc. Page 87 MachStdMill User Manual Revision 2.15 which provide this feature, or because of the presence of a spindle taper and holders with this native characteristic (e.g. BT30 or CAT40). As one moves along the scale from the occasional hobby user,. to prototype/small shop user, the use of RH holders increases. 5.1.2.3 Mixed Tool Holders While a professional CNC operator is likely to have all repeatable height tool holders (and would probably not consider using a non-repeatable tool holder), Mach3 hobby and small shop users often utilize a mixture of the two tool holding types. MachStdMill supports mixed type tool holder usage. This facilitates the adoption of RH holders over time (as the tool holder investment can be spread over time with RH holders being purchased as they are needed). MachStdMill can be configured to automatically measure TLO for NRH holders as part of the tool change sequence, while not taking the time to measure RH tool holders when they are mounted. 5.1.3 Auto Tool Changer models There are two primary physical hardware tool changer models in use in the industry. 5.1.3.1 Fixed Tool Selection model In this model, whatever T function number is used in the program, will be the tool number selected and mounted during the tool change. This fixed 1:1 mapping between T# and physical Tool# is used by humans putting tools in a machine (one w/o a tool changer other than the human). It is also the model used by simple Tool changers (where the T# = Tool changer pocket #). 5.1.3.2 Mapped Tool Number Selection Model In this tool changer model, a mapping function is assumed between the T function number and the tool changer pocket number. I.e. the changer implements a table which maps Tool# to Changer pocket# and a request for T3 may cause pocket 7 to rotate into the ready position. This tool change model requires the ability to register tool numbers to pocket numbers with the CNC control in order to set up the mapping table. 5.1.3.3 MachStdMill Auto Tool Change Model support Mach3 V3 implicitly uses the Fixed Tool Selection model. The model matches well with the “Mill/Router with human tool change accessory” approach. A human is a reasonably (we hope) intelligent tool changer. If any mapping is needed between the T function number and the storage location of the tool (tool drawer/chest number), MachStdMill assumes that this is handled external to Mach3 (the human tool changer handles it, finds the tool and gets the right tool mounted in the spindle). As Mach3 does not directly support the Mapped Tool Number changer model, neither does MachStdMill. Copyright © 2009-2015 Calypso Ventures, Inc. Page 88 MachStdMill User Manual Revision 2.15 5.1.4 Mach Tool Change modes Mach3 has 3 Tool change modes. 5.1.4.1 “Ignoring Tool Changes” Mode. This mode is used mostly for simulation runs. When Mach3 is configured for this mode, the M6Start and M6End macros are not called as part of the M6 M-Code execution. MachStdMill does nothing special for this tool change mode. 5.1.4.2 “Stop & Wait” (for user to continue) Mode. This mode is well matched for servicing the “Mill/Router with human tool change accessory” model. The sequence Mach3 uses is: a) Stop spindle, turn off coolant, indicate tool change request, b) Run M6Start macro script, c) Wait for user to tell Mach to continue the tool change (implemented as wait for cycle start button press). d) Run M6End macro script. This is the primary tool change mode that MachStdMill supports for tool changes. MachStdMill supports (and requires the use of) MachStdMill specific M6Start and M6End macros with “Stop & Wait” tool change mode (which are installed with MachStdMill). 5.1.4.3 Auto Tool Changer mode In this mode, Mach3 runs the M6Start macro script but does NOT run the M6End macro script. As this mode is intended as a hook for auto tool changer support, and there is no standardization of auto tool changers (within the Mach3 user base), the MachStdMill screen set does not include “complete out of the box” support for this mode. MachStdMill provides a defined M6Start script interface, which may be used to integrate custom Auto Tool Changer script with the MachStdMill M6Start script. When the tool changer mode is “auto tool changer” the MachStdMill M6Start script will look for an externally supplied auto tool changer script and run it from M6Start. A template of this interface script is provided, it is up to the auto tool changer implementer to complete the script appropriately for the tool changer hardware being supported. In the <Mach install dir>\macros\<profile name> directory (for a profile which is running MachStdMill), MachStdMill places a template script: “M6ATC_template.m1s”. This is the template Auto tool changer script. Make a copy of the template, add your auto tool changer code, and save the completed script as “M6ATC.m1s” (in the same directory as the template script) or compile it to create “M6ATC.mcc”. M6ATC will be invoked by MachStdMill’s M6Start script when Mach3 is in auto tool changer mode. Copyright © 2009-2015 Calypso Ventures, Inc. Page 89 MachStdMill User Manual Revision 2.15 Because M6ATC is a profile specific script, it is necessary to place a copy of it in the <Mach install dir>\macros\<profile name> directory for each profile that is running MachStdMill that also needs the customized auto tool changer script. Note that putting Mach into auto tool changer mode with MachStdMill, but not providing a M6ATC script, will result is a run time error trap during the tool change operation. Do not modify “M6ATC_template.m1s” directly – always make a copy. M6ATC_template.m1s will be updated by later MachStdMill installs and this will result in the loss of any changes put directly into the template file. 5.2 Tool Changes and TLO measurements When a Tool change operation (M6) causes a new tool to be mounted in the spindle, it is necessary for the machine to know the Tool Length Offset for the tool before TLO position compensation for the tool is activated by the G-code program. Tool Length Offsets can either be entered into the control before a program is run (Pre-loaded TLOs), or they can be determined during the tool change process (Just-in-time TLOs). What needs to be done to set the TLO values is interrelated to the TLO technique being employed with the G-code program being run. Before we can consider the TLO measurement support features included in MachStdMill, we need to review some of the common TLO setting techniques 24. 5.2.1 WCO and TLOs Physical Tool Lengths, Tool Length Offsets and WC Offsets are interrelated. In section 4.1 we saw this diagram which illustrates the relationship between the WC and MC systems: 24 Included are the most common TLO techniques used by Mach3 users, but by no means does this section cover all the possible ways a program/job could be set up. Copyright © 2009-2015 Calypso Ventures, Inc. Page 90 MachStdMill User Manual Revision 2.15 MC to WC relationship WC = f(MC); where f = translation MC Z WC = MC - WCO WCOy MC Y WCx = MCx - WCOx WCy = MCy - WCOy WC Z WCz = MCz - WCOz MC X WC Y WCOz WC X WCOx Figure 54: MC to WC Relationship In English this is “Work Coordinate = Machine Coordinate minus the Work Coordinate Offset”. This manual uses common acronyms: WC = Work Coordinate; MC = Machine Coordinate and WCO = Work Coordinate Offset. Using the acronyms yields an important formula: WC = MC - WCO Equation 1 The formula notation used in this manual is: WC and MC are used to refer to any axis. WCx means “WC of the X axis” (and similarly for other Axes). For Tool length offsets we need only be concerned with the Z axis. Copyright © 2009-2015 Calypso Ventures, Inc. Page 91 MachStdMill User Manual Revision 2.15 When WCOx = WCOy = 0 MC Z WCOy MC Y MC X WC Z WC Y WCOz WC X WCOx Figure 55: WCOx = WCOy = 0 Removing the X & Y axes simplifies the picture to: WCz to MCz relationship MC Z MC Z0 WC Z WCOz WC Z0 Figure 56: WCz to MCz This becomes: Copyright © 2009-2015 Calypso Ventures, Inc. Page 92 MachStdMill User Manual Revision 2.15 WCz to MCz Relationship MC Z0 WCOz Example: WCOz = -10 WC Z0 Figure 57: Basic TLO Z Relationship Figure 57 is the basic TLO Z relationship. This relationship is used in example TLO diagrams. WCz = MCz - WCOz Examples of tools at different heights Tool Gage Line MC Z0 T1 @ MC = 0 WCz = MCz - WCOz WCz = 0 - (-10) WCz = +10 T1 WCOz Example: WCOz = -10 WC Z0 T2 T3 T2 @ MCz = -6.5 WCz = MCz - WCOz WCz = -6.5 - (-10) WCz = +3.5 T3 @ MCz = -10 WCz = MCz - WCOz WCz = -10 - (-10) WCz = 0 T4 Note: Horizontal positions of tools are not significant, examples are just spread apart to fit on the page T4 @ MCz = -14 WCz = MCz - WCOz WCz = -14 - (-10) WCz = -4 Figure 58: WC Tool Position Examples Copyright © 2009-2015 Calypso Ventures, Inc. Page 93 MachStdMill User Manual Revision 2.15 The prior figure shows examples of a tool at various Z heights, and shows the corresponding WC from MC calculation 25. 5.2.2 TLO Setting Techniques The following diagram shows some key measurement relationships used for various TLO setting techniques 26. Z Axis Relationships Gage Line (Machine Z Zero) A D A = Distance Gage line to tool point B = Distance Tool point to Part Z0 C = Height of part D=A+B+C B Part Part Z0 C Table Figure 59: Z Axis Relationships Modern G-code programs are written without knowledge (at G-code programming time) of the actual length of the tools used by the program (at run time). When a G-code program is setup to run on a machine, it is necessary to tell the machine the “length” of the tools in use at program run time. Doing this is called “setting Tool Length Offsets (TLO)”. There are several TLO setting techniques in common use. 5.2.3 Off-Machine Tool Length Setting 5.2.3.1 Preset Tool Length 25 Note: The tool holders are just shown at various example heights, the positions of the holders left-right on the page are arbitrary. 26 Diagrams have been drawn to be similar in style to figures in Peter Smid’s book CNC Programming Handbook. The reader may find Smid’s book useful as an additional information source.. Copyright © 2009-2015 Calypso Ventures, Inc. Page 94 MachStdMill User Manual Revision 2.15 A common TLO technique is to pre-measure the physical length of the tools before bringing the tools to the machine to be used. Preset Tool Length Offsets Gage Line MC Z0 T1 T3 T2 H01 H02 H03 G54 (TL Offsets will be positive values) Part Z0 Part Table Figure 60: Preset TLOs Tools are measured off the machine and the lengths are entered into the machine control before the program is run. This approach requires that the machine support tool holders which provide a repeatable tool length when the tool is mounted in the spindle. If the act of mounting the tool changes the physical length of the tool, the measured off line value will no longer match the mounted length of the tool. A requirement is that the tools must be measured relative to the Machine’s gage line (the off-line measuring setup must provide this capability). This is simple with a fixture and the use of RH holders, but more problematic with the use of NRH tool holders (consider a tool in an R8 collet – the tool length can’t really be measured off the machine as the length will change when the draw bar tightens the tool in the collet). Note that when using this technique, the TLO values entered into Mach are positive values. MachStdMill (and Mach3) support this TLO technique by providing a screen page where TLOs can be entered for your tools (the Tooling page). 5.2.3.1.1 Measuring a Tool Off-Line The following pictures provide an example of measuring TLOs off-line. Copyright © 2009-2015 Calypso Ventures, Inc. Page 95 MachStdMill User Manual Revision 2.15 When making off-line TLO measurements, it is important that the TLO distance be relative to the machine’s gage line. This is often accomplished by making measurements relative to a special fixture. Gage Line Surface Figure 61: Setting TLO Zero to the Gage Line The picture shows setting the height gage zero to the top of the measurement fixture. This makes the TLO measurement relative to the machine gage line (the top of the fixture is also the bottom of the holder, which is in turn the part of the holder which contacts the machine’s gage line). Copyright © 2009-2015 Calypso Ventures, Inc. Page 96 MachStdMill User Manual Revision 2.15 Gage Line Surface Figure 62: Tool Holder Gage Line This figure shows a end mill mounted in a tool holder 27, ready to have its TLO measured. 27 The tool holders shown in the pictures are examples of the Tormach Tooling System®, available from www.tormach.com. Copyright © 2009-2015 Calypso Ventures, Inc. Page 97 MachStdMill User Manual Revision 2.15 Figure 63: End Mill TLO Measurement This shows the tool placed in the fixture and the TLO being measured; in this example the TLO is +2.3173 inches. Figure 64: Drill Bit TLO Measurement This figure shows the TLO measurement of a drill bit in a chuck. 5.2.3.1.1.1 Dial Gage Touch Tool A popular tool used to touch off and set Z zero is the “dial gage touch tool”. Copyright © 2009-2015 Calypso Ventures, Inc. Page 98 MachStdMill User Manual Revision 2.15 Figure 65: Dial Gage Touch Tool TLO Measurement The previous picture shows an example of a dial gage touch tool. This particular example happens to have a digital readout instead of an analog dial. When measuring the length of this type of touch tool, it is critical that the length measurement be taken when the tool’s dial reads zero. It does not matter whether you a) move the height gage down until the dial reads zero, or b) pick a convenient physical length (within the indicating range of the tool) and then set the touch tool’s dial to zero. Once the physical length measurement is taken, it is crucial that the tool’s zero not be changed. Changing the tool’s dial zero setting requires that the tool length be re-measured. For an example of using a dial gage indicating touch tool, refer to Section 4.3.1.1.3. 5.2.4 On-Machine Tool Length Setting 5.2.4.1 TLO by Touch Off to Part Z0 Another common technique is to touch each tool off on the machine to the Part’s Z0 plane and set the tool length to be relative to the Part’s Z0 surface. This is illustrated in the following sequence of figures. Copyright © 2009-2015 Calypso Ventures, Inc. Page 99 MachStdMill User Manual Revision 2.15 Example Tools Gage Line MC Z0 WC Z0 T1 PTL1 T3 T2 PTL2 PTL3 G54 Part Z0 Part Table Figure 66: Example Tools While only one tool at a time will be mounted in the spindle, the figure takes the liberty of showing three tools above the part so that the relationships of the TLO for different length tools can readily be illustrated. In the figure, each tool is shown at the gage line of the machine and each tool has a physical length denoted by PTL1, PTL2 and PTL3. Copyright © 2009-2015 Calypso Ventures, Inc. Page 100 MachStdMill User Manual Revision 2.15 Tool 1 at TCP (MC Z0) Gage Line MC Z0 WC Z0 (WC Z Offset = 0) T1 PTL1 G54 Part Z0 Part Table Figure 67: Tool at TCP The prior figure shows the first step in the sequence used to “measure the TLO” for a tool. The measurement is made by lowering the tool until the tool tip touches the Part’s Z0 Plane. (Note that the Part Z0 MC is not the same as the WC Z0 MC). The example assumes that the WCO = 0 (i.e. WCz0 = MCz0). The next figure shows the Tool touching the Part Z0 plane. Copyright © 2009-2015 Calypso Ventures, Inc. Page 101 MachStdMill User Manual Revision 2.15 Tool 1 Tip Touching Part Z0 Gage Line MC Z0 WC Z0 (WC Z Offset = 0) T1 TLO = Z-8.0 TL = MC_ZPos’n – WC_ZOffset TLO = MC_ZPos’n G54 MC = Z-8.0 T1 PTL1 Part Z0 Part Table Figure 68: TLO with WCOz = 0 When the tool is touching the Part Z0 plane, the measurement relationships are as shown in the above figure. The example shows that the Tool Tip is touching when the Tool is at Machine Coordinate (MC) = Z-8.0. The actual MC Z value could be any value depending on the total Z travel of the machine and the PTL of the tool being measured. In this example, the TLO for Tool 1 would have the value of -8.0. The touch off technique for setting TLOs has an interesting characteristic: Copyright © 2009-2015 Calypso Ventures, Inc. Page 102 MachStdMill User Manual Revision 2.15 Part Z0 is Used but Not Known… Gage Line MC Z0 WC Z0 (WC Z Offset = 0) T1 TLO = Z-8.0 Notice this XY plane (Part Z0) is TL =that MC_ZPos’n – WC_ZOffset used as the reference yet the Z coord TLO = MC_ZPos’n value is NOT known… G54 MC = Z-8.0 T1 PTL1 Part Z0 Part Table Figure 69: PartZ0 Z Used, Yet Unknown All tools are touched to the same Z level (or XY plane). The touch off technique uses the PartZ0 plane as that reference plane. Interestingly, the actual machine Z coordinate of Part Z0 is never known or used during this process. The touch off technique provides a TLO relative to the Part surface for each tool. However it does not yield Part_WCz0 (as we don’t know the PTL). This technique uses Part_MCz0 as a common relative reference plane without knowing the plane’s Z coordinate value. The touch off technique requires that the WC Z0 has been set before the tools are touched off to Part Z0. Let’s consider a more complicated example where WCOz is not equal to 0, i.e. when WCz0 is not equal to MCz0: (Neither the part nor the Tool have changed position, only the WC is shifted from MCz0.) Copyright © 2009-2015 Calypso Ventures, Inc. Page 103 MachStdMill User Manual Revision 2.15 Tool 1 Tip Touching Part Z0 (WCOz <> 0) Gage Line MC Z0 (WC Z Offset = -3.5) WC Z0 T1 TLO = Z-4.5 G54 MC = Z-8.0 T1 TLO = MC_ZPos’n – WC_ZOffset PTL1 Part Z0 Part Table Figure 70: TLO with WCOz <> 0 We now see that the general formula for TLO is: TLO equals the distance the tool has to move from WC Z0 to place the Tool tip at Part Z0. The relationships are given by: Part_WCz0 = WCz0 + WC_TLO – PTL Equation 2 Combining Equation 1 and Equation 2 we get: Part_WCz0 = WCz0 + WC_TLO – PTL Part_WCz0 = MCz0 + WCOz + WC_TLO – PTL And since MCz0 = 0… Part_WCz0 = WCOz + WC_TLO – PTL Equation 3 Before going on, we will also observe that when a tool is touching Part Z0: Part_MCz0 = MCz – PTL Equation 4 Note that when using the Tool Touch Off method, the TLO values will be negative values. Copyright © 2009-2015 Calypso Ventures, Inc. Page 104 MachStdMill User Manual Revision 2.15 If you’re using the touch off technique and you find yourself entering a positive TLO value into the tool table, something is wrong – best to figure out what before you run the program and crash a tool. It is often not desirable to actually touch the tool tip to the part Z0 surface (its easy to scar the part surface, or overshoot when touching and break a cutting edge). A more commonly used variation is to put a “gage block” of known height on the part and touch the tool tip to the gage block. This is illustrated in the next figure. (Now that the general equation is known, the rest of the examples will continue using the simpler and more common WCOz=0 situation) Tool 1 Tip Touching Part Z0 TLO = MC_ZPos’n - WC_ZOffset – GBH (TLOs will be Negative Values) Gage Line MC Z0 WC Z0 (WC Z Offset = 0) T1 TLO = Z-7.9 – GBH = -8.0 G54 MC = Z-7.9 T1 Gage Block Height = 0.1 PTL1 Gage Block / Touch Plate Part Z0 Part Table Figure 71: Using a Gage Block for Touch Off Note that this approach results in the same TLO value as when the gage block is not used (-8.0 in this example). The equation for TLO via touch off is: TLO = MC_ZPos’n - WC_ZOffset – GBH Equation 5: TLO Formula MachStdMill supports the use of Gage Blocks for touch off operations. The gage Block height is entered on the Settings-Common page as shown below: Copyright © 2009-2015 Calypso Ventures, Inc. Page 105 MachStdMill User Manual Revision 2.15 Figure 72: Gage Block Height Setting MachStdMill also allows you to specify that the Gage Block is a touch plate 28. When the Gage Block is a touch plate, MachStdMill can lower the tool until the TP triggers the Mach3 Probe input, determine the TLO value of the tool and store the value in the tool table. This automates much of the manual touch off TLO process. For more information about Touch Plate usage to set TLOs see section 5.4.7 An alternative way to draw a picture with the same relationships is shown in below. Equivalent Picture Gage Line MC Z0 WC Z0 (WC Z Offset = 0) T1 PTL1 G54 T1 TLO = -8.0 Part Z0 Part Table Figure 73: TLO Equivalent Diagram Now that we have determined the TLO for the Tool, what do we do with it? TLOs are entered into the Mach tool table. MachStdMill takes care of making the necessary tool table entries when using a touch or probing operation to set a TLO. 28 This requires that the optional “mobile” Touch Plate be present on the machine. Copyright © 2009-2015 Calypso Ventures, Inc. Page 106 MachStdMill User Manual Revision 2.15 A word about terminology is in order here. Often people talk about entering tool “lengths” into the tool table. That is imprecise use of language. The Mach3 tool table is not a table of “Tool Lengths”, it is a table of “Tool Length Offsets” 29. The correct terminology is Tool Length Offset (TLO) …NOT… Tool Length (TL). With the Offline measurement technique TLO=TL. With other techniques, other relations between TLO and TL can occur. Touch Off TLO Values Stored in H registers (Often the H# = T# for convenience) Gage Line MC Z0 WC Z0 T1 T3 T2 (TL Offsets will be negative values) H1 H3 H2 Gage Block / Touch Plate Part Z0 Part Table Figure 74: H Registers store TLO Values Once a TLO value is measured, it is stored in a register in Mach. TLO values are stored in H (for “height”) registers. A common convention is for a program to use the same number for an H register as the T#, but this is not required by G-code. T3 M6 G43 H7 is perfectly fine G-code 30. 29 This concept is often misunderstood and reflected in imprecise naming of DROs, buttons and scripting interfaces; most controls in V3 are named as “length” when in fact the values they store & manipulate, and the functionality they support is really that of “Tool Length Offset”. 30 Future versions of Mach3 are anticipated to have improved support for this situation. For Mach3 V3, it is recommended that G-code make T#=H#=D# to avoid known Mach3 V3 issues (mach3 V3 does not fully support Gcode D and H registers). Copyright © 2009-2015 Calypso Ventures, Inc. Page 107 MachStdMill User Manual Revision 2.15 5.2.4.2 Master Tool TLO Technique MachStdMill also supports the use of a Master Tool. When a Master tool is used, the TLOs of all tools are relative to the physical length of the Master tool. When using a master tool, TLOs can be either positive or negative values. MachStdMill facilitates the use of the Master Tool approach and integrates Master Tool usage with some additional optional features. For more information about Master Tool Mode, see section 9. 5.2.4.3 NO TLO – Shifting Z-zero There is also a technique used which is not really a TLO technique, i.e. to NOT use TLOs in the G-code program. With this technique, rather than use TLOs, the Z-Zero level is reset for each tool (shifting the current work coordinate system offsets). This is illustrated in the following figure: Resetting Z Zero with each Tool Gage Line MC Z0 T02 G54 T01 Gage Block Height Part Z0 Part Table Figure 75: Resetting Z Zero Instead of TLO To use this technique, set all TLOs in the tool table equal to zero 31. An easy way to do this is to load the sample tool table “All Empty w D 0 and TLO 0”. This table has all tools marked as empty tools with TLO=0 and Diameter=0. 31 Setting all the TLO values to zero will avoid accidental invocation of the dangerous Mach3 V3 “feature” which turns on TLO compensation if the TLO value is not equal to 0. It is hoped that this “feature” will go away in a future version of Mach3 (it causes multiple internal problems including G-code state machine contradictions). Copyright © 2009-2015 Calypso Ventures, Inc. Page 108 MachStdMill User Manual Revision 2.15 When all tools have a zero offset value, the Mach3 control logic can not compensate for the physical length of the tool. Rather than using TLO compensation, you will be resetting the WC Z Zero surface every time you change a tool (thereby changing the WCOz offset value). To prepare for resetting Z-Zero on each tool change, you should set up the G-Blk height. If you will be using a gage block or feeler gage between the tool tip and your z-zero when touching the tool, Mach needs to know the thickness of the gage-block so that it can compensate for it and set Z-zero to the correct height. The setting for the gage-block height setting is on the Settings-Common page. Figure 76: Gage/Plate Height Setting For example, we sometimes uses a gage block that lights up when touched with a tool. The block is nominally 1” high. Therefore, in the figure, the height is set to 1.003 inches (the actual measured height of the block). If you were using a 5 thousandths feeler gage, you would set the height to 0.005. If you intend to touch the tool directly to the reference surface (i.e. not using a gage block), set the gage block height to 0. Now that the gage-block height is configured, you are ready to touch a tool and set the Z axis zero from the tool. To set Z-Zero, switch to the WC Offset-Touch Off page. Copyright © 2009-2015 Calypso Ventures, Inc. Page 109 MachStdMill User Manual Revision 2.15 Figure 77: Set Z Zero Arrow Set the gage-block on the WC Z0 surface and lower the tool to the gage block. When the tool is touching the gage block, click the blue arrow labeled “Set Z Zero”. Mach will set the Z Zero level to the reference surface by adjusting the WC Offset value for the Z axis. Since you are not using TLO offsets, you will have to do this operation each time the tool is changed. This technique also requires that the part reference surface be available for tool touch at each tool change (if you machine away the reference surface half way through the program, you will have a problem). 5.3 Offset Registers & Data storage When offsets are being used, offset information must be entered into the Mach tool table for use during G-code run time. Mach3 stores TLO data in the Mach tool table. For each tool, the internal Mach3 tool tables stores: The Tool Length Offset The Tool Length Offset Wear adjustment amount The Tool Diameter The Tool Diameter wear adjustment amount A descriptive name for the tool. Copyright © 2009-2015 Calypso Ventures, Inc. Page 110 MachStdMill User Manual Revision 2.15 The RH/NRH (Repeatable Holder/Non-Repeatable Holder) attributes are also stored as part of the table 32. Intro to the Tooling Page 3 Now that we have reviewed some of the common TLO techniques, and had an overview of the information stored in tool tables, let’s take a look at the MachStdMill tooling page. Figure 78: Tooling Page The tooling page is where the operator manages tooling information and tool changes. The page’s functionality is grouped into panels which are described below. 5.4.1 Current Tool Panel This panel always shows information about the current tool mounted in the spindle. 32 On Mach3 V3, this is implemented via a MachStdMill extension to the tool description. You do not need to worry about these details as MachStdMill handles this for you. 33 Future versions of Mach3 are expected to provide improved support for H & D offset registers. Copyright © 2009-2015 Calypso Ventures, Inc. Page 111 MachStdMill User Manual Revision 2.15 Figure 79: Current Tool Panel 5.4.1.1 Current Tool # This control displays the Current tool number. In MSM the current tool DRO will not take an input value to change what Mach3 thinks is the currently mounted tool # 34. Use the MDI control to do T#M6 instead. This avoids many of the known Mach3 V3 bugs which result from directly changing the Tool # DRO value. 5.4.1.2 Setup Units Indicator At the top of the Panel, just to the left of the Current Tool DRO the units for the information is the panel is displayed. This will always be the machine’s “setup units” and will not change unless Mach is restarted with a profile that has different setup units. The values for setup units are “inch” and “mm”. 5.4.1.3 G43 & G49 These buttons turn TLO On/Off. In MachStdMill, TLO is no longer “toggled on/off” as older screen sets did. This is because TLO activation is NOT a two state transition diagram (G43, G44 and G49), MachStdMill provides action buttons to literally do G43 or G49 – this covers 99% of the common G-code cases. A button for G44 was not provided due to G44 usage being very rare. If you need to use G44 for TLO, either use MDI or program it into your G-code. 5.4.1.4 TLO Active LED This led indicates that TLO is currently active. This led is lit when either G43 or G44 is active. Note that this is not the same as indicating G43 is the current TLO mode 35. 5.4.1.5 Tool Geometry These DROs are R/W and provide the user interface to enter the geometry information for the current tool. 34 35 The Mach3 V3 implementation of this is the source of multiple V3 bugs. The LED definition is determined by Mach3, not by MachStdMill. Copyright © 2009-2015 Calypso Ventures, Inc. Page 112 MachStdMill User Manual Revision 2.15 5.4.1.5.1 TL Offset The Tool Length Offset (I.e. the TLO, not the Physical tool length or PTL) of the tool. 5.4.1.5.2 Wear Length Length wear adjustment to TLO of the tool. 5.4.1.5.3 Diameter Offsets 5.4.1.5.4 Diameter Nominal Diameter of the tool w/o wear value applied. 5.4.1.5.5 Wear Diameter Wear adjustment to diameter of the tool. 5.4.1.6 Tool description The Tool description line shows the text description of the current tool. 5.4.1.6.1 Edit Button This button allows you to edit the Tool description. NOTE: Because of the limitations of the Mach3 Tool Table on Mach V3, MSM internally utilizes the description field of the tool table to implement the MSM extended tool table attributes. Thus the tool description field should ONLY be accessed via MSM. If you directly edit a tool table description string, you will cause errors in operation of the extended tool attributes. For script access to the tool description see the MSM APIs described in section 15.9.2.2 WARNING: DO NOT USE the Mach menu bar item Config-ToolTable to edit a tool description directly as doing so will break the MSM tool table handling! 5.4.1.7 Empty LED MachStdMill implements the concept of an explicitly empty tool table entry. An empty entry is indicated by this led being On. Empty tool table entries do not contain valid numeric values. 5.4.1.8 RH / NRH LED This LED indicates the tool holder type for this tool table entry. The LED off indicates a NRH tool holder, while the LED On indicates a RH tool holder. All empty Tool entries are considered to be NRH holders. Copyright © 2009-2015 Calypso Ventures, Inc. Page 113 MachStdMill User Manual Revision 2.15 5.4.1.9 Tool Changes Figure 80: Tool Change Panel The Tool Change Panel appearance and content is dynamic, and is used by MachStdMill to support operator interaction with Tool Changes. 5.4.1.9.1 Tool Change Status During a Tool Change (TC), MachStdMill provides status of the tool change in the TC status line. 5.4.1.9.2 Tool Change LED The tool change LED indicates when a tool change is in progress. 5.4.1.9.3 Dynamic Panel Information and Run/Cycle-Start Button When a tool change (TC) is initiated (M6), MachStdMill automatically switches the active page to the Tooling page so you can handle the tool change operation. During the M6 sequence, Mach3 has also invoked M6Start.m1s (depending on the Mach3 tool change mode, see section 5.1.4). The following figure shows an example tool change status while M6Start is executing: Figure 81: M6Start TC status The status message text shows that the spindle is currently moving to the TCP. Copyright © 2009-2015 Calypso Ventures, Inc. Page 114 MachStdMill User Manual Revision 2.15 The Tool Change LED indicates that a tool change sequence is in process (it’s actually blinking on the screen); and that the Run/Cycle-Start button is disabled (even though the message line at the top of the page already says to press Cycle-Start 36). When it is time for the operator to physically mount the Tool in the spindle, MachStdMill tells the operator that via the TC Status line. The Cycle-Start button also becomes enabled so that the operator can use it to tell Mach that the tool is now mounted in the spindle. Because of the internal way that Mach3 V3 handles the concepts of “Current Tool” and “Next Tool”, it is necessary internally to Mach3 to make the next tool info the current tool information BEFORE the physical tool change has been finished by the operator. MachStdMill indicates this by updating the info in the current tool panel and dynamically changing the panel label from “Current Tool #” to “Next Tool #”. The following figure shows the “Current Tool” panel when it is showing the “Next Tool” information and waiting for the operator to complete a “Stop & Wait” tool change by pressing Run/Cycle-Start. Figure 82: Current Tool & TC Panel During V3 Tool Change Once the tool change is completed, the Current tool panel changes back to showing (the now) Current tool information and the Dynamic Run/Cycle-Start button is again disabled until the next tool change. The next figure shows the Panel at the end of a tool change to T2. 36 This is a known Mach3 V3 bug as of when this manual was written. Copyright © 2009-2015 Calypso Ventures, Inc. Page 115 MachStdMill User Manual Revision 2.15 Figure 83: Current Tool Panel at end of TC Finally, at the end of a tool change sequence, MachStdMill automatically switches the active page back to whatever page was active when the Tool change started. 5.4.2 Next Tool Panel The Next Tool Panel displays information for the “Next Tool”. The Next Tool is the T# specified by the last executed T word. Figure 84: Next Tool Panel The next tool panel can not be used to change next tool information. 5.4.2.1 Setup Units Indicator At the top of the Panel, just to the left of the Current Tool DRO the units for the information is the panel is displayed. This will always be the machine’s “setup units” and will not change unless Mach is restarted with a profile that has different setup units. The values for setup units are “inch” and “mm”. Copyright © 2009-2015 Calypso Ventures, Inc. Page 116 MachStdMill User Manual Revision 2.15 5.4.3 Tool Table Information Browse Panel The Browse Panel is a convenient way for the operator to browse and set Tool information into the tool table. Figure 85: Tool Browse Panel You can use the T# DRO to set the tool you want to see information for. You can also use the “-“ and “+” buttons to change the T# DRO. The geometry values and tool attributes can be edited from this panel. This is done by pressing the edit button. 5.4.4 Tool Table Data Edit and Storage Buttons The internal Mach3 tool table is a memory data structure. Changes made while Mach3 is running are made to the memory resident data structure. To make changes to Mach’s internal tool table permanent, you have to save the table. This panel provides buttons which let the operator save the tool table. 5.4.4.1 Mach Tool Table Actions 5.4.4.1.1 Save Mach TT The save button does the same operation that Mach3 has traditionally done: it saves the memory tool table to a (Mach3 internal use only) disk file. 5.4.4.1.2 Edit This button brings up the Tool Information edit dialog which is used to set dimensions and attributes for a tool. Copyright © 2009-2015 Calypso Ventures, Inc. Page 117 MachStdMill User Manual Revision 2.15 Figure 86: Tool Edit Dialog 5.4.4.1.2.1 Tool Description This field displays the current text description of the tool. The description may be edited by clicking in the description field. 5.4.4.1.2.2 Tool Attributes This section shows the current tool attributes. 5.4.4.1.2.2.1 Empty Tool When checked this indicates that the Tool number entry for the table is for an “Empty Tool”. Empty tools will display values for other fields, but the values are not considered “valid” unless the tool is marked as not empty. 5.4.4.1.2.2.2 Holder Type The tool holder type may be either RH (repeatable height) or NRH (Non-repeatable height). This attribute and the Skip RH Tools button control how the tool is processed during tool changes. RH type tool holders can be skipped for automatic tool measurement during tool changes. 5.4.4.1.2.3 Tool Length Geometry This section provides access to the tool length related geometry. All values in this section are in the “setup units” (inch or mm) of the machine. 5.4.4.1.2.3.1 Tool Length Offset Copyright © 2009-2015 Calypso Ventures, Inc. Page 118 MachStdMill User Manual Revision 2.15 This is the TLO (Tool Length Offset) value for the tool. 5.4.4.1.2.3.2 Tool Length Offset Wear This is the TLO wear value for the tool. 5.4.4.1.2.3.3 PTL (Physical Tool Length) This field displays the PTL of the tool. Viewing the measured PTL for a tool which is useful when Auto TLO is in use for Tool Changes (described later in this chapter) or when using PTLs as the TLO values and using MachStdMill to measure tools. When MachStdMill is used with a TCP TP to measure a tool, it is the physical tool length (PTL) which can be measured. The PTL value is used in conjunction with the WC settings to determine the tool’s TLO value. PTL is only used internally by MachStdMill to facilitate certain operations (Ex: Auto-TLO) and is always in setup units. 5.4.4.1.2.4 Tool Diameter Geometry This area displays the Diameter geometry of the tool. The values for diameter and diameter wear are presented to the operator in units appropriate for the tool. The supported tool units are inches and millimeters. MachStdMill takes care of internally converting tool units to setup units as needed by Mach3 37. Thus it is possible to on a imperial setup machine to enter a 10mm diameter drill as 10mm rather than as 0.393701 inches. Similarly, on a metric machine, a 3/8” drill may be entered as 0.375 inches rather than 9.525 mm. 5.4.4.1.2.4.1 Tool Units The radio buttons determine the units that will be associated with the values supplied by the operator in the dialog. 5.4.4.1.2.4.2 Diameter This field displays the Diameter of the tool. 5.4.4.1.2.4.3 Diameter Wear This field displays the wear diameter of the tool. 5.4.4.2 Enhanced Tool Table Actions This section describes the relationship between Mach’s internal Tool table and MachStdMill’s external Tool Table files. The tool table structures used by Mach and MSM are diagramed in the figure below: 37 The use of Tool Units is strictly for the operators convenience, all internal tool table entry values used by Mach are always presented to Mach in the machine’s setup units. Copyright © 2009-2015 Calypso Ventures, Inc. Page 119 MachStdMill User Manual Revision 2.15 Mach & MSM & tool tables “Save Mach TT” Action causes mach to Write mach’s session Tool table to tools3.dat If you do not do this, tools3.dat is NOT updated! Tools3.dat saved in current profile dir (contents are loaded by mach on start up) Mach’s in memory tool table; Changes only apply to the current mach session! MSM TT “Load” action causes MSM to read file & replace contents of mach’s session tool table. MSM TT “SaveAs” Action causes MSM to write mach’s TT to disk. MSM .m3tt Tool table file; Stored on disk in location picked by user 5.4.4.2.1 Load This button allows you to load a previously saved tool MachStdMill Enhanced tool table into the Mach3 memory resident tool table. 5.4.4.2.2 Save As Without MachStdMill, Mach3 V3 only has the concept of a single internal tool table instance. MachStdMill extends the Mach tool table capabilities and adds the ability to save the enhanced tool table as a named file. This button will save the current memory tool table to a disk file with a name of the user’s choice. This makes it possible to create a tooling set for a job and save the tooling set up for later reuse. As of MachStdMill versions 1.1.x and newer, enhanced external tool tables may contain both imperial and metric tools. The conversion of tool units to/from the machine’s setup units is handled for you by MachStdMill 38. Current versions of MachStdMill can load external tool tables saved by earlier releases, and will only save external tool table files in the updated format. To convert a MachStdMill 1.0.x release external tool table to the current format in order to load it on another machine, simply load it then use SaveAs to save it as the same file name. 5.4.4.2.3 Report 38 MachStdMill release 1.0.x constrained external tool table files to be in the setup units of the machine that created the file. This prevented a metric file from being used on a Imperial machine and vise versa. Copyright © 2009-2015 Calypso Ventures, Inc. Page 120 MachStdMill User Manual Revision 2.15 This button creates a report of the information in the tool table and sends it to the configured nonG-code editor. From the editor you can modify, change, copy & paste or print the report. The report generated is uses the Empty Tool attribute to include only non-empty tool table entries in the report. 5.4.5 Current Position Panel This panel displays current position information. Figure 87: Current Position Panel 5.4.5.1 M-Coords This button changes the multimode DROs from WC to MC. 5.4.5.2 Save Pos’n This button does the traditional Mach3 operation of saving the current position. 5.4.5.3 Return Pos’n This button does the traditional Mach3 operation of returning to the (last) previously saved position. 5.4.6 TC Position Panel Copyright © 2009-2015 Calypso Ventures, Inc. Page 121 MachStdMill User Manual Revision 2.15 Figure 88: Tool Change Position Panel 5.4.6.1 TC Position DROs These DROs show the current Tool Change Position (TCP). The DROs are R/W and can be used to directly enter coordinates for the TCP. TCP coordinates are ALWAYS in Machine coordinates and they are ALWAYS shown in the machine’s Setup Units. 5.4.6.2 Go TC Pos’n This button will move to the TCP shown in the TCP DROs. The move is first Z, then X,Y. 5.4.6.3 CPos’n to TCP This button will load the current position (in machine coordinates) into the TCP DROs. 5.4.7 TLO Setting Panel This panel provides the controls used to set TLOs for the current tool number. Two methods to set a tools TLO relative to a reference surface are provided. Figure 89: Set TLO Panel 5.4.7.1 Set G-Blk TLO When this button is pressed, MachStdMill assumes that the current tool tip is positioned touching the TLO gage-block (which is presumed to be on the parts WCZ0 surface) and the current position information is used to set the TLO for the current tool. 5.4.7.1.1 Tutorial: Setting TLOs via touch off to a gage block on part In section 4.3.1.1.2 we saw a picture of using a gage block to set Z0. A gage block is also commonly used to touch off tools in order to set the TLO for the tool. This is a common method of setting TLOs on the machine. Since we will be using a Gage block to touch off tools to set their TLO values, before using the gage block, be sure to set the gage block height on the Settings-Common page. Copyright © 2009-2015 Calypso Ventures, Inc. Page 122 MachStdMill User Manual Revision 2.15 Before starting a job, all tools which will be used by the job need to have their TLO values set. The process to do this is: Mount the tool in the spindle. This includes both the physical placement of the tool into the spindle and telling Mach the tool number of the mounted tool. The best way to do this is to use the MDI line to execute “T# M6” where “#” is the number of the tool being mounted. Jog the newly mounted tool over the gage block Lower the tool until is just touches the gage block With the tool tip touching the gage block, click the “Set G-Blk TLO” button. The TLO value for the tool will be entered into the Mach tool table. Repeat these steps for each tool the G-code program will use. The following figure show an example of a tool touching a gage block. Figure 90: Using a Gage Block to set a tool’s TLO This gage block shown happens to be of the indicating type that lights up when the tool tip touches the top of the block. Once all the tool TLOs have been set, double check the tool table entries to make sure that you have also set the tool diameters in the tool table. This is particularly important if your G-Code program user cuter compensation (G41, G42) as the tool table diameters are used to offset the cutter’s path. This touch off technique is common in industry where will tool holders are inherently RH. Copyright © 2009-2015 Calypso Ventures, Inc. Page 123 MachStdMill User Manual Revision 2.15 NOTE: This TLO touch off technique measures and stores the TLO values for the tool before the G-Code program is started. Consequently, this technique assumes that your tools are mounted in Repeatable Height (RH) tool holders. If you do not have RH holders, the TLO values measured will not be the correct when a NRH holder is remounted during the run of the G-Code program. What do you do when you do not have RH holders? If you do not have RH holders, you have to determine the TLO for a tool after the G-Code program calls for the tool and the tool is mounted, but before the newly mounted tool is used by the program. There are two ways to do this: You can mount the tool when the program calls for it, then use the above steps to set the TLO for the tool manually as part of you tool change steps. To be able to do this, you have to place the gage block on the part reference surface as part of each tool change. This can be problematic if the program has cut away the reference surface… To avoid the problems which can arise from the use of non-RH holders and the reference surface being cut away during the program run, MachStdMill has the ability to measure a Tool’s TLO automatically as part of a tool change sequence. This let you use NRH holders and have the system measure the tool each time a tool is mounted. This ability requires the presence of the optional fixed location Tool Change Position (TCP) Touch Plate (TP). Set up and use of a TCP TP is described after we cover Touch Plates and their installation and setup and use are described in sections 6 and 6.3. 5.4.7.1.2 Tutorial: Using a tool with known TLO to touch and set Z-Zero Now that you have set the TLOs for the job’s tools. Remember to set the Z-Zero surface for the part. You generally want to set Z-zero using a tool which has a valid TLO value. If the TLO value for the tool is incorrect, the location of the Z-Zero will also be incorrect. You also want to check that TLO is active for the tool that you use to set Z-Zero with. TLO state is shown and can be set from the current tool panel on the tooling page. TLO state is also given in the mode status of the main Primary pages and can be set (G43, G49) via MDI. Section 4.3.1.1 covers Touching off to set WC Z0. 5.4.7.2 Set TP TLO To set TLOs via touch off, a “mobile” Touch Plate can be used instead of a static gage block. This allows automation of the touch off process. If the G-Blk has been configured 39 to be a Touch Plate (TP), this action button will move the current tool down until the mobile touch plate is found, and then set the TLO measurement for the current tool. 39 See section 10.3.1.7 for the G-Blk configuration. Copyright © 2009-2015 Calypso Ventures, Inc. Page 124 MachStdMill User Manual Revision 2.15 The maximum distance to probe for the TP is set on the Settings-Common page. 5.4.7.2.1 Tutorial: Setting TLOs via touch off to a mobile touch plate Since we will be using a Touch plate in place of the Gage block to touch off tools to set their TLO values, before using the mobile touch plate, you have to configure MachStdMill to know that the gage block in really a touch plate. The controls for this are on the settings-common page and are documented in section 10.3.1.7 as part for the Probing Control Group (Internally the use of a touch plate is really a probing operation 40). The TLO G-Blk controls are show here: Figure 91: TLO G-Blk Controls Turning on the “TLO G-BLk is TP” button will let you use a mobile TP as a gage block. When this option is active, clicking the “SET TLO TP” button on the tooling page will cause the tool tip to be lowered to the mobile touch plate (which you have positioned on the part reference surface instead of the Gage Block). When the plate is touched, the TLO value will automatically be determined and entered into the tool table. The results are exactly the same as the manual touch off process described in section 5.4.7.1.1, the only difference is that the machine automates the actual touch off action. After placing the mobile touch plate on the part (in place of the gage block), the steps for setting TLO values via the TP are: Mount the tool in the spindle. This includes both the physical placement of the tool into the spindle and telling Mach the tool number of the mounted tool. The best way to do this is to use the MDI line to execute “T# M6” where “#” is the number of the tool being mounted. Jog the newly mounted tool over the mobile touch plate. Lower the tool until is within the “Max Dist” you configured for the Mobile TP. Click the “Set TP TLO” button. The TLO value for the tool will be measured and entered into the Mach tool table. Repeat these steps for each tool the G-code program will use. 40 Since Touch Plate use is really a probing operation, the probing actions (tool movement feed rate, back off distance etc) for touch plates are controlled by the Probing Op Parameters panel on the WC Offset, Probing Tab Page. Copyright © 2009-2015 Calypso Ventures, Inc. Page 125 MachStdMill User Manual Revision 2.15 The following figure show an example of using a Mobile TP instead of a gage block. Figure 92: Using a Mobile TP to touch for TLO NOTE: The use of a mobile TP simply automates the touch process. It does not resolve the issues associated with NRH tool holders. The other TP (the TCP TP) is required for dynamic TLO measurements as part of a tool change. 5.4.8 TC Options & Master Tool Mode Panel This panel contains Tool Change and Master Tool Mode option controls. The panel has two primary functions: a) To set TC options b) To control Master Tool Mode. Figure 93: TC Options & Master Tool Mode Panel Copyright © 2009-2015 Calypso Ventures, Inc. Page 126 MachStdMill User Manual Revision 2.15 As most of the controls in this panel are used for advanced Tool Change options (which can require optional hardware features), these control are described in detail in Section 6.2. Copyright © 2009-2015 Calypso Ventures, Inc. Page 127 MachStdMill User Manual Revision 2.15 6 Optional Hardware Support 6.1 Probe Signal Input Several of the features which MachStdMill supports require the use of the Probe input signal and hence the presence of appropriate input sensors configured and attached to the control and logically connected to the Mach Probe signal 41. MachStdMill has built in support for the use of the Probe input for a) 3D probe tools, and b) One or two simple touch off plates. 6.1.1 Active Probe MachStdMill includes extensive built in support (Offsets-Probing Page) for the use of a 3D probe tool for finding edges, corners & surfaces, setting Zeros, aligning vises and finding hole centers. See section 6.2 for more information. The following picture shows an example 3D probe: Figure 94: 3D Probe 41 Various Mach documents are inconsistent as to the name of this signal. Some documents refer to this as the “digitize” input signal (we are referring to signal #22 in Mach3 V3). Because this manual is end user oriented, the term “Probe” is used to refer to this input signal. Copyright © 2009-2015 Calypso Ventures, Inc. Page 128 MachStdMill User Manual Revision 2.15 6.1.2 Touch Off Plate A touch plate is simple conductive plate, either fixed or moveable, that is connected to the Probe input. These are commonly made from a piece of Printed Circuit Board (PCB) material. The top surface is wired to the digitizing input. When a (conductive) tool touches the plate surface, the circuit is closed thru the Spindle/machine frame and Mach3 then knows the plate has been touched by the tool. The following picture shows a simple digitizing plate made from PCB material: Figure 95: Simple Touch Plate MachStdMill understands how to use two distinct touch plates. One touch plate can be used in place of a gage block. This touch plate is sometimes referred to as “mobile” (as it is positioned by the operator where a gage block would be used). This touch plate is enabled via the “TLO G-Blk is TP” button on the Settings-Common page. Copyright © 2009-2015 Calypso Ventures, Inc. Page 129 MachStdMill User Manual Revision 2.15 Figure 96: Touch plate serving as Gage Block MachStdMill also knows how to use a second touch plate that is assumed to be (semipermanently) mounted below the Tool Change Position. This touch plate is enabled via the “TCP TP Installed” button on the Settings-Common page. Figure 97: TCP Touch Plate Example Copyright © 2009-2015 Calypso Ventures, Inc. Page 130 MachStdMill User Manual Revision 2.15 Figure 98: TCP TP being used to measure Drill Bit TLO 6.1.3 Both Plate(s) and Probe Some of the operations supported by MachStdMill either require, or are much easier, when the machine has both a Touch Off plate and an active 3D probe. A full function MachStdMill machine would have 3 digitizing devices: An active probe, a movable touch off plate for use on part z-zero surfaces and a fixed plate below the TCP for Master Tool Mode Auto-TLO. You only need to have the devices required for the features of MachStdMill you want to use. MachStdMill can support any combination of the 3D probe and the two touch plates. At first glance, this could appear to pose a problem since Mach3 only has one digitizing (probe) input signal. MachStdMill supports two different methods for interfacing multiple probe event devices for use by MSM. There is no explicit MSM configuration setting to select between the one signal and the two signal interfaces that are described in the following sections. The choice of the standard “one signal” interface and the “two signal” interface is determined by the definition of the Mach Timing input signal in Mach’s ports & pins dialog. To use MSM with only the Probe input signal (“one signal” interface), the Timing input signal must NOT BE enabled in the ports & pins dialog. The “two signal” interface will be used whenever the Timing input signal is enabled in the ports & pins settings. Copyright © 2009-2015 Calypso Ventures, Inc. Page 131 MachStdMill User Manual Revision 2.15 IMPORTANT NOTE: When making a change to Mach’s Ports&Pins settings, Mach will make the change for the current session, but Mach will not write the change to the Mach profile until Mach is closed. For various technical reasons, it is vital that you close Mach to force the Ports&Pins changes to get written into the XML profile file. MSM will not see the Ports&Pins configuration change until this is done! You can get very frustrated by making pin changes that MSM can not see because they have not been written to the XML profile yet… 6.1.3.1 One Signal Interface It is possible (via a simple circuit) to connect all three devices to a single digitizing input pin simultaneously. That pin is then logically connected to the Mach Probe Signal. This is referred to as the “one signal interface”. This interfacing approach has the advantage that it uses only 1 input pin, and it enables the GUI to show the state of all input devices at all times. This is achieved by utilizing some minimal electronics to combine multiple device inputs that are feed to the one input pin. The hardware circuit requirement is that when multiple sensors are present, any one of the sensors must cause a probe trigger event (without requiring a sensor cable swap). The technical technique for doing this is to connect the sensors such that they form a “active low wired-or” connection. This can easily be done by using two (or more) active low devices and “wire-or’ing” them to the Probe input, and then setting up Mach3 for active low signal operation on the Probe input 42. While many active probes are active high (they are a normally closed circuit), an inversion of the signal will convert it to active low. 42 Consider the logic of C = (A and B); if either A is false (0) or B is false (0), the result C is also False(0). This is logically the same as notC = notA OR notB. See De Morgan’s law for those interested in more. Copyright © 2009-2015 Calypso Ventures, Inc. Page 132 MachStdMill User Manual Revision 2.15 The schematic shows a simple circuit which can be used to connect an active probe and two touch plates for use with MachStdMill 43. The circuit also shows an optional section that provides a LED “Digitize/Probe signal active” (making use of the extra portions of the 74LS06 44 that would otherwise be ignored). 6.1.3.2 Two signal Interface For users that are not comfortable building the interface electronics described in section 6.1.3.1, active high and active low devices can be combined at the Mach logical signal level instead of the hardware input pin level. This is referred to as the “two signal interface”. Taking this approach requires the use of two input pins at the control. This approach also sacrifices the ability for the GUI to show the state of all probe input devices at all times. In 43 Note that the circuit as drawn assumes the BoB input is +5v TTL level. While the 74LS06 used will tolerate 30V on the output, modifications will be needed for BoBs that use non-ttl inputs (for example +24v) as the input to the indicating LED circuit is TTL level. 44 Design note: A 74LS series IC was used as they are cheap and easy to find. The response time is not critical for this application. Any IC (nSec) delays are added to the mechanical probe stopping time and hence, at most, might impact the probe overrun amount – which is already compensated for in the probing software routines. Copyright © 2009-2015 Calypso Ventures, Inc. Page 133 MachStdMill User Manual Revision 2.15 exchange, the hardware complexity is reduced to attaching a send wire to a second terminal on a break out board. With the one signal interface, MSM uses the Mach Probe input signal and assumes that all probe event input devices drive the single input pin (and hence the single “probe” input signal). In contrast, with the two signal interface, the probe device is interfaced to a pin that is logically connected to the mach probe signal, and the touch plates are interfaced to a 2nd pin and an alternate mach signal. This removes the need for the external interface electronics at the cost of using one additional physical input pin & one more input signal into Mach. When configuring the “two signal” interface, the probe and touch plates are wired to different pins of the break out board. The Probe tool must be connected to the mach Probe input pin and the Probe signal must be enabled in ports & pins. The other Probe signal pin attributes (active high/low etc) may be configured as needed for the probe device being used on this pin. The Touch plate(s) must be connected to the pin for the mach Timing signal. The other Timing signal pin attributes (active high/low etc) may be configured as needed for the device(s) being used on this pin. There are some restrictions that must be followed in order to use this “two signal” interface approach: 1) The Mach Probe Signal and the Timing Signal must both be defined and enabled in the Mach Ports & Pins dialog. 2) Both the Probe and Timing Signals must be on input pins. 3) The Probe and Timing signals must be defined on the same Port. This is crucial, as the interfaces will not work correctly if the two signals are defined on pins that are on separate ports. For example: You can not use the Probe Signal on Pin 13 of Parallel port 1 and the timing signal on pin 15 of parallel port 2. Attempting to use multiple ports may (very likely will) result in machine crashes during probing operations. 6.1.3.2.1 Technical Notes about Two Signal Interfaceing: Timing signal usage: The “two signal” implementation makes use of the Mach Timing input signal. The timing signal was deprecated in mach is no longer used by Mach in the 3.43.xx series, however it is still present in the ports & pins table. This made it a easy signal for MSM to repurpose and use as the touch Plate input. MachStdMill GUI impacts: When using the standard one signal interface, all devices present the single Probe input signal to mach and hence to MSM. Effectively all devices are “OR’ed” together and any device that is Copyright © 2009-2015 Calypso Ventures, Inc. Page 134 MachStdMill User Manual Revision 2.15 triggered will cause an active probe input signal to mach. A convenient side effect of this is that any device will cause the MSM Probe LEDs to turn on when any device is triggered, which makes it easy to manually check the devices for connection and correct operation, When using the “two signal” interface approach, the probe signal is the default input signal that mach and MSM use. The Touch plate input (the mach Timing signal pin) is dynamically selected during a probe operation and is used to “replace” the Probe signal input only when the touch plate is in actual use for a probing operation that uses a touch plate. This makes the Probe input the active input 99.9% of the time. Thus pushing on the probe will toggle the MSM Probe LEDs. However, it is now effectively impossible to use the MSM probe LEDs to test the touch plates – as the touch plate signal is only “connected thru Mach to MSM” for brief periods during the course of a TP probe operation. This is an unavoidable consequence of the two signal interface implementation. BoB interactions: Some break out boards have implemented the electronics required to accept mixed active high and active low signals, combine them and feed the combined SINGLE input signal into mach as the Probe signal (the PMDX 126 is an example of a breakout board which offers this features). In this situation there are two wires, from two devices, connected to two screw terminals on the break out board. HOWEVER, only one signal is provided as input into mach. This is a “one signal” (but two pin) interface situation (not a two signal, two pin interface) as Mach (and MSM) are only using the single Probe input signal. Do not confuse this with the Two signal interface. The two signal interface also uses two wires and two physical connections (pins), but it also presents two separate logical signals to mach (one from each input pin). Mach Version restriction: The Two signal interface requires the use of a Mach script interface that is not present in a Mach LockDown release prior to mach 3.43.66. MSM checks to see if the two signal interface is being used and also checks the Mach version. If the combination is incompatible, a prominent warning is displayed to the user when MSM starts. MSM allows Mach and itself to go ahead and startup (so that the user can either use the Mach ports & pins dialog to rectify the conflict or update the installed Mach release. CAUTION: Ignoring the mach version warning is a very bad idea!!! Copyright © 2009-2015 Calypso Ventures, Inc. Page 135 MachStdMill User Manual Revision 2.15 6.2 Optional Hardware and Advanced Features Note: If setting a system up for touch plates only (no 3D probe device), the use of the one signal interface approach is recommended; set the touch plate(s) up on the mach probe signal. 6.2.1 Mobile TP: If you want to be able to automate the setting of TLOs relative to a parts Z0 surface, you need a mobile TP. You do not need to have the Mobile TP if you only want to measure TLOs as part of a tool change (only the TCP TP is required for this). The mobile touch plate is a separate touch plate from the one mounted at the TCP. This one is placed on top of the part stock and used to probe to the mobile TP when setting the part’s Work Coordinate Z0. 6.2.2 TCP TP The MachStdMill tool change auto tool length measurement ability requires the optional "TCP TP" or Tool Change Position Touch Plate. The TCP TP is a touch plate that is mounted at a fixed location, which is required to be below (in Z) whatever position you use as your tool change position. 6.2.2.1 TCP TP Setup and Calibration Once the TCP TP is present and working, MSM needs to learn where it is. This is done by the "Set TCP TP MCz" button on the settings-common page. Refer to section 7.1.4 for additional information. 6.2.3 Home Switches Some MachStdMill operations require that the machine must have home switches and that it must be referenced. For example, the TCP TP is at a fixed location that can not change. This means the location is stored (between Mach runs) in machine coordinates. That in turn means that the machine coordinates much be constant between runs of the machine. This is accomplished by referencing the machine to it’s home switches. The TCP TP and Home Switches are required to enable a machine to be able to measure tools as part of a tool change sequence. 6.2.4 3D Active Probe The use of the MachStdMill Probing operations requires the presence of active Probe tool. Copyright © 2009-2015 Calypso Ventures, Inc. Page 137 MachStdMill User Manual Revision 2.15 6.3 Interfacing Probes to Break Out Boards The topic of interfacing a probe with a LED in it to a Break Out Board (BoB) that uses opto isolated inputs has come up a couple of times on the MSM support forum. This section is a summary of the issue involved which may be of help to MSM users... 6.3.1 Probe Switch Action At the hardware level, many probes are basically a NC switch. Most probes are naturally an “Active High” device to mach. When the probe is not triggered, it’s internal switch is closed and hence the input is shorted to ground; therefore the input pin is at a low (0v) state. Conversely when the probe is triggered, the probe switch opens and this is supposed to let the input go to the “active state” = High. Alas, this does not always happen with all break out boards, with all probes…. 6.3.2 Control Interface Problem Symptoms: The LED state on the Probe and the Screen LEDs in mach do not match, or the Probe action is intermittent. 6.3.2.1 Test Approach: You can determine if you are having an electronic interface issue by comparing the actions of the probe to a pair of wires connected where the probe connects. First test things using the pair of wires in place of the probe. Disconnect the probe and replace the probe with a simple pair of wires. Touch the wires to simulate the probe “not triggered”, and open the wires to simulate “probe triggered” (note, this is a static test – no need to try to touch the wires in sync with a G31 motion). Copyright © 2009-2015 Calypso Ventures, Inc. Page 138 MachStdMill User Manual Revision 2.15 Jumper/Wires Connected Voltage at Input Pin Jumper state MSM PP driver page Pin 13 LED 0v (or close) Shorted/Closed Disconnected/Open OFF (low) V+ (or close) ON (high) MSM Signal page Probe LED OFF (Inactive) ON (active) Notes This is what we want This is what we want Figure 99: Jumper test results for probe input (note in the table above, V+ is typically +5v or sometimes +12v, check your boards specs to know what V+ level to look for) Verifying the results in Table 1 will tell you that the chain from input terminal, thru the BoB, to the PP, then into Mach is working. Now reconnect the probe and check things again. If you get the results in table 1 again, you are good shape. If you get the results shown in Table 2 below, you probably have the technical issue this paper addresses. Probe connected Voltage at Input Pin Probe state NOT Triggered 0v (or close) Rises above 0v, but not near the BoB’s V+ supply MSM PP driver page Pin 13 LED MSM Signal page Probe LED OFF (low) OFF OFF OFF Triggered probable reasons This is Correct Interface Issue: Probe LED creates enough leakage current so that the BoB Opto stays on and thus so does switch the input pin signal to the PP and thus into Mach. Figure 100: Probe test results of probe input line 6.3.2.2 (Semi) Technical Explanation: For this I’m going to use the Gecko G540 as an example (only because it was the interface under discussion when this was written up). Copyright © 2009-2015 Calypso Ventures, Inc. Page 139 MachStdMill User Manual Revision 2.15 The potential problem is that the probes with a LED in them, do not appear as just a switch to the input line of the Break out board. What follows is a summary of the technical situation. The input lines on the G540 (and many other BoBs) are opto isolated. This is generally a good thing, but can have some side effects. In the G540 case, the input lines of the G540 look like this (excerpted from the G540 schematic posted on the Gecko Yahoo group): Figure 101: G540 Opto Inputs The Jumpers or a simple switch are electrically this: Figure 102: Switch/Jumper Copyright © 2009-2015 Calypso Ventures, Inc. Page 140 MachStdMill User Manual Revision 2.15 So, rearranging and connecting the jumper/probe to the input line, and just showing externally exposed 1/2 of the opto isolator we would get: Figure 103: Composite Opto Input and Probe Switch The above is what the jumper is doing and it generally works fine with Opto isolated inputs. For the jumper case, when the switch is closed, current flows thru the LED and it gets bright, that turns on the Opto transistor that feed the G540 side (not shown above). When the switch is closed the current thru the opto will be 12/2.2k = 5.5 ma When the switch is open, the G540 LED will be off, and so will the opto transistor it drives. So the two states from the electronics point of view are: Closed (probe inactive) = 5.5 ma current Open (probe active) = 0 ma current This is the behavior you want – so why can connecting the probe cause a problem? Because the probe is not just the switch, it also has the LED in it. If we add the Probe’s LED and resistor to the above circuit, we then get this schematic: Copyright © 2009-2015 Calypso Ventures, Inc. Page 141 MachStdMill User Manual Revision 2.15 Figure 104: Typical Probe with LED This is a different situation from Figure 103… With the switch closed, we have the same situation as before: 5.5ma thru the G540 opto LED. Now, let’s assume the forward voltage drop across both LEDs are1.5v (when they are on; this voltage varies by LED but is close enough to illustrate the problem…) Voltage = 12v – 1.5 – 1.5 = 9v Resistance = 2.2k + 1k = 3.2k Therefore ohms law gives the current thru the Opto LED as 9v/3.2k = 2.8 ma … and that tells us the basic problem… The probe LED is causing the probe’s “ON” state to draw 2.8 ma thru the G540 Opto LED – that is enough that the opto’s LED will still be lit and the opto transistor may still be ON…. Copyright © 2009-2015 Calypso Ventures, Inc. Page 142 MachStdMill User Manual Revision 2.15 In this circuit, the changing of the switch in the Probe is probably not causing a change in logic level at the PP input. Instead of changing between 5.5 and 0 ma, the probe is making the delta 5.5 and 2.8 ma. The 2.8 ma current level is not low enough to get the Opt transistor to turn off. You can think of the presence of the Probe LED as causing a current “leakage” path where the leakage is causing the problem. This also matches the symptom that sometimes the probe works and sometimes it does not, Since the 2.8ma current is in the middle range (neither 5.5 ma not 0 ma) where it may or may not drive the Opto transistor to a definite on/off state. 6.3.2.3 Typical Fix Approach: The usual fix for this is to add a pull up resistor from the input line to +V, then the circuit would become: Figure 105: Addition of Pull Up Resistor To calculate the value of the pull up resistor, one needs to know the internal circuit characteristics of the Opto used by the BoB and the Probe’s indicator circuit. Copyright © 2009-2015 Calypso Ventures, Inc. Page 143 MachStdMill User Manual Revision 2.15 Since CVI is not in the business of designing custom electronic interfaces to various BoBs, we have to point you back to the BoB vendor for electronic interface issues. If you are experiencing this situation, please contact your BoB vendor for advice on interfacing this type of LED indicating probe with their product. Copyright © 2009-2015 Calypso Ventures, Inc. Page 144 MachStdMill User Manual Revision 2.15 7 Advanced Tool Change Options 7.1.1 TC Options & Master Tool Mode Panel This panel contains Tool Change and Master Tool Mode option controls. The panel has two primary functions: a) To set TC options b) To control Master Tool Mode. Figure 106: TC Options & Master Tool Mode Panel 7.1.2 WC Offset This DRO displays the current WCO in use. This control lets the operator easily verify the current WC when setting TC options. 7.1.3 TC & Master Tool Mode Options Multiple Tool Change options are presented in this panel. Some of the options have other options as prerequisites. The relationships are indicted by the lines linking the option buttons. The use of the “TC Auto TLO” option (and hence any of its dependant options) require the configured presence of the optional TCP TP (Tool Change Position Touch Plate). The Measure Tool button also require the presence of the TCP TP. Before the TCP TP can be used, it must be setup (see section 7.1.4). Proper setup of the TCP TP is critical. If the TCP TP location is not precisely known, all measurements made with the TCP TP will be in error; that error will in turn propagate into TLO values and you will end up making scrap parts. 7.1.3.1 TLO and PTL All Tool table entries used by Mach for TLO compensation are TLO values. G-Code programs only use TLO values. Copyright © 2009-2015 Calypso Ventures, Inc. Page 145 MachStdMill User Manual Revision 2.15 Seldom does an operator need to actually deal with PTL values directly. When measuring a tool via the TCP TP, the only value that can be directly measured is the physical tool length (PTL). The software uses the measured PTL value to calculate the correct TLO value for the tool table. As PTL values are not used by Mach for TLO compensation, they are not shown in the Current Tool or Next Tool panels of the tooling page. PTL values for tools are shown in the Tool Table Information panel (tooling page), and can be edited from the tool geometry edit dialog. However, it is strongly recommended that PTL values be set only as the result of TCP TP measurement actions. 7.1.3.2 TC Auto TCP If this option is selected, the spindle will be automatically be moved to the TCP as part of the tool change sequence. Thus, the spindle will be at the TCP when the operator is prompted to mount the requested (next) tool. 7.1.3.3 TC Auto TLO: Automatic On-Machine Tooling Measurements MachStdMill has the ability to use the machine to measure tool physical lengths. From this measurement it can determine the TLO value to enter into the tool table. These abilities require the presence of one or more of the optional Touch Plates. The tool measurement abilities can be invoked either manually or as part of a tool change sequence. If TC Auto TCP is active AND the TCP TP is configured as installed (see Settings-Common), this option will auto-measure the new tool’s TLO as part of the tool change process. The TLO setting actions are further controlled by whether Master Tool Mode is active or not. When not in Master Tool Mode, there is one Auto TLO option (TLO = PTL) in addition to thw uaual non-automated TLO techiques.. 7.1.3.3.1 TLO = PTL Option Button With MachStdMill you no longer need an offline PTL measurement facility. Instead MachStdMill can measure a tool’s physical length. Effectively, this lets you use the TCP TP as a “just in time, on machine” tool measurement facility. This option causes a tool change to measure the tool’s PTL, and set the TLO of the tool to be the PTL of the tool. This supports the preset tool offset measurement approach described in section 5.2.3.1 This option is mutually exclusive with Master Tool Mode. Copyright © 2009-2015 Calypso Ventures, Inc. Page 146 MachStdMill User Manual Revision 2.15 7.1.3.4 Skip RH Tools If TC Auto TLO is active, this option will have MachStdMill skip the TLO measurement for RH tool holders. For RH tool holders, the existing TLO and PTL data is assumed to be correct and is used without further run time validation. It is the operator’s responsibility to re-measure any RH tool which may have physically changed length. Tip: Techniques like placing a bit of nail polish placed on a tool holder’s set screw when a tool is mounted in the holder, can help to alert you to remember to re-measure tools which have changed. 7.1.3.5 Measure Tool Button This button will use a probing operation with the TCP TP to measure the currently mounted tool. The PTL of the tool is always measured and stored. The TLO for the tool will also be calculated and stored as part of the measurement process IF AND ONLY IF a TLO mode is set. IF not TLO mode is set, only the PTL will be updated. With the following option combination, only the PTL will be measured when the Measure Tool button is clicked: Figure 107: PTL Only Measurement With the following option combination, the PTL will be measured and the TLO will be set = to the PTL value: Copyright © 2009-2015 Calypso Ventures, Inc. Page 147 MachStdMill User Manual Revision 2.15 Figure 108: TLO = PTL Option Settings With the following option combination, the PTL will be measured and the TLO will be set relative to the master tool PTL: Figure 109: Master Tool Mode Option Settings 7.1.3.6 Master Tool Mode Master tool Mode is turned On/Off by the Master Tool button. See section 9.1 for more information about the MachStdMill Master Tool Mode. When Master Tool Mode is On, the “TLO=PTL” Auto-TLO option is disabled. 7.1.3.7 Master Tool # This DRO specifies which tool in the tool table is considered to be the Master Tool. 7.1.3.7.1 Master Tool PTL When MachStdMill measures the PTL of the Master Tool, it is stored in the tool table entry for the Master Tool’s tool number. When MachStdMill needs to know the PTL of the Master Tool, this is the value it uses. Copyright © 2009-2015 Calypso Ventures, Inc. Page 148 MachStdMill User Manual Revision 2.15 If you are using MT Mode with the part Z0 touch off method, the Master Tool’s PTL value must be set to be actual PTL of the Master Tool before doing the touch off operation. If you have the TCP TP installed, you can go to the TCP and then use the “Measure Tool” action button to measure the PTL of the MT. The measured PTL value will be stored and can be displayed in the browse Tool Table information panel. See section 9.1 for additional explanation of the use of a Master Tool. Copyright © 2009-2015 Calypso Ventures, Inc. Page 149 MachStdMill User Manual Revision 2.15 7.1.4 TCP TP Configuration and Set Up. The TC Auto TLO modes require the presence of the TCP TP and that the TCP TP be setup before using these features. This section describes how to set it up the TCP TP. A key concept is that when the TCP TP is configured, MachStdMill learns and remembers the MC Z level of the top of the TCP TP. This enables MachStdMill to use the TCP TP to calculate the PTL of a tool and to use the PTL value to set the TLO of a tool. The TCP TP setup controls (on the Setting-Common Page) are: Figure 110: TCP TP Configuration Controls 7.1.4.1 TCP TP Installed Button When this button is on, it informs MachStdMill that the TCP TP is physically present. 7.1.4.2 Rnd Diam DRO When using the TCP TP for tool measurements, all measurements start from the Tool change Position (TCP). As many tools tend to have sharp points in the center of the tool (e.g. a drill bit), this also means that one location on the TCP TP gets most of the contact impact for tools. This DRO allows you specify an area, centered around the XY location of the TCP coordinates which will be used for TCP TP operations. This moves the contact point randomly within this circular area. MachStdMill does this by moving to a random point within the circle before doing the measurement probe. After the measurement the spindle is returned to the TCP location. If you do not want this feature to be active, set the Rnd Diam DRO to 0 and the exact TCP XY position will always be used. Note: When using this feature, the spindle may be moved form the TCP XY position by up to the DRO value /2 (i.e. the DRO radius value) in any XY direction. If you have set up the TCP TP to Copyright © 2009-2015 Calypso Ventures, Inc. Page 150 MachStdMill User Manual Revision 2.15 be at the extreme limits of the machine’s travel (a common choice as it minimizes work area used by the TCP TP), the TCP TP location must be set so that it is far enough away from the travel limits that a measurement operation will not activate a limit switch. 7.1.4.3 Max Distance DRO This specifies the maximum Z probing distance to use when using the TCP TP. This needs to be large enough to allow the shortest tool to reach the TCP TP for measurement. 7.1.4.4 Set TCP TP MCz Button This button invokes the TCP TP set up sequence. The setup process is described below. Any Tool Touching TCP TP TCP TP Top Position Calculation Gage Line MC Z0 TCP TP Bottom = MC_ZPos’n – PTL – GBH MC_ZPos’n T? PTL TCP TP Top Gage Block / Touch Plate Table Figure 111: Calculating TCP TP Top Position The figure illustrates how, if the PTL is known, the location of the TCP TP can be calculated. The Set TCP TP MCz button requires that the process be invoked from the TCP. When the Set TCP MCz button is pressed, a sequence of dialogs will be presented: Copyright © 2009-2015 Calypso Ventures, Inc. Page 151 MachStdMill User Manual Revision 2.15 Next the operator will be asked for the PTL of the currently mounted tool. The PTL value must have been previously accurately measured (see section 5.2.3.1.1). This initial measurement needs to be done offline - you can’t use the TCP TP to measure a tools PTL until AFTER the TCP TP is first setup! Tip: If your machine geometry is such that you can lower the gage line surface of your spindle to the TCP TP, you can setup the TCP TP location by using a PTL of zero – i.e. the gage line will be touched to the TCP TP top surface. If you use this approach, first make sure your machine is in tram. Since the spindle nose I wide, if the machine is not in tram, you could introduce error by having one side of the spindle or the other contact the TCP TP before the other side does. The accuracy of all measurements made using the TCP TP is dependant on the accuracy of the Z location of the TCP TP and hence also dependant upon the PTL value supplied by the operator during TCP TP setup. The tool will then be used to probe down to find the TCP TP. The TCP TP Z location will be calculated using the operator supplied PTL and stored in the TCP TP MCz DRO. 7.1.4.5 TCP TP MCz DRO This displays the MCz of the top of the TCP TP as set by the Locate TCP TP dialog sequence. The value of this DRO can only be changed by the dialog sequence – any attempt to change the DRO value manually will result in the manually input value being ignored. This value (which should never change unless the TCP TP is physically moved) is used within the auto TLO code to find the length of a tool. Copyright © 2009-2015 Calypso Ventures, Inc. Page 152 MachStdMill User Manual Copyright © 2009-2015 Calypso Ventures, Inc. Revision 2.15 Page 153 MachStdMill User Manual Revision 2.15 8 Advanced WCO operations: Probing The 3D probing operations built into MachStdMill are described in this section. The following is an example of a WC Offset – Probing sub-page: Figure 112: WCO Probing Page MachStdMill provides support for using a 3D probe to set work coordinate offsets and to get simple measurements from a part. To utilize this functionality, a configured and attached 3D probe is required. Some of the panels on this page have been previously described, and will be reviewed in this section. 8.1 Probe Tool Tip Geometry 3D Probe tools are assumed to have a spherical tip and the tool table diameter is used as the tip diameter. If you attempt to use a cylindrical tool with a flat end (like a piece of bar stock), you will not get correct probe results. Both MSM and Mach assume that a probe has a spherical tip, while Copyright © 2009-2015 Calypso Ventures, Inc. Page 154 MachStdMill User Manual Revision 2.15 a flat cylinder does not. While the difference will not be noticed for probing motion in the XY plane, any probing motion which involves Z will be incorrect. This is because the control pointof the probe tool is not at the physical end of the tool, rathere, the control point is the center of the probe tip. This is illustrated in the figure below: Z Effect of Non-Spherical Probe tip Probe Tool w/ Spherical Tip Cylindrical Tool w/ Flat End Tool Control Point Z Error from Using cylinder Probe Tool Tip Tool Diameter Figure 113: Probe Tool Tip Geometry Therefore a probe tool must actually have a spherical tip in order for the tip shape not to introduce measurement errors into probing operations. While other tip shapes are available for probes, neither Mach nor MSM support any tip shape other than spherical. 8.2 Work Coordinate Panel Figure 114: Work Coordinate Offset Panel Copyright © 2009-2015 Calypso Ventures, Inc. Page 155 MachStdMill User Manual Revision 2.15 This panel provides details of the calculation of the current WC position from Machine Coordinates (MC). It also provides controls to set the WC zero of each axis. This panel was introduced in section 3.1.3.2 for the WCO Touch-Off Page. The panel on the WCO Probing page is identical. 8.3 Work Coordinate Selection Panel This panel’s functionality was introduced in section 4.3.3. While this panel is arranged slightly differently from the panel on the WCO Touch-Off sub-page, the button and DRO functions are the same. Figure 115: 10x7 Probing WC Selection Panel Figure 116: 12x9 Probing WC Selection Panel The current work coordinate offset system is used for all probing operations 45. 8.4 Probe Operation Graphic Block Panels The probing specific panels on this page are The graphic probing operation panels. The Probing Op Parameters panels. This graphic probing operation panels are used to visually portray the available probing operations. There are multiple graphics panels, each of which groups together related probing operations. 45 Note: Due to the multi-step nature of probing operations, a probing operation may alter/reset WC offsets even if a probe operation is terminated by an error. Copyright © 2009-2015 Calypso Ventures, Inc. Page 156 MachStdMill User Manual Revision 2.15 Each panel contains three types of controls: Probe Operation Action “Graphic Buttons” Buttons LEDs The three probing operation panels are show below. Figure 117: Edge Finding Probing Operations Copyright © 2009-2015 Calypso Ventures, Inc. Page 157 MachStdMill User Manual Revision 2.15 Figure 118: Ridge and Valley Probing Operations Figure 119: Pocket and Post Probing Operations Copyright © 2009-2015 Calypso Ventures, Inc. Page 158 MachStdMill User Manual Revision 2.15 Figure 120: A Axis Probing Operations Figure 121: B Axis Probing Operations Copyright © 2009-2015 Calypso Ventures, Inc. Page 159 MachStdMill User Manual Revision 2.15 The functions of the various probing operations are described in detail in later sections. 8.5 Probing Operation Parameters Panel This panel provides the user interface to input key parameters used to control a probing operation. The panel also displays probing operation results. The contents of this panel change slightly when selecting a operation graphics block. Figure 122: Edge Finding Probing Op Parameters Panel The panel is horizontally divided into two parts by the Probing Operation message line. The upper portion is where the operator specifies probing operation parameters, and the lower portion is where probing operation results are displayed. The lower portion also contains the probing operation status LEDs and the Probe Operation Reset button. 8.5.1 Common Probing Operation Parameters 8.5.1.1 Probe Tool # This specifies the tool # of a probe tool. (While there can be more than one probe tool in the tool table, MachStdMill only knows about one probe tool at any given time). All probing operations require that the current tool be the probe tool #. 8.5.1.1.1 Probe TLOs Remember that all probing operations get the geometry of the probe tool from the tool table, including the probe TLO. Copyright © 2009-2015 Calypso Ventures, Inc. Page 160 MachStdMill User Manual Revision 2.15 Figure 123: Measuring a Probe’s PTL When measuring the PTL of a probe tool, remember that the TLO should include any travel of the probe tip before the probe triggers. If you were doing an off-line measurement of the probe PTL, the measurement point is not when the height gage just touches the probe tip, but rather is the point when the probe is first triggered by downward pressure of the height gage. Note that in the figure above, the probe PTL is measured with the probe triggered (for the example probe shown, the triggered LED is illuminated on the probe). If your probe does not have a LED in it, you can use the Probe Active LED to see when the probe is triggered. 8.5.1.2 Step Off Width Copyright © 2009-2015 Calypso Ventures, Inc. Page 161 MachStdMill User Manual Revision 2.15 Step Off Width Figure 124: Step Off Width This parameter is used for two purposes: a) For a “Down & Over” probe operation, after the probe finds the Z height of the top surface, this is the distance the probe will move over before attempting to lower to probing depth. b) For a corner find operation, this is the maximum (inside the corner) distance that the probe must be from the vertical edges of the corner at the start of the probe operation. For a corner operation, the probe should be positioned above the Z plane of the corner (within max Z distance) and “inside” of the corner, within Step Off width of both the X and Y edges. 8.5.1.3 Probing Depth For “down and over” operations, the probing depth is automatically set as show below: Copyright © 2009-2015 Calypso Ventures, Inc. Page 162 MachStdMill User Manual Revision 2.15 Probe Depth Probing Depth = Probe Diameter Part Table Figure 125: Probing Depth The probe is positioned such that the tip of the probe is at one Probe Diameter below the Z surface. The probing depth may be modified by the use of the Extra Probe Depth parameter. 8.5.1.4 Probe Fast FR (Feed Rate) Initial Feed rate to use for all probing operations. 8.5.1.5 Probe Slow FR (Feed Rate) Feed rate for optional 2nd probe of a found surface. This can be used to get better accuracy from the probe. If the slow feed rate = 0, the second re-probe operation is disabled and it is not performed. 8.5.1.6 Max X/Y Distance Max distance in X and Y that a probing operation will move. If the probe is not triggered within this distance, the probe operation will return an error. 8.5.1.7 X/Y Clearance The amount to back the probe off in X/Y from the found surface when a probe operation is successful. It is recommended that this distance be > 0. Due to the sensitivity of most probes, if you do not back off the probed surface, the probe may be re-triggered by small motions or vibrations. Copyright © 2009-2015 Calypso Ventures, Inc. Page 163 MachStdMill User Manual Revision 2.15 8.5.1.8 Max Z Distance Max distance in Z that a probing operation will move. If the probe is not triggered within this distance, the probe operation will return an error. 8.5.1.9 Z Clearance The amount to back the probe off in Z from a found surface when a probe operation is successful. It is recommended that this distance be > 0. Due to the sensitivity of most probes, if you do not back off the probed surface, the probe may be re-triggered by small motions or vibrations. 8.5.1.10 Extra Probe Depth This value is an additional amount to increase the probe depth by for “down and over” probe operations. When this parameter is zero, the probe tip depth is set as shown in figure Figure 125: Probing Depth. If this parameter is not zero, the probe depth is increased by this amount. Extra Probe Depth can not have a negative value (I.e. is only can only increase in depth, not a decrease it). This parameter is only included in the Probing Op Parameters panel when it is applicable to one or more of the operations shown in the graphic operation button panel. 8.5.2 Edge Finding Specific Probing Operation Parameters 8.5.2.1 Edge Width Specifies the width of the edge to be measured by an Edge probing routine. 8.6 Edge Finding Probe Operation Group This panel is used to initiate the edge finding probing operations. This panel contains three types of controls: Probe Operation Action “Graphic Buttons” Buttons LEDs Copyright © 2009-2015 Calypso Ventures, Inc. Page 164 MachStdMill User Manual Revision 2.15 Figure 126: Edge Finding Probe Operation Arrows & Buttons 8.6.1 Probing Operation Group Selection buttons The left pointing triangle and right pointing triangle buttons allow you to cycle between the different probing operation groups. 8.6.2 Edge Finding Probe Action “Graphic Buttons” The graphic buttons initiate the corresponding probing operation(s). 8.6.2.1 Vertical Surface Probe Operations This group of probing operations are used to probe along the X-, X+, Y- and Y+ axes to find a vertical surface. The graphic button arrows are labeled “Probe X+”, “Probe X-”, “Probe Y+” and “Probe Y-”. These probe operations simply probe in the direction indicated by the arrow (at whatever Z level the probe is at when the operation is invoked). By clicking on the green shaded ovals associated with each arrow, you can perform a “down and over probe”. This has the convenience of finding the top surface and then setting the probe tip to an appropriate probe depth (below the Z surface) before doing the Arrow operation. 8.6.2.2 Z-Zero Probe Operation This operation probes in the Z- direction to find a surface perpendicular to the Z axis. The Probe TLO is accounted for if TLO is active. Copyright © 2009-2015 Calypso Ventures, Inc. Page 165 MachStdMill User Manual Revision 2.15 A probe operation can be done either with a Probe tool or a regular tool can be “probed” to a touch Plate. Using a touch plate for a Z- probe operation, requires that the “G-Blk is TP” option be On. The use of the inclusion of the gage block height value in the calculation for where to set the Z Zero point depends on the settings of the Settings-Common “G-Blk is TP” button and the current tool when the operation is started. The combinations are given below: G-Blk is TP Probe Tool Mounted Off On No An Error if Probe Tool is not mounted. G-Blk Height used G-BLk Height NOT used G-BLk Height NOT used Yes G-BLk Height NOT used Table 1: G-Blk Height vs. Options & Tool type The case of probe tool mounted and G-BLk is TP = On is handled specially. In this situation, the mounted probe tool is used to perform the Z- probe operation and the G-BLk height is NOT used. This means that you never want to use a G-Blk between the probe tool tip and a Z- surface you are probing for as the presence of the G-Blk will present a false Z surface for the probe tool to find (you will end up setting Z0 to the top of the G-Blk/TP instead of the top of the surface the G-Blk/TP is sitting on). This special case handling allows you to use a probe tool to find Zero surfaces, and to use a G-Blk or Mobile Touch plate to set TLO values to a common reference surface, This typically happens if the machine is configured with a probe tool, a mobile touch plate but not a stationary TCP TP (and so tools can not be measured during the tool change sequence). 8.6.2.3 3D Corner Probe Operation Click within a green circle to find the X,Y,Z work coordinate of the corresponding corner. At the end of the operation, the probe tip will be positioned above the X/Y location of the corner and above it by the Z clearance amount. WC Aligned Corner Operation Figure 127: WC Aligned Corner Probe Copyright © 2009-2015 Calypso Ventures, Inc. Page 166 MachStdMill User Manual Revision 2.15 This operation is only valid for block that are aligned with the WC X and Y axes. If the block is rotated around the Z axis, use the Angled Corner Operation instead. The Corner Probe sequence of movements is controlled by specific Probing parameters. A Corner Probe must be started with the Probe tip within Step Off Width (SOW) by Step Off Width the corner’s edges. Step Off Width and Corners Probe must be positioned within the area that is Step Off Width by Step Off Width of the actual corner. Top view If not within this area to start, routine will fail as it will find a surface when it didn’t expect one, or will not find a surface when it expected one. Figure 128: Corners Probes and Step Off Width The corner probe movement sequence is: 1. Probes in Z- to find top surface, raises up from Top by Z Clearance distance 2. Moves over SOW to get off top 3. Lowers to probe height and probes back to find YZ plane surface 4. Backs off surface by XY Clearance distance 5. Moves SOW to get past corner 6. Moves SOW to get along next surface to find 7. Probes to find XZ plane surface 8. Backs off by XY Clearance distance 9. Moves to XY clearance dist off corner (still at probe depth) 10. Moves to Z clearance above top surface Copyright © 2009-2015 Calypso Ventures, Inc. Page 167 MachStdMill User Manual Revision 2.15 Corner probe moves Top view SOW 3 SOW 1 SOW 2 4 SOW 5 10 8 9 1 7 6 SOW Figure 129: Corner Probe Movement Sequence Note: the Corner probe operation I sonly valid for rectangular corners (all faces at 90 degrees to each other) which are also aligned with the Work Coordinate axes. If these conditions are not met, the corner point found will not be accurate. To find the corner of a rotated rectangular block, use the “Edge” graphic arrow to find a corner and measure the rotation of the block. 8.6.2.4 Corner with Edge Angle Measurement Probe This operation allows for finding the corner of a block rotated around the Z axis. Both the corner and the rotation angle of the block can be determined. To start this operation, click the portion of the edge arrow labeled “Edge”. Rotated or Angled Corner Operation Figure 130: Rotated Block Corner Operation Position the probe as you would for the corresponding 3D corner, then click an “edge arrow” to find the corner and measure an edge angle along the direction of the arrow. The operation will Copyright © 2009-2015 Calypso Ventures, Inc. Page 168 MachStdMill User Manual Revision 2.15 perform the appropriate 3D corner operation (X,Y,Z zero is set to the corner), followed by an edge offset measurement operation and then calculate the location of the corner of the rotated block. The angle of the edge, relative to the work coordinate axes, will be displayed in the probing operation results DROs. Note: The block is assumed to be rectangular (all corner faces at 90 degrees to each other. When finding the corner of a rotated block, the start position of the probe has some constraints. In addition to the requirement for the position to be within SOW of the corner edges, You also need to start on the “edge angle face side of the axis line bisecting the corner. This is illustrated in the figure below. Corner with Edge Angle Start Locations ge Ed gle An ce Fa ge Ed ce Fa gle n A A ge Ed ce Fa le g n A ge Ed ce Fa le g n Figure 131: Starting touch spots for Angled Block Corner Probes. The system can’t know the block angle until after it measures the angle of the indicated face. To make the angle measurement, probe moves aligned with the current XY WC axes are used. If the angle measurement sequence is started from the non-angle face side of the bisecting line, the probe movements may not avoid the corner (depending on the values of StepOffWidth etc). Starting on the recommended side of the bisector, avoids the corners as all the edge angle measurement movements will be on the angle face side of the corner. Copyright © 2009-2015 Calypso Ventures, Inc. Page 169 MachStdMill User Manual Revision 2.15 8.6.2.5 Edge Angle Only Measurement Probe The Down and Over version of the edge angle measurement operation will measure the edge of the block an report the angle of the block to the WC XY axes. This operation does only the edge angle measurement and does not find the corner location. Edge Angle Measurement (“down and over”) Edge Angle Measurement (“at depth”) Figure 132: Edge Angle Measurements Position the probe over the top surface of the block, then click the down and over spot for the edge angle operation desired. The operation will perform the appropriate edge angle measurement operation. The angle of the edge, relative to the work coordinate axes, will be displayed in the probing operation results DROs. Note: The block is assumed to be rectangular (all corner faces at 90 degrees to each other. 8.6.3 Buttons 8.6.3.1 Probe Only Button For offset setting operations, this button will normally be Off. When Off, a probe operation shifts the current work coordinate system axis to align with the probed surface. When this button is On, the WC is not shifted, and the probe results are displayed in the results panel. This is useful for doing simple CM (Coordinate Measurement) operations with the Probe. 8.6.4 Edge Finding Probe Operation Results The results from edge finding operations are shown in the lower have of the Probing Op Parameters panel. Copyright © 2009-2015 Calypso Ventures, Inc. Page 170 MachStdMill User Manual Revision 2.15 Figure 133: Edge Finding Results 8.6.5 X Probed Position: The X coordinate result for the probe operation. The position is given in the current work coordinate system. 8.6.6 Y Probed Position: The Y coordinate result for the probe operation. The position is given in the current work coordinate system. 8.6.7 Z Probed Position: The Z coordinate result for the probe operation. The position is given in the current work coordinate system. 8.6.8 Edge measurement results: These calculated probe operation results are useful for assistance with vise or fixture alignment. 8.6.8.1 Edge Angle: The angle of the measured edge, relative to the 0 degrees in the current coordinate system. 8.6.8.2 Edge Delta: The amount the edge varies perpendicular to the probe direction over the edge width distance. 8.6.9 Probing Operation Status LEDs 8.6.9.1 Probing Op LED This LED indicates that a probing operation is in progress. It will turn off upon a successful completion of the probing operation. 8.6.9.2 Probing Error LED This LED indicates that an error occurred during the probing operation. The displayed probing operation results are not valid when an error has occurred. The LED will stay on after the operation ends to let the operator know that an error occurred. 8.6.10 Probe Op Reset Button This button will reset the probing operation subsystem and clear any prior probing operation errors. The button also clears the probing operation status message and the Mach3 message area at the top of the screen. Copyright © 2009-2015 Calypso Ventures, Inc. Page 171 MachStdMill User Manual 8.6.10.1.1 Revision 2.15 Probe Only & Measurement Resolution The MachStdMill probing operations were designed for work offset setting etc. The "probe only" option was included as simple measurement tool. When making measurements with the probe, think about the interactions of tolerances, absolute precision & accuracy of the machine's movement mechanisms (what is the minimum movement physical resolution of each axis). All this will factor into the "Measurement quality". For example: If a machine has 10000 steps per inch, the minimum movement for the machine will be 1/10k. A general rule of thumb is that a measuring device needs to have resolution at least 10x better than the measurement you want to make; so right away the machine has a usable measurement resolution limitation of 1/1000 or 0.001 inches. Don’t get too enamored with all the nice significant digits that the DROs display.... not all those digits are necessarily filled with good values. 8.6.11 LEDs 8.6.11.1 Probe Active This LED indicates when the Mach3 Probe input signal is active. 8.6.11.2 Master Tool Mode This LED indicates when the MachStdMill Master Tool Mode is active. 8.7 Ridge and Valley Probing Operation Group This group provides support for probing and measuring Ridges and Valleys. While the graphic shows rectangular ridges and valleys, the probing logic will work with any cross sectional shape which is symmetrical wrt to the center line of the ridge or valley. Accordingly, these operations may be used to measure and find the center top of objects with rectangular, round or triangular cross sections. Objects with asymmetrical cross sections will introduce errors into the centerline results. Copyright © 2009-2015 Calypso Ventures, Inc. Page 173 MachStdMill User Manual Revision 2.15 8.7.1 Ridge and Valley Action “Graphic Buttons” 8.7.1.1 X Direction Valley Probe This operation measures and finds the center of a valley along the X axis. Note that the measurement direction is perpendicular to the visual direction of the “valley” (i.e. a X measurement is used for valleys which run in the Y direction). These probe operations simply probe the span in the direction indicated by the arrow (at whatever Z level the probe is at when the operation is invoked). By clicking on the green shaded ovals associated with a double headed arrow, you can perform a “down and over valley probe”. This has the convenience of finding the top surface and then setting the probe tip to an appropriate probe depth (below the Z surface) before doing the valley probing operation. 8.7.1.2 Y Direction Valley Probe This operation measures and finds the center of a valley along the Y axis. Note that the measurement direction is perpendicular to the visual direction of the “valley” (i.e. a Y measurement is used for valleys which run in the X direction). These probe operations simply probe the span in the direction indicated by the arrow (at whatever Z level the probe is at when the operation is invoked). By clicking on the green shaded ovals associated with a double headed arrow, you can perform a “down and over valley probe”. This has the convenience of finding the top surface and then Copyright © 2009-2015 Calypso Ventures, Inc. Page 174 MachStdMill User Manual Revision 2.15 setting the probe tip to an appropriate probe depth (below the Z surface) before doing the valley probing operation. 8.7.1.3 X Direction Ridge Probe This operation measures and finds the center of a Ridge along the X axis. Note that the measurement direction is perpendicular to the visual direction of the “Ridge” (i.e. a X measurement is used for ridges which runs in the Y direction). 8.7.1.3.1 X Hint DRO The X Hint DRO is an input parameter specific to this operation. Simply set the “hint” to the approximate width of the ridge being probed. There is no need for the hint to be precise. If the hint value is too large, a little extra time will be expended probing air. This probe operation should be started with the probe tip roughly over the center of the ridge you want to probe. The probe will search in Z- to establish an initial Z height and the he probe will lift above this height by Z Clearance. The probe will then step over by a distance equal to Hint/2 + Step Off Width, and then lower to find the first face of the ridge. The rest of the operation will find both outside faces of the ridge, the position the probe tip over the center of the ridge. Finally the Z height of the ridge at the center line will be probed. If “Probe Only” is off, the X and Z axes will be Zeroed to the center line of the top of the ridge. The results of the probe operation will be shown in the result portion of the Probing Op Parameters panel. Note that for a X direction Ridge Probe, the Y axis is not changed by the operation. 8.7.1.4 Y Direction Ridge Probe This operation measures and finds the center of a Ridge along the Y axis. Note that the measurement direction is perpendicular to the visual direction of the “Ridge” (i.e. a Y measurement is used for ridges which runs in the X direction). 8.7.1.4.1 Y Hint DRO The Y Hint DRO is an input parameter specific to this operation. Simply set the “hint” to the approximate width of the ridge being probed. There is no need for the hint to be precise. If the hint value is too large, a little extra time will be expended probing air. This probe operation should be started with the probe tip roughly over the center of the ridge you want to probe. The probe will search in Z- to establish an initial Z height and the he probe will lift above this height by Z Clearance. The probe will then step over by a distance equal to Hint/2 + Step Off Width, and then lower to find the first face of the ridge. The rest of the operation will find both outside faces of the ridge, the position the probe tip over the center of the ridge. Finally the Z height of the ridge at the center line will be probed. If “Probe Only” is off, the Y and Z axes will be Zeroed to the center line of the top of the ridge. Copyright © 2009-2015 Calypso Ventures, Inc. Page 175 MachStdMill User Manual Revision 2.15 The results of the probe operation will be shown in the result portion of the Probing Op Parameters panel. Note that for a Y direction Ridge Probe, the X axis is not changed by the operation. 8.7.1.5 Probe ZThis operation is the same that described in the Edge Finding group. It is also included in this group for convenience. 8.7.2 Ridge and Valley Group buttons The buttons in the panel are the same as those in the edge finding group panel. 8.7.2.1 Z Action Options These buttons modify the Z actions for the X,Y ridge operations. For normal ridge operations both the First Z and Last Z buttons should be ON. With both buttons ON, the operation sequence will be: Probe down to find the Z level of the top of the Ridge. This Z level is used to determine the post operation’s Probe depths during the probing sequence. Find the center of the ridge, using a series of probing operations. From above the center point of the ridge, probe down to find the Z level of the center of the ridge. This is the Z level that is reported and is used for setting the WCZ0. Normally, the ridge’s final Z level is measured at the center of the ridge, and this can’t be done until after the center is known. When probing a ridge with a hole or depression in the center, this becomes problematic as there may be no Z surface at that location to probe. The First Z and Last Z options can be used to find the center of a ridge which is not solid or flat. By turning off both First Z and Last Z options, and by using appropriate ZClearance and Extra Probe Depth amounts, it is possible to find the center of an piece of channel which does not have a symmetrical center, or one where the center material is not centered between the outside faces. 8.7.2.1.1 First Z Then this button is ON, the first Z probe of the sequence will be done normally. If this button is OFF, the first Z probe is not done. Instead the Z level of the probe as of when the post operation was started is assumed to be the Z level of the top of the ridge PLUS the ZClearance amount set in the probing parameter DROs. Turning off “First Z” should be used with caution as it then becomes necessary to manually locate the probe tip in Z, BEFORE starting the post probe operation, to ensure the probe clears the ridge during the center finding movements. 8.7.2.1.2 Last Z Copyright © 2009-2015 Calypso Ventures, Inc. Page 176 MachStdMill User Manual Revision 2.15 When this button is ON, the Last probe of the sequence will be to find the Z level of the top of the ridge at the post center. The Z level found is normally used to set the Z Zero level for the ridge center point. If This button is OFF, the final Z level of the post top surface to find the Z of the center of the ridge will not be performed. Turning off “Last Z” should be used with caution as the Z level used for the ridge is NOT the Z level of the center of the ridge. The Z level used to set Z Zero will be dependant on the setting of the First Z option (either the Z level found by the First Z probe, or the starting Z level of the Probe is First Z was Off). 8.7.3 Ridge and Valley Group Results The results of the Ridge and Valley probe operations are shown in the lower portion of the Probing Op Parameters panel. In addition to the X, Y, Z results for the operation the measured X and Y width are also given. Figure 134: Ridge and Valley Probe Results 8.8 Pocket and Post Probing Operation Group This Probing Operation Group supports measuring and finding the center of rectangular and circular pockets and extrusions (“posts”). Copyright © 2009-2015 Calypso Ventures, Inc. Page 177 MachStdMill User Manual Revision 2.15 8.8.1 Pocket and Post Action “Graphic Buttons” 8.8.1.1 Probe ZThis operation is the same that described in the Edge Finding group. It is also included in this group for convenience. 8.8.1.2 Rectangular Post Center Probe Operation This operation measures and finds the center of a Rectangular post along the X and Y axes. 8.8.1.2.1 X, Y Hint DROs The X Hint and Y Hint DROs are input parameters specific to this operation. Simply set the “hints” to the approximate corresponding widths of the rectangular post being probed. There is no need for the hints to be precise. If the hint value is too large, a little extra time will be expended probing air. This probe operation should be started with the probe tip roughly over the center of the post you want to probe. The probe will search in Z- to establish an initial Z height and the he probe will lift above this height by Z Clearance. A Ridge probe operation will be performed in both the X and Y directions and probe tip will be positioned over the center of the post. If “Probe Only” is off, the X, Y and Z axes will be Zeroed to the center, top of the post. The results of the probe operation will be shown in the result portion of the Probing Op Parameters panel. Copyright © 2009-2015 Calypso Ventures, Inc. Page 178 MachStdMill User Manual Revision 2.15 8.8.1.3 Rectangular Pocket Center Probe Operation This Operation will find the center of a rectangular pocket. The operations is performed at whatever height the probe is at when the operation is started. The size of the pocket to be probed is limited by the Max X/Y Distance parameter. At the end of the operation, the X,Y axes will be zeroed to the center of the pocket (if “Probe only” is off). Note that the probing logic assumes that the pocket is rectangular and aligned with the X,Y axes. If the pocket is not rectangular or is skewed to the axes, the results will be inaccurate. There is also a “down and over” version of the operation available in the graphic panel. 8.8.1.4 Circular Post Center Probe Operation This operation measures and finds the center of a cylinder (circular post) along the X and Y axes. 8.8.1.4.1 Diameter Hint DRO The Diameter Hint DRO is an input parameter specific to this operation. Simply set the “hint” to the approximate diameter of the cylinder end being probed. There is no need for the hints to be precise. If the hint value is too large, a little extra time will be expended probing air. This probe operation should be started with the probe tip roughly over the center of the post you want to probe. The probe will search in Z- to establish an initial Z height and then the probe will lift above this height by Z Clearance. The center of the cylinder will be found in the X and Y directions and probe tip will be positioned over the top center of the post. The post is assumed to be circular (probing an ellipse or other non-circular shape will not yield valid results). If “Probe Only” is off, the X, Y and Z axes will be Zeroed to the center, top of the post. The results of the probe operation will be shown in the result portion of the Probing Op Parameters panel. 8.8.1.5 Circular Pocket Center Probe Operation Click the double headed arrow inside the center hole to initiate this operation. The probe will be used to find the center of the hole and will be left positioned at the X,Y center of the circle. The hole is assumed to be circular (probing an ellipse or other non-circular shape will not yield valid results). A “down and over” version of the circle probe operation is also provided. Copyright © 2009-2015 Calypso Ventures, Inc. Page 179 MachStdMill User Manual Revision 2.15 8.8.2 Pocket and Post Group buttons The buttons in the panel are mostly the same as those in the edge finding group panel. 8.8.2.1 Calibration This panel has an additional button: “Calibration” which is covered in section 8.9. 8.8.2.2 Z Action Options These buttons modifies the Z actions for the circular and rectangular post operations. For normal Post probe operations both the First Z and Last Z buttons should be ON. With both buttons ON, the operation sequence will be: Probe down to find the Z level of the top of the post. This Z level is used to determine the post operations Probe depths during the operation sequence. Find the center of the post, using a series of probing operations. From above the center point of the post, probe down to find the Z level of the center of the post. This is the Z level that is reported and is used for setting the WCZ0. Normally, the post’s final Z level is measured at the center of the post, and this can’t be done until after the center is known. When probing a post with a hole in the center this becomes problematic as there is no Z surface at that location to probe. This situation can commonly occur when probing a cylinder end with a hole in the center. If the center hole is too small to probe, the center can still be found by probing the outer surface of the cylinder. The First Z and Last Z options can be used to find the center of a post which is not solid. For example by turning off both First Z and Last Z, and by using appropriate ZClearance and Extra Probe Depth amounts, it is possible to find the center of a very thin wall vertical tube. 8.8.2.2.1 First Z Then this button is ON, the first Z probe of the sequence will be done normally. If this button is OFF, the first Z probe is not done. Instead the Z level of the probe as of when the post operation was started is assumed to be the Z level of the top of the Post, PLUS the ZClearance amount set in the probing parameter DROs. Turning off “First Z” should be used with caution as it then becomes necessary to manually locate the probe tip in Z, BEFORE starting the post probe operation, to ensure the probe clears the post during the post center finding movements. 8.8.2.2.2 Last Z When this button is ON, the Last probe of the Post sequence will be to find the Z level of the top of the post at the post center. The Z level found is normally used to set the Z Zero level for the post center point. If this button is OFF, the final Z level of the post top surface to find the Z of the center of the post will not be performed. Copyright © 2009-2015 Calypso Ventures, Inc. Page 180 MachStdMill User Manual Revision 2.15 Turning off “Last Z” should be used with caution as the Z level for the post is NOT the Z level of the center of the post. The Z level used to set Z Zero will be dependant on the setting of the First Z option (either the Z level found by the First Z probe, or the starting Z level of the Probe is First Z was Off). 8.8.3 Pocket and Post Group Results The results of the Pocket and Post probe operations are shown in the lower portion of the Probing Op Parameters panel. Figure 135: Pocket & Post Results In addition to the X, Y, Z results for the operation the measured X and Y width are also given. For circular operation the X and Y Widths are the Diameter of the Probe feature. 8.9 Rotary Axis Probing Groups This Probing Operation Group supports measuring and finding the center the 4th and 5th Axes. The routines are also useful for probing cylinders parallel to the X and/or Y axes. 8.9.1 The A Axis Group The A Axis is presumed to be aligned parallel to the X axis. Copyright © 2009-2015 Calypso Ventures, Inc. Page 181 MachStdMill User Manual Revision 2.15 Figure 136: A Axis Probing Panel 8.9.1.1 Cylinder center and Cylinder Alignment “Graphic Buttons” 8.9.1.1.1 A-Center Operation This operation is similar to the ridge probing operations. Because the Operation can assume that it is probing a circular cylinder, only three probe points are required to find the center of the cylinder. This operation measures the cylinder diameter and finds the center of the cylinder along the Y and Z axes. The "Diam Hint" DRO is an input parameters specific to this operation. Simply set the “hint” to the approximate corresponding diameter of the cylinder being probed. There is no need for the hint to be precise. However, it should be “reasonably close” as it is used to derive probing depth and the distance to transverse when crossing from one side of the cylinder to the other. If the hint value is too large, a little extra time will be expended probing air. The hint’s primary purpose is to minimize overall probe time for the operation. This probe operation should be started with the probe tip roughly over the center of the cylinder you want to probe (you can start off center and it will not effect the results). The probe will search Copyright © 2009-2015 Calypso Ventures, Inc. Page 182 MachStdMill User Manual Revision 2.15 in Z- to establish the first probe point on the cylinder. The operation will then continue and look for two more probe points on the cylinder (one on the Y- and one on the Y+ side of the cylinder). From these 3 touch points, the operation determines the diameter and location in YZ of the cylinder (at the X axis position) where the probe operation was performed. If “Probe Only” is off, the Y and Z axes will be Zeroed to a point on the cylinder that is controlled by the “YZ Zero Option” graphic buttons. The results of the probe operation will be shown in the result portion of the Probing Op Parameters panel. 8.9.1.1.2 YZ Zero Option Graphic buttons If the “Probe Only” button is Off, these buttons control where the YZ zero point is set. Figure 137: YZ Zero Option Graphic Buttons The choices are The center of the Cylinder Z+ (top) of the Cylinder Z- (bottom) of the Cylinder Y+ side of the Cylinder Y- side of the Cylinder 8.9.1.1.2.1 A-Axis Orientation Some machines are set up with the A-Axis at the X- (typically the “left”) end of the table, and some are set up with the A-Axis at the X+ (typically the “right”) end of the table. Note that the graphic operations are show relative to the Y and Z axes. The A-Axis operations simply probe a cylinder that is mounted on the A-Axis drive and they neither know nor care which end of the cylinder is “driven” by the A-Axis. All operations are specified relative to the Y, Z axis directions. The A-Center operation will probe the cylinder at the X location the operation is started from. Copyright © 2009-2015 Calypso Ventures, Inc. Page 183 MachStdMill User Manual Revision 2.15 The A-Edge operation will do it’s first A-Center operation then move in the X- direction to do to 2nd operation. 8.9.1.1.3 A-Axis Edge Operation This operation measures and finds the center of a cylinder along the X axis and measures it’s parallelism relative to the X axis. An A-Center operation is done to measure and locate the cylinder center. Then, the probe is moved in the X- direction the distance specified in the Edge Width probing Op Parameters DRO, at that location a second A-Center operation is performed. The results of the two operations are used to calculate the Y Delta and Z Delta of the cylinder from the X Axis direction. The accuracy of this operation depends on the fact that a circular cylinder is being probed. If the cylinder has any taper (I.e. it’s a cone rather than a cylinder), the results will be inaccurate. The diameter of the two A-Center operations is compared and if they differ by a significant amount, a warning is displayed. The cylinder is also assumed to be straight, any bend in the cylinder will create errors in the results. 8.9.1.1.4 A-Axis Rotation Angle Operation This operation can be used to determine the rotation angle of the A Axis. IT is also useful for measuring the angle of a plane which is rotated around the A Axis. The standard convention of a right hand coordinate system is used to determine the positive A direction of rotation. 8.9.1.1.4.1 Angle Jog Button The Angle Jog button determines whether the operation is done as a single operation or a two part operation. When the Button is Off, the Rotation angle operation is done as one operation. When the Button is On, the operation requires into two separate probing operations. 8.9.1.1.4.2 Single Operation When executed as a single operation, the machine will probe down to find the Z height of the surface at the X,Y location the operation is started from. It will then step over in the Y- direction by “Step Off Width”. A second Z probe is then performed at the second location and the results calculated from the two probe points. 8.9.1.1.4.3 Two Part Operation When executed as a two part operation, the machine will probe down to find the Z height of the surface at the X,Y location the operation is started from. The operator then jogs manually to the location for the second part of the probe operation. To initiate the second part of the operation, click the second highlighted area of the operation (The green oval without the down arrow). Copyright © 2009-2015 Calypso Ventures, Inc. Page 184 MachStdMill User Manual Revision 2.15 A second Z probe is then performed at the second location and the results calculated from the two probe points. This split operation is useful when two surfaces used to align a rotary axis may not be part of a singe contiguous surface. This allows the operator to jog around fixture obstructions which might be in the way. Note that when doing a two part operation, that the results from the first operation are assumed by the second operation. If any other probing operations are done in between part 1and part 2, the part 2 operation will refuse to execute to prevent generating erroneous results. 8.9.1.1.5 A-Axis Results Panel This is the Probing results area for the A Axis Group: Figure 138: A Axis Probing Results Note that each operation in the group only updates the applicable DROs. 8.9.2 The B Axis Group The B Axis rotation center is aligned parallel to the Y axis. Copyright © 2009-2015 Calypso Ventures, Inc. Page 185 MachStdMill User Manual Revision 2.15 Figure 139: B Axis Probing Panel 8.9.2.1 Cylinder center and Cylinder Alignment “Graphic Buttons” 8.9.2.1.1 B-Center Operation This operation is similar to the ridge probing operations. Because the Operation can assume that it is probing a circular cylinder, only three probe points are required to find the center of the cylinder. This operation measures the cylinder diameter and finds the center of the cylinder along the X and Z axes. The "Diam Hint" DRO is an input parameters specific to this operation. Simply set the “hint” to the approximate corresponding diameter of the cylinder being probed. There is no need for the hint to be precise. However, it should be “reasonably close” as it is used to derive probing depth and the distance to transverse when crossing from one side of the cylinder to the other. If the hint value is too large, a little extra time will be expended probing air. The hint’s primary purpose is to minimize overall probe time for the operation. This probe operation should be started with the probe tip roughly over the center of the cylinder you want to probe (you can start off center and it will not effect the results). The probe will search in Z- to establish the first probe point on the cylinder. The operation will then continue and look for two more probe points on the cylinder (one on the X- and one on the X+ side of the cylinder). Copyright © 2009-2015 Calypso Ventures, Inc. Page 186 MachStdMill User Manual Revision 2.15 From these 3 touch points, the operation determines the diameter and location in XZ of the cylinder (at the Y axis position) where the probe operation was performed. If “Probe Only” is off, the X and Z axes will be Zeroed to a point on the cylinder that is controlled by the “XZ Zero Option” graphic buttons. The results of the probe operation will be shown in the result portion of the Probing Op Parameters panel. 8.9.2.1.2 XZ Zero Option Graphic buttons If the “Probe Only” button is Off, these buttons control where the XZ zero point is set. Figure 140: XZ Zero Option Graphic Buttons The choices are The center of the Cylinder Z+ (top) of the Cylinder Z- (bottom) of the Cylinder X+ side of the Cylinder X- side of the Cylinder 8.9.2.1.2.1 B-Axis Orientation Some machines are set up with the B-Axis at the Y- (typically the “closest”) side of the table, and some are set up with the B-Axis at the Y+ (typically the “farthest”) side of the table. Note that the graphic operations are show relative to the X and Z axes. The B-Axis operations simply probe a cylinder that is mounted on the B-Axis drive and they neither know nor care which end of the cylinder is “driven” by the B-Axis. All operations are specified relative to the X, Z axis directions. The B-Center operation will probe the cylinder at the Y location the operation is started from. The B-Edge operation will do it’s first B-Center operation then move in the Y- direction to do to 2nd operation. 8.9.2.1.3 B-Axis Edge Operation Copyright © 2009-2015 Calypso Ventures, Inc. Page 187 MachStdMill User Manual Revision 2.15 This operation measures and finds the center of a cylinder along the Y axis and measures it’s parallelism relative to the Y axis. A B-Center operation is done to measure and locate the cylinder center. Then, the probe is moved in the Y- direction the distance specified in the Edge Width Probing Op Parameters DRO. At that location a second B-Center operation is performed. The results of the two operations are used to calculate the X Delta and Z Delta of the cylinder from the Y Axis direction. The accuracy of this operation depends on the fact that a circular cylinder is being probed. If the cylinder has any taper (I.e. it’s a cone rather than a cylinder), the results will be inaccurate. The diameter of the two B-Center operations is compared and if they differ by a significant amount, a warning is displayed. The cylinder is also assumed to be straight, any bend in the cylinder will create errors in the results. 8.9.2.1.4 B-Axis Rotation Angle Operation This operation can be used to determine the rotation angle of the B Axis. It is also useful for measuring the angle of a plane which is rotated around the B Axis. The standard convention of a right hand coordinate system is used to determine the positive A direction of rotation. 8.9.2.1.4.1 Angle Jog Button The Angle (“via”) Jog button determines whether the operation is done as a single operation or a two part operation. When the Button is Off, the Rotation angle operation is done as one operation. When the Button is On, the operation requires into two separate probing operations. 8.9.2.1.4.2 Single Part Operation When executed as a single operation, the machine will probe down to find the Z height of the surface at the X,Y location the operation is started from. It will then step over in the X- direction by “Step Off Width”. A second Z probe is then performed at the second location and the results calculated from the two probe points. 8.9.2.1.4.3 Two Part Operation When executed as a two part operation, the machine will probe down to find the Z height of the surface at the X,Y location the operation is started from. The operator then jogs manually to the location for the second part of the probe operation. To initiate the second part of the operation, click the second highlighted area of the operation (the green oval without the down arrow). A second Z probe is then performed at the second location and the results calculated from the two probe points. Copyright © 2009-2015 Calypso Ventures, Inc. Page 188 MachStdMill User Manual Revision 2.15 This split operation is useful when two surfaces used to align a rotary axis may not be part of a singe contiguous surface. This allows the operator to jog around fixture obstructions which might be in the way. Note that when doing a two part operation, that the results from the first operation are assumed by the second operation. If any other probing operations are done in between part 1and part 2, the part 2 operation will refuse to execute to prevent generating erroneous results. 8.9.2.1.5 B-Axis Results Panel This is the Probing results area for the B Axis Group: Figure 141: A Axis Probing Results Note that each operation in the group only updates the applicable DROs. 8.10 Probe Calibration and Accuracy 8.10.1 Probe Calibration To get accurate probing results, it is important to calibrate the effective probe tip diameter. This section describes the probe tip calibration procedure. For a description of the type of Probe Travel errors that the Probe Calibration procedure can compensate for, as well as other accuracy considerations, see section 8.10.1.2.3 8.10.1.1 Calibration Button For normal operation this button will be Off. When the button is On, a circular center probe operation (hole or post) will result in the probe tip total diameter being set to the effective probe tip diameter. By probing a circular hole or post of a known size, an effective tip diameter can be calculated. The effective tip diameter is the physical tip diameter plus compensation for the probe’s angular shaft movement when edge finding. When doing a circular probe operation with the calibration button on, the measured circle diameter will be compared to the Calibrate Diameter value (as given by the operator in the Probing Op Parameters panel). This lets MachStdMill calculate the effective probe tip diameter (which may be different from the physical tip diameter). Copyright © 2009-2015 Calypso Ventures, Inc. Page 189 MachStdMill User Manual Revision 2.15 Before the start of the calibration, the tool table diameter for the probe tool must be the physical diameter of the probe tip and the actual diameter of the object being probed must be correctly entered. The calibration procedure updates the probe tip wear diameter value in the tool table to make the total tip diameter be the newly calculated effective diameter. Using the effective diameter, instead of the physical tip diameter, for probe operations will compensate for angular displacement effects (such as cosine errors from probe shaft deflection before triggering). When saving the tip compensation value, the operator is offered the choice of replacing the current value, or averaging the new value with the old value. 8.10.1.2 Other Probing Accuracy Considerations There are multiple sources of error that can impact a probing trip point and hence a measurement made via a probe operation. 8.10.1.2.1 Centering the probe tip The probe tip needs to be concentric with the spindle axis. Most probes have some adjustment for this - it's important to get the probe adjusted to the center line of the Z axis. The MachStdMill probing logic really only knows where the theoretical spindle axis is in X and Y and it assumes that the probe tip is centered around that axis. Consider a probe shaft that is offset in X,Y (but still parallel to Z) - this would introduce an error dependent on the offset of the shaft (and hence the probe tip location). Mach has no internal facilities to deal with this type of error in a G31 result. Most probes have adjustments at 120 degrees apart (because internally, they use 3 radial contact points). Centering the probe tip is done by tilting the probe shaft axis until the center of the spherical tip is aligned on the spindle axis. This tends to be a rather tedious process of adjusting while measuring run out with a dial indicator. 8.10.1.2.2 Probe Mounting Once the probe is adjusted to be concentric with the Z axis, before you remove it from the spindle, mark the probe and spindle so that you can put the probe tool back into the spindle with at the same relative rotation each time you mount the probe tool (or the probe adjustment has to be redone each time you mount the probe). 8.10.1.2.3 Probe Travel Errors When the probe is used, it has some inherent errors due to the mechanics of the probe. For example: The probe tip has to move a finite amount before the internal probe contacts change state (the probe shaft tilts a bit before the probe triggers). This means that the trigger point event Mach sees does not happen precisely when the probe tip first touches the object. This figure shows the ideal situation of an instantly triggering, perfectly rigid probe: Copyright © 2009-2015 Calypso Ventures, Inc. Page 190 MachStdMill User Manual Revision 2.15 Theoretical Probe Action Probe Body Ideal Probe position when Triggered: Tip aligned with vertical axis Figure 142: Ideal Probe Action All real probes introduce some error into the trigger point as shown below: Actual (exaggerated) Probe Action Probe Body Actual Probe position when Triggered: Tip is shifted from probe position.. Figure 143: Probe Trigger Point Error The MachStdMill Calibration process allows you to compensate for this type of error. The calibration process consists of probing a circle probe of a known diameter. MachStdMill knows the probe tip diameter and the (operator supplied) known calibration hole diameter. The measured diameter is compared to stated value you provide. The difference is due to the probe shaft angle when the probe triggers. The difference is used by MachStdMill to adjust the diameter of the probe tip the tool table to be what it “should be” to get the stated hole size. Copyright © 2009-2015 Calypso Ventures, Inc. Page 191 MachStdMill User Manual Revision 2.15 This resets the Tool Table diameter for the probe tip to an "effective diameter" (slightly different from the measured physical diameter). The result is that this adjusted probe tip diameter compensates for the "probe mechanism tilt error". Note that changing probe shafts (longer or shorter) or changing the probe tip diameter will change the probe tip geometry and hence require recalibration. Finally, MachStdMill assumes the probe tip is perfectly spherical - if it is not, that would be another source of error. MachStdMill can compensate for much of this “cosine error” but not 100% of it. The software assumes that the amount of shaft tile is independent of the direction of the probe operation travel. However, the internal geometry of a typical probe makes the cosine error a function of the probe direction. 8.10.1.2.4 Cosine Errors When using a probe for taking measurements, the operator needs to be aware of the possibility for cosine errors. A cosine error is named for the trigonometric function which describes the amount of the error. Consider the following picture: Probing Perpendicular to an Object Mach thinks the probe touched here… ..and it did. Figure 144: Perpendicular Probe Movement When the probe movement is perpendicular to the surface of the object being probed, no cosine error is introduced. MSM arranges most integrated probing operations to satisfy this condition. However, if the probing operations are being used to make measurements from a part (“Probe Only” is on), this may not always be the situation. Now consider this situation: Copyright © 2009-2015 Calypso Ventures, Inc. Page 192 MachStdMill User Manual Revision 2.15 Cosine Error Mach thinks the probe touched here… …but it didn’t… Cosine Position Error Figure 145: Cosine Error If the probe finds a surface which is not oriented perpendicular to the direction of the probe movement, an position error is introduced. The amount of the error is a function of the cosine of the angle of the angle between the direction of the probe movement and the surface the object found. 8.10.1.2.5 Misc Accuracy Considerations 8.10.1.2.5.1 Effects of a non-Z centered Tip If the probe is not perfectly centered on the Z axis center line (i.e. not adjusted perfectly) there will be deltas between X and Y direction measurements. Do not attempt to make the adjustment perfect – you’ll go nuts before that happens. Just make the adjustment good enough for the work you are doing. 8.10.1.2.5.2 Probe Shaft Length The amount of tip compensation calculated is dependent on probe shaft length. A longer shaft will have more cosine error than a shorter shaft. This is one reason it is best to use the shortest probe shaft possible for a given job. Changing the shaft will require realignment of the probe tip and recalibration. 8.10.1.2.5.3 Spindle Run Out The Z axis spindle itself may have some run out in it. This can affect measurements. To minimize this, always position the spindle to the same rotation position whenever you mount the probe. 8.10.1.2.5.4 Cosine Error is a Function of Travel Direction The probe is not a symmetric device with respect to the direction of travel. Copyright © 2009-2015 Calypso Ventures, Inc. Page 193 MachStdMill User Manual Revision 2.15 The amount of "tip shaft tilt" that occurs before it opens the internal contacts is a function of what direction the probe is moving then the tip touches. 8.10.1.2.5.5 Circularity Calibration Assumptions Is the object being measured perfectly circular? If not the calibration calculations will be off. 8.11 Tutorial: Getting started with probing This "how to get started" section was created in response to the various questions from people trying probing for the first time. The following are some simple sequential steps to try when first experimenting with probing and MSM. FIRST: RTFM (read the fine manual – since you are reading this section you are on the right track). Things usually go much smoother if you have first read the prior probing sections. These steps use many of the probing operations detailed in section 8. The MSM probing routines are internally built in a layered fashion and they are implemented in the probing library which is installed with MSM. We’ll start from square one and work our way up to more complicated operations. If at any point in the process, something seems off, stop and figure out what is happening ***before*** going on…. OK, let’s get started - 8.11.1 Check Probe input line Does the big green probe led light on the probing page when you trigger the probe by pushing on the probe shaft? And the LED is off when the probe is not triggered? Assuming these are correct, we go on... 2) Test Probing Library Linkage Use the settings-common page, Probe Ver button - this calls the probing lib, gets the lib version and displays in the line at the top of the screen. You should see a message like "MachStdMill Probing v0.XX". That exercises all the screen set to probing library software linkages etc - it just doesn't cause any motion. 3) Check basic probe actions. Let’s start with some slow but reasonable probing set up parameters. Please set the probing input parameters as shown in the screen shot below - this will you working off the Probing Op Parameters assumed within this section of the manual. Copyright © 2009-2015 Calypso Ventures, Inc. Page 194 MachStdMill User Manual Revision 2.15 Figure 146: Imperial Probing Tutorial Parameter Settings The above settings are for an imperial measurement machine. Similar settings for metric users are given in the next figure. Figure 147: Metric Probing Tutorial Parameters The probe tool number does not have to be 250; use whatever number you prefer for your probe tool. What is important is that whatever you have set as the probe tool number, has to be the currently mounted tool. Anything else will result in an error as MSM won't do a probe operation without the probe tool mounted. MSM also won’t let you start the spindle when the probe tool is mounted. Note that the "probe slow FR" parameter DRO is set to 0. This disables the 2nd probing operation; for now we want a simple, single probe operation for testing. 8.11.1.1 Probing and Signal noise A common problem is noise on the probe input line into Mach. The suggested settings use a fast probe rate of 15 IPM – this is slow enough to be able to see and react to what is happening while still being fast enough to generally avoid some common problems associated with slow feed rate probing operations. Depending on the physical probe being used, slower feed rates can actually cause problems with switch bounce in the probe sequence. The symptom will be false triggering or only partial triggering of a G31 (the G-code for a probe movement) sequence. Copyright © 2009-2015 Calypso Ventures, Inc. Page 195 MachStdMill User Manual Revision 2.15 To start, use the mach menus to get to the Config general dialog and set the mach debounce interval (this the one used for the probe input filtering) to 100. This is a nice starting number. Later when all is well you can reduce this – clear down to 0 if you have a very clean, non-noisy system. If you see the probe touch a surface, stop and then MSM say “surface not found” and then it goes back to the operation start point, or if you see movement start and then stop without the probe touching a surface and then MSM says “surface not found”, you probably have noise on your probe input line. Try raising the mach debounce level to verify the problem is noise. It may sound reasonable to assume that any noise on the probe input line will act just like the probe had actually touched a physical surface. However, this makes assumptions about how Mach implements probing which do not hold true. The basic probing operation sequence: 1. G31 starts, mach starts moving machine 2. Probe input triggers; mach records the position of the probe when it was triggered 3. Mach decelerates the probe and movement stops. Note that the stopping position is not the trigger position. The difference is “overrun”. A bit of Overrun is expected and good – as it keeps the probe in the triggered state. 4. Mach returns from internal G31 execution to program that issued the G31 (for the MSM probing operations, this will be a return to the code in the MSM probing library) 5. Script looks at probe signal input state – a. If probe is not active, we ran out of distance w/o triggering the probe b. If probe is active, we found something and were triggered. 6. Probing Lib gets the trigger position and does what it needs (for example sets axis zero to the face we found). 7. Library backs off by the overrun amount (this lets the probe become un-triggered) 8. Library back off the user defined clearance amount. Noise on the probe input line will make this sequence not work correctly. Example: A short noise pulse at step 2 can be long enough to stop the G31 motion; but at step 5 the probe will not be in the triggered state when checked (as the probe did not actually touch a surface). Therefore, MSM thinks nothing was found and so it puts the probe back to the starting position. Adding some Debounce in Mach may help. If you do this, you need to be aware that Mach's debounce is really a software patch fix for a hardware problem. The ideal solution is to remove the electrical noise from the system and use a debounce of 0. Many people either can't or don't want to expend the effort required to accomplish that. The pragmatic approach is to lower the debug number until the problem appears, then raise it back up a little. Copyright © 2009-2015 Calypso Ventures, Inc. Page 196 MachStdMill User Manual Revision 2.15 That leaves the issue of "How do I tell if my required debounce setting is too high"? "Debouce" is the amount of time a signal must be continually "on" before mach will consider it as having turned on. Each number in the debounce DRO represents about 40usec of time (25kHz Mach: 1/25KHz = 40uSec, the time quantum will be shorter for faster Mach kernel speeds). A debounce of 40uSec* 4000 = 160mSec. That is a long time for a computer, it's even pretty noticeable to a human. At 4000, the probe signal has to be on for a minimum of 160ms before mach will see it and stop the probe motion. Now consider, how fast are you probing? Let's just pick a number for illustration: Say you are probing at 50 ipm with debounce set to 4000; during the debounce interval the probe will have moved (50 ipm * 160msec ) / 60 sec/min = 0.133 inches. So the probe will travel 0.133 in past where the edge is before mach will think the probe is triggered - and then it has to decelerate and stop..... Be careful to think about: How much tip travel does the probe have? 0.133 inches over travel could be hard on the probe - depends on the probe design. Same scenario with 200 debounce: 50ipm * (200*40usec) / 60 sec/min = 0.0067 inch over travel Personally, I prefer to see a debounce of no more than a few hundred. but the real answer is whatever combination works that makes the machine run reliably. Play with the numbers and decide what you are comfortable with. 8.11.2 Set the geometry for the probe tool. Did you set the probe tool # diameter to the probe’s physical tip diameter? As you just setting up the probe for the first time, you may hot have a TLO for the probe tool set into the tool table. That is OK, we are going to do the first steps with TLO Off anyhow. Save the tool table (so that when you com back and do this later you still have the data in the table for the probe tool). Use the G49 button on the tooling page to make sure TLO is off. The following tests all use the probing operations from the edge finding probing group. 8.11.3 Test simple XY direction probes. Position the probe in nice clear air. Click the X+ green arrow - it should start moving toward X+, not find an edge after the XY max distance (1 inch) and tell you there no edge was found - does it? Copyright © 2009-2015 Calypso Ventures, Inc. Page 197 MachStdMill User Manual Revision 2.15 The probe should return to the start point after not finding an edge. Clear the error from the probe operation- hit the "probe Op reset" button. This resets us to start a new probing operation. If that works, do it all again, only this time while the probe is moving trigger the probe manually (use a long pencil or stick or something to tap the probe tip for a moment. DO NOT put your hands into the working area where a machine is moving). This should cause the routine to think it found the surface - does this work? You may have to try this a couple of time to get a feel for how long to keep the probe triggered manually – it’s around a 1/10 to 1/4 sec at 15 ipm. If that works, try the other XY directions. for each of X+, X-, Y+ and Y- do the "let it reach max distance and return to start" test and also the "Probe and trigger with stick" test. Do all XY directions work? 8.11.4 Test Z direction probing We now know that basic line probing routines work in X and Y. We now proceed to check out Z.... Z max is set to 1" - confirm this. Start from a height where 1" Z travel downward should not get close to anything. Do a Probe ZIt should go 1", not find a surface, tell you and that, then go back to where it started. Do it again, only this time use your stick/pencil to trigger the probe - does it then think it found a Z surface? Did the Z Zero get set to the where you triggered the probe? If all is well, all 3 axes are working for basic probing hardware triggering. Let try a real probing operation…. 8.11.5 The First XY Probing Operations Set up something to use as a probing target. A nice rectangular block works well. Jog the probe tip over near block, position the probe in Z so that the top of the tip sphere is a bit below the top surface of the block. Back off the block a bit – say 1/2 to 3/4 inch. Now go thru trying the X+ probe op – It should find the block, stop, and back off of the block by the XY clearance amount. Using the params we set up above, the gap between the probe tip and the block’s vertical surface will be 0.100” when the operation completes. (If the “probe only” button is OFF), you will see that the WC zero for the X axis has been set to the surface the probe found. Copyright © 2009-2015 Calypso Ventures, Inc. Page 198 MachStdMill User Manual Revision 2.15 If all is well, now reposition and try X-, Y= and Y- directions. All still good? 8.11.6 The First Z Probing Operation Now position the probe over the top surface of the test block. Try the Z- probe. All good? (It should be as we did this earlier, manually – this is the same test only with the block). 8.11.7 Down and Over Operations Now you can position the probe in from the edges of the block and try the “down and over” versions of the X & Y edge operations. Do all 4 corners – all still OK? The results will be the same, only this is easier as you don’t have to position the probe tip height by eye. You’ve now worked thru all the X,Y and Z single axis probing operations. 8.11.8 A Corner Probe Operation Now you can position the probe over the block, within step off width of the corner and try the non-rotated corner probe operations. All OK? 8.11.9 Edge Measurements Now position the probe just like for the corner cases, but click the edge arrows. MSM will do a corner find op, then move along the edge and measure the angle of the edge wrt to the axis parallel to the edge. (We set the “edge width” parameter to 1 inch, you can adjust it to be closer to your test block size if you like). All OK still? 8.11.10 Circular Pocket Center Probing For this operation you will need to change to the Post & Pocket probe operation group. Position the probe in a circular hole, set the probe to as you did before to just below the top surface of the hole, and try the center finding double headed arrow. Now you can try the down and over version of he circle center finder. Every thing still ok? Copyright © 2009-2015 Calypso Ventures, Inc. Page 199 MachStdMill User Manual Revision 2.15 All is working and you have now worked thru the basic MSM probing operations. 8.11.11 Checking for noise sensitivity Now go back and reduce the debounce number until you start to see problems, then set it a bit higher again. If things run a debounce of 0, great! - you have a non-noisy system. Remember that a single debounce value is used for all inputs except the index pulse (which is separate). If you needed a debounce amount for your home switches, you will still need that amount to make the switches reliable. 8.11.12 Dual feed rate probing Now, if you like, set Slow probe FR to non-zero and do it all yet again. 8.11.13 Set TLO for the probe tool Now you can enter a TLO for the probe tool and do it all once more to verify that TLO and probing is also OK. If you have a Tool Change Position Touch Plate also installed (TCP TP), the easiest way to set the probe tool’s TLO is to use the TCP TP to measure the probe tool. Copyright © 2009-2015 Calypso Ventures, Inc. Page 200 MachStdMill User Manual Revision 2.15 9 Advanced Tool Handling: Master Tool Mode 9.1 Master Tool Mode This section introduces the MachStdMill support for Master Tool Mode (MTM). The touch off method of setting TLOs was introduced in Section 4.3 and the steps necessary to use the TCP TP for TC Auto TLO measurements was described in Section Error! Reference source not found.. With the touch off technique, each tool’s TLO is determined relative to Part Z0. As noted in section 4.3, the WCOz must be set before the touch off operations are performed to “measure” the tools. This is required because the touch off method creates a TLO that is relative to the PartZ0 Plane, and if the WCOz moves, the TLOs also all need to be re-determined. A convenient variation of the touch off method is the use of a Master Tool (MT). With the master tool technique, TLOs are set relative to a single reference tool instead of relative to Part Z0. The tool used as the reference tool is called the “Master Tool” (MT). MachStdMill supports use of a master tool via the Master Tool Mode. Master Tool Mode is enabled by the “Master T Mode” button on the tooling page. Figure 148: Master Tool Mode Button When Master Tool Mode (MTM) is On, certain actions are modified when compared to when MTM is Off 9.1.1 Master Tool Mode SetZ0 Actions The actions performed when setting a WCOz to a part are dependent on MTM. When MTM is off, a SetZ0 action sets the WCz to the tool tip location and the WCOz is not changed (usually the WCOz value = 0) Copyright © 2009-2015 Calypso Ventures, Inc. Page 201 MachStdMill User Manual Revision 2.15 In MTM the SetZ0 process is different. The WC Z offset is set to a non-zero value which is a function of the Physical Tool Length (PTL) of the Master Tool (MT). Successful use of MTM requires that the operator has set the PTL of the MT by measuring the MT PTL before using MTM to SetZ0. Master Tool @ MC Z0 Master Gage Line MC Z0 T2 In MTM, the Master Tool Physical length is known. (It is input by the Operator on the Tooling Page.) MT PTL Gage Block / Touch Plate Part Z0 Part Table Figure 149: MT at MC Z0 The SetZ0 process starts as it has before, with the MT at MC Z0. The MT is then lowered until the MT tip is touching PartZ0. Copyright © 2009-2015 Calypso Ventures, Inc. Page 202 MachStdMill User Manual Revision 2.15 Master Tool Touching Part Z0 Gage Line MC Z0 Master MC = Z-5.9 T2 MT PTL Gage Block Height = 0.1 Gage Block / Touch Plate Part Z0 Part Table Figure 150: MT touching Part Z0 via G-Blk The next two figures illustrate the effects of the MTM SetZ0 action. Before MTM SetZ0 Action Gage Line MC Z0 Master MC = Z-5.9 T2 In Master Tool mode, The master tool is touched off to Part Z0. In MTM mode the SetZ0 action will set the WC Offset = “Touch-off value”. MT PTL WCO = MC_ZPos’n - WC_ZOffset – GBH MT TLO = 0.0 Gage Block / Touch Plate Gage Block Height = 0.1 Part Z0 Part Table Figure 151: Before Set Z0 action With MTM, the SetZ0 action places a value into the WCOz register of the current WC system. Copyright © 2009-2015 Calypso Ventures, Inc. Page 203 MachStdMill User Manual Revision 2.15 After MTM SetZ0 Action WCO = MC_ZPos’n - WC_ZOffset – GBH (WCOz will be a Negative Value) Gage Line MC Z0 Master WCOz = Z-5.9 – GBH = -6.0 MC = Z-5.9 T2 WC Z0 MT PTL Gage Block Height = 0.1 Gage Block / Touch Plate Part Z0 Part Table Figure 152: After Set Z0 Action The prior figure shows the results of the MTM SetZ0 action. The value which the Touch Off technique calculated for TLO, is used in MTM mode as the WCOz value and the “touch-off offset for the MT” is used to shift the WC. 9.1.2 Master Tool Mode Touch Off TLOs In MTM, the TLOs will be relative to the PTL of the MT. Note that the length of the Master tool, relative to the master tool, is 0 (since MT PTL – MT PLT = 0). Thus, we can see that in MTM, the TLO for the master tool is always = 0. Copyright © 2009-2015 Calypso Ventures, Inc. Page 204 MachStdMill User Manual Revision 2.15 Master Tool (MT) at WC Z0 Gage Line MC Z0 WCOz = -6.0 Master WC Z0 MC = Z-6.0 T2 MT PTL Part Z0 Part Table Figure 153: MT at WC Z0 Looking at the figure one will see that when the MT is at WC Z0, with the MT TLO applied (which = 0) that the tool tip is at PartZ0. Once the WC Z0 has been set using MTM mode, the touch off technique is used to touch all the other tools to PartZ0 and thereby set the TLOs for the tools. Because of the WCOz set by the MTM SetZ0 operation, the touch off formula (refer to Equation 5: TLO Formula ) results in TLO values that are relative to the MT. This is illustrated in the next figure. Copyright © 2009-2015 Calypso Ventures, Inc. Page 205 MachStdMill User Manual Revision 2.15 MTM TL Offsets Relative to Master (TL Offsets will be positive OR negative values) Gage Line MC Z0 Master WCO H4 T2 WC Z0 T4 H3 H1 T3 T1 H2 (Master TLO =0.0) Gage Block / Touch Plate Part Z0 Part Table Figure 154: MTM TLOs Relative to MT Observe that in MTM, the TLO values may be either positive or negative values. TLO values will be positive for any tool which is longer than the Master tool. TLO values will be negative for any tool which is shorter than the Master tool. Any tool which happens to be exactly the same length as the master tool will have a TLO = 0. Because of this relationship of TLO signs to MT length, many operators choose to use a Master tool which is longer than any other tool. If the MT is the longest tool, all the TLO values will be negative (as they are when using the regular touch off technique). Since Z0 was set with the MT, and the MT is the longest tool, any tool change will place the new Tool Off of the part when it is at WC Z0 ( before TLO is applied), as all tools are shorter than the MT. However, the operation of MTM does not require that the MT be the longest tool and the MT can be of any length (the math doesn’t care). Finally, we note that conceptually, it would be possible to have multiple master tools, each of a different length, and to have a corresponding set of TLOs for each MT. MachStdMill does not support this additional level of complexity. The current MachStdMill model is that there is only one MT at any given instant in time. If the MT PTL changes, the other tool’s TLOs need to be remeasured. 9.1.3 Master Tool Mode Advantages The advantage of using MTM is that (once the TLO’s are set relative to the MT), you no longer have to set the TLOs of the tools for each job (This assumes RH holders). It becomes only Copyright © 2009-2015 Calypso Ventures, Inc. Page 206 MachStdMill User Manual Revision 2.15 necessary to use the MT to set Z0 for the job. Once that is done, the entire tool set is ready to be used. To summarize: With the regular touch off technique, every tool has to be touched off to the part to set the TLOs for each tool to the Part. With Master Tool mode, the Tool TLOs only need to be set once. The MT essentially “sets the TLO’s” for the entire tool set each time it is used to SetZ0. This key advantage is used by MachStdMill to provide simplified support for automatic TLO measurements during a tool change (see section 9.2.1). 9.1.4 Master Tool Mode Tool Set TLO Set Up Process 9.1.4.1 Measuring the MT PTL with the TCP TP The logic in the PTL Measurement routines knows that the MT is treated specially. If the MT is being measured, the PTL of the MT will be stored in the tool table. If the MT length is ever changed, you can use the TCP TP to measure the new MT and MachStdMill will then know the new MT’s PTL. 9.1.4.2 MTM TLOs using TCP TP This is the easiest and the recommended way to set TLOs relative to the Master Tool. To use this technique, some pre-conditions must be satisfied: 2. The TCP must be setup to be over the TCP TP, and 3. The MT PTL must be measured before using the TCP TP to measure other (nonmaster) tools. For each tool for which you want to set the TLO in MTM mode: 1. Mount the tool to be measured via tool change (MDI T#M6). (You must both physically mount the tool and let Mach3 know what tool # is mounted – the easiest way to do this is via an MDI tool change sequence.) 2. With MTM ON, use the “Measure Tool” button to probe down to the TCP TP and have the MTM TLO set. (Tip: When Auto TCP is On, and the TCP TP is set correctly, this is done for you automatically as part of the tool change process.) Important note: It is a REQUIREMENT that the “Measure TLO” action start exactly from the TCP. For this reason the “Measure Tool” button will go to the TCP before starting the measurement. You can also use the GoTo TCP button (do not assume you are “close enough”) when using the TCP TP to set TLOs. If this condition is not met, MachStdMill can not tell that you are using the TCP TP and instead may assume that you are using the G-Blk TP (if the G-Blk is TP option is set on the SettingCopyright © 2009-2015 Calypso Ventures, Inc. Page 207 MachStdMill User Manual Revision 2.15 common page) – which will result in the creation of an invalid TLO if the G-Blk height is nonzero. 9.1.4.3 Other MTM techniques 9.1.4.3.1 MTM TLO Setting Using a Gage-Blk or Mobile Touch Plate The TCP TP is the easiest and most convenient way to set TLOs for MTM. However, MachStdMill also allow you to use MTM with a gage block or Mobile TP (the TCP TP is not a requirement for use of MTM). The basic process steps for setting TLOs relative to the MT is: 1. Mount the Master Tool via a tool change, 2. Measure the value of the Master Tool PTL via the tooling page, 3. Turn ON MTM on the Tooling page, 4. Position the G-Blk or TP that you will be using to set Z0, a. Remember to set the G-Blk / TP height on the Setting-common page. 5. Use the MT to SetZ0 to the top of the G-Blk / TP. This will establish Z0 for the TLO setting process and can you can then measure the TLO for each tool. 9.1.4.3.1.1 TLOs from Gage Block For each tool for which you want to set the TLO: 1. Mount the tool to be measured via tool change (MDI T#M6), (You must both physically mount the tool and let Mach3 know what tool # is mounted – the easiest way to do this is via an MDI tool change sequence.) 2. Touch the tool tip to the G-Blk, 3. Use the “Set G-Blk TLO” button on the tooling page to set the Tool’s TLO. 9.1.4.3.1.2 TLOs from Touch Plate For each tool for which you want to set the TLO: 1. Mount the tool to be measured via tool change (MDI T#M6), (you must both physically mount the tool and let Mach3 know what tool # is mounted – the easiest way to do this is via an MDI tool change sequence.) 2. Position the tool over the TP, (Tip: Moving the TCP to a point above the TP makes this easy - but don’t forget that this moves the TCP for all subsequent operations also.) 3. Use “Measure TLO” button to probe down to the TP and have the tool’s TLO set. 9.2 MTM Tool Change Options For Master Tool Mode, MachStdMill provides additional support features to automate tool changes. These additional features require the installation and configuration of the optional Tool Change Position Touch Plate (TCP TP). 9.2.1 MTM Auto TLO Measurement Support During a Tool Change sequence, the Auto TLO option will cause the Tool to be measured for TLO as part of the tool change process. Copyright © 2009-2015 Calypso Ventures, Inc. Page 208 MachStdMill User Manual Revision 2.15 Auto TLO: PTL Calculation Gage Line MC Z0 Physical Tool Length = TCP_TP_ZPos’n – MC_ZPos’n MC_ZPos’n T03 TCP TP Top Gage Block / Touch Plate Table Figure 155: MT TLOs relative to MT PTL The TLO of the tool (relative to the MT) is then given by: TLO = Measured Tool PTL – Master Tool PTL Equation 6: MTM TLO Calculation 46 This equation shows why it is necessary that before any Auto (or manual) MTM TLO measurements are made, the MT PTL must be known by the system. Once the TCP TP location has been set up, it can be used to measure the PTL of any tool. (See section 9.1.4.3 for information on using the TCP TP to measure the MT PTL.) 9.2.2 RH & NRH Tool Holder Handling If TC Auto TLO is active, the Skip RH Tools option will have MachStdMill skip the TLO measurement for RH tool holders. This saves the probing time required during a tool change for a tool that does not change PTL (a tool in a RH holder). If the Skip RH Tools option is off, all tools are measured during a Tool Change (if Auto-TLO is on). For this reason, it is recommended that you mark your tools in the tool table as RH and NRH, and use the RH option whenever Auto-TLO is enabled. 46 This equation is technically correct. When MT = PT, the implementation of MachStdMill with Mach V3 requires that the non-MT TLO be adjusted by the effective probe radius in order to work around a Mach v3 G31 tip comp bug. Copyright © 2009-2015 Calypso Ventures, Inc. Page 209 MachStdMill User Manual Revision 2.15 Note: The Master Tool should NEVER be mounted in a NRH tool holder. If the MT is measured each time it is mounted, it is possible that the stored MT PTL will change with each measurement of the MT 47. 47 These errors could be accumulative and become the source of TLO errors for other tools (since tools measured for TLO before the re-measurement of the MT, will have TLOs relative to the prior MT PTL, they would no longer correspond to the updated MT PTL value….). Copyright © 2009-2015 Calypso Ventures, Inc. Page 210 MachStdMill User Manual Revision 2.15 9.3 Using the Probe as the Master Tool It is very convenient for the probe tool to also be the Master Tool. This is accomplished by setting the Probe Tool # (WC Offsets, Probing Tab) equal to the Master Tool # (Tooling page). With this configuration, and the Probe mounted in a RH holder, you only need to measure the PTL of the Probe/Master Tool. The use of the probe to set Z0, will then also perform the actions of setting WC Z0 from the Master Tool (as the probe IS the master tool). The result is that in one simple click you can find the stock’s corner, set Z0 and have all the tools ready to go for the job. If you also have a TCP TP, you can use it to measure and set the TLO for all the non-master tools by simply setting the TC options as shown, and then performing the T#M6 Measure Tool sequence for each non-master tool. If you do not have RH holders, or do not want to bother setting the MTM TLOs prior to running the job, simply let MSM do an MTM ATLO measurement as part of each tool change. The only slight disadvantage of using the Probe as the Master is that the Probe tool is seldom the longest tool you may use (so you need to be a tad more careful about applying TLO after a tool change and moving the tool to the part. This is one reason it makes sense to set the TCP to be at the top of Z travel, as this typically gives the maximum possible clearance at the end of any tool change. 9.4 Tutorial: Probe tool = Master Tool with Auto Tool Measurements This tutorial section will be an exploration in how to use Master Tool Mode (MTM), A probe tool and a Tool Change position Touch Plate (TCP TP) to do 1) set the work coordinate zero point for a part, and Copyright © 2009-2015 Calypso Ventures, Inc. Page 211 MachStdMill User Manual Revision 2.15 2) automatically measure a tool every time a tool is mounted. For the following discussion, it would be good to be familiar with sections 1.7, 5.4, 7, 8.4 and 9 of the MSM user manual. Machine optional hardware scenario: Optional hardware present: o Probe tool o TCP TP Operational Assumption 1: The TCP is properly set up and it’s location is calibrated and known to MSM. (See section 7.1.4 for how to set up the TCP TP) Operational Assumption 2: The Probing parameters are set up to successfully probe (see section 8.4 for probing parameters). Tool holders: o Only NRH This means we will not be using the Skip RH Tools option for a tool change. Since ALL tool holders are NRH, each time a tool is mounted it must be measured - as the tool’s Physical tool Length (PTL) may change each time the tool is mounted. Goal 1: Least amount of effort for setting stock Zeros and Tool TLOs. Goal 2: Auto measurement of tools each time a tool is mounted. Easiest Solutions: Use Master Tool Mode (MTM). So let’s get started…. Setup the desired MSM options configuration: I presume you have already picked a tool number that you use you probe tool. This number is entered in the Probe Tool # DRO in the Probing parameters block. For this tutorial, I’ve arbitrarily used T#100 as the probe tool number. We want the probe tool to also be the master tool. This will tell MSM that when it is using the probe tool, it is also using the master tool. This makes MSM do the correct calculations behind the scenes to make everything work as we want for this combination. We just need to set the Master Tool # DRO = to the Probe tool number (#100 for this example). Next we also want to set up the Tool Change (TC) options: Copyright © 2009-2015 Calypso Ventures, Inc. Page 212 MachStdMill User Manual Revision 2.15 Figure 156: PT = MT and ALTO Option settings We want TC Auto TCP = On TC AUTO TLO = On Skip RH Tools = Off Master T Mode = ON Master Tool # = 100 (we want every tool change to use the TCP) (we want to measure tools when they’re mounted) (we want to measure ALL tools) (we want to use MT mode) (the MT#=the Probe tool #) The Current WC offset set will be whatever you want to it is you want to use – I’ve shown the default of G54. The rest of this will assume MTM is on… We will be using the probe tool to set zero levels so we want the Gage block offset to be zero. We also do NOT want the system to think that the gage block is a (mobile) touch plate. The options for this are on the Setting-Common page: We want: TLO G-BLK is TP = Off (we are NOT using a TP for the Gage block) Copyright © 2009-2015 Calypso Ventures, Inc. Page 213 MachStdMill User Manual Revision 2.15 Max Distance = this value does not matter as it is only used for mobile touch plate operations. Gage/Plate Height = the height of the gage block, This will not be used with the “TLO GBlk is TP” button Off. TP delay = 0 (we are not using this for the examples). The above turn OFF the mobile TP as the gage block. TCP TP Installed = On ( we have the TCP TP installed) Rnd Diam = 0 (Not using this feature in the example) Max Dist = enough to get from the TCP to the TCP TP for the shortest tool you will be using. Now then a note: whenever I say “mount a tool”, I mean use MDI to do T# M6. Mounting a tool always has to include both the physical mounting of the tool AND telling the software what tool is mounted. It also will be assumed that the MSM Tool Change options as set as described above. Get in the habit of using MDI to change tools - you have been warned. ;-( OK, we have the MSM options set up – let’s see how we use them… Using the Probe as the Master tool: First, I’m going to point out that we will be using MTM with the MT in a NRH holder. The user manual says in section 9.2.2 that the MT should never be in an NRH holder – and that’s true – if we have a choice. But the scenario is that we only have NRH holders – so we will use what we have… Having only NRH holders means that we can not count on the PTL (and hence the TLO) of the mounted tool (any tool, including the MT) to be correct in the tool table at any time except right after the tool has been mounted and measured. The way we have set up the TC options will make each and every TC do a tool measurement, so we will be OK. (This is vitally important to the scenario being described.) We’ll be OK, and to make sure this condition true, we will adopt an operating rule for our scenario: DON’T CHANGE THE TC OPTIONS without seriously thinking thru the implications! In particular, for this scenario, do NOT turn off TC Auto TLO! Now we’ll walk thru the steps: 1) Mount the probe/master tool – this will also get the probe tool (which is also the master tool) (re)measured. Copyright © 2009-2015 Calypso Ventures, Inc. Page 214 MachStdMill User Manual Revision 2.15 2) Set X and Y and Z WC Offsets using whatever probing operation you like. The corner probe operations are convenient because they will find all three sides of a rectangular book and set the X,Y,Z zero point to the corner. That’s it – you are all done setting up the WC zero for the part. The part zero is set up and you are ready to run your g-code program. Convincing yourself that MSM knows what it is doing: OK, now let’s verify that the magic all works…. (If you want to know HOW or WHY the magic works, see section 9 in the manual). Mount a different tool. I’ll assume T1 as many programs start with T1. (you have already set up any needed info in the tool table right – like the tool diameter? MSM can’t measure tool diameters as part of a TC). MDI T1M6 – the machine will move to the TCP, ask you to mount T1 and then measure it using the TCP TP as part of the tool change sequence. The Tool TLO will be set by the TC process and TLO compensation will be on (as the TLO is non-zero and Mach turns on TLO auto-magically (actually “auto-incorrectly” but that is a different topic I need not muddy these waters with). Verify that TLO is ON – if NOT, figure out what went wrong. OK, we have T1 mounted and measured and TLO compensation is active. Let’s see if we believe what the machine has done. Jog the tool over above the part stock. Jog down slowly to bring the tip of the tool near to the Z0 surface. Look at the Z WC DRO – do the numbers match the distance you are from the Z0 surface? If things look good, do another tool change to a different tool and repeat the above sanity check until you are comfortable with what is going on. What you are doing is manually creating tool changes (just as a g-code program would call for) and checking that the results are good. Now move the part in the vise to change the Z0 level. We just moved the stock, so we need to reset Z0…. Mount the probe/master tool and use a probing operation(s) to reestablish XYZ zero. Now do some manual tool changes and recheck some more – by now you should get a feel for what the expected steps are and how Tool changes will work during a program run. Note: Each time the Probe/MT is remounted, it can have a different PTL. This does not cause us problems as the only time the Probe/MT physical length is used to set levels is after the Probe/MT has been mounted and measured. Copyright © 2009-2015 Calypso Ventures, Inc. Page 215 MachStdMill User Manual Revision 2.15 In MTM, the other tools all get their TLOs set to values relative to the PTL of the master. Having the master PTL change (it is in an NRH holder) is OK here, as we are always measuring EVRY tool for every tool change. 9.5 Tutorial: Touch Plates only with NRH Tool Holders This section is an exploration of how to use MTM and the Tool Change Auto Tool measurements when all you have are the optional Touch Plates (TP)s. For the following discussion, it would be good to be familiar with sections 1.7, 5.4, 7, 8.4 and 9 of the MSM user manual. Machine optional hardware scenario: Optional hardware present: o TCP TP o Mobile TP This is a match for the level 3 hardware scenario given in section 1.7 of the user manual. Operational Assumption 1: The TCP is properly set up and it’s location is calibrated and known to MSM. (See section 7.1.4 for how to set up the TCP TP) Operational Assumption 2: The Probing parameters are set up to successfully probe to a TP (see section 8.4 for probing parameters). Tool holders: o Only NRH This means we will not be using the Skip RH Tools option for a tool change. Since ALL tool holders are NRH, each time a tool is mounted it must be measured - as the Tool’s PTL may change each time the tool is mounted. Goal 1: Least amount of effort for setting stock Zeros and Tool TLOs. Goal 2: Auto measurement of tools each time a tool is mounted. Possible Solution: Use Master Tool Modes (MTM). MTM is easier during operation and so Goal #1 will lead us to choose MTM. So let’s get started…. First we need to make an arbitrary choice: We need to pick a tool # for the master tool. It doesn’t matter what # we pick. It’s just that we have to pick one so that when that tool is mounted and MTM is active, the software will know to take the desired actions. Copyright © 2009-2015 Calypso Ventures, Inc. Page 216 MachStdMill User Manual Revision 2.15 For this paper, I’ve arbitrarily used T#100 as the MT number (I may refer to the master Tool as either the MT or as T100 as I go). What tool to use as the master? Any tool will do, but to make things simple, let’s do this: Make up a MT that is NOT a tool you will be using for any job. A dummy rod with a slightly rounded tip works nicely. Make the MT physically longer than any other tool you will be using. As mentioned in the manual, this is a safety measure. If the MT is longest, then given that we set Z0 with the MT, all other tools being shorter, are much more likely to be able to physically get to the part z0 level after a tool change. Nest let’s set up the TC options: We want TC Auto TCP = On TC AUTO TLO = On Skip RH Tools = Off Master T Mode = ON Master Tool # = 100 (we want every tool change to use the TCP) (we want to measure tools when they’re mounted) (we want to measure ALL tools) (we want to use MT mode) (the MT# choice we made above) The Current WC offset set will be whatever you want to it is you want to use – I’ve shown the default of G54. The rest of this will assume MTM is on… We also want the Gage block set up to be the mobile TP and the TCP TP set up. The options for these are on the Setting-Common page: Copyright © 2009-2015 Calypso Ventures, Inc. Page 217 MachStdMill User Manual Revision 2.15 We want: TLO G-BLK is TP = On (we are using a TP for the Gage block) Max Distance = large enough to get from a starting level (reached via jogging) to where the mobile TP will typically be. Gage/Plate Height = the height of the Mobile TP (the example shows a 0.375 thick plate). TP delay = 0 (we are not using this for the examples). The above sets up the mobile TP as the gage block. TCP TP Installed = On ( we have the TCP TP installed) Rnd Diam = 0 (Not using this feature in the example) Max Dist = enough to get from TCP to the TCP TP for the shortest tool you will be using. Now then a note: whenever I say “mount a tool”, I mean use MDI to do T# M6. Mounting a tool always has to include both the physical mounting of the tool AND telling the software what tool is mounted. OK, we have the MSM options set up – let’s see how we use them… First, I’m going to point out that we will be using MTM with the MT in a NRH holder. The user manual says in section 9.2.2 that the MT should never be in an NRH holder – and that’s true. But the scenario is that we only have NRH holders – so we will use what we have… Having only NRH holders means that we can not count on the PTL (and hence the TLO) of the mounted tool (any tool, including the MT) to be correct in the tool table at any time except right after the tool has been mounted and measured. The way we have set up the TC options will make each and every TC do a tool measurement, so we will be OK. (This is vitally important to the scenario being described.) We’ll be OK, and to make sure this condition true, we will adopt an operating rule for our scenario: DON’T CHANGE THE TC OPTIONS without seriously thinking thru the implications! Copyright © 2009-2015 Calypso Ventures, Inc. Page 218 MachStdMill User Manual Revision 2.15 In particular, for this scenario, do NOT turn off TC Auto TLO! Now we’ll walk thru the steps: 3) Set X and Y WC Offsets using whatever method you like. 4) Now set WC Z0 for the part. Since we are using MTM, we have to use the MT to do this (MSM will complain if you attempt to set Z0 without the MT). 5) Mount the MT (Via MDI command). This will measure the PTL of the MT as part of the Tool change. 6) Place the mobile TP on the zero surface of the part. 7) Jog the MT over to be above the mobile TP 8) Click the Green “Probe Z-” graphic button on any WC Offset probing tab page. This will cause MSM to “probe” down to the Mobile TP and set the Z0 level. 9) Remove the Mobile TP and Jog the MT away from the part. We are done with the MT until/unless we need to set/rest Z0. OK, now let’s verify that the magic all works…. (If you want to know HOW or WHY the magic works, see section 9 in the manual). Mount a different tool. I’ll assume T1 as many programs start with T1. (you have already set up any needed info in the tool table right – like the tool diameter? MSM can’t measure tool diameters as part of a TC). MDI T1M6 – the machine will move to the TCP, ask you to mount T1 and then measure it using the TCP TP as part of the tool change sequence. The Tool TLO will be set by the TC process and TLO compensation will be on (as the TLO is non-zero and Mach turns on TLO auto-magically (actually “auto-incorrectly” but that is a different topic I need not muddy these waters with). Verify that TLO is ON – if NOT, figure out what went awry. OK, we have T1 mounted and measured and TLO compensation is active. Let’s see if we believe what the machine has done. Jog the tool over above the part stock. Jog down slowly to bring the tip of the tool near to the Z0 surface. Look at the Z WC DRO – do the numbers match the distance you are from the Z0 surface? If things look good, do another tool change to a different tool and repeat the above sanity check until you are comfortable with what is going on. What you are doing is manually creating tool changes (just as a g-code program would call for) and checking that the results are good. Now move the part in the vise to change the Z0 level. We just moved the stock, so we need to reset Z0…. Mount the master tool (MT) and use the above steps to reset Z0. Copyright © 2009-2015 Calypso Ventures, Inc. Page 219 MachStdMill User Manual Revision 2.15 Now do some manual tool changes and recheck some more – by now you should get a feel for what the expected steps are and how Tool changes will work during a program run. Note: Each time the MT is remounted, it can have a different PTL. This does not cause us problems as the only time the MT is used to set levels is after the MT has been mounted and measured. In MTM, the other tools all get their TLOs set to values relative to the PTL of the master. Having the master PTL change (it is in an NRH holder) is OK here, as we are always measuring EVRY tool for every tool change. Copyright © 2009-2015 Calypso Ventures, Inc. Page 220 MachStdMill User Manual Revision 2.15 10 MachStdMill Configuration, Hardware and Reference Pages Previous sections have covered the MachStdMill pages used to load, setup and execute G-code programs. This section covers the remaining pages: the MachStdMill User Extension page, MachStdMill Configuration, Hardware specific pages and Diagnostic facilities. 10.1 Fly out Mach3 provides a facility for a “fly out” page. The fly out page appearance is toggled by the Tab key. The MachStdMill fly out page contains controls which the operator might want to access independent of the current screen set page. Most of the controls present on the fly out page have already been explained in previous sections. The fly out controls not yet covered are described below. Copyright © 2009-2015 Calypso Ventures, Inc. Page 221 MachStdMill User Manual Revision 2.15 Figure 157: Fly Out Page 10.1.1 Graphic Jogging Arrow Buttons These graphic buttons cause a jog motion in the direction indicated by the button. Copyright © 2009-2015 Calypso Ventures, Inc. Page 222 MachStdMill User Manual 10.1.2 Revision 2.15 Auto OR Limits This button enables the Mach3 Automatic override of a limit condition. Normally jogging is disabled when a limit switch is active. When this button is activated, Mach3 allows you to jog off a limit switch even though a limit switch is active. 10.1.3 Shuttle This button turns On/Off the Mach3 shuttle mode. 10.1.4 Z Inhibit Panel This panel allows you to limit the minimum Z value to which the tool will move. When the “Z Inhibit” button is on, the tool will not go below the value set in the “Min Z” DRO. This can be useful when running new G-code to force the tool to stay above a minimum Z level (which has presumably been set to be above the table and any fixtures and raw stock). 10.1.5 Spindle and Coolant Panel This panel provides buttons to run the spindle in the CW or CCW direction and to stop the spindle. Buttons are also provided to toggle Mach3’s Flood and Mist coolant output signals. 10.1.6 Override Panels 10.1.6.1 Spindle Override Panel This panel contains controls for adjusting (Over Riding) the G-code programmed spindle speed. The S Word DRO sets the spindle RPM. The “O’Ride %” DRO and the vertical slider control can both be used to manually adjust the spindle RPM from the S Word value. The slider can be dragged up/down to adjust the RPM, and the DRO will show the % of adjustment. A percentage may also be entered directly into the O’Ride % DRO. The “Reset” button will cancel all O’Ride values by resetting the override % to 100%. The “spin RPM” DRO shows the actual RPM of the spindle 48. 10.1.6.2 Feed Rate Override Panel This panel contains controls for adjusting (Over Riding) the G-code programmed cutting feed rate. The F Word DRO sets the feed rate. The “O’Ride %” DRO and the vertical slider control can both be used to manually adjust the feed rate from the F Word value. The slider can be dragged up/down to adjust the rate, and the DRO will show the % of adjustment. A percentage may also be entered directly into the O’Ride % DRO. 48 The Mach3 feature requires that the Index signal be appropriately configured and connected to a spindle index signal source. Copyright © 2009-2015 Calypso Ventures, Inc. Page 223 MachStdMill User Manual Revision 2.15 The “Reset” button will cancel all O’Ride values by resetting the override % to 100%. The “Feed” DRO shows the actual Feed rate of the tool. 10.1.7 Rapid Rate Panel This panel allows you to limit the rapid movement rate of the machine. Normally the limit is set to 100% - this corresponds to the maximum velocity for the motion. The maximum Rapid rate can be adjusted graphically with the slider control. The buttons set the rapid rate to the present values of 100%, 75%, 50% and 25% of the maximum rate. 10.1.8 G-code Run, Pause, Stop Panel This panel provides access to the Run, Pause and Stop G-code buttons. 10.1.9 Current Mach3 Loaded Profile This label area displays the name of the currently loaded Mach3 profile. 10.2 User Exts MachStdMill provides this page as an easy place for users to place their own Mach3 extensions and customizations. The User Exts page is shown below. Copyright © 2009-2015 Calypso Ventures, Inc. Page 224 MachStdMill User Manual Revision 2.15 Figure 158: User Exts page This page already has all the common controls present on the Load, WC Offsets, Tooling and Run pages. The rest of the page is left blank for user’s to utilize. 10.3 Settings Pages 10.3.1 Settings – Common This page contains the majority of the MachStdMill configuration settings. Copyright © 2009-2015 Calypso Ventures, Inc. Page 225 MachStdMill User Manual Revision 2.15 Figure 159: Settings - Common Page 10.3.1.1 General Settings Control Group 10.3.1.1.1 Load Screen This button opens a dialog box which allows you to select the default screen set to be loaded when MachStdMill initializes. This facility is also used to change between he MachStdMill 10x7 and 12x9 resolution screen sets. Simply select the screen set file for the preferred resolution. The MachStdMill Master 10x7 screen set is the default resolution used by a fresh install of MachStdMill. Caution: Do not change to a higher screens set resolution than the monitor’s physical resolution. If you do, the buttons needed to get back to a lower resolution may be off the physical edge of the screen. If this happens, a reinstall of MachStdMill will reset the active resolution to 10x7. 10.3.1.1.2 Clone Screen Copyright © 2009-2015 Calypso Ventures, Inc. Page 226 MachStdMill User Manual Revision 2.15 This button opens a dialog box which allows you to make a clone of an existing MachStdMill Screen set. This is typically done as part of customizing MachStdMill. See Section 15 for additional information about techniques for customizing MachStdMill. 10.3.1.1.3 M-Code Copy This button controls the updating of profile M-Code macros to the current version of the MachStdMill specific M-Code implementations. For proper operation of MachStdMill, the M-Code update operation should NOT BE DISABLED. Only in very rare circumstances would a user ever really want to disable this feature. 10.3.1.1.4 Control On-line This button toggles the CNC control on-line and off-line. Taking the control off-line disables much of Mach3’s functionality. 10.3.1.1.5 Menu Bar On/Off These buttons allow you to turn on and off the Mach menu bar at the top of the Mach window. The setting is persistent and will be remembered between Mach3 sessions. Turning off the menu bar when using 10x7 resolution on a 1024x768 monitor may allow enough extra space on the screen to show the windows task bar along with the Mach window (it depends on multiple Windows settings as to how much space the task bar requires). 10.3.1.2 Motion Settings Control Group 10.3.1.2.1 CV Dist This button toggles On/Off the Mach3 CV distance threshold. The threshold value is set in the corresponding DRO. 10.3.1.2.2 CV Feed This button toggles On/Off the Mach3 CV feed threshold. The CV threshold value is set in the corresponding DRO. 10.3.1.2.3 CJog % Incr This DRO sets the amount of increment applied by the “Cyc-Incr” button on the jogging controls panel. See section 2.2.3.5.4. 10.3.1.2.4 Safe Z Height This DRO sets the Mach3 Safe Z height. 10.3.1.2.5 G73 Pullback This DRO sets the Mach3 G73 pullback value. 10.3.1.2.6 Rapid Max Copyright © 2009-2015 Calypso Ventures, Inc. Page 227 MachStdMill User Manual Revision 2.15 This DRO sets a global upper limit for the Rapid speed. This limit may be lower than the hardware max velocity settings and effectively sets the 100% rapid speed for the machine. 10.3.1.3 Axes Enabled Controls Group This group controls which axes are enabled and provides axis position verification facilities. 10.3.1.3.1 X-Z & A-C & Spindle Enable buttons Each button will enable or disable the corresponding axis. On (green) is enabled. 10.3.1.3.2 Verify Axes Buttons Each button will verify the position of the corresponding axis. The “V’fy All” (Verify All) button will verify the position of all axes. 10.3.1.3.3 Rotation Radii DROs These DROs are used to set the Rotation Radius for a rotary axis (A, B, or C). 10.3.1.3.4 De-Ref All button This button will force the state of all axes to be set to “unreferenced”. 10.3.1.4 Overrides Control Group 10.3.1.4.1 Limit Switch Override This enables the limit switch override so that the machine may be jogged off an active limit switch. This override needs to be set each time a limit switch is triggered. 10.3.1.4.2 Auto Limit Switch Override This enables the Limit Switch Override functionality so that the machine may be jogged off an active limit switch. Additionally, when Auto Limit Switch Override is enabled, the Limit Switch Override functionality remains enabled once you have moved off the triggered limit. 10.3.1.5 Special Functions Control Group 10.3.1.5.1 In-4 Single Step Turning on this option instructs Mach3 to single step G-code when Input 4 is active. 10.3.1.5.2 Run Maint Script This control is use for system maintenance or trouble shooting activities. User may be supplied special scripts to gather diagnostic information or to correct some aspect of the system operation. Such scripts can be run via this button. The button will open a file browse dialog which allows you to select the script to be run. The dialog opens by default to the \Masters\Scripts\Maintenance. Both .m1s and .mcc scripts may be selected via the dialog. When a script is selected by the dialog, it is then executed. Note that when running the selected script, if ABC.m1s is selected and ABC.mcc also exists, the .mcc file will be run, This is the normal way that Mach handles .mcc and .m1s extension priority. Copyright © 2009-2015 Calypso Ventures, Inc. Page 228 MachStdMill User Manual 10.3.1.6 Misc Config Control Group 10.3.1.6.1 Reset Interpreter Revision 2.15 This button resets the Mach G-code interpreter. 10.3.1.6.2 Set Utility Paths This button opens a dialog box sequence to configure the Non-G-code editor and the PDF reader utility paths. The Non-G-code Editor is used to display text log files and reports (tool table etc). The Non-G-code Editor is used to display and edit G-Code files. Note that the G-code editor which is set via Mach3’s General Config dialog and is NOT USED BY MSM. The Mach Config dialog G-Code editor can’t pass command line parameters down to the editor. MSM allows you to specify command line parameters for the editors. For the G-Code editor, the command line parameters are saved independently form mill and lathe modes, This allows you to use the feature of some G-Code editors that allows the editor to be told how to handle the G-Code file (as a lathe or as a mill G-Code file). The PDF reader utility is used to open and display documentation files. 10.3.1.7 Probing Controls Group This group contains controls to configure the MachStdMill probing support. 10.3.1.7.1 Probing Version This button will invoke the probing subsystem and display the version information for the probing subsystem. 10.3.1.7.2 Probing Debug Setup This button displays a dialog that allows control of various debug options for the probing subsystem. The use of this dialog is not needed for normal MachStdMill usage and it is not necessary to change any of these settings unless instructed to do so as part of a debugging support effort in cooperation with Newfangled Solutions, LLC or Calypso Ventures, Inc. Access to the dialog is password protected. 10.3.1.7.3 TLO G-BLk is TP Button This button tells MachStdMill whether the TLO Gage-Blk is a Touch Plate (and hence a probing operation can be used to find the block’s top surface). 10.3.1.7.3.1 Max Distance DRO Copyright © 2009-2015 Calypso Ventures, Inc. Page 229 MachStdMill User Manual Revision 2.15 If the G-Blk is a TP, this sets the max distance in Z for a probe to the TP operation. 10.3.1.7.3.2 Gage/Plate Height This DRO sets the physical height of the G-BLk/TP. This value is used in calculations for TLO etc when using a G-Blk. 10.3.1.7.3.3 TP Delay This setting inserts a user specified delay time before the start of any probing operation. This is useful when the control screen is positioned such that it may not be easy to see the screen and the machine simultaneously. This feature is NOT INTENDED to allow an operator to start a probing operation at the control and then rush to get a mobile touch plate positioned before movement starts! Never initiate any action which causes machine movement until after you are clear of the working envelope of the machine. The DRO units are msec and the max delay value is limited to 10sec. 10.3.1.7.4 TC Position TP Configuration Group Please see section 7.1.4 for a description of these controls. 10.3.1.8 Encoder DRO Setting This panel is used to get or set Encoder positions. The current position is shown for X, Y and Z and each encoder can be set to the current position with the right arrow button. Similarly the current encoder position can become the current position via the left arrow buttons. The Zero buttons reset the corresponding encoder to zero. 10.3.1.9 Reference Point Settings This panel provides control of the machine reference point. The reference point is always in machine coordinates. The DROs display and allow you to set the location of the reference point. 10.3.1.10 Set Ref Point This button will set the reference point to be the current position. 10.3.1.11 Go Home Pos’n This button will move the spindle to the home position. 10.3.1.12 Go Ref Point This button will move the spindle to the reference point. Copyright © 2009-2015 Calypso Ventures, Inc. Page 230 MachStdMill User Manual 10.3.1.13 Revision 2.15 Go Ref via Mid This button will move to the reference point via a mid point. A dialog box is presented to allow the user to specify the mid point for the move. 10.3.2 Settings - Spindle This page contains configurations settings specific to the spindle types supported by Mach3 “mill”. Figure 160: Settings - Spindle Page 10.3.3 Rotating Spindle Pulley Panel This panel allows you to set the current (in use) pulley number and the minimum and maximum RPM for the pulley. 10.3.4 Tangential Knife Control Panel This panel provides control of Mach3’s tangential knife spindle features. The Tangential control button tells Mach3 whether to use the tangential knife control logic. The Life angle DRO specifies the lift angle to use. The Lift Z specifies the amount of Z lift to use. Copyright © 2009-2015 Calypso Ventures, Inc. Page 231 MachStdMill User Manual 10.3.5 Revision 2.15 Laser Settings Panel This panel provides control of Mach3’s laser spindle features. The “Laser On” button turns the Laser On/Off. 10.3.6 Plasma Settings Panel This panel provides control of Mach3’s Plasma spindle features. The “Enable THC” button turns Torch Height Control On/Off. The “Torch Voltage” button opens a dialog box that allows you to configure torch voltages. 10.4 Hardware Specific Pages 10.4.1 Logical Signals Page Figure 161: Logical Signals Page This page shows the state of the Mach3 logical I/O signals. This display represents Mach3’s view of the states of Mach3’s logical hardware interfaces. Copyright © 2009-2015 Calypso Ventures, Inc. Page 232 MachStdMill User Manual 10.4.2 Revision 2.15 Parallel Port Driver Diagnostics Figure 162: Parallel Port Driver Diagnostics Page This page contains information and diagnostics specific to the parallel port interface. This page is the only hardware interface specific page supplied with Mach3 and MachStdMill (as it is the only hardware interface supported natively by Mach3) 49. The controls on this page are described in the Mach3 Install & Config manual. Please refer to that manual for the controls on this page. The parallel port pin states shown on this page are updated via a background process that MachStdMill starts when it is initialized. The update period is not intended (and is not fast enough) to provide real time indication of fast signals (e.g. Step pulse pins). Only enabled ports have pin LEDs activated. In the above figure, Port 1 is enabled and Port 2 is disabled. 49 This page is designed so that interface hardware venders may create pages specific to their product, which could then be displayed via additional sub-page tabs. Copyright © 2009-2015 Calypso Ventures, Inc. Page 233 MachStdMill User Manual Revision 2.15 The letter in the LEDs indicates if the pin is an input (I) or output (O) while the LED itself indicates the state of the input pin using positive logic (Grey = Off (0v) and Green = On (5v)). See the next section for other hardware interface pages. 10.4.2.1 PP2 Configuration The LED display for Parallel Port 2 (PP2) is dependant on the configuration of the port (in the Mach ports & Pins dialog). Here is an example of the port configured for “pins 2-9 as input”: Figure 163: PP2 Input Display Here is an example of the port configured as “output”: Figure 164: PP2 Output Display 10.4.3 Utilities These buttons invoke utility routines that are useful for setting up a Machine’s configuration. See the Install & Config manual for descriptions of these utilities. Copyright © 2009-2015 Calypso Ventures, Inc. Page 234 MachStdMill User Manual 10.4.4 Revision 2.15 Mach Driver Metrics The values in this panel display various performance metrics for Mach3’s parallel port driver and movement buffers and are for intended for diagnostic use. 10.5 Reference Pages The MachStdMill reference pages provide access to Mach3 and MachStdMill documentation and manuals, as well as quick reference information. These pages also provide information about the MachStdMill license terms and acknowledgement of people who significantly assisted with the development of the of the MachStdMill project. The lower center area of the page is used to display MachStdMill version and license status information. Figure 165: Main Reference page 10.5.1 License and Activation buttons 10.5.1.1 License Info This button displays the installation’s MachStdMill license information. Please refer to section 16 for more details. Copyright © 2009-2015 Calypso Ventures, Inc. Page 235 MachStdMill User Manual 10.5.1.2 Revision 2.15 Activation This button is used to activate a MachStdMill installation with a purchased license. Please refer to section 16 for more details. 10.5.2 Documentation Buttons Documentation buttons open the specified document using the PDF reader (configured via the Settings-Common page). 10.5.2.1 User Manual This button opens the MachStdMill User Manual (this document). 10.5.2.2 User Forum This button opens the default browser to the MachStdMill User Group Forum. 10.5.2.3 Release Notes This button opens the MachStdMill Release notes document installed with the MachStdMill package. The Release notes contain the latest information which may not yet be reflected in the User manual. 10.5.2.4 G&M Code Quick Ref This button opens the Mach3 G&M Code Quick reference document. Copyright © 2009-2015 Calypso Ventures, Inc. Page 236 MachStdMill User Manual Revision 2.15 Figure 166: G-code Quick Reference Page Copyright © 2009-2015 Calypso Ventures, Inc. Page 237 MachStdMill User Manual Revision 2.15 Figure 167: M-Codes Quick Reference Page 10.5.2.5 G-Code Manual This button opens the Mach3 G-code manual. 10.5.2.6 Install & Config This button opens the Mach3 Install and Configuration manual. 10.5.2.7 Script Language This button opens the Mach3 Cypress Basic Scripting Language reference manual. 10.5.2.8 Mach3 Script Calls This button opens the Mach3 Specific Scripting Language Extensions reference manual. 10.5.3 License terms This button opens the legal license terms under which the MachStdMill package is distributed. It is important that the Mach3 user (and all operators of the machine) understand and agree with the MachStdMill license terms. If you do not agree with the terms, you must uninstall the MachStdMill package and not use it. Copyright © 2009-2015 Calypso Ventures, Inc. Page 238 MachStdMill User Manual 10.5.4 Revision 2.15 Credits The credits page makes note of the people which helped with the development of the MachStdMill package. As the contents of the page my change from time to time, please see the current page displayed by the MachStdMill installation. Copyright © 2009-2015 Calypso Ventures, Inc. Page 239 MachStdMill User Manual Revision 2.15 11 Wizards Mach3 is highly extensible and the Mach3 user community has created many Wizard packages which extend Mach3’s capabilities. Some Wizards are installed with the Mach3 installation and others are available online. The installed Wizards are accessed via the “Last Wizard” and “Pick Wizard” buttons on the Load page. Wizards are provided independently from Mach3 and/or MachStdMill. The www.machsupport.com web site and the Mach3 user forums are good sources for Mach3 wizard packages. Copyright © 2009-2015 Calypso Ventures, Inc. Page 241 MachStdMill User Manual Revision 2.15 12 Installing MachStdMill The MachStdMill installation procedure is significantly different from the installation of the old 1024 screen set. The installation instructions for MachStdMill are provided separately from this document and can be found in the MachStdMill Readme file. Please refer to the Readme file for more information. We strongly encourage you to review the entire Readme file before installing MachStdMill. Doing so will provide you an overview of the installation procedure and prepare you for the choices presented during the install process. Copyright © 2009-2015 Calypso Ventures, Inc. Page 243 MachStdMill User Manual Revision 2.15 13 MachStdMill Operational Changes from Mach3 V3 with 1024.set 13.1 Geometry for “special tools” 13.1.1 Tool geometry always comes from the tool table The Mach3 V3 1024 screen set treats some types of tools specially and the 1024 set uses some special tool specific DROs for some functions. In particular, task specific DROs are used to specify tool geometry for edge finders and probes. This creates a design conflict: What should the system do if a tool is mounted and the “special value” diameter is not the same as the diameter in the tool table for the current tool? Which is correct? A generally good programming principle is to store a given piece of information in one place. With MachStdMill the tool table is the source for all tool geometry information 50. The MachStdMill screens do not contain or use tool specific controls to set probe or edge finder diameters and/or lengths. Instead, MachStdMill gets the current tool’s geometry from the tool table. This has the advantage that wear values can now be applied consistently for any tool (the 1024 probe and edge finder DROs do not implement wear value adjustments). 13.1.2 Special tool geometry DROs deprecated While the old style 1024 set tool specific interfaces will still operate, (so old script code will continue to operate) the use of the impacted DROs is strongly discouraged. Any values set into those DROs are ignored by MachStdMill on Mach3 V3 In a future version of Mach3, continued use of the deprecated interfaces may cause warning messages or failures. 13.2 Tool Changes 13.2.1 Tool Changes & G-code Modes Tool changes will change G-code modal states. In particular, with MachStdMill, at the end of M6End the machine will be in G90, G00 modes. 13.2.2 Tool Change Positioning 13.2.2.1 Auto TCP If the Auto TC Position button is on during a tool change, the tool will be taken to the defined tool change position as part of the tool change sequence. All tool change operations are done in G53 (machine) coordinates. The “go to TCP” algorithm is: 50 Calypso Ventures was informed that this was the design decision for Mach3 V4, and so MachStdMill also follows this design decision when running on Mach3 V3. Copyright © 2009-2015 Calypso Ventures, Inc. Page 245 MachStdMill User Manual Revision 2.15 a) Rapid up to G53 Z TCP b) Rapid to G53 X,Y TCP Warning: Like most things CNC, if you set TCP to a bad location, you can crash the machine. Make sure you are happy with the TCP position before selecting the Auto TCP option. 13.2.2.2 TC M6End Movements We decided to REMOVE the code from M6End which used to try to “put the tool back” after a tool change . The more this was looked at, the more it became obvious that this was dangerous (safety issue) code. Consider: in M6end, we have just changed a tool, the code has no idea of what tool was inserted or what its dimensions are, and the code has no way to find out. Even worse, the old M6End code used SafeZ - which can be in work coordinates or machine coordinates, or even be set to an incremental move in either coordinate system. There are not sufficient scripting API calls to find all the SafeZ parameter settings. Even if all the settings were easily available, the code required to figure out what to do in all cases would be far from trivial and the work coordinate modes would still be unsafe 51. This is a potential machine crash / safety situation – and it was decided it was an unacceptable safety risk to incorporate a “feature” that has proven to be broken. If a machine owner wants to customize their installation to include some “put it back” movements, they may do so at their own risk. MachStdMill will not be including this “feature” and the buggy code used in the 1024 M6 routines will not be supported by MachStdMill. For MachStdMill, the decision is to simply leave the tool wherever it is when the TC process completes. At the end of the TC process the tool will either be: a) At the TC position (if Auto-TCP was on and the user did not jog the tool) or b) Wherever the user moved the tool to via jogging etc during a tool change sequence. 51 While SafeZ allows one to specify that a move is in work coordinates, it has no ability for the operator to specify which work coordinate system the move relates to… this is a easy way to crash a machine. Copyright © 2009-2015 Calypso Ventures, Inc. Page 246 MachStdMill User Manual Revision 2.15 13.3 Profile Dependant M-Code Macros 13.3.1 M-code Macro Updates MachStdMill incorporates custom scripts into several M-code macros to integrate spindle control and tool change sequencing with MachStdMill. When MachStdMill is installed, it stores master copies of these macros on disk. Each time MachStdMill is started, the corresponding M-code macros, for the profile being initialized, are dynamically updated to the master versions of the macros. This mechanism is designed to reduce support issues occurring due to out of date macros never getting updated (which has been a significant issue wrt prior screen sets). This update propagation has the advantage that future updates of the MachStdMill package will automatically update the master macros and hence bug fixes and features will propagate by replacement of older macro revisions. There could be a disadvantage to this mechanism wrt to user modifications of system M-Code macros. Any alterations to the profile specific copies of the macros will be lost the next time that profile starts MachStdMill and the macros are updated from the installed master copies. We recommend that users not modify the operation of these profile macros as it could impair the operation of MachStdMill functionality. If you simply must make a modification to these macros, there are techniques available to do so (not detailed in this user manual). Please note that support is not available for MachStdMill installations which have modified core scripts and/or macros. Modifications of scripts are essentially alterations of the MachStdMill package source code. The cost of custom modification is that you become totally responsible for maintaining your modifications. 13.3.2 Profiles and different screen sets It is strongly recommended that you do not use multiple different screen sets with a single Mach3 profile. The previous section described how MachStdMill requires specific M-code macros to be the MachStdMill version of the macros. Other screen set M-codes (for example 1024) are not interchangeable with the MachStdMill versions. Additionally, the advanced programming interfaces for scripts can require that ancillary files be found in expected locations etc. This location will be dependant on the screen set being run. Unfortunately, while Mach3 provides a menu facility to change the loaded screen set on the fly, it does not support any facilities to dynamically manage other associated files when a screen set is changed. Dynamic switching of screens sets may require that the user must have fairly intimate knowledge of the internal structure and interrelationship of many components (and remember to manually change them when changing screen sets). Copyright © 2009-2015 Calypso Ventures, Inc. Page 247 MachStdMill User Manual Revision 2.15 It is far simpler to set up different profiles for different screen sets. Therefore, the recommended way to change screen sets is to simply load a different Mach3 profile. 13.4 Old Mach habits to avoid 13.4.1 Wiping the Mach install directory In the early days of Mach history, Mach was a simple program that was limited to files in the Mach3 installation directory. As part of their Mach bug trouble shooting process, Mach users sometimes delete the mach3 directory prior to reinstalling mach3. However, the proper approach is to uninstall mach3. Deleting the Mach3 Directory is a practice that will cause you trouble with MachStdMill. Because MSM is an extension to Mach3, it has to install files into the Mach3 installation directory. Deleting the Mach directory, also deletes portions (but not all) of MachStdMill. This can lead to the an inability to uninstall or reinstall MSM. It is strongly recommended that you treat MachStdMill (and Mach) like any other modern windows program and refrain from attempting to do manual modifications to the MachStdMill installation. 13.4.2 Changing screens Once MachStdMill is initially installed and a MachStdMill profile has been configured for Mach, you should never again need to use the mach menus for View; Load Screens. Once running MSM, all changes of screens and resolutions are done from within MachStdMill using the “Load Screen” button on the Setting-Common page of MSM. DO not attempt to use the Mach menus to change between MSM screens or resolutions. The mach menus are only to be used if changing the screen set a specific profile is to start by default. Since MSM always sets up a separate profile for running Mach+MSM, this is only needed when initially creating an MSM profile. Copyright © 2009-2015 Calypso Ventures, Inc. Page 248 MachStdMill User Manual Revision 2.15 14 MachStdMill Resource Information The MachStdMill screen set uses user space resources (DROs, LEDs, User labels, Ticker and Macro numbers). When the project was started, Newfangled Solutions, LLC directed us to pick a resource range and “homestead” it. Knowing that there was no perfect choice of ranges, the resources ranges MachStdMill reserves for it’s exclusive use are 52: 1700-1899 for (200) DROs 1700-1899 for (200) LEDs 53 170-200 for (30) User Labels 170-189 for (20) Tickers 1700-1799 for (100) M macro numbers Any Mach3 add-on, wizard or script which allocates resources in these ranges is probably incompatible with MachStdMill and is likely to cause runtime errors in Mach3 and/or MachStdMill. The numerical pattern makes it easy to remember – if the magic number you are considering using starts with “17” or “18”, pick another range – the “17s” and “18s” have been homesteaded by MachStdMill. 52 MachStdMill may not use 100% of these resources at first release, resource space is included for future additions and changes. 53 The 18* series resources are used by MachStdMill with Mach3 V3 to implement Mach3 features which are expected to migrate into Mach3 with a later release of Mach3. Copyright © 2009-2015 Calypso Ventures, Inc. Page 249 MachStdMill User Manual Revision 2.15 15 Customizing MachStdMill This chapter contains information about techniques for customizing MachStdMill. Mach3 allows a very high degree of customization. Mach3 users have the ability to alter many fundamental aspects of how Mach3 works. The modifications created by users range from a simple addition of a stock button to a screen page, to complex packages that redesign the user interface appearance and extend the functionality of Mach3 as seen by a machine operator. The MachStdMill package is an example of the latter. 15.1 MachStdMill and Mach3 3.43.x MachStdMill is the first Mach3 extension package which makes extensive use of new Mach3 interfaces first introduced in Mach3 v3.43.6. The position of these interfaces is illustrated in the figure below. Mach 3 Block Diagram Mach3 V3.43.x new interfaces User Interface (Screen Set) Mach “kernel” User File storage G-Code Interpreter Loaded Tool Table Tool Tables Basic Script Interpreter Loaded WCO Table WCO Tables “Brains” engine Hardware Interfaces (PP driver, Device Plug-in) MSM Config Control Hardware Figure 168: Mach3 V3.43.x APIs The use of these new interfaces are key to the extensibility and maintainability of the MachStdMill package. As a result, the internal structure of MachStdMill is significantly different from prior screen sets. Many of the techniques used to modify older technology screens sets (those designed for the interfaces available before Mach3 3.43.x) will not be directly applicable for customizing MachStdMill. Unthinking use of “older folklore techniques” will likely cause trouble and frustration. Copyright © 2009-2015 Calypso Ventures, Inc. Page 250 MachStdMill User Manual Revision 2.15 It’s wise to gain an understanding of how something works before tinkering with it. In this respect, software is no different than a physical, mechanical device. We highly recommend that before attempting to make any modification to MachStdMill, that one read this chapter of the user manual carefully to gain an initial understanding of how MachStdMill is structured internally. 15.2 Tension Between Updates and Customization Allowing user customization of a product creates significant issues for both the user and the vendor. Vendor’s do not want, and can not afford, to expend time and money helping implement and/or debug user customizations. At the same time, users want to be able to tailor operation to their preferences. Customization also creates headaches with support and product updates… How can a vendor be assured that bug fixes and new features get distributed to their users? What happens when a bug fix changes something a user has “customized”? Which takes precedence? When a user reports a “bug”, how does the vendor verify the bug? It is the result of a flaw in a distributed script? Or the result of a user modification? These are no magic, simple, universal solutions to these issues. 15.2.1 Master and Customized Files. MachStdMill addresses these issues by incorporating the concepts of “Master Files” and user “Customized Files”. 15.2.1.1 Master Files Master files are what MachStdMill puts on the hard disk when it is installed. The directory structure and naming conventions used for the MachStdMill files makes the identification of master files easy. NEVER, EVER attempt to directly modify a MachStdMill Master file. Master files WILL BE OVERWRITTEN by a MachStdMill install. Any changes made to a master file will only exist (at best) until the next MachStdMill install. Master files are updated by the installer and any modified files in a master directory are discarded and replaced with current versions. When MachStdMill installs, it creates several self consistent, “all master file”, MachStdMill configurations. The master configurations can be used as a basis for user customization. Copyright © 2009-2015 Calypso Ventures, Inc. Page 251 MachStdMill User Manual 15.2.1.2 Revision 2.15 User Customized Files To customize MachStdMill, the general process is to make a copy of a Master file, place it in a location provided for user modified files, customize it as desired, and then teach MachStdMill to use the user customized configuration. The details of how to accomplish this are described in this chapter. A MachStdMill installation will never modify a file in the “Custom” directories. This separation of Master files and configurations and user modified custom files and configurations is intended to a) Make sure that there is always an unmodified, working version of MachStdMill available, and b) Cleanly separate user modifications from “as shipped” master configurations. 15.2.1.3 MachStdMill Directory Structure Conventions MachStdMill installs files using a directory structure convention which clearly identifies Master files and user Customized files. The general structure is …\xyz\Masters\ and …\xyz\Custom\ Because of the predetermined locations that Mach3 uses to find different types of files, this dual sub-tree structure is used in several parts of the Mach3 install directory. The relevant directories are described within the appropriate sections of this chapter. The basic rule is: Never modify a MachStdMill file that is in a “Masters” sub-directory. 15.3 Mach3 V3, Hardware Configurations, Profiles and MachStdMill Screen Sets A Mach3 profile contains lots of different types of information – not all of which is orthogonal in nature. With Mach3 V3, the relationships between profiles (Mach3 XML files), what a profile contains, and how that relates to locations of various disk files at run time is not as simple as one could wish for. For this introductory discussion, the information categories of interest are: Profile names, ScreenSet information, Wizard information, and Hardware Configuration information. Consider these factoids: Hardware configuration information (e.g. ports & pins) is contained in a Mach3 profile file. Thus hardware information is dependant upon the loaded profile name. Copyright © 2009-2015 Calypso Ventures, Inc. Page 252 MachStdMill User Manual Revision 2.15 Mach3 finds some files (at run time) based on the loaded profile name (M-Code macros are required to be in <mach install dir>\Macros\<profile name>\). This means that Mach requires copies of all M-Code files in a directory for each profile. This contradicts the generally accepted practice of keeping one piece of information in one place. Multiple copies of files exacerbates file version control issues. The MachStdMill implementation tries to keep all MachStdMill specific files in a small number of locations. This is accomplished imperfectly when running with Mach3 V3 (due to the assumptions made by Mach3 re where different types of files are to be found). For screen sets (at run time), Mach3 uses the loaded screen set name to find #Expand files (“< >” syntax usage). The screen set scripts are expected to be in <mach install dir>\ScreenSetMacros\<screen set name>\ For wizards (at run time), Mach3 uses the loaded wizard name to find #expand files. Wizard run time expand files are expected to be in <mach install dir>\AddOns\<wizard name>\ 15.3.1 Profiles MachStdMill implements extended functionality which requires a consistent set of files to operate correctly. Key M-Code macros are integrated with MachStdMill core functionality (ex: M3, M4 and M6). When running MachStdMill, you have to be using the MachStdMill versions of the M-Codes. The Mach3 pre-processing (#expand) facilities look for disk files based on screen set name. With the introduction of MachStdMill, you should no longer consider profiles and screen sets to be independent items that can be mixed and matched. Attempting to load different (non-MachStdMill family) screen sets while running a “MachStdMill profile” will probably get you in trouble. You will likely end up with mismatched M-code macros and buttons scripts. This results in bad things happening at run time. MachStdMill can not take care of this for you (as older Mach3 V3 screen sets have no concept of “which copies are the correct Macros?” for this screen set). If you want to run different screen sets, create different profiles to do so. 15.4 Key Mach3 Application Programming Interfaces (APIs) There are two key Mach3 programming features which the MachStdMill implementation makes extensive use of. This section is not intended to be a tutorial on how to program using these features. The features are introduced so that the reader may see generally how they are used by MachStdMill. Copyright © 2009-2015 Calypso Ventures, Inc. Page 253 MachStdMill User Manual Revision 2.15 For those interested in more detailed information, see the Mach3 V3 Programmer Reference manual. 15.4.1 RunScript() RunScript is an API which allows a script to call another script, which is in a file on disk. Prior to RunScript, the only container available to hold code that you wanted to call at run time, from multiple places, was a numbered M-Code (ex: M123.m1s) file. This mechanism was intended to support simple user defined M-Codes. It was not intended as a general purpose “subroutine call mechanism”. MachStdMill does not use M-Code files as subroutine containers. RunScript calls are used instead. 15.4.1.1 Summary: • MachStdMill avoids Code(“M123”) in favor of RunScript(<script name>). • MachStdMill also uses RunScript as a run time means to access user defined scripts (supplied after MachStdMill is installed). This is how MachStdMill creates run time “hooks”, without the need for a user alteration of MachStdMill script sources. 15.4.2 #Expand Pre-Processing MachStdMill makes extensive use of the Mach3 pre-processing capabilities. Pre-processing to include source code files enables: 1) Implementation of header files. This greatly increases code maintainability. 2) Creation of common, readable code modules (with parameters and type checking). The Syntax for #Expand has two syntax options. The “< >” syntax was designed to support screen sets and wizards. The < > form allows the location of included scripts to be dynamically determined at run time (the location of scripts do not have to hard coded into the scripts when they are written). This is a feature that MachStdMill takes significant advantage of. The semantics of #expand drives some of fundamental aspects of MachStdMill’s code structure. They also force the use of techniques to modify MachStdMill that are different from prior screen sets. 15.4.2.1 Summary • MachStdMill uses #Expand to create header files and code modules for internal MachStdMill reuse. 15.5 MachStdMill .Set Files With the introduction of “Named” script files, information that formally lived inside a screen set file, now may reside in a separate disk file. Copyright © 2009-2015 Calypso Ventures, Inc. Page 254 MachStdMill User Manual Revision 2.15 MachStdMill uses the #expand < > pre-processing facilities. This means that, at run time, script files are found based on the loaded screen set name. This also means that if the loaded screen set name changes, the #expand files will not be found at run time (since the dynamic location of the #expand filenames will change also). The MachStdMill design choose NOT to require that the user to copy 100’s of scripts to new places each time they want to make/use a MachStdMill derived custom screen set file (that is a maintenance and debug nightmare better avoided). MachStdMill always loads the same screen set filename (but not the same screen set file contents). The actual screen set file that is loaded by MachStdMill at initialization is always <mach install dir>\MachStdMill.set The contents of this file are changed dynamically by MachStdMill when the user alters the MachStdMill configuration. When the <mach install dir>\MachStdMill.set has been changed, MachStdMill has Mach3 reload the set file. This means that <mach install dir>\MachStdMill.set is a Master file and can not be directly edited by the user. Any edits made to this file will be lost when MachStdMill overwrites the file. For multiple reasons, it may be desirable to create customized, derivative versions of the MachStdMill Master .Set files (for example to add a button to the User extensions page, or to modify the named script invoked by a button). MachStdMill supports customized MachStdMill screens set files. The user can create customized .set files and teach MachStdMill that they exist. The user can select from the available set files (master and customized) and designate one as the .set file to be loaded when MachStdMill initializes. This is done via the Settings-Common page. Refer to section 10.3.1.1 for more information. 15.5.1 Customizing MachStdMill .Set Files To customize MachStdMill, these steps are typically required: Create a Screen set file to customize. This is most often done by cloning a new screen set from an existing MachStdMill screen set. You can use the Settings-common page, “Clone Screen” button to do this. The settings dialog can create a cloned screen set from an existing screen set, either a MachStdMill installed Master Screen Set, or a previously created, user customized screen set. Edit the screen set file as needed. Copyright © 2009-2015 Calypso Ventures, Inc. Page 255 MachStdMill User Manual Revision 2.15 Tell MachStdMill to load the customized .set file when MachStdMill is initialized. You use the Settings-common page, “Load Screen” button to do this. Customizing Note: When cloning a screen set, you are making a copy of the base screen set file. This creates a .set file snap shot which is frozen in time. Due to the way Mach requires that the various bits and pieces which make up a complete screen set be organized, customizing the cloned screen set file can lead to maintenance / update problems later on. For example: The location of where to put screen objects on a page is stored inside a set file. This means that a .set file has implicit knowledge of the graphics images used by mach to render a page image. If a page’s background or other graphics change in a later MachStdMill release, the cloned set file will not know about the change... The result will be a set file and graphics files that are an inconsistent set. This manifests itself as a customized set file looking odd (shifted or misplaced graphic objects). This core problem is an artifact of the simple static relationship between .set files and graphic bitmaps files assumed by Mach. The problem is not unique to MachStdMill and would require significant changes to Mach to materially improve. 15.5.2 MachStdMill Set File locations The MachStdMill Master set files are installed into <mach install dir>\MachStdMill\Set Files\Masters\ User customized set files are expected to be found in <mach install dir>\MachStdMill\Set Files\Custom\ MachStdMill customized set files can be edited from the \Custom sub-directory 54. Either Screen4 or MachScreen may be used to edit the custom set files. The author of MachStdMill highly recommends the use of MachScreen. The MachStdMill package was developed using MachScreen. 15.5.3 Loading a .Set file with MachStdMill The Settings-Common “Load Screen” button allows the user to both load and change the default .set file that MachStdMill uses. Since the Mater configurations are always available, it is always possible to easily load a known good master configuration. 54 Doing this with MachScreen requires that you use MachScreen version 1.44.1 or later and that you set the “User defined image path” directory option in MachScreen to your <mach install directory>\Bitmaps\. Earlier versions of MachScreen do not have the “User defined image path directory” option and so can not find images for .set files that are not located in the <mach install dir>\ This results in “missing image files” messages. To use earlier version of MachScreen, a work around is to copy the set file to <mach install dir>, edit from there and copy it back to the MachStdMill\Set Files\Custom\ directory after doing the customization. Copyright © 2009-2015 Calypso Ventures, Inc. Page 256 MachStdMill User Manual 15.5.3.1 Revision 2.15 Bug Report Verification When a bug is reported, the first response a user should expect is “Has this been verified to occur with a Master MachStdMill Screen Set configuration?” “No” is not a good answer if you want attention paid to the bug report. “Yes” is a much more interesting answer from the viewpoint of a MachStdMill support person. Since a master configuration should always be available (which was not the case with prior to MachStdMill), it is anticipated that this will be of significant assistance in determining if a problem is related to the core MachStdMill version or a user customization. If you suspect something is broken, first try it while running a “Master MachStdMill Screen Set”. All you have to do to get to a Master (non-customized) Screen set configuration is to select a Master Screen set via the “Load Screen” button. Since various scripts and set files are shipped and installed in source form with MachStdMill, it is possible that a Master setup could have been modified since the last MachStdMill install. This possibility can be eliminated by reinstalling MachStdMill. The install process will overwrite all the master files (and not modify files in the custom directories). The bug can then be verified against the known clean master screens set. 15.6 Customizing Button Actions Once you have created a Custom MachStdMill set file, you may want to modify the action of a button. This section introduces the method for customizing a MachStdMill button action. 15.6.1 Direct button code Prior to Mach3 version 3.43.x, all button script code lived in a screen set (.set or .lset) file. This is what is referred to as “direct button code”. The button definition within the .set file’s record for the screen control also contains the script code that the button executed. This is illustrated in the following figure: Copyright © 2009-2015 Calypso Ventures, Inc. Page 257 MachStdMill User Manual Revision 2.15 Direct button code Set file contents Button definitions inside set file Code for button © 2010 Calypso Ventures, Inc [email protected] Figure 169: Direct Button Code When a user wants to customize the code for a button, what they do is edit the code in the set file. This is illustrated in the following figure: Changing Direct button code Set file contents Button definitions inside set file Code for button For direct button code (eg 1024.set etc) you edit the code that lives in the .set file; Either via a screen editor or the mach menu “edit button script” © 2010 Calypso Ventures, Inc [email protected] Figure 170: Editing Direct Button Code Copyright © 2009-2015 Calypso Ventures, Inc. Page 258 MachStdMill User Manual Revision 2.15 There are two common ways to edit direct button code: a) use a screen editor to open the .set file and change the script code, or b) Use the Mach menus to “edit button script”. (What that actually does is open the currently loaded set file, get the code, load it into the script editor and show it to the user for editing. The user makes changes and saves the code. Mach takes the changes and puts them back into the currently loaded .set file, thereby modifying the .set file contents). 15.6.2 Indirect Button Code Starting with Mach3 3.43.x, there is a new approach that Mach3 supports. This is called “Indirect button code”. With indirect button code, the core code for a button no longer lives inside the .set file. All that is in the set file button control record is a line of script that points to where the actual code lives. The core button code is stored in a separate disk file. This is illustrated in the following figure: Indirect button code Set file contents MachStdMill Master File Area ButtonName.m1s Button definitions inside set file Code for button Code for button #expand <scripts\ButtonName> The #expand “redirects” mach to look on disk for a a file with the code to use when the button is pressed © 2010 Calypso Ventures, Inc [email protected] The tools that enable this are the Mach3 pre-processing #expand statement. The only code inside the set file is the #expand statement. When the button is pressed, Mach looks at the button definition from the set file, and runs it (just as it always has), and then Mach finds the #expand – which vectors Mach off to get the disk file contents – which is what actually gets run as a result of the button press. Copyright © 2009-2015 Calypso Ventures, Inc. Page 259 MachStdMill User Manual Revision 2.15 In MachStdMill, all buttons (those with scripts), use the indirect button code technique. This means that all “button scripts” are in disk files installed by MachStdMill and are not contained inside a .set file. All MachStdMill master screen set files use MachStdMill master script files (which are also installed by the MachStdMill installer). 15.6.2.1 User Customized MachStdMill Buttons To change what a MachStdMill button does, you edit the button’s #expand line inside a customized screen set file. The process is Find the master script file you want to customize. Put a copy of it in the customized script directory area. Modify a customized screen set file to change the button’s #expand line to point to the customized script copy. Customizations to the script itself are made by directly editing the script disk file. - Once the #expand link is changed, there is no need to open the screen set file. This is illustrated in the following figure: Changing Indirect button code Set file contents Button definitions inside set file With indirectMaster buttonFile code MachStdMill Area (e.g. MSM), you edit this “link” to customize a ButtonName.m1s button. Code for button Code for button #expand <Scripts\Custom\ButtonName> User Customized File Area ButtonName.m1s Customized Code for button © 2010 Calypso Ventures, Inc [email protected] Figure 171: Linking to a User Customized Script 15.7 Finding a Desired Master Script File OK, that is simple enough, but the reader is probably wondering “How do I find a particular “master button script file”? To answer that, we will take a short look at how the #expand mechanism works. Copyright © 2009-2015 Calypso Ventures, Inc. Page 260 MachStdMill User Manual 15.7.1 Revision 2.15 MachStdMill Master Scripts location MachStdMill installs the Master button scripts into: <mach install dir>\ScreenSetMacros\MachStdMill.set\Masters\ A parallel directory structure is created (if it does not exist already) at install time for user customized scripts: <mach install dir>\ScreenSetMacros\MachStdMill.set\Custom\ The recommended convention for customizing MachStdMill is to place only customized scripts into the …\Custom\ sub-tree. This convention creates an easy way to determine what scripts have been customized - as all customized scripts will then be present within the ..\Custom\ sub-tree. 15.7.2 #Expand Expansion We will use the RefAllHome buttons as our example for this discussion. If you use the mach menus to “edit button script” what mach will show you is a line that contains #Expand <Masters\Scripts\All-RefAllHome> Lets take this apart piece by piece to see that this line is doing... (This will be a simple example, for full details and options for the syntax, programmers are referred to the mach programmers ref manual – installed with MachStdMill and available via a button on the MachStdMill reference page). “#expand” is the key word that tells mach to go get the contents of a disk file and replace this line with the contents of that file. The < > syntax is telling mach that the place to look for the disk file is dependant on the name of the loaded screen set. With this form of the line, mach looks in <mach install dir>\ScreenSetMacros\<Screen set name>\ 55 For MachStdMill (default installation), the actual location will be: C:\Mach3\ScreenSetMacros\MachStdMill.set\ Note that the “.set” is part of the subdirectory name – this enables this approach to work for both mill screens (.set) and lathe screens (.lset) even when the mill and lathe screens might have the same name. Next we need to understand the naming conventions used by MachStdMill to name button script disk files. 55 Do not confuse the use of angle brackets (“<” and “>”) in the #expand line (where the are syntax delimiters used in parsing the #expand line) and the use of angle brackets to denote “meta tokens”. For example: <mach install dir> is used to indicate that the <xyz> meta token should be replaced with the token’s actual value. For a default mach3 install, <mach install dir> = C:\Mach3\ Copyright © 2009-2015 Calypso Ventures, Inc. Page 261 MachStdMill User Manual 15.7.3 Revision 2.15 MachStdMill Script Name Conventions By convention, MachStdMill installs all it’s button scripts in a “…\Masters\Scripts\” subdirectory. MachStdMill also uses a naming convention for button script files which looks like this: <page name>-<button name> For the case of the RefAllHome script, the filename is “All-RefAllHome”. This tells us that this script is used for “All” MachStdMill pages and is the script for the “RefAllHome” buttons. (I.e. this is the single script used for all instances of a RefAllHome button, changing this single script changes the actions of all RefAllhome buttons). All changes to the button’s action are accomplished without any need to open or change the .set file. Putting all the pieces together we see that mach will go “expand” the file C:\Mach3\ScreenSetMacros\MachStdMill.set\Masters\Scripts\All-RefAllHome.m1s This is the file that one would want to edit to change the action of the RefAllHome buttons. Once the concept of indirect button scripts is understood, doing the edit is just as easy as it is for direct button scripts. The script editor has been enhanced to understand #expand. Let’s change the action of the RefAllHome buttons for MachStdMill – let’s change it button to just put up a message box that says “Hello, I am the RefAllHome button script!”. 15.7.4 Example: Changing the RefAllHome Action These are screen shots taken as I actually did this change while writing this document… NOTE: This example assumes that you have already created and loaded the Custom screen .Set file that points the button to the custom script file we are about to create. Start up MachStdMill (using the cloned screen set file you already customized to point to the new script we are going to create). You get the initial load page, which has a RefAllHome button on it. If you click the RefAllHome now, you will get an error as it will try to execute a script file that is not created yet. Copyright © 2009-2015 Calypso Ventures, Inc. Page 262 MachStdMill User Manual Revision 2.15 We will edit this button… I will illustrate the use of the mach menus to find the Master script file we want to copy and then edit… Use the menus to open the RerfAllHome button (operator, edit button script, click on the ref all home button). The script editor will open and look like this: Copyright © 2009-2015 Calypso Ventures, Inc. Page 263 MachStdMill User Manual Revision 2.15 See those new E+ and E- icons in the editor? Click the E+ icon…. This will cause the editor to recursively expand the loaded script and show the results of the expansion operation. You should now be seeing this: Copyright © 2009-2015 Calypso Ventures, Inc. Page 264 MachStdMill User Manual Revision 2.15 This makes it easy to browse around and see that a script does, even if the script really lives in multiple disk files. If you single step, or run script with expansions, the editor will expand the script before running it. We want to change what the script does – HERE IS WHERE YOU HAVE TO BE CAREFUL ABOUT WHAT YOU ARE DOING! Realize that we have the code from the set file loaded in the editor, which is just the #expand line from the .set file - we DO NOT have the All-RefAllHome.m1s file loaded into the editor! Even though the editor is showing the contents of the All-RefAllHome file, you can not edit that file directly from here! Any edits you attempt to make will be lost when the file is unexpanded and later re-expanded. (This is a possible editor feature enhancement under consideration. However, this ability is not in the V3 version of the script editor as of Mach 3.43.22) Copyright © 2009-2015 Calypso Ventures, Inc. Page 265 MachStdMill User Manual Revision 2.15 We do not want to edit the .set file #expand line, we want to edit the actual All-RefAllHome script. Use the E- button to un-expand the script. Then use the file open to navigate to the actual script we want to change: Important: Right click the script name, select “copy”. Navigate up the tree and back down to …\ScreenSetMacros\MachStdMill.set\Custom\Scripts\ and save a Copy of the file into the \Custom\Scripts\ sub-directory. Now open the copy that you just created in the custom sub-tree. Make sure you are not editing the master version of the script! The contents of All-RefAllHome will now be shown: Copyright © 2009-2015 Calypso Ventures, Inc. Page 266 MachStdMill User Manual Revision 2.15 Use the editor to delete the entire contents of the script. (yes, delete the copyright expand lines also. You are about to make the contents of this file YOUR CODE – and there is no reason for a CVI © notice to be in your custom script code.) Add this line: Msgbox “Hello, I am the RefAllHome button script!” Save the file. Close the editor Click the Ref All Home button – you should see this dialog: You have just customized the button action. Copyright © 2009-2015 Calypso Ventures, Inc. Page 267 MachStdMill User Manual Revision 2.15 15.8 Modifying MachStdMill M-Code Macros The correct operation of MachStdMill requires the use of MachStdMill versions of several MCode macros. The MachStdMill implementation of spindle start/stop and tool changes are dependant on the correct operation of these macros. Because of the way that Mach3 V3 searches for M-Codes at run time, it is necessary for copies of the MachStdMill M-Code macros to be present in the correct directory for every profile that runs MachStdMill. During initialization, MachStdMill copies the master M-Code into the correct directory for the active profile. Therefore, any modifications made to these M-Code for a profile will be overwritten with the installed master M-Code macros when MachStdMill initializes. Run time hooks are provided to support the common reasons for modifying M-Code actions. It should be extremely rare that there is really a need for a user to change the operation of a MachStdMill M-code. However, if this is absolutely necessary, the M-Code update operation can be disabled via the Setting-Common page. Doing so is NOT recommended! Please note that all problems resulting from disabling M-Code update on initialization are solely the user’s responsibility. Support issues resulting from turning this option off will be declined. 15.9 Supported MachStdMill Interfaces This section contains information about the user hook interfaces provided by MachStdMill. While reasonable efforts will be made to not change these interfaces over time, no guarantees can be made or assumed. All portions of MachStdMill are subject to change at any time without notice. 15.9.1 Run Time User Script Calls 15.9.1.1 M6 Tool Change Sequence MachStdMill provides user script hooks to make customization of the M6 sequence possible without the need for alteration of the MachStdMill M6 sequence logic. Caution: It is possible for user scripts to take actions that will cause failure of the M6 Tool change sequence. You are solely responsible for adequately testing any scripts called by this interface. 15.9.1.1.1 Auto Tool Changers: M6ATC MachStdMill supports easy user customization for auto tool changers. When Mach is in auto tool changer mode, the MachStdMill M-Code macro set for M6 will look for a user supplied script and call it as part of the tool change sequence. Copyright © 2009-2015 Calypso Ventures, Inc. Page 268 MachStdMill User Manual Revision 2.15 If the user supplied script is present, it will be invoked as part of the tool change. No source modification of the M6 macro set is required to enable this. The M6 hook scripts are hooks in to the M-Code macros which are dependent on the active profile. Thus the hook scripts should be placed into <mach install dir>\macros\<active profile name>\ For example: If mach is installed in the default dir (C:\Mach3\), and the active profile was "XYZ" then that would be: C:\Mach3\Macros\XYZ\ A template for the M6ATC user script is installed by MachStdMill. The template script documents the interface conditions for the user script. Please see the template script source code for more information. Templates for M6 user run time hooks are installed in <mach install dir>\MachStdMill\Profile Macro Masters\Mill\Templates\. 15.9.1.1.2 M3, M4 & M5 Customization Hooks MSM provides hooks from MSM’s M3 & M4 & M5 scripts to call user scripts. This allows users to extend the M3/4/5 scripts by supplying user script code via a defined interface. The user extension scripts are looked for in the profile specific mach macro directory (as this is consistent with how mach treats M code scripts on a per profile basis). The M3/M4/M5 hook scripts are hooks called by the M-Code macros which are dependent on the active profile. Thus the hook scripts should be placed into <mach install dir>\macros\<active profile name>\ For example: If Mach is installed in the default dir (C:\Mach3\), and the active profile was "XYZ" then that would be: C:\Mach3\Macros\XYZ\ The user script files which are run (if present) are: ProfileM3UserScriptPre ProfileM3UserScriptPost ProfileM4UserScriptPre ProfileM4UserScriptPost ProfileM5UserScriptPre ProfileM5UserScriptPost Templates are not provided for these scripts. If the scripts are present in the profile macro directory, they are run. Copyright © 2009-2015 Calypso Ventures, Inc. Page 269 MachStdMill User Manual Revision 2.15 Note: that user extension scripts for M3/M4 should NOT make the Mach calls to start the spindle as this is already done by the MSM interface called by M3/M4. 15.9.1.1.3 M6Start and M6End User Customization Hooks MSM provides hooks from MSM’s M6Start & M6End scripts to call user scripts. This allows users to extend the M6Start and M6End scripts by supplying user script code via a defined interface. The user extension scripts are looked for the profile specific mach macro directory (as this is consistent with how mach treats M code scripts on a per profile basis). The M6Start/End hook scripts are hooks called by the M-Code macros which are dependent on the active profile. Thus the hook scripts should be placed into <mach install dir>\macros\<active profile name>\ For example: If Mach is installed in the default dir (C:\Mach3\), and the active profile was "XYZ" then that would be: C:\Mach3\Macros\XYZ\ The user script files which are run (if present) are: ProfileM6StartUserScript ProfileM6EndserScript Templates are not provided for these scripts. If the scripts are present in the profile macro directory, they are run. ProfileM6StartUserScript is run before any of MSM’s M6 handling code. ProfileM6EndserScript is run after all of MSM’s M6 handling code is completed. Note: that user extension scripts for M6Start and M6End should be used very carefully as they could easily break the MSM tool change sequence processing. These hooks are not needed by 99.9% of MSM users. DO NOT use these hooks to implement automatic tool changer actions - use M6ATC for that. 15.9.1.1.4 Pre-AutoTLO Measurement MachStdMill supports a run time hook when performing TLO measurements with the TCP TP. The user script is called just before the TLO measurement is performed. An example use of this hook is to trigger an air blast of the TCP TP to clear it of swarf or coolant. Copyright © 2009-2015 Calypso Ventures, Inc. Page 270 MachStdMill User Manual Revision 2.15 If the user supplied script is present, it will be invoked as part of the AutoTLO or manual TLO measurement sequence. No source modification of the M6 macro set is required to enable this. A template for the user script is installed by MachStdMill. The template script documents the interface conditions for the user script. Please see the template script source code for more information. Templates for M6 user run time hooks are installed in <mach install dir>\MachStdMill\Profile Macro Masters\Mill\Templates\. 15.9.1.2 MachStdMill Initialization & Exit Mach3 invokes special scripts when loading or unloading a screen set. These scripts are used by MachStdMill to perform initialization etc. To provide for user specified actions when MachStdMill is loaded or unloaded, run time hooks to user scripts are supported. Caution: It is possible for user scripts to take actions that will cause MachStdMill initialization or termination to fail. You are solely responsible for adequately testing any scripts called by this interface. 15.9.1.2.1 ScreenSetLoad This user script hook is called after MachStdMill has completed all it’s initialization tasks. If the user supplied script is present, it will be invoked as part of the MachStdMill initialization process. No source modification of MachStdMill is required to enable this. A template for the user script is installed by MachStdMill. The template script documents the interface conditions for the user script. Please see the template script source code for more information. The template for the MachStdMill ScreenSetLoad user run time hook is installed in <mach install dir>\ScreenSetMacros\MachStdMill.set\Templates\. The script file invoked by MSM is <mach install dir>\ScreenSetMacros\MachStdMill.set\Custom\MSMUserSSL 15.9.1.2.2 ScreenSetUnload This user script hook is called after MachStdMill has completed all it’s termination tasks. If the user supplied script is present, it will be invoked as part of the MachStdMill termination process. No source modification of MachStdMill is required to enable this. A template for the user script is installed by MachStdMill. The template script documents the interface conditions for the user script. Please see the template script source code for more information. The template for the MachStdMill ScreenSetLoad user run time hook is installed in <mach install dir>\ScreenSetMacros\MachStdMill.set\Templates\. Copyright © 2009-2015 Calypso Ventures, Inc. Page 271 MachStdMill User Manual Revision 2.15 The script file invoked by MSM is <mach install dir>\ScreenSetMacros\MachStdMill.set\Custom\MSMUserSSU 15.9.2 Pre-Implemented Button Action Options 15.9.2.1 GotoZero Button Action One of the most common Mach3 support requests is “How do I change the action of the GotoZero button?”. As a convenience, the MachStdMill master script for the GotoZero button includes support for some common alternative actions. You may want to create a custom MachStdMill Screen Set that points to a copy of the Master GotoZero script and change the action of the script copy. GotoZero actions can be changed by altering the constants defined in the script. Const GotoZs = 1 Const StraightXYZPathThenA = 2 Const XYThenZThenA = 3 Const ZThenXYThenA = 4 ' **************************************** ' the line below is the line to change to set the default movement sequence for GotoZero ' by default this script is set to use the same motion that the Mach API call ‘ GotoZs (v3 OEM code 1017) does. MoveMode = GotoZs ' **************************************** 15.9.2.2 G-Code Utility Button Mach includes wizards which are useful for generating G-Code for common operations. However, the are also windows programs which are in common use with Mach. Two poplar examples of such programs are D2NC and SheetCAM. MSM has a button on the load page: G-Code Utility”. This button causes MSM to invoke a user supplied script. The User script can then customize that script to invoke any program they want. A template script is supplied with MSM called MSMUserRunGCodeUtility_Template. The template can be found in <mach install dir>\ScreenSetMacros\<screen set name>\Templates (where <screen set name> is either MachStdMill.set for mill mode or MachStdMillLAthe.LSet for turn mode operations). The supplied template can be copied and renamed to (mill mode) Copyright © 2009-2015 Calypso Ventures, Inc. Page 272 MachStdMill User Manual Revision 2.15 <mach install dir>\ScreenSetMacros\MachStdMill.set\Custom\Scripts\ MSMUserRunGCodeUtility Which is the script that the G-Code Utility button will run. AS supplied with MSM, the template script simply puts up a dialog box that says the script has been called. By changing a couple of lines in the script you can also use the sample code to start the D2NC program. Similar code can be used to run other windows based G-Code generating programs. Please see the template script source for more details. 15.9.3 MSM scripting APIs There are a scripting calls that MSM provides to either make user scripts easier to write or to solve specific script issues. The Supported MSMAPI calls are provided in the MSMAPIs.m1s script file. There is also a matching Header file that defines the User Space resources used by the MSM APIs. 15.9.3.1 MSMAPI_GetToolDesc The stock Mach script call GetToolDesc CAN NOT be used with MSM on mach v3. This is because MSM requires per tool storage of extended attributes and the only place to save them is in the description field of the tool table. Therefore, if Mach’s internal tool table description is directly accessed, the XML that MSM stores in the description string can easily be corrupted. This will lead to incorrect operation of the MSM extended tool table functionality. However, a user script still needs to be able to access the tool description. To enable this, MSM provides a direct substitution for the stock Mach call. The MSM API takes the same parameters and returns the same values as the Mach call, MSMAPI_GetToolDescription(ByVal TN as integer) as string Here is an example user script that uses the MSM API to display a tool description: Option Explicit #expand <Masters\Headers\MSMAPIConstants> Dim s As String Dim TN As Integer TN = 1 MsgBox "tool “ & TN & “ desc = " & MSMAPI_GetToolDescription(1) Exit Sub Copyright © 2009-2015 Calypso Ventures, Inc. Page 273 MachStdMill User Manual Revision 2.15 #expand <Masters\Scripts\Common\Expands\MSMAPIs> 15.9.3.2 MSMAPI_SetToolDesc The stock Mach script call SetToolDesc CAN NOT be used with MSM on mach v3. This is because MSM requires per tool storage of extended attributes and the only place to save them is in the description field of the tool table. Therefore, if Mach’s internal tool table description is directly accesses, the XML that MSM stores in the description string can easily be corrupted. This will lead to incorrect operation of the MSM extended tool table functionality. However, a user script still need to be able to access the tool description. To enable this, MSM provides a direct substitution for the stock Mach call. The MSM API takes the same parameters and returns the same values as the Mach call, MSMAPI_SetToolDescription(ByVal TN as integer, ByVal Tdesc as string) Here is an example user script that uses the MSM API to display a tool description: Option Explicit #expand <Masters\Headers\MSMAPIConstants> Dim s As String Dim TN As Integer TN = 1 s = "I changed it via the API" MsgBox "tool “ & TN & “ desc = " & MSMAPI_GetToolDescription(1) Call MSMAPI_SetToolDescription(1, s) MsgBox "tool 1 desc = " & MSMAPI_GetToolDescription(1) Exit Sub #expand <Masters\Scripts\Common\Expands\MSMAPIs> Copyright © 2009-2015 Calypso Ventures, Inc. Page 274 MachStdMill User Manual 15.9.3.3 Revision 2.15 MSMAPI_RSCall The MSM API file also provides access to an internal MSM mechanism which allows parameter passing and return values for scripts called by RunScript(). This implements Basic “call” semantics for disk scripts. The definition of the call is Function MSMAPI_RSCall(ByVal MSMScriptName As String, _ ByRef P1 As variant, _ ByRef P2 As variant, _ ByRef P3 As variant, _ ByRef P4 As variant, _ ByRef P5 As variant ) as Integer For more information see the comments in the source of the MSMAPIs.m1s file. 15.9.4 MachStdMill M1706: Tool Changes and TLO application sequence EXPERIMENTIAL FEATURE: MachStdMill currently includes an experimental feature for which user feedback is requested. It should be noted up front that, at this time, this feature is not committed to remain in MSM and it may be removed from a future release – it all depends on what feedback is received. This release includes a user macro to assist with stop & wait Tool Change sequences. Here a description of the issue the feature is attempting to address: An commercial CNC ATC generally does not move the spindle in XYZ while doing a tool change. I.e. most ATCs the spindle is moved to the tool change position and then tool is placed into the spindle (the tool comes to the spindle rather than the spindle going to the tool). This absence of other movement (for example manual jogging) . The tool is at the tool change position after the tool is changed and it is the responsibility of the G-Code to move the tool into position for whatever the G-Code intended to do with the new tool. In contrast, a Mach3 tool change sequence often involves some X,Y,Z movement. Also, Mach3 allows jogging during the tool change. Therefore, a Mach3 TC can not assume that the position at the start of a TC is the same as the position at the end of the TC sequence. With Mach3 and MSM, using "auto TCP" moves position in XY - so an MSM feature specifically causes Tool movement. The issue is that MSM can’t “put the tool back to the TC start position” as part of TC sequence. Doing so during the TC sequence is not possible because the control (Mach) does not (and can not) know the TLO value of the newly mounted tool, or even if the G-Code will want any TLO value applied. Remember that the M6 code does not apply TLO as part of a Copyright © 2009-2015 Calypso Ventures, Inc. Page 275 MachStdMill User Manual Revision 2.15 tool change sequence, the G43 preparatory command has to be executed to apply TLO. It is unsafe for the M6 TC code to make any assumptions about tool TLO. Making any such assumption in the M6 scripts will/can cause a tool crash – so we don’t do it. The experimental M1706 macro uses some information saved by the MSM M6start script. M6Start stores the tool position at the start of the TC sequence. By including a call to M1706 in a CAM post, we can avoid making bad assumptions in the M6 scripts, yet still (maybe) have a way to get the new tool tip located at the same WC point as the prior tool tip after the G-Code has applied TLO. This is probably not a fool proof scheme – hence the request for comments from testers. The idea is that M1706 would be used as follows: 1. MSM M6start stores the current WC position at the start of a tool change sequence. This enables use of an M-Code to tell mach to return to the saved position after the tool change is done and G-Code has applied (or not applied) a TLO for the new tool. 2. A Cam Post can be made to output T# M6 (this mounts a new tool) G43 H# (G-Code now tells control about TLO) M1706 (This causes motion to put the tool tip at the saved WC position) M1706 uses information stored by MSM’s M6 scripts to access the TC WC position as of the start of the Prior TC. M1706 is named to remind one of M06. M1706 currently is coded to assume it is entered from the TCP and that TCP is at the top of Z travel, thus it can do XY movement first then Z Copyright © 2009-2015 Calypso Ventures, Inc. Page 276 MachStdMill User Manual Copyright © 2009-2015 Calypso Ventures, Inc. Revision 2.15 Page 277 MachStdMill User Manual Revision 2.15 16 MachStdMill Licensing & Activation MachStdMill is designed to take advantage of modern Internet e-commerce practices. Both license purchases and activations may be done online 24/7. However, an internet connection is not required for operation of MachStdMill. This Section describes the software license purchase and activation steps for MachStdMill. 16.1.1 Purchasing a MachStdMill License Licenses for MachStdMill may be purchased online. Calypso Ventures, Inc. does not accept software license orders via telephone or postal mail (the cost of the man power time required to do so would require an increase in the pricing for MachStdMill). When you purchase a license, a License ID and password are sent to the email address you provide when making a license purchase. This license ID and password are required when activating software. For the types of End User licenses currently available, refer to the Calypso Ventures web site at www.CalypsoVentures.com. If you are interested in OEM licensing, please contact Calypso Ventures, Inc. directly. 16.1.1.1 Check Time and Date Before doing any activation or deactivation, check the time and date setting of the PC. The date setting of the PC should be correct. It is also inadvisable to try things like setting the date in the past once MSM is installed, as this can cause MSM to think that someone is trying to extend a trial period by messing with the date settings. 16.1.1.2 Licensing Dialog You may purchase or activate a license while running MachStdMill. During the trial period, MachStdMill is set up to let you learn and use all of MachStdMill’s features. The Software is “nag free” until the last part of the trial period, when the Licensing dialog will be displayed to the user when MachStdMill loads. After purchasing a MachStdMill license, you will want to invoke the activation process to change from the installation from Trial mode. To start the Activation steps, go to the Reference page and click on the “Activation” button. You should then see this dialog, which presents the available activation methods: Copyright © 2009-2015 Calypso Ventures, Inc. Page 278 MachStdMill User Manual Revision 2.15 Figure 172: Activation Methods Dialog Select the activation method you want to use (Online or Proxy activation), then follow the steps in the corresponding sub-section of this manual to complete the activation. 16.1.1.3 Online Activation This is the online licensing/activation dialog: Figure 173: MachStdMill Licensing Dialog Copyright © 2009-2015 Calypso Ventures, Inc. Page 279 MachStdMill User Manual Revision 2.15 From this dialog, you may go to the Calypso Ventures Software Store to purchase a license, activate an already purchased license, or continue running MachStdMill for the remainder of the evaluation period. If you want to access this dialog after MachStdMill is loaded (for example prior to the end of the trial period), the dialog can also be called up manually. To bring up the Licensing Activation dialog, go to the reference page, click the “Activation” button, and choose the online activation action. 16.1.1.3.1 Online License Purchase Clicking the “Purchase MachStdMill Online” option from the licensing dialog will open a browser window and take you to the Calypso Ventures Software Store where you may purchase Licenses. As part of the purchase transaction, a License ID and password are sent to the email address you provide when making the license purchase. It is important to make sure this is a valid email address, as your Licensed ID and Password will be sent to the email address you provide. 16.1.2 Activating a License The second choice of the Licensing dialog (“Activate MachStdMill”) will give you the available methods for activating a license. Figure 174: Activation Methods Dialog Each computer on which MachStdMill is activated is treated as a “MachStdMill installation”. The license purchase determines the maximum number of MachStdMill installations permitted for the license. Copyright © 2009-2015 Calypso Ventures, Inc. Page 280 MachStdMill User Manual 16.1.2.1 Revision 2.15 Online Activation Pick the “Activate MachStdMill Online” to activate a purchased license. You will be presented with this Online Activation Dialog: Figure 175: Online Activation Dialog Enter your License ID and password. The License ID and password must be entered exactly as they were sent to you (the password is case sensitive). MachStdMill will then contact the online license server to verify the entered License ID and password. You will see a progress bar while this process takes place. Upon successful activation, you will see this dialog: Copyright © 2009-2015 Calypso Ventures, Inc. Page 281 MachStdMill User Manual Revision 2.15 Figure 176: Successful Activation If there was a problem with the activation process, an error code will be presented in the dialog. For an explanation of common activation error codes, see the appropriate section below. 16.1.2.2 Installation Deactivation When MachStdMill is activated, the License Installation is keyed to the machine it was activated on, creating a unique “MachStdMill Installation”. MachStdMill allows you to move an installation from one machine to another. This is accomplished by deactivating a current installation, installing MachStdMill on the new machine, and then activating the new machine using your license ID and password.. To access this dialog after MachStdMill is loaded, go to the reference page, click the “Activation” button, and choose the online deactivation action. Confirming this dialog deactivates (only) the specific PC installation and not the MachStdMill license itself. You will use your (still valid) license to activate the new installation. 16.1.2.3 Manual Activation Manual activation is only used for unusual support circumstances. You will need to use this only at the direction of CVI product support. Copyright © 2009-2015 Calypso Ventures, Inc. Page 282 MachStdMill User Manual 16.1.2.4 Revision 2.15 Proxy (Offline) Activation MachStdMill also supports activation of computers which are not connected to the internet. This is supported via the use of a “Proxy” PC which communicates with the license server on behalf of the “Offline” PC where the MachStdMill installation resides. The following figure illustrates the basic flow of an activation via a Proxy computer. Proxy Activation Steps Phase 1: Data & Utility to Thumb drive Phase 2: Thumb Drive to Proxy PC Internet MSM (Offline) Control PC Proxy (Online) PC Phase 3: Proxy Activation results go back to Control PC Proxy Activation Utility gets installed on this PC Figure 177: Proxy Activation Steps When MachStdMill loads, the normal Online activation dialog is presented if the installation needs to be activated because the trial period has expired. If you click “exit” on that dialog and the installation is not already activated, the following dialog will appear: Figure 178: Proxy Activation Start Choose “yes” to start the Proxy Activation process to use another PC to activate MachStdMill for this computer. Copyright © 2009-2015 Calypso Ventures, Inc. Page 283 MachStdMill User Manual Revision 2.15 If you started the Proxy activation process from the reference page, activation button, you will be a the step in section 16.1.2.4.1. 16.1.2.4.1 Proxy Activation A Proxy Activation is done in three phases. 16.1.2.4.1.1 Installation PC (Phase 1) When the Proxy Activation process is started on the MachStdMill installation computer, you will be presented with the following dialog: Figure 179: Proxy Activation License Information Enter the LicenseID and Password you received when you purchased your MachStdMill license. Click “OK” to continue with the Proxy activation process. MachStdMill will then create a Proxy Activation request and ask you where you want to copy the request to. Since this information has to be physically taken to another PC (which has network access) to do the 2nd phase of the Proxy activation process, choose a removable media drive. Here is the dialog that appears from which you can select where to store the proxy information: Copyright © 2009-2015 Calypso Ventures, Inc. Page 284 MachStdMill User Manual Revision 2.15 Figure 180: Proxy data storage location dialog The amount of storage required is modest (a few MBs), a USB thumb drive would be a convenient device to use for this purpose. MachStdMill will copy the required information to the location you choose and when the file copy is complete you will see this dialog: Figure 181: Proxy Activation Pause This dialog tells you that the first phase of the Proxy Activation process is complete. Important: If you continue or close this dialog before completing the second phase of the proxy Activation process, your installation will not be activated and you will have to restart the sequence. Copyright © 2009-2015 Calypso Ventures, Inc. Page 285 MachStdMill User Manual Revision 2.15 16.1.2.4.1.2 Proxy PC (Phase 2) Remove the thumb drive from the MachStdMill installation computer and take it to the “Proxy” computer. At the Proxy computer, you will use the information that was copied to the thumb drive. Here is an example of a drive with a Proxy Activation request on it: Figure 182: Proxy Activation Files You will see that two items were placed here by the MachStdMill Installation computer: 1) the data for this activation request, and 2) The MSM Proxy Utility installer files. The proxy Utility will be used to do the second phase of the Proxy Activation sequence. This requires that a proxy Activation utility be installed on the Proxy PC. Go into the “MSM Proxy Utility Setup” folder - Copyright © 2009-2015 Calypso Ventures, Inc. Page 286 MachStdMill User Manual Revision 2.15 Figure 183: Proxy Activation Utility Setup Files Run setup.exe to install the Proxy Activation utility on the Proxy PC. Follow the instructions for the install. Her is a typical example of the steps for the Utility installation: Click here to install the Proxy Activation Utility Copyright © 2009-2015 Calypso Ventures, Inc. Page 287 MachStdMill User Manual Revision 2.15 When the proxy utility installation is complete you will see a new Windows start menu item for the utility. Figure 184: Proxy Utility Start Menu Item Now that the utility is installed, use the start menu to run the utility. (Note: It is best to use the version of the utility that was provided by the Proxy Activation Request. If you use an old version of the utility (from a prior version of MachStdMill) it may complain about the ProxyActivationRequest file version. The utility will tell you if you have a incompatibility between the request file version and the utility version. If that should happen, install the current utility version over the old one and start the new version of the Proxy Activation Utility). When the utility starts, it will first ask you to point it to the ProxyActivationRequest file. Browse to the file on the thumb drive. Figure 185: Proxy Utility Browse Window Copyright © 2009-2015 Calypso Ventures, Inc. Page 288 MachStdMill User Manual Revision 2.15 Select the ProxyActivationRequest file and click “open”. The Activation Request will be loaded and the Utility main screen will appear: Figure 186: Proxy Utility Activation Example The Proxy utility can be used for both new activations and reactivations. The example shows a reactivation case. If this were a new (or first) activation on the MachStdMill installation computer, the InstallationID field would be blank. Click the “(Re)Activate” button to have the Proxy Utility communicate with the license server and activate the license. For a successful activation, the screen will appear similar to the next figure. Copyright © 2009-2015 Calypso Ventures, Inc. Page 289 MachStdMill User Manual Revision 2.15 Figure 187: Successful Proxy Activation Close the Proxy Activation Utility to complete Phase 2 of the process. If you look at the thumb drive, you will see that the proxy activation request has been replaced by a proxy activation response. The response file now has to be taken back to the MachStdMill installation computer. Figure 188: ProxyActivationResponse File 16.1.2.4.1.3 Installation PC (phase 3) Take the thumb drive back to the installation computer. It will still be showing this dialog: Copyright © 2009-2015 Calypso Ventures, Inc. Page 290 MachStdMill User Manual Revision 2.15 Figure 189: Proxy Activation Pause Click OK to continue the Proxy Activation process on the installation pc. You will be asked the location of the ProxyActivationResponse file – browse to it and open it. Figure 190: Browse for Activation Response File MachStdMill will now process the Proxy Activation Response file. A successful activation will show you this notice: Copyright © 2009-2015 Calypso Ventures, Inc. Page 291 MachStdMill User Manual Revision 2.15 MachStdMill will be reloaded with the activated license information. The proxy activation process is finished. 16.1.2.4.2 Proxy Deactivation A MachStdMill installation deactivation can also be accomplished via the Proxy process. The deactivation steps are very similar to Proxy Activation, the primary difference being that there are only two phases for the deactivation process. To start the Proxy Deactivate Installation process, go to the reference page, click the Activation button and then select the Proxy Deactivation action. 16.1.2.4.2.1 Installation PC (step 1) This dialog is shown when you start the Proxy Deactivation process: Figure 191: Proxy Deactivation Confirmation Dialog Clicking “Yes” will cause you to be asked where to save the DeactivationRequest files (put them on portable drive as described in the section on proxy activations). When the proxy request has saved, you will see this dialog: Figure 192: Installation Deactivated Confirmation The MachStdMill Installation is now deactivated. This completes the installation computer part of the deactivation process, be sure to compete the proxy part of the process also. 16.1.2.4.2.2 Proxy PC (phase 2) Copyright © 2009-2015 Calypso Ventures, Inc. Page 292 MachStdMill User Manual Revision 2.15 At the Proxy computer, start the Proxy Utility and browse to the ProxyDeactivation file. Note that you may need to change the file type filter in the dialog from ProxyActivation to ProxyDeactivation to see the file. Figure 193: Browsing for the ProxyDeactivation file The proxy Utility will load the file and show you the information for the Deactivation. Copyright © 2009-2015 Calypso Ventures, Inc. Page 293 MachStdMill User Manual Revision 2.15 Figure 194: Proxy Deactivation Example Click “Deactivate the installation” to remove the installation from the license server. Figure 195: Deactivation Confirmation Copyright © 2009-2015 Calypso Ventures, Inc. Page 294 MachStdMill User Manual Revision 2.15 You can now reuse the installation for another computer. 16.1.2.5 Trouble shooting MachStdMill Online activation requires an internet connection to talk to the license server. If you are having trouble activating, you may need to disable any firewall or security suite software, or to authorize MachStdMill’s use of the network connection. As MachStdMill is an add-on package to Mach3, it runs as part of Mach3 and therefore the actual executable to authorize is Mach3.exe. 16.1.2.5.1 Common Activation Error Codes The most common error codes that may happen during activation are: Error 2 and Error 4: The activation server could not be found. Error 13: During online activation: There is no network connection to connect to the Internet or the connection timed out. Verify connection or try disabling any firewall or Internet security software. Error 15: During startup: The license file was not found. Error 69: The activation code was incorrect. This can be caused by a user incorrectly typing in the activation code. Error 305: If the user has modified their HOSTS file to attempt to redirect the online license checks or online activations to another server, this error will be displayed. Error 5006: Security Check Failure - This occurs when too many failed activation attempts are made in a short period. Error 5008: The License ID or the Password was not validated by the license server. Make sure the License ID and Password are being typed in correctly during activation. Error 5010: The user is attempting to activate with a License ID for a different product. Error 5013: During activation: There are no more activations left for this license. The user has used up the allowed number of activations. Error 5017: Copyright © 2009-2015 Calypso Ventures, Inc. Page 295 MachStdMill User Manual Revision 2.15 Invalid License Status - The license status at the license server is something other than 'OK'. One reason this can happen is if you have upgraded your MachStdMill edition (for example from the Personal Edition to the Professional Edition) and then attempt to activate using the old (now replaced by the upgrade) license ID and password instead of the upgraded License ID and password. Error 5022: Invalid System Time - The system clock is not within the threshold specified by the license server. The user must correct their system time to be able to continue. Error 8080: If the user has modified their HOSTS file to attempt to redirect the online license checks or online activations to another server, this error will be displayed. 16.1.3 The Bundled License Free Update Period Once activated a MachStdMill installation does not “expire” or “stop running”. In addition, each MachStdMill license purchase starts a period of time during which the licensee may utilize all MSM updates released during that period. This “update period” also has no effect on your ability to use your existing release of MachStdMill. Once you have a MachStdMill license, licensed installations of the software do not ever stop running. (Trial installations of course will stop running at the end of the trial period if they are not activated and thereby turned into licensed installations). Updates for MachStdMill are released as new features are implemented and/or as verified errata are repaired. MachStdMill releases are not quantized into a fixed calendar schedule and new features are not held up to match an arbitrary release schedule. A licensee is free to use any release published during the bundled update period. If you want to use updates released after the included update period (say to get a particular new feature), you may extend the license update period. This is done by purchasing an “update extension” for the license. Purchasing an extended update period is generally more cost effective than purchasing a new license. Update extension periods are available from the CVI Customer Service portal (reachable from the CVI website, support area). Should one accidentally install an update which is more recent than is licensed, MachStdMill will inform you of this when it loads. You have the option to either extend the update period for the license or reinstall an earlier release version of MachStdMill. When a license update period extension is purchased, simply perform an activation using your original license info and your MachStdMill installation will then be able to utilize updates released thru the end of the new period. Copyright © 2009-2015 Calypso Ventures, Inc. Page 296 MachStdMill User Manual 16.1.3.1 Revision 2.15 Example: Updating a license’s update period To extend the release versions that a license may run, you stat by logging into your customer account via the Calypso ventures web site. (The following example uses screen shots from the web site as of when this was written). Go to the CalypsoVentures.com web site and select the support page: Figure 196: CVI support web page You want the “Upgrades and Updates” section of the page. Select the “CVI Customer Service Portal” button and you will get the log in page: Copyright © 2009-2015 Calypso Ventures, Inc. Page 297 MachStdMill User Manual Revision 2.15 Figure 197: Customer Service Login There are several login methods available, The “License ID” is generally easy (as this information is what was sent to you with the license purchase email). When you are logged in, you will see the home page for your customer account. Copyright © 2009-2015 Calypso Ventures, Inc. Page 298 MachStdMill User Manual Revision 2.15 Figure 198: Upgrades & Updates Options Select Renewals & Upgrades – You will then be presented the available options for the licenses associated with your account. The option you prefer can be added to the shopping cart and when the transaction is complete, you license information on the license server will have been updated. The last step is to reactivate your copy of MSM to get it to pull the new info from the license server. After the reactivation, the license info on the Reference page will show the updated license status. 16.1.4 Uninstall / Deactivation considerations MachStdMill treats Un-installation of the MachStdMill software independently from Deactivating a specific MachStdMill Installation. Each MachStdMill license permits active simultaneous use of MachStdMill on a specific number of computers. Each time MachStdMill is Activated, a “MachStdMill Installation” is created and the installation is bound to the machine that the installation was activated on. Uninstalling the MachStdMill software does not automatically perform a MachStdMill Installation deactivation for the PC. If deactivation were an automatic consequence of de-installation, it would become necessary to reactivate an installation after every installation (update) of the software. Copyright © 2009-2015 Calypso Ventures, Inc. Page 299 MachStdMill User Manual Revision 2.15 That would be inconvenient for software updates which do not require a de-installation of MachStdMill as part of the update process. Additionally, these actions were kept independent in consideration of users who prefer offline operation of MachStdMill. If you want to “move” an installation to a different PC, you need to deactivate MachStdMill installations from the machine you are “moving the license from”; this will allow you another installation with the license to use on the “new PC”. The “new PC” may be completely different PC hardware, or it may be the same PC, to which some hardware configuration changes are being made (e.g. a motherboard change). The safest approach to making system hardware changes is to deactivate the MSM installation before making the changes and then reactivate the installation with the “new PC” hardware configuration. Should you run into a situation where a PC hardware failure prevents deactivation of an MSM installation, please contact CVI support for assistance in recovering the license activation. Note that the flip side of the decision to treat de-installation and deactivation independently, is that if you first uninstall MachStdMill (without first doing a deactivation) and then later want to move the installation to another PC, you will need to reinstall MachStdMill on the prior PC in order to do the installation deactivation process. As “moving licenses” between machines is much less frequent than doing a software update on a running MachStdMill installation, it was felt that this was the preferred trade off. 16.1.5 Viewing License Information The “License Info” button on the reference page may be used to display additional license information. Figure 199: License Info Button Here is an example license information dialog: Copyright © 2009-2015 Calypso Ventures, Inc. Page 300 MachStdMill User Manual Revision 2.15 Figure 200: License Information Dialog 16.1.6 Invoking Activation Actions On the reference page, the “Activation” button allows you to select the available activation actions. Figure 201: The Activation Button The Activation button will bring up this dialog from which you can pick the desired action. Copyright © 2009-2015 Calypso Ventures, Inc. Page 301 MachStdMill User Manual Revision 2.15 Figure 202: Activation Action Dialog 16.1.7 Activation After Edition Upgrade After upgrading from the paid license Personal Edition (MSM 1.x.x) to the Professional Edition, you will need to reactivate your MachStdMill installations to get MachStdMill loaded with the Professional Edition features. This needs to be done for all Personal Edition installations which are running under the upgraded license. Be sure to do these reactivations using the new license key sent to you for the Professional Edition. The previous Personal Edition license will no longer be valid as it has been replaced with the Professional Edition license. Activation attempts using the old Personal Edition license will not be successful and will likely result in error code 5017 (Status of the license is not “OK”), as the Personal Edition status is now “replaced by upgraded license”. Copyright © 2009-2015 Calypso Ventures, Inc. Page 302 MachStdMill User Manual Revision 2.15 17 Six Axis Screen Shots This section contains screen shots of the 6 Axis pages. Other than the additional DROs for the B and C axes, the pages are functionally the same as the corresponding 4 axis pages. NOTE: the default ref-all home operations for MSM use the mach 4 axis reference script code. If you are running the 6 axis screens, you probably want all 6 axes referenced by ref-all home. Please see the All-refAllHome script soruce code and the user manual section about that script. You probably want to alter the default actions to better suit your 5 or 6 axis system. Figure 203: 6 Axis Load page Copyright © 2009-2015 Calypso Ventures, Inc. Page 303 MachStdMill User Manual Revision 2.15 Figure 204: 6 Axis WC Offset Touch Off page Copyright © 2009-2015 Calypso Ventures, Inc. Page 304 MachStdMill User Manual Revision 2.15 Figure 205: 6 Axis WC Offset Probing page Figure 206: 6 Axis Run page Copyright © 2009-2015 Calypso Ventures, Inc. Page 305 MachStdMill User Manual Revision 2.15 Figure 207: 6 Axis Run/Path page Copyright © 2009-2015 Calypso Ventures, Inc. Page 306