1
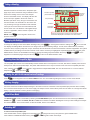
Crane TorqueStar
Opta
Quick Start Guide
Man 890-01
Getting to know your TorqueStar Opta
Mains charger
attaches here
Transducer cable
attaches here
PC/printer cable
attaches here
REAR VIEW SHOWING CONNECTORS
Switching On
Press the ON button
on the keypad
The MAIN MENU screen now appears.
To change the Language,
select here and press the
green Enter Button
To change the Power
options, select here and
press the green Enter
Button
Press 1 to change the TIME, DATE
or the Date FORMAT.
Menu and
level number
No users logged
in (cross
disappears
when users
are logged in)
Press 2 to enter the TOOLS menu.
Selecting the Quick Measure Mode
Use the ARROW buttons (A) to move
around the screen Icons until the required
mode icon is highlighted and press the
green ENTER button (B) to select.
A
The selected QUICK READING Mode screen will now appear on the
display. You are now ready to connect a transducer and take a reading.
B
NOTE: Before entering the QUICK READING Mode, make sure a
suitable transducer is connected to the TorqueStar Opta, otherwise an
error message will be displayed on the screen. Attach the cable from
the transducer to the 25 way D connector on the back of the TorqueStar
- see REAR VIEW above.
Issue 2a - June 2012
Taking a Reading
TYPICAL SCREEN
With the transducer connected to the Torquestar Opta
apply torque to the transducer using a suitable tool and
Number of pulses
(Pulse Mode only)
observe the reading on the screen. This example
Total time
torque is
applied
shows a Pulse Mode screen. The display will show the
amount of torque applied in the chosen Units of
Torque reading
Measure (Nm shown here), the type of transducer and
the serial number. The information on the screen will
Direction
vary according to the type of Measure mode selected.
Transducer
information
The top of the screen shows the mode selected, both
as text and an icon. The direction of the applied torque
is shown if applicable, and the number of 'pulses' if in
Pulse mode.
NOTE: Press
Press the corresponding number on the keypad to access
the features displayed on the bottom row of the screen.
1 on the keypad to return to the
previous menu level.
Changing the Settings
To change the settings for the chosen Quick Reading mode, press
2 on the keypad to select the Settings icon
. The screen will
now display the Settings Menu and the user can change some or all the following settings: UTA ID, Units of Measurement, Direction,
Cycle End Time, Frequency Response, Torque Threshold, Second Parameter and Second Parameter Threshold if applicable. The options
available will vary according to the chosen measure mode. Use the arrow keys to highlight the required parameter and press the green
ENTER button. Use the UP and DOWN arrow keys to change the setting and press ENTER. Press keys
keypad to move between pages and press the key
1 to return to the Quick Measure mode.
2 and 3 on the
Printing from the TorqueStar Opta
The TorqueStar Opta can be set to automatically send its readout data to a serial printer. To do this, first attach a suitable printer such as
the Epson LX-300 to the TorqueStar Opta. The printer cable attaches to the 9 way D connector at the rear of the TorqueStar (see Rear
View, overleaf). Press
Autoprint ON
3 on the keypad to toggle between Autoprint ON or OFF. The Icon will show a tick or a cross to indicate
or Autoprint OFF
.
Viewing the plot for the current series of readings
Press
4 on the keypad to enter the PLOT TRACE screen. For more details regarding this screen, see the User's Manual.
Battery charging
Connect the lead from the Mains adaptor/Charger to the mains connector at the back of the TorqueStar Opta (see Rear View overleaf),
and connect the mains adaptor to an AC mains supply. The adaptor can be used for direct power from the mains or to charge the internal
battery. It has an automatic cut-off to prevent overcharging.
Quick Store Mode
The QUICK STORE mode is accessible by selecting the OTHER MODES option from the Main Menu and then selecting the QUICK
STORE icon.
It works with PEAK, PULSE or CLICK and is similar to the Quick Reading but stores up to 200 readings for analysis
and assessment etc. For more information on QUICK STORE, see the User's Manual.
Switching Off
To switch off the TorqueStar Opta:
From the Main Menu screen, highlight the Power Menu Icon
From within the POWER OPTIONS screen, press
using the arrow keys and press the green ENTER button.
3 on the keypad to switch off the Opta.