1
User_Guide_AlineaSol_Reports_4.4_v1
User Guide
AlineaSol
Reports 4.4 v1
Version:
Date:
1
02/04/2015
© AlineaSol 2015
Proprietary
Page 1 of 38
User_Guide_AlineaSol_Reports_4.4_v1
Contents
1
Introduction ...................................................................................................... 3
2
Comparison Community and Enterprise versions ................................................ 5
3
Version Management ........................................................................................ 7
4
Installation ........................................................................................................ 9
4.1
First time install .......................................................................................... 9
4.2
Install new version ...................................................................................... 9
4.3
Activation ................................................................................................. 10
5
Creating a Report – Table format ..................................................................... 12
5.1
General data ............................................................................................. 12
5.2
Fields and Filters ....................................................................................... 14
5.3
Specials .................................................................................................... 23
6
Charts.............................................................................................................. 24
7
Scheduled tasks ............................................................................................... 27
8
Distribution list ................................................................................................ 28
9
List view Report options ................................................................................... 29
10
Running a report .......................................................................................... 30
10.1 Basic interaction ....................................................................................... 30
10.2 Running a report with user-input filters .................................................... 31
11
Dashlets! ...................................................................................................... 32
12
Report in standard CRM views ...................................................................... 34
13
Creating clickable links (only Enterprise). ...................................................... 35
13.1 Extra icon ................................................................................................. 35
13.2 Clickable name ......................................................................................... 37
14
Configuration ............................................................................................... 38
© AlineaSol 2015
Proprietary
Page 2 of 38
User_Guide_AlineaSol_Reports_4.4_v1
1
Introduction
This document is the user guide to AlineaSol´s Reports (Asol Reports) module for
SugarCRM. The guide covers release 4.X, and is updated up to 4.4.
AlineaSol Reports is part of a family of modules that AlineaSol has developed on top of
the SugaCRM base. These modules include:
Module
AlineaSol Reports
AlineaSol Work Flow Manager
AlineaSol Blue Theme
AlineaSol Projects
AlineaSol Publish Home Page
AlineaSol Chat (note 1)
Community
V
V
V
V
V
Enterprise
V
V
V
V
Note 1: will be published end of March 2015.
Both community and enterprise editions have regular new releases. The enterprise
versions include direct support from AlineaSol.
Asol Reports have been tested and run on both CE and Professional versions of
SugarCRM. As with all AlineaSol modules, MySQL is required as database.
AlineaSol Reports Community focusses on the capability to quickly create nice looking
reports with a minimum of fuss. Both table and graphical output is offered (also
combined). Various graphical engines are supported, including by-default NVD3/D3,
which offers transitions and interactions.
AlineaSol Reports Enterprise introduces more tools and facilities to meet the demands
of users who want to have more control and potentially want to integrate with
external databases and applications.
This User guide covers both versions.
As of AlineaSol Reports 4.4, SugarCRM 7.5 is supported. Note that there are currently
some (small) limitations compared with SugarCRM CE (see readme for “knownissues”).
© AlineaSol 2015
Proprietary
Page 3 of 38
User_Guide_AlineaSol_Reports_4.4_v1
Note that this is not an administration guide. See currently “Readme” notes in package
for administration, configuration and a considerable number of advanced options.
© AlineaSol 2015
Proprietary
Page 4 of 38
User_Guide_AlineaSol_Reports_4.4_v1
2
Comparison Community and Enterprise versions
Community
Enterprise
Report Editor
v
v
Support for Dashlets
v
v
Multi-module reports
v
v
Programmable reports
v
v
General
Auto delivery via email
v
v
Export xls,csv, pdf, html
v
v
Role based access
v
v
Compatible with AlineaSol Publish
Home Page
Tables and Graphics
v
v
v
v
Multiple graphical engines
v
v
Intelligent graphics with transitions
v
v
Extensive set of graphs
v
v
Interactive reports, dynamic filters
v
v
Filters with complex logical constructs
v
v
User Definable CSS
v
v
Advanced math functions
v
v
Force format on output
v
v
Output processing
CSS for each report (1)
v
Post DB query processing (in php)
v
Integration with external systems
Access to external Databases
v
Connects to remote apps using http(s)
v
Grid (1)
Multiple graphs in Grid
v
Multiple tables in Grid
v
User inputs in grid
v
Enhanced presentation options
Multiple graphs in one view
v
Multiple y-axes
v
User definable colour palette
v
Advanced customisation graphs
v
Additional Graph Package
v
Insert Report in any view via Studio
v
Click-through in tables
v
© AlineaSol 2015
Proprietary
Page 5 of 38
User_Guide_AlineaSol_Reports_4.4_v1
Definable action buttons in reports
v
Define fields as clickable extra info
v
Extras
Access to Report Library
v
Preview SQL(1)
v
Support
Community
Email/Web (1)
Note 1: certain enterprise features are made available in the first half of 2015.
© AlineaSol 2015
Proprietary
Page 6 of 38
User_Guide_AlineaSol_Reports_4.4_v1
3
Version Management
Version
4.x V1
4.4 V1
Published
Date
24-3-2014
16-3-2015
AlineaSol
Reports
4.0
4.4
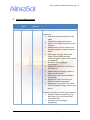
Changes
First Official User Manual
Main changes:
Community
Overwrite formatting type for used
fields.
Visibility for pagination buttons.
${this} is not longer required in a SQL
function.
Added minute, hour & quarter hour
detail/groupings to reports datetime
fields.
When right-clicking a field in edit
mode, a hover panel with SQL
reference appears. This can be copied
to Clipboard.
SQL editor with intelligent
highlighting.
Support for export xls, and clean csv
and clean xls
Updated Dutch language: thanks to
Jason van del Leeuw!
Support for multi-enum and Radioenum fields.
Support for “Like” and “Not Like”
filters for numeric expression.
Support for “starts with” and “ends
with” for filtered strings, numeric and
enum.
Enterprise (includes all Community Features)
Supports PHP post-processing. E.g.
New field is the sum of two other
calculated fields.
PHP editor with intelligent
highlighting.
© AlineaSol 2015
Proprietary
Page 7 of 38
User_Guide_AlineaSol_Reports_4.4_v1
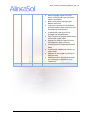
© AlineaSol 2015
Proprietary
Multi-language support for field
labels, enum format type, field user
options and labels.
New overwrite formatting types:
Button and Enum.
Javascript functions can be defined
and executed at report execution. Can
be combined with buttons.
In edit mode, now up to 5 linkthroughs can be performed.
Filters created in graphic mode can be
referenced in SQL mode.
Support for different types of Joins:
Left (default), Right and Inner.
Virtual Relations supported between
fields
In edit mode, added tree-selector to
select fields
Add field in edit mode by clicking on
field/link icon
Added possibility (config parameter)
for a full Report installation to be
“read-only”.
Page 8 of 38
User_Guide_AlineaSol_Reports_4.4_v1
4
Installation
AlineaSol Reports, community edition, can be downloaded at:
https://www.alineasol.com/en/sugarapps/reports
Requirements:
Use MySQL as database
Requires module: “AlineaSol Common base for 3.X and higher”
o This module is used by various AlineaSol applications
For enterprise editions you can contact us at: [email protected]
4.1
First time install
Follow the standard way to load a module in SugarCRM:
First download “AlineaSol Common Base” module to your PC
Login as a SugarCRM admin user
Goto “Admin”
Select “Module Loader”
Select the module, and upload
Install the module
Repeat this action for “Asol Reports”.
You should have now a new module “Asol_Reports” that you can assign to your users.
4.2
Install new version
Recommended procedure:
Uninstall older version but KEEP DATABASE
Install new version of module
© AlineaSol 2015
Proprietary
Page 9 of 38
User_Guide_AlineaSol_Reports_4.4_v1
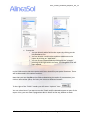
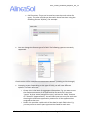
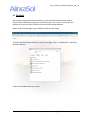
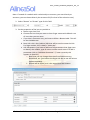
4.3
Activation
Asol Reports should be ready to run now. If you want to use the schedule reports
facility, you will have to add scheduler entries to Sugar.
See Sugar documentation to set this up for your specific Operating System.
For Sugar you will have to add an entry point through sugar admin:
The url to be filled in:
"http://localhost/sugarCRM_dir_in_htdocs/index.php?entryPoint=scheduledTask&mo
dule=asol_Reports"
Notes:
1. change in the url above “sugarCRM_dir_in_htdocs” to reflect your own Sugar
installation
2. if you are using a hosted set-up (virtual server) you may have to use instead of
“localhost” the external address.
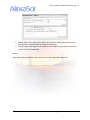
Execution should be set to every 5 minutes and every day.
We recommend that you also set-up a Scheduler to clean-up report obsolete files:
Create a new Scheduler that executes the url:
"http://localhost/sugarCRM_dir_in_htdocs/index.php?entryPoint=reportCleanUp&module=asol_Reports".
Note: remember to adapt the URL in line with your installation.
Set the time interval that fits your needs (e.g. once a day).
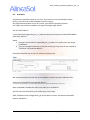
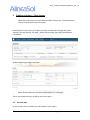
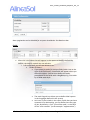
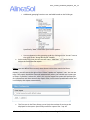
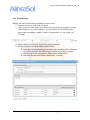
After installation and configuration, go to the admin section, and execute AlineaSol
Reports Validation.
© AlineaSol 2015
Proprietary
Page 10 of 38
User_Guide_AlineaSol_Reports_4.4_v1
Check that there is nothing in red. If there are issues, hover over it and the system will
provide a suggestion.
For support reasons, we normally will ask for a screenshot of this.
© AlineaSol 2015
Proprietary
Page 11 of 38
User_Guide_AlineaSol_Reports_4.4_v1
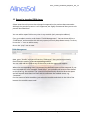
5
Creating a Report – Table format
Note: the screenshots show the AlineaSol Blue Theme skin. The Asol Reports
version used is the Enterprise version.
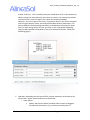
Select Reports in the menu (if it does not show, activate this through the admin
section). You will see the “list view”, which will be nicely clean after Asol Reports
installation.
Select Create to go to the “edit view”
Note: in the community version all information is in one page.
There are various sections to define your new report.
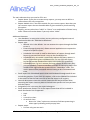
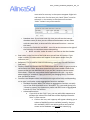
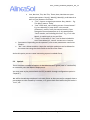
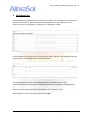
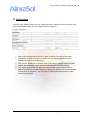
5.1
General data
In this section you can define the main data for your report.
© AlineaSol 2015
Proprietary
Page 12 of 38
User_Guide_AlineaSol_Reports_4.4_v1
The main elements that you need to fill in are:
Report Name: if you plan to create many reports, you may want to define a
nomenclature for easy recognition.
Report Module: this is the main module for your current report. Note that you
can create a report also on the audit table of given module by check-marking
this option.
Display: you can select here “table” or “charts” or a combination of these in any
order. Charts will not be shown if you only select “table”.
Additional elements:
User database: in enterprise-version you can select any configured external
database besides the “CRM Native Database”.
Report type:
o Manual: this is the default. You can execute the report through the CRM
to see it.
o External usage (enterprise): allows external applications to request the
output of a specific report.
o Scheduled: this mode is used for distribution of reports through email.
Report is executed and result is sent to the distribution list.
o Scheduled only: this mode is specifically relevant for heavy reports. It
will only execute at given scheduled time. If a user runs the report,
he/she will see the results of the report executed at the previously
scheduled time. E.g. let´s assume you have millions of sales every day:
you can schedule a report to calculate all kinds of interesting data in the
middle of the night and then present this as “Yesterdays”-sales. The
result report will be presented without having to be re-executed each
time.
Email report link: Scheduled reports that are distributed through email do not
include the graphics. If you check this option, a link to the CRM will be included
in the email so that the user can click to see the report in all its glory.
Internal description: these are internal notes that will not be shown when
executing the report. You may want to include here specifics on how you have
built the report.
Assigned to: this is the user the report belongs to.
Email attachment format: This is the report-format that will be included in
email distribution lists. Supported:
o Html
o Pdf
o csv and csv clean
o xls and xls clean
Note: the “clean” options are meant to facilitate processing in
other apps by deleting mainly empty lines.
Report scope:
o Private: only you can see it.
© AlineaSol 2015
Proprietary
Page 13 of 38
User_Guide_AlineaSol_Reports_4.4_v1
5.2
o Public: everyone can see and execute the report. They cannot edit it.
o Role: only given roles can see and execute the report. They can also
copy and edit it.
Public description: this description will be included in the report output. NOTE:
html editor coming soon…
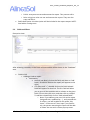
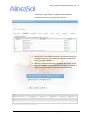
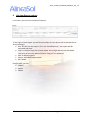
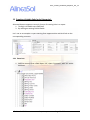
Fields and Filters
Enterprise view:
After selecting a module, all the fields of that module will be shown in the “Database”
area.
Fields in DB
o Adding a Field to report:
Community
Normal (not blue): click on the field, and then on “add
fields” to add this field to the report (will appear to the
right)
Link (blue and “+”): double click on the field. Related
fields will appear for that link. The ID + field will allow
you to go to all the modules with a relation to the given
field. You can also click once, and then click on related.
To add the related field, click on “Add related fields”.
o Note: if you add any user user-link to the report
(assigned-user, modified-by, …), and you add this
to a filter, you will be able to also select “My
items”. In the case of “User Input” (see further
on), the person executing the report will be able
to select the user with a select pop-up menu.
© AlineaSol 2015
Proprietary
Page 14 of 38
User_Guide_AlineaSol_Reports_4.4_v1
Enterprise
o You can directly add a field to the report by clicking on the
link/database icon.
o You can also do a multi-select and then add them to the
report by clicking on “Add fields”.
o You can access related fields by clicking on the “triangle”
pointing to the right within the tree. The navigation tree will
then expand.
In the Fields section there are quite some icons that offer you special functions. These
will be discussed in the various sections.
Note that you can drag&drop the fields to determine the order of presentation: just
click on some white space, and carry the row to a different location.
To the right of the “Fields” header you will see an “options” icon.
You can select here if you want to see the Totals and/or subtotals appear as part of the
report. Also, you can show if pagination data is shown at the top, bottom or both.
© AlineaSol 2015
Proprietary
Page 15 of 38
User_Guide_AlineaSol_Reports_4.4_v1
Note: pagination can be disabled for a reports installation. See Read-me doc.
Fields:
Alias: this is the name that will appear in the report to identify the field. By
default, the label is copied. You can edit this.
o Left to the alias you will see various icons.
“Order of Orders”.
If you select an order for various fields (order icon to the
right of the field itself), these fields will appear when you
select this option. You can then define the order
precedence of the fields with a drag&drop. Eg. First order
by A THEN order by B.
© AlineaSol 2015
The multi-lingual icon allows you to define label reports
in the languages defined in the system.
Join icon: If you include in the report, fields that you have
accessed via a relationship, you can define here the type
of join. By default, a “left” join will be used, i.e. the field
of the “main module” (in the example: “opportunities”)
Proprietary
Page 16 of 38
User_Guide_AlineaSol_Reports_4.4_v1
must exist for an entry in the report to appear. Right Join
and Inner Join. For the Inner join, both “Exists” must be
selected, i.e. the entries in the report will not have
“NULL” values in any of the entries.
o Database icon: If you hover over this icon you will see the internal
database name (so that you can differentiate between various fields
with the same label, or also useful for advanced functions… more on
this later).
o You can sort fields ASC and DESC . Just click on the arrows to the right of
the field alias. Arrow down means descending.
NOTE: see also “order of orders” icon next to the alias header.
Row index: in the first line of the fields area you will see this option. If you
make it visible, an index column will appear in the report output. Easy for
reference, etc.
Reference: This is used for internal referencing, specifically for PHP functions
(see later).
Display: A black eye means that the field values will be visible. A grey eye with a
slash means not visible. Note that sometimes you want to add a field to the
report so that you can add filters to it, but you don´t want to see the actual
field values… There are many other useful applications for this… e.g. think
about copying a “standard” report, and then just changing filters, and fields
that you want to show…
Function: Asol Reports takes into account the type of the field, and depending
on its type, it will make certain aggregation functions available.
o Standard function: When you select an aggregation function, normally
one of the fields should be set to “Grouped”. E.g. you could group (see
“Group by Layout”) by Opportunity name and then have an aggregated
function of “sum” on amount.
o Advanced functions:
If you click on the “SQL” icon, you can add a SQL statement to
calculate the value of the field that will be displayed. See also
“alias” in filter section.
Click on the icon, and a pop-up will appear showing you a
subset of MySQL functions available (actually, they are
ALL available). NOTE: see admin guide to see how full
access to the database can/should be limited (e.g.
© AlineaSol 2015
Proprietary
Page 17 of 38
User_Guide_AlineaSol_Reports_4.4_v1
statements using “Select”). Admin users should be
extremely careful in opening up this access.
© AlineaSol 2015
Note that it is not longer necessary to include ${this} (see
variable section). E.g. to display 2 times the value of the
field, just type: ${this}*2.
When an advanced function is defined, the colour of the
SQL icon changes: it becomes blue. See figure below for a
typical example (amount multiplied by probability)
Proprietary
Page 18 of 38
User_Guide_AlineaSol_Reports_4.4_v1
PHP functions: These can be used to reuse the result-value of a
query. The alias of fields can be used in these functions using the
following format “#{alias}). For example:
You can change the format type of a field. The following types are currently
supported:
Check section 13 for examples on how to use “Button” (creating a click-through).
Group by Layout: Depending on the type of field, you will have different
options. The basic ones are:
o Group: this is the basic for aggregate information. E.g. you want to see
the maximum amount of all opportunities for each user. You then
“group” by User name (assigned to user), and use the “MAX” function
on “amount” (opportunities). You will then have one entry for each user
showing the maximum opportunity amount for all the opportunities
assigned to that user.
o Detail: this provides a table with all the data for each field value. E.g.
you may want to see all open opportunities listed for each user.
© AlineaSol 2015
Proprietary
Page 19 of 38
User_Guide_AlineaSol_Reports_4.4_v1
o Additional grouping functions are available based on the field type.
Specifically “date” fields offer quite some options.
o You can determine the grouping order by clicking on the “arrow” icon to
the right of the “Group BY Layout” header.
At the end of the row you will see two icons: “add filter” (“+”) and a bin to
delete the field from the report.
Filters: you can define filters to only show those entries that match the filters.
Options: you will see to the right of the “Filters” header an “options” icon. You can set
here if the report should be executed automatically when you include user-input type
of filters. If you don´t select this, when you run the report the system will prompt you
for information and then execute the report. Else, it will use the predefined values and
it will display the report automatically.
The first row in the filter allows you to limit the number of entries to be
displayed in the report. Specifically useful for reports like: “top 10”
© AlineaSol 2015
Proprietary
Page 20 of 38
User_Guide_AlineaSol_Reports_4.4_v1
opportunities. By default, all entries that meet the filter conditions are shown.
This can be limited to the first or last n entries.
Logical operators: you can define complex filter using AND and OR statements.
In order to group this appropriately brackets can be used. Admittedly, it was
difficult to come up with an ideal look&feel, so finally we settled for the one
you see (see figure below)
o Example: (Amount Not Equal 0 AND Sales Stage = Prospecting) OR
(Probability >50% OR amount>500)
o For the brains: the bracket is set to the left of the field, unless it starts
with “..” which means it goes to the right. The Logical operator is set to
the right of the field and brackets.
o Note: if you don´t fill-in anything ANDs are assumed.
Alias: This is the label presented to the user in the case of “User Input” type.
o Note again the database field icon. You can hover over it to see what
the database field is called internally.
Reference: this is used for external applications and to reuse filters within SQL
advanced functions. When external applications call a report, they can include
this “row reference” as a parameter to set dynamically filters.
o This reference can now also be used within SQL advanced functions, by
adding #[reference] in the where clause. A new parameter can be
injected in the given filter by using the format: #[reference(parameter)]
. E.g. “SELECT AVG(OPP0.amount) FROM opportunities OPP0 WHERE
#[amount(OPP0.amount)]”
Behavior: The type has various meanings:
o Auto: filter is not shown to the user when running the report.
o Visible: filter is shown to the user when running the report.
o User input: user is prompted for the value of the filter. See options for
filters to determine if the report should be executed automatically at
first run or not.
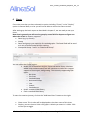
User input options: this is an interesting piece of code… If you click on the
wheel (enterprise version only) you will see a pop-up with a “Add New Value”
button. Now, let´s assume that you have in your database a field that can have
three values which are internally saved as “1,2,3”, and you have NOT created
the corresponding labels in the CRM… You can define the labels here (even
multi-language)! Let´s assume that you want to allow the user to filter based on
the field, but want to hide the internal coding. This is where you create your
“labels”. See next figure. Be aware that this only will be visible to the end-user
if you have chosen “User input” or “Visible”.
The pop-up editor will create automatically the user-input-options “1=Red,
© AlineaSol 2015
Proprietary
Page 21 of 38
User_Guide_AlineaSol_Reports_4.4_v1
2=Blue, 3=Green”. This is actually what you would have to fill in the community
edition to get the same behavior (note that currently in the community edition,
you have to do a save first before the values are properly handled).
However, this is only part of the story. If you want not only the filters to appear
with the given display values, but also the field descriptions themselves, you
have to add the corresponding translation in the advanced function for given
field. To make things easier for you, just click on the “Get MySQL Mapping”,
copy the SQL statement and paste it into your advanced function. Voilá! (see
following figure)
Operator: depending on the type of field, various operators are shown to setup the filter. Again, special attention to date fields.
o Date option:
Equals, Not Equals, Before and After Date as well as Between,
use absolute parameters. E.g. activities on December 25th.
© AlineaSol 2015
Proprietary
Page 22 of 38
User_Guide_AlineaSol_Reports_4.4_v1
Last, Not Last, This, Not This, These, Next, Not Next act upon
relative parameters: Days(s), Week(s), Month(s), and Natural as
well as Fiscal Quarters and Years.
“This”, expects a singular parameter: Day, Month…. E.g.
This Day(s) means: Today.
“Last” looks back, not including current “time element”.
E.g. Last Month(s) 1 (note that 1 is the second
parameter), means: really last natural month. If you
change the second parameter to 2, this would mean,
“last 2 months, not including this one!”. E.g. if it is now
March, it would apply to Jan and Feb.
“These” is the same as “last”, but! It does include this
one! These Mont(s) 2, means: current one + last one.
Parameters: Depending on the operators, one or two parameters need to be
filled-in.
“Bin” icon: delete condition. Note that multiple conditions can be deleted at
the same time using the check-fields at the left of the filters.
And at this point you can create interesting reports in tabular form.
5.3
Specials
There are quite a number of options in the Administration guide (now in “readme file)
to customize your Asol Reports deployment.
You may want to play around with the CSS (available through configuration option in
“Reports”).
We will be introducing templates in the near future so that you can for example show a
percentage as a bar instead of a number, or a green check mark when the field value is
“true”, etc.
© AlineaSol 2015
Proprietary
Page 23 of 38
User_Guide_AlineaSol_Reports_4.4_v1
6
Charts
First make sure that you have selected an option including “Charts” in the “Display”
option in General Data, or else you will not be able to access the Charts section.
After setting up the basic report as described in chapter 5, we are ready to set-up a
chart.
Note that in general you will need to group by some field for Reports to figure out
where the X-axis is. Reports supports:
Detail (e.g. by month)
Group
Detail and group: you need this for stacked graphs. The Detail field will be used
as X-axis, and the Group field for stacking.
Group and Group: “same” as “Detail and Group”.
You can select the Charts engine:
NVD3: this is the default engine. Great interactive library. We have
added some enhancements and will continue to evolve this. Largest
support of chart-types, and growing. The currently supported graph
types:
o Bar chart
o Pie Chart
o Stacked Group
o Horizontal Group
o Line
o Scatter
o Stacked area
Html5: standard CRM library
Flash: standard CRM library
To start the creative journey, click on the “Add New Chart” button on the right.
Chart name: This is what will be displayed as the chart name of this chart.
Display: you can show or hide a full graph. A black-eye means it´s visible. Click
on the eye to toggle.
© AlineaSol 2015
Proprietary
Page 24 of 38
User_Guide_AlineaSol_Reports_4.4_v1
Char type: select one of the available types.
Y-axis: you will be offered an option to select any of the numerical fields that
you have added to “Fields and Filter” section.
Icons:
o Add subchart: to add a sub-chart. Currently only supported for “line
charts” (in enterprise edition). See next section for more info.
o “Options”: currently you can define your own color palette (enterprise
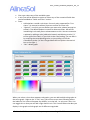
edition). The default palette is meant for discrete values. We will be
introducing in the near future enhancements to this. You can customize
a palette by adding a color (add color button) and deleting a color (“x”
to the right of the color). If you click on the color/coding, you can edit it
by entering the corresponding value, or just picking it from the
colour&hue picker (i.e. don´t forget about the hue picker: the vertical
bar on the right…)
o “Bin”: delete graph
When you select a chart that supports sub-graphs, you can add multiple sub-graphs to
the same graph. Right to the “Y-axis” entry you will see a new icon indicating where
the labels for the Y-axis will appear. By default, its to the left, i.e. only one Y-axis. You
can toggle this so that you can add a right-hand Y-axis. This is useful when the data you
display in the graph and sub-graph are of different magnitude.
© AlineaSol 2015
Proprietary
Page 25 of 38
User_Guide_AlineaSol_Reports_4.4_v1
© AlineaSol 2015
Proprietary
Page 26 of 38
User_Guide_AlineaSol_Reports_4.4_v1
7
Scheduled tasks
First make sure that you have selected an option including “Scheduled” in the “Report
type” options in General Data or else you will not be able to access the Scheduled tasks
section.
Also, make sure that both scheduling is set at your Operating System level, and that
the corresponding Scheduler entries are filled-in in your CRM (see
readme/administration guide).
To add a scheduled task, click on “add new task”.
Task-name: You can give this any name that may be useful for you.
Execution Range: with this you can select when the report should be executed.
Note that you can add more than one task, e.g. Monday and Wednesday at
8:00. You can select:
o Monthly: you will have to select then Day and time values
o Weekly: select day of the week and time value
o Daily: select time value
As of the now, you will have to fill-in an “Execution end-date”. After this date,
scheduled tasks will not longer apply.
Task-state: you can deactivate a task
“Bin” icon: deletion of task.
Note that when you schedule a report you have to define to whom the report should
be sent. See next chapter.
© AlineaSol 2015
Proprietary
Page 27 of 38
User_Guide_AlineaSol_Reports_4.4_v1
8
Distribution list
You can define a distribution list for any type or report. If it´s scheduled, the report will
be sent to all people in the distribution list automatically. If not, when you run a
report, you can use the option “send email” to send them a copy.
In the summary tab you will see who will get the report (blank in the example). You can
click on the to, CC and BCC tabs to add destinations.
You can add specific users, roles, and plain email (“distribution list” area).
In the distribution list area you can add more than one email address separated by a
“,”.
Once you select users, the full list will appear in the “summary” tab.
Don´t forget to “Save” when you make the changes!
© AlineaSol 2015
Proprietary
Page 28 of 38
User_Guide_AlineaSol_Reports_4.4_v1
9
List view Report options
In list view, you can find a number of options:
To the right of each report you will find a number of icons (these can be limited due to
access settings).
Run: this will run the report. If it´s not “Scheduled only”, the report will be
executed real-time.
Copy: to make a copy of a current report. You will go directly into edit mode.
The name of the new report will have “Copy of” pre-attached.
Edit: to edit the report
Export: individual export option.
Bin: delete.
Groups-wise, you can:
Import
Export
Delete
© AlineaSol 2015
Proprietary
Page 29 of 38
User_Guide_AlineaSol_Reports_4.4_v1
10 Running a report
10.1 Basic interaction
Reports can run automatically in dashlets, initiated from external applications,
automatically scheduled or manually by clicking on the report name in list-view (or
“run” icon).
If the report is not “Scheduled only”, the report will be executed real-time.
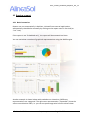
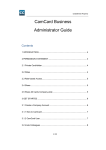
You can see below a number of graphical representations using the NVD3 engine
Another example is shown below with stacked areas. Note that 3 different
representations are supported. The right most representation (“Expanded”) show the
values normalized to 100%, i.e. you can see percentage wise how the values relate.
© AlineaSol 2015
Proprietary
Page 30 of 38
User_Guide_AlineaSol_Reports_4.4_v1
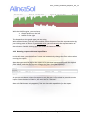
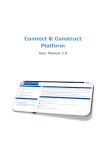
With the NVD3 engine, you can have:
Graph options on the left
Labels on the right
This depends on the graph-type you are using.
With stacked-charts, you can select and de-select elements from the representation by
just clicking once on them. If you double-click, you will see only the representation of
that element. Double clicking again will make all elements visible.
10.2 Running a report with user-input filters
In the edit-view, you can define if a user can interactively change the filter values when
running the report.
Note that you can also define the report to be executed automatically with the default
filter values, and then let the user change the filters (see filter options).
As you can see above, when the report is run, the user is first asked to provide certain
inputs. Once the data is filled-in, the user can hit “Execute”.
Note: the Edit button only appears if the user has edit capabilities for the report.
© AlineaSol 2015
Proprietary
Page 31 of 38
User_Guide_AlineaSol_Reports_4.4_v1
11 Dashlets!
We strongly recommend (not mandatory) to use AlineaSol Publish Home page to
enhance your CRM home page with multi-tab option, role control, and many more
facilities that you will really need to make those dashing dashboards.
Admin view of home page using “Alineasol Publish Home Page”:
To add a AlineaSol Report dashlet to your home-page, click on “add dashlet” and select
AlineaSol Reports.
Follow the standard Dashlet process.
© AlineaSol 2015
Proprietary
Page 32 of 38
User_Guide_AlineaSol_Reports_4.4_v1
Report Name: fill-in part of the report name you are looking for and hit search.
You can filters reports based on database and scope.
A list of reports will appear in the bottom area. Select the one you want and fill
in the “Title” for the dashlet.
Done!
Note that tabular, graphical, user-inputs, etc. are all supported in dashlets.
© AlineaSol 2015
Proprietary
Page 33 of 38
User_Guide_AlineaSol_Reports_4.4_v1
12 Report in standard CRM views
Please note that this process has changed compared to the previous documentation.
Although the previous process is still supported, we highly recommend that you use the
process described here.
You can add a report field to any view in any module (only enterprise edition).
First: go to admin section, and choose “Fields Management”. You can there define a
“Field Name” and associate this with any report (currently drop-down menu). To do so,
hit on the “+” icon to add an entry.
Hit on the “play” icon to save.
Now, go to “Studio” and you will see the “field name” that you have previously
Entered within studio, in the corresponding module.
You can now add this field to any of the views, and the reports will appear.
When the corresponding view is presented, the defined report will be executed. If you
have included this in for example “Detail view”, you probably will want to filter based
on the ID of e.g. the account. The system will automatically send the ID to the report
and will assume that there is a filter with as reference the module name, e.g.
“Accounts”.
For the names of other modules: just select the module and check in the URL of the
browser the module name used.
© AlineaSol 2015
Proprietary
Page 34 of 38
User_Guide_AlineaSol_Reports_4.4_v1
13 Creating clickable links (only Enterprise).
Alineasol Reports supports currently 2 ways of creating links in a report:
1. Through a clickable extra field/icon
2. By making an existing field clickable
Let´s use as an example a report starting from opportunities and with links to the
corresponding accounts.
13.1 Extra icon
1. Add the account ID as a field: Open “ID”, Open “Accounts”, add “ID” within
accounts.
© AlineaSol 2015
Proprietary
Page 35 of 38
User_Guide_AlineaSol_Reports_4.4_v1
Note: if instead of a module with a relationship to accounts, you start directly at
accounts, you can choose directly the accounts ID! (first level of the selection tree).
2. Select “Button” as “format” type for this field.
3. Set the properties of the icon as you desire.
a. Button type: html link
b. Choose the icon that you want to show. Sugar comes with default a set
of icons that you can reuse.
c. If you don´t choose an Icon, you have to define a Button Label. This will
be the clickable text.
d. Base URL: this is the (relative) URL that will be used to create the link.
For Sugar actions, this is always “index.php”.
e. URL Parameters: you have to add here the parameters that Sugar uses
to identify the module, type of action and the actual record. To add a
parameter click on “Add New Parameter” (**note: currently this
appears in Spanish!)
i. Note that you can change the action from EditView to e.g.
DetailView, etc. (just look at the Sugar URL bar to see the various
options available).
ii. Record will be ${this} as it is the actual ID of the account.
© AlineaSol 2015
Proprietary
Page 36 of 38
User_Guide_AlineaSol_Reports_4.4_v1
13.2 Clickable name
Making the name of the account clickable is quite similar.
1. Add the account ID as as field: see above.
2. Add a new field to the report that shows the account Name, and give it an easy
referencename, e.g. “accountName”. As you need to use this field but you
don´t want it to appear “double”, make it “transparent” (i.e. nor visible, nor
invisible)
3. Select “Button” as “format” type for the account ID field
4. Set the properties of the ID field as shown below
a. Note that instead of adding a fixed label, we are adding now a reference
to a field using PHP. The PHP function returns the account name by
referencing to the “transparent” field that we added before.
b. See here that we have chosen “DetailView” as action.
© AlineaSol 2015
Proprietary
Page 37 of 38
User_Guide_AlineaSol_Reports_4.4_v1
14 Configuration
From the main Reports menu you can configure certain elements from the report (see
also readme/admin guide for more administration options).
Date: Defined when the fiscal year starts, as well as first day of the week.
Pagination: number of entries to appear on one page (pagination can be
disabled, but be careful with that…)
PDF options: landscape or portrait. PDF scaling factor. Default recommended.
Report Retention days: after which scheduled reports will be cleaned.
Host name: in principle the right host name will be automatically filled-in.
Reports Style Sheet: various options to change the default style sheet (strongly
improved as of release 4). You can export, modify and import back for your
own private delight!
© AlineaSol 2015
Proprietary
Page 38 of 38