1
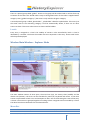
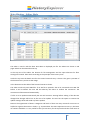
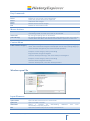
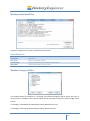
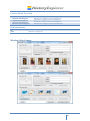
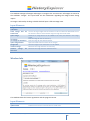
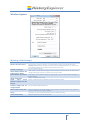
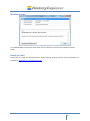
Version 1.1.11.2 December 2015 User Manual Content Thank you for using the HistoryExplorer! ............................................................................................... 4 Getting started ........................................................................................................................................ 4 Note concerning the Evaluation Phase ................................................................................................... 4 Overview of the HistoryExplorer ............................................................................................................ 4 History Chart........................................................................................................................................ 4 Acquisition of Historical Data .............................................................................................................. 5 Historical Data ..................................................................................................................................... 5 Management of the Data in Files .................................................................................................... 5 Date Values.......................................................................................................................................... 5 Categories ............................................................................................................................................ 6 Groups ................................................................................................................................................. 6 Levels ................................................................................................................................................... 7 Window Main Window – Explorer Mode ................................................................................................ 7 Menu Bar ............................................................................................................................................. 7 Detail View .......................................................................................................................................... 9 Key Commands .................................................................................................................................... 9 Mouse Actions ..................................................................................................................................... 9 Main Window – Editor Mode ................................................................................................................ 10 Input Elements of the Menu Bar ....................................................................................................... 11 Control Elements of the Table........................................................................................................... 11 Key Commands .................................................................................................................................. 12 Mouse Actions ................................................................................................................................... 12 Context Menu .................................................................................................................................... 12 Window open File.................................................................................................................................. 12 Input Elements .................................................................................................................................. 12 Window download Files ........................................................................................................................ 13 Input Elements .................................................................................................................................. 13 Window Category Filter......................................................................................................................... 13 Context Menu Treeview .................................................................................................................... 14 Bedienelemente ................................................................................................................................ 14 Window Select Image ............................................................................................................................ 14 Input Elements .................................................................................................................................. 15 Window Info .......................................................................................................................................... 15 Input Elements .................................................................................................................................. 15 www.01dilly.com/historyexplorer 2 Window Options.................................................................................................................................... 16 Meaning of the Settings .................................................................................................................... 16 Windows News ...................................................................................................................................... 17 Ready to Start!....................................................................................................................................... 17 www.01dilly.com/historyexplorer 3 Thank you for using the HistoryExplorer! This document should help you to discover all features of the software. It will give you an overview of all the functions and explains the basic concepts all the forms. Just the essential information will be provided which will be organized in user interface elements (textfields, buttons etc.), mouse actions and keypad shortcuts. Many user interface elements provide a tooltip in order to make using the HistoryExplorer as easy as possible. Do not forget to register for the HistoryExplorer Newsletter which will inform you about software and data updates. (http://www.01dilly.com/historyexplorer/support.php) Getting started With these two steps you can use your history archive: 1. Download the software as installer or zip archive and install it on your computer. You can download the software from: http://www.01dilly.com/historyexplorer/download.php 2. After installing you download the history data. Use the download function oft he HistoryExplorer. (see Window download Files) That´s it! If you already have a license key enter it now. Otherwise your evaluation phase starts now. Note concerning the Evaluation Phase The software grants you the possibility of a three days evaluation phase. After this period you will need a license key to continue using the software. During this period the software has some restrictions: „HistoryExplorer Evaluation“ will be displayed in the chart. Modified data cannot be saved. By unlocking the software with a license key you can use all the features at any time. Overview of the HistoryExplorer History Chart History data are displayed as events and timespans accurate to a second from the creation to the return of Christ. The maximum period of time ranges from 20 billion years before Christ to 20 billion years after Christ. The data can easily be categorized. With the zoom function one can navigate from overview views to timebased or topicbased details and back. The chart can be designed even appealing by adding images. Data can be easily combined from different files. The chart can be exported and included in other documents. www.01dilly.com/historyexplorer 4 Acquisition of Historical Data Data are organized in different files. The HistoryExplorer can use XML and XLS files. Data can be downloaded by the HistoryExplorer. Files can be created by you. Everyone can collect his own data and share it. The aim is to build up a huge historical database! Historical Data Historical data are organized as events and timespans. An earthquake, a battle, a birth, a death etc. are samples for events. The lifespan of a man, an age, a reign etc. are samples for timespans. The difference is that events are defined by one date where timespans are defined by end and start date. Management of the Data in Files The data are stored in data files. The HistoryExplorer can load XML and XLS files. The preferred format is XML. Both formats must fulfill the requirements of the HistoryExplorer. The HistoryExplorer can open many files at one time. All the files have to be located in one folder. All opened files will be displayed in the historical chart but every file will be edited separately. Therefore you can add your personal data to every collection of data. Date Values Date values are the basis for the HistoryExplorer. There is some interesting information concerning the date values. The valid values range from 20 billion years before Christ to 20 billion years after Christ. The smallest unit is one second. Every date value consists of three components: Date string defines the point of time in a certain calender, e. g. 21.3.2014 Calendar defines the calendar system, e. g. after Christ Reliability defines how exact the point of time is known, e. g. unexact The date string consists of day, month, year, hour, minute and second. Not all parts need to be provided. The following formats are possible: Year (e. g. 1492) Day.Month.Year (e. g. 12.10.1492) Day.Month.Year Hour:Minute (e. g. 12.10.1492 13:00) Day.Month.Year Hour:Minute:Second (e. g. 12.10.1492 13:14:30) For the date parts the following values are valid: Day: 1 to 31 Month: 1 to 12 Year: 1 to 20000000000 (20 billion)1 Hour: 0 to 23 1 20 billion years are sufficient to build a Big Bang Modell or similar models. The point of time of the Big Bang is estimated with 13.8 billion years before Christ. www.01dilly.com/historyexplorer 5 Minute: 0 to 59 Second: 0 to 59 The Calendar defines how the date string should be understood. Today we are using the Gregorian Calendar. Date values are associated to the birth of Christ. We call it a year before or after Christ. The HistoryExplorer is a tool to explore Bible history. Therefore it deals with two more calendar systems, one is based on creation and the other one is based on the return of Christ. The valid values for calendar are: before / after Christ, before / after Creation, before / after return of Christ. The HistoryExplorer uses abbreviations if required. The reliability defines how exact the point of time is known. Three values are possible: exact, inexact and estimated. Exact defines a date which is exactly known. Inexact defines a date which approximately known. Estimated defines a date which is just estimated. Hint: If not all parts of a date value are provided e. g. just the 1492 year is provided the value is not very accurate because one year reaches from 1st January to 31st December. The software has to decide how to present a certain date. For this purpose there are two rules: Events and the beginning of a timespan: The earliest possible point of time is assumed. For this example it would mean 1.1.1492 0:00:00 End of timespan: The latest possible point of time is assumed. For this example it would mean 31.12.1492 23:59:59 This can lead to overlaps of timespans if one ends in a certain year and the other one starts in this certain year. Both will cover this year. To avoid this one has to provide more exact date values. Special date values can be used with the software. These are: today: This value represents the start of the current day now: This value represents the current second Categories The historical data are organized in categories. Categories are structured in a hierarchy. This leads to a clearly arranged chart and makes navigation through the data easy. Every category has a name, e. g. “Roman Empire”. A Category can have child categories, e. g. “Iron Age” or “Republic”. To identify a category the name of the parent category will be put in front of the category’s name. The names will be separated by a “.”. If a category’s name contains a “.” it can be put in brackest “[…]“. Here are the full names of the examples: Roman Empire Roman Empire. Iron Age Roman Empire. Republic Groups Historical data can join a group. Groups are not hierarchically structured. All members of a group are painted with the same color in the chart. If the entry’s group name is equal to the full name of a category the entry is painted in the same color like the category’s members. www.01dilly.com/historyexplorer 6 There is a special group called “global”. Entries in this group will be marked with a red line from top to bottom in the chart. This should make it easy to show global events. If this value is supplied with a category name („global:<category>“) the event is only valid for the given category. A second special group is called „placeholder“. „placeholder“ identifies a placeholder. If the entry has the same name as the containing category it will be automatically shown, if there are no other entries to show. If there are other entries to show it will be hidden. Levels Every entry is assigned to a level. The visibility of entries is also controlled by levels. A level is identified by a number. The lower the number the more important is the entry. Entries with level 1 will always be displayed. Window Main Window – Explorer Mode The main window consists of three parts, the menu bar (top), the history chart (middle) and the details area (bottom). The chart can be controlled by menu bar, keyboard and mouse. In the chart events are presented as little cross and timespans as bars. Left to the drawing the name of the entry is shown. The entries are grouped together according to their categories and surrounded by a frame. The detail area shows the details for the selected event. Menu Bar Name of the Current Top left the name of the current file is displayed. www.01dilly.com/historyexplorer 7 File open File Import Messages edit save Opens the window to open a file. Shows information concerning loading the data, e. g. duplicate entries. Opens the editor. Saves the current file. Redraws the chart. The chart will be automatically redrawn if a display or filter setting changes. Savest he current chart as image (PNG file). The image will be an exact copy of the display. Shows or hides all images that are assigned to the historical data. All data will be searched for the given term. The search will be started by pressing enter. All hits will be marked in the chart using a yellow or orange frame. This text will be shown at the bottom of the chart. If no text is provided the title will be determined by the viewed timespan. show export show Images search Chart Title The displayed period of time will be shortened, for example if the period of time reaches from 570 after Christ to 2014 after Christ will it be shortened to 714 after Christ to 1869 after Christ. The displayed period of time will be expanded. The displayed period of time will be moved towards the past, for example if the period of time was 714 after Christ to 1869 after Christ it will be moved to a period from 570 after Christ to 1725 after Christ. The displayed period of time will be moved towards the future. The next level will be displayed, more details will be shown. One level will be hidden, less details will be shown. All zoom settings will be rested. Zoom Time + Zoom Time Zoom Time < Zoom Time > Zoom Level + Zoom Level reset 100% Drawing Area expand By default the drawing area is equal to the size of the window. Expanding the drawing area makes it larger. |< >| Drawing Area reduce Reduces the drawing area until it reaches the windows size. >| |< Filter reset from Inputfield Calendar to Inputfield Calender Level Selection Resets the filter settings. and Set the date value “from” for the filter. Only historical data are displayed that Categories took place after the time value “from”. Sets the date value “to” for the filter. Only historical data are displayed that took place before the time value “to”. All entries that belong to a level which number is equal or less the given number are displayed. Opens the window to select categories to be displayed. Info Options Help News Opens the Info window. Opens the Options window. Opens this document. News concerning this software, data files and events are shown. By clicking the and www.01dilly.com/historyexplorer 8 Pin News window will open. With the pin the menu bar can be displayed permanently. Detail View Tabs Tab Links Image The tabs show information concerning the event. A “*“ is shown next to the tab’s name if there is information available. The tab „Links“ contains links which are assigned tot he event and buttons to search for information at google, youtube or wikipedia. Clicking at the image will display the image in a larger version. Key Commands ↑ ↓ ← → Page Up Page Down + Return Escape The displayed period of time will be shortened, for example if the period of time reaches from 570 after Christ to 2014 after Christ will it be shortened to 714 after Christ to 1869 after Christ. The displayed period of time will be expanded. The displayed period of time will be moved towards the past, for example if the period of time was 714 after Christ to 1869 after Christ it will be moved to a period from 570 after Christ to 1725 after Christ. The displayed period of time will be moved towards the future. The next level will be displayed, more details will be shown. One level will be hidden, less details will be shown. By default the drawing area is equal to the size of the window. Expanding the drawing area makes it larger. Reduces the drawing area until it reaches the windows size. All zoom settings will be rested. All zoom settings will be rested. Mouse Actions Click on an Event Show or Hide Details Doppleclick left Doppleclick right Select Move Shows the detail view for the selected event. When the mouse pointer moves over a category the buttons will be shown. By clicking the “-“ less details are shown, by clicking the “+” more details are shown. Showing and hiding of elements is based on the levels assigned to the elements. If the buttons are shown a double click with the left mouse buttons shows more details. If the buttons are shown a double click with the right mouse buttons shows less details. By clicking with the left mouse button at a certain point of the chart, holding the mouse button and moving the mouse pointer a time area is selected. The selected time span will be shown blue. If one clicks in the selected area the HistoryExplorer zooms to the selected time span. By clicking with the right mouse button at a certain point of the chart, holding the mouse button and moving the mouse pointer will move the chart. www.01dilly.com/historyexplorer 9 Main Window – Editor Mode The editor is used to edit the data. One editor is displayed per file. The editors are shown in tab pages which can be selected at the top. In the top area of the editor the buttons for file management and the input elements for filter settings are located. These work according to the principle of the history chart. Under the top area the detail view for the current historical entry is shown. This gives a preview of the historical entry and to set the image. In the bottom area the table of the historical entries is shown. The editor works only with XML files. If an XLS file is opened it has to be converted to an XML file before it can be edited. The user will be asked by the editor to confirm the conversion. The conversion will be executed automatically. If a file is set to update automatically the user will receive a warning before editing. If the data are changed the changes will be lost in the case of an update. The user has the option to remove the update settings which will avoid any future update. Note on the organization of data in categories and levels: If there are many entries for one area it is helpful to organize the entries in levels, e. g. 10, 20 and 30. The more important an entry is, the lower its number should be. It is very useful to have just one entry for the top level with the same name as www.01dilly.com/historyexplorer 10 the category which represents the category. If one zooms to an overview only the top entry is shown. If one zooms to detail the whole area unfolds. Input Elements of the Menu Bar back to Chart open File add new File save all Options Info Changes back to chart mode. Opens the window to open a file. If a whole folder is opened a further file can be added. Saves all open files. Opens the window to set the options. Opens the Info window. save save as … File Details revert Saves the file. Saves he file with a different name. Opens the window for file details. This window is used to set additional information for the file. This information can be provided optionally. This information contains: Content Publisher License Date of Creation or Second Coming of Christ: This settings are if supplied compared with the programm settings. In case of inequality a hint is displayed. For the generation of the chart always the program settings are used. Basis URL für Aktualisierung: Dieser Wert wird vom HistoryExplorer Team bei einer Veröffentlichung der Datei gesetzt. Version Language Creates a ZIP File which you can send at [email protected] to publish it. Ignores all changes and reloads the file. Filter Settings Text see Main Window – Explorer Mode Searches the text in all the items. Item Details see Main Window – Explorer Mode. Additionally to the Explorer mode the data can be changed here. Opens the window to select an image for the current entry. publish File select Image Control Elements of the Table ↑ ↓ + X add new row Moves the selected rows to the next higher position. If the selected rows are not in one block they will be moved to form one block starting with the first row. Moves the selected rows to the next lower position. If the selected rows are not in one block they will be moved to form one block ending with the last row. Adds one row before the current row. Deletes the current row or the selected rows. At the end of the table there is always a new row. Editing the new row will add it to the data set. www.01dilly.com/historyexplorer 11 Key Commands Ctrl C Ctrl X Ctrl V Ctrl Z Ctrl Y Del Copies the current row or the selected rows. Deletes the current row or the selected rows. Inserts the copied rows from the clipboard. Undoes the last changes. Redoes the last undone changes. Deletes the content of the cells. Mouse Actions select row select cell pull and copy By clicking at the left border oft he table whole rows can be selected. Pressing and holding of SHIF Tor CTRL more rows can be selected. By clicking and pulling cells can be selected. By clicking and pulling cells can be selected. If the selection covers more rows the content of the cells where the selection started will be copied to all other cells. Context Menu Table Column Category Clicking with the right mouse button opens a window to change the category’s name. The name will be changed in all displayed rows. If only a leading category’s name should be changed only this name should be provided. Example: current category: History.Israel.Kings Kings should be changed to Kingdom old name: History.Israel.Kings, new name: History.Israel.Kingdom Example: current category: History.Israel.Kings Israel should be changed to Palestine old name: History.Israel, new name: History.Palestine Window open File Input Elements new File open Folder open File download OK Opens a new file. Opens all XML and XLS files of a certain folder. Opens one XML or XLS file. Opens a window for downloading additional www.01dilly.com/historyexplorer. Opens the selected entry of the recently opened files list. www.01dilly.com/historyexplorer 12 files from Window download Files Using this window one can select, download and open files. Input Elements List of Files Download all / none select Folder download for Shows the list of available files. By setting the marker the file is selected for download. Selects or deselects all files. Selects the folder to store the downloaded files to. Downloads the files and opens them. Window Category Filter This window shows all categories in a treeview. The selected categories will be shown the chart. A context menu is available in the treeview which can be opened by clicking at it with the right mouse button. If a category is deselected all subcategories will be deselected as well. If a category is selected all supercategories will be selected as well. www.01dilly.com/historyexplorer 13 Context Menu Treeview + X + - Select Subcategories Deselect Subcategories Expand Subcategories Select Supercategories Deselect Supercategories Selects this category and all subcategories. Deselects this category and all subcategories. Expands this category and all subcategories. Selects this category and all supercategories. Deselects this category and all supercategories. Bedienelemente all none Selects all categories. Removes all categories. Window Select Image www.01dilly.com/historyexplorer 14 This window manages all Images and assigns an image to the current event. All images are stored in the subfolder “images”. The input fields set the information regarding the image license during import. An image is selected by clicking. A double click will open a full size image view. Input Elements Image Size Inputfield Defines the display size of the image in the chart. and Slider Limit Image Size for The size of large images will be reduced in order to reduce the download size of the historical data. If unchecked the original image size will be used. Detailview Searches an image which can be added to the entry and stored in the image open Image set Image set Image for Selection open Image Folder Image Info remove Image remove Image for Selection cache. Sets the image for the current entry. Sets the image for the selected entries. Opens the folder which contains all the images. Here the image license information can be edited. Removes the image from the current entry. Removes the image form the selected entries. Window Info This window shows the license agreement and the program version. Input Elements update Software update Data Downloads an new software version and installs it Downloads new versions of the data files and installs them. www.01dilly.com/historyexplorer 15 Window Options Meaning of the Settings Creation (est.) Return of Christ (est.) Sets the point of time for which it is assumed that the creation took place. Sets the point of time for which it is assumed that the return of Christ will take place. Warning: Nobody knows the date of the return of Christ (Mk 13:32, Acts 1:7). This value is a personal assumption and enables the generation of the chart. Sets the display language. If this option is set for every category a frame is shown in the chart. If it is not set for every category which just contains one element no frame is shown. Display Language Show always Panels for Categories in Chart Show Border for Panels If this option is set a frame is shown for every panel. If it is not set the panels will appear a show Time Scale show Time Scale before Creation and for Future Default Image Size for Image Import Max. Export Image Size Fonts enter License Key little bit darker. Shows or hides the time scale. Shows or hides the time scale before creation and for the future. Sets the default display image size. Sets the maximum size of the image to export to file in thousand pixels. If the graphic to export exceeds this size it will be splitted. Clicking in one of the textfields will open the font selection dialog. Opens a window to enter the license key. www.01dilly.com/historyexplorer 16 Windows News This window displays all current news. Here you can subscribe to receive the newsletter also by email. Ready to Start! Thank you for using the HistoryExplorer! Enjoy zooming through history! Actual information is available at www.01dilly.com/historyexplorer. www.01dilly.com/historyexplorer 17