1
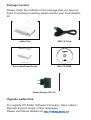
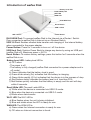
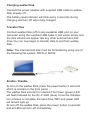
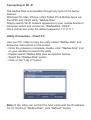
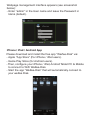
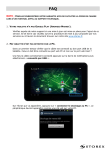
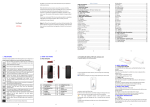
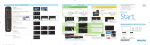
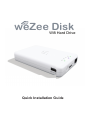
weZee Disk
Wifi Hard Drive
Quick Installation Guide
Package Content
Please check the contents of the package that you have on
hand. If anything is missing, please contact your local distributor.
weZee Disk
USB 3.0 Cable
weZee Disk
Wifi Hard Drive
Guide d’installation rapide
Quick Installation Guide
Mini CD-ROM
Power Adapter (5V-1A)
Upgrade weZee Disk
For upgrade PC & Mac Software/ Firmware / Appli¬cations /
Manuals & Quick Guide / Other languages...
Please visit Storex Website at:
Introduction of weZee Disk
Battery Level LED
Read / Write LED
WIFI LED
WAN LED
RJ45 WAN Port
Reset Button
USB 3.0 Port
USB 3.0 Port
Power Button
RJ45 WAN Port: To connect weZee Disk to the Internet via a Router / Switch.
Pour connecter le weZee Disk à Internet via un Routeur/Switch
USB 3.0 Port: Enables ultrafast data transfer and charging of the internal battery
when connected to the power adapter.
Power Button: Press for 3 seconds to turn on / off the device.
USB Host Port: Fashion Power Bank to charge any device by using an USB port
(weZee Disk off), Maximum power = 5V/1A
Reset Button: To restore factory settings, press this button for 5 seconds when the
weZee Disk is on.
Battery Level LED: battery level LED is:
a) OFF when:
- The power is off.
- The battery is fully charged (weZee Disk connected to a power adapter and in
off mode).
b) Green indicates that the battery level is good.
c) Green blinks slowly (2s) indicates that the battery is charging.
d) Green blinks rapidly (0.5 s) indicates that the device is in the process of stop.
e) Red flashes slowly indicates the battery level is of less than 30%.
f) Red flashes quickly indicates that the battery is empty and the unit will stop
within 6 seconds.
Read / Write LED: The read / write LED is:
a) White when the device is connected via USB 2.0 mode.
b) Blue when the device is connected via USB 3.0 mode.
c) Blinks when data transfer.
Wi- Fi LED:The Wi-Fi LED is:
a) Blue flashes when the unit is being initialized.
b) Blue and stable when the WiFi is ready for use.
WAN LED: The WAN LED is:
a) Green when the Internet connection is ready for use.
b) Off when no Internet connection is found.
Charging weZee Disk
Connect the power adapter with supplied USB cable to weZee
Disk already off.
The battery level indicator will blink every 2 seconds during
charging and turn off when fully charged.
Transfer files
Connect weZee Disk (off) to any available USB port on your
computer using the supplied USB cable. It just works simply and
the disk volume will appear like any other external hard disk
drive. You can now begin to transfer data to and from weZee
Disk.
Note: The internal hard disk must be formatted by using one of
the following file system: NTFS or FAT32.
Enable / Disable
To turn on the weZee Disk, press the power button 3 seconds
which is located on the front panel.
The weZee Disk will start to initialize. The Power (green) LED
will flash followed by the Wi -Fi LED (blue). Once the initialization process is complete, the hard drive, WiFi and power LED
will remain light up.
To turn off the weZee Disk, press the power button 3 seconds
and all LEDs will turn off immediately.
Connecting to Wi -Fi
The weZee Disk is accessible through any type of the below
devices:
Windows PC, Mac, iPhone / iPad, Tablet PC & Mobile Apps via
the APPs and Client utility "WeZee-Disk"
Simply search Wi-Fi network appeared on your mobile device or
computer, select and connect to "WeZeeDisk -XXXX".
Once connected, enter the default password: 11111111.
Utility Connection - Client PC
Use your PC / Mac to copy the utility called "WeZee-Disk" and
follow the instructions on the screen:
- Once the process is complete, double -click "WeZee-Disk" icon
on your desktop to launch the utility.
- Please search WeZee Disk (see screenshot below).
- Select the "WeZee-Disk" option.
- Click on the "Log in" button.
Note: If the utility can not find the host name and the IP address
10.10.10.254 of "WeZee-Disk", click "Refresh" button.
Webpage management interface appears (see screenshot
below):
- Enter "admin" in the User name and leave the Password in
blank (default).
iPhone / iPad / Android App
Please download and install the free app "WeZee-Disk" via:
- Apple "App Store" (For iPhone / iPad users).
- Goole Play Store (for Android users).
- Then, configure your iPhone / iPad, Android Tablet PC & Mobile
to connect to WiFi WeZee-Disk.
- Start the app "WeZee-Disk" that will automatically connect to
your weZee Disk.
Activate Application on iPhone & iPad
Note: The WeZee Disk application integrates its own media
player that decodes all types of video formats
- You have 30 days to authenticate and register your WiFi Disk
online by following the process below. After this time, the
implementation of WeZee Disk Video decoding will be disabled.
- If you want to reactivate this video decoding, please follow the
process referred in the manual.
After downloading the free application "WeZee -Disk" via Apple
App Store and install on your iPhone or iPad.
1) Please connect the RJ45 cable from your router to the RJ45
port on your WeZee-Disk so that it can access the Internet.
2) Make sure the Internet WAN LED is light (Green).
3) Please connect your iPhone or iPad to WiFi network via your
weZee Disk.
4) Please now start playing a video on your iPhone or iPad to
activate decoding media player of WeZee-Disk.
For any technical support or repair, please contact Technical
Support via the following address:
support.fr @ storex.eu
STOREX guarantee is valid for 1 year for the device and 3
months for accessories (power supply, CPL...).
STOREX guarantees your products against any manufacturing
or assembling faults. This guarantee only applies to the first
purchase of the device by the end user and is not transferable if
the device is resold. This warranty does not cover any incompatibilities found by end user apart from recommendations
specified on the packaging, or any other incompatibility generated by other hardware or software on the computer that is
connected to the device.
The guarantee doesn’t cover failures or defects induced by
non-compliance to this manual’s instructions, neglect, alteration,
improper installation or maintenance, improper tests, accident or
external factor such as excessive heat, humidity or power
failures of the device.
The only contractual obligation endorsed by STOREX pertains
to the reparation or replacement of a defective product.
This guarantee is well defined and cannot be modified,
decreased or increased without written consent from STOREX.
This warranty covers only your device and is governed by
French law.
Note: STOREX reserves the right to modify the user manual
according to the development and updates of the product
without prior notice.
is the registered mark of STOREX.