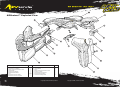
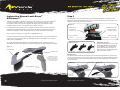
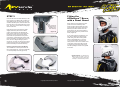
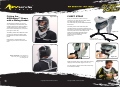
1
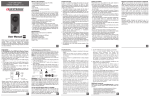
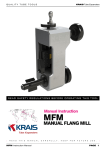
™
USER MANUAL
www.leatt-brace.com
USER MANUAL
Motor Sports and racing can be dangerous. Participation in these activities can result in
severe brain, head and neck injuries which may result in paralysis or death. Although the
Leatt-Brace® is designed to help reduce the risk of such injuries, there is no guarantee
that any injury will be prevented by the use of this or any other safety equipment. Read all
instructions prior to use. Before putting on your Leatt-Brace® each time, please review and
comply with the following cautions and instructions below.
The Leatt-Brace® cannot protect against all possible impacts and/or injuries. Although the Leatt-Brace® is
designed to help reduce the risk of such injuries, there is no guarantee that any injury will be prevented by the use of
this equipment. Perform any motor sport activity with caution and use/wear appropriate safety equipment.
For maximum performance, the Leatt-Brace® must be properly fitted and attached according to the instructions in
the user manual. It is recommended that this product be used only in conjunction with a full-face helmet. Use at your
own risk.
For maximum performance, the Leatt-Brace® must be inspected prior to each use. STOP using the Leatt-Brace®
if any components show signs of damage or are worn, cracked, and/or deformed, or if the inside padding is
deteriorated. Leatt® Corporation recommends that the Leatt-Brace® be replaced every two 2 years under
normal racing conditions.
Should you experience a collision or if the Leatt-Brace® or any component shows any signs of damage, cracking,
deformity and/or the inside padding is deteriorating, return the Leatt-Brace® to the seller for inspection or destroy
and replace the Leatt-Brace®.
Leatt-Brace® ADVenture™
Table of Contents
•
ADVenture™ Brace Exploded View .......................................... Page 03 - 04
•
Instruction Manual Introduction ................................................. Page 05
•
Brace Fitment
Common substances applied to this brace (solvent, cleaners, hair tonics, etc.) can cause damage that may be
invisible to the user and compromise the effectiveness/safety of the Leatt-Brace®. Wash only with gentle soap or
detergent in cold water, rinse in cold water and dry with a soft cloth.
•
Fitment and Adjustment of Pins .......................................... Page 06
•
Padding Inserts ................................................................... Page 07
Do not drill holes, paint, cut, heat, bend, apply decals or stickers, or make any other modifications to the
Leatt-Brace® unless authorized in advance by the Seller. Doing so may compromise the effectiveness/safety of the
Leatt-Brace®.
•
Strut and Thoracic Assembly .............................................. Page 08 - 09
The brace has been tested using various static and dynamic tests, but has not been tested on riders under race
conditions for instrumented impact assessment; this product is of a new design.
•
Opening and Closing your Brace ........................................ Page 09
•
Fitting the ADVenture™ Brace with a Roost Guard ............ Page 10
•
Fitting the ADVenture™ Brace with a Riding Jacket ........... Page 11
The brace has been tested on a wide range of users and vehicle types and should fit you and your vehicle, if not,
minor adjustments may be required for proper fit. Failure to properly adjust the brace before use may compromise
rider safety and brace effectiveness.
Always attach your helmet correctly according to seller’s guidelines. Ensure that all of your safety equipment has not
passed beyond its recommended life span. Travel/race with safety as your primary principle.
If you have any questions regarding this product or its proper use, please contact Leatt® Corporation at:
•
Chest Strap ............................................................................... Page 12
Leatt® Corporation South Africa
Unit 1, Kyalami Plaza, Kyalami Drive, Killarney Gardens, Cape Town, 7441, RSA
Tel: 0027 21 556 5409; Fax: 0027 21 557 3925
•
Looking after your Leatt-Brace® ..............................................
•
Indemnity and Warranty Disclaimer .......................................... Page 14
Leatt® Corporation USA
5348 Vegas Drive, #775, Las Vegas, Nevada 89108 USA
Tel: 702 447 6751; Fax: 702 447 6751
Email: [email protected]
Page 13
Copyright © 2008, Leatt® Corporation
WARRANTY DISCLAIMER
NO EXPRESS WARRANTIES WITH RESPECT TO THE BRACE OTHER THAN THOSE EXPRESSLY SET FORTH
HEREIN HAVE BEEN PROVIDED.
LEATT® CORPORATION UNDERTAKES NO RESPONSIBILITY FOR THE QUALITY OF THE GOODS EXCEPT AS
OTHERWISE PROVIDED HEREIN. LEATT® CORPORATION TAKES NO RESPONSIBILITY THAT THE GOODS
WILL BE FIT FOR ANY PARTICULAR PURPOSE FOR WHICH YOU MAY BE BUYING THE GOODS, EXCEPT AS
OTHERWISE PROVIDED HEREIN. ALL IMPLIED WARRANTIES ARE HEREBY DISCLAIMED INCLUDING THE IMPLIED
WARRANTIES OF MERCHANTABILITY AND OF FITNESS FOR A PARTICULAR PURPOSE.
01
Copyright © 2008, Leatt® Corporation
02
™
ADVenture™ Exploded View
03
Parts/Components List
QTY
1 - Adventure Front Component
2 - Adventure Front Padding
3 - Button Head Cap Screw M4 x 10mm
4 - Step Washer
5 - Hinge Lever Assembly
6 - Stainless Steel Washer
7 - Pin
8 - Adventure Thoracic Padding
9 - Adventure Thoracic Component
1
1
8
2
2
5
3 pairs
1
1
QTY
10 - Strut (10 degrees)
11 - Nylon Washer
12 - Shim
13 - Button Head Cap Screw M4 x 22mm
14 - Rivet 2,9 x 25mm
15 - Adventure Back Component
16 - Adventure Back Padding
17 - Adventure Padding Inserts
1
2
2
1
1
1
1
2
Copyright © 2008, Leatt® Corporation
Copyright © 2008, Leatt® Corporation
04
™
Instruction Manual Leatt-Brace®
ADVenture™
Step 1
Welcome to the world of Leatt-Brace® and thank you for choosing our product. The Leatt-Brace®
you have purchased is based on years of academic research, extensive evaluation of the
mechanisms of head and neck injuries, together with testing, both in test facilities and with
simulation software, and also in conjunction with top drivers and riders.
Our design philosophy has always been to produce an effective neck injury prevention device
with practical appeal as determined by our test riders. We will therefore always appreciate your
feedback with regards to comfort and practicality for your chosen application of our product.
Your ADVenture™ brace is supplied with three pairs of different sized Pins for adjustment. The
Medium Pin is fitted as standard. To begin with, fit your brace without the thoracic assembly on your
shoulders and chest as shown below in Figure 2.
Figure 2
Change Pin size
to short or long
according to fit
Brace fitted without the
thoracic assembly on
the back assembly
Please e-mail any comments you might have to [email protected].
For fitment, please follow this easy fitment guide. The size of brace you have purchased should be
correct for your body shape and allows for adjustability to ensure correct fitment and comfort no
matter what your application is.
The Leatt® ADVenture™ Brace (Figure 1) has been designed to be set up in stages to suit your
requirements. Please follow the fitment process which should take you about 20 minutes to complete.
Ensure comfortable
fit to chest
Ensure comfortable
fit to shoulders
Figure 3: Pin sizes
Figure 1
Front Assembly
Back Assembly
Please note: The product
shown may vary in colour. Brace
components are illustrated in
contrasting colours to indicate
individual identification.
Long Pin (20mm)
Medium Pin (10mm)
Short Pin (0mm)
Adjustment with Pins
If the brace is too loose around your neck
with the fitted Medium Pin and does not
sit comfortably on your shoulders and
chest, fit the Short Pin (see Figure 3).
If the brace is too short and therefore too
tight, simply fit the Long Pin.
Fitting the Pins
Unscrew the 2 Buttonhead Cap Screws (see Figure 4a) with the supplied Allen key. Slide the Pin
out once the Cap Screws are removed (see Figure 4b) and replace by sliding the desired Pin back
in the same way. Now screw in the 2 Buttonhead Cap Screws with its washers in place to secure
the newly fitted Pin.
Figure 4a:
Back Assembly
Figure 4b:
Thoracic Assembly
Buttonhead
Cap Screws
Fitted
Medium Pin
05
Copyright © 2008, Leatt® Corporation
Copyright © 2008, Leatt® Corporation
Slide Pin in or out
in this direction
06
™
PADDING INSERTS
When the 10 and 20mm Pins are used, fit the
supplied Padding Inserts (Figure 5a) to cover the
longer exposed Pins.
STEP 2
Figure 5a
Figure 6
Now attach the strut onto the thoracic
assembly as shown in Figure 6. You
have been supplied with a 10 degree
strut and a 7 degree wedge.
Padding Inserts and Padding join together with
Velcro®. (Figure 5b &5c)
Velcro®
We recommend that you start with the
standard 10 degree strut (Figure 6a.)
This is the most commonly fitted strut
for average sized riders.
strips
Figure 5b
Padding surface adjacent to neck
M4 Cap Screw
fastening strut to
thoracic assembly
Thoracic
assembly
7 Degree Wedge
Slender riders can insert the 7 Degree
Wedge upright between the thoracic
assembly and the strut (Figure 6b).
Larger riders can in turn invert the
7 degree wedge for a larger fit.
Velcro®
inner surface
Strut locates
into back
assembly
Figure 6b
Upright position of the
7 degree wedge
Figure 6a
10 Degree Strut
locates into
back assembly
Figure 5c
M4 (10mm) Cap
Screw fastening
strut to thoracic
assembly
M4 (12mm) Cap
Screw fastening
strut to thoracic
assembly
M4 (18mm)
Cap Screw
1
07
Insert padding this way
2
7 Degree Wedge
added between
strut and thoracic
assembly
End result
Copyright © 2008, Leatt® Corporation
Copyright © 2008, Leatt® Corporation
08
™
STEP 3
Insert the strut into the back assembly of the
brace (Figure 7a), starting with one Shim on
either side (Figure 7b) of the strut. The strut
and Shim will always be contained within the
brace so that you can adjust the brace at any
time. There is no need to fit the Locking Cap
Screw at this time.
Now refit the brace. If the brace is pulled
slightly backward, place the two Shims
(Figure 7b) before the strut (towards the
front portion of the brace), if the brace has
become too loose, place the two Shims
behind the strut (towards the back portion
of the brace). If the lowermost portion of the
thoracic assembly is located away from your
back, use the 7 Degree Wedge. (refer to
Figure 6b). You may now secure the Locking
Cap Screw (see Figure 7a) that fastens the
thoracic assembly to the back assembly.
Fitting the
ADVenture™ Brace
with a Roost Guard
Locking Cap Screw
fastening thoracic
assembly to the
back assembly
Figure 7a
Figure 7b
Shims
Opening and Closing the Leatt-Brace®
The Leatt-Brace® can be opened from the
left or right (Figure 8a), or the front assembly
can be completely removed (Figure 8b).
Figure 9a
When wearing a roost guard, the lower
portion of the front assembly of the
brace should be placed inside the roost
guard and the upper portion of the front
assembly should be outside the roost
guard (Figure 9a). The same applies to
the back upper and lower portions of the
brace (Figure 9b).
Roost Guard
If your roost guard is a smaller size, you
may have to widen the head opening
of the roost guard. Most roost guards
allow for this adjustment. In the case
of very small children, allow the front
lower portion to rest on the outside of the
roost guard. Some junior riders choose
to remove the hard outer portion of the
shoulder padding from their roost guards
for comfort.
Figure 9b
Figure 9a & 9b: Your ADVenture™
Brace may be worn under or on top of
Roost Guard as long as the thoracic
assembly is under the back protector.
Figure 8a
09
Roost Guard
Figure 8b
Copyright © 2008, Leatt® Corporation
Copyright © 2008, Leatt® Corporation
10
™
Fitting the
ADVenture™ Brace
with a Riding Jacket
Figure 10a
CHEST STRAP
Once your Adventure™ Brace is set up
correctly to your body size and shape, attach
the chest strap (see Figure 11a).
The chest strap can provide additional stability
and comfort.
The ADVenture™ Brace can be worn
very comfortably and unobtrusively with
a Riding Jacket. When wearing a Riding
Jacket with the brace, ensure that the
brace rests comfortably over your jacket
(see Figure 10a & 10b).
The back portion of the Chest Strap has
controlled stretch and should be attached with
the Velcro® on the thoracic assembly (Figure 11b).
The front portion of the Chest Strap has no
stretch and should be attached with the
Velcro® on the underside of the lower
portion of the front assembly
(Figure 11c).
The Riding Jacket will be difficult to close
properly if an attempt is made to wear
the ADVenture™ Brace underneath the
jacket.
Figure 11a
Fastening clip with
adjustable tension strap
Refer to Step 1 to adjust the fit and
comfort of your brace on the chest and
back.
Figure 10b
Figure 10a & 10b: Your ADVenture™
Brace may be worn comfortably over
your Riding Jacket.
Figure 11b
Fasten the plastic clips on each side of the strap by
clipping one into the other (Figure 11a & 11c).
Figure 11c
Figure 11d
You can tighten or loosen the excess tension strap
for comfort and stability.
11
Copyright © 2008, Leatt® Corporation
Copyright © 2008, Leatt® Corporation
12
™
LOOKING AFTER YOUR LEATT-BRACE®
You may want to wash your Leatt-Brace® after hard riding. The brace and integrated padding can
be washed with a gentle soap or detergent in cold water, rinsed in cold water and dried with a cloth.
Common substances applied to this brace [solvent, cleaners, hair tonics, etc.) can cause damage
that may be invisible to the user and compromise the effectiveness/safety of the Leatt-Brace®.
For maximum performance the Leatt-Brace® must be inspected prior to each use. Stop using the
Leatt-Brace® if any of its components, including but not limited to, the Front Component, Hinge
Lever Assembly, Pins, Strut, Nylon Washers and/or the Back Component (See Parts/Components
List on page 3) are worn, cracked and/or deformed, or if the inside padding is deteriorated.
We wish you many safe hours of enjoyable racing and riding with your Leatt-Brace®. Please do not
hesitate in contacting us with any questions or comments at [email protected].
We recommend that you replace your Leatt-Brace® every two years of normal use and replace any
components that are damaged in a serious accident.
INDEMNITY
As a condition of purchase/receipt of the Leatt-Brace®, the user has fully read and understood the User
Manual and understands that although the brace is desgined to help reduce brain, head and neck injuries
when worn in conjunction with a full-faced helmet, there is no guarantee that any injury will be prevented
by the use of the brace. Each brace must be set up for the individual user and be of the correct size and fit.
As a condition of purchase and/or receipt of the Leatt-Brace®, the user has read and familiarized himself/herself
with the technical aspects, research and test results relating to the Leatt-Brace® provided at Leatt® Corporation’s
website (www.leatt-brace.com) and understands the nature of the brace and its intended use and correct fitment.
As a condition of purchse and/or receipt of the Leatt-Brace®, the user understands and recognizes that the brace
has not been tested on humans in race conditions for instrumented impact assessment and that this is a new
design.
Should you not wish to accept the terms of this Indemnity, please return the Leatt-Brace®.
Always attach your helmet correctly according to manufacturer’s guidelines, ensure all your safety equipment has
not passed its recommended lifespan and travel/race with safety as an important principal.
As a condition of purchase and/or receipt of the Leatt-Brace®, the user waives any claims against Leatt®
Corporation, the inventor, manufacturer, any subcontractor, agent or Global Distributor. Leatt® Corporation, the
inventor, manufacturer, any subcontractor, agent of Global Distributor will under no circumstances be liable to any
person for any damages, direct, indirect, bodily or otherwise including injury or death, that may be sustained by
any person as a result of the use of the Leatt-Brace®, any alleged defect therein or its alleged failure to afford the
protection offered by it or for any consequential loss of profits or damages suffered by any person, however such
loss or damage may arise or for any other reason of from any other circumstances of whatsoever nature.
Leatt® Corporation (South Africa)
Unit 1, Kyalami Plaza, Kyalami Drive, Killarney Gardens, Cape Town, 7441, RSA
Tel.: 0027 21 556 5409; Facsimile: 0027 21 557 3925
Leatt® Corporation USA
5348 Vegas Drive, #775, Las Vegas, Nevada 89108 USA
Tel.: 702 447 6751; Facsimile: 702 447 6751
Email: [email protected]
WARRANTY DISCLAIMER
NO EXPRESS WARRANTIES WITH RESPECT TO THE BRACE OTHER THAN THOSE EXPRESSLY SET FORTH
HEREIN HAVE BEEN PROVIDED.
LEATT® CORPORATION UNDERTAKES NO RESPONSIBILITY FOR THE QUALITY OF THE GOODS EXCEPT AS
OTHERWISE PROVIDED HEREIN. LEATT® CORPORATION TAKES NO RESPONSIBILITY THAT THE GOODS
WILL BE FIT FOR ANY PARTICULAR PURPOSE FOR WHICH YOU MAY BE BUYING THE GOODS, EXCEPT AS
OTHERWISE PROVIDED HEREIN. ALL IMPLIED WARRANTIES ARE HEREBY DISCLAIMED INCLUDING THE IMPLIED
WARRANTIES OF MERCHANTABILITY AND OF FITNESS FOR A PARTICULAR PURPOSE.
13
Copyright © 2008, Leatt® Corporation
Copyright © 2008, Leatt® Corporation
14
CONTACT DETAILS
Postal Address:
Suite 109, Private Bag X3
Bloubergrant, 7443, South Africa
Copyright © 2008, Leatt® Corporation
Leatt-Brace® ADV02/08
Leatt® Corporation, South African Branch
Unit 1, Kyalami Plaza, Kyalami Drive
Killarney Gardens, Cape Town, 7441, South Africa
Tel: +27 21 556 5409, Fax: +27 21 557 3925
Email: [email protected]
Website: www.leatt-brace.com