1
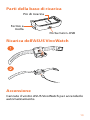
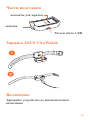
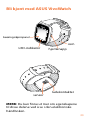
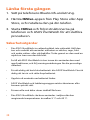
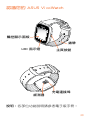
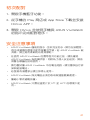
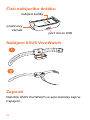
/ H e a l t h c a r e
User Manual
Index
English...................................................................................................... 3
Françis....................................................................................................... 6
Deutch...................................................................................................... 9
Italiano..................................................................................................... 12
Español..................................................................................................... 15
Pyccкий.................................................................................................... 18
Polski......................................................................................................... 21
Nederlands............................................................................................. 24
Dansk........................................................................................................ 27
Suomi........................................................................................................ 30
Norsk......................................................................................................... 33
Svenska.................................................................................................... 36
繁體中文................................................................................................. 39
Português................................................................................................ 42
Čeština...................................................................................................... 45
Türkçe....................................................................................................... 48
2
Get to know your ASUS VivoWatch
touch screen
display panel
strap
LED indicator
sensor
home button
charging
connectors
NOTE: To know the features of these parts, refer
to the E-Manual.
3
Parts of the charging cradle
charging pins
spring lock
micro USB port
Charging the ASUS VivoWatch
Powering on
Charge your ASUS VivoWatch to automatically
power it on.
4
Pairing for the first time
1. Turn on your phone’s Bluetooth connection.
2. Download the HiVivo app from Play Store or
App Store, then install it on your phone.
3.Launch HiVivo and follow the succeeding
instructions on the phone and ASUS
VivoWatch to complete the process.
Safety precautions
•
Your ASUS VivoWatch is water-resistant, not waterproof. Keep
it dry and refrain from using it near liquids, rain, moisture, and
other sources of water or liquid. If it gets wet, wipe immediately
using a soft dry cloth.
•
Ensure that your ASUS VivoWatch is dry before using it with app
features and follow the warning labels for your personal safety.
•
Never attempt to short-circuit the battery inside your ASUS
VivoWatch. Never attempt to disassemble and reassemble the
battery.
•
Discontinue usage if leakage is found.
•
The ASUS VivoWatch and the charging cradle must be recycled
or disposed of properly.
•
Keep any small components away from children.
•
Your ASUS VivoWatch should only be used in environments with
ambient temperatures between 5°C and 40°C.
5
Présentation de votre ASUS
VivoWatch
Écran tactile
Bracelet
Témoin lumineux
Bouton Accueil
Connecteurs
Capteur de charge
REMARQUE : Consultez le manuel au format
électronique pour plus de détails.
6
Station de charge
Broches de chargement
Verrou à
ressort
Port micro USB
Charger votre ASUS VivoWatch
Allumer votre ASUS VivoWatch
Chargez votre ASUS VivoWatch pour l’allumer
automatiquement.
7
Association Bluetooth
1. Activez la connexion Bluetooth de votre
appareil mobile.
2. Téléchargez l’application HiVivo sur le Play
Store ou l’App Store, puis installez-la sur votre
appareil mobile.
3. Ouvrez l’application HiVivo et suivez les
instructions pour terminer le processus
d’enregistrement.
Precautions relatives à la sécurité
•
Votre ASUS VivoWatch offre un certain degré de résistance à l’eau
mais n’est pas étanche. Utilisez-la dans un environnement sec
et maintenez-la à distance de liquides, de la pluie ou d’autres
sources d’eau ou de liquides. En cas de contact avec un liquide,
nettoyez-la immédiatement à l’aide d’un chiffon sec.
•
Assurez-vous que votre ASUS VivoWatch est sèche avant d’utiliser
ses applications logicielles.
•
Lisez et suivez les indications de toutes les étiquettes
d’avertissements pour votre sécurité personnelle.
•
Ne tentez jamais de court-circuiter, désassembler ou
réassembler la batterie de votre ASUS VivoWatch.
•
Cessez d’utiliser votre ASUS VivoWatch si la batterie fuie.
•
L’ ASUS VivoWatch et la station de charge doivent être recyclés
de façon appropriée.
•
Gardez les pièces de petite taille hors de portée des enfants.
•
Votre ASUS VivoWatch doit être utilisée dans un environnement
dont la température ambiante est comprise entre 5°C et 40°C.
8
Ihre ASUS VivoWatch kennenlernen
TouchscreenDisplay
Schlaufe
LED-Anzeige
Sensor
Home-Taste
Ladeanschlüsse
HINWEIS: Funktionen und Merkmale dieser Teile
werden in der elektronischen Anleitung beschrieben.
9
Teile der Ladeschale
Ladekontakte
Gefederte
Sperre
Micro-USB-Anschluss
ASUS VivoWatch Auflanden
Einschalten
Laden Sie Ihre ASUS VivoWatch zum automatischen
Einschalten auf.
10
Erste Kopplung
1. Schalten Sie die Bluetooth-Verbindung Ihres
Telefons ein.
2. Laden Sie die HiVivo-App aus dem Play Store
oder App Store herunter und installieren Sie
sie auf Ihrem Telefon.
3. Starten Sie HiVivo und befolgen Sie
die Anweisungen an Telefon und ASUS
VivoWatch zum Abschließen des Vorgangs.
Sicherheitshinweise
•
Ihre ASUS VivoWatch ist wasserabweisend, nicht wasserdicht. Halten
Sie sie trocken, verwenden Sie sich nicht in der Nähe von Flüssigkeiten
und anderen Wasser- und Flüssigkeitsquellen, bei Feuchtigkeit oder
im Regen. Wischen Sie sie umgehend mit einem weichen, trockenen
Tuch ab, wenn sie nass oder feucht wird.
•
Stellen Sie sicher, dass Ihre ASUS VivoWatch trocken ist, bevor Sie sie
mit App-Funktionen nutzen; befolgen Sie die Warnhinweise zu Ihrer
persönlichen Sicherheit.
•
Versuchen Sie niemals, den Akku in Ihrer ASUS VivoWatch
kurzzuschließen. Versuchen Sie nicht, den Akku zu de-/montieren.
•
Unterbrechen Sie die Nutzung, falls der Akku ausläuft.
•
ASUS VivoWatch und Ladeschale müssen dem Recycling zugeführt
oder ordnungsgemäß entsorgt werden.
•
Halten Sie kleine Komponenten von Kindern fern.
•
Ihre ASUS VivoWatch sollte nur in Umgebungen mit einer Temperatur
zwischen 5 °C und 40 °C verwendet werden.
11
Conoscete il vostro ASUS VivoWatch
Schermo
touch
Cinturino
Indicatore LED
Sensore
Pulsante Home
Connettori
di ricarica
NOTA: Per conoscere le funzioni di queste
componenti fate riferimento all'e-Manual.
12
Parti della base di ricarica
Pin di ricarica
Fermo a
molla
Porta micro-USB
Ricarica dell'ASUS VivoWatch
Accensione
Caricate il vostro ASUS VivoWatch per accenderlo
automaticamente.
13
Prima associazione con il telefono
1. Attivate il Bluetooth del vostro telefono.
2. Scaricate l’app HiVivo dal Play Store o dall’App
Store quindi installatela sul vostro telefono.
3.Avviate HiVivo e seguite le istruzioni
sullo schermo, e sull’ASUS VivoWatch, per
completare il processo.
Norme di sicurezza
•
Il vostro ASUS VivoWatch è resistente all’acqua ma non è
impermeabile. Tenetelo il più possibile asciutto e evitate di
usarlo nelle vicinanze di liquidi, pioggia, umidità o simili. Se si
bagna asciugatelo immediatamente usando un panno morbido
e asciutto.
•
Assicuratevi che l’ASUS VivoWatch sia asciutto prima di usare
le sue funzioni e seguite le indicazioni per la vostra sicurezza
personale.
•
Non cercate mai di cortocircuitare la batteria presente all’interno
dell’ASUS VivoWatch. Non cercate mai di disassemblare e
riassemblare la batteria.
•
Interrompete subito l’utilizzo se rilevate una qualsiasi perdita.
•
L’ASUS VivoWatch e la base di ricarica devono essere riciclate o
smaltite correttamente.
•
Tenete le altre componenti di piccole dimensioni lontano dalla
portata dei bambini.
•
Il vostro ASUS VivoWatch deve essere utilizzato solamente in
ambienti con temperature comprese tra i 5 °C e i 40 °C.
14
Familiarizarse con su ASUS VivoWatch
panel de
visualización de
pantalla táctil
correa
Indicador LED
sensor
botón de inicio
conectores de
carga
NOTA: Para conocer las funciones de estas
piezas, consulte el manual electrónico.
15
Partes de la base de carga
contactos de carga
cierre con
muelle
puerto micro-USB
Cargar su ASUS VivoWatch
Encender el producto
Cargue su ASUS VivoWatch para encenderlo
automáticamente.
16
Primera asociación
1. Active la conexión Bluetooth del teléfono.
2. Descargue la aplicación HiVivo desde Play
Store o App Store y, a continuación, instálela
en el teléfono.
3.Inicie HiVivo y siga las instrucciones
posteriores sobre el teléfono y ASUS
VivoWatch para completar el proceso.
Precauciones de seguridad
•
Su ASUS VivoWatch es impermeable, no sumergible. Manténgalo
seco y evite utilizarlo cerca de líquidos, la lluvia, la humedad
y otras fuentes de agua o líquido. Si se moja, límpielo
inmediatamente usando un paño seco y suave.
•
Asegúrese de que su ASUS VivoWatch está seco antes de
utilizarlo con funciones de aplicación y siga las etiquetas de
advertencia por su propia seguridad.
•
Nunca cortocircuite la batería dentro de su ASUS VivoWatch.
Nunca desarme o reensamble la batería.
•
Deje de utilizar la batería si detecta fugas.
•
Su ASUS VivoWatch y la base de carga debe reciclarse o
desecharse correctamente.
•
Mantenga todos los componentes pequeños alejados del
alcance de los niños.
•
Su ASUS VivoWatch solamente se debe usar en entornos con
temperaturas ambiente comprendidas entre 5 °C y 40 °C.
17
Знакомство с ASUS VivoWatch
сенсорный
дисплей
ремешок
Индикатор
датчик
кнопка Home
контакты для
подзарядки
ПРИМЕЧАНИЕ: Подробную информацию об
этих частях смотрите в электронном руководстве.
18
Части подставки
контакты для зарядки
защелка
Разъем micro-USB
Зарядка ASUS VivoWatch
Включение
Заряжайте устройство до автоматического
включения.
19
Сопряжение в первый раз
1. Включите Bluetooth на телефоне.
2. Скачайте приложение HiVivo из Play Store
или App Store, затем установите его на свой
телефон.
3. Запустите HiVivo и следуйте инструкциям на
экране телефона до завершения процесса.
Информация о правилах безопасности
•
Это устройство не является водонепроницаемым. Храните его
в сухом месте, не подвергайте его воздействию жидкостей и не
используйте в условиях повышенной влажности. Если устройство
намокнет, немедленно вытрите его мягкой сухой тканью.
•
Перед использованием устройства с приложениями убедитесь, что
оно сухое.
•
Не пытайтесь замыкать контакты аккумулятора. Не разбирайте
аккумулятор.
•
Прекратите использование при обнаружении протечки.
•
ASUS VivoWatch и держатель для подзарядки должны быть
правильно утилизированы.
•
Храните аккумулятор и другие мелкие компоненты в недоступном
для детей месте.
•
Этот продукт может использоваться при температуре воздуха в
диапазоне от 5°C до 40°C.
20
Poznanie ASUS VivoWatch
wyświetlacz
z ekranem
dotykowym
pasek
Wskaźnik LED
czujnik
przycisk ekranu
głównego
złącza
ładowania
UWAGA: W celu poznania funkcji tych portów,
sprawdź podręcznik w wersji elektronicznej.
21
Części podstawki ładowania
styki ładowania
blokada
sprężynowa
port micro USB
Ładowanie ASUS VivoWatch
Włączanie zasilania
Ładowanie ASUS VivoWatch w celu
automatycznego włączenia zasilania.
22
Pierwsze parowanie
1. Włączenie połączenia Bluetooth telefonu.
2. Pobierz aplikację HiVivo z Play Store lub App
Store, a następnie zainstaluj ją w telefonie.
3.Uruchom HiVivo i wykonaj kolejne instrukcje
z telefonu i ASUS VivoWatch, aby dokończyć
proces.
Środki bezpieczeństwa
•
Twój ASUS VivoWatch jest odporny na oddziaływanie wody ale
nie wodoodporny. Należy go trzymać w suchym miejscu i należy
unikać używania w pobliżu płynów, w deszczu, w wilgotnych
miejscach oraz w obecności innych źródeł wody lub cieczy. Jeśli
się zamoczy, należy go jak najszybciej wytrzeć suchą szmatką.
•
Przed użyciem z aplikacjami należy się upewnić, że ASUS
VivoWatch jest suchy, a dla własnego bezpieczeństwa należy
przestrzegać ostrzeżeń na etykietach ostrzegawczych.
•
Nie należy nigdy doprowadzać do zwarcia baterii ASUS
VivoWatch. Nie należy nigdy podejmować prób demontażu i
ponownego montażu baterii.
•
W przypadku wycieku należy zaprzestać używanie.
•
Baterię i podstawkę ładowania należy przekazać do recyklingu
lub w odpowiedni sposób zutylizować.
•
Małe komponenty należy trzymać z dala od dzieci.
•
Twój ASUS VivoWatch można używać wyłącznie przy
temperaturze otoczenia 5°C do 40°C.
23
Kennismaken met uw ASUS VivoWatch
display
aanraakscherm
riem
LED-indicator
sensor
beginknop
laadconnectors
OPMERKING: raadpleeg de e-handleiding
om kennis te maken met de functies van deze
onderdelen.
24
Onderdelen van de laadhouder
laadpennen
veerslot
micro-USB-poort
De ASUS VivoWatch opladen
Inschakelen
Laad uw ASUS VivoWatch op om deze
automatisch in te schakelen.
25
De eerste keer koppelen
1. Schakel de Bluetooth-verbinding van uw
telefoon in.
2. Download de app HiVivo van de Play Store
of App Store en installeer deze vervolgens op
uw telefoon.
3.Start HiVivo en volg de opeenvolgende
instructies op de telefoon en ASUS VivoWatch
om het proces te voltooien.
Veiligheidsmaatregelen
•
Uw ASUS VivoWatch is waterbestendig, maar niet waterdicht.
Houd het apparaat droog en gebruik het niet in de buurt van
vloeistoffen, regen, vocht en andere bronnen van water of
vloeistof. Als het nat wordt, moet u het onmiddellijk droog
vegen met een zachte droge doek.
•
Zorg dat de ASUS VivoWatch droog is voordat u deze gebruikt
met app-functies en volg de waarschuwingslabels voor uw
persoonlijke veiligheid.
•
Veroorzaak nooit een kortsluiting van de batterij binnenin de
ASUS VivoWatch. Probeer nooit de batterij te demonteren of
opnieuw te monteren.
•
Stop het gebruik als er een lek is gevonden.
•
De ASUS VivoWatch en de laadhouder moet worden gerecycled
of correct worden weggegooid.
•
Houd kleine onderdelen uit de buurt van kinderen.
•
Uw ASUS VivoWatch mag alleen worden gebruikt bij een
omgevingstemperatuur van 5°C tot 40°C.
26
Lær din ASUS VivoWatch at kende
Berøringsskærm
rem
Lysdiodeindikator
Sensor
Startside-knap
Opladningsstik
BEMÆRK: Der henvises til den elektroniske
brugervejledning for yderligere oplysninger om
disse deles funktioner.
27
Dele af opladeholderen
Opladningsstikben
Fjederlås
Micro USB-port
Opladning af ASUS VivoWatch
Tænde for apparatet
Oplad din ASUS VivoWatch for automatisk at
tænde for den.
28
Parring for første gang
1. Aktiver din telefons Bluetooth-funktion.
2.Download HiVivo appen fra Play Store eller
App Store, og installer den derefter på din
telefon.
3.Start HiVivo og følg anvisningerne på
telefonen og ASUS VivoWatch for at afslutte
processen.
Sikkerhedsforanstaltninger
•
Din ASUS VivoWatch er vandresistent, men ikke vandtæt. Sørg
for at den er tør og brug den ikke i nærheden af væsker, regn,
fugtighed og andre vand- eller væskekilder. Hvis den skulle blive
våd, skal du omgående tørre den af med en blød tør klud.
•
Sørg for, at din ASUS VivoWatch er tør, inden du bruger den med
app-funktioner og følg advarselsmærkaterne for din personlige
sikkerhed.
•
Forsøg aldrig at kortslutte batteriet inde i din ASUS VivoWatch.
Forsøg aldrig at skille batteriet ad eller samle det.
•
Hold op med at bruge batteriet hvis det begynder at lække.
•
ASUS VivoWatch og opladeholderen skal genbruges eller
bortskaffes på en miljørigtig måde.
•
Hold små dele væk fra børn.
•
Din ASUS VivoWatch bør kun bruges i temperaturomgivelser på
mellem 5°C og 40°C.
29
Tutustuminen ASUS VivoWatchiin
kosketusnäyttöpaneeli
hihna
LED-merkkivalo
anturi
kotipainike
latausliittimet
HUOMAUTUS: Katso lisätietoja näiden osien
ominaisuuksista E-käyttöoppaasta.
30
Latauskelkan osat
latausnastat
jousilukko
micro-USB-portti
ASUS VivoWatchin lataaminen
Käynnistäminen
Lataa ASUS VivoWatch käynnistääksesi sen
automaattisesti.
31
Pariuttaminen ensimmäistä kertaa
1. Kytke puhelimen Bluetooth-yhteys päälle.
2.Lataa HiVivo-sovellus Play Store - tai App
Store -kaupasta ja asenna se puhelimeesi.
3.Käynnistä HiVivo ja toimi seuraavien
puhelimen ja ASUS VivoWatch -sovellusten
ohjeiden mukaisesti suorittaaksesi prosessin
loppuun.
Turvallisuusvarotoimenpiteet
•
ASUS VivoWatch on vedenkestävä, ei vesitiivis. Pidä se kuivana
äläkä käytä sitä lähellä nesteitä, sateessa, kosteissa tiloissa tai
muissa vettä tai nestettä sisältävien kohteiden lähellä. Jos laite
kastuu, pyyhi se heti pehmeällä, kuivalla liinalla.
•
Varmista, että ASUS VivoWatch on kuiva ennen kuin käytät sitä
sovellusominaisuuksilla ja toimi varoitustarrojen mukaisesti
oman turvallisuutesi vuoksi.
•
Älä koskaan yritä oikosulkea ASUS VivoWatchin sisällä olevaa
akkua. Älä koskaan yritä purkaa ja koota akkua uudelleen.
•
Jos havaitset, vuodon lopeta akun käyttö.
•
ASUS VivoWatch ja lataustelakka on kierrätettävä tai hävitettävä
säädösten mukaisesti.
•
Pidä kaikki pienet osat lasten ulottumattomissa.
•
ASUS VivoWatch -puhelinta tulee käyttää vain lämpötilavälillä
5 °C - 40 °C.
32
Bli kjent med ASUS VivoWatch
berøringsskjermpanel
rem
LED-indikator
sensor
hjemknapp
ladekontakter
MERK: Du kan finne ut mer om egenskapene
til disse delene ved å se i den elektroniske
håndboken.
33
Delene i ladestasjonen
ladepinner
fjærlås
micro-USB-kontakt
Lade ASUS VivoWatch
Slå på
Lad opp ASUS VivoWatch, så slår den seg på
automatisk.
34
Pare for første gang
1. Slå på telefonens Bluetooth-tilkobling.
2. Last ned HiVivo-appen fra Play Store eller App
Store, og installer den på telefonen.
3.Start HiVivo, og følg instruksjonene på
telefonen og ASUS VivoWatch for å fullføre
prosessen.
Forholdsregler for sikkerhet
•
ASUS VivoWatch er vannavstøtende, men ikke vanntett. Du må
holde den tørr og ikke bruke den i nærheten av væsker, regn,
fuktighet og andre vann- eller væskekilder. Hvis den blir våt,
tørker du den umiddelbart av med en myk, tørr klut.
•
Sørg for at ASUS VivoWatch er tørr før du bruker den med appfunksjoner, og følg advarselsetikettene for din egen sikkerhet.
•
Forsøk aldri å kortslutte batteriet inni ASUS VivoWatch. Batteriet
må overhodet ikke demonteres og settes sammen igjen.
•
Må ikke brukes dersom det oppstår lekkasje.
•
ASUS VivoWatch og ladestasjonen må resirkuleres eller avhendes
på riktig måte.
•
Hold alle små deler unna barn.
•
ASUS VivoWatch bør kun brukes i omgivelser med en temperatur
på mellom 5°C og 40°C.
35
Lär känna din ASUS VivoWatch
pekskärmspanel
rem
LED-indikator
sensor
startsidesknap
laddningskontakter
OBS! Se E-manualen för att lära dig hur dessa
delar fungerar.
36
Laddningsvaggans delar
laddningsstift
fjäderlås
mikro-USB-port
Ladda ASUS VivoWatch
Ström på
Ladda din ASUS VivoWatch för att sätta på den
automatiskt.
37
Länka första gången
1. Sätt på telefonens Bluetooth-anslutning.
2.Hämta HiVivo-appen från Play Store eller App
Store, och installera den på din telefon.
3.Starta HiVivo och följ instruktionerna på
telefonen och ASUS VivoWatch för att slutföra
proceduren.
Säkerhetsåtgärder
•
Din ASUS VivoWatch är vattenskyddad, inte vattentät. Håll den
torr och undvikt att använda i närheten av vätskor, regn, fukt
och andra vatten- eller vätskekällor. Torka genast av den med en
mjuk torr trasa om den blir blöt.
•
Se till att ASUS VivoWatch är torr innan du använder den med
app-funktioner, och följ varningsmärkningen för din personliga
säkerhet.
•
Försök aldrig att kortsluta batteriet i din ASUS VivoWatch. Försök
aldrig att ta isär och sätta ihop batteriet.
•
Upphör att använda om batteriet läcker.
•
ASUS VivoWatch och laddningsvaggan måste återvinnas eller
kasseras på rätt sätt.
•
Förvara alla små delar utom räckhåll för barn.
•
Din ASUS VivoWatch ska bara användas i miljöer där den
omgivande temperaturen är mellan 5 °C och 40 °C.
38
認識您的 ASUS VivoWatch
觸控顯示面板
錶帶
LED 指示燈
感測器
主頁按鈕
充電連接埠
說明:各部位功能說明請參考電子版手冊。
39
充電座功能介紹
充電針腳
彈簧鎖
micro USB 連接埠
為 ASUS VivoWatch 充電
開機
為 ASUS VivoWatch 充電即可自動開機。
40
初次配對
1. 開啟手機藍牙功能。
2. 從手機的 Play 商店或 App Store 下載並安裝
HiVivo APP。
3. 開啟 HiVivo 並依照手機與 ASUS VivoWatch
的指示完成配對程序。
安全注意事項
• ASUS VivoWatch 僅能防潑水,並非完全防水。請勿在液體旁、
雨中或潮濕的環境中使用穿戴式手錶。若 ASUS VivoWatch 被
弄濕,請立刻用柔軟乾布將其擦乾。
• 在使用 ASUS VivoWatch 的應用程式功能之前,請先確認
ASUS VivoWatch 為乾燥狀態;同時為了個人安全起見,請依
照警告標籤的說明使用。
• 請勿嘗試讓 ASUS VivoWatch 中的電池短路。請勿嘗試自行拆
卸與組裝電池。
• 若發現有液體滲出請立即停止使用。
• ASUS VivoWatch 與充電座必須回收或做適當廢棄處理。
• 讓細小零件遠離孩童。
• ASUS VivoWatch 只應在溫度介於 5℃ 至 40℃ 的環境下使
用。
41
Conheça o seu ASUS VivoWatch
ecrã tátil
correia
indicador
LED
sensor
botão
de Início
conectores de
carregamento
NOTA: Para conhecer as funcionalidades destes
componentes, consulte o manual eletrónico.
42
Componentes da base de carregamento
pinos de carregamento
trinco de
mola
porta micro USB
Carregar o ASUS VivoWatch
Ligar o dispositivo
Carregue o ASUS VivoWatch para ligá-lo
automaticamente.
43
Emparelhar pela primeira vez
1. Ative a ligação Bluetooth do seu telefone.
2. Transfira a aplicação HiVivo a partir da Play
Store ou App Store e instale-a no seu telefone.
3. Abra a aplicação HiVivo e siga as instruções
apresentadas no telefone e no ASUS
VivoWatch para concluir o processo.
Precauções de segurança
•
O seu ASUS VivoWatch é resistente à água, porém não à prova
de água. Mantenha-o seco e evite a utilização junto a líquidos,
chuva, humidade e outras fontes de água ou líquido. Se molhar
o dispositivo, limpe-o imediatamente utilizando um pano macio
e seco.
•
Certifique-se de que o VivoWatch da ASUS se encontra seco
antes de o utilizar com funcionalidades da aplicação e siga as
indicações das etiquetas de aviso para sua própria segurança.
•
Nunca tente provocar curto-circuito na bateria do ASUS
VivoWatch. Nunca tente desmontar e voltar a montar a bateria.
•
Em caso de fuga de líquido, deixe de usar a bateria.
•
O ASUS VivoWatch e a base de carregamento devem ser
reciclados ou eliminados corretamente.
•
Mantenha todos os componentes de pequenas dimensões
afastados de crianças.
•
O ASUS VivoWatch deve ser utilizado apenas em ambientes com
temperaturas entre 5°C e 40°C.
44
Seznámení s ASUS VivoWatch
dotykový
zobrazovací
panel
řemínek
Indikátor LED
snímač
tlačítko Domů
nabíjecí
konektory
POZNÁMKA: Informace o funkcích těchto částí
najdete v elektronické příručce.
45
Čísti nabíjecího držáku
nabíjecí kolíky
pružinový
zámek
port micro USB
Nabíjení ASUS VivoWatch
Zapnutí
Nabitím ASUS VivoWatch se automaticky zapne
napájení.
46
První spárování
1. Zapněte připojení Bluetooth ve vašem
telefonu.
2. Stáhněte aplikaci HiVivo z webu Play Store
nebo App Store a potom ji nainstalujte do
vašeho telefonu.
3. Spusťte aplikaci HiVivo a dokončete instalaci
podle následujících pokynů v telefonu a ASUS
VivoWatch.
Bezpečnostní zásady
•
Hodinky ASUS VivoWatch jsou voděodolné, ale nikoli
voděvzdorné. Uchovávejte je v suchu a nepoužívejte je v
blízkosti tekutin, v dešti, ve vlhku nebo blízkosti jiných zdrojů
vody nebo tekutin. Pokud se hodinky namočí, rychle je otřete
měkkým suchým hadříkem.
•
Před používáním funkcí aplikace zkontrolujte, zda jsou hodinky
ASUS VivoWatch suché, a dodržujte varovné štítky pro vaši
osobní bezpečnost.
•
Zásadně se nepokoušejte zkratovat baterii uvnitř hodinek ASUS
VivoWatch. V žádném případě nezkoušejte baterii rozebrat a
sestavit.
•
V případě vytečení přestaňte používat.
•
Hodinky ASUS VivoWatch a nabíjecí držák je nutno řádně
recyklovat nebo zlikvidovat.
•
Uchovávejte malé části mimo dosah dětí.
•
Tyto hodinky ASUS VivoWatch je třeba používat pouze v
prostředí s okolní teplotou mezi 5 °C a 40 °C.
47
ASUS VivoWatch Aygıtınızı Tanıma
dokunmatik
ekran paneli
kayış
LED gösterge
sensör
giriş ekranı
düğmesi
şarj etme
bağlayıcıları
NOT: Bu parçaların özelliklerini öğrenmek için
E-Kılavuza başvurun.
48
Şarj Kızağının Parçaları
şarj etme pimleri
yaylı kilit
mikro USB bağlantı noktası
ASUS VivoWatch Aygıtını Şarj Etme
Gücü Açma
Gücünü otomatik olarak açmak için ASUS
VivoWatch aygıtınızı şarj edin.
49
İlk Kez Eşleştirme
1. Telefonunuzun Bluetooth bağlantısını açın.
2. HiVivo uygulamasını Play Store veya App
Store sitesinden indirip telefonunuza yükleyin.
3. HiVivo uygulamasını başlatıp, işlemi
tamamlamak için telefonda ve ASUS
VivoWatch aygıtında verilen talimatları izleyin.
Güvenlik Önlemleri
•
ASUS VivoWatch aygıtınız suya dayanıklıdır, su geçirmez
değildir. Kuru tutun ve sıvılar, yağmur, nem ve diğer su veya
sıvı kaynaklarının yakınında kullanmaktan kaçının. Islanırsa,
yumuşak, kuru bir bez kullanarak hemen silin.
•
Uygulama özellikleriyle kullanmadan önce ASUS VivoWatch
aygıtınızın kuru olduğundan emin olun ve kişisel güvenliğiniz
için uyarı etiketlerine uyun.
•
ASUS VivoWatch aygıtınız içindeki pile asla kısa devre yapmaya
çalışmayın. Pili kesinlikle parçalarına ayırmaya veya yeniden
birleştirmeye çalışmayın.
•
Pil akarsa kullanmayı durdurun.
•
ASUS VivoWatch ve şarj kızağı geri dönüşüme verilmeli veya
uygun biçimde elden çıkarılmalıdır.
•
Küçük bileşenleri çocuklardan uzak tutun.
•
ASUS VivoWatch aygıtınız yalnızca 5°C ila 40°C arasındaki ortam
sıcaklıklarında kullanılmalıdır.
50
51
Federal Communications Commission
Statement
This device complies with Part 15 of the FCC Rules. Operation is subject
to the following two conditions: (1) This device may not cause harmful
interference. (2)This device must accept any interference received including
interference that may cause undesired operation.
This equipment has been tested and found to comply with the limits for a
Class B digital device, pursuant to Part 15 of the FCC Rules. These limits are
designed to provide reasonable protection against harmful interference in
a residential installation. This equipment generates, uses and can radiate
radio frequency energy and, if not installed and used in accordance with
manufacturer’s instructions, may cause harmful interference to radio
communications. However, there is no guarantee that interference will
not occur in a particular installation. If this equipment does cause harmful
interference to radio or television reception, which can be determined by
turning the equipment off and on, the user is encouraged to try to correct
the interference by one or more of the following measures: (1) Reorient or
relocate the receiving antenna. (2) Increase the separation between the
equipment and receiver. (3) Connect the equipment to an outlet on a circuit
different from that to which the receiver is connected. (4) Consult the dealer
or an experienced radio/TV technician for help.
CAUTION! Any changes or modification not expressly approved by the
grantee of this device could void the user’s authority to operate the
equipment.
Labeling requirements
This device complies with Part 15 of the FCC Rules. Operation is subject
to the following two conditions: (1) this device may not cause harmful
interference, and (2) this device must accept any interference received,
including interference that may cause undesired operation.
CE: European Community Compliance
Statement
The equipment complies with the RF Exposure Requirement 1999/519/EC,
Council Recommendation of 12 July 1999 on the limitation of exposure of
the general public to electromagnetic fields (0–300 GHz). This wireless device
complies with the R&TTE Directive.
NCC Warning
經型式認證合格之低功率射頻電機,非經許可,公司、商號或使用者均
不得擅自變更頻率、加大功率或變更原設計之特性及功能。
低功率射頻電機之使用不得影響飛航安全及干擾合法通信;經發現有干
擾現象時,應立即停用,並改善至無干擾時方得繼續使用。
前項合法通信,指依電信法規定作業之無線電通信。低功率射頻電機須
忍受合法通信或工業、科學及醫療用電波輻射性電機設備之干擾。
52
Copyright information
No part of this manual, including the products and software described
in it, may be reproduced, transmitted, transcribed, stored in a retrieval
system, or translated into any language in any form or by any means, except
documentation kept by the purchaser for backup purposes, without the
express written permission of ASUSTeK COMPUTER INC. (“ASUS”).
ASUS PROVIDES THIS MANUAL “AS IS” WITHOUT WARRANTY OF ANY
KIND, EITHER EXPRESS OR IMPLIED, INCLUDING BUT NOT LIMITED TO THE
IMPLIED WARRANTIES OR CONDITIONS OF MERCHANTABILITY OR FITNESS
FOR A PARTICULAR PURPOSE. IN NO EVENT SHALL ASUS, ITS DIRECTORS,
OFFICERS, EMPLOYEES OR AGENTS BE LIABLE FOR ANY INDIRECT, SPECIAL,
INCIDENTAL, OR CONSEQUENTIAL DAMAGES (INCLUDING DAMAGES FOR
LOSS OF PROFITS, LOSS OF BUSINESS, LOSS OF USE OR DATA, INTERRUPTION
OF BUSINESS AND THE LIKE), EVEN IF ASUS HAS BEEN ADVISED OF THE
POSSIBILITY OF SUCH DAMAGES ARISING FROM ANY DEFECT OR ERROR IN
THIS MANUAL OR PRODUCT.
Products and corporate names appearing in this manual may or may not
be registered trademarks or copyrights of their respective companies, and
are used only for identification or explanation and to the owners’ benefit,
without intent to infringe.
SPECIFICATIONS AND INFORMATION CONTAINED IN THIS MANUAL ARE
FURNISHED FOR INFORMATIONAL USE ONLY, AND ARE SUBJECT TO CHANGE
AT ANY TIME WITHOUT NOTICE, AND SHOULD NOT BE CONSTRUED AS A
COMMITMENT BY ASUS. ASUS ASSUMES NO RESPONSIBILITY OR LIABILITY
FOR ANY ERRORS OR INACCURACIES THAT MAY APPEAR IN THIS MANUAL,
INCLUDING THE PRODUCTS AND SOFTWARE DESCRIBED IN IT.
Copyright © 2015 ASUSTeK COMPUTER INC. All Rights Reserved.
E-Manual version
For the full manual version of your ASUS VivoWatch, visit our multi-language
web site at: http://support.asus.com
53
Limitation of liability
Circumstances may arise where because of a default on ASUS’ part or
other liability, you are entitled to recover damages from ASUS. In each
such instance, regardless of the basis on which you are entitled to claim
damages from ASUS, ASUS is liable for no more than damages for bodily
injury (including death) and damage to real property and tangible personal
property; or any other actual and direct damages resulted from omission or
failure of performing legal duties under this Warranty Statement, up to the
listed contract price of each product.
ASUS will only be responsible for or indemnify you for loss, damages or
claims based in contract, tort or infringement under this Warranty Statement.
This limit also applies to ASUS’ suppliers and its reseller. It is the maximum for
which ASUS, its suppliers, and your reseller are collectively responsible.
UNDER NO CIRCUMSTANCES IS ASUS LIABLE FOR ANY OF THE FOLLOWING:
(1) THIRD-PARTY CLAIMS AGAINST YOU FOR DAMAGES; (2) LOSS OF, OR
DAMAGE TO, YOUR RECORDS OR DATA; OR (3) SPECIAL, INCIDENTAL, OR
INDIRECT DAMAGES OR FOR ANY ECONOMIC CONSEQUENTIAL DAMAGES
(INCLUDING LOST PROFITS OR SAVINGS), EVEN IF ASUS, ITS SUPPLIERS OR
YOUR RESELLER IS INFORMED OF THEIR POSSIBILITY.
Manufacturer
ASUSTek COMPUTER INC.
Address, City
4F No. 150, LI-TE RD., PEITOU, TAIPEI 112,
TAIWAN
Telephone Number
+886-2-2894-3447
Authorized
Representative in
Europe
ASUS COMPUTER GmbH
Address, City
HARKORT STR. 21-23, 40880 RATINGEN
Country
GERMANY
Q10449
June 2015
15060-52710200
54
Revised Edition V3


![MC95XX Series Regulatory Guide [English] (P/N 72-118502](http://vs1.manualzilla.com/store/data/005760097_1-2f741b3a88b00c5f81d3f7718b174271-150x150.png)