1
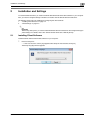
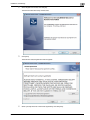
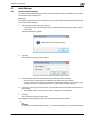
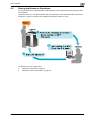
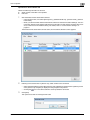
bizhub Remote Panel Ver. 1.0
User’s Manual [Client]
Introduction
The user's manual consists of the following.
Type of manual
Description
bizhub Remote Panel User's Manual
[Client]
This manual, which describes how to install and operate the bizhub Remote
Panel client software.
This manual is intended for operators who remotely operate the control panel
of an MFP.
bizhub Remote Panel User's Manual
[Server]
Describes how to install the Remote Panel server and configure its initial settings.
This manual is intended for system administrators who configure the bizhub
Remote Panel system.
2
Reminder
The reproduction of the content of this manual, either partially or in full, is prohibited without permission.
The content of this manual is subject to change without notice.
Unauthorized duplication or modification is strictly prohibited.
The contents of the screenshots shown in this manual may differ from those of the actual products.
Trademarks/Copyrights
KONICA MINOLTA and the KONICA MINOLTA logo are trademarks of KONICA MINOLTA HOLDINGS, INC.
Microsoft and Windows are trademarks of Microsoft Corporation U.S. in the U.S. and other countries.
Intel and Pentium are trademarks of Intel Corporation and its subsidiaries in the U.S. and other countries.
All other trademarks are the property of their respective owners.
bizhub Remote Panel
x-1
Contents
Introduction
Contents ................................................................................................................................................................. x-2
1
Overview
1.1
1.2
2
Installation and Settings
2.1
2.2
2.2.1
3
4
System Overview.................................................................................................................................... 1-2
Operating environment.......................................................................................................................... 1-3
Installing Client Software ...................................................................................................................... 2-2
Initial Settings......................................................................................................................................... 2-5
Communication settings .......................................................................................................................... 2-5
How to set................................................................................................................................................ 2-5
How to Operate
3.1
3.1.1
3.2
Overview ................................................................................................................................................. 3-2
Panel operation screen ............................................................................................................................ 3-3
Sharing the Screen for Operations....................................................................................................... 3-4
Operations in MFP side ........................................................................................................................... 3-5
Operations in client software side............................................................................................................ 3-6
3.3
Locking the Screen for Operations ...................................................................................................... 3-8
How to operate ........................................................................................................................................ 3-9
Uninstallation
4.1
Uninstalling the Software ...................................................................................................................... 4-2
How to uninstall ....................................................................................................................................... 4-2
bizhub Remote Panel
x-2
1
Overview
Overview
1
1
Overview
1.1
System Overview
bizhub Remote Panel is a system that establishes a communication with a remote MFP via the Internet and
synchronizes the control panel screen on the MFP side with the operation screen on the client PC side.
This system allows you to explain to a user in a distant location how to operate an MFP while viewing the
same screen as for the MFP side, or change MFP settings by remote control.
The following preparations are required in order to use bizhub Remote Panel.
Installing the bizhub Remote Panel server
Configuring the MFP to enable a connection with the bizhub Remote Panel server
Installing the bizhub Remote Panel client software on a client PC and configuring settings
2
Reminder
For information on how to install the bizhub Remote Panel server, refer to the "bizhub Remote Panel
User's Manual [Server]".
For information on how to set up an MFP, refer to the "bizhub Remote Panel User's Manual [Server]"
or the relevant manual supplied with the MFP.
bizhub Remote Panel
1-2
Overview
1.2
1
Operating environment
This section shows the operating environment of the bizhub Remote Panel client software.
Environment
Details
OS
•
•
•
•
•
•
•
Modules
One of the following modules must be installed on the machine.
• Microsoft .NET Framework 2.0 SP2
• Microsoft .NET Framework 3.0 SP2
• Microsoft .NET Framework 3.5 SP1
• Microsoft .NET Framework 3.5.1
HDD
At least 100MB free space
Monitor
WXGA (1280 e 800) full color (24bit) or more
Network
TCP/IP protocol (IPv4/IPv6) settings must be configured correctly.
bizhub Remote Panel
Windows XP Professional (32bit/64bit) (Service Pack 2 or later)
Windows Vista Enterprise (32bit/64bit) (Service Pack 2 or later)
Windows Vista Ultimate (32bit/64bit) (Service Pack 2 or later)
Windows Vista Business (32bit/64bit) (Service Pack 2 or later)
Windows 7 Enterprise (32bit/64bit) (Service Pack 1 or later)
Windows 7 Ultimate (32bit/64bit) (Service Pack 1 or later)
Windows 7 Professional (32bit/64bit) (Service Pack 1 or later)
1-3
2
Installation and Settings
Installation and Settings
2
2
Installation and Settings
To use bizhub Remote Panel, you need to install the bizhub Remote Panel client software on your computer.
Also, you need to configure settings to enable a connection with the bizhub Remote Panel server.
The following shows a flow of installing and configuring the client software.
1.
"Installing Client Software" on page 2-2
2.
"Initial Settings" on page 2-5
2
Reminder
Before using this system, you need to install the bizhub Remote Panel server and configure the appropriate settings. For details, refer to the "bizhub Remote Panel User's Manual [Server]".
2.1
Installing Client Software
Install the bizhub Remote Panel client software on your computer.
1
Execute "Setup.exe".
– If the "User account control" page appears after Setup.exe was executed, click [Yes].
The Setup Language window appears.
bizhub Remote Panel
2-2
Installation and Settings
2
2
Select English from the list, and click [OK].
The Remote Panel Client setup wizard starts.
3
Click [Next].
The Software License Agreement window appears.
4
Select [I accept the terms in the license agreement], and click [Next].
bizhub Remote Panel
2-3
Installation and Settings
5
2
Click [Install].
Installation starts.
6
When the wizard completes, click [Finish].
The bizhub Remote Panel setup wizard exits.
This completes the installation of the bizhub Remote Panel client software.
bizhub Remote Panel
2-4
Installation and Settings
2.2
Initial Settings
2.2.1
Communication settings
2
To use the bizhub Remote Panel client software, you need to configure settings to establish a communication
with the bizhub Remote Panel server.
How to set
This example is described based on the assumption that you start the bizhub Remote Panel client software
for the first time after installing it.
1
Start the bizhub Remote Panel client software.
–
Open the Start menu, and select [All Programs] - [KONICA MINOLTA] - [Remote Panel] - [Remote
Panel Client].
The following dialog box appears.
2
Click [OK].
The communication setting window appears.
3
Enter the address of the bizhub Remote Panel client software in [Server Address].
–
–
4
If necessary, enter the port number used for a communication with the bizhub Remote Panel server in
[Port Number].
–
5
The host name or IPv4/IPv6-format IP address can be used as the server address.
To enter an IPv6-format IP address, enclose the IPv6 address in brackets [ ]. For example, if the IP
address of the server is "fe80::220:6bff:fe10:2f16", type in "[fe80::220:6bff:fe10:2f16]".
The default is "61239", which you do not need to change for normal operations.
Click [OK].
The communication setting window closes.
This completes the initial setting process for the bizhub Remote Panel client software.
2
Reminder
To open the communication setting window, you can also select [Options] - [Communication Settings].
bizhub Remote Panel
2-5
3
How to Operate
How to Operate
3
3
How to Operate
3.1
Overview
Using the bizhub Remote Panel client software, you can establish a communication with a remote MFP via
the Internet and synchronize the control panel screen on the MFP side with the operation screen on the client
PC side.
This system allows you to explain to a user in a distant location how to operate an MFP while viewing the
same screen as for the MFP side, or lock the control panel of an MFP to prevent unauthorized users from
performing operations and change MFP settings by remote control.
The bizhub Remote Panel client software provides the following two operation methods depending on how
this software is used.
Method
Description
Start of operation
Screen
lock
"Sharing the Screen
for Operations" on
page 3-4
Allows you to operate this system while sharing the screen
of the control panel between the MFP and client PC. The
control panel of the MFP is not locked.
This method is useful, for example, when explaining how to
operate an MFP to a user.
MFP
OFF
"Locking the Screen
for Operations" on
page 3-8
Allows you to lock the control panel of a remote MFP and
operate it by remote control.
This method is useful when you do not need to share the
control panel and screens of an MFP.
To start a connection operation from CS Remote Care, a target MFP must be managed under CS Remote Care.
CS Remote Care
ON
2
Note
For details on CS Remote Care, refer to the CS Remote Care User's Manual.
2
Note
It may take some time to apply operations, which were performed using the client software or the control panel of an MFP, to a remote MFP depending on the network environment such as the communication rate.
2
Reminder
The screen lock can be released at any time by pressing the panel lock key in the panel operation
screen.
bizhub Remote Panel
3-2
How to Operate
3.1.1
3
Panel operation screen
When you connect from the bizhub Remote Panel client software to an MFP, the following screen appears.
1
3
2
3
4
No.
Item Name
Description
1
Menu
The following menus are available.
[File]
[Close]: Closes the screen display of the control panel and displays the device selection screen.
[Edit]
[Copy to Clipboard]: Copies an image displayed on the liquid crystal panel to the
clipboard.
You can also use the shortcut keys (Ctrl + C) on the keyboard to copy an image
on the liquid crystal panel to the clipboard.
[Tool]
•
•
•
[Help]
[Sound]: Selecting this check box outputs a sound when you press a hardware key or click the liquid crystal panel so that you will be aware whenever
an operation was performed.
[Panel Click Effect]: Selecting this check box generates a screen effect when
you click the liquid crystal panel so that you will be aware whenever an operation was performed.
[Language Selection]: Switches the language to display hardware keys in the
panel operation screen.
Allows you to check version information of the bizhub Remote Panel client software.
2
Liquid crystal panel
Displays the settings of the control panel on the connected MFP.
You can operate this panel using the mouse in the same way as when operating
the control panel of the MFP using fingers.
3
Hardware key
Allows you to use hardware keys of the connected MFP.
You can operate the MFP by pressing keys.
4
Panel lock key
Switches the lock state of the control panel on the connected MFP.
If the control panel of the MFP is locked, a message stating that the control panel
is locked is displayed in the control panel screen of the MFP, preventing you from
operating the control panel.
2
Reminder
In Service mode, the control panel of the MFP is always locked regardless of
the status of the panel lock key.
bizhub Remote Panel
3-3
How to Operate
3.2
3
Sharing the Screen for Operations
This system allows you to operate the MFP while sharing the screen between the control panel of the MFP
and a client PC.
Using this function, you can operate the MFP while viewing the same screen between the MFP and client PC;
therefore, it is useful, for example, when explaining the operation method to a user.
The following shows an operation flow.
"Operations in MFP side" on page 3-5
"Operations in client software side" on page 3-6
bizhub Remote Panel
3-4
How to Operate
3
Operations in MFP side
Make preparations for remote operation in an office with an MFP installed.
Before starting a remote operation, check the following.
0
The settings for connecting to the bizhub Remote Panel server are completed in the MFP.
1
Check the serial number of the MFP.
–
2
To check the serial number of the MFP, tap [Counter] on the main menu of the control panel.
Start the remote panel operation on the control panel of the MFP.
– Select [Utility] - [Remote Panel Operation], and tap [Start].
– The contents of the operation screen may vary depending on models.
The PIN code and phone number appear in the control panel screen.
3
Notify the user of an MFP, to be remote-controlled using the client software, of the serial number and
PIN code of the MFP.
– Call the phone number displayed in the control panel screen.
This completes the preparation in the MFP side.
bizhub Remote Panel
3-5
How to Operate
3
Operations in client software side
Obtain the following information in advance.
0
Serial number of the MFP to be operated
0
PIN code
1
Start the bizhub Remote Panel client software.
–
Open the Start menu, and select [All Programs] - [KONICA MINOLTA] - [Remote Panel] - [Remote
Panel Client].
– When you start the bizhub Remote Panel client software for the first time after installing it, the communication setting screen appears following the confirmation screen. Before continuing this procedure, confirm the communication setting. For details, refer to "Communication settings" on
page 2-5.
The bizhub Remote Panel client software starts, and the device selection screen appears.
2
Referring to the serial number in [Device List], select an MFP to be connected.
–
–
3
Select the desired MFP from the MFPs listed for which [Waiting] is displayed in the [Status] column
of the [Device List] and [MFP] is displayed in the [Request From] column.
Clicking the
icon in the device selection screen updates the device list.
Click [Start].
This opens the screen for entering the PIN code.
bizhub Remote Panel
3-6
How to Operate
4
3
Enter the PIN code of the MFP to be connected in [PIN Code], and click [OK].
The panel operation screen appears.
5
Perform the operations shown in the panel operation screen.
–
–
6
For details on the panel operation screen, refer to "Panel operation screen" on page 3-3.
To lock the control panel of the MFP as needed and prevent operations from being performed from
the MFP, click the panel lock key.
When the operation is completed, close the panel operation screen.
– Click the [x] button in the upper right of the screen, or click [Close] in the [File] menu.
The confirmation dialog box appears.
7
Click [Yes].
–
If you click [Yes], the MFP that has been operating until now is deleted from the device list of the
device selection screen.
– If you click [No], the information regarding the MFP that has been used is recorded in [device list] of
the device selection screen. This function is convenient when using the MFP, which has been operating until now, at a later date.
The panel operation screen closes, and the device selection screen appears.
bizhub Remote Panel
3-7
How to Operate
3.3
3
Locking the Screen for Operations
This system has a function to lock the control panel of an MFP and operate it by remote control.
Using CS Remote Care, specify any PIN code to issue a remote connection request to a target MFP. When
the MFP receives a remote connection request, it is automatically connected to the bizhub Remote Panel
server and placed into the standby state for remote operation.
No tasks are required to be carried out on the office side where the MFP is installed, thereby ensuring an
efficient setting operation. Furthermore, no operations are possible on the MFP side, thereby, preventing unintended operation errors.
This function is useful when the office side where the MFP is installed requests you to perform difficult setting
operations.
2
Note
To start the connection operation from CS Remote Care, the target MFP must be managed under CS
Remote Care. For information on how to manage an MFP using CS Remote Care, refer to the relevant
manual of CS Remote Care.
This operation method does not require any operations to be carried out on the MFP side, and enables
you to operate a target MFP using only a client PC. To perform a remote operation, be sure to gain
agreement with the customer who installs an MFP.
bizhub Remote Panel
3-8
How to Operate
3
How to operate
The following preparations are required.
0
Registering a target MFP in CS Remote Care
0
Informing the office side with an MFP installed that its control panel is locked
1
Select a required MFP using the CS Remote Care maintenance application, and issue a remote connection request to the MFP.
–
–
Enter any PIN code.
The specified PIN code is required when connecting to the MFP using the bizhub Remote Panel client software. Write down the PIN code to prevent you from forgetting it.
– For details on how to operate CS Remote Care, refer to the CS Remote Care User's Manual.
When the MFP receives a remote connection request, it is automatically connected to the bizhub Remote Panel server. The control panel of the MFP is then locked.
bizhub Remote Panel
3-9
How to Operate
2
3
Start the bizhub Remote Panel client software.
–
Open the Start menu, and select [All Programs] - [KONICA MINOLTA] - [Remote Panel] - [Remote
Panel Client].
– When you start the bizhub Remote Panel client software for the first time after installing it, the communication setting screen appears following the confirmation screen. Before continuing this procedure, confirm the communication setting. For details, refer to "Communication settings" on
page 2-5.
The bizhub Remote Panel client software starts, and the device selection screen appears.
3
Referring to the serial number in [Device List], select an MFP to be connected.
–
–
4
Select the desired MFP from the MFPs listed for which [Waiting] is displayed in the [Status] column
of the [Device List] and [CSRC] is displayed in the [Request From] column.
Clicking the
icon in the device selection screen updates the device list.
Click [Start].
This opens the screen for entering the PIN code.
bizhub Remote Panel
3-10
How to Operate
5
3
Enter the PIN code of the MFP to be connected in [PIN Code], and click [OK].
–
Enter the PIN code you entered when you issued a remote connection request from CS Remote
Care to the MFP in Step 1.
The panel operation screen appears.
6
Perform the operations shown in the panel operation screen.
–
–
7
For details on the panel operation screen, refer to "Panel operation screen" on page 3-3.
The control panel of the MFP is locked to prevent anyone from using the MFP. Clicking the panel
lock key in the panel operation screen allows you to unlock the control panel of the MFP.
When the operation is completed, close the panel operation screen.
– Click the [x] button in the upper right of the screen, or click [Close] in the [File] menu.
The confirmation dialog box appears.
8
Click [Yes].
–
If you click [Yes], the MFP that has been operating until now is deleted from the device list of the
device selection screen.
– If you click [No], the information regarding the MFP that has been used is recorded in [device list] of
the device selection screen. This function is convenient when using the MFP, which has been operating until now, at a later date.
The panel operation screen closes, and the device selection screen appears.
bizhub Remote Panel
3-11
4
Uninstallation
Uninstallation
4
4
Uninstallation
4.1
Uninstalling the Software
Uninstall the bizhub Remote Panel client software from your computer.
How to uninstall
1
Click the Start menu, and open [Control Panel] - [Programs and Functions].
2
Select [Remote Panel Client], and click [Uninstall].
–
–
bizhub Remote Panel
If the confirmation window appears to check whether you want to uninstall the software, click [Yes].
If the user account control dialog box appears, click [Yes].
4-2
http://konicaminolta.com
Copyright
4343-PS409-00
2011
2011.10