1
C203/C253/C353
Box operations
Contents
1
2
Introduction
1.1
1.1.1
1.1.2
1.2
About this manual ...........................................................................................................................
Contents............................................................................................................................................
Product notation................................................................................................................................
Explanation of manual conventions ..............................................................................................
Safety advices ...................................................................................................................................
Sequence of action ...........................................................................................................................
Tips....................................................................................................................................................
Special text markings........................................................................................................................
1-4
1-4
1-4
1-5
1-5
1-5
1-5
1-6
1.3
1.3.1
User manuals ................................................................................................................................... 1-7
Printed manual .................................................................................................................................. 1-7
User manual ...................................................................................................................................... 1-7
1.3.2
User manual DVD manuals ...............................................................................................................
Copy Operations ...............................................................................................................................
Print Operations ................................................................................................................................
Box Operations (this manual) ............................................................................................................
Network Scan/Fax/Network Fax Operations ....................................................................................
Network Administrator ......................................................................................................................
Advanced Function Operations.........................................................................................................
1-7
1-7
1-7
1-7
1-7
1-7
1-7
Overview of the User Box functions
2.1
2.1.1
User Box functions..........................................................................................................................
Available User Box functions ............................................................................................................
Saving documents.............................................................................................................................
Using document data........................................................................................................................
Organizing document data................................................................................................................
2-3
2-3
2-3
2-4
2-5
2.1.2
Set-up for User Box functions...........................................................................................................
User box registration.........................................................................................................................
To use the machine for relay device .................................................................................................
To use Memory RX user box.............................................................................................................
2-6
2-6
2-6
2-6
2.2
2.2.1
Information before saving documents ..........................................................................................
User authentication ...........................................................................................................................
Machine authentication .....................................................................................................................
External server authentication...........................................................................................................
Account track ....................................................................................................................................
2-7
2-7
2-7
2-7
2-7
2.2.2
Limitation on user box registration....................................................................................................
Public/personal/group user boxes ....................................................................................................
Bulletin board user box .....................................................................................................................
Polling TX user box ...........................................................................................................................
2-8
2-8
2-8
2-8
2.2.3
2.3
2.3.1
2.3.2
2.3.3
2.3.4
2.3.5
Limitation on document name........................................................................................................... 2-9
Authentication and accessible user boxes ................................................................................. 2-10
When user authentication and account track settings are not specified ........................................ 2-10
When only user authentication settings are specified..................................................................... 2-10
When only account track settings are specified ............................................................................. 2-11
When user authentication and account track settings are specified and synchronized................. 2-12
When user authentication and account track settings are specified but not synchronized ........... 2-13
bizhub C353/C253/C203 (FE2)
Contents-1
3
4
5
Control panel/touch panel
3.1
3.2
3.2.1
Control panel....................................................................................................................................
Touch panel......................................................................................................................................
Screen layout.....................................................................................................................................
Icons on the touch panel ...................................................................................................................
3-3
3-5
3-5
3-6
3.2.2
Display and operation of the left panel.............................................................................................. 3-7
Job List .............................................................................................................................................. 3-7
Job List - Delete ................................................................................................................................ 3-8
Job List - Job Details......................................................................................................................... 3-8
Current Jobs in Print page................................................................................................................. 3-9
Job History in Print page ................................................................................................................... 3-9
Current Jobs in Send page.............................................................................................................. 3-10
Job History in Send page ................................................................................................................ 3-10
Current Jobs in Receive page ......................................................................................................... 3-11
Job History in Receive page............................................................................................................ 3-11
Current Jobs in Save page .............................................................................................................. 3-12
Job History in Save page................................................................................................................. 3-12
Settings when saving documents.................................................................................................... 3-13
Detail - Check Scan Settings........................................................................................................... 3-13
Detail - Check Original Settings ...................................................................................................... 3-14
Settings when using documents ..................................................................................................... 3-14
Detail................................................................................................................................................ 3-14
Check Job Settings ......................................................................................................................... 3-15
Check Job Settings - Destination Settings...................................................................................... 3-15
Check Job Settings - Communication Settings .............................................................................. 3-15
Check Job Settings - E-Mail Settings ............................................................................................. 3-16
Preview ............................................................................................................................................ 3-16
Preview - Detail................................................................................................................................ 3-17
Preview - Detail (Print/Combine) ..................................................................................................... 3-17
Preview - Detail (Send/Bind TX) ...................................................................................................... 3-18
Operation flow of user boxes
4.1
4.2
4.3
4.4
4.5
4.6
4.7
4.7.1
Saving documents in user boxes ................................................................................................... 4-3
Printing documents in user boxes ................................................................................................. 4-6
Sending documents in user boxes................................................................................................. 4-9
Saving documents in external memory ....................................................................................... 4-15
Printing documents in external memory ..................................................................................... 4-18
Organizing user box documents .................................................................................................. 4-20
Menu trees in User Box mode ...................................................................................................... 4-22
Save Document ............................................................................................................................... 4-22
Public/Personal/Group User Boxes................................................................................................. 4-22
System User Box............................................................................................................................. 4-23
4.7.2
Use Document................................................................................................................................. 4-25
Public/Personal/Group User Boxes................................................................................................. 4-25
System User Box............................................................................................................................. 4-30
4.7.3
File Document.................................................................................................................................. 4-33
Entering User Box mode
5.1
5.2
5.2.1
5.2.2
5.2.3
Contents-2
Entering User Box mode .................................................................................................................
User box operation menus .............................................................................................................
Save Document .................................................................................................................................
Use Document...................................................................................................................................
File Document....................................................................................................................................
5-3
5-4
5-4
5-4
5-5
bizhub C353/C253/C203 (FE2)
6
7
Save Document
6.1
6.1.1
Overview of Save Document ..........................................................................................................
Available operations in the Save Document screen..........................................................................
Public/personal/group user boxes ....................................................................................................
Annotation User Box .........................................................................................................................
External Memory ...............................................................................................................................
6-3
6-3
6-3
6-3
6-3
6.1.2
Initial screen of Save Document........................................................................................................ 6-3
Public/Personal/Group user box ....................................................................................................... 6-3
System User Box............................................................................................................................... 6-4
6.1.3
6.2
6.2.1
6.2.2
6.2.3
6.2.4
Description of the Save Document screen........................................................................................
Scan Settings...................................................................................................................................
Basic - Original Type .........................................................................................................................
Basic - Simplex/Duplex.....................................................................................................................
Basic - Resolution .............................................................................................................................
Basic - File Type................................................................................................................................
File Type ............................................................................................................................................
Scan Setting ......................................................................................................................................
Encryption .........................................................................................................................................
Encryption - Detail Settings...............................................................................................................
6.2.5
6.2.6
6.2.7
Basic - Density ................................................................................................................................
Basic - Separate Scan ....................................................................................................................
Quality Adjustment ..........................................................................................................................
Color................................................................................................................................................
Background Removal......................................................................................................................
Sharpness .......................................................................................................................................
6.2.8
Erase ............................................................................................................................................... 6-13
Frame Erase .................................................................................................................................... 6-13
6.2.9
Book Scan - Book Copy .................................................................................................................
Book Copy ......................................................................................................................................
Book Erase - Frame Erase ..............................................................................................................
Book Erase - Center Erase..............................................................................................................
Binding Position ..............................................................................................................................
6-14
6-14
6-14
6-15
6-15
6.2.10
Application - Scan Size ...................................................................................................................
Standard..........................................................................................................................................
Custom Size ....................................................................................................................................
Photo Size .......................................................................................................................................
6-16
6-16
6-16
6-16
6.3
Original Settings ............................................................................................................................
Special Original ...............................................................................................................................
Direction Settings - Original Direction.............................................................................................
Direction Settings - Binding Position ..............................................................................................
Despeckle........................................................................................................................................
6-17
6-17
6-17
6-18
6-18
6-4
6-5
6-5
6-6
6-6
6-7
6-7
6-8
6-8
6-9
6-11
6-11
6-11
6-12
6-12
6-12
Use Document
7.1
7.1.1
Overview of Use Document screen ...............................................................................................
Available operations in the Use Document screen ...........................................................................
Printing ..............................................................................................................................................
Transmitting.......................................................................................................................................
Document Details ..............................................................................................................................
7.1.2
Initial screen of Use Document ......................................................................................................... 7-3
Public/Personal/Group user box ....................................................................................................... 7-3
System User Box............................................................................................................................... 7-4
7.1.3
7.1.4
7.2
7.2.1
7.2.2
Description of Use Document screen ...............................................................................................
When a password is specified for the user box ................................................................................
Print ..................................................................................................................................................
Overview of Print ...............................................................................................................................
Description of the Print screen..........................................................................................................
bizhub C353/C253/C203 (FE2)
7-3
7-3
7-3
7-3
7-3
7-4
7-5
7-6
7-6
7-6
Contents-3
7.3
7.3.1
7.3.2
7.3.3
Print - Basic (Public/Personal/Group user box)............................................................................ 7-7
Copies................................................................................................................................................ 7-7
1-Sided/2-Sided ................................................................................................................................ 7-7
Finishing............................................................................................................................................. 7-8
Sort/Group......................................................................................................................................... 7-8
Offset ................................................................................................................................................. 7-8
Staple................................................................................................................................................. 7-8
Staple - Position Setting.................................................................................................................... 7-8
Punch................................................................................................................................................. 7-9
Punch - Position Setting.................................................................................................................... 7-9
Center Staple/Fold............................................................................................................................. 7-9
Center Staple & Fold ....................................................................................................................... 7-10
7.4
7.4.1
Print - Application (Public/Personal/Group user box)................................................................
Page Margin ....................................................................................................................................
Margin Position................................................................................................................................
Adjust Value.....................................................................................................................................
Image Shift.......................................................................................................................................
Image Shift - Change Back Shift .....................................................................................................
7-11
7-11
7-11
7-11
7-11
7-12
7.4.2
7.4.3
Sheet/Cover/Chapter Insert.............................................................................................................
Sheet/Cover/Chapter Insert - Cover Sheet .....................................................................................
What is a cover sheet? ....................................................................................................................
Cover setting ...................................................................................................................................
Front Cover - Paper.........................................................................................................................
Back Cover-Paper ...........................................................................................................................
7-12
7-13
7-13
7-14
7-14
7-14
7.4.4
Sheet/Cover/Chapter Insert - Insert Sheet ......................................................................................
What is Insert Sheet?.......................................................................................................................
Specified page/Sort.........................................................................................................................
Insert Paper .....................................................................................................................................
Insert Type .......................................................................................................................................
7-15
7-15
7-15
7-16
7-16
7.4.5
Sheet/Cover/Chapter Insert - Chapters ..........................................................................................
What is Chapters? ...........................................................................................................................
Specified page/Sort.........................................................................................................................
Chapter Paper .................................................................................................................................
7-16
7-16
7-17
7-17
7.4.6
7.4.7
Stamp/Composition.........................................................................................................................
Stamp/Composition - Date/Time.....................................................................................................
Date Format.....................................................................................................................................
Time Format.....................................................................................................................................
Pages...............................................................................................................................................
Text Color ........................................................................................................................................
Text Size ..........................................................................................................................................
Print Position - Print Position...........................................................................................................
Print Position - Fine-Tune................................................................................................................
7-17
7-18
7-18
7-18
7-18
7-18
7-18
7-19
7-19
7.4.8
Stamp/Composition - Page Number ...............................................................................................
Starting Page Number .....................................................................................................................
Starting Chapter Number ................................................................................................................
Page Number Type..........................................................................................................................
Insert Sheet Setting .........................................................................................................................
Text Color ........................................................................................................................................
Text Size ..........................................................................................................................................
Print Position - Print Position...........................................................................................................
Print Position - Fine-Tune................................................................................................................
7-20
7-20
7-20
7-20
7-20
7-21
7-21
7-21
7-22
7.4.9
Stamp/Composition - Stamp...........................................................................................................
Stamp Type/Preset Stamps ............................................................................................................
Pages...............................................................................................................................................
Text Size ..........................................................................................................................................
Text Color ........................................................................................................................................
Print Position - Print Position...........................................................................................................
Print Position - Fine-Tune................................................................................................................
7-22
7-22
7-22
7-22
7-23
7-23
7-23
Contents-4
bizhub C353/C253/C203 (FE2)
7.4.10
Stamp/Composition - Copy Protect ...............................................................................................
What is Copy Protect? ....................................................................................................................
Copy Protect Type - Registered Stamp ..........................................................................................
Copy Protect Type - Preset Stamp .................................................................................................
Copy Protect Type - Date/Time ......................................................................................................
Copy Protect Type - Other..............................................................................................................
Detail Settings .................................................................................................................................
Detail Settings - Text/background color .........................................................................................
Detail Settings - Density..................................................................................................................
Detail Settings - Copy Protect Pattern............................................................................................
Detail Settings - Text Size ...............................................................................................................
Detail Settings - Pattern Overwrite..................................................................................................
Detail Settings - Background Pattern .............................................................................................
Position............................................................................................................................................
Position - Change Pos./Delete ........................................................................................................
7-24
7-24
7-24
7-24
7-25
7-25
7-26
7-26
7-26
7-27
7-27
7-27
7-28
7-28
7-28
7.4.11
Stamp/Composition - Stamp Repeat..............................................................................................
What is Stamp Repeat? ..................................................................................................................
Stamp Repeat Type - Registered Stamp ........................................................................................
Stamp Repeat Type - Preset Stamp ...............................................................................................
Stamp Repeat Type - Date/Time ....................................................................................................
Stamp Repeat Type - Other ............................................................................................................
Detail Settings .................................................................................................................................
Detailed Settings - Text Color .........................................................................................................
Detailed Settings - Density..............................................................................................................
Detailed Settings - Text Size ...........................................................................................................
Detailed Settings - Pattern Overwrite..............................................................................................
Position............................................................................................................................................
Position - Change Pos./Delete ........................................................................................................
7-29
7-29
7-29
7-29
7-30
7-30
7-31
7-31
7-31
7-32
7-32
7-32
7-33
7.4.12
Stamp/Composition - Header/Footer .............................................................................................
Recall Header/Footer ......................................................................................................................
Check/Change Temporarily ............................................................................................................
Check/Change Temporarily - Header Settings/Footer Settings .....................................................
Check/Change Temporarily - Header Settings/Footer Settings - Text...........................................
Check/Change Temporarily - Header Settings/Footer Settings - Date/Time .................................
Check/Change Temporarily - Header Settings/Footer Settings - Other .........................................
Check/Change Temporarily - Pages ...............................................................................................
Check/Change Temporarily - Text Color ........................................................................................
Check/Change Temporarily - Text Size ..........................................................................................
7-33
7-33
7-33
7-34
7-34
7-34
7-34
7-35
7-35
7-35
7.5
7.5.1
7.5.2
7.5.3
Send (Public/Personal/Group user box)......................................................................................
Overview of Send ............................................................................................................................
Description of the Send screen.......................................................................................................
Address Book - Search ...................................................................................................................
Address Type ..................................................................................................................................
Index................................................................................................................................................
Detail Search ...................................................................................................................................
Detail Search - Search Options.......................................................................................................
7-36
7-36
7-36
7-37
7-37
7-38
7-39
7-39
7.5.4
7.5.5
7.5.6
7.5.7
Direct Input......................................................................................................................................
Direct Input - Fax.............................................................................................................................
Direct Input - E-Mail ........................................................................................................................
Direct Input - Internet Fax ...............................................................................................................
RX Ability (Destination) ....................................................................................................................
7-40
7-40
7-41
7-41
7-41
7.5.8
7.5.9
Direct Input - IP Address Fax ..........................................................................................................
Direct Input - PC (SMB)...................................................................................................................
Host Name ......................................................................................................................................
File Path...........................................................................................................................................
User Name ......................................................................................................................................
Password.........................................................................................................................................
Reference ........................................................................................................................................
Next Destination..............................................................................................................................
7-42
7-42
7-42
7-42
7-42
7-42
7-42
7-43
bizhub C353/C253/C203 (FE2)
Contents-5
7.5.10
Direct Input - FTP ............................................................................................................................
Host Name.......................................................................................................................................
File Path...........................................................................................................................................
User Name.......................................................................................................................................
Password .........................................................................................................................................
Detailed Settings .............................................................................................................................
Next Destination ..............................................................................................................................
7-43
7-43
7-43
7-43
7-43
7-43
7-43
7.5.11
Direct Input - WebDAV ....................................................................................................................
Host Name.......................................................................................................................................
File Path...........................................................................................................................................
User Name.......................................................................................................................................
Password .........................................................................................................................................
Detailed Settings .............................................................................................................................
Next Destination ..............................................................................................................................
7-44
7-44
7-44
7-44
7-44
7-44
7-44
7.5.12
7.5.13
7.5.14
7.5.15
Job History ......................................................................................................................................
Address Search ...............................................................................................................................
Address Search - Search ................................................................................................................
Address Search - Advanced Search ...............................................................................................
Name ...............................................................................................................................................
E-Mail Addr......................................................................................................................................
Fax Number .....................................................................................................................................
Last Name .......................................................................................................................................
First Name .......................................................................................................................................
City...................................................................................................................................................
Company Name...............................................................................................................................
Department......................................................................................................................................
OR/AND/STARTS WITH/ENDS WITH..............................................................................................
7-45
7-45
7-46
7-46
7-46
7-46
7-46
7-46
7-47
7-47
7-47
7-47
7-47
7.5.16
File Type ..........................................................................................................................................
File Type ..........................................................................................................................................
Scan Setting ....................................................................................................................................
Encryption........................................................................................................................................
Encryption - Detail Settings .............................................................................................................
Stamp Composition.........................................................................................................................
7-48
7-48
7-48
7-49
7-49
7-51
7.5.17
7.5.18
Overview of Communication Settings .............................................................................................
Communication Settings - Line Settings .........................................................................................
About Line Settings .........................................................................................................................
Overseas TX ....................................................................................................................................
ECM OFF .........................................................................................................................................
V.34 OFF..........................................................................................................................................
Check Dest. & Send ........................................................................................................................
Select Line .......................................................................................................................................
7-51
7-52
7-52
7-52
7-52
7-53
7-53
7-53
7.5.19
Communication Settings - E-Mail Settings .....................................................................................
About E-Mail Settings......................................................................................................................
Document Name..............................................................................................................................
Subject.............................................................................................................................................
From ................................................................................................................................................
Body ................................................................................................................................................
7-54
7-54
7-54
7-54
7-55
7-55
7.5.20
Communication Settings - URL Notification Setting .......................................................................
What is URL notification? ................................................................................................................
Detail Search ...................................................................................................................................
Direct Input ......................................................................................................................................
7-56
7-56
7-56
7-56
7.5.21
Communication Settings - Communication Method Settings.........................................................
Timer TX...........................................................................................................................................
Password TX....................................................................................................................................
F-Code TX .......................................................................................................................................
7-57
7-57
7-58
7-58
7.5.22
7.5.23
7.5.24
7.5.25
Communication Settings - E-Mail Encryption .................................................................................
Communication Settings - Digital Signature ...................................................................................
Communication Settings - Fax Header Settings .............................................................................
Overview of Application...................................................................................................................
7-59
7-59
7-60
7-60
Contents-6
bizhub C353/C253/C203 (FE2)
7.5.26
Application - Send & Print ...............................................................................................................
What is Send & Print? .....................................................................................................................
Copies .............................................................................................................................................
Simplex/Duplex ...............................................................................................................................
Staple ..............................................................................................................................................
Staple-Position Setting ...................................................................................................................
7-61
7-61
7-61
7-61
7-61
7-61
7.6
7.6.1
7.6.2
7.6.3
7.7
7.7.1
7.7.2
7.8
7.8.1
7.8.2
7.8.3
7.8.4
7.9
7.10
7.10.1
7.10.2
7.10.3
7.10.4
Combine (Public/Personal/Group user box) ...............................................................................
What is Combine? ...........................................................................................................................
Combining Order.............................................................................................................................
Description of the Print screen........................................................................................................
Bind TX (Public/Personal/Group user box) .................................................................................
What is Bind TX?.............................................................................................................................
Combining Order screen .................................................................................................................
Bulletin Board User Box (System User Box) ...............................................................................
What is Bulletin Board User Box?...................................................................................................
Bulletin Board User Box screen ......................................................................................................
Printing document in the bulletin board user box ...........................................................................
Deleting document from the bulletin board user box......................................................................
Polling TX User Box (System User Box) ......................................................................................
Secure Print User Box (System User Box) ..................................................................................
What is Secure Print User Box?......................................................................................................
Authentication procedure 1.............................................................................................................
Authentication procedure 2.............................................................................................................
Printing ............................................................................................................................................
Copies .............................................................................................................................................
1-Sided/2-Sided..............................................................................................................................
Finishing ..........................................................................................................................................
Sheet/Cover/Chapter Insert ............................................................................................................
Stamp/Composition ........................................................................................................................
7-62
7-62
7-62
7-63
7-64
7-64
7-64
7-65
7-65
7-65
7-65
7-65
7-66
7-67
7-67
7-67
7-67
7-68
7-68
7-68
7-68
7-68
7-68
7.10.5
7.11
7.11.1
7.11.2
7.11.3
7.11.4
7.12
7.12.1
7.12.2
7.12.3
7.12.4
7.12.5
Deleting ...........................................................................................................................................
Memory RX User Box (System User Box) ...................................................................................
What is Memory RX User Box?.......................................................................................................
Memory RX User Box screen ..........................................................................................................
Printing ............................................................................................................................................
Deleting ...........................................................................................................................................
Annotation User Box (System User Box) ....................................................................................
What is Annotation User Box? ........................................................................................................
Annotation User Box screen ...........................................................................................................
Description of the Print screen........................................................................................................
Description of the Send screen.......................................................................................................
Application - Stamp Element ..........................................................................................................
Secondary Field ..............................................................................................................................
Date/Time ........................................................................................................................................
Density.............................................................................................................................................
Number Type...................................................................................................................................
Print Position ...................................................................................................................................
7-68
7-69
7-69
7-69
7-69
7-69
7-70
7-70
7-70
7-70
7-71
7-71
7-71
7-71
7-72
7-72
7-72
7.13
7.13.1
7.13.2
7.13.3
7.13.4
7.14
7.14.1
7.14.2
7.14.3
7.14.4
Fax Retransmit User Box (System User Box) .............................................................................
What is Fax Retransmit User Box? .................................................................................................
Fax Retransmit User Box screen ....................................................................................................
Retransmitting a fax ........................................................................................................................
Printing ............................................................................................................................................
Encrypted PDF User Box (System User Box) .............................................................................
What is Encrypted PDF User Box? .................................................................................................
Encrypted PDF User Box screen ....................................................................................................
Printing ............................................................................................................................................
Deleting ...........................................................................................................................................
7-73
7-73
7-73
7-73
7-73
7-74
7-74
7-74
7-74
7-74
bizhub C353/C253/C203 (FE2)
Contents-7
8
7.15
7.15.1
7.15.2
7.15.3
7.15.4
7.16
7.16.1
ID & Print User Box (System User Box) .......................................................................................
ID & Print User Box..........................................................................................................................
ID & Print User Box screen ..............................................................................................................
Printing.............................................................................................................................................
Deleting............................................................................................................................................
External Memory (System User Box) ...........................................................................................
About External Memory ...................................................................................................................
Available External Memory ..............................................................................................................
Connecting an external memory .....................................................................................................
7-75
7-75
7-75
7-76
7-76
7-77
7-77
7-77
7-77
7.16.2
External Memory screen..................................................................................................................
File Path...........................................................................................................................................
File selection....................................................................................................................................
To print encrypted PDF data ...........................................................................................................
Move to the upper folder .................................................................................................................
Open a folder ...................................................................................................................................
Print .................................................................................................................................................
Document Details ............................................................................................................................
7-79
7-79
7-79
7-80
7-80
7-80
7-80
7-80
7.16.3
7.16.4
External Memory - Print...................................................................................................................
Basic ................................................................................................................................................
Copies..............................................................................................................................................
Color ................................................................................................................................................
Print .................................................................................................................................................
Binding Position...............................................................................................................................
Finishing...........................................................................................................................................
Paper ...............................................................................................................................................
7-80
7-81
7-81
7-81
7-81
7-81
7-81
7-81
File Document
8.1
8.1.1
Available operations in the File Document screen ....................................................................... 8-3
Public/Personal/Group ...................................................................................................................... 8-3
System............................................................................................................................................... 8-3
8.1.2
Description of the File Document screen .......................................................................................... 8-4
Public/Personal/Group ...................................................................................................................... 8-4
System User Box............................................................................................................................... 8-5
8.2
8.2.1
8.2.2
8.2.3
8.2.4
8.2.5
Public/Personal/Group user box ....................................................................................................
Deleting a document .........................................................................................................................
Edit Name ..........................................................................................................................................
Move ..................................................................................................................................................
Copy ..................................................................................................................................................
Document Details ..............................................................................................................................
Display of detailed information ..........................................................................................................
Preview ..............................................................................................................................................
8.3
8.3.1
8.3.2
8.3.3
8.3.4
8.3.5
8.3.6
System User Box ............................................................................................................................. 8-9
Bulletin Board User Box .................................................................................................................... 8-9
Polling TX User Box........................................................................................................................... 8-9
Secure Print User Box ..................................................................................................................... 8-10
Memory RX User Box ...................................................................................................................... 8-10
Annotation User Box ....................................................................................................................... 8-11
Fax Retransmit User Box................................................................................................................. 8-11
Contents-8
8-6
8-6
8-6
8-6
8-7
8-7
8-7
8-8
bizhub C353/C253/C203 (FE2)
9
10
User box setting
9.1
9.1.1
9.1.2
9.2
9.2.1
Menu tree for user box setting....................................................................................................... 9-3
Utility ................................................................................................................................................. 9-3
Administrator Settings....................................................................................................................... 9-4
User box registration ...................................................................................................................... 9-6
User box registration......................................................................................................................... 9-6
Public/Personal/Group user boxes ................................................................................................... 9-7
Delete Empty User Box(es) ............................................................................................................... 9-8
Bulletin Board User Box.................................................................................................................... 9-9
Relay User Box................................................................................................................................ 9-10
9.3
9.3.1
Administrator Settings ..................................................................................................................
User box permissions......................................................................................................................
Types of users .................................................................................................................................
Public user boxes and personal/group user boxes ........................................................................
9-11
9-11
9-11
9-11
9.3.2
9.3.3
9.3.4
User box registration.......................................................................................................................
Registering annotation user boxes..................................................................................................
Maximum Number of User Boxes ...................................................................................................
Public/Personal/Group ....................................................................................................................
Max No. of Use Boxes - ON/OFF....................................................................................................
Maximum Number of User Boxes ...................................................................................................
9-12
9-13
9-15
9-15
9-15
9-15
9.3.5
User Box Settings ...........................................................................................................................
Delete Unused User Box.................................................................................................................
Delete Secure Print Documents ......................................................................................................
Auto Delete Secure Document........................................................................................................
Encrypted PDF Delete Time ............................................................................................................
ID & Print Delete Time .....................................................................................................................
Document Hold Setting...................................................................................................................
External Memory Functions Settings ..............................................................................................
9-16
9-16
9-16
9-16
9-17
9-17
9-18
9-18
9.3.6
9.3.7
ID & Print Settings ...........................................................................................................................
User Box Administrator Setting.......................................................................................................
Specifying the box administrator ....................................................................................................
When logging on as the box administrator: ....................................................................................
Actions permitted for the box user administrator ...........................................................................
9-19
9-19
9-19
9-20
9-20
9.3.8
HDD Settings...................................................................................................................................
Check HDD Capacity ......................................................................................................................
Overwrite Temporary Data ..............................................................................................................
Overwrite All Data............................................................................................................................
HDD Lock Password .......................................................................................................................
Format HDD ....................................................................................................................................
HDD Encryption Setting ..................................................................................................................
9-21
9-21
9-21
9-22
9-23
9-24
9-24
PageScope Web Connection
10.1
10.1.1
10.1.2
10.1.3
Using PageScope Web Connection.............................................................................................
Operating environment....................................................................................................................
Accessing PageScope Web Connection ........................................................................................
Web browser cache ........................................................................................................................
With Internet Explorer......................................................................................................................
With Netscape Navigator ................................................................................................................
With Mozilla Firefox .........................................................................................................................
10-3
10-3
10-3
10-4
10-4
10-4
10-4
10.1.4
10.2
10.2.1
Structure of pages...........................................................................................................................
Logging on and logging off ..........................................................................................................
Login and logout operations ...........................................................................................................
When user authentication and account track settings are not specified ........................................
When user authentication and account track settings are specified ..............................................
10-5
10-7
10-7
10-7
10-8
bizhub C353/C253/C203 (FE2)
Contents-9
11
10.2.2
10.2.3
Logout.............................................................................................................................................. 10-9
Login ................................................................................................................................................ 10-9
Options that can be selected when logged on to PageScope Web Connection ............................ 10-9
Logging on as a public user .......................................................................................................... 10-10
Logging on as a registered user .................................................................................................... 10-10
Logging on to Administrator mode................................................................................................ 10-11
Logging on as a user box administrator ........................................................................................ 10-12
10.3
10.3.1
10.3.2
10.3.3
10.3.4
10.3.5
10.4
10.4.1
Overview of User mode...............................................................................................................
Information.....................................................................................................................................
Job.................................................................................................................................................
Box ................................................................................................................................................
Direct Print.....................................................................................................................................
Store Address................................................................................................................................
Operation of documents in user boxes .....................................................................................
Displaying the list of documents saved in a user box ...................................................................
Opening user box ..........................................................................................................................
File List...........................................................................................................................................
10.4.2
Printing document ......................................................................................................................... 10-20
Printing procedure ......................................................................................................................... 10-21
10.4.3
Sending document to another device ........................................................................................... 10-23
Sending procedure ........................................................................................................................ 10-24
10.4.4
Downloading document data to computer.................................................................................... 10-26
Downloading procedure ................................................................................................................ 10-26
10.4.5
Moving/copying document to another user box ........................................................................... 10-29
Moving/coping procedure ............................................................................................................. 10-29
10.4.6
10.5
10.5.1
10.5.2
10.5.3
10.5.4
10.5.5
10.5.6
Deleting document ........................................................................................................................
Overview of Administrator mode ...............................................................................................
Maintenance ..................................................................................................................................
Security..........................................................................................................................................
Box ................................................................................................................................................
Print Settings .................................................................................................................................
Store Address ................................................................................................................................
Network .........................................................................................................................................
10-31
10-33
10-33
10-35
10-36
10-37
10-38
10-39
Appendix
11.1
11.2
11.2.1
11.2.2
11.2.3
11.3
12
10-13
10-13
10-14
10-15
10-16
10-17
10-18
10-18
10-18
10-19
Error message list..........................................................................................................................
Entering text ...................................................................................................................................
Enlarging the keyboard....................................................................................................................
To type text......................................................................................................................................
List of available characters ..............................................................................................................
Glossary..........................................................................................................................................
11-3
11-4
11-6
11-7
11-7
11-8
Index
Contents-10
bizhub C353/C253/C203 (FE2)
1
Introduction
Introduction
1
1
Introduction
Thank you for purchasing this machine.
This User manual describes the operating instructions, precautions for proper operation, and simple
troubleshooting of the User Box functions of bizhub C353/C253/C203. In order to allow functionality of this
product fully and to use it effectively, please read this user manual as necessary.
Also, by installing the softwares such as HDDTWAIN, and PageScope Box Operator, you can access the data
in the user box from another computer over the network. Available functions vary depending on the software.
Refer to each software manual.
In order to operate the product safely and properly, be sure to read the accompanying User manuals –
Copy/Print/Network Scan/Fax/Network Fax/Box Operations and Network Administrator.
For detailed safety information and operation precautions, refer to the User Manual.
For descriptions on trademarks and copyrights, refer to the User Manual.
The illustrations used in this manual may appear slightly different from views of the actual equipment.
bizhub C353/C253/C203 (FE2)
1-3
Introduction
1
1.1
About this manual
This document is a user manual on the User Box functions of bizhub C353/C253/C203.
The following describes the contents of this manual and representation of the product name.
This manual is intended for persons with basic knowledge of computers and this machine. For details on the
Windows or Macintosh operating systems, or software applications, refer to the respective manuals.
Also, the software related to the User Box functions, such as HDDTWAIN and PageScope Box Operator, is
provided with this machine. For details on using these softwares, refer to the manual on the DVD.
1.1.1
Contents
This manual consists of the following chapters:
No.
Chapter name
Description
1
Introduction
This chapter describes the manual conventions and gives an overview of the
available user manuals.
2
Overview of the User Box
functions
This chapter describes the type, function and restrictions of available user boxes
before using the user box function of this machine.
3
Control panel/touch panel
This chapter describes the function of keys on the control panel and usage of the
touch panel.
4
Operation flow of user
boxes
This chapter describes the main operation of the user box function in flow
charts.Refer to the flow chart for flow of each operation.It also introduces the
menu tree of items that can be specified to use the user box function.Clicking the
link of the menu tree displays the page that describes the setting screen.
5
Entering User Box mode
This chapter describes the procedure to display the User Box mode screen after
turning the machine on.
6
Save Document
This chapter describes items you can specify to save a document in the user box.
7
Use Document
This chapter describes items you can specify to print and send the document
saved in the user box.
8
File Document
This chapter describes how to check, copy and move the document saved in the
user box.
9
User box setting
This chapter describes items of the Utility mode related to the user box function.The Utility mode allows you to register a user box and specify automatic deletion time of the document.Clicking the link described at the beginning of the
chapter displays the page that describes the Utility mode.
PageScope Web Connection
This chapter describes the overview of the utility software that allows you to configure the machine using an Web browser from a computer on a network.
11
Appendix
This chapter includes handling error messages, entering text and a glossary.
12
Index
10
1.1.2
1-4
Product notation
Product name
Notation
bizhub C353/C253/C203
This machine, C353/C253/C203
Microsoft Windows NT 4.0
Windows NT 4.0
Microsoft Windows 2000
Windows 2000
Microsoft Windows XP
Windows XP
Microsoft Windows Vista
Windows Vista
To combined OS
Windows NT 4.0/2000/XP/Vista
bizhub C353/C253/C203 (FE2)
Introduction
1.2
1
Explanation of manual conventions
The marks and text formats used in this manual are described below.
Safety advices
6 DANGER
Failure to observe instructions highlighted in this manner may result in fatal or critical injuries in fact
of electrical power.
%
Observe all dangers in order to prevent injuries.
7 WARNING
Failure to observe instructions highlighted in this manner may result in serious injuries or property
damage.
%
Observe all warnings in order to prevent injuries and to ensure safe use of the machine.
7 CAUTION
Failure to observe instructions highlighted in this manner may result in slight injuries or property
damage.
%
Observe all cautions in order to prevent injuries and to ensure safe use of the machine.
Sequence of action
1
The number 1 as formatted here indicates the first step of a
sequence of actions.
2
Subsequent numbers as formatted here indicate subsequent
steps of a sequence of actions.
Text formatted in this style provides additional assistance.
% Text formatted in this style describes the action that will
ensure the desired results are achieved.
?
An illustration inserted
here shows what operations
must be performed.
Tips
2
Note
Text highlighted in this manner contains useful information and tips to ensure safe use of the machine.
2
Reminder
Text highlighted in this manner contains information that should be reminded.
!
Detail
Text highlighted in this manner contains references for more detailed information.
bizhub C353/C253/C203 (FE2)
1-5
Introduction
1
Special text markings
[Stop] key
The names of keys on the control panel are written as shown above.
MACHINE SETTING
Display texts are written as shown above.
2
Note
The machine illustrations shown in this manual can vary and depend on the machine configuration.
1-6
bizhub C353/C253/C203 (FE2)
Introduction
1.3
1
User manuals
This machine is provided with printed manuals and PDF manuals on the user manual DVD.
1.3.1
Printed manual
User manual
This manual contains operating procedures and descriptions of the most frequently used functions.
In addition, this manual contains notes and precautions that should be followed for safe use of the machine.
Be sure to read this manual before using the machine.
1.3.2
User manual DVD manuals
Copy Operations
This manual contains descriptions of the Copy mode operations and machine maintenance.
Refer to this manual for details on the paper and originals, copy procedures using convenient Application
functions, replacing consumables, and troubleshooting operations such as clearing paper misfeeds.
Print Operations
This manual contains details of the printing functions that can be specified with the standard built-in printer
controller.
Refer to this manual for operating procedures on using the printing functions.
Box Operations (this manual)
This manual contains operating procedures for using the user boxes on the hard disk.
Refer to this manual for details on saving data in user boxes, retrieving data from user boxes and transferring
data.
Network Scan/Fax/Network Fax Operations
This manual contains details on the network scan, G3 fax, network fax operations, and fax driver functions.
Refer to this manual for details on using network scan function by E-Mail or FTP, G3 fax, Internet fax, IP
address fax operations, and PC-FAX functions.
In order to use the fax functions, the optional fax kit must be purchased separately.
Network Administrator
This manual contains descriptions on setting methods for each function utilizing network connection, mainly
using the PageScope Web Connection.
Refer to this manual for details on using network functions.
Advanced Function Operations
This user manual describes overview and usage of functions that become available by registering the optional
license kit and enabling its function, and functions that become available by connecting the MFP with
applications.
In order to use the functions effectively, please read this user manual.
The following models support the advanced function: bizhub C650/C550/C451/C353/C253/C203
bizhub C353/C253/C203 (FE2)
1-7
1
1-8
Introduction
bizhub C353/C253/C203 (FE2)
2
Overview of the User Box
functions
Overview of the User Box functions
2
2
Overview of the User Box functions
2.1
User Box functions
The User Box functions allow document data to be saved on the internal hard disk of the machine and later
printed. Documents that can be saved are data scanned for copying and saved scan data. To save data to a
box, create the box, and then save the data to the specified box.
The saved data can be printed, sent by e-mail, forwarded to an FTP site, or sent to a computer. By using the
User Box functions, documents can easily be scanned repeatedly and the separate data can be saved on a
computer.
2.1.1
Available User Box functions
Saving documents
Data can be saved to the following box:
User box
Description
Reference
Public/personal/group user
boxes *1
Document data that has been copied or scanned on this machine can
be saved in the user boxes.
Document data, which is printed from a computer on the network, can
be saved.
Based on user authentication or account track settings, access to
some boxes, such as personal and group user boxes, can be limited
to particular users.
p. 6-3
Annotation user box
Document data saved in Scan mode and to be printed or transmitted
with an image of the date/time or an annotation number can be saved.
p. 6-3
External memory *2
Appears if an external memory is installed. Scanned data can be directly saved in the external memory connected to the machine.
p. 6-3
*1
For details on saving document data sent for print jobs from a computer, refer to the user manual – Print
Operations.
*2
To connect an external memory, an optional local interface kit is required.
Original
Fax
Computers
FTP server etc.
External memory
bizhub C353/C253/C203 (FE2)
2-3
Overview of the User Box functions
2
Using document data
The document saved in boxes can be used as follows:
User box
Description
Reference
Public/personal/group user
boxes *1
Saved documents can be printed or sent. Multiple documents can be
selected for printing/transmission.
Depending on user authentication and account track settings, use of
some boxes, such as personal and group user boxes, can be limited
to a particular user.
p. 7-3
Bulletin Board User Box
This box appears when the optional fax kit is installed. Saved documents in the bulletin board user box can be printed.
p. 7-65
Polling TX User Box *2
This box appears when the optional fax kit is installed. Documents
sent using polling can be printed.
p. 7-66
Secure Print User Box *3
Saved documents can be printed. To print the data, enter an ID and
password.
p. 7-67
Memory RX user box *2
This box appears when the optional fax kit is installed. The fax document received though the memory RX setting can be confirmed and
printed.
p. 7-69
Annotation User Box
Document data saved can be printed or transmitted with an image of
the date/time or an annotation number.
p. 7-70
Fax Retransmit User Box *2
This box appears when the optional fax kit is installed. Saved documents can be retransmitted or printed for confirmation.
p. 7-73
Encrypted PDF User Box *4
Saved documents can be printed. Encrypted PDF files saved in an external memory and sent for print jobs are also saved in this box. To
print documents, the preset password is necessary.
p. 7-74
ID & Print User Box
This user box appears if user authentication is applied. Documents
being sent for print jobs by the printer driver after logging on as a user
can be printed.
p. 7-75
External Memory *5
Appears if an external memory is installed. Document data in the external memory connected to the machine can be printed.
p. 7-77
*1
For details on saving document data sent for print jobs from a computer, refer to the User manual – Print
Operations.
*2
For details on sending and receiving documents through polling, refer to the User manual – Network
Scan/Fax/Network Fax Operations.
*3
For details on saving document data to the secure print user box, refer to the User manual – Print
Operations.
*4 For print instruction of an encrypted PDF, see PageScope Direct Print manual or the help on direct print of
PageScope Web Connection.
*5
2-4
To connect an external memory, an optional local interface kit is required.
bizhub C353/C253/C203 (FE2)
Overview of the User Box functions
2
Fax
Computers
FTP server etc.
E-mail etc.
Printouts
External memory
Organizing document data
Documents can be organized by renaming the saved document name, changing the box where they are
saved, or duplicating or deleting them.
User box
Delete
Change
name
Public/personal/group user boxes
o
o
o
o
o
Bulletin Board UserBox
o
e
e
e
e
Polling TX User Box
o
e
e
e
e
Secure Print User Box
o
o
e
e
o
Memory RX User Box
o
o
e
e
o
Annotation User Box
o
o
e
e
o
Fax Retransmit User Box
o
e
e
e
e
Encrypted PDF User Box
e
e
e
e
e
ID & Print User Box
e
e
e
e
e
External Memory
e
e
e
e
e
bizhub C353/C253/C203 (FE2)
Move
Copy
Details
2-5
Overview of the User Box functions
2
2.1.2
Set-up for User Box functions
Before using the User Box functions, the following settings should be specified.
User box registration
Create and save the user boxes where documents will be saved. Boxes can be registered by using the
machine’s touch panel or by using PageScope Web Connection from a computer on the network. The
following boxes can be created:
Public/personal/group user boxes (p. 9-7)
Bulletin board user box (if needed) (p. 9-9)
Annotation user box (p. 9-13)
To use the machine for relay device
If the optional fax kit is installed, and you want to use this machine for relaying fax transmission, create a relay
user box for saving documents temporarily. (p. 9-10)
!
Detail
To create a relay user box, specify the group which contains fax number to be forwarded in advance.
To use Memory RX user box
If the optional fax kit is installed, and you do not want the documents printed upon reception, use the Memory
RX setting.
2
Note
For details on Memory RX setting, refer to the User manual – Network Scan/Fax/Network Fax
Operations.
2-6
bizhub C353/C253/C203 (FE2)
Overview of the User Box functions
2.2
2
Information before saving documents
The following describes information to be kept in mind before using the user box functions.
2.2.1
User authentication
This machine can be set so that an account or user name and a password must be entered in order to use
the machine. Contact the administrator for authorized account or user name.
Machine authentication
%
Type in the user name and password, and then touch [Login] or press the [Access] key.
External server authentication
%
Specify the user name, password and authenticating server, and then touch [Login] or press the
[Access] key.
Account track
%
Type in the account name and password, and then touch [Login] or press the [Access] key.
bizhub C353/C253/C203 (FE2)
2-7
Overview of the User Box functions
2
!
Detail
With user authentication, the only boxes that are displayed are those accessible by the user that is
logged on. For details, refer to "Authentication and accessible user boxes" on page 2-10.
If "Prohibit Functions When Auth. Error" in Administrator mode is set to "Mode 2" and a user enters an
incorrect password the specified number of times, that user is locked out and can no longer use the
machine. Contact the administrator to cancel operation restrictions.
If authentication is performed with PageScope Authentication Manager, contact your server
administrator for log on.
For details on the login method, when the authentication is performed with optional authentication unit
(biometric type) AU-101, refer to the User manual – Copy Operations.
2.2.2
Limitation on user box registration
Public/personal/group user boxes
There are "public" user boxes, which can be used by more than one person, "personal" user boxes, which
can be used only by a single person, and group user boxes, which can be used only by authorized users in
the account track settings.
The followings are limitations for each box.
Before document data can be saved, a user box must be created for saving the data.
Up to 1,000 user boxes can be created.
Up to 200 documents can be saved in a single user box.
A total of 10,000 pages can be saved in all user boxes.
A total of 3,000 documents can be saved in all user boxes.
Bulletin board user box
Up to 10 user boxes can be created for bulletin board user box.
One document can be saved in a single bulletin board user box.
Polling TX user box
One document can be saved in a polling TX user box.
2-8
bizhub C353/C253/C203 (FE2)
Overview of the User Box functions
2.2.3
2
Limitation on document name
Document data that is saved can be given a name.
The names can contain a maximum of 30 characters.
The names can also be changed after they are saved.
The names can be specified when the data is saved; however, if the data is saved without a name specified,
a preset name is applied.
Preset names are created by combining the following elements. (Example of the name
"CKMBT_C35308102315230")
Item
Description
C
This letter indicates the mode when the document is saved. "S" appears for documents saved in the
Fax/Scan mode screen or the User Box screen.
C: Copy
S: Fax/Scan
P: Print
KMBT_C353
This represents the name of the device that scanned the data. The factory default is "KMBT_(product
name)". This name can be changed with the "Device Name" parameter on the "Administrator/Machine Setting" in "Administrator Setting". A name of up to 10 characters can be specified.
08102315230
This indicates the year (last two digits), month, day, hour and minutes when the data is scanned. The
last digit is a serial number if the document is part of a series of scans.
_0001
This indicates the page when multi-page data is scanned. This numeral does not appear beside "File
Name"; however, it is added automatically as part of the name when the file is transmitted. Consider
this when creating a file name so that it meets the naming requirements of the server receiving the
files, for example, when data is sent by FTP.
.TIF
This is the extension for the specified data format. This text does not appear beside "File Name";
however, it is added automatically as part of the name when the file is transmitted.
bizhub C353/C253/C203 (FE2)
2-9
Overview of the User Box functions
2
2.3
Authentication and accessible user boxes
When user authentication and account track settings have been applied, the accessible user boxes and the
access permissions change as shown below. Specify the user authentication and account track settings
according to the desired functions.
2.3.1
When user authentication and account track settings are not specified
Create and access
Public user box
Description
Users can access all public user boxes.
User boxes created by users and the administrator are "public" user boxes.
2.3.2
When only user authentication settings are specified
Public user box
User 1
Personal user box
for user 1
User box administrator
Personal user box
for user 2
User 2
Accessible
Description
Users can access all public user boxes and only personal user boxes that the user has created.
Personal user boxes cannot be accessed by other users.
A user box administrator can be specified.
A user box administrator can access all public user boxes and all personal user boxes.
If user authentication settings are canceled or if authentication method is changed, all personal user
boxes become public user boxes.
2-10
bizhub C353/C253/C203 (FE2)
Overview of the User Box functions
2.3.3
2
When only account track settings are specified
Account A
Public user box
Group user box
for account A
Account B
Group user box
for account B
Accessible
Description
Users can access all public user boxes and only group user boxes for the account that the user
belongs to.
If account track settings are canceled or if authentication method is changed, all group user boxes
become public user boxes.
bizhub C353/C253/C203 (FE2)
2-11
Overview of the User Box functions
2
2.3.4
When user authentication and account track settings are specified and
synchronized
Account A
Account B
User 1
User 2
Since account name is synchronized with user names, group user boxes for accounts that the user does not
belong to cannot be accessed.
Public user box
Account A
Personal user
box for user 1
User 1
Group user box
for account A
Account B
Public user box
Personal user
box for user 2
User 2
Group user box
for account B
Accessible
Description
Users can access all public user boxes, only group user boxes for the account that the user belongs to,
and only personal user boxes that the user has created.
Personal user boxes cannot be accessed by other users.
A user box administrator can be specified.
A user box administrator can access all public user boxes, all personal user boxes and all group user
boxes.
If user authentication settings are canceled or if authentication method is changed, personal user boxes
and all group user boxes become public user boxes.
2-12
bizhub C353/C253/C203 (FE2)
Overview of the User Box functions
2.3.5
2
When user authentication and account track settings are specified but not
synchronized
Account A
Account B
User 1
Since account name is not synchronized with user names, the account name and password must be entered
when logging on. A user can use different account name at each login, and therefore can access to each
group user box for the account.
Public user box
Personal user
box for user 1
User 1
Group user box
for account A
Public user box
Group user box
for account B
Accessible
Accessible by entering the account name and password
Description
Users can access all public user boxes and only personal user boxes that the user has created.
Personal user boxes cannot be accessed by other users.
A user can access to a particular group user box by entering the relevant account name and password
when logging on.
A user box administrator can be specified.
A user box administrator can access all public user boxes, all personal user boxes and all group user
boxes.
If user authentication settings are canceled or if authentication method is changed, personal user boxes
and all group user boxes become public user boxes.
bizhub C353/C253/C203 (FE2)
2-13
2
2-14
Overview of the User Box functions
bizhub C353/C253/C203 (FE2)
3
Control panel/touch panel
Control panel/touch panel
3
3
Control panel/touch panel
3.1
Control panel
Use the control panel for User Box mode operation. The following keys and switches are provided on the
control panel.
1
2
3
4
22
5
21
20
19
6
18
17
7
16
8
15
14
No.
13 12 11
10 9
Part name
Description
1
Touch panel
Displays various screens and messages. Specify the various
settings by directly touching the panel.
2
Main Power indicator
Lights up in green when the machine is turned on with the main
power switch.
3
Sub power switch
Press to turn on/off machine operations, for example, for copying, printing or scanning. When turned off, the machine enters
a state where it conserves energy.
4
[Mode Memory] key
Press to register (store) the desired copy/scan settings as a
program or to recall a registered copy/scan program.
5
[Utility/Counter] key
Press to display the Utility screen and the Meter Count screen.
6
[Reset] key
Press to clear all settings (except programmed settings) entered in the control panel and touch panel.
7
[Interrupt] key
Press to enter Interrupt mode. While the machine is in Interrupt
mode, the indicator on the [Interrupt] key lights up in green and
the message "Now in Interrupt mode." appears on the touch
panel. To cancel Interrupt mode, press the [Interrupt] key
again.
8
[Stop] key
Pressing the [Stop] key during scanning temporarily stops the
scan operation.
bizhub C353/C253/C203 (FE2)
3-3
Control panel/touch panel
3
No.
Part name
Description
[Proof Copy] key
Press to print a single proof copy to be checked before printing a large number of copies. Press the [Proof Copy] key before scanning or copying, the result can be viewed on the
touch panel.
This key cannot be used when saving documents by pressing
the [User Box] key. To check the preview image when saving
to a user box, press the [Fax/Scan] key. For the procedure for
checking preview images, refer to the User manual – Network
Scan/Fax/Network Fax Operations.
10
[Start] key
Press to start scanning. When this machine is ready to begin
to scan, the indicator on the [Start] key lights up in blue. If the
indicator on the [Start] key lights up in orange, the operation
cannot be started.
Press to restart a stopped job.
11
Data indicator
Flashes in blue while a print job is being received.
Lights up in blue when data is being printed.
12
[C] (clear) key
Press to erase a value (such as the number of copies, a zoom
ratio, or a size) entered using the keypad.
13
Keypad
Use to type in the number of sets to be copied.
Use to type in the zoom ratio.
Use to type in the various settings.
14
[Help] key
Press to display the Help screen. From this screen, descriptions of the various functions and details of operations can be
displayed.
15
[Enlarge Display] key
Press to enter Enlarge Display mode. If authentication is performed with PageScope Authentication Manager, it does not
enter Enlarge Display mode.
16
[Accessibility] key
Press to display the screen for specifying settings for user accessibility functions.
17
[Power Save] key
Press to enter Power Save mode. While the machine is in Power Save mode, the indicator on the [Power Save] key lights up
in green and the touch panel goes off. To cancel Power Save
mode, press the [Power Save] key again.
18
[Access] key
In order to use this machine when user authentication or account track settings have been applied, enter the user name
and password (for user authentication) or the account name
and password (for account track), and then press this key. Also
press this key to log off.
19
[Brightness] dial
Use to adjust the brightness of the touch panel.
20
[User Box] key
Press to enter User Box mode.
While the machine is in User Box mode, the indicator on the
[User Box] key lights up in green.
21
[Fax/Scan] key
Press to enter Fax/Scan mode.
While the machine is in Fax/Scan mode, the indicator on the
[Fax/Scan] key lights up in green. For details on the fax operation or the operation, refer to the User manual – Network
Scan/Fax/Network Fax Operations.
22
[Copy] key
Press to enter Copy mode. (As a default, the machine is in
Copy mode.)
While the machine is in Copy mode, the indicator on the [Copy]
key lights up in green. For details, refer to the User manual –
Copy Operations.
9
7 CAUTION
Do not apply extreme pressure to the touch panel, otherwise it may be scratched or damaged.
%
Never push down on the touch panel with force, and never use a hard or pointed object to make a
selection in the touch panel.
3-4
bizhub C353/C253/C203 (FE2)
Control panel/touch panel
3.2
Touch panel
3.2.1
Screen layout
3
1
No.
5
2
4
3
Part Name
Description
1
Message display area
The status of the machine and details on operations
are displayed.
2
Functions/settings display area
Softkeys to select functions are displayed. This area
is for specifying the settings of various functions.
Touch softkeys to display the corresponding screen
for specifying the settings.
3
Icon display area
Icons indicating the status of jobs and the machine
are displayed.
4
Toner supply indicators
These indicators show the amount of toner remaining
for yellow (Y), magenta (M), cyan (C), and black (K).
5
Left panel
The softkeys, such as [Job List] showing the jobs being processed or to be processed, and [Mode Check]
showing the result of the specified settings, appear in
this area.
For details on the left panel, refer to "Display and operation of the left panel" on page 3-7.
bizhub C353/C253/C203 (FE2)
3-5
Control panel/touch panel
3
Icons on the touch panel
The status of the machine may appear in the icon display area. The followings are the icons appear on the
touch panel.
Icon
Description
Indicates that data is being sent from the machine, regardless of the current mode.
Indicates that data is being received by the machine, regardless of the current mode.
Indicates that an error occurred during an image stabilization operation, a print operation or
a scan operation.
Touch this icon to view a screen containing a warning code.
If the warning screen was closed when a warning occurred, touch this button to display the
warning screen again.
Appears when there is a message indicating that consumables must be replaced or the machine requires maintenance. Touch this icon to display the message, and then perform the
replacement or maintenance procedure.
Appears when an error occurs with the connection to the POP server.
Indicates that paper is not loaded in the paper tray.
Indicates that very little paper remains in the paper tray.
If the optional image controller is installed, touch this icon to display the setting screen for
the image controller.
Indicates that Enhanced Security mode is set to ON.
Indicates that an external memory is installed.
3-6
bizhub C353/C253/C203 (FE2)
Control panel/touch panel
3.2.2
3
Display and operation of the left panel
In the left panel of the touch panel, job status and settings can be displayed using the keys. The followings
are the keys appear in the left panal in User Box mode.
1
2
3
No.
Part Name
Description
1
[Job List]
Jobs that are being processed and the job history can
be checked.
2
[Check Job]
Information on the selected user box, scan, printing
and transmission settings of documents can be
checked.
3
[Preview]
Saved document image can be previewed.
Job List
Queued operation, such as saving document data to a user box and printing/sending documents, is called a
job.
%
Touch [Job List] to display the jobs being processed.
bizhub C353/C253/C203 (FE2)
3-7
Control panel/touch panel
3
Job List - Delete
Jobs being processed can be deleted from the list to cancel the job. Select the job from the job list, and then
touch [Delete].
%
Check the message that appears, and then delete the job.
Job List - Job Details
Jobs that are being processed and the job history can be viewed from the Job List screens. Jobs are
classified into the following four categories:
3-8
Name
Description
[Print]
Lists print jobs for copying, computer printing, and received faxes.
[Send]
Lists fax and scanner transmission jobs.
[Receive]
Lists fax reception jobs.
[Save]
Lists jobs for saving documents in user boxes.
bizhub C353/C253/C203 (FE2)
Control panel/touch panel
3
Current Jobs in Print page
Item
Description
List items
No.: Job identification number assigned when the job is queued.
User Name: User or account name who queued the job.
Status: Job status (Receiving, PrintWait, Printing, StopPrint, Print Err, Job Stored)
Document Name: File name to be printed.
Time Stored: Time when the job is queued.
Org.: The number of original pages.
Copies: The number of copies to be printed.
[
][
]
Touch them when there are more jobs than seven that can be displayed at one time, to switch the
pages.
[Delete]
Deletes the selected job.
[Increase Priority]
Allows to change printing job priority.
[Release Held
Jobs]
Allows to change settings of a stored job, or print or delete the job.
[Check Job
Set.]
Allows to view the settings of the selected job. To check, touch either [
[Detail]
Displays the job status, user name, document name, output tray, queued time, the number of original
pages, and the number of copies to be printed. Touch [Delete] to delete the job.
Back] or [Forward
].
!
Detail
If user authentication settings have been applied, the document name is not accessible from other
users.
Document names do not appear on the screen for secured documents.
If Change Job Priority in Administrator mode is set to "Restrict", the print job priority control is not
available.
If Change Job Priority is set to ON, touching this softkey interrupts the printing job for the given priority.
The interrupted job is automatically printed once the given priority job is finished.
Job History in Print page
Item
Description
List items
No.: Job identification number assigned when the job is queued.
User Name: User or account name who queued the job.
Document Name: File name to be printed.
Time Stored: Time when the job is queued.
Org.: The number of originals.
Copies: The number of copies to be printed.
Result: Result of a job (Job Complete, Deleted Due To Error, Deleted by User, Reset Modes).
[
][
]
Touch them when there are more jobs than seven that can be displayed at one time, to switch the
pages.
[Deleted
Jobs]/
[Finished
Jobs]/
[All Jobs]
Touch the softkey to display each category of job.
[Detail]
Displays the results of the job, error details, user name, document name, output tray, queued time,
completed time, the number of original pages, and the number of copies to be printed.
!
Detail
If user authentication settings have been applied, the document name is not accessible from other
users.
Document names do not appear on the screen for secured documents.
bizhub C353/C253/C203 (FE2)
3-9
Control panel/touch panel
3
Current Jobs in Send page
Item
Description
List items
No.: Job identification number assigned when the job is queued.
Address Type: Type of the terminal receiving data (Fax, E-Mail, FTP, PC (SMB), WebDAV, TWAIN,
others).
Status: Job status (Transferring, Waiting, Dialing, Waiting To Redial)
Address: Fax number, E-mail address and user box name of the recipient.
Time Stored: Time when the job is queued.
Org.: The number of original pages.
[
][
]
Touch them when there are more jobs than seven that can be displayed at one time, to switch the
pages.
[Timer TX Job]
Displays the status of the reserved transmission in the memory. Touch [Delete] to delete the job.
[L1][L2]
These softkeys appear if the optional fax multi line has been installed. Displays the list of the selected
line.
[Delete]
Deletes the selected job.
[Redial]
Select the job marked "Waiting To Redial" status for redialing.
[Check Job
Set.]
Allows to view the settings of the selected job. To check, touch either [
[Detail]
Displays the job status, user name, document name, destination type, destination, queued time,
transmission time, the number of original pages, and external server information. Touch [Delete] to
delete the job.
Back] or [Forward
].
!
Detail
If user authentication settings have been applied, the document name is not accessible from other
users.
Document names do not appear on the screen for secured documents.
"TWAIN" is indicated for jobs sent by the Web service.
The external server information in [Detail] is available only if the external server authentication is applied.
Job History in Send page
Item
Description
List items
No.: Job identification number assigned when the job is queued.
Address Type: Type of the terminal receiving data (Fax, E-Mail, FTP, PC (SMB), WebDAV, TWAIN,
others).
Address: Fax number, E-mail address and user box name of the recipient.
Time Stored: Time when the job is queued.
Org.: The number of original pages.
Result: Result of a job (Job Complete/Deleted Due To Error/Deleted by User).
[
][
]
Touch them when there are more jobs than seven that can be displayed at one time, to switch the
pages.
[Deleted
Jobs]/
[Finished
Jobs]/
[All Jobs]
Touch the softkey to display each category of job.
[Comm. List]
Displays the Scan list, Fax TX list, and Fax RX list. At each list screen, the activity report, TX report,
and RX report can be printed.
[Detail]
Displays the job results, error details, user name, document name, destination type, queued time,
transmission time, the number of original pages, and external server information.
!
Detail
If user authentication settings have been applied, the document name is not accessible from other
users.
Document names do not appear on the screen for secured documents.
"TWAIN" is indicated for jobs sent by the Web service.
3-10
bizhub C353/C253/C203 (FE2)
Control panel/touch panel
3
The external server information in [Detail] is available only if the external server authentication is applied.
Current Jobs in Receive page
Item
Description
List items
No.: Job identification number assigned when the job is queued.
User Name: User or account name who queued the job.
Status: Job status (Receiving, Dialing (only with polling reception), Print Wait, Printing, Stop Print,
Print Err, Saving to Memory)
Document Name: Displays the name of the received or saved document.
Time Stored: Time when the job is queued.
Org.: The number or received original pages.
[
][
]
Touch them when there are more jobs than seven that can be displayed at one time, to switch the
pages.
[Delete]
The selected job is deleted.
[Redial]
Select the job marked "Waiting To Redial" status for redialing.
[Forward]
Forwards the fax which has been received and stored in the memory. Specify the recipient either by
selecting from the address book or by typing them in directly.
[Detail]
Displays the job status, user name, document name, output tray, queued time, transmission time,
and the number of original pages. Touch [Delete] to delete the job.
!
Detail
If user authentication settings have been applied, the document name is not accessible from other
users.
Document names do not appear on the screen for secured documents.
Job History in Receive page
Item
Description
Items
No.: Job identification number assigned when the job is queued.
User Name: User or account name who queued the job.
Document Name: Displays the name of the received or saved document.
Time Stored: Time when the job is queued.
Org.: The number of original pages.
Result: Result of a job (Job Complete/Deleted Due To Error/Deleted by User/Reset Modes).
[
][
]
Touch them when there are more jobs than seven that can be displayed at one time, to switch the
pages.
[Deleted
Jobs]/
[Finished
Jobs]/
[All Jobs]
Touch the softkey to display each category of job.
[Comm. List]
Displays the Scan list, Fax TX list, and Fax RX list. At each list screen, the activity report, TX report,
and RX report can be printed.
[Detail]
Displays the results of the job, error details, user name, document name, output tray, queued time,
transmission time, and the number of original pages.
!
Detail
If user authentication settings have been applied, the document name is not accessible from other
users.
Document names do not appear on the screen for secured documents.
bizhub C353/C253/C203 (FE2)
3-11
Control panel/touch panel
3
Current Jobs in Save page
Item
Description
List items
No.: Job identification number assigned when the job is queued.
User Name: User or account name who queued the job.
Status: Job status (Receiving, Saving to Memory).
Document Name: Displays the name of the saved document.
Time Stored: Time when the job is queued.
Org.: The number of original pages.
[
][
]
Touch them when there are more jobs than seven that can be displayed at one time, to switch the
pages.
[Delete]
Deletes the selected job.
[Detail]
Displays the job status, user name, document name, user box, queued time, and the number of original pages. Touch [Delete] to delete the job.
!
Detail
If user authentication settings have been applied, the document name is not accessible from other
users.
Document names do not appear on the screen for secured documents.
Job History in Save page
Item
Description
List items
No.: Job identification number assigned when the job is queued.
User Name: User or account name who queued the job.
Document Name: Displays the name of the saved document.
Time Stored: Time when the job is queued.
Org.: The number of originals.
Result: Result of a job (Job Complete/Deleted Due To Error/Deleted by User/Reset Modes).
[
][
]
Touch them when there are more jobs than seven that can be displayed at one time, to switch the
pages.
[Deleted
Jobs]/
[Finished
Jobs]/
[All Jobs]
Touch the softkey to display each category of job.
[Comm. List]
Displays the Scan list, Fax TX list, and Fax RX list. At each list screen, the activity report, TX report,
and RX report can be printed.
[Detail]
Displays the job result, error details, user name, document name, user box, queued time, and the
number of original pages.
!
Detail
If user authentication settings have been applied, the document name is not accessible from other
users.
Document names do not appear on the screen for secured documents.
3-12
bizhub C353/C253/C203 (FE2)
Control panel/touch panel
3
Settings when saving documents
1
Select [Save Document] to display the information of the user box where the document is to be saved.
– When saving a document, select "Scan Settings" or "Original Settings".
[Detail] appears.
2
Touch [Detail] to view scan settings and original settings.
Detail - Check Scan Settings
The basic scan setting, scan settings, and application settings can be checked.
%
To check, touch either [
bizhub C353/C253/C203 (FE2)
Back] or [Forward
].
3-13
Control panel/touch panel
3
Detail - Check Original Settings
The original settings can be checked.
Settings when using documents
%
Select [Use Document] to display the information of the selected user box.
Detail
%
Touch [Document Details] in the Use Document screen to view the Registerd Time/User
Name/Document Name/the No. of Pages/Job No. Touch [Preview] to view the preview image of the
saved document.
– When multiple documents are selected, switch the preview page by touching [
][
].
2
Note
For the procedure on viewing preview image, refer to "Preview" on page 3-16.
3-14
bizhub C353/C253/C203 (FE2)
Control panel/touch panel
3
Check Job Settings
When [Send] or [Bind TX] is selected on the Use Document screen, [Check Job Settings] appears.
%
Touch [Check Job Settings] to check the following settings:
– Destination Settings
– Communication Settings
– E-Mail Settings
Check Job Settings - Destination Settings
This screen displays the list of registered destinations.
%
To add a destination to the address book by directly entering it, select the destination and touch [Store
Address].
– To view the details of the destination on the screen, select the destination and touch [Details].
– To delete a destination, select the destination and touch [Delete].
!
Detail
For details on address book registration, refer to the User manual – Network Scan/Fax/Network Fax
Operations.
Check Job Settings - Communication Settings
The line setting and transmission method settings can be checked.
%
To check, touch either [
bizhub C353/C253/C203 (FE2)
Back] or [Forward
].
3-15
Control panel/touch panel
3
Check Job Settings - E-Mail Settings
The document name, subject, From address and message body for sending e-mail messages can be
checked.
Preview
When Use Document or File Document is selected, the image of the saved document can be previewed. The
document can be viewed at full size or at a size of 2, 4 or 8 times the normal size.
%
Touch [Preview] to display the thumbnail image of the top page in the left panel.
!
Detail
With documents containing multiple pages, only the image of the first page can be checked.
The contents of a document saved with encryption cannot be previewed.
3-16
bizhub C353/C253/C203 (FE2)
Control panel/touch panel
3
Preview - Detail
%
To enlarge the preview image, touch [Detail].
–
–
The document can be viewed at full size or at a size of 2, 4 or 8 times the normal size.
Select the display size, and use the scroll bars in the right end and bottom end of the image to view
the desired section of the image.
Preview - Detail (Print/Combine)
%
When [Print] or [Combine] is selected while using documents, by touching [Detail], the page image of
printing result can be previewed.
!
Detail
If a document contains multiple pages, images for all the pages can be previewed.
Item
Description
[Prev. Page]/
[Next Page]
If stored document contains multiple pages, touch [Prev. Page]/[Next Page] to move to the previous/next page on the preview image.
Zoom
The document can be viewed at full size or at a size of 2, 4 or 8 times the normal size. Select the
display size, and use the scroll bars in the right end and bottom end of the image to view the desired
section of the image.
Page
Rotation
•
•
•
•
•
[View Finishing]
[Rotate current page]: Touch this key to rotate the page currently displayed by 180 degrees.
[Select page(s) to rotate]: This key appears when the stored document contains multiple pages.
List of scanned pages appears. Select the desired page to rotate by 180 degrees. The rotation
options in the list of scanned page are as follows:
[Select Odd]: Rotates the images for odd number of pages by 180 degrees.
[Select Even]: Rotates the images for even number of pages by 180 degrees.
[Select All]: Rotates the images for all of pages by 180 degrees.
Touch this key to display the specified settings in the preview image by icons and text. When [View
Finishing] is cancelled, the only image is displayed without icons or text.
2
Note
When selecting on the page directly, the image of the selected page is rotated by 180 degrees.
bizhub C353/C253/C203 (FE2)
3-17
Control panel/touch panel
3
Preview - Detail (Send/Bind TX)
%
If [Send] or [Bind TX] is selected when using documents, by touching [Detail], the result of the page
image to be sent can be previewed.
Item
Description
[Scan]
Touch this key to display the preview for [E-mail TX], [PC (FTP)], [SMB], and [WebDAV].
[Fax]
Touch this key to display the preview for sending G3 fax/IP address fax/Internet fax.
[Prev. Page]/
[Next Page]
If stored document contains multiple pages, touch [Prev. Page]/[Next Page] to move to the previous/next page on the preview image.
Zoom
The document can be viewed at full size or at a size of 2, 4 or 8 times the normal size. Select the
display size, and use the scroll bars in the right end and bottom end of the image to view the desired
section of the image.
Page
Rotation
•
•
•
•
•
[View Finishing]
[Rotate current page]: Touch this key to rotate the page currently displayed by 180 degrees.
[Select page(s) to rotate]: This key appears when the stored document contains multiple pages.
List of scanned pages appears. Select the desired page to rotate by 180 degrees. The rotation
options in the list of scanned page are as follows:
[Select Odd]: Rotates the images for odd number of pages by 180 degrees.
[Select Even]: Rotates the images for even number of pages by 180 degrees.
[Select All]: Rotates the images for all of pages by 180 degrees.
Touch this key to display the specified settings in the preview image by icons and text. When [View
Finishing] is cancelled, the image only is displayed without icons or text.
2
Note
When selecting on the page directly, the image of the selected page is rotated by 180 degrees.
3-18
bizhub C353/C253/C203 (FE2)
4
Operation flow of user boxes
Operation flow of user boxes
4
Operation flow of user boxes
4.1
Saving documents in user boxes
1
Press the [User Box] key.
2
Touch [Save Document].
3
Select the user box where the documents are to be saved, and then touch [OK].
bizhub C353/C253/C203 (FE2)
4
4-3
Operation flow of user boxes
4
The following screen appears.
4
4-4
Specify the document name (p. 6-4), scan settings (p. 6-5), and original settings (p. 6-17).
–
Touch [Document Name] to change the name of the document.
–
Touch [Scan Settings] to specify the scan settings.
–
Touch [Original Settings] to specify the original settings.
bizhub C353/C253/C203 (FE2)
Operation flow of user boxes
5
Position the original.
6
Press the [Start] key or touch [Start].
bizhub C353/C253/C203 (FE2)
4
4-5
Operation flow of user boxes
4
4.2
4-6
Printing documents in user boxes
1
Press the [User Box] key.
2
Touch [Use Document].
3
Select the desired user box, and then touch [OK].
bizhub C353/C253/C203 (FE2)
Operation flow of user boxes
4
4
Select one or multiple documents.
One document selected
Multiple documents selected
–
–
If one document is selected, touch [Print]. (p. 7-6)
If multiple documents are selected, touch [Combine]. (p. 7-62)
Specify an order for printing (combination order).
bizhub C353/C253/C203 (FE2)
4-7
Operation flow of user boxes
4
4-8
5
Specify basic and application settings. (p. 7-6)
6
Check the result in preview images. (p. 3-16)
7
Press the [Start] key or touch [Start].
bizhub C353/C253/C203 (FE2)
Operation flow of user boxes
4.3
4
Sending documents in user boxes
The following outlines are the steps for sending documents saved in public user boxes.
1
Press the [User Box] key.
2
Touch [Use Document].
3
Select the desired user box, and then touch [OK].
bizhub C353/C253/C203 (FE2)
4-9
Operation flow of user boxes
4
4
Select one or multiple documents.
One document selected
Multiple documents selected
–
–
If one document is selected, touch [Send]. (p. 7-36)
If multiple documents are selected, touch [Bind TX]. (p. 7-64)
Specify an order for sending (combination order).
4-10
bizhub C353/C253/C203 (FE2)
Operation flow of user boxes
5
4
Specify a recipient.
–
Selecting from Address Book
–
Selecting from Direct Input
–
Selecting from Job History
–
Selecting via Address Search
bizhub C353/C253/C203 (FE2)
4-11
Operation flow of user boxes
4
6
Specify file types, communication settings, and application settings. (p. 7-36)
–
From Address Book or Direct Input
File Type
Communication Settings
Application
4-12
bizhub C353/C253/C203 (FE2)
Operation flow of user boxes
–
4
From Job History and Address Search
File Type
Communication Settings
Application
7
Check the result in preview images. (p. 3-16)
bizhub C353/C253/C203 (FE2)
4-13
Operation flow of user boxes
4
8
4-14
Press the [Start] key or touch [Start].
bizhub C353/C253/C203 (FE2)
Operation flow of user boxes
4.4
4
Saving documents in external memory
The following outlines are steps for saving documents in external memory.
1
Connect an external memory to the machine, and then press
the [User Box] key.
2
Touch [Save Document].
3
Touch the System User Box tab, select [External Memory], and then touch [OK].
The following screen appears.
bizhub C353/C253/C203 (FE2)
4-15
Operation flow of user boxes
4
4
4-16
Specify the document name, scan settings, and original settings.
–
Touch [Document Name] to change the name of the document.
–
Touch [Scan Settings] to specify the scan settings.
–
Touch [Original Settings] to specify the original settings.
bizhub C353/C253/C203 (FE2)
Operation flow of user boxes
5
Position the original.
6
Press the [Start] key or touch [Start].
bizhub C353/C253/C203 (FE2)
4
4-17
Operation flow of user boxes
4
4.5
Printing documents in external memory
The following outlines are the steps for printing documents saved in external memory.
4-18
1
Connect an external memory to the machine, and then press
the [User Box] key.
2
Touch [Use Document].
3
Touch the System User Box tab, select [External Memory], and then touch [OK].
4
Select files (p. 7-79).
bizhub C353/C253/C203 (FE2)
Operation flow of user boxes
5
Specify basic settings. (p. 7-81)
6
Press the [Start] key or touch [Start].
bizhub C353/C253/C203 (FE2)
4
4-19
Operation flow of user boxes
4
4.6
Organizing user box documents
The following outlines are the steps for organizing documents saved in public user boxes.
4-20
1
Connect an external memory to the machine, and then press
the [User Box] key.
2
Touch [File Document].
3
Select the desired user box, and then touch [OK].
4
Select documents and choose action. (p. 8-3)
bizhub C353/C253/C203 (FE2)
Operation flow of user boxes
4
2
Note
For the procedure for deleting the documents, refer to "Deleting a document" on page 8-6.
For the procedure for changing the name of saved document, refer to "Edit Name" on page 8-6
For the procedure for moving documents to a different user box, refer to "Move" on page 8-6.
For the procedure for copying a document to a different user box, refer to "Copy" on page 8-7
For the procedure for checking or previewing document information, refer to "Document Details" on
page 8-7.
bizhub C353/C253/C203 (FE2)
4-21
Operation flow of user boxes
4
4.7
Menu trees in User Box mode
The functions and settings that can be operated in User Box mode are structured as shown below.
4.7.1
Save Document
Public/Personal/Group User Boxes
The following are menu trees that are associated with saving documents in public, personal, and group user
boxes.
First-level menu
Second-level menu
Third-level menu
Fourth-level menu
User Box (p. 6-4)
Document Name (p. 6-4)
Scan Settings
Original Type (p. 6-5)
Simplex/Duplex (p. 6-6)
Resolution (p. 6-6)
File Type
File Type (p. 6-7)
Scan Setting (p. 6-8)
Encryption (p. 6-8)
Density (p. 6-11)
Separate Scan (p. 6-11)
Quality Adjustment
Color (p. 6-12)
Background Removal
(p. 6-12)
Sharpness (p. 6-12)
Original Settings
Erase
Frame Erase (p. 6-13)
Book Scan
Book Copy (p. 6-14)
Application
Scan Size (p. 6-16)
Special Original (p. 6-17)
Mixed Original
Z-Folded Original
Long Original
Direction Settings
Original Direction (p. 6-17)
Binding Position (p. 6-18)
Auto
Top
Left
Despeckle (p. 6-18)
4-22
bizhub C353/C253/C203 (FE2)
Operation flow of user boxes
4
System User Box
The following are menu trees that are associated with saving documents in system user box.
First-level menu
Second-level menu
Annotation User Box
User Box (p. 6-4)
Third-level menu
Fourth-level menu
Document Name (p. 6-4)
Scan Settings
Original Type (p. 6-5)
Simplex/Duplex (p. 6-6)
Resolution (p. 6-6)
File Type
File Type (p. 6-7)
Scan Setting (p. 6-8)
Encryption (p. 6-8)
Density (p. 6-11)
Separate Scan (p. 6-11)
Quality Adjustment
Color (p. 6-12)
Background Removal
(p. 6-12)
Sharpness (p. 6-12)
Original Settings
Erase
Frame Erase (p. 6-13)
Book Scan
Book Copy (p. 6-14)
Application
Scan Size (p. 6-16)
Special Original (p. 6-17)
Mixed Original
Z-Folded Original
Long Original
Direction Settings
Original Direction (p. 6-17)
Binding Position (p. 6-18)
Despeckle (p. 6-18)
bizhub C353/C253/C203 (FE2)
4-23
Operation flow of user boxes
4
First-level menu
Second-level menu
External Memory
User Box (p. 6-4)
Third-level menu
Fourth-level menu
Document Name (p. 6-4)
Scan Settings
Original Type (p. 6-5)
Simplex/Duplex (p. 6-6)
Resolution (p. 6-6)
File Type
File Type (p. 6-7)
Scan Setting (p. 6-8)
Encryption (p. 6-8)
Density (p. 6-11)
Separate Scan (p. 6-11)
Quality Adjustment
Color (p. 6-12)
Background Removal
(p. 6-12)
Sharpness (p. 6-12)
Original Settings
Erase
Frame Erase (p. 6-13)
Book Scan
Book Copy (p. 6-14)
Application
Scan Size (p. 6-16)
Special Original (p. 6-17)
Mixed Original
Z-Folded Original
Long Original
Direction Settings
Original Direction (p. 6-17)
Binding Position (p. 6-18)
Despeckle (p. 6-18)
4-24
bizhub C353/C253/C203 (FE2)
Operation flow of user boxes
4.7.2
4
Use Document
Public/Personal/Group User Boxes
First-level menu
Print
Second-level menu
Third-level menu
Fourth-level menu
Copies (p. 7-7)
Print
1-Sided (p. 7-7)
2-Sided (p. 7-7)
Finishing
Sort (p. 7-8)
Group (p. 7-8)
Offset (p. 7-8)
Staple (p. 7-8)
Punch (p. 7-9)
Center Staple/Fold (p. 7-9)
Center Staple & Fold
(p. 7-10)
Page Margin
Margin Position (p. 7-11)
Adjust Value (p. 7-11)
Image Shift (p. 7-11)
Horizontal Shift
Vertical Shift
Change Back Shift
Sheet/Cover/Chapter Insert
Cover Sheet (p. 7-13)
Front Cover
Back Cover
Insert Sheet (p. 7-15)
Insert Paper
Insert Type
Stamp/Composition
Chapters (p. 7-16)
Chapter Paper
Date/Time (p. 7-18)
Date Format (p. 7-18)
Time Format (p. 7-18)
Pages (p. 7-18)
Text Color (p. 7-18)
Text Size (p. 7-18)
Print Position (p. 7-19)
bizhub C353/C253/C203 (FE2)
4-25
Operation flow of user boxes
4
First-level menu
Second-level menu
Third-level menu
Fourth-level menu
Print
Stamp/Composition
Page Number (p. 7-20)
Starting Page Number
(p. 7-20)
Page Number Type
(p. 7-20)
Starting Chapter Number
(p. 7-20)
Insert Sheet Setting
(p. 7-20)
Text Color (p. 7-21)
Text Size (p. 7-21)
Print Position (p. 7-21)
Stamp (p. 7-22)
Stamp Type/Preset
Stamps (p. 7-22)
Pages (p. 7-22)
Text Size (p. 7-22)
Text Color (p. 7-23)
Print Position (p. 7-23)
Copy Protect (p. 7-24)
Copy Protect Type
(p. 7-24)
Detail Settings (p. 7-26)
Position (p. 7-28)
Stamp Repeat (p. 7-29)
Stamp Repeat Type
(p. 7-29)
Detail Settings (p. 7-31)
Position (p. 7-32)
Header/Footer (p. 7-33)
Recall Header/Footer
(p. 7-33)
Check/Change Temporarily (p. 7-33)
Send
Address Book
Search (p. 7-37)
Direct Input
Fax (p. 7-40)
Fax Number
E-Mail (p. 7-41)
Internet Fax (p. 7-41)
RX Ability (Destination)
(p. 7-41)
IP Address Fax (p. 7-42)
PC (SMB) (p. 7-42)
Host Name (p. 7-42)
File Path (0p. 7-42)
User Name (p. 7-42)
Password (p. 7-42)
Reference (p. 7-42)
FTP (p. 7-43)
Host Name (p. 7-43)
File Path (p. 7-43)
User Name (p. 7-43)
Password (p. 7-43)
Detailed Settings (p. 7-43)
WebDAV (p. 7-44)
Host Name (p. 7-44)
File Path (p. 7-44)
User Name (p. 7-44)
Password (p. 7-44)
Detailed Settings (p. 7-44)
4-26
bizhub C353/C253/C203 (FE2)
Operation flow of user boxes
4
First-level menu
Second-level menu
Send
Job History (p. 7-45)
Address Search (p. 7-45)
Third-level menu
Fourth-level menu
Search (p. 7-45)
Advanced Search (p. 7-46)
File Type (p. 7-48)
File Type (p. 7-48)
Scan Setting (p. 7-48)
Encryption (p. 7-49)
Encryption Level
Password
Document Permissions
Detail Settings (p. 7-49)
Stamp Composition
(p. 7-51)
Communication Settings
Line Settings (p. 7-52)
Overseas TX (p. 7-52)
ECM OFF (p. 7-52)
V.34 OFF (p. 7-53)
Check Dest. & Send
(p. 7-53)
Select Line (p. 7-53)
E-Mail Settings (p. 7-54)
Document Name (p. 7-54)
Subject (p. 7-54)
From (p. 7-55)
Body (p. 7-55)
URL Notification Setting
(p. 7-57)
Address Book (p. 7-56)
Detail Search (p. 7-56)
Direct Input (p. 7-56)
Communication Method
Settings (p. 7-57)
Timer TX (p. 7-57)
Password TX (p. 7-58)
F-Code TX (p. 7-58)
E-Mail Encryption (p. 7-59)
Digital Signature (p. 7-59)
Fax Header Settings
(p. 7-60)
Application
Stamp/Composition
(p. 7-60)
Date/Time (p. 7-17)
Page Number (p. 7-17)
Stamp (p. 7-17)
Header/Footer (p. 7-17)
Send & Print (p. 7-61)
Copies (p. 7-61)
Simplex/Duplex (p. 7-61)
Staple (p. 7-61)
bizhub C353/C253/C203 (FE2)
4-27
Operation flow of user boxes
4
First-level menu
Second-level menu
Third-level menu
Combine
Copies (p. 7-7)
1-Sided
Print (p. 7-7)
2-Sided
Finishing
Fourth-level menu
Offset (p. 7-8)
Yes/No
Staple (p. 7-8)
Punch (p. 7-9)
Center Staple/Fold (p. 7-9)
Center Staple & Fold
(p. 7-10)
Page Margin
Margin Position (p. 7-11)
Adjust Value (p. 7-11)
Image Shift (p. 7-11)
Horizontal Shift
Vertical Shift
Change Back Shift
Stamp/Composition
Date/Time (p. 7-18)
Date Format
Time Format
Pages
Text Color
Text Size
Print Position
Page Number (p. 7-20)
Starting Page Number
Page Number Type
Starting Chapter Number
Insert Sheet Setting
Text Color
Text Size
Print Position
Stamp (p. 7-22)
Stamp Type/Preset
Stamps
Pages
Text Size
Text Color
Print Position
Copy Protect (p. 7-24)
Copy Protect Type
Detail Settings
Position
Stamp Repeat (p. 7-29)
Stamp Repeat Type
Detail Settings
Position
Header/Footer (p. 7-33)
Recall Header/Footer
Mode Check
4-28
bizhub C353/C253/C203 (FE2)
Operation flow of user boxes
4
First-level menu
Second-level menu
Third-level menu
Bind TX
Address Book
Search (p. 7-37)
Direct Input
E-Mail (p. 7-41)
PC (SMB) (p. 7-42)
Fourth-level menu
Host Name
File Path
User Name
Password
Reference
FTP (p. 7-43)
Host Name
File Path
User Name
Password
Detailed Settings
WebDAV (p. 7-44)
Host Name
File Path
User Name
Password
Detailed Settings
Address Search
Search (p. 7-46)
Advanced Search (p. 7-46)
File Type (p. 7-48)
File Type
Scan Setting
Encryption
Encryption Level
Password
Document Permissions
Detail Settings
Stamp Composition
Communication Settings
E-Mail Settings (p. 7-54)
Document Name
Subject
From
Body
URL Notification Setting
(p. 7-56)
Address Book
Detail Search
Direct Input
E-Mail Encryption (p. 7-59)
Digital Signature (p. 7-59)
Application
Stamp/Composition
Date/Time (p. 7-18)
Page Number (p. 7-20)
Stamp (p. 7-22)
Header/Footer (p. 7-33)
Document details
bizhub C353/C253/C203 (FE2)
Preview (p. 8-8)
4-29
Operation flow of user boxes
4
System User Box
First-level menu
Second-level menu
Third-level menu
Print
Copies (p. 7-68)
Fourth-level menu
Bulletin Board User Box
(p. 7-65)
Polling TX User Box
(p. 7-66)
Secure Print User Box
(p. 7-67)
Print (p. 7-68)
1-Sided
Finishing (p. 7-8)
Sort
2-Sided
Group
Offset
Staple
Punch
Center Staple/Fold (p. 7-9)
Center Staple & Fold
(p. 7-10)
Sheet/Cover/Chapter Insert (p. 7-12)
Cover Sheet
Insert Sheet
Chapters
Stamp/Composition
(p. 7-17)
Date/Time
Page Number
Stamp
Copy Protect
Stamp Repeat
Header/Footer
Document Details
Memory RX User Box
(p. 7-69)
Delete (p. 7-69)
Document Details
4-30
Preview (p. 8-8)
Print (p. 7-69)
Preview (p. 8-8)
bizhub C353/C253/C203 (FE2)
Operation flow of user boxes
4
First-level menu
Second-level menu
Third-level menu
Annotation User Box
(p. 7-70)
Print
Copies (p. 7-7)
Fourth-level menu
Print (p. 7-7)
1-Sided
Finishing (p. 7-8)
Sort
2-Sided
Group
Offset
Staple
Punch
Center Staple/Fold (p. 7-9)
Center Staple & Fold
(p. 7-10)
Application (p. 7-11)
Margin Position
Adjust Value
Image Shift
Sheet/Cover/Chapter Insert
Cover Sheet (p. 7-13)
Insert Sheet (p. 7-15)
Chapters (p. 7-16)
Stamp/Composition
Date/Time (p. 7-18)
Page Number (p. 7-20)
Stamp (p. 7-22)
Copy Protect (p. 7-24)
Stamp Repeat (p. 7-29)
Header/Footer (p. 7-33)
Send
Address Book (p. 7-37)
Direct Input
E-Mail (p. 7-41)
PC (SMB) (p. 7-42)
FTP (p. 7-43)
WebDAV (p. 7-44)
Address Search
Search (p. 7-46)
Advanced Search (p. 7-46)
File Type (p. 7-48)
File Type
Page Setting
Encryption
Stamp Composition
Communication Settings
E-Mail Settings (p. 7-54)
URL Notification Setting
(p. 7-56)
E-Mail Encryption (p. 7-59)
Digital Signature (p. 7-59)
Application
Stamp/Composition
(p. 7-17)
Send & Print (p. 7-61)
Stamp Element (p. 7-71)
Document Details
bizhub C353/C253/C203 (FE2)
Preview (p. 8-8)
4-31
Operation flow of user boxes
4
First-level menu
Second-level menu
Fax Retransmit User
Box (p. 7-73)
Fax
Fourth-level menu
Proof Print
Document Details
Encrypted PDF User
Box (p. 7-74)
Third-level menu
Preview (p. 8-8)
Delete
Print
Document Details
ID & Print User Box
(p. 7-75)
Delete
Print
Document Details
External Memory (p. 7-77)
Print
Copies (p. 7-81)
Color (p. 7-81)
Print (p. 7-81)
Finishing (p. 7-8)
Sort/Group
Offset
Center Staple/Fold
Center Staple & Fold
Staple
Paper (p. 7-81)
Document Details
4-32
Preview (p. 8-8)
bizhub C353/C253/C203 (FE2)
Operation flow of user boxes
4.7.3
4
File Document
First-level menu
Second-level menu
Public/Personal/Group
Delete (p. 8-6)
Third-level menu
Fourth-level menu
Edit Name (p. 8-6)
Move (p. 8-6)
Copy (p. 8-7)
System User Box
Document Details
Preview (p. 8-8)
Bulletin Board User Box
(p. 8-9)
Delete
Polling TX User Box
(p. 8-9)
Delete
Secure Print User Box
(p. 8-10)
Delete
Edit Name
Document Details
Memory RX User Box
(p. 8-10)
Delete
Edit Name
Document Details
Annotation User Box
(p. 8-11)
bizhub C353/C253/C203 (FE2)
Preview
Delete
Edit Name
Document Details
Fax Retransmit User Box
(p. 8-11)
Preview
Preview
Delete
Document Details
Preview
4-33
4
4-34
Operation flow of user boxes
bizhub C353/C253/C203 (FE2)
5
Entering User Box mode
Entering User Box mode
5
Entering User Box mode
5.1
Entering User Box mode
5
When the machine is ready to begin making copies after being turned on, the Basic screen appears.
1
To enter User Box mode, press the [User Box] key in the
control panel.
The User Box mode screen appears.
2
Lightly touch the desired button in the touch panel to activate a menu or function that appears on the
screen.
bizhub C353/C253/C203 (FE2)
5-3
Entering User Box mode
5
5.2
User box operation menus
In User Box mode, one of the following three menus can be chosen.
5.2.1
Save Document
Originals placed on the original glass can be scanned and saved in a user box.
%
Specify document names, original type, or the like when saving documents if necessary.
2
Note
For details on saving documents, refer to "Save Document" on page 6-3.
For the menu structure of Save Document, refer to "Menu trees in User Box mode" on page 4-22.
5.2.2
Use Document
Documents saved in the user box can be printed or sent.
%
Specify the number of copies, page margin, and other settings when printing documents.
– Specify a file type when sending documents
2
Note
For details on using documents, refer to "Use Document" on page 7-3.
For the menu structure of Use Document, refer to "Menu trees in User Box mode" on page 4-22.
5-4
bizhub C353/C253/C203 (FE2)
Entering User Box mode
5.2.3
5
File Document
Documents saved in user boxes can be renamed, user boxes containing documents can be moved or
documents can be copied to other user boxes.
2
Note
For details on filing documents, refer to "File Document" on page 8-3.
For the menu structure of File Document, refer to "Menu trees in User Box mode" on page 4-22.
bizhub C353/C253/C203 (FE2)
5-5
5
5-6
Entering User Box mode
bizhub C353/C253/C203 (FE2)
6
Save Document
Save Document
6
6
Save Document
6.1
Overview of Save Document
6.1.1
Available operations in the Save Document screen
%
To save documents in User Box mode, directly specify the user box where the document is to be saved.
– Documents to be saved can be used in the same way as saved scan data.
Public/personal/group user boxes
Document data (copies and scans) created using this machine can all be saved in boxes.
Document data sent for print jobs from a computer over the network can be saved.
Depending on user authentication and account track settings, access to some boxes, such as personal and
group user boxes, can be limited to a particular user.
Annotation User Box
To print or send document data saved with an image of the date/time or an annotation number, save the
document data in this Annotation User Box.
%
Touch the System User Box tab, and then touch [Annotation Number] to select your desired box.
External Memory
Scanned data can be directly saved in the external memory connected to the machine.
%
Check that an external memory is plugged into the USB slot, and then touch [External Memory] on
System User Box tab.
– For details on available external memories, refer to "External Memory (System User Box)" on
page 7-77.
!
Detail
Saving document to an external memory is disabled (cannot be saved) at factory default.It is also
disabled (cannot be saved) in the user function setting when the user authentication is specified. To
save a document to an external memory, change the Administrator Settings to allow documents to be
saved in an external memory.
6.1.2
Initial screen of Save Document
Public/Personal/Group user box
Selecting the Public/Personal/Group User Box tab lists the boxes where documents can be saved.
%
Select a box you want to save documents in.
bizhub C353/C253/C203 (FE2)
6-3
Save Document
6
System User Box
Selecting the System User Box tab lists the boxes where documents can be saved. Select a box you want
to save documents in.
6.1.3
1
Select "Annotation User Box".
2
Select a box you want to save documents in.
Description of the Save Document screen
On the Save Document screen, settings can be specified for the following.
Item
Description
[User Box]
For Public, Personal, Group, and Annotation User Boxes, you can change the user box where documents are saved. To change it, touch [User Box] to select the desired user box.
It is not possible to select a user box to save documents contained in an external memory.
6-4
[Document
Name]
The on-screen keyboard appears in the touch panel. Enter a document name from the touch panel.
[Scan Settings]
Specify details for scanning documents. For details, refer to "Scan Settings" on page 6-5.
[Original Settings]
Specify a type of original and orientation of loaded original. For details, refer to "Original Settings" on
page 6-17.
bizhub C353/C253/C203 (FE2)
Save Document
6.2
6
Scan Settings
In the Save Document screen, touch [Scan Settings] to specify detailed settings for saving documents.
6.2.1
Basic - Original Type
%
From the following image quality settings, select the appropriate setting according to the type of
document being scanned.
Item
Description
Text
Select this setting for documents consisting only of text.
Text/Photo
Select this setting for documents consisting of both text and photos (halftones).
Photo
Select this setting for documents consisting of only photos (halftones).
Dot Matrix
Original
Select this setting for documents consisting of text that generally appears faint.
Copied Paper
Select this setting for documents with an even density produced using a copier or printer.
If "Text/Photo" or "Photo" is selected, the photo type can also be selected.
Item
Description
Photo Paper
Select this setting for photos printed on photo paper.
Printed Photo
Select this setting for printed photos, such as in books or magazines.
bizhub C353/C253/C203 (FE2)
6-5
Save Document
6
6.2.2
Basic - Simplex/Duplex
%
6.2.3
Item
Description
1-Sided
Select this setting to scan a single-sided document.
2-Sided
Select this setting to scan a double-sided document.
Cover + 2Sided
Select this setting to scan the first page of the document as a single sided cover page, then scan the
remaining pages as double-sided.
Basic - Resolution
%
6-6
Select whether a single-sided or double-sided document is to be scanned.
Select the resolution for scanning.
bizhub C353/C253/C203 (FE2)
Save Document
6.2.4
6
Basic - File Type
%
Select the file format for saving the scan data.
File Type
The following file types are available.
Item
Description
PDF
Select this setting to save the data in the PDF format.
Compact
PDF
Select this setting to compress the data more than with the PDF format. This is used with full-color
scan data.
TIFF
Select this setting to save data in the TIFF format.
JPEG
Select this setting to save the data in the JPEG format.
XPS
Select this setting to save data in the XPS format.
Compact
XPS
Select this setting to compress the data more than the XPS format and save.
2
Note
The compression format can be specified when saving a TIFF file in color. For details, refer to the User
manual – Network Scan/Fax/Network Fax Operations.
!
Detail
If a file type is selected when saving a document in a user box, the file type must be specified when
downloading data.
If "JPEG" is selected, "Single Page" is selected automatically for page setting.
Some file type settings may not be available, depending on the setting for "Color". The possible combinations
of the "File Type" and "Color" settings are shown below.
Auto Color
Full Color
Gray Scale
Black
PDF
o
o
o
o
Compact PDF
o
o
o
e
TIFF
o
o
o
o
JPEG
o
o
o
e
XPS
o
o
o
o
Compact XPS
o
o
o
e
bizhub C353/C253/C203 (FE2)
6-7
Save Document
6
Scan Setting
In addition, the grouping of the saved data can be specified.
Item
Description
Single Page
Select the setting to create a file in a format that allows data to be saved for each page when downloading data.
Multi Page
Select this setting to create a single file from the entire scanned document. This setting cannot be
selected if the "JPEG" File Type setting is selected.
!
Detail
Even if "Single Page" is selected when saving a document in a user box, the document is saved in "Multi
Page". Pages can be specified when downloading data to a computer.
Encryption
%
Specify the encryption level if "PDF" or "Compact PDF" is selected with the File Type.
Item
Description
Encryption
Level
Select the encryption level.
Password
Specify this when [Password] is selected for "Encryption Type". Enter the password necessary to
open encrypted data (up to 32 characters). For confirmation, type in the password again.
Document
Permissions
Specify this when [Password] is selected for "Encryption Type". Enter the password necessary to
change document permissions (up to 32 characters). For confirmation, type in the password again.
!
Detail
The contents of a document saved with encryption cannot be previewed.
Up to 100 digital certificates can be selected.
The digital signature settings are available when the digital ID (digital certificate) of the administrator is
registered to this machine.
6-8
bizhub C353/C253/C203 (FE2)
Save Document
6
Encryption - Detail Settings
When document permissions is selected with "Encryption", detailed permissions can be specified.
If [Low Level] is selected
If [High Level] is selected
Item
Description
Printing Allowed
Select whether or not to allow data printing. When you specify [High Level] for the encryption level,
[Low Resolution] appears.
Enable copying of text,
images and
other content
Select whether or not to allow copying of text, images and other content.
bizhub C353/C253/C203 (FE2)
6-9
Save Document
6
%
Touch [Forward
] to select details on the Changes Allowed.
If [Low Level] is selected
If [High Level] is selected
6-10
Item
Description
Changes Allowed
Select the appropriate permission level for document changes including data signature, inputs and
remarks.
bizhub C353/C253/C203 (FE2)
Save Document
6.2.5
Basic - Density
%
6.2.6
6
Adjust the density for scanning.
Basic - Separate Scan
The scan operation can be divided into several sessions for various types of documents, for example, when
all pages of a document cannot be loaded into the ADF, when placing the document on the original glass, or
when single-sided documents are combined with double-sided documents.
%
6.2.7
Touch [Separate Scan] to highlight it and enable the desired setting.
Quality Adjustment
%
Adjust the quality, such as color and background, for scanning.
bizhub C353/C253/C203 (FE2)
6-11
Save Document
6
Color
Select whether the document will be scanned in color or black and white.
Item
Description
Auto Color
Select this setting to automatically detect the color of the document and scan it with the corresponding setting.
Full Color
Select this setting to scan in full color.
Gray Scale
Select this setting for documents with many halftones, such as in black-and-white photos.
Black
Select this setting for documents with distinct black and white areas, such as in line drawings.
Some color settings may not be available, depending on the setting for "File Type". The possible
combinations of the "File Type"and "Color" settings are shown below.
Auto Color
Full Color
Gray Scale
Black
PDF
o
o
o
o
Compact PDF
o
o
o
e
TIFF
o
o
o
o
JPEG
o
o
o
e
XPS
o
o
o
o
Compact XPS
o
o
o
e
Background Removal
The scanning density of the document background can be adjusted. If a scanned colored paper is too dark,
the density of the background can be adjusted.
%
To adjust the density automatically, touch [Auto].
Sharpness
Contours, for example, the edges of text can be emphasized when scanning.
6-12
bizhub C353/C253/C203 (FE2)
Save Document
6.2.8
6
Erase
An area around the edge of the document can be erased.
Frame Erase
%
Select this setting to specify frame erasing.
– To erase the same width on all sides, touch [Frame], and then specify a value (range: 0.1 mm to
50.0 mm).
– To specify different widths for the top, left, right and bottom, touch the button for the desired
location, and then specify a value.
– To cancel frame erasing, touch [None].
!
Detail
If a width to be erased around the document is specified with "Frame Erase" with the "Book Copy"
function, the same settings are also applied on the"Frame Erase" screen (displayed from the "Erase"
screen).
bizhub C353/C253/C203 (FE2)
6-13
Save Document
6
6.2.9
Book Scan - Book Copy
%
Select the method for scanning page spreads.
– In addition, the binding position and erasure of unnecessary parts can be specified.
!
Detail
Specify the size of the page spread as the scan size.
Book Copy
%
Select a desired scanning method.
Item
Description
Book Spread
Select this setting to scan a page spread as a single page.
Separation
Select this setting to scan a page spread as two separate pages (left and right).
Front Cover
Select this setting to scan the first page as the front cover.
Front + Back
Covers
Select this setting to scan the first page as the front cover, the second page as the back cover, and
the remaining pages as the body.
Book Erase - Frame Erase
%
Select this setting to specify frame erasing for page spreads.
– To erase the same width on all sides, touch [Frame], and then specify a value (range: 0.1 mm to
50.0 mm).
– To specify different widths for the top, left, right and bottom, touch the button for the desired
location, and then specify a value.
– To cancel frame erasing, touch [None].
!
Detail
If a width to be erased around the document is specified with "Frame Erase" with the "Book Copy"
function, the same settings are also applied on the"Frame Erase" screen (displayed from the "Erase"
screen).
6-14
bizhub C353/C253/C203 (FE2)
Save Document
6
Book Erase - Center Erase
An area along the center of the document can be erased.
%
Enter frame erase width using the keypad or [-] and [+] keys (range: 0.1 mm to 30.0 mm).
Binding Position
%
If "Separation", "Front Cover" or "Front + Back Covers" was selected, touch [Binding Position] to select
the binding position.
bizhub C353/C253/C203 (FE2)
6-15
Save Document
6
6.2.10
Application - Scan Size
Specifies the size of paper for scanning.
Standard
%
To automatically detect the size of first paper when scanned, touch [Auto].
– To scan a preset paper size (such as A4, B5), select appropriate paper size.
Custom Size
%
Type in the dimensions of a custom size that is not available as a preset size.
– The size in the X direction can be set between between 30 mm and 432 mm.
– The size in the Y direction can be set between between 30 mm and 297 mm.
Photo Size
%
6-16
Select size 9 e 13, 10 e 15 or 13 e 18 cm.
bizhub C353/C253/C203 (FE2)
Save Document
6.3
6
Original Settings
%
Specify the type of document that is loaded, for example, if it contains mixed page sizes or is folded in
a zigzag.
!
Detail
[Original Settings] can be used together.
Special Original
Settings can be specified for the following.
Item
Description
Mixed Original
Select this setting when documents of different sizes are loaded into the ADF at the same time. The
scan speed is decreased since the size of each page is detected before it is scanned.
Z-Folded
Original
Select this setting to detect the size of a zigzag-folded document by the length fed through the ADF.
Long Original
Select this setting for documents that are longer than the standard size.
Direction Settings - Original Direction
%
Select the orientation of the document.
– After the document is scanned, the data is processed so that it is correctly oriented.
bizhub C353/C253/C203 (FE2)
6-17
Save Document
6
Direction Settings - Binding Position
%
Select the binding position, such as when holes are punched in the document or the document is
stapled.
– This adjusts the scan of double-sided documents so that the binding position is not reversed.
Item
Description
Auto
The binding is on the long side if the page is 297 mm or less, or it is on the short side if the page is
more than 297 mm.
Top
Select this setting if the original that is loaded has a binding margin at the top.
Left
Select this setting if the original that is loaded has a binding margin at the left.
Despeckle
%
Select this setting to reduce the effect that dust on the left partition glass has on images when the
document is loaded into the ADF.
!
Detail
The scanning speed will be reduced if the "Despeckle" setting is selected.
Clean the left partition glass when it becomes extremely dirty. For details, refer to the User manual –
Copy Operations.
6-18
bizhub C353/C253/C203 (FE2)
7
Use Document
Use Document
7
7
Use Document
7.1
Overview of Use Document screen
7.1.1
Available operations in the Use Document screen
Printing
Documents saved in user boxes by Copy, Fax/Scan, Print mode or Fax RX can be printed. Finishing settings,
such as the number of copies and double-sided printing, can be added when the document is printed. "Bind"
can also be specified to select and print multiple documents at the same time.
Transmitting
Documents saved in user boxes in Fax/Scan mode, or Print mode can be sent by E-Mail and Fax. Settings
related to finishing and sending can be added when the document is transmitted. "Bind TX" can also be
specified to select and print multiple documents at the same time.
Document Details
Enables checking of the saving date and time and a preview image of a document.
7.1.2
Initial screen of Use Document
Public/Personal/Group user box
1
Select the Public/Personal/Group tab lists to display available boxes.
2
Select a box you want to use.
bizhub C353/C253/C203 (FE2)
7-3
Use Document
7
System User Box
1
Select the System User Box tab lists to display available system boxes.
2
Select a box you want to use.
–
–
–
7.1.3
When you select [Bulletin Board User Box], select another box to use.
When you select [Secure Print User Box], enter the ID and password for a secure print document.
When you select [Annotation User Box], select another box to use.
Description of Use Document screen
Selecting a box you want to print and transmit displays the following screen. As an example, the following
procedure describes the public user box.
1
2
3
4
5
6
7
11
No.
7-4
10
98
Part Name
Description
1
-
Displays the user box number and name.
2
[
3
[Print]
Specifies the print information of the selected document. (p. 7-7)
4
[Send]
Specifies the recipient and sending information of the selected document. (p. 7-36)
5
[Combine]
Specifies the binding order and print information of the selected document. (p. 7-62)
6
[Bind TX]
Specifies the binding order and sending information of the selected document. (p. 7-64)
7
[Document Details]
Enables checking of detailed information and a preview image of a document.
8
[Select All]
Selects all documents in the user box.
9
[Reset]
Resets all documents in the user box.
][
]
When seven or more documents are saved, use the [
displayed lists.
] and [
] keys to switch the
bizhub C353/C253/C203 (FE2)
Use Document
7.1.4
7
No.
Part Name
Description
10
[Detail View]/
[Thumbnail View]
Switches the display format of the saved document.
[Thumbnail View]: Displays a thumbnail of the first page, page number and the document
name.
[Detail View]: Displays the time stored, user name, and document name. Pressing the title
of the [Time Stored] sorts the list in ascending/descending order of the time stored.
11
-
Displays the list of documents saved in the user box.
When a password is specified for the user box
When a password is specified in the user box, a screen to enter a password appears.
1
Enter the password.
2
Press the [OK] button.
bizhub C353/C253/C203 (FE2)
7-5
Use Document
7
7.2
Print
7.2.1
Overview of Print
The following functions can be added in Print.
Item
Description
Copies
Specifies the number of copies to be printed.
Print
Specifies whether 1-sided or 2-sided copies are to be printed.
Finishing
Specifies sort/group, stapling and hole punching.
Page Margin
Adds a binding margin to the left or right side or to the top of the printed pages.
Sheet/
Cover/
Chapter Insert
Specifies cover mode, insert sheet and chapters to insert covers and papers.
Stamp/
Composition
Prints the specified information including the date/time and the stamp.
!
Detail
The Center Staple/Fold settings are available only if optional Finisher FS-519 is installed.
The Center Staple & Fold setting is available only if the optional Finisher FS-609 is installed.
The Punch setting is available only if the punch kit is installed on the optional finisher.
7.2.2
Description of the Print screen
%
Touch [Print] to display the following screen.
1
No.
7-6
2
Part Name
Description
1
[Basic]
Specifies the basic settings such as number of copies and 1-sided/2-sided.
2
[Application]
Specifies more difficult settings such as page margin, sheet insertion and stamp.
bizhub C353/C253/C203 (FE2)
Use Document
7.3
7.3.1
7
Print - Basic (Public/Personal/Group user box)
Copies
%
Using the keypad, type in the desired number of copies.
– The number of copies can be specified between 1 and 999.
!
Detail
To reset the number of copies to "1", press the [C] button.
7.3.2
1-Sided/2-Sided
%
Select whether 1-sided or 2-sided copies of the document are to be printed.
bizhub C353/C253/C203 (FE2)
7-7
Use Document
7
7.3.3
Finishing
!
Detail
The feeding method when a finisher is installed can be changed from Administrator Setting. For details
on the offset function, refer to the User manual – Copy Operations.
Sort/Group
%
Select "Sort" to feed out the document by copies.
– Select "Group" to feed out the document by pages.
Offset
%
Specifies offset to separate the copies or pages of the document.
– If a finisher is installed, the printed pages are fed out with each copy shifted to separate it.
– If no finisher is installed, the printed pages are fed out sorted in an alternating crisscross pattern.
Staple
%
Select one of these settings to bind copies with a staple in the corner or with two staples.
Staple - Position Setting
When you select a staple type, you can specify the position.
7-8
bizhub C353/C253/C203 (FE2)
Use Document
7
Punch
%
Select the setting to punch holes for filing.
Punch - Position Setting
%
Specify the punch position.
Center Staple/Fold
When [Center Staple/Fold] is displayed by the installed finisher, the following items can be specified.
Item
Description
Center Staple
Select this option to staple copies at two places along the center, then fold the copies in half before
feeding them out.
Half-Fold
Select this option to fold copies in half before feeding them out.
You can adjust the center staple and half-fold position by pressing [Position Adjustment]. Press [-] and [+] to
adjust the position.
bizhub C353/C253/C203 (FE2)
7-9
Use Document
7
Center Staple & Fold
When [Center Staple & Fold] is displayed by the installed finisher,
copies are bound with staples at two places along the center and
folded in half before feeding out.
The following can be specified.
7-10
Item
Description
Center Erase
Image on the center fold line with Center Staple & Fold can be automatically erased.
Erase: Erases the image in the 10mm-wide area, with the fold line as the center.
None: Does not erase the image on the center fold line.
bizhub C353/C253/C203 (FE2)
Use Document
7.4
7.4.1
7
Print - Application (Public/Personal/Group user box)
Page Margin
A binding margin can be added to the left or right side or to the top of the printed pages.
Margin Position
%
Specify the location where the binding margin is to be added.
– When [Auto] is selected, a binding margin along the long side of the paper is selected if the
document length is 297 mm or less.
– If the paper length is more than 297 mm, a binding margin along the short side of the paper is
selected.
Adjust Value
An area with a width between 0.1 mm and 20.0 mm can be specified.
%
To set the binding margin to 0 mm, touch [None].
Image Shift
When a binding margin is created, the image can be shifted according to the position of the created binding
margin. The image can be shifted between 0.1 and 250.0 mm left, right, up or down, depending on the
position of the binding margin.
!
Detail
The width of the binding margin can be specified in 0.1 mm increments.
To set the binding margin to 0 mm, touch [No Shift].
bizhub C353/C253/C203 (FE2)
7-11
Use Document
7
Image Shift - Change Back Shift
%
To print the document double-sided with page margin, press [Change Back Shift] to specify the shift
on the back side of the pages.
– The image can be shifted between 0.1 mm and 250.0 mm left, right, up or down, depending on the
position of the binding margin.
!
Detail
The width of the binding margin can be specified in 0.1 mm increments.
To set the binding margin to 0 mm, touch [No Shift].
7.4.2
Sheet/Cover/Chapter Insert
Sheet/Cover/Chapter Insert allows you to specify a cover sheet, insert sheet and chapter functions.
7-12
Item
Description
Cover Sheet
Select this option to print with cover pages added to the front and back.
Insert Sheet
Select this option to print with other paper, such as colored paper, inserted for the specified
pages.
Chapters
Settings can be specified for the function when printing double-sided pages. Pages, such as
chapter title pages, that must be printed on the front side of the paper, can be specified.
bizhub C353/C253/C203 (FE2)
Use Document
7.4.3
7
Sheet/Cover/Chapter Insert - Cover Sheet
What is a cover sheet?
Documents can be printed with cover pages added to the front and back. Settings can be specified for the
following.
Item
Description
Front
Cover
Back
Cover
None
Select this option to add no front cover.
Front
(Copy)
Select this option to print the first page of the document onto the front cover page. If [2Sided] is selected, the second page of the document is printed on the back of the front
cover page.
Front
(Blank)
Select this option to add the blank page in front of the first page of the document.
None
Select this option to add no back cover.
Back
(Copy)
Select this option to print the last page of the document onto the back cover page. If [2Sided] is selected, the last two pages of the document are printed on the back cover
page.
Back
(Blank)
Select this option to add the blank page after the last page of the document.
2
Reminder
Load the paper trays with the paper for the front cover page and the back cover page in advance.
To add the cover sheet setting to print the document saved for copying, either of the following conditions
must be met when saving the document in a user box.
Paper tray is specified.
The cover sheet is set.
bizhub C353/C253/C203 (FE2)
7-13
Use Document
7
Cover setting
Details for the front and back cover page can be specified.
Front Cover - Paper
%
When you select [Front Cover], and then select [Front (Copy)] or [Front (Blank)], select a paper tray.
Back Cover-Paper
%
7-14
When you select [Back Cover], and then select [Back (Copy)] or [Back (Blank)], select a paper tray.
bizhub C353/C253/C203 (FE2)
Use Document
7.4.4
7
Sheet/Cover/Chapter Insert - Insert Sheet
What is Insert Sheet?
Documents can be printed with other paper, such as colored paper, inserted for the specified pages.
There are two settings, [Copy] and [Blank], for selecting whether or not the inserted pages are printed. When
the settings are combined with single-sided printing or double-sided printing, the document is printed as
described in the following.
Example: When page six is specified
Item
Description
Copy
(When single-sided is selected)
The specified paper is inserted for the sixth page, and the sixth page of the document is printed
onto it.
Copy
(When doublesided is selected)
The back side of the third page is fed in blank. The specified paper is inserted for the fourth page,
and the sixth and seventh pages of the document are printed onto it.
Blank
(When single-sided is selected)
A specified paper is inserted after the sixth page.
Blank
(When doublesided is selected)
The specified paper is inserted for the fourth page of the printed document.
If an odd-numbered page is specified, the back side is left blank.
!
Detail
The paper can be inserted at a maximum of 30 locations within a document of up to 999 pages.
Specified page/Sort
The page to insert paper can be specified.
1
Touch a page button, and then use the keypad to type in the desired page number.
2
To sort the entered page numbers, touch [Sort].
bizhub C353/C253/C203 (FE2)
7-15
Use Document
7
Insert Paper
%
Select the tray to insert paper.
Insert Type
%
7.4.5
Specify Copy/Blank for the paper to be inserted.
Sheet/Cover/Chapter Insert - Chapters
What is Chapters?
Settings can be specified for the function when printing double-sided pages. Pages, such as chapter title
pages, that must be printed on the front side of the paper, can be specified.
!
Detail
The paper can be inserted at a maximum of 30 locations within a document of up to 999 pages.
7-16
bizhub C353/C253/C203 (FE2)
Use Document
7
Specified page/Sort
1
To specify the page to be printed on the front side, touch a page button.
2
Use the keypad to type in the desired page number.
3
To sort the entered page numbers, touch [Sort].
Chapter Paper
7.4.6
1
To copy a page on a chapter paper, select [Copy Insert].
2
Select a tray for the chapter paper.
Stamp/Composition
The following functions can be specified.
Item
Description
Date/Time
Prints the date and time of printing on the pages.
Page Number
Prints the page numbers on all pages of the document.
Stamp
Adds preset text, such as "URGENT" to the pages.
Copy Protect
Prints hidden text on all pages of a document in order to prevent unauthorized copying.
Stamp Repeat
Prints text or images repeatedly throughout the pages.
Header/Footer
Prints headers or footers on the pages.
bizhub C353/C253/C203 (FE2)
7-17
Use Document
7
7.4.7
Stamp/Composition - Date/Time
%
Select [Yes] to print the date and time of printing on the pages.
Date Format
%
Select the format for the date.
Time Format
%
Select whether or not the time is added and selects its format.
Pages
%
Select the pages to be printed on (either all pages or 1st page only).
Text Color
%
Select the printing color (black, red, blue, green, yellow, cyan and magenta).
Text Size
%
7-18
Select the size (minimal or std.) in which text is printed.
bizhub C353/C253/C203 (FE2)
Use Document
7
Print Position - Print Position
%
Select the desired position to be printed.
Print Position - Fine-Tune
1
To make fine adjustments, touch [Adjust Position].
2
Adjust the position between 0.1 mm and 50.0 mm in the left/right direction and the up/down direction.
bizhub C353/C253/C203 (FE2)
7-19
Use Document
7
7.4.8
Stamp/Composition - Page Number
%
Add page numbers to all pages of the document.
Starting Page Number
%
Specify the starting page number.
Starting Chapter Number
%
Specify the starting chapter number.
Page Number Type
%
Select the format for the page number.
Insert Sheet Setting
%
Specify whether or not page numbers are printed on inserted paper.
Settings can be specified for the following.
Item
Cover
Sheet
Insert
Sheet
(Copy)
Insert
(Blank)
7-20
Description
Print on Front
and Back
Cover
Select this option to print the page numbers on the front and back cover pages.
Print on Back
Cover Only
Select this option not to print the page number on the front cover page.
Do Not Print
Page Number
Select this option not to print the page numbers on the front and back cover pages.
Print Page #
Select this option to print the page number on printed insertions.
Do Not Print #
Select this option not to print the page number on printed insertions.
Skip the
Page(s)
Select this option to count printed insertions as pages, but not print the page numbers on them.
Do Not Print #
Select this option not to print the page number on blank insertions.
Skip the
Page(s)
Select this option to count blank insertions as pages, but not print the page numbers
on them.
bizhub C353/C253/C203 (FE2)
Use Document
7
Text Color
%
Select the printing color (black, red, blue, green, yellow, cyan and magenta).
Text Size
%
Select the size (minimal or std.) in which text is printed.
Print Position - Print Position
%
Select the desired position to be printed.
bizhub C353/C253/C203 (FE2)
7-21
Use Document
7
Print Position - Fine-Tune
7.4.9
1
To make fine adjustments, touch [Adjust Position].
2
Adjust the position between 0.1 mm and 50.0 mm in the left/right direction and the up/down direction.
Stamp/Composition - Stamp
%
Print preset text, such as "URGENT".
Stamp Type/Preset Stamps
%
Select a stamp, such as "URGENT", "PLEASE REPLY", or "DO NOT COPY".
Pages
%
Select the pages to be printed on (either all pages or 1st page only).
Text Size
%
7-22
Select the size (minimal or std.) in which text is printed.
bizhub C353/C253/C203 (FE2)
Use Document
7
Text Color
%
Select the printing color (black, red, blue, green, yellow, cyan and magenta).
Print Position - Print Position
%
Select the desired position to be printed.
Print Position - Fine-Tune
1
To make fine adjustments, touch [Adjust Position].
2
Adjust the position between 0.1 mm and 50.0 mm in the left/right direction and the up/down direction.
bizhub C353/C253/C203 (FE2)
7-23
Use Document
7
7.4.10
Stamp/Composition - Copy Protect
What is Copy Protect?
Prints hidden text on all pages of a document in order to prevent unauthorized copying. When a document
printed with copy protection text is copied, the hidden text appears clearly repeated throughout the pages
of the copies so that the reader knows that it is a copy.
Up to eight characters and stamps can be placed. When text and stamps to be inserted are set at 45 (-45)
degrees, up to four areas are needed.
Copy Protect Type - Registered Stamp
%
Insert stamp images registered with the utility software.
– One stamp requires one area.
!
Detail
Use the "Copy Protection Utility" to register a stamp. For details, refer to the manual for the utility
software.
A registered stamp may require multiple areas depending on the contents.
Copy Protect Type - Preset Stamp
%
7-24
Insert preset text, such as "Invalid Copy", "Copy", or "Private", as preset stamps.
– One stamp requires one area.
bizhub C353/C253/C203 (FE2)
Use Document
7
Copy Protect Type - Date/Time
%
Insert the date and time that the document was registered.
– [Date Format] requires one area.
– [Time Format] requires one area.
Copy Protect Type - Other
%
Insert the job number assigned to the document, the serial number or a distribution control number.
– Selecting [Job Number] prints the job number of the printed job. [Job Number] requires one area.
– Selecting [Serial Number] prints the serial number of this machine. [Serial Number] requires one
area.
– If [Distribution Control Number] is specified, copies of the entered number are printed. [Distribution
Control Number] requires one area.
!
Detail
The printed serial number indicates the serial number of the machine. For details on specifying the serial
number, contact your service representative.
bizhub C353/C253/C203 (FE2)
7-25
Use Document
7
Detail Settings
%
Press [Detail Settings] to set the color and density of texts and background patterns.
Detail Settings - Text/background color
%
Select the color (black, magenta or cyan) used to print the text and background.
Detail Settings - Density
%
7-26
Select the printing density (light, std. or dark).
bizhub C353/C253/C203 (FE2)
Use Document
7
Detail Settings - Copy Protect Pattern
%
Select the pattern type and contrast when the document is copied.
Detail Settings - Text Size
%
Select the size (minimal, std. or large) in which text is printed.
Detail Settings - Pattern Overwrite
%
Select the pattern overwrite from [Front (Overwrite)] or [Back].
bizhub C353/C253/C203 (FE2)
7-27
Use Document
7
Detail Settings - Background Pattern
%
Select the pattern to be printed in the background.
Position
The following settings are enabled.
Changing the angle of text within the area (+45 degrees, 0 degrees (none) or -45 degrees)
Inserting spaces between copy protection
Changing the printing order of copy protection
Deleting copy protection or spaces
Position - Change Pos./Delete
Specifies by selecting a stamp to be changed, and then pressing [Change Pos./Delete] to make the setting
in effect.
7-28
bizhub C353/C253/C203 (FE2)
Use Document
7.4.11
7
Stamp/Composition - Stamp Repeat
What is Stamp Repeat?
Text or images can be repeatedly printed throughout all pages. Copy Protect is used to prevent copying while
Stamp Repeat allows copying.
Stamp Repeat Type - Registered Stamp
%
Inserts stamp images registered with the utility software.
– One stamp requires one area.
!
Detail
Use the "Copy Protection Utility" to register a stamp. For details, refer to the manual for the utility
software.
A registered stamp may require multiple areas depending on the contents.
Stamp Repeat Type - Preset Stamp
%
Insert preset text, such as "Invalid Copy", "Copy", or "Private", as preset stamps.
– One stamp requires one area.
bizhub C353/C253/C203 (FE2)
7-29
Use Document
7
Stamp Repeat Type - Date/Time
%
Insert the date and time that the document was registered.
– [Date Format] requires one area.
– [Time Format] requires one area.
Stamp Repeat Type - Other
%
Insert the job number assigned to the document, the serial number or a distribution control number.
– Selecting [Job Number] prints the job number of the printed job. [Job Number] requires one area.
– Selecting [Serial Number] prints the serial number of this machine. [Serial Number] requires one
area.
– If [Distribution Control Number] is specified, copies of the entered number are printed. [Distribution
Control Number] requires one area.
!
Detail
The printed serial number indicates the serial number of the machine. For details on specifying the serial
number, contact your service representative.
7-30
bizhub C353/C253/C203 (FE2)
Use Document
7
Detail Settings
%
Touch [Detailed Settings] to set the color and density of texts and patterns.
Detailed Settings - Text Color
%
Select the color (black, magenta. or cyan) used to print the text.
Detailed Settings - Density
%
Select the printing density (light, std. or dark).
bizhub C353/C253/C203 (FE2)
7-31
Use Document
7
Detailed Settings - Text Size
%
Select the size (minimal, std. or large) in which text is printed.
Detailed Settings - Pattern Overwrite
%
Select the pattern overwrite from "Front (Overwrite)", "Transparent", or "Back".
Position
The following settings are enabled.
Changing the angle of text within the area (+45 degrees, 0 degrees or -45 degrees)
Inserting spaces between stamps
Changing the printing order of stamps
Deleting stamps or spaces
7-32
bizhub C353/C253/C203 (FE2)
Use Document
7
Position - Change Pos./Delete
Specifies by selecting a stamp to be changed, and then pressing [Change Pos./Delete] to make the setting
in effect.
7.4.12
Stamp/Composition - Header/Footer
Inserts headers or footers on all pages. The contents of the header/footer must be registered in Administrator
Settings.
%
Touch "Check/Change Temporarily" to change what is registered and print it.
2
Note
For details on header/footer registration, refer to the User manual – Network Scan/Fax/Network Fax
Operations.
Recall Header/Footer
%
Select a header/footer to be printed from the registered list.
Check/Change Temporarily
%
Display the Check/Change Temporarily screen.
bizhub C353/C253/C203 (FE2)
7-33
Use Document
7
Check/Change Temporarily - Header Settings/Footer Settings
%
Select whether or not to print a header/footer. Press [Print] to specify a text, the date/time or other
information (distribution control number, job number or serial number).
Check/Change Temporarily - Header Settings/Footer Settings - Text
%
Specify the header/footer text from the touch panel.
Check/Change Temporarily - Header Settings/Footer Settings - Date/Time
%
Specify the date/time for the header/footer.
Check/Change Temporarily - Header Settings/Footer Settings - Other
%
Specify the distribution control number, job number and serial number for the header/footer.
!
Detail
The printed serial number indicates the serial number of the machine. For details on specifying the serial
number, contact your service representative.
7-34
bizhub C353/C253/C203 (FE2)
Use Document
7
Check/Change Temporarily - Pages
%
Select the pages to be printed on (either all pages or first page only).
Check/Change Temporarily - Text Color
%
Select the printing color (black, red, blue, green, yellow, cyan and magenta).
Check/Change Temporarily - Text Size
%
Select the size (minimal or std.) in which text is printed.
bizhub C353/C253/C203 (FE2)
7-35
Use Document
7
7.5
Send (Public/Personal/Group user box)
7.5.1
Overview of Send
Document data saved in user boxes can be sent using the following methods. The data can easily be routed
simply by registering a destination with this machine instead of sending the data through different computers.
7.5.2
Item
Description
Fax
Sends data in the document as Fax.
E-Mail Addr.
Document data can be sent as an E-Mail attachment.
Internet Fax
Document data can be sent as an E-Mail attachment via the Intranet and Internet.
IP Address
Fax
Specifies the host name or IP address for the destination to send a Fax.
Scan to SMB
Document data is sent to a shared folder on the specified computer.
Scan to FTP
Document data is sent to the specified FTP server.
Scan to WebDAV
Document data is sent to the specified server on the network.
Description of the Send screen
%
Touch [Send] to display the following screen.
1
2
3
4
7
No.
6
5
Part Name
Description
1
[Address Book]
Select a recipient from the registered destinations.
2
[Direct Input]
Enter and specify an unregistered destination directly.
If manual destination input is restricted by "Security Settings"
in the Administrator mode, [Direct Input] and [Address search]
does not appear.
7-36
3
[Job History]
Select one from the fax destination history.
4
[Address Search]
Search the address from the address book.
5
[Application]
Specifies optional functions such as stamp and page print.
6
[Communication Settings]
Specifies settings for communication.
7
[File Type]
Specifies the file format and the encryption detail to be sent.
bizhub C353/C253/C203 (FE2)
Use Document
7.5.3
7
Address Book - Search
The destination address can be searched. Search the registered destination according to the following
method.
Address Type
You can search the destination by destination type specified when the destination was registered.
[Address Type] appears by touching [Search] if [Default Address Book] (displayed by touching [Custom
Display Settings] - [Scan/Fax Settings] on the [User Settings]) is set to "Index".
!
Detail
For details on the "Default Address Book" setting, refer to the User manual – Network
Scan/Fax/Network Fax Operations.
bizhub C353/C253/C203 (FE2)
7-37
Use Document
7
Index
The index is displayed based on the index that was specified when the destination was registered.
[Index] appears by touching [Search] if [Default Address Book] (displayed by touching [Custom Display
Settings] - [Scan/Fax Settings] on the [User Settings]) is set to "Address Type".
7-38
bizhub C353/C253/C203 (FE2)
Use Document
7
Detail Search
1
Type in the destination name or part of the address to search for the corresponding address.
2
Select [Name] or [Destination] and enter the search text.
Detail Search - Search Options
When a condition is selected in the Detail Search screen, search options appear.
%
Select options to be added for the search, and then touch [OK].
!
Detail
Display of the Search Options screen and contents of the items to be displayed can be specified in
"Search Option Settings" in the Utility mode. For details, refer to the User manual – Network
Scan/Fax/Network Fax Operations.
bizhub C353/C253/C203 (FE2)
7-39
Use Document
7
7.5.4
Direct Input
An unregistered destination can be specified by directly entering it.
7.5.5
Direct Input - Fax
%
Enter the fax number from the touch panel.
–
If the "Confirm Address (TX)" is specified, after touching [OK], a screen appears prompting you to
enter the fax number again. Enter the fax number, and then touch [Send].
!
Detail
For details on Confirm Address (TX), refer to the User manual – Network Scan/Fax/Network Fax
Operations.
7-40
bizhub C353/C253/C203 (FE2)
Use Document
7.5.6
7
Direct Input - E-Mail
%
Enter an E-Mail address from the touch panel.
!
Detail
Frequently entered user names and domain names can be registered to be recalled and used again.
Prefixes and suffixes must be registered in advance in Administrator Settings.
For details on Prefix/Suffix, refer to the User manual – Network Administrator.
7.5.7
Direct Input - Internet Fax
%
Enter an E-Mail address from the touch panel.
!
Detail
Frequently entered user names and domain names can be registered to be recalled and used again.
Prefixes and suffixes must be registered in advance in Administrator Settings.
For details on Prefix/Suffix, refer to the User manual – Network Administrator.
RX Ability (Destination)
%
Select a receivable setting at the Internet Fax destination.
– You can select multiple receivable settings.
Item
Description
Compression Type
MMR, MR, and MH can be selected.
Paper size
A3, B4, and A4 can be selected.
Resolution
600 e 600 dpi (ultra high-definition), 400 e 400 dpi (high-definition), 200 e 200 dpi (fine) and 200 e 100
dpi (normal) can be selected.
bizhub C353/C253/C203 (FE2)
7-41
Use Document
7
7.5.8
Direct Input - IP Address Fax
%
7.5.9
Specify the IP address Fax destination.
Item
Description
IP Address
Specifies the host name or IP address for the destination.
Port Number
Type in the port number to be used for transmission with the numeric keypad (range: 1 to 65535).
Destination Machine Type
Select [Color] if the machine type of the destination is a color machine.
Next Destination
Continues to specify other destinations.
Direct Input - PC (SMB)
%
Specify the PC (SMB) address directly.
Host Name
%
Specify the host name or IP address of the destination from the touch panel.
File Path
%
Enter the path to the destination folder from the touch panel.
User Name
%
Enter the user name to log in from the touch panel.
Password
%
Enter the login password from the touch panel.
Reference
The structure of the folders on the destination computer can be checked. This can be used to directly specify
the destination folder.
7-42
bizhub C353/C253/C203 (FE2)
Use Document
7
Next Destination
%
7.5.10
Continue to specify other destinations.
Direct Input - FTP
%
Specify the FTP address directly.
Host Name
%
Specify the host name or IP address for the destination from the touch panel.
File Path
%
Enter the path to the destination folder from the touch panel.
User Name
%
Enter the user name to log in from the touch panel. Touching [Anonymous] displays "anonymous".
Password
%
Enter the login password from the touch panel.
Detailed Settings
%
Make further detail settings.
Item
Description
Port Number
Type in the port number.
PASV
Specifies whether or not the PASV mode is used.
Proxy
Specifies whether or not a proxy server is used.
Next Destination
%
Continue to specify other destinations.
bizhub C353/C253/C203 (FE2)
7-43
Use Document
7
7.5.11
Direct Input - WebDAV
%
Specify the WebDAV address directly.
Host Name
%
Specify the host name or IP address for the destination from the touch panel.
File Path
%
Enter the path to the destination folder from the touch panel.
User Name
%
Enter the user name to log in from the touch panel.
Password
%
Enter the login password from the touch panel.
Detailed Settings
%
Make further detail settings.
Item
Description
Port Number
Type in the port number.
Proxy
Specifies whether or not a proxy server is used.
SSL Settings
Specifies whether or not SSL is used for transmission.
Next Destination
%
7-44
Continue to specify other destinations.
bizhub C353/C253/C203 (FE2)
Use Document
7.5.12
7
Job History
The latest five desntinations are displayed from the Fax destinations sent in the past. You can select a
destination from this history.
7.5.13
Address Search
If LDAP server settings are specified in Administrator Settings, "Address Search" appears on the screen.
!
Detail
For details on the LDAP server settings, refer to "Enabling LDAP" in the User manual – Network
Administrator.
If the manual destination input is restricted by Security Settings in the Administrator mode, "Address
Search" does not appear.
The display position of "Address Search" varies dependimng on the user settings. For details, refer to
in the User manual – Network Scan/Fax/Network Fax Operations.
bizhub C353/C253/C203 (FE2)
7-45
Use Document
7
7.5.14
Address Search - Search
%
7.5.15
Enter a search keyword, press "Start Search" to search the corresponding address in the specified
LDAP server.
Address Search - Advanced Search
%
Specifies multiple search conditions to search the destination address.
Name
%
Enter the name from the touch panel.
E-Mail Addr.
%
Enter the E-Mail address from the touch panel.
Fax Number
%
Enter the fax number from the touch panel.
Last Name
%
7-46
Enter the family name from the touch panel.
bizhub C353/C253/C203 (FE2)
Use Document
7
First Name
%
Enter the first name from the touch panel.
City
%
Enter the city name from the touch panel.
Company Name
%
Enter the company name from the touch panel.
Department
%
Enter the department name from the touch panel.
OR/AND/STARTS WITH/ENDS WITH
You can select search conditions from "OR"/"AND"/"STARTS WITH"/"ENDS WITH".
bizhub C353/C253/C203 (FE2)
7-47
Use Document
7
7.5.16
File Type
%
Specify a file format of the sending data.
File Type
The following file types are available.
Item
Description
PDF
Saves the data in the PDF format.
Compact
PDF
Select this option to compress the data more than the PDF format. This is used for full-color scan
data.
TIFF
Saves the data in the TIFF format.
JPEG
Saves the data in the JPEG format.
XPS
Saves the data in the XPS format.
Compact
XPS
Select this setting to compress the data more than the XPS format and save.
!
Detail
"JPEG" cannot be selected for Bind TX.
If "JPEG" is selected, "Single Page" is selected automatically for page setting.
2
Note
The compression format can be specified when saving a TIFF file in color. For details, refer to the User
manual – Network Scan/Fax/Network Fax Operations.
Scan Setting
Specifies a group of data.
Item
Description
Single Page
Creates a file in a format that allows data to be saved for each page when downloading data.
Multi Page
Creates a single file from the entire scanned document. This setting cannot be selected if the "JPEG"
is selected with [File Type].
!
Detail
"Single Page" cannot be selected for Bind TX.
7-48
bizhub C353/C253/C203 (FE2)
Use Document
7
Encryption
If you select PDF or Compact PDF File Type, you can specify the encryption level.
Item
Description
Encryption
Level
Specifies the encryption level.
Password
Specify this when [Password] is selected for "Encryption Type". Type in the password necessary to
open encrypted data (up to 32 characters). For confirmation, type in the password twice.
Document
Permissions
Specify this when [Password] is selected for "Encryption Type". Type in the password necessary to
change document permissions (up to 32 characters). For confirmation, type in the password twice.
Encryption - Detail Settings
When you specify document permissions with "Encryption", you can specify detailed permissions.
If [Low Level] is selected
If [High Level] is selected
bizhub C353/C253/C203 (FE2)
7-49
Use Document
7
Item
Description
Printing Allowed
Specifies whether or not to allow data printing. When you specify [High Level] for the encryption level,
[Low Resolution] appears.
Enable copying of text,
images and
other content
Specifies whether or not to allow copying of text, images and other content.
%
Touch [Forward
] to select details on the Changes Allowed screen.
If [Low Level] is selected
If [High Level] is selected
7-50
Item
Description
Changes Allowed
Specifies the appropriate permission level for document changes including data signature, inputs
and remarks.
bizhub C353/C253/C203 (FE2)
Use Document
7
Stamp Composition
You can select a stamp composition for what is added by stamp/page print.
Item
Description
Image
Insert the text as an image.
Text
Insert the text as text.
!
Detail
The date/time, page number and header/footer can be combined as text.
Stamps are combined as images.
7.5.17
Overview of Communication Settings
Settings related to communication such as communication line for transmission and digital signature can be
specified.
bizhub C353/C253/C203 (FE2)
7-51
Use Document
7
7.5.18
Communication Settings - Line Settings
About Line Settings
%
Specify settings for a fax sending line.
Overseas TX
%
Specify a slow transmission speed to send a fax to an area in bad communication.
!
Detail
This is not used with the following functions.
Polling TX
Polling RX
Bulletin Board
ECM OFF
%
Cancel ECM mode to send data.
– The ECM mode is an error request repeat method communication defined by ITU-T (International
Telecommunication Union). As Faxes equipped with the ECM mode communicate by checking if
the sent data has an error, they can prevent image blurring by the noise on the phone line. When
there are a lot of noises, communication time may be slightly longer than it is when ECM OFF is
selected. This machine automatically returns to the ECM ON status when it completes transmission.
!
Detail
Data is sent in the ECM mode unless ECM OFF is selected for this machime.
This is not used with the following functions.
Polling RX
Polling TX
V34 OFF
Bulletin Board Registration
Bulletin Board Polling RX
7-52
bizhub C353/C253/C203 (FE2)
Use Document
7
V.34 OFF
V.34 is a communication mode used for Fax communication of super G3. There are cases when the
communication is not possible in super G3 mode depending on the telephone line conditions when the
recipient's machine or this machine is connected to the line via a private branch exchange.
It is recommended that you set V.34 to off before sending a Fax. This machine automatically returns to V.34
mode when it completes transmission.
!
Detail
This is not used with the following functions.
Polling RX
Polling TX
Bulletin Board Registration
Bulletin Board Polling RX
Check Dest. & Send
A Fax is sent only after a comparison of the specified Fax number with the Fax number information (CSI) for
the recipient's machine indicates a match. This prevents misdirected transmissions since a transmission
error occurs if the numbers do not match.
!
Detail
[Check Dest. & Send] requires that the destination has its fax number registered.
Select Line
%
Select "Line 1" or "Line 2" to send a fax if a fax multi line is installed. Specify a line for transmission.
!
Detail
You cannot specify a line when "Line 2 Setting" of "Multi Line Setting" is set to "RX Only".
bizhub C353/C253/C203 (FE2)
7-53
Use Document
7
7.5.19
Communication Settings - E-Mail Settings
About E-Mail Settings
%
Specify the document name, subject, From address and message body for sending E-Mails.
Document Name
Displays the name of the file to be saved. The document name specified later appears as the document
name, even if the document name was specified in the File Document screen. You can enter up to 30
characters.
Subject
The text specified in Utility mode is automatically displayed.
%
7-54
Press [Direct Input] to change the text.
– You can enter up to 64 characters.
bizhub C353/C253/C203 (FE2)
Use Document
7
From
1
Display the E-Mail address specified in the Utility mode.
2
Touch [Direct Input] to change the text.
!
Detail
For Internet fax, the E-Mail address of the machine is used.
If you set "Change the From Address" (displayed by touching [System Settings] on the Administrator
Settings screen, then [Restrict User Access], then [Restrict Operation]) to "Restrict", you cannot directly
enter the From address.
Body
Displays the text specified in the Utility mode.
%
Touch [Direct Input] to change the text.
– You can enter up to 256 characters.
bizhub C353/C253/C203 (FE2)
7-55
Use Document
7
7.5.20
Communication Settings - URL Notification Setting
What is URL notification?
%
Specify the E-Mail address to notify completion of the job.
!
Detail
The destinations that can be specified for URL notification setting include FTP, SMB and WebDAV.
This feature is not available for E-Mail and fax transmission.
Detail Search
You can search the notification E-Mail address from where the address is registered.
1
Type in the destination name or part of the address to search for the corresponding address.
2
Select [Name] or [Destination] and enter the search text.
Direct Input
%
Enter the E-Mail address from the touch panel.
!
Detail
Frequently entered user names and domain names can be registered to be recalled and used again.
Prefixes and suffixes must be registered in advance in Administrator Settings.
For details on Prefix/Suffix, refer to the User manual – Network Administrator.
7-56
bizhub C353/C253/C203 (FE2)
Use Document
7.5.21
7
Communication Settings - Communication Method Settings
You can specify a communication method.
Timer TX
Specifies the transmission time. It is economical to communicate using telephone discount rate hours in early
morning and late at night.
%
Specify the communication start time with the numeric keypad.
!
Detail
You can specify the time only. Specify the time in hours and minutes.
You may not specify the date.
bizhub C353/C253/C203 (FE2)
7-57
Use Document
7
Password TX
Sends data with a password. If the recipient's Fax machine is set for closed network receptions, the sender's
Fax machine should transmit a Fax with the same password as the closed network reception password.
This function is available only when the recipient's machine has the closed network reception (password)
function.
%
Enter the password from the numeric keypad.
F-Code TX
Sends data to the specified box of the recipient by entering the SUB address and Sender ID. There are the
following two types of special boxes.
Confidential transmission
Sends data to the confidential transmission box of the recipient. Enter the box number as SUB address,
and the confidential transmission password as Sender ID.
Relay transmission
Sends data to the relay transmission box when the recipient has the relay distribution function. Enter
the relay box number as SUB address, and the relay transmission password as Sender ID.
!
Detail
The recipient needs to have the F-code function to use an F-code.
7-58
bizhub C353/C253/C203 (FE2)
Use Document
7.5.22
7
Communication Settings - E-Mail Encryption
This parameter appears when "S/MIME Communication Settings" (under "E-Mail Settings" under "Network
Setting" under "Administrator Setting") is set to "ON". Specifies whether or not to encrypt E-Mail messages
for transmission.
2
Note
For details on the S/MIME communication settings, refer to the User manual – Network Administrator.
7.5.23
Communication Settings - Digital Signature
This parameter appears when "S/MIME Communication Settings" (under "E-Mail Settings" under "Network
Setting" under "Administrator Setting") is set to "ON". Specifies whether or not to add a digital signature to
E-Mail messages for transmission.
!
Detail
This parameter may not be available or may be set to normally sign, depending on the specified S/MIME
communication settings.
2
Note
For details on the S/MIME communication settings, refer to the User manual – Network Administrator.
bizhub C353/C253/C203 (FE2)
7-59
Use Document
7
7.5.24
Communication Settings - Fax Header Settings
%
Specify whether or not to add sender information for transmission. Select one from the list of sender
names.
!
Detail
Use "TTI Setting" in the Utility to register the detail added to the original as sender information. For
details, refer to the User manual – Network Scan/Fax/Network Fax Operations.
Use "TTI/RTI" in the Utility to register how to add sender information. For details, refer to the User
manual – Network Scan/Fax/Network Fax Operations.
7.5.25
Overview of Application
Other settings (Stamp/Composition, Send & Print) specifiable at transmission can be specified here.
!
Detail
For details on Stamp/Composition, refer to p. 7-18
7-60
bizhub C353/C253/C203 (FE2)
Use Document
7.5.26
7
Application - Send & Print
What is Send & Print?
1
Specify whether or not to print a document concurrently with transmission.
2
Make various settings for printing.
Copies
%
Type in the desired number of print copies using the keypad. The input range is 1 to 999.
Simplex/Duplex
%
Select either 1-sided or 2-sided.
Staple
%
Specify whether or not the prints will be stapled.
Staple-Position Setting
When you select a staple type, you can specify the position.
bizhub C353/C253/C203 (FE2)
7-61
Use Document
7
7.6
Combine (Public/Personal/Group user box)
7.6.1
What is Combine?
Multiple documents can be selected and printed together. Up to 10 documents can be selected to print
together. Additional settings can be made on finishing such as the number of copies for the selected
document. Settings can be specified for the following.
7.6.2
Item
Description
Copies
Specifies the number of copies to be printed.
1-Sided/2Sided
Specifies whether 1-sided or 2-sided copies are to be printed.
Finishing
Specifies offset, stapling and hole punching.
Page Margin
Prints the document with a binding margin.
Stamp/Composition
Prints the document with the date/time, page number or a stamp.
Combining Order
Selecting multiple documents and touching [Combine] displays a screen to specify the combining order. The
document is printed in the displayed order here.
Selecting two documents switches their order.
7-62
bizhub C353/C253/C203 (FE2)
Use Document
7.6.3
7
Description of the Print screen
When the combining order is determined, the Print screen appears.
1
No.
2
Part Name
Description
1
Basic
Specifies the basic settings such as number of copies and 1-sided/2-sided.
2
Application
Specifies more difficult settings such as page margin and stamp.
!
Detail
For details on Basic settings, refer to p. 7-7
For details on Finishing, refer to p. 7-8
For details on Page Margin settings, refer to p. 7-11
For details on Stamp/Composition, p. 7-18
bizhub C353/C253/C203 (FE2)
7-63
Use Document
7
7.7
Bind TX (Public/Personal/Group user box)
7.7.1
What is Bind TX?
Multiple documents can be selected and sent together. Up to 10 documents can be selected to print
together. File format specifications can be added to the selected document. Settings can be specified for the
following.
Item
Description
File Type
Specifies the file format to save data.
E-Mail Setting
Specifies the document name, subject, From address and message body for sending E-Mails.
URL Notification Setting
Specifies the E-Mail address where notifications of completion of the job are to be sent.
Stamp/Composition
Prints the document with the date/time, page number or a stamp.
!
Detail
For details on the Combining Order, refer to p. 7-64
For details on Address Book, refer to p. 7-37
For details on Direct Input, refer to p. 7-41
For details on Address Search, refer to p. 7-46
For details on File Type, refer to p. 7-48
For details on Communication Settings, refer to p. 7-54
For details on Stamp/Composition, refer to p. 7-18
7.7.2
Combining Order screen
Selecting multiple documents and touching [Bind TX] displays a screen to specify the combining order. The
document is sent in the displayed order here.
Selecting two documents switches their order.
7-64
bizhub C353/C253/C203 (FE2)
Use Document
7.8
7.8.1
7
Bulletin Board User Box (System User Box)
What is Bulletin Board User Box?
The box to register a document for reference. Documents registered in the Bulletin Board User Box is
transmited by polling instruction from the destination.
7.8.2
Bulletin Board User Box screen
Selecting [Bulletin Board User Box] from the System tab displays the registered bulletin board user boxes.
%
7.8.3
Select a box in which documents registered in the machine are saved.
Printing document in the bulletin board user box
Saved documents in the bulletin board user box can be printed
%
7.8.4
Check the preview and document information and touch [Start].
Deleting document from the bulletin board user box
The document registered in the bulletin board can be deleted in the File Document screen. For details, refer
to "Bulletin Board User Box" on page 8-9.
bizhub C353/C253/C203 (FE2)
7-65
Use Document
7
7.9
Polling TX User Box (System User Box)
The polling TX user box is used to save documents to be sent by an instruction from the recipient.The
operation to send a document to the polling TX user box and save it is called Polling TX.
You can print documents saved in the polling transmission user box.
%
Check the preview and document information and touch [Start].
!
Detail
You can save only one document in the polling transmission user box. To register a new document,
delete the document in the File Document screen, and then register a new document.
For the procedure to delete documents in the polling transmission user box, refer to "Polling TX User
Box" on page 8-9.
7-66
bizhub C353/C253/C203 (FE2)
Use Document
7.10
7.10.1
7
Secure Print User Box (System User Box)
What is Secure Print User Box?
Documents being sent for print jobs by protecting with an ID and password are saved in this box. The ID and
password must be entered in order to print a document.
The authentication procedure may vary depending on how [Prohibited Functions When Authentication Error]
(displayed by touching [Security Settings], and then [Security Details] in Administrator Settings) is set. For
details, consult the administrator of this machine.
2
Note
For procedure of saving secure prints, refer to the User manual – Print Operations.
7.10.2
Authentication procedure 1
Take an appropriate operation acccording to the following procedure when [Prohibited Functions When
Authentication Error] (displayed by touching [Security Settings], and then [Security Details] in Administrator
Settings) is set to "Mode 1".
1
Touch [Secure Print User Box].
2
Type in the secure print ID.
3
Type in the password for secure print.
A list of documents appears.
4
7.10.3
Select the document to be printed and make print settings.
Authentication procedure 2
Take an appropriate operation acccording to the following procedure when [Prohibited Functions When
Authentication Error] (displayed by touching [Security Settings], and then [Security Details] in Administrator
Settings) is set to "Mode 2".
1
Touch [Secure Print User Box].
2
Type in the secure print ID.
A list of documents appears.
3
Select the document to be printed and type in the password for secure print.
!
Detail
When you select "Mode 2", the security level is higher than that in "Mode 1".
bizhub C353/C253/C203 (FE2)
7-67
Use Document
7
7.10.4
Printing
You can add several functions to documents stored in secure print user box when you print them.
Copies
%
Type in the desired number of print copies using the keypad.
– The input range is 1 to 999.
1-Sided/2-Sided
%
Select either 1-sided or 2-sided.
Finishing
For the setting procedure, refer to "Finishing" on page 7-8.
Sheet/Cover/Chapter Insert
For the setting procedure, refer to "Sheet/Cover/Chapter Insert" on page 7-12.
Stamp/Composition
For the setting procedure, refer to "Stamp/Composition" on page 7-17.
7.10.5
Deleting
The document saved in the secure print user box can be deleted in the File Document screen. For details,
refer to "Secure Print User Box" on page 8-10.
7-68
bizhub C353/C253/C203 (FE2)
Use Document
7
7.11
Memory RX User Box (System User Box)
7.11.1
What is Memory RX User Box?
This is the box to store the received document in memory and to print as necessary. When Memory RX is set
to on, the received document is automatically saved.
7.11.2
Memory RX User Box screen
Selecting [Memory RX User Box] from the System tab displays the list of saved documents
%
7.11.3
Printing
%
7.11.4
Select the document to be checked.
Check the document, and then touch [Print].
The received document you specified is printed.
Deleting
The document saved in the Memory RX User Box can be deleted in the File Document screen. For details,
refer to "Memory RX User Box" on page 8-10.
bizhub C353/C253/C203 (FE2)
7-69
Use Document
7
7.12
Annotation User Box (System User Box)
7.12.1
What is Annotation User Box?
This is the box to print and transmit the saved document data with an image of the date/time and an
annotation number. You can set the character string added to the saved box and change it when you print
and send a document.
7.12.2
7.12.3
Annotation User Box screen
1
Select [Annotation User Box] to display the registered annotation user boxes from the System tab.
2
Select a box to check the document.
Description of the Print screen
%
Touch [Print] to display the following screen.
1
No.
2
Part Name
Description
1
Basic
Specifies the basic settings such as number of copies and 1sided/2-sided.
2
Application
Specifies more difficult settings such as page margin, sheet insertion and stamp.
!
Detail
For details on Basic settings, refer to p. 7-7
For details on Finishing, refer to p. 7-8
For details on Page Margin, refer to p. 7-12
For details on Sheet/Cover/Chapter Insert, refer to p. 7-13
7-70
bizhub C353/C253/C203 (FE2)
Use Document
7
For details on Stamp/Composition, refer to p. 7-18
7.12.4
Description of the Send screen
For the setting procedure, refer to "Description of the Send screen" on page 7-36.
!
Detail
For details on Address Book, refer to p. 7-37
For details on Direct Input, refer to p. 7-41
For details on Job History, refer to p. 7-45
For details on Address Search, refer to p. 7-46
For details on File Type, refer to p. 7-48
For details on Communication Settings, refer to p. 7-52
For details on Stamp/Composition, refer to p. 7-18
For details on Send & Print, refer to p. 7-61
For details on Stamp Element, refer to p. 7-71
7.12.5
Application - Stamp Element
The formats for texts and distribution numbers are set in the Annotation User Box in advance. You can
change these details when you send the document.
Secondary Field
Texts can be added to the number to be printed. You can enter up to 20 characters.
Date/Time
%
Specify the display type for the date and time to be printed.
bizhub C353/C253/C203 (FE2)
7-71
Use Document
7
Density
%
Specify the density for the annotation numbers to be printed.
Number Type
%
Specify the output format (number of digits) for the annotation numbers to be printed.
Print Position
%
7-72
Specify the printing position.
bizhub C353/C253/C203 (FE2)
Use Document
7
7.13
Fax Retransmit User Box (System User Box)
7.13.1
What is Fax Retransmit User Box?
A box to save documents that could not be sent even by dialing exceeding the automatic redial count
specified in the line parameter setting for a certain period because the recipient's line is busy during fax
transmission. Saved documents can be retransmitted or printed later for confirmation.
7.13.2
Fax Retransmit User Box screen
Selecting [Fax Retransmit User Box] from the System tab displays the list of saved documents.
%
7.13.3
Retransmitting a fax
%
7.13.4
Select the document to be checked.
Select the document to be retransmitted, and then touch [Fax].
Printing
%
Select the document to be printed, and then touch [Proof Print].
bizhub C353/C253/C203 (FE2)
7-73
Use Document
7
7.14
Encrypted PDF User Box (System User Box)
7.14.1
What is Encrypted PDF User Box?
If the password-protected PDF file data is saved using PageScope Web Connection or PageScope Direct
Print, documents are automatically saved in the encrypted PDF user box.
!
Detail
Printing is instructed from the encrypted PDF box to print an encrypted PDF file with an external
memory.
7.14.2
7.14.3
7.14.4
Encrypted PDF User Box screen
1
Select [Encrypted PDF user box] to display the list of saved documents from the System tab.
2
Select the document to be checked.
Printing
1
Select the document to be printed and then touch [Print].
2
Enter the password specified in the PDF file when printing.
Deleting
%
7-74
Select the document to be deleted and then touch [Delete].
bizhub C353/C253/C203 (FE2)
Use Document
7
7.15
ID & Print User Box (System User Box)
7.15.1
ID & Print User Box
This user box appears if user authentication is applied. If an appropriate user is logged on this machine,
documents can be printed. Document data, which is printed from a computer on the network by entering the
user name and password, is temporarily saved in the ID & Print User Box.
When documents are saved in ID & Print User Box, the following keys appear on the login screen. Enter the
user name and password, and then touch the desired key.
Item
Description
[Begin Printing]
A document that is saved in ID & Print User Box can be printed without logging in.
[Print & Login]
A document that is saved in ID & Print User Box can be printed when a user is logged in.
[Login]
Login only. After logging on, a document that is saved in ID & Print User Box can be printed or deleted.
2
Note
For details on saving document data sent for print jobs from a computer to ID & Print User Box, refer
to the User manual – Print Operations.
!
Detail
Even if user authentication is not applied or for print jobs saved by a public user, print jobs can also be
saved in ID & Print User Box. For details, refer to "ID & Print Settings" on page 8-16.
When printing is completed, the data in ID & Print User Box is deleted.
7.15.2
ID & Print User Box screen
Selecting [ID & Print User Box] from the System User Box tab displays the list of saved documents.
%
Select the document to be checked.
bizhub C353/C253/C203 (FE2)
7-75
Use Document
7
7.15.3
Printing
%
7.15.4
Deleting
%
7-76
Select the document to be printed, and then touch [Print].
Select the document to be deleted and then touch [Delete].
bizhub C353/C253/C203 (FE2)
Use Document
7
7.16
External Memory (System User Box)
7.16.1
About External Memory
Available External Memory
The conditions of external memories available on this machine are as follows.
USB flash memory supporting the USB (1.1/2.0) Interface
FAT32 formatted.
!
Detail
To connect an external memory, an optional local interface kit is required.
Connecting an external memory
1
Connect an external memory to the USB connector on the side of this machine.
2
When the external memory is connected, an icon appears on the bottom of the screen and the following
screen appears.Check it, and then touch [OK].
bizhub C353/C253/C203 (FE2)
7-77
Use Document
7
2
Reminder
This machine is equipped with two USB connectors on the side. As one is for optional connection, two
sets of external memories cannot be connected at a time.
Do not pull out the external memory while a document is being saved to the external memory or being
printed.
Do not use any USB device other than the USB flash memory (such as hard disk or USB hub). However,
the optional products connectable to the USB connector of this machine are exceptions.
7-78
bizhub C353/C253/C203 (FE2)
Use Document
7.16.2
7
External Memory screen
The folder structure of the installed external memory is displayed.
File Path
From the touch panel, you can specify the file path of the folder in which documents to be printed are saved.
%
Touch [File Path] to type in a path.
!
Detail
Enter the file path and file name of up to 250 characters. If 250 characters are exceeded, file list cannot
be displayed.
File selection
File formats used for printing are PDF, JPEG, TIFF and XPS. Select appropriate files from the list.
2-sided printing, punching, or stapling is not available for files in the JPEG or XPS format.
Versions of PDF files which can be printed by this machine are the PDF Version 1.6 and before.
2
Note
Only file names of printable file formats are displayed among saved files.
If the file path and file name exceeds 250 characters, the file becomes inaccessible.
In the folder of the specified file path, up to 255 files that can be printed are displayed. If a folder
contains more than 255 files, it may take time to display the file list screen.
bizhub C353/C253/C203 (FE2)
7-79
Use Document
7
To print encrypted PDF data
%
To print encrypted PDF data saved in an external memory, select data on the external memory screen
and instruct printing.
When printing is instructed, the encrypted PDF data in the external memory is saved in the encrypted
PDF box of this machine. Access the encrypted PDF box of this machine and perform printing
operation.
2
Note
For details on the encrypted PDF user box, refer to "Encrypted PDF User Box screen" on page 7-74.
Move to the upper folder
%
Touch [Up] to move to the upper folder.
Open a folder
%
To view the content of the folder, touch [Open].
Print
%
Select the document to be print, and then touch [Print] to display the Print screen.
Document Details
You can check the update date and document name of the selected document.
7.16.3
External Memory - Print
%
Touch [Print] to display the following screen.
1
7-80
No.
Part Name
Description
1
Basic
Specifies the basic settings such as number of copies and 1sided/2-sided.
bizhub C353/C253/C203 (FE2)
Use Document
7.16.4
7
Basic
Copies
%
Type in the desired number of print copies using the keypad. The input range is 1 to 999.
Color
%
Specify whether the document is printed in color or black and white.
Print
%
Select either 1-sided or 2-sided.
Binding Position
%
When 2-sided is selected in "Print", select a binding position.
Finishing
For the setting procedure, refer to "Finishing" on page 7-8.
!
Detail
2-sided printing, punching, or stapling is not available for files in the JPEG or XPS format.
Paper
%
Select the paper tray to print.
bizhub C353/C253/C203 (FE2)
7-81
7
7-82
Use Document
bizhub C353/C253/C203 (FE2)
8
File Document
File Document
8
8
File Document
8.1
Available operations in the File Document screen
The following operations can be performed from the File Document screen.
8.1.1
Public/Personal/Group
Documents stored in public, personal, or group user box are subject to the following operations:
Item
Description
Delete
Deletes documents that are no longer needed after being printed or transmitted.
Edit Name
Changes the name of a saved document.
Move
Moves data of documents stored in the user box to another public, personal, or
group user box.
Copy
Copies data of documents stored in the user box to another public, personal, or
group user box.
Document Details
Enables checking of the saving date and time and a preview image of a document.
System
Documents stored in a system user box are subject to different operations, depending on the hosting box.
Bulletin
Board User
Box
Polling TX
User Box
Secure Print
User Box
Memory RX
User Box
Annotation
User Box
Fax Retransmit
User Box
Delete
o
o
o
o
o
o
Edit Name
e
e
o
o
o
e
Move
e
e
e
e
e
e
Copy
e
e
e
e
e
e
Document
Details
e
e
o
o
o
o
bizhub C353/C253/C203 (FE2)
8-3
File Document
8
8.1.2
Description of the File Document screen
Public/Personal/Group
Select the Public, Personal, or Group tab, and then a user box. A screen like the following appears.
1
2
3
4
5
6
7
11
No.
8-4
10
Item
Description
1
-
Displays the user box number and name.
2
[
][
]
9 8
When seven or more documents are saved, use the [
list displays.
] and [
] keys to switch
3
[Delete]
Deletes selected documents.
4
[Edit Name]
Changes the name of the selected document.
5
[Move]
Specifies moving of the selected document.
6
[Copy]
Specifies copying of the selected document.
7
[Document Details]
Enables checking of detailed information and a preview image of a document.
8
[Select All]
Selects all documents in the user box.
9
[Reset]
Resets all documents in the user box.
10
[Detail
View]/[Thumbnail
View]
Switches the display format of the saved document.
[Thumbnail View]: Displays a thumbnail of the first page, page number and the document name.
[Detail View]: Displays the time stored, user name, and document name. Touch the title
of [Time Stored] to sort entries on the list in ascending/descending order of the time
stored
11
-
Displays the list of documents saved in the user box.
bizhub C353/C253/C203 (FE2)
File Document
8
System User Box
1
Select the System User Box tab, and a list of available system boxes appears.
2
Select a box for document filing.
–
–
–
When you select the [Bulletin Board User Box], further select a box inside that box for document
filing.
When you select [Secure Print User Box], enter the ID and password for a secure print document.
When you select the [Annotation User Box], further select a box inside that box for document filing.
!
Detail
Depending on the settings for the Prohibit Functions When Auth. Error functions available from
"Security Setting" - "Security Details" under [Administrator Settings], the procedure to input the ID and
password for the secure print user box may vary.
bizhub C353/C253/C203 (FE2)
8-5
File Document
8
8.2
Public/Personal/Group user box
8.2.1
Deleting a document
Deletes documents that are no longer needed after printing, etc. Multiple documents can be selected and
deleted at once. After checking the details of the document, touch [Yes], and then [OK].
8.2.2
Edit Name
Changes the name of a saved document. Enter a new name from the touch panel.
!
Detail
The document name specified here is the default file name for transmission. Change the name of a
document to be transmitted according to the conditions of the destination server.
The document name can also be changed later upon transmission.
8.2.3
Move
Moves data of documents stored in the user box to another user box. You can select a destination box from
public, personal or group user box.
1
Select the destination user box, and check the contents of the document.
2
Touch [OK].
!
Detail
Display contents vary for personal and group user boxes according to the user who is logged on.
Password entry is not necessary even if a password has been specified for the destination box.
8-6
bizhub C353/C253/C203 (FE2)
File Document
8.2.4
8
Copy
Copies data of documents stored in the user box to another user box. You can select the destination from
public, personal and group user boxes.
1
Select the destination user box, and check the contents of the document.
2
Touch [OK]
!
Detail
Display contents vary for personal and group user boxes according to the user who is logged on.
Password entry is not necessary even if a password has been specified for the destination user box.
8.2.5
Document Details
Enables the details of a stored document to be checked from the touch panel.
Display of detailed information
%
Select a document and touch [Document Details] to check the following items:
Item
Description
Registered Time
Displays the date and time when the document was stored.
User Name
Displays the mode (Scan, Copy or Print) and name of the user who stored the
document.
Document Name
Displays the name of the document.
No. of Pages
Displays the number of pages in the document.
Job No.
Displays the job number used for storing (registering) the document.
[
][
]
[Preview]
bizhub C353/C253/C203 (FE2)
If two or more documents are stored in the user box, use [
switch documents.
] and [
] to
Touch this button to switch to the Preview screen. For details, refer to "Preview"
on page 8-8.
8-7
File Document
8
Preview
1
On the Document Details screen, touch [Preview] to display the preview image of the saved document.
–
The document can be viewed at full size or at a size of 2, 4 or 8 times the normal size.
2
Select the display size.
3
Use the scroll bars in the right end and bottom end of the image to view the desired section of the
image.
!
Detail
With documents containing multiple pages, only the image of the first page can be checked.
The contents of a document saved with encryption cannot be previewed.
8-8
bizhub C353/C253/C203 (FE2)
File Document
8.3
8.3.1
8
System User Box
Bulletin Board User Box
Enables documents for viewing stored in a bulletin board user box to be checked and deleted.
8.3.2
1
Select a bulletin board user box and check the contents of the box.
2
Touch [Delete].
Polling TX User Box
Enables documents stored in a polling TX user box to be checked and deleted.
%
Check the contents and touch [Delete].
bizhub C353/C253/C203 (FE2)
8-9
File Document
8
8.3.3
Secure Print User Box
Enables operation on documents stored in a secure print user box.
Available operations are as follows:
Item
Description
Delete
Deletes documents that are no longer needed after printing, etc.
Edit Name
Changes the name of a saved document.
Document Details
Enables checking of the saving date and time and a preview image of a document.
!
Detail
To delete all documents stored in secure print user boxes, touch [Administrator Settings], and select
"User Box Settings" - "Delete Secure Print Documents""Delete Secure Print Documents" on page 9-16.
8.3.4
Memory RX User Box
Enables operation on documents stored under "Memory RX User Box".
Available operations are as follows:
8-10
Item
Description
Delete
Deletes documents that are no longer needed after printing, etc.
Edit Name
Changes the name of a saved document.
Document Details
Enables checking of the saving date and time and a preview image of a document.
bizhub C353/C253/C203 (FE2)
File Document
8.3.5
8
Annotation User Box
Enables operation on documents stored under Annotation User Box.
Available operations are as follows:
8.3.6
Item
Description
Delete
Deletes documents that are no longer needed after printing, transmitting, etc.
Edit Name
Changes the name of a saved document.
Document Details
Enables checking of the saving date and time and a preview image of a document.
Fax Retransmit User Box
Enables operation on documents stored under Fax Retransmit User Box.
Available operations are as follows:
Item
Description
Delete
Deletes documents that are no longer needed after printing, etc.
Document Details
Enables checking of the saving date and time and a preview image of a document.
bizhub C353/C253/C203 (FE2)
8-11
8
8-12
File Document
bizhub C353/C253/C203 (FE2)
9
User box setting
User box setting
9
9
User box setting
9.1
Menu tree for user box setting
The following describes the menus and items related to the user box setting in the Utility mode.
9.1.1
Utility
First-level menu
Second-level menu
Third-level menu
Fourth-level menu
[1] One-Touch/User Box
Registration
[2] Create User Box
(p. 9-6)
[1] Public/Personal User
Box (p. 9-7)
New
Edit
Delete
[2] Bulletin Board User
Box (p. 9-9
New
Edit
Delete
[3] Relay User Box
(p. 9-10)
New
Edit
Delete
bizhub C353/C253/C203 (FE2)
9-3
User box setting
9
9.1.2
Administrator Settings
First-level menu
Second-level menu
Third-level menu
[1] System Settings
[0] User Box Settings
(p. 9-16)
[1] Delete Unused User
Box (p. 9-16)
Fourth-level menu
[2] Delete Secure Print
Documents (p. 9-16)
[3] Auto Delete Secure
Document (p. 9-16)
[4] Encrypted PDF Delete
Time (p. 9-17)
[5] ID & Print Delete Time
(p. 9-17)
[6] Document Hold Setting
(p. 9-18)
[3] One-Touch/User Box
Registration
[2] Create User Box
(p. 9-6)
[7] External Memory Function Settings (p. 9-18)
Save Document
[1] Public/Personal User
Box (p. 9-7)
New
Print Document
Edit
Delete
Delete Empty User Box(es)
(p. 9-8)
[2] Bulletin Board User
Box (p. 9-9)
New
Edit
Delete
[3] Relay User Box
(p. 9-10)
New
Edit
Delete
[4] Annotation User Box
(p. 9-13)
New
Edit
Delete
[4] User Authentication/Account Track
9-4
[4] Maximum Number of
User Boxes (p. 9-15)
Max. No. of Use Boxes
[2] User Authentication
Settings
[1] Administrative Settings
Maximum Number of User
Boxes
ID & Print Settings
(p. 9-19)
bizhub C353/C253/C203 (FE2)
User box setting
9
First-level menu
Second-level menu
[0] Security Settings
[2] User Box Administrator
setting (p. 9-19)
[6] HDD Settings
Third-level menu
Fourth-level menu
[1] Check HDD Capacity
(p. 9-21)
[2] Overwrite Temporary
Data (p. 9-21)
Overwrite Method
Encryption Priority
Overwrite Priority
[3] Overwrite All Data
(p. 9-22)
[4] HDD Lock Password
(p. 9-23)
[5] Format HDD (p. 9-24)
[6] HDD Encryption Setting
(p. 9-24)
bizhub C353/C253/C203 (FE2)
9-5
User box setting
9
9.2
User box registration
9.2.1
User box registration
New user boxes can be registered. Available user box types are as follows:
Item
Description
Public user box
Shared box that any user can access.
Personal user box
Personal-use user box that only the user who is logged on can access when the
machine is subject to management with user authentication.
Group user box
User box that can only be accessed by users who belong to the account that is
logged on when the Account Track function is operating on the machine.
Bulletin board user box
Used for F-coded polling transmission/reception via a bulletin board. This type
can be specified if the optional fax kit is installed.
Relay user box
Used for storing relay data when this machine operates as the relay distribution
station for F-coded relay distribution. This type can be specified if the optional
fax kit is installed.
Annotation user box
Used for adding an image of the date/time or an annotation number to a document when printing or transmitting it. The type of text added can be specified
when the document is used. Annotation user boxes are registered in Administrator mode.
!
Detail
If user authentication is canceled, personal and group user boxes become public user boxes.
If user authentication or account tracking is in place, be sure to complete authentication by touching
[Login] or press the [ID] key after entering the ID and password. If user authentication has failed,
personal or group user boxes cannot be created.
If the optional fax kit is installed, confidential reception (F-code transmission) is available as a functional
expansion for public/personal/group user boxes.
If "Password Rules" is enabled, no password containing less than eight characters can be registered.
If you have already registered a password containing less than eight characters, change it to one using
eight characters containing eight characters before enabling "Password Rules". For the password
rules, refer to the User manual – Copy Operations.
9-6
bizhub C353/C253/C203 (FE2)
User box setting
9
Public/Personal/Group user boxes
%
When registering or editing, specify the following items.
!
Detail
To change settings for a registered user box, select the user box and touch [Edit].
After touching [Edit], the user box number cannot be changed.
To delete a registered user box, select the user box and touch [Delete].
Screen (1/2)
Item
Description
User Box No.
The next available user box number appears automatically. To specify a user box
number, touch [User Box No.], and then use the keypad to type in the user box
number (between 1 and 999999999).
User Box Name
Touch [User Box Name], and then enter the user box name from the touch panel
(20 characters or less). Multiple user boxes can be registered under the same
user box name if different user box numbers are specified respectively.
Password
Specify a password to limit access to the user box. Touch [Password], and then
enter the password from the touch panel (8 characters or less).
Index
Select the index characters.
Type
Depending on the state of user authentication and account track operations, either [Public], [Personal], or [Group] can be selected.
When selecting [Personal], specify the owner name. To change the owner, touch
[Change Owner], and then select a different owner.
When selecting [Group], specify the owner account. In the Change Owner page,
select a different owner account.
bizhub C353/C253/C203 (FE2)
9-7
User box setting
9
Screen (2/2)
Item
Description
Auto Document Delete Time
Specify the length of time for documents to remain before they are deleted,
counting from the registration.
Confidential RX
This key appears when the optional fax kit is installed. Select the option to add
or not to add the confidential reception function to the user box. To add the confidential reception function, type in the confidential reception password.
For confirmation, type in the password for confidential reception twice.
Delete Empty User Box(es)
If a public, personal, or group user box are registered in the Administrator Settings mode, it is possible to set
up so that the program can search for empty user boxes and automatically delete them if any. Touch [Delete
Empty User Box(es)] on the User Box Registration page.
9-8
bizhub C353/C253/C203 (FE2)
User box setting
9
Bulletin Board User Box
%
Up to 10 bulletin board user boxes can be registered. When registering or editing, specify the following
items.
!
Detail
To change settings for a registered user box, select the user box and touch [Edit].
After touching [Edit], the user box number cannot be changed.
To delete a registered user box, select the user box and touch [Delete].
Screen (1/2)
Item
Description
User Box No.
The next available user box number is displayed. To specify a user box number,
touch [User Box No.], and then use the keypad to type in the user box number
(between 1 and 999999999).
User Box Name
Touch [User Box Name], and then enter the user box name from the touch panel
(20 characters or less). Multiple user boxes can be registered under the same
user box name if different user box numbers are specified respectively.
Password
Specify a password to limit access to the user box. Touch [Password], and then
enter the password from the touch panel (8 characters or less).
Type
Depending on the state of user authentication and account track operations, either [Public], [Personal], or [Group] can be selected.
When selecting [Personal], specify the owner name. To change the owner, touch
[Change Owner], and then select a different owner.
When selecting [Group], specify the owner account. In the Change Owner page,
select a different owner account.
Screen (2/2)
Item
Description
Auto Document Delete Time
Specify the length of time for documents to remain before they are deleted,
counting from the registration.
bizhub C353/C253/C203 (FE2)
9-9
User box setting
9
Relay User Box
%
Up to five relay user boxes can be registered. When registering or editing, specify the following items.
!
Detail
To change settings for a registered user box, select the user box and touch [Edit].
After touching [Edit], the user box number cannot be changed.
To delete a registered user box, select the user box and touch [Delete].
Item
Description
User Box No.
The next available user box number appears automatically. To specify a user box
number, touch [User Box No.], and then use the keypad to type in the user box
number (between 1 and 999999999).
User Box Name
Touch [User Box Name], and then enter the user box name from the touch panel
(20 characters or less). Multiple user boxes can be registered under the same
user box name if different user box numbers are specified respectively.
Relay Destination
Select a relay destination of transmission from a relay user box. Relay destinations are preregistered as group destinations.
Relay TX Password
Specify a password to limit access to the user box. Touch [Relay TX Password],
and then enter the password from the touch panel (8 characters or less).
!
Detail
For details on group destination registration, refer to the User manual – Network Scan/Fax/Network Fax
Operations.
9-10
bizhub C353/C253/C203 (FE2)
User box setting
9
9.3
Administrator Settings
9.3.1
User box permissions
Types of users
Users of various levels can use this machine. The User Box functions are managed by the user box
administrator, apart from the administrator of the machine. Each type of users can access certain types of
user boxes as shown in the following table.
Item
Description
Public user
When user athenitcation is not performed, users can access user boxes as a
public user.
Registered user
Users registered by the administrator when user authentication is performed.
User box administrator
This user logs on as the user box administrator when user authentication is performed. The user box administrator can access all user boxes, regardless of the
password status.
Administrator
Performs device management. This user can create, change, or delete any user
box, regardless of the password status.
!
Detail
To log on as the user box administrator, type "boxadmin" as the user name for user authentication and
type the password specified in "User Box Administrator Setting" on page 9-19.
Public user boxes and personal/group user boxes
The following table shows operations that can or cannot be performed on public user boxes, which can be
accessed by all users, and those that can or cannot be performed on personal/group user boxes, which can
only be accessed by specific users.
Operation
Create boxes
View/download/delete documents
Change box settings
Delete boxes
User box
type
Public
Personal/group
Public
Personal/group
Public
Personal/group
Public
Personal/group
Public
user
o
e
o
e
o
e
o
e
Registered
user
o
o
o
o*1
o
o*1
o
o
User box
administrator
o*2
o*2
o*2
o*2
o*2
o*2
o*2
o*2
Administrator
o*2
e
e
e
o*2
o*2
o*2
o*2
*1 The operations can be performed only on user boxes created by the registered user.
*2 The user box administrator and the administrator can perform operations without entering the password,
even if a password has been set for the user box.
bizhub C353/C253/C203 (FE2)
9-11
User box setting
9
9.3.2
User box registration
New user boxes can be registered. Available user box types are as follows:
Item
Description
Public user box
Shared box that any user can access.
Personal user box
Personal-use user box that only the user who is logged on can access when the
machine is subject to management with user authentication.
Group user box
User box that can only be accessed by users who belong to the account that is
logged on when the Account Track function is operating on the machine.
Bulletin board user box
Used for F-coded polling transmission/reception via a bulletin board. This type
can be specified if the optional fax kit is installed.
Relay user box
Used for storing relay data when this machine operates as the relay distribution
station for F-coded relay distribution. This type can be specified if the optional
fax kit is installed.
Annotation user box
Used for adding an image of the date/time or an annotation number to a document when printing or transmitting it. The type of text added can be specified
when the document is used. Annotation user boxes are registered in Administrator mode.
!
Detail
If user authentication is canceled, personal and group user boxes become public user boxes.
If user authentication or account tracking is in place, be sure to complete authentication by touching
[Login] or press the [ID] key after entering the ID and password. If user authentication has failed,
personal or group user boxes cannot be created.
If the optional fax kit is installed, confidential reception (F-code transmission) is available as a functional
expansion for public/personal/group user boxes.
If "Password Rules" is enabled, no password containing less than eight characters can be registered.
If you have already registered a password containing less than eight characters, change it to one using
eight characters containing eight characters before enabling "Password Rules". For the password
rules, refer to the User manual – Copy Operations.
2
Note
For details on registering public, personal and group user boxes, refer to p. 9-7
For details on registering bulletin board user boxes, refer to p. 9-9
For details on registering relay user boxes, refer to p. 9-10
For details on registering annotation user boxes, refer to p. 9-13
9-12
bizhub C353/C253/C203 (FE2)
User box setting
9.3.3
9
Registering annotation user boxes
%
When registering or editing, specify the following items.
!
Detail
To change settings for a registered user box, select the user box and touch [Edit].
After touching [Edit], the user box number cannot be changed.
To delete a registered user box, select the user box and touch [Delete].
Screen (1/3)
Item
Description
User Box No.
The next available user box number appears automatically. To specify a user box
number, touch [User Box No.], and then use the keypad to type in the user box
number (between 1 and 999999999).
User Box Name
Touch [User Box Name], and then enter the user box name from the touch panel
(20 characters or less). Multiple user boxes can be registered under the same
user box name if different user box numbers are specified respectively.
Password
Specify a password to limit access to the user box. Touch [Password], and then
enter the password from the touch panel (8 characters or less).
!
Detail
If "Password Rules" is enabled, a password containing less than eight characters cannot be registered.
If you have already registered a password containing less than eight characters, change it to one using
eight characters containing eight characters before enabling "Password Rules". For the password
rules, refer to the User manual – Copy Operations.
bizhub C353/C253/C203 (FE2)
9-13
User box setting
9
Screen (2/3)
Item
Description
Count Up
Select either [By Job] or [By Page] for the annotation number counting method.
Secondary Field
Text can be added to the number to be printed (within 20 characters).
Date/Time
Select the format for the date and time to be printed.
Density
Select the density for the annotation numbers to be printed.
Number Type
Select the output format (number of digits) for the annotation numbers to be
printed.
Print Position
Select the printing position.
Primary Field
Text can be added (within 40 characters).
Screen (3/3)
9-14
Item
Description
Auto Document Delete Time
Specify the length of time for documents to remain before they are deleted,
counting from the registration.
bizhub C353/C253/C203 (FE2)
User box setting
9.3.4
9
Maximum Number of User Boxes
%
Specify the upper limit of the number of user boxes that can be registered for each user.
Public/Personal/Group
Depending on the state of user authentication and account track operations, either [Public], [Personal], or
[Group] can be selected.
Max No. of Use Boxes - ON/OFF
%
Select [ON] to specify the upper limit.
– Select [OFF] not to specify the upper limit, allowing an infinite number of boxes to be registered.
Maximum Number of User Boxes
The upper limit of registered user boxes can be specified between zero and 1,000.
1
Use the keypad to enter the maximum number.
2
Touch [Apply] to specify the upper limit.
!
Detail
Specify "0" for the upper limit of the number of user boxes, and new registration is blocked.
If the user has selected specified three user boxes already, the range of the upper limit for the number
for user boxes that can be specified is indicated as "3 - 1000".
bizhub C353/C253/C203 (FE2)
9-15
User box setting
9
9.3.5
User Box Settings
Delete Unused User Box
Boxes containing no documents can be deleted as unused boxes.
%
To delete unused user boxes, confirm the message and select [Yes].
Delete Secure Print Documents
All documents stored in secure print user boxes can be deleted.
%
To delete secure print documents, confirm the message and select [Yes].
Auto Delete Secure Document
Specify the length of time for secure print documents to remain in before they are automatically deleted,
counting from the moment they are stored.
%
To delete them automatically, select [Yes], and then select the delete time.
!
Detail
Select the delete time from "12 hours", "1 day", "2 days", "3 days", "7 days" and "30 days".
9-16
bizhub C353/C253/C203 (FE2)
User box setting
9
Encrypted PDF Delete Time
1
Select the length of time for encrypted PDF files to remain before they are automatically deleted,
counting from the moment they are stored.
2
To delete them automatically, select [Yes].
3
Then select the delete time.
!
Detail
Select the delete time from "12 hours", "1 day", "2 days", "3 days", "7 days" and "30 days".
ID & Print Delete Time
%
Specify the length of time until documents are automatically deleted after they are stored in ID & Print
User Box.
– To automatically delete these documents, select [Yes], and then select the delete time.
!
Detail
Select the delete time from "12 hours", "1 day", "2 days", "3 days", "7 days" and "30 days".
bizhub C353/C253/C203 (FE2)
9-17
User box setting
9
Document Hold Setting
%
Specify to retain or to delete documents automatically when they are transmitted or printed.
– To retain (not to delete) documents after they are printed or transmitted, touch [ON].
– To delete documents when they are printed or transmitted, touch [OFF].
External Memory Functions Settings
This operation enables or disables functions using an external memory connected to this machine.
%
Select a function, and then [ON] or [OFF].
Item
Description
Save Document
With [Save Document] in User Box mode, enable or disable the function to save
documents scanned into the external memory.
Print Document
With [Print Document] in User Box mode, enable or disable the function to
print/transmit documents saved in the external memory.
!
Detail
Saving document to an external memory is disabled (cannot be saved) at factory default.It is also
disabled (cannot be saved) in the user function setting when the user authentication is specified. To
save a document to an external memory, change the Administrator Settings to allow documents to be
saved in an external memory.
9-18
bizhub C353/C253/C203 (FE2)
User box setting
9.3.6
9
ID & Print Settings
Specify settings for ID & Print User Box.
9.3.7
Item
Description
ID & Print
•
•
Public User
Select the operation when a print job without authentication information is sent
from the printer driver to save in ID & Print User Box.
• [Print Immediately]: Print without saving in ID & Print User Box.
• [Save]: Save in ID & Print User Box.
[ON]: Select this key to apply ID & Print User Box function.
[OFF]: Select this key not to apply ID & Print User Box function.
User Box Administrator Setting
The box administrator can be specified when user authentication is performed. If a user has logged on as the
box administrator, it is permitted to access documents in any user box created, regardless of the password
status.
Specifying the box administrator
1
To specify the box administrator, select [Allow].
2
Enter the password for the box administrator.
3
For confirmation, type in the password again.
!
Detail
If "Password Rules" is enabled, a password containing less than eight characters cannot be registered.
If you have already registered a password containing less than eight characters, change it to one using
eight characters containing eight characters before enabling "Password Rules". For the password
rules, refer to the User manual – Copy Operations.
bizhub C353/C253/C203 (FE2)
9-19
User box setting
9
When logging on as the box administrator:
%
In the logon page, enter the following items:
– User name: boxadmin
– Password: The password specified in the User Box Administrator Setting page
Actions permitted for the box user administrator
A user who is logged on as the box administrator is permitted to perform the following actions:
To create public, personal and group user boxes
To check, download and delete documents stored in any user box
To change settings for any user box
To delete all use box
9-20
bizhub C353/C253/C203 (FE2)
User box setting
9.3.8
9
HDD Settings
Check HDD Capacity
This function enables checking of the used and remaining amounts of hard disk space.
Overwrite Temporary Data
This function enables specification of the overwrite method for deleting the existing data on the hard disk.
This machine destroys data by overwriting all data in the entire area where an image was stored when that
image data on the hard disk is considered unnecessary. In addition, destroying the structure of data other
than image data prevents the disclosure of the data in case the hard disk installed is stolen.
When the security kit is not installed:
The following items can be specified. (Default setting: Mode 1)
Item
Description
Mode 1
Overwritten with 0x00
Mode 2
Overwritten with 0x00 % Overwritten with 0xff % Overwritten with the letter [A]
(0x61) % Verified
bizhub C353/C253/C203 (FE2)
9-21
User box setting
9
When the security kit is installed:
When the security kit is installed, [Encryption Priority] and [Overwrite Priority] appear.
The following items can be specified. (Default setting: Mode 1)
Item
Description
Mode 1
Overwritten with 0x00.
Mode 2
Overwritten with 0x00. % Overwritten with 0xff. % Overwritten with the letter [A]
(0x61). % Verifies.
Encryption Priority
Selected for performing high-level security encryption processing. Note that data
overwriting with encryption specified on the hard disk differs from overwriting
with [Mode 1] or [Mode 2] specifications. Normally, select [Encryption Priority].
Overwrite Priority
Overwriting with encryption specified on the hard disk follows specifications with
[Mode 1] or [Mode 2]. Select this setting when the format of the data written to
the hard disk is considered important.
2
Reminder
When the setting for giving priority to encryption or overwriting is changed, the hard disk must be
formatted after restarting this machine. When you change settings, be aware that data will be deleted.
!
Detail
For more information on data deleted during hard disk formatting, refer to "Format HDD" on page 9-24.
Overwrite All Data
This operation deletes all data on the hard disk by overwriting.
1
To overwrite the data, select the delete method
2
Touch [Delete].
Overwriting is performed after the machine is restarted.
2
Reminder
Perform this operation before disposing of the machine. Before performing this operation, be sure to
consult with your service representative.
While the data is being overwritten, do not use the main power switch to turn the machine off and on.
9-22
bizhub C353/C253/C203 (FE2)
User box setting
9
The overwite method operates as follows:
Item
Description
Mode 1
Overwritten with 0x00.
Mode 2
Overwritten with random 1-byte numbers. % Overwritten with random 1-byte
numbers. % Overwritten with 0x00.
Mode 3
Overwritten with 0x00.% Overwritten with 0xff. % Overwritten with random 1byte numbers. % Verifies.
Mode 4
Overwritten with random 1-byte numbers. % Overwritten with 0x00. % Overwritten with 0xff.
Mode 5
Overwritten with 0x00. % Overwritten with 0xff. % Overwritten with 0x00. %
Overwritten with 0xff.
Mode 6
Overwritten with 0x00. % Overwritten with 0xff. % Overwritten with 0x00. %
Overwritten with 0xff. % Overwritten with 0x00. % Overwritten with 0xff. % Overwritten with random numbers.
Mode 7
Overwritten with 0x00. % Overwritten with 0xff. % Overwritten with 0x00. %
Overwritten with 0xff. % Overwritten with 0x00. % Overwritten with 0xff. % Overwritten with 0xaa.
Mode 8
Overwritten with 0x00. % Overwritten with 0xff. % Overwritten with 0x00. %
Overwritten with 0xff. % Overwritten with 0x00. % Overwritten with 0xff. % Overwritten with 0xaa. % Verifies.
Mode 1 operation takes about 40 minutes.
HDD Lock Password
The password for locking the hard disk can be specified. The hard disk locking password is critical for
protecting the data on the hard disk. Keep the password in a safe place so that it will not be lost.
All the 20 characters in the HDD locking password must be different from each other. Specify the password
to restart the machine, and then the HDD locking password takes effect on the machine.
2
Reminder
Take extra care to protect the established password so that the password will not be lost. If the
password is lost, significant restoration of operations will be required for recovery.
bizhub C353/C253/C203 (FE2)
9-23
User box setting
9
Format HDD
This function formats the hard disk. To execute formatting, select [Yes], and then follow the instructions on
the display. After formatting is completed, restart the machine.
2
Reminder
When turning off the main power switch and turning it on again, wait for 10 seconds or longer after
power-off, and then turn on the power again. The machine may not operate correctly if it is turned on
immediately after being turned off.
The following data are deleted when the hard disk is formatted.
Program address
Address Book
Authentication method settings
User authentication settings
Account track settings
User boxes
User box settings
Documents in user boxes
Secure print user box settings
Bulletin board user box settings
!
Detail
User registration information and address data can be backed up using the export function of
PageScope Web Connection.For details, refer to the PageScope Web Connection Help.
HDD Encryption Setting
Installation of an optional security kit is required to enable HDD encryption setting. With an encryption
passphrase of 20 characters set up, data saved on the hard disk cannot be accessed easily.
All the 20 characters in the HDD locking password must be different from each other. Specify the encryption
to restart the machine, and then the encryption passphrase takes effect on the machine.
2
Reminder
Take extra care to protect the established encryption passphrase so that the passphrase will not be
lost.
The encryption passphrase should be managed by the administrator of the machine.
When turning off the main power switch and turning it on again, wait for 10 seconds or longer after
power-off, and then turn on the power again. The machine may not operate correctly if it is turned on
immediately after being turned off.
9-24
bizhub C353/C253/C203 (FE2)
10
PageScope Web Connection
PageScope Web Connection
10
10
PageScope Web Connection
10.1
Using PageScope Web Connection
PageScope Web Connection is a device management utility supported by the HTTP server integrated into
the printer controller. Using a Web browser on a computer connected to the network, machine settings can
be specified and the status of the machine can be checked.
In addition to the convenience of specifying some settings easily from your computer instead of typing a text
with the machine’s control panel.
10.1.1
10.1.2
Operating environment
Network
Ethernet (TCP/IP)
Computer applications
Compatible Web browsers:
Microsoft Internet Explorer Ver. 6 or later
(JavaScript and Cookies enabled)
Netscape Navigator Ver. 7.02 or later (JavaScript and Cookies enabled)
Mozilla Firefox Ver. 1.0 or later (JavaScript and Cookies enabled)
Adobe® Flash® Player (plug-in version 7.0 or later required if "Flash" is selected
as the display format)
Accessing PageScope Web Connection
PageScope Web Connection can be used from a Web browser.
1
Start the Web browser.
2
In the "Address" bar, enter the IP address of this machine, and then press the [Enter] key.
–
http:// (IP_address_of_machine) /
Example: If the IP address of this machine is 192.168.1.20
http://192.168.1.20/
– If the machine is set to use IPv6, enter an IPv6 address with [ ] when using a browser other than
Internet Explorer.
http:// (IPv6_address_of_machine) /
Example: If the IPv6 address of this machine is fe80::220:6bff:fe10:2f16
http://[fe80::220:6bff:fe10:2f16]/
– If the machine is set to use IPv6 and Internet Explorer is being used, first edit the hosts file to include
"fe80::220:6bff:fe10:2f16IPv6 IPv6_MFP_1", and then specify the URL with the domain name.
The User mode page that appears is for a user who has logged on.
!
Detail
If user authentication settings have been specified, the user name and password must be entered. For
details, refer to "Logging on as a registered user" on page 10-10.
For details on specifying the IP address of this machine, refer to the User manual – Network
Administrator.
PageScope Web Connection has Flash and HTML display formats. For details, refer to "Logging on and
logging off" on page 10-7.
bizhub C353/C253/C203 (FE2)
10-3
PageScope Web Connection
10
10.1.3
Web browser cache
The most recent information may not appear in the PageScope Web Connection pages because older
versions of pages are saved in the cache for the Web browser. In addition, problems may occur when the
cache is used.
When using PageScope Web Connection, disable the cache for the Web browser.
2
Reminder
The menus and commands may vary depending on the Web browser version. For details, refer to the
Help for the Web browser.
If the utility is used with the cache enabled and Administrator mode was timed out, the time out page
may appear even when PageScope Web Connection is accessed again. In addition, since the
machine’s control panel remains locked and cannot be used, the machine must be restarted with the
main power switch. In order to avoid this problem, disable the cache.
With Internet Explorer
1
On the "Tools" menu, click "Internet Options".
2
On the General tab, click the [Settings] button under "Temporary Internet files".
3
Select "Every visit to the page", and then click the [OK] button.
With Netscape Navigator
1
On the "Edit" menu, click "Preferences".
2
Under "Category" on the left, click "Advanced", then click "Cache".
3
Under "Document in cache is compared to document on network:", then click "Every time".
With Mozilla Firefox
10-4
1
On the "Tools" menu, click "Options".
2
Click "Privacy", and then click the [Settings] button at the bottom of the dialog box.
3
Select the "Cache" check box under "Private data", select the "Clear private data when closing Firefox"
check box under "Settings", and then click the [OK] button.
bizhub C353/C253/C203 (FE2)
PageScope Web Connection
10.1.4
10
Structure of pages
The pages of PageScope Web Connection are constructed as shown below.
3 4
5 6
7
1
2
8
9
10
12
11
No.
Part Name
Description
1
Konica Minolta logo
Click the logo to visit the Konica Minolta Web site at
the following URL.
http://konicaminolta.com
2
PageScope Web Connection logo
Click the logo to display the version information for
PageScope Web Connection.
3
Logon user name
Displays the icon of the current mode and the name
of the user who is logged on (public, administrator,
user box administrator, registered user or account).
Click the user name to display the name of the user
who is logged on.
4
Status display
Displays icons and messages indicating the status of
the printer and scanner sections of the machine. If an
error occurred, click the icon to display the error information (consumables, paper trays and registered
user information) so that the status can be checked.
5
Message display
Displays the operating status of the machine.
6
[Logout] button
Click to log off from the current mode.
7
[Change Password] button
Click to go to the Change User Password page. (Refer to "Information" on page 10-13.) This button appears only in User mode when a registered user is
logged on.
8
Help
Click to display the page specified as the online manual Web page. For details on specifying the Web
page, refer to "Information" on page 10-13.
9
[Refresh] button
Click to update the displayed page.
Tabs
Select the category of the page to be displayed. The
following tabs are displayed in User mode.
Information
Check Job
User Box
Direct Print
Store Address
10
bizhub C353/C253/C203 (FE2)
10-5
PageScope Web Connection
10
No.
Part Name
Description
11
Information and settings
Displays details of the item selected in the menu.
12
Menu
Information and settings for the selected tabs are listed. The menu that appears differs depending on the
tab that is selected.
!
Detail
The page that appears immediately after accessing the machine with PageScope Web Connection is
called the User mode page. This page appears when a user has logged on.
If user authentication settings have been specified, the user name and password must be entered. For
details, refer to "Logging on as a registered user" on page 10-10.
The PageScope Web Connection pages appear differently depending on the options installed on the
machine and the specified machine settings. For details on logging on as a different user or as the
administrator, refer to "Logging on and logging off" on page 10-7.
10-6
bizhub C353/C253/C203 (FE2)
PageScope Web Connection
10.2
Logging on and logging off
10.2.1
Login and logout operations
10
When the machine is accessed with PageScope Web Connection, the logon page appears if user
authentication and account track settings have been specified on the machine. If user authentication and
account track settings have not been specified, the page for a public user appears. In order to log on as a
different user or as an administrator after logon, it is necessary to log off first, then log on again.
When user authentication and account track settings are not specified
1
The user logs in automatically as a public user.
2
To log in as an administrator, log out.
3
Log in again as an administrator.
bizhub C353/C253/C203 (FE2)
10-7
PageScope Web Connection
10
When user authentication and account track settings are specified
The User Authentication/Account Track screen appears.
1
Enter the required information to log in.
2
To log in as a different user or an administrator, log out.
3
Log in again.
!
Detail
If authentication is performed with PageScope Authentication Manager, contact your server
administrator for log on.
10-8
bizhub C353/C253/C203 (FE2)
PageScope Web Connection
10.2.2
10
Logout
When clicking [Logout] in the upper right screen, a log off confirmation message appears.
%
Click [OK], and the logon page appears again.
!
Detail
The logon page that appears differs depending on the authentication settings specified on the machine.
If a timeout occurs because no operation is performed for a set length of time while logged on or if the
authentication settings are changed from the machine’s control panel while logged on to User mode,
you will automatically be logged off.
For details on specifying the time out periods for User mode and Administrator mode, refer to "Security"
on page 10-35.
10.2.3
Login
Depending on the logon method used, PageScope Web Connection will be in User mode or Administrator
mode. Depending on user authentication or user box administrator setting, it is possible to log on to
PageScope Web Connection as a an administrator or user box administrator in User mode.
Options that can be selected when logged on to PageScope Web Connection
%
Select the display language and format, if necessary.
– If "When in warning, the dialog is displayed." check box is selected, warning messages appear
during operation after log on.
– If "Flash" is selected as the display format, the following items are displayed using Flash.
Status icons and messages
Status of "Paper Tray" in the page displayed when "Device Information" is selected on the
Information tab
Page display of the Check Job tab
Flash Player is required in order to use the Flash features.
If screen reader software is used, we recommend selecting "HTML" as the display format. In an IPv6
environment, select "HTML".
!
Detail
If control panel settings have been specified to allow user box administrators, it is possible to log on to
PageScope Web Connection as a user box administrator. For details on the user box administrator
settings, permissions and password, refer to "User Box Administrator Setting" on page 9-19.
If you log in to PageScope Web Connection as an administrator in User mode, it is possible to delete
jobs that cannot be done in Administrator mode.
bizhub C353/C253/C203 (FE2)
10-9
PageScope Web Connection
10
Logging on as a public user
If user authentication settings have not been specified on the machine, logon will be as a public user.
1
In the logon page, select "Public User".
2
Click the [Login] button.
Logging on as a registered user
If user authentication settings have been specified on the machine, the name and password for a registered
user is required to log on
1
In the logon page, enter the user name and the password, and then click the [Login] button.
–
2
To select a user name from a list, click the [User List] button.
–
3
10-10
If account track settings have been specified, type in the account name and password.
If an external server authentication was selected, select server.
To log on to PageScope Web Connection as the administrator in User mode, select "Administrator"
"Administrator (User mode)", and then enter the administrator password.
bizhub C353/C253/C203 (FE2)
PageScope Web Connection
10
!
Detail
If "Prohibited Functions When Authentication Error" in Administrator mode is set to "Mode 2" and a user
enters an incorrect password the specified number of times, that user is locked out and can no longer
use the machine. Contact the administrator to cancel operation restrictions.
The [User List] button can be used when "User Name List" is specified as "ON".
Logging on to Administrator mode
1
In order to specify system and network settings, log on to Administrator mode.
2
In the logon page, select "Administrator", to enter the administrator password.
3
Click the [Login] button.
!
Detail
When logged on to Administrator mode, the control panel of the machine is locked and cannot be used.
Depending on the status of the machine, you may not be able to log on to Administrator mode.
If "Prohibited Functions When Authentication Error" in Administrator mode is set to "Mode 2" and an
incorrect password is entered the specified number of times, it is no longer possible to log on to
Administrator mode. For details on the "Prohibited Functions When Authentication Failed" parameter,
refer to the User manual – Copy Operations.
The password input dialog box differs depending on the specified machine settings.
bizhub C353/C253/C203 (FE2)
10-11
PageScope Web Connection
10
Logging on as a user box administrator
If user authentication settings have been specified on the machine, you can log on as an administrator in User
mode to delete jobs. If user box administrators have been allowed in the control panel, it is possible to log
on to PageScope Web Connection as a user box administrator in User mode.
%
In the logon page, select "Administrator", and then click the [Login] button.
– To log on to PageScope Web Connection as the user box administrator in User mode, select "User
Box Administrator", and then enter the password for the user box administrator.
!
Detail
If "Prohibited Functions When Authentication Error" in Administrator mode is set to "Mode 2" and an
incorrect password is entered the specified number of times, it is no longer possible to log on to
Administrator mode. For details on the "Prohibited Functions When Authentication Failed" parameter,
refer to the User manual – Copy Operations.
The password input dialog box differs depending on the specified machine settings.
10-12
bizhub C353/C253/C203 (FE2)
PageScope Web Connection
10.3
10
Overview of User mode
By logging on to PageScope Web Connection in User mode, the following functions can be specified.
!
Detail
For other details on the User mode, refer to the PageScope Web Connection help on the DVD.
10.3.1
Information
This is the first page that appears when you access to PageScope Web Connection.
Item
Description
Device Information
The current system configuration, options, consumables and counter values can be displayed.
Online Assistance
Support information for the machine can be displayed.
Change User
Password
The password for the user who is logged on can be changed.
Function Permission Information
Information on operations permitted by users and accounts can be displayed.
Network Setting Information
Network settings for the machine can be displayed.
Print Setting
Information
Settings for the printer controller of the machine can be displayed.
Print Information
Font and settings information can be printed.
bizhub C353/C253/C203 (FE2)
10-13
PageScope Web Connection
10
10.3.2
10-14
Job
Item
Description
Current Jobs
On this list, you can check curently running jobs and those in a queue.
Job History
On this list, you can check completed jobs.
Communication List
On this list, you can check received or transmitted jobs.
bizhub C353/C253/C203 (FE2)
PageScope Web Connection
10.3.3
10
Box
Item
Description
Open User
Box
A public, personal or group user box that is currently created can be opened to print, send or download a saved document, or to change user box settings.
Create User
Box
New user boxes can be created.
Open System
User Box
Displays if the optional fax kit has been installed. System user boxes (Bulletin Board User Box, Polling
TX User Box, Memory RX User Box, Relay User Box) can be opened to work on a saved document
or to change user box settings.
Create System User Box
Displays if the optional fax kit has been installed. New bulletin board user boxes and relay user boxes
can be created.
!
Detail
For the procedure on user box operation, refer to "Operation of documents in user boxes" on
page 10-18.
bizhub C353/C253/C203 (FE2)
10-15
PageScope Web Connection
10
10.3.4
10-16
Direct Print
Item
Description
Direct Print
Files that are saved in a computer can be specified and printed with this machine.
bizhub C353/C253/C203 (FE2)
PageScope Web Connection
10.3.5
10
Store Address
Item
Description
Address
Book
The list of address book registered to the machine can be displayed, and destinations can be registered or their settings can be changed.
Group
The list of group destinations registered to the machine can be displayed, and destinations can be
registered or their settings can be changed.
Program
The list of program destinations registered to the machine can be displayed, and destinations can be
registered or their settings can be changed.
Temporary
One-Touch
The list of temporary program destinations registered to the machine can be displayed, and destinations can be registered or their settings can be changed.
Subject
A maximum of 10 subjects for sending E-Mail messages can be registered.
Text
A maximum of 10 texts for sending E-Mail messages can be registered.
!
Detail
This may not appear depending on the Administrator mode settings.
bizhub C353/C253/C203 (FE2)
10-17
PageScope Web Connection
10
10.4
Operation of documents in user boxes
In the [Open User Box] menu, the following operations can be performed.
Displaying the list of documents saved in a user box
Printing document
Sending document to another device
Downloading and saving document data to the local computer
Moving/copying document to another user box
Deleting document
10.4.1
Displaying the list of documents saved in a user box
When logged on, the list of the user boxes (public/personal/group user boxes) created in the MFP being
accessed is displayed.
Opening user box
From the user box list, select the name of the desired user box. Or, enter the user box No. and user box
password, and then click the [OK] button.
!
Detail
If the selected user box is password-protected, the password input screen appears.
Open User box (public/personal)
Item
Description
User Box
Number
Type in the number of the user box to be opened.
User Box
Password
Type in the password if one has been specified for the user box.
2
Note
If user authentication is applied, "Open User Box (Public/Personal)" appears for "Open User Box". If
user authentication is not applied, "Open User Box (Public)" appears.
10-18
bizhub C353/C253/C203 (FE2)
PageScope Web Connection
10
User Box List
Item
Description
Search from
Index
Displays the list of user boxes according to the index selected when the user box was created.
Page (Display
by 50 cases)
If there are more than 50 user boxes, specify the page to be displayed.
User Box List
Displays the user box number, user box name, user box type and date/time that the box was created.
A key-shaped icon appears next to a password-protected user box.
File List
When a user box is selected, basic information of the user box and the list of documents saved in the user
box are displayed.
Item
Description
[User Box
Setting] button
User box name, index, expansion function, and password settings can be changed.
[Delete User
Box] button
Click this button to delete the user box currently displayed.
Thumbnail
View
Click the [ON] button to display the documents in thumbnail images. Click the [OFF] button to hide
thumbnail images.
Specify operation
Operations such as print, send to another device, download to a PC, move/copy and delete can be
selected. For details, refer to the descriptions on page 10-20 and subsequent pages.
[Changes the
display] button
Click this button after selecting the operation. A check box appears in the "Select" filed of the document that is available for the selected operation.
Select
A check box appears beside the documents with which the selected operation can be performed.
Thumbnail
If thumbnail image is specified for display, displays the top page image.
Document
Name
Displays the name of the document.
Number of
Originals
Displays the number of originals.
[Edit Name]
button
Click this button to change the document name.
bizhub C353/C253/C203 (FE2)
10-19
PageScope Web Connection
10
!
Detail
If a user box is deleted, all the saved documents in the user box are deleted.
10.4.2
Printing document
Documents saved in a user box can be printed by specifying the following settings.
Function
Description
Change order
This box appears when multiple documents are selected. The printing order of the documents can
be changed. Click a document, and then click the [Top], [Up], [Down], [Bottom] or [Undo] button.
Click the [Thumbnail View] button to check the documents in thumbnail images.
Combine
This box appears when multiple documents are selected. Multiple documents can be combined and
printed as a single document.
Basic Setting
Specify the number of copies, 2-sided print and finishing.
Application
Setting
Detailed settings such as page margin and stamp can be specified. To specify, click the [Display] button.
Save Print
Settings
Select whether or not to save the print settings.
!
Detail
If multiple documents are selected but "Combine" is set to "OFF" "Basic Setting" and "Application
Setting" cannot be specified.
"Save Print Settings" does not appear if multiple documents are selected.
10-20
bizhub C353/C253/C203 (FE2)
PageScope Web Connection
10
Printing procedure
1
In "Specify operation", select "Print", and then click the [Change the display] button.
The "Select" check box appears beside the documents available for printing.
2
Select the check box for the documents to be printed, and then click the [Print Setting] button.
bizhub C353/C253/C203 (FE2)
10-21
PageScope Web Connection
10
3
Specify the print settings.
4
Click the [OK] button.
Printing starts
5
Click the [OK] button.
The file list page appears again.
10-22
bizhub C353/C253/C203 (FE2)
PageScope Web Connection
10.4.3
10
Sending document to another device
Documents saved in a user box can be sent to another device by specifying the following settings.
Item
Description
Specify destination
Click the [Search from List] button, and then select the destination from the registered destinations.
Click the [Check Destination] button to check the destinations.
Change order
This box appears when multiple documents are selected. The sending order of the documents can
be changed. Click a document, and then click the [Top], [Up], [Down], [Bottom] or [Undo] button.
Click the [Thumbnail View] button to check the documents in thumbnail images.
Bind TX
This box appears when multiple documents are selected. Multiple documents can be combined and
sent as a single document.
File Type
Specify the file type to be sent and details of encryption.
Communication Setting Specify the E-mail setting, URL notification destination, etc. To specify, click
the [Display] button.
Application
Setting
Detailed settings such as stamp and whether to send and print at the same time can be specified. To
specify, click the [Display] button.
Save Print
Settings
Select whether to save/not save the print settings.
bizhub C353/C253/C203 (FE2)
10-23
PageScope Web Connection
10
!
Detail
If multiple documents are selected but "Bind TX" is set to "OFF", "File Type", "Communication Setting"
and "Application Setting" cannot be specified.
Sending procedure
1
In "Specify operation", select "Send to other device", and then click the [Changes the display] button.
The "Select" check box appears beside the documents available for sending.
2
10-24
Select the check box for the documents to be sent, and then click the [TX Setting] button.
bizhub C353/C253/C203 (FE2)
PageScope Web Connection
3
Specify the contents for sending,
4
Click the [OK] button.
10
Sending starts.
5
Click the [OK] button.
The File List page appears again
bizhub C353/C253/C203 (FE2)
10-25
PageScope Web Connection
10
10.4.4
Downloading document data to computer
Documents saved in a user box can be downloaded by specifying the following settings.
Item
Description
Change order
This box appears when multiple documents are selected. The documents are bound in the order
shown here and can be saved as a single document. The order of the documents can be changed.
Click a document, and then click the [Top], [Up], [Down], [Bottom] or [Undo] button.
Click the [Thumbnail View] button to check the documents in thumbnail images.
File Format
Select the file format for saving the data.
Page Range
Select to download all pages or specify a successive page range.
Downloading procedure
1
In "Specify operation", select "Download to PC", and then click the [Change the display] button.
The "Select" check box appears beside the documents available for operation.
10-26
bizhub C353/C253/C203 (FE2)
PageScope Web Connection
10
2
Select the check box for the documents to be downloaded, and then click the [Download Setting]
button.
3
Specify the desired settings.
4
Click the [OK] button.
5
When the "Preparation for download has been completed." message appears, click the [Download]
button.
The File Download dialog box appears.
bizhub C353/C253/C203 (FE2)
10-27
PageScope Web Connection
10
6
Click the [Save] button.
7
Specify the location to save the file, and then click the [Save] button.
–
When multiple documents are selected, the name of the document selected first is displayed.
The Download complete dialog box appears.
8
Click the [Close] button.
9
Click the [Back] button.
The File List page appears again.
10-28
bizhub C353/C253/C203 (FE2)
PageScope Web Connection
10.4.5
10
Moving/copying document to another user box
Documents saved in a user box can be moved or copied to another user box by specifying the following
settings.
Item
Description
User Box
Number
Select the destination user box for moving/copying from the user box list.
Copy
Select this check box to copy the document to the selected user box.
Moving/coping procedure
1
In "Specify operation", select "Move/Copy", and then click the [Change the display] button.
The "Select" check box appears beside the documents available for operation
bizhub C353/C253/C203 (FE2)
10-29
PageScope Web Connection
10
2
Select the check box for the documents to be moved or copied, and then click the [Move/Copy Setting]
button.
–
Only one document can be selected.
3
Specify the desired settings.
4
Click the [OK] button.
The document is moved or copied, and the File List page appears again.
10-30
bizhub C353/C253/C203 (FE2)
PageScope Web Connection
10.4.6
10
Deleting document
1
In "Specify operation", select "Delete", and then click the [Change the display] button.
The "Select" check box appears beside the documents available for operation.
2
Select the check box for the documents to be deleted, and then click the [Delete] button.
–
To select or clear the check boxes for all the documents, select the "Check/Uncheck" check box
bizhub C353/C253/C203 (FE2)
10-31
PageScope Web Connection
10
3
Confirm the name of the document to be deleted, and then click the [OK] button.
–
4
Click the [Thumbnail View] button to check the documents in thumbnail images.
Click the [OK] button.
The document is deleted, and the File List page appears again.
10-32
bizhub C353/C253/C203 (FE2)
PageScope Web Connection
10.5
10
Overview of Administrator mode
By logging on to PageScope Web Connection in Administrator mode, the following functions can be
specified.
!
Detail
For details on the Administrator mode, refer to the User manual – Network Administrator.
10.5.1
Maintenance
Item
Description
Meter Count
Counters managed by the machine can be displayed.
ROM Version
The ROM version can be displayed.
Import/Export
Machine settings can be saved as a file (exported), or settings can be written to the machine (imported).
Status Notification Setting
Specify settings for sending a notification if a machine error occurred. Settings can be specified for
the destination of error notifications and the occasions when notifications are sent.
Total Counter
Notification
Setting
Specify the settings for sending notifications of the total counter by E-Mail and the E-Mail address
where notifications are sent.
Machine Setting
The registered machine information can be changed.
Online Assistance
Specify the support information for the machine. To display this information, click the Information tab
in User mode, and then click "Online Assistance" in the menu.
Date/Time
Settings
Specify the date and time that are displayed on the machine.
Timer Settings
Specify the power save and weekly timer functions.
Network
TWAIN
Specify the length of time until the operations are automatically unlocked during scanning (except
with PUSH scanning).
Reset
Resets the network settings or controller settings or erases all destinations.
bizhub C353/C253/C203 (FE2)
10-33
PageScope Web Connection
10
Item
Description
External
Memory
Function Settings
Specify the external memory settings for saving or printing documents.
Header/Footer
Registration
The list of headers/footers can be displayed, and they can be registered or edited.
License Settings
A license can be issued and functions can be enabled. Also, a request code can be issued.
!
Detail
To use the machine as a scanner from application software using TWAIN, install the KONICA MINOLTA
TWAIN driver software designed for that purpose. For details, refer to the User manual – Network
Scan/Fax/Network Fax Operations on the bizhub C353 Series DVD.
10-34
bizhub C353/C253/C203 (FE2)
PageScope Web Connection
10.5.2
10
Security
Item
Description
Authentication
Specify user authentication and account track settings for the machine. To perform authentication,
an external server and default function permission can also be specified.
User Registration
If user authentication settings are specified, users can be registered and their settings can be
changed.
Account
Track Registration
If account track is specified, accounts can be registered and their settings can be changed.
SSL/TLS Setting
Specify the settings for SSL/TLS. With SSL/TLS enabled, communication between this machine and
a client computer is encrypted to prevent passwords and messages being leaked.
Address Reference Setting
When permitting address reference, specify apply group setting and public user reference setting.
Permission of
Address
Change
Select whether or not to allow users to register destinations.
Auto Logout
Specify the length of time until Administrator mode or User mode is automatically logged off.
Administrator Password
Setting
Specify the password for logging on to PageScope Web Connection in Administrator mode.
!
Detail
"Administrator Password Settings" does not appear in the following cases:
No SSL certificate is installed.
The Enhanced Security Mode is enabled.
bizhub C353/C253/C203 (FE2)
10-35
PageScope Web Connection
10
10.5.3
Box
When logged on in Administrator mode, user boxes can be used without entering the password.
Item
Description
Open User
Box
A currently created public, personal or group user box can be opened to change user box settings.
Create User
Box
New user boxes can be created.
Open System
User Box
System user boxes (Annotation User Box Bulletin, Board User Box, Polling TX User Box, Memory RX
User Box, Relay User Box,) can be opened to work on a saved document or to change user box settings.
Create System User Box
New annotation user boxes, bulletin board user boxes and, relay user boxes can be created.
!
Detail
The Bulletin Board User Box, Polling TX User Box, Memory RX User Box, Relay User Box can be
operated when the optional fax kit is installed.
10-36
bizhub C353/C253/C203 (FE2)
PageScope Web Connection
10.5.4
10
Print Settings
Item
Description
Basic
The default printer settings can be specified.
PCL Setting
The default settings for PCL mode can be specified.
PS Setting
The default settings for PS mode can be specified.
XPS Settings
The XPS print settings can be specified.
Interface Setting
The interface time out can be specified.
bizhub C353/C253/C203 (FE2)
10-37
PageScope Web Connection
10
10.5.5
Store Address
Item
Description
Address
Book
The list of address book registered to the machine can be displayed, and destinations can be registered or their settings can be changed.
Group
The list of group destinations registered to the machine can be displayed, and destinations can be
registered or their settings can be changed.
Program
The list of program destinations registered to the machine can be displayed, and destinations can be
registered or their settings can be changed.
Temporary
One-Touch
The list of temporary program destinations registered to the machine can be displayed, and destinations can be registered or their settings can be changed.
Subject
Up to 10 subjects for E-Mail mesages can be registered.
Text
A maximum of 10 texts for sending E-Mail messages can be registered.
Application
Registration
When using an application, such as RightFax Server, registered with an external server, register the
application information and server address. By registering the application and server, a connection
to the server of the selected application can automatically be established for use.
Prefix/Suffix
Prefixes and suffixes can be registered to be added as destination information when sending E-Mail
messages.
Header Information
Register sender information for transmissions.
!
Detail
"Application Registration" does not appear when the fax kit is installed.
10-38
bizhub C353/C253/C203 (FE2)
PageScope Web Connection
10.5.6
10
Network
Item
Description
TCP/IP Setting
Specify the TCP/IP settings to connect the machine to the network.
E-mail Setting
Specify the E-Mail TX/RX setting and I-Fax extended functions.
LDAP Setting
Register an LDAP server when using it.
IPP Setting
Specify the settings for IPP printing.
FTP Setting
Specify the settings to use this machine as an FTP client or server.
SNMP Setting
Specify the SNMP settings.
SMB Setting
Specify the settings for the SMB client, WINS, and SMB print.
Web Service
Setting
Specify the settings for scan and print via the Web service.
Bonjour Setting
Specify the Bonjour settings.
NetWare Setting
Specify the NetWare settings.
AppleTalk
Setting
Specifying the AppleTalk settings.
bizhub C353/C253/C203 (FE2)
10-39
PageScope Web Connection
10
10-40
Item
Description
Network Fax
Setting
Specify the settings for direct SMTP transmission and direct SMTP reception.
WebDAV Settings
Specify the WebDAV client settings.
Open API
Setting
Specify OpenAPI settings.
TCP Socket
Setting
Specify TCP Socket settings used for data transmissions between the computer application and this
machine.
bizhub C353/C253/C203 (FE2)
11
Appendix
Appendix
11
11
Appendix
11.1
Error message list
%
If an error message appears, perform the corresponding operation described below.
Message
Cause and solution
Unable to connect to the network.
A connection to the network could not be established. Check if the network
cable is correctly connected. In addition, check that the "Network Settings"
parameters in Administrator mode have been correctly specified.
For details on the network settings, refer to the User manual – Network Administrator.
The address for the communication
method cannot be selected since the
number of addresses has exceeded
the maximum allowed for broadcasting.
The number of destinations specified exceeds the number possible for a
broadcast transmission. Reduce the number of broadcast destinations, or
send the transmission in multiple batches.
Document could not be saved in user
box due to insufficient HDD capacity.
Check log.
The hard disk is full. Delete unnecessary data, and then try saving the data
again.
The number of registered user boxes
has reached the max. allowance.
The number of user boxes that can be registered has reached the maximum
number possible. Delete unnecessary user boxes, and then try registering
new boxes again.
The number of documents saved in
the User Box has reached its maximum.
The number of documents that can be saved in a user box has reached the
maximum number possible. Delete unnecessary documents, and then try
saving the document again.
The number of programmed jobs has
reached the max. allowance. Wait until a programmed job is completed.
The number of jobs that can be programmed has reached the maximum
number possible. Wait until a job has been completed, or delete a current
job.
bizhub C353/C253/C203 (FE2)
11-3
Appendix
11
11.2
Entering text
The following procedure describes how to use the keyboard that appears in the touch panel for typing in the
names of registered users and custom paper sizes. The keypad can also be used to type in numbers.
Any of the following keyboards may appear.
Example
Password input screen
Screen for entering the name of a custom paper size
11-4
bizhub C353/C253/C203 (FE2)
Appendix
11
%
Touch [Shift] to switch the keyboard display between lowercase letters (numbers) and uppercase letters
(symbols).
bizhub C353/C253/C203 (FE2)
11-5
Appendix
11
11.2.1
Enlarging the keyboard
The keyboard can be displayed larger so that it is easier to read.
1
While the keyboard is displayed, touch [Enlarge ON].
The keyboard display is enlarged.
2
To cancel the enlarged display and return the keyboard to its normal size, touch [Enlarge OFF] while the
keyboard display is enlarged.
2
Note
The keyboard is used in the same way, even when it is enlarged display.
11-6
bizhub C353/C253/C203 (FE2)
Appendix
11.2.2
11
To type text
%
Touch the button for the desired character from the keyboard that appeared.
– To type in uppercase letters or symbols, touch [Shift].
– Numbers can also be typed in with the keypad.
The entered characters appear in the text box.
2
Note
To revert to the setting when the keyboard was displayed, touch [Cancel].
To clear all entered text, press the [C] (clear) key.
Some buttons may not appear, depending on the characters being entered.
!
Detail
To change a character in the entered text, touch [ ] and [ ] to move the cursor to the character to
be changed, touch [Delete], and then type in the desired letter or number.
11.2.3
List of available characters
Type
Characters
Alphanumeric characters/symbols
bizhub C353/C253/C203 (FE2)
11-7
Appendix
11
11.3
11-8
Glossary
Term
Description
10Base-T/100BaseTX/1000Base-T
A set specifications under the Ethernet standards.
Uses cables consisting of pairs of twisted copper wires. The transmission speed of
10Base-T is 10Mbps, of 100Base-TX is 100Mbps, and of 1000Base-T is 1,000 Mbps.
Adobe® Flash®
Software developed by Adobe Systems Inc. (formerly developed by Macromedia,
Inc.), and used to create data combining vector-graphic animation and sound, and
the format of this data file. The bidirectional content can be manipulated using a
keyboard and a mouse. The files can be kept relatively compact, and they can be
accessed with the Web browser plug-in.
anonymous FTP
While normal FTP sites are protected by an account name and password, this type
of FTP site can be used by anyone without a password by simply entering "anonymous" as the account name.
Auto IP
A function for automatically acquiring the IP address.
If acquisition of the IP address failed with DHCP, an IP address is acquired from
the address space of 169.254.0.0.
bit
Abbreviation for Binary Digit. The smallest unit of information (data quantity) on a
computer or printer. Displays data using 0 or 1. Dithering may occur if the character
size is increased.
Bitmap Font
A font that is displayed using a collection of dots. These look increasingly jagged
with larger font sizes.
BMP
Abbreviation for Bitmap. A file format for saving image data which uses the .bmp
extension. Commonly used on Windows platforms. You can specify the color
depth from monochrome (2 values) to full color (16,777,216 colors). Images are not
usually compressed when saved.
Byte
Unit of information (data quantity) on a computer or printer. Configured as 1 byte
equals 8 bits.
Compact PDF
Compression method for reducing the data amount using the PDF format when
converting color documents to data.
The highest compression efficiency is achieved by identifying the text and image
regions and using the resolution and compression method most appropriate for
each region.
The compact PDF format can be selected when converting documents to data using the scanning functions of this machine.
Contrast
The difference in intensity between the light and dark parts of the image (light/dark
variation). An image with little light/dark variation is said to have a low contrast, and
an image with large light/dark variation is said to have a high contrast.
Default
The initial settings. The settings first selected when the machine is turned on, or the
settings first specified when the function is selected.
Default gateway
A device, such as a computer or router, used as a gateway to access computers
not on the same LAN.
Density
An indication of the amount of darkness in the image.
Density Compensation
Color correction function used in output devices such as printers and displays.
DHCP
Abbreviation for Dynamic Host Configuration Protocol. A protocol in which a client
computer on a TCP/IP network automatically specifies the network settings from
the server. With collective management of the IP address for DHCP clients on the
DHCP server, you can avoid duplication of an address and you can build a network
easily.
Dither
One method of combining two colors to create an approximate representation of
shades of gray. Processing is easier than with error diffusion, but this can lead to
irregularities.
DNS
Abbreviation for Domain Name System. A system that acquires the supported IP
addresses from host names in a network environment. DNS allows the user to access other computers over a network by specifying host names, instead of difficult
to memorize and understand IP addresses.
DPI (dpi)
Abbreviation for Dots Per Inch. A resolution unit used by printers and scanners. Indicates how many dots per inch are represented in an image. The higher the value,
the higher the resolution.
Driver
Software that works as a bridge between a computer and a peripheral device.
Ethernet
LAN transmission line standard
File extension
The characters added to the file name in order to differentiate file formats. The file
extension is added after a period, for example, ".bmp" or ".jpg".
bizhub C353/C253/C203 (FE2)
Appendix
11
Term
Description
FTP
Abbreviation for File Transfer Protocol. A protocol for transferring files over the Internet or an intranet on the TCP/IP network.
Gradation
The light and dark levels of an image. As the number increases, smoother brightness variations can be reproduced
Gray Scale
Monochrome image expressive form using the gradation information from black to
white
Halftone
The method of producing the light and dark parts of an image through varying sizes
of black and white dots
Hard disk
Large capacity storage device for storing data. The data can be stored even if the
power is turned off.
HTTP
Abbreviation for Hyper Text Transfer Protocol. A protocol used to send and receive
data between a Web server and a client (Web browser). Documents containing images, recordings, and video clips can be exchanged with the expressive form information.
ID & Print
Function that allows you to print the job sent from the printer driver when performing user authentication.
Install
To install hardware, operating systems, applications, printer drivers on to a computer
IP address
A code (address) that is used to identify individual network devices over the Internet.IPv4 (Internet Protocol version 4), widely spread today, is expressed such as
192.168.1.10 using 32-bit numbers divided into four.In the next generation IPv6 (Internet Protocol version 6), 128-bit IP addresses are used.IP addresses are assigned to devices, including computers, which are connected to the Internet.
JPEG
Abbreviation for Joint Photographic Experts Group. One of the file formats for saving image data. (The file extension is ".jpg".) The compression ratio is roughly 1/10
to 1/100. This format uses an effective method in the compression of continuoustone images, such as photographs.
Kerberos
A type of network authentication system used by Windows 2000 or later. Used in
Active Directory authentication. Users can be safely and efficiently authenticated
with a two-phase authentication (user logon and network resource usage) on a dependable site set up on the network.
LAN
Abbreviation for Local Area Network. A network which connects computers on the
same floor, in the same building, or in neighboring buildings.
LDAP
Abbreviation for Lightweight Directory Access Protocol. On a TCP/ IP network,
such as the Internet or an intranet, this protocol is used to access a database for
managing environment information and the e-mail addresses of network users.
Memory
Storage device for storing data temporally. When the power is turned off, the data
may or may not be erased.
Multi Page TIFF
A TIFF file that has multiple pages.
OS
Abbreviation for Operating System. Basic software for controlling the system of a
computer. Windows, MacOS, and Unix are Operating Systems.
PASV
Abbreviation for PASsiVe. A mode for connecting to an FTP server from within a
firewall. If this mode is not specified, the firewall will be considered inaccessible
and the connection will be terminated, preventing the file from being sent.
PDF
Abbreviation for Portable Document Format. An electronically formatted document
which uses the .pdf extension. Based on the Post-Script format, you can use the
free Adobe Reader software to view documents.
Pixel
The smallest unit of an image.
Plug-and-play
Ability to automatically find and use the appropriate driver when a peripheral device
is connected to a computer.
Port number
The number that identifies the transmission port for each process running on a
computer on the network. The same port cannot be used by multiple processes.
PPI
Abbreviation for Pixels Per Inch. Measuring unit for resolution, particularly for monitors and scanners. Indicates how many pixels per inch.
Preview
A function that allows you to view an image before processing a print or scan job
Print Job
Print request transmitted from a computer to a printing device.
Printer driver
Software that works as a bridge between a computer and a printer.
Property
Attribute information when using a printer driver, various functions can be specified
in the file properties. In the file properties, you can check the attribute information
of the file.
bizhub C353/C253/C203 (FE2)
11-9
Appendix
11
11-10
Term
Description
Protocol
The rules that allow computers to communicate with other computers or peripheral
devices
Proxy server
A server that is installed to act as an intermediary connection between each client
and different servers to effectively ensure security over the entire system for Internet connections
Resolution
Displays the ability to reproduce the details of images and print matter correctly.
Scanning
With the scanning operation of the scanner, an image is read while the row of image sensors is gradually moved. The direction that the image sensors are moved
is called the main scanning direction, and the direction in which the image sensors
are arranged is called the sub-scanning direction.
Screen frequency
Indicates the density of dots used to create the image.
Single-page TIFF
A single TIFF file that contains only a single page.
SMB
Abbreviation for Server Message Block. A protocol that shares files and printers
over a network and which is mainly used by Microsoft Windows.
SSL/TLS
Abbreviation for Secure Socket Layer/Transport Layer Security.
The encoding method for safely transmitting data between the Web server and
browser.
Subnet mask
The unit used to divide a TCP/IP network into small networks (subnetworks). It is
used to identify the bits in a network address that are higher than the IP address.
TCP/IP
Abbreviation for Transmission Control Protocol/Internet Protocol. This is virtually
the standard Internet protocol. IP addresses are used to identify respective network devices.
Thumbnail
A small image that shows the contents of the image or document file (the image
displayed when the file was opened)
TIFF
Abbreviation for Tagged Image File Format. One of the file formats for saving image
data. (The file extension is ".tif".) Depending on the tag indicating the data type, information for various image formats can be saved in a single image data.
TWAIN
The interface standard for imaging devices, such as scanners and digital cameras,
and for applications, such as graphics software. In order to use a TWAIN-compliant
device, the TWAIN driver is required.
Uninstall
To delete software installed on a computer
USB
Abbreviation for Universal Serial Bus. A general interface standard for connecting
a mouse, printer, and other devices to a computer.
Web browser
Software for viewing Web pages. Internet Explorer and Netscape Navigator are this
type of software.
bizhub C353/C253/C203 (FE2)
12
Index
Index
12
12
Index
Numerics
1-Sided/2-Sided 7-7
A
About Line Settings 7-52
Account Track 2-10, 10-8
Address Book - Search 7-37
Address Search 7-45
Address Search - Advanced Search 7-46
Address Search - Search 7-46
Address Type 7-37
Adjust Value 7-11
Administrator mode 10-11
Administrator Settings 9-11
Annotation User Box 7-70, 8-11, 9-13
Application - Scan Size 6-16
Application - Send & Print 7-61
Auto Delete Secure Document 9-16
B
Back Cover-Paper 7-14
Background Removal 6-12
Basic - Density 6-11
Basic - File Type 6-7
Basic - Original Type 6-5
Basic - Resolution 6-6
Basic - Separate Scan 6-11
Basic - Simplex/Duplex 6-6
Bind TX 7-64
Binding Position 6-15
Body 7-55
Book Copy 6-14
Book Erase - Center Erase 6-15
Book Erase - Frame Erase 6-14
Book Scan - Book Copy 6-14
Box 10-15, 10-36
Bulletin Board User Box 7-65, 8-9, 9-9
C
Center Staple & Fold 7-10
Center Staple/Fold 7-9
Chapter Paper 7-17
Chapters 7-16
Check Dest. & Send 7-53
Check HDD Capacity 9-21
Check Job Settings 3-15
Check Job Settings - Communication Settings 3-15
Check Job Settings - Destination Settings 3-15
Check Job Settings - E-Mail Settings 3-16
Check/Change Temporarily 7-33
Check/Change Temporarily - Header Settings/Footer
Settings 7-34
bizhub C353/C253/C203 (FE2)
Check/Change Temporarily - Header Settings/Footer
Settings - Date/Time 7-34
Check/Change Temporarily - Header Settings/Footer
Settings - Other 7-34
Check/Change Temporarily - Header Settings/Footer
Settings - Text 7-34
Check/Change Temporarily - Pages 7-35
Check/Change Temporarily - Text Color 7-35
Check/Change Temporarily - Text Size 7-35
Color 6-12
Combine 7-62
Combining Order 7-62, 7-64
Communication Settings - Add Digital Signature 7-59
Communication Settings - Communication Method
Settings 7-57
Communication Settings - E-Mail Encryption 7-59
Communication Settings - E-Mail Settings 7-54
Communication Settings - Fax Header Settings 7-60
Communication Settings - Line Settings 7-52
Communication Settings - URL Notification Setting
7-56
Control panel 3-3
Copies 7-7
Copy 8-7
Copy Protect 7-24
Copy Protect Type - Date/Time 7-25
Copy Protect Type - Other 7-25
Copy Protect Type - Preset Stamp 7-24
Copy Protect Type - Registered Stamp 7-24
Cover setting 7-14
Current Jobs 3-9
Custom Size 6-16
D
Date Format 7-18
Date/Time 7-71
Delete Empty User Box(es) 9-8
Delete Secure Print Documents 9-16
Deleting a document 8-6
Density 7-72
Despeckle 6-18
Detail 3-14
Detail - Check Original Settings 3-14
Detail - Check Scan Settings 3-13
Detail Search 7-39, 7-56
Detail Settings 7-26, 7-31
Detail Settings - Background Pattern 7-28
Detail Settings - Copy Protect Pattern 7-27
Detail Settings - Density 7-26
Detail Settings - Pattern Overwrite 7-27
Detail Settings - Text Size 7-27
Detail Settings - Text/background color 7-26
Detailed Settings 7-43, 7-44
12-3
Index
12
Detailed Settings - Density 7-31
Detailed Settings - Pattern Overwrite 7-32
Detailed Settings - Text Color 7-31
Detailed Settings - Text Size 7-32
Direct Input 7-40, 7-56
Direct Input - E-Mail 7-41
Direct Input - Fax 7-40
Direct Input - FTP 7-43
Direct Input - Internet Fax 7-41
Direct Input - IP Address Fax 7-42
Direct Input - PC (SMB) 7-42
Direct Input - WebDAV 7-44
Direct Print 10-16
Direction Settings - Binding Position 6-18
Direction Settings - Original Direction 6-17
Document Details 8-7
Document Hold Setting 9-18
Document Name 2-9, 7-54
E
ECM OFF 7-52
Edit Name 8-6
E-Mail Settings 7-54
Encrypted PDF Delete Time 9-17
Encrypted PDF User Box 7-74
Encryption 6-8, 7-49
Encryption - Detail Settings 6-9, 7-49
Erase 6-13
Error message list 11-3
External Memory 7-77
External Memory Functions Settings 9-18
J
Job 10-14
Job History 3-9, 7-45
Job List 3-7
Job List - Delete 3-8
Job List - Job Details 3-8
L
Left panel 3-7
Log off 10-7
Log on 10-7
M
Maintenance 10-33
Manual conventions 1-5
Margin Position 7-11
Maximum Number of User Boxes 9-15
Memory RX 2-6
Memory RX User Box 7-69, 8-10
Menu tree 4-22, 9-3
Move 8-6
N
Network 10-39
Next Destination 7-43, 7-44
Number Type 7-72
F
O
Fax Retransmit User Box 7-73, 8-11
F-Code TX 7-58
File Document 5-5, 8-3
File Path 7-42, 7-43, 7-44
File Type 6-7, 7-48
Finishing 7-8
Format HDD 9-24
Frame Erase 6-13
From 7-55
Front Cover - Paper 7-14
Offset 7-8
Organizing user box documents 4-20
Original Settings 6-17
Overseas TX 7-52
Overview of Application 7-60
Overwrite All Data 9-22
Overwrite Temporary Data 9-21
H
HDD Encryption Setting 9-24
HDD Lock Password 9-23
HDD Settings 9-21
Host Name 7-42, 7-44
I
Icon 3-6
ID & Print Delete Time 9-17
ID & Print Settings 9-19
ID & Print User Box 7-75
Image Shift 7-11
Image Shift - Change Back Shift 7-12
12-4
Information 10-13
Insert Paper 7-16
Insert Sheet 7-15
Insert Sheet Setting 7-20
Insert Type 7-16
P
Page Margin 7-11
Page Number Type 7-20
Pages 7-18, 7-22
PageScope Web Connection 10-3
Password 7-5, 7-42, 7-43, 7-44
Password TX 7-58
Photo Size 6-16
Polling TX User Box 7-66, 8-9
Position 7-28, 7-32
Position - Change Pos./Delete 7-28, 7-33
Preview 3-16, 8-8
Print 7-6
Print - Application 7-11
Print Position 7-72
Print Position - Fine-Tune 7-19, 7-22, 7-23
bizhub C353/C253/C203 (FE2)
Index
12
Print Position - Print Position 7-19, 7-21, 7-23
Print Settings 10-37
Print-Basic 7-7
Printing documents 4-6, 4-18
Public user 10-10
Public/Personal/Group user boxes 9-7
Punch 7-9
Punch - Position Setting 7-9
Starting Chapter Number 7-20
Starting Page Number 7-20
Store Address 10-17, 10-38
Subject 7-54
T
Quality Adjustment 6-11
Text Color 7-18, 7-21, 7-23
Text Size 7-18, 7-21, 7-22
Time Format 7-18
Timer TX 7-57
Touch panel 3-5
R
U
Recall Header/Footer 7-33
Reference 7-42
Registered user 10-10
Relay User Box 9-10
RX Ability (Destination) 7-41
URL notification 7-56
Use Document 5-4, 7-3
User authentication 2-7, 2-10, 10-8
User box administrator 10-12
User Box Administrator Setting 9-19
User box registration 9-6, 9-12
User Box Settings 9-16
User manuals 1-7
User Name 7-42, 7-43, 7-44
Q
S
Save Document 5-4, 6-3
Saving documents 4-3
Scan Setting 6-8, 7-48
Scan Settings 6-5
Secondary Field 7-71
Secure Print User Box 7-67, 8-10
Security 10-35
Select Line 7-53
Send 7-36
Send & Print 7-61
Sending document 4-9
Settings when using documents 3-14
Sharpness 6-12
Sheet/Cover/Chapter Insert 7-12
Sheet/Cover/Chapter Insert - Chapters 7-16
Sheet/Cover/Chapter Insert - Cover Sheet 7-13
Sheet/Cover/Chapter Insert - Insert Sheet 7-15
Sort/Group 7-8
Special Original 6-17
Specified page/Sort 7-15, 7-17
Stamp Composition 7-51
Stamp Repeat 7-29
Stamp Repeat Type - Date/Time 7-30
Stamp Repeat Type - Other 7-30
Stamp Repeat Type - Preset Stamp 7-29
Stamp Repeat Type - Registered Stamp 7-29
Stamp Type/Preset Stamps 7-22
Stamp/Composition 7-17
Stamp/Composition - Copy Protect 7-24
Stamp/Composition - Date/Time 7-18
Stamp/Composition - Header/Footer 7-33
Stamp/Composition - Page Number 7-20
Stamp/Composition - Stamp 7-22
Stamp/Composition - Stamp Repeat 7-29
Standard 6-16
Staple 7-8
Staple - Position Setting 7-8
bizhub C353/C253/C203 (FE2)
V
V.34 OFF 7-53
12-5
12
Index
12-6
bizhub C353/C253/C203 (FE2)


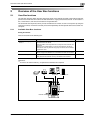
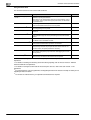
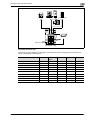
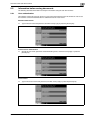

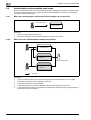


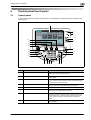

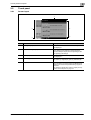


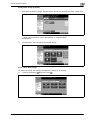
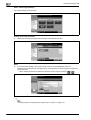
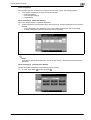
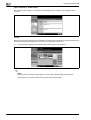
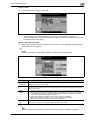
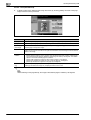


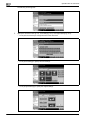
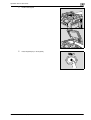

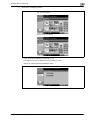
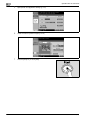

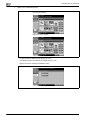
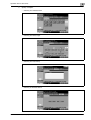


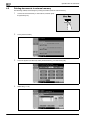

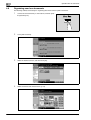


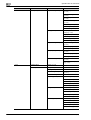
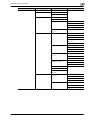
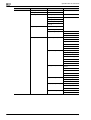


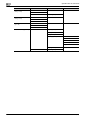


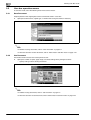


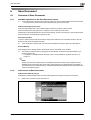


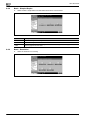


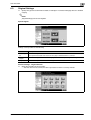


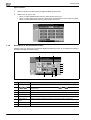
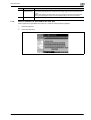


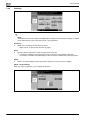


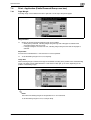


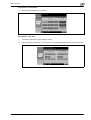
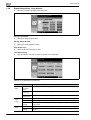

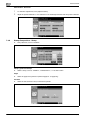
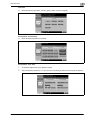
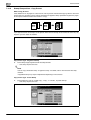
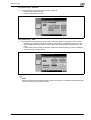
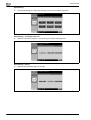
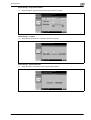
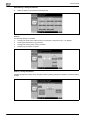


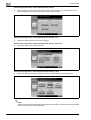

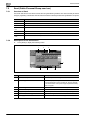
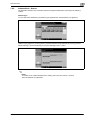
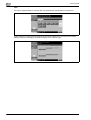
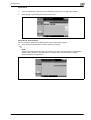


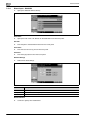

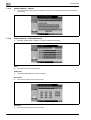

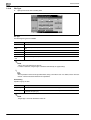
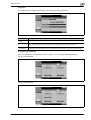
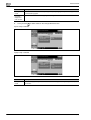

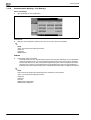
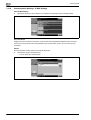

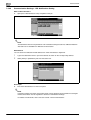
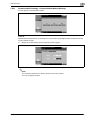
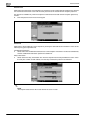
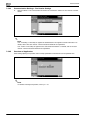

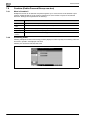

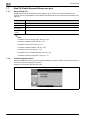

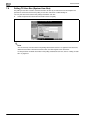


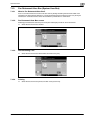

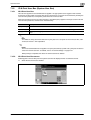
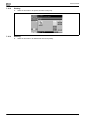
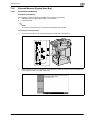

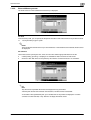
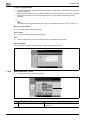
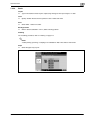


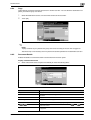
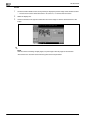


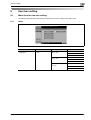

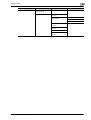
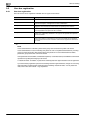
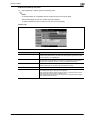

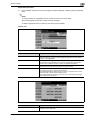
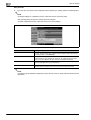
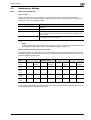
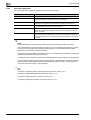

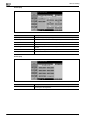


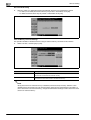
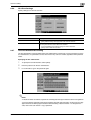


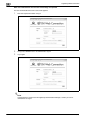

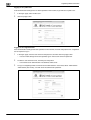
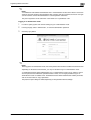

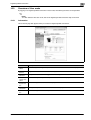
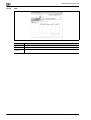
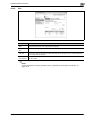

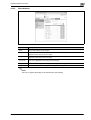
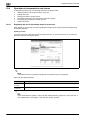
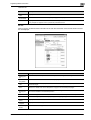
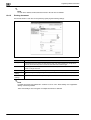


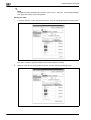


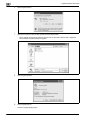


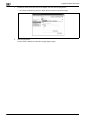
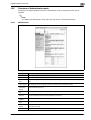


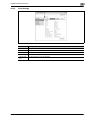

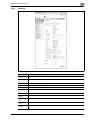


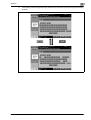


![User's Guide [Network Scan/Fax/Network Fax Operations]](http://vs1.manualzilla.com/store/data/006858172_1-5457135f625fcbd0fd36870e9109a5b2-150x150.png)