1
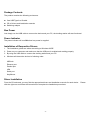
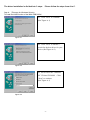
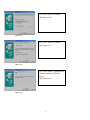
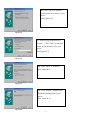
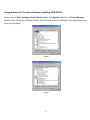
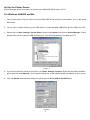
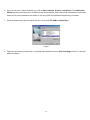
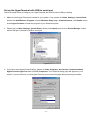
User's Manual USB 2.0 Docking Station Series Introduction Thank you for purchasing this device. With different options, the product features a desired variety and function to fulfill your needs when you work with your laptop or desktop PC. Its convenience, effectiveness, efficiency, and economics will make you satisfied in diverse working requirements. Docking station series are basically equipped with following ports as a main unit: - one USB 2.0 upstream port for connecting up to your PC or notebook - multiple (average 4-port) USB 2.0 down-stream ports for devices - one high-speed RS-232 Serial port - one printer port supports IEEE-1284 bi-directional printer - one pair of PS2 keyboard/mouse port Features Fully Compliant with USB specification 1.1 and 2.0 Supports one high-speed RS-232 Serial port Hot plug and play; supports bus powered Supports ±15kV HBM ESD protection Supports Windows OS & Mac OS (Exception: Parallel port is not applicable to Mac OS.) The following options are additionally equipped to different models to fulfill your special needs: - one USB 2.0 Ethernet (MD-3000) - one USB 2.0 Ethernet + IrDA (MD-6000) - 5-port USB 2.0 hub + one USB 2.0 Ethernet (MD-M20) - one USB 2.0 Ethernet + one Audio (MD-M20A) - 3-port USB 2.0 hub + one USB 2.0 7-in-1 card reader (MD-M20CR) System Requirements A PC with a minimum of a 75MHz Pentium or equivalent A minimum of 16M bytes of RAM One available USB Type A downstream port (either UHCI or OHCI) Windows 98SE or later. Package Contents The product contains the following enclosures: One USB Type A to B cable CD of drivers and installation manuals Switching adaptor Bus Power Just simply use the USB cable to connect the device and your PC, the docking station will start functional. Power Indicator The power indicator will turn ON when bus power is supplied. Installation of Respective Drivers 1. The installation guides are written according to Windows 98/SE. 2. Power on your computer and make sure that the USB port is enabled and working properly. 3. By using the USB cable to connect the docking station and your PC. 4. Windows will detect the devices in following order: USB hub Ethernet port Parallel port IrDA Serial port Key/Mouse Driver Installation From the CD enclosed, you may find the appropriate drivers and installation manuals for each device. click the right one and follow the instructions to complete the installation procedures. -2- Please The driver installation is divided into 3 steps. Step A: Please follow the steps from A to C. (This step for Windows 98 only) To install the HUB function of the MINI USB DOCK: A1. Click “Next” to Continue (Ref Figure A-1) Figure A-1 A2. Click “Next” to initiate a search for the best driver for your device (Ref Figure A-2) Figure A-2 A3. Please insert the “Windows 98” CD into CD-ROM. Click “Next” to continue (Ref Figure A-3) Figure A-3 -3- A4. Click “Next” to continue (Ref Figure A-4) Figure A-4 A5. Click “Next” to continue (Ref Figure A-5) Figure A-5 A6. Click “Finish”, Windows has finished installing USB Hub driver (Ref Figure A-6) Figure A-6 -4- Step B: (This section for Windows98/98SE/Me only) To install the software for USB to Printer Converter of the MINI USB DOCK: B1. Insert the “MINI USB DOCK driver diskette” into drive A. Click “Next” to continue (Ref Figure B-1) Figure B-1 B2. Click “Next” to initiate the search for the best driver for your device (Ref Figure B-2). Figure B-2 B3. Selected Floppy diskette drives location as "A:\Win98". Click “Next” to start and search. (Ref Figure B-3). Figure B-3 -5- B4. Click “Next” to continue (Ref Figure B-4) Figure B-4 B5. Click “Finish”, windows has finished installing the printer driver (Ref Figure B-5) Figure B-5 Before connecting the printer on the parallel port of MINI USB DOCK, the printer driver must be installed in advance, or it might print unknow format of character. Please refer "Setting Up the Printer Device" section to connect your printer to the MINI USB DOCK. Step C: To install the USB to serial port driver of the USB DOCK, please make sure the driver diskette is inserted: Figure D-1 D1. Click “Next” to continue (Ref Figure D-1) -6- D2. Click “Next” to initiate a search for the best drive for your device (Ref Figure D-2) Figure D-2 D3. Select Floppy diskette drives location. Click “Next” to start and search for the best driver for your device (Ref Figure D-3) Figure D-3 D4. Click “Next” to continue (Ref Figure D-4) Figure D-4 D5. Click “Finish”, Windows has finished installing RS-232 port driver (Ref Figure D-5) Figure D-5 -7- Congratulations!! You have finished installing USB DOCK. Please click on Start, Settings, Control Panel, double click System, and click on Device Manager. Double check the Human Interface Devices, and Universal serial bus controller of the dialog box to see if they work properly. Figure 3 Figure 4 -8- Set Up the Printer Device Follow the steps below to connect your printer to the MINI USB DOCK with your PC: For Windows 98/98SE and Me: 1. Turn off your printer. Plug the cable to connect MINI USB DOCK parallel port and printer. Turn on the printer afterwards. 2. Turn on your computer and plug in the USB cable to connect the MINI USB DOCK and the USB port of PC. 3. Please click on Start, Settings, Control Panel, double click System, and click on Device Manager. Check which printer port is located by USB to parallel port. The following example is located as LPT2. Figure 5 4. If you have installed a printer device before, click Start, Settings, Printers. Right-click the default installed printer and click on Properties. The Properties dialog box of the installed printer will appear on your screen. 5. Click the Details folder tab and change the printer port to LPT2: (USB to Parallel Port). Figure 6 -9- 6. If you do not have a printer installed yet, click on Start, Settings, Printers, Add Printer. The Add Printer Wizard will start and assist you in installing a new printer device. Select the printer manufacturer and model name from the list provided by the wizard or use the printer driver diskette supplied by your printer. 7. When prompted which port the printer will use, click on LPT2: USB to Parallel Port. Figure 7 8. Follow the succeeding instructions to complete the installation and run Print Test Page to see if it can print without problems. - 10 - For WINDOWS 2000 and XP: 1. Turn off your printer. Plug the cable to connect USB PORT REPLICATOR parallel port and printer. Turn on the printer afterwards. 2. Turn on your computer and plug in the USB cable to connect the USB PORT REPLICATOR and the USB port of PC. 3. If you have installed a printer device before, click Start, Settings, Printers. Right-click the default installed printer and click on Properties. The Properties dialog box of the installed printer will appear on your screen. 4. Click the Ports tab and change the printer port to USB001 (Virtual printer port to USB). Figure 17 5. If you do not have a printer installed yet, click on Start, Settings, Printers, Add Printer. The Add Printer Wizard will start and assist you in installing a new printer device. Select the printer manufacturer and model name from the list provided by the wizard or use the printer driver diskette supplied by your printer. 6. When prompted which port the printer will use, click on USB001 (Virtual printer port to USB). Figure 18 - 11 - Set up the HyperTerminal with USB to serial port Follow the steps below to configure your HyperTerminal with USB to serial COM port setting: 1. Make sure that HyperTerminal is installed in your system. If not, please click Start, Settings, Control Panel, double click Add/Remove Programs, choose Windows Setup page, Communications, click Details button, enable HyperTerminal to install the program to your Windows system. 2. Please click on Start, Settings, Control Panel, double click System, and click on Device Manager. Check which COM port is located by USB to serial port. Figure 8 3. If you have setup HyperTerminal before, please run Start, Programs, Accessories, Communications, HyperTerminal, HyperTrm.exe. Click File, Properties. The Properties dialog page will appear on your screen. If you are first time to setup HyperTerminal, you will see this page during the setup procedure. - 12 - Figure 9 4. Click the "Connect using" item to indicate the proper COM port which appeared in step 1, and follow the succeeding instructions to complete the setup. - 13 -