1
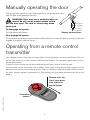
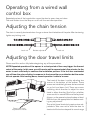
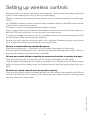
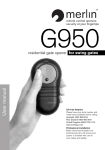
1
EDR4 1180 G2.16 10/03
Important safety instructions for
operation
It is vital for the safety of persons to follow all instructions. Save these instructions.
WARNING Do not allow children to play with door controls. Keep remote controls away from children. The appliance is not intended for use by young children or infirm persons without supervision.
Watch the moving door and keep people away until the door is completely
opened or closed.
Use caution when operating the manual release with the door open since it
may fall rapidly due to weak or broken springs or an imbalanced door.
Do not use the manual release cord to pull the door open. The cord or release
may break under load.
Frequently examine the installation, in particular cables, springs and mountings, for signs of wear damage or imbalance. Do not use if repair or adjustment
is needed since a fault in the installation or an incorrectly balanced door may
cause injury.
Each month check that the drive reverses when the door contacts a 40mm (50mm
for UK) high object placed on the floor. Adjust if necessary and recheck since
an incorrect adjustment may present a hazard.
Disconnect electric power to the garage door opener before making any repairs or removing any side covers.
To prevent fire or shock hazard, do not expose the opener to rain or moisture.
To avoid electrical shock do not open the cabinet without disconnecting the
opener from the mains.
Thank you for purchasing the Merlin Prolift sectional or tilting door opener. This product combines
convenience with security.
You can operate the door from a remote control radio transmitter or from a push-button inside your
garage. One touch of the remote control button or internal push button will activate the opener and
the door will open (or close) automatically. The door may be stopped in any position during the
opening cycle by simply depressing either button. You may close the door by depressing the button
again.
This ruggedly built garage door opener will provide years of safe and dependable service. Please
take a moment to complete and send in the warranty card included with this product. Also please
note your serial number and purchase details. We are proud of our product and want to provide the
best after sale service possible.
Please feel free to contact us if you have any suggestions or comments.
2
EDR4 1180 G2.16 10/03
Welcome
Manually operating the door
The garage door opener can be disengaged from the garage door to enable the door to be operated manually.
WARNING Door may move suddenly when released. Do not use the manual release cord to
pull the door open. The cord or release may break
under load.
Push up to
re-engage
Pull down
to release
To disengage the opener
Pull the release cord down.
Release cord and lever
To re-engage the opener
Push the lever (attached to the red release cord) upwards and move the door manually to allow the
torpedo to engage inside the trolley.
Operating from a remote control
transmitter
Your remote control transmitter has two buttons. One large button and one small button. You can
control two products or two functions with the two buttons. For example a gate opener and a
garage door opener.
A press on the a remote control transmitter button will open, stop or close the door
If your remote control transmitter has no effect, move closer to the opener. Radio signals can be
blocked or reduced by many external factors. There is a battery inside the remote control transmitter which requires periodic replacement. A fresh battery will give better performance than an old
battery.
Remove visor clip.
EDR4 1180 G2.16 10/03
Press cover down
then slide off to
expose battery.
Transmitter
buttons
3
Operating from a wired wall
control box
Repeated pushes of the large button cause the door to open, stop and close.
The small button turns the lamp on or off until the next door operation.
Adjusting the chain tension
The chain is correctly tensioned when it sags no lower than the bottom of the pole. After tensioning,
tighten any locking nuts.
Lock nut
Rotate adjuster
Lock nut
Adjusting the door travel limits
Please read this section fully before beginning any of the procedures.
The travel of the door is set by adjusting two
screws at the bottom of the opener. These
screws are inside the light cover and are marked
as up limit and down limit. There are arrows
indicating which direction to adjust for more
travel in either direction. One full turn of either
screw results in around 250mm of trolley travel.
Always run the opener to place the door at least
500mm from the appropriate limit before making any adjustment.
The up limit travel should only require minor adjustments. Take care not to allow the door to
travel out of its tracks or beyond its normal range
Door travel limit
adjustments inside
4
EDR4 1180 G2.16 10/03
NOTE Repeated operation of the opener in a short period of time may trigger the thermal
cutout of the motor. In this case you will have to wait for approximately five minutes for the
motor to cool sufficiently to continue the installation process. If the unit has overheated
you will hear the relays clicking in response to the transmitter or pushbutton but the motor
will not operate. After cooling down, normal operation is able to resume.
of movement. For doors with tracks, allow a safety margin of at least 50mm to prevent the guide
wheels from travelling out of their tracks.
WARNING The door is not safe for unsupervised operation until the force sensitivity has been be set.
Adjusting the force sensitivity
The force sensing is not preset and must be set correctly to suit your door.
STEP 1:
Remove the lamp cover, and the green control panel cover.
STEP 2:
Identify the green and the red control knobs marked open-force and close-force. Note: The opener
can be set to either determine its own safe operating force level, or it can be set to allow a deliberately greater amount of force to be applied to the door.
STEP 3:
To set the force levels automatically, press the ‘program’ button and ensure the force control knobs
are both fully anti-clockwise. Ensure that the door is engaged to the opener. Then operate the
opener to move the door in a single unobstructed movement from one limit position to the other. If
no obstruction was sensed during this cycle then the opener will save the settings to memory.
Operate the opener to move the door back to the original limit position. Again, if no obstruction is
sensed, the settings will be stored in memory.
STEP 4:
To set the force levels at some higher level, rotate the control knob to some position clockwise from
the auto-setting point.
STEP 5:
If a very light door is being operated, and if a very gentle closing force is required, then set the
option switch marked ‘Light door’ to the ON position. Note that on a heavier door this option switch
position may result in unintended detections of obstructions.
EDR4 1180 G2.16 10/03
CAUTION Regularly check the force sensitivity feature using a 40mm (50mm for UK) or
greater block of wood as an obstruction. The door should reverse promptly on contact.
Adjust down force as required.
5
Setting up wireless controls
Wireless controls can operate the opener, or the opener’s courtesy lamp, by sending coded radio
signals. These coded signals use high-security code-hopping.
Wireless controls can be hand-held or fixed to walls, such as a wireless keypad, or a wireless wallswitch.
Up to 25 Merlin wireless controls can be learned by the opener. After this, the 25th wireless control
is over-written in the opener’s memory.
All wireless controls can be deleted from the opener’s memory.
There is a learn button on the underside of the opener inside the lamp cover. The small button on a
Merlin M-122 wired wall-switch can also be used as the learn button.
If a setting is enabled in the opener, then it is possible to use any existing learned wireless control
as a learn button. (See separate section following.)
Remove the lamp cover by turning the catch on its underside. Remove the green control panel
cover to expose the setup controls. Identify the red learn button.
To learn a remote button to operate the opener:
Press the learn button for 1-2 seconds, until the courtesy lamp begins to flash slowly.
Press the desired remote button, wait 1 second, press the desired remote button again. The courtesy lamp will stop flashing once learning is complete.
To learn one remote button to operate the opener and another to operate the lamp:
Press the learn button for 1-2 seconds, until the courtesy lamp begins to flash slowly.
Press the desired remote button for control of the opener, wait 1 second, press the desired remote
button for control of the courtesy lamp. The courtesy lamp will stop flashing once learning is complete.
EDR4 1180 G2.16 10/03
To delete all remote controls from the opener’s memory
Press and hold the learn button for eleven seconds, until the courtesy lamp stops flashing. After six
seconds it will flash fast as a warning. If you release the learn button during this warning period
then the memory will not be wiped.
6
Remote transmitter learning
Remote Transmitter Learning (RTL), when enabled, allows any existing learned wireless control to
be used as a learn button for the learning of additional wireless controls. Note that this feature
trades convenience for security. If it is chosen to disable RTL (the default setting at manufacture is
enabled) then the level of security is increased.
To enable or disable RTL:
Remove the lamp cover by turning the catch on its underside. Remove the green control panel
cover to expose the setup controls. Identify the red learn button and the black program button.
Hold both of the these buttons down for three seconds until the courtesy lamp begins to flash.
Release both buttons.
Six flashes confirms that RTL is now enabled.
Four flashes confirms that RTL is now disabled.
To place the opener in learn mode using RTL:
Select any two or four button Merlin hand held remote control that is already learned in to the
opener. Call this the master remote.
Press the master remote north and south buttons together for 2-3 seconds.
The courtesy lamp on the opener will begin to repeat a cycle of flashing three times and pausing. If
you have several openers that operate from this master remote, then all these openers will begin to
flash their courtesy lamps.
Press the button on the master remote that would normally operate the desired opener. Now that
opener will go into learn mode, and any other openers that were flashing will return to their normal
standby state.
The courtesy lamp on the opener that is in learn mode will begin to flash slowly. If no signals are
received for 20 seconds, the opener will revert to its normal standby state.
To learn a button to operate the opener:
Press the desired remote button, wait 1 second, press the desired remote button again. The courtesy lamp will stop flashing once learning is complete.
EDR4 1180 G2.16 10/03
To learn one remote button to operate the opener and another to operate the lamp:
Press the learn button for 1-2 seconds, until the courtesy lamp begins to flash slowly.
Press the desired remote button for control of the opener, wait 1 second, press the desired remote
button for control of the courtesy lamp. The courtesy lamp will stop flashing once learning is complete.
7
Troubleshooting
There are no user serviceable parts inside the opener. The power cord is not intended for replacement
by the user. Please refer to your Merlin dealer in the event that replacement is required. Contact your
Merlin dealer or Authorised Merlin Installer for any service requirements.
Opener does not work at all.
May be no power. If the lamp is still on then the motor may have temporarily shut off to cool down.
SOLUTION: Plug another appliance into the power point to check power. Wait five minutes for the
motor to cool.
Courtesy lamp flashes when door stops.
This is a warning that your door was obstructed and couldn’t reach its normal stopping position. It may
also be a warning that the door has become very heavy to operate.
SOLUTION: Look for a anything blocking the beam sensor. Is the beam aligned correctly? Release the
manual release and check the door can be operated easily by hand. Get your door repaired or serviced
if it is heavy to move by hand.
Transmitter range is shorter than normal.
Your transmitter battery may be going flat. The antenna wire out of the door opener may be damaged.
SOLUTION: Replace the transmitter battery. Uncoil the antenna wire if it is coiled up.
Transmitter doesn’t work some times.
There may be occasional radio interference in your area. Your transmitter battery may be going flat.
SOLUTION: Check for other interfering wireless products. Replace the transmitter battery.
Transmitter doesn’t work at all.
Your transmitter battery may be flat. Transmitter may not be learned.
SOLUTION: Replace the transmitter battery. Learn transmitter.
Wall button doesn’t work.
Switch or wiring may be broken or damaged. Connection may be loose.
SOLUTION: Replace switch. Replace wiring. Check connections each end.
Door operates unexpectedly.
A transmitter may be operated accidentally.
SOLUTION: Check all of your transmitters to be sure they are not being operated by items placed on
top of them.
Door stops part way up.
There is an obstruction being sensed. Settings for force sensitivity or door travel limits may have been
altered.
SOLUTION: Pull the manual release and check that the door can be operated easily by hand through
the full range of movement. Adjust or repair the door. Make the opener less sensitive by adjusting
force sensing.
8
EDR4 1180 G2.16 10/03
Door is open when you arrive home, yet you pressed the button to close it when leaving.
Door may have sensed an obstruction and automatically reversed to the open position.
SOLUTION: Make sure you watch the door close fully before driving away. Do not rely on autoclosing, there are many safety over-rides which can prevent it from operating.
Door closes partly then opens again by itself.
There is an obstruction being sensed. Settings for force sensitivity may have been altered.
SOLUTION: Pull the manual release and check that the door can be operated easily by hand through
the full range of movement. Adjust or repair the door. Make the opener less sensitive by adjusting
force sensing
Courtesy lamp does not go.
Bulb may be blown.
SOLUTION: Remove the lamp cover and replace the bulb.
Door or opener has become more noisy.
Door may be worn. Chain may be loose. Mountings may be loose.
SOLUTION: Pull the manual release and check that the door can be operated easily by hand through
the full range of movement. Adjust, lubricate or repair the door. Adjust the chain tension. Check the
mountings.
Auto-closing doesn’t work any more.
Beam sensor may not be functioning correctly.
SOLUTION: Check beam is aligned. Check for damage to the sensors or wiring.
Fault feedback
EDR4 1180 G2.16 10/03
LED flashes
The green and red LEDs under the green control panel cover display the status of the opener, and
can be used to diagnose common causes of problems.
Green continuous
= at open limit
Red continuous
= at closed limit
Red slow flash
= closing
Green slow flash
= opening
Both slow flash
= obstructed during last operation
Red flickering
= receiving a Merlin remote control
Both flickering
= receiving a learned Merlin remote
Main lamp flashes
1 on-flash, pause, repeating
1 off-flash, pause, repeating
3 on-flashes, pause, repeat
on-off fast flashing
4 slow off-flashes
4 slow off-flashes
6 slow off-flashes
=
=
=
=
=
=
=
in learn mode
in ‘set limits’ mode
in pre-learn mode
about to wipe all remotes from memory
obstructed during last operation
just disabled Remote Transmitter Learning
just enabled Remote Transmitter Learning
9
Specifications
Replacement light bulb
Mains power required
Stand-by power consumption
Operating power consumption
Rated force
E27 45mm Round, 40W maximum, RC preferred
220V to 240 V, 50 Hz, single phase AC, earthed
3W maximum
900W maximum
770N maximum
Garage Door Opener Limited Warranty
Merlin warraîs to the original purchaser (“the Buyer”) that the Merlin garage door opener (“the
Unit”) sold under this warranty will be free from defects in materials and workmanship for a period
of 24 months from date of purchase.
Accordingly if the Unit fails due to defects in materials or workmanship within the warranty period
Merlin will, provided the defective part or Unit is returned freight and insurance prepaid and well
packaged to the nearest address listed in this manual, undertake to repair or, at its option replace,
any defective part or Unit and return it to the Buyer at no cost. Repairs and replacement parts are
warranted for the remaining portion of the original warranty period.
Limited warranty on motor. After 24 months and through to 60 months, Merlin will furnish a replacement motor, if it is found to be defective; free of charge. Labour costs will be charged.
Where the Unit has been installed by an authorised installer, Merlin Garage Openers Limited will
furnish replacement parts free of charge through the authorised installer. A service fee on site
service may apply.
LIMITATIONS It expressly excludes any batteries or light bulbs and malfunctions or defects to the
Unit or its operation due to any of the following:
A Failure to observe installation, adjustment, maintenance or operating instructions provided with
the Unit;
B Incorrect installation, operation or adjustment of the garage door to which the Unit is fitted;
C Connection to any garage door outside the specifications set out in the owners manual;
D Any modification or repair to the Unit carried by a person not authorised to do so by Merlin;
E Radio or any other electrical or electronic interference;
F Faulty or unsuitable electrical wiring of the building to which the Unit is attached;
G Faulty or flat batteries in the remote control transmitter;
H Where the defect is due to: conditions other than normal domestic use or dirt, misuse, neglect,
fire, accident, electrical storm or other act of God.
This warranty is void if the serial number has been altered, defaced or moved.
The liability of the Distributor for any loss or damage or injury arising directly or indirectly from any
defect in the goods supplied is limited to the replacement or repair of such goods or to damages
not exceeding the invoice value of such goods at the option of Merlin Garage Openers Limited.
FUTURE MODIFICATIONS Merlin Garage Openers Limited may modify any existing or future
model of the Unit without the obligation to incorporate these modifications into Units already manufactured or into the Unit to which this warranty applies.
10
EDR4 1180 G2.16 10/03
Warranty - please return your warranty card
GENERAL This warranty is the only Warranty made by Merlin Garage Openers Limited. All other
warranties, representations and conditions of any kind, express or implied, are hereby excluded.
Nothing in this warranty is intended to have the effect of contracting out of the provisions of the
Consumer Guarantees Act (1993) except to the extent provided by that Act and all provisions of
this warranty shall be read and modified to the extent necessary to give effect to that intention. This
warranty does not deprive the Buyer of any rights conferred upon them by any applicable law or
statute in their country of purchase.
Proof of date of purchase may be required when making a claim under warranty. In the event that
the Buyer is unable to provide adequate proof of purchase the date of warranty will apply from date
of shipment from the Distributor to the Reseller.
NOTE We request that you attach your sales docket or invoice to this manual to enable you
to establish the date of purchase in the unlikely event of a service call being made.
In-warranty service
During the warranty period, if the product appears as though it may be defective, call our toll free
service before removal of the unit. A Merlin technician will diagnose the problem and promptly
supply you with the parts for “do-it-yourself” repairs, or provide you with shipping instructions for a
factory repair or replacement. If an Authorised Installer installed your unit you must call them for
prompt on-site service.
After warranty
EDR4 1180 G2.16 10/03
Need help after the warranty period? Need help obtaining parts, service and accessories? See your
yellow pages or phone Merlin toll free.
11
Merlin service centres
New Zealand
Auckland phone 09 415 4393
Phone toll free 0800 653 667 or 0800 MERLIN
Fax toll free 0800 653 663
Australia
NSW, Vic, Qld, WA
Phone toll free 1 800 638 243
Fax toll free 1 800 640 243
England
Phone toll free 0800 073 0112
Fax toll free 01709 514 534
Merlin does not accept responsibility for damage or injury resulting from installing this opener.
Merlin reserves the right to change the design and specification without prior notification. Some
features or accessories may not be available in certain markets or areas. Please check with your
distributor.
12
EDR4 1180 G2.16 10/03
www.merlingo.com