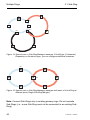
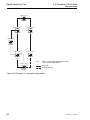
1
ConneXium Ethernet Cabling System 31007126.03 TCSESM, TCSESM-E Managed Switch Redundancy Configuration User Manual www.schneider-electric.com 31007126 - 03/2010 Content Content Content 1 Safety information 3 About this Manual 5 Key 8 1 Introduction 11 1.1 Overview of Redundancy Topologies 12 1.2 Overview of Redundancy Protocols 13 2 Ring Redundancy 15 2.1 Example of a HIPER-Ring 2.1.1 Setting up and configuring the HIPER-Ring 17 19 2.2 Example of an MRP-Ring 23 2.3 Example of a Fast HIPER-Ring 29 2.4 Example for HIPER-Ring with Straight Cables 34 3 Multiple Rings 37 3.1 Sub-Ring 3.1.1 Example configuration 38 41 4 Ring/Network Coupling 47 4.1 Variants of the ring/network coupling 48 4.2 Preparing a Ring/Network coupling 4.2.1 STAND-BY switch 4.2.2 One-Switch coupling 4.2.3 Two-Switch coupling 4.2.4 Two-Switch Coupling with Control Line 50 50 53 59 67 31007126 - 03/2010 1 Content 5 Rapid Spanning Tree 75 5.1 The Spanning Tree Protocol 5.1.1 The tasks of the STP 5.1.2 Bridge parameters 5.1.3 Bridge Identifier 5.1.4 Root Path Costs 5.1.5 Port Identifier 77 77 78 78 79 80 5.2 Rules for Creating the Tree Structure 5.2.1 Bridge information 5.2.2 Setting up the tree structure 81 81 81 5.3 Example of Root Path Determination 83 5.4 Example of Root Path Manipulation 85 5.5 Example of Tree Structure Manipulation 87 5.6 The Rapid Spanning Tree Protocol 5.6.1 Port roles 5.6.2 Port states 5.6.3 Spanning Tree Priority Vector 5.6.4 Fast reconfiguration 5.6.5 Configuring the Rapid Spanning Tree 88 88 90 91 92 93 5.7 Combining RSTP and MRP 5.7.1 Application example for the combination of RSTP and MRP A 2 Index 101 102 105 31007126 - 03/2010 Safety information Safety information Important Information Notice: Read these instructions carefully, and look at the equipment to become familiar with the device before trying to install, operate, or maintain it. The following special messages may appear throughout this documentation or on the equipment to warn of potential hazards or to call attention to information that clarifies or simplifies a procedure. 31007126 - 03/2010 3 Safety information PLEASE NOTE: Electrical equipment should be installed, operated, serviced, and maintained only by qualified personnel. No responsibility is assumed by Schneider Electric for any consequences arising out of the use of this material. © 2010 Schneider Electric. All Rights Reserved. 4 31007126 - 03/2010 About this Manual About this Manual Validity Note The data and illustrations found in this book are not binding. We reserve the right to modify our products in line with our policy of continuous product development. The information in this document is subject to change without notice and should not be construed as a commitment by Schneider Electric. Product Related Information Schneider Electric assumes no responsibility for any errors that may appear in this document. If you have any suggestions for improvements or amendments or have found errors in this publication, please notify us. No part of this document may be reproduced in any form or by any means, electronic or mechanical, including photocopying, without express written permission of Schneider Electric. All pertinent state, regional, and local safety regulations must be observed when installing and using this product. For reasons of safety and to ensure compliance with documented system data, only the manufacturer should perform repairs to components. When devices are used for applications with technical safety requirements, please follow the relevant instructions. Failure to use Schneider Electric software or approved software with our hardware products may result in improper operating results. Failure to observe this product related warning can result in injury or equipment damage. User Comments We welcome your comments about this document. You can reach us by email at [email protected] 31007126 - 03/2010 5 About this Manual Related Documents Title of Documentation ConneXium Ethernet Cabling System Managed Switch User Manual Redundancy Configuration ConneXium Ethernet Cabling System Managed Switch User Manual Basic Configuration ConneXium Ethernet Cabling System Managed Switch Reference Manual Command Line Interface ConneXium Ethernet Cabling System Managed Switch Reference Manual Web-based Interface ConneXium Ethernet Cabling System Managed Switch Installation Manual TCSESM ConneXium Ethernet Cabling System Managed Switch Installation Manual TCSESM-E Reference-Number 31007126.03 31007122.04 31007130.03 EIO0000000482.01 31007118.05 EIO0000000529.01 Note: The Glossary you will find in the Reference Manual Command Line Interface. The “Redundancy Configuration” user manual contains the information you need to select a suitable redundancy procedure and configure it. The “Basic Configuration” user manual contains the information you need to start operating the device. It takes you step by step from the first startup operation through to the basic settings for operation in your environment. The “Installation” user manual contains a device description, safety instructions, a description of the display, and the other information that you need to install the device before you begin with the configuration of the device. The "Web-based Interface" reference manual contains detailed information on using the Web interface to operate the individual functions of the device. 6 31007126 - 03/2010 About this Manual The "Command Line Interface" reference manual contains detailed information on using the Command Line Interface to operate the individual functions of the device. 31007126 - 03/2010 7 Key Key The designations used in this manual have the following meanings: List Work step Subheading Link Note: Indicates a cross-reference with a stored link A note emphasizes an important fact or draws your attention to a dependency. Courier ASCII representation in user interface Execution in the Web-based Interface user interface Execution in the Command Line Interface user interface Symbols used: Router with firewall Switch with firewall Router Switch Bridge 8 31007126 - 03/2010 Key Hub A random computer Configuration Computer Server PLC - Programmable logic controller I/O - Robot 31007126 - 03/2010 9 Key 10 31007126 - 03/2010 Introduction 1 Introduction The device contains a range of redundancy functions: HIPER-Ring MRP-Ring Fast HIPER-Ring (TCSESM-E) Ring/Network Coupling Rapid Spanning Tree Algorithm (RSTP) 31007126 - 03/2010 11 Introduction 1.1 Overview of Redundancy Topologies 1.1 Overview of Redundancy Topologies To introduce redundancy onto layer 2 of a network, first clarify which network topology you require. Depending on the network topology selected, you then choose from the redundancy protocols that can be used with this network topology. The following topologies are possible: Network topology Possible redundancy procedures Tree structure with- Only possible in combiout loops (cyclenation with physical free) loop creation Topology with 1 RSTP, Ring Redundanloop cy Topology with 2 loops Topology with 3 non-nested loops Topology with nested loops Comments - Ring Redundancy procedures (HIPER-Ring, Fast HIPER-Ring or MRP) provide shorter switching times than RSTP RSTP, Ring Redundan- Ring Redundancy: one rimary ring with a Subcy, Sub-Ring Ring or an MRP-Ring with an RSTP-Ring. RSTP, Ring Redundan- The ring coupling provides particular support cy, Sub-Ring, Ring when redundantly coupling a redundant ring to coupling another redundant ring, or to any structure that only works with Schneider Electric devices RSTP, Sub-Ring, Ring Ring coupling only couples non-nested rings, coupling though these can couple local Sub-Rings Table 1: Overview of Redundancy Topologies The Ring Redundancy Protocol MRP has particular properties to offer: It can nest MRP-Rings. A coupled ring is known as a Sub-Ring (see on page 38 “Sub-Ring“). You can couple to MRP-Rings to other structures that work with RSTP, including RSTP rings (see on page 101 “Combining RSTP and MRP“). 12 31007126 - 03/2010 Introduction 1.2 Overview of Redundancy Protocols 1.2 Overview of Redundancy Protocols Redundancy procedure RSTP HIPER-Ring MRP-Ring Fast HIPERRing (TCSESM-E) Redundant coupling Network topology Switching time Random structure typically < 1 s (STP < 30 s), up to < 30 s - depends heavily on the number of devices Note: Up to 79 devices possible, depending on topology and configuration. If the default values (factory settings) are used, up to 39 devices are possible, depending on the topology (see page 75). Ring typically 80 ms, up to < 500 ms or < 300 ms (selectable) - the number of switches has a minimal effect on the switch-over time Ring typically 80 ms, up to < 500 ms or < 200 ms (selectable) - the number of switches has a minimal effect on the switch over time Note: In combination with RSTP in MRP compatibility mode, up to 39 devices are possible, depending on the configuration. If the default values (factory settings) for RSTP are used, up to 19 devices are possible (see page 75). Ring < 25 ms with 50 devices in ring. Coupling of network segment/rings via a main line and a redundant line typically 150 ms, up to < 500 ms Table 2: Comparison of the redundancy procedures 31007126 - 03/2010 13 Introduction 14 1.2 Overview of Redundancy Protocols 31007126 - 03/2010 Ring Redundancy 2 Ring Redundancy The concept of ring redundancy allows the construction of high-availability, ring-shaped network structures. With the help of the RM (Ring Manager) function, the two ends of a backbone in a line structure can be closed to a redundant ring. The ring manager keeps the redundant line open as long as the line structure is intact. If a segment becomes inoperable, the ring manager immediately closes the redundant line, and line structure is intact again. Figure 1: Line structure RM Figure 2: Redundant ring structure RM = Ring Manager —— main line - - - redundant line 31007126 - 03/2010 15 Ring Redundancy If a section is down, the ring structure of a HIPER-(HIGH PERFORMANCE REDUNDANCY) Ring with up to 50 devices typically transforms back to a line structure within 80 ms (possible settings: standard/accelerated). MRP (Media Redundancy Protocol) Ring (IEC 62439) of up to 50 devices typically transforms back to a line structure within 80 ms (adjustable to max. 200 ms/500 ms). Fast HIPER-Ring of up to 5 devices typically transforms back to a line structure within 5 ms (maximum 10 ms). With a larger number of devices, the reconfiguration time increases. Devices with HIPER-Ring function capability: Within a HIPER-Ring, you can use any combination of the following devices: – TCSESM – TCSESM-E Within an MRP-Ring, you can use devices that support the MRP protocol based on IEC62439. Within a Fast HIPER-Ring, you can use the following device: – TCSESM-E Note: Enabled Ring Redundancy methods on a device are mutually exclusive at any one time. When changing to another Ring Redundancy method, deactivate the function for the time being. Note: The following usage of the term “ring manager” instead of “redundancy manager” makes the function easier to understand. 16 31007126 - 03/2010 Ring Redundancy 2.1 Example of a HIPER-Ring 2.1 Example of a HIPER-Ring A network contains a backbone in a line structure with 3 devices. To increase the redundancy reliability of the backbone, you have decided to convert the line structure to a HIPER-Ring. You use ports 1.1 and 1.2 of the devices to connect the lines. 1 1.1 2 1.2 1.1 3 1.2 1.1 1.2 RM Figure 3: Example of HIPER-Ring RM = Ring Manager —— main line - - - redundant line The following example configuration describes the configuration of the ring manager device (1). The two other devices (2 to 3) are configured in the same way, but without activating the ring manager function. Select the “Standard” value for the ring recovery, or leave the field empty. 31007126 - 03/2010 17 Ring Redundancy 2.1 Example of a HIPER-Ring Note: As an alternative to using software to configure the HIPER-Ring, with device TCSESM you can also use a DIP switch to enter a number of settings. You can also use a DIP switch to enter a setting for whether the configuration via DIP switch or the configuration via software has priority. The state on delivery is “Software Configuration”. You can find details on the DIP switches in the User Manual Installation. RING LOOP HAZARD Configure all the devices of the Ring individually. Before you connect the redundant line, you must complete the configuration of all the devices of the Ring. Failure to follow these instructions can result in death, serious injury, or equipment damage. 18 31007126 - 03/2010 Ring Redundancy 2.1.1 2.1 Example of a HIPER-Ring Setting up and configuring the HIPER-Ring Set up the network to meet your demands. You configure all 6 ports so that the transmission speed and the duplex settings of the lines correspond to the following table: Bit rate Autonegotiation (automatic configuration) Port Duplex 100 Mbit/s off 1000 Mbit/s on on Full on – Table 3: Port settings for ring ports Note: When you use the DIP switch to activate the HIPER-Ring, the device makes the appropriate settings for the pre-defined ring ports in the configuration table (transmission rate and duplex mode). When the HIPER-Ring function is disabled, the ports revert from ring ports to normal ports but will keep the ring port settings. Independently of the DIP switch setting, you can still change the port settings via software. Select the Redundancy:Ring Redundancy dialog. Under “Version”, select HIPER-Ring. Define the desired ring ports 1 and 2 by making the corresponding entries in the module and port fields. If it is not possible to enter a module, then there is only one module in the device that is taken over as a default. Display in “Operation” field: – active: This port is switched on and has a link. – inactive: This port is switched off or it has no link. 31007126 - 03/2010 19 Ring Redundancy 2.1 Example of a HIPER-Ring Figure 4: Ring Redundancy Dialog TCSESM Figure 5: Ring Redundancy dialog (TCSESM-E) 20 31007126 - 03/2010 Ring Redundancy 2.1 Example of a HIPER-Ring Activate the ring manager for this device. Do not activate the ring manager for any other device in the HIPER-Ring. In the “Ring Recovery” frame, select the value “Standard” (default). Note: Settings in the “Ring Recovery” frame only take effect for devices configured as ring managers. Click “Set” to temporarily save the entry in the configuration. enable Switch to the Privileged EXEC mode. configure Switch to the Configuration mode. hiper-ring mode ring-manager Select the HIPER-Ring ring redundancy and define the device as ring manager. Switch's HIPER Ring mode set to ring-manager hiper-ring port primary 1/1 Define port 1 in module 1 as ring port 1. HIPER Ring primary port set to 1/1 hiper-ring port secondary 1/2 Define port 2 in module 1 as ring port 2. HIPER Ring secondary port set to 1/2 exit Switch to the privileged EXEC mode. show hiper-ring Display the HIPER-Ring parameters. HIPER Ring Mode of the Switch.................. ring-manager configuration determined by.................. management HIPER Ring Primary Port of the Switch.......... 1/1, state active HIPER Ring Secondary Port of the Switch........ 1/2, state active HIPER Ring Redundancy Manager State............ active HIPER Ring Redundancy State (red. guaranteed).. no (rm is active) HIPER Ring Setup Info (Config. failure)........ no error HIPER Ring Recovery Delay...................... 500ms Now proceed in the same way for the other two devices. Note: If you have configured VLANs, note the VLAN configuration of the ring ports. In the configuration of the HIPER-Ring, you select for the ring ports – VLAN ID 1 and – VLAN membership Untagged in the static VLAN table 31007126 - 03/2010 21 Ring Redundancy 2.1 Example of a HIPER-Ring Note: Deactivate the Spanning Tree protocol on the ports connected to the HIPER-Ring because Spanning Tree and Ring Redundancy affect each other. If you enable the HIPER-Ring function by means of the DIP switch, RSTP will be disabled automatically. Now you connect the line to the ring. To do this, you connect the 2 devices to the ends of the line using their ring ports. The displays in the “Redundancy Manger Status” frame mean: – “Active (redundant line)”: The ring is open, which means that a data line or a network component within the ring is down. – “Inactive”: The ring is closed, which means that the data lines and network components are working. The displays in the “Information” frame mean – “Redundancy existing”: One of the lines affected by the function may be interrupted, with the redundant line then taking over the function of the interrupted line. – "Configuration failure”: The function is incorrectly configured or the cable connections at the ring ports are improperly configured (e.g., not plugged into the ring ports). 22 31007126 - 03/2010 Ring Redundancy 2.2 Example of an MRP-Ring 2.2 Example of an MRP-Ring A network contains a backbone in a line structure with 3 devices. To increase the availability of the backbone, you decide to convert the line structure to a redundant ring. In contrast to the previous example, devices from different manufacturers are used which do not all support the HIPER-Ring protocol. However, all devices support MRP as the ring redundancy protocol, so you decide to deploy MRP. You use ports 1.1 and 2.2 of the devices to connect the lines. 1 1.1 2 1.2 1.1 3 1.2 1.1 1.2 RM Figure 6: Example of MRP-Ring RM = Ring Manager —— main line - - - redundant line The following example configuration describes the configuration of the ring manager device (1). You configure the 2 other devices (2 to 3) in the same way, but without activating the ring manager function. This example does not use a VLAN. You have entered 200 ms as the ring recovery time, and all the devices support the advanced mode of the ring manager. 31007126 - 03/2010 23 Ring Redundancy 2.2 Example of an MRP-Ring Note: For devices with DIP switches, put all DIP switches to “On”. The effect of this is that you can use the software configuration to configure the redundancy function without any restrictions. You thus avoid the possibility of the software configuration being hindered by the DIP switches. RING LOOP HAZARD Configure all the devices of the Ring individually. Before you connect the redundant line, you must complete the configuration of all the devices of the Ring. Failure to follow these instructions can result in death, serious injury, or equipment damage. Set up the network to meet your demands. You configure all 6 ports so that the transmission speed and the duplex settings of the lines correspond to the following table: Bit rate Autonegotiation (automatic configuration) Port Duplex 100 Mbit/s off 1000 Mbit/s on on Full on – Table 4: Port settings for ring ports Select the Redundancy:Ring Redundancy dialog. Under “Version”, select MRP. Define the desired ring ports 1 and 2 by making the corresponding entries in the module and port fields. If it is not possible to enter a module, then there is only one module in the device that is taken over as a default. 24 31007126 - 03/2010 Ring Redundancy 2.2 Example of an MRP-Ring Display in “Operation” field: forwarding: this port is switched on and has a link. blocked: this port is blocked and has a link disabled: this port is disabled not-connected: this port has no link Figure 7: Ring Redundancy Dialog TCSEM Figure 8: Ring Redundancy dialog (TCSESM-E) 31007126 - 03/2010 25 Ring Redundancy 2.2 Example of an MRP-Ring In the “Ring Recovery” frame, select 200 ms. Note: If selecting 200 ms for the ring recovery does not provide the ring stability necessary to meet the requirements of your network, you select 500 ms. Note: Settings in the “Ring Recovery” frame only take effect for devices configured as ring managers. Under “Configuration Redundancy Manager”, activate the advanced mode. Activate the ring manager for this device. Do not activate the ring manager for any other device in the MRP-Ring. Leave the VLAN ID as 0 in the VLAN field. Switch the operation of the MRP-Ring on. Click “Set” to temporarily save the entry in the configuration. The displays in the “Information” frame mean – “Redundancy existing”: One of the lines affected by the function may be interrupted, with the redundant line then taking over the function of the interrupted line. – "Configuration failure”: The function is incorrectly configured or the cable connections at the ring ports are improperly configured (e.g., not plugged into the ring ports). The “VLAN” frame enables you to assign the MRP-Ring to a VLAN: If VLANs are configured, you make the following selections in the "VLAN" frame: – VLAN ID 0, if the MRP-Ring configuration is not to be assigned to a VLAN, as in this example. Select VLAN ID 1 and VLAN membership U (Untagged) in the static VLAN table for the ring ports. – A VLAN ID > 0, if the MRP-Ring configuration is to be assigned to this VLAN. For all devices in this MRP-Ring, enter this VLAN ID in the MRPRing configuration, and then choose this VLAN ID and the VLAN membership Tagged (T) in the static VLAN table for all ring ports in this MRP-Ring. 26 31007126 - 03/2010 Ring Redundancy 2.2 Example of an MRP-Ring Note: For all devices in an MRP-Ring, activate the MRP compatibility in the Rapid Spanning Tree:Global dialog if you want to use RSTP in the MRP-Ring. If this is not possible, perhaps because individual devices do not support the MRP compatibility, you deactivate the Spanning Tree protocol at the ports connected to the MRP-Ring. Spanning Tree and Ring Redundancy affect each other. Note: If you want to configure an MRP-Ring using the Command Line Interface, you must define an additional parameter. When configured using CLI, an MRP-Ring is addressed via its MRP domain ID. The MRP domain ID is a sequence of 16 number blocks (8-bit values). Use the default domain of 255 255 255 255 255 255 255 255 255 255 255 255 255 255 255 255 for the MRP domain ID. This default domain is also used internally for a configuration via the Webbased interface. Configure all the devices within an MRP-Ring with the same MRP domain ID. enable Switch to the Privileged EXEC mode. configure Switch to the Configuration mode. mrp new-domain default domain Create a new MRP-Ring with the default domain ID 255.255.255.255.255.255.255.255.255.255.255. 255.255.255.255.255 MRP domain created: Domain ID: 255.255.255.255.255.255.255.255.255.255.255.255.255.255.255.255 (Default MRP domain) mrp current-domain Define port 1 of module 1 as ring port 1 (primary). port primary 1/1 Primary Port set to 1/1 mrp current-domain Define port 2 of module 1 as ring port 2 (secondport secondary 1/2 ary). Secondary Port set to 1/2 31007126 - 03/2010 27 Ring Redundancy 2.2 Example of an MRP-Ring mrp current-domain mode Define this device as the ring manager. manager Mode of Switch set to Manager mrp current-domain recovery- Define 200 ms as the value for the “Ring Recovdelay 200 ms ery”. Recovery delay set to 200 ms mrp current-domain advanced- Activate the “MRP Advanced Mode”. mode enable Advanced Mode (react on link change) set to Enabled mrp current-domain operation enable Activate the MRP-Ring. Operation set to Enabled exit Go back one level. show mrp Show the current parameters of the MRP-Ring (abbreviated display). Domain ID: 255.255.255.255.255.255.255.255.255.255.255.255.255.255.255.255 (Default MRP domain) Configuration Settings: Advanced Mode (react on link change).... Enabled Manager Priority........................ 32768 Mode of Switch (administrative setting). Manager Mode of Switch (real operating state)... Manager Domain Name............................. <empty> Recovery delay.......................... 200 ms Port Number, Primary.................... 1/1, State: Not Connected Port Number, Secondary.................. 1/2, State: Not Connected VLAN ID................................. 0 (No VLAN) Operation............................... Enabled Now you connect the line to the ring. To do this, you connect the 2 devices to the ends of the line using their ring ports. 28 31007126 - 03/2010 Ring Redundancy 2.3 Example of a Fast HIPER-Ring 2.3 Example of a Fast HIPERRing This example can be set up with the device type TCSESM-E. A network contains a backbone in a line structure with 3 devices. To increase the redundancy reliability of the backbone, you have decided to convert the line structure to a ring redundancy. In contrast to the previous example, you need a very short switch-over time in a redundancy case (about 10 ms). Only TCSESM-E devices are being used, so you decide on the Fast HIPERRing as the ring redundancy protocol. You use ports 1.1 and 1.2 of the devices to connect the lines. 1 1.1 2 1.2 1.1 3 1.2 1.1 1.2 RM Figure 9: Example of Fast HIPER-Ring RM = Ring Manager —— main line - - - redundant line The following example configuration describes the configuration of the ring manager device (1). The 2 other devices (2 to 3) are configured in the same way, but without activating the ring manager function. No VLAN used in this example. 31007126 - 03/2010 29 Ring Redundancy 2.3 Example of a Fast HIPER-Ring RING LOOP HAZARD Configure all the devices of the Ring individually. Before you connect the redundant line, you must complete the configuration of all the devices of the Ring. Failure to follow these instructions can result in death, serious injury, or equipment damage. Set up the network to meet your demands. You configure all 6 ports so that the transmission speed and the duplex settings of the lines correspond to the following table: Bit rate Autonegotiation (automatic configuration) Port Duplex 100 Mbit/s off 1000 Mbit/s on on Full on – Table 5: Port settings for ring ports Select the Redundancy:Ring Redundancy dialog. Under “Version”, select Fast HIPER-Ring. Define the desired ring ports 1 and 2 by making the corresponding entries in the module and port fields. If it is not possible to enter a module, then there is only one module in the device that is taken over as a default. 30 31007126 - 03/2010 Ring Redundancy 2.3 Example of a Fast HIPER-Ring Display in “Operation” field: forwarding: this port is switched on and has a link. blocked: this port is blocked and has a link disabled: this port is disabled not-connected: this port has no link Figure 10: Ring Redundancy dialog (TCSESM-E) Activate the ring manager for this device. Do not activate the ring manager for any other device in the Fast HIPER-Ring. Activate the function in the “Operation” frame. Leave the VLAN ID as 0 in the VLAN field. In the “Switches” frame, enter the number of Switches in the ring in “Number”. This entry is used to optimize the reconfiguration time and the stability of the ring. Click “Set” to temporarily save the entry in the configuration. 31007126 - 03/2010 31 Ring Redundancy 2.3 Example of a Fast HIPER-Ring The display in the “Ring Information” frame means: – Round Trip Delay: round-trip delay in µs for test packets, measured by the ring manager. Display begins with 100 µs, in steps of 100 µs. Values of 1000 µs and greater indicate that the ring may become unstable. In this case, check that the entry for the number of Switches in the “Switches” frame is correct. The displays in the “Information” frame mean – “Redundancy existing”: One of the lines affected by the function may be interrupted, with the redundant line then taking over the function of the interrupted line. – "Configuration failure”: The function is incorrectly configured or the cable connections at the ring ports are improperly configured (e.g., not plugged into the ring ports). The “VLAN” frame enables you to assign the Fast HIPER-Ring to a VLAN: If VLANs are configured, you make the following selections in the "VLAN" frame: – VLAN ID 0, if the Fast HIPER-Ring configuration is not to be assigned to a VLAN, as in this example. Select VLAN ID 1 and VLAN membership U (Untagged) in the static VLAN table for the ring ports. – A VLAN ID > 0, if the Fast HIPER-Ring configuration is to be assigned to this VLAN. For all devices in this Fast HIPER-Ring, enter this VLAN ID in the Fast HIPER-Ring configuration, and then choose this VLAN ID and the VLAN membership T (Tagged) in the static VLAN table for all ring ports in this Fast HIPER-Ring. Note: If you want to configure a Fast HIPER-Ring using the Command Line Interface (CLI), you must define an additional parameter. When configured using CLI, a Fast HIPER-Ring is addressed via its Fast HIPER-Ring ID. This ID is a number in the value range 1 to 2,147,480,647 (231 - 1)). The default setting is 1. The device also uses this value internally for a configuration via the Web-based interface. Configure all the devices within a Fast HIPER-Ring with the same Fast HIPER-Ring ID. 32 31007126 - 03/2010 Ring Redundancy 2.3 Example of a Fast HIPER-Ring Switch to the Privileged EXEC mode. Switch to the Configuration mode. Create a new Fast HIPER-Ring with the default ID (1). Ports 1/1 and 1/2 are defined as ring ports here. You keep these default values. Fast HIPER-Ring ID created:ID: 1 (Default Fast HIPER-Ring ID) fast-hiper-ring current-id Define this device as the ring manager. mode ring-manager Mode of Switch set to Ring Manager fast-hiper-ring current-id Define the number of devices in the Fast HIPERnodes 3 Ring as 3. Number of nodes set to 3 fast-hiper-ring current-id Activate the Fast HIPER-Ring. operation enable Operation set to Enabled exit Switch to the Configuration mode. show fast-hiper-ring Show the current parameters of the Fast HIPERRing. Ring ID: 1 (Default Fast HIPER-Ring ID) Mode of Switch (administrative setting). Ring Manager Mode of Switch (real operating state)... Ring Manager Ring Name................................<empty> Number of nodes in the ring............. 3 Port Number, Primary.................... 1/1, State: Not Connected Port Number, Secondary.................. 1/2, State: Not Connected VLAN ID................................. 0 (No VLAN) Operation............................... Enabled General Operating States: FHR Setup Info (Config. Failure)........ Ring Port Link Error Manager-related Operating States: Ring State.............................. Open Redundancy Guaranteed................... No Round Trip Delay........................ 0 enable configure fast-hiper-ring new-id default-id Note: Deactivate the Spanning Tree protocol for the ports connected to the redundant ring, because Spanning Tree and Ring Redundancy work with different reaction times (Redundancy:Rapid Spanning Tree:Port). Now you connect the line to the ring. To do this, you connect the 2 devices to the ends of the line using their ring ports. 31007126 - 03/2010 33 Ring Redundancy 2.4 Example for HIPER-Ring with Straight Cables 2.4 Example for HIPER-Ring with Straight Cables You can implement this example with the model TCSESM or TCSESM-E. Port 1 Port 2 Port 1 Port 2 1 2 2 1 1 2 Port 1 Port 2 2 1 Port 2 Port 1 Figure 11: Example for a HIPER-Ring with straight cables 1 = Manual Cable Crossing disabled 2 = Manual Cable Crossing enabled The following example configuration describes the configuration of a HIPERRing where straight cables are used between the switches, in contrast to the normal case, where crossed cables are used between switches. The choice which switch is assigned the ring manager function as well as which line is assigned the redundant line in the normal mode of operation, is independent from that and is therefore not given in the example. 34 31007126 - 03/2010 Ring Redundancy 2.4 Example for HIPER-Ring with Straight Cables RING LOOP HAZARD Configure all the devices of the Ring individually. Before you connect the redundant line, you must complete the configuration of all the devices of the Ring. Failure to follow these instructions can result in death, serious injury, or equipment damage. Note: Configure all the devices of the HIPER-Ring individually. Before you connect the redundant line, you must complete the configuration of all the devices of the HIPER-Ring. You thus avoid loops during the configuration phase. Set up the network to meet your demands. Configure the transmission rate, the duplex mode and the manual cable crossing for the ring ports as given in the following table: Port Port on Autonegotiation (Automatic Configuration) Manual Configuration Manual Cable Crossing 1.1 yes (checked) no (not checked) 1.2 yes (checked) no (not checked) 100 Mbit/s FDX disable 100 Mbit/s FDX enable Table 6: Port settings for ring ports when using straight cables Note: You can also use the ring redundancy protocol MRP instead of HIPERRing; when employing TCSESM-E switches, you can also use Fast HIPERRing. 31007126 - 03/2010 35 Ring Redundancy 36 2.4 Example for HIPER-Ring with Straight Cables 31007126 - 03/2010 Multiple Rings 3 Multiple Rings You can set up multiple rings with multiple redundancy protocols: It can nest MRP-Rings. A coupled ring is known as a Sub-Ring (see on page 38 “Sub-Ring“). You can couple to MRP-Rings to other structures that work with RSTP, including RSTP rings (see on page 101 “Combining RSTP and MRP“). 31007126 - 03/2010 37 Multiple Rings 3.1 Sub-Ring 3.1 Sub-Ring For the device TCSESM-E. The Sub-Ring concept enables you to easily couple new network segments to suitable devices in existing redundancy rings (primary rings). The devices of the primary ring to which the new Sub-Ring is being coupled are referred to as Sub-Ring Managers (SRMs). RM 1.1 1.2 1.2 1.1 1.2 1.2 1.9 SRM 1 1 1.1 1.2 1.2 1.2 2 1.1 1.1 1.1 SRM 2 1.9 1.1 1.1 1.2 Figure 12: Example of a Sub-Ring structure 1 Blue ring = primary ring 2 Orange ring = Sub-Ring SRM = Sub-Ring Manager RM = Ring Manager Note: The following devices support the Sub-Ring Manager function: – TCSESM-E In a Sub-Ring, you can integrate all devices that support MRP, the Sub-Ring Manager function is not neccessary. 38 31007126 - 03/2010 Multiple Rings 3.1 Sub-Ring Setting up Sub-Rings has the following advantages: Through the coupling process, you include the new network segment in the redundancy concept. You can easily integrate new company areas into existing networks. You easily map the organizational structure of a company in the network topology. As an MRP-Ring, the switching times of the Sub-Ring in redundancy cases are typically < 100 ms. The following graphics show examples of possible Sub-Ring topologies: RM SRM 1 SRM 2 SRM 4 SRM 3 Figure 13: Example of an overlapping Sub-Ring structure 31007126 - 03/2010 39 Multiple Rings 3.1 Sub-Ring RM SRM 1 SRM 2 SRM 3 Figure 14: Special case: a Sub-Ring Manager manages 2 Sub-Rings (2 instances). Depending on the device type, you can configure additional instances. RM SRM 1 Figure 15: Special case: a Sub-Ring Manager manages both ends of a Sub-Ring at different ports (Single Sub-Ring Manger). Note: Connect Sub-Rings only to existing primary rings. Do not cascade Sub-Rings (i.e., a new Sub-Ring must not be connected to an existing SubRing). 40 31007126 - 03/2010 Multiple Rings 3.1 Sub-Ring Note: Sub-Rings use MRP. You can couple Sub-Rings to existing primary rings with the HIPER-Ring protocol, the Fast HIPER-Ring protocol and MRP. If you couple a Sub-Ring to a primary ring under MRP, configure both rings in different VLANs. You configure either the Sub-Ring Managers’ Sub-Ring ports and the devices of the Sub-Ring in a separate VLAN. Here multiple Sub-Rings can use the same VLAN. or the devices of the primary ring including the Sub-Ring Managers’ primary ring ports in a separate VLAN. This reduces the configuration effort when coupling multiple Sub-Rings to a primary ring. 3.1.1 Example configuration The following section shows in detail the configuration of a simple Sub-Ring example. Example description You want to couple a new network segment with 3 devices to an existing redundant ring with the HIPER-Ring protocol. If you couple the network at both ends instead of only one end, this provides increased availability with the corresponding configuration. The new network segment will be coupled as a Sub-Ring. The coupling to the primary ring is performed by existing devices of the type – TCSESM-E Configure these devices as Sub-Ring Managers. 31007126 - 03/2010 41 Multiple Rings 3.1 Sub-Ring RM 1.1 1.2 1.2 1.1 1.2 1.2 1.9 SRM 1 1 1.1 1.2 2 1.1 1.2 1.2 1.1 1.1 SRM 2 1.9 1.1 1.1 1.2 Figure 16: Example of a Sub-Ring structure 1 Blue ring = primary ring 2 Orange ring = Sub-Ring SRM = Sub-Ring Manager RM = Ring Manager Proceed as follows to configure a Sub-Ring: Configure the three devices of the new network segment as participants in an MRP-Ring. This means: – Configure all the ring ports in accordance with the port settings table (see table 7): Bit rate Autonegotiation (automatic configuration) Port Duplex 100 Mbit/s Off 1000 Mbit/s On On Full On – Table 7: Port settings for ring ports – Define different VLAN membership for the primary ring and the Sub-Ring even if the primary ring uses the MRP protocol; e.g., VLAN ID 1 for the primary ring and VLAN ID 2 for the Sub-Ring. – For all ring ports in the Sub-Ring, select this VLAN ID and the VLAN membership Tagged (T) in the static VLAN table. – Switch the MRP-Ring function on for all devices. – In the Ring Redundancy dialog, under MRP-Ring, configure for all devices the two ring ports used in the Sub-Ring. 42 31007126 - 03/2010 Multiple Rings 3.1 Sub-Ring – Switch the Ring Manager function off for all devices. – Switch RSTP off for the MRP-Ring ports used in the Sub-Ring. – Assign the same MRP domain ID to all devices. Note: The MRP domain ID is a sequence of 16 number blocks (value range 0 to 255). The default domain („default-domain“) is the MRP domain ID 255 255 255 255 255 255 255 255 255 255 255 255 255 255 255 255. An MRP domain ID consisting only of “0” blocks is invalid. If you need to adjust the MRP domain ID, open the Command Line Interface (CLI) and proceed as follows: enable Switch to the Privileged EXEC mode. configure Switch to the Configuration mode. mrp delete-domain Deletes the current MRP domain. If no MRP docurrent-domain main exists, an error message appears. MRP current domain deleted: Domain ID: 255.255.255.255.255.255.255.255.255.255.255.255.255.255.255.255 (Default MRP domain) mrp new-domain Creates a new MRP domain with the specified 0.0.1.1.2.2.3.4.4.111. MRP domain ID. You can subsequently access 222.123.0.0.66.99 this domain with “current-domain”. MRP domain created: Domain ID: 0.0.1.1.2.2.3.4.5.111.222.123.0.0.66.99 Sub-Ring configuration SUB-RING LOOP HAZARD Configure all the devices of the Sub-Ring individually. Before you connect the redundant line (close the Sub-Ring), you must complete the configuration of all the devices of the Sub- Ring. Failure to follow these instructions can result in death, serious injury, or equipment damage. Proceed as follows to configure the 2 Sub-Ring Managers in the example: Select the Redundancy:Sub-Ring dialog. Click the button "New“. 31007126 - 03/2010 43 Multiple Rings 3.1 Sub-Ring Figure 17: Sub-Ring - New Entry dialog Enter the value “1” as the ring ID of this Sub-Ring. In the Module.Port field, enter the ID of the port (in the form X.X) that connects the device to the Sub-Ring (in the example, 1.9). For the connection port, you can use all the available ports that you have not already configured as ring ports of the primary ring. You have the option of entering a name for the Sub-Ring (in the example, “Test”). Select the Sub-Ring Manager mode (SRM mode). You thus specify which connection between the primary ring and the Sub-Ring becomes the redundant line. The options for the connection are: Both Sub-Ring Managers have the same setting (default manager): - the device with the higher MAC address manages the redundant line. In the SRM Mode field, a device is selected to be the redundant manager: - this device manages the redundancy line as long as you have configured the other Sub-Ring Manager as a manager, otherwise the higher MAC address applies. Configure Sub-Ring Manager 1 as the “manager” and Sub-Ring Manager 2 as the manager of the redundant line with “redundant manager”, in accordance with the overview drawing for this example. 44 31007126 - 03/2010 Multiple Rings 3.1 Sub-Ring Leave the fields VLAN ID (default 0) and MRP Domain (default 255.255.255.255.255.255.255.255.255.255.255.255.255.255.255.2 55) as they are. The example configuration does not require any change here. Click “Set” to temporarily save the entry in the configuration. Click “Back” to return to the Sub-Ring dialog. enable Switch to the Privileged EXEC mode. configure Switch to the Configuration mode. sub-ring new-ring 1 Creates a new Sub-Ring with the Sub-Ring ID 1. Sub-Ring ID created:ID: 1 sub-ring 1 port 1/9 Defines port 9 in module 1 as the Sub-Ring port. Port set to 1/9 sub-ring 1 ring-name Test Assigns the name “Test” to Sub-Ring 1 Sub-Ring Ring name set to "Test" sub-ring 1 mode manager Configures the mode of this Sub-Ring Manager as “manager”. Mode of Switch set to manager Click “Reload” to update the Sub-Ring overview and check all the entries. Figure 18: Completely configured Sub-Ring Manager 31007126 - 03/2010 45 Multiple Rings 3.1 Sub-Ring Configure the 2nd Sub-Ring Manager in the same way. If you have explicitly assigned SRM 1 the SRM mode manager, you configure SRM 2 as redundant manager. Otherwise, the assignment is performed automatically via the higher MAC address (see above) Switch the two Sub-Ring Managers on under “Function on/off” in the overview of the Sub-Ring dialog. Click “Set” to temporarily save the entry in the configuration. Select the dialog Basic Settings:Load/Save. In the “Save” frame, select “To Device” for the location and click “Save” to permanently save the configuration in the active configuration. enable configure sub-ring 1 operation enable Operation set to Enabled exit show sub-ring Switch to the Privileged EXEC mode. Switch to the Configuration mode. Switches on the Sub-Ring with the Sub-Ring ID 1. Switch to the privileged EXEC mode. Displays the state for all Sub-Rings on this device. Ring ID: 1 Mode of Switch (administrative setting)... manager Mode of Switch (real operating state)..... manager Port Number............................... 1/9, State: Forwarding Protocol...................................Standard MRP MRP Domain ID.................................. 255.255.255.255.255.255.255.255.255.255.255.255.255.255.255.255Ri ng Name...................................... Test Partner MAC.................................... 02:E3:00:1B:00:09 VLAN ID........................................ 0 (No VLAN) Operation...................................... Enabled General Operating States: SRM Setup Info (Config. Failure)............... No Error Manager-related Operating States: Ring State..................................... Open Redundancy Guaranteed.......................... No copy system:running-config Save the current configuration to the non-volatile nvram:startup-config memory. When you have configured both SRMs and, if applicable, the devices included in the Sub-Ring, close theSub-Ring’s redundant line. 46 31007126 - 03/2010 Ring/Network Coupling 4 Ring/Network Coupling Ring/Network Coupling allows the redundant coupling of redundant rings and network segments. 2 rings/network segments are connected via 2 separate paths. The ring/network coupling supports the coupling of a ring (HIPER-Ring, Fast HIPER-Ring or MRP) to a second ring (also HIPER-Ring, Fast HIPER-Ring or MRP) or to a network segment of any structure, when all the devices in the coupled network are Schneider Electric devices. The ring/network coupling supports the following devices: TCSESM TCSESM-E 31007126 - 03/2010 47 Ring/Network Coupling 4.1 Variants of the ring/network coupling 4.1 Variants of the ring/network coupling In the one-Switch coupling configuration, the redundant coupling is performed by 2 ports of one device in the first ring/network coupled to 1 port each of 2 neighboring devices in a second ring/network segment (see fig. 20). One of the lines, the redundant line, is blocked for normal traffic during normal operation. When the main line becomes inoperable, the device immediately opens the redundant line. When the main line becomes functional again later, the redundant line is again blocked for normal traffic and the main line is used again. An error is detected and handled within 500 ms (typically 150 ms). In the two-Switch coupling configuration, the redundant coupling is performeded by 1 port each on two devices in the first ring/network to 1 port each of 2 neighboring devices in the second ring/network segment (see fig. 26). The device for the redundant line and the device for the main line use control packets to inform each other about their operating states, via the Ethernet or the control line. When the main line becomes inoperable, the redundant device (called the slave) opens the redundant line. When the main line becomes functional again later, the device for the main line informs the redundant device. The redundant line is again blocked for normal traffic and the main line is used again. An error is detected and handled within 500 ms (typically 150 ms). The type of coupling configuration is primarily determined by the topological conditions and the desired level of availability (see table 8). 48 31007126 - 03/2010 Ring/Network Coupling Application Disadvantage Advantage 4.1 Variants of the ring/network coupling One-Switch coupling Two-Switch coupling Two-Switch coupling with control line The 2 devices are in The 2 devices are in The 2 devices are in impractical topological practical topological practical topological positions. positions. positions. Therefore, putting a Installing a control line Installing a control line line between them would involve a lot of would not involve would involve a lot of effort. much effort. effort for two-Switch coupling. If the Switch configMore effort for More effort for connecting the two ured for the redundant connecting the 2 coupling becomes in- devices to the network devices to the network operable, no connec- (compared with one- (compared with oneSwitch and two-Switch tion remains between Switch coupling). the networks. coupling). Less effort involved in If one of the devices If one of the devices connecting the 2 configured for the re- configured for the redevices to the network dundant coupling be- dundant coupling be(compared with two- comes inoperable, the comes inoperable, the Switch coupling). coupled networks are coupled networks are still connected. still connected. Table 8: Selection criteria for the configuration types for redundant coupling Note: Choose a configuration based on topological conditions and the level of availability you require (see table 8). 31007126 - 03/2010 49 Ring/Network Coupling 4.2 Preparing a Ring/Network coupling 4.2 Preparing a Ring/Network coupling 4.2.1 STAND-BY switch All devices have a STAND-BY switch, with which you can define the role of the device within a Ring/Network coupling. Depending on the device type, this switch is either a DIP switch or a softwareonly setting (Redundancy:Ring/Network Coupling dialog). By setting this switch, you define whether the device performs the main coupling or the redundant coupling role within a Ring/Network coupling. You can find details on the DIP switches in the User Manual Installation. Device type TCSESM TCSESM-E STAND-BY switch type Selectable: DIP switch and software setting Software switch Table 9: Overview of the STAND-BY switch types Depending on the device and model, set the STAND-BY switch in accordance with the following table (see table 10): Note: In the following screenshots and diagrams, the following conventions are used: Blue color denotes devices or lines in the current scope, black color denotes devices or lines adjacent to the current scope, thick lines denote lines in the current scope, thin lines denote lines adjacent to the current scope, the dashed line denotes the redundant link, 50 31007126 - 03/2010 Ring/Network Coupling 4.2 Preparing a Ring/Network coupling the dotted line denotes the control line. Device with DIP switch DIP switch/software switch option Software switch Choice of main coupling or redundant coupling On “STAND-BY” DIP switch According to the option selected - on “STAND-BY” DIP switch or in the - Redundancy:Ring/Network Coupling dialog, by making selection in “Select configuration”. Note: These devices have a DIP switch, with which you can choose between the software configuration and the DIP switch configuration. You can find details on the DIP switches in the User Manual Installation. In the Redundancy:Ring/Network Coupling dialog Table 10: Setting the STAND-BY switch Select the Redundancy:Ring/Network Coupling dialog. You first select the configuration you want: One-Switch coupling (“1”), two-Switch coupling (“2”) or two-Switch coupling with control line (“3”), (see fig. 19). 31007126 - 03/2010 51 Ring/Network Coupling 4.2 Preparing a Ring/Network coupling Figure 19: Choosing the ring coupling configuration (when the DIP switch is off, or for devices without a DIP switch) For devices without DIP switches, the software settings are not restricted. For devices with DIP switches, depending on the DIP switch position, the dialog displays the possible configurations in color, while those configurations that are not possible appear in gray. The possible configurations are: DIP switch RM: ON or OFF, STAND-BY: OFF: Two-Switch coupling as master (with or without control line) DIP switch RM: OFF, STAND-BY: ON: One-Switch coupling and two-Switch coupling as slave (with or without control line) DIP switch RM: ON, STAND-BY: ON: DIP switches are deactivated, and the software settings are not restricted If you want to select one of the configurations that are not possible (grayed-out), you put the DIP switches on the device into another position and reload the dialog. Note: For reasons of redundancy reliability, do not use Rapid Spanning Tree and Ring/Network Coupling in combination. 52 31007126 - 03/2010 Ring/Network Coupling 4.2.2 4.2 Preparing a Ring/Network coupling One-Switch coupling 1 RM 5 3 6 4 I O STAND-BY 2 RM Figure 20: Example of one-Switch coupling 1: Backbone 2: Ring 3: Partner coupling port 4: Coupling port 5: Main Line 6: Redundant Line 31007126 - 03/2010 53 Ring/Network Coupling 4.2 Preparing a Ring/Network coupling RING-/NETWORK COUPLING LOOP HAZARD Configure all the devices that participate actively in the Ring-/Network Coupling individually. Before you connect the redundant line, you must complete the configuration of all the devices that participate actively in the Ring-/Network Coupling. Failure to follow these instructions can result in death, serious injury, or equipment damage. The coupling between two networks is performed by the main line (solid blue line) in the normal mode of operation, which is connected to the partner coupling port. If the main line becomes inoperable, the redundant line (dashed blue line), which is connected to the coupling port, takes over the ring/network coupling. The coupling switch-over is performed by one Switch. Select the Redundancy:Ring/Network Coupling dialog. Select "One-Switch coupling" by means of the dialog button with the same graphic as below (see fig. 21). 2 1 I O STAND-BY Figure 21: One-Switch-coupling 1: Coupling port 2: Partner coupling port The following settings apply to the Switch displayed in blue in the selected graphic. Select the partner coupling port (see fig. 22), (see table 11). With “Partner coupling port” you specify at which port you are connecting the main line. 54 31007126 - 03/2010 Ring/Network Coupling 4.2 Preparing a Ring/Network coupling The following tables show the selection options and default settings for the ports used in the Ring/Network coupling. Device TCSESM TCSESM-E Partner coupling port All ports (default setting: port 1.3) All ports (default setting: port 1.3) Coupling port All ports (default setting: port 1.4) All ports (default setting: port 1.4) Table 11: Port assignment for one-Switch coupling Note: Configure the partner coupling port and the ring redundancy ports on different ports. Select the coupling port (see fig. 28), (see table 11). With “Coupling port” you specify to which port you connect the remote network segment. Note: Configure the coupling port and the redundancy ring ports on different ports. Activate the function in the “Operation” frame (see fig. 28). Now connect the redundant line. The displays in the “Select port” frame mean (see fig. 22): – “Port mode”: The port is either active or in stand-by mode. – “Port state”: The port is either connected or not connected. The displays in the “Information” frame mean (see fig. 22): – “Redundancy existing”: If the main line becomes inoperable, the redundant line will then take over the function of the main line. – “Configuration failure”: The function is incomplete or incorrectly configured. 31007126 - 03/2010 55 Ring/Network Coupling 4.2 Preparing a Ring/Network coupling Figure 22: Selecting the port and enabling/disabling operation Note: The following settings are required for the coupling ports (you select the Basic Settings:Port Configuration dialog): – Port: on – Automatic configuration (autonegotiation): on for twisted-pair connections – Manual configuration: 100 Mbit/s FDX, 1 Gbit/s FDX, or 10 Gbit/s FDX, according to the port’s capabilities for glass fiber connections Note: If VLANs are configured, set the coupling and partner coupling ports’ VLAN configuration as follows: – in the dialog Switching:VLAN:Port Port VLAN ID 1 and „Ingress Filtering“ deactivated – in the dialog Switching:VLAN:Static VLAN-Membership U (Untagged) Redundancy mode In the “Redundancy Mode” frame, select (see fig. 23) – “Redundant Ring/Network Coupling” or – “Extended Redundancy”. 56 31007126 - 03/2010 Ring/Network Coupling 4.2 Preparing a Ring/Network coupling Figure 23: Selecting the redundancy mode With the “Redundant Ring/Network Coupling” setting, either the main line or the redundant line is active. The lines are never both active at the same time. With the “Extended Redundancy” setting, the main line and the redundant line are simultaneously active if the connection line between the devices in the connected (i.e., remote) network becomes inoperable (see fig. 24). During the reconfiguration period, packet duplications may occur. Therefore, select this setting only if your application detects package duplications. Figure 24: Extended redundancy Coupling mode The coupling mode indicates the type of the connected network. In the “Coupling Mode” frame, select (see fig. 25) – “Ring Coupling” or – “Network Coupling” 31007126 - 03/2010 57 Ring/Network Coupling 4.2 Preparing a Ring/Network coupling Figure 25: Selecting the coupling mode Select "Ring coupling" if you are connecting to a redundancy ring. Select "Network Coupling" if you are connecting to a line or tree structure. Delete coupling configuration The “Delete coupling configuration” button in the dialog allows you to reset all the coupling settings of the device to the state on delivery. 58 31007126 - 03/2010 Ring/Network Coupling 4.2.3 4.2 Preparing a Ring/Network coupling Two-Switch coupling RM 1 3 4 RM I O STAND-BY I O STAND-BY 2 Figure 26: Example of two-Switch coupling 1: Backbone 2: Ring 3: Main line 4: Redundant line 31007126 - 03/2010 59 Ring/Network Coupling 4.2 Preparing a Ring/Network coupling RING-/NETWORK COUPLING LOOP HAZARD Configure all the devices that participate actively in the Ring-/Network Coupling individually. Before you connect the redundant line, you must complete the configuration of all the devices that participate actively in the Ring-/Network Coupling. Failure to follow these instructions can result in death, serious injury, or equipment damage. The coupling between 2 networks is performed by the main line (solid blue line). If the main line or one of the adjacent Switches becomes inoperable, the redundant line (dashed black line) takes over coupling the 2 networks. The coupling is performed by two Switches. The switches send their control packages over the Ethernet. The Switch connected to the main line, and the Switch connected to the redundant line are partners with regard to the coupling. Connect the two partners via their ring ports. Select the Redundancy:Ring/Network Coupling dialog. Select "Two-Switch coupling“ by means of the dialog button with the same graphic as below (see fig. 27). 1 I O 2 STAND-BY Figure 27: Two-Switch coupling 1: Coupling port 2: Partner coupling port The following settings apply to the Switch displayed in blue in the selected graphic. 60 31007126 - 03/2010 Ring/Network Coupling 4.2 Preparing a Ring/Network coupling Select the coupling port (see fig. 28), (see table 12). With “Coupling port” you specify to which port you connect the remote network segment. For a device with DIP switches, you switch the STAND-BY switch to OFF or deactivate the DIP switches. Connect the main line to the coupling port. Device TCSESM TCSESM-E Coupling port Adjustable for all ports (default setting: port 1.4) Adjustable for all ports (default setting: port 1.4) Table 12: Port assignment for the redundant coupling (two-Switch coupling) Note: Configure the coupling port and the redundancy ring ports on different ports. Activate the function in the “Operation” frame (see fig. 28). Now connect the redundant line. The displays in the “Select port” frame mean (see fig. 28): – “Port mode”: The port is either active or in stand-by mode. – “Port state”: The port is either connected or not connected. – “IP Address”: The IP address of the partner, if the partner is already operating in the network. The displays in the “Information” frame mean (see fig. 28): – “Redundancy existing”: If the main line becomes inoperable, the redundant line will then take over the function of the main line. – “Configuration failure”: The function is incomplete or incorrectly configured. 31007126 - 03/2010 61 Ring/Network Coupling 4.2 Preparing a Ring/Network coupling Figure 28: Selecting the port and enabling/disabling operation To avoid continuous loops, the Switch sets the port state of the coupling port to “off” if you: – switch off the operation setting or – change the configuration while the connections are in operation at these ports. Note: The following settings are required for the coupling ports (you select the Basic Settings:Port Configuration dialog): – Port: on – Automatic configuration (autonegotiation): on for twisted-pair connections – Manual configuration: 100 Mbit/s FDX, 1 Gbit/s FDX, or 10 Gbit/s FDX, according to the port’s capabilities for glass fiber connections Note: If VLANs are configured, set the coupling and partner coupling ports’ VLAN configuration as follows: – in the dialog Switching:VLAN:Port Port VLAN ID 1 and „Ingress Filtering“ deactivated – in the dialog Switching:VLAN:Static VLAN-Membership U (Untagged) 62 31007126 - 03/2010 Ring/Network Coupling 4.2 Preparing a Ring/Network coupling Note: If you are operating the Ring Manager and two-Switch coupling functions at the same time, there is the possibility of creating a loop. Select "Two-Switch coupling“ by means of the dialog button with the same graphic as below (see fig. 27). 2 1 STAND-BY I O Figure 29: Two-Switch coupling 1: Coupling port 2: Partner coupling port The following settings apply to the Switch displayed in blue in the selected graphic. Select the coupling port (see fig. 28), (see table 12). With “Coupling port” you specify to which port you connect the remote network segment. For a device with DIP switches, you switch the STAND-BY switch to ON or deactivate the DIP switches. You connect the redundant line to the coupling port. Note: Configure the coupling port and the redundancy ring ports on different ports. 31007126 - 03/2010 63 Ring/Network Coupling 4.2 Preparing a Ring/Network coupling Activate the function in the “Operation” frame (see fig. 28). The displays in the “Select port” frame mean (see fig. 28): – “Port mode”: The port is either active or in stand-by mode. – “Port state”: The port is either connected or not connected. – “IP Address”: The IP address of the partner, if the partner is already operating in the network. The displays in the “Information” frame mean (see fig. 28): – “Redundancy existing”: If the main line becomes inoperable, the redundant line will then take over the function of the main line. – “Configuration failure”: The function is incomplete or incorrectly configured. To avoid continuous loops, the Switch sets the port state of the coupling port to "off” if you:: – switch off operation or – change the configuration while the connections are in operation at these ports. Note: The following settings are required for the coupling ports (you select the Basic Settings:Port Configuration dialog): – Port: on – Automatic configuration (autonegotiation): on for twisted-pair connections – Manual configuration: 100 Mbit/s FDX, 1 Gbit/s FDX, or 10 Gbit/s FDX, according to the port’s capabilities for glass fiber connections Note: If VLANs are configured, set the coupling and partner coupling ports’ VLAN configuration as follows: – in the dialog Switching:VLAN:Port Port VLAN ID 1 and „Ingress Filtering“ deactivated – in the dialog Switching:VLAN:Static VLAN-Membership U (Untagged) Note: If you are operating the Ring Manager and two-Switch coupling functions at the same time, there is the possibility of creating a loop. 64 31007126 - 03/2010 Ring/Network Coupling 4.2 Preparing a Ring/Network coupling Redundancy mode In the “Redundancy Mode” frame, select (see fig. 30) – “Redundant Ring/Network Coupling” or – “Extended Redundancy”. Figure 30: Selecting the redundancy mode With the “Redundant Ring/Network Coupling” setting, either the main line or the redundant line is active. The lines are never both active at the same time. With the “Extended Redundancy” setting, the main line and the redundant line are simultaneously active if the connection line between the devices in the connected (i.e., remote) network becomes inoperable (see fig. 31). During the reconfiguration period, packet duplications may occur. Therefore, select this setting only if your application detects package duplications. Figure 31: Extended redundancy 31007126 - 03/2010 65 Ring/Network Coupling 4.2 Preparing a Ring/Network coupling Coupling mode The coupling mode indicates the type of the connected network. In the “Coupling Mode” frame, select (see fig. 32) – “Ring Coupling” or – “Network Coupling” Figure 32: Selecting the coupling mode Select "Ring coupling" if you are connecting to a redundancy ring. Select "Network Coupling" if you are connecting to a line or tree structure. Delete coupling configuration The “Delete coupling configuration” button in the dialog allows you to reset all the coupling settings of the device to the state on delivery. 66 31007126 - 03/2010 Ring/Network Coupling 4.2.4 4.2 Preparing a Ring/Network coupling Two-Switch Coupling with Control Line RM 1 3 4 5 RM I O STAND-BY I O STAND-BY 2 Figure 33: Example of Two-Switch coupling with control line 1: Backbone 2: Ring 3: Main line 4: Redundant line 5: Control line 31007126 - 03/2010 67 Ring/Network Coupling 4.2 Preparing a Ring/Network coupling RING-/NETWORK COUPLING LOOP HAZARD Configure all the devices that participate actively in the Ring-/Network Coupling individually. Before you connect the redundant line, you must complete the configuration of all the devices that participate actively in the Ring-/Network Coupling. Failure to follow these instructions can result in death, serious injury, or equipment damage. The coupling between 2 networks is performed by the main line (solid blue line). If the main line or one of the adjacent Switches becomes inoperable, the redundant line (dashed black line) takes over coupling the 2 networks. The coupling is performed by two Switches. The Switches send their control packets over a control line (dotted line). The Switch connected to the main line, and the Switch connected to the redundant line are partners with regard to the coupling. Connect the two partners via their ring ports. Select the Redundancy:Ring/Network Coupling dialog. Select „Two-Switch coupling with control line“ by means of the dialog button with the same graphic as below (see fig. 34). 1 I O 3 2 STAND-BY Figure 34: Two-Switch coupling with control line 1: Coupling port 2: Partner coupling port 3: Control line The following settings apply to the Switch displayed in blue in the selected graphic. 68 31007126 - 03/2010 Ring/Network Coupling 4.2 Preparing a Ring/Network coupling Select the coupling port (see fig. 35), (see table 13). With “Coupling port” you specify to which port you connect the remote network segment. For a device with DIP switches, you switch the STAND-BY switch to OFF or deactivate the DIP switches. Connect the main line to the coupling port. Select the control port (see fig. 35), (see table 13). With “Control port” you specify to which port you connect the control line. Device TCSESM TCSESM-E Coupling port Adjustable for all ports (default setting: port 1.4) Adjustable for all ports (default setting: port 1.4) Control port Adjustable for all ports (default setting: port 1.3) Adjustable for all ports (default setting: port 1.3) Table 13: Port assignment for the redundant coupling (two-Switch coupling with control line) Note: Configure the coupling port and the redundancy ring ports on different ports. Activate the function in the “Operation” frame (see fig. 28). Now connect the redundant line and the control line. The displays in the “Select port” frame mean (see fig. 35): – “Port mode”: The port is either active or in stand-by mode. – “Port state”: The port is either connected or not connected. – “IP Address”: The IP address of the partner, if the partner is already operating in the network. The displays in the “Information” frame mean (see fig. 22): – “Redundancy existing”: If the main line becomes inoperable, the redundant line will then take over the function of the main line. – “Configuration failure”: The function is incomplete or incorrectly configured. 31007126 - 03/2010 69 Ring/Network Coupling 4.2 Preparing a Ring/Network coupling Figure 35: Selecting the port and enabling/disabling operation To avoid continuous loops, the Switch sets the port state of the coupling port to “off” if you: – switch off the operation setting or – change the configuration while the connections are in operation at these ports. Note: The following settings are required for the coupling ports (you select the Basic Settings:Port Configuration dialog): – Port: on – Automatic configuration (autonegotiation): on for twisted-pair connections – Manual configuration: 100 Mbit/s FDX, 1 Gbit/s FDX, or 10 Gbit/s FDX, according to the port’s capabilities for glass fiber connections Note: If VLANs are configured, set the coupling and partner coupling ports’ VLAN configuration as follows: – in the dialog Switching:VLAN:Port Port VLAN ID 1 and „Ingress Filtering“ deactivated – in the dialog Switching:VLAN:Static VLAN-Membership U (Untagged) 70 31007126 - 03/2010 Ring/Network Coupling 4.2 Preparing a Ring/Network coupling Select "Two-Switch coupling with control line“ by means of the dialog button with the same graphic as below (see fig. 36). 3 2 1 STAND-BY I O Figure 36: Two-Switch coupling with control line 1: Coupling port 2: Partner coupling port 3: Control line The following settings apply to the Switch displayed in blue in the selected graphic. Select the coupling port (see fig. 35), (see table 13). With “Coupling port” you specify to which port you connect the remote network segment. For a device with DIP switches, you switch the STAND-BY switch to ON or deactivate the DIP switches. You connect the redundant line to the coupling port. Select the control port (see fig. 35), (see table 13). With “Control port” you specify to which port you connect the control line. Note: Configure the coupling port and the redundancy ring ports on different ports. Activate the function in the “Operation” frame (see fig. 28). Now connect the redundant line and the control line. The displays in the “Select port” frame mean (see fig. 35): – “Port mode”: The port is either active or in stand-by mode. – “Port state”: The port is either connected or not connected. – “IP Address”: The IP address of the partner, if the partner is already operating in the network. 31007126 - 03/2010 71 Ring/Network Coupling 4.2 Preparing a Ring/Network coupling The displays in the “Information” frame mean (see fig. 22): – “Redundancy existing”: If the main line becomes inoperable, the redundant line will then take over the function of the main line. – “Configuration failure”: The function is incomplete or incorrectly configured. To avoid continuous loops, the Switch sets the port state of the coupling port to “off” if you: – switch off the operation setting or – change the configuration while the connections are in operation at these ports. Note: The following settings are required for the coupling ports (you select the Basic Settings:Port Configuration dialog): – Port: on – Automatic configuration (autonegotiation): on for twisted-pair connections – Manual configuration: 100 Mbit/s FDX, 1 Gbit/s FDX, or 10 Gbit/s FDX, according to the port’s capabilities for glass fiber connections Note: If VLANs are configured, set the coupling and partner coupling ports’ VLAN configuration as follows: – in the dialog Switching:VLAN:Port Port VLAN ID 1 and „Ingress Filtering“ deactivated – in the dialog Switching:VLAN:Static VLAN-Membership U (Untagged) Redundancy mode In the “Redundancy Mode” frame, select (see fig. 37) – “Redundant Ring/Network Coupling” or – “Extended Redundancy”. 72 31007126 - 03/2010 Ring/Network Coupling 4.2 Preparing a Ring/Network coupling Figure 37: Selecting the redundancy mode With the “Redundant Ring/Network Coupling” setting, either the main line or the redundant line is active. The lines are never both active at the same time. With the “Extended Redundancy” setting, the main line and the redundant line are simultaneously active if the connection line between the devices in the connected (i.e., remote) network becomes inoperable (see fig. 38). During the reconfiguration period, packet duplications may occur. Therefore, select this setting only if your application detects package duplications. Figure 38: Extended redundancy Coupling mode The coupling mode indicates the type of the connected network. In the “Coupling Mode” frame, select (see fig. 39) – “Ring Coupling” or – “Network Coupling” 31007126 - 03/2010 73 Ring/Network Coupling 4.2 Preparing a Ring/Network coupling Figure 39: Selecting the coupling mode Select "Ring coupling" if you are connecting to a redundancy ring. Select "Network Coupling" if you are connecting to a line or tree structure. Delete coupling configuration The “Delete coupling configuration” button in the dialog allows you to reset all the coupling settings of the device to the state on delivery. 74 31007126 - 03/2010 Rapid Spanning Tree 5 Rapid Spanning Tree Note: The Spanning Tree and Rapid Spanning Tree protocols based on IEEE 802.1D-2004 and IEEE 802.1w respectively are protocols for MAC bridges. For this reason, the following description of these protocols usually employs the term bridge instead of switch. Local networks are getting bigger and bigger. This applies to both the geographical expansion and the number of network participants. Therefore, it usually makes sense to use multiple bridges, for example: to reduce the network load in sub-areas, to set up redundant connections and to overcome distance limitations. However, using multiple bridges with multiple redundant connections between the subnetworks can lead to loops that can stop communications on the network. The Rapid Spanning Tree Protocol (RSTP) enables redundancy by interrupting these loops. RSTP is a further development of the Spanning Tree Protocol (STP) and is compatible with it. If communication is unable to pass through a connection or a bridge, the STP takes up to 30 seconds to reconfigure. This was no longer acceptable in time-sensitive applications. The STP was therefore developed to the RSTP, leading to average reconfiguration times of less than a second. If you use RSTP in a ring topology with 10 to 20 devices, you can achieve reconfiguration times in the range of milliseconds. Note: RSTP resolves a given topology to a tree structure (Spanning Tree). The number of devices in a branch (from the root to the branch tip) is limited by the parameter Max Age. The default value for Max Age is 20, it can be increased to 40. If the root device becomes inoperable and another device takes over the root function, the maximum possible number of devices in a branch will be limited by the new root’s Max Age setting. 31007126 - 03/2010 75 Rapid Spanning Tree Note: The RSTP Standard dictates that all the devices within a network work with the (Rapid) Spanning Tree Algorithm. However, if STP and RSTP are used at the same time, the advantages of faster reconfiguration with RSTP are lost. Note: Due to a change in the IEEE 802.1D-2004 standard on which RSTP is based, the Standards Commission has reduced the maximum value for the “Hello Time” from 10 to 2. When firmware versions prior to 5.x are upgraded to version 5.x or higher, the firmware automatically changes a locally entered “Hello Time” value > 2 to 2. If the device is not the RSTP root, “Hello Time” values greater than 2 can remain valid, depending on the firmware version of the root device. 76 31007126 - 03/2010 Rapid Spanning Tree 5.1 The Spanning Tree Protocol 5.1 The Spanning Tree Protocol Because RSTP is a further development of the STP, all the following descriptions of the STP also apply to the RSTP. 5.1.1 The tasks of the STP The Spanning Tree algorithm reduces network topologies that are set up using bridges, and that have ring structures with redundant connections, to a tree structure. In doing this, STP divides up the ring structures on the basis of specified rules by deactivating redundant paths. If a path is interrupted by mistake, the STP reactivates the path just deactivated. This enables redundant connections for increased communication availability. In forming the tree structure, the STP determines what is known as a root bridge. This forms the basis of the STP tree structure. Features of the STP algorithm: automatic reconfiguration of the tree structure in the case of a bridge becoming inoperable or the interruption of a data path the tree structure is stabilized up to the maximum network size (up to 39 hops, depending on the setting for Max Age, (see table 16) stabilization is achieved within a short time period topology can be specified and reproduced by the administrator transparency for the terminal devices low network load relative to the available transmission capacity due to the tree structure created 31007126 - 03/2010 77 Rapid Spanning Tree 5.1.2 5.1 The Spanning Tree Protocol Bridge parameters Each bridge is uniquely described by the parameters: Bridge Identifier Root Path Costs for the bridge ports Port Identifier 5.1.3 Bridge Identifier The Bridge Identifier consists of 8 bytes. The 2 highest-value bytes are the priority. The default setting for the priority number is 32,768, but the Management Administrator can change this when configuring the network. The 6 lowest-value bytes of the bridge identifier are the bridge’s MAC address. The MAC address allows each bridge to have unique bridge identifiers. The bridge with the smallest number for the bridge identifier has the highest priority. MSB LSB 80 00 Priority 00 80 63 51 74 00 MAC Address Figure 40: Bridge Identifier, Example (values in hexadecimal notation) 78 31007126 - 03/2010 Rapid Spanning Tree 5.1.4 5.1 The Spanning Tree Protocol Root Path Costs Each path that connects 2 bridges is assigned a cost for the transmission (path cost). The Switch determines this value based on the transmission speed (see table 14). It assigns a higher path cost to paths with lower transmission speeds. Alternatively, the Administrator can set the path cost. Like the Switch, the Administrator assigns a higher path cost to paths with lower transmission speeds. However, since the Administrator can choose this value freely, he has a tool with which he can give a certain path an advantage among redundant paths. The root path cost is the sum of all the individual path costs for all paths a data packet travels between the connected port of a bridge and the root bridge. Bridge 1 PC = 200 000 PC = 2 000 000 PC Path costs Ethernet (100 Mbit/s) PC = 200 000 Bridge 2 Ethernet (10 Mbit/s) Bridge 3 Figure 41: Path costs 31007126 - 03/2010 79 Rapid Spanning Tree Data rate <=100 kBit/s 1 MBit/s 10 MBit/s 100 MBit/s 1 GBit/s 10 GBit/s 100 GBit/s 1 TBit/s 10 TBit/s Recommended value 200,000,000a 20,000,000a 2,000,000a 200,000a 20,000 2,000 200 20 2 5.1 The Spanning Tree Protocol Recommended range 20,000,000-200,000,000 2,000,000-200,000,000 200,000-20,000,000 20,000-2,000,000 2,000-200,000 200-20,000 20-2,000 2-200 1-20 Possible range 1-200,000,000 1-200,000,000 1-200,000,000 1-200,000,000 1-200,000,000 1-200,000,000 1-200,000,000 1-200,000,000 1-200,000,000 Table 14: Recommended path costs for RSTP based on the data rate. a. Bridges conforming to IEEE 802.1D-1998 that only support 16-bit values for path costs should use the value 65,535 for path costs when they are used in conjunction with bridges that support 32-bit values for the path costs. 5.1.5 Port Identifier The Port Identifier consists of 2 bytes. One part, the least-significant byte, contains the physical port number. This provides a unique identifier for each port of the bridge. The second part is the port priority, which can be set by the Administrator (default value: 128). It also applies here that the port with the smallest number for the port identifier has the highest priority. MSB LSB Priority Port number Figure 42: Port Identifier 80 31007126 - 03/2010 Rapid Spanning Tree 5.2 Rules for Creating the Tree Structure 5.2 Rules for Creating the Tree Structure 5.2.1 Bridge information To determine the tree structure, the bridges need more detailed information about the other bridges located in the network. To obtain this information, each bridge sends a BPDU (Bridge Protocol Data Unit) to the other bridges. The contents of a BPDU include bridge identifier, root path costs and port identifier (see IEEE 802.1D). 5.2.2 Setting up the tree structure The bridge with the smallest number for the bridge identifier is called the root bridge. It is (or will become) the root of the tree structure. The structure of the tree depends on the root path costs. STP selects the structure so that the path costs between each individual bridge and the root bridge become as small as possible. If more than 1 path exists with the same root path costs, the priority of the bridge identifier for the bridge connected to one of these paths decides which bridge should block. 31007126 - 03/2010 81 Rapid Spanning Tree 5.2 Rules for Creating the Tree Structure Of more than 1 path with the same root path costs originate from a bridge, the port identifier is used as the last criterion (see fig. 42). This decides which port is selected. Determine root path Equal path costs? no Path with lowest path costs = root path no Path with highest priority in bridge identification = root path no Path with highest port priority = root path yes Equal priority in bridge identification? yes Equal port priority? yes Path with lowest port number = root path Root path determined Figure 43: Flow diagram for specifying the root path 82 31007126 - 03/2010 Rapid Spanning Tree 5.3 Example of Root Path Determination 5.3 Example of Root Path Determination The network plan (see fig. 44) can be used to create the flow diagram (see fig. 43) for defining the root path. The Administrator has defined a different priority for for each bridge’s bridge identifier. The bridge with the smallest number for the bridge identifier will become the root bridge, in this case bridge 1. In the example, all the sub-paths have the same path costs. The path between bridge 2 and bridge 3 isblocked, because a connection from bridge 3 to the root bridge via bridge 2 has a higher path cost. The path from bridge 6 to the root bridge is interesting: The path via bridge 5 and bridge 3 create the same root path costs as the path via bridge 4 and bridge 2. The path via bridge 4 is selected because the value 28,672 for its priority in the bridge identifier is smaller than value 32,768. However, there are also 2 paths between bridge 6 and bridge 4. The port identifier is decisive here. 31007126 - 03/2010 83 Rapid Spanning Tree 5.3 Example of Root Path Determination P-BID = 16 384 Bridge 1 P-BID = 20 480 P-BID = 24 576 Bridge 2 Bridge 3 P-BID = 40 960 Bridge 7 P-BID = 28 672 Port 3 Bridge 4 P-BID = 32 768 Bridge 5 Port 1 P-BID P-BID = 36 864 Port 2 Priority of the bridge identifikation (BID) = BID without MAC Address Root path Interrupted path Bridge 6 Figure 44: Example of root path determination 84 31007126 - 03/2010 Rapid Spanning Tree 5.4 Example of Root Path Manipulation 5.4 Example of Root Path Manipulation The network plan (see fig. 44) can be used to create the flow diagram (see fig. 43) for defining the root path. The Administrator – left the default value of 32,768 for each bridge except for bridge 1, – bridge 1 value was set to 16,384, thus making it the root bridge. In the example, all the sub-paths have the same path costs. The path between bridge 2 and bridge 3 is blocked by the protocol because a connection from bridge 3 to the root bridge via bridge 2 has a higher path cost. The path from bridge 6 to the root bridge is interesting: The path via bridge 5 and bridge 3 creates the same root path costs as the path via bridge 4 and bridge 2. STP selects the path using the bridge that has the lowest MAC address in the bridge identification (bridge 4 in the illustration). However, there arealso 2 paths between bridge 6 and bridge 4. The port identifier is decisive here. Note: Because the Administrator does not change the default values for the priorities of the bridges in the bridge identifier, apart from the value for the root bridge, the MAC address in the bridge identifier alone determines which bridge becomes the new root bridge if the root bridge becomes inoperable. 31007126 - 03/2010 85 Rapid Spanning Tree 5.4 Example of Root Path Manipulation P-BID = 16 384 Bridge 1 P-BID = 32 768 P-BID = 32 768 Bridge 2 Bridge 3 P-BID = 32 768 Bridge 7 P-BID = 32 768 Port 3 Bridge 4 P-BID = 32 768 Bridge 5 Port 1 P-BID P-BID = 32 768 Port 2 Priority of the bridge identifikation (BID) = BID without MAC Address Root path Interrupted path Bridge 6 Figure 45: Example of root path manipulation 86 31007126 - 03/2010 Rapid Spanning Tree 5.5 Example of Tree Structure Manipulation 5.5 Example of Tree Structure Manipulation The Management Administrator soon discovers that this configuration with bridge 1 as the root bridge (see on page 83 “Example of Root Path Determination“) is unfavorable. On the paths from bridge 1 to bridge 2 and bridge 1 to bridge 3, the control packets which the root bridge sends to all other bridges are adding up. If the Management Administrator makes bridge 2 the root bridge, the burden of the control packets on the subnetworks is distributed much more evenly. The result is the configuration shown here (see fig. 46). The distances between the individual bridges and the root bridge are now shorter. P-BID = 16 384 Bridge 2 P-BID = 40 960 P-BID = 20 480 Port 2 P-BID = 24 576 P-BID = 32 768 Bridge 3 Bridge 1 Bridge 4 Bridge 7 Port 1 P-BID P-BID = 36 864 Port 3 P-BID = 28 672 Bridge 6 Bridge 5 Priority of the bridge identifikation (BID) = BID without MAC Address Root path Interrupted path Figure 46: Example of tree structure manipulation 31007126 - 03/2010 87 Rapid Spanning Tree 5.6 The Rapid Spanning Tree Protocol 5.6 The Rapid Spanning Tree Protocol The RSTP uses the same algorithm for determining the tree structure as STP. RSTP merely changes parameters, and adds new parameters and mechanism that speed up the reconfiguration if a link or bridge becomes inoperable. The ports play a significant role in this context. 5.6.1 Port roles RSTP assigns each bridge port one of the following roles (see fig. 47): Root port This is the port on which a bridge receives data packets with the lowest path costs from the root bridge. If there is more than 1 port with the same low path costs, the bridge identifier determines which port is the root port. If there is more than 1 port with the same low path costs connected to the same bridge, the port identifier determines which port is the root port (see fig. 43). The root bridge itself does not have a root port. Designated port The bridge in a network segment that has the lowest root path costs is the designated bridge. If more than 1 bridge has the same root path costs, the bridge with the smallest value bridge identifier becomes the designated bridge. The port on this bridge that connects it to a network segment leading to the root bridge, is the designated port. 88 31007126 - 03/2010 Rapid Spanning Tree 5.6 The Rapid Spanning Tree Protocol Edge port Every network segment with no additional RSTP bridges is connected with exactly one designated port. In this case, this designated port is also an edge port. The distinction of an edge port is the fact that it does not receive any RST BPDUs (Rapid Spanning Tree Bridge Protocol Data Units). Alternate port This is a blocked port that takes over the task of the bridge port if the connection to the root bridge is lost. The alternate port provides a backup connection to the root bridge. Backup port This is a blocked port that serves as a backup in case the connection to the designated port of this network segment (without any RSTP bridges) is lost Disabled port This is the port that does not participate in the Spanning Tree Operation, i.e., is switched off or does not have any connection. 31007126 - 03/2010 89 Rapid Spanning Tree 5.6 The Rapid Spanning Tree Protocol P-BID = 16 384 Bridge 1 P-BID = 20 480 P-BID = 24 576 Bridge 2 Bridge 3 P-BID = 28 672 P-BID = 32 768 P-BID = 40 960 Bridge 7 P-BID Port 2 Priority of the bridge identifikation (BID) = BID without MAC Address Root path Bridge 4 Port 1 Bridge 5 Interrupted path Root port Designated port Alternate port Backup port Edge port Figure 47: Port role assignment 5.6.2 Port states Depending on the tree structure and the state of the selected connection paths, the RSTP assigns the ports their states. 90 31007126 - 03/2010 Rapid Spanning Tree STP port state DISABLED DISABLED BLOCKING LISTENING LEARNING FORWARDING Administrative bridge port state Disabled Enabled Enabled Enabled Enabled Enabled 5.6 The Rapid Spanning Tree Protocol MAC RSTP operational Port state FALSE FALSE TRUE TRUE TRUE TRUE Discardinga Discardinga Discardingb Discardingb Learning Forwarding Active topology (port role) Excluded (disabled) Excluded (disabled) Excluded (alternate, backup) Included (root, designated) Included (root, designated) Included (root, designated) Table 15: Relationship between port state values for STP and RSTP a. The dot1d MIB shows “Disabled b. The dot1d MIB shows “Blocked” Meaning of the RSTP port states: Disabled: port does not belong to the active topology Discarding: no address learning in FDB, no data traffic except BPDUs Learning: address learning active (FDB), no data traffic except BPDUs Forwarding: address learning active (FDB), sending and receiving of all frame types (not only BPDUs) 5.6.3 Spanning Tree Priority Vector To assign roles to the ports, the RSTP bridges exchange configuration information with each other. This information is known as the Spanning Tree Priority Vector. It is part of the RST BPDUs and contains the following information: Bridge identifier of the root bridge Root path costs for the sending bridge Bridge identifier for the sending bridge Port identifiers of the port through which the message was sent Port identifiers of the port that has received the message 31007126 - 03/2010 91 Rapid Spanning Tree 5.6 The Rapid Spanning Tree Protocol Based on this information, the bridges participating in RSTP are able to determine port roles autonomously and define their local ports’ states. 5.6.4 Fast reconfiguration Why can RSTP react faster than STP to an interruption of the root path? Introduction of edge ports: During a reconfiguration, RSTP sets an edge port to the transmission mode after 3 seconds and then waits for the “Hello Time” (see table 16) to elapse, to ascertainthat no BPDU-sending bridge is connected. When the user ascertains that a terminal device is connected at this port and will remain connected, he can switch off RSTP at this port. Thus no waiting times occur at this port in the case of a reconfiguration. Introduction of alternate ports: As the port roles are already determined in normal operation, a bridge can immediately switch from the root port to the alternate port after the connection to the root bridge is lost. Communication with neighboring bridges (point-to-point connections): The decentralized, direct communication between neighboring bridges enables immediate reaction to status changes in the spanning tree architecture. Address table: With STP, the age of the entries in the address table determines the updating of the communication. RSTP immediately deletes the entries for those ports affected by a reconfiguration. Reaction to events: Without having to adhere to any time specifications, RSTP immediately reacts to events such as connection interruptions, connection reinstatements, and the like. 92 31007126 - 03/2010 Rapid Spanning Tree 5.6 The Rapid Spanning Tree Protocol Note: The drawback for this fast reconfiguration is the possibility that data packets may be duplicated or their sequence be altered during the reconfiguration phase. If this is unacceptable for your application, use the slower Spanning Tree Protocol or select one of the other, faster redundancy procedures described in this manual. 5.6.5 Configuring the Rapid Spanning Tree Set up the network to meet your demands. RSTP LOOP HAZARD Configure all the devices of the RSTP configuration individually. Before you connect the redundant lines, you must complete the configuration of all devices in the RSTP configuration. Failure to follow these instructions can result in death, serious injury, or equipment damage. For devices with DIP switches, you switch these to “deactivated” (both to ON), so that the software configuration is not restricted. Select the Redundancy:Rapid Spanning Tree:Global dialog. 31007126 - 03/2010 93 Rapid Spanning Tree 5.6 The Rapid Spanning Tree Protocol Switch on RSTP on each device Figure 48: Operation on/off Define the desired Switch as the root bridge by assigning it the lowest priority in the bridge information among all the bridges in the network, in the “Protocol Configuration/Information” frame. Note that only multiples of 4.096 can be entered for this value (see table 16). In the “Root Information” frame, the dialog shows this device as the root. A root switch has no root port and a root cost of 0. If necessary, change the default priority value of 32,768 in other bridges in the network in the same way to the value you want (multiples of 4.096). For each of these bridges, check the display in the “Root Information” frame: – Root-ID: Displays the root bridge’s bridge identifier – Root Port: Displays the port leading to the root bridge – Root Cost: Displays the root cost to the root bridge in the “Protocol Configuration/Information” frame: – Priority: Displays the priority in the bridge identifier for this bridge – MAC Address: Displays the MAC address of this Switch – Topology Changes: Displays the number of changes since the start of RSTP – Time since last change: Displays the time that has elapsed since the last network reconfiguration 94 31007126 - 03/2010 Rapid Spanning Tree 5.6 The Rapid Spanning Tree Protocol If necessary, change the values for “Hello Time”, “Forward Delay” and “Max. Age” on the rootbridge. The root bridge then transfers this data to the other bridges. The dialog displays the data received from the root bridge in the left column. In the right column you enter the values which shall apply when this bridge becomes the root bridge. For the configuration, take note of table 16. Figure 49: Assigning Hello Time, Forward Delay and Max. Age The times entered in the RSTP dialog are in units of 1 s Example: a Hello Time of 2 corresponds to 2 seconds. Now connect the redundant lines. 31007126 - 03/2010 95 Rapid Spanning Tree Parameter Priority Meaning The priority and the MAC address go together to make up the bridge identification. Hello Time The left column shows the value currently being used by the root bridge. The device periodically receives configuration frames (Hello frames) from the root bridge. The Hello Time shows the time between 2 successive configuration frames sent by the root bridge. If you configure the current device as the root bridge, the other devices in the entire network will assume the value in the right column. Forward Delay The left column shows the value currently being used by the root bridge. The predecessor protocol STP used the parameter to control (delay) the transition time between the states "disabled“, "blocking“, "learning“, "forwarding“. Since the introduction of RSTP, this parameter has only secondary relevance because state transitions are negotiated between RSTP bridges without a given time delay. If you configure the current device as the root bridge, the other devices in the entire network will assume the value in the right column. Max Age The left column shows the value currently being used by the root bridge. Contrary to the past (STP) meaning, Max Age now (for RSTP) denotes the maximum permissible branch length (number of devices to the root bridge). If you configure the current device as the root bridge, the other devices in the entire network will assume the value in the right column. 5.6 The Rapid Spanning Tree Protocol Value range 0 < n*4,096 < 61,440 Default setting 32,768 1-2s 2s 4 - 30 s (see a:) 30 s 6 - 40 s (see a:) 6s Table 16: Global RSTP settings 96 31007126 - 03/2010 Rapid Spanning Tree 5.6 The Rapid Spanning Tree Protocol Diameter = 7 1 1 2 2 3 3 4 4 5 5 1 Age = 5 6 2 7 3 4 Age = 4 = Root Figure 50: Definition of diameter and age The diameter is the number of connections between the two devices furthest away from the root bridge. The parameters – Forward Delay and – Max Age have a relationship to each other: Forward Delay >= (Max Age/2) + 1 If you enter values that contradict this relationship, the device then replaces these values with a default value or with the last valid values. When necessary, change and verify the settings and displays that relate to each individual port (dialog: Rapid Spanning Tree:Port). 31007126 - 03/2010 97 Rapid Spanning Tree 5.6 The Rapid Spanning Tree Protocol Figure 51: Configuring RSTP per port Note: Deactivate the Spanning Tree Protocol on the ports connected to a redundant ring, because Spanning Tree and Ring Redundancy work with different reaction times. 98 31007126 - 03/2010 Rapid Spanning Tree Parameter STP State Enable Port State Priority Meaning Here you can turn RSTP on or off for this port. If you turn RSTP off for this port while RSTP is globally enabled for the device, the device will discard RSTP frames received on this port. Displays the port state Here you enter the first byte of the port identification. Port Path Cost Enter the path costs to indicate preference for redundant paths. If the value is 0, the Switch automatically calculates the path costs according to the transmission rate. Admin Edge If the parameter is set to "true“, the Port port will transition to the forwarding state. If the port nevertheless receives an RSTP frame, it will transition to the blocking state and the bridge will then determine the new port role. .If the parameter’s value is "false“, the port remains in the blocked state until the bridge has determined the port role. Only after that will the port transition to its final state. Oper Edge Port Is "true“ if no RSTP frames have been received, i. e., a terminal device that does notsend RSTP frames is connected to this port. Is "false“ if RSTP frames have been received, i. e., no terminal device but a bridge is connected. Auto Edge Port The setting for Auto Edge Port only takes effect if the parameter "Oper Edge Port“ has been set to "false“. if "Auto Edge Port“ is set to "true“, the port will transition to the forwarding state within 1.5 * Hello Time (3 seconds). If is is set to "false“, it will take 30 seconds until the edge port forwards data frames. 5.6 The Rapid Spanning Tree Protocol Value range on, off Default setting on disabled, forwarding, discarding, blocking, learning 16 < n*16 < 240 - 128 0 - 200,000,000 0 true, false false true, false - true, false false Table 17: Port-related RSTP settings and displays 31007126 - 03/2010 99 Rapid Spanning Tree Parameter Oper PointToPoint Meaning If this port has a full-duplex link to another RSTP device, the value for "Oper PointToPoint“ will become "true“, else it will become "false“ (e.g., if a hub is connected). A Pointto-point connection is a direct connection between 2 RSTP devices. The direct, local communications between the 2 switches results in a short reconfiguration time. Designated Displays the bridge identification of Root the designated root bridge for this port. Designated Display of the costs for the path from Cost this port to the root Switch. Designated Port Display of the port identifier (on the designated Switch) of the port that connects to the root bridge - for the local port. 5.6 The Rapid Spanning Tree Protocol Value range true, false Default setting auto (is calculated): FDX: true HDX: false Bridge identification (hexadecimal) - Cost - Port identification (hexadecimal) and port number - Table 17: Port-related RSTP settings and displays 100 31007126 - 03/2010 Rapid Spanning Tree 5.7 Combining RSTP and MRP 5.7 Combining RSTP and MRP In the MRP compatibility mode, the device allows you to combine RSTP with MRP. With the combination of RSTP and MRP, the fast switching times of MRP are maintained. The RSTP diameter (see fig. 50) depends on the “Max Age”. It applies to the devices outside the MRP-Ring. Note: The combination of RSTP and MRP presumes that both the root bridge and the backup root bridge are located within the MRP-Ring. RM 1 2 Figure 52: Combination of RSTP and MRP 1: MRP-Ring 2: RSTP-Ring RM: Ring Manager To combine RSTP with MRP, you perform the following steps in sequence: Configure MRP on each device in the MRP-Ring. Activate RSTP on the RSTP ports and on the MRP-Ring ports. 31007126 - 03/2010 101 Rapid Spanning Tree 5.7 Combining RSTP and MRP Configure the RSTP root bridge and the RSTP backup root bridge in the MRP-Ring: – Set the priority. – If you exceed the RSTP diameter specified by the default value of Max Age = 20, modify “Max Age” and “Forward Delay” accordingly. Activate RSTP globally. Activate the MRP compatibility mode. After configuring all the participating devices, connect the redundant RSTP connection. 5.7.1 Application example for the combination of RSTP and MRP The figure (see fig. 53) shows an example for the combination of RSTP and MRP. Table 18: Values for the switch configuration in the MRP/RSTP example Parameter MRP settings Ring redundancy: MRP version Ring port 1 Ring port 2 Port from MRP-Ring to the RSTP net Redundancy Manager mode MRP operation RSTP settings For each RSTP port: STP State Enable Protocol Configuration: Priority (S2<S1<S3 and S2<S1<S4) RSTP:Global: Operation RSTP:Global: MRP compatibility 102 S1 S2 S3 S4 S5 S6 MRP 1.2 1.1 1.3 On On MRP 1.1 1.2 1.3 Off On – Off MRP 1.1 1.2 Off On MRP 1.1 1.2 Off On – Off On 4,096 On 0 On On On On 32,768 32,768 32.768 32.768 On On On On On – On – On On On On 31007126 - 03/2010 Rapid Spanning Tree 5.7 Combining RSTP and MRP Prerequisities for further configuration: You have configured the MRP settings for the devices in accordance with the above table. The MRP-Ring’s redundant line is connected. S5 S6 1.2 1.1 1.1 S1 RM 1.1 1.2 1.1 1.2 1 1.2 1.3 1.3 S2 2 1.1 S3 1.2 1.1 3 1.2 S4 Figure 53: Application example for the combination of RSTP and MRP 1: MRP-Ring, 2: RSTP-Ring, 3: Redundant RSTP connection RM: Ring Manager S2 is RSTP Root Bridge S1 is RSTP Backup Root Bridge 31007126 - 03/2010 103 Rapid Spanning Tree 5.7 Combining RSTP and MRP Activate RSTP at the ports, using S1 as an example. enable configure interface 1/1 spanning-tree port mode exit interface 1/2 spanning-tree port mode exit interface 1/3 spanning-tree port mode exit Switch to the Privileged EXEC mode. Switch to the Configuration mode. Switch to the Interface Configuration mode of interface 1/1. Activate RSTP on the port. Switch to the Configuration mode. Switch to the interface configuration mode for port 1.2. Activate RSTP on the port. Switch to the Configuration mode. Switch to the interface configuration mode for port 1.3. Activate RSTP on the port. Switch to the Configuration mode. Configure the global settings, using S1 as an example: – the RSTP priority – global operation – the MRP compatibility mode spanning-tree mst priority 0 4096 spanning-tree spanning-tree stp-mrp-mode Set the RSTP priority to the value 4,096. Activate RSTP operation globally. Activate MRP compatibility. Configure the other switches S2 though S6 with their respective values (see table 18). Connect the redundant RSTP connection. 104 31007126 - 03/2010 Index A Index A Advanced Mode Age Alternate port B Backup port Bridge Identifier C Configuration error Configuring the HIPER-Ring D Designated bridge Designated port Diameter Disabled port E Edge port F Fast HIPER-Ring Forward Delay H Hello Time HIPER-Ring L Loops M Max Age N Network load P Port state R Rapid Spanning Tree Redundancy Redundancy existing Redundancy functions Redundancy Manager Redundant Redundant coupling 31007126 - 03/2010 23 97 89 89 78 22, 26, 32 35 Ring Ring Manager Ring structure Ring/Network Coupling Root port RST BPDU RSTP S Sub-Ring configuration Symbol V VLAN (HIPER-Ring settings) 15 16 16 11 88 89, 91 11 43 8 21 88 88 97 89 89 11 96 96 11 62, 64, 70, 72 96 77 90 11 6 22, 26, 32 11 16 15 11 105