1
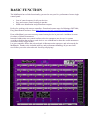
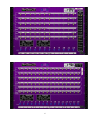
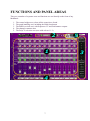
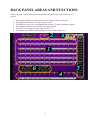
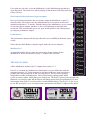
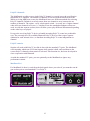
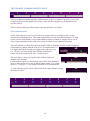
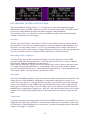
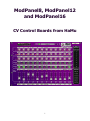
ModPanel8, ModPanel12 and ModPanel16 CV Control Boards from HaMu 1 Table of contents VARIANTS ................................................................................................................................ 3 BASIC FUNCTION ................................................................................................................... 5 FUNCTIONS AND PANEL AREAS ........................................................................................ 7 BACK PANEL AREAS AND FUNCTIONS ............................................................................ 8 THE CONTROL WIDGETS ................................................................................................. 9 Bipolar and inverted mode switches .................................................................................. 9 Indicator for buttons on or off ............................................................................................ 9 Output sockets of the controls ............................................................................................ 9 THE PATCH HANDLING AREA ...................................................................................... 10 Patch handling .................................................................................................................. 10 The Hold Outs button ....................................................................................................... 10 Hold Outs Gate sockets .................................................................................................... 10 Using Hold Outs with patch changes ............................................................................... 11 THE MIDI RECIVED AREA .............................................................................................. 11 Sequencer CV ................................................................................................................... 11 Note event distribution ..................................................................................................... 11 How Sustain affects the note & gate outputs ................................................................... 12 Performance ..................................................................................................................... 12 ModPanel 16 .................................................................................................................... 12 THE POLY CV AREA ........................................................................................................ 12 PolyCV channels .............................................................................................................. 13 PolyCV sustain ................................................................................................................. 13 ModPanel 16 .................................................................................................................... 13 THE CHANNEL COMMON WIDGETS AREA ................................................................ 14 Scale amount factor .......................................................................................................... 14 BUTTONS MIDI CONTROL SETTINGS AREA .............................................................. 15 Start key............................................................................................................................ 15 White keys only, or all keys? ........................................................................................... 15 Operation .......................................................................................................................... 15 Typical use ....................................................................................................................... 15 DOWNLOADS AND VIDEOS ............................................................................................... 16 2 VARIANTS The ModPanel comes in three versions, with 8, 12 or 16 'channels' (columns) of controls. ModPanel 8 is maybe enough for most, and will allow you to add longer tag names to the control widgets. When you really need to have as much controls as possible in a single panel, the ModPanel 16 is of course your choice, while ModPanel 12 may be the best compromise if you want to stay with one version. What MIDI control surface you use is of course also an important aspect. To make it easier for you to choose, we sell the three panels in a bundle, at less than 50% of the separate prices! Due to the restricted width of a rack extension, the 16 channel version is missing MIDI performance output and also has bipolar and invert switches which affect eight controls each. 3 4 BASIC FUNCTION The ModPanels have all the functionality you need to run your live performance from a single control panel: Lots of control outputs, for all your devices Save and restore control settings in patches MIDI notes distribution and performance outputs Perfect for working with remote controllers. Download remote maps for Behringer BCF2000, Korg NanoKontrol and more from http://hamu.se/root/rack-extensions/modpanel.html. From a ModPanel you can access any control on any device in your rack. And there is room for plenty of labeled parameters. Instead of addressing your control surface to device parameters one by one, by remote override or locking the surface to rack devices, use a ModPanel to have the useful parameters accessible from a single surface. Let your controller follow the selected track in Reasons main sequencer, and select tracks for ModPanels. Thanks to the included midi key and performance handling, all you need will now follow you to the selected track. Just keep on playing! 5 6 FUNCTIONS AND PANEL AREAS There are a number of separate areas and functions we can identify on the front of any ModPanel: 1. 2. 3. 4. 5. The control widget area, where all the controls are found The patch handling area, including the Hold Outs button The MIDI received area, with Sequencer CV and Performance outputs The channels common area The PolyCV selection area (new with release 1.1.1) 7 BACK PANEL AREAS AND FUNCTIONS Areas 1 through 5 on the back panel correspond to the same front areas, while area 6 is special: 1. 2. 3. 4. 5. 6. The control widget area, where all the control output sockets are found The Hold Outs function CV control input sockets The MIDI received area, with standard note & gate CV and performance outputs The channels common area with the scale input sockets The PolyCV selection area (new with release 1.1.1) The buttons rows MIDI control settings area (new with release 1.1.1) 8 THE CONTROL WIDGETS The fundamental part of the ModPanels is obviously the control widgets area. For each control there is a tag tape and – in most cases – a mode switch. The controls are organized as a number of channels and across these rows of the following controls; Three knobs A, B and C, A momentary button, A toggle button and finally A vertical fader The way the controls are organized as channels, is mainly for ease of reference and overview, and you’re of course free to use any control for any purpose. The tool tips of controls are presented as percentage of the total range. Same figure independent of mode. Bipolar and inverted mode switches In addition to the actual controls, there are a number of output mode switches in the control area. For knobs and faders these will switch on to bipolar mode, while for the buttons they switch on to inverted mode. The unscaled (scaling is explained later) output range for unipolar mode is 0 to 1 volt, while bipolar out goes from -1 volt to +1. The buttons will output an unscaled output of 0 volt for ‘off’ and 1 for ‘on’, while unscaled inverted outs are 1 for ‘off’ and 0 volt for ‘on’. For the ModPanel16 the mode switches for knobs and buttons are reduced to one for each half of the row, to fit the panel space. Indicator for buttons on or off These indicators were introduced with release 1.1.1 as it became possible to activate the buttons via MIDI keys. They will always show the correct status of each output, independent on if this was set via button or MIDI key. If you don't use MIDI key activation, the indicators will simply follow the buttons. Output sockets of the controls For each control there is a corresponding output socket, at roughly the same position as the control on the front. 9 THE PATCH HANDLING AREA This includes the standard patch display and patch button group, and the Hold Outs button. Patch handling Patches for ModPanels are strongly related to the setup where the device is utilized. Only a few very basic patches are included with the device, and you are encouraged to check out the device patches that come with any combinator patches available for download. Patches are an essential part of the ModPanel concept, because they provide a very efficient way to remember settings you find especially useful. Typically you should expect to create many patches for any setup. When working with a specific setup it’s best to keep all relevant patch files in a folder of it’s own, within a functional folder structure, so that you have easy access to just the fitting patches without getting confused or hindered by other patches. The Hold Outs button When the 'Hold Outs' button switch is on, your control changes will not affect the output levels until you release the switch again. This can be used for manual changes, as well as for patch changes. The obvious use is to set the Hold Outs switch on, change any number of controls without affecting any sounds, and finally release the Hold Outs to simultaneously change all changed outputs to new levels. This is especially useful when you control stepped parameters of a target device, enabling you to 'jump' several steps without snapping to any steps between. You need to get used to the Hold Outs button, because it's easy to forget it. Suddenly you find that the ModPanel isn't working at all. "What's happening? I keep turning this knob, but there's no change in the sound"... Oops, forgot! Again and again... ;) Hold Outs Gate sockets Since release 1.1.1 there are two CV input sockets available to gate the outputs. The button on the front must be active (lit) to enable the CV inputs to control the Hold Outs. The 'Hold' input will freeze the ModPanel outputs as long as it stays high (>0.001V), while the 'Open' input will freeze the outputs while it stays low (<0.001V). If both sockets are connected, the 'Open' input CV level is ignored. The indicator on the front will be lit when the outputs are on hold, and go dark if any of the CV inputs opens the outputs gate. Now it's easy to syncronize the patch change to the rest of your setup. Just connect any CV signal you have, you can use a Matrix gate or curve, or an RPG-8 'Start of Arpeggio Trig Out'. 10 Using Hold Outs with patch changes Notice that the Hold Outs button itself is part of a saved patch, so you will in advance decide what will happen after loading the patch back. If a patch was saved with Hold Outs on, it will not affect your outputs when loaded, until you release the button. A typical way to use this is to save all patches of a folder with Hold Outs activated. You can now select a patch by stepping up and down - by remote control - until you find the one you need, and only then you release the Hold Outs. Beware that the init patch (after resetting a ModPanel) has the Hold Outs on. This is a technical necessity to achieve glitch free patch changes. The default patch however, which is loaded when a ModPanel is created, has the Hold Outs set to off. THE MIDI RECIVED AREA All the ModPanels are all able to receive MIDI note events, and to let sustain performance be applied to these events. The ModPanels ‘8 and ’12 also receive and output all performance events to separate outputs. Sequencer CV The ModPanel16 has only one pair of sequencer CV note and gate outputs, while ModPanels ‘8 and ’12 both have eight pairs between which the received note events can be distributed. The following note distribution description is still valid for all three devices, taking into account that ModPanel16 can never have more than one 'active' output pair. Note event distribution Only as many pairs as are ‘active’ will be used. If at least one of the note and gate sockets has a cable attached, this pair and all pairs with lower numbers are considered active, even if such lower pairs are not connected. When a note on event is received, it will be sent to the first active pair which is not used (gate is off). If all active pairs are in use, the new note will be sent to the pair where the oldest note is playing. The expected note off event corresponding to this "oldest note" is ignored, when it eventually arrives. This means that the old note will still sound and the new note is added. Gate off for this CV pair will be sent out only when the latest added note distributed to this pair goes off. Thanks to this distribution, first note (after all off) will always go to the first pair, which can be used to play two or more different sound sources in a predictable way. 11 Even with one pair only, as for the ModPanel16, you'll find that playing chords is quite functional. The main 'issue' while playing, is that all notes will 'hang' until you release all keys. How Sustain affects the note & gate outputs Received sustain performance has it's separate output for ModPanels ‘8 and ‘12, described later, but in most cases the wanted behavior is for sustain to affect the distributed sequencer CV directly. Default setting of the ModPanels is to use sustain for the note & gate outputs, but there is also a switch button to optionally turn sustain off. This would enable you to use your sustain pedal for any other purpose, by using its performance output. Performance The performance outputs will directly reflect the received MIDI performance input events. Notice that the Pitch Bend is a bipolar signal, while the rest are unipolar. ModPanel 16 As mentioned earlier there is only one pair of note & gate outputs for the ModPanel16. These also double as PolyCV outputs when activated. THE POLY CV AREA All the ModPanels include PolyCV outputs from release 1.1.1. PolyCV is a method for sending more information over two cables then with the standard sequencer CV. Most important to end users of Reason rack extensions is perhaps that each playing note in the receiving PolyCV device can be turned of independent of other sounding notes. This is achieved by sending simple MIDI events over these cables, rather than just a single level. The PolyCV protocol was designed by Blamsoft, reviewed by other RE developers and finally approved by Propellerhead. For more information about PolyCV as such, please visit this Blamsoft blog. The PolyCV is free to use by any RE developers, so we can expect more instruments with PolyCV support in the future. 12 PolyCV channels The ModPanels are able to use a single PolyCV channel, or several, up to the specification maximum of 15 channels. The number of channels is selected with the knob on the front. While receiving MIDI note events, the ModPanels have two different methods for selecting PolyCV channels; Default is to strictly rotate from one channel to next, between the set number of channels. The option - set by a back panel switch - is to only use a higher channel when all lower channels are in use, i.e. similar to how the standard note&gate sockets are used. As with the separate sockets, this will allow you to play different instruments depending on the order keys are played. It's up to the receiving PolyCV device to handle incoming PolyCV events in a predictable way. The currently (nov'14) available Blamsoft PolyCV devices either expect separate channels for each internal voice, or distribute incoming PolyCV events independent on channel. PolyCV sustain Sustain will work with PolyCV just like it does with the standard CV pairs. The ModPanel will remember which note off events happen while sustain is held, and send them to the correct PolyCV channels when sustain is released. This function too, has been developed in close cooperation with Blamsoft. As with the standard CV pairs, you can optionally set the ModPanels to ignore any performance sustain. ModPanel 16 For ModPanel 16 there's a switch on the back panel where you select if you want the note & gate sockets pair to send standard CV or PolyCV. 13 THE CHANNEL COMMON WIDGETS AREA There is a channel common tag tape, with bold font, at the very bottom. The idea is to use this to indicate the use of the channel as a whole, while all other tag tapes are designated to one specific control. There is also an indicator reflecting the scale amount factor, as follows. Scale amount factor At the final stage before any level is sent to an output socket, it's possible to have a scale amount factor multiplied to it. This scale amount factor is only accessible through a CV input socket, one for each channel. If you want a knob of fader to control it, simply reserve one or more of your channels for this, and use a splitter to affect several channels if needed. The scale amount is reflected on the front panel LED bar. Both the position and the brightness of the indicator change with the scale level. An amount factor of 1 or higher will show a bright green light at the right end, zero (i.e. ‘all off’) will show an all dark LED bar, and negative values will lit an orange LED with -1 at the far left. The scale factor can be any bipolar value, and will affect all outputs of the channel. For the buttons, however, the absolute value of the scale amount is used, so there will never be any negative button output. E.g. a scale factor of -1 will give +1 volt output for button 'on' in normal mode. A scale amount of 0.0V will in effect turn off the entire channel, setting the outputs to 0.0V. 14 BUTTONS MIDI CONTROL SETTINGS AREA This was introduced with the release 1.1.1 in response to issues with momentary/toggle functionality relative to MIDI controllers, but also as a means to get easily accessible control for any user with a MIDI keyboard to the button switches of the ModPanels. These settings allow you to specify an interval of MIDI keys which will control the button switches, momentary as well as toggle. Start key The key interval will always start with a C at the low end. With the knob you select which C this should be. If you only use a small keyboard to control the buttons of the ModPanel, and only these, you may choose maybe C2 or C3 to get immediate access. On the other hand, if you want to use just a small section of a bigger keybord, and want to use this for playing notes as well, you'd choose the low or high end of the keyboard to control the buttons. White keys only, or all keys? You may find it easier to have the buttons mapped to only the white keys of the MIDI keyboard, rather than all chromatic keys, even if the interval will occupy a larger section of the keyboard. With the ModPanels you can choose! :) Notice that any MIDI key specified to affect a button switch, will be silent to the note & gate CV outputs, both standard and PolyCV. Consequently, when you set the switch to 'White keys', the intermediate black keys - within the button control inteval - will be transfered to the note & gate outputs. You may utilize or just beware of this! Operation One issue with MIDI controllers is that you need to match the operation of the controller with what you have on the ModPanel. Momentary for momentary and toggle for toggle, so to speak. This is not alway so easy, but should be possible even if it may require som controller setup or programming. Using a MIDI keyboard will make this easier, since a keyboard will always give a momentary output; You can simply chose if you want the operation inside the ModPanel to be momentary or toggle, but - mind you - this will affect the entire row of switch buttons! Left is default, leaving the function as the button and socket labels of the front and back. Typical use A typical setting for maximizing simple control from a MIDI keyboard to some percussive or triggered device in Reason, would be to set operation of both rows to momentary, and to only use white keys. With a ModPanel16 set up this way, you'll have immediate physical keyboard control of 32 trigger CV signals! 15 DOWNLOADS AND VIDEOS From the product page at http://hamu.se/root/rack-extensions/modpanel.html you can download remote maps, Reason song files and combinator patches. You will also find a couple of videos etc. 16