1
March 2008
DesignBuilder 1.5
User Manual
© 2008 DesignBuilder Software, Ltd.
All rights reserved. No parts of this work may be reproduced in any form or by any means - graphic, electronic, or
mechanical, including photocopying, recording, taping, or information storage and retrieval systems - without the
written permission of the publisher.
Products that are referred to in this document may be either trademarks and/or registered trademarks of the
respective owners. The publisher and the author make no claim to these trademarks.
While every precaution has been taken in the preparation of this document, the publisher and the author assume no
responsibility for errors or omissions, or for damages resulting from the use of information contained in this
document or from the use of programs and source code that may accompany it. In no event shall the publisher and
the author be liable for any loss of profit or any other commercial damage caused or alleged to have been caused
directly or indirectly by this document.
2
DesignBuilder 1.5
Table of Contents
14
Section 1 Getting Started
1.1 DesignBuilder
......................................................................................................................................
Tips
15
1.2 Capabilities
...................................................................................................................................... 15
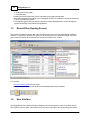
1.3 Recent Files
......................................................................................................................................
(Opening Screen)
16
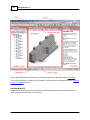
1.4 User Interface
...................................................................................................................................... 16
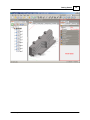
1.5 Edit Screen
...................................................................................................................................... 17
21
Section 2 Core Concepts
2.1 Model Data
......................................................................................................................................
Hierarchy & Data Inheritance
21
2.2 Templates
......................................................................................................................................
and Components
23
2.3 Blocks
...................................................................................................................................... 23
2.4 Navigating
......................................................................................................................................
Building Models
27
2.5 Customising
......................................................................................................................................
Model Detail
28
30
Section 3 Building Models
3.1 Create New
......................................................................................................................................
Site
30
3.1.1 Location .................................................................................................................................................................
30
3.1.2 Template.................................................................................................................................................................
30
3.2 Building Geometry
...................................................................................................................................... 30
3.2.1 View Controls
.................................................................................................................................................................
31
3.2.1.1 View
.......................................................................................................................................................................
Rotation
33
3.2.1.2 Orbit
.......................................................................................................................................................................
34
3.2.1.3 Zoom
.......................................................................................................................................................................
Dynamic
34
3.2.1.4 Zoom
.......................................................................................................................................................................
Window
34
3.2.1.5 Fit
.......................................................................................................................................................................
view
34
3.2.1.6 Pan
.......................................................................................................................................................................
view
34
3.2.1.7 Normal
.......................................................................................................................................................................
View
35
3.2.2 Perimeters
.................................................................................................................................................................
35
3.2.2.1 Shape
.......................................................................................................................................................................
36
3.2.2.2 Line
.......................................................................................................................................................................
Type
38
3.2.3 Snaps, Drawing
.................................................................................................................................................................
Guides & Protractor
40
3.2.3.1 Direction
.......................................................................................................................................................................
snaps
41
...................................................................................................................................................................................................
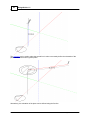
3.2.3.1.1 Axis snap
41
...................................................................................................................................................................................................
3.2.3.1.2 Parallel snap
45
...................................................................................................................................................................................................
3.2.3.1.3 Normal snap
46
...................................................................................................................................................................................................
3.2.3.1.4 Offset Snap
51
3.2.3.2 Point
.......................................................................................................................................................................
Snaps
55
© 2008 DesignBuilder Software, Ltd.
Table of Contents
3
...................................................................................................................................................................................................
3.2.3.2.1 End-point Snap
55
...................................................................................................................................................................................................
3.2.3.2.2 Mid-point Snap
56
...................................................................................................................................................................................................
3.2.3.2.3 Edge Snap
57
...................................................................................................................................................................................................
3.2.3.2.4 DXF Snap
59
...................................................................................................................................................................................................
3.2.3.2.5 Increment Snap
59
3.2.3.3 Drawing
.......................................................................................................................................................................
Guides
61
3.2.3.4 Protractor
.......................................................................................................................................................................
Tool
64
3.2.4 Construction
.................................................................................................................................................................
Lines
67
3.2.4.1 Drawing
.......................................................................................................................................................................
Construction Lines
67
3.2.4.2 Removing
.......................................................................................................................................................................
Construction Lines
72
3.2.5 General Operations
.................................................................................................................................................................
72
3.2.5.1 Select
.......................................................................................................................................................................
72
3.2.5.2 Move
.......................................................................................................................................................................
72
3.2.5.3 Copy
.......................................................................................................................................................................
(Clone)
75
3.2.5.4 Rotate
.......................................................................................................................................................................
75
3.2.5.5 Stretch
.......................................................................................................................................................................
77
3.2.5.6 Delete
.......................................................................................................................................................................
79
3.2.5.7 Measure
.......................................................................................................................................................................
79
3.2.6 Importing.................................................................................................................................................................
Geometric Data
79
3.2.6.1 Importing
.......................................................................................................................................................................
DXF
79
3.2.7 Exporting.................................................................................................................................................................
Geometric Data
84
3.2.7.1 Exporting
.......................................................................................................................................................................
3-D DXF
84
3.2.8 Working .................................................................................................................................................................
with Buildings (Site Level)
86
3.2.8.1 Create
.......................................................................................................................................................................
New Building
86
...................................................................................................................................................................................................
3.2.8.1.1 Create New Building - Model
87
...................................................................................................................................................................................................
3.2.8.1.2 Create New Building - Default Data
87
3.2.9 Working .................................................................................................................................................................
with Blocks (Building Level)
88
3.2.9.1 Adding
.......................................................................................................................................................................
Blocks
89
...................................................................................................................................................................................................
3.2.9.1.1 Block Creation Options
97
...................................................................................................................................................................................................
Block and Zone Dimensions
98
...................................................................................................................................................................................................
Block Types
100
...................................................................................................................................................................................................
Building Block
100
...................................................................................................................................................................................................
Outline Block
104
...................................................................................................................................................................................................
Component Block
111
...................................................................................................................................................................................................
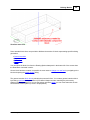
Block Form
115
...................................................................................................................................................................................................
General Extrusion
115
...................................................................................................................................................................................................
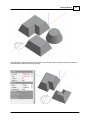
Sloped Wall
116
...................................................................................................................................................................................................
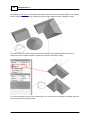
Pitched Roof
118
...................................................................................................................................................................................................
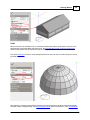
Dome
119
...................................................................................................................................................................................................
Height
119
...................................................................................................................................................................................................
Auto-Complete Block
120
3.2.9.2 .......................................................................................................................................................................
Editing blocks
120
...................................................................................................................................................................................................
3.2.9.2.1 Drag Block Face
120
...................................................................................................................................................................................................
3.2.9.2.2 Divide Block using Cutting Tool
122
...................................................................................................................................................................................................
3.2.9.2.3 Edit Block Geometry Dialog
140
...................................................................................................................................................................................................
3.2.9.2.4 Wall Thickness
141
© 2008 DesignBuilder Software, Ltd.
4
DesignBuilder 1.5
...................................................................................................................................................................................................
3.2.9.2.5 Convert Outline Block
144
...................................................................................................................................................................................................
3.2.9.2.6 Transfer Blocks
145
3.2.10 Working
.................................................................................................................................................................
within Blocks
146
3.2.10.1.......................................................................................................................................................................
Zone Block by Drawing Partitions
147
3.2.10.2.......................................................................................................................................................................
Hanging and Outline Partitions
156
3.2.10.3.......................................................................................................................................................................
Virtual Partitions
157
3.2.10.4.......................................................................................................................................................................
Creating Voids (Courtyard Spaces) Within Blocks
158
3.2.10.5.......................................................................................................................................................................
Edit Block Options
159
3.2.11 Working
.................................................................................................................................................................
within Zones
160
3.2.11.1.......................................................................................................................................................................
Placing Light Sensors
162
3.2.12 Working
.................................................................................................................................................................
with Surfaces (Surface Level)
163
3.2.12.1.......................................................................................................................................................................
Draw Window
166
3.2.12.2.......................................................................................................................................................................
Draw Sub-Surface
170
3.2.12.3.......................................................................................................................................................................
Draw Door
170
3.2.12.4.......................................................................................................................................................................
Draw Hole
170
3.2.12.5.......................................................................................................................................................................
Draw Vent
171
3.2.12.6.......................................................................................................................................................................
Edit Surfaces
171
3.2.13 Editing.................................................................................................................................................................
Openings at the Building Level
171
3.2.14 Undo/Redo
.................................................................................................................................................................
175
3.2.15 Rebuild
.................................................................................................................................................................
175
3.2.16 Rezone.................................................................................................................................................................
Block
176
3.3 Model Data
...................................................................................................................................... 176
3.3.1 Site Data
.................................................................................................................................................................
176
3.3.1.1 .......................................................................................................................................................................
Location
177
...................................................................................................................................................................................................
3.3.1.1.1 Site Location
178
...................................................................................................................................................................................................
3.3.1.1.2 Site Details
178
...................................................................................................................................................................................................
3.3.1.1.3 Time and Daylight Saving
181
...................................................................................................................................................................................................
3.3.1.1.4 Simulation Weather Data
181
...................................................................................................................................................................................................
3.3.1.1.5 Winter Design Weather Data
182
...................................................................................................................................................................................................
3.3.1.1.6 Summer Design Weather Data
182
3.3.1.2 .......................................................................................................................................................................
Legislative Region and Insulation Standards
182
...................................................................................................................................................................................................
3.3.1.2.1 Energy codes/insulation standards
183
3.3.2 Building.................................................................................................................................................................
Model Data
183
3.3.2.1 .......................................................................................................................................................................
Activity Data
184
...................................................................................................................................................................................................
3.3.2.1.1 Zone Type
184
...................................................................................................................................................................................................
3.3.2.1.2 Occupancy
186
...................................................................................................................................................................................................
3.3.2.1.3 Metabolic
187
...................................................................................................................................................................................................
3.3.2.1.4 Holidays
188
...................................................................................................................................................................................................
3.3.2.1.5 Environmental Control
189
...................................................................................................................................................................................................
3.3.2.1.6 Domestic Hot Water (DHW)
193
...................................................................................................................................................................................................
3.3.2.1.7 Computer Gains
193
...................................................................................................................................................................................................
3.3.2.1.8 Office Equipment Gains
194
...................................................................................................................................................................................................
3.3.2.1.9 Miscellaneous Gains
194
...................................................................................................................................................................................................
3.3.2.1.10 Catering Gains
195
...................................................................................................................................................................................................
3.3.2.1.11 Process Gains
196
3.3.2.2 .......................................................................................................................................................................
Construction Data
198
© 2008 DesignBuilder Software, Ltd.
Table of Contents
5
...................................................................................................................................................................................................
3.3.2.2.1 Constructions
199
...................................................................................................................................................................................................
Combined Constructions
200
...................................................................................................................................................................................................
Separate Constructions
203
...................................................................................................................................................................................................
Sub-Surface Construction
206
...................................................................................................................................................................................................
Internal Thermal Mass
207
...................................................................................................................................................................................................
Adjacency
208
...................................................................................................................................................................................................
Surface Convection
209
...................................................................................................................................................................................................
Component Block
210
...................................................................................................................................................................................................
3.3.2.2.2 Airtightness
213
...................................................................................................................................................................................................
'Scheduled' Ventilation Data Detail
213
...................................................................................................................................................................................................
'Calculated' Ventilation Data Detail
213
3.3.2.3 .......................................................................................................................................................................
Openings Data (Windows, Doors, Vents, Holes, Sub-surfaces)
214
...................................................................................................................................................................................................
3.3.2.3.1 External Glazing
215
...................................................................................................................................................................................................
Dimensions
215
...................................................................................................................................................................................................
Frame
216
...................................................................................................................................................................................................
Shading
219
...................................................................................................................................................................................................
Window Shading
220
...................................................................................................................................................................................................
Local Shading
222
...................................................................................................................................................................................................
Operation
223
...................................................................................................................................................................................................
3.3.2.3.2 Internal Glazing
223
...................................................................................................................................................................................................
Dimensions
223
...................................................................................................................................................................................................
Frame
224
...................................................................................................................................................................................................
Operation
227
...................................................................................................................................................................................................
3.3.2.3.3 Roof Glazing
228
...................................................................................................................................................................................................
Dimensions
228
...................................................................................................................................................................................................
Roof Shading
229
...................................................................................................................................................................................................
Frame
229
...................................................................................................................................................................................................
Window Shading
232
...................................................................................................................................................................................................
Operation
235
...................................................................................................................................................................................................
3.3.2.3.4 Doors
235
...................................................................................................................................................................................................
Door Placement
236
...................................................................................................................................................................................................
Door Operation
236
...................................................................................................................................................................................................
3.3.2.3.5 Vents and Holes
237
...................................................................................................................................................................................................
Vent Placement
238
...................................................................................................................................................................................................
Vent Operation
238
...................................................................................................................................................................................................
3.3.2.3.6 Wind Pressure Coefficients
239
3.3.2.4 .......................................................................................................................................................................
Lighting Data
239
...................................................................................................................................................................................................
3.3.2.4.1 General Lighting
240
...................................................................................................................................................................................................
3.3.2.4.2 Task and Display Lighting
242
...................................................................................................................................................................................................
3.3.2.4.3 Lighting Control
242
3.3.2.5 .......................................................................................................................................................................
HVAC Data
246
...................................................................................................................................................................................................
3.3.2.5.1 Compact HVAC System Types
248
...................................................................................................................................................................................................
Unitary Single Zone
248
...................................................................................................................................................................................................
Fan Coil Units
249
...................................................................................................................................................................................................
Unitary Multizone
250
...................................................................................................................................................................................................
VAV
251
© 2008 DesignBuilder Software, Ltd.
6
DesignBuilder 1.5
...................................................................................................................................................................................................
CAV
...................................................................................................................................................................................................
3.3.2.5.2 Mechanical Ventilation and Air Distribution
252
253
...................................................................................................................................................................................................
Outside Air
254
...................................................................................................................................................................................................
Fans
257
...................................................................................................................................................................................................
Economisers
259
...................................................................................................................................................................................................
Heat Recovery
260
...................................................................................................................................................................................................
Zone Terminal Units
261
...................................................................................................................................................................................................
Plenums
263
...................................................................................................................................................................................................
3.3.2.5.3 Cooling
265
...................................................................................................................................................................................................
3.3.2.5.4 Heating
268
...................................................................................................................................................................................................
3.3.2.5.5 Natural Ventilation
273
...................................................................................................................................................................................................
3.3.2.5.6 Air Temperature Distribution
276
...................................................................................................................................................................................................
3.3.2.5.7 Domestic Hot Water (DHW)
277
3.3.2.6 .......................................................................................................................................................................
Detailed Equipment
278
...................................................................................................................................................................................................
3.3.2.6.1 Edit Detailed Equipment
279
3.3.3 Model Data
.................................................................................................................................................................
Management
280
3.3.3.1 .......................................................................................................................................................................
Load Data from Template
280
3.3.3.2 .......................................................................................................................................................................
Clear Data to Default
281
3.4 Model Options
...................................................................................................................................... 282
3.4.1 Model Data
.................................................................................................................................................................
Options
283
3.4.1.1 .......................................................................................................................................................................
Model scope
284
3.4.1.2 .......................................................................................................................................................................
Construction and glazing
285
3.4.1.3 .......................................................................................................................................................................
Gains
285
3.4.1.4 .......................................................................................................................................................................
Timing
286
3.4.1.5 .......................................................................................................................................................................
Natural Ventilation
287
3.4.1.6 .......................................................................................................................................................................
HVAC
287
3.4.2 Advanced
.................................................................................................................................................................
Concepts
289
3.4.2.1 .......................................................................................................................................................................
Simplification
289
3.4.2.2 .......................................................................................................................................................................
Natural Ventilation
292
3.4.2.3 .......................................................................................................................................................................
Miscellaneous Edit
294
3.4.2.4 .......................................................................................................................................................................
Lighting
295
3.4.2.5 .......................................................................................................................................................................
Filters
295
3.4.2.6 .......................................................................................................................................................................
Component Blocks
295
3.4.3 Heating .................................................................................................................................................................
Design Calculation Options
296
3.4.3.1 .......................................................................................................................................................................
Winter Design Day
296
3.4.3.2 .......................................................................................................................................................................
Calculation Options
296
3.4.3.3 .......................................................................................................................................................................
Heating System Sizing
298
3.4.3.4 .......................................................................................................................................................................
Advanced Calculation Options
299
3.4.3.5 .......................................................................................................................................................................
Output Options
301
3.4.4 Cooling.................................................................................................................................................................
Design Calculation Options
301
3.4.4.1 .......................................................................................................................................................................
Summer Design Day
301
3.4.4.2 .......................................................................................................................................................................
Calculation Options
302
3.4.4.3 .......................................................................................................................................................................
Cooling System Sizing
304
...................................................................................................................................................................................................
3.4.4.3.1 ASHRAE Cooling Sizing
304
...................................................................................................................................................................................................
3.4.4.3.2 Unitary DX Cooling Sizing
305
...................................................................................................................................................................................................
3.4.4.3.3 VAV Cooling Sizing
305
© 2008 DesignBuilder Software, Ltd.
Table of Contents
7
...................................................................................................................................................................................................
3.4.4.3.4 Fan Coil Cooling Sizing
306
3.4.4.4 .......................................................................................................................................................................
Solar Options
307
3.4.4.5 .......................................................................................................................................................................
Advanced Calculation Options
310
3.4.4.6 .......................................................................................................................................................................
Output Options
312
3.4.5 Simulation
.................................................................................................................................................................
Calculation Options
312
3.4.5.1 .......................................................................................................................................................................
Simulation Period
313
3.4.5.2 .......................................................................................................................................................................
Calculation Options
313
3.4.5.3 .......................................................................................................................................................................
Advanced Calculation Options
315
3.4.5.4 .......................................................................................................................................................................
Output Options
317
3.4.6 Drawing.................................................................................................................................................................
Tools
320
3.4.6.1 .......................................................................................................................................................................
Solar Options
320
3.4.6.2 .......................................................................................................................................................................
Draw Block
324
3.4.6.3 .......................................................................................................................................................................
Direction Snaps
324
3.4.6.4 .......................................................................................................................................................................
Point Snaps
324
3.4.6.5 .......................................................................................................................................................................
Drawing Guides
324
3.4.6.6 .......................................................................................................................................................................
Object Rotation
325
3.4.6.7 .......................................................................................................................................................................
Protractor Tool
325
3.4.7 Display .................................................................................................................................................................
325
3.4.7.1 .......................................................................................................................................................................
Show Data for Calculations
325
3.4.7.2 .......................................................................................................................................................................
Edit Screen
326
3.4.7.3 .......................................................................................................................................................................
Visualisation Display
327
3.4.8 Block Options
.................................................................................................................................................................
328
3.4.8.1 .......................................................................................................................................................................
Block Geometry
328
3.4.8.2 .......................................................................................................................................................................
Roof-Wall Transition
329
3.4.9 Project Details
.................................................................................................................................................................
and Notes
329
3.4.9.1 .......................................................................................................................................................................
Project Details
330
3.4.9.2 .......................................................................................................................................................................
Owner Details
330
3.4.9.3 .......................................................................................................................................................................
Analyst Details
330
3.4.9.4 .......................................................................................................................................................................
Notes
330
Section 4 Library management
332
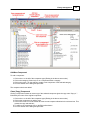
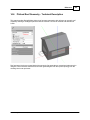
4.1 Opening......................................................................................................................................
Screen - Component Libraries
332
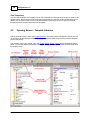
4.2 Opening......................................................................................................................................
Screen - Template Libraries
334
4.3 Import Components/Templates
...................................................................................................................................... 335
4.4 Export Components/Templates
...................................................................................................................................... 335
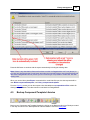
4.5 Backup ......................................................................................................................................
Component/Template Libraries
337
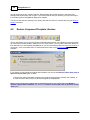
4.6 Restore ......................................................................................................................................
Component/Template Libraries
338
Section 5 Component Data
340
5.1 Constructions
...................................................................................................................................... 341
5.1.1 Layer Data
.................................................................................................................................................................
341
5.1.2 Image .................................................................................................................................................................
342
5.1.3 Calculated
.................................................................................................................................................................
Data
342
© 2008 DesignBuilder Software, Ltd.
8
DesignBuilder 1.5
5.2 Glazing ...................................................................................................................................... 344
5.2.1 Layers .................................................................................................................................................................
344
5.2.2 Calculated
.................................................................................................................................................................
345
5.3 Materials
...................................................................................................................................... 346
5.3.1 Material.................................................................................................................................................................
Properties
346
5.4 Panes ...................................................................................................................................... 349
5.4.1 General.................................................................................................................................................................
349
5.4.2 Thermal.................................................................................................................................................................
Data
350
5.4.3 Solar Data
.................................................................................................................................................................
350
5.4.4 Visible Data
.................................................................................................................................................................
350
5.4.5 Infra-red.................................................................................................................................................................
Data
351
5.5 Schedules
...................................................................................................................................... 351
5.5.1 7/12 Schedules
.................................................................................................................................................................
- Defined Using Profiles
352
5.5.2 Compact
.................................................................................................................................................................
Schedules
353
5.6 Profiles ...................................................................................................................................... 356
5.7 Defining......................................................................................................................................
setpoint temperature schedules
357
5.8 Textures...................................................................................................................................... 359
5.9 Window......................................................................................................................................
Gas
360
5.10 Local Shading
...................................................................................................................................... 361
5.10.1 General
.................................................................................................................................................................
361
5.10.2 Louvres
.................................................................................................................................................................
362
5.10.3 Sidefins
.................................................................................................................................................................
363
5.10.4 Overhangs
.................................................................................................................................................................
364
5.11 Window
......................................................................................................................................
Blinds
366
5.11.1 General
.................................................................................................................................................................
367
5.11.2 Slat Data
.................................................................................................................................................................
367
5.11.3 Shade/Transparent
.................................................................................................................................................................
Insulation Data
368
5.11.4 Electrochromic
.................................................................................................................................................................
Switching
368
5.12 Vents ...................................................................................................................................... 368
5.12.1 General
.................................................................................................................................................................
369
5.12.2 Airflow.................................................................................................................................................................
369
5.13 Holidays
...................................................................................................................................... 369
5.13.1 General
.................................................................................................................................................................
370
5.13.2 Holiday.................................................................................................................................................................
List
370
Section 6 Template Data
372
6.1 Activity ......................................................................................................................................
Templates
374
6.1.1 Activity .................................................................................................................................................................
Templates - General
375
6.1.2 Activity .................................................................................................................................................................
Templates - All Gains
375
6.1.3 Activity .................................................................................................................................................................
Templates - Occupancy
375
6.1.4 Activity .................................................................................................................................................................
Templates - Other Gains
376
6.1.5 Activity .................................................................................................................................................................
Templates - DHW
376
© 2008 DesignBuilder Software, Ltd.
Table of Contents
9
6.1.6 Activity .................................................................................................................................................................
Templates - Environmental
376
6.2 Construction
......................................................................................................................................
Templates
377
6.2.1 Construction
.................................................................................................................................................................
Templates - General
378
6.2.2 Construction
.................................................................................................................................................................
Templates - Simple
378
6.2.3 Construction
.................................................................................................................................................................
Templates - Walls
378
6.2.4 Construction
.................................................................................................................................................................
Templates - Roofs/Floors/Slabs/Ceilings
378
6.2.5 Construction
.................................................................................................................................................................
Templates - Doors
379
6.2.6 Construction
.................................................................................................................................................................
Templates - Airtightness
379
6.2.7 Construction
.................................................................................................................................................................
Templates - Thermal mass
379
6.3 Glazing ......................................................................................................................................
Templates
380
6.3.1 Glazing .................................................................................................................................................................
Templates - General
380
6.3.2 Glazing .................................................................................................................................................................
Templates - Glazing
381
6.3.3 Glazing .................................................................................................................................................................
Templates - Shading
381
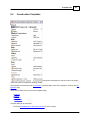
6.4 Facade Templates
...................................................................................................................................... 381
6.4.1 Facade Templates
.................................................................................................................................................................
- General
382
6.4.2 Facade Templates
.................................................................................................................................................................
- Openings
382
6.5 Lighting......................................................................................................................................
Templates
383
6.5.1 Lighting.................................................................................................................................................................
Templates - General
383
6.5.2 Lighting.................................................................................................................................................................
Templates - Output
384
6.5.3 Lighting.................................................................................................................................................................
Templates - Control
384
6.6 HVAC Templates
...................................................................................................................................... 386
6.6.1 HVAC Templates
.................................................................................................................................................................
- General
387
6.6.2 HVAC Templates
.................................................................................................................................................................
- Ventilation
387
6.6.3 HVAC Templates
.................................................................................................................................................................
- System
387
6.6.4 HVAC Templates
.................................................................................................................................................................
- Air Temperature Distribution
388
6.7 Location......................................................................................................................................
Templates
389
6.7.1 Location.................................................................................................................................................................
Templates - Location
390
6.7.2 Location.................................................................................................................................................................
Templates - Winter Design Weather
390
6.7.3 Location.................................................................................................................................................................
Templates - Summer Design Weather
390
6.7.4 Location.................................................................................................................................................................
Templates - Simulation Weather
391
6.8 Hourly Weather
......................................................................................................................................
Data
391
6.8.1 Hourly Weather
.................................................................................................................................................................
Data - General
392
6.8.2 Hourly Weather
.................................................................................................................................................................
Data - Statistics
392
6.9 Crack Templates
...................................................................................................................................... 394
6.9.1 Crack Templates
.................................................................................................................................................................
- General
395
6.9.2 Crack Templates
.................................................................................................................................................................
- Openings
395
6.9.3 Crack Templates
.................................................................................................................................................................
- Walls
395
6.9.4 Crack Templates
.................................................................................................................................................................
- Floors/Ceilings
395
6.9.5 Crack Templates
.................................................................................................................................................................
- Roofs
395
6.10 Legislative
......................................................................................................................................
Region Templates
396
6.10.1 Legislative
.................................................................................................................................................................
Region Templates - General
396
6.10.2 Legislative
.................................................................................................................................................................
Region Templates - Standard Insulation
397
6.10.3 Legislative
.................................................................................................................................................................
Region Templates - Emissions
397
© 2008 DesignBuilder Software, Ltd.
10
DesignBuilder 1.5
6.11 Energy......................................................................................................................................
Code Templates
398
6.11.1 Energy.................................................................................................................................................................
Code Templates - General
399
6.11.2 Energy.................................................................................................................................................................
Code Templates - Envelope (component)
399
6.11.3 Energy.................................................................................................................................................................
Code Templates - Envelope (building)
399
6.11.4 Energy.................................................................................................................................................................
Code Templates - Energy Performance
399
6.12 Sector ......................................................................................................................................
Templates
399
6.13 Times Zone
......................................................................................................................................
Templates
400
6.14 Wind Pressure
......................................................................................................................................
Coefficient Templates
400
6.15 Metabolic
......................................................................................................................................
Rate Templates
401
Section 7 Calculations
403
7.1 Heating ......................................................................................................................................
Design
403
7.1.1 Calculation
.................................................................................................................................................................
Options
404
7.1.2 Display .................................................................................................................................................................
Options
404
7.1.3 Summary
.................................................................................................................................................................
table
407
7.1.4 Heat loss
.................................................................................................................................................................
breakdown results
407
7.2 Cooling ......................................................................................................................................
Design
410
7.2.1 Calculation
.................................................................................................................................................................
Options
410
7.2.2 Detailed.................................................................................................................................................................
results
411
7.2.3 Display .................................................................................................................................................................
Options
415
7.2.4 Summary
.................................................................................................................................................................
table
417
7.3 Simulation
...................................................................................................................................... 418
7.3.1 Calculation
.................................................................................................................................................................
Options
418
7.3.2 Display .................................................................................................................................................................
Options
420
7.3.3 Detailed.................................................................................................................................................................
Results
423
7.3.4 Comfort.................................................................................................................................................................
Analysis
427
Section 8 Visualisation
434
8.1 Controls...................................................................................................................................... 435
8.1.1 Show Shadows,
.................................................................................................................................................................
Time, Day, Month
436
8.1.2 Show North
.................................................................................................................................................................
Arrow
439
8.1.3 Antialiasing
.................................................................................................................................................................
439
8.1.4 Dynamics
.................................................................................................................................................................
440
8.2 Creating......................................................................................................................................
Movies
440
Section 9 Reporting
443
9.1 Export Data
...................................................................................................................................... 443
9.2 Report Topics
...................................................................................................................................... 444
9.3 Compile......................................................................................................................................
Reports
444
© 2008 DesignBuilder Software, Ltd.
Table of Contents
Section 10 Program Options
11
446
10.1 Dialogs...................................................................................................................................... 446
10.2 Files ...................................................................................................................................... 446
10.3 User Interface
...................................................................................................................................... 447
10.4 EnergyPlus
...................................................................................................................................... 449
10.5 Limits ...................................................................................................................................... 453
10.6 International
...................................................................................................................................... 453
Section 11 Menu
456
11.1 File Menu
...................................................................................................................................... 456
11.2 Edit Menu
...................................................................................................................................... 457
11.3 Go Menu
...................................................................................................................................... 458
11.4 View Menu
...................................................................................................................................... 458
11.5 Tools Menu
...................................................................................................................................... 458
11.6 Help Menu
...................................................................................................................................... 459
Section 12 Modelling Advice
461
12.1 Natural......................................................................................................................................
Ventilation Modelling
461
12.2 Operative
......................................................................................................................................
Temperature Control
464
12.3 Working
......................................................................................................................................
with Large Models
464
12.4 Ground......................................................................................................................................
Modelling
465
12.5 Adjacent
......................................................................................................................................
Buildings
469
12.6 Electrochromic
......................................................................................................................................
Glazing
470
12.7 Trombe......................................................................................................................................
Walls
471
12.8 Autosizing
......................................................................................................................................
Heating and Cooling Equipment
472
12.9 Daylight
......................................................................................................................................
Saving and Local Time
473
12.10 Mixed......................................................................................................................................
mode
473
12.11 Double
......................................................................................................................................
Facades
474
12.12 Solar ......................................................................................................................................
Radiation Distribution
476
Section 13 Simulation Hourly Weather Data
484
13.1 Add new
......................................................................................................................................
hourly weather data
484
13.2 Edit/Translate
......................................................................................................................................
hourly weather data
486
Section 14 Reference
© 2008 DesignBuilder Software, Ltd.
489
12
DesignBuilder 1.5
14.1 DesignBuilder
......................................................................................................................................
Files, Location and Extensions
489
14.2 Licensing
......................................................................................................................................
& Activation
491
14.3 Hardware
......................................................................................................................................
Requirements
492
14.4 Surface......................................................................................................................................
Types
494
14.5 Calculation
......................................................................................................................................
of Air Density
500
14.6 Pitched......................................................................................................................................
Roof Geometry - Technical Description
501
14.7 Triangulation
...................................................................................................................................... 504
14.8 Calculation
......................................................................................................................................
of HVAC Energy Consumption
506
Section 15 EnergyPlus Background Information
508
15.1 Exporting
......................................................................................................................................
EnergyPlus IDF Files
508
15.2 EnergyPlus
......................................................................................................................................
Version Compatibility
509
15.3 EnergyPlus
......................................................................................................................................
IDF Window Dimensions
510
15.4 Calculation
......................................................................................................................................
of DesignBuilder Output from EnergyPlus Report Variables
510
15.5 EnergyPlus
......................................................................................................................................
Errors and Warnings
517
15.6 EnergyPlus
......................................................................................................................................
Daylight Calculations
520
15.7 EnergyPlus
......................................................................................................................................
Thermal Comfort
521
15.8 EnergyPlus
......................................................................................................................................
Date Definition
525
15.9 EnergyPlus
......................................................................................................................................
Documentation
525
Section 16 Support - Getting Help
528
16.1 Frequently
......................................................................................................................................
Asked Questions
528
Index
529
© 2008 DesignBuilder Software, Ltd.
Section
1
Getting
Started
14
DesignBuilder 1.5
Learning about DesignBuilder
If you're new to DesignBuilder you are probably keen to start using the program right away, but there's a
few things you should do before you dive in:
· Watch the Getting Started Tutorials.
· Read Important tips about software use.
A few minutes spent with these resources will be time well spent.
Go to Building model data
Keeping up-to-date
Visit www.designbuilder.co.uk for upgrades, new products and news about DesignBuilder.
Welcome to DesignBuilder 1.4
DesignBuilder is a user-friendly modelling
environment where you can work (and play) with
virtual building models. It provides a range of
environmental performance data such as: annual
energy consumption, maximum summertime
temperatures and HVAC component sizes.
Some typical uses are:
· Calculating building energy consumption.
· Evaluating façade options for overheating
and visual appearance.
· Thermal simulation of naturally ventilated
buildings.
· Daylighting - models lighting control systems
and calculates savings in electric lighting.
· Visualisation of site layouts and solar
shading.
· Calculating heating and cooling equipment
sizes.
· Communication aid at design meetings.
· An educational tool.
DesignBuilder uses the
EnergyPlus dynamic simulation engine to generate
performance data.
© 2008 DesignBuilder Software, Ltd.
Getting Started
1.1
15
DesignBuilder Tips
Miscellaneous information you should know before starting 'serious work' with DesignBuilder:
1. Buildings are put together by assembling blocks. Block creation and edit operations take place at
the building level.
2. Blocks can be subdivided into more than one zone by drawing partitions. Partitioning takes place at
the block level.
3. Default data is inherited from the level above, so blocks inherit their data from the building level,
zones inherit their data from blocks, surfaces from zones and openings from surfaces. It is
therefore possible to make global changes to the model by changing data at building level. It is
possible to override default by editing the data. So for example, you could change the external wall
construction for a whole block.
4. Data templates are the source of default data in DesignBuilder. They can also be used for loading
data to the model en masse. For example you can load the 'Energy code - heavyweight'
construction template at the building level to change the construction of the entire building to
thermally heavyweight elements which comply with local energy codes/building regulations.
5. You can clear non-default data (i.e. data that has been explicitly entered) to its default state by
using the Clear to default command.
6. When drawing a block which touches another block, you should use the shift key to lock the base
perimeter to the correct plane before drawing. You can release the shift key once you have placed
the first point of the perimeter.
7. Use the snap points - DesignBuilder block geometry is quite easy to work with but you must use the
positioning tools provided to ensure that blocks connect exactly. The only way to do this is to use
snaps - do not position blocks and partitions relative to each other 'by eye'.
8. Large building models can take a long time to simulate. You should familiarise yourself with the
Working with Large Models help topic before creating a large/complex DesignBuilder model.
9. DesignBuilder dsb files are already compressed so there is no need to 'Zip' them when attaching to
e-mails or support forums.
10.Understand DesignBuilder constructions, in particular the way floors and ceilings are defined.
11.Name your zones. Do this by clicking twice (not double-clicking) on the name in the Navigator and
typing the name. This is especially useful when merging zones and when checking adjacencies of
individual surfaces in the Navigator.
12.If you are exporting IDF data for use outside DesignBuilder please read the Exporting EnergyPlus
IDF Files topic.
1.2
Capabilities
· Environmental performance data is displayed without needing to run external modules and import
data and any simulations required to generate the data are started automatically.
· EnergyPlus ‘Compact HVAC’ descriptions provide an easy way into detailed analysis of commonly
used heating and cooling systems.
· Natural ventilation can be modelled with the option for windows to open based on a ventilation set
point temperature.
· Daylighting - models lighting control systems and calculates savings in electric lighting.
· Shading by louvres, overhangs and sidefins as well as internal and mid pane blinds.
· A comprehensive range of simulation data can be shown in annual, monthly, daily, hourly or subhourly intervals:
· Energy consumption broken down by fuel and end-use.
· Internal temperatures
· Weather data
· Heat transmission through building fabric including walls, roofs, infiltration, ventilation etc.
© 2008 DesignBuilder Software, Ltd.
16
DesignBuilder 1.5
· Heating and cooling loads.
· CO2 generation.
· Heating and cooling plant sizes can be calculated using design weather data.
· Parametric analysis screens allow you to investigate the effect of variations in design parameters on
a range of performance criteria.
· Generate EnergyPlus IDF files and work with these outside DesignBuilder to access EnergyPlus
system functionality not provided by DesignBuilder.
1.3
Recent Files (Opening Screen)
The Recent Files Opening Screen has a list of the files used in your previous DesignBuilder modelling
sessions. To access one of these files again you can double-click on it in the grid, or single click in the
grid to select it and then 'Open selected site' from the Info Panel on the Toolbar.
You can also:
· Create a new file (site) from this screen.
· Open existing dsb file from the 'My Documents\DesignBuilder Data' by default.
1.4
User Interface
The DesignBuilder user interface has been designed from first principles for ease of use. Each screen
has a specific purpose which is described in the Info panel on the right of the screen along with context
© 2008 DesignBuilder Software, Ltd.
Getting Started
17
sensitive commands and other relevant information.
The Info panel is only displayed in Learning mode. If you would prefer to have simultaneous access to the
Model Data and the Edit View you can switch Learning mode off from the Program Options dialog from
the Tools menu.
The user interface is described for each group of screens:
·
·
·
·
·
1.5
Opening Screen - Recent Files
Opening Screen - Component Libraries
Opening Screen - Template Libraries
Edit Screen
Visualisation Screen
Edit Screen
The diagrams below illustrate the various components of the DesignBuilder Edit Screen with Learning
Mode switched on and off.
Learning Mode On
© 2008 DesignBuilder Software, Ltd.
18
DesignBuilder 1.5
Use the Model data tabs to access Activity, Construction, Openings, Lighting and HVAC model data.
You can find information on using the Info | Data tab to view component and template data in the Opening
Screen - Templates help topic.
Learning Mode Off
Diagram below shows the same model but with Learning Mode Off. Edit Screen and Model Data are
visible simultaneously and there is no Info Panel..
© 2008 DesignBuilder Software, Ltd.
Getting Started
© 2008 DesignBuilder Software, Ltd.
19
Section
2
Core
Concepts
Core Concepts
21
Some core concepts you should be familiar with before attempting to use DesignBuilder on a real project
are:
·
·
·
·
·
2.1
Model data hierarchy and data inheritance
Templates and components
Blocks
Navigating building models
Customising model detail
Model Data Hierarchy & Data Inheritance
DesignBuilder models are organised in a hierarchy:
Default data is inherited from the level above in the hierarchy, so block data is inherited from building
level, zone data is inherited from block data and surface data from zone data. This arrangement allows
you to make settings at building level which can becomes active throughout the whole building; or make
settings at block level to change data for all zones/surfaces in the block. So for example, if the External
wall construction is set to 'Wall 1' at building level, then this will be the default External wall for all blocks in
the building. It is possible to change the inherited defaults in any of these blocks by making an explicit
selection (say 'Wall 2'). All the zones in the block whose external wall construction was set to 'Wall 2' have
that default External wall construction.
The construction and opening defaults are inherited down to surface level where the data is actually used
in the calculations. For example it is the External wall construction model data at the surface level that
defines the actual construction used for that external wall. The External wall model data set at zone, block
and building level has no effect on the model (other than by providing the default data for the level below
© 2008 DesignBuilder Software, Ltd.
22
DesignBuilder 1.5
in the hierarchy).
Model data inherited from the level above is shown in blue and user data is shown in red (see below).
The DesignBuilder hierarchy mechanism is a fast way of setting data globally in a building model, but you
must take care to enter the minimum amount of data to get the most from the inheritance system. For
example if all zones in a particular block have the same activity called say 'Office work', you should set the
activity at block level and not multiple times at zone level. Equally if all the blocks in the building have the
same activity, you should set the data at the building level and allow the blocks to inherit the data from the
building. By keeping the amount of user data to a minimum, you will find it quicker to make changes at a
later date. Clearly it is much faster to change a few Model data items at building and block level than it is
to make multiple changes at zone or surface levels.
When entering construction data, you could set the construction for each surface in the model but in
practice this would be an extremely inefficient process. It is faster and less error-prone to set the
construction as high up in the hierarchy as possible, possibly at building level (if all external walls in the
building have that external wall construction), or at block level if all walls in that block have the
construction (and other blocks don't).
Most data at the building level is 'user data' as buildings do not inherit their data from the site level.
Defaults
In short the rules are:
· Construction and Openings data is used at the surface level, i.e. all construction and opening data
at building, block and zone level is default data and only data at surface level is actually used to
define the model.
· Activity, Lighting, HVAC, Equipment data is used at the zone level, i.e. all Activity, Lighting, HVAC,
Equipment data at building and block level is default data. The exception is AHU data for Compact
HVAC systems which is set at building level.
A common question is "Why do I see Pitched roof constructions at building level on the Constructions tab
when my building doesn't have a pitched roof"?
The answer is that the Pitched roof construction setting at building, block and zone levels should be
thought of as the default setting for any pitched roofs that may (or may not) exist in the model further
down in the hierarchy. If there are no pitched roofs in the model then the data is simply not used.
Custom openings
When custom openings have been created at surface level these override the facade layout Model data
for the surface.
Openings
Although openings (windows, vents, doors etc) appear in the DesignBuilder hierarchy, there is no way in
© 2008 DesignBuilder Software, Ltd.
Core Concepts
23
version 1 to change data at the opening level. All openings inherit their data from the surface level. It is
therefore not possible to have different glazing types on a particular surface. If you click on an opening in
the Navigator you are actually taken to the surface containing the openings.
Component blocks
Component blocks inherit their data from building level.
2.2
Templates and Components
· Templates are databases of typical generic data.
· Components are databases of individual data items (e.g. a construction type, material, window
pane) .
DesignBuilder allows you to build up your own libraries of templates and components. Note that each user
on a computer maintains their own database of templates and components.
Template and component libraries are loaded into your model at the time it is created and new custom
data from other computers can be imported at any time.
2.3
Blocks
Blocks are the basic geometric shapes that you use to assemble a DesignBuilder model. The idea of
blocks is to provide fairly simple objects that you can easily move around in 3-D space in a similar fashion
to that of building a physical model using bricks from a construction set. Blocks are created by drawing 2D perimeters on horizontal or vertical planes and then extruding these perimeters to form 3-D shapes:
© 2008 DesignBuilder Software, Ltd.
24
DesignBuilder 1.5
Blocks are versatile objects and once created can easily be modified by moving their surfaces, by
stretching them and even by cutting them using arbitrary planes. Typically, you might use a block to
represent an entire building storey:
Or a particular building design might lend itself to an obvious division into blocks:
© 2008 DesignBuilder Software, Ltd.
Core Concepts
You can model an entire building as a single block:
© 2008 DesignBuilder Software, Ltd.
25
26
DesignBuilder 1.5
And then cut the block into storeys:
Once the overall geometry of a model has been established with blocks, you can go 'into' a block and sub© 2008 DesignBuilder Software, Ltd.
Core Concepts
27
divide it into a number of rooms or zones using partitions:
If you sub-divide a block internally using partitions, you can still modify the block by stretching, cutting,
rotating, etc. and where possible the internal geometry will be kept.
2.4
Navigating Building Models
· There are various ways of navigating (moving around) DesignBuilder models:
· Single clicking the appropriate entry in the Navigator panel is the most versatile way because every
object in the building has an entry in the Navigation panel.
· Double-clicking on the appropriate object in the Edit Screen takes you do it.
· Single-clicking on the appropriate object in the Edit Screen then mouse right mouse clicking on the
object and selecting the 'Go to…’ menu option at the top.
· Go to the level up in the hierarchy by pressing <F3> or by right mouse clicking in the Edit Screen
and selecting the 'Go up...’ menu option.
· The Next <F5> and Back <F4> Navigation buttons allows you to move sequentially through the
model (avoiding surfaces). This approach can be slow but can be useful when it is necessary to
methodically work through the model for any reason.
The Figure below shows how to either click on the Navigator entry or double-click on the Edit Screen to go
to 'Zone 1' from 'Block 1'.
© 2008 DesignBuilder Software, Ltd.
28
2.5
DesignBuilder 1.5
Customising Model Detail
DesignBuilder models can be customised to allow you to enter the level of detail which is appropriate to
your building design or modelling project. In early-stage design work you will generally want to use
generic selections for most Model Data and so would choose the corresponding 'low data requirement'
model options.
As the building design firms up, more information becomes available and you can change the model
options to use more specific data tailored to the project and less generic data.
The 'standard' Model Option set is loaded at the point the building is created and you should generally
keep these options unless you have specific reason to change.
Model Options are set in the Model Options dialog from the Edit menu.
© 2008 DesignBuilder Software, Ltd.
Section
3
Building
Models
30
DesignBuilder 1.5
The process for creating a new building model typically follows a sequence:
1. Create new site.
2. Create new building.
3. Draw and manipulate building blocks to create building geometry.
4. Partition building into thermal zones.
5. Set Model Data.
6. Add any 'custom openings' (windows, doors etc) by drawing up the surface level.
7. Size heating and cooling systems.
8. Check design by carrying out summer and winter simulations displaying hourly data.
9. Once model has been checked over short periods, you can use it with confidence for annual
simulations.
3.1
Create New Site
You can create a new site (dsb file) from the Opening Screen. In DesignBuilder, 'Site' is synonymous with
the file because each file can only contain one site.
3.1.1
Location
Select the Location Template as a source of location and weather data for the site.
The Location defines the geographical location and weather data for all buildings on this site. You will be
able to load data from other location templates or override the default data from the Location Model Data
tab at Site level.
3.1.2
Template
You can either select 'Blank' to create a clean site, or select a template to base your site on an existing
site.
If you have a DesignBuilder file you would like to use as a template for future sites save or copy it to the
'Templates' folder (accessed from the File | Folders | Template projects menu command).
3.2
Building Geometry
This section describes the various facilities within DesignBuilder to create and edit model geometry.
© 2008 DesignBuilder Software, Ltd.
Building Models
3.2.1
31
View Controls
A number of view controls are provided to allow you to change the point of view for the model:
·
·
·
·
·
·
View Rotation
Orbit
Zoom
Fit view
Pan view
Zoom window
View tools can be activated at any time during operation of the drawing tools and control returned to the
active drawing tool after completing the view process. For example to draw a block perimeter adjacent to
an existing cylindrical block:
To continue drawing the perimeter around the other side of the cylindrical block, click on the 'Orbit' tool
and orbit the model to reveal the other side and then pan to centre the model:
© 2008 DesignBuilder Software, Ltd.
32
DesignBuilder 1.5
You can then return to the drawing process either by pressing the ESC key or selecting 'Cancel Pan' from
the right-click menu:
© 2008 DesignBuilder Software, Ltd.
Building Models
3.2.1.1
33
View Rotation
DesignBuilder provides several pre-defined standard view rotations:
You can select one of these standard views from the view rotation drop list:
The default 'Axonometric' setting is designed to afford a good general axonometric view of the various
components at each model level.
© 2008 DesignBuilder Software, Ltd.
34
3.2.1.2
DesignBuilder 1.5
Orbit
The orbit tool is used to rotate the view around the model. To orbit the model click on the 'Orbit' tool and
then press the left mouse button and keep the button pressed as you move the mouse cursor, the view
will orbit around the model.
3.2.1.3
Zoom Dynamic
To zoom in and out from the current model point of view, click on the 'Zoom' tool, then press the left
mouse button and keep the button pressed as you move the mouse cursor, the view will zoom in as you
move the mouse cursor down and out as you move it up.
3.2.1.4
Zoom Window
The 'Zoom window' tool is used to zoom in on a specific area of your model. To create a window on an
area of the model, click on the 'Zoom window' tool and move the mouse cursor to a corner of the window
you want to create, then press the left mouse button and keep the mouse button pressed as you drag the
window, when you release the mouse button, the view will zoom to the extents of the defined window.
3.2.1.5
Fit view
The 'Fit view' tool is used to zoom your view to a distance which will enable the whole model to be made
visible and centred in the 'Edit' window.
3.2.1.6
Pan view
© 2008 DesignBuilder Software, Ltd.
Building Models
35
The 'Pan' tool is used to move the model point of view vertically and horizontally across the plane of the
screen. To pan the view, click on the 'Pan' tool, then press the left mouse button and keep the button
pressed as you move the mouse cursor, the point of view will pan horizontally as you move the mouse
cursor left and right and vertically as you move it up and down.
3.2.1.7
Normal View
At the surface level, The Normal button in the top right-hand corner of the screen can be used to rotate
the point of view to be normal to the surface and to automatically zoom in so that the extents of the
surface fill the view.
The Default surface normal view program option allows you to control the behaviour of this command.
3.2.2
Perimeters
Blocks, courtyards and surface openings are all created using perimeters. When any of these element
drawing tools are activated, perimeter options can be accessed from the 'Drawing Options' data panel, for
example when the Draw window tool is active at the surface level:
© 2008 DesignBuilder Software, Ltd.
36
3.2.2.1
DesignBuilder 1.5
Shape
Three perimeter shapes are provided to enable specific perimeter topologies to be drawn efficiently:
· Polygon
· Rectangle
· Circle
The 'Polygon' is probably the most useful shape and can be used to draw perimeters of any topology. The
'Polygon' shape also allows you to change the line type from a straight line to an arc. To draw a perimeter
using the 'Polygon' shape, start drawing the first line by clicking anywhere in the active drawing plane to
place the starting point, then move the mouse cursor and click to place the line end-point, you can use
the snaps and the protractor to help with alignment. Continue placing perimeter lines in the same way. If
at any time you want to cancel the last line that you placed, you can press the ESC key or select 'Undo
last point' from the right-click menu. If you want to incorporate an arc within the perimeter, you can change
the line type to 'Arc' and then place the centre-point of the arc:
To complete the perimeter, move the mouse cursor to the beginning of the first perimeter line, which
activates the end-point snap and click on it to connect the lines:
© 2008 DesignBuilder Software, Ltd.
Building Models
37
The 'Rectangle' shape allows you to draw perimeters by placing diagonally opposite corners of a
rectangle:
The 'Circle' shape is used to draw circular perimeters by placing the circle centre and then setting the
radius by placing a second point:
© 2008 DesignBuilder Software, Ltd.
38
DesignBuilder 1.5
The associated 'Segments' option allows you to control the accuracy of the circle. In DesignBuilder
geometry, circles are actually composed of polygons and the accuracy of the representation can be
controlled by defining the number of segments (or lines) used in generating the polygon. Generally
speaking, the greater the number of segments used will result in more memory usage and processing
time and so, particularly in the case of blocks, it's advisable to use the default number of segments where
possible.
3.2.2.2
Line Type
When the perimeter shape is set to 'Polygon', you can set the perimeter line type to 'Straight line' or 'Arc'.
When the line type is set to 'Straight line', a perimeter is drawn by placing the origin and then a series of
line end-points:
© 2008 DesignBuilder Software, Ltd.
Building Models
39
To incorporate an arc within a perimeter, set the line type to 'Arc'. An arc is defined using the sweep angle
and number of segments:
A negative sweep angle can be used to create an arc in an anti-clockwise direction. In DesignBuilder
geometry, arcs are created using a number of segments or straight lines and the accuracy of the
representation can be controlled by defining the number of segments. Generally speaking, the greater the
number of segments used will result in more memory usage and processing time and so, particularly in
the case of blocks, it's advisable to use the default number of segments where possible.
© 2008 DesignBuilder Software, Ltd.
40
DesignBuilder 1.5
To draw the arc, place the arc centre:
3.2.3
Snaps, Drawing Guides & Protractor
A number of drawing aids are provided to enable block perimeter lines, partitions, etc. to be drawn
precisely:
·
·
·
·
Protractor
Direction Snaps
Point Snaps
Drawing Guides
These items are made available when the various drawing tools are used, such as the ‘Draw window’ tool
at the zone surface:
© 2008 DesignBuilder Software, Ltd.
Building Models
3.2.3.1
41
Direction snaps
When drawing perimeter lines, block partitions or surface openings direction snaps can be used to draw
lines:
· Parallel with the active drawing plane axes (Axis snap),
· Parallel with existing elements (Parallel snap) or
· Perpendicular to existing elements (Normal snap).
3.2.3.1.1 Axis snap
The axis snap check boxes are displayed under 'Direction snaps' in the 'Drawing Options' data panel
when the various drawing commands are active. The axis snap is used to draw lines parallel with the
major axes of the active drawing plane.
As you move the cursor around to draw a line, the line will change colour and 'stick’ slightly as it becomes
parallel with one of the major axes:
© 2008 DesignBuilder Software, Ltd.
42
DesignBuilder 1.5
You can use axis snap to draw block perimeters on planes of any orientation. If the plane is nonhorizontal, the axis snap applies to the local coordinate system of the plane as if it were rotated to the
horizontal:
© 2008 DesignBuilder Software, Ltd.
Building Models
43
If the axis snap is operating on a horizontal plane, the perimeter line will change colour to red if the line is
snapped to the X-axis or green if it's snapped to the Y-axis. However if the active drawing plane is not
horizontal, the line will change colour to orange for the X-axis and purple for the Y-axis.
At the building level, when the active drawing plane is horizontal, you can also snap block perimeters and
construction lines to the Z-axis:
© 2008 DesignBuilder Software, Ltd.
44
DesignBuilder 1.5
which allows you to draw horizontally extruded blocks, this process is explained under Adding Blocks
© 2008 DesignBuilder Software, Ltd.
Building Models
45
3.2.3.1.2 Parallel snap
The parallel snap is used draw lines parallel with the edges of existing objects. The parallel snap check
box is displayed under 'Direction snaps' in the 'Drawing Options' data panel when the various drawing
commands are active. To draw a block perimeter line to be parallel with an existing block edge, switch the
parallel snap on and move the mouse cursor to touch the edge with which the current perimeter line is to
be parallel:
This will enable the active perimeter line to infer a direction from the selected edge and you can lock this
inference by pressing the SHIFT key to prevent a parallel inference being picked up from an unwanted
edge. So press the SHIFT key and move the mouse cursor to a position approximately parallel with the
edge, the cursor will 'stick' when the parallel snap operates and the perimeter line will change colour to
cyan:
© 2008 DesignBuilder Software, Ltd.
46
DesignBuilder 1.5
When the parallel snap is in operation, intersections are automatically calculated with drawing guides to
allow the two to be combined, so you can snap to the intersection of the two.
3.2.3.1.3 Normal snap
The normal snap is used to draw lines perpendicular to the edges of existing objects. The normal snap
check box is displayed under 'Direction snaps' in the 'Drawing Options' data panel when the various
drawing commands are active. When the normal snap is switched on and you draw a line string, each
line will automatically snap to be perpendicular with it's predecessor if it exists:
© 2008 DesignBuilder Software, Ltd.
Building Models
47
To draw a block perimeter line to be perpendicular with the edge of an existing block, move the mouse
cursor to touch the edge and then move it to be approximately perpendicular to it, the cursor will
automatically snap to a line which is exactly perpendicular.
© 2008 DesignBuilder Software, Ltd.
48
DesignBuilder 1.5
You can lock the perpendicular snap by pressing the SHIFT key which will prevent the cursor from picking
up an unwanted direction inference. In this case, a construction line has been placed parallel with the
block edge to help in positioning the new block. The perimeter line locks to a perpendicular from the
construction line:
© 2008 DesignBuilder Software, Ltd.
Building Models
49
When the normal snap is in operation, intersections are automatically calculated with drawing guides,
allowing you to snap to the intersection:
© 2008 DesignBuilder Software, Ltd.
50
DesignBuilder 1.5
© 2008 DesignBuilder Software, Ltd.
Building Models
51
3.2.3.1.4 Offset Snap
The offset snap is used to draw partitions and voids parallel to existing walls and partitions at a fixed
offset distance. This help topic describes the use of offset snap for drawing partitions, but the information
is equally applicable to drawing voids at a fixed offset from the perimeter.
The offset snap check box is displayed under Direction snaps in the Drawing Options data panel when
the Draw partitions command is active.
The offset snap can be used whenever a string of partitions is to be located at a fixed offset from a
perimeter, but can be specifically applied to dividing large open plan spaces up into ‘perimeter’ and ‘core’
zones for thermal simulation.
When the offset snap is switched on, an additional Distance item will be displayed under the offset snap
check box which allows you to define the offset distance. When you first switch on the offset snap, having
clicked on the Draw partition icon, you will see offset snap indicators displayed as you move the cursor
within the snap range of an existing wall or partition:
© 2008 DesignBuilder Software, Ltd.
52
DesignBuilder 1.5
The offset snap works in conjunction with the other snaps and so, for example, you can start an offset
partition at a fixed distance from the beginning of an existing wall using the edge snap in combination with
the increment snap:
After placing the beginning of the partition, the ‘rubber-banded’ partition will be automatically snapped to
the offset from the selected wall and as you move the cursor to the next connected wall segment, the
offset snap indicator will appear again:
© 2008 DesignBuilder Software, Ltd.
Building Models
53
As you move the cursor, you will see that the offset snap interacts with other snaps allowing you to
position partitions accurately. If you find that the other snaps are interfering with the offset snap, you can
switch them off by pressing the SHIFT key.
© 2008 DesignBuilder Software, Ltd.
54
DesignBuilder 1.5
Completed perimeter:
© 2008 DesignBuilder Software, Ltd.
Building Models
3.2.3.2
55
Point Snaps
When the various point snaps are switched on, a coloured indicator is displayed when the mouse cursor
is close to a key-point on an existing element allowing a perimeter or partition line end-point to be
positioned precisely at the selected key-point. The following point snaps are available:
·
·
·
·
·
end-point snap
mid-point snap
Edge snap
DXF snap
Increments snap
Note: In some cases Snaps can interfere with attempts to draw to a particular point and in this case you
can temporarily switch off the appropriate Snap(s) using the check boxes in the Drawing Options panel in
the bottom left of the screen.
3.2.3.2.1 End-point Snap
This snap allows you to snap lines to the end-point of an existing edge. A green indicator is displayed
when the mouse cursor is within the snap range of an end-point:
For example, to snap the starting point of a new block perimeter to the end-point of an existing block
© 2008 DesignBuilder Software, Ltd.
56
DesignBuilder 1.5
edge, move the mouse cursor onto the background and press SHIFT to lock the drawing plane to the
ground plane. Keep the SHIFT key pressed and move the mouse cursor close to the required edge
marker to activate the end-point snap:
Similarly to snap the starting point of a new block partition to the end-point of an existing partition, make
sure that the 'End-point' snap is switched on and move the mouse cursor close to the partition end-point
to activate the snap:
3.2.3.2.2 Mid-point Snap
For details of using the 'Mid-point' snap, please refer to the End-point snap.
© 2008 DesignBuilder Software, Ltd.
Building Models
57
3.2.3.2.3 Edge Snap
The edge snap allows you to snap to any point on the edge of an existing object. The edge snap can be
used in conjunction with the increment snap to enable a point to be located along an edge by moving it in
defined increments. A red indicator is displayed when the mouse cursor is within the snap range of an
edge and distance indicators are also displayed to help in locating a point a specific distance from either
end of the edge:
By switching the increment snap on, the point can be moved along the edge in defined increments. For
example, if you wanted to start a block perimeter line at 6.0 metres from the end of the block, after
switching on the increment snap, you could set the snap increment to say 0.5m and then move the mouse
cursor to snap to the edge at a distance of 6.0 metres from the end-point:
© 2008 DesignBuilder Software, Ltd.
58
DesignBuilder 1.5
If you wanted to locate the beginning of the perimeter line at a specific distance from the other end of the
edge, you can switch the end of the edge from which the increment snap operates by toggling the 'Switch
snap increment direction' switch:
© 2008 DesignBuilder Software, Ltd.
Building Models
59
3.2.3.2.4 DXF Snap
The DXF snap only applies when DXF data has been imported from an external file. The DXF snap
enables you to snap to the end-points of DXF lines:
Note: You should generally switch DXF snap off when drawing partitions at block level and simply use the
DXF lines as a visual guide. This ensures that partitions correctly snap to perimeters instead of snapping
to DXF lines which may be very close to the perimeter but not actually touching.
3.2.3.2.5 Increment Snap
The increment snap applies to any process that involves moving a point or a surface in a particular
direction. Such processes include drawing block partitions or perimeter lines which have an active
direction snap or dragging the surface of a block normal to the original surface position. The increment
snap allows you to move a point in a particular direction by defined increments. You can think of the
increment snap acting in the same way as a conventional CAD drawing grid and in fact if you were just to
use the axis snaps it would have the same effect, however the increment snap is more powerful in that it
provides this type of incremental snap along any defined vector not just the axis vectors.
The increment snap may be particularly useful during early stage design when you want to place
geometry with reasonable accuracy but don't want to be constantly keying-in distances.
Note: the increment snap will only come into operation when you are drawing a line or moving a surface
along a defined vector. For example if you are drawing a block perimeter parallel with an existing block
edge, the increment snap will operate when the parallel snap is active and in this case you would be able
to move the mouse cursor along the parallel vector in increments of 0.5m:
© 2008 DesignBuilder Software, Ltd.
60
DesignBuilder 1.5
The increment snap also works in conjunction with the Protractor:
You can use the increment snap to control the location of block faces when you extrude a block on
© 2008 DesignBuilder Software, Ltd.
Building Models
61
creation or drag faces during an edit or stretch operation:
The increment snap also comes into operation when an edge snap is active, allowing you to snap to the
edge by increments from either end, please see edge snap for details.
Switch snap increment direction
Increment snap provides increments between the 2 end points of the reference line and increments can
only be generated from one end point at a time. You can reverse the direction so that increments are
generated from the other end of the reference line by checking the Switch snap increment direction
drawing option. This option is found immediately below the Increment snap option (screenshot above).
3.2.3.3
Drawing Guides
Drawing guides are invisible lines that are automatically generated as soon as a drawing plane becomes
active during a drawing operation. Drawing guides are parallel with the active drawing plane X and Y axes
and run through all end-points and mid-points of existing object edges, which lie in the same plane as the
drawing plane. As you move the cursor in the vicinity of a drawing guide, it will become visible and you
can then snap the cursor to any point on the guide. When drawing guides are used in conjunction with
Direction Snaps or the Protractor they offer a powerful mechanism for locating perimeter lines in relation
to existing object edges.
For example to create a triangular window in a surface with the same height as an existing opening, first
click on the Draw window tool and check that the perimeter shape is set to 'Polygon', switch the protractor
on and then move the cursor to align approximately with the lower edge of the existing window which will
automatically snap the cursor to the required drawing guide:
© 2008 DesignBuilder Software, Ltd.
62
DesignBuilder 1.5
Click to place the window origin and move the cursor to snap to the drawing guide associated with the
existing window upper edge, the protractor angle lock will automatically combine with the drawing guide:
Click to place the apex of the window and then place the next point in a similar fashion:
© 2008 DesignBuilder Software, Ltd.
Building Models
63
Completing the window perimeter:
Note: In some cases Drawing guides can interfere with attempts to draw to a particular point and in this
© 2008 DesignBuilder Software, Ltd.
64
DesignBuilder 1.5
case you can temporarily switch off Drawing guides using the check boxes in the Drawing Options panel
in the bottom left of the screen.
3.2.3.4
Protractor Tool
The protractor tool is used to draw perimeter lines and partitions at specified angles in relation to the
current drawing plane. The protractor can be activated from the ‘Drawing options’ data panel, which is
displayed when any of the drawing tools are used. For example, to create an offshoot projecting from an
existing block with a roof slope of 30°, move the cursor over the existing block surface, press the SHIFT
key to lock the drawing plane and draw the first perimeter line, snapping to the base edge using end-point
snap:
Draw the second perimeter line to connect to the mid-point of the block edge and then activate the
protractor:
© 2008 DesignBuilder Software, Ltd.
Building Models
65
The protractor will automatically snap to the current drawing plane and as you move the mouse cursor,
the perimeter line will snap to the protractor in angular increments, which can be set in the ‘Drawing
options’ data panel. The rotation angle is displayed at the centre of the protractor. Move the cursor until
the displayed angle is 30° and then move the snapped line towards the upper block edge. When the line
end-point nears the edge, it will ‘stick’ to the edge and the edge snap marker will be displayed:
Click to accept the point and complete the perimeter by snapping to the block face vertices using the endpoint snap:
© 2008 DesignBuilder Software, Ltd.
66
DesignBuilder 1.5
Drag the perimeter to complete the offshoot:
© 2008 DesignBuilder Software, Ltd.
Building Models
3.2.4
67
Construction Lines
Construction lines can be used to help in the creation of precise geometry. You can draw construction
lines using the snaps and the protractor to lie at defined locations and then use these lines as a
framework from which or to which various object geometries can be projected or attached. At the building
level, construction lines can also be snapped to the Z-axis to form vertical planes from which block
geometry can be extruded.
3.2.4.1
Drawing Construction Lines
Construction lines are drawn in the form of line strings. To draw a construction line, click on the 'Place
construction line' tool and start drawing the first line by clicking anywhere in the active drawing plane then
move the mouse cursor and click to place the line end-point, you can use point snaps, direction snaps,
drawing guides and the protractor to help with alignment. Continue placing construction lines in this way. If
at any time you want to cancel the last line that you placed, you can press the ESC key or select 'Undo
last point' from the right-click menu.
Construction lines have numerous applications in forming temporary attachment points during the creation
of precise geometry. As a simple example, if you want to place a block at a precise distance from the
angled wall of an existing block, you could switch the Normal snap on, click on the 'Place construction line'
tool and draw a perpendicular line a precise distance from the wall. To draw the perpendicular line, place
the first point at an end-point of the wall baseline, move the mouse cursor to touch the baseline and press
SHIFT to lock the direction inference, then move the mouse cursor to activate the perpendicular lock and
key-in the required distance:
© 2008 DesignBuilder Software, Ltd.
68
DesignBuilder 1.5
You could then place a second construction line normal to the first line and key-in the required length:
You can then snap to the construction line to draw the new block perimeter:
© 2008 DesignBuilder Software, Ltd.
Building Models
The finished block:
You can also snap to the intersection of construction lines:
© 2008 DesignBuilder Software, Ltd.
69
70
DesignBuilder 1.5
At the building level, construction lines can be snapped to the Z-axis in order to create vertical planes to
which block geometry can be attached. To draw construction lines in a vertical plane, switch the Z-axis
snap on, click on the 'Place construction line' tool and place the first point on the ground plane or any
other horizontal plane. Move the mouse cursor to snap the current line to the Z-axis:
© 2008 DesignBuilder Software, Ltd.
Building Models
You can then use the protractor to place the next line in order to accurately define a plane:
After placing the second line, the two construction lines form a vertical plane that can be used for
extruding blocks or as a plane to be used as a cutting plane.
© 2008 DesignBuilder Software, Ltd.
71
72
3.2.4.2
DesignBuilder 1.5
Removing Construction Lines
You can remove construction lines individually by selecting and deleting or you can remove all
construction lines from the model by selecting 'Remove all construction lines' from the 'Edit' menu.
3.2.5
General Operations
This section describes general geometric operations:
·
·
·
·
·
·
Select
Move
Clone (copy)
Rotate
Stretch
Delete
3.2.5.1
Select
To select an object, click on the 'Select' tool or select 'Select' from the right-click menu, then move the
mouse cursor to the object to be selected and click the mouse to select. To select multiple objects you
can either press the CTRL key while clicking on objects or drag a selection rectangle by pressing the left
mouse button and keeping it pressed as you drag a window across the required selection, when you
release the mouse button, the objects inside the window will be selected.
3.2.5.2
Move
You can move blocks, partitions, courtyards and openings. To move an object, first select it and then click
on the 'Move' tool or select 'Move' from the right-click menu. If you want, you can move several objects at
the same time by doing a multiple selection. You then need to define a 'handle point' for the move
operation, the handle point can be any point on a model surface or ground plane but more usually will be
a vertex on the object that you want to move, so make sure that the end-point snap is switched on, move
the mouse cursor to the required object vertex and snap to it:
© 2008 DesignBuilder Software, Ltd.
Building Models
73
When you release the mouse button, you will be able to move the object to any required location. As you
move the object, a displacement line is displayed to show how far the object has been moved, the
displacement line can be snapped to the axes or the Protractor. When a direction snap is active the
increment snap can also be used:
You can then click the mouse button to place the object.
At the building level, blocks can be moved in three dimensions onto any existing block face in the model.
As you move the block around the model, each block face will highlight in blue as the block handle point is
moved across it, indicating that the face has become the active drawing plane.
© 2008 DesignBuilder Software, Ltd.
74
DesignBuilder 1.5
You can lock the active drawing plane by pressing the SHIFT key to position the block:
© 2008 DesignBuilder Software, Ltd.
Building Models
3.2.5.3
75
Copy (Clone)
For details of using the 'Clone' tool, please refer to the Move tool.
3.2.5.4
Rotate
You can rotate blocks, partitions, courtyards and openings. To rotate an object, first select it and then click
on the 'Rotate' tool or select 'Rotate' from the right-click menu. If you want, you can rotate several objects
at the same time by doing a multiple selection. As you move the cursor back into the Edit screen, the
Protractor will be displayed at the cursor position. At the building level, you can rotate a block around an
axis point defined on any plane and as you move the cursor from surface to surface in the model, each
surface will highlight in blue to show that it's the active drawing plane and the protractor will automatically
rotate into the same plane:
You define the rotation axis about which the object will be rotated by clicking the mouse when the mouse
cursor is in the required location, you can use the various snaps and drawing guides to locate the axis
point. After placing the axis point, you can then rotate the object around the axis:
© 2008 DesignBuilder Software, Ltd.
76
DesignBuilder 1.5
In the case of partitions and courtyards at the block level, the active drawing plane for rotation is always
the plane of the block floor and in the case of surface openings, the active drawing plane is always the
surface plane:
© 2008 DesignBuilder Software, Ltd.
Building Models
3.2.5.5
77
Stretch
Building and outline blocks can be stretched (or scaled) at the building level. To stretch a block, first select
it and then click on the 'Stretch' tool or select 'Stretch' from the right-click menu. You can only stretch one
block at a time. When you activate the 'Stretch' tool, a wire frame is displayed around the extent of the
block and as you move the cursor across the faces of this frame, each face will highlight in the colour of
the axis to which the face is normal:
If you then click on one of these highlighted faces, you can then stretch the block along the axis normal to
the face. If the increment snap is switched on, the block can be stretched in increments:
© 2008 DesignBuilder Software, Ltd.
78
DesignBuilder 1.5
In the case of the Z-axis, the stretch operation will only operate along the positive Z-axis:
Tip: You can also key in the new dimension using the keyboard. Note the difference to the Drag face tool
where the increment in the extrusion is keyed in.
© 2008 DesignBuilder Software, Ltd.
Building Models
3.2.5.6
79
Delete
To delete an object, first select the object you want to delete and then click on the 'Delete' tool or select
'Delete' from the right-click menu. If you want, you can delete several objects at the same time by doing a
multiple selection.
3.2.5.7
Measure
The measure tool allows you measure distance, angles and areas on single planes in the model:
· Distance - Click twice on a plane to define the length between the 2 points.
· Angle - Click three times on a plane to define the area between the 2 lines.
· Distance - Draw an enclosed polygon by clicking with the mouse on a single plane.
The requested data is displayed highlighted in the Drawing Options panel on the left of the screen.
3.2.6
Importing Geometric Data
CAD data can be imported into DesignBuilder in order to trace blocks and block partitions.
· Import DXF
3.2.6.1
Importing DXF
If you are having trouble importing the DXF data you should:
· Check that you have specified the correct units. If the DXF data looks too small or too large you may
have selected the wrong units. DXF data does not have units so you may need to find out the units
used in the source CAD model before attempting to import the DXF file.
· Try 'cleaning up' the CAD data before exporting it to avoid non-geometric data, grids, fittings etc from
being included in the DXF file.
· DesignBuilder requires floor plan DXF data to be saved in R-11 format. Other DXF formats may fail to
© 2008 DesignBuilder Software, Ltd.
80
DesignBuilder 1.5
load.
DXF data can be imported in the form of 2-D floor plan layouts which can be used to trace block
perimeters and partitions. You can import 2-D DXF floor plan files created in AutoCAD or other CAD
programs using the Files > Import > Import DXF data menu command. This starts a the DXF Import
Wizard (below) which prompts you for the name of the file, the units of your DXF data and the attachment
height.
Troubleshooting
Once the DXF data is imported and correctly positioned you can use it to define the position of blocks and
partitions. A typical process might go like this:
1. Create new dsb site file
2. Select location
3. Import DXF data
4. Draw blocks by snapping to the external perimeter corners of the DXF floor plan (requires DXF
snap to be switched on).
5. Go to block level and draw partitions using the DXF partition data. You should take care to connect
partitions to the external perimeters. A common mistake is to snap partitions to DXF data lying very
close to the external perimeter but not close enough to create a connection with the external
perimeter. It is recommended that you switch of DXF snap in the Drawing options panel
when drawing partitions at block level to avoid this problem. Be sure to switch it back on again
when you have finished drawing partitions.
6. Import other DXF floor plans for other stories if necessary. Note that only one set of DXF data can
be imported at a time. Once the CAD data has been imported into the model, the source DXF file is
no longer needed by DesignBuilder and can be moved or deleted.
IMPORT DXF WIZARD
To import DXF data, select Import DXF drawing file from the File menu which opens the Import DXF
dialog:
© 2008 DesignBuilder Software, Ltd.
Building Models
81
To browse for a DXF file, click into the 'Filename' control which will display an ellipsis button and then click
on this button to open the file browser dialogue box. After selecting the required DXF file, you need to set
the units used in the DXF file from the 'Units' drop list and set the attachment height at which the 2-D DXF
data will be attached. The DXF data can be moved around the model once it is imported, so you do not
need to know the exact attachment height - you can import the DXF data at zero height and move it to the
correct location using the Move command. Click on the 'Next' button to set up layer visibility:
© 2008 DesignBuilder Software, Ltd.
82
DesignBuilder 1.5
You can use these controls to switch off unnecessary layers in the DXF data. As you check/uncheck the
checkboxes you will see the effect of the change in the Edit view under the Wizard. Click on the 'Finish'
button to import the data:
© 2008 DesignBuilder Software, Ltd.
Building Models
83
At the building level, you can select, move and delete DXF data. When you select DXF data, you may
need to zoom in to make the selection. You can move DXF file in 3-D and snap the data to the edges of
blocks:
Move the DXF data on top of the existing block and snap to an edge end-point:
© 2008 DesignBuilder Software, Ltd.
84
DesignBuilder 1.5
When you have imported the DXF data you can use the Measure tool to check that the dimensions are
correct.
3.2.7
Exporting Geometric Data
The model geometric data can be exported in formats:
· 3-D DXF
3.2.7.1
Exporting 3-D DXF
You can export the geometry of the current building model in 3-D DXF format using the Export 3-D DXF
model command from the File > Export menu. This opens the 3-D DXF Export dialog:
© 2008 DesignBuilder Software, Ltd.
Building Models
85
Choose one of two options:
· 1-Whole model with details - The entire building model is exported including 3-D details such as
window frames, 3-D building elements etc. This option can be useful for exporting for visualisation
and further processing in other software such as SketchUp (image below)
· 2-Zones - The building model is exported showing only zones. This option can be useful for
visualising the geometry of the model used in simulations.
© 2008 DesignBuilder Software, Ltd.
86
DesignBuilder 1.5
Example 3-D DXF Output - Whole model with details
The above model was created in DesignBuilder, exported in DXF format using the Whole model with
details option and Imported into SketchUp where details such as textures, trees and people were added.
Note: when importing DXF files into SketchUp be sure to set the scale options on the Open dialog.
3.2.8
Working with Buildings (Site Level)
At the site level you can:
·
·
·
·
Add new buildings,
Copy, delete and change the position of existing buildings.
Change the site orientation.
Enter site Model Data including information on the site location, weather data etc.
3.2.8.1
Create New Building
You can add one or more new buildings from the site level.
© 2008 DesignBuilder Software, Ltd.
Building Models
87
Note that each building has its' own set of Model Options and is simulated separately but shares site
Model Data with the other buildings on the site.
3.2.8.1.1 Create New Building - Model
Select the type of building model you wish to create from the list of options. Your selection will depend on
what you want to do with the building model and the amount of data available. Some typical options are:
· Draw building + standard data - Recommended for general-purpose modelling.
· Single zone + simplified data - Early design stage analysis of building components, facade and
cooling options.
· Parametric building + standard data - Buildings of standard form (rectangular, L-shaped or
courtyard).
You can adjust the Model Options later if necessary using the Model Options dialog.
3.2.8.1.2 Create New Building - Default Data
This tab allows you to define the templates used to populate the new building:with default Model Data.
Construction
Select the construction template to use as a source of default fabric data for the building.
Activity
Select the activity template to use as a source of default activity-related data for the building.
This will set the following default data:
·
·
·
·
·
·
Occupancy levels and timing, holidays etc
Metabolic rates
Levels of equipment use
Heating and cooling temperature setpoints
Illuminance requirements
Fresh air requirements
Glazing
The glazing template is used as a source of default window, shading and percentage glazing data for the
building.
Lighting
The lighting template is used as a source of default lighting and lighting control data for the building.
HVAC
The HVAC template is used as a source of default data for the HVAC equipment to heat and cool the
building.
© 2008 DesignBuilder Software, Ltd.
88
3.2.9
DesignBuilder 1.5
Working with Blocks (Building Level)
Blocks are the basic elements used to create a DesignBuilder model. Three types of block can be added
to the building:
· Building Blocks are composed of building elements such as walls, floor slabs and roofs and may be
partitioned internally to form a number of zones.
· Outline Blocks are used to help in the creation of more complex building block geometry.
· Component Blocks are used to create visual, ground and shading structures which do not contain
zones.
All block types are created at the Building Level in the same way and are drawn using perimeters which
can be extruded either horizontally or vertically.
This section describes the various operations involved in creating and editing blocks at the building level.
To create or edit a block you must first go to the building level and you can do this by clicking on the
building entry in the navigator or if you're at the site level and you want to edit an existing building, you can
double-click on the building in the 'Edit' screen.
Go to building level
Either operation will take you to the building level:
© 2008 DesignBuilder Software, Ltd.
Building Models
3.2.9.1
89
Adding Blocks
To add or create a new block, first go to the building level (if you are not already there) and click on the
Add new block tool. If you've just created a new building, the Add new block tool is automatically
activated. A block is created by drawing the base perimeter of the block using one of the perimeter
shapes such as a polygon. The dimensions of the block are those measured from the outside, the height
of the block is the floor-floor height.
© 2008 DesignBuilder Software, Ltd.
90
DesignBuilder 1.5
Please refer to perimeter shapes for details of drawing perimeters. After drawing a perimeter, a block will
be automatically extruded by the Height entry in the ‘Drawing options’ settings or if the Auto-complete
block setting is switched off, the perimeter can be dragged to form the extrusion. To help in setting the
correct extrusion height, the increment snap setting can be used which enables the drag movement to
jump by any defined increment. Alternatively, you can simply type in an extrusion height and press the
enter key:
When a block has been placed, additional blocks can be drawn onto any surface of the block to form
© 2008 DesignBuilder Software, Ltd.
Building Models
91
more complex aggregate blocks. As you move the mouse cursor across the faces of an existing block,
each face will change colour from grey to blue to indicate the active drawing plane. You can lock the
active drawing plane by pressing the SHIFT key, which allows you to move the cursor off the current face
while keeping the plane active. You can also lock the active drawing plane to the ground plane by moving
the cursor over the background area and pressing the SHIFT key, this is particularly helpful in avoiding
the selection of the wrong plane when drawing a vertically extruded block adjacent to an existing block.
Once you’ve clicked the first data point into the active drawing plane, it becomes locked regardless of
whether or not the SHIFT key is pressed until the perimeter has been completed or the tool is cancelled.
In the example below the vertical plane shown in blue has been selected, the shape of the block will be
drawn in this plane and the volume created by extruding normal to it.
When a block is added to the surface of another block, a geometric link is automatically created between
the two blocks:
© 2008 DesignBuilder Software, Ltd.
92
DesignBuilder 1.5
A hole can be added to the mating surface of this link (the inter-block partition) in order to form one
contiguous space:
© 2008 DesignBuilder Software, Ltd.
Building Models
93
Note: the Merge zones connected by holes Model option must be set if you wish the two zones in the 2
blocks to be treated as one zone in the thermal calculations.
As already illustrated, a block perimeter can be drawn on the ground plane or onto the surface of an
existing block in which case the perimeter is extruded normal to the surface on which it is drawn.
Drawing in a vertical plane without reference to an existing block
To create horizontal extrusions from a vertical plane, the first perimeter line can be aligned with the Z-axis
using the axis snap:
© 2008 DesignBuilder Software, Ltd.
94
DesignBuilder 1.5
The protractor can be used to place the second line in order to accurately define the orientation of the
plane relative to the base or ground plane:
Alternatively, the orientation of the plane can be defined using the first line:
© 2008 DesignBuilder Software, Ltd.
Building Models
95
Snapping the second line to the Z-axis then forms the horizontal extrusion:
Once a vertical plane has been defined it will be ‘remembered’ until the ‘Add new block’ command is
cancelled, so the perimeter can be ‘unwound’ using the ESC key or the right-click menu ‘Undo last point’
© 2008 DesignBuilder Software, Ltd.
96
DesignBuilder 1.5
entry and any perimeter shape drawn into the stored plane:
After drawing the last perimeter line to connect to the perimeter start point, the perimeter can then be
dragged to create a horizontally extruded block:
© 2008 DesignBuilder Software, Ltd.
Building Models
97
3.2.9.1.1 Block Creation Options
The block creation options enable you to control the way a block is drawn:
·
·
·
·
·
Block type
Form
Height
Wall Thickness
Auto-complete block
These options are accessed through the ‘Drawing options’ data panel, which is displayed when you click
on the Add new block tool:
© 2008 DesignBuilder Software, Ltd.
98
DesignBuilder 1.5
Under development
COMBINED CONSTRUCTIONS
The diagram below illustrates how blocks should be defined and how zone volumes and surface
dimensions are derived from the parent block when using Combined constructions.
© 2008 DesignBuilder Software, Ltd.
Building Models
99
The important things to note are:
1. The dimensions of the block are measured from the outside of external walls..
2. The height of the block is the floor-floor height.
3. Blocks include their own floor slab but not the floor slab of any block above. So the block height is
measured from the bottom of the block floor slab to the bottom of the floor slab of the block above.
4. Flat roofs are placed on top of the block - so when drawing a block with a flat roof you should
exclude the roof construction in the height.
5. External floors are placed under the block, so when drawing a block with an external floor you
should exclude the external floor construction thickness in the height.
6. Surfaces extend the full height of the block.
7. Surfaces extend horizontally to the inner surface of external walls and to the centre line of
partitions. See below for more on zone/surface dimensions.
8. Zone surface dimensions (shown in green dotted lines above) are measured from inner edges of
outer walls and the centre line of partitions.
Show diagram for Separate Constructions
© 2008 DesignBuilder Software, Ltd.
100
DesignBuilder 1.5
The zone volume used in ventilation calculations is the actual inside volume (shown in yellow in the
diagram above). These inside zone surface dimensions are used to define surface heat transfer areas in
simulations and other calculations.
Zone perimeter (plan view)
See Construction Location for information on the meaning of the Construction Model data.
Also see Constructions for how to edit the construction configuration.
Three types of block are available:
· Building Blocks are used to draw the model or a section of the model.
· Outline Blocks are used to help in the creation of building block geometry and do not affect the
model.
· Component Blocks are used to create visual and shading structures which do not contain zones.
A building block represents the outer shell of the model or part of the model. A finished block comprises a
set of building elements, which may include external walls, roofs and floor slabs, the constructions of
which are determined from the current building construction model data. Similarly, using opening model
data, block facades are automatically created with the required configuration of windows, doors, vents and
solar shading devices:
© 2008 DesignBuilder Software, Ltd.
Building Models
Solar shading devices are displayed in the visualisation screen:
© 2008 DesignBuilder Software, Ltd.
101
102
DesignBuilder 1.5
A block may be divided internally into any number of zones by drawing partitions and where needed, voids
or courtyards can also be incorporated:
© 2008 DesignBuilder Software, Ltd.
Building Models
103
Custom openings (windows, doors, etc.) can be added to block facades by going to the surface level and
using the 'Draw window' family of commands.:
© 2008 DesignBuilder Software, Ltd.
104
DesignBuilder 1.5
Blocks can be moved, copied and rotated. Blocks can also be cut or stretched and block faces can be
dragged to different positions.
An outline block is created and edited in exactly the same way as a building block but is just a 3-D shape
without associated building elements such as walls, floors, roofs, etc.
Because Outline blocks are not part of the model they do not appear in the Navigator panel.
Outline blocks are very useful in the creation of more complicated models. Because they are relatively
simple objects, they are much faster to create, copy, move, etc. than conventional building blocks and can
be manipulated freely without worrying about intersections. Once the required geometry has been
established, outline blocks can be converted to conventional blocks. Outline blocks can also be used as a
temporary device to create drawing planes from which building blocks or other outline blocks can be
extruded. You can remove all outline blocks from a model by selecting Remove all outlines from the Edit
menu.
For example, to create a dormer window:
© 2008 DesignBuilder Software, Ltd.
Building Models
105
First set the Block type to 'Outline block' and lock the active drawing plane to the front surface of the first
floor block by selecting it and pressing the SHIFT key, then draw the base line of the dormer face
perimeter:
© 2008 DesignBuilder Software, Ltd.
106
DesignBuilder 1.5
Create the angle of the dormer pitch using the Protractor:
and then complete the perimeter:
© 2008 DesignBuilder Software, Ltd.
Building Models
Now drag the dormer perimeter all the way through the main roof block:
© 2008 DesignBuilder Software, Ltd.
107
108
DesignBuilder 1.5
Select the dormer block and click on the Divide block tool, making sure that the ‘Cutting method’ on the
‘Drawing options’ data panel is set to ‘Select plane’ and click on the forward facing plane of the main roof
block to create a cut in the dormer block in the plane of the roof:
© 2008 DesignBuilder Software, Ltd.
Building Models
109
Click again to finish the cut and then select the section of the dormer block that is not required and delete
it:
:
Select the dormer outline block and click on the Convert outline block tool to complete the process:
© 2008 DesignBuilder Software, Ltd.
110
DesignBuilder 1.5
The finished block after adding openings:
© 2008 DesignBuilder Software, Ltd.
Building Models
111
Note: Sometimes when converting outline blocks to component or building blocks you will notice that the
new block has a very slightly different size to the original outline block. This can happen when
DesignBuilder needs to slightly adjust the size in order to generate a viable zone with 3-D slab surfaces. It
is therefore advisable when using outline blocks to create complex geometries to draw and convert the
outline blocks individually. This avoids adjacencies between touching outline blocks from getting 'broken'
when they are converted 'en-masse'.
There are 3 types of component block:
· 1-Standard - used for shading, reflection and visualisation.
· 2-Ground - used for setting ground adjacency, shading, reflection and visualisation.
· 3-Adiabatic - used for setting adiabatic adjacency, shading, reflection and visualisation.
Component blocks are drawn in the same way as Building blocks but selecting the Block type in the
Drawing Options panel as 3-Component block.
Each Component block has its own Component block material, transmittance schedule and shade/not
shade model data. To edit this you must first go to the component block itself by double-clicking on it in
the model edit screen or clicking on the entry in the Navigator. Alternatively, component blocks inherit
default model data from the building level so if you leave the component block model data in its default
state (blue) you can change all model data in one go by making the edit at the building level.
All component blocks cast shadows in Visualisations.
© 2008 DesignBuilder Software, Ltd.
112
DesignBuilder 1.5
STANDARD COMPONENT BLOCK
Sometimes it can be useful to create structures such as pillars, shading obstructions and balconies which
do not contain zones. Standard component blocks can be used for modelling such structures as they
are treated simply as shading/reflection surfaces in simulations without any zones.
Standard component blocks are visible in Visualisations, using the texture associated with the Component
block material as set on the Constructions tab under the Component Block header. They can be used to
cast shadows and reflect solar radiation and light in simulations by checking the Component block
shades and reflects model data under Component Blocks on the Constructions tab.
The image below shows some typical uses of Standard component blocks.
GROUND COMPONENT BLOCK
Ground component blocks can be used as a convenient way to set the adjacency of any touching
building block surfaces as being 'adjacent to ground'. In the model below the Ground block (shown in
green) has been positioned in contact with the building block to create a ground adjacency in the part of
the Building block surface in contact with the Ground block.
Standard component blocks are visible in Visualisations, using the texture associated with the Component
block material as set on the Constructions tab under the Component Block header. They can be used to
cast shadows and reflect solar radiation and light in simulations by checking the Component block
shades and reflects model data under Component Blocks on the Constructions tab.
© 2008 DesignBuilder Software, Ltd.
Building Models
View from building level
© 2008 DesignBuilder Software, Ltd.
113
114
DesignBuilder 1.5
View from zone level
Ground component blocks are displayed in the visualisation screen using the Ground texture as set at the
site level.
More information on ground modelling can be found in the Ground Modelling topic.
Note: The adjacencies established by contact with ground blocks can be overridden by making settings
under Adjacency in Constructions model data at the surface level.
ADIABATIC COMPONENT BLOCKS
Adiabatic component blocks can be used as a convenient way to set the adjacency of any touching
building block surfaces to 'adiabatic'. Adiabatic surfaces do not transfer heat beyond their outer surface
and are often used for modelling boundaries with other spaces that can be considered to be at roughly the
same temperature as the zone. In the model below the Adiabatic block (shown in red) has been
positioned in contact with half of the South facade of the building to model the effect of an adjacent
building which does not form part of the DesignBuilder model. The touching adiabatic component block
creates an adiabatic adjacency in the part of the Building block surface in contact with the Adiabatic block.
Standard component blocks are visible in Visualisations, using the texture associated with the Component
block material as set on the Constructions tab under the Component Block header. They can be used to
cast shadows and reflect solar radiation and light in simulations by checking the Component block
shades and reflects model data under Component Blocks on the Constructions tab.
View from building level
© 2008 DesignBuilder Software, Ltd.
Building Models
115
View from zone level
Some standard block forms are provided to facilitate the creation of blocks representing specific building
geometries:
·
·
·
·
General extrusion
Sloped wall
Pitched roof
Dome
You can select the block form from the Drawing Options data panel in the bottom left of the screen when
the Draw Block command is active.
Once a block has been created, it is possible in some cases to change to a new form by navigating to the
block and opening the Model options dialog.
The general extrusion block form is probably the most useful form. You create a general extrusion block
by drawing a perimeter using a number of pre-defined shapes and then extruding the perimeter by
whatever distance is required. If you use the polygon perimeter shape you can create extrusions in both
horizontal and vertical planes (or even in sloped planes).
© 2008 DesignBuilder Software, Ltd.
116
DesignBuilder 1.5
The various methods of drawing general extrusions are explained under Adding Blocks. Circular and
rectangular perimeter shapes are used to create cylindrical and rectilinear prismatic extrusions from
horizontal planes:
This block form is used to create blocks on horizontal planes with uniformly sloping walls. Sloping wall
blocks can be created using any perimeter shape (polygon, rectangle or circle):
© 2008 DesignBuilder Software, Ltd.
Building Models
117
The wall angle is defined using the ‘Slope’ setting in the ‘Drawing options’ data panel and the blocks are
automatically truncated by the ‘Height’ setting:
© 2008 DesignBuilder Software, Ltd.
118
DesignBuilder 1.5
The pitched roof block form automatically generates a pitched roof from a perimeter drawn on a horizontal
plane. Pitched roof blocks can be created using any perimeter shape (polygon, rectangle or circle):
The slope of the roof is defined using the ‘Roof slope’ setting in the ‘Drawing options’ data panel. A
pitched roof can be created with hips or gable ends using the ‘Gable Roof’ setting:
If you draw a pitched roof on top of an existing block, you can control the overhang or the depth of the roof
eaves using the ‘Roof overlap’ setting:
© 2008 DesignBuilder Software, Ltd.
Building Models
119
Voids
Where roofs are to be created on top of conventional blocks that contain voids and the voids are to be
automatically incorporated within the pitched roof, the Automatically include voids from lower blocks
Model options switch must be switched on before drawing the roof perimeter.
The dome block form is used to create hemispherical blocks and can only be created using the circular
perimeter shape:
After drawing a vertically extruded block perimeter on a horizontal plane, the block will be automatically
extruded using the Height setting, if the Auto-Complete Block option is switched on or the View Rotation
© 2008 DesignBuilder Software, Ltd.
120
DesignBuilder 1.5
has been set to 'Plan'.
After drawing a vertically extruded block perimeter on a horizontal plane, the block will be automatically
extruded by the Height setting if the Auto-Complete Block option is switched on or the View Rotation has
been set to 'Plan'. With this option switched off (or in the case of a non-horizontal drawing plane), the
perimeter can be dragged along an axis normal to the perimeter to obtain the required extrusion.
3.2.9.2
Editing blocks
The geometry of blocks can be modified using the following tools:
· Drag block face
· Divide block
Outline blocks can be converted to building blocks using the Convert outline block tool.
3.2.9.2.1 Drag Block Face
The topology of a block can be edited using the 'Drag face' tool which allows you to select a block surface
and drag it along an axis, normal to the surface. To edit a block topology first go to the building level,
select the block that you want to modify and click on the 'Drag face' tool. Then move the mouse cursor to
the surface that you want to move. As you move the cursor across the block surfaces, each surface will
highlight to help in selecting the required surface. When the mouse cursor is over the required surface,
click to start dragging it:
© 2008 DesignBuilder Software, Ltd.
Building Models
121
Drag the surface using the mouse or key-in the distance to shift the surface by the required amount:
© 2008 DesignBuilder Software, Ltd.
122
DesignBuilder 1.5
3.2.9.2.2 Divide Block using Cutting Tool
Blocks can be cut (i.e. divided into 2) using the Divide Block Tool. To cut or divide a block first go to the
building level, select the block that you want to modify and click on the Divide block toolbar icon. Blocks
are divided using a plane which can be defined using one of 2 methods:
· 1-Draw plane - you define the plane by clicking on 3 points.
· 2-Select plane - you define the plane by selecting an existing plane in the model.
DRAW PLANE METHOD
The Draw plane cutting method involves drawing two lines which define the plane. For example to cut a
pitched roof to fit flush with a rotunda:
© 2008 DesignBuilder Software, Ltd.
Building Models
123
Because the geometry is fairly complicated, it's advisable to use an outline block to generate the
intermediate geometry and then convert the block to a building block after the editing process is complete.
So, from the building level, click on the Add new block tool, select 2-Outline block as the block type, set
the perimeter shape to 1-Polygon and the Height to the same height as the rotunda, then draw a
conventional vertical extrusion to fit flush to the rotunda. In order to trace round the base of the rotunda,
it's probably easier to set the view rotation to 'Plan', click on to the ground plane and press SHIFT to lock
the plane before placing the first perimeter point:
© 2008 DesignBuilder Software, Ltd.
124
DesignBuilder 1.5
When tracing around a perimeter by snapping from end-point to end-point, it can be helpful to switch off
the direction snaps and the drawing guides to prevent them from interfering with the point snaps.
Completing the perimeter:
© 2008 DesignBuilder Software, Ltd.
Building Models
125
Click on the outline block to select it and then click on the 'Divide block' tool and make sure that the
'Cutting method' is set to 1-Draw plane in the Drawing Options data panel. Switch the protractor on and
move the cursor over the end face of the selected block, the surface will highlight to indicate that it's
become the active drawing plane. Press the SHIFT key to lock the drawing plane and then locate the
cursor 4m from the base of the block using edge snap:
© 2008 DesignBuilder Software, Ltd.
126
DesignBuilder 1.5
Click to place the beginning of the first cutting plane line, then place the end of the line to intersect the
face edge with a pitch angle of 30°:
© 2008 DesignBuilder Software, Ltd.
Building Models
127
Orbit to make the back face of the block visible. Move the mouse cursor over the back face and when it
highlights, press the SHIFT key to lock the plane. Place the second cutting plane line to snap to the local
X-axis of the back face:
© 2008 DesignBuilder Software, Ltd.
128
DesignBuilder 1.5
Click to complete the cutting plane. The blocks that will be produced by the cut are displayed in red and
green, depending on which side of the cutting plane they lie. At this point, you can choose to cancel the
cut by pressing the ESC key or selecting 'Cancel Cut' from the right-click menu.
© 2008 DesignBuilder Software, Ltd.
Building Models
Click again to complete the cut and then select and delete the block that isn't needed:
© 2008 DesignBuilder Software, Ltd.
129
130
DesignBuilder 1.5
Go through a similar process to create the other pitch. You may need to switch off the drawing guides and
mid-point snap to prevent them from interfering with the protractor and edge snap:
© 2008 DesignBuilder Software, Ltd.
Building Models
Click to create the cutting plane:
© 2008 DesignBuilder Software, Ltd.
131
132
DesignBuilder 1.5
Click again to make the final cut and then select and delete the block that isn't part of the finished
structure:
© 2008 DesignBuilder Software, Ltd.
Building Models
The outline block can then be selected and converted to a building block:
© 2008 DesignBuilder Software, Ltd.
133
134
DesignBuilder 1.5
SELECT PLANE METHOD
The Select plane method of cutting a block uses an existing plane to define the cutting plane. It can be
demonstrated by modelling a roof offshoot:
© 2008 DesignBuilder Software, Ltd.
Building Models
135
Click on the 'Add new block' tool, select 2-Outline block as the block type and set the perimeter shape to
1-Polygon. Switch the protractor on and move the mouse cursor to the back face of the offshoot. When
the cursor is over the back face, press the SHIFT key to lock the drawing plane and snap the protractor to
the upper edge end-point:
© 2008 DesignBuilder Software, Ltd.
136
DesignBuilder 1.5
Draw the first perimeter line at a 45° pitch and move the cursor to intersect with the back face upper edge
mid-point drawing guide and click to set the end-point:
© 2008 DesignBuilder Software, Ltd.
Building Models
Move the cursor to snap to the other end-point of the back face upper edge and then complete the
perimeter:
Now drag the outline block face through the main roof block:
© 2008 DesignBuilder Software, Ltd.
137
138
DesignBuilder 1.5
Select the offshoot outline block and click on the ‘Cut block along plane’ tool, making sure that the ‘Cutting
method’ on the ‘Drawing options’ data panel is set to 'Select plane’ and click on the forward facing plane
of the main roof block to create a cut in the offshoot block in the plane of the roof:
© 2008 DesignBuilder Software, Ltd.
Building Models
139
Click again to finish the cut and then select the section of the offshoot roof block that is not required and
delete it:
© 2008 DesignBuilder Software, Ltd.
140
DesignBuilder 1.5
Select the roof offshoot block and click on the 'Convert selected outline blocks to building blocks' tool to
complete the process:
In some circumstances, resulting blocks may not be able to be converted to building blocks due to
geometrical limitations. In this case, the block will be displayed in a sepia colour to indicate that it cannot
be converted.
3.2.9.2.3 Edit Block Geometry Dialog
You can edit certain aspects of a building block geometry by clicking on the 'Building model options' icon
while at the block level. This opens the Model Options dialog box:
© 2008 DesignBuilder Software, Ltd.
Building Models
141
At the block level, the Block tab on the Model Options data dialogue box is enabled and allows you to
change the Form of the block and to modify pitched roof assignment.
To change the form of the current block, make a selection from the 'Form' drop list. When you change the
form of a block from an 'Extruded' form to 'Pitched Roof' or 'Sloping Walls' the original form will be
remembered so that even if you have edited the block by cutting it or dragging a face, when you convert
the form back to 'Extruded', the original form will be restored.
The Pitched Roof/Wall Construction Transition settings allow you to control which elements within a
block will be assigned pitched roof construction, either by disallowing pitched roof construction altogether
or by adjusting the element slope to determine which elements should be identified as pitched roofs. The
'Roof-wall transition angle' is the angle from the horizontal below which the element will be considered a
roof.
3.2.9.2.4 Wall Thickness
The Wall thickness is used to generate the geometric thickness of the external wall elements of a
building block. It is a significant parameter because zones are generated from the internal dimensions of
the block which are derived from the external block geometry and the block wall thickness. So the Wall
thickness influences:
1. Calculation of room air volume (thicker block walls mean less zone air volume).
2. Size and shape of zones, especially roof zones (below).
3. Visual representation of external walls in rendered view (below).
The default setting is automatically generated from the overall thickness of the external wall construction
set in Construction Model data panel but can be overridden by typing in the required value.
The block Wall thickness can be changed once the block has been drawn from the Block tab of Model
© 2008 DesignBuilder Software, Ltd.
142
DesignBuilder 1.5
options dialog when at block or lower level.
The Construction that determines the thermal characteristics of the external walls can be edited in
Constructions Model data.
Important Notes on Wall thickness
· The external wall thickness is uniform for all block surfaces.
· The wall thickness does not affect the thermal properties of the wall. Wall thermal
properties are based purely on the construction data specified for the wall.
· A small value of Wall thickness will mean that the zones dimensions will be very similar to
the block dimensions (below).
The Wall thickness is also entered when Converting an Outline block to a Building block.
Tip: Enter a low value of Wall thickness if:
· The block is a roof with low roof slope angle sloping roof elements - see Example 1 below.
· The block is mainly glazed - see Example 2 below.
The lowest value of wall thickness allowed is 0.01m and the highest allowed value is 2.0m.
ROOF BLOCKS - EXAMPLE 1
Select a small Wall thickness when creating a roof block having very shallow slope. This example shows
a 2 block, 2 zone model, the top block (selected) representing a roof having shallow slope angles.
Using a Wall thickness 0f 0.01m gives good results as the roof zone covers most of the block floor area
(below).
© 2008 DesignBuilder Software, Ltd.
Building Models
143
Using a large Wall thickness makes it impossible for DesignBuilder to generate a floor covering the
whole block floor area giving Poor results (below).
In the image above the white areas of the block floor will not form part of the model which is probably not
what the user had in mind.
CURTAIN GLAZING - EXAMPLE 2
When modelling continuous glazing for curtain walls, atria, greenhouses etc. it is often necessary to
model glazing joining at the corners. It is not possible for windows to literally meet in this way because
EnergyPlus requires all openings (windows, doors etc) to be placed on a parent surface with at least a
small gap between the opening and the parent surface edge. But by using a low value of block thickness
you can give the appearance of adjacent windows as shown below.
A small Wall thickness, below, allows the glazing to cover most of the wall giving Good results (below).
© 2008 DesignBuilder Software, Ltd.
144
DesignBuilder 1.5
A larger Wall thickness, below, requires more area to cater for the walls joining at the corners and the
glazing does not meet 'round the corner' giving Poor results (below).
r
3.2.9.2.5 Convert Outline Block
To convert an Outline block to a Building block, or Component block select the blocks that you want to
convert and then click on the Convert selected outline block tool. This opens the Convert Outline
Block Options dialog below.
© 2008 DesignBuilder Software, Ltd.
Building Models
145
Select the type of block to convert to:
· Building block
· Component block
When converting to a Building block you can also enter the Wall thickness of the block.
3.2.9.2.6 Transfer Blocks
You can move blocks from one building to another using the Transfer blocks command accessed from
the Edit menu when the site contains more than 1 building. This starts the Transfer blocks dialog below.
Select the building containing the blocks to be copied and the building to receive the blocks and Press
OK.
You should check before starting the transfer that none of the source blocks overlap with blocks
in the destination building. Even a small overlap will cause the process to fail.
Note: the operation cannot be undone and it clears any existing undo/redo information.
© 2008 DesignBuilder Software, Ltd.
146
DesignBuilder 1.5
3.2.10 Working within Blocks
This section describes the various operations involved in partitioning a block to create zones and adding
courtyards to blocks. Before you start to draw partitions or courtyards, you first need to go to the block that
you want to edit and you can do this by clicking on the block entry in the navigator or by double-clicking on
the block in the 'Edit' screen, if you're at the building level.
Go to block level
Either of these operations will take you to the block:
© 2008 DesignBuilder Software, Ltd.
Building Models
147
3.2.10.1 Zone Block by Drawing Partitions
Building blocks can be divided into any number of zones by drawing partitions inside the block. To start
drawing partitions, click on the 'Draw partitions' tool. You can place partitions freely within a block either
free-standing or snapped to an external block wall or existing partition. Partitions can be positioned using
the snaps, drawing guides and protractor. A partition doesn't need to be snapped to a wall element, you
can drag a partition across a wall and when you click the end-point, it will be automatically trimmed to the
wall.
You can enter the thickness of the first partition drawn in the block and subsequent partitions take on the
same thickness as the first.
Note for partitioning large models
By default, blocks are automatically re-zoned as soon as complete zone perimeters are formed by
drawing partitions. In order to speed up the process of adding partitions, particularly in the case of
large and complex blocks, the block zoning process can be postponed until partitioning has been
© 2008 DesignBuilder Software, Ltd.
148
DesignBuilder 1.5
completed. To do this, open the Model options dialog and switch off the Automatic block zoning
option under the Miscellaneous Edit header on the Advanced tab. When partitioning has been
completed, the block can be manually re-zoned by selecting the Rezone block command from the
Tools menu. Partitions drawn with the Automatic block zoning option switched off are called Outline
partitions and are shown in blue.
Click the partition end-point on the outside of the wall and it's automatically trimmed:
© 2008 DesignBuilder Software, Ltd.
Building Models
149
When you draw a partition or a series of partitions (stream), you can undo the last point placed by
pressing the ESC key or selecting 'Undo last point' from the right-click menu.
You can also terminate a partition stream anywhere by selecting 'End stream' from the right-click menu
(or by pressing the ENTER key):
© 2008 DesignBuilder Software, Ltd.
150
DesignBuilder 1.5
When partitions or partition streams are placed that don't connect with anything at either or both ends,
they are called hanging partitions and can be used to add thermal mass to zones:
© 2008 DesignBuilder Software, Ltd.
Building Models
151
Once you've placed partitions that divide existing zones within a block, the block is re-zoned automatically:
© 2008 DesignBuilder Software, Ltd.
152
DesignBuilder 1.5
When you partition complex blocks rather than simple vertical extrusions, partitions are automatically cut
to fit within the block:
In some cases, if the geometry is complex, it can be possible to create a zone that comprises several
geometric bodies which are physically separated from each other. For example, in the case of a
horizontally extruded 'C' shape:
© 2008 DesignBuilder Software, Ltd.
Building Models
If a partition is drawn as shown:
© 2008 DesignBuilder Software, Ltd.
153
154
DesignBuilder 1.5
The partition and resulting zone will be cut to form what appears to be two partitions and two zones:
© 2008 DesignBuilder Software, Ltd.
Building Models
However the two resulting zones are in fact two geometric bodies within one zone:
© 2008 DesignBuilder Software, Ltd.
155
156
DesignBuilder 1.5
While this geometry is perfectly acceptable for the default EnergyPlus solar calculations (see Model
Options), it cannot be processed by the more rigourous Full exterior and interior solar distribution option. If
this latter option is required, you can either model the geometry as two separate blocks or cut the block.
3.2.10.2 Hanging and Outline Partitions
Hanging partitions are partitions that do not create zones because they do not connect at both ends with
other walls/partitions. Hanging partitions are created in the same way as ordinary partitions using the
Draw partition tool, but are finished by pressing <Enter> (or the End partition stream command from the
right click menu) to define the end of a partition stream. They are shown in blue (below).
© 2008 DesignBuilder Software, Ltd.
Building Models
157
Hanging partitions are modelled non-geometrically in EnergyPlus as Internal thermal mass.
Outline partitions
Also if Automatic block zoning is switched off, all new partitions are treated as outline partitions (shown in
blue and do not create zones) until converted to standard partitions by using the Rezone block command
from the Tools menu.
3.2.10.3 Virtual Partitions
A virtual partition is a partition between 2 zones which exists purely to sub-divide the space up and has no
corresponding wall in the actual building.
Virtual partitions are commonly used for separating perimeter zones from core zones when there is to be
different HVAC provision or when carrying out daylighting or solar overheating studies in situations where
a large open plan space is subject to a high level of solar gain around the perimeter. Virtual partitions can
be placed to create separate perimeter and core zones so that the local effect of the solar gain in the
perimeter zone may be calculated. In the absence of virtual partitions, the risk of overheating could be
underestimated due to the distribution of solar gain throughout the open plan space.
When drawing partitions you can set the Partition type to 2-Virtual in the Drawing option panel. Also for
partitions that have already been created you can freely switch the partition type between 1-Standard and
2-Virtual using the same control.
Virtual partitions are modelled using a hole that fills the whole surface area. You cannot draw custom
openings on a virtual partition. The model options for controlling the effect of holes equally apply to virtual
partition holes:
· Merge zones connected by holes
· Model holes (including holes in virtual partitions)
· Model airflow through internal openings using flow per unit area
© 2008 DesignBuilder Software, Ltd.
158
DesignBuilder 1.5
3.2.10.4 Creating Voids (Courtyard Spaces) Within Blocks
To create an external courtyard within a block, go to the required block by clicking on the navigator entry
or double-clicking the block in the 'Edit' screen and then click on the 'Draw void perimeter' tool. You can
the select a perimeter shape and set the required wall thickness in the 'Drawing Options' data panel:
After completing the perimeter, a courtyard is automatically generated within the block:
© 2008 DesignBuilder Software, Ltd.
Building Models
159
3.2.10.5 Edit Block Options
You can edit certain aspects of a building block geometry by clicking on the 'Building model options' icon
while at the block level. This opens the Model Options dialog box:
© 2008 DesignBuilder Software, Ltd.
160
DesignBuilder 1.5
At the block level, the Block tab on the Model Options data dialogue box is enabled and allows you to
change the Form of the block and to modify pitched roof assignment.
To change the form of the current block, make a selection from the 'Form' drop list. When you change the
form of a block from an 'Extruded' form to 'Pitched Roof' or 'Sloping Walls' the original form will be
remembered so that even if you have edited the block by cutting it or dragging a face, when you convert
the form back to 'Extruded', the original form will be restored.
The Pitched Roof/Wall Construction Transition settings allow you to control which elements within a
block will be assigned pitched roof construction, either by disallowing pitched roof construction altogether
or by adjusting the element slope to determine which elements should be identified as pitched roofs. The
'Roof-wall transition angle' is the angle from the horizontal below which the element will be considered a
roof.
3.2.11 Working within Zones
This section describes the operations involved in placing light sensors within zones. To place light sensors
within a zone, you first need to go to the zone that you want to modify. You can do this from the block level
either by clicking on the navigator entry or double-clicking on the zone floor in the 'Edit' screen if you're at
the block level.
Go to zone level
© 2008 DesignBuilder Software, Ltd.
Building Models
Either of these operations will take you to the zone:
© 2008 DesignBuilder Software, Ltd.
161
162
DesignBuilder 1.5
3.2.11.1 Placing Light Sensors
If you switch zone Lighting Control on, a light sensor will be displayed as a blue rectangle with the
number '1' inside it indicating 'Light sensor 1'. By default Light sensor 1 is positioned in the geometric
centre of the zone.
If you now switch on the Second Lighting Area, a second light sensor will be displayed with a number '2'
inside it:
To move a light sensor to a different location, move the mouse cursor over the required sensor and click
on it to select it and then Move it to wherever you want within a floor perimeter:
© 2008 DesignBuilder Software, Ltd.
Building Models
163
Note: You can set the height of the working plane (and hence the z-position of the lighting sensor) on the
Advanced tab of the Model options dialog.
3.2.12 Working with Surfaces (Surface Level)
This section describes the operations involved in creating surface openings and sub-surfaces. To create
openings and sub-surfaces in a zone surface, you first need to go to the surface that you want to modify.
You can do this from the zone level either by clicking on the navigator entry or double-clicking on the zone
surface in the 'Edit' screen, if you're at the zone level.
Go to surface level
© 2008 DesignBuilder Software, Ltd.
164
DesignBuilder 1.5
Either of these operations will take you to the surface:
© 2008 DesignBuilder Software, Ltd.
Building Models
165
When working with surfaces, switching to Normal view rotation can be helpful in orientating openings and
sub-surfaces:
Openings
You can draw, move, clone (copy), rotate and delete the following types of opening:
· Window
© 2008 DesignBuilder Software, Ltd.
166
·
·
·
·
DesignBuilder 1.5
Sub-surface
Hole
Door
Vent
3.2.12.1 Draw Window
Before activating the 'Draw window' tool, you are given the option of keeping any default surface
openings. If you choose to keep these openings, they will not be subsequently affected by any changes to
the surface attribute data and must be deleted or edited manually.
To add a window to a surface, click on the 'Draw window' tool. If you have opted to keep the default
openings, they will be converted to custom openings:
On the other hand, if you un-check the 'Keep default openings' option, all default openings will be
removed. Select the perimeter shape that you require and then move the mouse cursor to place the
window origin. As you move the mouse cursor over the surface, distance guides will be displayed from
each of the surface vertices to help in placing the window origin. If the increment snap is switched on, the
origin will snap in increments from the vertex that's nearest to the mouse cursor:
© 2008 DesignBuilder Software, Ltd.
Building Models
167
You can lock the origin to a particular vertex by moving the mouse cursor close to the vertex and pressing
the SHIFT key and keeping it pressed until you actually place the origin. This can be helpful if you want to
place a window relative to a vertex at the other end of the surface:
© 2008 DesignBuilder Software, Ltd.
168
DesignBuilder 1.5
Having placed the window origin, you can then draw the window using the selected perimeter drawing
mode, for details of drawing perimeters please refer to the Perimeters section.
USING KEY INS TO CREATE OPENINGS
You can type in the precise dimensions and offset from the origin of your window using 'Key Ins'. The
procedure is:
1. Start the 'Draw window' command as described above.
2. Define the window position relative to an origin by first moving the mouse cursor to define the origin
(typically the bottom left corner of the surface)
3. Then type in the offset of the window origin (bottom left corner of the window in this example) in the
format x y. Note that there is no comma between the x and the y coordinates.
The coordinates that you type in will appear under the 'Key In' header in Drawing Options panel. The
convention used when positioning and drawing openings at surface level is that x increases from left to
right and y increases from bottom to top. This is true whether viewing the surface from inside or from
outside.
© 2008 DesignBuilder Software, Ltd.
Building Models
169
4. Then press <Enter> to define the window origin.
5. Next type in the window width followed by a space followed by the window height. Again the coordinates
you type in are shown in the Drawing Options panel. In the example below a window is being defined
having width 2m and height 1m.
6. Press enter to create the window:
© 2008 DesignBuilder Software, Ltd.
170
DesignBuilder 1.5
You can use the mouse in conjunction with Key Ins if you prefer. So you could use the mouse to define
the window offset from the origin and then use Key Ins to define the window dimensions or vice versa.
Tip: You can also enter negative x and y values when keying in offset and coordinates.
3.2.12.2 Draw Sub-Surface
For details of using the 'Draw sub-surface' tool, please refer to the Draw window tool.
3.2.12.3 Draw Door
For details of using the 'Draw door' tool, please refer to the Draw window tool.
3.2.12.4 Draw Hole
© 2008 DesignBuilder Software, Ltd.
Building Models
171
For details of using the 'Draw hole' tool, please refer to the Draw window tool.
Holes are used for two purposes:
1. As an air flow path between a zone and an other zone or outside (in much the same way that
Vents are used). Holes cannot be controlled - they simply represent a constant air flow path in the fabric.
Holes positioned on external walls only have an effect on Simulation calculations when the Natural
ventilation building model option is set to Calculated. They have no effect on Heating and Cooling Design
calculations. Holes positioned on internal partition walls are used to mix the air between the two adjacent
zones when the Scheduled Natural ventilation building model option is set. They also provide an air flow
path when the Calculated option is set. You can find information on the way Mixing works by looking at
the Vent Operation help topic.
2. For merging zones together. Note that the Merge zones connected by holes option must be selected
for this to work.
Tip: It is possible to draw large holes in surfaces to give the effect of the surface having being removed.
This can be a useful technique for creating atrium-type spaces, connecting gable roof blocks to the main
roof block and generally merging zones in different blocks.
Note: Holes transmit solar radiation.
Large horizontal holes
You can draw holes in internal and external horizontal surfaces to model the flow of air between storeys or
to outside, but you should be aware when using the Calculated natural ventilation option that Large
horizontal openings are only modelled approximately.
3.2.12.5 Draw Vent
For details of using the 'Draw vent' tool, please refer to the Draw window tool.
3.2.12.6 Edit Surfaces
You can select custom openings and move, clone (copy), delete and rotate them. Default openings
cannot be selected and manipulated in this way.
You can also clear custom openings their default state using the Clear Data to Default command.
3.2.13 Editing Openings at the Building Level
Building block façade openings can be selected at the building level and subsequently moved, copied or
deleted. In order to edit openings at the building level you first need to select the openings either clicking
© 2008 DesignBuilder Software, Ltd.
172
DesignBuilder 1.5
on them using the Select tool or by dragging a selection window around them:
The selected openings are highlighted:
When you have selected an opening, you will see that the Move selected object(s), Clone selected object
(s) and Delete selected object(s) icons are active and you can select one of these commands. As an
© 2008 DesignBuilder Software, Ltd.
Building Models
173
example, the arched openings and doorway are to be copied onto the angled façade of the leftmost block.
To begin with, you need to delete the existing opening on the angled façade by selecting it and clicking on
the Delete selected object(s) icon:
Opening removed:
All opening edit operations at the building level automatically convert default openings to custom
openings, which is why you need to remove the existing opening.
Then in order to copy the openings, you need to select a handle point and you can do this by first clicking
on the Clone selected object(s) command icon and then clicking on the required handle point - the
© 2008 DesignBuilder Software, Ltd.
174
DesignBuilder 1.5
endpoint snap will help in selecting the handle point.
First select the handle point, and then position the copy using the various snaps:
As you move the copied openings across each block façade you will see them automatically snap into the
façade plane and after positioning the openings, you can then click on the mouse key to add the openings
in the required position:
© 2008 DesignBuilder Software, Ltd.
Building Models
175
You will see that any copies that won’t fit into the selected location are automatically discarded.
Note: You can select openings on multiple planes but in this case the openings can only be deleted, not
moved or copied.
3.2.14 Undo/Redo
Undo/Redo commands accessed from Edit menu
To undo a geometric operation, select Undo from the 'Edit' menu (or press <Control-Z>) and similarly to
redo a geometric operation, select Redo (or press <Control-R>). Because many of the geometric
operations are dependent on specific model levels, you may need to undo or redo navigation operations
before you get to the required geometric operation, e.g. 'Undo - Go to surface', etc.
Note that Undo/Redo applies only to geometric operations and changes to Model Data cannot be undone.
3.2.15 Rebuild
Rebuild command accessed from Tools menu
Sometimes the adjacencies within DesignBuilder models can become corrupt. The Rebuild command
recalculates the zone, surface and adjacency geometry from the base building elements.
© 2008 DesignBuilder Software, Ltd.
176
DesignBuilder 1.5
3.2.16 Rezone Block
Rezone block command accessed from Tools menu
Use the Rezone block command to refresh the zoning in the current block. The command converts any
outline partitions in a block to standard partitions and updates zones due to any partitions that may have
deleted. The command should be used when the Automatic block zoning model option is switched off.
When the option is switched on (and it has always been switched on during the life of a model) then you
will not need to use this command.
3.3
Model Data
Model Data is the data for the site on the tabs:
· Location
· Legislative region and insulation standards
and data for building model on the tabs:
·
·
·
·
·
Activity (usage)
Constructions
Openings (windows, doors, vents, holes, sub-surfaces)
Lighting
HVAC
The Model Data tabs are shown in the Edit Screen - User Interface help topic.
At the point of the building is created, building model default data is initially loaded at the building level
from templates. This is inherited from the building to blocks to zones to surfaces and to openings. This
default model data can be overwritten by making edits on the Model Data tabs on the Edit screen.
3.3.1
Site Data
The site data represents information about the site including its location, the conditions of the ground,
weather, the legislative region and the maximum allowed U-values for new buildings. All buildings on the
site use the same site model data.
To edit site model data, go to site level and click on the Location or Region tabs (below).
© 2008 DesignBuilder Software, Ltd.
Building Models
177
You can easily change the location of the site by making a selection for the Location template on the
Location tab or by using the Load data from template command.
Alternatively you can open up the headers on the Location and Region tabs to edit the data.
3.3.1.1
Location
Location tab on model data at Site level
Use this screen to edit the location of the site, its weather data, the daylight savings and energy codes
which apply.
You can load a location from the database by clicking on Template line under the Location Template
header then on the '...' at the right of the line.
When you make a selection from the list of location templates data from selected template will be loaded
to the model.
Alternatively you can use the Load data from template tool.
© 2008 DesignBuilder Software, Ltd.
178
DesignBuilder 1.5
You can enter data on:
·
·
·
·
·
·
Site location,
Site details,
Time and daylight saving,
Simulation weather,
Winter design weather and
Summer design weather.
3.3.1.1.1 Site Location
Location tab on model data at Site level
You can set the latitude/longitude of the site as well as a number of site characteristics.
Latitude
The latitude (in degrees) of the site. By convention, North Latitude is represented as positive; South
Latitude as negative. Minutes should be represented in decimal fractions of 60. (15’ is 15/60 or .25)
Longitude
The longitude (in degrees) of the site. By convention, East Longitude is represented as positive; West
Longitude as negative. Minutes should be represented in decimal fractions of 60. (15’ is 15/60 or .25).
3.3.1.1.2 Site Details
Location tab on model data at Site level
Elevation above sea level
This data are defines the elevation of the site relative to sea level and is passed directly to EnergyPlus for
use in pressure-related calculations. It is also used to calculate air density within DesignBuilder when
calculating volumetric flow rates from cooling loads.
Site orientation
The site orientation is the angle of the site plan view relative to North. For example enter 45 to rotate the
building(s) clockwise by 45°.relative to North (screenshot example below).
© 2008 DesignBuilder Software, Ltd.
Building Models
179
This is the quickest and most reliable way to rotate all the buildings on the site relative to North and allows
you to keep your x and y axes aligned with the building. Rotating the building(s) is possible but once this is
done it makes further geometric edits more difficult because, for rotations other than 90, 180 or 270°, the
x and y axes will be out of alignment with the building.
North is indicated by the direction of the North arrow in the sketch plan view (above).
Exposure to wind
The exposure to wind model data affects the pressure coefficients used when the 'Calculated' Natural
ventilation option is set. It also affects the calculation of U-values but these are not used in EnergyPlus
simulations.
GROUND
Add ground construction layers to surfaces in contact with ground
You can choose to add ground construction layers to any surface that is in contact with the ground. If you
select this option you can define the construction layers of the ground.
Note: this option only affects the model for buildings having the Separate constructions model option set.
Ground construction
When the Add ground construction layers to surfaces in contact with ground option is selected you
can define the construction layers to be added below any ground floor constructions and on the outside of
any other surfaces which have been specified as being adjacent to ground.
More info on ground modelling.
Ground texture
The texture used to represent the ground in the rendered view on the Visualisation screen.
© 2008 DesignBuilder Software, Ltd.
180
DesignBuilder 1.5
Ground surface reflectance
This field is a decimal number between 0.0 and 1.0 and is used to characterize the average reflectivity of
the ground throughout the year. Ground reflectance data is used to calculate the ground reflected solar
amount. This fractional amount is used in the following equation:
GroundReflectedSolar = (BeamSolar x COS(SunZenithAngle) + DiffuseSolar) x GroundReflectance
Important note on ground reflection
Reflection from the ground is calculated even if the Reflections option is not used, but if
Reflections are not calculated the ground plane is considered unobstructed, i.e., the
shadowing of the ground by the building itself or by component blocks is ignored.
Shadowing of the ground by component blocks is only taken into account if the
Reflections option is used.
Conclusion: Switch Reflections on for accurate shading calculations.
Snow reflected solar modifier
A number between 0.0 and 10.0 which is used to modify the basic ground surface reflectance when snow
is on the ground. Note that the value of GroundReflectanceUsed (below) must be <=1.
GroundReflectanceUsed = GroundReflectance x ModifierSnow
During simulations, the ground is considered to be snow-covered when the SnowDepth data in the hourly
weather file is > 0.
Snow reflected daylight modifier
A number between 0.0 and 10.0 which is used to modify the basic ground surface reflectance when snow
is on the ground. Note that the value of DaylightingGroundReflectanceUsed (below) must be <=1.
DaylightingGroundReflectanceUsed = GroundReflectance x ModifierSnow
During simulations, the ground is considered to be snow-covered when the SnowDepth data in the hourly
weather file is > 0.
Ground monthly temperatures
There are 12 fields allowing you to represent the mean ground temperature for each month of the year.
These temperatures are used as the outside surface temperature for all surfaces adjacent to ground.
Note that the depth at which these temperatures apply depends on the thickness of the ground
construction (see above) added to the main floor/wall construction.
Caution: It may not be appropriate to use the 'undisturbed' ground temperatures calculated by the
weather converter and listed in EnergyPlus hourly weather files as these values are too extreme for the
soil under typical large conditioned buildings. A reasonable default value is 2°C less than the average
monthly indoor space temperature is appropriate for such buildings. For smaller buildings, the ground
© 2008 DesignBuilder Software, Ltd.
Building Models
181
temperatures will be closer to be undisturbed ground temperatures.
More information about determining appropriate ground temperatures is given in Ground Modelling and in
the EnergyPlus Auxiliary Programs document.
3.3.1.1.3 Time and Daylight Saving
Location tab on model data at Site level
Select the Time zone for the site location. The time zone defines both the standard time meridian and
information on daylight saving. Generally you should leave this as the default for the location.
You can override daylight savings to be off by unchecking the Use daylight saving model data.
DesignBuilder models the effect of daylight saving time where the clocks are moved forward one hour in
the summer months in most non-equatorial countries. The timing of this is handled automatically using
the Time zones database when you load data from one of the Location templates supplied with the
program.
There are some factors you should be aware of:
· In EnergyPlus, summer Daylight saving works by adding the number of hours specified in the Time
zone data (usually 1 hour) to the local mean time to get the time to determine schedule operation.
Because Simulation results are displayed in local mean time, during the summer when daylight
saving time is in use, occupancy and equipment etc will appear to start 1 hour earlier in the day than
it does in the winter. To help you pinpoint this, DesignBuilder prints the times when daylight saving
starts and ends on the graph.
· When comparing results with and without Daylight saving you will notice:
· Solar radiation data has exactly the same timing with and without daylight saving.
· Occupancy, equipment (and other aspects of building operation controlled by schedules) will start
1 hour earlier with daylight saving.
· Visualisations use local mean time when setting the position of the sun for site shading analysis.
Again you can account for daylight saving time by adding 1 hour to the time during summer months
to see shading for local clock time.
3.3.1.1.4 Simulation Weather Data
Location tab on model data at Site level
DesignBuilder uses EnergyPlus epw format hourly weather data for simulations (heating and cooling
design calculations use much simpler design weather data).
You can review, edit and convert weather using the Edit hourly weather data dialog.
You can also add your own hourly weather data.
© 2008 DesignBuilder Software, Ltd.
182
DesignBuilder 1.5
3.3.1.1.5 Winter Design Weather Data
Location tab on model data at Site level
You can select the 'confidence' of the design data, i.e. the probability that the design data will be at the
very extreme of conditions encountered over recent years. Select either 99.6 or 99% confidence (i.e. 0.4
or 1% chance of more extreme winter weather occuring).
The weather data used in heating design calculations:
· Minimum outside dry-bulb temperature - the design outside air temperature
· Co-incident wind speed and direction. - the speed of the wind and its direction for design conditions.
Note that the direction is not used at the moment.
3.3.1.1.6 Summer Design Weather Data
Location tab on model data at Site level
You can select the 'confidence' of the design data, i.e. the probability that the design data will be at the
very extreme of conditions encountered over recent years. This risk can be specified based on dry or wetbulb temperatures, for 99.6, 99 and 98% confidence (i.e. 0.4, 1 or 2% chance of more extreme weather
occuring).
The weather data used in cooling design calculations:
· Maximum outside dry-bulb temperature - the maximum dry bulb air temperature over the day
· Minimum outside dry-bulb temperature - the minimum dry bulb air temperature (nighttime)
· Wet-bulb temperature at the time of the maximum dry-bulb temperature.
The daily temperature profile used in the cooling design calculations is calculated from the maximum and
minimum values using a sinusoidal curve and assuming that the maximum temperature lags maximum
solar elevation by 3 hours.
3.3.1.2
Legislative Region and Insulation Standards
Region tab on model data at Site level
The data on the tab is related to the Legislative Region and associated insulation standards of the site.
Legislative region
A Legislative region in DesignBuilder is typically a whole country or a region, province or state within a
country which has its own building control powers. The legislative region contains information on:
· Local energy codes and building regulations
· Carbon dioxide emission factors for a range of fuels
© 2008 DesignBuilder Software, Ltd.
Building Models
183
3.3.1.2.1 Energy codes/insulation standards
Region tab on model data at Site level
You can select the mandatory energy code in force as well as three additional levels of reference
insulation standards to represent buildings with 'Uninsulated', 'Stock average' and 'Best practice'
construction standards.
This data is used:
· To identify the mandatory energy code in force in the region.
· To set the insulation levels used when the 'Pre-design' Construction and glazing Model option is
selected.
· When calculating asset ratings.
Note that if you change any of this data, the insulation standards of the constructions in the <System>
category will be automatically updated.
3.3.2
Building Model Data
Take care to enter the minimum amount of data to get the most from the inheritance system. For
example if all zones in a particular block have the same activity called say 'Office work', you should set the
activity at block level and not multiple times at zone level. Equally if all the blocks in the building have the
same activity, you should set the data at the building level and allow the blocks to inherit the data from the
building. By keeping the amount of user data to a minimum, you will find it quicker to make changes at a
later date. Clearly it is much faster to change a few Model Data items at building and block level than it is
to make multiple changes at zone or surface levels.
Building Model Data can be entered at building, block, zone and surface levels (but not at site level). The
set of data shown will depend on the level in the hierarchy (building, block etc) and on the Model options
selected.
Default data is inherited from the level above in the hierarchy and is shown in blue, while 'user data', i.e.
data you have explicitly set (or loaded from template) is shown in red. You can clear user data back to its
default state so it inherits from the level above using the Clear data to default command.
Building Model Data is laid out on five tabs:
·
·
·
·
·
Activity
Construction
Openings
Lighting
HVAC
Each of these categories of data has a template selection at the top of the tab allowing rapid loading of
the data from template.
Tip: Use DesignBuilder defaults wisely!
See also section on Model Data Hierarchy & Data Inheritance.
© 2008 DesignBuilder Software, Ltd.
184
3.3.2.1
DesignBuilder 1.5
Activity Data
Activity tab in model data
Data on the Activity tab allows you to define the activity (usage) of the zones including information on:
·
·
·
·
·
·
·
·
·
·
·
Zone Type (block and zone level only)
Occupancy
Metabolic rates
Holidays (building level only)
Domestic Hot Water (DHW)
Environmental control
Computer gains
Office equipment gains
Miscellaneous gains
Catering gains
Process gains
You can load generic activity data by clicking on the Template option under Activity Template and then by
clicking on the '...' at the right of the line (below).
When you make a selection from the list of Activity templates, data from selected template will be loaded
to the model.
Alternatively you can use the Load data from template tool.
Note that the appropriate Sector is loaded with the activity (screenshot above).
All Activity data (apart from Holidays) is used to generate simulation data at the Zone level. Holiday data
is used at Building level.
3.3.2.1.1 Zone Type
Activity tab in model data under Activity Template header
The zone type can be set at block or zone level on the Activity tab and can be one of:
· 1-Standard - considered to be occupied and heated or cooled.
© 2008 DesignBuilder Software, Ltd.
Building Models
185
· 2-Semi-exterior unconditioned - is an unoccupied zone in the building which is neither heated or
cooled. Examples of 'semi-exterior unconditioned' spaces are roofspaces, sunspaces, car parks
etc).
· 3-Cavity - the zone is a cavity such as the glazed cavity within a double facade or a Trombe wall.
This algorithm correctly calculates the convection coefficients for a narrow sealed vertical cavity
based on the ISO 15099 standard.
· 4-Plenum - the zone is a plenum which is unoccupied and has no heating, cooling, or mechanical
ventilation (though of course air will flow through it to meet the needs of the zones it serves).
Semi-exterior unconditioned
When the Zone type is set to 2-Semi-exterior unconditioned, the program asks you 'Do you want to
load default unoccupied data including Activity, HVAC and Construction templates'. If you reply 'Yes' then
the zone is set as unoccupied by loading <None> Activity, HVAC and Lighting template data.
Also Semi-exposed constructions will be used instead of standard partitions for adjacencies with 'Semiexterior unconditioned' zones. For example the wall between an occupied office and a car park would use
the Semi-exposed construction, whereas the wall between two occupied offices would use Internal
partition construction.
Also roofspace insulation is applied in the floor of a Semi-exterior unconditioned space when it is above a
Standard space, if 'Floor fitted above floor slab' option is checked.
Glazed cavity
When the Zone type is set to 3-Cavity, the program asks you 'Do you want to load default 'Glazed cavity'
data including appropriate convection coefficients, calculation options and Activity, HVAC and
Construction templates'. If you reply 'Yes' then the following changes are made:
· The zone is set as unoccupied by loading <None> Activity, HVAC and Lighting template data.
· Suspended floors and ceilings are switched off.
· The 5-Cavity Inside convection algorithm is set for Cooling design, Heating design and simulation
calculations.
· The 3-Full interior and exterior Solar distribution algorithm is set for Cooling design and simulation
calculations.
You can find out more about Trombe wall simulations in the Modelling Issues section.
Plenum
When the Zone type is set to 4-Plenum, the program asks you 'Do you want to load default plenum data
including appropriate convection coefficients, calculation options and Activity and HVAC templates?'. If
you reply 'Yes' then the following changes are made:
· The zone is set as unoccupied by loading <None> Activity, HVAC and Lighting template data.
· Suspended floors and ceilings are switched off.
· The 4-Ceiling diffuser Inside convection algorithm is set for Cooling design, Heating design and
simulation calculations.
You can find out more about modelling plenums under HVAC.
© 2008 DesignBuilder Software, Ltd.
186
DesignBuilder 1.5
3.3.2.1.2 Occupancy
Activity tab in model data
The Occupancy model data defines the number people in the space and the times of occupancy. This
data is used in simulations together with the Metabolic heat output of the occupants and Holidays to
calculate the heat input to the building.
The Occupancy schedule setting (Typical workday or Schedule) may also be used to control internal gains
and/or HVAC systems if the appropriate Model options are set.
Set the number of people (per unit floor area) and the occupancy times. Occupancy time definition
depends on the Timing model data option:
TYPICAL WORKDAY TIMING MODEL OPTION
When the Typical workday Timing model option is set, the occupancy times are controlled by setting On
and Off values and the number of days in the working week.
In above example there are 0.2 people per m2 between 8am and 6pm and there are no people outside
these times and at weekends.
Note: The Occupancy Days / week is set at the building level only and is used for all other Typical
workday schedules in the model apart from Mechanical ventilation, and Heating and Cooling operation
which have their own Days / week data.
SCHEDULE TIMING MODEL OPTION
When the Schedule Timing model option is set, the occupancy times are controlled by a Schedule . The
metabolic gains for the zone are multiplied by the value of the Schedule at each time step in the
simulation so you can define periods of part-occupancy using Schedule values less than 1. Use values of
0 to indicate that the space in unoccupied.
In above example number of people per m2 is calculated as 0.2 x Schedule value.
© 2008 DesignBuilder Software, Ltd.
Building Models
187
3.3.2.1.3 Metabolic
Activity tab in model data under Occupancy header
Set the metabolic rate according to the level of activity within the space.
The metabolic rate determines the amount of heat gain per person in the zone under design conditions.
This value is modified during simulations based on a correlation to account for variations in space
temperature. This should be borne in mind when analysing occupant sensible heat output in the Cooling
design and Simulation results screens. Metabolic rate has units Watts per person and represents the total
heat gain per person including convective, radiant, and latent heat. An internal algorithm is used to
determine what fraction of the total is sensible and what fraction is latent. Then, the sensible portion is
divided into radiant and convective portions based on the assumption of 50% radiant fraction.
Metabolic rate data can be found in the ASHRAE Handbook of Fundamentals, Chapter 8, Table 5.
DesignBuilder data is derived from this data and is for adult males having typical surface area of 1.8m2.
For women multiply the adult male value by 0.85 and for children multiply by 0.75.
The metabolic factor accounts for people of various sizes. Enter 1.00 for men, 0.85 for women, 0.75 for
children or you can use an average value if there is a mix of sizes.
Background
Heat is generated in the human body by oxidation at a rate called the metabolic rate. This heat is
dissipated from the body surface and respiratory tract by a combination of radiation, convection and
evaporation. The relative proportions of sensible and latent heat from people is a complex function of the
metabolic rate and the environmental conditions.
EnergyPlus uses a polynomial function to divide the heat gain into sensible and latent portions. More
details can be found in the EnergyPlus EngineeringDoc.pdf documentation.
Note: sensible/latent split for occupancy gains is affected by the internal temperature and relative
humidity. With high internal temperatures, people cool themselves largely by evaporation and sensible
occupancy gains can be very low or even zero.
Clothing
You can define the clothing levels of the occupants for summer and winter periods. This data is used
when generating comfort output.
Clothing reduces the body's heat loss and is classified according to its insulation value. The unit normally
used for measuring clothing's insulation is the Clo unit. The more technical unit is m²°C/W is also used
frequently (1 Clo = 0.155 m2°C/W). The Clo value can be calculated by adding the Clo value of each
individual garment. The insulation value for individual garments can be found in ISO 7730.
Clo-Values for Different Items of Clothing and Ensembles
Clothing
Naked
Briefs
T-shirt
© 2008 DesignBuilder Software, Ltd.
Clo-Value
0.0
0.06
0.09
188
DesignBuilder 1.5
Bra and panties
Long underwear
upper
lower
Shirt
White, short sleeve
heavy, long sleeve
Add 5% for tie or turtleneck
Skirt
Trousers
Sweater
Socks
Light summer outfit
Working clothes
Typical indoor winter clothing combination
Heavy business suit
0.05
0.35
0.35
0.14
0.29
0.22-0.70
0.26-0.32
0.20-0.37
0.04-0.10
0.3
0.8
1.0
1.5
Note: Clo-values are additive, so one can calculate the clo-value for a person wearing a T-shirt and light
socks (0.09 + 0.04) = 0.13. (Adapted from ASHRAE Fundamentals and "Technical Review of Thermal
Comfort," Bruel and Kjaer, No. 2, 1982.)
3.3.2.1.4 Holidays
Activity tab in model data
You can add holidays to the simulation to include the effect of building shutdown during certain periods of
the year. Do this by selecting the Holidays option under the Holidays header on the Activity tab at building
level. Holidays defined at building level in this way are used for the whole simulation and are additional to
any holidays which may have been defined in Compact schedules (Schedules Timing model option)
The holiday data is used for Simulations only (not Heating/Cooling Design Calculations) and allows you to
set the Holiday Schedule and the number of days of holiday per year. The possible holiday dates are
defined in the Holiday schedule and the actual holidays to be used in the simulation are selected from the
top of the list based on the Holidays per year data entered.
Note that you must have at least as many days defined in the holiday schedules as you request
here. If there are insufficient holidays in the holiday schedule you will receive an error message to this
effect prior to a simulation.
The way holiday definition works depends on the Timing model option:
© 2008 DesignBuilder Software, Ltd.
Building Models
189
COMPACT SCHEDULES
When the Timing model option is Schedules you can use Compact schedules. The value of Compact
schedule output during holidays can be defined explicitly using the Holidays day type following For:.
For example:
SCHEDULE:COMPACT,
Bedroom_Cool,
Temperature,
Through: 31 Dec,
For: Weekdays SummerDesignDay WinterDesignDay,
Until: 05:00, 0.5,
Until: 09:00, 1,
Until: 24:00, 0.5,
For: Weekends,
Until: 05:00, 0.5,
Until: 24:00, 1,
For: Holidays AllOtherdays,
Until: 24:00, 0;
The Holiday data in this Compact schedule indicates that the cooling is switched off on holidays.
7/12 SCHEDULES
Holiday operation is not defined explicitly and holidays use the same data as Sundays
TYPICAL WORKDAY
Holidays use the same data as Sundays
3.3.2.1.5 Environmental Control
Activity tab in model data
The heating and cooling setpoint temperatures, minimum fresh air per person and illuminance
requirements are related to the Activity or Usage of the zone and are accessed by opening the
Environmental Comfort group header.
HEATING SETPOINT TEMPERATURES
Heating setpoint temperature
Defines the ideal temperature (i.e. the setting of the heating thermostat) in the space when heating is
required. Its meaning depends on the Temperature control calculation option. When using 1-Air
temperature control the Heating setpoint temperature corresponds to the air temperature in the space
and when it is set to set to 2-Operative temperature it is the operative temperature (MAT+MRT)/2.
© 2008 DesignBuilder Software, Ltd.
190
DesignBuilder 1.5
Heating setback setpoint temperature
Some buildings require a low level of heating during unoccupied periods to avoid condensation/frost
damage or to prevent the building becoming too cold and to reduce peak heating requirements at startup.
Enter the setpoint temperature to be used at night-time, weekends and other holidays during the heating
season. Its meaning depends on the Temperature control calculation option (above).
Note: when using the Typical workday timing option, this setback temperature set point is only applied
during unoccupied periods such as night-time and holidays during the heating season. It is not applied
during the summer (if heating is switched off during the summer.)
Note: if the setback temperature set does not appear to affect results when using a Compact schedule,
this may be because the Zone setpoint heating schedule selected uses only 0 and 1, not the 0.5
required to access setback temperature. See Defining setpoint temperature schedules for more on this.
COOLING SETPOINT TEMPERATURES
Cooling setpoint temperature
Defines the ideal temperature (i.e. the setting of the cooling thermostat) in the space when cooling is
required. Its meaning depends on the Temperature control calculation option. When using 1-Air
temperature control the Cooling setpoint temperature corresponds to the air temperature in the space
and when it is set to set to 2-Operative temperature it is the operative temperature (MAT+MRT)/2.
Note: the cooling setpoint temperature must be higher than the heating setpoint temperature.
Cooling setback setpoint temperature
Some buildings require a low level of cooling during unoccupied periods to prevent the building becoming
too hot and to reduce the startup cooling load the next morning. Enter the setpoint temperature to be
used at night-time, weekends and other holidays during the cooling season. Its meaning depends on the
Temperature control calculation option (above).
Note: when using the Typical workday timing option, this setback temperature set point is only applied
during unoccupied periods such as night-time and holidays during the cooling season. It is not applied
during the winter (if cooling is switched off during the winter.)
Note: if the setback temperature set does not appear to affect results when using a Compact schedule,
this may be because the Zone setpoint cooling schedule selected uses only 0 and 1, not the 0.5
required to access setback temperature. See Defining setpoint temperature schedules for more on this.
VENTILATION SETPOINT TEMPERATURES
Natural ventilation cooling setpoint temperature
The natural ventilation cooling setpoint temperature controls the activation of natural ventilation. If the
inside air temperature is greater than this setpoint temperature (and the natural ventilation operation
schedule is on) then natural ventilation can take place. The way this works depends on the Natural
ventilation model option.
Note that when using the Calculated natural ventilation model option windows and vents are only opened
© 2008 DesignBuilder Software, Ltd.
Building Models
191
when:
· The inside air temperature is above this cooling setpoint temperature, and
· The inside air temperature is greater than the outside air temperature, and
· The operation schedule allows ventilation.
Also, the data under the Calculated Natural Ventilation header on the Advanced tab of the Model Options
dialog can modify ventilation control behaviour.
When using the Scheduled natural ventilation model option the Max natural ventilation in-out delta T
(below) can prevent natural ventilation from occurring if the outside air temperature is too high.
Natural ventilation max natural ventilation in-out delta T
The Natural ventilation Max. int-out temp difference is used for Scheduled natural ventilation only and is
the temperature difference between the indoor and outdoor air dry bulb temperatures below which
ventilation is shut off. This is to allow ventilation to be stopped if the temperature outside is too warm and
could potentially heat the space. It is not related to preventing drafts.
For example, if you specify a maximum delta temperature of 2°C, ventilation is assumed to be available if
the outside air temperature is at least 2°C cooler than the zone air temperature. If the outside air dry bulb
temperature is less than 2°C cooler or warmer than the indoor dry bulb temperature, then ventilation is
automatically turned off. The values for this field can include negative numbers. This allows ventilation to
occur even if the outdoor temperature is above the indoor temperature. The Delta Temperature control
works in the code in the following way:
if (IndoorTemp - OutdoorTemp) < Max ventilation in-out delta T then ventilation is not allowed.
For example:
Value of Natural ventilation Max in-out delta T
0
-50
2
Effect
Natural ventilation only operates when
OutdoorTemp < IndoorTemp
Natural ventilation unrestricted by Inside-Outside
delta T
Natural ventilation only operates when
OutdoorTemp + 2 < IndoorTemp
Tip: input a large negative number to allow ventilation even if the outdoor temperature is greater than the
indoor temperature. This useful for uncontrolled natural ventilation (open windows) or as a way to
estimate the effect of required ventilation air for load calculations.
See also Defining setpoint temperature schedules.
Mechanical ventilation cooling setpoint temperature
The mechanical ventilation cooling setpoint temperature controls the activation of mechanical ventilation
when using Simple HVAC data. If the inside air temperature is greater than this setpoint temperature
(and the mechanical ventilation operation schedule is on) then mechanical ventilation can take place.
This data is not used when working with Compact HVAC data.
Mechanical ventilation max natural ventilation in-out delta T
The mechanical ventilation Max int-out temp difference is used for Scheduled mechanical ventilation only
and is the temperature difference between the indoor and outdoor air dry bulb temperatures below which
ventilation is shut off. This is to allow ventilation to be stopped if the temperature outside is too warm and
© 2008 DesignBuilder Software, Ltd.
192
DesignBuilder 1.5
could potentially heat the space. It is not related to preventing drafts.
For example, if you specify a maximum delta temperature of 2°C, ventilation is assumed to be available if
the outside air temperature is at least 2°C cooler than the zone air temperature. If the outside air dry bulb
temperature is less than 2°C cooler or warmer than the indoor dry bulb temperature, then ventilation is
automatically turned off. The values for this field can include negative numbers. This allows ventilation to
occur even if the outdoor temperature is above the indoor temperature. The Delta Temperature control
works in the code in the following way:
if (IndoorTemp - OutdoorTemp) < Max ventilation in-out delta T then ventilation is not allowed.
For example:
Value of Mechanical ventilation Max in-out delta Effect
T
0
Mechanical ventilation only operates when
OutdoorTemp < IndoorTemp
-50
Mechanical ventilation unrestricted by InsideOutside delta T
2
Mechanical ventilation only operates when
OutdoorTemp + 2 < IndoorTemp
Tip: input a large negative number to allow ventilation even if the outdoor temperature is greater than the
indoor temperature. This useful for uncontrolled mechanical ventilation or as a way to estimate the effect
of required ventilation air for load calculations.
See also Defining setpoint temperature schedules.
MINIMUM FRESH AIR PER PERSON
Minimum fresh air per person
The Minimum fresh air per person defines the fresh air requirements of each person in the zone. It is
defined on the Activity tab because the fresh air requirement of the people in the zone depends on the
activity (use) of the space.
The fresh air requirement data is used to generate appropriate mechanical outside air distribution rates
when the mechanical air distribution Flow type on the HVAC tab is set to any of:
·
·
·
·
2-Min fresh air per person.
3-Min fresh air (Per area).
4-Min fresh air (Sum per person + per area).
5-Min fresh air (Max per person and per area).
This data is also used for natural ventilation when the natural ventilation Flow type on the HVAC tab is set
to 2-Min fresh air per person.
Minimum fresh air per area
The Minimum fresh air per area defines the fresh air requirements of the zone in terms of floor area. It
is defined on the Activity tab because the fresh air requirement of the zone depends on the activity (use)
of the space.
© 2008 DesignBuilder Software, Ltd.
Building Models
193
The data is used to generate appropriate mechanical outside air distribution rates when the mechanical
air distribution Flow type on the HVAC tab is set to any of:
· 3-Min fresh air (Per area),
· 4-Min fresh air (Sum per person + per area),
· 5-Min fresh air (Max per person and per area).
The data is not currently used for natural ventilation.
LIGHTING
Target illuminance
The desired lighting level (in lux) at the first daylighting sensor. This is also the lighting level that would be
produced at this sensor position at night if the overhead electric General lighting were operating at full
input power. Recommended values depend on type of activity; they may be found, for example, in the
Lighting Handbook of the Illuminating Engineering Society of North America and in CIBSE A Guide. A
typical value for general office work (excluding computer terminals) is 500 lux.
Display lighting
The typical density of display lighting for the activity. This value is used as a default on the Lighting tab for
the Task and Display lighting density.
3.3.2.1.6 Domestic Hot Water (DHW)
Activity tab in model data
In DesignBuilder the amount of DHW consumed is considered to be a function of the activity in the zone.
For example, there is a demand assumed to arise from the occupants of an office for activities such as
washing hands and washing up cups. This demand is associated with the office rather than the toilet or
tea room. Thus the demand from each space needs to be assigned to a DHW system even if the system
itself is not present in the space.
The effect of hot water consumption (hot water taps, showers etc) on building energy use can be included
in your thermal model by switching on DHW on the HVAC tab.
The data on this tab defines the hot water consumption rate in each zone as l/day/m2 data (gal/day/ft in IP
units). The DHW consumption data is only used if DHW is selected on the HVAC tab.
Note: Convert l/person/day DHW consumption data to the DesignBuilder format by multiplying it by
occupant density (people/m2).
The hot water generation system is defined under DHW on the HVAC tab.
3.3.2.1.7 Computer Gains
Activity tab in model data
© 2008 DesignBuilder Software, Ltd.
194
DesignBuilder 1.5
Set the thermal gains due to computers and other related IT equipment per unit floor area. The fuel is
assumed to be electricity, all gains are assumed to be emitted to the space and
Radiant Fraction
This field is a decimal number between 0.0 and 1.0 and is used to characterise the amount of long-wave
radiant heat being given off by computer equipment in a zone. The radiant fraction will be multiplied by
the total energy consumed by electric equipment and (1-Fraction lost) to give the amount of long
wavelength radiation gain from computer equipment in a zone. A value of zero means that the heat gain is
entirely convective in which case all the heat is transferred to the air node in simulations. A value of 1
means that the gain is entirely radiative in which case all the heat is distributed to the inside surfaces. a
typical value is somewhere between 0.1 and 0.2.
If the Internal gains operate with occupancy model option is not selected you can also set the operation
schedule.
3.3.2.1.8 Office Equipment Gains
Activity tab in model data
Set the thermal gains due to office equipment per unit floor area. The fuel is assumed to be electricity, all
gains are assumed to be emitted to the space.
Radiant Fraction
This field is a decimal number between 0.0 and 1.0 and is used to characterise the amount of long-wave
radiant heat being given off by office equipment in a zone. The radiant fraction will be multiplied by the
total energy consumed by electric equipment and (1-Fraction lost) to give the amount of long wavelength
radiation gain from office equipment in a zone.
A value of zero means that the heat gain is entirely convective in which case all the heat is transferred to
the air node in simulations. A value of 1 means that the gain is entirely radiative in which case all the heat
is distributed to the inside surfaces. a typical value is somewhere between 0.1 and 0.4.
If the Internal gains operate with occupancy model option is not selected you can also set the operation
schedule.
3.3.2.1.9 Miscellaneous Gains
Activity tab in model data
Gain
Set the design level of energy consumption due to miscellaneous equipment per unit floor area. The
actual heat gain to the space may be reduced through the Fraction lost data (below).
The Gain, entered in Watts/m2 (or Watts/ft2), is typically used to represent the maximum fuel
consumption of miscellaneous equipment in a zone that is then multiplied by a schedule fraction (below).
This is slightly more flexible in that the design level could be a 'diversity factor' applied to a schedule of
real numbers. Note that while the schedule value can vary from hour to hour, the design level field is
constant.
© 2008 DesignBuilder Software, Ltd.
Building Models
195
Fuel
The fuel can be selected from a drop down list. Note that these fuels are currently mapped to a shorter list
in the results as follows:
Fuel in Model Data
1-Electricity from grid
2-Natural gas
3-Oil
4-Coal
5-LPG
6-Biogas
7-Anthracite
8-Smokeless fuel (including coke)
9-Dual fuel appliances (mineral + wood)
10-Biomass
11-Waste heat
Mapped to Fuel in Output
Electricity
Gas
Oil
Solid
Gas
Gas
Solid
Solid
Other
Other
Other
Fraction lost
This field is a decimal number between 0.0 and 1.0 and is used to characterise the amount of 'lost' heat
being given off by the equipment in a zone. The number specified in this field will be multiplied by the total
energy consumed by equipment to give the amount of heat which is 'lost' and does not impact the zone
energy balances. This might correspond to electrical energy converted to mechanical work or heat that is
vented to the atmosphere.
Radiant Fraction
This field is a decimal number between 0.0 and 1.0 and is used to characterise the amount of long-wave
radiant heat being given off by miscellaneous equipment in a zone. The radiant fraction will be multiplied
by the total energy consumed by electric equipment and (1-Fraction lost) to give the amount of long
wavelength radiation gain from miscellaneous equipment in a zone. A value of zero means that the heat
gain is entirely convective in which case all the heat is transferred to the air node in simulations. A value
of 1 means that the gain is entirely radiative in which case all the heat is distributed to the inside surfaces.
a typical value is somewhere between 0.1 and 0.5.
If the Internal gains operate with occupancy model option is not selected you can also set the operation
schedule.
3.3.2.1.10 Catering Gains
Activity tab in model data
Set the thermal gains due to cooking and other catering activities per unit floor area.
Gain
Set the design level of energy consumption due to catering equipment per unit floor area. The actual heat
gain to the space may be reduced through the Fraction lost data (below).
© 2008 DesignBuilder Software, Ltd.
196
DesignBuilder 1.5
The Gain, entered in Watts/m2 (or Watts/ft2), is typically used to represent the maximum fuel
consumption of catering equipment in a zone that is then multiplied by a schedule fraction (below). This is
slightly more flexible in that the design level could be a 'diversity factor' applied to a schedule of real
numbers. Note that while the schedule value can vary from hour to hour, the design level field is constant.
Fuel
The fuel can be selected from a drop down list. Note that these fuels are currently mapped to a shorter list
in the results as follows:
Fuel in Model Data
1-Electricity from grid
2-Natural gas
3-Oil
4-Coal
5-LPG
6-Biogas
7-Anthracite
8-Smokeless fuel (including coke)
9-Dual fuel appliances (mineral + wood)
10-Biomass
11-Waste heat
Mapped to Fuel in Output
Electricity
Gas
Oil
Solid
Gas
Gas
Solid
Solid
Other
Other
Other
Fraction lost
This field is a decimal number between 0.0 and 1.0 and is used to characterise the amount of 'lost' heat
being given off by the catering equipment in a zone. The number specified in this field will be multiplied by
the total energy consumed by equipment to give the amount of heat which is 'lost' and does not impact the
zone energy balances. This might correspond to cooker heat that is vented to the atmosphere through an
extract hood.
Radiant Fraction
This field is a decimal number between 0.0 and 1.0 and is used to characterise the amount of long-wave
radiant heat being given off by catering equipment in a zone. The radiant fraction will be multiplied by the
total energy consumed by electric equipment and (1-Fraction lost) to give the amount of long wavelength
radiation gain from catering equipment in a zone. A value of zero means that the heat gain is entirely
convective in which case all the heat is transferred to the air node in simulations. A value of 1 means that
the gain is entirely radiative in which case all the heat is distributed to the inside surfaces. a typical value
is somewhere between 0.1 and 0.5.
If the Internal gains operate with occupancy model option is not selected you can also set the operation
schedule.
3.3.2.1.11 Process Gains
Activity tab in model data
Set the thermal gains due to process heat per unit floor area.
© 2008 DesignBuilder Software, Ltd.
Building Models
197
Gain
Set the design level of energy consumption due to process activity per unit floor area. Process heat is the
heat from any manufacturing/industrial process which is part of the business activity. The actual heat gain
to the space may be reduced through the Fraction lost data (below).
The Gain, entered in Watts/m2 (or Watts/ft2), is typically used to represent the maximum fuel
consumption of process equipment in a zone that is then multiplied by a schedule fraction (below). This is
slightly more flexible in that the design level could be a 'diversity factor' applied to a schedule of real
numbers. Note that while the schedule value can vary from hour to hour, the design level field is constant.
Fuel
The fuel can be selected from a drop down list. Note that these fuels are currently mapped to a shorter list
in the results as follows:
Fuel in Model Data
1-Electricity from grid
2-Natural gas
3-Oil
4-Coal
5-LPG
6-Biogas
7-Anthracite
8-Smokeless fuel (including coke)
9-Dual fuel appliances (mineral + wood)
10-Biomass
11-Waste heat
Mapped to Fuel in Output
Electricity
Gas
Oil
Solid
Gas
Gas
Solid
Solid
Other
Other
Other
Fraction lost
This field is a decimal number between 0.0 and 1.0 and is used to characterise the amount of 'lost' heat
being given off by the process equipment in a zone. The number specified in this field will be multiplied by
the total energy consumed by equipment to give the amount of heat which is 'lost' and does not impact the
zone energy balances. This might correspond to electrical energy converted to mechanical work or heat
that is vented to the atmosphere.
Radiant Fraction
This is a decimal number between 0.0 and 1.0 and is used to characterise the amount of long-wave
radiant heat being given off by process equipment in a zone. The radiant fraction will be multiplied by the
total energy consumed by electric equipment and (1-Fraction lost) to give the amount of long wavelength
radiation gain from process equipment in a zone. A value of zero means that the heat gain is entirely
convective in which case all the heat is transferred to the air node in simulations. A value of 1 means that
the gain is entirely radiative in which case all the heat is distributed to the inside surfaces. a typical value
is somewhere between 0.1 and 0.5.
If the Internal gains operate with occupancy model option is not selected you can also set the operation
schedule.
© 2008 DesignBuilder Software, Ltd.
198
DesignBuilder 1.5
3.3.2.2
Construction Data
Construction tab in model data
DesignBuilder uses construction components to model the conduction of heat through walls, roofs, ground
and other opaque parts of the building envelope . Constructions can be selected on the Constructions
model data tab to define the thermophysical and visual properties of the various internal and external
surface elements in the building. From the Construction model data tab, you can access data on:
· Construction and
· Airtightness
Open the headers to enter construction details where they are different from those loaded from the
template. Any changes you make that are different from the template data originally loaded shown in bold
red.
TEMPLATES
General Construction and glazing
When you have the General Construction and glazing model option set, you can load generic
Construction data by clicking on the Template option under Construction Template and then by clicking on
the '...' at the right of the line (below).
When you make a selection from the list of Construction templates data from selected template is loaded
to the model.
Pre-design Construction and glazing
Alternatively if you have the Pre-design Construction and glazing model option set, generic constructions
can be loaded using the sliders shown below. In this case you are restricted to the 4x3 construction
templates from the <System> Construction templates category identified by the combination of Insulation
and Thermal mass selected on the sliders. For example in the screenshot shown below data will be
loaded from the 'Energy code - Mediumweight' template.
© 2008 DesignBuilder Software, Ltd.
Building Models
199
Or in either case you can use the Load data from template tool.
3.3.2.2.1 Constructions
Construction tab in model data
From the Construction tab, you can open the group header boxes to edit detailed makeup of the
construction of walls, roofs, floors, ceilings, partitions etc. used in the building.
The default/inheritance system used in DesignBuilder allows you to define building constructions quickly
and easily by loading data from templates and by making global settings at building, block and zone
levels.
There are 2 alternative methods for representing floors/slabs/ceilings in DesignBuilder depending on the
setting of the Floor/slab/ceiling representation model option :
· Combined - option generally recommended for flexibility and ease of use.
· Separate - only option in v 1.2 and earlier allows you to set up floor/slab/ceiling configuration by
making selections in model data.
Other construction data:
·
·
·
·
·
Sub-Surface Construction - construction details of sub-surfaces (opaque surfaces within surfaces)
Internal Thermal Mass - how to define additional thermal mass
Component Block - construction and surface properties of component blocks
Adjacency - defining special adjacency conditions
Surface Convection - defining special surface convection options
Note: data on the Openings tab can be used to define the layout of the facade.
View/Edit construction details
To inspect the details of a selected construction, click on the icon to the left of the appropriate data entry
box (Learning mode only). Alternatively double-click the icon to view/edit the data in a dialog.
Note: Please be aware that all settings made on the Constructions Model data tab are defaults,
(unless you are working at the surface level). Model data at the surface level (inherited from the zone
above or directly set) defines the thermal and visual characteristics of the surface in the model.
© 2008 DesignBuilder Software, Ltd.
200
DesignBuilder 1.5
Construction tab in model data under Construction header
When the Floor/slab/ceiling representation model option is set to Combined wall, floor and roof
constructions are all defined using simple constructions as shown in the diagram below.
The diagram shows:
· The location/definition of the various categories of construction
· Block and zone dimension definitions
Schematic Diagram Showing 'Combined' Floor/Slab/Ceiling Constructions
© 2008 DesignBuilder Software, Ltd.
Building Models
201
External walls
The external wall construction defines the construction of walls adjacent to outside. The definition of walls
is given by the roof-wall transition angle model option. In cold climates this construction will generally
include an insulating layer.
Flat roof
Flat roof constructions apply to external horizontal surfaces. The construction used to represent the flat
roof should include any slabs, insulation and suspended ceiling layers. If there are no flat roof surfaces,
just ignore this data.
Pitched roof (occupied)
The Pitched roof (occupied) construction applies to external sloped surfaces when they appear in
occupied zones. In cold climates this construction will generally include an insulating layer. If there are no
pitched roof surfaces, just ignore this data.
The definition of 'pitched roof' is given by the roof-wall transition angle model option.
Pitched roof (unoccupied)
The Pitched roof (unoccupied) construction applies to external sloped surfaces when they appear in semiexterior unconditioned zones. This construction will generally not include any insulation layers. If there are
no pitched roof surfaces, just ignore this data.
The definition of 'pitched roof' is given by the roof-wall transition angle model option.
Internal partitions
The internal partition construction defines the construction of internal partitions (walls used to divide
blocks into zones) and inter-block partitions (internal walls shared with other blocks). Internal partitions are
used where both zones are occupied. When one of the zones is occupied and the other is not the Semiexposed walls construction data is used (below). If there are no partitions just ignore this data.
SEMI-EXPOSED
© 2008 DesignBuilder Software, Ltd.
202
DesignBuilder 1.5
Semi-exposed walls
The semi-exposed wall construction applies to walls between fully occupied zones and Semi-exterior
unconditioned zones. They will normally include some insulation. DesignBuilder determines which of the
zones is relatively 'outside' and uses this information to correctly order the material layers in the wall. The
material layer defined in the construction as being 'outermost' (first-in list) will be the one adjacent to the
semi-external unconditioned zone. If there are no semi-exposed wall surfaces, just ignore this data.
Semi-exposed roof
The semi-exposed roof construction is used between occupied zones and Semi-exterior unconditioned
zones (such as roofspace/attic/loft spaces) above. The construction should include any slabs, insulation
and suspended ceiling layers. DesignBuilder determines which of the zones is relatively 'outside' and uses
this information to correctly order the material layers in the roof. If there are no semi-exposed roof
surfaces, just ignore this data.
Semi-exposed floor
The semi-exposed floor construction is used between occupied zones and Semi-exterior unconditioned
spaces below. The construction should include any slabs, insulation and raised floor layers. If there are
no semi-exposed floor surfaces, just ignore this data.
FLOORS
Ground floor
The ground floor construction is used between all internal zones and the ground and can be optionally
combined with additional ground constructions layer(s) as shown in diagram above. The site ground
temperatures are applied to the outside of all surfaces adjacent to ground. If there are no ground wall
surfaces, just ignore this data.
External floor
External floors are floors that are adjacent to outside air, e.g. the floor of a cantilevered part of the building
or where for any other reason there is no ground or other zone below. The External floor construction
should include any slabs, insulation and raised floor layers. If there are no external floor surfaces, just
ignore this data.
Internal floor
The internal floor construction defines the makeup of floors between occupied zones including any slabs,
air gaps, raised floors and suspended ceilings. It will not usually contain insulation. Where the zone above
is unoccupied the Semi-exposed roof construction is used instead. Likewise where the zone below is
unoccupied the Semi-exposed floor construction is used instead. If there are no internal floor surfaces,
just ignore this data.
ZONE STATISTICS
Zone Volume
The zone volume is calculated for all zone geometries and by default, the volume is the actual air volume
of the space excluding the volume of floor and ceiling constructions but including half the volume of
partition walls. The volume of the floor construction can be included by checking the Include constructions
in zone volume Model option.
© 2008 DesignBuilder Software, Ltd.
Building Models
203
Construction tab in model data under Construction header
When the Floor/slab/ceiling representation model option is set to Separate floor/ceiling and roof
constructions are defined by combining constructions as shown in the diagram below.
The diagram shows:
· The location/definition of the various categories of construction
· How constructions are combined (behind-the-scenes) to form the floor/ceiling 'combo constructions'
passed to calculations.
· Block and zone dimension definitions
Schematic Diagram Showing 'Separate' Floor/Slab/Ceiling Constructions
© 2008 DesignBuilder Software, Ltd.
204
DesignBuilder 1.5
External walls
The external wall construction defines the construction of walls adjacent to outside. The formal definition
of walls is given by the roof-wall transition angle model option. In cold climates this construction will
generally include an insulating layer.
Flat roof
Flat roof constructions apply to external horizontal surfaces. The construction used to represent the flat
roof should include all construction layers between inside and outside excluding any suspended ceiling
and ceiling construction which is most easily included using the Suspended ceiling?, Suspension
height and Ceiling construction data described below. In cold climates this construction will generally
include an insulating layer.
See Detail 5 above.
Pitched roof (occupied)
The Pitched roof (occupied) construction applies to external sloped surfaces when they appear in
occupied zones. In cold climates this construction will generally include an insulating layer.
The definition of 'pitched roof' is given by the roof-wall transition angle model option.
Pitched roof (unoccupied)
The Pitched roof (unoccupied) construction applies to external sloped surfaces when they appear in semiexterior unconditioned zones. This construction will generally not include any insulation layers.
© 2008 DesignBuilder Software, Ltd.
Building Models
205
The definition of 'pitched roof' is given by the roof-wall transition angle model option.
Internal partitions
The internal partition construction defines the construction of internal partitions (walls used to divide
blocks into zones) and inter-block partitions (walls shared with other blocks). Internal partitions are used
where both zones are occupied. When one of the zones is occupied and the other is not the Semiexposed walls construction data is used (below).
Semi-exposed walls
The semi-exposed wall construction applies to walls which separate fully occupied zones with semiexterior unconditioned zones. They will normally include some insulation. DesignBuilder determines which
of the zones is relatively 'outside' and uses this information to correctly order the material layers in the
wall. The material layer defined in the construction as being 'outermost' (first-in list) will be the one
adjacent to the semi-external unconditioned zone.
Ceilings
In separate mode, you can define ceiling and floor constructions by combining standard structural slab
constructions with optional ceiling and floor layers and air gaps. In DesignBuilder a ceiling is the
construction immediately adjacent to the room at the top and is positioned below the floor slab of the zone
above (diagram above). Often its' purpose is to as a finish (e.g. to hide ugly concrete slabs) or to provide
an air gap between the slab above and the ceiling to allow light fittings, ducting, circuits and other services
to be hidden from sight. Ceilings can also provide improved thermal and acoustic properties. If the ceiling
is 'suspended' from the slab above it will have an air gap between the slab and the ceiling. You can use
the following model data to define ceilings:
· Suspended ceiling? - check this option if there is a ceiling in the zone and it is to be defined
separately from the floor slab. Checking this option shows:
· Suspension height - sets the height of the air gap between the floor slab of the zone above and
the ceiling.
· Ceiling construction - the construction of the ceiling tiles or other ceiling construction layers, not
including the suspension, slab or floor above.
See Details 4, 5, 6 and 7 in the diagram above.
If there is no suspended ceiling, you should clear the 'Suspended ceiling' checkbox. In this case, the zone
will be in direct contact with the floor slab of the zone above (if it is an internal ceiling) or the underside of
the flat roof construction (if it is an external flat roof).
Floors
Floors are made up by combining floor, slab and ceiling constructions with floor and ceiling suspension
voids as shown in the diagram above. If there is no raised floor, you should clear the 'Floor fitted above
slab' check box. In this case, the room will be in direct contact with the floor slab.
Note: it is not possible in v.1 to use the gap defined by the suspension height in floors and ceilings as a
plenum zone - supply and return plenums for use in Compact HVAC must be completely separate zones.
Roofspace insulation
In Semi-exterior unconditioned spaces such as roofspaces, the Roofspace insulation data is used
instead of the floor construction as the topmost floor layer. To include Insulation in the roofspace floor
follow the steps:
1. Go to the roofspace block or zone
© 2008 DesignBuilder Software, Ltd.
206
DesignBuilder 1.5
2. Check the Floor fitted above slab checkbox
3. Select the appropriate Roofspace insulation data. Note that this construction contains just the
construction layers above the slab. The construction might typically contain two layers: i) insulation
and possibly ii) boarding or other lining material.
4. If the roofspace floor construction is directly in contact with the slab, i.e. there is no suspension, set
the suspension height to zero.
See Detail 6 in the diagram above.
Ground floors
Ground floors are made up by combining floor, ground floor slab and ground constructions (optional site
level data) with an optional floor suspension void as shown in Construction Location and Block and Zone
Dimensions. The site ground temperatures are applied to the outside of all surfaces adjacent to ground. In
cold climates the Ground floor slab construction will generally include an insulating layer.
See Detail 1 in the diagram above.
External floors
External floors are floors that are adjacent to outside air, e.g. the floor of a cantilevered part of the building
or where for any other reason there is no ground or other zone below. With Separate constructions,
External floors are generated from Floor slab and External floor constructions plus optional Floor
suspension and Floor construction. In cold climates the External floor construction will generally include
an insulating layer.
See Detail 3 above.
Zone Volume
The zone volume is calculated correctly for all zone geometries and by default, the volume is the actual air
volume of the space excluding the volume of floor and ceiling constructions and any raised floor and
suspended ceiling voids (if selected) but including half the volume of partition walls.
Construction tab in model data under Construction header
Sub-surfaces are exceptions to the main surface construction. Examples include cold-bridging elements
such as window lintels and opaque panels in a lightweight facade. You can define different sub-surface
construction types for external walls, internal partitions and pitched roofs.
Note: because DesignBuilder Version 1 does not have model data associated with 'openings', it is not
possible to have more than one type of sub-surface on any particular surface.
To add a sub-surface, go to the surface you wish to work on, click on the Layout tab and select the Draw
sub-surface command.
You can also define constructions for doors.
Walls
Any opaque sub-surfaces created in a wall will have this construction.
Internal
Any opaque sub-surfaces created in any inside surface (partitons, internal floor etc) will have this
construction.
© 2008 DesignBuilder Software, Ltd.
Building Models
207
Roof
Any opaque sub-surfaces created in any pitched roof will have this construction.
External door
Defines the construction of external doors.
Internal door
Defines the construction of internal doors.
Construction tab in model data under Construction header
DesignBuilder uses the thermal characteristics of the constructions for each of the walls, floors, roofs,
partitions etc in each zone and accounts for the thermal mass in the simulations. You can also include
additional thermal mass to account for partitions within a zone, furniture and any other mass which will
affect the dynamic thermal response of the zone. There are two ways you can define additional internal
thermal mass in DesignBuilder:
1. Drawing hanging partitions (i.e. partitions which do not meet other walls at both ends),
2. Entering a non-zero internal thermal mass exposed area on the Constructions tab under the
Internal Thermal Mass header at zone level.
Thermal mass defined using these methods is lumped together for each zone and modelled in
EnergyPlus in a 'non-geometric' way. In both cases, the construction is defined under the Internal
Thermal Mass header on the Constructions tab.
Internal thermal mass defined in this way is used to specify the construction and area of items within the
space that are important to heat transfer calculations but not necessarily important geometrically. For
example, furniture within the space – particularly for large spaces. It can also be used for internal walls
that are not needed for solar distribution, when Solar distribution is set to 3-Full interior and exterior or
to represent all interior walls when solar is distributed to the floors only with Solar distribution set to 2-Full
exterior.
Example
When zoning an office building, five west-facing offices have been combined into one zone. All of the
offices have interior walls made of the same materials. As shown in the figure below, this zone may be
described with 5 exterior walls and 11 internal walls or 1 exterior wall and 1 internal mass. Note that fewer
surfaces will speed up the EnergyPlus calculations.
© 2008 DesignBuilder Software, Ltd.
208
DesignBuilder 1.5
Example
A five-story building has the same ceiling/floor construction separating each of the levels. Zones that are
on floors 2 through 4 may be described using a single piece of internal mass to represent both the floor
and ceiling. The construction for this internal mass would be identical to the ceiling/floor construction that
would be used to describe separate surfaces.
Exposed Area
The exposed area is the surface area of the internal mass. The area that is specified must be the entire
surface area that is exposed to the zone. If both sides of a wall are completely within the same zone, then
the area of both sides must be included when describing that internal wall.
Construction tab in model data under Construction header
The adjacency of individual surfaces can be set to be either adjacent to ground or adiabatic. The
adjacency data is used at the surface level, though defaults can be set at a block and zone level as well if
all surfaces in a block or zone have the same adjacency.
The full range of options are:
· 1-Auto - the adjacency of the surface is determined automatically by DesignBuilder based on its
position. External surfaces below the ground plane are, by default, considered to be adjacent to
ground and external surfaces above the ground plane are considered to be adjacent to outside
conditions.
· 2-Not adjacent to ground - the surface is not adjacent to ground even if it is situated below the
ground plane.
· 3-Adjacent to ground - the surface is adjacent to ground even if it is above the ground plane or it is
an internal surface.
· 4-Adiabatic - the surface is adiabatic. This means that heat is not transferred across in its external
surface. Adiabatic surfaces are frequently used in thermal modelling to represent surfaces which
are between two zones at substantially similar conditions. Note that thermal mass is still modelled
in Adiabatic surfaces because heat can still be transferred into the mass through the internal
surface. Adiabatic surfaces are often used for modelling the boundary between the actual building
model and any adjacent buildings which are not to be modelled.
You can determine which surfaces are adiabatic or adjacent to ground by looking for the corresponding
surface adjacency markers in the Edit Screen at zone and surface levels:
© 2008 DesignBuilder Software, Ltd.
Building Models
209
Note that the recommended way to set ground and adiabatic adjacencies is to use component
blocks.
Adiabatic surfaces use internal constructions:
· Adiabatic external floors use Internal floor construction.
· Adiabatic flat roofs use reversed Internal floor construction.
· Adiabatic external wall surfaces use Internal partition construction.
You can find out the construction that will be used for each adiabatic surface by looking at
data on the Construction tab at surface level.
Note that in the current version of DesignBuilder the Visualisations shows adiabatic
surfaces using external surfaces properties but internal surfaces (Internal floor and
partition constructions) are used in calculations as described above.
Paraphrased note from EnergyPlus developers: "The Trombe wall convection coefficients only make
sense for a zone. They are specific coefficients calculated for a narrow enclosed space. The two major
walls of a Trombe wall zone are so close together that the convection patterns for the two walls actually
interact. If they are close enough they can fight each other and totally stagnate the convection cell in the
space. This is not free-boundary convection such as that found in a typical room. Therefore, it does not
make sense to apply these coefficients to a single surface. The algorithm analyzes the zone to figure out
which are the two major surfaces and then sets the coefficients on those surfaces. The other minor
surfaces receive negligible convection."
· Model options dialog (Heating design, Cooling design, Simulation tabs)
· Calculation options dialog (Heating design, Cooling design, Simulation)
· Model data on Construction tab
Construction tab in model data under Construction header
You can select the inside and outside surface convection algorithms in the Model data on the
Construction tab under the Surface Convection header. This provides you with the option of making
different selections in different parts of the building.
Inside convection algorithm
You can select from a range of EnergyPlus inside convection algorithms for calculating the convection
between internal zone surfaces and the rest of the zone air in the simulation calculations:
· 1-Detailed - correlates the heat transfer coefficient to the temperature difference for various
orientations. This model is based on flat plate experiments.
· 2-Simple - applies constant heat transfer coefficients depending on the surface orientation.
· 3-CIBSE - applies constant heat transfer coefficient derived from traditional CIBSE values.
· 4-Ceiling diffuser - a mixed and forced convection model for ceiling diffuser configurations. The
model correlates the heat transfer coefficient to the air change rate for ceilings, walls and floors.
· 5-Cavity - This algorithm correctly calculates the convection coefficients for a narrow sealed vertical
cavity based on the ISO 15099 standard. Natural convection model correlated for air in a narrow
vertical cavity that is sealed and not ventilated. This applies both to the air gap in between panes of
a window or to the air gap between the Trombe wall glazing and the inner surface (often a selective
© 2008 DesignBuilder Software, Ltd.
210
DesignBuilder 1.5
surface). The 5-Cavity Inside convection algorithm is not available at the surface level.
To avoid discontinuities in surface heat transfer rate calculations, all correlations are extrapolated beyond
the lower limit of the data set (3 ACH) to a natural convection limit which is applied during the hours when
the system is off. These models are explained in greater detail in the EnergyPlus Engineering Reference
Document.
Outside convection algorithm
You can select from a range of EnergyPlus outside convection algorithms:
· 1-Detailed - all other methods apply heat transfer coefficients depending on the roughness,
windspeed, and terrain of the building’s location.
· 2-Simple - applies heat transfer coefficients depending on the roughness and windspeed. This is a
combined heat transfer coefficient that includes radiation to sky, ground, and air. The correlation is
based on Figure 1, Page 25.1 (Thermal and Water Vapor Transmission Data), 2001 ASHRAE
Handbook of Fundamentals.
· 3-CIBSE - applies heat transfer coefficients depending on orientation, derived from traditional
CIBSE values.
· 4-BLAST,
· 5-TARP,
· 6-DOE-2,
· 7-MoWiTT
These are convection-only heat transfer coefficients; radiation heat transfer coefficients are calculated
automatically by the program. All algorithms are described more fully in the EnergyPlus Engineering
Reference.
When the surface is wet (i.e. it is raining and the surface is exposed to wind) then the convection
coefficient appears in results as a very large number (1000) and the surface is exposed to the Outdoor
Wet Bulb Temperature rather than the Outdoor Dry Bulb Temperature.
Inside and Outside convection algorithm settings can be made in various places.
You cannot make changes to individual surface convection settings where the surface is an internal
partition.
Note: the equivalent inside and outside surface convection options in the Calculation and Model options
dialogs control building default values (equivalent of making a setting in Model data at building level)
and changes at block, zone or surface levels in the Model data will override these settings.
Construction tab in model data under Construction header
Component blocks can be used to include shading and reflection effects of objects such as local shading
devices, awnings, adjacent buildings and trees. They can also be used to define ground and adiabatic
adjacencies. The component block model data allows you to define the component block type, whether
the component block shades and reflects in simulations, transmittance of the shading material and also a
schedule for modelling seasonal variations in transmittance.
Component block type
You can change the type of the component block. Select from:
· 1-Standard - used for shading, reflection and visualisation.
· 2-Ground - used for setting ground adjacency, shading, reflection and visualisation.
© 2008 DesignBuilder Software, Ltd.
Building Models
211
· 3-Adiabatic - used for setting adiabatic adjacency, shading, reflection and visualisation.
For more information on the Component block types see Component Block under Working with Blocks
(Building Level)
Component block shades and reflects
Switch this option on to include the component block as a shading/reflection surfaces in the simulations.
Shading surfaces have the following effects:
·
·
·
·
Shade direct beam solar radiation.
Reflect solar radiation onto the building (if you select Model reflections in the calculation options).
Shade diffuse solar and long-wave radiation from the sky.
Shade diffuse solar radiation from the ground (if you select Model reflections in the calculation
options).
Important note on ground reflection
Reflection from the ground is calculated even if the Reflections option is not used, but if
Reflections are not calculated the ground plane is considered unobstructed, i.e., the
shadowing of the ground by the building itself or by component blocks is ignored.
Shadowing of the ground by component blocks is only taken into account if the
Reflections option is used.
Conclusion: Switch Reflections on for accurate shading calculations.
Note: all component block types cast shadows in the visualisations.
Material
The component block material is used to define the solar and visible reflectance of the block surfaces in
Cooling design calculations and Simulations using real weather data when the model reflections
calculation option is selected.
Note: Although component blocks are displayed in DesignBuilder as solid objects, non-flat component
blocks are modelled in EnergyPlus as a group of surfaces and it is the reflectance and transmission of
each of these surfaces that is being described here. The solar flux incident upon a building facade will be
attenuated by each successive shading object located on a path between the facade and the sun position.
Maximum Transmittance
The transmittance of the component block during the simulation is calculated by multiplying the maximum
transmittance by the time varying schedule value:
Transmittance = Max Transmittance x Schedule value
In most cases you will want component blocks to provide 100% shading for 100% of the time. In this case
you can leave the Maximum transmittance and Transmittance schedule in their default states of 0
and On respectively. If you wish the component block to transmit solar and visible radiation you can define
the extent and timing of the transmission. The component block transmittance is calculated during the
simulations as the Maximum transmittance multiplied by the value of the transmittance schedule below.
The maximum transmittance can have any value between 0 and 1. Note that if the component block is flat
© 2008 DesignBuilder Software, Ltd.
212
DesignBuilder 1.5
(i.e. it consists of 2 large surfaces and several smaller 'edge' surfaces) the block is represented in the
simulations by a single shading surface. In this case the surface used will depend on the value of the Flat
component block surface selection model option.
Tip: If your component block has a constant transmittance you can set the transmittance schedule below
to On and set the constant transmittance for the block here.
For non-flat component blocks every surface is included in the simulation as a shading surface and the
solar flux incident upon a building facade will be attenuated by each successive shading object located on
a path between the facade and the sun position. The shading transmittance schedule you define is
therefore modified to ensure that the overall transmittance of the block is the Maximum Transmittance
value multiplied by the schedule you selected. This is done assuming that the component block is convex
and that therefore solar rays can only pass through a maximum of 2 surfaces. The transmittance of each
non-flat component block surface is set to square root of the value you defined to achieve this.
Note: non-convex non-flat component blocks will provide more shading than you specified during times
when solar rays pass through more than 2 surfaces.
Note: there was a bug in the calculation of transmittance through multiple shading devices having
fractional transmittance in EnergyPlus version 2.0 and earlier. We haven't yet verified that the bug has
been fixed and so must recommend that you check results carefully when using fractional transmittance
for component blocks.
Transmittance schedule
The component block transmittance schedule defines any time varying transmittance of the component
block surfaces. By default, the component block is fully opaque for the whole year. The transmittance
schedule can contain any value between 0 and 1. The transmittance schedule can be used to allow for
seasonal transmittance change, such as deciduous trees that have a higher transmittance in winter than
in summer. Transmittance based on time of day can also be used - a movable awning, for example,
where the transmittance is some value less than 1.0 when the awning is in place and is 1.0 when the
awning is retracted.
The following assumptions are made in the shading surface transmittance calculation:
· Both sides of the shading surface have the same transmittance properties.
· The transmittance is the same for both beam and diffuse solar radiation.
· Beam solar transmittance is independent of angle of incidence on the shading surface.
© 2008 DesignBuilder Software, Ltd.
Building Models
213
· Beam radiation incident on a shading surface is transmitted as beam radiation with no change in
direction, i.e., there is no beam-to-diffuse component.
· If two shading surfaces with non-zero transmittance overlap, the net transmittance is the product of
the individual transmittances. Inter-reflection between the shading
· surfaces (and between the shading surfaces and the building) is ignored.
· For the daylighting calculation the shading surface’s visible transmittance is assumed to be the
same as its solar transmittance.
· Shading devices are assumed to be opaque to long-wave radiation no matter what the solar
transmittance value is.
Note that shading devices only shade solar radiation when the sun is up, which is automatically
determined by EnergyPlus from latitude, time of year, etc. The user need only account for the time-varying
transmittance of the shading device in the transmittance schedule, not whether the sun is up or not.
3.3.2.2.2 Airtightness
Construction tab in model data
There are two ways of defining air tightness depending on the Natural ventilation model option:
· Scheduled
· Calculated
In both cases infiltration can be switched off at building, block or zone level.
Construction tab in model data under Airtightness header
The infiltration rate (rate of entry of unintentional air from outside through cracks, holes and through the
porosity of the fabric) can be set in Air changes per hour (ac/h) and is constant throughout the simulation.
The air flow rate in m3/s is calculated from the ac/h data using:
m3/s = ac/h * ZoneVolume / 3600
where ZoneVolume is the total air volume of the space including the volume of floor and ceiling
constructions and any raised floor and suspended ceiling voids (if selected in Separate constructions) and
including half the volume of partition walls.
Note: this total zone volume value may be different from the value used for calculating air flow rates for
natural ventilation and mechanical ventilation which have model options for excluding floor/ceiling
constructions.
Construction tab in model data under Airtightness header
The Airtightness is defined by a position on a five point scale:
© 2008 DesignBuilder Software, Ltd.
214
DesignBuilder 1.5
The five settings correspond to the five Crack templates.
You can also switch off calculated infiltration off by unchecking the Model infiltration checkbox. This may
be useful if you are carrying out a summertime simulation of a large building to get around the restriction
on the maximum number of cracks in the model.
3.3.2.3
Openings Data (Windows, Doors, Vents, Holes, Sub-surfaces)
Openings tab in model data
The term opening is used in DesignBuilder to describe any opening in the main building fabric. These are
modelled as exceptions to the main surface construction. There are five types of opening:
· Windows
· Sub-surfaces ( i.e. opaque elements within the surface that have different properties from the main
construction. For example lintels and lightweight panels can be defined as sub-surfaces. Data for
these is held on the Construction tab)
· Holes
· Doors
· Vents
The layout, operation and construction data for these (apart from sub-surfaces) can be set on the
Openings tab.
Templates
You can load generic Opening data by clicking on the Template option under Glazing Template and then
by clicking on the '...' at the right of the line (below).
When you make a selection from the list of Glazing templates, data from selected template will be loaded
to the model.
You can also open the:
·
·
·
·
·
External Glazing,
Internal Glazing,
Roof Glazing,
Doors,
Vents
headers to enter opening details where they are different from those loaded from the template.
© 2008 DesignBuilder Software, Ltd.
Building Models
215
Note: Once you have created custom openings on any particular surface, changes made on this tab will
not affect the layout for the surface.
All Openings data is used to generate simulation data at the Surface level.
You can also override default Pressure Coefficient data when the Calculated Natural ventilation option is
set and you are at surface level.
3.3.2.3.1 External Glazing
Openings tab in model data
The data under the External Glazing header applies to all glazing lying on external walls. You can enter
information on:
·
·
·
·
Dimensions
Frame
Shading
Operation
Openings tab in model data under External Glazing and Internal Glazing headers
Facade types
There are a number of standard facade types:
· None - there is no glazing.
· Continuous horizontal - glazing is generated in a continuous horizontal strip using Sill height,
Window spacing and Percentage glazing.
· Fixed height - glazing is generated with a fixed height at the specified Sill height and Window
spacing, and width is calculated based on the Percentage glazing. This option uses Window to
wall % but prioritises window height.
· Preferred height - glazing is generated using the window height data and the Percentage glazing,
but the Window height may be adjusted to achieve the required Window to wall %. This option
uses Window height, Window spacing and Sill height but prioritises Window to wall %.
· Fixed width and height - windows have fixed width and height. This option uses Window to wall
% but prioritises Window Width, Height, Spacing and Sill height.
· Fill surface (100%) - the entire surface is filled with glazing and there is no frame.
You can use the Window to wall % (WWR) data and Window height, Window spacing and Sill height to
easily change the amount of glazing and its layout on the walls. This data is used as described above
under Facade types.
Note 1: you can control the makeup of the building facades in greater detail by drawing individual
windows at the surface level. In this case glazing, vent and door layout model data is ignored.
Note 2: flat roofs do not have default glazing set up using Roof glazing layout model data. To create
openings on a flat roof you should go to the surface level and add them there.
© 2008 DesignBuilder Software, Ltd.
216
DesignBuilder 1.5
Openings tab in model data under External Glazing, Internal Glazing and Roof Glazing headers
Frames are
applied to all rectangular windows (default and custom) but not to other shaped windows and not when
using the Fill surface (100%) facade type.
If the glazing does not have a frame or dividers, uncheck the Has a frame? box. If Has a frame? is
checked and then you can enter:
· the construction of the frame and dividers,
· the number of horizontal dividers and vertical dividers,
· frame width and divider with (see diagrams below for definition).
© 2008 DesignBuilder Software, Ltd.
Building Models
217
EXTERNAL WINDOWS ON WALLS
For external windows on walls the following dimensions in the direction of the glazing normal can also
be entered:
·
·
·
·
·
·
·
·
·
Inside reveal depth
Inside sill depth
Outside divider projection
Inside divider projection
Outside frame projection
Inside frame projection
Divider glass edge-centre conduction ratio
Frame glass edge-centre conduction ratio
Divider type
The definition of the above dimensions is shown in the diagrams.
REVEAL
© 2008 DesignBuilder Software, Ltd.
218
DesignBuilder 1.5
DIVIDERS
© 2008 DesignBuilder Software, Ltd.
Building Models
219
Openings tab in model data under External Glazing, Internal Glazing and Roof Glazing headers
You can select two types of shading for external windows:
· Window shading (blinds, curtains etc walls and roofs).
· Local shading (overhangs, louvres, sidefins on external walls only)
These types of shading can be used individually or combined.
© 2008 DesignBuilder Software, Ltd.
220
DesignBuilder 1.5
Openings tab in model data under External Glazing, Internal Glazing and Roof Glazing headers
To include blinds, transparent insulation or electrochromic glazing check the 'Window shading' checkbox.
This displays the data above.
Type
Select the Window blind component type. There are 4 categories of window blinds:
·
·
·
·
Slat
Shade
Transparent insulation
Electrochromic switching (if you select a blind of this category the position must be 'Switchable'.
Position
The window shading devices can be positioned in one of four ways:
· 1-Inside - the window shading devices is positioned inside the zone.
· 2-Mid-pane - the window shading device is positioned between the inner pane and the second
pane.
· 3-Outside - the shading devices positioned outside.
· 4-Switchable - select this option for electrochromic glazing in which case the outer pane is
switched based on the shading control (below).
Control type
Control data specifies how the shading device is controlled. It determines whether the shading device is
“on” or “off.” For blinds and shades, when the device is “on” it is assumed to cover all of the window
except its frame; when the device is “off” it is assumed to cover none of the window (whether “on” or “off”
the shading device is assumed to cover none of the wall that the window is on). For switchable glazing,
© 2008 DesignBuilder Software, Ltd.
Building Models
221
“on” means that the glazing is in the fully-switched state and “off” means that it is in the unswitched state;
for example, for electrochromic glazing, “on” means the glazing is in its darkest state and "off” means it is
in its lightest state.
The choices for Shading control type are the following. Equivalent EnergyPlus control types are shown
in italics. If SetPoint is applicable its units are shown in parentheses.
1- Always on (AlwaysOn) - Shading is always on.
The following six control types are used primarily to reduce zone cooling load due to window solar gain.
2-Daylight (MeetDaylightIlluminanceSetpoint) - Used only with Position = 4-Switchable in zones with
daylighting controls. In this case the transmittance of the glazing is adjusted to just meet the daylight
illuminance set point at the first daylighting reference point. Note that the daylight illuminance set point is
specified under Environmental Control on the Activity tab.
3-Schedule - Shading operation is defined by a schedule.
4-Solar (OnIfHighSolarOnWindow) - Shading is on if beam plus diffuse solar radiation incident on the
window exceeds SetPoint (W/m2 or BTU/hr-ft2).
5-Glare (OnIfHighGlare) - Shading is on if the total daylight glare index at the zone’s first daylighting
sensor from all of the exterior windows in the zone exceeds the maximum glare index specified in the
daylighting input for zone.
Note: Glare control requires Lighting control to be switched on in the zone.
6-Outside air temp (OnIfHighOutsideAirTemp) - Shading is on if outside air temperature exceeds
SetPoint (C or F).
7-Inside air temp (OnIfHighZoneAirTemp) - Shading is on if zone air temperature in the previous time
step exceeds SetPoint (C or F)
8-Cooling (OnIfHighZoneCooling) - Shading is on if zone cooling rate in the previous time step is nonzero.
The following two control types can be used to reduce zone cooling load. They are applicable to any
Shading type but are most appropriate for interior or exterior blinds, interior or exterior shades with low
insulating value, or switchable glazing.
9-Day cooling and solar + night (OnNight/OnDayIfCoolingAndHighSolarOnWindow) - Shading is on at
night. Shading is on during the day the solar radiation incident on the window exceeds SetPoint (W/m2 or
BTU/hr-ft2) and if the zone cooling rate in the previous time step is non-zeo.
10-Day cooling and solar (OffNight/OnDayIfCoolingAndHighSolarOnWindow) - Shading is off at night.
Shading is on during the day when the solar radiation incident on the window exceeds SetPoint (W/m2 or
BTU/hr-ft2) and if the zone cooling rate in the previous time step is non-zero.
The following three control types can be used to reduce zone heating load during the winter by reducing
window conductive heat loss at night and leaving the window unshaded during the day to maximize solar
gain. They are applicable to any Shading Type but are most appropriate for interior or exterior shades with
high insulating value ("movable insulation"). “Night” means the sun is down and “day” means the sun is
up.
11-Night outside low air temp (OnNightIfLowOutsideTemp/OffDay) - Shading is on at night if the outside
air temperature is less than SetPoint (C or F) and schedule, if specified, allows shading. Shading is off
during the day.
12-Night inside low air temp (OnNightIfLowInsideTemp/OffDay) - Shading is on at night if the zone air
temperature in the previous time step is less than SetPoint (C or F) and schedule, if specified, allows
shading. Shading is off during the day.
13-Night heating (OnNightIfHeating/OffDay) - Shading is on at night if the zone heating rate in the
previous time step exceeds SetPoint (W) and schedule, if specified, allows shading. Shading is off during
the day.
© 2008 DesignBuilder Software, Ltd.
222
DesignBuilder 1.5
The following two control types can be used to reduce zone heating and cooling load. They are applicable
to any Shading type but are most appropriate for translucent interior or exterior shades with high insulating
value ("translucent movable insulation").
14-Night outside low air temp + day cooling (OnNightIfLowOutsideTemp/OnDayIfCooling) - Shading is
on at night if the outside air temperature is less than Set point (C or F). Shading is on during the day if the
zone cooling rate in the previous time step is non-zero.
15-Night heating + day cooling (OnNightIfHeating/OnDayIfCooling) - Shading is on at night if the zone
heating rate in the previous time step is non-zero. Shading is on during the day if the zone cooling rate in
the previous time step is non-zero.
SetPoint
The setpoint for activating window shading. The units depend on the type of trigger:
· W/m2 or BTU/hr-ft2 for solar-based controls.
· C or F for temperature-based controls.
Openings tab in model data under External Glazing headers
To include overhangs, sidefins and/or louvres check the 'Local shading' checkbox.
This shows the Local shading component data. DesignBuilder comes with a small database of Local
shading devices, but if you cannot find a suitable component for your model, you can create a custom
local shading component by clicking on the New button from the Selection dialog (below).
Note: the DesignBuilder Local shading devices allow a range of different overhangs, side fins and louvres
to be defined, but if you need to model a shading device not covered by the standard mechanism, you can
draw custom shading devices using Component blocks.
© 2008 DesignBuilder Software, Ltd.
Building Models
223
Openings tab in model data under External Glazing, Internal Glazing and Roof Glazing headers
The operation of windows can be defined by entering data under Operation headers. The data will depend
on the Natural ventilation model option set:
Calculated Natural Ventilation
The % Glazing area opens slider allows you to define the openable window area as a percentage of the
total window area. For example enter '20' if 20% of the window area can open.
Note: if modulation is switched on (it is by default) the glazing opening areas are multiplied by a factor to
account for external conditions.
You can also enter a schedule to define the timing of the window operation.
The windows are 'open' when:
Tzone_air > Tsetpoint AND Tzone_air > Toutside_air AND the schedule value = 1
The ventilation rate is calculated based on the pressure difference across the opening calculated from
wind and stack pressure effects using equations described in Natural Ventilation Modelling.
Scheduled Natural Ventilation
Airflow through external windows, vents, doors and holes are not modelled with Scheduled natural
ventilation because the natural ventilation airflow from outside is explicitly defined using the total natural
ventilation flow rate and operation on the HVAC tab. No operation data is entered on the Openings tab for
external windows in this case.
Note: Natural Ventilation can be overridden to be off on the HVAC tab for both Calculated and Scheduled
model options.
3.3.2.3.2 Internal Glazing
Openings tab in model data
The data under the Internal Glazing header applies to all glazing lying on internal partition walls. You can
enter information on:
· Dimensions
· Frame
· Operation
Openings tab in model data under External Glazing and Internal Glazing headers
Facade types
There are a number of standard facade types:
© 2008 DesignBuilder Software, Ltd.
224
DesignBuilder 1.5
· None - there is no glazing.
· Continuous horizontal - glazing is generated in a continuous horizontal strip using Sill height,
Window spacing and Percentage glazing.
· Fixed height - glazing is generated with a fixed height at the specified Sill height and Window
spacing, and width is calculated based on the Percentage glazing. This option uses Window to
wall % but prioritises window height.
· Preferred height - glazing is generated using the window height data and the Percentage glazing,
but the Window height may be adjusted to achieve the required Window to wall %. This option
uses Window height, Window spacing and Sill height but prioritises Window to wall %.
· Fixed width and height - windows have fixed width and height. This option uses Window to wall
% but prioritises Window Width, Height, Spacing and Sill height.
· Fill surface (100%) - the entire surface is filled with glazing and there is no frame.
You can use the Window to wall % (WWR) data and Window height, Window spacing and Sill height to
easily change the amount of glazing and its layout on the walls. This data is used as described above
under Facade types.
Note 1: you can control the makeup of the building facades in greater detail by drawing individual
windows at the surface level. In this case glazing, vent and door layout model data is ignored.
Note 2: flat roofs do not have default glazing set up using Roof glazing layout model data. To create
openings on a flat roof you should go to the surface level and add them there.
Openings tab in model data under External Glazing, Internal Glazing and Roof Glazing headers
Frames are
applied to all rectangular windows (default and custom) but not to other shaped windows and not when
using the Fill surface (100%) facade type.
© 2008 DesignBuilder Software, Ltd.
Building Models
225
If the glazing does not have a frame or dividers, uncheck the Has a frame? box. If Has a frame? is
checked and then you can enter:
· the construction of the frame and dividers,
· the number of horizontal dividers and vertical dividers,
· frame width and divider with (see diagrams below for definition).
EXTERNAL WINDOWS ON WALLS
For external windows on walls the following dimensions in the direction of the glazing normal can also
be entered:
·
·
·
·
·
·
·
·
·
Inside reveal depth
Inside sill depth
Outside divider projection
Inside divider projection
Outside frame projection
Inside frame projection
Divider glass edge-centre conduction ratio
Frame glass edge-centre conduction ratio
Divider type
The definition of the above dimensions is shown in the diagrams.
REVEAL
© 2008 DesignBuilder Software, Ltd.
226
DesignBuilder 1.5
DIVIDERS
© 2008 DesignBuilder Software, Ltd.
Building Models
227
Openings tab in model data under External Glazing, Internal Glazing and Roof Glazing headers
The operation of windows can be defined by entering data under Operation headers. The data will depend
on the Natural ventilation model option set:
Calculated Natural Ventilation
The % Glazing area opens slider allows you to define the openable window area as a percentage of the
total window area. For example enter '20' if 20% of the window area can open.
© 2008 DesignBuilder Software, Ltd.
228
DesignBuilder 1.5
Note: if modulation is switched on (it is by default) the glazing opening areas are multiplied by a factor to
account for external conditions.
You can also enter a schedule to define the timing of the window operation.
The windows are 'open' when:
Tzone_air > Tsetpoint AND Tzone_air > Toutside_air AND the schedule value = 1
The ventilation rate is calculated based on the pressure difference across the opening calculated from
wind and stack pressure effects using equations described in Natural Ventilation Modelling.
Scheduled Natural Ventilation
Airflow through external windows, vents, doors and holes are not modelled with Scheduled natural
ventilation because the natural ventilation airflow from outside is explicitly defined using the total natural
ventilation flow rate and operation on the HVAC tab. No operation data is entered on the Openings tab for
external windows in this case.
Note: Natural Ventilation can be overridden to be off on the HVAC tab for both Calculated and Scheduled
model options.
3.3.2.3.3 Roof Glazing
Openings tab in model data
The data under the Roof Glazing header applies to all glazing lying on external roof surfaces. You can
enter information on:
·
·
·
·
Dimensions
Frame
Shading
Operation
Note: flat roofs do not have default glazing set up using Roof glazing layout model data. To create
openings on a flat roof you should go to the surface level and add them there.
Openings tab in model data under External Glazing and Internal Glazing headers
Facade types
There are a number of standard facade types:
· None - there is no glazing.
· Continuous horizontal - glazing is generated in a continuous horizontal strip using Sill height,
Window spacing and Percentage glazing.
· Fixed height - glazing is generated with a fixed height at the specified Sill height and Window
spacing, and width is calculated based on the Percentage glazing. This option uses Window to
wall % but prioritises window height.
· Preferred height - glazing is generated using the window height data and the Percentage glazing,
© 2008 DesignBuilder Software, Ltd.
Building Models
229
but the Window height may be adjusted to achieve the required Window to wall %. This option
uses Window height, Window spacing and Sill height but prioritises Window to wall %.
· Fixed width and height - windows have fixed width and height. This option uses Window to wall
% but prioritises Window Width, Height, Spacing and Sill height.
· Fill surface (100%) - the entire surface is filled with glazing and there is no frame.
You can use the Window to wall % (WWR) data and Window height, Window spacing and Sill height to
easily change the amount of glazing and its layout on the walls. This data is used as described above
under Facade types.
Note 1: you can control the makeup of the building facades in greater detail by drawing individual
windows at the surface level. In this case glazing, vent and door layout model data is ignored.
Note 2: flat roofs do not have default glazing set up using Roof glazing layout model data. To create
openings on a flat roof you should go to the surface level and add them there.
Openings tab in model data under Roof Glazing headers
You can select one type of shading for external roof windows:
· Window shading (blinds, curtains etc walls and roofs).
Openings tab in model data under External Glazing, Internal Glazing and Roof Glazing headers
Frames are
applied to all rectangular windows (default and custom) but not to other shaped windows and not when
© 2008 DesignBuilder Software, Ltd.
230
DesignBuilder 1.5
using the Fill surface (100%) facade type.
If the glazing does not have a frame or dividers, uncheck the Has a frame? box. If Has a frame? is
checked and then you can enter:
· the construction of the frame and dividers,
· the number of horizontal dividers and vertical dividers,
· frame width and divider with (see diagrams below for definition).
EXTERNAL WINDOWS ON WALLS
For external windows on walls the following dimensions in the direction of the glazing normal can also
be entered:
·
·
·
·
·
·
·
·
·
Inside reveal depth
Inside sill depth
Outside divider projection
Inside divider projection
Outside frame projection
Inside frame projection
Divider glass edge-centre conduction ratio
Frame glass edge-centre conduction ratio
Divider type
The definition of the above dimensions is shown in the diagrams.
REVEAL
© 2008 DesignBuilder Software, Ltd.
Building Models
DIVIDERS
© 2008 DesignBuilder Software, Ltd.
231
232
DesignBuilder 1.5
Openings tab in model data under External Glazing, Internal Glazing and Roof Glazing headers
To include blinds, transparent insulation or electrochromic glazing check the 'Window shading' checkbox.
© 2008 DesignBuilder Software, Ltd.
Building Models
233
This displays the data above.
Type
Select the Window blind component type. There are 4 categories of window blinds:
·
·
·
·
Slat
Shade
Transparent insulation
Electrochromic switching (if you select a blind of this category the position must be 'Switchable'.
Position
The window shading devices can be positioned in one of four ways:
· 1-Inside - the window shading devices is positioned inside the zone.
· 2-Mid-pane - the window shading device is positioned between the inner pane and the second
pane.
· 3-Outside - the shading devices positioned outside.
· 4-Switchable - select this option for electrochromic glazing in which case the outer pane is
switched based on the shading control (below).
Control type
Control data specifies how the shading device is controlled. It determines whether the shading device is
“on” or “off.” For blinds and shades, when the device is “on” it is assumed to cover all of the window
except its frame; when the device is “off” it is assumed to cover none of the window (whether “on” or “off”
the shading device is assumed to cover none of the wall that the window is on). For switchable glazing,
“on” means that the glazing is in the fully-switched state and “off” means that it is in the unswitched state;
for example, for electrochromic glazing, “on” means the glazing is in its darkest state and "off” means it is
in its lightest state.
The choices for Shading control type are the following. Equivalent EnergyPlus control types are shown
in italics. If SetPoint is applicable its units are shown in parentheses.
1- Always on (AlwaysOn) - Shading is always on.
The following six control types are used primarily to reduce zone cooling load due to window solar gain.
2-Daylight (MeetDaylightIlluminanceSetpoint) - Used only with Position = 4-Switchable in zones with
© 2008 DesignBuilder Software, Ltd.
234
DesignBuilder 1.5
daylighting controls. In this case the transmittance of the glazing is adjusted to just meet the daylight
illuminance set point at the first daylighting reference point. Note that the daylight illuminance set point is
specified under Environmental Control on the Activity tab.
3-Schedule - Shading operation is defined by a schedule.
4-Solar (OnIfHighSolarOnWindow) - Shading is on if beam plus diffuse solar radiation incident on the
window exceeds SetPoint (W/m2 or BTU/hr-ft2).
5-Glare (OnIfHighGlare) - Shading is on if the total daylight glare index at the zone’s first daylighting
sensor from all of the exterior windows in the zone exceeds the maximum glare index specified in the
daylighting input for zone.
Note: Glare control requires Lighting control to be switched on in the zone.
6-Outside air temp (OnIfHighOutsideAirTemp) - Shading is on if outside air temperature exceeds
SetPoint (C or F).
7-Inside air temp (OnIfHighZoneAirTemp) - Shading is on if zone air temperature in the previous time
step exceeds SetPoint (C or F)
8-Cooling (OnIfHighZoneCooling) - Shading is on if zone cooling rate in the previous time step is nonzero.
The following two control types can be used to reduce zone cooling load. They are applicable to any
Shading type but are most appropriate for interior or exterior blinds, interior or exterior shades with low
insulating value, or switchable glazing.
9-Day cooling and solar + night (OnNight/OnDayIfCoolingAndHighSolarOnWindow) - Shading is on at
night. Shading is on during the day the solar radiation incident on the window exceeds SetPoint (W/m2 or
BTU/hr-ft2) and if the zone cooling rate in the previous time step is non-zeo.
10-Day cooling and solar (OffNight/OnDayIfCoolingAndHighSolarOnWindow) - Shading is off at night.
Shading is on during the day when the solar radiation incident on the window exceeds SetPoint (W/m2 or
BTU/hr-ft2) and if the zone cooling rate in the previous time step is non-zero.
The following three control types can be used to reduce zone heating load during the winter by reducing
window conductive heat loss at night and leaving the window unshaded during the day to maximize solar
gain. They are applicable to any Shading Type but are most appropriate for interior or exterior shades with
high insulating value ("movable insulation"). “Night” means the sun is down and “day” means the sun is
up.
11-Night outside low air temp (OnNightIfLowOutsideTemp/OffDay) - Shading is on at night if the outside
air temperature is less than SetPoint (C or F) and schedule, if specified, allows shading. Shading is off
during the day.
12-Night inside low air temp (OnNightIfLowInsideTemp/OffDay) - Shading is on at night if the zone air
temperature in the previous time step is less than SetPoint (C or F) and schedule, if specified, allows
shading. Shading is off during the day.
13-Night heating (OnNightIfHeating/OffDay) - Shading is on at night if the zone heating rate in the
previous time step exceeds SetPoint (W) and schedule, if specified, allows shading. Shading is off during
the day.
The following two control types can be used to reduce zone heating and cooling load. They are applicable
to any Shading type but are most appropriate for translucent interior or exterior shades with high insulating
value ("translucent movable insulation").
14-Night outside low air temp + day cooling (OnNightIfLowOutsideTemp/OnDayIfCooling) - Shading is
on at night if the outside air temperature is less than Set point (C or F). Shading is on during the day if the
zone cooling rate in the previous time step is non-zero.
15-Night heating + day cooling (OnNightIfHeating/OnDayIfCooling) - Shading is on at night if the zone
heating rate in the previous time step is non-zero. Shading is on during the day if the zone cooling rate in
the previous time step is non-zero.
SetPoint
© 2008 DesignBuilder Software, Ltd.
Building Models
235
The setpoint for activating window shading. The units depend on the type of trigger:
· W/m2 or BTU/hr-ft2 for solar-based controls.
· C or F for temperature-based controls.
Openings tab in model data under External Glazing, Internal Glazing and Roof Glazing headers
The operation of windows can be defined by entering data under Operation headers. The data will depend
on the Natural ventilation model option set:
Calculated Natural Ventilation
The % Glazing area opens slider allows you to define the openable window area as a percentage of the
total window area. For example enter '20' if 20% of the window area can open.
Note: if modulation is switched on (it is by default) the glazing opening areas are multiplied by a factor to
account for external conditions.
You can also enter a schedule to define the timing of the window operation.
The windows are 'open' when:
Tzone_air > Tsetpoint AND Tzone_air > Toutside_air AND the schedule value = 1
The ventilation rate is calculated based on the pressure difference across the opening calculated from
wind and stack pressure effects using equations described in Natural Ventilation Modelling.
Scheduled Natural Ventilation
Airflow through external windows, vents, doors and holes are not modelled with Scheduled natural
ventilation because the natural ventilation airflow from outside is explicitly defined using the total natural
ventilation flow rate and operation on the HVAC tab. No operation data is entered on the Openings tab for
external windows in this case.
Note: Natural Ventilation can be overridden to be off on the HVAC tab for both Calculated and Scheduled
model options.
3.3.2.3.4 Doors
Openings tab in model data
DesignBuilder doors are opaque and are added to the model by navigating to the appropriate surface and
checking the 'Door fitted' option. This adds a single door replacing one of the windows. Alternatively, for
more control over the placement position of the doors, you can go to surface level and draw the doors
using the Draw Door command. On surfaces where custom openings have been defined, any changes to
door layout model data on the Opening tab is ignored.
· Door Placement
· Door Operation
© 2008 DesignBuilder Software, Ltd.
236
DesignBuilder 1.5
Note: if you have drawn custom doors at the surface level then these will be used even if the Doors
fitted checkbox is not checked. The Doors fitted checkbox only controls the automatic generation of
doors, not their use in the calculations.
Airflow through Doors: Doors positioned on external walls only have an effect on airflow in Simulation
calculations when the Natural ventilation building model option is set to Calculated. They have no effect
on airflow in Heating and Cooling Design calculations. Doors positioned on internal partition walls are
used to mix the air between the two adjacent zones when the Scheduled Natural ventilation building
model option is set. They also provide an air flow path when the Calculated option is set.
Openings tab in model data under Doors
On surfaces where no custom openings have been defined, you can create doors simply by checking the
'Doors fitted?' options under the External and Internal Doors headers. In this case a single door is
positioned on each surface in place of one of the windows in the automatically generated facade layout.
Openings tab in model data under Doors
The operation of doors can be defined by entering data under Operation headers:
· % Area door opens - defines the area of the door which opens relative to the total area to give an
approximation of the actual opening size and,
· % Time door is open - defines the average time the door is in the open position. Accounts for the
fact that during occupied periods the door may open and close repeatedly. The average effect
The way this data is used depends on the Natural ventilation model option set:
Calculated
The average door opening size used in the simulation is calculated by multiplying the % Area door opens
by the % Time the door is open by the gross door area. A schedule can be applied to control timing of
the opening.
The ventilation rate through the door opening is calculated based on the wind and stack pressure effects.
Scheduled
External door opening is not modelled explicitly with the Scheduled natural ventilation model data
setting. Instead, the total natural ventilation flow rate and operation is defined for each zone on the HVAC
tab. No operation data is entered on the Openings tab for external doors.
Internal doors are modelled using the EnergyPlus 'Mixing' object which mixes air between the two
adjacent zones. DesignBuilder uses a very approximate empirical relationship to calculate the mixing
flow:
Flow (m3/s) = Door area (m2) * % area door opens * % time door is open * Farea-flow
where Farea-flow is a factor used to obtain the mixing flow from the opening area = 0.1.
A schedule can be applied to control timing of the mixing flow..
© 2008 DesignBuilder Software, Ltd.
Building Models
237
3.3.2.3.5 Vents and Holes
Openings tab in model data
Vents
DesignBuilder vents are used for modelling airflow through openings and are added to the model by
navigating to the appropriate surface and checking the Vents fitted option. This adds a single vent under
each of the windows (if the vent spacing is the same as the window spacing). Alternatively, for more
control over the placement position of the vents, you can go to surface level and draw the vents using the
Draw vent command. On surfaces where custom openings have been defined, any changes to vent
layout model data on the Opening tab is ignored.
· Vent Placement
· Vent Operation
Note: if you have drawn custom vents at the surface level then these will be used even if the Vents fitted
checkbox is not checked. The Vents fitted checkbox only controls the automatic generation of vents, not
their use in the calculations.
See also vent components for more information.
Holes
Holes are modelled in a similar way to vents with some exceptions:
· Holes must be drawn at surface level
· Airflow through holes is uncontrolled, i.e. the airflow path is active all the time.
· Drawing holes can be used as a way to merge two zones when the Merge zones connected by
holes Model option is set.
· Holes are used internally with DesignBuilder to model the heat transfer and airflow through Virtual
partitions.
· Discharge coefficient of 0.65 is used whereas with vents the vent component defines the discharge
coefficient.
VENT MODELLING
Calculated Natural Ventilation (Simulations only)
Each vent is modelled using:
· An EnergyPlus 'Door'. The heat conduction through the vent 'door' component is displayed in results
as Internal Natural vent and External Natural vent.
· An EnergyPlus 'AIRFLOWNETWORK:MULTIZONE:COMPONENT DETAILED OPENING' and
other associated AIRFLOW components, providing a controllable flow path. You can define Vent
operation.
Scheduled Natural Ventilation (and Design Calcs)
Each vent is modelled using:
· An EnergyPlus 'Door'. The heat conduction through the vent 'door' component is displayed in results
© 2008 DesignBuilder Software, Ltd.
238
DesignBuilder 1.5
as Internal Natural vent and External Natural vent.
· Internal vents have an EnergyPlus 'Mixing' object using parameters set in the Model options dialog.
External vents .
HOLE MODELLING
Calculated Natural Ventilation (Simulations only)
Each hole is modelled using a sub-surface and an airflow connection:
· Sub-surface:
· If using 1-Minimum shadowing or 2-Full exterior solar distribution the hole is represented using an
EnergyPlus 'Door'. In this case the heat conduction through the vent 'Door' component is
displayed in results as Internal Natural vent and External Natural vent.
· If the 3-Full interior and exterior solar distribution Model option is set then the hole is modelled
using a 'perfectly clear' window which transmits solar radiation and visible light.
· EnergyPlus 'AIRFLOWNETWORK:MULTIZONE:COMPONENT DETAILED OPENING' and other
associated AIRFLOW components, providing a controllable flow path. You can define Vent
operation.
Scheduled Natural Ventilation (and Design Calcs)
Each hole is modelled using a sub-surface and a 'mixing' flow:
· Sub-surface:
· If using 1-Minimum shadowing or 2-Full exterior solar distribution the hole is represented using an
EnergyPlus 'Door'. In this case the heat conduction through the vent 'Door' component is
displayed in results as Internal Natural vent and External Natural vent.
· If the 3-Full interior and exterior solar distribution Model option is set then the hole is modelled
using a 'perfectly clear' window which transmits solar radiation and visible light.
· Internal vents have an EnergyPlus 'Mixing' object using parameters set in the Model options dialog.
External vents.
Openings tab in model data under Vents
On surfaces where no custom openings have been defined, you can create vents simply by checking the
'Vents fitted?' options under the External and Internal Vents headers. In this case vents are positioned on
each surface using 'Vent spacing' and 'Vent height above floor' in the automatically generated facade
layout. Typically, a single vent is positioned under each of the windows (if the vent spacing is the same as
the window spacing).
Openings tab in model data under Vents
The operation of vents can be defined by entering timing data under Operation headers:
The way this data is used depends on the Natural ventilation model option set:
Calculated
A schedule can be applied to control timing of the vents.
The ventilation rate through the vent is calculated based on the wind and stack pressure effects.
© 2008 DesignBuilder Software, Ltd.
Building Models
239
Scheduled
External vent opening is not modelled explicitly with the Scheduled natural ventilation model data
setting. Instead, the total natural ventilation flow rate and operation is defined for each zone on the HVAC
tab. No operation data is entered on the Openings tab for external vents.
Internal vents are modelled using the EnergyPlus 'Mixing' object which mixes air between the two
adjacent zones. DesignBuilder uses a very approximate empirical relationship to calculate the mixing
flow:
Flow (m3/s) = Door area (m2) * % area door opens * % time door is open * Farea-flow
where Farea-flow is a factor used to obtain the mixing flow from the opening area = 0.1.
A schedule can be applied to control timing of the mixing flow..
3.3.2.3.6 Wind Pressure Coefficients
Openings tab in model data
You can enter wind pressure coefficients (WPC) for wind incidence angles in 45° increments for each
surface in the model. DesignBuilder sets up default WPC data for each surface using Wind Pressure
Coefficient template data derived from the AIVC Applications Guide: A guide to energy-efficient
ventilation.
3.3.2.4
Lighting Data
Lighting tab in model data
Templates
You can load generic Lighting data by clicking on the Template option under Lighting Template and then
by clicking on the '...' at the right of the line (below).
When you make a selection from the list of Lighting templates, data from selected template will be loaded
to the model.
With 'Early' gains detail the lighting gains in the space are separated into Task and General lighting. You
can also open the:
· General Lighting
© 2008 DesignBuilder Software, Ltd.
240
DesignBuilder 1.5
· Task Lighting
· Lighting Control
headers to enter lighting details where they are different from those loaded from the template.
When you load lighting data from template, the actual lighting casual gain is calculated by dividing the W/
m2/100 lux data in the template by the required illuminance level as set on the Activity tab. Consequently
you should make sure the correct activity data has been loaded in each zone before loading lighting
templates. Also, you may need to explicitly load data in each zone by checking each zone in the Target
tab of the 'Load data from template' dialog.
Lighting data generates simulation data at the Zone level.
3.3.2.4.1 General Lighting
Lighting tab in model data
General lighting accounts for the main lighting in the room. It is assumed to be able to be replaced by
daylight through lighting control, if this option is selected.
Lighting energy
This is typically the maximum electrical power input (in Watts) to lighting in a zone, including ballasts, if
present. This value is multiplied by a schedule fraction (see previous field) to get the lighting power in a
particular time step.
Note that when you load lighting data from template, the actual lighting casual gain is calculated by
dividing the W/m2/100 lux data in the template by the required illuminance level as set on the Activity tab.
The electrical input to lighting ultimately appears as heat that contributes to zone loads or to return air
heat gains. In EnergyPlus this heat is divided into four different fractions. Three of these are given by the
input fields Return Air Fraction, Fraction Radiant and Fraction Visible. A fourth, defined as the fraction of
the heat from lights convected to the zone air, is calculated by EnergyPlus as:
Convected Fraction = 1.0 – (Return Air Fraction + Radiant Fraction + Visible Fraction)
You will get an error message if Return Air Fraction + Radiant Fraction + Visible Fraction exceeds 1.0.
These fractions depend on the type of lamp and luminaire, whether the luminaire is vented to the return
air, etc.
Luminaire type
Select from:
© 2008 DesignBuilder Software, Ltd.
Building Models
241
When you select using the drop-down list an appropriate set of defaults for the luminaire type is loaded
according to the table below, assuming fluorescent lighting.
Data
1-Suspended
2-Surface Mount 3-Recessed
Return Air
Fraction
Radiant Fraction
Visible Fraction
Convected
Fraction
0.0
0.0
0.0
4-Luminous and 5-Return-air
Recessed
Ducted
Ceiling
0.0
0.54
0.42
0.18
0.40
0.72
0.18
0.10
0.37
0.18
0.45
0.37
0.18
0.45
0.18
0.18
0.10
Approximate values of Return Air Fraction, Radiant Fraction and Visible Fraction for overhead fluorescent
lighting for different luminaire configurations. These values assume that no light heat goes into an
adjacent zone. Source: Lighting Handbook: Reference & Application, 8th Edition, Illuminating Engineering
Society of North America, New York, 1993, p. 355.
Return air fraction
For Return Air Ducted luminaires this is the fraction of the heat from lights that is convected out of the
room and into the zone return air (normally into a return plenum). If the return air flow is zero or the zone
has no return air system, the program will put this fraction into the zone air. Return Air Fraction is only
visible on the screen for 5-Return-air ducted luminaires.
Radiant fraction
The fraction of heat from lights that goes into the zone as long-wave (thermal) radiation. The program
calculates how much of this radiation is absorbed by the inside surfaces of the zone according the area
times thermal absorptance product of these surfaces.
Fraction visible
The fraction of heat from lights that goes into the zone as visible (short-wave) radiation. The program
calculates how much of this radiation is absorbed by the inside surfaces of the zone according the area
times solar absorptance product of these surfaces.
Note: selecting an option from the Luminaire type drop-down list loads default Return Air Fraction,
Radiant Fraction and Visible Fraction data from the table above.
© 2008 DesignBuilder Software, Ltd.
242
DesignBuilder 1.5
Fraction convected
The fraction of the heat from lights convected to the zone air is calculated from:
Fraction convected = 1.0 – (Return Air Fraction + Fraction Radiant + Fraction Visible)
You will get an error message if Return Air Fraction + Fraction Radiant + Fraction Visible exceeds 1.0.
This data is provided on screen for information purposes.
Operation
If 'Internal gains operate with occupancy' under model options is not set General lighting has a specific
operation schedule set under General Lighting, otherwise these gains are synchronised with occupancy.
3.3.2.4.2 Task and Display Lighting
Lighting tab in model data
Task and Display Lighting accounts for lighting used for specific tasks (e.g. desk lamps) or for displaying
items (e.g. display lighting for goods in shops). Task and Display Lighting is not offset by lighting control.
The following other data is assumed:
Data
Radiant fraction
Visible fraction
Return air fraction
Value
0.42
0.18
0
Internal gain
Note that when you load lighting data from template, the actual lighting casual gain is calculated by
dividing the W/m2/100 lux data in the template by the required illuminance level as set on the Activity tab.
Operation
If 'Internal gains operate with occupancy' under model options is not set Task lighting has a specific
operation schedule set under Task Lighting, otherwise these gains are synchronised with occupancy.
3.3.2.4.3 Lighting Control
A typical perimeter area would be the areas of the zone that are close to a window. By convention
perimeter areas are defined as the area within a fixed distance from a normal to the perimeter. In the UK
NCM the fixed distance is 6m.
If you wish to create a separate thermal zone to model the different lighting and solar conditions in the
perimeter area, you can use the Offset snap option to draw Virtual partitions.
Lighting tab in model data
You can control the electric lights according to the availability of natural daylight. When Lighting control is
© 2008 DesignBuilder Software, Ltd.
Building Models
243
switched on, illuminance levels are calculated at every time step during the simulation and then used to
determine how much the electric lighting can be reduced. The daylight illuminance level in a zone
depends on many factors, including sky condition, sun position, photocell sensor positions, location, size,
and glass transmittance of windows, window shades and reflectance of interior surfaces. Reduction of
electric lighting depends on daylight illuminance level, illuminance set point, fraction of zone controlled
and type of lighting control.
LIGHTING AREAS
When lighting control is switched on, by default all of the lights in the zone are controlled by the first
(main) lighting sensor and % Zone Controlled by Lighting Area 1 has value 100%. Some larger spaces
may have 2 Lighting Areas, each area having its own lighting sensor and covering its own area of the
zone. The area is not defined geometrically in DesignBuilder - it simply reflects the fraction of the total
General overhead electric lighting that can be dimmed by its lighting sensor.
You may wish to use 2 Lighting Areas for these situations:
1. A large zone may need more than one sensor if the output from main sensor does not represent
the daylight available in other parts of the zone. For example a zone having facades in both South
and East directions would need 2 sensors (and 2 Lighting Areas), one on each facade.
2. The zone has 2 different activity areas which have been lumped into a single zone for convenience.
The 2 activities have different visual illuminance requirements and the Lighting Areas for both can
benefit from daylighting through daylighting control. An example would be a zone having both office
and recreational space. The office space may have a lighting requirement of 500 lux and the
recreational space may need 300 lux.
Note 1: if the zone has a different sensor for the back half (for example) you should check the Second
light sensor option.
Note 2: if the zone has perimeter and core areas, perimeter lights having daylight control and core lights
not, then you only need to use a single lighting sensor. The fact that the core lights are not controlled can
be modelled using % Zone Controlled by Lighting Area 1. If 60% of the lights in the zone are located in
the core zone and do not have daylight control then set % Zone Controlled by Lighting Area 1 to 40.
Perimeter Area
Daylight illuminance on the 'working plane' is calculated for up to two locations in each zone during the
simulation and illuminance setpoints are maintained where necessary by electric lighting. The sensor is
always located in the working plane which, by default, is 0.8m above the floor. By default, when lighting
control is switched on, a single photo sensor monitors the daylight illuminance at the first sensor location
and controls the lights for the whole of the zone. You can however set up 2 Lighting Areas in each zone,
by checking the Second lighting area check box. In this case you can set a target illuminance for the
second lighting area separately and also define the percentage of the zone covered by Lighting Area 2.
Note 1: the floor area covered by the 2 sensors does not need to add to 100%. The lights in the remaining
floor area operate without daylight control.
Note 2: the target illuminance for Lighting Area 1 is set on the Activity tab under Environmental Control.
If there is only one lighting area then a percentage equal to
100 - (%Zone covered by Lighting Area 1)
is assumed to have no lighting control..
© 2008 DesignBuilder Software, Ltd.
244
DesignBuilder 1.5
% Zone Controlled by Lighting Area 2
The fraction of the zone floor-area whose electric lighting is controlled by the daylight illuminance on the
second sensor. This data is required if Lighting Area 2 is being used. A percentage equal to
100 – [%Zone Controlled by Lighting Area 1] - [%Zone Controlled by Lighting Area 2]
is assumed to have no lighting control (i.e. in this uncontrolled area of the space, the lights operate purely
according to the schedule without any dimming/switching).
PROCEDURE
The procedure for introducing the lighting control is:
1. Check the Lighting Control On checkbox (at building level if all zones are to have lighting control).
2. Select the type of control as described below.
3. Position the first sensor in each zone having lighting control. The z-position is set by the Working
plane height on the Advanced tab of the Model options dialog.
4. Set the % Zone covered by Lighting Area 1. If all the lights in the zone are in Lighting Area 1 (i.e.
they are controlled by the 1st (main) lighting sensor then enter 100%.
5. If there are two lighting areas then position the second sensor.
6. Set the % Zone covered by Lighting Area 2. If all the lights in the zone are in Lighting Area 2 (i.e.
they are controlled by the 2nd lighting sensor) then enter 100 - %Zone covered by Lighting Area 1.
Note: by default the main lighting sensor is positioned in the geometric centre of the zone. It is important
that you check the position of all lighting sensors to obtain accurate results. For example, if the lighting
sensor is positioned right next to a window receiving large amounts of daylight, the lighting sensor will
signal 'enough daylight' even if the rest of the zone is only dimly lit and electric lighting energy will be
under-estimated (daylight savings over-estimated).
Continuous Control
With Continuous control, the overhead lights dim continuously and linearly from maximum electric
power, maximum light output to minimum electric power, minimum light output as the daylight illuminance
increases. The lights stay at the minimum point with further increase in the daylight illuminance.
The Minimum input power fraction for Continuous control type is the lowest power the lighting system
can dim down to, expressed as a fraction of maximum input power. For Continuous/off lighting control,
this is the power fraction reached just before the lights switch off completely.
© 2008 DesignBuilder Software, Ltd.
Building Models
245
The Minimum output fraction for Continuous control type, is the lowest lighting output the lighting
system can dim down to, expressed as a fraction of maximum light output. This is the fractional light
output that the system produces at minimum input power. For Continuous/off lighting control, this is the
power fraction reached just before the lights switch off completely.
Note: Continuous control provides an idealised lighting control mechanism which can be useful for
calculating upper limits on the potential for savings using natural daylight.
Continuous/Off Control
Continuous/off control is the same as continuous control except that the lights switch off completely
when the minimum dimming point is reached.
Stepped Control
Stepped control allows you to switch lighting on/off according to the availability of natural daylight in
discrete steps. Whereas the Continuous control described above provides precisely controlled
illuminance by dimming the lights, the stepped control models blocks of lights switching on/off according
to the electric lighting requirement.
The electric power input and light output vary in discreet, equally spaced steps. The number of steps can
be set.
See also EnergyPlus Daylight Calculations.
GLARE
Maximum allowable glare index
If a daylit zone has windows with Window shading devices, the shades will be deployed if the daylight
glare at sensor 1 exceeds the value of Maximum allowable glare index. To get this type of glare control
you have to specify Shading control type as 5-Glare for one or more windows in the zone (see Window
Shading Control).
View angle relative to y-axis
Daylight glare from a window depends on occupant view direction. It is highest when you look directly at a
window and decreases as you look away from a window. This field specifies the view direction for
calculating glare. It is the angle, measured clockwise in the horizontal plane, between the positive y-axis
and the occupant view direction, i.e. it is the bearing of the persons line of sight. For example, with Site
orientation = 0, in the Northern Hemisphere, 90 = Facing East, 180 = Facing South etc).
© 2008 DesignBuilder Software, Ltd.
246
DesignBuilder 1.5
ALGORITHMS
DesignBuilder uses the EnergyPlus DAYLIGHTING:DETAILED object to model the control of electric
lighting according to daylight illumination levels. You can find more information on the algorithms used in
the EnergyPlus documentation.
3.3.2.5
HVAC Data
HVAC tab in model data
Templates
You can load generic HVAC data by clicking on the Template option under HVAC Template and then by
clicking on the '...' at the right of the line (below).
When you make a selection from the list of HVAC templates, data from selected template will be loaded
to the model.
You can also open headers to enter HVAC details where they are different from those loaded from the
template:
·
·
·
·
·
·
·
Mechanical Ventilation,
Heating,
Cooling,
Natural Ventilation,
Air Temperature Distribution
Domestic Hot Water (DHW)
Plenums
See Compact HVAC System Types for details on Compact HVAC systems.
System type
When using Compact HVAC data, the HVAC Type is displayed beneath the Template. This cannot be
edited directly - if you want to choose a different HVAC system type you should do this by selecting an
appropriate template.
Auxiliary energy
When using Simple HVAC data, the Auxiliary energy can be entered as kWh/m2/year (SI units) or Btu/ft2
(IP units). Auxiliary energy accounts for any additional energy consumption due to fans, pumps, control
gear etc. It is specified per floor area and is modelled as being consumed 24/7 during the simulation.
© 2008 DesignBuilder Software, Ltd.
Building Models
247
SYSTEM AVAILABILITY
When using Compact HVAC data, the system availability schedule can be defined to control the overall
operation of the HVAC system, including heating, cooling and ventilation. This schedule is used at the
building level for 2-Unitary multizone, 3-VAV and 5-CAV systems and at the zone level for 1-Unitary
single zone and 5-Fan coil.
System availability schedule
The System availability schedule defines the operation of the air system fans. For Compact Unitary
systems the Fan operation mode can be set to 2-Cycling in which case air distribution only occurs when
there is heating or cooling demand.
Night cycle control (VAV/CAV)
The Night cycle control manager is used for cycling on CAV and VAV air systems when one or more
zones become too hot or too cold. The usual situation is that the central air handler is turned off at night.
However if the building gets too cold there might be condensation on the walls and other damage. Thus
the control system is usually programmed to turn the system on if one control thermostat or any
thermostat shows a zone temperature of less than a night time set point. Similarly there might be a
concern about a building getting too hot. Again the control system is programmed to turn the air handler
back on if one or any zone temperature exceeds a night time cooling set point. This data gives the user
flexibility in determining how the night time on/off decision will be made. The manager can look at the
temperature in one Night cycle control zone or it can sample all the zones connected to the air handler (
Cycle on any).
Enter the system behavior during times when the System availability schedule (above) is zero (off). The
possible inputs are:
· Stay Off - the system will remain off, no matter how hot or cold the zones may be.
· Cycle on any - if any zone served by this system has an air temperature outside the cooling or
heating set points the central fan will turn on even though the System availability schedule indicates
the fan is off.
· Cycle on control zone - same as Cycle on any except the availability manager looks at the
temperature in only the zone specified by the Night cycle control zone. Note that when using this
option you must select one zone as being the Night cycle control zone. Do this by checking the
option at zone level in the zone used as the control zone (below).
The default is 1-Stay off.
The On cycle period is the time for which the system will run after it has cycled on. This is hard-set to 1
hour.
© 2008 DesignBuilder Software, Ltd.
248
DesignBuilder 1.5
3.3.2.5.1 Compact HVAC System Types
HVAC tab in model data
Compact HVAC systems are a powerful entry way into EnergyPlus HVAC modelling because they allow
you to model HVAC systems in quite some detail without the need to draw an air flow network and deal
with the complexities of control systems and node connections. You can model many common HVAC
systems including VAV with terminal reheat, VAV with PIU, Constant volume, Fan coil units, Packaged DX
units and Mechanical ventilation.
Simulations are carried out on detailed HVAC component models automatically generated from the
compact descriptions.
When the HVAC model option is set to Compact, there are 5 HVAC system types:
·
·
·
·
·
Unitary single zone
Fan Coil Units
Unitary multizone
VAV
CAV
Rules
1. Only one CAV, VAV or Unitary multizone system can be defined per building.
2. If you select Unitary multizone, CAV or VAV at zone level, then the same selection must be made at
building level.
3. You can enter Fan coil and Unitary single zone systems in any zone without concern for the
selection at building level.
4. Up to 400 zones can be modelled simultaneously using Compact HVAC systems. It is possible to
model more zones than this by making changes to the IDD file (contact DesignBuilder or
EnergyPlus Support desks for more information about this).
5. Pumps are modelled using typical default data.
6. Unitary multizone and Fan coil units cannot be used in same building.
7. Fan coil units are incompatible with Calculated natural ventilation.
The Unitary single zone option allows you to model simple single constant volume direct-expansion (DX)
based HVAC configurations with several different heating options. Direct expansion includes single
packaged rooftop systems commonly seen in commercial buildings and split systems commonly seen in
residential buildings. In this system, local cooling coils are used to condition air which is supplied to the
zone through a local air delivery system. Air delivery can be set up to ensure minimum fresh air supply
and there are options for economisers to provide free cooling and heat recovery.
Note: With Unitary single zone systems each zone has its own 'AHU' and so, unlike the Unitary
multizone, CAV and VAV Compact HVAC types, Unitary single zone systems take all their data from the
zone level.
System availability
You can model unitary single zone systems with or without outside air. If you include Air distribution with
your Unitary single zone system then heating and cooling will only operate when the Air distribution
operation schedule is on.
If you do not want to include outside air in your system, you should uncheck the Mechanical ventilation
© 2008 DesignBuilder Software, Ltd.
Building Models
249
'On' check box. In this case heating/cooling availability is determined entirely from the heating/cooling
operation schedules under the Heating and Cooling headers.
Technical EnergyPlus
EnergyPlus needs both the heating coil and cooling DX coil to be defined so even if heating or cooling is
not selected in the input, DesignBuilder will include both coils in the IDF data supplied to EnergyPlus and
schedule the appropriate coil to be off.
The Fan coil unit Compact option simulates a 4 pipe fan coil unit with hot water heating coil, chilled water
cooling coil, and an outside air mixer.
You can model Fan coil unit systems with or without outside air. If you include Mechanical ventilation with
your Fan coil unit system then heating and cooling will only operate when the Mechanical ventilation
operation schedule is on.
If you do not want to include outside air in your system, you should uncheck the Mechanical ventilation
'On' check box. In this case heating/cooling availability is determined entirely from the heating/cooling
operation schedules under the Heating and Cooling headers.
Unlike the Unitary multizone and CAV and VAV Compact HVAC types, Fan coil unit zone systems take
all their data from the zone level.
© 2008 DesignBuilder Software, Ltd.
250
DesignBuilder 1.5
Note 1: Fan coil supply fans run continuously at full speed whenever the availability schedules are > 0 so
fan coil outside air flow can be 'fully on' or 'fully off' but cannot reduce to fractional values in between. You
may therefore get higher outside air delivery rates than with other systems if you are using Schedules and
your Mechanical ventilation operation schedule has fractional values.
Limitations
1. Fan coil units cannot be used in the same simulation as Unitary multizone Compact HVAC type.
2. Outside air flow rate is either off, or on at a fixed flow rate depending on the value of the Fan
operation schedule..
3. Fan coil units cannot incorporate economisers and variable speed fans.
Technical EnergyPlus
EnergyPlus needs both the heating coil and cooling coil to be defined so even if heating or cooling is not
selected in the input, DesignBuilder will schedule the appropriate coil to be off to mimic a 2-pipe system.
The Unitary multizone option allows you to model constant volume direct-expansion (DX) based HVAC
configurations with several different heating options. Direct expansion includes single packaged rooftop
systems commonly seen in commercial buildings and split systems commonly seen in residential
buildings. In this system, central heating and cooling coils are used to condition air which is delivered to
the each of the zones in the system through an air delivery system. Air delivery can be set up to ensure
minimum fresh air supply and there are options for economisers to provide free cooling and heat
recovery.
For a multizone system, only one zone is specified as the control zone. The thermostat is located in this
control zone as set by the 'Thermostatic control zone for unitary system' at the top of the HVAC tab at
zone level. So when using the system you should be careful to locate the thermostat in a zone which will
have a representative temperature for the whole building, otherwise some zones will become over/under
heated/cooled.
© 2008 DesignBuilder Software, Ltd.
Building Models
251
Only one Unitary multizone system can be defined per building and it can serve up to 400 zones.
Limitations
1. The Compact HVAC type must be set to Unitary multizone at building level and in all zones which
are part of the system. Other zones can have HVAC type Unitary single zone or Fan coil units
but not VAV or CAV.
2. Unitary multizone cannot currently be used in the same simulation as Fan coil unit Compact HVAC
type.
Technical EnergyPlus
EnergyPlus needs both the heating coil and cooling DX coil to be defined so even if heating or cooling is
not selected in the input, DesignBuilder will include both coils in the IDF data supplied to EnergyPlus and
schedule the appropriate coil to be off.
The VAV option allows you to model Variable Air Volume (VAV) HVAC configuration with optional preheat,
main heating coils and reheat and several different heating coil options. You can select series or parallel
fan powered terminal units (also known as powered induction units or PIU). There are options to control
the air distribution system in various ways including the ability to ensure minimum fresh air delivery to
each zone, set VAV box minimum flow fraction and various outside air options including an economiser to
provide free cooling when appropriate. You can also model heating and cooling coil temperature reset.
Only one VAV system can be defined per building and it can serve up to 400 zones.
© 2008 DesignBuilder Software, Ltd.
252
DesignBuilder 1.5
Note: the Compact HVAC type must be set to VAV at building level and in all zones which are part of the
VAV system. Other zones can have HVAC type Unitary single zone or Fan coil units but not Unitary
multizone or CAV.
See also Zone Terminal Units for more on VAV systems.
The CAV option allows you to model Constant Air Volume HVAC configuration with optional preheat, main
AHU heating coils and zone terminal reheat and several different heating coil options. There are options
to control the air distribution system in various ways including the ability to ensure minimum fresh air
© 2008 DesignBuilder Software, Ltd.
Building Models
253
delivery to each zone, set various outside air options including an economiser to provide free cooling
when appropriate and heating and cooling coil temperature reset .
Only one CAV system can be defined per building.
Note: the Compact HVAC type must be set to CAV at building level and in all zones which are part of the
CAV system. Other zones can have HVAC type Unitary single zone or Fan coil units but not Unitary
multizone or VAV.
See also Zone Terminal Units for more on VAV systems.
3.3.2.5.2 Mechanical Ventilation and Air Distribution
HVAC tab in model data
Check the mechanical ventilation checkbox to indicate that outside air and/or recirculated air is delivered
to the zone. You can use this setting to define mechanical ventilation and air delivered through centrally
© 2008 DesignBuilder Software, Ltd.
254
DesignBuilder 1.5
ducted air conditioning systems. Simple and Compact HVAC options share many of the same data fields.
Data which applies only to Compact systems is indicated in the text below.
Note that Mechanical Ventilation data refers to the fan-powered air delivery through the main HVAC
system and not a separate mechanical ventilation system.
See also:
·
·
·
·
·
·
Outside Air
Fans
Economisers
Heat Recovery
Plenums
VAV Terminal Units
HVAC tab in model data under Mechanical Ventilation header
You can set the amount, timing and control of outside air delivery through the HVAC air distribution
system on the HVAC tab.
· Outside air requirement data is set at the zone level on the HVAC tab for all HVAC configurations
and options.
· Outside air flow control through the AHU (when using 2-Unitary multizone, 3-VAV and 5-CAV
Compact HVAC) is set at building level on the HVAC tab.
· Outside air flow control through zone units (1-Unitary single zone and 4-Fan coil Compact
HVAC) is set at zone level on the HVAC tab with the rest of the zone unit data.
The Mech Vent + Nat Vent + Infiltration data can displayed on the Heating design, Cooling design and
Simulation screens when you select 1-All or 3-Comfort data. This is the sum of fresh air delivered
through the HVAC system, infiltration and natural ventilation outside airflow in air changes per hour (ac/h)
and when used together with the other environmental output it can be very useful in checking for occupant
discomfort.
Outside air definition method
Defines the method used to set the maximum outside air delivery rate. The options are:
· 1-By zone - enter the zone outside air delivery rate in air changes per hour in the control directly
below. The air flow rate in m3/s is calculated from the ac/h data using:
m3/s = ac/h x ZoneVolume / 3600
where ZoneVolume is the actual air volume of the space calculated according to Model options
for excluding floor/ceiling constructions.
Note: this zone volume may be different from the value used for the purposes of calculating air
flow rates for infiltration which uses the total zone volume.
· 2-Min fresh air (Per person) - maximum natural ventilation rate is defined using Minimum fresh air
requirements per person as set on the Activity tab. The air flow rate in m3/s is calculated as:
m3/s = MinFreshAir x NumberPeople / 1000
NumberPeople = Occupancy density (people / m2) * Zone floor area (m2).
© 2008 DesignBuilder Software, Ltd.
Building Models
255
MinFreshAir is the minimum fresh air rate per person (l/s/person or CFM).
· 3-Min fresh air (Per area) - maximum natural ventilation rate is defined using Minimum fresh air
requirements as set on the Activity tab. The air flow rate in m3/s is calculated as:
m3/s = l/s-m2 x ZoneFloorArea / 1000
where ZoneFloorArea is the actual floor area of the space.
MinFreshAir is the minimum fresh air rate per floor area (l/s-m2 or CFM/ft2).
· 4-Min fresh air (Sum per person + per area) - maximum natural ventilation rate is defined using
Minimum fresh air requirements for both as set on the Activity tab. The air flow rate in m3/s is
calculated as:
m3/s = (l/s-m2 x ZoneFloorArea + MinFreshAir x NumberPeople)/ 1000
where ZoneFloorArea is the actual floor area of the space.
MinFreshAir is the minimum fresh air rate per floor area (l/s-m2 or CFM/ft2).
NumberPeople = Occupancy density (people / m2) * Zone floor area (m2).
MinFreshAir is the minimum fresh air rate per person (l/s/person or CFM).
· 5-Min fresh air (Max per person and per area) - maximum natural ventilation rate is defined
using Minimum fresh air requirements for both as set on the Activity tab. The air flow rate in m3/s is
calculated as:
m3/s = Maximum of (l/s-m2 x ZoneFloorArea / 1000) and (MinFreshAir x
NumberPeople/ 1000)
where ZoneFloorArea is the actual floor area of the space.
MinFreshAir is the minimum fresh air rate per floor area (l/s-m2 or CFM/ft2).
NumberPeople = Occupancy density (people / m2) * Zone floor area (m2).
MinFreshAir is the minimum fresh air rate per person (l/s/person or CFM).
Outside air flow rate
Enter the minimum zone outside air delivery rate in air changes per hour when Outside air definition
method (above) is 1-By zone.
The actual minimum amount of outside air entering the AHU can be modified by the Minimum AHU
outside air requirement schedule (below).
Note: in Compact HVAC systems, the total mixed air flow rate into the zone is calculated by EnergyPlus
and will often be higher than the outside air flow rate due to the mixing of recirculated air to provide
enough airflow to delivery any additional heating/cooling.
Minimum AHU outside air requirement schedule
You can modify the total outside airflow using the Minimum AHU outside air requirement schedule.
Whatever the outside air flow would have been without the schedule is multiplied by the current schedule
value. So, for example, if you select a schedule which is always 0.5, then the system will supply half the
outside air flow at all times vs. the same run without the schedule. You can also use this schedule to
switch off outside air during unoccupied periods.
Maximum supply air flow rate
The maximum supply air flow rate is the total flow rate of air entering the zone (not necessarily all fresh
air). It can be defined at the zone level when using Compact HVAC or it can be left in the default state (
© 2008 DesignBuilder Software, Ltd.
256
DesignBuilder 1.5
Auto), in which case the maximum supply air flow rate is calculated based only on the maximum heating
and cooling capacities.
This data is available at the zone level when using Unitary single zone, Unitary multizone or VAV Compact
HVAC and the plant sizing options Autosize when not set or Manual.
System availability schedule
The System availability schedule defines the operation of the air system fans. For Compact Unitary
systems the Fan operation mode (below) can be set to 2-Cycling in which case air distribution only
occurs when there is heating or cooling demand.
OUTSIDE AIR MIXING
This data is defined for CAV/VAV air handling units (AHU) at building level.
Outside air mixing
Select the way outside air is used:
· 1-Recirculation - the outside airflow supply to the AHU is mixed with recirculated return air from the
zones. This is done to save energy often in conjunction with an economiser to ensure that optimal
use is made of outside air. When heat recovery is used with the 1-Recirculation outside air mixing
option, the economiser must be switched on selected in the interface for the heat recovery to be bypassed.
· 2-Full fresh air - the airflow into the AHU is 100% outside air, without any recirculation. This is
modelled in EnergyPlus by setting the supply airflow rate to the outside air flow rate. Note that when
using this option, fixing the supply air flow rate to the outside air rate will in many cases mean that
the system will not be capable of meeting the design cooling load. To increase the maximum
cooling capacity of a Full fresh air VAV/CAV system you can increase the outside air flow rate (such
systems could be very inefficient in energy use without heat recovery). When heat recovery is used
with the 2-Full fresh air outside air mixing option, the heat recovery is by-passed when this is
advantageous in reducing AHU cooling coil loads. The heat recovery also operates when the
outside air temperature is less than 12°C.
Outside air control minimum flow type
This option allows you to specify the way minimum outside air flow rate is controlled for 3-VAV and 5-CAV
Compact HVAC types when the Outside air mixing type (above) is 1-Recirculation:
· 1-Fixed - the minimum outside air flow rate is fixed as set above no matter what the actual system
flow rate is. In practice even with 'Fixed' outside air control minimum it is possible for the outside air
flow rate into individual zones to be slightly different from the requested value. This is because the
minimum outside air is controlled at the AHU level to ensure that the total fresh air entering the AHU
is the total required for the building (the sum of the individual zone outside air requirements). But
depending on the cooling loads in each zone, some zones will require more supply air to meet the
cooling load than others. So the total fresh air entering the building will be correct but the distribution
around the building may not be perfectly maintained.
· 2-Proportional - the minimum outside air flow rate varies in proportion to the total system air flow
rate.
The minimum outside air flow rate through the AHU outside air inlet is automatically calculated as the sum
of the individual zone ventilation requirements. This is the 'design minimum'. During the simulation,
'minimum' and 'maximum' represent the limits for economizer operation. If there is no economizer, then
the minimum flow of outside air is delivered. If 1-Fixed is selected, then this value will remain fixed
© 2008 DesignBuilder Software, Ltd.
Building Models
257
(unless the total VAV system flow rate falls below this value, in which case, the system will deliver 100%
outside air at whatever the system flow rate is). If, 2-Proportional is specified, then the operating
minimum falls as system flow rate falls. This simulates a typical system with a fixed lower stop on the
outside air supply damper. Delivering 1-Fixed requires enhanced control systems.
Note: To ensure minimum outside air is delivered to all zones you should use 1-Fixed.
If you select 2-Manual HVAC sizing you can enter the Outside air control minimum flow rate manually
at building level.
Outside air sizing
When the Outside air definition method is 2-Min fresh air per person, sizing for minimum Outside air
(OA) flow rate is done using the 'Number of People' value (see above) with no regard for the schedules.
The total OA requirement for each zone on the air handler is summed and used to set the minimum OA
flow rate for the air handler. The OA controller sets an OA flow rate for the air handler each time step.
After that, each zone receives a pro-rated share of the total OA flow proportioned by the current supply
flow rate to each zone. There is no further zone-by-zone allocation of OA quantities, which is what
happens in a real system as well.
HVAC tab in model data under Mechanical Ventilation header
Fan operation mode (Compact, Unitary systems only)
In Compact Unitary HVAC systems the supply fan has two different possible operating modes. The
choices for this field are:
· 1-Continuous - fan operates using air distribution availability schedule (above)
· 2-Cycling - fan operates when heating or cooling is delivered.
For most commercial buildings, continuous fan operation will continue to supply outside air to the zones
as typically required by code. For continuous fan operation, the 'System Availability Schedule' (see above)
is the supply fan operating schedule. For systems where the supply fan only runs when either cooling or
heating needs to be supplied to the zone such as for many residential systems, cycling should be
specified.
Fan Type
When using Simple HVAC, enter the type of fan. Select from:
· 1-Intake - fan blows outside air into the zone and the zone receives heat from the fan if Fan in air
(below) > 0
· 2-Exhaust - fan exhausts air from the zone. In this case there is no fan heat pickup. It is assumed
that makeup air comes from outside.
Note that in Simple HVAC the Auxiliary energy data accounts for all fan, pump and other electrical energy
use.
Fan pressure rise
Enter the pressure rise at full flow and standard conditions. Standard conditions are considered 20C at
sea level, 101325 Pa.
You can calculate the approximate fan pressure rise from Specific Fan Power (SFP) data using:
Delta P = 1000 * SFP * Fan total efficiency
© 2008 DesignBuilder Software, Ltd.
258
DesignBuilder 1.5
Where SFP is fan power per flow rate in W/l/s.
Typical values for various system types are shown in the table below.
System Type
Central mechanical ventilation
including heating, cooling and
heat recovery
Central mechanical ventilation
including heating and cooling
All other systems
Local ventilation units within the
local area, such as window/wall/
roof units, serving one room/area
Local ventilation units remote from
the local area, such as ceiling void
or roof mounted units, serving one
room/area
Fan coil units (rating weighted
average)
Specific Fan
Power
(Watts/litre/
second)
2.5
2.0
1.8
0.5
1.2
0.8
Source ESTA: http://www.esta.org.uk/
Fan total efficiency (%)
Enter the product of the fan motor and impeller efficiency of the supply fan. This is the ratio of the power
delivered to the air to the electrical input power at maximum flow expressed as a percentage. The motor
efficiency is the power delivered to the shaft divided by the electrical power input to the motor. The fan
efficiency is power delivered to the air divided by the shaft power. The power delivered to the fluid is the
mass flow rate of the air multiplied by the pressure rise divided by the air density. Must be greater than 0
and less than or equal to 100.
Fan in air (%)
Enter the percentage of the motor heat that is added to the air stream. A value of 0 means that the motor
is completely outside the air stream. A value of 100 means that all of the motor heat will go into the air
stream and act to cause a temperature rise. Must be between 0 and 100.
Fan placement
Enter the supply fan placement type. There are two choices:
· 1-Draw through models a system where the supply air fan is after the cooling and heating coils.
· 2-Blow through where the supply air fan is before the cooling and heating coils.
The default is 1-Draw through.
Fan part-load power coefficients
Select the set of generic pre-defined coefficients to use for the supply fan part-load power consumption.
Choices are:
© 2008 DesignBuilder Software, Ltd.
Building Models
·
·
·
·
259
Inlet Vane Dampers
Outlet Dampers
Variable Speed Motor
ASHRAE 90.1-2004 Appendix G
The resulting power curves are shown in the graph below. The ASHRAE 90.1-2004 Appendix G
coefficients are from TABLE G3.1.3.15, Method 2. The other sets of coefficients are from the EnergyPlus
Input Output Reference, Fan Coefficient Values table.
HVAC tab in model data under Mechanical Ventilation header
HVAC Economisers are useful for facilities which require some cooling even when the outdoor
temperature is lower than the indoor temperature. An economizer is a damper opening that draws up to
100% outside air when the outside air is cooler than the temperature inside the building, thereby
providing free cooling. Economisers can reduce energy use by 15 percent or more, and are often
required by energy codes for larger air conditioning units.
Economisers can be modelled when using Compact HVAC but not Simple HVAC.
See under Heat recovery for information about how economisers interact with heat recovery.
Note: economiser operation applies to the overall HVAC system and so for Unitary multizone and VAV
systems its' data is set at building level. For Unitary single zone systems the data is used at zone level.
There are four options:
© 2008 DesignBuilder Software, Ltd.
260
DesignBuilder 1.5
· 1-None - no economizer operation will be simulated.
· 2-Return air temperature - whenever the outside air temperature is greater than the Economiser
upper temperature limit or less than the Economiser lower temperature limit the outside air flow
rate is set to the minimum.
· 3-Return air enthalpy - when the outside air enthalpy is greater than the Economiser upper
enthalpy limit or less than the Economiser lower enthalpy limit the outside air flow rate is set to
the minimum.
· 4-Return air temperature and enthalpy - either temperature or enthalpy limit is used.
The economiser setpoints below are limits on temperature and enthalpy of the outside air. When the
outside air conditions go beyond these limits the EnergyPlus economiser switches to 'minimum outside air
mode' (i.e. the outside air damper is closed to its minimum position).
Economiser upper temperature limit
Enter the outside air temperature high limit for economizer operation. If the outside air temperature is
above this limit, the outside air flow rate will be set to the minimum and heat recovery will be enabled if
available. Zero in this field means that there is no outside air temperature high limit control.
Economiser lower temperature limit
Enter the outside air temperature low limit for economizer operation. If the outside air temperature is
below this limit, the outside air flow rate will be set to the minimum and heat recovery will be enabled if
available. Zero in this field means that there is no outside air temperature low limit control.
Economiser upper enthalpy limit
Enter the outside air upper enthalpy limit for economizer operation. If the outside air enthalpy is above this
value, the outside air flow rate will be set to the minimum and heat recovery will be enabled if available.
Zero in this field means that there is no outside air enthalpy limit control.
Lockout
Unitary systems can also have lockout control:
· 1-No lockout - default option.
· 2-Lockout with heating - when the packaged unit is in heating mode, the economiser is locked out
– i.e., the economiser dampers are closed and there is minimum outside air flow.
· 3-Lockout with compressor - in addition to locking out the economizer when the unit is in heating
mode the economizer is locked out when the DX unit compressor is on. In other words, when the
DX coil is off, the economizer must meet the entire cooling load – it isn’t allowed to operate in
conjunction with the DX cooling coil. Similarly, when the DX coil is operating, the economizer is not
allowed to operate. The Lockout with compressor option is sometimes called a 'non-integrated
economizer'.
HVAC tab in model data under Mechanical Ventilation header
With Compact HVAC, you can specify air-to-air heat recovery which is available between the relief air
stream and the outside air inlet stream. Heat recovery is selected for Unitary multizone, CAV and VAV
systems by checking Heat Recovery On under the Mechanical Ventilation header at building level. For
Unitary single zone make the selection at the zone level.
Heat recovery type
Enter the type of air-to-air heat recovery. The choices are:
© 2008 DesignBuilder Software, Ltd.
Building Models
261
· 1-Sensible - recovers sensible heat
· 2-Enthalpy - recovers sensible and latent heat.
Sensible heat recovery effectiveness
Enter the sensible heat recovery effectiveness. This is applied as a constant effectiveness at all
conditions. The valid range is from 0.0 to 1.0, and the default is 0.70.
Latent heat recovery effectiveness
Enter the latent heat recovery effectiveness if Heat Recovery Type is Enthalpy. This is applied as a
constant effectiveness at all conditions. The valid range is from 0.0 to 1.0, and the default is 0.65.
Heat recovery heating setpoint temperature
When no economiser is selected this data defines the heating setpoint temperature of the heat recovery
device. Note that the single value is applied throughout the year. For example enter 15C to model a
system which heats outside air up to 15C and no higher. A high setpoint value will provide optimal heating
but this may add to cooling loads in the summer.
Heat recovery + economizer
If an economiser option is selected, the heat recovery is bypassed whenever the economiser operates
and the heat recovery is always bypassed if economiser operation would be beneficial.
The heat recovery will operate when:
· Heat recovery is switched on at the building level for VAV and unitary multizone systems and at
zone level for Unitary single zone and Fan coil systems AND
· When economiser operation is off.
You can have heat recovery and no Economiser action by switching on Heat recovery and setting
economiser to 1-None. In this case the heat recovery units heats outside air using the Heat recovery
heating setpoint temperature above. It also cools outside air when return air temperature is lower than
outside air temperature.
When heat recovery is used with the 2-Full fresh air outside air mixing option in CAV/VAV systems, the
heat recovery is by-passed when this is advantageous in reducing AHU heating/cooling coil loads.
Otherwise, when using the 1-Recirculation option, the economiser must be selected in the interface for
the heat recovery to be by-passed in this way.
HVAC tab in model data under Mechanical Ventilation header
Variable air volume (VAV) systems control the dry bulb temperature inside a zone by varying the supply
air volume instead of the air temperature. At full cooling the VAV terminal unit damper is fully open
supplying the specified maximum air flow rate. As the cooling load decreases, the damper closes until it
reaches the minimum stop specified by the turndown ratio (zone minimum air flow fraction). VAV systems
can be used for interior or perimeter zones with a common fan system, air temperature control, and
reheating devices. Heating is provided by use of reheat coils.
Note: Zone Terminal unit data is used at the zone level.
Turndown ratio (supply air minimum flow fraction)
The fraction that the zone VAV box can reduce to based on the supply air maximum flow rate. The
© 2008 DesignBuilder Software, Ltd.
262
DesignBuilder 1.5
minimum flow rate to the zone while the system is operating is specified as a fraction of the maximum air
flow rate. The turndown ratio is normally specified to meet the minimum ventilation requirement for the
occupants. The reheat coil operates only when the damper is at this minimum flow rate when Zone
damper heating action is set to 1-Normal (the default).
A value of 0 means the VAV box can completely shut off flow into the zone and a value of 1.0 means that
the VAV box cannot reduce supply air at all (i.e. it is a constant volume system). For CAV systems this
data is fixed at 1 and is not available for edit.
Turndown ratio is typically in range 0.3 - 0.5. Minimum is 0 and maximum is 1.
Note: in EnergyPlus v.2.0 and earlier a turndown ratio of zero (unusual value) has a special meaning as
the reheat coils can never operate in this case even if the Zone damper heating action is set to 2Reverse.
VAV terminal unit type
DesignBuilder provides 3 different VAV zone terminal unit types:
1-Standard - The VAV terminal unit contains a damper and optionally a reheat coil. During heating the
VAV unit can either work in Normal mode where the supply air flow into the zone is the minimum air flow
rate of the VAV system, essentially acting like a constant volume system or in Reverse action mode the
air flow rate through the VAV box may increase above the minimum air flow when the heating demand
cannot otherwise be satisfied. This is also the terminal type used for CAV systems.
2-Series PIU - The Series Powered Induction Unit is an air system terminal unit that mixes varying
amounts of secondary (recirculated) air and primary (conditioned supply) air to produce a fixed flow of air
to a zone. The unit contains a small fan that acts to induce the secondary air and a heating coil for heating
the mixed secondary and primary air. The fan runs at a constant volume flow rate whenever the unit is on.
The fan is downstream of the primary and secondary air inlets. The variable mixing is accomplished by a
damper in the unit’s primary air supply inlet duct. This damper can move from fully open (100% primary
air. 0% secondary air) to a minimum stop that can be specified in the input description. At full cooling the
damper will be fully open. At minimum cooling and for heating the damper will be at the minimum stop and
the secondary air flow will be at its maximum. It uses the EnergyPlus SINGLE DUCT:SERIES PIU:
REHEAT data.
3-Parallel PIU - The Parallel Powered Induction Unit is an air system terminal unit that mixes varying
amounts of secondary (recirculated) air and primary (conditioned supply) air to produce a variable total
flow of air to a zone. The unit contains a small fan that acts to induce the secondary air and a heating coil
for heating the mixed secondary and primary air. The secondary and primary air streams enter the unit in
parallel. The fan sits in the secondary air stream and runs only when secondary air is needed. The
primary air inlet contains a damper that can move from fully open (maximum primary air) to a minimum
stop (minimum primary air). At full cooling load the primary air damper is fully open and the fan is off. The
primary air flow is at maximum and there is little or no secondary air flow. As the cooling load decreases,
the primary air damper gradually closes and the secondary air flow remains close to zero. At some point,
usually when the primary air flow has reached the minimum, the fan switches on and secondary air is
induced. The heating coil will switch on as needed to meet any heating demand. It uses the EnergyPlus
SINGLE DUCT:PARALLEL PIU:REHEAT data.
See VAV for a schematic diagram showing the 3 Zone terminal unit types connected to an air distribution
system.
Parallel fan on flow fraction
For parallel PIUs, this data specifies the fraction of the primary air flow at which fan turns on. In the
parallel PIU the fan operation is intermittent. If the primary air flow is above this fraction of the maximum,
the fan is off. Otherwise it is on.
This data is available when using VAV Compact HVAC with the Parallel PIU VAV terminal unit type and
© 2008 DesignBuilder Software, Ltd.
Building Models
263
the plant sizing options Autosize when not set or Manual.
Terminal Unit Fans
When using fan powered terminal units (PIU) you can specify the characteristics of the terminal unit fans.
Terminal Unit Fan Total Efficiency
Enter the total efficiency of the zone induction fan. This is the ratio of the power delivered to the air to the
electrical input power at maximum flow. This is also the product of the fan motor efficiency and fan
(impeller) efficiency. The motor efficiency is the power delivered to the shaft divided by the electrical
power input to the motor. The fan efficiency is the power delivered to the air divided by the shaft power.
The power delivered to the fluid is the mass
flow rate of the air multiplied by the pressure rise divided by the air density. Must be greater than 0 and
less than or equal to 1.
Terminal Unit Fan Delta Pressure
Enter the pressure rise of the zone induction fan in Pa at full flow and standard conditions. Standard
conditions are considered 20C at sea level, 101325 Pa.
HVAC tab in model data under Mechanical Ventilation header
A plenum is an air compartment or chamber including uninhabited crawl spaces, areas above ceilings or
below a floor, including air spaces below raised floors of computer/data processing centers, or attic
spaces, to which one or more ducts are connected and which forms part of either the supply air, return air
or exhaust air system, other than the occupied space being conditioned.
DesignBuilder Compact HVAC Unitary multizone, Unitary single zone and VAV systems can have air
supplied and returned via plenums. The system supply and return plenums in the diagram below serve
each of the 3 zones.
There are 4 types of plenum:
© 2008 DesignBuilder Software, Ltd.
264
DesignBuilder 1.5
1. System supply plenum - a supply air plenum serving all zones in 3-VAV and 2-Unitary multizone
system. If any zone supply plenums have been specified, the outlet from the system supply plenum
will flow through the zone supply plenum to the zone terminal unit. The system supply plenum is
defined at building level and only one is allowed per simulation.
2. System return plenum - return air plenums serving all zones in 3-VAV and 2-Unitary multizone
systems. If any zone return plenums have been specified, the return air from the zone will flow
through the zone return plenum and then into the system return plenum. The system return plenum
is defined at building level and only one is allowed per simulation.
3. Zone supply plenum - a supply air plenum serving only this zone in 3-VAV, 2-Unitary multizone
and 1-Unitary single zone systems. The plenum zone is added to the supply air path after the
system splitter or system-level supply plenum and before the zone terminal unit. The zone supply
plenum is defined at zone level. A zone supply plenum can serve only one zone.
4. Zone return plenum - return air plenums serving only this zone in 3-VAV, 2-Unitary multizone and
1-Unitary single zone systems. The plenum zone is added to the return air path immediately after
the zone and before the system mixer or system-level return plenum. The zone supply plenum is
defined at zone level. A zone return plenum can serve only one zone.
When specifying a system or zone supply or return plenum you should enter a unique zone name. The
zone does not need to be in the same block.
Plenum modelling
·
·
·
·
·
·
·
·
·
Maximum of 1 system supply plenum allowed per simulation
Maximum of 1 system return plenum allowed per simulation
Each zone plenum can only serve one zone
Set the Zone type of any plenum zones to 4-Plenum. This makes the necessary changes
(remaining requirements and recommendations in bullet list)
Plenum zones cannot be controlled. Use the HVAC template <None> to switch off heating, cooling
and mechanical ventilation in all plenum zones.
Remember to ensure plenum zones have no internal gains, occupancy, lighting etc.
We recommend using the 4-Ceiling diffuser interior convection heat transfer coefficient for plenum
zones to model the effect of fast moving air on surface heat transfer.
You will probably find it easiest to use the Combined method for Floor/slab/ceiling definition for
models using plenums as each surface element in the model has just a single construction and you
don't have the confusion of Model data referring to 'raised floors' and 'suspended ceilings'.
The floor of a ceiling plenum is the ceiling of the zone below so you will often define the plenum floor
as 'Ceiling tiles' construction or similar.
If the building you are modelling has more than one plenum zone, each serving multiple zones you should
use zone plenums. Use virtual partitions to partition the large plenum zones (which in reality serve multiple
zones) into multiple plenum zones, each serving a single zone. See image below.
© 2008 DesignBuilder Software, Ltd.
Building Models
265
Red lines show the 5 zones of the occupied space. Each zone has its own return-air ceiling plenum.
This technique is also illustrated in the example file supplied with DesignBuilder Zone vs System
Plenums Example.dsb.
Note: it is not possible in DesignBuilder v.1 to use the suspended ceiling/floor (as set on the
Constructions tab when using Separate constructions) as a plenum - the plenum must be a completely
separate zone.
3.3.2.5.3 Cooling
HVAC tab in model data
You can enter details on the cooling system including the maximum capacity (at zone level).
Cooling capacity
The Cooling capacity can either be entered by hand or can be Autosized using the Cooling Design
Calculations. If, immediately prior to a Simulation the Cooling capacity has not been entered (neither by
hand nor from a previous Cooling Design Calculation) then a Cooling design autosizing simulation is
started to calculate the capacity. The Plant sizing building model option controls the way this works.
You can change cooling capacities by hand if you wish but you should bear in mind that, by default, if
Model Options change, all heating and cooling capacities are reset to zero. Set the Plant sizing model
option to '2-Manual' to avoid this happening.
SUPPLY AIR CONDITIONS
When using Simple HVAC you can specify the cooling supply air conditions of the air. This data is used
for simulations only - cooling design calculations have a specific equivalent setting.
Supply air delivery temperature
© 2008 DesignBuilder Software, Ltd.
266
DesignBuilder 1.5
The constant dry-bulb air temperature of the air supplied for cooling the zone.
Supply air humidity ratio
The constant humidity ratio (mass of water per mass of dry air) of the cold supply air to be delivered when
cooling is required. The default humidity ratio is 0.009.
COOLING PLANT
Fuel
Select the type of fuel used to generate the cooling energy - choose from:
·
·
·
·
·
·
1-Electricity
2-Gas
3-Oil
4-Solid fuel
5-Bottled gas
6-Other
Cooling system CoP (Simple HVAC only).
The cooling system coefficient of performance is used to calculate the fuel consumption required to meet
cooling demand. The value represents the total seasonal efficiency of the entire cooling system and
should include the effect of all energy consumption associated with building cooling such as fan and pump
energy, chiller inefficiency, control equipment etc.
Cooling system CoP data is specified by zone so you can model different cooling efficiencies in each
zone. But generally you should access this data from the building level and allow zones to take on building
default.
Chiller CoP (Compact HVAC only).
The chiller coefficient of performance is used to calculate the fuel consumption required to meet cooling
demand. It represents the total seasonal efficiency of the chiller excluding losses/consumption due to
external pumps and fans but including all energy consumed by such ancillary devices within the chiller.
Chiller CoP data is specified for the whole building.
Cooling distribution loss (%)
The cooling distribution loss is the loss of heat (cooling energy) due to the distribution of cold water/air
around the building. It is used to increase the cooling load prior to calculating chiller energy consumption.
VAV CENTRAL COOLING COILS
The central AHU cooling coil data is specified for the whole building and is not accessible at zone level.
Cooling coil type
The cooling coil must be one of:
· 1-None i.e. there is no cooling coil
· 2-Chilled water to model a chilled water coil.
© 2008 DesignBuilder Software, Ltd.
Building Models
267
The default is 2-Chilled water.
Note: you can achieve 'free cooling' without a cooling coil by selecting 1-None but you will only get the
cooling effect of the HVAC air on the zone if the outside air + any fan pickup is cooler than the zone air
temperature.
The difference between switching cooling off altogether (by unchecking the Cooled checkbox) and setting
cooling coil type to 1-None is that in the latter case controlled free cooling is possible due to relatively cool
outside air being introduced to the building but when cooling is switched off altogether there is no
possibility of controlled cooling through the HVAC system.
Off-coil air temperature set point
This data defines the temperature of the air coming off the coils assuming idealised control. Cooling coils
are automatically sized by EnergyPlus before the simulation to provide this off coil temperature given the
flow rates in the air handling unit.
Cooling coil setpoint reset type
Select the type of automatic reset control for the central cooling supply air temperature. The choices are:
· 1-None – no reset, use the Off-coil air temperature set point in conjunction with the Zone setpoint
schedule.
· 2-Outdoor air temperature reset – reset the cooling supply air temperature based on the following
default rules. When the outdoor dry bulb temperature (ODB) is at or below 15.6C the setpoint is
18C. When the ODB is at or above 26.7C the setpoint is the Off-coil air temperature set point. In
between, the setpoint is varied linearly. These control parameters are from ASHRAE 90.1 Appendix
G par. G3.1.3.9.
· 3-Warmest - reset the cooling supply air temperature to the highest supply air temperature that will
meet the cooling requirements of all the zones (i.e. according to the cooling demand of the warmest
zone). The minimum setpoint allowed is the Off-coil air temperature set point (above). The
maximum setpoint allowed is defaulted to 18C. For each zone in the system at each system time
step the EnergyPlus set-point manager calculates a supply air temperature that will meet the zone
cooling load at the maximum zone supply air flow rate. The lowest of the possible supply air
temperatures becomes the new supply air temperature set point, subject to minimum and maximum
supply air temperature constraints. The resulting temperature set point is the highest supply air
temperature that will meet the cooling requirements of all the zones. When compared to a fixed
cooling supply air temperature set point, this strategy minimizes zone reheat coil energy (or
overcooling) and central chiller energy consumption (if the chilled water temperature is also reset) at
the cost of possible increased fan energy.
The 2003 ASHRAE Applications Handbook discusses warmest reset control for constant volume
systems (p.41.27) and calls it "Supply Air Temperature Reset for Constant Air Volume (CAV)". A
requirement is set out in ASHRAE Std 90.1-2004, Appendix G, paragraph G3.1.3.12: Supply air
temperature shall be reset based on zone demand from the design temperature difference to a 10°
F temperature difference under minimum load conditions. Design air flow rates shall be sized for
the reset supply air temperature, i.e., a 10°F temperature difference.
Tip: using Warmest or Outside air temperature cooling coil setpoint reset can drastically improve
energy efficiency by reducing the cooling energy delivered to the airstream to the minimum required for
occupant comfort.
The DesignBuilder HVAC template default is 3-Warmest for constant volume systems and 1-None for
other system types.
© 2008 DesignBuilder Software, Ltd.
268
DesignBuilder 1.5
OPERATION
Unitary Multizone and VAV
When using the 2-Unitary multizone 5-CAV and 3-VAV Compact HVAC system types, the AHU cooling
coil operation is defined by AHU cooling coil operation data.
Note: only one set of zone thermostatic control data is used per Unitary multizone system - this is the
zone for which Thermostatic control zone for unitary system is selected.
Unitary Single zone and Fan Coil Units
Cooling operation schedules are set at zone level and there is no central plant apart from the chiller.
Note: for all systems, cooling setpoint temperatures are defined on the Activity tab.
Zone setpoint schedule
This schedule data is used in conjunction with the cooling setpoint temperatures on the Activity tab to
define the cooling demand in the zone by creating a cooling setpoint schedule. The schedule defines the
times when full and setback setpoints should be met and the setpoint data on the Activity tab define the
actual setpoint values. See Defining setpoint temperature schedules for more on this.
3.3.2.5.4 Heating
HVAC tab in model data
The data required to define the heating system will depend on whether the HVAC model option is set to
Simple or Compact and if set to Compact the type of Compact HVAC system selected.
Heating capacity
The heating capacity can either be entered by hand or can be Autosized using the Heating Design
Calculations. By default, if immediately prior to a Simulation the heating capacity has not been entered
(neither by hand nor from a previous Heating design calculation) then a Heating design autosizing
simulation is started to calculate the capacity. The Plant sizing building model option controls the way this
works.
You can change heating capacities by hand if you wish but you should bear in mind that, by default, if
Model Options change, all heating and cooling capacities are reset to zero. Set the Plant sizing model
option to '2-Manual' to avoid this happening.
If the HVAC system is Unitary multizone then the central heating coil capacity is calculated as the sum of
the individual zone heating energy requirements.
HEATING PLANT
Fuel
Select the type of fuel used to generate the heating energy - choose from:
© 2008 DesignBuilder Software, Ltd.
Building Models
·
·
·
·
·
·
269
1-Electricity
2-Gas
3-Oil
4-Solid fuel
5-Bottled gas
6-Other
Heating system CoP (Simple HVAC only).
The heating system coefficient of performance is used to calculate the fuel consumption required to meet
heating demand. The value represents the total seasonal efficiency of the entire heating system and
should include the effect of all energy consumption associated with building heating such as fan and
pump energy, boiler inefficiency, control equipment etc.
Heating system CoP data is specified by zone so you can model different heating efficiencies in each
zone. But generally you should access this data from the building level and allow zones to take on building
default.
Heat generator CoP (Compact HVAC only).
Heat generators are devices such as boilers and heat pumps used to heat water for distribution to heating
coils, radiators and DHW systems. The heat generator coefficient of performance is used to calculate the
fuel consumption required to meet heating demand. It represents the total seasonal efficiency of the boiler
excluding losses/consumption due to external pumps and fans but including all energy consumed by such
ancillary devices within the boiler.
CoP is entered as a fractional value (not % value). So a boiler might have a CoP of 0.89.
Heat generator CoP data is specified for the whole building, i.e. a single hot water circuit (served by one
boiler) is simulated.
Part-load boiler/heat pump performance cannot be calculated in DesignBuilder v.1.
Heating distribution loss (%)
The heating distribution loss is the loss of heat due to the distribution of hot water/air around the building.
It is used to increase the heating load prior to calculating boiler heating energy consumption.
VAV OUTSIDE AIR PREHEAT COILS
AHU preheat data is specified for the whole building and is not accessible at zone level.
Coil type
The preheat coil is located in the outside air stream, upstream of the outside air mixing box and tempers
the outside air. If no preheat coil is used in the VAV system, then the option 1-None should be specified
here. Otherwise this indicates the type of preheat coil. It is unlikely that both a heating coil and a preheat
coil would be used at the same time. The options are:
· 1-None - no preheat.
· 2-Electric - preheat coils powered by electricity (assumed 100% efficient, 0 distribution loss).
· 3-Gas - gas-fired preheat coils (assumed 80% efficient, 0 distribution loss).
Off-coil air temperature set point
© 2008 DesignBuilder Software, Ltd.
270
DesignBuilder 1.5
When preheat is specified, this data defines the temperature of the air coming off the preheat coils
assuming idealised control. Preheat coils are automatically sized by EnergyPlus before the simulation to
provide this off coil temperature given the flow rates in the air handling unit.
VAV AND CAV CENTRAL HEATING COILS
The central AHU heating coil data is specified for the whole building and is not accessible at zone level.
Coil type
The main central heating coil is located in the supply air stream, upstream of the cooling coil and after the
outside air mixing box. If no central heating coil is used in the VAV system, then the option 1-None should
be specified here. Otherwise this indicates the type of heating coil. It is unlikely that both a heating coil
and a preheat coil would be used at the same time. The options are:
·
·
·
·
1-None - no heating.
2-Electric - heating coils powered by electricity (assumed 80% efficient, 0 distribution loss).
3-Hot water - heating coils supplied with hot water generated by a boiler.
4-Gas - gas-fired heating coils (assumed 80% efficient, 0 distribution loss).
If you select 3-Hot water main heating coils, the program generates data to simulate the boiler and the
pumps required to serve the heating coil.
Off-coil air temperature set point
When main heating coils are specified, this data defines the temperature of the air coming off the coils
assuming idealised control. Heating coils are automatically sized by EnergyPlus before the simulation to
provide this off coil temperature given the flow rates in the air handling unit.
Heating coil setpoint reset type
Select the type of automatic reset control for the central heating supply air temperature for CAV and VAV
system. The choices are:
· 1-None – no reset, use the Off-coil air temperature set point in conjunction with the Zone setpoint
schedule.
· 2-Outdoor air temperature reset – reset the heating supply air temperature based on the following
default rules. When the outdoor dry bulb temperature (ODB) is at or below –6.7C the setpoint is the
Off-coil air temperature set point. When the ODB is at or above 10.0C the setpoint is 20.0C. In
between, the setpoint is varied linearly. These control parameters are from ASHRAE 90.1 Appendix
G.
The default is 1-None.
Note: you should be aware when using 2-Outdoor air temperature reset that the effective off-coil
setpoint for the AHU heating coil used in the simulation will be between 20C and the value you enter for
the Off-coil air temperature set point. If you also have an AHU cooling coil you must make sure that it
does not operate simultaneously with the AHU heating coil by making the appropriate AHU coil operation
schedules.
VAV TERMINAL REHEAT COILS
© 2008 DesignBuilder Software, Ltd.
Building Models
271
Reheat data is specified for individual zones.
Coil type
Use this data to either switch reheat off or select either electric or hot water reheat coils. The options are:
· 1-None - no heating.
· 2-Electric - heating coils powered by electricity (assumed 100% efficient, 0 distribution loss).
· 3-Hot water - heating coils supplied with hot water generated by a boiler.
If you select 3-Hot water main heating coils, DesignBuilder generates data to simulate the boiler and the
pumps required to serve the reheat coil.
Zone damper heating action
During heating operation, there are two control options for the damper controlling the air flow in the VAV
terminal unit as the zone moves above or below the zone setpoint. With both control options, the damper
is at the minimum air flow rate whenever the zone temperature is between the cooling and heating
setpoints.
· 1-Normal - the damper will remain at the minimum air flow rate during heating operation. As the
heating load increases, the water flow rate in the reheat coil will be increased to maintain
temperature in the zone until the maximum water flow rate is reached. The system essentially acts
like a constant volume system during heating.
· 2-Reverse - the air flow rate through the VAV box may increase above the minimum air flow when
the heating demand cannot be satisfied unless greater air flow is provided. As the heating load
increases, the unit starts at minimum air flow and minimum hot water flow. The hot water flow is
increased until it reaches maximum flow, then the air damper starts to open to meet the load. This
option is used if the minimum air flow rate is not adequate to serve the peak heating load.
Note: you should switch heating 'on' if you want the zone to be heated to the heating setpoint temperature
specified on the Activity tab.
LOCAL HEATING UNITS
Heating type (Simple HVAC only)
There are currently two heating types:
· 1-Convective - the space is heated by an air system and controlled to the air temperature set point.
The system is modelled using EnergyPlus 'purchased air'.
· 2-Radiative/convective units - used for modelling general systems where a radiant heat is a
factor. Allows modelling of convective systems, hot water radiator systems, underfloor heating
systems, baseboard heating etc. using EnergyPlus radiant heating system.
1-CONVECTIVE
When using Simple HVAC you can specify the heating supply air conditions of the air.
Supply air delivery temperature
The constant dry-bulb air temperature of the air supplied for heating the zone.
© 2008 DesignBuilder Software, Ltd.
272
DesignBuilder 1.5
Supply air humidity ratio
The constant humidity ratio (mass of water per mass of dry air) of the warm supply air to be
delivered when heating is required. The default humidity ratio is 0.01.
2-RADIANT UNITS
When the Simple HVAC model option is set you can model radiant heating systems. Set the
heating system type as '2-Radiant units' (above) and enter the heating radiant fraction, control
method and the way radiant heat is distributed through the space:
Heating radiant fraction
The fraction of the power input to the radiant heater that is actually radiant heat transfer. The
fraction should be between 0 and 1. In conjunction with the Radiant distribution option, it defines
the breakdown of how the power input to the heater is distributed to the rest of the zone.
Control method
Radiant units can be controlled in one of three ways:
· 1-MAT - control the room mean air temperature to the heating setpoint temperature
specified on the Activity tab.
· 2-Operative - control the room operative temperature (MAT+MRT) / 2 to the heating
setpoint temperature specified on the Activity tab.
· 3-MRT - control the room mean radiant temperature to the heating setpoint temperature
specified on the Activity tab.
This option overrides the overall simulation control radiant fraction option.
Note: You should ideally use Operative control if you want to calculate realistic heating
energy because heating systems controlled using the operative temperature continue to
heat the building until comfort conditions are met (just that they are in the real building).
Also, the default heating temperature set points from the Activity templates are derived from
sources quoting Operative temperatures. With MAT control the room air temperature is
controlled to the heating set point temperature, which (depending on internal radiant
temperatures) may not necessarily be comfortable.
Radiant distribution
The Radiant distribution allows you to control how the radiant heat from the Radiant unit is
distributed around the room. Options are:
· 1-Uniform - radiant heat is distributed uniformly around the zone.
· 2-Floor - heat is distributed uniformly across all floors in the zone. Use this for modelling
floor heating systems.
· 3-Wall - heat is distributed uniformly across all walls in the zone. Use this for modelling hot
water radiators and other radiant heaters close to wall surfaces.
Technical Note: DesignBuilder uses the EnergyPlus 'HIGH TEMP RADIANT SYSTEM' to model
radiant heating systems. This system type is intended for modelling 'high-temperature' radiant
sources but it can equally well be used for low temperature radiant sources.
© 2008 DesignBuilder Software, Ltd.
Building Models
273
OPERATION
VAV
When using the 1-VAV system type, you can set the operation schedule for the central air handling unit
heating coils separately from the schedules for the local reheat coils. The operating schedule for the
central heating coils is set under the AHU Heating Coil Operation header at building level. Local reheat
coils are controlled using Operation data at zone level.
Unitary Multizone
When using the 2-Unitary multizone system type, the operating schedule for the central heating coils is
set under the AHU Heating Coil Operation header at building level.
Note: only one set of zone thermostatic control data is used per Unitary multizone system - this is the
zone for which Thermostatic control zone for unitary system is selected.
Unitary Single zone
Heating operation schedules are set at zone level and there is no central plant apart from the boiler.
Note: for all systems, heating setpoint temperatures are defined on the Activity tab.
Zone setpoint schedule
This schedule data is used in conjunction with the heating setpoint temperatures on the Activity tab to
define the heating demand in the zone by creating a heating setpoint schedule. The schedule defines the
times when full and setback setpoints should be met and the setpoint data on the Activity tab define the
actual setpoint values. See Defining setpoint temperature schedules for more on this.
3.3.2.5.5 Natural Ventilation
HVAC tab in model data
You can control the operation of natural ventilation using the data under the Natural Ventilation header on
the HVAC tab. When using Calculated natural ventilation model option there is additional data on the
Openings tab to control the timing and extent of operation of openings.
SCHEDULED
When the Natural ventilation model option is set to Scheduled, natural ventilation is defined simply as
follows:
·
·
·
·
Check the 'On' checkbox under the Natural Ventilation header.
Select the flow type
Set the maximum zone natural ventilation rate in air changes per hour (if flow type is 1-By zone).
Enter the operation information.
Find out more about Natural Ventilation Modelling under Modelling Issues.
© 2008 DesignBuilder Software, Ltd.
274
DesignBuilder 1.5
Flow type
Defines the method used to set the maximum outside air natural ventilation rate. The options are:
· 1-By zone - enter the zone natural ventilation rate in air changes per hour in the control directly
below. The air flow rate is calculated from the ac/h data using:
m3/s = ac/h x ZoneVolume / 3600
where ZoneVolume is the actual air volume of the space calculated according to options for
optionally excluding floor/ceiling constructions.
Note: this zone volume may be different from the value used for the purposes of calculating air
flow rates for infiltration which uses the total zone volume.
· 2-Min fresh air per person - maximum natural ventilation rate is defined using Minimum fresh air
requirements as set on the Activity tab. The air flow rate in m3/s is calculated as:
m3s = MinFreshAir x NumberPeople / 1000
NumberPeople = Occupancy density (people / m2) * Zone floor area (m2)
MinFreshAir is the minimum fresh air rate per person (l/s/person)
Scheduled natural ventilation is active at any time in the simulation when:
· The air temperature in the zone is higher than the Ventilation cooling set-point temperature (as set
on the Activity tab under the 'Environmental Comfort' header) AND ...
· The difference between inside and outside air temperatures (Tin - Tout) is less than 'Max ventilation
in-out delta T' (below the Ventilation cooling setpoint data on the Activity tab) AND ...
· The operation schedule is on at that time in the simulation.
Note: to avoid temperature control of natural ventilation set a very low Ventilation cooling setpoint
temperature and to avoid temperature difference control of natural ventilation set a high negative value
of Max ventilation in-out delta T.
The actual natural ventilation rate at any one time in the simulation is calculated by multiplying the
maximum natural ventilation rate (ac/h) by the value of the operation schedule.
When using the 'Typical workday' Timing option, natural ventilation can be either on or off. When it is on,
the ventilation rate is the 'maximum natural ventilation rate'.
© 2008 DesignBuilder Software, Ltd.
Building Models
275
When using the 7/12 Timing option, it is possible to vary the natural ventilation rate between 0 and the
maximum value by using daily profiles which have values between 0 and 100%.
Internal Windows, Doors and Vents
Airflow through external windows, vents, doors and holes are not modelled with Scheduled natural
ventilation because the natural ventilation airflow from outside is explicitly defined (above). Internal
windows, vents, doors and holes cause air to be exchanged between the two adjacent zones using the
EnergyPlus 'Mixing' object. You can override operation of internal windows, vents, doors be off as follows:
Window, Vent, Door position
Internal adjacent to unconditioned semi-exterior
Other internal
Override Off Action
Switch off the Natural ventilation 'On' checkbox in
the occupied zone
Unaffected by the Natural ventilation 'On' checkbox.
Use the operation schedules on the Openings tab to
switch off
CALCULATED
When the Natural ventilation model option is set to Calculated, natural ventilation is defined as follows:
· Check the 'On' checkbox under the Natural Ventilation header.
· On the Openings tab by setting window, door and vent opening sizes and operation times.
You can override operation of windows, vents, doors be off as follows:
Window, Vent, Door position
External
Internal adjacent to unconditioned semi-exterior
Other internal
Override Off Action
Switch off the Natural ventilation 'On' checkbox
Switch off the Natural ventilation 'On' checkbox in
the occupied zone
Unaffected by the Natural ventilation 'On' checkbox.
Use the operation schedules on the Openings tab to
switch off
Note that even when operation is switched off as described above (or because operation schedules on
the Openings tab are off) windows, vents and doors still provide a small flow path through the crack
between the opening and the surrounding surface if the Model infiltration data is switched on.
Note 1: for Cooling design simulations, natural ventilation is always handled as Scheduled even when
the Natural ventilation model option is set to Calculated. In this case you can still enter natural ventilation
data on the HVAC tab and it is used only for design simulations.
Note 2: Natural ventilation is not included in Heating design calculations as it is considered to be a cooling
mechanism - windows and vents will be closed during the coldest winter periods.
© 2008 DesignBuilder Software, Ltd.
276
DesignBuilder 1.5
3.3.2.5.6 Air Temperature Distribution
HVAC tab in model data
By default EnergyPlus assumes that air temperature within a zone is completely uniform (i.e. the air is fully
mixed). The Air Distribution model data allows you to model stratification within a zone by setting up a
temperature gradient which varies dynamically depending on:
·
·
·
·
·
Outside temperature.
Inside temperature.
Inside-outside temperature difference.
Heating load.
Cooling load.
How it works
Changing the Distribution mode to 2-Dynamic gradient reveals the air temperature distribution data. By
default the Interpolation mode is 2-Inside-outside DeltaT. This means that the temperature gradient
within the space is modelled as varying according to the inside-outside temperature difference. The Upper
conditions define the most extreme temperature gradient, typically under design conditions. In the
screenshot above right, the upper temperature difference is 10°C and the corresponding temperature
gradient is 4°C/m. This means that when the temperature difference between inside and outside if 10°C
or more the internal temperature gradient is 4°C/m. The Lower conditions data shows that when the
temperature difference between inside and outside is zero there is no temperature gradient, i.e. the air is
fully mixed. EnergyPlus calculates the temperature gradient for other inside-outside temperature
differences by linear interpolation.
Operation schedule
The operation schedule defines the times when air temperature distribution is to be calculated. When the
value of the schedule is 1, the distribution calculations take place, when the value is 0, the zone air
temperature is fully mixed.
Thermostat height
Thermostat height specifies the distance above the floor where the thermostat for HVAC control is
situated. This height is used by the model to determine the thermostat temperature relative to the mean
air temperature by applying the gradient.
© 2008 DesignBuilder Software, Ltd.
Building Models
277
Return air height
Return air height specifies the distance above the floor where the air leaves the zone and returns to the
air system. This height is used by the model to determine the return air temperature relative to the mean
air temperature by applying the gradient.
Range of applicability
The air temperature distribution within the zone is used as follows:
1. To calculate boundary conditions for conduction through surfaces (walls, roofs, glazing etc).
2. To include the effects of extracting relatively warmer air at the ceiling level when using Compact
HVAC.
3. To include the vertical position of the thermostat sensor for HVAC control.
Limitations
The air temperature distribution mechanism does not include:
1. The effects of extracting relatively warmer air at the ceiling level when using Scheduled and
Calculated natural ventilation.
2. The vertical position of the sensor for ventilation control.
3.3.2.5.7 Domestic Hot Water (DHW)
HVAC tab in model data
The effect of hot water consumption (hot water taps, showers etc) on building energy use can be included
in your thermal model by switching on DHW on the HVAC tab.
Domestic Hot Water (DHW) is modelled in DesignBuilder by using hot water consumption rates based on
the activity in each zone. DHW hot water consumption is defined on the Activity tab and the definition of
the hot water generating equipment is described below) is defined on the HVAC tab.
Type
Three types of DHW are available:
1-Boiler - heat is supplied by the same boiler used for heating the building
2-Gas - gas-fired hot water system
3-Electric - electric immersion heater
Delivery hot water temperature
The temperature of the water supplied to the taps.
Mains supply temperature
The temperature of the water delivered to the building. This can be approximated to the annual average
outside air temperature.
Operation
The operation schedules define the timing of the hot water draw off when the Timing HVAC + natural
ventilation operates with occupancy option model option is not selected. The profile of hot water
consumption in the EnergyPlus simulation is calculated from l/person/day data (gal/person/day in IP units)
© 2008 DesignBuilder Software, Ltd.
278
DesignBuilder 1.5
entered on the Activity tab by first estimating a typical number of hours per day. When typical workday
schedules are used, this is simply the number of hours occupied during the working day. When 7/12
schedules are used the typical occupancy hours per day is determined from January Monday data.
Note: When using a Compact schedule to define DHW operation DesignBuilder assumes a fixed 8
hours per day operation when calculating the maximum m3/s hot water draw off for passing to
EnergyPlus.
DHW volumetric consumption supplied to EnergyPlus is calculated as:
DHW (m3/s) = DHW (l/day/m2) x 0.001 x m2 / (Typical hours per day x 3600)
3.3.2.6
Detailed Equipment
Equipment tab in model data (zone level only)
When the Gains model option is set to Detailed you can enter data on individual items of equipment in
each zone.
Details on editing Equipment data
This option is intended for modelling existing buildings where individual items of equipment have been
recorded as part of a detailed survey. DesignBuilder has a software utility for recording and calibrating
this data available on the Prerelease and beta test versions Downloads page of the DesignBuilder
website.
Note: For other modelling applications you should use the Early gains model option because data can be
set at the building level and/or loaded from template with much less effort.
© 2008 DesignBuilder Software, Ltd.
Building Models
279
3.3.2.6.1 Edit Detailed Equipment
You can model time-varying internal gains and energy consumption of individual items of equipment in
each zone by adding equipment data at the zone level on the Equipment tab. To add an item of
equipment click on the Add toolbar icon, or if you are running DesignBuilder in Learning mode you can
use the link in the Info panel to the right of the screen. This opens the Edit Equipment dialog:
You can define the category of internal gain (below), the number of items of equipment, the rated power
per item of equipment as well as the operational schedule.
The Radiant fraction is the fraction of heat emitted by the device as long-wave radiation. The rest of the
heat is considered to be convective i.e. it is modelled as heating up the zone air directly.
The Latent fraction is the fraction of the rated power which is converted to latent energy and affects the
moisture balance in the zone instead of the sensible heat balance.
Fraction heat lost is the fraction of the sensible heat emitted which is lost or vented directly to outside
without affecting the zone heat balance. This can be used for modelling equipment such as fluorescent
lighting with control gear which can have different higher energy consumption than heat gain into the
space.
A number of categories of gains are available. These are listed below together with the output data with
which they are associated:
·
·
·
·
·
·
·
·
·
·
·
·
·
·
·
·
·
·
Fluorescent lights - General lighting
Tungsten lights - Task lighting
Office equipment - Computer + equipment
Computers - Computer + equipment
Computer accessories - Computer + equipment
Telecoms - Computer + equipment
Lifts - Miscellaneous
Catering - Catering
Small power - Miscellaneous
Heating - Miscellaneous
Cooling - Miscellaneous
Pumps - Miscellaneous
Fans - Miscellaneous
DHW - Miscellaneous.
Process - Miscellaneous
External lighting - Task lighting
Other external - Miscellaneous
Miscellaneous - Miscellaneous
© 2008 DesignBuilder Software, Ltd.
280
DesignBuilder 1.5
Note that all of the above gains are modelled as scheduled gains in the zone and the data is reported as
such in the program output. So for example categorising an item of equipment as DHW does not affect in
any way DHW modelling as defined on the HVAC tab. Likewise data for Heating, Cooling, Pumps and
Fans is simply modelled as a scheduled gain in the zone, completely unconnected with HVAC modelling.
3.3.3
Model Data Management
The DesignBuilder building Model Data inheritance mechanism is a powerful way to edit building models.
Tools are provided to help manage and manipulate this data.
· Load data from template
· Clear data to default
3.3.3.1
Load Data from Template
Model Data Management
Access the Load Data from Template from:
1. The Toolbar
2. The Edit menu
3. Mouse right-click in the Model Data.
Use it to load template data into the model. You can select one or more data sources from the following
template libraries:
·
·
·
·
·
·
Construction
Glazing
Facade
Activity
Lighting
HVAC
When you select one of the above templates as a source of data you must also set the template from
which to load:
© 2008 DesignBuilder Software, Ltd.
Building Models
281
Target Object(s)
On the Target tab you can select the way you want to set data and, where appropriate, which model
objects to load to.
· Selected object(s) - choose this option if you want to load the same data to one or more building,
block, zone or surface. Check the boxes next to the target objects to select them as targets.
· Reload templates - reloads template data for the current building and all blocks, zones and surfaces
in the building. Data is only loaded if the template selection is non-default. If the template inherits
from the hierarchical level above, data is not loaded.
· Search & replace - allows you to search the model for particular data and replace with data from a
template.
Selection tools are available to allow you to control the selection of building objects:
·
·
·
Select all.
Select all down to zone level.
Select none.
Making global lighting settings
When you load lighting data from template you should consider that DesignBuilder sets the lighting output
from the lights based on:
a) Lighting system efficiency (W/m2/100 lux) using data from the lighting template and,
b) Illuminance levels required in the zone as set on the Activity tab.
If you have many types of activity in the building you can load lighting data for each zone taking into
account the required illuminance level in the zone by selecting the appropriate zones in the Target tab.
3.3.3.2
Clear Data to Default
Model Data Management
© 2008 DesignBuilder Software, Ltd.
282
DesignBuilder 1.5
The Clear Data to Default dialog allows you to:
· Clear Model Data
· Clear custom openings and revert back to default facades.
'Clearing to default' removes any 'user data' (shown in red) from the current object and instead default
data is passed from the 'parent' object in the hierarchy (Model Data shown in blue).
You can control the extent of the 'clearance' by setting the 'Clear Down to' data at the bottom. Leave this
data as 'Surface level' if you want all data in the currently selected model object (including child objects) to
be returned to a default state.
3.4
Model Options
All Model Options are stored in the DesignBuilder dsb file and so any changes you make to the model
configuration will not affect other models.
You can open the Model Options dialog by:
· Pressing F11.
· Clicking on the spanner icon on the toolbar.
· From the Edit menu.
All Model Options are stored in a single dialog but the options you can access depend on where you are in
the model hierarchy.
Some model options are stored at the site level:
· All options on the Display tab
Most are stored at the building level:
· Options on the Data, Advanced, Heating design, Cooling design, Simulation tabs
and some are stored at block level:
© 2008 DesignBuilder Software, Ltd.
Building Models
283
· All options on the Block tab.
So if you open the Model Options dialog when you are at building level you will not be able to access the
Block Model Options. Likewise if you are at site level you will only be able to access the Display tab.
3.4.1
Model Data Options
Data tab on Model Options dialog.
Use this dialog to customise the Model Data Options for the current building.
You can edit the amount of detail in various aspects of the model:
·
·
·
·
·
·
Model scope
Construction and Glazing
Gains
Timing
HVAC
Natural ventilation
The descriptions to the right of the sliders, taken together, provide a summary of the current model
options.
© 2008 DesignBuilder Software, Ltd.
284
3.4.1.1
DesignBuilder 1.5
Model scope
Data tab on Model Options dialog.
You can use the scope control to switch between 'whole building' and 'single zone' modes. To model a
single-zone within a building, make sure you are editing the zone you want to model and change the
scope to 'Zone'.
If you want to include building self-shading effects in a single-zone analysis you should select the 'Single
zone + shading' option. Note that if the single zone is part of a large complex building, simulations using
this option are often no quicker to complete than the full building simulation. This is because the shading
calculations required for the large number of shading elements used to model the rest of the building are
slow.
© 2008 DesignBuilder Software, Ltd.
Building Models
3.4.1.2
285
Construction and glazing
(Exception: ground floors can optionally have a ground construction added)
Data tab on Model Options dialog.
Construction and glazing
The Construction and glazing model option controls the way construction templates are loaded on the
construction model data tab. When the option is set to Pre-design you can load construction templates
using the Insulation and Thermal mass slider controls. When set to General, templates are loaded by
selection from a list in the usual way.
Floor/slab/ceiling representation
You can choose to model floors, ceilings and flat roofs each having a single construction or by combining
separate constructions for floor, slab and ceiling. The options are:
· 1-Combined - all wall, floor and roof constructions are defined using a series of single constructions
without the complication of understanding how layers are combined. This can be easier to
understand for new users and requires less input model data. You may also find it easier to use this
option when assessing your building for compliance with energy codes because by default the
combined constructions used have exactly the maximum U-values allowed by the local code. See
the Combined Constructions section for more details.
With Combined constructions, the volume of the floor constructions can be included or excluded
from the zone air volume by making the appropriate setting under Include constructions in zone
volume.
· 2-Separate - internal floors are defined in model data by selecting constructions for floor, slab and
ceiling with air gaps. Likewise flat roofs are defined by separately defining the ceiling and roof
details etc. This approach can be more economical in the number of different construction
components required, but requires more input model data and more careful planning. When using
this option you must first familiarise yourself with the meaning on the data as described in the
Separate Constructions section. Choosing this option configures constructions in the same way as
DesignBuilder version 1.2 and earlier.
With Separate constructions, the volume of the floor constructions + floor void and ceiling
constructions + ceiling void can be included or excluded from the zone air volume by making the
appropriate setting under Include constructions in zone volume.
Note: the zone air volume referred to above is for calculating air flow rates for natural ventilation and
mechanical ventilation not for infiltration which always uses the total volume (including the volume of all
floor/ceiling constructions). The rationale is that infiltration will find it's way into all corners of the building
but natural and mechanical ventilation is specifically delivered to the occupied space.
3.4.1.3
Gains
Data tab on Model Options dialog.
There are three levels of gains model detail:
© 2008 DesignBuilder Software, Ltd.
286
DesignBuilder 1.5
· Lumped - all internal gains including occupancy, computer, office equipment, miscellaneous,
catering process and lighting gains are lumped together into a single value. Solar gains are still
calculated in the usual way.
· Early - gains can be defined separately under various categories (see above).
· Detailed - gains are specified by defining each individual item of equipment in each zone on the
Equipment tab. If you select this option then DesignBuilder will automatically set the Timing model
option to Schedules. Note that this option was developed for creating very detailed models of
existing buildings based on survey data. Entering this data for a large building is very timeconsuming and in most cases you will be better served by the Early gains option above.
Internal gains operate with occupancy
Check this option if you wish the timing of internal gains to be the same as occupancy. Unchecking the
option allows you to set the timing of each type of gain individually. For example there may be low levels
of emergency lighting and some IT equipment usage while the building is unoccupied.
3.4.1.4
Timing
Data tab on Model Options dialog.
You can specify schedules in DesignBuilder using two approaches:
· Typical workday - where the timing is defined by a start time, end time, working days per week and
seasonal variation. This approach is intended for easy early stage modelling of non-domestic
buildings.
· Schedules - where Schedules can either be defined for each day of the week and each month of
the year using daily Profiles or by using Compact Schedule format. Schedules are more flexible and
can be used in other projects but they take longer to set up.
Generally if you start to find the Typical workday timing mode too restrictive you should switch to
Schedules mode.
You can also request:
Timing HVAC + natural ventilation operates with occupancy
Select this option if all heating, cooling, natural ventilation and DHW operation follows occupancy.
This option is only available if Timing is set to Typical workday.
Note that HVAC operation data can modify the occupancy patterns even when Timing HVAC + natural
ventilation operates with occupancy is set. For example :
· Simple HVAC - Mechanical ventilation, Heating and Cooling operation have additional Days / week
and seasonal operation data. Heating operation also has Preheat hours and Cooling operation also
has Precool hours.
· Compact HVAC:
· Fan-coil units, Unitary single zone - Mechanical ventilation, Heating and Cooling operation
have additional Days / week and seasonal operation data. Heating operation also has Preheat
hours and Cooling operation also has Precool hours.
· VAV/CAV/Unitary multizone - Min AHU outside air, AHU heating/cooling, Zone setpoint
schedules have additional Days / week and seasonal operation data. Heating operation also has
Preheat hours and Cooling operation also has Precool hours.
These differences are applied as 'modifiers' to the basic occupancy schedule because HVAC systems
© 2008 DesignBuilder Software, Ltd.
Building Models
287
generally switch on and off based on the occupancy time but with differences. e.g. Heating systems are
often switched off in summer, they may operate during weekends when the building is unoccupied and
they will often have a preheat period to get the building up to temperature before occupancy.
Internal gains operate with occupancy
Select this option if lighting and other internal gains operation follows occupancy. If you wish to enter
specific schedules for lighting and/or other internal gains you should uncheck this option.
3.4.1.5
Natural Ventilation
Data tab on Model Options dialog.
Natural ventilation can either be 'Scheduled' or 'Calculated'
· Scheduled - the ventilation rates are predefined using a maximum air change rate modified by
operation schedules.
· Calculated - the ventilation rates are calculated using wind and buoyancy-driven pressure, opening
sizes and operation, crack sizes etc.
You should generally use the 'Scheduled' natural ventilation model option because it is quicker and easier
to enter the related model data and also because the simulations run more quickly. However if you need
to calculate natural ventilation rates which can be achieved with a particular configuration then you should
use the 'Calculated' option.
More on Natural Ventilation modelling.
3.4.1.6
HVAC
Data tab on Model Options dialog.
HVAC can be defined in DesignBuilder using:
· Simple - the heating/cooling system is modelled using basic loads calculation algorithms and the
corresponding energy consumption is calculated from loads as a post-process.
· Compact - the heating/cooling systems are defined in DesignBuilder using Compact HVAC
descriptions but modelled in detail in EnergyPlus.
Note: you can force all HVAC systems to have the same operation schedule as occupancy by checking
the 'HVAC + natural ventilation operate with occupancy' option under 'Timing'.
Plant Sizing- Autosizing
DesignBuilder can be used to automatically calculate heating and cooling capacity in each zone based on
the output from the Heating and Cooling design calculations. The Plant sizing model option provides
control over how heating and cooling capacities are set for Simulations. Select from:
· 1-Adequate - The effect of this option depends on the HVAC model option. When using Simple
HVAC, equipment is modelled as having adequately large capacity to meet any heating or cooling
demand and setpoint temperatures are always maintained. This option can cause extremely large
© 2008 DesignBuilder Software, Ltd.
288
DesignBuilder 1.5
peaks in heating and cooling delivery to zones and will tend to over-predict heating and cooling
energy and under predict discomfort hours. When using Compact HVAC this option is equivalent to
3-Autosize and the Compact HVAC autosizing mechanism is used to size the components and flow
rates to ensure that the required comfort conditions are met.
· 2-Manual - heating and cooling capacity Model Data must be entered manually. Choose this option
if you have specific heating and cooling capacity data you wish to use and do not want it to be
overwritten when model data or model options change.
· 3-Autosize - the default option where heating and cooling capacities are always calculated prior to
each simulation and the heating and cooling capacity Model data is not displayed. When using
Simple HVAC the heating and cooling design calculations will be run as required before the
simulation to calculate the required sizes. When using Compact HVAC the components and flow
rates are sized using the EnergyPlus autosizing mechanism to ensure that the required comfort
conditions are met.
· 4-Autosize when not set - heating and cooling capacities are Autosized and loaded into model
data following heating and cooling design simulations. If Capacity model data is not present before
a simulation, it is generated by automatically by carrying out heating and cooling design calculations
and is written into the HVAC model data.
Note: Heating and Cooling design calculations assume that heating and cooling loads are always met and
so do not use this option.
Important Note About Using '4-Autosize when not set'
You should be aware that when using the default 4-Autosize when not set option, the heating/cooling
zone capacity model data is not treated the same way as other calculated results. In general, calculated
results are deleted when any edit is made to the building model, but this is not the case for zone capacity
model data. This is only updated when:
1. There is no heating/cooling capacity data (the value is either blank or zero when heating/cooling is
switched on) and a simulation is requested. In this case the appropriate design calculations are
carried out to fill in the capacity data, before the simulation.
2. The appropriate design calculation is carried out by clicking on the Heating/Cooling design tab.
3. Model Options change. In this case zone HVAC capacity is deleted.
If you always want the heating capacity to be kept up-to-date with your model and do not have any specific
capacity sizes you wish to use, you should consider using the 3-Autosize option. This will cause
autosizing to be carried out prior to every simulation.
You can change heating capacities by hand if you wish but you should bear in mind that, if Model options
change, all heating and cooling capacities are reset to zero. Set the option to 2-Manual to avoid this
happening.
© 2008 DesignBuilder Software, Ltd.
Building Models
3.4.2
289
Advanced Concepts
Advanced tab on Model Options
dialog.
· Simplification - options to allow zones to be merged and for controlling lumping of similar windows,
openings and cracks and eliminating unnecessary zones and elements from the model.
· Natural ventilation - options to control the operation of natural ventilation.
· Miscellaneous Edit - options for controlling data displayed.
· Lighting - options for lighting.
· Filters - excluding elements from the model.
This data applies to the current building.
3.4.2.1
Simplification
When generating data for the calculations, surfaces between zones are defined twice, once from each
side. Surfaces between 2 zones that have been merged are called Surfaces within zone. By default
these are modelled in the same way as standard surfaces but with both sides adjacent to the same zone.
If the Surfaces within zone treated as adiabatic option is set, the 'other side' in each of the 2 surfaces
is modelled as adiabatic.
Advanced tab on Model Options dialog.
You can simplify and speed up simulations (sometimes quite significantly) by lumping zones, walls and
windows and/or eliminating unnecessary zones and elements from the model. The following options are
available:
Merge zones of same activity
Option reduces the number of zones by merging all zones of same activity. See below for more on
merging zones.
Merge zones connected by holes
Merges zones which are connected by holes drawn at surface level or by virtual partitions. You can merge
one or more zones within the same block or across multiple blocks. See below for more on merging
zones.
© 2008 DesignBuilder Software, Ltd.
290
DesignBuilder 1.5
Lump similar windows on surface
Causes all windows on a zone surface having the same area, construction, frame/dividers, shading etc to
be lumped into a single opening. Lumping only occurs in zones which have no lighting control. The
EnergyPlus Window Multiplier mechanism is used. For models having surfaces with many similar
windows this option can provide a worthwhile reduction in simulation times.
DesignBuilder does not allow a multiplier for windows to be used for daylighting calculations or 3-Full
interior and exterior Solar distribution calculations. This is because EnergyPlus does not know where
each of the individual windows is located, and so cannot properly calculate the solar and visible light
transmitted through these windows into a space. So in either of this cases the simulation takes place as if
this option is switched off.
This is currently the only 'Simplification' option switched on by default for new models.
Lump similar cracks
Causes all cracks in a zone which are facing the same direction and have similar height to be lumped into
a single crack. This option applies only when the natural ventilation model option is Calculated.
Lump walls and windows (developer option)
Reduces the number of walls and windows. This is currently a research only tool because it has
undocumented restrictions. It is not available for general users
Generate fully enclosed zones
Check the Generate fully enclosed zones checkbox to model Link surfaces. This has 2 main effects on
the model:
1. Extra Link surfaces are generated to connect adjacent blocks together for both visual continuity and
to allow fully closed zones to be generated.
2. The volume enclosed by the link surfaces and the inter-block partition is included in the zone
volume. This volume is essentially the thickness of the block wall x inter-block partition area).
Model 'semi-exterior unconditioned' zones as simple R-value to outside
Including complex roof structures in the model can sometimes cause simulations to run slowly for little
benefit in accuracy. This option allows you to exclude such spaces from the calculations adding in their
place a single R-value resistance to outside. The resistance can be used as a way to include the
'buffering' of the occupied space by the semi-exterior zones without sacrificing simulation speeds.
This option can be very useful for speeding data entry for simple calculation methods like SBEM.
Openings in semi-exposed surfaces
Any openings (window, doors, vents, sub-surfaces and holes) in semi-exposed surfaces
do not include the additional R-Value when this option is selected.
By default this option is off and roofspace zones (and all other semi-exposed unconditioned zones) are
modelled as separate zones in calculations.
R-Value to outside
The R-value added to the outside of semi-exposed elements when Model 'semi-exterior unconditioned'
© 2008 DesignBuilder Software, Ltd.
Building Models
291
zones as simple R-value to outside option (above) is set.
You can enter an R-Value of 0 if you don't want to include a resistance between semi-exposed elements
and outside. In this case it your responsibility to include the effect of the adjacent semi-exterior
unconditioned zone in the semi-exposed constructions themselves.
Tip: You can calculate approximations for R-Value to outside by adjusting the R-Value until the results
match those of the equivalent simulation with Model 'semi-exterior unconditioned' zones as simple Rvalue to outside switched off.
MERGING ZONES
When zones are merged using Merge zones of same activity or Merge zones connected by holes,
combined merged zones are treated as a single zone in thermal calculations. When zones are merged,
DesignBuilder marks one of the zones as being the 'parent' zone, and the other zones 'child' zones. The
child zones are marked in blue in the Navigator together with the parent zone they have been merged into
as shown below.
This screenshot of the Navigation list shows the First floor zone, Second floor zone and Roof zones all
merged into the Atrium zone.
The parent zone is the zone that is used for defining Activity, HVAC, Lighting (and all other zone related
data) for itself and all it's child zones. You therefore cannot access this zone-related Model data for
merged child zones. You must go to
the parent zone to edit the Model data for the combined zone. The internal gains are calculated based on
the data set on the Activity tab for the parent zone but using the combined total floor area of all of the
merged zones.
Constructions, glazing and other surface level data can be defined separately in each of the parent and
child zones in the normal way.
Important: when merging 2 or more stacked zones using holes in the floor and the
Merge zones connected by holes option, you should be aware that the combined
floor area used to calculate internal gains in the simulations will exclude the area of any
holes in the floor. In this case, if you have any gains calculated using the combined floor
area you should either ensure that the area of the hole is very small or else use the
Merge zones of same activity option instead and avoid using holes.
Why merge zones?
You may want to merge zones for various reasons:
© 2008 DesignBuilder Software, Ltd.
292
DesignBuilder 1.5
· Speed up simulations.
· A geometrically complex space in the actual building is to be modelled using more than one block in
DesignBuilder (e.g. Dormer windows, Atria).
· To reduce the number of zones and simplify HVAC system descriptions when exporting EnergyPlus
IDF data for use outside DesignBuilder.
· If you have created a tall merged zone, you may want to use the Air distribution model data on the
HVAC tab to create a dynamic vertical temperature gradient. This approach to modelling tall spaces
is preferred over connecting a number of horizontal slices with air flow openings, because it does
not rely on getting correct airflow conductances between the horizontal slices.
Technical note
Disadvantages of merging
Merging zones can reduce cooling load peaks resulting in an underestimate of cooling equipment
required to condition the building. To understand this consider a building in the Northern hemisphere with
two zones, a North zone and a South zone connected to each other along the E-W axis. When solar gains
are highest, the South zone may experience a cooling load and the North Zone not. Now imagine the
same 2 spaces merged into a single zone. The combined zones will probably now have a lower cooling
load than the load in the original South zone because the air from the South side of the merged space is
cooled by the shaded North side.
In most cases merging zones will speed up simulations but sometimes simulations can slow down,
especially the initialisation stage. This may be because any very large zones generated through merging
can have many windows which can slow down solar and daylighting initialisation.
Merging rules
1. When merging zones using the Merge zones of same activity or Merge zones connected by
holes zones connected by the merge option are lumped together into a single 'parent' zone, which
in a vertical stack of zones, will be the lowest zone in the stack.
2. The zone surfaces are generated in exactly the same way as they would have been without the
merging but are associated with the parent zone rather than the original zone.
3. In child merged zones, you can access Constructions and Openings surface-based Model data but
not space related data such as Activity, Lighting, HVAC. This is accessed from the parent zone
only.
Merging buildings
You can merge 2 existing buildings (including component blocks) using the Transfer blocks command
from the Edit menu.
3.4.2.2
Natural Ventilation
Advanced tab on Model Options dialog.
Model holes (including holes in virtual partitions)
You can optionally switch off all holes in the model including those holes generated by defining partitions
as virtual partitions. In this case the building is modelled as if no holes were defined.
Tip: Unchecking this data can be a quick way to model virtual partitions as standard partitions.
© 2008 DesignBuilder Software, Ltd.
Building Models
293
CALCULATED NATURAL VENTILATION OPTION
Wind Factor
When carrying out conservative design simulations you may prefer to exclude (or reduce) the effects of
wind from Calculated natural ventilation. To exclude wind-driven airflow from the analysis altogether set
the Wind factor to 0. For full treatment of wind effects set it to 1 and for intermediate treatment of wind set
to a number between 0 and 1.
Modulation of Openings
You can modulate the window/door openings when Calculated natural ventilation is being used by making
appropriate settings to:
· Limit value of opening modulation factor - gives the reduction on opening area for low outside
air temperatures.
· Lower value of Tin-Tout - lower value on inside/outside temperature difference for modulating the
venting open factor.
· Upper value of Tin-Tout - upper value on inside/outside temperature difference for modulating the
venting open factor (defines 'low outside air temperatures')
Note: if Modulate calculated opening sizes is switched on then airflow will be switched off if the
difference between inside and outside air temperatures is greater than Upper value of Tin-Tout
This data is used within EnergyPlus/AIRNET to calculate a factor between 0 and 1 that multiplies the
opening factor of each window and door in the building. Modulation of the openings can reduce the large
temperature swings that can occur if the windows/doors are too far open when they are venting, especially
when there is a large inside-outside temperature difference.
Temperature difference (Tin - Tout)
Tin - Tout <= [Lower value of Tin - Tout]
© 2008 DesignBuilder Software, Ltd.
Opening Multiplier
1.0
294
DesignBuilder 1.5
[Lower value of Tin - Tout] < Tin - Tout < [Upper value of Tin - Factor varies linearly from 1.0 to
Limit value of Opening modulation
Tout]
factor.
Factor = Limit value of opening
Tin - Tout >= [Upper Value of Tin - Tout]
modulation factor.
For example if the Lower value of Tin - Tout is 0, the Upper value is 15 and the Limit value of opening
modulation factor is 0.05, the windows and doors are only opened 5% of their full opening area when the
outside air is 15 degC or more colder than inside.
SCHEDULED NATURAL VENTILATION OPTION
Airflow through internal openings
When using Scheduled natural ventilation, windows, vents, doors and holes in internal partitions can be
modelled by mixing a predefined amount of air from one zone with the adjacent zone by selecting the
Airflow through internal openings option and entering the Airflow rate per opening area.
Technical note: this airflow is modelled using the EnergyPlus Mixing option.
Warning: In EnergyPlus v.2.1.0 there is a bug in internal airflow reports for zones having 2 or more
internal openings. In such zones Internal Natural ventilation typically has very large values.
3.4.2.3
Miscellaneous Edit
Advanced tab on Model Options dialog.
Automatic block zoning
By default DesignBuilder automatically generates zones as partitions are drawn. You can change this
behaviour by unchecking the Automatic block zoning option. In this case partitions are shown in blue
as they are drawn and are referred to as outline partitions. Outline partitions do not create new zones
and are modelled in the same way in simulations as hanging partitions. To convert any outline partitions to
standard partitions and to rezone the block use the Rezone block command accessed from the Tools
menu. Note that outline partitions that do not connect at both ends (known in DesignBuilder as hanging
partitions) will remain in blue even after the Rezone block command.
Alternatively to convert all outline partitions in the building to standard partitions and hence rezone the
whole building you can use the Rebuild command. This will take longer to process than the Rezone block
command as it recalculates the surface and adjacency geometry as well rezoning.
Note: switching Automatic block zoning off also prevents rezoning following other partition edit
commands such as delete, copy and undo/redo.
Automatically include voids from lower blocks
Select this option if you would like DesignBuilder to automatically punch voids through new blocks drawn
on top of existing blocks having voids. If you leave this option switched off (default state) you can still draw
voids at the block level using the ghosted outline of adjacent voids in a block below as a guide.
Edit block model data
© 2008 DesignBuilder Software, Ltd.
Building Models
295
Use this option to allow editing of block level model data.
Note: If you disable block editing you will no longer be able to edit Model Data at the block level in the
current building and so will not be able to set different defaults for different blocks.
3.4.2.4
Lighting
Advanced tab on Model Options dialog.
Working plane height
You can set the height of the working plane (and hence the z-position of the lighting sensor). The x-y
coordinate is set by placing the Lighting sensor marker(s) at zone level.
3.4.2.5
Filters
Advanced tab on Model Options dialog.
Exclude surface elements smaller than
You can also filter out very small surfaces from the simulations (and from the Navigator panel) by defining
a minimum area.
Experience suggests that a value of 0.05 is a good default. If you set the limit much lower than this you
will run the risk of including very small surface slivers in the calculations. These can cause problems with
EnergyPlus.
3.4.2.6
Component Blocks
Advanced tab on Model Options dialog.
Flat component block surface selection
For flat component blocks DesignBuilder uses the selection made here to decide which of the 2 largest
surfaces of the component block is used in the simulation as a shading surface. Choose from:
· 1-Highest - the upper of the 2 largest surfaces is used.
· 2-Lowest - the lower of the 2 largest surfaces is used.
Definition of a flat component block
A component block is considered 'flat' when the 2 largest surfaces have the same area
and constitute at least 95% of the total surface area of the component block.
© 2008 DesignBuilder Software, Ltd.
296
3.4.3
DesignBuilder 1.5
Heating Design Calculation Options
Heating Design tab on Model Options dialog.
Data on this tab allows you to control the Heating Design calculations.
·
·
·
·
·
Winter Design Day
Calculation Options
Heating system sizing
Advanced Calculation Options
Output Options
This data is also shown before Heating Design Calculations.
3.4.3.1
Winter Design Day
Schedule types for Compact HVAC Autosizing (Compact and Typical workday
Schedules)
7/12 Schedules can be categorised using the following categories when using the End-use defaults
option:
· General - include general purpose schedules in Compact HVAC heating autosizing calculations on by default.
· Occupancy - include occupancy schedules - off by default
· Lighting - include lighting schedules - off by default.
· Equipment - include equipment schedules - off by default.
· Heating demand - include heating demand schedules - on by default.
· Cooling demand - include cooling demand schedules - on by default.
· HVAC - HVAC schedules - on by default.
· Natural ventilation demand - natural ventilation schedules - off by default.
· DHW - DHW schedules - on by default.
For example, occupancy gains should normally be excluded when sizing heating plant to ensure that the
design heating plant meets all heating loads itself. So leave the Occupancy check box unchecked.
Heating and cooling demand schedules must be included to ensure the system operates so the Heating
demand and Cooling demand options should normally left selected.
These options are also used for Typical workday schedules.
3.4.3.2
Calculation Options
Heating Design, Cooling Design and Simulation tabs on Model Options dialog and Options tab on
Simulation Options dialog.
Calculation description
Enter some text to identify the calculation. This will be used in reports and in the filename for automatically
© 2008 DesignBuilder Software, Ltd.
Building Models
297
generated ESO files.
Number of time steps per hour (Simulation only)
The 'time steps per hour' is the number of times the building thermal network is solved per hour in the
simulations. When the HVAC portion of the simulation begins it's solution for the current time step, it uses
the basic time step as its maximum but then can reduce the time step, as necessary, to reach the
solution.
The technical details of the approach are explained in the EnergyPlus Engineering Documentation under
'Integrated Solution Manager'.
Advanced EnergyPlus users can obtain and view data at intervals of the HVAC time step used if they
select the 'detailed' option on an HVAC report variable (e.g. Zone/Sys Air Temp).
The time step entered here is also known in the EnergyPlus documentation as the Zone Time Step.
Though many buildings can be successfully simulated with 1 or 2 time steps per hour, EnergyPlus
suggest 4 for non-HVAC simulations and 6 for simulations with HVAC.
Hourly data (such as outdoor conditions expressed by Design Days or Weather data) are interpolated to
the Zone Time Step. This is discussed the EnergyPlus documentation under: Weather Data Hourly
Interpolation.
Note: In general, increasing the number of time steps improves accuracy but slows the simulation (and
generates more data if output is requested at the 'sub-hourly' interval).
Temperature Control
Heating and cooling systems control internal temperatures to meet the setpoint temperatures specified on
the Activity tab. These setpoint temperatures can be interpreted as air, operative or some other radiant
fraction and DesignBuilder provides corresponding options to allow HVAC systems to be controlled by:
· 1-Air temperature - control the room mean air temperature to the heating and cooling setpoint
temperatures specified on the Activity tab.
· 2-Operative temperature - control the room temperature using 0.5 radiant fraction. See notes of
operative temperature control below if you plan to use this option.
· 3-Other- you can enter the radiant temperature control fraction.
The radiant fraction should be less than 0.9 and the minimum is 0.0. A value of 0.0 is the same as
controlling on only zone air temperature. If air velocities are higher than 0.2 m/s, then lower values for
radiative fraction might apply. Niu and Burnett (1998) cite International Standard ISO 77300 in
recommending the values for this fraction listed in the following table.
Radiative Fraction vs Air Velocity
Air Velocity (m/s)
<0.2
Radiant fraction
0.5
0.2 - 0.6
0.4
0.6 - 1.0
0.3
Reference: J. Niu and J. Burnett. 1998. Integrating Radiant/Operative Temperature Controls into Building
Energy Simulations. ASHRAE Transactions Vol. 104. Part 2. page 210. ASHRAE. Atlanta, GA.
You can think of the Temperature control option as:
· The radiant fraction sensed by the room thermostat, or,
· Given a room thermostat that mainly senses air temperature, the extent of automatic modification of
the setpoint temperature to ensure occupant comfort.
© 2008 DesignBuilder Software, Ltd.
298
DesignBuilder 1.5
Notes
1. This option is overridden when using radiant heating systems by the radiant heating system control
setting.
2. This option does not affect natural and mechanical ventilation setpoints - these always use air
temperature set points.
Operative vs Air temperature control - Advanced discussion
There has been much debate amongst simulation experts over the years on the extent to which radiant
effects should be included on the simulated thermostat. Most real-world thermostats probably don't
actually sense more than about 20% radiant heat transfer - mostly the temperature sensor will be
sensitive to the temperature of room air nearby. So apparently we should air temperature (or 20% radiant)
control. But Operative control (radiant fraction = 0.5) can be useful for calculating realistic heating and
cooling energy based on published summer and winter temperature requirements for the activities in each
zone. This is because HVAC systems controlled using the operative temperature continue to condition the
building until comfort conditions are met (just like they are in the real building). Also, the default
temperature set points from the Activity templates are generally derived from sources quoting operative
temperatures. With Air temperature control the room air temperature is controlled to the set point
temperature, which (depending on internal radiant temperatures) may not necessarily be comfortable.
The disadvantage of Operative temperature control is that start up loads can be unrealistically high due to
the lag in thermal response of the walls, floor, ceilings. The slow temperature response of the building
fabric part governs the output of the operative thermostat and hence the operation of the heating/cooling
equipment. If this effect dominates it can lead to an overestimate of the required design cooling load. You
should be familiar with this issue before using operative temperature control to size heating and cooling
equipment. In our experience using Operative temperature control usually leads to higher peak loads in
Heating and Cooling design calculations and higher energy consumption in Simulations.
Caution
Operative temperature control can cause EnergyPlus Error 3 when using Simple HVAC, or Cooling
design calculations with Operative control in zones with strong radiant heat gains causing high
radiant temperatures (e.g. uninsulated roof or zone is highly glazed). The error is caused by the
fixed supply air temperature being higher than the zone air temperature required to give the
operative setpoint (.e.g. 24 °C). The solution may be to use Air temperature control and to manage
the high radiant temperatures using solar shading/insulation as appropriate.
Air temperature control is easier to use as none of the aforementioned problems apply, but it can lead to
inadequate equipment sizes peak loads in Heating and Cooling design calculations when not used with a
design safety factor. Also the calculations may underestimate energy consumption in Simulations of
buildings with poor insulation.
Note: as a general rule you should prioritise checking building comfort levels when using Air temperature
control and realistic plant operation (oversized equipment, supply temperatures very low) when using
Operative temperature control.
3.4.3.3
Heating System Sizing
Heating Design tab on Model Options dialog.
Design margin
The Heating Design margin is used to multiply calculated steady state heating loads in each zone to give
a recommended heating plant size. It accounts for the additional heat required to bring the building up to
© 2008 DesignBuilder Software, Ltd.
Building Models
299
temperature in a reasonably short preheat period and allows you to be confident that comfort conditions
will be maintained in all but the most extreme winter conditions.
3.4.3.4
Advanced Calculation Options
Heating Design, Cooling Design and Simulation tabs on Model Options dialog, Options tab on
Simulation Options dialog and General tab on the Heating and Cooling Design Calculation options
dialogs.
Maximum warmup days (not heating/cooling design)
The maximum number of 'warmup' days that might be used in the simulation before 'convergence' is
achieved. A warning message will occur when the simulation 'runs out of days':
Loads Initialization did not Converge (CheckWarmupConvergence)
You may be able to increase the Maximum Number of Warmup Days and get convergence, but some
anomalous buildings may still not converge. Simulation proceeds for x warmup days until convergence is
reached (see Temperature and Loads Convergence above.
Inside and Outside convection algorithms
You can select from a range of EnergyPlus inside convection algorithms for calculating the convection
between internal zone surfaces and the rest of the zone air in the simulation calculations. More details on
this and external convection can be found under Constructions Model Data > Surface Convection header.
Solution Algorithm
Select from:
· CTF - sensible heat only solution not taking into account moisture storage or diffusion in the
construction elements. The method used in EnergyPlus for CTF calculations is known as the state
space method (Ceylan and Myers 1980; Seem 1987; Ouyang and Haghighat 1991).
· Finite Difference - currently research only because instabilities can occur with complex
constructions.
Temperature and Loads convergence
The temperature and loads convergence values represent the maximum difference in zone temperature/
loads between successive iterations before “convergence” is reached.
Convergence of the simultaneous heat balance/HVAC solution is reached when either the loads or
temperature criterion is satisfied. Both tolerances work the same way, one looks at temperatures and one
looks at heating and cooling loads. After the second warm-up day, the program compares the maximum
temperature experienced in a space with the maximum temperature from the previous day. If those two
temperatures are within the tolerance, then it has passed the first warm-up check. It does a similar
comparison with lowest temperatures experience within all the zones. If the current simulation day and the
previous day values are within the tolerance, then it has passed the second warm-up check. A similar
comparison is carried with the loads tolerance and the maximum heating and cooling loads that are
experienced within the spaces. Those are compared individually to the values for the previous day. If they
are both in tolerance, then the simulation has passed the third and fourth warm-up check. The simulation
stays in the warm-up period until ALL FOUR checks have been passed.
Maximum shadow overlap (not heating design)
© 2008 DesignBuilder Software, Ltd.
300
DesignBuilder 1.5
Enter the maximum number of figures per shadow overlap. The shadow overlaps is a measure of the
amount of complexity in the shading calculation and this maximum value allows you to limit the amount of
time spent in the solar initialisation calculations.
Note: entering a small value here can speed up simulations in complex buildings. If you plan to use
Maximum shadow overlaps below the default value of 15000 you should check accuracy of solar gains
relative to results using default value
Surfaces within zone treated as adiabatic
EnergyPlus support recommend modelling surfaces wholly contained within a zone as adiabatic and this
option allows you to follow this advice. We have found that in practice this option not make much
difference in results or in simulation speed so for most cases you can leave it in its default state.
Note: 'surfaces contained within a zone' are frequently generated when one of the zone merging options
is used where a partition or floor which would have separated two zones actually sits within the merged
zone. These surfaces do not refer to hanging partitions which are modelled using Internal thermal mass.
COMPACT HVAC SIMULATION AUTOSIZING OPTIONS
The following 2 data items are used when autosizing Compact HVAC systems before simulations.
Sizing factor (not heating/cooling design)
This ratio is applied at the zone level to all of the zone heating and cooling loads and air flow rates. These
new loads and air flow rates are then used to calculate the system level flow rates and capacities and are
used in all of the component sizing calculations.
Default value is 1.2.
Design averaging window period (not heating/cooling design)
The time in the zone design flow sequence averaging window during EnergyPlus Compact HVAC
autosizing calculations. The default is 1 hour, in which case the calculated zone design flow rates are
averaged over an hour. The autosizing zone design air flow rate calculation is performed assuming a
potentially infinite supply of heating or cooling air at a fixed temperature. Thus the calculated design air
flow rate will always be able to meet any load or change in load no matter how large or abrupt. In reality
air flow rates are limited by duct sizes and fan capacities. The idealized zone design flow calculation may
result in unrealistically large flow rates, especially if the user is performing the sizing calculations using
thermostat schedules with night setup or setback. The calculated zone design flow rates are always
averaged over the load timestep. You may want to perform a broader average to mitigate the effect of
thermostat setup and setback and prevent the warm up or cool down flow rates from dominating the
design flow rate calculation. Specifying the width of the averaging window allows the user to do this.
INCLUDE IDF DATA (NOT HEATING/COOLING DESIGN)
You can include up to 2 custom IDF data in your EnergyPlus simulations by checking the IDF File 1 or
IDF File 2 check boxes and entering the name of the IDF data source file. The contents of any files
specified are copied to the end of the IDF dataset generated by DesignBuilder before simulation.
© 2008 DesignBuilder Software, Ltd.
Building Models
301
Note: Included IDF files must be located in the EnergyPlus folder.
3.4.3.5
Output Options
Include unoccupied zones in block and building totals and averages
By default data for unoccupied zones is excluded from block and building totals and averages. Check this
option to include data for unoccupied zones.
A zone is defined as unoccupied if it has:
·
·
·
·
No occupancy and,
No cooling and,
No heating and,
No mechanical ventilation
3.4.4
Cooling Design Calculation Options
Cooling Design tab on Model Options dialog.
Data on this tab allows you to control the Cooling Design calculations:
·
·
·
·
·
·
Summer Design Day
Calculation Options
Cooling system sizing
Solar Options
Advanced Calculation Options
Output Options
This data is also shown before Cooling Design Calculations.
3.4.4.1
Summer Design Day
Day
Select the day of the month for the design day
Month
Select the month for the design day
Day of week
Select the day of week. This is used to identify the appropriate daily profile.
© 2008 DesignBuilder Software, Ltd.
302
3.4.4.2
DesignBuilder 1.5
Calculation Options
Heating Design, Cooling Design and Simulation tabs on Model Options dialog and Options tab on
Simulation Options dialog.
Calculation description
Enter some text to identify the calculation. This will be used in reports and in the filename for automatically
generated ESO files.
Number of time steps per hour (Simulation only)
The 'time steps per hour' is the number of times the building thermal network is solved per hour in the
simulations. When the HVAC portion of the simulation begins it's solution for the current time step, it uses
the basic time step as its maximum but then can reduce the time step, as necessary, to reach the
solution.
The technical details of the approach are explained in the EnergyPlus Engineering Documentation under
'Integrated Solution Manager'.
Advanced EnergyPlus users can obtain and view data at intervals of the HVAC time step used if they
select the 'detailed' option on an HVAC report variable (e.g. Zone/Sys Air Temp).
The time step entered here is also known in the EnergyPlus documentation as the Zone Time Step.
Though many buildings can be successfully simulated with 1 or 2 time steps per hour, EnergyPlus
suggest 4 for non-HVAC simulations and 6 for simulations with HVAC.
Hourly data (such as outdoor conditions expressed by Design Days or Weather data) are interpolated to
the Zone Time Step. This is discussed the EnergyPlus documentation under: Weather Data Hourly
Interpolation.
Note: In general, increasing the number of time steps improves accuracy but slows the simulation (and
generates more data if output is requested at the 'sub-hourly' interval).
Temperature Control
Heating and cooling systems control internal temperatures to meet the setpoint temperatures specified on
the Activity tab. These setpoint temperatures can be interpreted as air, operative or some other radiant
fraction and DesignBuilder provides corresponding options to allow HVAC systems to be controlled by:
· 1-Air temperature - control the room mean air temperature to the heating and cooling setpoint
temperatures specified on the Activity tab.
· 2-Operative temperature - control the room temperature using 0.5 radiant fraction. See notes of
operative temperature control below if you plan to use this option.
· 3-Other- you can enter the radiant temperature control fraction.
The radiant fraction should be less than 0.9 and the minimum is 0.0. A value of 0.0 is the same as
controlling on only zone air temperature. If air velocities are higher than 0.2 m/s, then lower values for
radiative fraction might apply. Niu and Burnett (1998) cite International Standard ISO 77300 in
recommending the values for this fraction listed in the following table.
Radiative Fraction vs Air Velocity
© 2008 DesignBuilder Software, Ltd.
Building Models
Air Velocity (m/s)
Radiant fraction
<0.2
0.5
0.2 - 0.6
0.4
303
0.6 - 1.0
0.3
Reference: J. Niu and J. Burnett. 1998. Integrating Radiant/Operative Temperature Controls into Building
Energy Simulations. ASHRAE Transactions Vol. 104. Part 2. page 210. ASHRAE. Atlanta, GA.
You can think of the Temperature control option as:
· The radiant fraction sensed by the room thermostat, or,
· Given a room thermostat that mainly senses air temperature, the extent of automatic modification of
the setpoint temperature to ensure occupant comfort.
Notes
1. This option is overridden when using radiant heating systems by the radiant heating system control
setting.
2. This option does not affect natural and mechanical ventilation setpoints - these always use air
temperature set points.
Operative vs Air temperature control - Advanced discussion
There has been much debate amongst simulation experts over the years on the extent to which radiant
effects should be included on the simulated thermostat. Most real-world thermostats probably don't
actually sense more than about 20% radiant heat transfer - mostly the temperature sensor will be
sensitive to the temperature of room air nearby. So apparently we should air temperature (or 20% radiant)
control. But Operative control (radiant fraction = 0.5) can be useful for calculating realistic heating and
cooling energy based on published summer and winter temperature requirements for the activities in each
zone. This is because HVAC systems controlled using the operative temperature continue to condition the
building until comfort conditions are met (just like they are in the real building). Also, the default
temperature set points from the Activity templates are generally derived from sources quoting operative
temperatures. With Air temperature control the room air temperature is controlled to the set point
temperature, which (depending on internal radiant temperatures) may not necessarily be comfortable.
The disadvantage of Operative temperature control is that start up loads can be unrealistically high due to
the lag in thermal response of the walls, floor, ceilings. The slow temperature response of the building
fabric part governs the output of the operative thermostat and hence the operation of the heating/cooling
equipment. If this effect dominates it can lead to an overestimate of the required design cooling load. You
should be familiar with this issue before using operative temperature control to size heating and cooling
equipment. In our experience using Operative temperature control usually leads to higher peak loads in
Heating and Cooling design calculations and higher energy consumption in Simulations.
Caution
Operative temperature control can cause EnergyPlus Error 3 when using Simple HVAC, or Cooling
design calculations with Operative control in zones with strong radiant heat gains causing high
radiant temperatures (e.g. uninsulated roof or zone is highly glazed). The error is caused by the
fixed supply air temperature being higher than the zone air temperature required to give the
operative setpoint (.e.g. 24 °C). The solution may be to use Air temperature control and to manage
the high radiant temperatures using solar shading/insulation as appropriate.
Air temperature control is easier to use as none of the aforementioned problems apply, but it can lead to
inadequate equipment sizes peak loads in Heating and Cooling design calculations when not used with a
design safety factor. Also the calculations may underestimate energy consumption in Simulations of
buildings with poor insulation.
Note: as a general rule you should prioritise checking building comfort levels when using Air temperature
control and realistic plant operation (oversized equipment, supply temperatures very low) when using
Operative temperature control.
© 2008 DesignBuilder Software, Ltd.
304
3.4.4.3
DesignBuilder 1.5
Cooling System Sizing
Cooling Design tab on Model Options dialog.
Design margin
The Cooling Design margin is a 'safety factor' used to multiply calculated cooling loads in each zone to
give a recommended maximum cooling equipment capacity. It accounts for the additional cooling required
to cool the building down in a reasonably short precool period and allows you to be confident that comfort
conditions will be maintained in all but the most extreme summer conditions (risk depends on the
Summer Design Weather Data options selected at site level).
Sizing method
Sizing methods available are:
· 1-ASHRAE - standard Heat Balance method implemented in EnergyPlus.
· 2-Unitary DX - calculations are made through a detailed EnergyPlus simulation using Unitary DX
equipment.
· 3-VAV - detailed EnergyPlus simulation using VAV equipment.
· 4-Fan coil - detailed EnergyPlus simulation using Fan coil equipment.
Note: you do not need to have the Compact HVAC model option set to use the detailed cooling load
sizing options 2, 3 and 4 above.
3.4.4.3.1 ASHRAE Cooling Sizing
In the ASHRAE cooling sizing method the cooling design load calculations are carried out using the
standard ASHRAE Heat Balance method implemented in EnergyPlus using the 'Purchased air' system
type. You can define the conditions of the supply air delivered to cooled zones using Design supply
temperature and Supply air humidity ratio. The total (sensible + latent) load is calculated as the enthalpy
change between the zone return air and the specified supply air condition for the current load.
The ASHRAE system is modelled assuming:
No economiser,
No heat recovery,
No heating,
Zero pressure rise fan,
No humidification/dehumidification,
Zone plenums will not be used if specified,
Outside airflow rate and operation schedule defined by the data under the Mechanical Ventilation
header on the HVAC tab at the zone level,
· Cooling coil availability defined by the schedule under the Cooling header on the HVAC tab at the
zone level,
· Zone design cooling temperature setpoints are defined by the data under Environmental Control on
the Activity tab.
·
·
·
·
·
·
·
© 2008 DesignBuilder Software, Ltd.
Building Models
305
Unlike the other 3 cooling sizing options, 1-ASHRAE cannot be used in conjunction with Natural
ventilation.
Design supply temperature
The constant dry-bulb air temperature of the air supplied for cooling the zone.
Supply air humidity ratio
The constant humidity ratio (mass of water per mass of dry air) of the cold supply air. The default humidity
ratio is 0.009.
3.4.4.3.2 Unitary DX Cooling Sizing
When using the Unitary DX cooling sizing method the Cooling design calculation is made through a
detailed EnergyPlus simulation using Compact HVAC Single zone Unitary DX equipment. A diagram of
the system layout used is shown in the Unitary Single Zone topic.
Each zone has it's own Unitary system with a fan (generating no pickup), a DX cooling coil, an outside air
controller and a damper to reduce supply air flow. More specifically:
No economiser,
No heat recovery,
No heating coil,
Zero pressure rise fan,
No humidification/dehumidification,
Zone plenums will be used if specified,
Outside airflow rate and operation schedule defined by the data under the Mechanical Ventilation
header on the HVAC tab at the zone level,
· Cooling coil availability defined by the schedule under the Cooling header on the HVAC tab at the
zone level,
· Zone design cooling temperature setpoints are defined by the data under Environmental Control on
the Activity tab.
·
·
·
·
·
·
·
Unlike the ASHRAE cooling sizing option, Unitary DX can be used in conjunction with Natural ventilation.
Note: Unitary DX will tend to calculate higher latent loads than the other 3 cooling sizing methods and the
zone air humidity will generally be lower. This is because DX coils run colder than water-cooled coils and
will condense out more water from the supply air. Unitary DX can be used to provide a conservative
calculation for the latent cooling loads.
3.4.4.3.3 VAV Cooling Sizing
When using the VAV cooling sizing method, the Cooling design calculation is made through a detailed
EnergyPlus simulation using Compact HVAC VAV equipment. A diagram of the system layout used is
shown in the VAV topic.
Each zone has it's own VAV AHU with a fan (generating no pickup), a water-cooled AHU cooling coil, an
outside air controller and a zone terminal box with a damper to reduce supply air flow. More specifically:
© 2008 DesignBuilder Software, Ltd.
306
DesignBuilder 1.5
No economiser,
No heat recovery,
No AHU heating coil,
No reheat coil,
No preheat coil,
Zero pressure rise fan,
No humidification/dehumidification,
Standard zone terminal unit,
Zone plenums will be used if specified,
Outside airflow rate and operation schedule defined by the data under the Mechanical Ventilation
header on the HVAC tab at the zone level,
· Cooling coil availability defined by the schedule under the Cooling header on the HVAC tab at the
zone level,
· Zone design cooling temperature setpoints are defined by the data under Environmental Control on
the Activity tab.
·
·
·
·
·
·
·
·
·
·
Unlike the ASHRAE cooling sizing option, VAV can be used in conjunction with Natural ventilation.
Design supply temperature
The constant dry-bulb air temperature of the air supplied for cooling the zone
Design turndown ratio (supply air minimum flow fraction)
The Design turndown ratio is the fraction that the zone VAV box can reduce to based on the supply air
maximum flow rate. It is normally specified to meet the minimum ventilation requirement for the
occupants. A value of 1.0 means that the VAV box cannot reduce supply air at all (i.e. it is a constant
volume system).
Turndown ratio is typically in range 0.3 - 0.5. Minimum is 0 and maximum is 1.
3.4.4.3.4 Fan Coil Cooling Sizing
When using the Fan coil cooling sizing method, the Cooling design calculation is made through a detailed
EnergyPlus simulation using Compact HVAC Fan coil equipment. A diagram of the system layout used is
shown in the Fan Coil Units topic.
Each zone has it's own Fan coil unit with a fan (generating no pickup), a water-cooled cooling coil, an
outside air controller and a zone terminal box with a damper to reduce supply air flow. More specifically:
No economiser,
No heat recovery,
No heating coil,
Zero pressure rise fan,
No humidification/dehumidification,
Outside airflow rate and operation schedule defined by the data under the Mechanical Ventilation
header on the HVAC tab at the zone level (see note below about outside air flow rates),
· Cooling coil availability defined by the schedule under the Cooling header on the HVAC tab at the
zone level,
· Zone design cooling temperature setpoints are defined by the data under Environmental Control on
the Activity tab.
·
·
·
·
·
·
Unlike the ASHRAE cooling sizing option, Fan coil can be used in conjunction with Natural ventilation.
© 2008 DesignBuilder Software, Ltd.
Building Models
307
Design supply temperature
The constant dry-bulb air temperature of the air supplied for cooling the zone
Note: the Fan coil outside air flow can be fully on or fully off but cannot reduce to fractional values in
between. You may therefore get higher outside air delivery rates than with the other methods if you are
using Schedules and your Mechanical ventilation operation schedule has fractional values.
3.4.4.4
Solar Options
Cooling Design and Simulation tabs on Model Options dialog and Options tab on Simulation
Options dialog.
Solar Options allow you to control aspects of the model related to solar gains.
Include all buildings in shading calcs
Use this option to include other buildings on the site as shading obstructions.
Note: there is no way to simulate > 1 building at a time. All external surfaces in buildings other than the
current one are modelled as shading surfaces. If you need to model the adjacency of another building in
contact with the current one, you can use the adiabatic adjacency option to model the touching surfaces.
Cooling Design Calculations and Simulations both use this option but have separate Model option data.
Note: if one or more 'other buildings' are large/complex then you could generate a large number of
shading elements and the simulation could be slow (even if the current building being simulated is
simple).
Model reflections
If using reflections, the program calculates beam and sky solar radiation that is reflected from exterior
surfaces and then strikes the building. These reflecting surfaces fall into 3 categories:
1. Shadowing surfaces. These are surfaces like overhangs or neighboring buildings (see below). These
surfaces can have diffuse and specular (beam-to-beam) reflectance values derived from the material
properties of the wall/windows.
Solar reflection from shadowing surfaces. Solid arrows are beam solar radiation; dashed arrows are
diffuse solar radiation. (a) Diffuse reflection of beam solar radiation from the top of an overhang. (b)
© 2008 DesignBuilder Software, Ltd.
308
DesignBuilder 1.5
Diffuse reflection of sky solar radiation from the top of an overhang. (c) Beam-to-beam (specular)
reflection from the façade of an adjacent highly-glazed building represented by a vertical shadowing
surface.
2. Exterior building surfaces. In this case one section of the building reflects solar radiation onto
another section (and vice-versa). See below. The building surfaces are assumed to be diffusely reflecting
if they are opaque (walls, for example) and specularly reflecting if they are windows or glass doors. The
reflectance values for opaque surfaces are calculated by the program from the Solar Absorptance and
Visible Absorptance of the outer material layer of the surface’s construction. The reflectance values for
windows and glass doors are calculated by the program from the reflectance properties of the individual
glass layers that make up surface’s construction assuming no shading device is present and taking into
account inter-reflections among the layers.
Solar reflection from building surfaces onto other building surfaces. In this example beam solar reflects
from a vertical section of the building onto a roof section. The reflection from the window is specular. The
reflection from the wall is diffuse.
3. The ground surface.
Reflection from the ground is calculated even if the reflections option is not used. But in this case
the ground plane is considered unobstructed, i.e., the shadowing of the ground by the building itself or
by obstructions such as neighboring buildings is ignored. This shadowing is taken into account if the
reflections option is used. This is shown in diagrammatically below.
Shadowing from building affects beam solar reflection from the ground. Beam-to-diffuse reflection from
the ground onto the building occurs only for sunlit areas, A and C, not from shaded area, B.
If reflections option is used for the ground surface then the ground view factor is NOT used.
Solar distribution
© 2008 DesignBuilder Software, Ltd.
Building Models
309
This option determines how EnergyPlus treats beam solar radiation and reflectance from exterior surfaces
that strike the building and, ultimately, enter the zone. There are five choices:
1-Minimal shadowing - In this case, there is no exterior shadowing except from window and door
reveals. All beam solar radiation entering the zone is assumed to fall on the floor, where it is absorbed
according to the floor's solar absorptance. Any reflected by the floor is added to the transmitted diffuse
radiation, which is assumed to be uniformly distributed on all interior surfaces. If no floor is present in the
zone, the incident beam solar radiation is absorbed on all interior surfaces according to their
absorptances. The zone heat balance is then applied at each surface and on the zone's air with the
absorbed radiation being treated as a flux on the surface.
2-Full Exterior - in this case, shadow patterns on exterior surfaces caused by detached shading, wings,
overhangs, and exterior surfaces of all zones are computed. As for Minimal shadowing, shadowing by
window and door reveals is also calculated. Beam solar radiation entering the zone is treated as for
'Minimal shadowing' - all beam solar radiation entering the zone is assumed to fall on the floor, where it is
absorbed according to the floor's solar absorptance. Any reflected by the floor is added to the transmitted
diffuse radiation, which is distributed among interior surfaces according to view factors. If no floor is
present in the zone, the incident beam solar radiation is absorbed on all interior surfaces according to
their absorptance.
If you use 2-Full Exterior you should make sure that all of your zones have a floor. If
your building model has any zones of unusual shape without floors then the EnergyPlus
simulation may not work because it will not have a surface to apportion solar gains to.
3-Full interior and exterior - this is the same as 'Full exterior' except that instead of assuming all
transmitted beam solar falls on the floor the program calculates the amount of beam radiation falling on
each surface in the zone, including floor, walls and windows, by projecting the sun's rays through the
exterior windows, taking into account the effect of exterior shadowing surfaces and window shading
devices. If this option is used, you should be sure that the surfaces of the zone totally enclose a space.
This can be determined by viewing the eplusout.dxf file with an external DXF viewer program.
You should also be sure that the zone is convex. Examples of convex and non-convex zones are shown
below. The most common non-convex zone is an L-shaped zone. (A formal definition of convex is that
any straight line passing through the zone intercepts at most two surfaces.) If the zone’s surfaces do not
enclose a space or if the zone is not convex you should use 'Full exterior' instead.
If you use 3-Full Interior and exterior the program will also calculate how much beam radiation falling on
the inside of an exterior window (from other windows in the zone) is absorbed by the window, how much is
reflected back into the zone, and how much is transmitted to the outside. In this calculation the effect of a
© 2008 DesignBuilder Software, Ltd.
310
DesignBuilder 1.5
shading device, if present, is accounted for.
Important!
You must use 3-Full Interior and exterior to account for solar and light transmission
through internal windows.
Check for non-convex zones
When the solar distribution selection is 3-Full interior and exterior (above) you can choose whether
DesignBuilder is to check for non-convex zones. By default the option is to carry out the check to prevent
invalid results, but if the zones are only slightly non-convex you can switch off this check and allow
EnergyPlus to continue calculations. You will probably receive error message 2 if you switch this option off
and have non-convex zones. The EnergyPlus simulation may or may not fail.
Shadowing interval (Simulation only)
Enter the number of days (1-365) covered by each shadowing calculation.
Enter 1 if you want shadowing to be calculated every day (for greater detail but slower calculations).
3.4.4.5
Advanced Calculation Options
Heating Design, Cooling Design and Simulation tabs on Model Options dialog, Options tab on
Simulation Options dialog and General tab on the Heating and Cooling Design Calculation options
dialogs.
Maximum warmup days (not heating/cooling design)
The maximum number of 'warmup' days that might be used in the simulation before 'convergence' is
achieved. A warning message will occur when the simulation 'runs out of days':
Loads Initialization did not Converge (CheckWarmupConvergence)
You may be able to increase the Maximum Number of Warmup Days and get convergence, but some
anomalous buildings may still not converge. Simulation proceeds for x warmup days until convergence is
reached (see Temperature and Loads Convergence above.
Inside and Outside convection algorithms
You can select from a range of EnergyPlus inside convection algorithms for calculating the convection
between internal zone surfaces and the rest of the zone air in the simulation calculations. More details on
this and external convection can be found under Constructions Model Data > Surface Convection header.
Solution Algorithm
Select from:
· CTF - sensible heat only solution not taking into account moisture storage or diffusion in the
construction elements. The method used in EnergyPlus for CTF calculations is known as the state
space method (Ceylan and Myers 1980; Seem 1987; Ouyang and Haghighat 1991).
· Finite Difference - currently research only because instabilities can occur with complex
© 2008 DesignBuilder Software, Ltd.
Building Models
311
constructions.
Temperature and Loads convergence
The temperature and loads convergence values represent the maximum difference in zone temperature/
loads between successive iterations before “convergence” is reached.
Convergence of the simultaneous heat balance/HVAC solution is reached when either the loads or
temperature criterion is satisfied. Both tolerances work the same way, one looks at temperatures and one
looks at heating and cooling loads. After the second warm-up day, the program compares the maximum
temperature experienced in a space with the maximum temperature from the previous day. If those two
temperatures are within the tolerance, then it has passed the first warm-up check. It does a similar
comparison with lowest temperatures experience within all the zones. If the current simulation day and the
previous day values are within the tolerance, then it has passed the second warm-up check. A similar
comparison is carried with the loads tolerance and the maximum heating and cooling loads that are
experienced within the spaces. Those are compared individually to the values for the previous day. If they
are both in tolerance, then the simulation has passed the third and fourth warm-up check. The simulation
stays in the warm-up period until ALL FOUR checks have been passed.
Maximum shadow overlap (not heating design)
Enter the maximum number of figures per shadow overlap. The shadow overlaps is a measure of the
amount of complexity in the shading calculation and this maximum value allows you to limit the amount of
time spent in the solar initialisation calculations.
Note: entering a small value here can speed up simulations in complex buildings. If you plan to use
Maximum shadow overlaps below the default value of 15000 you should check accuracy of solar gains
relative to results using default value
Surfaces within zone treated as adiabatic
EnergyPlus support recommend modelling surfaces wholly contained within a zone as adiabatic and this
option allows you to follow this advice. We have found that in practice this option not make much
difference in results or in simulation speed so for most cases you can leave it in its default state.
Note: 'surfaces contained within a zone' are frequently generated when one of the zone merging options
is used where a partition or floor which would have separated two zones actually sits within the merged
zone. These surfaces do not refer to hanging partitions which are modelled using Internal thermal mass.
COMPACT HVAC SIMULATION AUTOSIZING OPTIONS
The following 2 data items are used when autosizing Compact HVAC systems before simulations.
Sizing factor (not heating/cooling design)
This ratio is applied at the zone level to all of the zone heating and cooling loads and air flow rates. These
new loads and air flow rates are then used to calculate the system level flow rates and capacities and are
used in all of the component sizing calculations.
Default value is 1.2.
Design averaging window period (not heating/cooling design)
The time in the zone design flow sequence averaging window during EnergyPlus Compact HVAC
autosizing calculations. The default is 1 hour, in which case the calculated zone design flow rates are
© 2008 DesignBuilder Software, Ltd.
312
DesignBuilder 1.5
averaged over an hour. The autosizing zone design air flow rate calculation is performed assuming a
potentially infinite supply of heating or cooling air at a fixed temperature. Thus the calculated design air
flow rate will always be able to meet any load or change in load no matter how large or abrupt. In reality
air flow rates are limited by duct sizes and fan capacities. The idealized zone design flow calculation may
result in unrealistically large flow rates, especially if the user is performing the sizing calculations using
thermostat schedules with night setup or setback. The calculated zone design flow rates are always
averaged over the load timestep. You may want to perform a broader average to mitigate the effect of
thermostat setup and setback and prevent the warm up or cool down flow rates from dominating the
design flow rate calculation. Specifying the width of the averaging window allows the user to do this.
INCLUDE IDF DATA (NOT HEATING/COOLING DESIGN)
You can include up to 2 custom IDF data in your EnergyPlus simulations by checking the IDF File 1 or
IDF File 2 check boxes and entering the name of the IDF data source file. The contents of any files
specified are copied to the end of the IDF dataset generated by DesignBuilder before simulation.
Note: Included IDF files must be located in the EnergyPlus folder.
3.4.4.6
Output Options
Include unoccupied zones in block and building totals and averages
By default data for unoccupied zones is excluded from block and building totals and averages. Check this
option to include data for unoccupied zones.
A zone is defined as unoccupied if it has:
·
·
·
·
No occupancy and,
No cooling and,
No heating and,
No mechanical ventilation
3.4.5
Simulation Calculation Options
Simulation tab on Model Options dialog.
Data on this tab allows you to control the simulations:
·
·
·
·
·
Simulation Period
Calculation options
Solar options
Advanced Calculation Options
Output options
© 2008 DesignBuilder Software, Ltd.
Building Models
313
This data is also shown before simulations in the Simulation Calculation Options dialog.
3.4.5.1
Simulation Period
Simulation tab on Model Options dialog and General tab on Simulation Options dialog.
Simulation Period
Select the start and end days for the simulation, or select a typical period using the links on the Info panel:
· Annual simulation - all 365 days of the year.
· Summer design week - a week identified by the weather data translator as being the hottest of the
year.
· Summer typical week - a week identified by the weather data translator as being typical of the
summer.
· All summer - simulate the whole summer (as identified by the weather data translator).
· Winter design week - a week identified by the weather data translator as being the coldest of the
year.
· Winter typical week - a week identified by the weather data translator as being typical of the winter.
· All winter - simulate the whole winter (as identified by the weather data translator).
The above typical simulation periods are derived from the Statistics data from the currently selected
Hourly weather data.
3.4.5.2
Calculation Options
Heating Design, Cooling Design and Simulation tabs on Model Options dialog and Options tab on
Simulation Options dialog.
Calculation description
Enter some text to identify the calculation. This will be used in reports and in the filename for automatically
generated ESO files.
Number of time steps per hour (Simulation only)
The 'time steps per hour' is the number of times the building thermal network is solved per hour in the
simulations. When the HVAC portion of the simulation begins it's solution for the current time step, it uses
the basic time step as its maximum but then can reduce the time step, as necessary, to reach the
solution.
The technical details of the approach are explained in the EnergyPlus Engineering Documentation under
'Integrated Solution Manager'.
Advanced EnergyPlus users can obtain and view data at intervals of the HVAC time step used if they
select the 'detailed' option on an HVAC report variable (e.g. Zone/Sys Air Temp).
The time step entered here is also known in the EnergyPlus documentation as the Zone Time Step.
Though many buildings can be successfully simulated with 1 or 2 time steps per hour, EnergyPlus
suggest 4 for non-HVAC simulations and 6 for simulations with HVAC.
© 2008 DesignBuilder Software, Ltd.
314
DesignBuilder 1.5
Hourly data (such as outdoor conditions expressed by Design Days or Weather data) are interpolated to
the Zone Time Step. This is discussed the EnergyPlus documentation under: Weather Data Hourly
Interpolation.
Note: In general, increasing the number of time steps improves accuracy but slows the simulation (and
generates more data if output is requested at the 'sub-hourly' interval).
Temperature Control
Heating and cooling systems control internal temperatures to meet the setpoint temperatures specified on
the Activity tab. These setpoint temperatures can be interpreted as air, operative or some other radiant
fraction and DesignBuilder provides corresponding options to allow HVAC systems to be controlled by:
· 1-Air temperature - control the room mean air temperature to the heating and cooling setpoint
temperatures specified on the Activity tab.
· 2-Operative temperature - control the room temperature using 0.5 radiant fraction. See notes of
operative temperature control below if you plan to use this option.
· 3-Other- you can enter the radiant temperature control fraction.
The radiant fraction should be less than 0.9 and the minimum is 0.0. A value of 0.0 is the same as
controlling on only zone air temperature. If air velocities are higher than 0.2 m/s, then lower values for
radiative fraction might apply. Niu and Burnett (1998) cite International Standard ISO 77300 in
recommending the values for this fraction listed in the following table.
Radiative Fraction vs Air Velocity
Air Velocity (m/s)
<0.2
Radiant fraction
0.5
0.2 - 0.6
0.4
0.6 - 1.0
0.3
Reference: J. Niu and J. Burnett. 1998. Integrating Radiant/Operative Temperature Controls into Building
Energy Simulations. ASHRAE Transactions Vol. 104. Part 2. page 210. ASHRAE. Atlanta, GA.
You can think of the Temperature control option as:
· The radiant fraction sensed by the room thermostat, or,
· Given a room thermostat that mainly senses air temperature, the extent of automatic modification of
the setpoint temperature to ensure occupant comfort.
Notes
1. This option is overridden when using radiant heating systems by the radiant heating system control
setting.
2. This option does not affect natural and mechanical ventilation setpoints - these always use air
temperature set points.
Operative vs Air temperature control - Advanced discussion
There has been much debate amongst simulation experts over the years on the extent to which radiant
effects should be included on the simulated thermostat. Most real-world thermostats probably don't
actually sense more than about 20% radiant heat transfer - mostly the temperature sensor will be
sensitive to the temperature of room air nearby. So apparently we should air temperature (or 20% radiant)
control. But Operative control (radiant fraction = 0.5) can be useful for calculating realistic heating and
cooling energy based on published summer and winter temperature requirements for the activities in each
zone. This is because HVAC systems controlled using the operative temperature continue to condition the
building until comfort conditions are met (just like they are in the real building). Also, the default
temperature set points from the Activity templates are generally derived from sources quoting operative
temperatures. With Air temperature control the room air temperature is controlled to the set point
© 2008 DesignBuilder Software, Ltd.
Building Models
315
temperature, which (depending on internal radiant temperatures) may not necessarily be comfortable.
The disadvantage of Operative temperature control is that start up loads can be unrealistically high due to
the lag in thermal response of the walls, floor, ceilings. The slow temperature response of the building
fabric part governs the output of the operative thermostat and hence the operation of the heating/cooling
equipment. If this effect dominates it can lead to an overestimate of the required design cooling load. You
should be familiar with this issue before using operative temperature control to size heating and cooling
equipment. In our experience using Operative temperature control usually leads to higher peak loads in
Heating and Cooling design calculations and higher energy consumption in Simulations.
Caution
Operative temperature control can cause EnergyPlus Error 3 when using Simple HVAC, or Cooling
design calculations with Operative control in zones with strong radiant heat gains causing high
radiant temperatures (e.g. uninsulated roof or zone is highly glazed). The error is caused by the
fixed supply air temperature being higher than the zone air temperature required to give the
operative setpoint (.e.g. 24 °C). The solution may be to use Air temperature control and to manage
the high radiant temperatures using solar shading/insulation as appropriate.
Air temperature control is easier to use as none of the aforementioned problems apply, but it can lead to
inadequate equipment sizes peak loads in Heating and Cooling design calculations when not used with a
design safety factor. Also the calculations may underestimate energy consumption in Simulations of
buildings with poor insulation.
Note: as a general rule you should prioritise checking building comfort levels when using Air temperature
control and realistic plant operation (oversized equipment, supply temperatures very low) when using
Operative temperature control.
3.4.5.3
Advanced Calculation Options
Heating Design, Cooling Design and Simulation tabs on Model Options dialog, Options tab on
Simulation Options dialog and General tab on the Heating and Cooling Design Calculation options
dialogs.
Maximum warmup days (not heating/cooling design)
The maximum number of 'warmup' days that might be used in the simulation before 'convergence' is
achieved. A warning message will occur when the simulation 'runs out of days':
Loads Initialization did not Converge (CheckWarmupConvergence)
You may be able to increase the Maximum Number of Warmup Days and get convergence, but some
anomalous buildings may still not converge. Simulation proceeds for x warmup days until convergence is
reached (see Temperature and Loads Convergence above.
Inside and Outside convection algorithms
You can select from a range of EnergyPlus inside convection algorithms for calculating the convection
between internal zone surfaces and the rest of the zone air in the simulation calculations. More details on
this and external convection can be found under Constructions Model Data > Surface Convection header.
Solution Algorithm
Select from:
© 2008 DesignBuilder Software, Ltd.
316
DesignBuilder 1.5
· CTF - sensible heat only solution not taking into account moisture storage or diffusion in the
construction elements. The method used in EnergyPlus for CTF calculations is known as the state
space method (Ceylan and Myers 1980; Seem 1987; Ouyang and Haghighat 1991).
· Finite Difference - currently research only because instabilities can occur with complex
constructions.
Temperature and Loads convergence
The temperature and loads convergence values represent the maximum difference in zone temperature/
loads between successive iterations before “convergence” is reached.
Convergence of the simultaneous heat balance/HVAC solution is reached when either the loads or
temperature criterion is satisfied. Both tolerances work the same way, one looks at temperatures and one
looks at heating and cooling loads. After the second warm-up day, the program compares the maximum
temperature experienced in a space with the maximum temperature from the previous day. If those two
temperatures are within the tolerance, then it has passed the first warm-up check. It does a similar
comparison with lowest temperatures experience within all the zones. If the current simulation day and the
previous day values are within the tolerance, then it has passed the second warm-up check. A similar
comparison is carried with the loads tolerance and the maximum heating and cooling loads that are
experienced within the spaces. Those are compared individually to the values for the previous day. If they
are both in tolerance, then the simulation has passed the third and fourth warm-up check. The simulation
stays in the warm-up period until ALL FOUR checks have been passed.
Maximum shadow overlap (not heating design)
Enter the maximum number of figures per shadow overlap. The shadow overlaps is a measure of the
amount of complexity in the shading calculation and this maximum value allows you to limit the amount of
time spent in the solar initialisation calculations.
Note: entering a small value here can speed up simulations in complex buildings. If you plan to use
Maximum shadow overlaps below the default value of 15000 you should check accuracy of solar gains
relative to results using default value
Surfaces within zone treated as adiabatic
EnergyPlus support recommend modelling surfaces wholly contained within a zone as adiabatic and this
option allows you to follow this advice. We have found that in practice this option not make much
difference in results or in simulation speed so for most cases you can leave it in its default state.
Note: 'surfaces contained within a zone' are frequently generated when one of the zone merging options
is used where a partition or floor which would have separated two zones actually sits within the merged
zone. These surfaces do not refer to hanging partitions which are modelled using Internal thermal mass.
COMPACT HVAC SIMULATION AUTOSIZING OPTIONS
The following 2 data items are used when autosizing Compact HVAC systems before simulations.
Sizing factor (not heating/cooling design)
This ratio is applied at the zone level to all of the zone heating and cooling loads and air flow rates. These
new loads and air flow rates are then used to calculate the system level flow rates and capacities and are
used in all of the component sizing calculations.
Default value is 1.2.
© 2008 DesignBuilder Software, Ltd.
Building Models
317
Design averaging window period (not heating/cooling design)
The time in the zone design flow sequence averaging window during EnergyPlus Compact HVAC
autosizing calculations. The default is 1 hour, in which case the calculated zone design flow rates are
averaged over an hour. The autosizing zone design air flow rate calculation is performed assuming a
potentially infinite supply of heating or cooling air at a fixed temperature. Thus the calculated design air
flow rate will always be able to meet any load or change in load no matter how large or abrupt. In reality
air flow rates are limited by duct sizes and fan capacities. The idealized zone design flow calculation may
result in unrealistically large flow rates, especially if the user is performing the sizing calculations using
thermostat schedules with night setup or setback. The calculated zone design flow rates are always
averaged over the load timestep. You may want to perform a broader average to mitigate the effect of
thermostat setup and setback and prevent the warm up or cool down flow rates from dominating the
design flow rate calculation. Specifying the width of the averaging window allows the user to do this.
INCLUDE IDF DATA (NOT HEATING/COOLING DESIGN)
You can include up to 2 custom IDF data in your EnergyPlus simulations by checking the IDF File 1 or
IDF File 2 check boxes and entering the name of the IDF data source file. The contents of any files
specified are copied to the end of the IDF dataset generated by DesignBuilder before simulation.
Note: Included IDF files must be located in the EnergyPlus folder.
3.4.5.4
Output Options
Simulation tab on Model Options dialog and Output tab on Simulation Options dialog.
You can control the data generated from simulations by making selections on the Simulation tab of the
Model options dialog and on the Advanced tab of the Simulation calculation options dialog.
Zone environmental and comfort reports
You can restrict the simulation comfort output to just occupied periods by selecting 2-Just occupied
periods. Options are:
· 1-All periods - comfort data is generated for all periods including times when the zone is
unoccupied.
· 2-Just occupied periods - comfort data is only output during times when the zone is occupied so
daily and monthly comfort statistics become more meaningful.
Default is 1-All periods.
Building and block output of zone data
This option causes average and total zone data to be generated for building and blocks. For example
average temperatures, comfort conditions, total solar radiation, internal gains, fabric transmission losses
etc. It does not affect the generation of energy consumption and CO2 data at the building level.
© 2008 DesignBuilder Software, Ltd.
318
DesignBuilder 1.5
Include unoccupied zones in block and building totals and averages
By default data for unoccupied zones is excluded from block and building totals and averages. Check this
option to include data for unoccupied zones.
A zone is defined as unoccupied if it has:
·
·
·
·
No occupancy and,
No cooling and,
No heating and,
No mechanical ventilation
Surface heat transfer incl. solar
Select this option to generate heat flow at surface boundaries. The following EnergyPlus reports are
generated:
·
·
·
·
Opaque Surface Inside Face Conduction
Window Heat Gain
Window Heat Loss
Window Transmitted Solar
Environmental
This option generates temperatures and humidity data. The following EnergyPlus reports are generated:
·
·
·
·
Zone Mean Air Temperature
Zone Mean Radiant Temperature
Zone Air Relative Humidity
Outdoor Dry Bulb
Comfort
Select this option to generate Comfort output. The following EnergyPlus reports are generated:
·
·
·
·
·
·
·
·
·
FangerPMV
PiercePMVET
PiercePMVSET
PierceDISC
PierceTSENS
KsuTSV
Time Not Comfortable Summer Clothes
Time Not Comfortable Winter Clothes
Time Not Comfortable Summer or Winter Clothes
Internal gains
Select this option to generate internal gains-related output. The following EnergyPlus reports are
generated:
·
·
·
·
·
Zone Lights Total Heat Gain
Zone Task Lights Total Heat Gain
Zone People Sensible Heat Gain
Zone Electric Equipment Cat02 Electric Consumption
Zone Electric Equipment Cat03 Electric Consumption
© 2008 DesignBuilder Software, Ltd.
Building Models
·
·
·
·
·
·
·
319
Zone Electric Equipment Cat04 Electric Consumption
Zone Electric Equipment Cat05 Electric Consumption
Zone Transmitted Solar
Zone Infiltration Sensible Heat Loss
Zone Infiltration Sensible Heat Gain
Zone Ventilation Sensible Heat Loss
Zone Ventilation Sensible Heat Gain
Energy, HVAC etc
Select this option to generate energy consumption data.
Temperature distribution
Select this option to generate Temperature distribution data for each zone (distribution data for Blocks
and Buildings not available).
DXF model output
This option causes EnergyPlus to generate a DXF file summarising the building model. The file is called
eplusout.dxf and it is stored in the EnergyPlus folder. This option can be useful for checking that the
correct geometry has been generated.
Construction and surface details
This option causes EnergyPlus to generate a comma separated value file summarising the building
model. The file is called eplusout.eio and it is stored in the EnergyPlus folder.
© 2008 DesignBuilder Software, Ltd.
320
3.4.6
DesignBuilder 1.5
Drawing Tools
Drawing Tools tab on Model Options
dialog.
Options for:
·
·
·
·
·
·
Draw Block
Direction Snaps
Point Snaps
Drawing Guides
Object Rotation
Protractor
To learn more about Drawing Tools go to the Block Creation Options and Snaps, Drawing Guides &
Protractor sections.
3.4.6.1
Solar Options
Cooling Design and Simulation tabs on Model Options dialog and Options tab on Simulation
Options dialog.
Solar Options allow you to control aspects of the model related to solar gains.
© 2008 DesignBuilder Software, Ltd.
Building Models
321
Include all buildings in shading calcs
Use this option to include other buildings on the site as shading obstructions.
Note: there is no way to simulate > 1 building at a time. All external surfaces in buildings other than the
current one are modelled as shading surfaces. If you need to model the adjacency of another building in
contact with the current one, you can use the adiabatic adjacency option to model the touching surfaces.
Cooling Design Calculations and Simulations both use this option but have separate Model option data.
Note: if one or more 'other buildings' are large/complex then you could generate a large number of
shading elements and the simulation could be slow (even if the current building being simulated is
simple).
Model reflections
If using reflections, the program calculates beam and sky solar radiation that is reflected from exterior
surfaces and then strikes the building. These reflecting surfaces fall into 3 categories:
1. Shadowing surfaces. These are surfaces like overhangs or neighboring buildings (see below). These
surfaces can have diffuse and specular (beam-to-beam) reflectance values derived from the material
properties of the wall/windows.
Solar reflection from shadowing surfaces. Solid arrows are beam solar radiation; dashed arrows are
diffuse solar radiation. (a) Diffuse reflection of beam solar radiation from the top of an overhang. (b)
Diffuse reflection of sky solar radiation from the top of an overhang. (c) Beam-to-beam (specular)
reflection from the façade of an adjacent highly-glazed building represented by a vertical shadowing
surface.
2. Exterior building surfaces. In this case one section of the building reflects solar radiation onto
another section (and vice-versa). See below. The building surfaces are assumed to be diffusely reflecting
if they are opaque (walls, for example) and specularly reflecting if they are windows or glass doors. The
reflectance values for opaque surfaces are calculated by the program from the Solar Absorptance and
Visible Absorptance of the outer material layer of the surface’s construction. The reflectance values for
windows and glass doors are calculated by the program from the reflectance properties of the individual
glass layers that make up surface’s construction assuming no shading device is present and taking into
account inter-reflections among the layers.
© 2008 DesignBuilder Software, Ltd.
322
DesignBuilder 1.5
Solar reflection from building surfaces onto other building surfaces. In this example beam solar reflects
from a vertical section of the building onto a roof section. The reflection from the window is specular. The
reflection from the wall is diffuse.
3. The ground surface.
Reflection from the ground is calculated even if the reflections option is not used. But in this case
the ground plane is considered unobstructed, i.e., the shadowing of the ground by the building itself or
by obstructions such as neighboring buildings is ignored. This shadowing is taken into account if the
reflections option is used. This is shown in diagrammatically below.
Shadowing from building affects beam solar reflection from the ground. Beam-to-diffuse reflection from
the ground onto the building occurs only for sunlit areas, A and C, not from shaded area, B.
If reflections option is used for the ground surface then the ground view factor is NOT used.
Solar distribution
This option determines how EnergyPlus treats beam solar radiation and reflectance from exterior surfaces
that strike the building and, ultimately, enter the zone. There are five choices:
1-Minimal shadowing - In this case, there is no exterior shadowing except from window and door
reveals. All beam solar radiation entering the zone is assumed to fall on the floor, where it is absorbed
according to the floor's solar absorptance. Any reflected by the floor is added to the transmitted diffuse
radiation, which is assumed to be uniformly distributed on all interior surfaces. If no floor is present in the
zone, the incident beam solar radiation is absorbed on all interior surfaces according to their
absorptances. The zone heat balance is then applied at each surface and on the zone's air with the
absorbed radiation being treated as a flux on the surface.
2-Full Exterior - in this case, shadow patterns on exterior surfaces caused by detached shading, wings,
© 2008 DesignBuilder Software, Ltd.
Building Models
323
overhangs, and exterior surfaces of all zones are computed. As for Minimal shadowing, shadowing by
window and door reveals is also calculated. Beam solar radiation entering the zone is treated as for
'Minimal shadowing' - all beam solar radiation entering the zone is assumed to fall on the floor, where it is
absorbed according to the floor's solar absorptance. Any reflected by the floor is added to the transmitted
diffuse radiation, which is distributed among interior surfaces according to view factors. If no floor is
present in the zone, the incident beam solar radiation is absorbed on all interior surfaces according to
their absorptance.
If you use 2-Full Exterior you should make sure that all of your zones have a floor. If
your building model has any zones of unusual shape without floors then the EnergyPlus
simulation may not work because it will not have a surface to apportion solar gains to.
3-Full interior and exterior - this is the same as 'Full exterior' except that instead of assuming all
transmitted beam solar falls on the floor the program calculates the amount of beam radiation falling on
each surface in the zone, including floor, walls and windows, by projecting the sun's rays through the
exterior windows, taking into account the effect of exterior shadowing surfaces and window shading
devices. If this option is used, you should be sure that the surfaces of the zone totally enclose a space.
This can be determined by viewing the eplusout.dxf file with an external DXF viewer program.
You should also be sure that the zone is convex. Examples of convex and non-convex zones are shown
below. The most common non-convex zone is an L-shaped zone. (A formal definition of convex is that
any straight line passing through the zone intercepts at most two surfaces.) If the zone’s surfaces do not
enclose a space or if the zone is not convex you should use 'Full exterior' instead.
If you use 3-Full Interior and exterior the program will also calculate how much beam radiation falling on
the inside of an exterior window (from other windows in the zone) is absorbed by the window, how much is
reflected back into the zone, and how much is transmitted to the outside. In this calculation the effect of a
shading device, if present, is accounted for.
Important!
You must use 3-Full Interior and exterior to account for solar and light transmission
through internal windows.
Check for non-convex zones
© 2008 DesignBuilder Software, Ltd.
324
DesignBuilder 1.5
When the solar distribution selection is 3-Full interior and exterior (above) you can choose whether
DesignBuilder is to check for non-convex zones. By default the option is to carry out the check to prevent
invalid results, but if the zones are only slightly non-convex you can switch off this check and allow
EnergyPlus to continue calculations. You will probably receive error message 2 if you switch this option off
and have non-convex zones. The EnergyPlus simulation may or may not fail.
Shadowing interval (Simulation only)
Enter the number of days (1-365) covered by each shadowing calculation.
Enter 1 if you want shadowing to be calculated every day (for greater detail but slower calculations).
3.4.6.2
Draw Block
Drawing Tools tab on Model Options dialog.
Auto complete block
See Auto-complete block entry under Block Creation Options.
3.4.6.3
Direction Snaps
Drawing Tools tab on Model Options dialog.
See Direction Snaps entry under Snaps, Drawing Guides & Protractor.
3.4.6.4
Point Snaps
Drawing Tools tab on Model Options dialog.
See Point Snaps entry under Snaps, Drawing Guides & Protractor.
3.4.6.5
Drawing Guides
Drawing Tools tab on Model Options dialog.
See Drawing Guides entry under Snaps, Drawing Guides & Protractor.
© 2008 DesignBuilder Software, Ltd.
Building Models
3.4.6.6
325
Object Rotation
Drawing Tools tab on Model Options dialog.
You can change the rotation increment to control the angular increments for the object rotation process.
See Rotation entry under General Operations.
3.4.6.7
Protractor Tool
Drawing Tools tab on Model Options dialog.
See Protractor entry under Snaps, Drawing Guides & Protractor.
3.4.7
Display
Display tab on Model Options dialog.
Options related to the display of data:
· Show Data for Calculations
· Edit Screen
· Visualisation Display
3.4.7.1
Show Data for Calculations
Display tab on Model Options dialog.
Analysis type
DesignBuilder user interface adapts to the currently selected Analysis type as set under Show Data for
Calculations. This ensures that the Model data displayed in the UI is relevant to the calculation results.
You can change the Analysis type at any time to carry out different calculations.
The list of Analysis type options available will depend on the Location of the site. For example when the
site is located in the UK, it possible to set the Analysis type to SBEM Part-L Compliance Checking mode.
New Analysis type options will be available in future versions.
© 2008 DesignBuilder Software, Ltd.
326
3.4.7.2
DesignBuilder 1.5
Edit Screen
Display tab on Model Options dialog.
Show zone labels
Select this option to display the name of each zone in the Edit screen while at block level. Zone labels are
shown by default.
Show shading devices
Select this option to display shading devices while in the Edit screen. Shading devices are shown by
default.
Show windows
You can speed up display in the edit screen by switching off window display. Windows are shown by
default.
Zone floor shading at block level
Zone floors can be shaded by:
· 1-Activity Template, where zone floors are shaded according to the Activity Template selection
allowing different areas of the block to be easily identified.
· 2-HVAC Template, where zone floors are shaded according to the HVAC Template selection to
show the distribution of HVAC systems in the block.
· 3-None
The image below illustrates shading by Activity Template.
© 2008 DesignBuilder Software, Ltd.
Building Models
3.4.7.3
327
Visualisation Display
Display tab on Model Options dialog.
Dynamics
This option affects the display of the model when orbiting and zooming in the Edit and Visualisation
Screens:
· 1-Rendered - the default setting where the whole building image is retained during the operation.
For a large models/slow graphic adapters, this can result in a jerky motion in which case you should
use...
· 2-Wire-frame - where the building is represented using a wire frame which moves smoothly even
for large models/slow graphic adapters.
Show shadows
Use this option to display shadows in the Visualisation Screen.
Show North arrow
You can display the North Arrow in the Visualisation Screen.
© 2008 DesignBuilder Software, Ltd.
328
DesignBuilder 1.5
Show ground plane
You can choose to show/hide the plane used to represent the ground in the Visualisation Screen. You
may wish to hide the ground plane if you have used component blocks to represent the ground.
Note: when displayed, the ground plane extents just beyond the x-y size of the model and hides any other
building object situated at or below z=0.
Antialiasing
Antialiasing is the process used to remove 'jaggy' edges of lines which are not horizontal or vertical. Most
modern medium-high-end graphics adapters allow effective antialiasing to be automatically applied to
OpenGL screens using hardware acceleration. If you have one of these cards you should be getting sharp
lines already and you can switch the DesignBuilder software antialiasing off. See hardware requirements
for more on this.
If you switch on software antialiasing you can select a quality setting from 1-4 where 4 gives the
smoothest edges and takes longest time to generate.
Note: some low-end graphics adapters are not suited to software antialiasing because they lack hardware
acceleration for this feature.
3.4.8
Block Options
Block tab on Model Options dialog.
Data on the Block tab of the Model options dialog allows you to edit the form and related properties of the
current block:
· Block geometry
· Roof-wall transition
See also Edit Block Geometry Dialog.
3.4.8.1
Block Geometry
Block tab on Model Options dialog.
Wall thickness
You can change the Wall thickness of the current block by entering the new thickness here. The
thickness must be in the range 0.01m - 2.0m (0.39 - 78 inches).
© 2008 DesignBuilder Software, Ltd.
Building Models
329
Display external walls
You can choose to switch on/off display of external walls for each block. Generally for extruded blocks it is
best to show external walls to help reference location within the block with respect to existing openings
etc. For roof blocks and other non-plan extrusion blocks the external walls can obscure the internal space
and so the default for these block types is to hide the external walls. You can override the defaults using
this option.
Block form
Once a block has been created it's form can usually be changed to one of:
· 1-General,
· 2-Sloped walls or
· 3-Pitched roof
For more on block forms see help on creating blocks.
3.4.8.2
Roof-Wall Transition
Block tab on Model Options dialog.
You can enter the angle which defines the surface tilt below which a wall becomes a roof. For example if
the roof-wall transition angle for a particular block is 45°, a surface in this block having tilt 40° is modelled
as being a roof (using roof constructions, glazing layout etc). And a surface having tilt 50° is modelled as
being a wall (using wall constructions, glazing layout etc).
You can force all non-horizontal surfaces to be walls by unchecking the 'Allow pitched roof construction'
option.
3.4.9
Project Details and Notes
Use the Notes tab to record General information about the building model:
·
·
·
·
Project Details
Owner Details
Analyst Details
Notes
The Project, Owner and Analyst Details data is used as a header in UK Part-L2 Compliance Check
reports.
© 2008 DesignBuilder Software, Ltd.
330
3.4.9.1
DesignBuilder 1.5
Project Details
Enter the building Sector, Project name and address.
3.4.9.2
Owner Details
Enter the name and contact details for the building owner/client.
3.4.9.3
Analyst Details
Enter your own name and contact details.
3.4.9.4
Notes
You can enter any information about the building model in free text format.
Note: If you want to add hard carriage returns in the text you should hold the CTRL key down while
pressing ENTER. Pressing ENTER on its own will save and close the dialog.
© 2008 DesignBuilder Software, Ltd.
Section
4
Library
management
332
DesignBuilder 1.5
DesignBuilder is supplied with libraries of Templates and Components and these can be managed from
the opening screen (i.e. when no dsb file is loaded).
Click on Component Libraries or Templates tabs (above) to manage library data.
Tip: you can load the latest library components and templates into your model using the Import library
data to model command from the Tools menu when a model is loaded. Any new data that has been
added to the library since the model file was created will be imported to the model. Also if there have been
any changes to library component and template data, this new data will overwrite the original data.
Keeping Templates and Component Libraries
You may build up a large database of your own templates and components and to avoid losing this data
between version upgrades, DesignBuilder backs up your library data in a series of .dat files which you can
access from the File > Folders > Library data menu command. These files are retained when the
software is uninstalled. When you install a new version of DesignBuilder and run it for the first time, any
data you entered in the old libraries is merged with the new libraries. This ensures that you keep any data
you created, while receiving the latest DesignBuilder system template and component data.
Note: DesignBuilder keeps separate program options and template and component libraries for each user
on the computer system.
4.1
Opening Screen - Component Libraries
From the Component Library screen you can add, clone (copy), delete, view, edit, import, export, backup,
restore components as shown below. You can also save the libraries by clicking on the Save toolbar icon
(libraries are also saved when the program exits).
Library Components are automatically loaded into the model at the time the file is created and from then
on, they are associated specifically with this model and so are known as 'Model Components'. Any
change made to the Library Components does not affect existing building models because they reference
their own set of Model Components.
© 2008 DesignBuilder Software, Ltd.
Library management
333
Add New Component
To add a component:
1. Click on the + to the left of the component type (Glazing in the above screen shot).
2. Click on the category (folder icon) or on a component within a category.
3. Click on the green + on the toolbar to create a new component of the selected category.
4. Fill in the details on the dialog and press OK.
The component has been added.
Clone (Copy) Component
Cloning a component creates an exact copy of the selected component gives the copy name 'Copy of ...'
followed by the name of the original component.
1. Click on the + to the left of the component type (Glazing in the above screen shot).
2. Click on the component you wish to copy.
3. Click on the clone icon on the toolbar to create a new component identical to the selected one. This
creates the copy and selects it,
4. To edit the new component click on the Edit toolbar button
5. Fill in the details on the dialog and press OK.
© 2008 DesignBuilder Software, Ltd.
334
DesignBuilder 1.5
View Component
You can view the details of a component in the Info | Data panel on the right of the screen as shown in the
diagram above. Note that icons in the View panel indicate that you can click on the component to see its'
details. You can also use the Previous and Next Navigation buttons above the Info panel to navigate
through previously viewed components and templates.
4.2
Opening Screen - Template Libraries
Use the opening screen to work with template libraries. The whole screen is dedicated to the job and you
get access to the Info Data panel which allows you to review the data for the currently selected template
(screen shot below).
You can add, clone (copy), delete, view, edit, import, export, backup, restore library templates as shown
below. You can also save the libraries by clicking on the Save toolbar icon (libraries are also saved when
the program exits)
© 2008 DesignBuilder Software, Ltd.
Library management
335
Add New Template
To add a template:
1. Click on the + to the left of the template type (Activity templates in the above screen shot).
2. Click on the category (folder icon) or on a template within a category.
3. Click on the green + on the toolbar to create a new template of the selected category.
4. Fill in the details on the dialog and press OK.
The template has been added.
Clone (Copy) Template
Cloning a template creates an exact copy of the selected template gives the copy name 'Copy of ...'
followed by the name of the original template.
1. Click on the + to the left of the template type (Activity templates in the above screen shot).
2. Click on the template you wish to copy.
3. Click on the clone icon on the toolbar to create a new template identical to the selected one. This
creates the copy and selects it,
4. To edit the new template click on the Edit toolbar button
5. Fill in the details on the dialog and press OK.
View Template
You can view the details of a template in the Info | Data panel on the right of the screen as shown in the
diagram above. Note that icons in the View panel indicate that you can click on the template to see its'
details. You can also use the Previous and Next Navigation buttons above the Info panel to navigate
through previously viewed components and templates.
Note: You can work with templates with a file open from the Templates tab on the Navigator panel but in
this case you're working with Model Templates, i.e. templates specifically associated with a particular
model not the library.
4.3
Import Components/Templates
Import component/template .DDF files previously exported using the File > Import > Library data menu
command:
· Import the data to the model by selecting the Import menu command with a file open.
· Import to libraries by working from the Opening screen.
This command imports all components/templates in the DDF file.
4.4
Export Components/Templates
You can export your user DesignBuilder Component/Template libraries by selecting the File > Export >
Library data menu command to create a .DDF file. This file can be shared with other users, imported on
other computers in your office or simply used as a backup.
© 2008 DesignBuilder Software, Ltd.
336
DesignBuilder 1.5
When exporting a complex set of data, DesignBuilder will check that where user data references other
user components, these referenced components are also selected. For example, if you select a
construction for export which uses your own materials, you must make sure that all materials used in this
construction are also selected. If any required user components are not selected DesignBuilder displays a
dialog showing the missing components. See below.
© 2008 DesignBuilder Software, Ltd.
Library management
337
Press the OK button to continue with the export automatically including the missing data.
Note: if there is any data that is referenced but does not exist it is flagged with a red '!' icon (above). In
this case you should press the Cancel button and make the necessary edits to ensure that all referenced
data exists. DesignBuilder will not prevent you from continuing so it is possible to create DDF files with
missing data.
When you use the library data Export command with a model data file open, the data exported will be
user Model components/templates, not Library components/templates.
From the Opening screen you can also export entire data tables as csv-spreadsheet files suitable for
viewing in a spreadsheet. This data cannot be read back into DesignBuilder.
4.5
Backup Component/Template Libraries
Back up your Component and Template libraries by clicking on the Backup toolbar icon. Backups created
in this way are stored in the 'Backup\Manual' folder beneath the rest of the library data.
© 2008 DesignBuilder Software, Ltd.
338
DesignBuilder 1.5
As well as backing up the compiled .dbt files, DesignBuilder also exports the files in .dat format and
packages the whole backup into a zip file. If you have problems with your libraries you may find it helpful
to send this zip file to DesignBuilder Support for analysis.
You can use this data as a backup of your library data and can restore it at a later date using the Restore
libraries command.
4.6
Restore Component/Template Libraries
Click on the Restore icon to open the Restore Data dialog which allows you to Restore previously backed
up Component/Template libraries. Select the source of the restore - you can either restore the libraries to
their state when you first installed DesignBuilder or you can restore library data from a previous backup (if
one exists). In the screenshot below, no backup had been made so the Previous backup option is not
available.
If you choose to restore libraries supplied with installation you can use the Restore custom data (clear to
delete all custom data) option to either:
1. Restore the custom data which existed on the computer at the time the software was installed, or,
2. Clear all custom data to keep only the data supplied by DesignBuilder.
Note to restore the libraries supplied with the installation and clear any custom data select Restore
libraries supplied with installation and uncheck the Restore custom data (clear to delete all custom
data) option.
© 2008 DesignBuilder Software, Ltd.
Section
5
Component
Data
340
DesignBuilder 1.5
Components represent individual building elements and can be referenced from other components,
templates or model data. The following components are available:
·
·
·
·
·
·
·
·
·
·
·
·
Constructions
Glazing
Materials
Panes
Profiles
Schedules
Textures
Window gas
Local shading
Window blinds
Vents
Holidays
Library components are loaded into the model at the time the file is created and from then on they are
associated specifically with the model and so are known as Model components. Any later change made
to the Library components does not affect existing building models because they reference their own set
of Model components.
Managing component data
You can edit and move component data around in various ways:
1. Add, Edit, Delete, Import and Export Component library data from the Opening Screen Component Library tab.
2. If a model file is loaded you can edit Model components from the Components tab in the Navigator
panel (Learning mode switched off) or by using the Data management panel on the right of the
screen (Learning mode switched on).
3. In either case, to add a component open up the component type you wish to define by clicking on
the + to the left of the component icon, then click on the category of component you wish to define.
Now click on the Green '+' to add a component of the selected category.
4. Import/export Model component using the File > Export > Library data menu command to create
a .ddf file with the .dsb model file open.
5. To import the previously exported Model component data to the Component library close the .dsb
file and import the .ddf file to the library.
6. Load the latest library components into your model using the Import library components and
templates to model command from the Tools menu when a model is loaded. Any new data that
has been added to the library since the model file was created will be imported to the model. Also if
there have been any changes to library component data, this new data will overwrite the original
data.
Important Note: any component you add while a model is open will be added to Model components and
not to the Component library. It will only be added to the library and hence to new models if you export the
new component model data in .ddf form and import the .ddf file to the library before creating the new
model.
Colour code
Components are coded by colour in the Navigator panel and selection lists as follows:
Red shows user data, i.e. data that was not supplied by DesignBuilder.
Green indicates that the data is derived from a reputable national or international source.
Blue indicates that the data is generated internally by DesignBuilder.
© 2008 DesignBuilder Software, Ltd.
Component Data
341
Black is used for other data.
5.1
Constructions
The thermal properties of the construction are calculated based on layers, each layer having a material
reference and thickness. The combination of thickness and material gives the thermal characteristics of
the layer.
Construction Components also store derived data on the thermal properties of the overall layered
construction for example U-value, convective heat transfer coefficients etc.
There are three tabs on Constructions dialogs:
· Layers
· Image
· Calculated
Construction component data can be accessed:
·
·
·
·
from the Components tab on the opening screen (to view/edit library components if no file is open),
from the Components tab in the Navigator panel (to view/edit model components if a file is open),
by double-clicking on the construction icon in the model data,
by clicking on the Edit button when selecting constructions from a list.
5.1.1
Layer Data
Layers tab on Constructions Dialog.
Set the number of layers first, then select the material and thickness for each layer. Use the Controls in
the Info Panel to insert and delete layers. For example to delete a layer, first click on the material for the
layer to identify which layer you want to delete, then click on Delete layer.
You can create constructions with up to 6 layers.
You should define the layers in the same order they appear in the actual construction starting with the
outermost layer and finishing with the innermost. The outermost layer will be positioned adjacent to
outside (or in the case of Semi--exposed walls) adjacent to the semi-exposed unconditioned zone.
Note: You should not include surface resistance (film coefficient) layers to represent the
resistance of the air films adjacent to the inner and outer surfaces. These are included
automatically by DesignBuilder.
Thickness
This field characterizes the thickness of the material layer. This is the dimension of the layer in the
direction perpendicular to the main path of heat conduction. This value must be a positive.
Note: If the material referenced is defined as a simple R-value then the construction thickness does not
have to be entered.
Bridging
© 2008 DesignBuilder Software, Ltd.
342
DesignBuilder 1.5
You can also add bridging to any layer to model the effect of a relatively more conductive material bridging
a less conductive material. For example wooden joists briging an insulation layer.
Note: bridging effects are NOT yet used in EnergyPlus, but are used in energy code compliance checks
requiring U-values to be calculated according to BS EN IOS 6946.
5.1.2
Image
Image tab on Constructions Dialog.
This tab shows the construction to scale (except for very thin layers) using material textures as specified.
Bridging elements are ignored
5.1.3
Calculated Data
Calculated tab on Constructions Dialog.
This tab provides further information on the heat transmission properties of the construction.
© 2008 DesignBuilder Software, Ltd.
Component Data
343
U-values and R-Values are shown including and excluding the effect of surface resistance and are
calculated with and without bridging effects.
Note that when working with library constructions, the outer surface resistance is calculated assuming a
'typical' exposure to wind. When working with model constructions the outer surface resistance is
calculated using the wind exposure as defined on the Location tab at site level.
Convective heat transfer coefficients
The calculated convective heat transfer coefficients are used in EnergyPlus when the 'CIBSE' Inside/
Outside convection algorithm is selected. Otherwise EnergyPlus uses its' own convection algorithm as
set in the simulation options and the transmission data displayed here is not used.
© 2008 DesignBuilder Software, Ltd.
344
5.2
DesignBuilder 1.5
Glazing
Each Glazing Component consists of a series of
glazing layers (Panes) separated from each other by Window Gas layers.
There are two tabs on the Glazing data dialog:
· Layers
· Calculated
Glazing component data can be accessed:
·
·
·
·
from the Components tab on the opening screen (to view/edit library components if no file is open),
from the Components tab in the Navigator panel (to view/edit model components if a file is open),
by double-clicking on the glazing icon on the Openings tab in the model data,
by clicking on the Edit button when selecting glazing components from a list.
5.2.1
Layers
Layer tab on Glazing Dialog.
Set the number of layers first, then select the pane and window gas material for each layer. The
DesignBuilder Glazing data simply consists of layers of panes interspersed with layers of window gases.
Other data such as internal and external surface heat transfer coefficients, U-values etc can be calculated
and stored on the Calculated tab.
Note that you can define low emissivity glazing systems by specifying an appropriate 'LoE' Pane type
for the Innermost Pane. You can find some typical low emissivity panes under the 'Clear ' Panes category.
© 2008 DesignBuilder Software, Ltd.
Component Data
345
Note that the Info Panel contains information on the naming convention used with EnergyPlus glazing and
pane data.
5.2.2
Calculated
Calculated tab on Glazing Dialog.
The Calculated data on the Glazing tab has been calculated by EnergyPlus using the Layer data on the
previous tab. You can refresh the Calculated data by clicking on the Update link in the Info panel on the
right of the dialog.
The data can be useful for setting up glazing model descriptions in cases where global glazing system
data is known rather than data on individual panes and window gases. The Calculated data is used in
DBSim and 3TC simulations*.
The U-value is determined by doing a heat balance calculation on the glazing layers for the following
standard ASHRAE winter conditions:
·
·
·
·
·
·
Inside air temperature = 21.1C (70F)
Outside air temperature = -17.8C (0F)
Wind speed = 6.71 m/s (15 mph)
Outside convective air film conductance = 25.47 W/m2-K (4.486 Btu/h-ft2-F)
Inside convective air film conductance: calculated by EnergyPlus
No solar radiation
© 2008 DesignBuilder Software, Ltd.
346
DesignBuilder 1.5
The 'Total solar transmission (SHGC)' (Solar Heat Gain Coefficient) is the fraction of incident beam solar
radiation that enters the zone. This includes the transmitted solar radiation and the inward flowing heat
from the solar radiation that is absorbed by the glazing. SHGC applies only to the center of the glazed part
of a window construction; it does not include the effect of beam solar radiation absorbed by a window
frame or divider. SHGC is calculated for the following standard summer condition:
·
·
·
·
Inside air temperature = 23.9C (75F)
Outside air temperature = 31.7C (89F)
Wind speed = 3.35 m/s (7.5 mph)
Incident beam solar radiation normal to glazing = 783 W/m2 (248 Btu/h-ft2)
* DBSim and 3TC are alternative calculation methods which are still under development.
5.3
Materials
Materials components hold thermophysical data on
building materials.
Material component data can be accessed:
·
·
·
·
from the Components tab on the opening screen (to view/edit library components if no file is open),
from the Components tab in the Navigator panel (to view/edit model components if a file is open),
by double-clicking on the material icon in the model data,
by clicking on the Edit button when selecting a material from a list.
5.3.1
Material Properties
General tab on Materials Dialog.
Materials are used to define the properties of construction layers. There are 2 types of material:
© 2008 DesignBuilder Software, Ltd.
Component Data
347
1. Detailed properties including the thermophysical properties, surface properties and visual
appearance for the material.
2. Simple resistive material with no thermal mass. This option will typically be used to model air
gaps.
DETAILED PROPERTIES
Thermal bulk properties
Thermal conductivity
This field is used to enter the thermal conductivity of the material layer. Thermal conductivity must be
greater than zero.
Specific heat
This field represents the specific heat of the material layer. Only positive values of specific heat are
allowed.
Density
This field is used to enter the density of the material layer. Density must be a positive quantity.
SIMPLE RESISTANCE
Thermal resistance
This field is used to enter the thermal resistance (R-value) of the material layer.
Note: Materials defined using an R-value do not contribute to construction (and hence building) thermal
mass in the calculations and so should be used with care, especially if you plan to use the model for
dynamic thermal simulations.
SURFACE PROPERTIES
Surface properties are only used in simulations when the material is located on an inner or outer surface
of the construction.
Thermal absorptance (emissivity)
The thermal absorptance represents the fraction of incident long wavelength radiation that is absorbed by
the material. This parameter is used when calculating the long wavelength radiant exchange between
various surfaces and affects the surface heat balances (both inside and outside as appropriate). Values
for this field must be between 0.0 and 1.0 (with 1.0 representing “black body” conditions).
Solar absorptance
The solar absorptance field in the Material input syntax represents the fraction of incident solar radiation
that is absorbed by the material. Solar radiation includes the visible spectrum as well as infrared and
ultraviolet wavelengths. This parameter is used when calculating the amount of incident solar radiation
absorbed by various surfaces and affects the surface heat balances (both inside and outside as
appropriate). Values for this field must be between 0.0 and 1.0.
© 2008 DesignBuilder Software, Ltd.
348
DesignBuilder 1.5
Visible absorptance
The visible absorptance field in the Material input syntax represents the fraction of incident visible
wavelength radiation that is absorbed by the material. Visible wavelength radiation is slightly different than
solar radiation in that the visible band of wavelengths is much more narrow while solar radiation includes
the visible spectrum as well as infrared and ultraviolet wavelengths. This parameter is used when
calculating the amount of incident visible radiation absorbed by various surfaces and affects the surface
heat balances (both inside and outside as appropriate) as well as the daylighting calculations. Values for
this field must
be between 0.0 and 1.0.
Roughness
This field is a character string that defines the relative roughness of a particular material layer. This
parameter only influences the the calculated exterior convection coefficient. A special keyword is
expected in this field with the options being “VeryRough”, “MediumRough”, “Rough”, “Smooth”,
“MediumSmooth”, and “VerySmooth” in order of roughest to smoothest options.
Colour
The colour data is used for display purposes when the texture is not available for any reason. It is not
used in any of the calculations.
Texture
The texture is used to represent this material when it is specified as either the inside or outside material of
a construction which is selected in the building model. It is also used to represent the material in
diagrams of any construction using this material.
© 2008 DesignBuilder Software, Ltd.
Component Data
5.4
349
Panes
Pane components holds data on the thermal, solar,
visible and infrared properties of individual window panes.
Note that the Info Panel on the right of the Dialog contains information on the naming convention is used
with EnergyPlus glazing data.
There are five tabs on the Pane dialog:
·
·
·
·
·
General
Thermal
Solar
Visible
Infra-red
Pane component data can be accessed:
· from the Components tab on the opening screen (to view/edit library components if no file is open),
· from the Components tab in the Navigator panel (to view/edit model components if a file is open),
· by clicking on the Edit button when selecting panes from a list.
5.4.1
General
General tab on Panes Dialog.
Enter the name and category of the pane.
© 2008 DesignBuilder Software, Ltd.
350
5.4.2
DesignBuilder 1.5
Thermal Data
Thermal Data tab on Panes Dialog.
Thickness
Enter the thickness of the pane.
Thermal conductivity
This field is used to enter the thermal conductivity of the material layer. Thermal conductivity must be
greater than zero.
5.4.3
Solar Data
Solar transmittance
The solar transmittance at normal incidence averaged over the solar spectrum.
Solar reflectance
The inside (back-side) and outside (front-side) solar reflectance properties of the pane at normal
incidence averaged over the solar spectrum.
Note, For uncoated glass, when alternative optical properties (thickness, solar index of refraction, and
solar extinction coefficient) are available, they can be converted to equivalent solar transmittance and
reflectance values using the equations given in 'Conversion from Alternative Specification of Glass Optical
Properties' in the EnergyPlus documentation).
5.4.4
Visible Data
Visible Data tab on Panes Dialog.
Visible transmittance
The visible transmittance at normal incidence averaged over the solar spectrum, and weighted by the
response of the human eye.
Visible reflectance
The inside (back-side) and outside (front-side) visible reflectance properties of the pane at normal
incidence averaged over the solar spectrum, and weighted by the response of the human eye.
Note, For uncoated glass, when alternative optical properties (thickness, visible index of refraction, and
visible extinction coefficient) are available, they can be converted to equivalent visible transmittance and
reflectance values using the equations given in 'Conversion from Alternative Specification of Glass Optical
Properties' in the EnergyPlus documentation).
© 2008 DesignBuilder Software, Ltd.
Component Data
5.4.5
351
Infra-red Data
Infra-red tab on Panes Dialog.
Long-wave transmittance
The long wave transmittance at normal incidence.
Emissivity (long wave reflectance)
Enter the inside (back-side) and outside (front-side) hemispherical emissivity (long wave reflectance)
properties of the pane.
5.5
Schedules
Schedules are used in DesignBuilder to define:
·
·
·
·
Occupancy times
Equipment, lighting HVAC operation
Heating and Cooling temperature setpoints
Transparency of component blocks (usually seasonal)
Apart from their use for defining Transparency of component blocks, Schedules are only used in
simulations when the Timing model option is set to 'Schedules'
You can define schedules in one of 2 ways:
· 7/12 Schedules - where each day of the week and each month of the year has a unique daily
variation defined using profiles.
· Compact Schedules - more flexible definition using EnergyPlus Schedule:Compact text-based
data format.
Use the Schedule type drop list on the Schedules dialog to make the selection.
When Schedules are used to define heating and cooling equipment temperature setpoint temperatures
the following convection in used:
Click here for more detailed information on temperature setpoint schedule definition.
Schedule data can be accessed:
·
·
·
·
from the Components tab on the opening screen (to view/edit library components if no file is open),
from the Components tab in the Navigator panel (to view/edit model components if a file is open),
by double-clicking on the schedules icon in the model data,
by clicking on the Edit button when selecting schedules from a list.
© 2008 DesignBuilder Software, Ltd.
352
5.5.1
DesignBuilder 1.5
7/12 Schedules - Defined Using Profiles
General tab on Schedules Dialog.
7/12 Schedules reference Profiles, one Profile for each day of the week and for each month of the year
(hence 7/12).
You can select multiple rows (months) or columns (days) and edit the data by clicking on the Edit
selected cells link in the Info Panel. Likewise, you can select individual profiles by clicking on the
appropriate cell and clicking Edit selected cells.
Design days
Winter and summer design day simulations are carried out when required for autosizing heating and
cooling equipment prior to a Compact HVAC simulation.
Design day definition method
With 7/12 Schedules there are 2 ways to define the schedule output during these winter design day
simulations:
1. End-use defaults - use the default heating autosizing behaviour defined on the Heating design tab of
the Model option dialog.
In this case for summer design, the profile for Wednesday is used. If Wednesday is not a good choice for
Summer design autosizing then you can instead define the profile explicitly using the Profiles design day
definition method below.
Use End use default - apply the behaviour for the selected category as defined on the Model
options on the Heating design tab.
2. Profiles - define both heating and cooling design day operation as a Profile. This option is more flexible
and clearer than End-use defaults but can take slightly longer to set up.
Heating design day profile - the profile defining the schedule output during the heating autosizing
design day.
Cooling design day profile - the profile defining the schedule output during the cooling autosizing
design day.
Weekly and monthly variations
Other tools are available for rapid selection/deselection and setting of schedule data:
·
·
·
·
·
Select all weekdays
Select all weekends
Set all weekends 'Off'
Select all
Deselect all
© 2008 DesignBuilder Software, Ltd.
Component Data
353
See also EnergyPlus Compact Schedules
5.5.2
Compact Schedules
General tab on Schedules Dialog.
Compact Schedules are defined using a slightly modified version of the standard EnergyPlus Schedule:
Compact format documented below.
Using the Compact Schedule definition all the features of the schedule components are accessed in a
single command. Each Compact Schedule must cover all the days for a year and it must have values for
all 24 hours and all values for all day types.
Tip: When entering the text for the Compact Schedule, to start a new line you should hold the
<CTRL> key down while pressing <ENTER>. Just pressing <ENTER> will save and close the
dialog.
Name
© 2008 DesignBuilder Software, Ltd.
354
DesignBuilder 1.5
This field is for your own use and is replaced by DesignBuilder with the name of the Schedule when
generating data for EnergyPlus.
ScheduleType
ScheduleType should generally be Fraction even for schedules to be used for temperature setpoint
definition.
You can enter Any Number to enter values greater than 1 but please bear in mind:
· The maximum gains values (e.g. people/m2) are multiplied by the values in the schedule to obtain
the actual value to use at each time step in the simulation. So if you enter large schedule values the
actual maximum value in the simulation will be higher than the 'maximum' value entered in DB.
There is no problem with this, just a methodological concern that if the Interface indicates that the
maximum occupancy density is say 0.1 people/m2 but the schedule has values > 1 then the
simulation results will, at first sight, appear incorrect. If you come back to the model 6 months later
you may not remember the reason.
· Temperature set-point schedules should only have values 0, 0.5 or 1.0.
So generally we recommend using Fraction Compact schedules for clarity.
Field-Set (Through, For, Interpolate, Until, Value)
Each Compact Schedule must contain the elements Through (date), For (days), Interpolate (optional),
Until (time of day) and Value.
Field: Through
This field starts with 'Through:' and contains the ending date for the schedule period. You may define
multiple schedule periods in this way, for example to define seasonal variations. If there are no seasonal
variations then enter: Through: 31 Dec, to indicate that the data that follows applies to the whole
year.
Note that only Month-Day combinations are allowed for this field.
Field: For
This field starts with 'For: ' and contains the applicable days. Multiple choices may be combined on the
line.
Choices are:
·
·
·
·
·
·
·
·
·
·
·
·
·
·
Weekdays,
Weekends,
Holidays,
Alldays,
SummerDesignDay,
WinterDesignDay,
Sunday,
Monday,
Tuesday,
Wednesday,
Thursday,
Friday,
Saturday,
CustomDay1,
© 2008 DesignBuilder Software, Ltd.
Component Data
355
· CustomDay2.
In fields after the first 'For', 'AllOtherDays' may also be used.
Note: EnergyPlus has limit of line length of about 60 characters so lines like:
For: Weekdays SummerDesignDay WinterDesignDay Weekends Holidays
AllOtherDays,
should be changed to:
For: AllDays,
Field: Interpolate (optional)
Schedule values are input to the simulation at the zone time step, so there is also a possibility of
'interpolation' from the entries used in this object to the value used in the simulation. This field, if used,
starts with 'Interpolate:' and contains the word 'Yes' or 'No'.
Field: Until
This field contains the ending time for the current days and day schedule being defined. The data should
represent clock time (standard) in the format HH:MM. 24 hour clock format (i.e. 1pm is 13:00). Note that
'Until: 7:00' includes all times up through 07:00 (7am).
Field: Value
Finally, the value field is the schedule value for the specified time interval.
Note: you can use 0 for Temperature type Compact Schedules to indicate that the heating/cooling system
is switched off during the specified period. See Example 2 below.
Example 1 - Operation Schedule
SCHEDULE:COMPACT,
Office_CellOff_Light,
Fraction,
Through: 31 Dec,
For: Weekdays SummerDesignDay WinterDesignDay,
Until: 07:00, 0,
Until: 19:00, 1,
Until: 24:00, 0,
For: Weekends,
Until: 24:00, 0,
For: Holidays AllOtherDays,
Until: 24:00, 0;
© 2008 DesignBuilder Software, Ltd.
356
DesignBuilder 1.5
This schedule is intended to be used to describe the lighting operation in an office. It indicates:
· Schedule is a fraction (0-1).
· No seasonal variation.
· Weekdays and cooling and heating design days the schedule is 1 (i.e. 'on') between 7am and 7pm
and 0 (i.e. 'off') other times.
· Weekends, holidays and all other days the schedule is 'off'.
Example 2 - Temperature Setpoint Schedule
SCHEDULE:COMPACT,
Bedroom_Cool,
Temperature,
Through: 31 Dec,
For: Weekdays SummerDesignDay WinterDesignDay,
Until: 05:00, 0.5,
Until: 09:00, 1,
Until: 17:00, 0.5,
Until: 24:00, 1,
For: Weekends,
Until: 05:00, 0.5,
Until: 24:00, 1,
For: Holidays AllOtherDays,
Until: 05:00, 0;
This schedule is intended to be used to describe the cooling temperature setpoint and setback in a
bedroom. It indicates:
· Schedule is a temperature (degC).
· No seasonal variation.
· Weekdays and cooling and heating design days the main temperature setpoint data (Activity tab) is
used between 5am and 9am and also between 5pm and midnight. Cooling operates at setback
temperature setpoint data at all other times on these days.
· Weekends the cooling setpoint is main temperature setpoint between 5am and midnight. Cooling
operates at setback temperature setpoint data at all other times on these days.
· Holidays and all other days the cooling is off.
More on Temperature setpoint schedules.
5.6
Profiles
Profiles define the variation in occupancy, equipment usage or temperature over the course of a single
day. They are used as building blocks in the definition of Schedules.
© 2008 DesignBuilder Software, Ltd.
Component Data
357
There are 3 types of profile:
1. Constant - has the same value all day. Enter the constant value for the profile
2. Single period - define the 'on' period by setting the start and end times for the profile using the
mouse. The operation is assumed to be 'off' for the rest of the day
3. Custom - the profile is defined by a number of intervals, each of which can have a different value.
There are two ways to set interval values:
3.a.To change the value for a single interval (single histogram bar) select the top of the histogram
bar and drag up/down using the LEFT mouse button.
3.b.To apply a constant value over a range of intervals select the top of the histogram bar which has
the required value and drag left/right over the range of intervals to be set using the RIGHT mouse
button.
The figure above shows an example custom profile.
Profile data can be accessed:
· from the Components tab on the opening screen (to view/edit library components if no file is open),
· from the Components tab in the Navigator panel (to view/edit model components if a file is open),
· by clicking on the Edit button when selecting profiles from a list in the Schedules dialog.
5.7
Defining setpoint temperature schedules
SCHEDULES TIMING MODEL OPTION
Operation of heating and cooling equipment is defined by selecting a Schedule under the Heating,
© 2008 DesignBuilder Software, Ltd.
358
DesignBuilder 1.5
Cooling and Operation headers on the HVAC tab. These schedules are used to generate both the
heating/cooling availability schedule and the temperature setpoint schedules used in the simulations.
Schedule values greater than 0.5 indicate the system is in full operation controlling temperature to the
main heating/cooling setpoint, values between 0 and 0.5 indicate the equipment in setback mode and
values of 0 indicate that the equipment is switched off. See Table below.
Value
0
> 0.5
0 < Value <= 0.5
Heating/Cooling Equipment Operation
Equipment is off
Equipment is controlled using the main temperature
setpoint data (Activity tab)
Equipment is controlled using the setback
temperature setpoint data (Activity tab)
Notes
1. When using 7/12 Schedules, for 0.5 read 50% etc.
2. When using 2-Single period profiles with 7/12 Schedules to generate temperature setpoints the
'Off' periods are modelled using setback temperatures, i.e. the system is not switched off. If you
wish the system to switch off outside main heating/cooling hours use the 3-Custom profile type.
3. If the setback temperature set does not appear to affect results, this may be because the heating/
cooling operation schedule selected uses only 0 and 1, not the 0.5 required to access setback
temperature (see table above).
TYPICAL WORKDAY TIMING MODEL OPTION
You can define the operation of heating and cooling equipment by entering Typical workday start and
end times and seasonal operation under the Heating and Operation headers on the HVAC tab.
This data is used to generate both the heating/cooling availability schedule and the temperature setpoint
schedule used in the simulations.
The equipment is switched on between the On and Off times (8am and 6pm in the example below).
During this time the equipment is controlled using the main temperature setpoint (Activity tab). At other
times and during weekends the equipment is controlled using the setback temperature setpoint.
Weekends are defined on the Activity tab at the building level under Occupancy by setting the number of
working days per week.
The Seasonal control data allows you to set times when the equipment is switched off altogether. For
example the heating system data shown below indicates that the heating system will be switched on
during the winter only and switched off in the summer.
© 2008 DesignBuilder Software, Ltd.
Component Data
5.8
359
Textures
Textures are used to represent the external surface of
building constructions in the rendered views in the Visualisation Screen.
Select the texture file and the real-world width and height represented by the texture. Textures are
associated with materials and used to render the model in the Visualisation Screen.
DesignBuilder comes with a library of textures. Future versions of the software will allow user-defined
textures to be added to the library but version 1.0 does not allow this.
Note: If an image does not appear under the Image header this means that the selected file is not
installed.
Texture data can be accessed:
·
·
·
·
from the Components tab on the opening screen (to view/edit library components if no file is open),
from the Components tab in the Navigator panel (to view/edit model components if a file is open),
by double-clicking on the texture icon in the model data,
by clicking on the Edit button when selecting textures from a list.
© 2008 DesignBuilder Software, Ltd.
DesignBuilder 1.5
360
5.9
Window Gas
Window Gas component data is used to define the thermal properties of the cavity fill gas between
window Panes in Glazing components.
The gas which fills the inter-glazing cavity affects the heat transfer through the assembly but has almost
no effect on the solar heat gain or the visible light transmission. Air, of course, is the most common cavity
fill gas, but the use of an inert gas (typically argon or krypton) can significantly reduce window heat
transfer. Krypton and argon are colourless, odourless and non-toxic. Argon is the most commonly-used fill
gas because it offers good thermal performance at low cost. Krypton is more effective at reducing heat
loss, but is roughly 200 times more expensive than argon per unit volume. Because krypton works best at
smaller pane spacings (8 mm), it is often used in triple and quadruple-glazed windows to minimize the
overall thickness of the unit. Other types of gases are used (e.g. sulphur hexafluoride (SF6) and carbon
dioxide (CO2)) to reduce sound transmission, but these gases do not offer the improved thermal
performance of the inert gases.
Category
This is the gas type. Select from:
·
·
·
·
·
·
·
Air
Argon
CO2
Krypton
Other
SF6
Xenon
The window gas you are defining does not fit with the available options select Other. Select Air for an air
gap.
Thickness
Enter the thickness of the inter-glazing cavity.
Custom material properties
The window gas properties of the gases Air, Argon, Krypton, Xenon are known by EnergyPlus and so no
further data is required for these gases.
For CO2, Other and SF6 you must enter custom properties.
CUSTOM GASES ONLY
If you elect to enter custom material properties then you must enter the details. The A and B coefficients
are those in the following expression that gives a property value as a function of temperature in degrees
K:
Property = Coefficient_A + Coefficient_B * Gas_Temperature (K)
Conductivity Coefficient A
The A coefficient for gas conductivity (W/m-K).
© 2008 DesignBuilder Software, Ltd.
Component Data
361
Conductivity Coefficient B
The B coefficient for gas conductivity (W/m-K2).
Viscosity Coefficient A
The A coefficient for gas viscosity (kg/m-s).
Viscosity Coefficient B
The B coefficient for gas viscosity (kg/m-s-K).
Specific Heat Coefficient A
The A coefficient for gas specific heat (J/kg-K).
Specific Heat Coefficient B
The B coefficient for gas specific heat (J/kg-K2).
Molecular Weight
The molecular weight (mass) of the gas (Kg/kmol).
Window gas component data can be accessed:
· from the Components tab on the opening screen (to view/edit library components if no file is open),
· from the Components tab in the Navigator panel (to view/edit model components if a file is open),
· by clicking on the Edit button when selecting window gases from a list.
5.10
Local Shading
General tab on Local Shading Dialog.
Local Shading Components are used to define simple generic shading devices to apply to the Windows in
the model.
Enter the name and category for the local shading data set.
Overhangs, louvres and sidefins can be specified either individually (e.g. just overhangs) or in
combination (e.g. sidefins combined with louvres).
© 2008 DesignBuilder Software, Ltd.
362
DesignBuilder 1.5
Local Shading component data can be selected from the Openings tab in Model Data and is applied to all
windows on the surface, including custom windows.
The data applies only to external glazing - roof and internal glazing do not use local shading data.
Overhang, louvre and sidefin blades are all assumed to be 100% opaque and made of the material
specified on this tab.
Note: the DesignBuilder Local shading devices allow a range of different overhangs, side fins and louvres
to be defined, but if you need to model a shading device not covered by the standard mechanism, you can
draw custom shading devices using Component blocks.
There are four tabs on the Local Shading dialog:
·
·
·
·
General
Louvres
Sidefins
Overhangs
Local shading data can be accessed:
·
·
·
·
from the Components tab on the opening screen (to view/edit library components if no file is open),
from the Components tab in the Navigator panel (to view/edit model components if a file is open),
by double-clicking on the local shading icon on the Openings tab in the model data,
by clicking on the Edit button when selecting local shading devices from a list.
5.10.2 Louvres
Louvres tab on Local Shading Dialog.
Enter details on the louvres, if fitted.
© 2008 DesignBuilder Software, Ltd.
Component Data
363
The number of louvres is a maximum value and if the window is not high enough to accommodate the
requested number of louvres blades, any louvres blades which would be positioned below the window are
not added.
5.10.3 Sidefins
Sidefins tab on Local Shading Dialog.
Enter details on the sidefins, if fitted.
© 2008 DesignBuilder Software, Ltd.
364
DesignBuilder 1.5
5.10.4 Overhangs
Overhangs tab on Local Shading Dialog.
Enter details on the overhangs if fitted.
© 2008 DesignBuilder Software, Ltd.
Component Data
© 2008 DesignBuilder Software, Ltd.
365
366
5.11
DesignBuilder 1.5
Window Blinds
Window blind components can be selected for external glazing, roof glazing and interior glazing from the
Openings tab in the Model Data.
There are four types of window blinds, as selected in the Category data on the General tab:
© 2008 DesignBuilder Software, Ltd.
Component Data
367
· Slat - slatted blinds which have different transmission properties with solar position.
· Shade - assumed perfectly diffusing.
· Transparent insulation - transparent insulation material to be positioned on the outer surface of an
external wall.
· Electrochromic switching - switchable visible and solar properties based on solar gain.
Window blind component data can be selected from the window shading data on the Openings tab in
Model Data and is applied to all windows on the surface, including custom windows.
The data applies only to external, internal and roof glazing.
Window blinds component data can be accessed:
·
·
·
·
from the Components tab on the opening screen (to view/edit library components if no file is open),
from the Components tab in the Navigator panel (to view/edit model components if a file is open),
by double-clicking on the window blinds icon on the Openings tab in the model data,
by clicking on the Edit button when selecting window blinds from a list.
5.11.1 General
General tab on Window Blinds Dialog.
Enter the name and category for this Window blinds data set.
5.11.2 Slat Data
Slat data tab on Window Blinds Dialog.
Enter details on the slats
© 2008 DesignBuilder Software, Ltd.
368
DesignBuilder 1.5
The slat angle is the angle between the glazing outward normal to the slat outward normal. A slat angle of
0° sets slats to be vertical and an angle of 90° sets them to be horizontal.
The openings data allows you to define the distance between the blind and the window and also define
the fraction of the shade surface that is open to air flow on each side of the blind
A slatted blind can be applied inside, outside or mid-pane. Note that if the Blind is applied mid-pane, the
gap between the inner pane and the second pane must be at least large enough to accommodate the slat
width.
5.11.3 Shade/Transparent Insulation Data
Shade data tab on Window Blinds Dialog.
Enter the shade material properties.
A diffusing blind can be applied inside, outside or mid-pane.
5.11.4 Electrochromic Switching
Electrochromic tab on Window Blinds Dialog.
Enter the electrochromic switchable pane material.
This pane will be used in place of the standard outer glazing pane according to the control data in the
Model Data.
More information on Electrochromic glazing.
Note: that the blind position in Openings Model Data must be 'Switchable' to use electrochromic
switchable shading
5.12
Vents
Vent Components have a coefficient of discharge and a
texture (used to represent a vent in the rendered view).
© 2008 DesignBuilder Software, Ltd.
Component Data
369
More information about vents.
There are two tabs on the Vents dialog:
· General
· Airflow
Vent component data can be accessed:
·
·
·
·
from the Components tab on the opening screen (to view/edit library components if no file is open),
from the Components tab in the Navigator panel (to view/edit model components if a file is open),
by double-clicking on the vent icon on the Openings tab in the model data,
by clicking on the Edit button when selecting vents from a list.
5.12.1 General
General tab on Vents Dialog.
Enter the name and category for this vent component.
The texture is used to represent the vent in rendered views.
5.12.2 Airflow
Airflow tab on Vents Dialog.
Enter the discharge coefficient for this vent component.
You can select this vent from the Openings model data.
Note: The discharge coefficient is only used in thermal simulations when the Natural ventilation Model
option is set to Calculated.
5.13
Holidays
A 'Holiday schedule' is a list of intervals of one or more day which identify the days the building may be
unoccupied. The holiday intervals are listed in order, with holidays most likely to be taken at the top of the
list. The Holidays per year Model Data on the Activities tab at building level defines how many holidays are
taken and this 'Holiday schedule' defines which days are holidays. Days are selected from the top of the
list working downwards. The data is used to specify EnergyPlus 'SpecialDayPeriods'.
There are two tabs on the Holidays dialog:
· General
· List
Holiday data can be accessed:
© 2008 DesignBuilder Software, Ltd.
370
·
·
·
·
DesignBuilder 1.5
from the Components tab on the opening screen (to view/edit library components if no file is open),
from the Components tab in the Navigator panel (to view/edit model components if a file is open),
by double-clicking on the holidays icon on the Activity tab in the model data,
by clicking on the Edit button when selecting holidays from a list.
5.13.1 General
General tab on Holidays Dialog.
Enter the Region and Category for the Holiday Schedule.
5.13.2 Holiday List
List tab on Holidays Dialog.
Holidays are selected from
the top of the list, so holidays which are most likely to be taken should be defined first (so they are
positioned at the top of the list).
Use the controls in the Info panel to add, edit and delete holidays.
Valid holiday date formats are defined in Compact Schedules: EnergyPlus Date Definition
© 2008 DesignBuilder Software, Ltd.
Section
6
Template
Data
372
DesignBuilder 1.5
Note that the behaviour of templates changed starting with version 1.3. In previous versions templates
were always associated with the application and never with the model. In version 1.3 templates are loaded
to the model in the same way that components are.
DesignBuilder templates allow you to quickly load data into your model in bulk. If you often work with
similar types of buildings you may find it useful to create your own templates. This will allow you to load
the same data into any models you work with in the future.
DesignBuilder Templates are databases of typical generic data. The following templates are available:
·
·
·
·
·
·
·
·
·
·
·
·
·
·
Activity templates
Construction templates
Glazing templates
Facade templates
HVAC templates
Location Templates
Hourly weather data
Pressure coefficients
Metabolic rates
Cracks
Legislative regions
Energy codes
Sectors
World time zones (predefined, not editable)
Library Templates are loaded into the model at the time the dsb file is created and from then on, they are
associated specifically with this model and so are known as Model Templates. Any changes made to the
Library Templates do not affect existing building models because they reference their own set of Model
Templates. The latest set of library templates can be loaded into a model using the Import library
components and templates to model command.
Also templates are used for loading data into models, so a change to a template will not affect the
model until the data is loaded.
New Template functionality in version 1.3
Managing template data
You can edit and move template data around in various ways:
1. Add, Edit, Delete, Import and Export Template library data from the Opening Screen - Template
Libraries tab.
2. If a model file is loaded you can edit Model templates from the Templates tab in the Navigator panel
(Learning mode switched off) or by using the Data management panel on the right of the screen (
Learning mode switched on).
3. In either case, to add a template, open up the template type you wish to define by clicking on the +
to the left of the template icon, then click on the category of template you wish to define. Now click
on the Green '+' to add a template of the selected category.
4. Import/export Model template using the File > Export > Library data menu command to create a .
ddf file with the .dsb model file open.
5. To import the previously exported Model template data to the Template library close the .dsb file
and import the .ddf file to the library.
6. Load the latest library templates into your model using the Import library components and
templates to model command from the Tools menu when a model is loaded. Any new data that
has been added to the library since the model file was created will be imported to the model. Also if
there have been any changes to library template data, this new data will overwrite the original data.
© 2008 DesignBuilder Software, Ltd.
Template Data
373
Important Note: any template you add while a model is open will be added to Model templates and not to
the Template library. It will only be added to the library and hence to new models if you export the new
component model data in .ddf form and import the .ddf file to the library before creating the new model.
Loading to Model Data
Each tab in the Model data has the name of the template last used to load the data at the top (shown in
bold). At the top of the HVAC tab is the HVAC Template, at the top of the Lighting tab is the Lighting
Template etc. This is the template that was previously used to load the default data, but you can load
different data from a different template by clicking on the template data, then clicking again on the '...’ to
the right of the template data and making a new selection. When you make the selection, the appropriate
data is loaded from the template into the model.
Note 1: It is important to understand that the template data itself does not contribute to the model until it is
loaded in.
Note 2: Changes to the model data relative to the data in the template last loaded are highlighted in bold
to show that it overrides the template data previously loaded.
Note 3: Another way to load data to a model from templates is to use the Load Data From Template tool.
Colour code
Templates are coded by colour in the Navigator panel and selection lists as follows:
Red shows user data, i.e. data that was not supplied by DesignBuilder.
Green indicates that the data is derived from a reputable national or international source.
Blue indicates that the data is generated internally by DesignBuilder.
Black is used for other data.
© 2008 DesignBuilder Software, Ltd.
374
6.1
DesignBuilder 1.5
Activity Templates
Activity templates are used as a source of default activity
(building usage) data for building models.
The data covers occupancy, equipment usage and suitable design internal temperatures, illuminance
levels and ventilation rates per person.
There are five tabs on the Activity Template dialog:
· General
· All gains
© 2008 DesignBuilder Software, Ltd.
Template Data
375
· Occupancy
· Other gains
· Environmental
Template data can be accessed:
·
·
·
·
from the Templates tab on the opening screen (if no file is open),
from the Templates tab in the Navigator panel (if a file is open),
by double-clicking on the template icon in the model data,
by clicking on the Edit button when selecting templates from a list.
6.1.1
Activity Templates - General
General tab on Activity Templates Dialog.
Enter the name, category, sector and region for this activity template.
Enter the region as 'General' if you want the data to be generally available (i.e. not restricted to a particular
region).
The floor shade colour is used to shade the floor of the model at block and zone levels to give a quick
indication of the usage of the building in various areas.
6.1.2
Activity Templates - All Gains
All Gains tab on Activity Templates Dialog.
The lumped gains into the space from people, equipment, lights etc.
Data on this tab is only used when the Gains option is set to 'Lumped'.
6.1.3
Activity Templates - Occupancy
Occupancy tab on Activity Templates Dialog.
Occupancy levels and times, metabolic activity on this tab is used when the 'Gains' option is set to 'Early'
or 'Detailed'.
Set the metabolic rate according to the level of activity within the space. The metabolic factor accounts
for people of various sizes. Enter 1.00 for men, 0.85 for women, 0.75 for children, or you can use an
average value if there is a mix of sizes.
The Workday profile is used when the 'Timing' option is set to 'Typical workday' and the Schedule data is
used when the Timing option is set to '7/12 Schedules'.
© 2008 DesignBuilder Software, Ltd.
376
6.1.4
DesignBuilder 1.5
Activity Templates - Other Gains
Other Gains tab on Activity Templates Dialog.
Data on this tab is used when the 'Gains' option is set to 'Early'. DHW Data is always used.
The default gains into the space from computers, office equipment, catering, process and miscellaneous
equipment for this activity.
Also hot water consumption rate per person per day and the operation schedules are defined here.
6.1.5
Activity Templates - DHW
Enter the Domestic Hot Water (DHW) volumetric consumption per unit of floor area per day and the
operation schedule.
In DesignBuilder the amount of DHW consumed is considered to be a function of the activity. For
example, there is a demand assumed to arise from the occupants of an office for activities such as
washing hands and washing up cups. This demand is associated with the office rather than the toilet or
tea room. Thus the demand from each space needs to be assigned to a DHW system even if the system
itself is not present in the space.
6.1.6
Activity Templates - Environmental
Environmental tab on Activity Templates Dialog.
Enter the data related to the environmental and comfort requirements of this activity:
·
·
·
·
·
Heating set-point temperature (if the space is heated).
Cooling set-point temperature (if the spaces cooled).
Ventilation set-point temperature
Illuminance levels required.
Fresh air levels required per person - defines mechanical ventilation air change rates.
If there is never any heating or cooling, you can leave these set-points.
See Environmental Control under Activity Model Data for more details.
© 2008 DesignBuilder Software, Ltd.
Template Data
6.2
377
Construction Templates
Construction templates are used as a source of generic
construction data for loading into building models.
The template provides data on the construction of external walls, roofs, floors, partitions, roofs etc and airtightness data.
There are four tabs on the Construction template dialog:
·
·
·
·
General
Simple
Standard
Airtightness
Template data can be accessed:
· from the Templates tab on the opening screen (if no file is open),
© 2008 DesignBuilder Software, Ltd.
378
DesignBuilder 1.5
· from the Templates tab in the Navigator panel (if a file is open),
· by double-clicking on the template icon in the model data,
· by clicking on the Edit button when selecting templates from a list.
6.2.1
Construction Templates - General
General tab on Construction Templates Dialog.
Enter the name, source, category and region for this construction template.
6.2.2
Construction Templates - Simple
Simple tab on Construction Templates Dialog.
Data on this tab is used when the Construction model detail is set to Pre-design.
Enter default levels of insulation and thermal mass for this construction type.
6.2.3
Construction Templates - Walls
Walls tab on Construction Templates Dialog.
Data on this tab is used when the Construction model detail is set to Pre-design or General (i.e. it is
always used).
Select default walls, partitions for exposed and semi-exposed surfaces for this Constructions template.
You can also select the external and internal wall sub-surface constructions here.
6.2.4
Construction Templates - Roofs/Floors/Slabs/Ceilings
Roofs/Floors/Slabs/Ceilings tab on Construction Templates Dialog.
Data on this tab is used when the Construction model detail is set to Pre-design or General (i.e. it is
always used).
Select default constructions for roofs, floors, slabs and ceiling surfaces for this Constructions template.
You can also select the roof sub-surface construction here.
© 2008 DesignBuilder Software, Ltd.
Template Data
6.2.5
379
Construction Templates - Doors
Doors tab on Construction Templates Dialog.
Data on this tab is used when the Construction model detail is set to Pre-design or General (i.e. it is
always used).
Select default door constructions for internal and external doors for this Constructions template.
You can also select the external and internal wall sub-surface constructions here.
6.2.6
Construction Templates - Airtightness
Airtightness tab on Construction Templates Dialog.
Cracks template
The Cracks template setting indicates the Cracks data template to use as a source for crack data when
the Calculated Natural ventilation model option is selected.
Infiltration
The default infiltration rate used when the 'Natural ventilation' model detail level is 'Simple'.
6.2.7
Construction Templates - Thermal mass
Thermal mass tab on Construction Templates Dialog.
Data on this tab is used when the Construction model detail is set to Pre-design or General (i.e. it is
always used).
Enter the default thermal mass construction for this construction template.
See Internal Thermal Mass for more information on defining thermal mass in a model.
© 2008 DesignBuilder Software, Ltd.
380
6.3
DesignBuilder 1.5
Glazing Templates
Glazing templates are used as a source of default
glazing, frame and shading construction data for building models.
There are three tabs on the Glazing Template dialog:
· General
· Glazing
· Shading
Template data can be accessed:
·
·
·
·
from the Templates tab on the opening screen (if no file is open),
from the Templates tab in the Navigator panel (if a file is open),
by double-clicking on the template icon in the model data,
by clicking on the Edit button when selecting templates from a list.
6.3.1
Glazing Templates - General
General tab on Glazing Templates Dialog.
Enter the name, category and region for this glazing template.
Enter the region as 'General' if you want the data to be generally available (i.e. not restricted to a particular
region). Glazing templates with category '<System>' have their data set up at the time a file is created or
when the Legislative region is changed.
© 2008 DesignBuilder Software, Ltd.
Template Data
6.3.2
381
Glazing Templates - Glazing
Glazing tab on Glazing Templates Dialog.
Enter data on the glazing construction, frame and opening area for external glazing, internal glazing and
roof glazing.
6.3.3
Glazing Templates - Shading
Shading tab on Glazing Templates Dialog.
Select any shading devices to be applied when this glazing templates is loaded to the model.
6.4
Facade Templates
Facade templates are used to provide a choice of typical
simple facade layouts and frame definitions which can be easily loaded into a building model.
There are two tabs on the Facade Template dialog:
· General
· Openings
Template data can be accessed:
· from the Templates tab on the opening screen (if no file is open),
© 2008 DesignBuilder Software, Ltd.
382
DesignBuilder 1.5
· from the Templates tab in the Navigator panel (if a file is open),
· by double-clicking on the template icon in the model data,
· by clicking on the Edit button when selecting templates from a list.
6.4.1
Facade Templates - General
General tab on Facade Templates Dialog.
Enter the name and category for this Facade Template.
6.4.2
Facade Templates - Openings
Openings tab on Facade Templates Dialog.
Enter the glazing and frame data for the facade. There are a number of standard facade types:
· None - there is no glazing.
· Continuous horizontal - glazing is generated in a continuous horizontal strip using sill height and %
glazing.
· Fixed height - glazing is generated with a fixed height at the specified sill height, and width is
calculated based on the % glazing. This option uses % glazing but prioritises window height.
· Preferred height - glazing is generated using the window height data and the % glazing, but the
window height may be adjusted to achieve the required % glazing. This option uses window and sill
height but prioritises % glazing.
· Fixed width and height - windows have fixed width and height. This option uses % glazing but
prioritises window width and height.
· Fill surface (100%) - the entire surface is filled with glazing and there is no frame.
· If the glazing does not have a frame, uncheck the 'Has a frame?' box.
© 2008 DesignBuilder Software, Ltd.
Template Data
6.5
383
Lighting Templates
Lighting templates data sets are used as a source of
generic lighting systems for loading into the building data.
There are three tabs on the Lighting Template dialog:
· General
· Output
· Control
Template data can be accessed:
·
·
·
·
from the Templates tab on the opening screen (if no file is open),
from the Templates tab in the Navigator panel (if a file is open),
by double-clicking on the template icon in the model data,
by clicking on the Edit button when selecting templates from a list.
6.5.1
Lighting Templates - General
General tab on Lighting Templates Dialog.
Enter the name, category and region for this Lighting Template.
Enter the region as 'General' if you want the data to be generally available (i.e. not restricted to a particular
region).
See also Building Model Lighting Data for more information on the use of this template data in the model.
© 2008 DesignBuilder Software, Ltd.
384
6.5.2
DesignBuilder 1.5
Lighting Templates - Output
Output tab on Lighting Templates Dialog.
Enter the lighting energy for task and general lighting in W/m2/100 lux (W/ft2/100 lux). This data is used
for setting up the actual Lighting energy W/m2 data in each zone using:
Lighting energy (W/m2) = Lighting (W/m2/100 lux) x Design lux level (Activity tab) / 100
Substitute ft2 for m2 for equation in IP units.
The 'Output' data is used for generating default lighting loads based on lighting type and required
illuminance levels as set in Activity data.
See General Lighting under Building Model Lighting Data for more information on the use of this template
data in the model.
6.5.3
Lighting Templates - Control
Control tab on Lighting Templates Dialog.
If the lighting is to be controlled by the availability of natural daylight, check the 'control' option box and
select the type of control.
Continuous Control
For 'continuous' control, the overhead lights dim continuously and linearly from maximum electric power,
maximum light output to minimum electric power, minimum light output as the daylight illuminance
increases. The lights stay at the minimum point with further increase in the daylight illuminance.
The minimum input power fraction for 'continuous' control type is the lowest power the lighting system can
dim down to, expressed as a fraction of maximum input power. For 'continuous/off' lighting control, this is
the power fraction reached just before the light switch off completely.
The minimum output fraction for 'continuous' control type, is the lowest lighting output the lighting system
can dim down to, expressed as a fraction of maximum light output. This is the fractional light output that
© 2008 DesignBuilder Software, Ltd.
Template Data
385
the system produces at minimum input power. For 'continuous/off' lighting control, this is the power
fraction reached just before the light switch off completely.
Continuous/Off Control
'Continuous/off' control is the same as continuous control except that the lights switch off completely when
the minimum dimming point is reached.
Stepped Control
For 'stepped' control, the electric power input and light output vary in discreet, equally spaced steps. The
number of steps can be set.
© 2008 DesignBuilder Software, Ltd.
386
6.6
DesignBuilder 1.5
HVAC Templates
HVAC templates data sets are used as a source of generic
heating/cooling and ventilation systems for loading into the building data.
There are four tabs on the HVAC Template dialog:
© 2008 DesignBuilder Software, Ltd.
Template Data
·
·
·
·
387
General
Ventilation
System
Air temperature distribution
Template data can be accessed:
·
·
·
·
from the Templates tab on the opening screen (if no file is open),
from the Templates tab in the Navigator panel (if a file is open),
by double-clicking on the template icon in the model data,
by clicking on the Edit button when selecting templates from a list.
6.6.1
HVAC Templates - General
General tab on HVAC Templates Dialog.
Enter the name, category, sector and region for this HVAC template.
Enter the region as 'General' if you want the data to be generally available (i.e. not restricted to a particular
region).
The floor shade colour is used to shade the floor of the model at block and zone levels to give a quick
indication of the system type fitted in various areas.
6.6.2
HVAC Templates - Ventilation
Ventilation tab on HVAC Templates Dialog.
Enter the maximum natural/mechanical ventilation rates as appropriate.
6.6.3
HVAC Templates - System
System tab on HVAC Templates Dialog.
The data on this tab is divided into 'System' (i.e. whole system data), 'Heating' and 'Cooling'.
Auxiliary energy - defines the energy consumption of fans, pumps and other auxiliary equipment when
using the 'Simple' HVAC model option. This energy is assumed to be consumed during periods when
either heating or cooling systems are operating.
Type - defines the EnergyPlus compact system type when the 'Compact' HVAC model option is set.
Select from:
· Unitary single zone - for modelling 'window' air conditioning units and any other system which does
not use ducted air
· Unitary multizone - for modelling constant volume air conditioning systems.
· VAV - for modelling variable air volume air conditioning systems.
© 2008 DesignBuilder Software, Ltd.
388
DesignBuilder 1.5
When using the VAV compact system type you can define the system in more detail using:
· Outside air control type - select either 'Fixed' or 'Proportional'. 'Fixed means that the minimum
outside air flow rate is fixed no matter what the actual system flow rate is. Proportional means the
minimum outside air flow rate varies in proportion to the total system air flow rate.
· Supply air min flow fraction - is the fraction that the zone VAV box can reduce to based on the
supply air maximum flow rate.
Heating/cooling system CoP is the whole system seasonal coefficient of performance including
distribution losses when using the 'Simple' HVAC model option.
Boiler/chiller CoP is the seasonal coefficient of performance of the boiler/chiller, excluding any energy
consumption by fans, pumps etc and excluding distribution losses..
6.6.4
HVAC Templates - Air Temperature Distribution
Air temperature distribution tab on HVAC Templates Dialog.
By default EnergyPlus assumes that air temperature within a zone is completely uniform (i.e. the air is fully
mixed). The data on this tab allows you to set up a temperature gradient which varies dynamically
depending on:
·
·
·
·
·
Outside temperature.
Inside temperature.
Inside-outside temperature difference.
Heating load.
Cooling load.
See Air Temperature Distribution for more information on defining vertical zone temperature profiles
(temperature gradients).
© 2008 DesignBuilder Software, Ltd.
Template Data
6.7
389
Location Templates
Location Templates are a database of locations from around
the world based on ASHRAE design weather data including daylight savings.
Each Location data set is located within a 'Legislative Region'. Most Regions in Europe include some
© 2008 DesignBuilder Software, Ltd.
390
DesignBuilder 1.5
basic data on the energy codes which apply.
There are four tabs on the Location Template dialog:
·
·
·
·
Location
Winter design weather
Summer design weather
Simulation weather
Template data can be accessed:
·
·
·
·
from the Templates tab on the opening screen (if no file is open),
from the Templates tab in the Navigator panel (if a file is open),
by double-clicking on the template icon in the model data,
by clicking on the Edit button when selecting templates from a list.
6.7.1
Location Templates - Location
Location tab on Location Templates Dialog.
DesignBuilder Location Templates are located within 'Legislative Regions'. Most regions in Europe include
some basic data on the energy codes which apply.
6.7.2
Location Templates - Winter Design Weather
Winter design weather tab on Location Templates Dialog.
The weather data used in winter design calculations is:
· Minimum outside dry-bulb temperature
· Co-incident wind speed and direction.
There are options for 99.6 or 99% confidence (i.e. 0.4 or 1% chance of more extreme winter weather
occurring).
6.7.3
Location Templates - Summer Design Weather
Summer design weather tab on Location Templates Dialog.
The weather data used in summer design calculations is:
· Maximum outside dry-bulb temperature
· Minimum outside dry-bulb temperature
· Wet-bulb temperature at the time of the maximum dry-bulb temperature.
Risk can be specified based on dry or wet-bulb temperatures, for 99.6, 99 and 98% confidence (i.e. 0.4, 1
or 2% chance of more extreme weather occurring).
© 2008 DesignBuilder Software, Ltd.
Template Data
6.7.4
391
Location Templates - Simulation Weather
Simulation weather tab on Location Templates Dialog.
DesignBuilder will only use hourly weather data for simulations (winter and summer design calculations
use design weather data).
You can add your own Hourly Weather data.
6.8
Hourly Weather Data
DesignBuilder is supplied with a large database of hourly weather data sets from around the world. When
you select an hourly weather data set on the Location tab at Site level, you do not select the file directly,
but rather an hourly weather data template, which in turn references the actual file. It works this way so
that we can supply you with a database of hourly weather data locations without needing to include
hundreds of large hourly weather files.
There are two tabs on the Hourly Weather Data dialog:
· General
· Statistics
If you select an Hourly weather file from the DesignBuilder database which does not yet exist on your
computer, the program will automatically download it from the DesignBuilder server. You must be
connected to the Internet for this option to work.
© 2008 DesignBuilder Software, Ltd.
392
DesignBuilder 1.5
You can add new hourly weather data sets to the DesignBuilder database.
Template data can be accessed:
·
·
·
·
from the Templates tab on the opening screen (if no file is open),
from the Templates tab in the Navigator panel (if a file is open),
by double-clicking on the template icon in the model data,
by clicking on the Edit button when selecting templates from a list.
6.8.1
Hourly Weather Data - General
General tab on Hourly Weather data Dialog.
Select the Hourly weather data filename and the rest of the data is loaded directly from the .epw and .stat
files.
Each file is named using the ISO standard three-letter country abbreviation (i.e. CUB for Cuba), followed
by the location name, and the source format (CityUHK, CSWD, CTYW, CTZ2, CWEC, ISHRAE, IWEC,
IGDG, INETI, KISR, SWEC, SWERA, TMY2, or TMY).
Thus, CUB_Havana_IWEC.epw is the EnergyPlus weather file (epw) from the ASHRAE International
Weather for Energy Calculations (IWEC) data for Havana, Cuba (CUB).
There are three files associated with each location:
· epw - EnergyPlus weather files
· stat - a summary report on the data. Data from this file is loaded into the Statistics tab when an
hourly weather data file is selected.
· ddy - design conditions.
Note: the above hourly weather data and associated statistics files are located in the Weather data folder.
6.8.2
Hourly Weather Data - Statistics
Statistics tab on Hourly Weather data Dialog.
© 2008 DesignBuilder Software, Ltd.
Template Data
393
The statistics displayed are generated by the EnergyPlus weather
data translation utility.
The statistics data is used to identify useful simulation periods:
Summer start month, Summer end month define the summer simulation period in mmm format.
Winter start month, Winter end month define the winter simulation period in mmm format.
Extreme hot week, starting defines the first day of the hottest week of the year.
Typical hot week, starting defines the first day of a typical summer week.
Extreme cold week, starting defines the first day of the coldest week of the year.
Typical cold week, starting defines the first day of a typical winter week.
Note: week starting dates must be in the format mmm dd - any other format will generate an error when
clicking on the links in the Simulation Options dialog.
This data can be accessed from the Simulation Calculation options dialog to set up typical simulation
periods (screenshot right) .
© 2008 DesignBuilder Software, Ltd.
394
6.9
DesignBuilder 1.5
Crack Templates
Crack data is used when the 'Calculated' natural
ventilation option is set. In this case every surface in the model has a crack and its size (characterised by
flow coefficient and exponent) is determined by Airtightness as set on the Constructions tab in the Model
Data. The value of Airtightness is used as a key to look up corresponding crack sizes in the Cracks
database.
The cracks database has been set up empirically to give typical air change rates for each of the five
Airtightness categories in a range of building types.
There are five tabs on the Crack Template data dialog:
·
·
·
·
·
General
Openings
Walls
Floors/ceilings
Roofs
© 2008 DesignBuilder Software, Ltd.
Template Data
6.9.1
Crack Templates - General
General tab on Crack Templates Dialog.
Tab contains the name and category of the crack template.
6.9.2
Crack Templates - Openings
Openings tab on Crack Templates Dialog.
Enter the characteristics of the cracks around internal and external windows, vents and doors.
Note that the opening crack characteristics are normalised by opening perimeter lengths.
6.9.3
Crack Templates - Walls
Walls tab on Crack Templates Dialog.
In reality the porosity of walls is caused by a very large number of small cracks and holes.
DesignBuilder models this porosity using a single equivalent crack. Enter the characteristics this
equivalent single crack for internal and external walls.
Note that the crack characteristics are normalised by surface area.
6.9.4
Crack Templates - Floors/Ceilings
Floors/Ceilings tab on Crack Templates Dialog.
In reality the porosity of floors is caused by a very large number of small cracks and holes.
DesignBuilder models this porosity using a single equivalent crack. Enter the characteristics this
equivalent single crack for internal and external floors.
Note that the crack characteristics are normalised by surface area.
6.9.5
Crack Templates - Roofs
Roofs tab on Crack Templates Dialog.
In reality the porosity of roofs is caused by a very large number of small cracks and holes.
DesignBuilder models this porosity using a single equivalent crack. Enter the characteristics this
equivalent single crack for roofs.
© 2008 DesignBuilder Software, Ltd.
395
396
DesignBuilder 1.5
Note that the crack characteristics are normalised by surface area.
6.10
Legislative Region Templates
A Legislative region in DesignBuilder is typically a whole
country or a region, province or state within a country which has its own building control powers.
In current versions of the software a Legislative Region contains information on:
· Local energy codes/building regulations.
· Carbon dioxide emission factors are provided for a range of fuels.
The current regions database is only sparsely populated with useful data (most of that is from countries
within Europe). But we expect to expand this in time.
There are three tabs on the Legislative Region Template dialog:
· General
· Standard insulation
· Emissions
Template data can be accessed:
·
·
·
·
from the Templates tab on the opening screen (if no file is open),
from the Templates tab in the Navigator panel (if a file is open),
by double-clicking on the template icon in the model data,
by clicking on the Edit button when selecting templates from a list.
6.10.1 Legislative Region Templates - General
General tab on Legislative Region Templates Dialog.
Enter the name of the Legislative region, the category (country) and a description of the Region.
© 2008 DesignBuilder Software, Ltd.
Template Data
397
6.10.2 Legislative Region Templates - Standard Insulation
Standard insulation tab on Legislative Region Templates Dialog.
Data on this type specifies 4 standard insulation levels which apply to this region:
· Uninsulated - typical U-values for buildings in the region which are not insulated
· Stock average - Average (estimated) insulation standards for real buildings in the region. This data
is used in some asset rating calculations.
· Mandatory energy code - Defines the maximum U-values allowed in the energy code/building
regulations in force in the region.
· Best practice - Defines the U-values to be expected in a state-of-the-art building in the region.
The data on this tab indicates the required maximum U-values.
6.10.3 Legislative Region Templates - Emissions
Emissions tab on Legislative Region Templates Dialog.
The factors on this tab define the amount of carbon dioxide emitted per unit of energy consumed for each
of the major fuel types in the region. The CO2 emission factors depend on the mix of technology used to
generated the electricity, the quality of the fuel and other factors such as production carbon cost.
© 2008 DesignBuilder Software, Ltd.
398
6.11
DesignBuilder 1.5
Energy Code Templates
Energy code data is used within DesignBuilder to indicate
the mandatory energy performance of building components and/or the whole building.
There are three types of heat transmission code:
1. Envelope component performance
2. Whole building envelope performance
3. Whole building energy performance
You can define the type of energy code by making selections on the next 3 tabs.
If this energy code requires for example that minimum component perforance and whole building energy
performance then check both these options.
Template data can be accessed:
·
·
·
·
from the Templates tab on the opening screen (if no file is open),
from the Templates tab in the Navigator panel (if a file is open),
by double-clicking on the template icon in the model data,
by clicking on the Edit button when selecting templates from a list.
© 2008 DesignBuilder Software, Ltd.
Template Data
399
6.11.1 Energy Code Templates - General
General tab on Energy Code Templates Dialog.
Enter a name and description of this Energy code.
6.11.2 Energy Code Templates - Envelope (component)
Envelope (component) tab on Energy Code Templates Dialog.
Specifies mandatory maximum U-values through the individual components (walls, windows, roofs etc.).
The data on this tab indicates the required maximum U-values.
6.11.3 Energy Code Templates - Envelope (building)
Envelope (building) tab on Energy Code Templates Dialog.
Sets a limit on the rate of heat transfer through the overall building envelope. The limit is typically set as
an average U-value for the overall building envelope.
6.11.4 Energy Code Templates - Energy Performance
Energy performance tab on Energy Code Templates Dialog.
Sets a limit on the rate of heat transfer through the overall building envelope. The limit is typically set as
an average U-value for the overall building envelope.
6.12
Sector Templates
Sectors are used to categorise buildings according to
their use/activity.
© 2008 DesignBuilder Software, Ltd.
400
DesignBuilder 1.5
A sector is located within a legislative region and can only be accessed if the building is situated within the
region containing the sector.
The 'General' sector is an exception to this rule as it can be accessed from all regions if the 'List region
data' Program Options setting is 'All or 'General+Local'.
You can also associate a holiday schedule with the sector.
Template data can be accessed:
·
·
·
·
from the Templates tab on the opening screen (if no file is open),
from the Templates tab in the Navigator panel (if a file is open),
by double-clicking on the template icon in the model data,
by clicking on the Edit button when selecting templates from a list.
6.13
Times Zone Templates
DesignBuilder comes with a database of all of the world's time zones including information on daylight
savings. This data is sourced from ASHRAE.
If the time zone does not have daylight saving then the text N/A is entered in the Daylight saving from
field.
The time zone is selected in model data under Time and Daylight Saving on the Location tab at site level.
Note: you can override daylight savings to be off in the model data by unchecking the Use daylight saving.
Template data can be accessed:
·
·
·
·
from the Templates tab on the opening screen (if no file is open),
from the Templates tab in the Navigator panel (if a file is open),
by double-clicking on the template icon in the model data,
by clicking on the Edit button when selecting templates from a list.
6.14
Wind Pressure Coefficient Templates
Wind pressure coefficients are used when Natural ventilation model option is set to 'Calculated'.
EnergyPlus/AIRNET uses pressure coefficients when calculating wind-induced pressure on each surface
during simulations when the Calculated Natural ventilation option is selected.
DesignBuilder is supplied with a database of wind pressure coefficients based on data from AIVC
Applications Guide: A guide to energy-efficient ventilation. The Cp data is buildings of 3 storeys or less,
with square surfaces and for 3 levels of site exposure. The data is given in 45° increments.
Note: The AIVC wind pressure coefficient data provides a good first level of approximation for basic
design purposes. However, ideally you would override this default data with pressure coefficient data
specific to your application. This data might be calculated from CFD simulations or measured from wind
tunnel studies using physical models.
© 2008 DesignBuilder Software, Ltd.
Template Data
401
Template data can be accessed:
·
·
·
·
from the Templates tab on the opening screen (if no file is open),
from the Templates tab in the Navigator panel (if a file is open),
by double-clicking on the template icon in the model data,
by clicking on the Edit button when selecting templates from a list.
6.15
Metabolic Rate Templates
Metabolic rate Templates define a category of human
metabolic output. The metabolic rate can be selected in Model Data on the Activity tab by choosing a
Metabolic rate template.
The metabolic rate per person data is supplied to EnergyPlus which multiplies it by the number of people
in the zone as the starting point for occupancy heat emission calculations.
Metabolic rate data can be found in the ASHRAE Handbook of Fundamentals, Chapter 8, Table 5.
DesignBuilder data is derived from this data and is for adult males having typical surface area of 1.8m2.
For women multiply the adult male value by 0.85 and for children multiply by 0.75.
Template data can be accessed:
·
·
·
·
from the Templates tab on the opening screen (if no file is open),
from the Templates tab in the Navigator panel (if a file is open),
by double-clicking on the template icon in the model data,
by clicking on the Edit button when selecting templates from a list.
Background
Heat is generated in the human body by oxidation at a rate called the metabolic rate. This heat is
dissipated from the body surface and respiratory tract by a combination of radiation, convection and
evaporation. The relative proportions of sensible and latent heat from people is a complex function of the
metabolic rate and the environmental conditions.
EnergyPlus uses a polynomial function to divide the heat gain into sensible and latent portions.
More details can be found in the EnergyPlus EngineeringDoc.pdf documentation.
© 2008 DesignBuilder Software, Ltd.
Section
7
Calculations
Calculations
403
There are four types of energy simulation:
·
·
·
·
Heating design simulation
Cooling design simulation
Simulation using real weather (simply referred to as 'simulation' in DesignBuilder documentation)
Energy Performance Indicator simulations (on the Check screen). This capability is still under
development and is so far undocumented.
DesignBuilder has been set up to allow a choice of calculation method for each of these energy simulation
types, but version 1.0 only allows EnergyPlus as the calculation method. The range of options will be
expanded in future versions.
Display Options in the Panel in the bottom left of the screen allow you to change the data displayed and
the presentation style.
Results can be exported in a variety of file formats or they can added as a Report topic.
7.1
Heating Design
Heating design calculations are carried out to determine the size of heating equipment required to meet
the coldest winter design weather conditions likely to be encountered at the site location. These design
calculations are traditionally carried out using steady-state methods such as those offered by ASHRAE
and CIBSE. You can use DesignBuilder to carry out effectively the same calculation using the
EnergyPlus dynamic thermal simulation engine.
Click on the Heating Screen tab to view Heating Design data. If the necessary data has not yet been
generated, a Heating Design calculation is automatically started to generate the data.
Heating design simulations using EnergyPlus have the following characteristics:
Constant (Steady-state) external temperature set to the winter design external temperature.
Wind speed and direction set to design values.
No solar gain.
No internal gains (lighting, equipment, occupancy etc).
Heated zones are heated constantly to achieve the heating temperature set point using a simple
convective heating system.
· Includes consideration of heat conduction and convection between zones of different temperatures.
·
·
·
·
·
Simulation continues until temperatures/heat flows in each zone have converged. If convergence does
not occur then simulation continues for the maximum number of days as specified in the calculation
options.
The simulation calculates heating capacities required to maintain the temperature set points in each zone
and displays the total heat loss broken down as:
·
·
·
·
·
·
·
Glazing
Walls
Partitions
Solid floors
Roofs
External infiltration
Internal natural ventilation (i.e. heat lost to other cooler adjacent spaces through windows, vents,
© 2008 DesignBuilder Software, Ltd.
404
DesignBuilder 1.5
doors, holes)
The total heat loss in each zone is multiplied by a Safety factor (1.5 by default) to give a recommended
heating Design Capacity. This heating capacity can be written directly into the Heating capacity model
data depending on the setting of the Plant sizing model option on the Data tab under HVAC.
Customise the data displayed and display style using the Display Options panel.
Note: heating design calculations do not use any Natural ventilation data.
EnergyPlus IDF data
You can view the EnergyPlus IDF data used to carry out the calculation by clicking on the 'View the input
data' link in the info panel (Learning mode only) or from the Tools menu.
7.1.1
Calculation Options
These calculation options can be accessed from the Heating design calculation options tab of the Model
Options dialog and from the Heating design calculation options dialog.
· Calculation Options
· Heating system sizing
· Advanced Calculation Options
Calculation description
Enter some text to identify the calculation. This will be used in reports and in the filename for automatically
generated ESO files.
Click on the OK button to start the Heating design calculation.
7.1.2
Display Options
You can review heating design output in 2 ways:
· Heat loss breakdown - on the Steady State tab.
· Summary table - heating capacity data for each zone on the Summary tab.
To update the data using different calculation options, click Update (Ctrl-U).
The General tab on the Display Options panel provides options for controlling the data displayed in the
Heating design data display screen. General Display Options are grouped under three headers:
· Data - control the data displayed.
· Y-axis - for customising the layout of the Y-axis.
· Appearance - for customising the style and appearance of the graphics.
The Detailed tab on the Display Options panel provides controls which allow you to select exactly the data
items you wish to display.
© 2008 DesignBuilder Software, Ltd.
Calculations
405
DATA OPTIONS
Data
Select an option to indicate the data you wish to display:
· 1-All - fabric and ventilation heat gains/losses, internal gains (not Heating Design), temperatures
and outside dry-bulb air temperature.
· 2-Site data - all site data.
· 3-Comfort - inside air, the radiant and comfort temperatures.
· 4-Internal gains - internal gains including equipment, lighting, occupancy, solar and HVAC heating/
cooling delivery.
· 5-Fabric and ventilation - heat gains to the space from the surface element (walls, floors, ceilings
etc.) and ventilation. Negative values indicate heat loss from the space.
Tip: to update the data using different calculation options, click Update (Ctrl-U).
Show as
You can display the data in one of four ways:
·
·
·
·
Graph
Grid
Graph and table
Table
Note: you must select the Grid option to export data in spreadsheet format.
Normalise by floor area
Check this option if you wish data to be displayed 'per floor area' i.e. /m2 or /ft2. You can select the area
to use as the denominator from:
· 1-All areas - Total area is used,
· 2-Occupied area - just occupied areas are used.
Note: you can only select 1-All areas if the building and block data includes occupied areas as set in
Include unoccupied zones in block and building totals and averages option in Heating design Output
options, Likewise you can only select 2-Occupied area if the building and block data excludes occupied
areas.
Y-AXIS OPTIONS
These options give you control over how the Y-axis is displayed.
Lock min/max
© 2008 DesignBuilder Software, Ltd.
406
DesignBuilder 1.5
This option locks the extent of the Y-axes so that they keep their current
maximum and minimum values. This allows consistent comparison with the future results display.
The Y-axis keeps its current settings until you unlock it again.
You can achieve the same effect by clicking on the 'Lock Y-axis min/max values' toolbar command.
When you lock the Y-axis the current settings are stored and displayed for each of the available Y-axes.
You can edit any of these to get a more precise setting. Remember to click on the Apply button when you
are ready to register a change to any numeric display option data.
Overlap multiple axes
Option allows you to save space on the Y-axis allowing different axes to overlap.
Separate axes
Check this option to add a vertical space between each of the displayed axes.
Normalise by floor area
Check this option if you wish data to be displayed 'per floor area' i.e. /m2 or /ft2.
APPEARANCE
You can control the details of the presentation of the graphical output by making selections on the Display
Options panel under the Appearance header.
ENERGYPLUS SCRIPT
You can view the input data script used to calculate these results by selecting the 'Tools | Display
simulation input script' menu option. If you do not have the EnergyPlus IDF editor installed, then you
should associate the .idf file extension with a text editor to make this option work.
© 2008 DesignBuilder Software, Ltd.
Calculations
407
Note: this shows the script stored with the model just before the simulation not the in.idf file stored in the
EnergyPlus folder.
7.1.3
Summary table
The Summary screen shows Comfort temperature, Steady state heat loss and Design heating capacity:
· Comfort temperature - The mean of the internal air and radiant temperatures (also known as the
'operational' temperature)
· Steady-state heat loss - same as 'Heating delivered' on the Steady State tab - heat delivered to
maintain the internal heating design temperature.
· Design capacity - is the Steady-state heat loss multiplied by the Design margin to give the design
heating capacity of the equipment.
Use the Export command to export this data in spreadsheet format.
7.1.4
Heat loss breakdown results
The 'Steady-State' tab has detailed heating design results (displayed as a histogram and table by default).
For more on how the output is calculated see: Calculation of DesignBuilder Output from EnergyPlus
Report Variables.
© 2008 DesignBuilder Software, Ltd.
408
DesignBuilder 1.5
· Air Temperature - the calculated average temperature of the air.
· Radiant Temperature - the calculated average Mean Radiant Temperature (MRT) of the zone,
calculated assuming that the person is in the centre of the zone, with no weighting for any particular
surface.
· Operative Temperature - The mean of the internal air and radiant temperatures.
· Outside Dry-Bulb Temperature.
· Glazing - heat loss through all glazing.
· Walls - heat loss through all external walls.
· Ceilings (int) - heat loss through internal ceilings (e.g. zone above is colder).
· Floors (int) - heat loss through internal floors (e.g. zone below is colder).
· Floors (ext) - heat loss through external floors (not ground floor, e.g. floor in cantilevered space,
roof eaves etc).
· Doors and Vents - conduction heat loss through doors and vents.
· Ground Floors - heat loss through ground floors.
· Partitions (int) - heat loss through all internal partitions (e.g. adjacent zone is colder).
· External Infiltration - heat loss through air infiltration (non-unintentional air entry through cracks
and holes in building fabric).
· External Mechanical Ventilation - is the heat loss due to the entry of outside air through the air
distribution system. View can exclude mechanical ventilation from the heating design calculations
by unchecking the 'Mechanical ventilation On' Model Data.
· Internal Natural Ventilation - heat loss due to air exchange through open internal windows, doors,
vents, holes and virtual partitions to adjacent spaces.
· Zone/Sys Sensible Heating - heat delivered to maintain the internal heating design temperature.
Note: The Heating delivered is the sum of the component heat loss values.
Surface heat loss data (walls, ceilings, floors etc) refers to heat transfer from the zone to the inside
surface of the building elements.
You can also customise the data displayed and display style using the Display Options panel.
© 2008 DesignBuilder Software, Ltd.
Calculations
© 2008 DesignBuilder Software, Ltd.
409
410
7.2
DesignBuilder 1.5
Cooling Design
Cooling design calculations are carried out to determine the capacity of mechanical cooling equipment
required to meet the hottest summer design weather conditions likely to be encountered at the site
location. In zones which are not mechanically cooled free-floating temperatures are calculated including
the effects of natural or mechanical ventilation if these options are selected on the zone HVAC tab. These
design calculations are traditionally carried out using periodic steady-state methods such as the
admittance and response factor methods provided by CIBSE and ASHRAE. You can use DesignBuilder to
carry out effectively the same calculation using the EnergyPlus dynamic thermal simulation engine.
Click on the Cooling Screen tab to view Cooling Design data. If the necessary data has not yet been
generated, a Cooling Design calculation is automatically started to generate the data.
Cooling design simulations using EnergyPlus have the following characteristics:
· Periodic steady-state external temperatures calculated using maximum and minimum design
summer weather conditions.
· No wind.
· Includes solar gains through windows and scheduled natural ventilation.
· includes internal gains from occupants, lighting and other equipment.
· Includes consideration of heat conduction and convection between zones of different temperatures.
For buildings situated in the Northern Hemisphere, Cooling Design calculations are made for the month of
July and for buildings in the Southern Hemisphere they are made for the month of January.
Simulation continues until temperatures/heat flows in each zone have converged. If convergence does
not occur then simulation continues for the maximum number of days as specified in the calculation
options.
The simulation calculates half-hourly temperatures and heat flows for each zone and determines cooling
capacities required to maintain any cooling temperature set points in each zone.
The maximum cooling load in each zone is multiplied by a Safety factor (1.5 by default) to give a Design
Cooling Capacity. This design cooling capacity can be written directly into the Cooling capacity model
data depending on the setting of the Plant sizing model option on the Data tab under HVAC.
Customise the data displayed and display style using the Display Options panel.
Note: Cooling Design calculations use Scheduled Natural ventilation model data set on the HVAC tab
even when the Calculated natural ventilation option is set. This is to help you to document the input data
for your Cooling Design calculations. Calculated natural ventilation data input is too complex to be
adequately summarised.
7.2.1
Calculation Options
These calculation options can also be accessed from the Cooling design calculation options tab of the
Model Options dialog.
· Calculation Options
· Summer design day
· Cooling system sizing
© 2008 DesignBuilder Software, Ltd.
Calculations
411
· Solar Options
· Advanced Calculation Options
Calculation description
Enter some text to identify the calculation. This will be used in reports and in the filename for automatically
generated ESO files.
Click on the OK button to start the Cooling design calculation.
7.2.2
Detailed results
The 'Analysis' tab has detailed half-hourly cooling design results (displayed as a line graph by default).
For more on how the output is calculated see: Calculation of DesignBuilder Output from EnergyPlus
Report Variables.
· Air Temperature - the calculated average temperature of the air.
· Radiant Temperature - the calculated average Mean Radiant Temperature (MRT) of the zone,
calculated assuming that the person is in the centre of the zone, with no weighting for any particular
surface.
· Operative Temperature - The mean of the mean internal air and mean radiant temperatures.
· Outside Dry-Bulb Temperature.
· Glazing - the total heat flow to the zone from the glazing, frame and divider of exterior glazing
excluding transmitted short-wave solar radiation (which is accounted for in Solar Gains Exterior
Windows below).
For windows without an interior shading device this heat flow is equal to:
+ [Convective heat flow to the zone from the zone side of the glazing]
+ [Net IR heat flow to the zone from zone side of the glazing]
– [Short-wave radiation from zone transmitted back out the window]
+ [Conduction to zone from window frame and divider, if present]
Here, short-wave radiation is that from lights and diffuse interior solar radiation.
For windows with an interior shading device this heat flow is equal to:
[Convective heat flow to the zone from the air flowing through the gap between glazing and
shading device]
+ [Convective heat flow to the zone from the zone side of the shading device]
+ [Net IR heat flow to the zone from the zone side of the glazing]
+ [Net IR heat flow to the zone from the zone side of the shading device]
– [Short-wave radiation from zone transmitted back out the window]
+ [Conduction to zone from window frame and divider, if present]
· Walls - heat gain due to conduction through all external walls, including the effect of solar radiation
and longwave radiation to the sky.
· Roofs - heat gain due to conduction through all external roofs, including the effect of solar radiation
and longwave radiation to the sky.
· Ceilings (int) - heat conduction gain through internal ceilings (e.g. zone above is colder).
· Floors (int) - heat conduction gain through internal floors (e.g. zone below is colder).
· Floors (ext) - heat conduction gain through external floors (not ground floor, e.g. floor in
© 2008 DesignBuilder Software, Ltd.
412
DesignBuilder 1.5
cantilevered space, roof eaves etc).
· Ground floors - heat conduction gain through ground floors.
· Partitions (int) - heat conduction gain due to heat conduction through all internal partitions from
adjacent zones at different temperatures.
· Doors and vents - conduction heat gain through doors and vents.
· External Infiltration - heat gain through air infiltration (non-unintentional air entry through cracks
and holes in building fabric).
· External Natural Ventilation - heat gain due to the entry of outside air through natural ventilation
(as defined on the HVAC tab).
· Internal Natural Ventilation - heat gain from other zones due to air exchange through open
internal windows, doors, vents, holes and virtual partitions.
· External Mechanical Ventilation - heat gain due to the entry of outside air through the air
distribution system. You can exclude mechanical ventilation from the cooling design calculations by
unchecking the 'Mechanical ventilation On' Model data.
· Task Lighting - heat gain due to task lighting.
· General Lighting - heat gain due to general lighting.
· Miscellaneous - heat gain due to miscellaneous equipment.
· Process - heat gain due to process equipment.
· Catering - heat gain due to cooking.
· Computer and Equipment - heat gain due to computer and other IT-related equipment.
· Occupancy - sensible gain due to occupants. Please note that this can vary depending on the
internal conditions. With very high temperatures the sensible gain can drop to zero with all cooling
effects taking place through latent heat transfer.
· Solar Gains Exterior Windows - (used to be called 'Transmitted solar gains'). Short-wave solar
radiation transmission through external windows. For a bare window, this transmitted radiation
consists of solar radiation passing through the glass and diffuse radiation from solar reflected from
the outside window reveal, if present. For windows with a shade, this transmitted radiation is totally
diffuse (shades are assumed to be perfect diffusers). For windows with a blind, this transmitted
radiation consists of beam + diffuse radiation that passes between the slats and diffuse radiation
from beam-to-diffuse reflection from the slats. Solar re-reflected back out of the external window
and transmitted through interior windows is not subtracted.
Solar Gains Interior Windows - Total beam + diffuse solar radiation transmission through interior
windows. Requires the 3-Full interior and exterior solar model option to be set.
· Zone/Sys sensible cooling - is the sensible cooling effect on the zone of any air introduced into
the zone through the HVAC system. It includes any 'free cooling' due to introduction of relatively
cool outside air. Cooling always shows as a negative heat gain in the results. It is best thought of as
part of the zone heat balance.
Airflow
· Mech Vent + Nat Vent + Infiltration - The sum of outside air (in ac/h) flowing into the zone
through:
· The HVAC air distribution system +
· Infiltration +
· Natural ventilation
System Heat Flows (Compact HVAC only)
These heat flows are plotted on the same axes as the Internal Gains but they should really have their own
graph because they do not play a part in the zone heat balance.
· Zone Heating - energy supplied by local room heaters and reheat coils to maintain room internal
heating temperature setpoint temperature when using Compact HVAC data.
· Total Cooling - at building level: sensible + latent cooling transfer to the supply air from the AHU
cooling coil + any single zone unitary and fan coil units in the building. At zone level: sensible +
latent cooling transfer to the supply air from a single zone unitary or fan coil unit.
© 2008 DesignBuilder Software, Ltd.
Calculations
413
· Sensible Cooling - sensible only cooling transfer from the cooling coil to the supply air. Latent coil
heat can be calculated as the difference: Total Cooling - Sensible Cooling.
Surface heat gain data refers to heat transfer from the inside surface of the building elements to the zone.
You can also customise the data and the way it is displayed using the Display Options panel.
© 2008 DesignBuilder Software, Ltd.
414
DesignBuilder 1.5
© 2008 DesignBuilder Software, Ltd.
Calculations
7.2.3
415
Display Options
You can review Cooling design output in 2 ways:
· Detailed results - half-hourly heat balance and inside conditions displayed on 'Analysis' tab.
· Summary table - cooling capacity data for each zone on the Summary tab.
To update the data using different calculation options, click Update (Ctrl-U).Data Options
The General tab on the Cooling design Display options panel provides options for controlling the data
displayed in the Simulation data display screen. General Display options are grouped under three
headers:
· Data - control the data displayed.
· Y-axis - for customising the layout of the Y-axis.
· Appearance - for customising the style and appearance of the graphics.
The Detailed tab on the Display Options panel provides controls which allow you to select exactly the data
items you wish to display.
DATA OPTIONS
Data
Select an option to indicate the data you wish to display:
· 1-All - fabric and ventilation heat gains/losses, internal gains (not Heating Design), temperatures
and outside dry-bulb air temperature.
· 2-Site data - all site data.
· 3-Comfort - inside air, the radiant and comfort temperatures, relative humidity, ASHRAE 55 and
various comfort indices.
· 4-Internal gains - internal gains including equipment, lighting, occupancy, solar and HVAC heating/
cooling delivery.
· 5-Fabric and ventilation - heat gains to the space from the surface element (walls, floors, ceilings
etc.) and ventilation. Negative values indicate heat loss from the space.
Tip: to update the data using different calculation options, click Update (Ctrl-U).
Show as
You can display the data in one of four ways:
·
·
·
·
Graph
Grid
Graph and table
Table
Note: you must select the Grid option to export data in spreadsheet format.
Normalise by floor area
Check this option if you wish data to be displayed 'per floor area' i.e. /m2 or /ft2. You can select the area
© 2008 DesignBuilder Software, Ltd.
416
DesignBuilder 1.5
to use as the denominator from:
· 1-All areas - Total area is used,
· 2-Occupied area - just occupied areas are used.
Note: you can only select 1-All areas if the building and block data includes occupied areas as set in
Include unoccupied zones in block and building totals and averages option in Cooling design Output
options, Likewise you can only select 2-Occupied area if the building and block data excludes occupied
areas.
Y-AXIS OPTIONS
These options give you control over how the Y-axis is displayed.
Lock min/max
This option locks the extent of the Y-axes so that they keep their current
maximum and minimum values. This allows consistent comparison with the future results display. The Yaxis keeps its current settings until you unlock it again.
You can achieve the same effect by clicking on the 'Lock Y-axis min/max values' toolbar command.
When you lock the Y-axis the current settings are stored and displayed for each of the available Y-axes.
You can edit any of these to get a more precise setting. Remember to click on the Apply button when you
are ready to register a change to any numeric display option data.
Overlap multiple axes
Option allows you to save space on the Y-axis allowing different axes to overlap.
Separate axes
Check this option to add a vertical space between each of the displayed axes.
© 2008 DesignBuilder Software, Ltd.
Calculations
417
Normalise by floor area
Check this option if you wish data to be displayed 'per floor area' i.e. /m2 or /ft2.
APPEARANCE
You can control the details of the presentation of the graphical output by making selections on the Display
Options panel under the Appearance header.
ENERGYPLUS SCRIPT
You can view the input data script used to calculate these results by selecting the 'Tools | Display
simulation input script' menu option. If you do not have the EnergyPlus IDF editor installed, then you
should associate the .idf file extension with a text editor to make this option work.
Note: this shows the script stored with the model just before the simulation not the in.idf file stored in the
EnergyPlus folder.
7.2.4
Summary table
The Summary screen shows design cooling loads and flow rates for each zone plus other related data.
· Design Capacity, shown in bold, is the maximum value of Total Cooling Load and Sensible
multiplied by the Design margin to give the design cooling capacity of the equipment. This value is
written into the Cooling capacity Model Data on the HVAC tab if the appropriate Plant sizing Model
Option is set.
· Design Flow Rate, shown in bold, is the flow rate required to deliver the Sensible cooling load
using the Design supply temperature and the zone air temperature at the time of the maximum
load multiplied by the Design margin.
· Total Cooling Load is the total maximum Sensible + Latent loads for the zone at the time of
maximum sensible load. If latent load is negative then it is ignored here and the Total Cooling Load
is the same as the Sensible load.
· Sensible is the maximum sensible load for the zone in the Design day.
· Latent is the latent load for the zone at the time of maximum Sensible load.
· Op Temperature is the Operative temperature in the zone (using radiant fraction = 0.5) at the time
of maximum Sensible load.
· Humidity is the humidity (%) in the zone at the time of maximum Sensible load.
· Time of Max Cooling - the time at which the maximum sensible cooling occurs.
· Max Op Temp in Day is the maximum operative temperature in the zone (using radiant fraction =
0.5) over the design day including periods when the zone may be unconditioned.
· Floor area is the floor area of the zone.
· Volume is the volume of the zone.
· Flow/Floor area (MBH/ft2 in IP units) is the Design Flow Rate divided by the Floor area of the
zone. It provides a useful check for the flow rates calculated.
© 2008 DesignBuilder Software, Ltd.
418
DesignBuilder 1.5
Use the Export command to export this data in spreadsheet format.
7.3
Simulation
You can generate detailed building energy performance data based on simulations using real weather
data.
Click on the Simulation Screen tab to view simulation data. If the necessary data has not yet been
generated, a simulation is automatically started to generate the data.
Simulations using EnergyPlus have the following characteristics:
·
·
·
·
·
Weather data comes from Hourly weather data file.
Includes consideration of heat conduction and convection between zones of different temperatures.
Includes solar gain through windows.
Simulation of HVAC equipment (options)
Includes one or more 'warmup' days to ensure correct distribution of heat in building thermal mass
and the start of the simulation. Warmup continues until temperatures/heat flows in each zone have
converged. If convergence does not occur then simulation continues for the maximum number of
days as specified in the calculation options.
Customise the data displayed and display style using the Display Options panel.
7.3.1
Calculation Options
These options control the simulation and the output produced.
Click on the OK button to start the Simulation.
© 2008 DesignBuilder Software, Ltd.
Calculations
419
GENERAL
Calculation description
Enter some text to identify the calculation. This will be used in reports and in the filename for automatically
generated ESO files.
Simulation Period
The simulation period is described in the help for the Model options.
Interval
Monthly and annual output is always generated and daily, hourly and sub-hourly data can selected by
checking the appropriate boxes.
Note: selecting output at hourly or sub-hourly intervals can produce large amounts of data which slows
processing and results in large file sizes. If you want to generate hourly or sub-hourly data you may wish
to consider switching off some of the Output options to ensure you are only generating the data you
require.
Auto-Update
This dialog is always shown when you select 'Update' and will also be shown before all simulations if
'Don't show this dialog' at the bottom is cleared.
OPTIONS
See Help for Simulation calculation options tab of the Model Options dialog.
© 2008 DesignBuilder Software, Ltd.
420
7.3.2
DesignBuilder 1.5
Display Options
The General tab on the Simulation Display Options Panel provides
options for controlling the data displayed in the Simulation data display screen. General Display Options
are grouped under three headers:
· Data - control the data displayed.
· Y-axis - for customising the layout of the Y-axis.
· Appearance - for customising the style and appearance of the graphics.
The Detailed tab on the Display Options panel provides controls which allow you to select exactly the data
items you wish to display.
DATA OPTIONS
Interval
Select an interval from the list:
· 1-Annual - show data for the entire simulation.
· 2-Monthly - show data broken down by month.
· 3-Daily - show data broken down by day.
© 2008 DesignBuilder Software, Ltd.
Calculations
421
· 4-Hourly - show hourly data. Useful for checking operation of equipment and comfort conditions for
particular design periods.
· 5-Sub-hourly - show data recorded at time step intervals (2 and 6 intervals per hour depending on
the 'Time steps per hour' calculation option). Useful for detailed checking of building performance.
· 6-Distribution - temperature distribution curves showing 'hours at', 'hours below' and 'hours above'
temperature levels in 1°C temperature intervals during the occupied period. Note that 'Data' (below)
should be set to 3-Comfort to get temperature distribution curves.
Note: be aware that requesting Hourly and Sub-hourly results in large buildings and/or long simulation
periods can result in very large data sets which take a long time to read in after the simulation.
Data
Select an option to indicate the data you wish to display:
· 1-All - fabric and ventilation heat gains/losses, internal gains (not Heating Design), temperatures
and outside dry-bulb air temperature.
· 2-Site data - all site data.
· 3-Comfort - inside air, the radiant and comfort temperatures, relative humidity, ASHRAE 55 and
various comfort indices. If you set Interval to 6-Distribution you get temperature distribution curves.
· 4-Internal gains - internal gains including equipment, lighting, occupancy, solar and HVAC heating/
cooling delivery.
· 5-Fabric and ventilation - heat gains to the space from the surface element (walls, floors, ceilings
etc.) and ventilation. Negative values indicate heat loss from the space.
· 6-Fuel breakdown - fuel consumption broken down by system category (building level only).
· 7-Fuel totals - fuel consumption broken down by fuel (building level only)
· 8-CO2 production - CO2 production by weight (building level only)
Click here for information on the meaning of the data.
Tip: to update the data using different calculation options, click Update (Ctrl-U).
Show as
You can display the data in one of four ways:
·
·
·
·
Graph
Grid
Graph and table
Table
Note: you must select the Grid option to export data in spreadsheet format.
Days per Page (Simulation only)
DesignBuilder displays all simulation results together, but you can select how many days are displayed at
any one time using The 'Days displayed per page' option. A value of 365 means you will show all
simulation data on the same screen and a value of 1 means you see each day on a separate screen.
Note: you can use the horizontal scroll bar at the bottom of the graph to see simulation results not
currently displayed.
Normalise by floor area
Check this option if you wish data to be displayed 'per floor area' i.e. /m2 or /ft2. You can select the area
© 2008 DesignBuilder Software, Ltd.
422
DesignBuilder 1.5
to use as the denominator from:
· 1-All areas - Total area is used,
· 2-Occupied area - just occupied areas are used.
Note: you can only select 1-All areas if the building and block data includes occupied areas as set in
Include unoccupied zones in block and building totals and averages option in Simulation Output
options, Likewise you can only select 2-Occupied area if the building and block data excludes occupied
areas.
Y-AXIS OPTIONS
These options give you control over how the Y-axis is displayed.
Lock min/max
This option locks the extent of the Y-axes so that they keep their current
maximum and minimum values. This allows consistent comparison with the future results display. The Yaxis keeps its current settings until you unlock it again.
You can achieve the same effect by clicking on the 'Lock Y-axis min/max values' toolbar command.
When you lock the Y-axis the current settings are stored and displayed for each of the available Y-axes.
You can edit any of these to get a more precise setting. Remember to click on the Apply button when you
are ready to register a change to any numeric display option data.
Overlap multiple axes
Option allows you to save space on the Y-axis allowing different axes to overlap.
Separate axes
Check this option to add a vertical space between each of the displayed axes.
© 2008 DesignBuilder Software, Ltd.
Calculations
423
APPEARANCE
You can control the details of the presentation of the graphical output by making selections on the Display
Options panel under the Appearance header.
7.3.3
Detailed Results
It is important to understand when looking at the 'Zone heat balance' data that the values do not
necessarily add to zero because:
1. Solar radiation values reported by EnergyPlus are gross values and do not account for the radiation rereflected back out of internal and external windows. EnergyPlus tracks solar radiation in full detail but
does not report all of the calculated values. It is not currently possible to generate net solar radiation
gains from EnergyPlus.
2. Heat transfer gains between the zone and the surfaces cannot be added directly to ventilation gains
because they are to different 'points' in the zone heat balance (surface heat transfer is to the 'rad-air'
point and ventilation is to the 'air' point).
3. Minor EnergyPlus bug in reporting of conduction through window frames causes a minor error in
Glazing heat gain reported values.
The main Display options are in the bottom left of the screen. They allow you to control the content of the
Detailed data and also the Display style.
The 'Analysis' tab has detailed simulation results (displayed as a line graph by default).
For more on how the output is calculated see: Calculation of DesignBuilder Output from EnergyPlus
Report Variables.
Environmental/Comfort Output
· Air Temperature - the calculated average temperature of the zone air.
· Radiant Temperature - the average zone Mean Radiant Temperature (MRT) of the zone,
calculated assuming that the person is in the centre of the zone, with no weighting for any particular
surface.
· Operative Temperature - The mean of the zone air and radiant temperatures.
· Outside Dry-Bulb Temperature.
· Relative Humidity - the calculated average relative humidity of the air.
· Fanger PMV - Fanger Predicted Mean Vote
· Pierce PMV ET - the Predicted Mean Vote (PMV) calculated using the effective temperature and
the Pierce two-node thermal comfort model.
· Pierce PMV SET - the Predicted Mean Vote (PMV) calculated using the 'Standard' effective
temperature and the Pierce two-node thermal comfort model.
· Pierce Discomfort Index (DISC) - the Discomfort index calculated using the Pierce two-node
thermal comfort model.
· Pierce Thermal Sens. Index (TSENS) - the Thermal Sensation Index (PMV) calculated using the
Pierce two-node thermal comfort model.
· Kansas Uni TSV - the Thermal Sensation Vote (TSV) calculated using the KSU two-node thermal
comfort model.
· Discomfort hrs (summer clothing) - the time when the zone is occupied that the combination of
humidity ratio and operative temperature is not in the ASHRAE 55-2004 summer clothes region.
· Discomfort hrs (winter clothing) - the time when the zone is occupied that the combination of
© 2008 DesignBuilder Software, Ltd.
424
DesignBuilder 1.5
humidity ratio and operative temperature is not in the ASHRAE 55-2004 winter clothes region.
· Discomfort hrs (all clothing) - the time when the zone is occupied that the combination of
humidity ratio and operative temperature is not in the ASHRAE 55-2004 summer or winter clothes
region.
More on Comfort Analysis...
Fabric and ventilation
· Glazing - the total heat flow to the zone from the glazing, frame and divider of exterior glazing
excluding transmitted short-wave solar radiation (which is accounted for in Solar Gains Exterior
Windows below).
For windows without an interior shading device this heat flow is equal to:
+ [Convective heat flow to the zone from the zone side of the glazing]
+ [Net IR heat flow to the zone from zone side of the glazing]
– [Short-wave radiation from zone transmitted back out the window]
+ [Conduction to zone from window frame and divider, if present]
Here, short-wave radiation is that from lights and diffuse interior solar radiation.
For windows with an interior shading device this heat flow is equal to:
[Convective heat flow to the zone from the air flowing through the gap between glazing and
shading device]
+ [Convective heat flow to the zone from the zone side of the shading device]
+ [Net IR heat flow to the zone from the zone side of the glazing]
+ [Net IR heat flow to the zone from the zone side of the shading device]
– [Short-wave radiation from zone transmitted back out the window]
+ [Conduction to zone from window frame and divider, if present]
· Walls - heat gain due to conduction through all external walls, including the effect of solar radiation
and longwave radiation to the sky.
· Roofs - heat gain due to conduction through all external roofs, including the effect of solar radiation
and longwave radiation to the sky.
· Ceilings (int) - heat conduction gain through internal ceilings (e.g. zone above is colder).
· Floors (int) - heat conduction gain through internal floors (e.g. zone below is colder).
· Floors (ext) - heat conduction gain through external floors (not ground floor, e.g. floor in
cantilevered space, roof eaves etc).
· Ground floors - heat conduction gain through ground floors.
· Partitions (int) - heat conduction gain through all internal partitions (e.g. adjacent zone is colder).
· Doors and Vents - conduction heat gain through doors and vents.
· External Infiltration - heat gain through air infiltration (non-unintentional air entry through cracks
and holes in building fabric) when using Simple natural ventilation option.
· External Natural Ventilation - heat gain due to the entry of outside air through natural ventilation,
as defined on the HVAC tab, when using Simple natural ventilation option.
· Internal Natural Ventilation - heat gain from other zones due to air exchange through open
internal windows, doors, vents, holes and virtual partitions.
· External Mechanical Ventilation - heat gain due to the entry of outside air through the air
distribution system. You can exclude mechanical ventilation from the cooling design calculations by
unchecking the 'Air Distribution On' Model Data.
· External Air - heat gain due to the entry of outside air through external windows, vents, doors,
holes and cracks when using Calculated natural ventilation option.
· Mixing Air - heat gain due to the entry of inside mixing air through internal windows, vents, doors
and holes when using Scheduled natural ventilation option.
© 2008 DesignBuilder Software, Ltd.
Calculations
425
Airflow
· Mech Vent + Nat Vent + Infiltration - The sum of outside air (in ac/h) flowing into the zone
through:
· The HVAC air distribution system +
· Infiltration +
· Natural ventilation
Internal Gains
·
·
·
·
·
·
·
·
·
·
·
Task Lighting - heat gain due to task lighting.
General Lighting - heat gain due to general lighting.
Miscellaneous - heat gain due to miscellaneous equipment.
Process - heat gain due to process equipment.
Catering - heat gain due to cooking.
Computer and Equipment - heat gain due to computer and other IT-related equipment.
Occupancy - sensible gain due to occupants. Please note that this can vary depending on the
internal conditions. With very high temperatures the sensible gain can drop to zero with all cooling
effects taking place through latent heat transfer.
Solar Gains Exterior Windows - (used to be called 'Transmitted solar gains'). Short-wave solar
radiation transmission through all external windows. For a bare window, this transmitted radiation
consists of solar radiation passing through the glass and diffuse radiation from solar reflected from
the outside window reveal, if present. For windows with a shade, this transmitted radiation is totally
diffuse (shades are assumed to be perfect diffusers). For windows with a blind, this transmitted
radiation consists of beam + diffuse short-wave radiation that passes between the slats and diffuse
radiation from beam-to-diffuse reflection from the slats. The heating effect of solar radiation on
opaque roofs and walls is accounted for in the Roofs and Walls fabric heat conduction data. Solar
re-reflected back out of the external window and transmitted through interior windows is not
subtracted.
Solar Gains Interior Windows - Total beam + diffuse solar radiation transmission through interior
windows. Requires the 3-Full interior and exterior solar model option to be set.
Zone/Sys Sensible Cooling - is the sensible cooling effect on the zone of any air introduced into
the zone through the HVAC system. It includes any 'free cooling' due to introduction of relatively
cool outside air and the heating effect of any fans present. Cooling always shows as a negative heat
gain in the results. It is therefore not the same as a cooling coil energy delivery when mechanical
ventilation is involved. It is best thought of as the HVAC cooling contribution to the zone heat
balance.
Zone/Sys Sensible Heating - is the sensible heating effect of any air introduced into the zone
through the HVAC system including any 'free heating' due to introduction of relatively warm outside
air and the heating effects of fans. It is therefore not the same as a heating coil energy delivery
when mechanical ventilation is involved. It is best thought of as the HVAC heating contribution
to the zone heat balance.
Surface heat gain data refers to heat transfer from the inside surface of the building elements to the zone.
Note: taken together the Internal gains and the Fabric and ventilation data above give an approximate
Zone Heat Balance, i.e. the data represents all of the heat flows into and out of the zone.
Technical Note
System Heat Flows (Compact HVAC only)
These heat flows are plotted on the same axes as the Internal Gains but they should really have their own
graph because they do not play a part in the zone heat balance.
© 2008 DesignBuilder Software, Ltd.
426
DesignBuilder 1.5
· Zone Heating - energy supplied by local room heaters and reheat coils to maintain room internal
heating temperature setpoint temperature when using Compact HVAC data.
· Preheat - energy supplied by preheat coils to temper the outside air before it enters the outside air
mixing box when using Compact HVAC data.
· AHU Heating - energy supplied by the AHU heating coil when using Compact HVAC data.
· Total Cooling - at building level: sensible + latent cooling transfer to the supply air from the AHU
cooling coil + any single zone unitary and fan coil units in the building. At zone level: sensible +
latent cooling transfer to the supply air from a single zone unitary or fan coil unit.
· Sensible Cooling - sensible only cooling transfer from the cooling coil to the supply air. Latent coil
heat can be calculated as the difference: Total Cooling - Sensible Cooling.
· Heat Recovery Sensible Cooling - the sensible cooling rate of the supply air by the heat
exchanger. This rate is determined using the supply air mass flow rate through the heat exchanger
unit, the supply air inlet and outlet conditions, and the specific heat of the inlet supply air. A positive
value is reported if the supply air is cooled by the heat exchanger, else the rate is set to zero.
· Heat Recovery Total Cooling - the total cooling rate of the supply air by the heat exchanger. This
rate is determined using the supply air mass flow rate through the heat exchanger unit, and the
enthalpy of the supply air entering and leaving the unit. A positive value is reported if the enthalpy of
the supply air is decreased by the heat exchanger, else the rate is set to zero.
· Heat Recovery Sensible Heating - the sensible heating rate of the supply air by the heat
exchanger. This rate is determined using the supply air mass flow rate through the heat exchanger
unit, the supply air inlet and outlet conditions, and the specific heat of the inlet supply air. A positive
value is reported if the supply air is heated by the heat exchanger, else the rate is set to zero.
· Heat Recovery Total Heating - the total heating energy added to the supply air by the heat
exchanger.
BUILDING LEVEL ONLY
Fuel breakdown
The data for fuel consumption for building level broken down by end-use:
· Heat Generation - total fuel consumption due to operation of heat generators such as boilers and
heat pumps.
· Chiller - total chiller fuel consumption.
· Fans - total electrical energy consumed by HVAC fans.
· Pumps - total electrical energy consumed by HVAC pumps.
· Preheat - heating energy transferred from main plant preheat coils to HVAC system air when using
Compact HVAC data.
· Lighting - electricity consumed by general and task/display lights.
· Room Electricity - electricity consumed by room equipment other than lights (computers,
equipment, process etc).
· Room Gas - gas consumed by room equipment (miscellaneous, process and catering)
· Room Oil - oil consumed by room equipment (miscellaneous, process and catering)
· Room Solid - solid fuel (such as coal) consumed by room equipment (miscellaneous, process and
catering)
· Room Bottled gas - bottled gas (propane) consumed by room equipment (miscellaneous, process
and catering)
· Room Other - other fuel consumed by room equipment (miscellaneous, process and catering)
Fuel totals
Total fuel consumption for building, data available at building level only:
· Electricity - total building electricity consumption.
© 2008 DesignBuilder Software, Ltd.
Calculations
·
·
·
·
·
427
Gas - fuel consumption total building gas consumption.
Oil - total building or oil consumption.
Solid - total building solid fuel consumption.
Bottled gas - total building gas consumption.
Other fuel consumption - total consumption of all other fuels.
CO2 production
Total carbon dioxide emission for building, data available at building level only:
· CO2 - total CO2 emissions mass.
Site Weather data
Weather data stored at the site level and derived from the hourly weather file:
·
·
·
·
·
·
·
·
·
Outside Dry-Bulb Temperature
Outside Dew-Point Temperature
Direct Normal Solar
Diffuse Horizontal Solar
Wind Speed
Wind Direction
Atmospheric Pressure
Solar Altitude
Solar Azimuth
Note: although Site weather data is stored at the Site level, it can be displayed at Building, Block and
Zone levels too.
7.3.4
Comfort Analysis
DesignBuilder can generate extensive data on environmental conditions within the building and resultant
occupant comfort levels. The following comfort-related output is available:
· Internal air temperature - the calculated average temperature of the air.
· Internal radiant temperature - the average Mean Radiant Temperature (MRT) of the zone,
calculated assuming that the person is in the centre of the zone, with no weighting for any particular
surface.
· Internal operative temperature - The mean of the internal air and radiant temperatures.
· Outside dry-bulb temperature - site data.
· Relative Humidity - the calculated average relative humidity of the air.
· Fanger PMV - Fanger Predicted Mean Vote
· Pierce PMV ET - the Predicted Mean Vote (PMV) calculated using the effective temperature and
the Pierce two-node thermal comfort model.
· Pierce PMV SET - the Predicted Mean Vote (PMV) calculated using the 'Standard' effective
temperature and the Pierce two-node thermal comfort model.
· Pierce Discomfort Index (DISC) - the Discomfort index calculated using the Pierce two-node
thermal comfort model.
· Pierce Thermal Sens. Index (TSENS) - the Thermal Sensation Index (PMV) calculated using the
Pierce two-node thermal comfort model.
· Kansas Uni TSV - the Thermal Sensation Vote (TSV) calculated using the KSU two-node thermal
© 2008 DesignBuilder Software, Ltd.
428
DesignBuilder 1.5
comfort model.
· Discomfort hrs (summer clothing) - the time when the combination of zone humidity ratio and
operative temperature is not in the ASHRAE 55-2004 summer clothes region.
· Discomfort hrs (winter clothing) - the time when the combination of zone humidity ratio and
operative temperature is not in the ASHRAE 55-2004 winter clothes region.
· Discomfort hrs (all clothing) - the time when the combination of zone humidity ratio and operative
temperature is not in the ASHRAE 55-2004 summer or winter clothes region.
· Mech Vent + Nat Vent + Infiltration - The sum of outside air (in ac/h) flowing into the zone
through:
· The HVAC air distribution system +
· Infiltration +
· Natural ventilation
The Discomfort hrs data above is equivalent to ASHRAE 'unmet load hours'.
The above data can be displayed at all time increments. In addition, air, radiant and operative
temperatures can be displayed as distribution curves (below).
You can find more detailed information about Fanger, Pierce and Kansas State University Thermal
comfort prediction algorithms in the EnergyPlus Background Section.
The Mech Vent + Nat Vent + Infiltration data is the sum of fresh air delivered through the HVAC system,
infiltration and natural ventilation outside airflow in air changes per hour (ac/h). When used together with
the other environmental output it can be very useful in checking for occupant discomfort.
Note: It is possible to display comfort data for occupied periods only by selecting 2-Just occupied
periods as Zone environmental and comfort reports on the Output tab of the simulation options dialog.
This option applies to all data described in this Comfort Analysis help section.
© 2008 DesignBuilder Software, Ltd.
Calculations
429
Example Hourly Comfort Data
TEMPERATURE DISTRIBUTION
if you requested Temperature distribution data prior to the simulation, you can generate temperature
distribution curves showing 'hours at', 'hours below' and 'hours above' temperature levels in 1°C
temperature intervals during the occupied period. To view temperature distribution data set the Interval in
the Display Options panel to "Distribution". This data can be useful for getting an overview of the levels of
comfort (or otherwise) provided by the building over time. The results can be compared with benchmark
comfort criteria.
For example, CIBSE provides recommended benchmark summertime peak temperatures and
overheating criteria as follows:
Offices, schools, dwellings (living areas) should have no more than 1% of the annual occupied hours over
operative temperature of 28°C. Bedrooms in dwellings should have no more than 1% of the annual
occupied hours over operative temperature of 26°C.
UK DfES Building Bulletin BB87 recommends an allowable overheating criteria of 80 occupied hours in a
year over and air temperature of 28°C.
Note: Temperature distribution data is only available at zone level.
© 2008 DesignBuilder Software, Ltd.
430
DesignBuilder 1.5
Example Temperature Distribution Output
SIMPLIFIED ASHRAE 55-2004 GRAPH RELATED OUTPUTS
The Discomfort hours data is based on whether the humidity ratio and the operative temperature is within
the region shown in ASHRAE Standard 55-2004 in Figure 5.2.1.1. For these outputs the operative
temperature is simplified to be the average of the air temperature and the mean radiant temperature. For
summer, the 0.5 Clo level is used and, for winter, the 1.0 Clo level is used. The graphs below are based
on the following tables which extend the ASHRAE values to zero humidity ratio.
In some cases you may find a large number of discomfort hours for a particular zone even though the air
temperature in the space is within normal ranges. If this happens you should check:
1. Operative temperatures which can be very different in highly glazed spaces in the summer or poorly
insulated spaces in the winter.
2. Humidity levels are within range - you may find very high or very low humidity caused by inadequate
ventilation. Note that the minimum comfort temperature with winter clothes when the air is very dry
is 21.7°C / 71°F which may be lower than some heating temperature setpoints. Likewise in the
summer when the air is very humid operative temperatures above 26.8°C / 80.2°F are considered
too hot with summer clothes.
Winter Clothes
© 2008 DesignBuilder Software, Ltd.
Calculations
Summer Clothes
© 2008 DesignBuilder Software, Ltd.
431
432
DesignBuilder 1.5
© 2008 DesignBuilder Software, Ltd.
Section
8
Visualisation
434
DesignBuilder 1.5
The Visualisation screen allows you to view the model in full 3-D rendered mode. This section describes
the process of creating and controlling rendered images.
From the Visualisation screen you can export rendered images in various formats and also generate AVI
movies of the scene.
To render a model, click on the Visualisation tab:
which takes you to the Visualisation screen:
© 2008 DesignBuilder Software, Ltd.
Visualisation
8.1
Controls
The following controls are available to customise the view:
·
·
·
·
·
·
View Rotation
Orbit
Zoom
Fit view
Pan view
Zoom window
Controls are also provided to customise the rendered image:
·
·
·
·
Show shadows
Antialiasing
Show north arrow
Dynamics
These controls are accessed from the Display Options panel on the Visualisation screen:
© 2008 DesignBuilder Software, Ltd.
435
436
8.1.1
DesignBuilder 1.5
Show Shadows, Time, Day, Month
Display options on Visualisation screen
You can incorporate solar shading within the rendered model view by switching the 'Show shadows' check
box on and then clicking on the 'Apply' button:
© 2008 DesignBuilder Software, Ltd.
Visualisation
437
After clicking on the 'Apply' button, a progress control appears to inform of shadow generation and then
the view is updated:
The month, day and time-of-day can be controlled using the 'Period' controls. Note that the time specified
here is local mean time excluding any daylight saving. You can account for daylight saving time by adding
1 hour to the local mean time during summer months to see shading for clock time.
Note in versions 1.3.4 and later, time is defined in decimal hours, e.g. '10.5' is the same as 10:30am.
© 2008 DesignBuilder Software, Ltd.
438
DesignBuilder 1.5
If you want to look at much more detailed shading, you can include the window frame dividers in the
shading calculations by switching on the 'Show window frame shadows' check box and clicking the 'Apply'
button:
© 2008 DesignBuilder Software, Ltd.
Visualisation
8.1.2
439
Show North Arrow
Display options on Visualisation screen
Use this control to switch the display of the North direction arrow on or off.
8.1.3
Antialiasing
Display options on Visualisation screen
The antialiasing option can be used to improve image quality. You may need to experiment with
antialiasing to confirm whether or not the graphics card fitted to your computer will facilitate this feature with some earlier cards, antialiasing can be very slow.
Tip: more advanced graphics cards can provide hardware antialiasing and in this case this software
antialiasing option may only provide marginal benefit.
To enable antialiasing, switch the Antialiasing check box on and click on the Apply button:
You can improve the quality of the image using the Increasing Quality slider control:
© 2008 DesignBuilder Software, Ltd.
440
DesignBuilder 1.5
Bear in mind that as you increase image quality, the display speed will decrease.
8.1.4
Dynamics
Display option on Visualisation screen
With larger and more complex models, orbit and zoom control speed can be increased very significantly
by selecting 'Wireframe' from the 'Dynamics' control drop list.
8.2
Creating Movies
You can create AVI movies of your model using this feature. To create a movie, click on the 'Generate
AVI movie' tool which opens the 'Movie options data' dialogue box:
© 2008 DesignBuilder Software, Ltd.
Visualisation
441
Use the 'Type' drop list to select either:
· Shading for design day - fixed camera position, varying the solar position over the design day as
specified on the Visualisation Data Options panel.
· Orbit - 360° orbit movie.
Click on the OK button to generate the movie. After the movie generation has completed, a file save
dialogue will be displayed to allow you to save the movie file to any required location.
Note: smaller 'Shading time increments' and 'Orbit increments' can generate a lot of data and take a long
time to complete movie generation, especially when software antialiasing is switched on.
© 2008 DesignBuilder Software, Ltd.
Section
9
Reporting
Reporting
443
You can use DesignBuilder to generate reports using the Compile Reports and Report topic mechanism
or you can Export individual report content to file, clipboard (for pasting into word processors) or directly to
the printer.
9.1
Export Data
You can export data from DesignBuilder screens:
· Edit Screen - exports a non-rendered 3-D image of the building. Alternatively a 3-D DXF file can be
exported.
· Visualisation Screen - exports a rendered 3-D image of the building optionally including shading
and antialiasing..
· Heating and Cooling Design Screens - exports design data (graphical, tabular, spreadsheet).
· Simulation Screen - exports simulation data (graphical, tabular, spreadsheet).
You can export to a range of destinations (depending on the nature of the data):
·
·
·
·
File - store output in a file which can be imported into your documents/e-mails.
Printer - sends output directly to the printer.
Clipboard - for pasting directly into word processors etc.
Report topic - for generating reports using the Compile Reports feature.
Export format options depend on the nature of the data. The full range of options is:
·
·
·
·
·
·
·
·
·
Bitmap - best bitmap based output quality but very large file sizes.
PNG - better quality compression than JPEG but sometimes have larger file sizes.
TIFF - best bitmap based output quality but very large file sizes.
GIF - good compression but black and white only.
JPEG - recommended for 3-D images of the model because of its good quality combined with small
file sizes.
DXF - generate 3-D DXF data of the model - only available from Edit and Visualisation Screens.
The 3-D DXF file generated by DesignBuilder is suitable for reading into other CAD software. Two
options are available:
· 1-Whole model with details which includes all of the details of the model as seen on the
Visualisation tab, and,
· 2-Zones which generates the internal surfaces as used in simulations and other energy
calculations.
Windows metafile - results graphs only - scalable so graphs can be resized without losing quality.
CSV spreadsheet - grid results and library data only.
Text - reports only.
© 2008 DesignBuilder Software, Ltd.
444
9.2
DesignBuilder 1.5
Report Topics
Report topics are used to store snapshots of model data including model descriptions, graphic images of
the model and results.
You can export to a report topic by selecting 'Report topic' from the 'Export to' option on the Export Data
dialog. When Report topic is selected, a second tab becomes available called Report on which you can
enter a title and caption for the topic. You can also choose to include a model description with the topic.
This allows a building description to be included alongside the data when the report is compiled using the
Compile Report dialog.
Report topics are retained within the dsb file and are available for compiling into a report if the file is saved
and reloaded.
9.3
Compile Reports
The Compile Reports dialog allows you to control the generation of a report based on previously created
Report topics. Available report topics are listed and can be previewed by clicking on them.
The Title entered on this dialog is displayed in a table at the top of the report.
Check the checkbox to the left of the report topics to be included in the report and click on OK.
© 2008 DesignBuilder Software, Ltd.
Section
10
Program
Options
446
DesignBuilder 1.5
The program options apply to the overall application no matter which file is loaded. The program options
dialog is accessed from the Tools menu. There are six tabs:
·
·
·
·
·
·
User interface
Dialogs
Files
EnergyPlus
Limits
International
10.1
Dialogs
Calculation dialogs
These options control whether a calculation option dialog appears by default before every calculation.
Note that a dialog always appears when you press Update.
New object dialogs
When you create a new site or building, a dialog box appears by default allowing you to enter basic data
on the new object. If you prefer not to see these dialogs and just use default data, uncheck these two
check boxes.
10.2
Files
Backup
DesignBuilder can automatically make backups of your current working file. Check the 'Automatic backup'
option box and select a backup interval to enable this option.
If for any reason DesignBuilder does not close down cleanly and is unable to save, a backup will remain
and DesignBuilder will ask whether you want to recover this data the next time you open the file.
Default folders
DesignBuilder stores the most recently used folders for:
·
·
·
·
·
Data file storage
Picture file export
AVI file export
Report file export
DXF file import/export
You can edit these default folders on this tab.
© 2008 DesignBuilder Software, Ltd.
Program Options
10.3
447
User Interface
Learning mode
You should generally select Learning mode while you gain experience with DesignBuilder. In Learning
mode, the Info panel is shown to the right of the main screen, providing additional information and
commonly used tools relevant to each screen. Model Data is accessed from tabs along to the top of the
screen.
With Learning mode switched off, the Info window is not shown and Model data is shown on the right of
the screen alongside the Model edit screen. This allows you to see the effects of updates to data as they
are made.
Use Slider controls
Some significant data items are (by default) controlled using a 'slider' which allows rapid selection of
typical values. If however you need to enter precise values (for example when modelling an existing
building) you may prefer to type this data in a text box. In this case uncheck the 'Use slider controls' data.
Note: when using DesignBuilder with IP units, slider controls are always switched off regardless of this
setting.
Sort lists
By default DesignBuilder automatically sorts navigator and other data lists alphabetically. This can make it
easier to find the data you are looking for but also increases the time taken to generate lists and so slows
some program operations requiring lists to be generated. You can request unsorted lists by unchecking
this option.
Automatically refresh site navigator lists
By default DesignBuilder automatically refreshes the contents of the site navigator list on the left of the
screen as the building is modified. In large models frequent rebuilding of the navigator list can slow
progress especially when drawing partitions. Uncheck this option to avoid this problem.
You can manually refresh the navigator lists by clicking on the refresh list icon above the Navigator panel
(below).
Double-click to navigate site hierarchy
By default you can navigate to an object in the site hierarchy (building, block, zone etc) by single-clicking
in the Navigator. You can change this behaviour by checking Double-click to navigate site hierarchy. In
this case you must double-click to go to objects in the Navigator and a single click highlights the object in
the Edit view (if you are already at the level above). For example if you are at block level and you single
click on one of the zones in the block the zone is highlighted in red in the Edit view.
Note: disabling this option can be useful for identifying blocks, zones, surfaces by single-clicking in the
Navigator.
Show 'Load data from template' dialog when template selected
© 2008 DesignBuilder Software, Ltd.
448
DesignBuilder 1.5
When you select a new template by clicking on the browse button in the Model data, by default the data in
the template is loaded directly to the current object. However if this option the 'Load data from template'
dialog is opened giving you the opportunity to select various options and load other templates. This option
is switched off by default.
Show model data departures from template in bold
Select this option to show any differences in model data relative to the selected template in bold. This
option is switched on by default.
Default surface normal view
When working at surface level it can be useful to get a normal view of the surface by clicking on the
Normal button in the top right of the screen. By default this will show a normal view of the surface as
viewed from outside. You can use the Default surface normal view program option to instead view from
the inside.
Double buffer display dynamics
On some displays the screen is incorrectly refreshed when dragging a selection rectangle, resulting in a
series of lines left on the screen as the mouse moves (below). This problem does not affect the model but
you can avoid it by switching off double buffering on this dialog. On some graphics cards you may instead
be able to make a hardware setting to prevent this display problem.
Maximum characters shown in data display lists
You can control the number of characters displayed in data lists on the right hand panel. This provides a
workaround to a problem with the list component used in DesignBuilder which always scroll to the right
when an item with a long name is selected. This scrolling can be inconvenient so we have implemented
the option to control the amount of text displayed. By default this is set to 35 characters but you can use a
larger value if you prefer.
© 2008 DesignBuilder Software, Ltd.
Program Options
449
Show tooltips in Model data
With small window sizes or when Learning mode is switched off there is not always enough space to
display the caption for each Model data item so DesignBuilder provides the option for tooltips to appear
when the mouse hovers over a truncated caption. See screenshot below.
10.4
EnergyPlus
The screenshot below shows EP-Launch being used to control EnergyPlus simulations from
DesignBuilder.
© 2008 DesignBuilder Software, Ltd.
450
DesignBuilder 1.5
Note 1: If you use this method you must make sure to set the correct weather file manually.
Note 2: Any changes you make to the IDF data, either in the IDF Editor or using a text editor, will be
saved in a file called ip.inp in the EnergyPlus folder. This file will be overwritten the next time a simulation
is requested so if you wish to save the any changes you make to IDF data you should use the File >
Export option and edit the data and make simulations outside DesignBuilder.
EnergyPlus
You can select the version of EnergyPlus to use in your simulations. This can be useful to target a specific
DOE version you may wish to use or when a new version becomes available which might provide new
functionality or address previous problems.
© 2008 DesignBuilder Software, Ltd.
Program Options
451
You should generally select the recommended DLL option as it is more tightly integrated within
DesignBuilder and provides progress feedback.
DesignBuilder comes with 2 internal versions of EnergyPlus:
· DLL - the default option, runs the internal version of EnergyPlus supplied with the program
asynchronously giving visual feedback of progress and allowing interaction with the computer during
the simulation.
· Executable - an executable version of the program running in a command window.
...or you can select an executable version of EnergyPlus supplied by DOE. If you are exporting IDF data
for use outside DesignBuilder you should select the appropriate DOE version to avoid incompatibilities.
Note: the EnergyPlus version selected here is used for simulations within DesignBuilder but also as the
target version when exporting IDF data for use outside DesignBuilder.
Mode
If you select an executable version (internal or DOE) there are four options available to control the way
EnergyPlus is executed when simulating within DesignBuilder:
· 1-Executable (minimised) - runs the executable invisibly - you will just see a minimised window on
the Task bar but not the EnergyPlus command window.
· 2-Executable (visible) - runs the executable showing EnergyPlus screen output in a command
window.
· 3-Executable (debug) - runs the executable showing EnergyPlus screen output in a command
window and pauses after simulation - intended for advanced EnergyPlus users who may want to
see the stack dump following a crash.
· 4-Executable (EP-Launch) - runs the DOE-supplied EP-Launch program, waiting until this is
closed before loading results. This option is only possible if you have selected a DOE-supplied
version of the EnergyPlus executable. This option can be useful for making quick minor changes to
the IDF data prior to simulation. Any changes made to the IDF data from within EP-Launch will be
included in the simulation but will not be retained for future simulations. Info on the EP-Launch
option.
EnergyPlus export folder
When using a DOE EnergyPlus executable version you must also select the folder where the selected
version is installed. You can scan the disk for DOE installations by clicking on the link in the Info help
panel..
When you select any option other than the default DLL option, the necessary EnergyPlus files are
downloaded seamlessly prior to the first simulation following the change.
Note: If you wish to install a different DLL version of EnergyPlus to that which is recommended, you must
have administrative rights on the computer.
DesignBuilder are licensed distributors of EnergyPlus. All versions of EnergyPlus supplied by
DesignBuilder have been compiled by the DOE.
© 2008 DesignBuilder Software, Ltd.
452
DesignBuilder 1.5
ESO Output
You can generate ESO output files containing Heating design, Cooling design and Simulation results. The
files can be loaded later using the File > Load results file menu option, provided the model hasn't changed
too much.
Rules:
1. The DesignBuilder model must still have same zones and surfaces it had at the time the simulation
data was generated
2. If you have modified these files and carried out further simulations in EnergyPlus you should find
that the results will read in OK provided you haven't changed zone or surface names in the IDF
data.
3. You cannot read in ESO files generated from IDF data which was entered by hand (or by other
software) because the zone and surface references will be different.
4. Results must be loaded to the correct screen - you can't for example read Heating design results
into the Simulation screen.
5. Simulation only: the results to be read in must have been generated using the same simulation
period and number of timesteps currently set in the Simulation options.
If you choose to Save ESO simulation output then you can also select options to Prompt for filename
and Auto load ESO described below.
Prompt for filename
Tell DesignBuilder whether you wish to be prompted for a filename after each simulation. If you choose
not to be prompted then DesignBuilder will automatically generate output filenames based on the name of
the dsb file, the calculation type, the calculation description and the date. It places the file in the
EnergyPlus folder. If you choose to be prompted the file can be stored anywhere on your computer
system.
Auto load ESO
Check this option to automatically load the ESO results file after simulations. If you have been warned that
there will be a lot of data and the program may crash on reading results you may wish to switch this option
off and reload the results later. It is often possible to read in very large ESO files after DesignBuilder has
restarted following a simulation and this can be a useful for avoiding a crash due to too much data. You
may also wish to switch the option off to avoid waiting for the results to read in when carrying out
parametric simulations.
This option only refers to Simulation results no Heating/Cooling Design results.
IDF OPTIONS
Display extra warnings
Requesting Display extra warnings causes the statement:
Diagnostics,DisplayExtraWarnings;
to be included in the IDF data. This option is for experienced EnergyPlus users who understand the
significance of the extra warning messages generated.
IDF Formatting
The IDF data can be formatted using the options:
© 2008 DesignBuilder Software, Ltd.
Program Options
453
· 1-Full - indentation and comments are included in the IDF data
· 2-Basic - just indentation and comments required to reference the IDF objects with data in the
DesignBuilder model.
· 3-Compressed - the IDF data is fully compressed. Choose this option if your model is very large
and you wish to reduce the amount of IDF text being processed. When the IDF data uses more than
about 10MB of disk space DesignBuilder is unable to process the quantity of text involved and if this
happens when the 1-Full or 2-Basic options are set it will attempt to regenerate the IDF data using
the 3-Compressed option to reduce the memory requirement. If IDF data is being generated twice
before your simulations you can speed the process by selecting this option from the start ensuring
that IDF data is only generated once.
Options will be made available in future versions to ease reading of IDF data generated by DesignBuilder.
10.5
Limits
You can enter the maximum number of arc and circle segments if you have a special requirement.
10.6
International
Language
DesignBuilder currently supports 4 languages:
·
·
·
·
English (native language)
Italian (available from Evolvente only)
French
Spanish (still under development)
When you change the language you must restart DesignBuilder to see the full effect.
Units
DesignBuilder can be used either with SI units (metric) or IP units. Because the program uses SI units
internally, and because the databases which come with the program have been built up assuming SI
units, US users may find some limitations with the data supplied and with some aspects of the user
interface. These will be addressed in due course.
Region filter
The region filter allows you to see only the data relevant to your particular region. Note that if you have a
file loaded then DesignBuilder will use the region associated with the location of the site. The region in this
dialogue is only used when no file is loaded. Data tables which can be filtered in this way are:
·
·
·
·
·
·
·
Constructions
Glazing
Materials
Metabolic rates
Schedules
Holidays
Activity templates
© 2008 DesignBuilder Software, Ltd.
454
·
·
·
·
·
·
DesignBuilder 1.5
Construction templates
Glazing templates
Lighting templates
HVAC templates
DHW templates
Sectors
Show other region data
Use this option to display/hide component and template data from other regions.
Show 'General' data
Use this option to display/hide component and template data from the 'General' region. Options are:
1-Never - Never show General data
2-Always - always show General data
3-When no region specific data - only show General data when the is no region specific data available.
Show program 'Early' data
Use this option to display/hide special 'Early' and other 'broad-brush' typical system component and
template data. Options are:
1-Never - Never show 'Early' data
2-Always - always show 'Early' data
3-When no region specific data - only show 'Early' data when the is no region specific data available.
Note when categories of data are hidden this does not mean they are deleted from the database - the
data is still there but it does not appear on lists.
© 2008 DesignBuilder Software, Ltd.
Section
11
Menu
456
DesignBuilder 1.5
The DesignBuilder menu is located at the top of the screen and provides a full reference of all the
currently available commands.
The following sub-menus are available:
·
·
·
·
·
·
File - access file operations
Edit - options for editing the model
Go - options for navigating and obtaining data
View - options for adjusting the view of the model
Tools - miscellaneous tools
Help - documentation and other support resources on use of the program.
11.1
File Menu
The File menu can be accessed from the horizontal top bar menu at the top of the screen. The following
options are available when a file is open:
General
· New project (Ctrl+N) - create a new DesignBuilder dsb file.
· Open project (Ctrl+O) - Open an existing DesignBuilder dsb file.
· Close (Ctrl+F4) - close the currently open DesignBuilder dsb file and returned to the opening
screen.
· Print - Print current view
· Load results file - load a previously generated ESO file.
Save
· Save (Ctrl+S) - Save currently open DesignBuilder dsb file. If no file is currently loaded then this
command saves the libraries.
· Save without output results - save the current DesignBuilder dsb file without output results
reducing the file size. Use this option if you plan to send the dsb file by e-mail or to the support
forums.
· Save as (F12) - save the DesignBuilder dsb file using a different name/location.
· Save as template - save the DesignBuilder dsb file as a template so it can be used as a starting
point for subsequent new projects.
Import
· Import 2-D DXF floorplan - import a 2-D DXF floorplan into the model for tracing over.
· Import detailed survey data - import a survey data file into the model (advanced option - contact
DesignBuilder support for more information on this)
· Import building from external file - import a building into the current model from an external file.
The option assumes that there is only one building in the external file.
· Import library data - import library data from an existing DDF file.
Export
· Export EnergyPlus Heating design IDF file - export an IDF file using options for heating design
© 2008 DesignBuilder Software, Ltd.
Menu
457
calculations.
· Export EnergyPlus Cooling design IDF file - export an IDF file using options for cooling design
calculations.
· Export EnergyPlus Simulation design IDF file - export an IDF file using options for simulation
using hourly weather data.
· Export model image - export the currently displayed image of the model.
· Export 3-D DXF model - export the model in 3-D DXF format.
· Export library data - export library data in DDF format.
11.2
Edit Menu
The Edit menu can be accessed from the horizontal top bar menu at the top of the screen.
General
·
·
·
·
·
·
·
·
·
·
·
·
·
Undo (Ctrl+Z) - undo last operation
Redo (Ctrl+R) - redo last operation
End stream (Enter) - end the partition stream creating a floating partition
Cancel current operation (Escape) - cancel the current operation returning to select mode
Undo last point (Escape) - undo the last point drawn when creating a block or when drawing
partitions
Clear to default - clear model data to defaults
Load data from template (Ctrl+L) - loads data from template
Reload non-default templates - loads data from template throughout model where template is
non-default
Transfer blocks - transfers blocks from one building to another
Convert selected outlines to blocks - convert any selected outlines to component or building
blocks
Drag block face -start the drag face operation on the currently selected block
Divide block - divide the currently selected block using the cutting tool
Measure (Ctrl+M) - measure length, angles or areas in the model
Draw
·
·
·
·
·
·
·
·
·
Draw block – add a new block (building level only)
Draw internal perimeter - draw a void/courtyard (block level only)
Draw partition - draw partition streams (block level only)
Draw window - draw windows (surface level only)
Draw sub-surface - draw sub-surface (surface level only)
Draw door - draw doors (surface level only)
Draw hole - draw holes (surface level only)
Draw vent - draw vents (surface level only)
Draw construction line - draw one or more construction lines
Remove
· Remove DXF data - remove all current DXF data
· Remove all construction lines - remove all construction lines
· Remove all outlines - remove all outline blocks
General
· Select - returned to select mode
© 2008 DesignBuilder Software, Ltd.
458
DesignBuilder 1.5
· Select all - select all objects in current view
Equipment (zone level, Equipment tab when Detailed gains model option selected)
· Add - at an item of equipment
· Edit - edit currently selected equipment
· Delete - delete currently selected equipment
Opening screen component and template edit
· Add - add a new component/template as per currently selected item
· Edit - edit currently selected component/template
· Delete - delete currently selected component/template
Edit currently selected model objects
·
·
·
·
·
Move (Ctrl+V) - move selected objects
Clone (Ctrl+C) - clone (copy) selected objects
Rotate (Ctrl+T) - rotate selected objects
Stretch (Ctrl+J) - stretch selected objects
Delete (DEL) - delete selected objects
General
· Building model options (F11) - open Model options dialog
· Add building (Ctrl+A) - add a new building (site level only)
11.3
Go Menu
The Go menu can be accessed from the horizontal top bar menu at the top of the screen.
11.4
View Menu
The View menu can be accessed from the horizontal top bar menu at the top of the screen.
11.5
Tools Menu
The Tools menu can be accessed from the horizontal top bar menu at the top of the screen.
General
·
·
·
·
Program options - open program options dialog.
Rebuild - recalculate the zone, surface and adjacency geometry from the base building elements.
Rezone block - refresh the zoning in the current block.
Import library components to model - import current component and template libraries to the
© 2008 DesignBuilder Software, Ltd.
Menu
·
·
·
·
459
model replacing existing ones.
Export data - export results/graphics results from the current screen.
Compile report - generation of a report based on previously created Report topics.
Hourly weather data - open the hourly weather data dialog.
Show log file - show a log file containing information on your computer and all significant actions
taken during the current DesignBuilder session.
Results screens
· Update calculated data - refreshes the results first opening the Calculation options dialog allowing
you to enter new options.
· Lock Y-axis min/max values - locks the extent of the Y-axes so that they keep their current
maximum and minimum values allowing consistent comparison with the future results display.
Libraries (opening screen)
· Backup libraries - backup component and template libraries
· Restore libraries - restore previous component and template library backups
11.6
Help Menu
The Help menu can be accessed from the horizontal top bar menu at the top of the screen.
·
·
·
·
·
·
Index - access program help using the Index.
Search - access program help using the Search facility.
Contents - access program help using the hierarchical Contents.
Licence - enter serial number and licence keys
Tutorials - access DesignBuilder web tutorials
About - DesignBuilder version number
© 2008 DesignBuilder Software, Ltd.
Section
12
Modelling
Advice
Modelling Advice
461
Modeling advice topics:
·
·
·
·
·
·
·
·
·
·
·
·
·
Working with large models
Natural ventilation modelling
Ground modelling
Adjacent Buildings
Defining setpoint temperature schedules
Electrochromic Glazing
Trombe Walls
Autosizing Heating and Cooling Equipment
Daylight Saving and Local Time
Mixed mode
Double Facades
Solar Radiation Distribution
Solar Technology Solutions
12.1
Natural Ventilation Modelling
Natural ventilation
There are two general approaches to natural ventilation and infiltration modelling in DesignBuilder
depending on the setting of the Natural ventilation model option:
· Scheduled in which the natural ventilation change rate is explicitly defined for each zone in terms of
a maximum ACH value and a schedule and infiltration air change rate is defined by a constant ACH
value.
· Calculated where natural ventilation and infiltration are calculated based on window openings,
cracks, buoyancy and wind driven pressure differences crack dimensions etc.
You should generally choose Scheduled natural ventilation if you are able to make a reasonable estimate
of the natural ventilation rates and infiltration rates in the building. Some airflow scenarios are more
difficult to estimate and it may be necessary to calculate airflows.
SCHEDULED NATURAL VENTILATION AND INFILTRATION
Scheduled Natural Ventilation flow rate and schedule data is accessed on the HVAC tab. The flow is
switched off if the zone air temperature falls below the Ventilation setpoint temperature set under
Environmental Control on the Activity tab.
Infiltration is defined by a constant ACH value under Airtightness on the Construction tab.
Airflow through Exterior Windows, Vents and Doors is considered to be included in the Natural ventilation
outside air ac/h value set on the HVAC tab.
Airflow through Interior Windows, Vents and Doors is modelled using the concept of mixing where equal
amounts of air are transferred from one zone to another and vice-versa. The flow rate is directly
proportional to the opening area using Airflow rate per opening area data accessed from the Model
Options dialog. There is no way in v.1 to set airflows between zones using Scheduled Natural ventilation.
© 2008 DesignBuilder Software, Ltd.
462
DesignBuilder 1.5
CALCULATED NATURAL VENTILATION AND INFILTRATION
By default Calculated natural ventilation is controlled by timer (window and vent data on the Operation
header on the Openings tab) and by Ventilation setpoint temperature on the Activity tab.
The Crack data under Airtightness on the Constructions tab is used in EnergyPlus/AIRNET to calculate
infiltration.
Note 1: Using the Calculated option increases the complexity of the model and slows simulations down.
You should aim to simplify the model as appropriate to the requirements of the calculations. For example
if you are carrying out a summertime simulation of a naturally ventilated building you could consider
switching off infiltration modelling if infiltration heat flow is only a very small part of summertime heat
balance.
Note 2: In Version 1 the calculated airflows through external windows, vents, doors, holes and cracks are
all lumped into 'External air' data on the Simulation results screen.
Calculations
The ventilation rate (q) through each opening and crack in the model is calculated based on the pressure
difference using wind and stack pressure effects:
q = C.(DP) n
Where:
q is the volumetric flow through the opening.
DP is the pressure difference across the opening/crack.
n is the flow exponent varying between 0.5 for fully turbulent flow and 1.0 for fully laminar flow..
C is the flow coefficient, related to the size of the opening/crack.
Wind-Driven Ventilation
When wind impinges on the surface of a rectangular building, a positive pressure is induced on the
upwind face. The flow separates at the corners resulting in negative pressure regions on the side of the
building and a negative pressure distribution on the leeward facade. The pressure distribution on the roof
varies according to pitch - the pressure on the upwind face being negative for roof pitches of 30° and
positive for steeper pitches.
The pressure on any point on the surface of a building facade can be represented by:
Pw = 0.5 .rho. Cp . vz2
Where:
Pw is the surface pressure due to wind,
rho is the density of air,
Cp is the wind pressure coefficient at a given position on the surface and
vz is the mean wind velocity at height z.
The wind pressure coefficient, Cp, is a function of wind direction, position on the building surface and side
exposure. Some typical approximate values for buildings subjected to varying degrees of shelter and
wind directions is given in an AIVC publication A guide to energy-efficient ventilation. This data is also
© 2008 DesignBuilder Software, Ltd.
Modelling Advice
463
quoted in the CIBSE A Guide. DesignBuilder uses this data to populate the Pressure Coefficients
templates and provide default pressure coefficients suitable for use in basic design calculations for
buildings having no more than three stories.
For more detailed analysis, or for buildings having 4 or more stories you should obtain specific pressure
coefficient data from CFD analysis of from wind tunnel measurements and enter it for each surface under
the Pressure Coefficients header on the Openings tab.
Excluding Wind-Effects
When carrying out conservative design calculations you may prefer to exclude (or reduce) the effects of
wind from Calculated natural ventilation. To exclude wind-driven airflow from the analysis altogether set
the Wind factor on the Advanced tab of the Model Options dialog to 0. For full treatment of wind effects
set it to 1 and for intermediate treatment of wind set to a number between 0 and 1.
Limitations
DesignBuilder uses the EnergyPlus AIRNET method to calculate air flow rates. You should be aware of
some restrictions:
· Large horizontal openings are only modelled very approximately. The opening algorithm in
AIRNET assumes that openings are vertical or near vertical. Horizontal openings have no 'opening
height' and so 'cross-mixing' (i.e. simultaneous inflow and outflow) does not occur.
· EnergyPlus AIRNET simulations take considerably longer than the equivalent simulations with
Scheduled natural ventilation.
Modulation
You can modulate the opening sizes to reduce the large temperature swings that can occur if the
windows/doors are too far open when they are venting, especially when there is a large inside-outside
temperature difference. Use the Modulation settings on the Advanced tab of the Model Options dialog to
control this. By default modulation is on and opening sizes are reduced to 5% of full values when the
outside is 15°C or more colder than inside. This models the fact that occupants are unlikely to throw the
windows wide open when it is very cold outside (for manual control systems).
Modelling Infiltration
Normally when Calculated natural ventilation is set DesignBuilder includes a single crack in each surface
in the simulation to account for infiltration. The size and properties of this crack depend on the setting of
the Airtightness slider.
Tip: The effects of infiltration in some areas of the building and in some calculation types can be minor
and in these cases infiltration can be switched off. This can be done by unchecking the Model infiltration
checkbox on the Construction model data tab for the areas of the building where infiltration in not to be
modelled. For example you may wish to switch off infiltration in roof blocks (and include the roofspace
ventilation using a smaller number of vents or holes instead) or you could switch it off in the whole
building for Summertime simulations where the effects of infiltration would be minimal relative to the much
larger flow rates due to open windows, vents, holes and doors.
Airtightness slider
The setting of the Airtightness slider indicates the Crack template applied when setting crack properties:
·
·
·
·
Very poor
Poor
Medium
Good
© 2008 DesignBuilder Software, Ltd.
464
DesignBuilder 1.5
· Excellent
See also Mixed mode.
12.2
Operative Temperature Control
12.3
Working with Large Models
It is possible to create very large complex building models using DesignBuilder but you should consider
what you're trying to achieve by your modelling exercise before diving in and including every detail of the
building design. Otherwise you may find you have created a beautiful model which is impractical to
simulate because it takes too long or causes the simulation engine to fail. You can should consider the
following points.
EnergyPlus simulations are slowed down by:
1. Lots of windows
2. Lots of zones
3. Lots of windows per zone
4. Lots of surfaces
5. VAV Compact HVAC descriptions
6. Radiant heating systems (Simple HVAC)
7. Calculated natural ventilation using AIRNET
8. Calculating solar reflections
9. Reading hourly or sub-hourly results for extended simulation periods
10.Not enough computer memory (RAM)
11.Lots of output
You can speed up simulations by using these techniques:
1. Reduce the number of windows in the model by increasing the Window spacing. Shading issues
aside, modelling a small number of large Windows has the same effect as a large number of small
Windows provided you get the frame area right.
2. Use the Lump similar windows on surface option to speed up simulations with many similar
windows per surface.
3. Only create zones to model areas of the building with specific environmental conditions, and HVAC
systems or internal gains schedules. A common mistake made by the 'beginners' is to model each
room as a separate zone. This is generally not necessary because most rooms will have very
similar operating conditions. In this case you may want to use one of the DesignBuilder Merging
features to reduce the number of zones.
4. When you first create a building model you may want to carry out simulations before partitioning the
blocks into zones. If your unpartitioned blocks are very large there could be an enormous number
of windows in the single zone making up a block and this can slow down EnergyPlus simulations
especially if carrying out daylighting analysis. In this case you should try to reduce the number of
windows in the model as recommended above.
5. Try to use the smallest number of blocks possible to keep the number of surfaces down.
6. Exclude semi-exterior unconditioned zones from the model and replace them with an R-Value.
© 2008 DesignBuilder Software, Ltd.
Modelling Advice
465
7. Use Simple HVAC descriptions.
8. Use the Scheduled Natural ventilation option.
9. If you need to use Calculated natural ventilation in your simulations then you should aim to minimise
the number of cracks and openings involved in the airflow calculations. One way to do this is to
switch off infiltration calculations. Normally DesignBuilder includes a single crack in each surface in
the simulation to simulate infiltration. If you have other openings such as vents, windows, doors etc
in a particular block/zone you can switch off infiltration. This approach can be used in roof blocks or
calculations such as cooling design where infiltration is relatively insignificant. Switch off infiltration
and create 2 vents or holes somewhere in the zone to allow the calculations to take place. If you
have multiple zones merged into a single merged zone you should make sure that you have two
flow paths in total across all of the zones making up the single merged zone.
10.Switching off calculation of solar reflections in the Model options dialog
11.Restricting hourly and sub hourly results to short simulations for investigation of detailed building
operation. You should not attempt to generate hourly or sub-hourly results for a whole year unless
your model is very simple.
12.If you are interested in analysing a single zone within a much larger model, you could consider
using the single zone option to carry out simulations just on the zone, excluding consideration of the
rest of the building.
13.Fit as much memory (RAM) to your computer as possible (1-2 GB ideally). Paging memory to disk
during simulations of large models can cause EnergyPlus to grind to a halt.
14.Only request the output you really need. This will speed up simulation initialisation and reading of
output (especially hourly and sub-hourly) at the end. If you don't need surface data (Walls, Windows
etc. heat transfer) switch this off in the Output Options tab of Simulation options dialog. If you are
only looking at hourly results switch off monthly and daily. You will get noticeably faster initialisation.
12.4
Ground Modelling
How it works
In EnergyPlus, heat is transferred between zones and the ground through one-dimensional ground floor
surface elements. The 2-D and 3-D effects in the ground heat conduction that occur in reality are not
treated by default. EnergyPlus uses ground construction data to model the storage of heat in the ground
and it can accurately model heat transfer processes over several days (so it can model the effect of say a
warm week followed by a cool week) but it cannot directly model long-term ground thermal storage effects
(periods measured in months). For more on advanced ground modelling see bottom of this topic.
EnergyPlus applies a constant temperature boundary condition for each month on the lower surfaces of
ground adjacent elements.
There are 3 ways to create an adjacency to ground in DesignBuilder:
1. Using DesignBuilder's Auto adjacency detection where ground adjacency is set for all surfaces at or
below ground level. By default, all external surfaces which are at or below ground level are
considered to be adjacent to ground. Surfaces that are partly above ground (z=0) and partly below,
are modelled as entirely adjacent to outside (if the Adjacency setting is 1-Auto - see below).
2. Using Ground component blocks - any surfaces (or part of surfaces) touching a ground component
block are considered to be adjacent to ground.
3. Using the Adjacency model data on the Construction tab at block, zone and surface levels where
external surfaces can be defined as being adjacent to ground by changing the Adjacency model
data on the Construction tab from 1-Auto to 3-Adjacent to Ground. If a surface is below ground
level but is not adjacent to ground you can select 2-Not adjacent to ground.
When using Separate constructions, and when the Add ground construction layers to surfaces in contact
with ground option is selected, DesignBuilder automatically combines the site ground construction (0.5m
of earth by default) with the main construction (typically ground floor or wall) set on the Constructions tab.
© 2008 DesignBuilder Software, Ltd.
466
DesignBuilder 1.5
With Combined constructions the earth layers must be explicitly included in the ground floor/wall
constructions if you wish to define ground temperatures within the earth.
Ground temperatures
Monthly ground temperatures are defined at the site level under Site details.
Note: You should not use the ground temperatures in the EnergyPlus weather file header because these
are for undisturbed sites. The temperature beneath buildings is significantly affected by the building itself the EnergyPlus documentation recommends using ground temperatures of 2°C below average internal
temperatures for large commercial buildings (where perimeter heat loss is relatively less important). Note
that this temperature should be applied directly below the slab and should not include ground material - so
if you use this approach to ground temperature definition, you should switch off use of the ground
construction at the site level.
EnergyPlus cannot model very thick constructions so it is necessary to use less thick constructions (2m or
smaller) combined with some assumptions about temperatures at about half a metre below the floor.
Many modellers prefer to define the ground temperature just below the slab and exclude the earth layers
from the model. This has the advantage of simplicity and clarity and the approach recommended by
EnergyPlus developers.
Note: the default ground temperatures provided in DesignBuilder assume that an earth layer is included in
the constructions adjacent to ground. If an earth layer is not included then you should increase the default
site ground temperatures to values closer to those typically found just below the ground slab (as
described in note above).
Example Application - Basement or Cellar under inclined ground slope
This example illustrates how to create a simple 3 storey rectangular building model with:
· Basement which is fully below ground and
· Ground floor is partially buried under an inclined ground plane.
Step 1
Draw 3 blocks on the z=0 ground plane. The lowest block will be the basement
(completely buried), the middle block will be the ground level block, partially
© 2008 DesignBuilder Software, Ltd.
Modelling Advice
buried and the top block will be the second level. So far only the bottom
surface is adjacent to ground because it sits on the z=0 plane.
Step 2
Draw 2 ground component blocks around the basement building block to give
it's surfaces ground adjacency.
Note this step could be avoided by moving the whole building down so that the
basement is fully below ground. To do this go to building level, select all the
blocks, select the move command, click on one of the bottom corners of the
middle block to create a reference point then click on a blank part of the
screen to move the reference point down to z=0.
Step 3
Draw three new ground component blocks to create the sloping ground and
the upper ground levels.
Step 4
© 2008 DesignBuilder Software, Ltd.
467
468
DesignBuilder 1.5
The zone of the middle block is shown above. Notice how 3 of the surfaces
have been split into external and ground adjacencies (ground adjacencies are
flagged by green ground symbols). Note also that the portions of the surfaces
touching the ground component block cannot have windows but DesignBuilder
attempts to set up the correct % glazing for the remaining external parts of the
surface.
Step 5
The ground component blocks probably do not need to shade this model as
they are mainly below all surfaces that can receive solar radiation/light, but if
you are modelling reflections you will probably need to include the reflection of
solar radiation and light from the ground blocks during simulations. In other
cases you may prefer to switch off the generation of the component blocks
shading/reflection surfaces to speed simulations. Do this on the Constructions
model data tab under Component Block.
Step 6
© 2008 DesignBuilder Software, Ltd.
Modelling Advice
469
The finished model. The texture of Ground component blocks is defined by the material set under
Component blocks on the Constructions tab.
3-D Modelling Using the EnergyPlus Slab Preprocessor (Advanced)
To accurately model long-term ground thermal storage you may wish to consider using an external 2 or 3D conduction tool such as the ‘Slab’ utility supplied with EnergyPlus. This can be used to calculate the
temperatures applied to the underside of the ground floor surface elements.
The EnergyPlus slab program produces temperature profiles for the outside surface at the core and at the
perimeter of the slab. It also produces the average based on the perimeter and core areas used in the
calculation. EnergyPlus has a single GroundTemperatures object that is used for twelve monthly average
ground temperature values - see the Input Output Reference document. Because of this, there are two
options for dealing with the ground temperatures:
1. Use the average temperatures produced by the slab program for the GroundTemperatures object.
This will provide an average ground temperature at the outside face of any heat transfer surface
whose OutsideFaceEnvironment field is 'ground'.
2. If two or more ground temperature conditions are desired, it is necessary to utilize the ground
temperature modification feature of other side coefficients (OtherSideCoef field in
OutsideFaceEnvironment). Then, for example, if core and perimeter temperatures are wanted, the
perimeter temperatures from the slab program should be specified in the GroundTemperatures
object, and the surface associated with that condition is treated as in Option 1 above. The surface
that is to be exposed to the core temperature should be given the OtherSideCoef designation, and
the OtherSideCoefficients object should be used to specify the temperatures. To do this, all of the
numerical fields in this object should be zero except field N5. This field should contain the ratio of
the average annual core temperatures and average annual perimeter temperatures. In other words,
the resulting core profile values will be N5 times the perimeter values. This same procedure can be
used to generate as many profiles as needed. However, it should be noted that they will all have the
same profile as the GroundTemperatures object values.
Detailed ground modelling may only give a marginal difference in results and you might want to carry out a
sensitivity study to check the influence of ground temperatures on simulation results before deciding on
the most appropriate level of detail.
DesignBuilder version 1 does not account for 2-D and 3-D thermal bridging effects but future versions will.
12.5
Adjacent Buildings
Adjacent buildings (i.e. other buildings that are touching the modelled building) usually modify the
boundary conditions relative to external and also provide shade.
There is no explicit way in DesignBuilder 1.2 to model temperatures and heat flows in 2 buildings
simultaneously and account for energy transfer between them. Future versions may allow this, but in the
meantime there are two options:
1. Model the adjacent building using component blocks (for shading/reflection) and adiabatic surfaces
between the buildings. This is the usual way to treat an adjacent building not requiring full
simulation and is accurate if the temperature of the adjacent and actual buildings are similar or if
there is insulation between the two buildings.
2. If the adjacent building does require simulation then model it as part of the actual building and
separate simulation results at the end.
You can set adiabatic adjacent condition data under Constructions on the Constructions tab at surface
© 2008 DesignBuilder Software, Ltd.
470
DesignBuilder 1.5
level.
Merging buildings
Where two separate buildings have been created inadvertently, the blocks of one building can be
transferred to the other building using the Transfer blocks command from the Edit menu.
Airflow
If there is airflow between the two buildings and the adjacent building is at the same temperature as the
modelled building then you could probably ignore its effect. To model the effect of the airflow through an
opening between buildings in detail you should model both buildings as one DB building using the
Calculated natural ventilation model option. If you do it this way and the adjacent building uses energy you
must separate results for the two buildings at the end. You can use different boiler and chiller fuels to
differentiate fuel consumption between the two buildings.
If you use the Simple natural ventilation instead of Calculated, DesignBuilder uses an assumed mixing of
air between the two buildings based on 'flow per opening area' as set on the Model options dialog on the
Advanced tab under Natural Ventilation.
12.6
Electrochromic Glazing
Electrochromic windows are part of a new generation of technologies called switchable glazing-or 'smart'
windows. Switchable glazing can change the light transmittance, transparency, or shading of windows in
response to an environmental signal such as sunlight, temperature or an electrical control. Electrochromic
windows change from transparent to tinted by applying an electrical current. Potential uses for
electrochromic technology include daylighting control, glare control, solar heat control, and fading
protection in windows and skylights. By automatically controlling the amount of light and solar energy that
can pass through the window, electrochromic windows can help save energy in buildings.
A variety of electrochromic technologies and media have been developed. One type is darkened by
applying a small electrical voltage to the windows and lightened by reversing the voltage. Light
transmittance during operation varies from five to 80 percent. Once the change in tint has been initiated,
the electrochromic glazing has 'memory' and does not need constant voltage to maintain the tinting.
Further, the film can be tuned to block certain wavelengths, such as infrared (heat) energy.
Another switchable technology, the liquid crystal suspended particle device (SPD), contains molecular
particles suspended in a solution between plates of glass. In their natural state, the particles move
randomly and collide, blocking the direct passage of light. When energized, the particles align rapidly and
the glazing becomes transparent. This type of switchable glazing can block up to about 90 percent of light.
You can easily model electrochromic glazing in DesignBuilder using the Window shading data and
defining the properties of the outer Window Pane to be used when the shading is active. The procedure
is:
1. Specify the glazing type to be used when the electrochromic glazing system is clear (bleached) in
the standard way on the Openings tab under External glazing.
2. Under External Glazing and Shading headers, check the 'Window shading' option.
3. Select the Type as 'Electrochromic absorptive 6mm' (for example).
4. Select the Position as 4-Switchable.
5. The Shading Type defines the properties of the pane which is to be used in place of the standard
outer glazing pane according to the control data in the Control type.
6. Set the Control type together with any supplementary setpoint data.
© 2008 DesignBuilder Software, Ltd.
Modelling Advice
471
A model using the data in the above screenshot would enter its' darkened state whenever the solar
radiation incident on the outside of the window is greater than 200 W/m2..
12.7
Trombe Walls
Trombe walls are passive solar devices designed for thermal storage and delivery. A Trombe wall
consists of a thick wall (150mm to 300mm) [8" to 16"] faced with a selective surface solar absorber, air
gap, and high transmissivity glass pane. Trombe walls are usually South facing (in the Northern
Hemisphere) for maximum sun exposure. An overhang above the wall is used to decrease exposure in
the summer when the sun is high in the sky and heating is not required, yet still allows for full exposure in
the winter when the sun is low in the sky and heating is desirable. In DesignBuilder, there is no Trombe
wall object per se; rather, it is composed of other standard building components. This approach provides
flexibility in specifying the various wall parameters and allows the freedom to explore unusual
configurations.
To simulate the Trombe wall, a very narrow zone is coupled to the desired surface via an interzone
partition. The depth of the zone corresponds to the size of the air space usually 18mm to 150mm (¾" to
6"). In most cases the Trombe zone will be a sealed zone with no ventilation. The exterior wall of the
Trombe zone contains a single or double-pane window. Optimally, the window covers nearly all of the wall
area and has a very high transmissivity to allow the maximum amount of solar flux into the Trombe zone.
Frames and dividers can be defined as usual for the window. The interior wall is usually constructed of
very thick masonry materials with a solar absorber surface as the innermost layer of the wall. The
absorber is a selective surface material with very high absorptivity and very low emissivity, e.g. copper
with a special black surface treatment. It is important to make sure the Solar Distribution is set to 3-Full
Interior and Exterior so that the majority of the solar flux is directed on the absorber surface and not just
on the very small area of the Trombe zone floor.
The Zone type on the Activity tab should be set to 3-Cavity and this causes the following changes to be
made to the model:
· The zone is set as unoccupied by loading <None> Activity, HVAC and Lighting template data.
· Suspended floors and ceilings are switched off when using Separate constructions.
· The 5-Cavity Internal convection algorithm is set for Cooling design, Heating design and simulation
calculations to correctly model the air space.
· The 3-Full interior and exterior Solar distribution algorithm is set for Cooling design and simulation
calculations because it allows solar radiation to be accurately distributed onto zone internal
surfaces. The default option 2-Full exterior assumes all solar radiation falls on floor which is not
good for modelling solar absorption by a Trombe wall.
Finally, an overhang should be attached to the Trombe zone to control the amount of seasonal sun
exposure. There is considerable freedom to experiment with different materials, sizes, and configurations.
Passive Trombe wall
Passive Trombe walls perform without the assistance of any additional mechanical equipment. Most
© 2008 DesignBuilder Software, Ltd.
472
DesignBuilder 1.5
Trombe walls are passive Trombe walls. They can be either sealed or naturally ventilated. For a sealed or
unvented Trombe wall, the Zone Inside Convection Algorithm should be set to 5-Cavity. This algorithm
correctly calculates the convection coefficients for a narrow sealed vertical cavity based on the ISO 15099
standard.
The EnergyPlus modeling approach for the sealed passive Trombe wall has been validated with
experimental data (Ellis 2003). For a naturally ventilated Trombe wall, there is no built-in algorithm for
calculating the correct convection coefficients on the inside of the cavity walls. One option is to use the 1Detailed Inside convection algorithm. This algorithm takes into account some natural convection effects
but is intended for a normal sized room.
You can define holes and vents through the Trombe wall by drawing them on at surface level. Vent
openings can be scheduled and controlled by internal temperature.
Mechanically ventilated Trombe wall
You can also model mechanically ventilated Trombe walls by using Compact HVAC and specifying the
Trombe wall cavity zone as a plenum zone.
12.8
Autosizing Heating and Cooling Equipment
The Heating Capacity and Cooling Capacity Model Data is found on the HVAC tab at zone level.
If the Plant sizing building model option is set to 4-Autosize when not set these heating and cooling
capacities can be automatically calculated by the software.
Note: if you change heating or cooling capacities by hand you should be aware that the data will be
overwritten if Model Options change.
To keep the heating and cooling capacities fixed, change the Plant sizing model option to 2-Manual. You
may choose to use this option if you are already satisfied with the autosized capacities and wish to keep
them as they are regardless of future changes to the model.
COMPACT HVAC AUTOSIZING
Winter and summer design day simulations are automatically carried out as required for autosizing
heating and cooling equipment prior to a Compact HVAC simulation. There are some considerations you
should be aware of regarding autosizing.
1. Internal gains should normally be excluded from Winter design day calculations.
2. You therefore shouldn't use the same schedule for equipment, occupancy and HVAC operation
because equipment and occupancy should be off for heating autosizing and HVAC should be on.
3. Typical workday gives the easiest route to defining autosizing operation - the appropriate Winter
Design Day schedule data settings are used.
4. Summer design day schedules are normally the same as the general ones so are easier to deal
with.
5. If you are using Compact schedules then you should ensure that a specific line of WinterDesignDay
data is included for all schedule periods.
6. If you are using 7/12 Schedules then there are 2 options: End-use defaults and Profiles.
7. You can include intermittent operation by using a time-varying Heating demand or HVAC schedule.
This would normally provide heating equipment sizes with higher capacity than a steady-state
calculation where the heating is on all day.
© 2008 DesignBuilder Software, Ltd.
Modelling Advice
12.9
473
Daylight Saving and Local Time
DesignBuilder allows you to model the effect of daylight saving time where the clocks are moved forward
one hour in the summer months in most non-equatorial countries. The timing of this is handled
automatically using DesignBuilders' time zones database when you load data from one of the Location
templates supplied with the program.
You can set the Time zone at the Site level on the Location tab:
There are however some factors you should be aware of:
· Simulation results are displayed in 'local mean time'. This means that during the summer,
occupancy will appear to start 1 hour earlier in the day than it does in the winter. To help you
pinpoint this, DesignBuilder prints the times when daylight saving starts and ends on the graph.
· Visualisations use local mean time when setting the position of the sun for site shading analysis.
Again you should add 1 hour to the time to see shading for local time.
12.10 Mixed mode
In mixed mode buildings natural ventilation is used as the primary means of providing cooling and, when
this is inadequate to provide comfort conditions, active cooling is introduced. A concise definition of a
mixed mode building is:
It is a building in which occupants can open windows, and which is designed with
effective passive strategies for limiting the effects of the external climate. The
passively designed building is utilised to provide acceptable conditions for the majority
of the year, and is supplemented by a mechanical system, either on an ‘as and when
required’ basis, or on a seasonal basis.
Source: Cooper, V.A., “Occupancy Comfort and Energy Consumption in Naturally Ventilated
and Mixed Mode Office Buildings”, PhD thesis, UMIST, 1998
“Mixed-mode” refers to a hybrid approach to space conditioning that uses a
combination of natural ventilation from operable windows (either manually or
automatically controlled), and mechanical systems that include air distribution
equipment and refrigeration equipment for cooling. A well-designed mixed-mode
building begins with intelligent facade design to minimize cooling loads. It then
integrates the use of air-conditioning when and where it is necessary, with the use of
natural ventilation whenever it is feasible or desirable, to maximize comfort while
avoiding the significant energy use and operating costs of year-round air conditioning.
Source: Mixed mode page on Center for Built Environment website, contains background, case
studies and a database of 150 mixed buildings.
Some useful background documents on mixed mode design and simulation:
© 2008 DesignBuilder Software, Ltd.
474
DesignBuilder 1.5
1. www.cbe.berkeley.edu/mixedmode
2. www.ibpsa.org/proceedings/BS1999/BS99_D-07.pdf
When modelling mixed mode systems in DesignBuilder you should ideally use Compact HVAC to avoid
the limitations explained below of Simple HVAC. You may also want to use Calculated natural ventilation
to calculate natural ventilation air and heat flows based on window opening, stack and wind driven flows
etc.
The steps to setting up a mixed mode model are:
1. Include active cooling and natural ventilation by switching on the 'Natural ventilation on' and 'Cooling
on' options on the HVAC tab.
2. Also, include mechanical ventilation if there is outside air introduced through the HVAC system.
3. Ensure that the setpoints for natural ventilation and cooling operation are correct. Generally the
natural ventilation (window/vent opening) setpoint should be lower than the cooling setpoint to
ensure maximum use of natural ventilation and to avoid the active cooling system being used
unnecessarily. There is currently no way to link the natural ventilation and cooling systems (see
limitations below).
Limitations
DesignBuilder uses the EnergyPlus zone ventilation object for modelling natural ventilation (when using
Scheduled natural ventilation) and mechanical ventilation (when using Simple HVAC). Only one ventilation
object can be included per zone in EnergyPlus so if your model uses Scheduled natural ventilation and
Simple HVAC you will get an error message like:
Building 1 - Mechanical ventilation and Natural ventilation in same zone not allowed with Simple HVAC +
Scheduled natural ventilation
This message will also be generated for Cooling design calculations when mechanical and natural
ventilation are selected even if you have selected Calculated natural ventilation or Compact HVAC
because Scheduled natural ventilation and Simple HVAC are used by default in Design calculations.
There are various workarounds:
1. If the problem is occurring in Cooling design calculations, it is possible to select one of the Compact
HVAC cooling design sizing methods to use detailed modelling of mechanical ventilation instead of
the simple Ventilation object. This allows mechanical ventilation in combination with Scheduled
natural ventilation.
2. Again for Cooling design calculations you can put all of the ventilation in either natural or
mechanical category to avoid having both switched on at the same time. Once you have sized your
system switch the HVAC sizing option to Manual to avoid carrying sizing calculations before every
simulation.
3. Use Calculated natural ventilation or Compact HVAC for simulations.
Note 1: The problem does not arise in Heating design calculations because natural ventilation is not
included in Heating Design calculations.
Note 2: In current versions of DesignBuilder it is not possible to couple the natural ventilation and cooling
systems so that windows shut when the cooling switches on but this should be possible in the future.
12.11 Double Facades
Background
A ventilated double facade can be defined as a traditional single facade doubled inside or outside by a
© 2008 DesignBuilder Software, Ltd.
Modelling Advice
475
second, essentially glazed facade. Each of these two facades is commonly called a skin . A ventilated
cavity - having a width which can range from several centimetres at the narrowest to several metres for
the widest accessible cavities - is located between these two skins. There exist facade concepts where
the ventilation of the cavity is controllable, by fans and/or openings, and other facade concepts where this
ventilation is not controllable . The indoor and outdoor skins are not necessarily airtight (see, for example,
the "louvre" type facades). Automated equipment, such as shading devices, motorised openings or fans,
are most often integrated into the facade. The main difference between a ventilated double facade and an
airtight multiple glazing, whether or not integrating a shading device in the cavity separating the panes,
lies in the intentional and possibly controlled ventilation of the cavity of the double facade.
The standard prEN 13119, specifies the terminology associated with curtain walls and of a double-skin
facade. These are defined as:
Curtain walling
Double-Skin
Facade
External building facade produced with framing made
mainly of metal, timber or PVC-U, usually consisting of
vertical and horizontal structural members, connected
together and anchored to the supporting structure of
the building, which provides, by itself or in conjunction
with the building construction, all the normal functions
of an external wall, but does not contribute to the load
bearing characteristics of the building structure.
A curtain wall construction comprising an outer skin of
glass and an inner wall constructed as a curtain wall
that together with the outer skin provide the full function
of a wall.
This definition includes only references to the constructive and structural aspects of the facade. No
reference is made to the ventilation of the cavity. Thus formally, the term "double-skin facade" does not
designate a ventilated double facade. It is for this reason that the term ´Ventilated Double-Skin Facade´ is
proposed as the generic term to designate these facades.
Double facades can be categorised according to the type of ventilation.
Type of
ventilation
Natural
Mechanical
Hybrid
Name of the
facade concept
Passive facade
Active facade
Interactive
facade
This table contains the commonly used names referring (only) to the type of ventilation and thus giving no
indication about the partitioning of the facade or the ventilation modes. In the literature, the double
facades adopting the air supply ventilation mode are called airflow window or also ventilated window. The
facades adopting the air exhaust ventilation mode are also called extract air or exhaust airflow.
Modelling Considerations
There are some important considerations when using DesignBuilder to model double facades.
1. If you are using a zone to model the cavity in the double facade then the inner glazing is 'interior'
and so requires the Full interior and exterior solar distribution option to get solar radiation to pass
through exterior and then through interior windows. You should read the information about the
restrictions associated with this option before using it.
2. Take care when comparing the exterior solar radiation transmitted into the double facade zone with
the interior solar radiation transmitted into the occupied zone. These do not include the re-reflection
of solar back out of the external windows. Read the definitions for the output data.
© 2008 DesignBuilder Software, Ltd.
476
DesignBuilder 1.5
3. It is possible to set the double facade zone as a return plenum.
To be extended...
Source of background information:
http://www.bbri.be/activefacades/new/content/1_home/en.html
12.12 Solar Radiation Distribution
This topic summarises the methods used in calculation of solar radiation in EnergyPlus.
Sky Radiance Model
In EnergyPlus the calculation of diffuse solar radiation from the sky incident on an exterior surface takes
into account the anisotropic (non-uniform) radiance distribution of the sky. For this distribution, the diffuse
sky irradiance on a surface is given by:
AnisoSkyMult * DifSolarRad
where:
DifSolarRad is the diffuse solar irradiance from the sky on the ground and AnisoSkyMult is determined by
surface orientation and sky radiance distribution, and accounts for the effects of shading of sky diffuse
radiation by shadowing surfaces such as overhangs. It does not account for reflection of sky diffuse
radiation from shadowing surfaces.
The sky radiance distribution is based on an empirical model based on radiance measurements of real
skies, as described in Perez et al., 1990. In this model the radiance of the sky is determined by three
distributions that are superimposed (see Figure 33)
1. An isotropic distribution that covers the entire sky dome;
2. A circumsolar brightening centered at the position of the sun;
3. A horizon brightening.
Schematic view of sky showing solar radiance distribution as a superposition of three components: dome
with isotropic radiance, circumsolar brightening represented as a point source at the sun, and horizon
brightening represented as a line source at the horizon.
© 2008 DesignBuilder Software, Ltd.
Modelling Advice
477
The proportions of these distributions depend on the sky condition, which is characterized by two
quantities, clearness factor and brightness factor, defined below, which are determined from sun position
and solar quantities from the weather file.
The circumsolar brightening is assumed to be concentrated at a point source at the center of the sun
although this region actually begins at the periphery of the solar disk and falls off in intensity with
increasing angular distance from the periphery.
The horizon brightening is assumed to be a linear source at the horizon and to be independent of
azimuth. In reality, for clear skies, the horizon brightening is highest at the horizon and decreases in
intensity away from the horizon. For overcast skies the horizon brightening has a negative value since for
such skies the sky radiance increases rather than decreases away from the horizon.
Shadowing of Sky Long-Wave Radiation
EnergyPlus calculates the sky long-wave radiation incident on exterior surfaces assuming that the sky
long-wave radiance distribution is isotropic. If obstructions such as overhangs are present the sky longwave incident on a surface is multiplied by an isotropic shading factor. The long-wave radiation from these
obstructions is added to the long-wave radiation from the ground; in this calculation both obstructions and
ground are assumed to be at the outside air temperature and to have an emissivity of 0.9.
Solar Gains
The total solar gain on any exterior surface is a combination of the absorption of direct and diffuse solar
radiation given by
where:
a =solar absorptance of the surface
A =angle of incidence of the sun's rays
S =area of the surface
Ss = sunlit area
Ib =intensity of beam (direct) radiation
Is =intensity of sky diffuse radiation
Ig =intensity of ground reflected diffuse radiation
Fss = angle factor between the surface and the sky
Fsg = angle factor between the surface and the ground
If the surface is shaded the program modifies Fss by a correction factor that takes into account the
radiance distribution of the sky (see “Shadowing of Sky Diffuse Solar Radiation”). Shading of ground
diffuse solar radiation is not calculated by the program. It is up to the user to estimate the effect of this
shading and modify the input value of Fsg accordingly.
SOLAR DISTRIBUTION
As discussed in the Solar Model options section, the Solar Distribution determines how EnergyPlus will
treat beam solar radiation entering a zone through exterior windows. The three choices: 1-Minimal
shadowing, 2-Full exterior and
3-Full Interior and exterior are discussed in the Solar options topic.
© 2008 DesignBuilder Software, Ltd.
478
DesignBuilder 1.5
EnergyPlus calculates the distribution of short-wave radiation in the interior of each thermal zone. This
radiation consists of beam solar radiation, diffuse solar radiation, and short-wave radiation from electric
lights. The program determines the amount of this radiation that is (1) absorbed on the inside face of
opaque surfaces, (2) absorbed in the glass and shading device layers of the zone’s exterior and interior
windows, (3) transmitted through the zone’s interior windows to adjacent zones, and (4) transmitted back
out of the exterior windows. The effects of movable shading devices on the exterior windows are taken
into account.
Initial Distribution of Diffuse Solar Transmitted through Exterior and Interior Windows
As of Version 2.1 the treatment of diffuse solar transmitted first through exterior windows and
subsequently through interior windows has been improved. Diffuse solar (from sky and ground sources)
transmitted through exterior windows is first distributed to the interior heat transfer surfaces in the zone
containing the exterior windows. This initial distribution apportions the transmitted diffuse solar to interior
surfaces using the approximate view factors described above in “LW Radiation Exchange Among Zone
Surfaces.” The amount of this initially distributed diffuse solar absorbed by each interior surface, and each
window material layer, is calculated and later added to the “short-wave radiation absorbed” values
described below. The amount of this initially distributed diffuse solar that is reflected is accumulated for
each zone and redistributed uniformly to the other surfaces. The amount of this initially distributed diffuse
solar that is transmitted by interior windows to adjacent zones is initially distributed to the interior heat
transfer surfaces in the adjacent zone in the same manner as just described.
This new treatment of diffuse solar is intended to more accurately account for the initial absorption,
transmittance, and reflection of short-wave radiation prior to the uniform distribution described below.
Interior Solar Radiation Absorbed by Opaque Surfaces
The short-wave radiation absorbed on the inside face of an opaque surface (floor, wall or ceiling) is given
by:
Ground surface reflectance
Ground reflectance values are used to calculate the ground reflected solar amount. This fractional amount
(entered monthly) is used in the following equation:
GroundReflectedSolar = (BeamSolar x COS(SunZenithAngle) + DiffuseSolar) x GroundReflectance
The Ground Reflected Solar is never allowed to be negative. The Snow Ground Reflectance Modifier can
further modify the ground reflectance when snow is on the ground. If the user enters 0.0 for each month,
no ground reflected solar is used.
Ground Reflectances (Snow)
When snow is on the ground, ground reflectances may change. The user can specify two values, Snow
reflected solar modifier and Snow reflected daylight modifier.
Snow reflected solar modifier
A number between 0.0 and 10.0 which is used to modify the basic ground surface reflectance when snow
is on the ground. Note that the value of GroundReflectanceUsed (below) must be <=1.
GroundReflectanceUsed = GroundReflectance x ModifierSnow
During simulations, the ground is considered to be snow-covered when the SnowDepth data in the hourly
weather file is > 0.
© 2008 DesignBuilder Software, Ltd.
Modelling Advice
479
Snow reflected daylight modifier
A number between 0.0 and 10.0 which is used to modify the basic ground surface reflectance when snow
is on the ground. Note that the value of DaylightingGroundReflectanceUsed (below) must be <=1.
DaylightingGroundReflectanceUsed = GroundReflectance x ModifierSnow
During simulations, the ground is considered to be snow-covered when the SnowDepth data in the hourly
weather file is > 0.
Beam distribution
If the Solar Distribution option is Minimal shadowing or Full exterior, it is assumed that all beam solar
from exterior windows falls on the floor. If Solar Distribution is Full Interior and Exterior the program
tracks where beam solar from exterior windows falls inside the zone, and wall as well as floor surfaces
can receive beam radiation.
Diffuse distribution
Diffuse solar transmitted through exterior and interior windows is distributed according to the approximate
view factors between the transmitting window and all other heat transfer surfaces in the zone. This
variable is the amount of transmitted diffuse solar that is initially absorbed on the inside of each heat
transfer surface. The portion of this diffuse solar that is reflected by all surfaces in the zone is
subsequently redistributed uniformly to all heat transfer surfaces in the zone, along with interior reflected
beam solar and shortwave radiation from lights. The total absorbed shortwave radiation is given by the
next variable.
Solar radiation reflected from exterior surfaces
EnergyPlus has an option to calculate beam and sky solar radiation that is reflected from exterior surfaces
and then strikes the building. For zones with detailed daylighting, these reflections are also considered in
the daylight illuminance calculations. The reflecting surfaces fall into three categories:
1. Shadowing surfaces. These are surfaces like overhangs, component blocks or surfaces of the
building Examples are shown in Solar Options. These surfaces can have diffuse and/or specular
(beam-to-beam) reflectance values that are specified with the based on the material surface
properties.
2. Exterior building surfaces. In this case one section of the building reflects solar radiation onto
another section (and vice-versa). See Figure 47. Opaque building surfaces (walls, for example) are
assumed to be diffusely reflecting. Windows and glass doors are assumed to be specularly
reflecting. The reflectance values for opaque surfaces are calculated by the program from the
Absorptance:Solar and Absorptance:Visible values of the outer material layer of the surface’s
construction. The reflectance values for windows and glass doors are calculated by the program
from the reflectance properties of the individual glass layers that make up surface’s construction
assuming no shading device is present and taking into account interreflections among the layers.
© 2008 DesignBuilder Software, Ltd.
480
DesignBuilder 1.5
3. The ground surface. Beam solar and sky solar reflection from the ground is calculated even if the
Reflections option is not used (the default). But in this case the ground plane is considered
unobstructed, i.e., the shadowing of the ground by the building itself or by obstructions such as
component blocks is ignored. This shadowing is taken into account only if the Reflections option is
used. In this case the ground view factor calculated by DesignBuilder is not used.
See Solar Options,
Diffuse reflection of beam solar and sky solar radiation
A ray-tracing method is used to calculate beam solar and sky solar radiation that is diffusely reflected onto
each of a building’s exterior surfaces (walls, roofs, windows and doors), called here "receiving surfaces".
The calculation begins by generating a set of rays proceeding into the outward hemisphere at each
receiving point on a receiving surface. Then it determines whether each ray hits the sky, ground or an
obstruction. The radiance at the hit point from reflection of incident beam or sky solar is determined and
the contribution of this radiance to the receiving surface is calculated, added to the contribution from other
hit points, and averaged over the receiving points. Separate calculations are done for beam-to-diffuse and
sky solar reflection from all obstructions and beam-to-diffuse and sky solar reflection from the ground.
(For beam-to-beam reflection see Beam solar radiation specularly reflected from obstructions
below.)
Rays
A total of 90 rays are sent out into the exterior hemisphere surrounding each receiving point. An upgoing
ray may hit an obstruction or the sky. A downgoing ray may hit an obstruction or the ground. See diagram
below.
Two-dimensional schematic showing rays going outward from a point on a receiving surface. Rays 1-6 hit
the ground, rays 7-11 hit an obstruction, and rays 12-15 hit the sky.
Sky Solar Radiation Diffusely Reflected from the Ground
If a downgoing ray from a receiving point hits the ground (for example, rays 1-6 in diagram below), the
program calculates the radiance at the ground hit point due to sky diffuse solar reaching that point. To do
this, rays are sent upward from the ground hit point and it is determined which of these rays are
unobstructed and so go to the sky (for example, rays 6-10 below). For this calculation it is assumed that
the radiance of the sky is uniform.
© 2008 DesignBuilder Software, Ltd.
Modelling Advice
481
Two-dimensional schematic showing rays going upward from a ground hit point.
Beam Solar Radiation Specularly Reflected from Obstructions
The diagram below shows schematically how specular (beam-to-beam) reflection from an obstruction is
calculated.
Two-dimensional schematic showing specular reflection from an obstruction such as the glazed façade of
a neighboring building. The receiving point receives specularly reflected beam solar radiation if (1) DB
passes through specularly reflecting surface EF, (2) CD does not hit any obstructions (such as RS), and
(3) AC does not hit any obstructions (such as PQ).
More detailed information on can be found in the EnergyPlus EngineeringReference.pdf document.
© 2008 DesignBuilder Software, Ltd.
482
DesignBuilder 1.5
© 2008 DesignBuilder Software, Ltd.
Section
13
Simulation
Hourly
Weather Data
484
DesignBuilder 1.5
DesignBuilder uses EnergyPlus format hourly weather data to define external conditions during
simulations. Each location has a separate file describing the external temperature, solar radiation,
atmospheric conditions etc. for every hour of the year at that location.
These hourly weather data sets are often 'typical' data derived from hourly observations at a specific
location by the National weather service or methodological office. Examples of these typical data include
TMY2 and WYEC2 in the United States and Canada and TRY (CEC 1985) in Europe.
Because hourly weather data is not always available for every location, it is often necessary to use
weather data for a nearby location which represents the weather of the actual site.
The DesignBuilder hourly weather data has been obtained from the Weather section of the EnergyPlus
website and processed using the DesignBuilder weather data translator, but you can use any weather
data provided it is in the correct format.
EnergyPlus format hourly weather data has extension 'epw' by convention.
Downloading Hourly Weather Data
DesignBuilder comes with a database of hourly weather data but the EnergyPlus epw files are not loaded
onto your computer until you actually need them. This keeps the size of the DesignBuilder setup program
small. The first time you require an hourly weather data file it is automatically downloaded from the
DesignBuilder Website into the Weather data folder on your computer where it can be accessed by
EnergyPlus for any subsequent simulations. You must be connected to the Internet to download weather
data in this way.
See also:
· Add new hourly weather data
· Edit/Translate hourly weather data
13.1
Add new hourly weather data
To add your own hourly weather data follow the steps below:
1. Copy the EnergyPlus format hourly weather data epw file to the weather data folder (File > Folders
> Weather data).
2. From the Opening screen click on the Templates tab
3. Click on the + to the left of Hourly weather data to open up the list of countries.
4. Select the country of the location (or the location within the country).
5. Add a new Hourly weather data set by clicking on the green + in the Toolbar.
6. Enter information on the Hourly weather data and select the file. Note that the hourly weather data
details are automatically loaded from the .stat and .epw files when you select the file.
Tip: steps 2-5 above can be accomplished in one step if you have Learning mode switched on. Go to the
Locations tab at site level and look for the Add hourly weather data link under the Hourly weather data
header. You can also find a link to show the weather data folder in Windows Explorer.
You will now be able to select this hourly weather data set from the Location tab at site level.
Starting with version 1.3, any custom hourly weather epw file you select in your model will be saved with
© 2008 DesignBuilder Software, Ltd.
Simulation Hourly Weather Data
485
the model so that it can be used on other computers.
Although DesignBuilder can been used with any valid epw data sets, you are strongly advised to process
the data first to ensure that each hourly record has year 2002. This ensures that daily, hourly and subhourly data generated by EnergyPlus is correctly synchronised with the DesignBuilder graphics display. If
you do not set the year to 2002 it will not affect the results but it will affect the day of the week display in
DesignBuilder.
Note: If you do not set the year to 2002, daily, hourly and sub-hourly data will not necessarily show the
correct day of the week in the results display graphics.
In the Hourly weather data, enter the details of the location and select the EnergyPlus epw filename as
shown below.
© 2008 DesignBuilder Software, Ltd.
486
DesignBuilder 1.5
Selecting the epw file automatically loads all other required location and general weather statistics to the
Hourly weather data dialog if a corresponding stat file exists in the same folder as the epw file. The stat
file is automatically generated by the Hourly weather data translation process.
When you press enter you will be able to select this new Hourly weather data set from the Location tab at
site level.
Data format
The epw weather data format is described on the Weather data section of the EnergyPlus website.
13.2
Edit/Translate hourly weather data
You can use the Edit/Translate Hourly Weather Data dialog to process hourly weather data. You may
wish to do this for various reasons:
· Convert EnergyPlus epw data to be compatible with DesignBuilder day of week results for daily,
hourly and sub-hourly output (set the year to 2002).
· Translate weather data in other formats to the EnergyPlus format so that it can be used in
DesignBuilder.
· Generating modified weather data sets for investigating climate change scenarios.
Translating
Use this dialog to convert weather data to and from a range of file formats. Supported formats are:
EnergyPlus data files (.epw)
© 2008 DesignBuilder Software, Ltd.
Simulation Hourly Weather Data
487
EnergyPlus 'comma separated values' files (.csv)
TMY2 data files (.tmy2 or tm2)
TMY data files (.tmy)
IWEC data files (.iwec or iwc)
Samson data files (.samson or dat)
WYEC2 data files (.wyec2 or wy2)
DOE-2 formatted data files (.fmt or txt)
ESP-r formatted data files (.esp-r or clm)
BLAST ASCII formatted data files (.blast or asc)
Required extensions are shown in brackets. To edit/convert a file or files:
1. Select the folder containing the file(s) using the browse box at the top of the left-hand side of the
screen. All relevant weather data files are then loaded into the table on the left.
2. Check the files to be converted.
3. Ensure that the correct options have been set on the Options tab.
4. Press the Convert button to start the process.
Converted files are stored in the Weather data folder. You can access these files by clicking on the 'Edit/
Review' tab.
© 2008 DesignBuilder Software, Ltd.
Section
14
Reference
Reference
489
Reference help:
·
·
·
·
·
·
·
·
DesignBuilder files, locations and extensions
Licensing and activation
Hardware requirements
Surface Types
Calculation of Air Density
Pitched Roof Geometry - Technical Description
Triangulation
Calculation of HVAC Energy Consumption
14.1
DesignBuilder Files, Location and Extensions
Filename/ Folder
Extension
.dsb
DesignBuilder Data folder (default)
.ddf
.dat
.idf
.stat
Library folder
EnergyPlus folder
Weather data folder
.epw
Weather data folder
Energy+.
idd
Eplusout.
err
Eplusout.
eso
Eplusout.
eio
EnergyPlus folder
Eplusout.
rdd
EnergyPlus folder
Eplusout.
bnd
EnergyPlus folder
EnergyPlus folder
EnergyPlus folder
EnergyPlus folder
© 2008 DesignBuilder Software, Ltd.
Description
DesignBuilder model description file. Note that dsb
files are already compressed so don't need to be
'zipped' before sending in emails.
DesignBuilder exported component/template data
Construction and Template exported files.
EnergyPlus input script file.
EnergyPlus hourly weather data statistics file used
by DesignBuilder to automatically load location and
weather statistics to the Hourly weather data dialog
when the epw file is selected. stat files are
supplied with DesignBuilder and are automatically
generated by the Hourly weather data translation
process when creating custom weather data.
EnergyPlus hourly weather data. a database of
hourly weather data is supplied by automatic
download or you can create your own hourly
weather data.
EnergyPlus data definition dictionary (see
EnergyPlus documentation for information on this).
EnergyPlus error message file.
Standard eso Output File - contains detailed
results to be read in by DesignBuilder.
EnergyPlus model summary configuration output
file. Note there is a free utility called xESOView
that can be used to quickly view EnergyPlus eso
output files. Download it from: http://sourceforge.
net/projects/xesoview.
Report Variable Data Dictionary - list all possible
EnergyPlus output reports for a particular idf input
file.
HVAC layout summary file - shows details about
the branches, nodes, and other elements of the
flow connections. It is intended for use in
490
DesignBuilder 1.5
Eplusout.
dxf
Eplusout.
mtr
Eplusout.
end
EnergyPlus folder
debugging potential problems and supports the
EnergyPlus diagramming tool.
DXF file (from Report,Surfaces,DXF;)
EnergyPlus folder
Similar to .eso but only has Report Meter outputs.
EnergyPlus folder
Eplusout.
dbg
Eplusout.
csv
EnergyPlus folder
A one line summary of success or failure used by
DesignBuilder to indicate whether the simulation
was successful or not.
From Debug Output object – may be useful to
support to help track down problems.
Not directly from EnergyPlus - produced by
EnergyPlus utility program that reads the .eso file
and produces output files for spreadsheet
programs.
EnergyPlus folder
Folders
Folder
Typical Location*
DesignBuilder My Documents\DesignBuilder Data
Data
EnergyPlus
C:\Documents and Settings\User\LocalSettings\Application Data
\DesignBuilder\EnergyPlus
Library data
Library data
Use
Storing DesignBuilder
dsb data files.
Storing files related to
EnergyPlus
simulations.
C:\Documents and Settings\User\LocalSettings\Application Data Library data and .dat
files currently being
\DesignBuilder\Data
used by DesignBuilder
Library data including
backups and .dat files.
Template
DesignBuilder dsb files
projects
stored in this folder can
be used as templates
for future models. Click
on the Templates tab
on the Create New Site
dialog for a list of
available template files.
Weather data C:\Documents and Settings\User\LocalSettings\Application Data EnergyPlus hourly
weather data is stored
\DesignBuilder\Weather Data
in this folder. The data
may have been
automatically
downloaded from the
DesignBuilder website
or it can be added
manually.
C:\Documents and Settings\User\LocalSettings\Application Data
\DesignBuilder\Data
C:\Documents and Settings\All Users\Application Data
\DesignBuilder\Templates
* The actual names of the folders will depend on the language used on your computer and on your
Windows user name. The above locations assume English as the language and Windows user name '
User'.
© 2008 DesignBuilder Software, Ltd.
Reference
491
Tip: the above folders can be accessed from the File | Folders menu commands.
14.2
Licensing & Activation
DesignBuilder consists of a modelling Graphical User Interface (GUI) connected to a number of
calculation/rendering modules. The DesignBuilder GUI can be used without a licence but you need a
license for each of the modules you intend to use.
When you install DesignBuilder an evaluation license key is generated for each module. These evaluation
licences are valid for 30 days from the date of installation and allow you to try out a fully functional version
of the software to check that it meets your needs and is compatible with your computer. The only
restriction with evaluation licences is that a ‘nag screen’ is displayed prior to each simulation or
visualisation session.
When you buy licences to use DesignBuilder, you are sent an e-mail containing a serial number, license
keys and information on when the licences expire (if ever).
You should copy (Ctrl-C) the Serial number and License keys from the e-mail you received when you
bought the software and paste (Ctrl-V) directly into the License dialog (accessed from the Help menu).
When you paste the license keys (one for each module) the software attempts to activate the license over
the Internet, and if successful, validates the license keys and unlocks the modules.
© 2008 DesignBuilder Software, Ltd.
492
DesignBuilder 1.5
Note: You must be connected to the Internet to activate DesignBuilder license keys.
You need an EnergyPlus license to generate IDF files even if you want to
simulate using an external version of EnergyPlus.
14.3
Hardware Requirements
DesignBuilder is a professional graphics application and requires a high standard of computer hardware
for successful use. This page contains information on the minimum system requirements and also the
recommended specification. The main areas you should pay attention to if you are buying or upgrading
your computer system to run DesignBuilder are:
· Graphics adapter - a good 100% OpenGL compatible graphics adapter is required to run
DesignBuilder. Most of the cards based on the Radeon chipset seem to work very well (provided
they have the latest drivers installed) and we have had no problem with the mid-range and better
NVIDIA cards. Some graphics adapters integrated with the motherboard we have tested are unable
to run DesignBuilder. See also note below on Windows Vista.
· Memory - DesignBuilder will use all the memory you can throw at it - at least 2 GB is recommended
for serious modelling or more if you are running under Windows Vista which itself uses 1 GB.
· CPU speed - get as fast as you can afford.
· Cores - having more than one processor core does not necessarily speed up simulations in
© 2008 DesignBuilder Software, Ltd.
Reference
493
DesignBuilder version 1 but it does allow you to continue using your computer while simulations are
running. Dual core processors also make the software more responsive in use.
Minimum Requirements
·
·
·
·
·
·
·
Windows 2000 or XP SP2 running on
1000MHz processor (or faster)
800x600 pixel screen
256MB RAM
200MB free disk space
Pointing device
100% OpenGL compatible 3D graphics adapter with hardware acceleration running in 32-bit color
mode
The above specification will allow you to successfully model small buildings using DesignBuilder but we
recommend a more powerful computer for best results especially when working with larger building
models.
Recommended
Windows XP SP2
2.4 dual core processor or faster.
2GB (or more) RAM
5GB free disk space
Pointing device
100% OpenGL compatible 3D graphics adapter with hardware acceleration running in 32-bit color
mode
· 1280x1024 pixels or larger screens for efficiency during the modelling process and for displaying
high-quality visualisation images and walk-throughs of DesignBuilder models and CFD results.
DesignBuilder works well with wide screens.
·
·
·
·
·
·
Windows Vista
DesignBuilder works under Windows Vista, but we do not currently (June 07) recommend it because a)
many of the early graphics adapter drivers written for Vista have bugs and b) we have not tested it
extensively ourselves. If you do plan to purchase a computer with Windows Vista installed we recommend
choosing an NVIDIA graphics adapter as these, in our experience, have more reliable drivers where new
operating systems are released. This is possibly because NVIDIA take OpenGL more seriously than ATI.
Graphics Card Settings
Many graphics cards allow you to customise driver settings. The example screenshot below is for an
NVIDIA card showing recommended settings. Note antialiasing, anisotropic filtering and unified back/
depth buffer have been changed from default settings to provide hardware accelerated optimal
visualisations. The antialiasing option provides sharp lines without slowing program operation and unified
back/depth buffer gives best results for dragging selection rectangles on some graphics cards allowing
double buffering to be used for cursor dynamics.
© 2008 DesignBuilder Software, Ltd.
494
14.4
DesignBuilder 1.5
Surface Types
The meaning of most surface types listed in the Navigator should be obvious. This section provides
further information on the meaning of 3 less obvious surface types:
· Inter-block partition
· Wall (with hole)
· Block link surfaces (not generated by default)
These special surfaces are required because DesignBuilder uses 3-D surface slabs to represent building
fabric. Using 3-D surface slabs allows accurate calculation of zone volumes, definition of blocks using
external dimensions and realistic rendered images. Zones for EnergyPlus simulations and other
calculations provided by DesignBuilder are generated from the interior faces of the block geometry.
Cutaway of DesignBuilder Zone showing 3D-slabs
Inter-block partition
An Inter-block partition surface is the shared partition wall between 2 zones in different blocks. Inter-block
partition surfaces are generated whenever 2 blocks touch along a plane. They are listed in the Navigator
twice, once in each of the 2 zones in which they appear. They are however a single partition object within
DesignBuilder and in the thermal calculations. So if, for example, you change the Partition construction
model data for an inter-block partition (or draw windows) the change will also be reflected in the
equivalent inter-block partition surface in the adjacent zone.
© 2008 DesignBuilder Software, Ltd.
Reference
495
Wall (with hole)
Surfaces marked Wall (with hole) in the navigator are external surfaces on the same block face as an
inter-block partition surface (see above). The 'hole' is where the inter-block partition goes. So 'Wall (with
hole)' is the part of the block face that is adjacent to outside. The partition with the adjacent block is in a
separate surface called inter-block partition (it is separated from the rest of the wall because it has a
different adjacency). So the sum of the inter-block partition(s) and the wall with the hole make up the
actual surface. The figures below illustrate.
© 2008 DesignBuilder Software, Ltd.
496
DesignBuilder 1.5
At building level
At surface level
Note that at surface level you can only draw openings on the grey areas of the surface. The white 'hole' is
© 2008 DesignBuilder Software, Ltd.
Reference
497
actually the inter-block partition (above).
Wall (with hole) representation in EnergyPlus
Because EnergyPlus does not allow surfaces to be defined with holes (i.e. surfaces are defined using a
single set of vertices) DesignBuilder generates 2 or more valid sub-polygons to represent the surface in
EnergyPlus. The diagram below illustrates the procedure used for a typical Wall (with hole) surface.
The surface is split into 2 (often equal area) polygons that, together, enclose the 'hole' left by the
interblock partition. You should bear this in mind when looking at EnergyPlus IDF data.
Block link surfaces
Block link surfaces are used to connect the Wall (with hole) and the Inter-block partition surfaces to
ensure that zones are fully enclosed. They are required because zones in adjacent blocks are separated
from each other due to the thickness of the walls of the 2 blocks. The link surfaces bridge the gap
between the (internal) zone shell and the (external) block shell.
© 2008 DesignBuilder Software, Ltd.
498
DesignBuilder 1.5
Block link surfaces are excluded from the calculations by default to keep the size of models down
but you can change the setting under Miscellaneous Edit on the Advanced tab of the Model options dialog
to include them. When included, link surfaces are modelled using very high resistance zero mass
elements and their contribution is to:
· Allow EnergyPlus to calculate zone volumes avoiding warning messages about volume
mismatches. This does not actually affect the results because EnergyPlus uses the accurately
calculated zone volumes supplied by DesignBuilder.
· Provide a slightly more accurate picture of the actual internal zone surface area and so potentially
provide a more accurate convective/radiant calculation.
The pictures below show how the Block link surfaces are used to connect the 2 blocks and ensure that
zones are enclosed.
© 2008 DesignBuilder Software, Ltd.
Reference
EnergyPlus Model with Block link surfaces - zones are enclosed and the zone volume
includes the volume enclosed by the link surfaces and the inter-block partition. This volume is
the thickness of the block wall x inter-block partition area).
© 2008 DesignBuilder Software, Ltd.
499
500
DesignBuilder 1.5
Equivalent EnergyPlus Model without Block link surfaces - zones are not enclosed and
the zone volume excludes the volume enclosed by the link surfaces and the inter-block partition.
14.5
Calculation of Air Density
The air density is used for calculating the air volumetric flow rate from air mass flows as part of the loads
calculation procedure.
The method used in DesignBuilder is the same as that in EnergyPlus for consistency. Air is assumed to
be dry and at 20°C. The site elevation is used to calculate standard atmospheric pressure using the
equation for 'standard atmospheric' pressure on p 6.1 of the ASHRAE 1997 HOF.
Density = P / (R * T)
Where:
R is the Gas constant = 287.05 J/kg-K
T is the temperature in K. Air is assumed to be at 20°C so, T = (20 + 273.15)
P is standard pressure:
P = 101325 x (1.0 - Z x 0.0000225577)5.2559
where:
Z = Elevation above sea level (m)
© 2008 DesignBuilder Software, Ltd.
Reference
14.6
501
Pitched Roof Geometry - Technical Description
This page describes DesignBuilder pitched roof geometry generation with reference an example roof
created by drawing a rectangular perimeter with an offset of 0.3m and an external wall thickness of
0.25m:
Roof perimeter blocks are created behind the scenes by first generating a conventional plan extrusion
using the current external wall thickness and then generating the roof inner profile topology from the
resulting block outer perimeter:
© 2008 DesignBuilder Software, Ltd.
502
DesignBuilder 1.5
The roof geometry is created as if a stub wall existed from the original extrusion, cut to fit within the roof
space and on top of which the roof assembly sits:
The resulting roof block is composed of a polyhedron representing the inner zone, which is created from
the original inner block perimeter and is cut to fit within the roof space and a number of slabs that
represent the actual roof construction. The roof slabs are generated from the inner roof profile and an
outer profile created using the roof construction thickness.
© 2008 DesignBuilder Software, Ltd.
Reference
503
EnergyPlus model
DesignBuilder automatically generates overhangs for Pitched roof block types using EnergyPlus shading
devices. The diagram below shows EnergyPlus DXF output of the building model generated using the
above data. It shows the overhangs in grey.
© 2008 DesignBuilder Software, Ltd.
504
14.7
DesignBuilder 1.5
Triangulation
*** STARTING WITH VERSION 1.2 DESIGNBUILDER OPTIMISES FOR TRIANGULATION SO THE
ADVICE BELOW SHOULD NOT APPLY IN MOST CASES ***
Triangulation is the process of breaking up polygons of complex shape into simple triangles which can be
easily be manipulated by computers. This is routinely done behind the scenes in DesignBuilder for
generating optimal surfaces in the OpenGL display routines, but is also sometimes necessary when
generating EnergyPlus surfaces.
There is an option on the Advanced tab of the Model Options dialog which allows triangulation to be
switched on/off explicitly. You should leave this switched off as it is intended for developer testing, but if
you do switch it on all surface polygons (apart from triangular and rectangular ones) are triangulated.
You should however be aware of some situations requiring EnergyPlus surfaces to be triangulated even
when this option is switched off:
1. When two blocks are adjacent and one of the adjacent faces is larger than the other and has
glazing (see EnergyPlus DXF output below). This situation requires triangulation because
EnergyPlus cannot handle surfaces with holes. You should try to avoid this situation wherever
possible, especially if the surface involved is large or has a large number of windows because the
large number of triangulated surfaces can slow simulations significantly
© 2008 DesignBuilder Software, Ltd.
Reference
505
Illustration of triangulation in inter-block connection surfaces
· Windows which are neither triangular nor rectangular must be triangulated to fit with EnergyPlus
requirements.
· If a surface, shading surface or opening has more vertices than is allowed from the IDD definition
then it must be triangulated.
TIP TO REDUCE NUMBER OF TRIANGLES WHEN TRIANGULATION IS REQUIRED
You can reduce the number of triangles required when a smaller block is placed adjacent to a large one
and the larger block has Windows by drawing a partitions stub to separate the block connection area from
the window area as shown the diagram below.
© 2008 DesignBuilder Software, Ltd.
506
14.8
DesignBuilder 1.5
Calculation of HVAC Energy Consumption
DesignBuilder calculates boiler, chiller, DHW fuel consumption from the loads calculated by EnergyPlus
using the CoP data at the building level on the HVAC tab as follows:
Simple HVAC
Boiler energy = EnergyPlus heating loads / Heating system CoP
Chiller energy = EnergyPlus cooling loads / Cooling system CoP
Compact HVAC
Boiler energy = (EnergyPlus heating loads x Heating distribution loss factor) / Boiler CoP
Chiller energy = (EnergyPlus cooling loads x Cooling distribution loss factor) / Chiller CoP
Where:
Heating distribution loss factor = 1 + (Heating Distribution Loss) / 100
Cooling distribution loss factor = 1 + (Cooling Distribution Loss) / 100
DHW (Simple and Compact HVAC)
DHW energy (kWh) = DHW CoP x 1000 (kg/m3) x 4.187 (KJ/kg-K) x (EnergyPlus DHW m3 loads) x (
Delivery water temperature - Mains water temperature)
Where:
DHW CoP is Heating system CoP when using '1-Central heating boiler' DHW type
Data shown in blue is HVAC model data.
Data shown in italics is read from the EnergyPlus results eso file .
© 2008 DesignBuilder Software, Ltd.
Section
15
EnergyPlus
Background
Information
508
DesignBuilder 1.5
EnergyPlus is the U.S. DOE building energy simulation program for modelling building heating, cooling,
lighting, ventilating, and other energy flows. It builds on the most popular features and capabilities of
BLAST and DOE-2 but also includes many innovative simulation capabilities such as time steps of less
than an hour, modular systems and plant integrated with heat balance-based zone simulation, multizone
air flow, thermal comfort, and photovoltaic systems.
EnergyPlus is a stand-alone simulation program without a 'user friendly' graphical interface – which is
where DesignBuilder comes in. We have integrated EnergyPlus tightly within the DesignBuilder
environment to allow you to carry out simulations without any fuss – just define your building model,
request data and let the EnergyPlus simulation engine take care of the details.
DesignBuilder has been specifically developed around EnergyPlus allowing most of the EnergyPlus fabric
and glazing data to be input. Databases of building materials, constructions, window panes, window gas,
glazing units and blinds are provided.
HVAC is modelled using the Compact HVAC descriptions. A range of commonly used HVAC system
types can be defined parametrically without the need for complex system layouts. These compact
descriptions are automatically expanded behind-the-scenes into full HVAC simulation data sets prior to
simulation.
You can use DesignBuilder to generate IDF files and work with these outside DesignBuilder to
access system functionality not provided by DesignBuilder.
There is a range of EnergyPlus simulators to choose from including the current DOE executable release,
the current DLL release and any interim releases made available by DOE. You can carry out
DesignBuilder simulations via EP-Launch.
See also:
·
·
·
·
·
·
·
·
·
·
·
·
·
·
EnergyPlus Program options
Exporting EnergyPlus IDF Files
EnergyPlus Version Compatibility
EnergyPlus IDF Window Dimensions
Calculation of DesignBuilder Output from EnergyPlus Report Variables
EnergyPlus Errors and Warnings
EnergyPlus Daylight Calculations
EnergyPlus Thermal Comfort
EnergyPlus Date Definition
DOE EnergyPlus website
Simulation Hourly Weather Data
DesignBuilder Files, Location and Extensions
Licensing & Activation
EnergyPlus Documentation
15.1
Exporting EnergyPlus IDF Files
You can use DesignBuilder to generate EnergyPlus idf files for use in external simulation environments
such as EP-Launch. There are 4 alternative procedures for doing this:
1. From the File | Export menu option (preferred method).
2. By copying the intermediate in.idf file in the EnergyPlus folder.
© 2008 DesignBuilder Software, Ltd.
EnergyPlus Background Information
509
3. Tools | Display simulation input script from Simulation or Heating/Cooling design screens.
4. Using the DOE executable EnergyPlus simulation option to open the EP-launch application before
simulation.
Note that DesignBuilder will automatically generate compatible IDF files with the target version of
EnergyPlus as set on the Program options dialog.
It is important to set the version you intend to use before exporting the IDF data.
1. File > Export menu option
1. Open your DesignBuilder dsb model file.
2. Make sure you are at building level or below.
3. Click on File > Export > EnergyPlus IDF file > Simulation. DesignBuilder will warn you if the
currently selected version of EnergyPlus is not a DOE one and give you an opportunity to change it.
2. Copy in.idf in the EnergyPlus folder
An alternative way to generate IDF files is to use the intermediate file in.idf in the EnergyPlus folder which
is generated prior to each DesignBuilder EnergyPlus simulation. You should copy this file to a different
filename/location before using it.
Important: You should not make any changes to in.idf itself because this file will get overwritten before
the next DesignBuilder EnergyPlus simulation.
3. Tools > Display menu option
You can view the input data script used to calculate these results by selecting the Tools > Display
simulation input script menu option. If you do not have the EnergyPlus IDF editor installed, then you
should associate the .idf file extension with a text editor to make this option work.
Note: this shows the script stored with the model just before the simulation not the in.idf file stored in the
EnergyPlus folder.
4. DOE executable EnergyPlus simulation option
In the Program options dialog you can select an executable EnergyPlus option and set the execution
mode to 4-Executable (EP-Launch). This gives you some control over the IDF data before the
simulation. Any changes made to the IDF data from within EP-Launch will be included in the simulation
but will not be retained for future simulations. See Program options > EnergyPlus for more info on this.
Reading ESO results files back into DesignBuilder
Provided you haven't changed the zone and surface names in the IDF data you can
read ESO results files generated from your modified data back into DesignBuilder for
display and analysis.
15.2
EnergyPlus Version Compatibility
You should ensure that you have the correct version of EnergyPlus set before exporting IDF data
for use outside DesignBuilder.
© 2008 DesignBuilder Software, Ltd.
DesignBuilder 1.5
510
DesignBuilder will automatically generate compatible IDF files with the target version of EnergyPlus as set
on the EnergyPlus tab Program options dialog. If you are generating IDF files for simulation outside
DesignBuilder you should note that, by default, DesignBuilder targets an internal version of EnergyPlus
which has an extended IDD data definition file to allow:
1. Surfaces of up to 330 vertices.
2. Shading surfaces of up to 33 vertices.
3. Up to 400 zones in compact HVAC systems.
So if you attempt to use IDF files generated for internal versions of EnergyPlus in a version of EnergyPlus
supplied by DOE, you may find some surface or HVAC data errors related to the above changes. To avoid
this situation you should either:
1. Explicitly target your DOE EnergyPlus installation by making the appropriate setting on the Program
options dialog (preferred option), or
2. Carry the DesignBuilder IDD extensions over to your standalone version of EnergyPlus by copying
Energy+.idd from the DesignBuilder EnergyPlus folder (use the File > Folder > EnergyPlus folder
menu command) to your standalone EnergyPlus folder (e.g. C:\EnergyPlusV2-0-0).
15.3
EnergyPlus IDF Window Dimensions
The window dimensions supplied to EnergyPlus are the total opening size (window size including the
frame), but deflated by an amount equal to the width of the window frame. The deflation is required
because EnergyPlus expects window dimensions excluding the frame whereas DesignBuilder openings
include the frame. DesignBuilder takes this approach because it is usually more convenient to enter the
size of the opening in the fabric.
The default window areas generated by DB should correspond with the Window to wall % (WWR) setting
on the Openings tab , provided you are using either Continuous horizontal or Preferred height facade
types.
Tip: switching off frames on the Openings tab causes EnergyPlus windows of the expected dimensions to
be generated given the simplistic 'window area divided by total wall area' calculation.
15.4
Calculation of DesignBuilder Output from EnergyPlus Report
Variables
At the end of an EnergyPlus simulation DesignBuilder reads the EnergyPlus output file eplusout.eso. The
format of this file is described in EnergyPlus documentation. The table below explains how the raw
EnergyPlus output is processed to create DesignBuilder output. The Environmental/Comfort Output
column refers to the data shown in DesignBuilder output screens. EnergyPlus Report variable column
data shows report variable names with the units in square brackets. The units should be omitted when
using the report variables in IDF data. The Area column indicates the zone, surface, component etc.
innocuous
Environmental/
EnergyPlus Report
Area
Notes*
© 2008 DesignBuilder Software, Ltd.
EnergyPlus Background Information
Comfort Output
511
Variable
Internal air temperature Zone Mean Air Temperature
[C]
Internal radiant
Zone Mean Radiant
temperature
Temperature [C]
Internal operative
temperature
ZoneId
Relative Humidity
Fanger PMV
Pierce PMV ET
Pierce PMV SET
Pierce Discomfort
Index (DISC)
Pierce Thermal Sens.
Index (TSENS)
Kansas Uni TSV
Discomfort hrs
(summer clothing)
Discomfort hrs (winter
clothing)
Discomfort hrs (all
clothing)
Zone Air Relative Humidity [%]
FangerPMV
PiercePMVET
PiercePMVSET
PierceDISC
ZoneId
PEOPLE ZoneId
PEOPLE ZoneId
PEOPLE ZoneId
PEOPLE ZoneId
PierceTSENS
PEOPLE ZoneId
KsuTSV
Time Not Comfortable
Summer Clothes [hr]
Time Not Comfortable Winter
Clothes [hr]
Time Not Comfortable
Summer or Winter Clothes [hr]
PEOPLE ZoneId
PEOPLE ZoneId
ZoneId
ZoneId
0.5 x (Zone Mean Air
Temperature + Zone
Mean Radiant
Temperature)
PEOPLE ZoneId
PEOPLE ZoneId
Fabric and
ventilation
Glazing heat gain
Window Heat Gain [W] SurfaceId
Window Heat Loss [W] Window Transmitted Solar [W]
Walls, Roofs, Ceilings Opaque Surface Inside Face
(int), Floors (int), Floors Conduction [W]
(ext), Ground floors,
Partitions (int), Doors
and vents
External infiltration
Zone Infiltration Sensible Heat
Loss [J] + Zone Infiltration
Sensible Heat Gain [J]
External natural
Zone Ventilation Sensible Heat
ventilation
Gain [J] + Zone Ventilation
Sensible Heat Loss [J]
External mechanical
Zone Ventilation Sensible Heat
ventilation
Gain [J] + Zone Ventilation
Sensible Heat Loss [J]
© 2008 DesignBuilder Software, Ltd.
Window Transmitted Solar
is subtracted so that
Glazing heat gain
represents the transfer of
all heat through the
window excluding beam
and diffuse short-wave
solar heat effects.
SurfaceId
ZoneId
Scheduled Natural
ventilation only
ZoneId
Scheduled Natural
ventilation only
ZoneId
Scheduled Natural
ventilation only
512
DesignBuilder 1.5
Internal Air
ZoneId
Calculated Natural
ventilation only
ZoneId
Calculated Natural
ventilation only
Mech Vent + Nat Vent Zone Mechanical Ventilation
+ Infiltration
Air Change Rate [ach]
ZoneId
Mech Vent + Nat Vent Zone Ventilation Air Change
+ Infiltration
Rate [ach]
ZoneId
Mech Vent + Nat Vent Zone Infiltration Air Change
+ Infiltration
Rate [ach]
ZoneId
Summed across blocks
and building using volumeweighted average
Summed across blocks
and building using volumeweighted average
Summed across blocks
and building using volumeweighted average
External Air
AirflowNetwork Mixing
Sensible Loss Rate [W] +
AirflowNetwork Mixing
Sensible Gain Rate [W]
AirflowNetwork Infiltration
Sensible Loss Rate [W]+
AirflowNetwork Infiltration
Sensible Gain Rate [W]
Airflow
Internal Gains
Task lighting gains
General lighting gains
ELECTRIC
EQUIPMENT#ZoneId#TaskLig
hts* [J]
ELECTRIC
EQUIPMENT#ZoneId#General
Lights* [J]
Miscellaneous gains
ELECTRIC
EQUIPMENT#ZoneId#02:
InteriorEquipment* [J]
-
Process gains
ELECTRIC
EQUIPMENT#ZoneId#03:
InteriorEquipment* [J]
-
The 'GeneralLights'
ELECTRIC EQUIPMENT
EnergyPlus output is a
lighting fuel consumption
and is summed to give the
Lighting fuel consumption
(below). The gain to the
zone is calculated from
this in each zone by
multiplying by (1 - Return
air fraction).
The '02' ELECTRIC
EQUIPMENT EnergyPlus
output is the
miscellaneous internal
gains fuel consumption
and is summed to give the
Room fuel consumption
(below). The gain to the
zone is calculated from
this in each zone by
multiplying by (1 - Fraction
lost).
The '03' ELECTRIC
EQUIPMENT EnergyPlus
output is the process
internal gains fuel
consumption and is
© 2008 DesignBuilder Software, Ltd.
EnergyPlus Background Information
Catering gains
ELECTRIC
EQUIPMENT#ZoneId#04:
InteriorEquipment* [J]
-
Computer and
equipment gains
ELECTRIC
EQUIPMENT#ZoneId#05:
InteriorEquipment* [J]
Zone People Sensible Heat
Gain [J]
Zone Transmitted Solar [W]
-
Zone Diff Solar from Interior
Windows [W] + Zone Beam
Solar from Interior Windows
[W]
Zone/Sys Sensible Cooling
Rate [W]
Zone/Sys Sensible Heating
Rate [W]
ZoneId
Occupancy gains
Solar Gains Exterior
Windows
Solar Gains Interior
Windows
Zone/Sys sensible
cooling
Zone/Sys sensible
heating
513
summed to give the Room
fuel consumption (below).
The gain to the zone is
calculated from this in
each zone by multiplying
by (1 - Fraction lost).
The '04' ELECTRIC
EQUIPMENT EnergyPlus
output is the catering
internal gains fuel
consumption and is
summed to give the Room
fuel consumption (below).
The gain to the zone is
calculated from this in
each zone by multiplying
by (1 - Fraction lost).
ZoneId
ZoneId
ZoneId
ZoneId
System Heat Flows
(Compact HVAC
only)
Zone Heating
AHU Heating
Total Water Heating Coil Rate ZoneId REHEAT
[W]
COIL
Heating Coil Rate [W]
ZoneId REHEAT
COIL
Heating Coil Rate [W]
ZoneId AHU
HEATING COIL
Total Water Heating Coil Rate ZoneId HEATING
[W]
COIL
Heating Coil Rate [W]
AHU PREHEAT
COIL
Total Water Heating Coil Rate AHU HEATING COIL
[W]
Heating Coil Rate [W]
AHU HEATING COIL
Total Cooling
Total Water Cooling Coil Rate AHU COOLING
Zone Heating
Zone Heating
Zone Heating
Preheat
AHU Heating
© 2008 DesignBuilder Software, Ltd.
VAV/CAV Hot water
reheat coils
VAV/CAV Electric reheat
coils
Unitary single zone
Fan coil
VAV/CAV Gas/Electric
preheat coils
VAV/CAV Hot water coils
VAV/CAV with Gas/
Electric AHU heating coils
and Unitary multizone
VAV/CAV with Chilled
514
DesignBuilder 1.5
Total Cooling
Total Cooling
Total Cooling
Sensible Cooling
Sensible Cooling
Sensible Cooling
Sensible Cooling
[W]
DX Coil Total Cooling Rate
[W]
DX Coil Total Cooling Rate
[W]
Total Water Cooling Coil Rate
[W]
Sensible Water Cooling Coil
Rate [W]
DX Coil Sensible Cooling Rate
[W]
DX Coil Sensible Cooling Rate
[W]
Sensible Water Cooling Coil
Rate [W]
COIL
AHU COOLING
COIL
ZoneId AHU
COOLING COIL
ZoneId COOLING
COIL
AHU COOLING
COIL
AHU COOLING
COIL
ZoneId AHU
COOLING COIL
ZoneId COOLING
COIL
water coils
Unitary Multizone
Compact HVAC
The fuel consumption for
each heating load is
calculated based on the
efficiency of the heat
generation and distribution
loss:
Unitary single zone
Fan coil
VAV/CAV with Chiller
water
Unitary multizone
Unitary single zone
Fan coil
Fuel breakdown
(building level)
Heat generator
Heat generator fuel = (
Heating Load x Heating
distribution loss factor) /
Heat generator CoP
Where:
Heating distribution loss
factor = 1 + (Heating
Distribution Loss) / 100
Note 1: distribution loss is
0 for direct electric and
gas heating coils.
Note 2: CoP for direct gas
coils is assumed to be 0.8
and direct electric coils
1.0.
Heat generator
Simple HVAC
Heat generator fuel =
Heating load / Heating
system CoP
Note: the Heating system
CoP is defined separately
for each zone.
© 2008 DesignBuilder Software, Ltd.
EnergyPlus Background Information
Chiller
Compact HVAC
515
The fuel consumption for
each cooling load is
calculated based on the
efficiency of the chiller and
distribution loss:
Chiller fuel = (Cooling
Load x Cooling distribution
loss factor) / Chiller CoP
Where:
Chiller
Simple HVAC
Cooling distribution loss
factor = 1 + (Cooling
Distribution Loss) / 100
Chiller fuel = Cooling
load / Cooling system CoP
Note: the Cooling system
CoP is defined separately
for each zone.
System fan
Fan Electric Consumption [J]
System fan
Fan Electric Consumption [J]
System fan
System pumps
DHW
AHU SUPPLY FAN
VAV/CAV with Chiller
water, Unitary multizone
Unitary single zone
ZoneId AHU
SUPPLY FAN
Fan Electric Consumption [J] ZoneId SUPPLY FAN Fan coil
Pump Electric Consumption [J] HOT WATER LOOP
HW SUPPLY PUMP
+ CHILLED WATER
LOOP CHW
SUPPLY PUMP +
CHILLED WATER
LOOP CNDW
SUPPLY PUMP
Domestic Hot Water
ZoneId DHW 1
DHW energy (kWh) =
Consumption [m3]
DHW CoP x 1000 (kg/m3)
x 4.187 (KJ/kg-K) x (
Domestic Hot Water
Consumption [m3]) x (
Delivery water
temperature - Mains water
temperature)
Where:
Preheat energy
Lighting
© 2008 DesignBuilder Software, Ltd.
DHW CoP is Heat
generator CoP when
using 1-Central heating
boiler DHW type.
(Preheat Heating Coil
Rate + Distr loss if
appropriate) / Preheat
CoP
516
DesignBuilder 1.5
Room electricity
Room gas
Room oil
Room solid
Room bottled gas
Room other
Fuel totals
(building level)
Electricity
Gas
Oil
Solid
1-Electricity from grid
2-Natural gas
3-Oil
4-Coal + 7-Anthracite + 8Smokeless fuel (including
coke)
5-LPG + 6-Biogas
9-Dual fuel appliances
(mineral + wood) + 10Biomass + 11-Waste heat
Bottled gas
Other fuel consumption
CO2 production
(building level)
CO2
Calculated from Fuel
totals above using locally
published CO2 emission
factors from the Emissions
tab on the Legislative
regions dialog accessed
from the Site level on the
Regions model data tab.
Site Weather data
Outside dry-bulb
temperature
Outside dew-point
temperature
Direct normal solar
Diffuse horizontal solar
Wind speed
Wind direction
Atmospheric pressure
Solar altitude
Solar azimuth
Outdoor Dry Bulb
Outdoor Dew Point
Direct Solar
Diffuse Solar
Wind Speed
Wind Direction
Outdoor Barometric Pressure
Solar Altitude Angle
Solar Azimuth Angle
* Variables shown in green represent EnergyPlus output.
© 2008 DesignBuilder Software, Ltd.
EnergyPlus Background Information
15.5
517
EnergyPlus Errors and Warnings
A file eplusout.err is generated following each EnergyPlus simulation in the EnergyPlus folder. It may
contain three levels of errors (Warning, Severe, Fatal) as well as the possibility of just message lines.
These errors may be duplicated in other files (such as the standard output file) and are described more
completely in the EnergyPlus Output Details and Examples documents.
ERRORS
** Severe
** Did not find "Until:
22:00" in list of Objects
1
You may have entered a semi-colon character (;) at the end of one of the lines in a Compact schedule
when you meant to enter a comma (,).
2
** Severe ** Problem in interior solar distribution calculation (CHKBKS)
**
~~~
**
Solar Distribution = FullInteriorExterior will not work
in Zone=78474
**
~~~
**
because vertex 3 of back surface=W_73536_2_0_0 is in
front of receiving surface=W_78474_3_0_0
**
~~~
**
(Dot Product indicator=1.4966)
**
~~~
**
Check surface geometry; if OK, use Solar Distribution =
FullExterior instead.
The 3-Full interior and exterior solar distribution option is selected but one or more zone in the model
is non-convex. Note that DesignBuilder is configured by default to check for this condition and
provides more friendly error messages.
3
** Severe ** For Purchased Air ZONE 21438 PURCHASED AIR serving Zone 21438
** ~~~ ** ..the supply air temperature for cooling [10.00] is greater than
the zone cooling setpoint [8.99].
This severe error can occur when using Simple HVAC, or Cooling design calculations with Operative
control in zones with strong radiant heat gains causing high radiant temperatures (e.g. un-insulated
roof or zone is highly glazed). The supply air temperature is fixed (to 10°C in the above example) but
the zone air temperature must be cooled lower than this (8.99°C in the above example) to give the
required operative setpoint (.e.g. 24 °C). Operative temperature, Top, is calculated as:
Top= 0.5 x (Ta + Tr)
where:
Top is the operative temperature.
Ts is the air supply temperature.
Ta is the zone air temperature (Ta must be > Ts).
Tr is the zone radiant temperature.
So there is a requirement:
© 2008 DesignBuilder Software, Ltd.
518
DesignBuilder 1.5
Tr max <= 2 Top - Ts
If the zone radiant temperature is higher than Tr max and Operative temperature control is used then
this severe error will occur.
The solution may be to use Air temperature control and to reduce the radiant temperatures using
solar shading/insulation as appropriate.
4
** Severe ** Problem in interior solar distribution calculation (CHKBKS)
**
~~~
**
Solar Distribution = FullInteriorExterior will not
work in Zone=42272
**
~~~
**
because vertex 6 of back surface=F_42272_10106_0_10277
is in front of receiving surface=W_42272_9_0_0
**
~~~
**
(Dot Product indicator=7.3314)
**
~~~
**
Check surface geometry; if OK, use Solar Distribution
= FullExterior instead.
One or more zones is non-convex which makes the model incompatible with the 3-Full interior and
exterior solar distribution algorithm. This error can also lead to temperature out of bounds errors.
5
** Severe ** Temperature out of bounds (637.89) for surface=W_43311_4_0_0
**
~~~
** in Zone=43276
**
~~~
** Occurrence info=BRUSSELS - BEL IWEC DATA WMO#=064510,
01/04 13:30 - 13:32
**
~~~
** A temperature out of bounds problem can be caused by
several things. The user
**
~~~
** should check the weather environment, the level of
internal gains with respect
**
~~~
** to the zone, and the thermal properties of their
materials among other things.
**
~~~
** A common cause is a building with no thermal mass -- all
materials with
**
~~~
** Regular-R definitions.
A temperature of a surface has become too high, during the simulation. Possible causes are:
1. Some form of geometric error in the simulation, sometimes related to unrealistic amounts of
solar radiation falling on small surfaces.
2. Use of the finite-difference solution method.
© 2008 DesignBuilder Software, Ltd.
EnergyPlus Background Information
519
WARNINGS
1
** Warning ** GetHTSubSurfaceData: A Multiplier > 1.0 for window/glass
door W_67_4_0_0_0_0
**
~~~
** in conjunction with SolarDistribution = FullExterior or
FullInteriorExterior
**
~~~
** can cause inaccurate shadowing on the window and/or
**
~~~
** inaccurate interior solar distribution from the window.
The Lump similar windows on surface model option has been selected which causes DesignBuilder to
use the EnergyPlus Window Multiplier option to speed up simulations. The message is warning that
the Window Multiplier option, when used in conjunction with the Full exterior or Full interior and
exterior calculation options can lead to inaccurate distributions of solar radiation around the room.
2
** Warning ** GetSurfaceData:The total number of floors, walls, roofs and
internal mass surfaces in Zone 59
**
~~~
** is < 6. This may cause an inaccurate zone heat balance
calculation.
This warning is often generated for pitched roofs and for interior zones separated by virtual partitions
and can safely be ignored.
3
** Warning ** GetGroundTemps: Some values for "GroundTemperatures" fall
outside the range of 15-25C.
**
~~~
** These values may be inappropriate. Please consult the Input
Output Reference for more details.
The default ground temperatures used in DesignBuilder is 14degC. This may be inappropriate in
some cases and EnergyPlus is warning about this. You should take care to enter realistic ground
temperatures bearing in mind the advice given in the Ground Modelling section.
4
** Warning ** DXFOut: Could not triangulate surface="W_7469_0_0_1",
type="Wall", check surface vertex order(entry)
Caused by a minor bug in EnergyPlus when creating a DXF representation of the model - it is not
always able to fully triangulate all surfaces and generate a full set of surfaces. You can ignore the
message for the purposes of simulation results.
5
** Warning ** Base surface does not surround subsurface (CHKSBS), Overlap
Status=No-Overlap
**
~~~
**
The base surround errors occurred 3 times.
**
~~~
** Surface "W_7376_3_0_0" misses SubSurface "W_7376_3_0_0_0_0"
These warnings are usually a reporting bug in EnergyPlus v.2.0 and earlier.
6
** Warning ** Calculated design cooling/heating load for zone=78474 is
zero.
**
~~~
** Check ZONE SIZING and ZONE CONTROL:THERMOSTATIC inputs.
© 2008 DesignBuilder Software, Ltd.
520
DesignBuilder 1.5
Cooling/heating may have been switched off in this zone or there is no cooling/heating load (i.e. the
zone does not require any cooling/heating).
For a zone sizing run, there must be at least 1 Zone Sizing object input.
7
Can usually be ignored.
15.6
EnergyPlus Daylight Calculations
The EnergyPlus daylighting model, in conjunction with the thermal analysis, determines the energy impact
of daylighting strategies based on analysis of daylight availability, site conditions, window management in
response to solar gain and glare, and various lighting control strategies.
The daylighting calculations are carried out during the simulation in 3 main steps:
1. Daylight factors, which are ratios of interior illuminance or luminance to exterior horizontal
illuminance, are calculated and stored. The user specifies the coordinates of one or two reference
points in each daylit zone. EnergyPlus then integrates over the area of each exterior window in the
zone to obtain the contribution of direct light from the window to the illuminance at the reference
points, and the contribution of light that reflects from the walls, floor and ceiling before reaching the
reference points. Window luminance and window background luminance, which are used to
determine glare, are also calculated. Taken into account are such factors as sky luminance
distribution, window size and orientation, glazing transmittance, inside surface reflectances, sun
control devices such as movable window shades, and external obstructions. Dividing daylight
illuminance or luminance by exterior illuminance yields daylight factors. These factors are
calculated for the hourly sun positions on sun-paths for representative days of the run period.
2. A daylighting calculation is performed each heat-balance time step when the sun is up. In this
calculation the illuminance at the reference points in each zone is found by interpolating the stored
daylight factors using the current time step’s sun position and sky condition, then multiplying by the
exterior horizontal illuminance. If glare control has been specified, the program will automatically
deploy window shading, if available, to decrease glare below a specified comfort level. A similar
option uses window shades to automatically control solar gain.
3. The electric lighting control system is simulated to determine the lighting energy needed to make up
the difference between the daylighting illuminance level and the design illuminance. Finally, the
zone lighting electric reduction factor is passed to the thermal calculation, which uses this factor to
reduce the heat gain from lights. The EnergyPlus daylighting calculation is derived from the
daylighting calculation in DOE-2.1E, which is described in [Winkelmann, 1983] and [Winkelmann
and Selkowitz, 1985]. There are two major differences between the two implementations: (1) In
EnergyPlus daylight factors are calculated for four different sky types—clear, clear turbid,
intermediate, and overcast; in DOE-2 only two sky types are used—clear and overcast. (2) In
EnergyPlus the clear-sky daylight factors are calculated for hourly sun-path sun positions several
times a year whereas in DOE-2 these daylight factors are calculated for a set of 20 sun positions
that span the annual range of sun positions for a given geographical location.
© 2008 DesignBuilder Software, Ltd.
EnergyPlus Background Information
15.7
521
EnergyPlus Thermal Comfort
The integration of a sophisticated building thermal analysis tool with thermal comfort models will allow us
to perform an energy analysis on a zone and simultaneously determine if the environmental control
strategy will be sufficient for the occupants to be thermally comfortable. This chapter is intended to
provide background on thermal comfort, present an overview of state of the art thermal comfort models
and present the mathematical models that have been incorporated into Energy Plus.
Background on Thermal Comfort Models
Throughout the last few decades, researchers have been exploring the thermal, physiological and
psychological response of people in their environment in order to develop mathematical models to predict
these responses. Researchers have empirically debated building occupants' thermal responses to the
combined thermal effect of the personal, environmental and physiological variables that influence the
condition of thermal comfort.
There are two personal variables that influence the condition of thermal comfort: the thermal resistance of
the clothing (Icl), and the metabolic rate (H/ADu). The thermal resistance of the clothing (Icl) is measured
in units of "clo." The 1985 ASHRAE Handbook of Fundamentals (3) suggests multiplying the summation
of the individual clothing items clo value by a factor of 0.82 for clothing ensembles.
The environmental variables that influence the conditions of thermal comfort include:
1. Air Temperature (Ta),
2. Mean Radiant Temperature (Tr),
3. Relative air velocity (v),
4. Water vapor pressure in ambient air (Pa)
The Air Temperature (Ta), a direct environmental index, is the dry-bulb temperature of the environment.
The Mean Radiant Temperature (Tr) is a rationally derived environmental index defined as the uniform
black-body temperature that would result in the same radiant energy exchange as in the actual
environment. The Relative air velocity (v) a direct environmental index is a measure of the air motion
obtainable via a hot wire or vane anemometers. The Water vapor pressure in ambient air (Pa) is a direct
environmental index.
The physiological variables that influence the conditions of thermal comfort include:
1. Skin Temperature (Tsk),
2. Core or Internal Temperature (Tcr),
3. Sweat Rate,
4. Skin Wettedness (w),
5. Thermal Conductance (K) between the core and skin.
Where the Skin Temperature (Tsk), the Core Temperature (Tcr) and the Sweat Rate are physiological
indices. The Skin Wettedness (w) is a rationally derived physiological index defined as the ratio of the
actual sweating rate to the maximum rate of sweating that would occur if the skin were completely wet.
One more consideration is important in dealing with thermal comfort - the effect of asymmetrical heating
or cooling. This could occur when there is a draft or when there is a radiant flux incident on a person
(which is what is of primary interest to us here). Fanger (5) noted that the human regulatory system is
quite tolerant of asymmetrical radiant flux. A reasonable upper limit on the difference in mean radiant
temperature (Tr) from one direction to the opposing direction is 15_ (1). This limit is lower if there is a high
air velocity in the
zone.
Mathematical Models for Predicting Thermal Comfort
© 2008 DesignBuilder Software, Ltd.
522
DesignBuilder 1.5
Many researchers have been exploring ways to predict the thermal sensation of people in their
environment based on the personal, environmental and physiological variables that influence thermal
comfort. From the research done, some mathematical models that simulate occupants' thermal response
to their environment have been developed. Most thermal comfort prediction models use a seven or nine
point thermal sensation scale, as in the following tables.
Seven point Thermal Sensation Scale:
3 hot
2 warm
1 slightly warm
0 neutral
-1 slightly cool
-2 cool
-3 cold
Nine point Thermal Sensation Scale:
4 very hot
3 hot
2 warm
1 slightly warm
0 neutral
-1 slightly cool
-2 cool
-3 cold
-4 very cold
The most notable models have been developed by P.O. Fanger (the Fanger Comfort Model), the J. B.
Pierce Foundation (the Pierce Two-Node Model), and researchers at Kansas State University (the KSU
Two-Node Model). Berglund (6) presents a detailed description of the theory behind these three models.
Note: for all Thermal Comfort reporting: Though the published values for thermal comfort “vote” have a
discrete scale (e.g. –3 to +3 or –4 to +4), the calculations in EnergyPlus are carried out on a continuous
scale and, thus, reporting may be “off the scale” with specific conditions encountered in the space. This is
not necessarily an error in EnergyPlus – rather a different approach that does not take the “limits” of the
discrete scale values into account.
The main similarity of the three models is that all three apply an energy balance to a person and use the
energy exchange mechanisms along with experimentally derived physiological parameters to predict the
thermal sensation and the physiological response of a person due to their environment. The models differ
somewhat in the physiological models that represent the human passive system (heat transfer through
and from the body) and the human control system (the neural control of shivering, sweating and skin
blood flow). The models also differ in the criteria used to predict thermal sensation.
FANGER COMFORT MODEL
Fanger's Comfort model was the first one developed. It was published first in 1967 (7) and then in 1972
(2), and helped set the stage for the other two models. The mathematical model developed by P.O.
Fanger is probably the most well known of the three models and is the easiest to use because it has been
put in both chart and graph form.
Description of the model and algorithm
Fanger developed the model based on the research he performed at Kansas State University and the
© 2008 DesignBuilder Software, Ltd.
EnergyPlus Background Information
523
Technical University of Denmark. Fanger used the seven-point form of a thermal sensation scale along
with numerous experiments involving human subjects in various environments. He related the subjects in
response to the variables, which influence the condition of thermal comfort. Fanger's model is based upon
an energy analysis that takes into account all the modes of energy loss (L) from the body, including: the
convection and radiant heat loss from the outer surface of the clothing, the heat loss by water vapor
diffusion through the skin, the heat loss by evaporation of sweat from the skin surface, the latent and dry
respiration heat loss and the heat transfer from the skin to the outer surface of the clothing. The model
assumes that the person is thermally at steady state with his environment.
By determining the skin temperature and evaporative sweat rate that a thermally comfortable person
would have in a given set of conditions, the model calculates the energy loss (L). Then, using the thermal
sensation votes from subjects at KSU and Denmark, a Predicted Mean Vote (PMV) thermal sensation
scale is based on how the energy loss (L) deviates from the metabolic rate (M) in the following form:
PIERCE TWO-NODE MODEL
The Pierce Two-Node model was developed at the John B. Pierce Foundation at Yale University. The
model has been continually expanding since its first publication in 1970 (8). The most recent version on
the model appears in the 1986 ASHRAE Transactions (9).
The Pierce model thermally lumps the human body as two isothermal, concentric compartments, one
representing the internal section or core (where all the metabolic heat is assumed to be generated and
the skin comprising the other compartment). This allows the passive heat conduction from the core
compartment to the skin to be accounted for. The boundary line between two compartments changes with
respect to skin blood flow rate per unit skin surface area (SKBF in L/h•m2) and is described by alpha – the
fraction of total body mass attributed to the skin compartment (13).
Furthermore, the model takes into account the deviations of the core, skin, and mean body temperature
weighted by alpha from their respective set points. Thermoregulatory effector mechanisms (Regulatory
sweating, skin blood flow, and shivering) are defined in terms of thermal signals from the core, skin and
body (13).
The latest version of the Pierce model (15) discusses the concepts of SET* and ET*. The Pierce model
converts the actual environment into a "standard environment" at a Standard Effective Temperature,
SET*. SET* is the dry-bulb temperature of a hypothetical environment at 50% relative humidity for
subjects wearing clothing that would be standard for the given activity in the real environment.
Furthermore, in this standard environment, the same physiological strain, i.e. the same skin temperature
and skin wettedness and heat loss to the environment, would exist as in the real environment. The Pierce
model also converts the
actual environment into a environment at an Effective Temperature, ET*, that is the dry-bulb temperature
of a hypothetical environment at 50% relative humidity and uniform temperature (Ta = MRT) where the
subjects would experience the same physiological strain as in the real environment.
In the latest version of the model it is suggested that the classical Fanged PMV be modified by using ET*
or SET* instead of the operative temperature. This gives a new index PMV* which is proposed for dry or
humid environments. It is also suggested that PMV* is very responsive to the changes in vapor
permeation efficiency of the occupants clothing.
Besides PMV*, the Pierce Two Node Model uses the indices TSENS and DISC as predictors of thermal
comfort. Where TSENS is the classical index used by the Pierce foundation, and is a function of the mean
body temperature. DISC is defined as the relative thermoregulatory strain that is needed to bring about a
state of comfort and thermal equilibrium. DISC is a function of the heat stress and heat strain in hot
environments and equal to TSENS in cold environments. In summary, the Pierce Model, for our purposes,
uses four thermal comfort indices; PMVET-a function of ET*, PMVSET- a function of SET*, TSENS and
DISC.
KSU TWO-NODE MODEL
© 2008 DesignBuilder Software, Ltd.
524
DesignBuilder 1.5
The KSU two-node model, developed at Kansas State University, was published in 1977 (10). The KSU
model is quite similar to that of the Pierce Foundation. The main difference between the two models is
that the KSU model predicts thermal sensation (TSV) differently for warm and cold environment.
The KSU two-node model is based on the changes that occur in the thermal conductance between the
core and the skin temperature in cold environments, and in warm environments it is based on changes in
the skin wettedness. In this model metabolic heat production is generated in the core which exchanges
energy with the environment by respiration and the skin exchanges energy by convection and radiation. In
addition, body heat is dissipated through evaporation of sweat and/or water vapor diffusion through the
skin. These principles are used in following passive system equations.
Here, control signals, based on set point temperatures in the skin and core, are introduced into passive
system equations and these equations are integrated numerically for small time increments or small
increments in core and skin temperature. The control signals modulate the thermoregulatory mechanism
and regulate the peripheral blood flow, the sweat rate, and the increase of metabolic heat by active
muscle shivering. The development of the controlling functions of skin conductance (KS), sweat rate
(Esw), and shivering (Mshiv) is based on their correlation with the deviations in skin and core
temperatures from their set points.
The KSU model's TSV was developed from experimental conditions in all temperature ranges and from
clo levels between .05 clo to 0.7 clo and from activities levels of 1 to 6 mets (6).
References
1. ASHRAE, “High Intensity Infrared Radiant Heating”, 1984 system Handbook, American Society of
Heating, Refrigerating and Air Conditioning Engineers, Atlanta, GA, Chapter 18, 1984.
2. Fanger, P.O., Thermal Comfort-Analysis and Applications in Environmental Engineering, Danish
Technical Press, Copenhagen, 1970.
3. ASHRAE, “Physiological Principles for Comfort and Health,” 1985 Fundamental Handbook,
American Society of Heating, Refrigerating and Air Conditioning Engineers, Atlanta, GA, Chapter 8,
1985.
4. Du Bois, D. and E.F., “A Formula to Estimate Approximate Surface Area, if Height and Weight are
Known”, Archives of internal Medicine, Vol.17, 1916.
5. Fanger, P.O., “Radiation and Discomfort”, ASHRAE Journal. February 1986.
6. Berglund, Larry, “Mathematical Models for Predicting the Thermal Comfort Response of Building
Occupants”, ASHRAE Trans., Vol.84, 1978.
7. Fanger P.O., “Calculation of Thermal Comfort: Introduction of a Basic Comfort Equation”, ASHRE
Trans., Vol.73, Pt 2, 1967.
8. Gagge, A.P., Stolwijk, J. A. J., Nishi, Y., “An Effective Temperature Scale Based on a Simple Model
of Human Physiological Regulatory Response”, ASHRAE Trans., Vol.70, Pt 1, 1970.
9. Gagge, A.P., Fobelets, A.P., Berglund, L. G., “A Standard Predictive Index of Human Response to
the Thermal Environment”, ASHRAE Trans., Vol.92, Pt 2, 1986.
10.Azer, N.Z., Hsu, S., “The prediction of Thermal Sensation from Simple model of Human
Physiological Regulatory Response”, ASHRAE Trans., Vol.83, Pt 1, 1977.
11.Hsu, S., “A Thermoregulatory Model for Heat Acclimation and Some of its Application”, Ph. D.
Dissertation, Kansas State University, 1977.
12.ISO., “Determination of the PMV and PPD Indices and Specification of the Conditions for Thermal
Comfort”, DIS 7730, Moderate Thermal Environment, 1983.
13.Doherty, T.J., Arens, E., “Evaluation of the Physiological Bases of Thermal Comfort Models”,
ASHRAE Trans., Vol.94, Pt 1, 1988.
14.ASHRAE, “Physiological Principles and Thermal Comfort”, 1993 ASHRAE HandbookFundamentals, American Society of Heating, Refrigerating and Air Conditioning Engineers, Atlanta,
GA, Chapter 8, 1993.
15.Fountain, Marc.E., Huizenga, Charlie, “A Thermal Sensation Prediction Tool for Use by the
Profession”, ASHRAE Trans., Vol.103, Pt 2, 1997.
16.Int-Hout, D., “Thermal Comfort Calculation / A Computer Model”, ASHRAE Trans., Vol.96, Pt
© 2008 DesignBuilder Software, Ltd.
EnergyPlus Background Information
15.8
EnergyPlus Date Definition
Field Contents
<Number> / <Number>
<Number> / Month
Month / <Number>
<Number> Weekday in Month
Last Weekday in Month
Interpretation
Month / Day
Day and Month
Day and Month
Numbered weekday of month
Last weekday of month
Notes
Month can be one of:
·
·
·
·
·
·
·
·
·
·
·
·
January,
February,
March,
April,
May,
June,
July,
August,
September,
October,
November,
December.
Abbreviations of the first three characters are also valid.
Weekday can be one of:
·
·
·
·
·
·
·
Sunday,
Monday,
Tuesday,
Wednesday,
Thursday,
Friday,
Saturday.
Abbreviations of the first three characters are also valid.
15.9
EnergyPlus Documentation
You can get the EnergyPlus user guides:
· Getting Started and Overview
· Input/Output Reference
· Output Details and Examples
© 2008 DesignBuilder Software, Ltd.
Example
12 / 31
31 Dec
Dec 31
1st Saturday in April
Last Sunday in October
525
526
DesignBuilder 1.5
· Engineering Reference
· Auxiliary Programs
Free from the EnergyPlus website:
http://www.eere.energy.gov/buildings/energyplus/documentation.html
© 2008 DesignBuilder Software, Ltd.
Section
16
Support Getting Help
528
DesignBuilder 1.5
If you need information that you could not find in this help file you should first check the FAQ and
Support Forum on the Website:
http://www.designbuilder.co.uk/support
If this does not give you the information you need you can send us a support request using a Support
Request Form and DesignBuilder team will endeavour to answer your question by email.
16.1
Frequently Asked Questions
An up-to-date FAQ list is maintained from the Support section of the DesignBuilder web site.
© 2008 DesignBuilder Software, Ltd.
Index
529
All 21, 30, 35, 61, 72, 104, 166, 176, 178, 184,
198, 199, 214, 215, 216, 223, 224, 228, 229, 239,
280, 281, 282, 285, 286, 287, 296, 302, 307, 313,
320, 329, 351, 356, 361, 372, 375, 399, 407, 411,
418, 423, 492, 504
All Gains 375
Allow 15, 21, 23, 27, 28, 31, 36, 41, 45, 46, 55, 57,
59, 87, 89, 120, 140, 159, 176, 178, 183, 184, 188,
2-D 79
223, 227, 235, 276, 280, 281, 289, 294, 296, 298,
2-D layouts 79
301, 304, 307, 312, 320, 326, 327, 329, 334, 335,
338, 346, 367, 388, 397, 403, 446, 447, 449, 453,
491, 492, 504, 508
Allow antialiasing 327
Alternative 350, 508
32-bit 492
Alternative Specification 350
3-D 79, 104, 464, 465, 492
Analysis 15, 87, 284, 411, 415, 420, 423
3-D hardware 492
And/or 186, 398
3-D shape 104
Antialiasing 327, 435, 439
3GHz 492
Apply 41, 59, 175, 177, 178, 184, 199, 215, 216,
3TC 345
223, 224, 228, 229, 236, 238, 289, 296, 302, 307,
3TC simulations 345
313, 320, 327, 345, 356, 361, 367, 368, 381, 389,
390, 397, 436, 439, 465
Apply button 436, 439
Arc 36, 38, 453
ASHRAE 187, 296, 302, 313, 345, 389, 401, 403,
Absorptance 307, 320
410
Ach 273, 296, 302, 313
Asynchronously 449
Activation 491
Auto-Complete Block 89, 97, 119, 120, 324
Activity 17, 184, 189, 239, 240, 242, 273, 326, 369,Automatic 446
374, 375, 376, 384, 401
Autosize 287
Activity data 184, 384
Autosizing 287
Activity Templates 184, 326, 374
Auto-Update 418
Add New Component 332
AuxiliaryPrograms.pdf 525
Add New Template 334
Average 178, 183, 187, 236, 350, 375, 397, 399,
Adding 41, 89, 97, 122, 484
407, 411, 423, 465
Adding Blocks 41
Average Mean Radiant Temperature 407, 411, 423
Advanced 282, 289, 418, 504
AVI file 446
Advanced concepts 289
Axis Snap 41, 89
Air 246, 253, 276, 388, 407, 411, 423
Axonometric 33
Air Distribution On 407, 411, 423
Air Temperature Distribution 246, 276, 388
Airflow 369
AirTemperature Distribution 246, 253, 276
Back 27, 75, 122, 140, 159, 183, 281, 307, 320,
Airtightness 198, 213, 379
332, 335, 337, 338, 411, 423
value 394
Back face 122
Airtightness Calculated 213
Backup 332, 334, 337, 338, 446, 489
Airtightness Scheduled 213
Backup Component/Template Libraries 337
AIVC 400
Backup toolbar icon 337
Backup/Manual 337
Beam-to-diffuse 307, 320
Behind-the-scenes 508
Index
-2-3-
-A-
-B-
© 2008 DesignBuilder Software, Ltd.
530
DesignBuilder 1.5
Blank 30
Calculating building energy 14
BLAST 296, 302, 313, 508
Calculating heating 14
Blinds 15, 219, 220, 232, 340, 366, 367, 368, 508 Calculation Options 296, 302, 312, 313, 418, 446
Blinds Components 220, 232
Calculation/rendering
number 491
Block 15, 21, 27, 30, 31, 35, 36, 38, 40, 41, 45, 46,
55, 57, 59, 64, 67, 72, 75, 77, 79, 88, 97, 100, 115, Calculations 147, 178, 181, 182, 284, 287, 294,
116, 118, 119, 120, 122, 140, 141, 144, 146, 147,
296, 301, 302, 307, 312, 313, 320, 342, 345, 346,
158, 159, 160, 183, 199, 280, 282, 294, 320, 324,
390, 391, 397, 401, 403, 404, 407, 410, 411, 415,
326, 328, 329, 356, 375, 387, 464, 504
418, 420, 423, 436, 446, 464
Adding 89
Canada 484
Building 100
Cancel Cut 122
set 104
Cancel Pan 31
Block comprises a set 100
Capabilities 15, 327, 403, 508
Block Creation options 97, 320, 324
Categorise 399
Block edge 45, 55, 59, 64
Category 183, 198, 220, 232, 285, 307, 320, 332,
help 46
334, 361, 366, 367, 369, 372, 375, 378, 380, 382,
383, 387, 394, 395, 396, 401
Block Forms 115, 119
Holiday Schedule 370
Block Geometry 67, 88, 100, 140, 159, 328
Catering 184
Block having 329
gains 195
Block Level 15, 21, 75, 140, 146, 159, 160, 282,
294
CEC 1985 484
Block Model Options
Ceilings 199, 296, 302, 313, 378, 407, 411, 423
access 282
Centre 31, 36, 38, 64, 162
Block partition 41
Centred 34
endpoint 55
Centre-point
place 36
Block Types 97, 100, 104, 122
BRE-3TC 342
CFD 400
Briging 341
Change rate 287, 296, 302, 313, 394
BS EN IOS 6946 341
Changes 15, 21, 28, 31, 36, 41, 45, 86, 89, 115,
140, 159, 166, 176, 183, 214, 215, 223, 228, 248,
Btu/h-ft2 345
273, 282, 284, 287, 296, 302, 313, 328, 332, 340,
Btu/h-ft2-F 345
356, 376, 380, 394, 403, 447
Building 86, 87, 140, 159, 184, 246
in.idf 508
Block 100
Model Data 175
Geometry 30
Chapter 187, 401
Level 88
Characterised 394
Model Data 183
Characteristics 178, 341, 403, 410, 418
Models 30
Enter 395
Building Level 15, 21, 41, 67, 72, 75, 77, 79, 88,
Check
30, 41, 45, 46, 61, 184, 199, 220, 222, 232,
146, 184, 248, 282, 369, 423, 508
235, 236, 237, 238, 242, 273, 280, 285, 287, 294,
Building Model 21, 30, 87, 140, 159, 176, 183, 189,296, 302, 313, 341, 384, 398, 403, 418, 436, 439,
280, 346, 381, 464, 508
446, 465, 491
Buoyancy-driven 287
FAQ 528
Checkbox 199, 220, 222, 232, 242, 273, 294
Checks requiring 341
CheckWarmupConvergence 296, 302, 313
Choosing
CAD 59
Metabolic 401
Calculated data 342
CIBSE
296, 302, 313, 342, 403, 410
Glazing 345
Circle 36, 116, 118, 453
Calculates heating 14, 403
Clear 171, 183, 199, 280, 281, 294, 418
-C-
© 2008 DesignBuilder Software, Ltd.
Index
531
Clear 171, 183, 199, 280, 281, 294, 418
Construction Location 199
default 15
Construction Templates 15, 87, 198, 285, 372,
377, 378, 379
Clear data 171, 183, 280
Construction types 23, 199, 378
default 281
Continuous Control 242, 384
Default dialog 281
Continuous/Off Control 242, 384
Clear Down 281
Control-R 175
Clear Model Data 281
Controls 14, 15, 31, 35, 36, 38, 59, 79, 87, 97, 118,
Clone 72, 75, 163, 171, 332, 334
140, 159, 182, 186, 189, 199, 215, 223, 228, 235,
CO2 15, 397, 423
236, 237, 238, 239, 273, 280, 281, 284, 285, 287,
Codes 177, 182, 372, 389, 390, 398
289, 296, 301, 307, 312, 320, 325, 368, 370, 384,
Codes/building 15, 396
387, 396, 418, 435, 436, 439, 440, 446, 447
Codes/insulation 183
Lighting 242
Coefficient 178, 296, 302, 313, 341, 342, 346, 350,
Use 341
368, 369, 372, 387, 394, 400
Control-Z 175
Colour 41, 45, 77, 89, 122, 346, 375, 387
Converge 296, 302, 313, 403, 410, 418
Coloured 55
Conversion 350
Comfort temperature 417
Convert 104, 120, 122, 140, 144, 159, 166, 181,
mean 407, 411, 423
350
COMIS 400, 464
Convert Outline Block 104, 120, 144
Comma-separated 335
Cooling 246, 282, 387, 411, 417, 423
Compact HVAC 248, 387, 508
Design Calculation Options 301, 410
Compiling
design simulation 410
reports 444
setpoint 189
Component 14, 16, 17, 21, 23, 33, 87, 198, 220,
system 304
222, 232, 332, 334, 335, 337, 340, 341, 344, 346,
Cooling Design 181, 182, 273, 282, 287, 301, 403,
349, 361, 368, 372, 398, 399, 407
410, 411, 415, 417, 423
Component data 222, 332, 340, 361
Cooling Design Calculation Options 301, 410
Component gives the copy 332
Cooling Design Calculations 301, 410
Component Library 332, 372
Cooling Design Output
manage 340
Reviewing 415
Component/Template 337, 338
Cooling Screen 410
Components/Template Library 335
CoP 387
Components/templates 335
Copy 30, 72, 75, 86, 100, 104, 163, 171, 491, 508
Computer gains 193
component gives 332
Computers 23, 184, 193, 285, 376, 391, 411, 423,
EnergyPlus 484
439, 449, 484, 489, 491, 492, 504
Model Component 340
Concepts 21, 289
template gives 334
Construction 15, 17, 21, 23, 41, 46, 67, 72, 87,
Core
21
100, 140, 141, 159, 178, 183, 184, 198, 199, 214,
Core
concepts
21
216, 224, 229, 280, 283, 285, 296, 302, 307, 313,
320, 329, 340, 341, 342, 345, 346, 372, 377, 378,
COS 178
379, 380, 381, 394, 453, 465, 489, 508
CPU 492
Construction calculated data 342
Crack Templates 379, 394, 395
Construction Components 341
Cracks 213, 287, 289, 372, 379, 394, 395, 407,
Construction Data 198, 214, 377, 380
411, 423
Construction image 342
Create 15, 16, 28, 30, 34, 35, 38, 61, 64, 67, 86,
87, 89, 100, 104, 115, 116, 118, 119, 122, 146, 147,
Construction layer data 341
163, 214, 222, 236, 238, 285, 332, 334, 337, 340,
Construction Lines 46, 67
341, 380, 446, 464, 489
Drawing 67
DesignBuilder 88
Removing 72
Voids 158
© 2008 DesignBuilder Software, Ltd.
532
DesignBuilder 1.5
Create building geometry 30
Create drawing 104
Create new 30, 86, 87, 489
Create New Building 30, 86, 87
Create New Site 30, 489
Creation 15, 59, 67, 88, 97, 100, 104, 115, 320,
324
points during 67
Csv-spreadsheet 335
CTRL key
press 72
Ctrl-C 491
Ctrl-U 404, 415, 420
Ctrl-V 491
Custom hourly weather data 484
Customise 407, 411, 423
Model Data Options 283
Customised 28
Customising 21, 28
Customising Model Options 28
Cut block 122
Cutting 122
Cutting method’ 104, 122
Default 16, 21, 30, 33, 36, 38, 87, 141, 147, 162,
166, 171, 178, 181, 183, 216, 224, 229, 248, 253,
276, 280, 287, 294, 296, 302, 313, 326, 372, 374,
376, 378, 379, 380, 384, 388, 403, 407, 410, 411,
423, 446, 447, 449, 465, 489
Clear 15
Clear data 281
Default allowing 446
Default Data 15, 21, 30, 87, 183, 248, 281, 294,
372, 446
Default dialog
Clear Data 281
Default glazing 380
Default lighting 87
Delete 72, 79, 86, 104, 122, 163, 166, 171, 332,
334, 341, 370, 372
Depending
Natural 213
Deselect 351
Design 14, 15, 16, 28, 30, 33, 59, 87, 181, 182,
273, 282, 287, 296, 302, 313, 374, 389, 390, 391,
400, 403, 407, 410, 411, 417, 418, 423, 464
Heating 296, 404
Design Calculation options
Cooling 301, 410
Heating 296, 404
Design cooling 410, 417
Design Days 296, 302, 313
Dat 332, 335, 489
Design heating 407, 417
Data 14, 15, 17, 21, 23, 28, 30, 35, 41, 45, 46, 59, Design simulation 282, 403
64, 79, 86, 87, 89, 97, 104, 115, 116, 118, 122, 140,
Cooling 410
158, 159, 166, 176, 177, 178, 181, 182, 183, 184,
Heating 403
187, 188, 198, 214, 215, 220, 223, 227, 228, 232,
235, 236, 238, 240, 242, 246, 253, 273, 280, 281,
DesignBuilder 14, 15, 16, 17, 21, 23, 27, 28, 30,
282, 285, 287, 289, 296, 301, 302, 312, 313, 332,
33, 36, 38, 79, 181, 182, 187, 198, 199, 214, 222,
334, 335, 337, 341, 342, 344, 345, 346, 349, 351,
235, 236, 237, 238, 242, 248, 280, 282, 286, 287,
360, 361, 366, 367, 368, 369, 372, 374, 375, 376,
332, 335, 338, 372, 390, 391, 395, 396, 398, 400,
377, 378, 379, 380, 381, 382, 383, 384, 386, 387,
401, 403, 410, 446, 447, 449, 453, 464, 465, 484,
388, 389, 390, 391, 392, 394, 396, 397, 398, 399,
489, 491, 492, 504, 508, 528
400, 401, 403, 404, 407, 410, 411, 415, 418, 420,
create 88
423, 446, 447, 453, 465, 484, 489, 508
DesignBuilder Component/Template 335
Exporting 443
DesignBuilder Data 187, 401, 489
Lighting 239
DesignBuilder dsb file 282
open 199
DesignBuilder Edit Screen 17
Data inheritance 21, 280
DesignBuilder EnergyPlus 508
Data Map Mode 280
DesignBuilder file 30, 489
Daylight 14, 15, 177, 181, 242, 346, 384, 389
DesignBuilder GUI 491
Daylight saving 177, 181
DesignBuilder Location Templates 390
Days 182, 188, 286, 296, 302, 307, 313, 320, 351,
DesignBuilder Merging 464
356, 369, 403, 410, 418, 436, 465, 484, 491
DesignBuilder Templates 372
DBSim 342, 345
DesignBuilder tips 15
Debug Output 489
DesignBuilder Version 1.0 199
-D-
© 2008 DesignBuilder Software, Ltd.
Index
533
DesignBuilder Website 484, 489
Draw Vent 171, 237
Detailed building 418
Draw void 158
Detailed building operation 464
Draw window 35, 61, 100, 166, 170, 171
Detailed heating design 407
Draw window’ tool 40
Detailed Results 407, 411, 423
Drawing 35, 41, 45, 46, 115, 122, 147, 158, 170,
171, 324, 325
Detailed shading 436
Construction Lines 67
Dialogs 16, 115, 181, 199, 282, 283, 332, 334,
guides 61, 324
342, 349, 418, 446, 464, 489, 504
tools 320
DiffuseSolar 178
Dimensions 72, 215, 223, 228, 341
Drawing block partitions 59
Direction 38, 40, 41, 45, 46, 57, 59, 61, 67, 72,
Drawing Options 35, 41, 45, 46, 115, 122, 158
122, 178, 182, 320, 324, 341, 390, 423, 439
Drawing Options data 115
Direction snaps 41, 59, 61, 72, 324
Drawing partitions 147
Discontinuities 296, 302, 313
Drawing Tools 31, 320
Display 15, 16, 30, 41, 45, 46, 55, 57, 64, 72, 75, Dsb file 30, 332
77, 79, 97, 100, 122, 162, 166, 220, 232, 282, 287,
existing 16
289, 325, 392, 403, 404, 407, 411, 415, 420, 423,
DXF 55, 59, 79, 307, 320, 446, 489
435, 439, 484, 491, 492, 504
Importing 79
North Arrow 327
Move 79
option affects 326
DXF file 79, 446, 489
Distance 34, 57, 59, 67, 115, 120, 166, 367
DXF file import/export 446
Distribution 246, 253, 276, 388, 407, 411, 423
DXF Snap 55, 59
Divide block 104, 120, 122
Dynamics 14, 326, 403, 410, 435, 440
Dividing 122, 239, 240, 242
DLL 449, 508
Document 178, 296, 302, 313, 489, 517
Documentation 187, 242, 296, 302, 313, 350, 401,
403, 465, 489
Early 59, 87, 239, 285, 375, 376
DOE 449, 508
Edge Snap 55, 57, 59, 64, 122
DOE building 508
Edit 15, 16, 17, 27, 28, 30, 31, 34, 59, 72, 75, 88,
DOE EnergyPlus 449, 508
104, 120, 122, 140, 146, 158, 159, 160, 163, 166,
171, 175, 176, 177, 181, 199, 280, 282, 283, 284,
DOE-2 296, 302, 313, 508
294, 325, 326, 328, 332, 334, 351, 370, 372, 446,
DOE-supplied EPLaunch 449
486
Dome 115, 119
Edit block Options 140, 159, 328
Don't show 418
Edit blocks 120, 140, 159, 294, 328
Door opening 236
Edit building models 280
Door Operation 235, 236
Edit menu 28, 72, 104, 175, 280, 282
Door Placement 236
Edit Mode 31
Door replacing 235
Edit model data 294
Doors 30, 100, 163, 199, 214, 215, 223, 228, 235,
Edit on Visualisation Screens 326
236, 238, 273, 307, 320, 395
Edit Screen 16, 17, 27, 75, 88, 146, 158, 160, 163,
Downloading
176, 326
hourly weather data 484
Edit surfaces 171
Drag 34, 59, 64, 72, 89, 100, 104, 120, 122, 140,
Edit toolbar button 332, 334
147, 159, 356
Edit View 16, 325, 326
Drag block face 120
Electrochromic 220, 232, 366, 368
Draw Block 41, 59, 115, 320, 324
Email 528
Draw Door 170, 235
E-mail 491
Draw Hole 170
Emission factors 182
Draw Sub-Surface 170, 199
-E-
© 2008 DesignBuilder Software, Ltd.
534
DesignBuilder 1.5
Emissions 182, 396, 397, 401, 423
Environmental/Comfort 376
Emissivity 346, 351
EPLaunch 449
End 57, 59, 67, 118, 122, 147, 166, 199, 286, 313, EP-Launch 508
356, 418
Eplusout.csv 489
End face 122
Eplusout.dbg 489
Endeavour 528
Eplusout.dxf 307, 320, 489
Endpoint 36, 38, 55, 56, 57, 59, 61, 64, 67, 72, 79, Eplusout.dxf file
122, 147
viewing 307, 320
block partition 55
Eplusout.eio 489
Endpoint Snap 36, 55, 56, 64, 72
Eplusout.end 489
Energy 14, 15, 177, 182, 183, 198, 253, 287, 341, Eplusout.err 489, 517
372, 387, 389, 390, 396, 397, 398, 399, 403, 411,
Eplusout.eso 489
418, 420, 423, 508
Eplusout.mtr 489
Energy Code Templates 398, 399
Energy Codes 15, 183, 198, 341, 372, 397, 398, Eplusout.rdd 489
Epw 484
399
Epw file 484
Energy codes/insulation standards 183
Errors 307, 320, 492, 517
Energy Performance Indicator simulations 403
ESC key 89
Energy+.idd 489
press 36, 67, 122, 147
EnergyPlus 14, 15, 147, 178, 181, 187, 199, 236,
238, 242, 248, 276, 287, 296, 302, 307, 313, 320,
pressing 31
341, 342, 344, 345, 349, 350, 369, 372, 384, 388,
Eso file 489
392, 400, 401, 403, 404, 410, 415, 418, 420, 446,
Europe 389, 390, 396, 484
464, 484, 489, 508, 517
Evaluating
Copy 484
façade 14
defines 387
Examples
15, 21, 31, 35, 55, 57, 59, 61, 64, 67,
generating 504
104, 122, 147, 184, 198, 199, 223, 227, 235, 307,
let 508
320, 329, 341, 356, 372, 447, 484, 517
need 491
energy code requires 398
requiring 504
EXE 449
showing 449
Existing
use 465
dsb file 16
EnergyPlus 2-D 464
Export 508
EnergyPlus Auxiliary 178
Export Components/Templates 335
EnergyPlus background information 508
Export toolbar icon
EnergyPlus DAYLIGHTING 242
clicking 335
EnergyPlus DXF 504
Exporting 335
EnergyPlus Engineering Reference Document 296, Data 443
302, 313
IDF 508
EnergyPlus epw 181, 484
IDF Files 508
EnergyPlus Errors 489, 517
Exporting IDF 508
EnergyPlus glazing data 344, 349
Exposed 296, 302, 313
EnergyPlus IDF 404, 415, 420, 508
entering 199
EnergyPlus Output Details 517
Extensions 404, 415, 420, 484, 489
EnergyPlus Script 404, 415, 420
External 15, 21, 59, 100, 141, 147, 158, 198, 199,
EnergyPlus Support 248
214, 215, 219, 228, 236, 238, 287, 307, 320, 361,
EnergyPlus website 484
377, 381, 395, 403, 407, 410, 411, 423, 465, 484,
491, 508
English 489
External Glazing 214, 215, 361, 381
Envelope 198, 398, 399
Extruded 41, 59, 67, 88, 89, 104, 115, 119, 120,
Environmental comfort 184, 189, 273
140, 147, 159
© 2008 DesignBuilder Software, Ltd.
Index
-F-
535
Has 216, 224, 229, 382
Frequently 528
Frequently Asked Questions 528
Full 147, 284, 307, 320, 508
Full building simulation 284
Full Exterior 147, 307, 320
Full Interior 307, 320
Fundamentals
ASHRAE Handbook 187, 296, 302, 313, 401
F11
Pressing 282
F3 27
F4 27
F5 27
Facade 87, 100, 199, 215, 223, 228, 236, 238,
280, 281, 372, 381, 382, 447
Façade 307, 320
Evaluating 14
Facade Templates 381, 382
Gable Roof 118
Familiarise 15
Gains 184, 186, 187, 193, 194, 196, 239, 240, 242,
Fan 253, 387, 423
283, 285, 286, 307, 320, 375, 376, 384, 401, 403,
410, 411, 418, 423, 447, 464
FAQ 528
Catering 195
check 528
Gains and/or 186
Farea-flow 236, 238
Gains data model detail 285
Fatal 307, 320, 517
Gains including 285
Figure 27, 296, 302, 313, 356
Gains including occupancy 285
File describing 484
Gas 340, 344, 345, 360, 423, 508
Filename 79, 392, 484
General 33, 72, 115, 198, 239, 240, 285, 296, 302,
Filename/Extension 489
313, 325, 328, 349, 366, 367, 369, 370, 375, 378,
Filename/location 508
380, 382, 383, 384, 387, 392, 395, 396, 399, 411,
Files 15, 16, 30, 59, 79, 178, 332, 334, 335, 340, 418, 423
359, 372, 380, 391, 403, 404, 415, 418, 420, 446,
General Extrusion 115
453, 465, 484, 489, 491, 508, 517, 528
General Lighting 239, 240, 384, 411, 423
Finish 67, 79, 88, 100, 104, 122
General lighting gains 411, 423
Finished building block 88
Fit 31, 34, 122, 184, 199, 235, 236, 237, 238, 362, General operations 72
General+Local 399
363, 364, 387, 439, 504
General-purpose
automatically cut 147
Recommended 87
Fit flush 122
Generate EnergyPlus IDF 15
Fit view 31, 34
Generating
Fixed 215, 223, 228, 382, 387
EnergyPlus 504
Floor shading 325, 326
Floors 75, 88, 100, 104, 160, 162, 178, 184, 186, Geometric Data
Importing 79
193, 194, 195, 196, 198, 199, 238, 296, 302, 307,
313, 320, 325, 326, 375, 377, 378, 387, 395, 403,
Geometry 30, 36, 38, 59, 67, 104, 115, 120, 122,
407, 411, 423, 465
147
Floors/Ceilings 395
Building 30
Folders 30, 332, 334, 337, 404, 415, 420, 446,
Getting 14
449, 484, 489, 508, 517
Getting Help 528
Folders menu 489
Getting Started
Form 67, 87, 88, 89, 97, 115, 116, 118, 140, 147,
Watch 14
159, 492, 528
Glass 307, 320, 350
2D 79
Glass Optical Properties
Forums 15
Alternative Specification 350
Frame 77, 215, 223, 228, 326, 345, 372, 380, 381,
Glazing 214, 215, 223, 227, 228, 235, 283, 360
436, 464
-G-
© 2008 DesignBuilder Software, Ltd.
536
DesignBuilder 1.5
Glazing 214, 215, 223, 227, 228, 235, 283, 360
Heating Design 182, 282, 287, 296, 302, 313, 403,
404, 407, 423
calculated data 345
Heating Design output 404
Components 344
Heating Screen 403
layer data 344
Heating/cooling 287, 387
Model 183
Heating/cooling system 287, 387
model detail 285
Heavyweight 15, 372
Templates 380, 381
Height 61, 79, 89, 97, 119, 120, 122, 199, 215,
Glazing area 223, 227, 235
223, 228, 238, 359, 382
Glazing Component 344
Help 15, 17, 36, 57, 67, 88, 89, 100, 120, 166, 176,
Glazing Components 344
280, 340, 384, 418, 461, 489, 491, 528
Glazing Template 87, 214, 380
block edge 46
Go to…’ menu 27
Help menu 491
Go up.’ menu 27
Holiday Schedule 188, 369, 370, 399
Graphical User Interface
Category 370
modelling 491
Holidays 87, 184, 188, 340, 369, 370, 399, 453
Green 41, 55, 122, 332, 334, 372, 484
Hourly 15, 30, 178, 181, 296, 302, 313, 372, 391,
Grid 16, 59
392, 418, 464, 484, 489
Ground 55, 67, 72, 89, 122, 176, 178, 199, 296, Hourly results 464
302, 307, 313, 320, 407, 411, 423, 461, 465
Hourly weather data 181, 372, 391, 392, 418, 484,
Ground Modelling 465
489
Ground plane 55, 67, 72, 89, 122, 307, 320
Downloading 484
GroundReflectance 178
Hourly weather data follow 484
GroundReflectedSolar 178
HVAC 14, 17, 87, 183, 186, 223, 227, 235, 236,
GUI 491
238, 246, 248, 273, 280, 283, 286, 287, 296, 302,
Guides 40, 45, 46, 67, 75, 122, 147, 166, 320, 324,313, 326, 372, 386, 387, 388, 403, 410, 411, 417,
418, 423, 464, 508
325
HVAC data 246
Drawing 61, 324
HVAC model detail 287
HVAC portion 296, 302, 313
HVAC System Type 248
HVAC Templates 87, 246, 372, 386, 387, 388
Hardware 327, 492
according 326
Hardware Requirements 492
Has 15, 16, 27, 30, 46, 59, 72, 86, 89, 104, 115,
119, 120, 182, 183, 240, 242, 296, 302, 313, 332,
334, 345, 356, 372, 394, 396, 403, 407, 410, 411,
418, 423, 464, 484, 489, 492, 504, 508
ID 335
frame 216, 224, 229, 382
IDD 248, 504
Has become 72
IDD file 248
Has glazing 464, 504
Idf 404, 415, 420, 489, 491, 508
Heat Balance 296, 302, 307, 313, 320, 345, 415,
Exporting 508
420
IDF Files 491, 508
Heating 246, 282, 287, 407, 417
Exporting 508
Design 296, 404
Illuminance 87, 189, 239, 240, 242, 374, 376, 384
Design Calculation options 296, 404
Image 326, 359, 435, 439
design simulation 403
Import Components/Templates 335
setpoint 189
Import DXF 79
start 404
Import DXF drawing file 79
System Sizing 298
Import toolbar icon 335
Importing
-H-
-I-
© 2008 DesignBuilder Software, Ltd.
Index
537
Importing
DXF 79
Geometric Data 79
In.idf 404, 415, 420
Jaggy 327
changes 508
Increasing Quality 439
Increment Snap 55, 57, 59, 72, 77, 89, 166
Increment snap acting 59
Keep 14, 21, 28, 34, 72, 89, 166, 464, 484
Increment snap applies 59
SHIFT key 55
Increments 55, 57, 64, 72, 77, 89, 166
Templates 332
0.5m 59
Indicator 55, 57, 403
Info 16, 17, 332, 341, 344, 349, 351, 370, 418, 447
access 334
Info Pane 370
Large 15, 178, 189, 284, 285, 287, 296, 302, 307,
Info Panel 16, 17, 332, 334, 341, 344, 349, 351, 313, 320, 326, 332, 367, 395, 418, 447, 461, 464,
465, 504
418, 447
Toolbar 16
Large building 285
Large building models 15, 287
Info window 447
Large Models 464
Inner 342, 367
Large/complex DesignBuilder
Inside/Outside 342
creating 15
Inside/site 420
Insulation 182, 183, 184, 198, 199, 220, 232, 285, Latitude/longitude
341, 366, 372, 378, 397
set 178
Insulation Standards 182
Layer 79, 341, 342, 344, 345, 346, 360
Integrated Solution Manager 296, 302, 313
surface’s 307, 320
Intel 492
Layer data
Interface 447, 508
Glazing 344
Internal 15, 184, 186, 187, 193, 194, 195, 196,
Layer having 341
198, 199, 214, 223, 236, 238, 240, 242, 285, 286,
Layout 14, 79, 199, 214, 215, 223, 228, 235, 236,
296, 302, 307, 313, 320, 361, 374, 381, 395, 403,
237, 238, 329, 381, 447, 508
417, 449, 464, 465
Learning 16, 447
comfort temperature - The mean 407, 411,
Mode Off 17
423
Mode On 17
Internal Doors 199, 236
Learning Mode 16, 17, 447, 484
Internal Glazing 214, 223, 361, 381
Learning Mode Off 16, 17
Internal Vents 238
Learning Mode On 17
International 446, 453
LEFT 356
Internet 491
Left/right 356
Inter-reflections 307, 320
Legislative 176, 182, 372, 380, 389, 390, 396, 397,
Introducing
399
Templates 372
Legislative Region 176, 182, 380, 389, 390, 396,
IP 453
397, 399
Issues 464
Legislative Region Templates 396, 397
Modelling 461
Let
IT 193
EnergyPlus 508
IT-related 411, 423
Level 15, 21, 27, 28, 30, 86, 87, 175, 176, 178,
183, 199, 239, 240, 242, 246, 280, 282, 285, 374,
375, 376, 378, 379, 384, 387, 397, 465, 484, 517
Building 88
-J-
-K-
-L-
© 2008 DesignBuilder Software, Ltd.
538
DesignBuilder 1.5
Level 15, 21, 27, 28, 30, 86, 87, 175, 176, 178,
Local shading data 361
183, 199, 239, 240, 242, 246, 280, 282, 285, 374,
Location 30, 59, 67, 72, 75, 86, 162, 176, 177, 178,
375, 376, 378, 379, 384, 387, 397, 465, 484, 517
181, 296, 302, 313, 372, 389, 390, 391, 392, 403,
rate according 187, 375
410, 453, 484, 489
Library 16, 23, 280, 332, 334, 335, 337, 338, 340, Location Model Data 30
489
Location Templates 176, 177, 389, 390, 391
Library Components 332, 340
Select 30
Library Management 332
Long-wave 351
License 491
Louvres 15, 219, 361
License dialog 491
number 362
Light Sensors
L-shaped 87, 307, 320
Placing 162
Luminaire 240
Lighting 17, 162, 240, 242, 372
Enter 384
Areas 242
Luminaire Type 240, 384
control 242
Lumped 285, 289, 375
data 239
Sensors 242
Templates 383, 384
Lighting Control 14, 15, 87, 162, 239, 242, 384
M/s 345
Lighting Control On 162, 242
M2 236, 238
Lighting data 239, 240, 242
M3/s 236, 238
Lighting Template 87, 239, 372, 383
Manage 280, 332
Lightweight 199, 372
Component Library 340
Limits 296, 302, 313, 399, 446, 453
Templates 372
Line passing 307, 320
Manufacturing/industrial 196
Line Type 36, 38
Material bridging 341
Lines 36, 38, 40, 41, 45, 46, 55, 57, 59, 61, 64, 67,
72, 104, 122, 177, 184, 198, 214, 239, 246, 307, 320,Material Properties 346
Materials 23, 307, 320, 340, 341, 342, 344, 346,
327, 411, 423, 489, 517
359, 361, 368, 508
Z-axis 41, 67, 89
Load Data 15, 30, 176, 177, 184, 198, 280, 372 Max 189, 273, 417
Max Cooling 417
Access 280
Max ventilation 189, 273
Load Data From Template tool 177, 184, 198
Maximum 14, 176, 182, 189, 242, 265, 268, 273,
use 372
287, 296, 302, 304, 313, 362, 384, 387, 390, 397,
Load lighting data 239, 240, 242
399, 403, 410, 417, 418, 453
Loads 15, 23, 28, 30, 176, 177, 183, 184, 198, 214,
Maximum cooling 304, 417
239, 240, 242, 246, 276, 280, 285, 287, 296, 302,
Maximum cooling load 410
313, 332, 340, 377, 381, 383, 384, 386, 388, 410,
Maximum cooling requirement 304
449, 453, 484
Maximum heating 268, 296, 302, 313
Model Data 372
Maximum warmup 296, 302, 313
model objects 280
MB 492
Loads Convergence 296, 302, 313
MB RAM 492
Loads Initialization 296, 302, 313
Local 15, 122, 182, 219, 340, 361, 362, 363, 364, Mean 178, 359, 387, 417
396
comfort temperature 407, 411, 423
axis snap applies 41
Mediumweight 198, 372
shows 222
Memory - DesignBuilder 492
Local Shading 219, 222, 340, 361, 362, 363, 364 Merging 464
Local shading component 222, 361
Metabolic 87, 184, 187, 372, 375
Local Shading Components 361
choosing 401
-M-
© 2008 DesignBuilder Software, Ltd.
Index
Metabolic Rates Templates 401
Metre 465
Metres 57
MHz 492
Midpoint 55, 56, 61, 64, 122
Midpoint drawing guide 122
Midpoint Snap 55, 56, 122
Min 387
Minimal 307, 320
Minimal shadowing 307, 320
Minimised 449
Minimum Requirements 492
Miscellaneous 15, 184, 194, 285, 289, 294, 325,
326, 376, 411, 423
Miscellaneous Display 326
Miscellaneous Edit 289, 294
Miscellaneous gains 194
Mixing 236, 238
Mode On
Learning 17
Model Components
copy 340
set 332, 340
Model data 17, 21, 23, 28, 30, 86, 87, 100, 141,
176, 178, 198, 199, 235, 236, 237, 238, 276, 280,
283, 285, 287, 294, 361, 368, 369, 394, 403, 407,
410, 411, 417, 423, 447
access 16
Activity 401
Building 183
changes 175
Loading 372
Model data affects 178
Model Data depending
setting 403, 410
Model Data depending on the setting 403, 410
Model Data following 287
Model data hierarchy 21
Model Data including 86
Model Data management 280
Model Data Options
customise 283
Model detail 21, 283, 285, 351, 378
glazing 285
Timing 286
Model Levels 33
Model objects 280, 281
© 2008 DesignBuilder Software, Ltd.
539
Model Options 28, 87, 140, 147, 159, 183, 193,
194, 195, 196, 198, 213, 223, 227, 235, 236, 238,
248, 273, 282, 285, 286, 287, 379, 387, 403, 410,
417
Model Options dialog 282, 504
Model point 34
Model scope 283, 284
Model view 436
Modelling building 508
Models lighting 14, 15
Most Regions 389
Move 27, 34, 36, 41, 45, 46, 55, 57, 59, 61, 64, 67,
72, 75, 77, 89, 100, 104, 120, 122, 162, 163, 166,
171, 326
DXF 79
Movie Options 440
Movies 440
MoWiTT 296, 302, 313
MRT 407, 411, 423
Multizone 508
-NNational 484
Natural Ventilation 15, 178, 213, 223, 227, 235,
236, 238, 246, 273, 283, 287, 369, 394, 400, 403,
410, 411, 423, 461, 464
Natural Ventilation model detail 287, 379
Natural Ventilation Operation 189
Natural/mechanical 387
Navigation 27, 175
Navigator 21, 27, 88, 104, 146, 158, 160, 163, 294,
334, 372, 447, 484
Navigator Panel 27, 294, 334, 372, 484
NB Any component 340
NB If 294
New 332, 334
New button
clicking 222
Next 27, 61, 67, 79, 280, 332, 334, 398, 446, 508
Next Navigation 332, 334
Non-HVAC 296, 302, 313
Non-unintentional 407, 411, 423
Normal 35, 41, 46, 59, 67, 77, 89, 120, 163, 345,
350, 351, 367, 423
Normal Snap 41, 46, 67
Normal View 35, 163
Normalised 395
North 178, 327, 439
North Arrow 178
540
DesignBuilder 1.5
North Arrow 178
display 327
NOT 307, 320, 341
Number 31, 36, 38, 40, 88, 100, 115, 147, 162,
178, 186, 188, 189, 215, 216, 223, 224, 228, 229,
242, 284, 287, 296, 302, 307, 313, 320, 341, 344,
356, 382, 384, 395, 401, 403, 410, 418, 453, 504,
508
calculation/rendering 491
louvres 362
Windows 464
NVidia 492
Operation 15, 31, 45, 46, 59, 61, 72, 77, 88, 146,
160, 163, 175, 193, 194, 195, 196, 214, 215, 223,
227, 228, 235, 236, 238, 240, 242, 273, 285, 286,
287, 325, 326, 356, 464
Optical 350
Option affects
display 326
Option affects the display 326
Options 14, 15, 16, 27, 28, 35, 36, 41, 45, 46, 86,
87, 97, 115, 119, 120, 122, 140, 147, 158, 159, 166,
178, 183, 184, 186, 189, 198, 214, 215, 223, 228,
235, 236, 237, 238, 239, 240, 242, 246, 273, 280,
282, 283, 284, 285, 287, 289, 296, 301, 302, 307,
312, 313, 320, 324, 325, 326, 327, 328, 329, 338,
340, 342, 346, 375, 376, 382, 384, 390, 394, 398,
399, 400, 403, 404, 407, 410, 411, 415, 418, 420,
423, 435, 439, 440, 446, 447, 449, 453, 464, 504
Object Rotation 320, 325
Options dialog 16, 28, 87, 115, 282, 404, 410, 418,
Occupancy 87, 184, 186, 187, 193, 194, 195, 196, 464, 504
240, 242, 285, 286, 287, 356, 374, 375, 403, 411,
Options Panel 407, 411, 423, 435
423
Orbit 31, 34, 122, 326, 435, 440
starting point 401
Organised 21
Occuring 182
OS 492
Off 17, 89, 120, 122, 189, 242, 273, 294, 296, 302,
Other 16, 30, 31, 57, 67, 86, 104, 122, 147, 166,
313, 326, 351, 356, 384, 439, 447, 464, 504
193, 195, 199, 216, 224, 229, 282, 296, 302, 307,
Office 21, 184, 194, 285, 376, 484
313, 320, 335, 344, 351, 376, 387, 397, 411, 423,
Office Equipment 184, 194, 285, 376
464, 504, 508, 517
Office equipment gains 194
Other building surfaces 307, 320
OK 332, 334, 404, 410, 418
Other catering 195
On/off 504
Other catering activities 195
One-dimensional 465
Other Gains 376
Open 16, 140, 159, 223, 227, 235, 340, 367, 381, Outdoor Dry Bulb Temperature 296, 302, 313
504
Outdoor Wet Bulb Temperature 296, 302, 313
Open existing 16
Outer Surface 342
OpenGL 327, 492, 504
Outline 77, 88, 100, 104, 120, 122, 144
Opening 15, 16, 17, 21, 30, 61, 79, 100, 115, 140, Outline Block 104, 122, 144
159, 163, 176, 184, 198, 214, 223, 227, 235, 236,
Output 242, 287, 296, 302, 313, 384, 401, 418,
237, 238, 239, 246, 273, 287, 332, 334, 335, 372,
449, 489, 504, 517
395, 446, 484, 508
Overhang
Data 199
louvre 361
Environmental Comfort 189
Overhangs
15, 118, 219, 222, 307, 320, 361, 364
Model Options dialog 282
louvres
219,
361
Screen 16, 332
-O-
Opening data 214
Opening Screen 16, 17, 30, 332, 334, 335, 340,
372
Openings 15, 17, 30, 35, 41, 72, 75, 100, 104, 163,Pan 31, 34
166, 171, 183, 199, 214, 223, 227, 235, 236, 237,
Pan view 31, 34
238, 273, 281, 289, 361, 367, 368, 369, 382, 395
Pane Components 349
surface containing 21
Panel 27, 35, 41, 45, 46, 64, 97, 104, 115, 116,
Openings data 214, 367
118, 122, 141, 158, 199, 332, 334, 403
Openings Model Data 368
-P-
© 2008 DesignBuilder Software, Ltd.
Index
541
Panes 15, 23, 104, 340, 344, 345, 349, 350, 351, Previous 16, 296, 302, 313, 338
367, 368, 508
use 332, 334
Parallel Snap 41, 45, 59
Prioritises 215, 223, 228, 382
Partition building 30
Prioritises Percentage 215, 223, 228
Partitions 15, 30, 40, 41, 55, 59, 64, 72, 75, 79, 88,Prioritises Percentage glazing 215, 223, 228
100, 146, 147, 184, 199, 223, 377, 403, 407, 411,
Prioritises window 215, 223, 228, 382
423, 464
Prioritises Window Width 215, 223, 228, 382
Percentage 87, 215, 223, 227, 228, 235
Process 30, 31, 36, 38, 41, 59, 104, 122, 147, 184,
Percentage glazing 87, 215, 223, 228
196, 285, 327, 376, 411, 418, 423, 484, 504
Perforance 398
Process gains 196
Perimeter drawing 166
Profiles 182, 273, 286, 340, 351, 356, 375
Perimeter Drawing Options 35
Program 14, 16, 178, 296, 302, 307, 313, 320,
Perimeters 15, 31, 35, 36, 38, 40, 41, 45, 46, 55, 332, 334, 399, 446, 447, 449, 453, 465, 484, 489
57, 59, 61, 64, 67, 88, 89, 104, 115, 116, 118, 119,
Program compares 296, 302, 313
120, 122, 158, 162, 395, 465
Program Options 399, 446, 447, 449, 453
refer 166
Program Options setting 399
Period 30, 296, 301, 302, 313, 356, 387, 418, 436,
Properties 198, 307, 320, 341, 342, 346, 349, 350,
464, 465
351, 368
Photovoltaic 508
Proportional 387
Pitched Roof 115, 118, 122, 140, 159, 199, 328,
Protractor 36, 40, 59, 61, 64, 67, 72, 75, 89, 104,
329
122, 147, 320, 324, 325
Pitched Roof/Wall Construction Transition 140,
Protractor tool 64, 325
159
Place 15, 38, 46, 59, 61, 67, 72, 75, 89, 122, 147,
160, 166, 189, 236, 242, 368, 411, 423
centre-point 36
Light Sensors 162
Questions 528
Template 334
Placing Light Sensors 162
Plan 119, 120, 122, 178
Plant 15, 287, 298, 304, 403, 410, 417, 508
Radeon chipset 492
Plant Sizing 287, 403, 410, 417
Point 15, 28, 31, 34, 35, 36, 40, 55, 57, 59, 61, 64, Rate according
level 187, 375
67, 72, 75, 89, 122, 147, 213, 242, 320, 324, 384,
403, 410, 464, 492
Rate according to the level 187, 375
Point Snaps 55, 324
Rate called 187, 401
Polygon 36, 38, 61, 89, 115, 116, 118, 122, 504 Rates 87, 184, 187, 213, 223, 227, 235, 236, 238,
Position 45, 46, 55, 59, 72, 75, 86, 100, 147, 162, 273, 287, 296, 302, 313, 372, 374, 375, 376, 379,
387, 394, 399, 401
213, 220, 232, 235, 236, 237, 238, 242, 362, 368,
370
Read Important 14
Pre-design 183, 198, 285
Recent 16, 182
Pressing
Recent Files 16
CTRL key 72
Recent Files Opening Screen 16
ESC key 31, 36, 67, 122, 147
Recommended 298, 304, 403, 449, 464, 465, 492
F11 282
general-purpose 87
SHIFT key 45, 46, 64, 72, 89, 104, 122, 166 Rectangle 36, 72, 116, 118, 162
Update button 296, 301
Redo 175
Pressure 178, 223, 227, 235, 236, 238, 253, 287, Refer 56, 75, 89, 170, 171, 403
372, 400, 423
Perimeters 166
Pressure Coefficient Templates 400
Reference 183, 296, 302, 313, 332, 335, 340, 341,
Pressure-related 178
372, 384, 489
-Q-R-
© 2008 DesignBuilder Software, Ltd.
542
DesignBuilder 1.5
Reference - Heavyweight 372
R-value 346
Reference - Lightweight 372
Reference - Mediumweight 372
Refresh Navigator Toolbar 447
Region 176, 182, 183, 370, 372, 375, 380, 383,
Safety 298, 304, 403, 407, 410, 417
387, 389, 390, 396, 397, 399, 453
Safety factor 298, 304, 403, 407, 410, 417
Region containing
Save toolbar icon
sector 399
clicking 332, 334
Region containing the sector 399
Scheduled 186, 189, 193, 194, 195, 196, 213, 223,
Remembered’ 89
227, 235, 236, 238, 240, 242, 273, 285, 286, 287,
Remove 72, 104, 166
340, 351, 356, 375, 410, 464
Removing 104, 166, 281, 327
Screen 15, 16, 34, 100, 115, 177, 178, 325, 326,
Construction Lines 72
327, 334, 335, 403, 407, 410, 417, 418, 423, 447,
449, 484
Report Meter 489
Opening 16, 332
Report topics 403, 443, 444
Screen’ 491
Report Variable 296, 302, 313, 489
Screenshot 184, 198, 338
Report Variable Data Dictionary 489
Second 36, 64, 67, 89, 122, 162, 296, 302, 313,
Report,Surfaces,DXF 489
Reports 296, 302, 313, 403, 443, 444, 446, 489 367
Second cutting 122
Compiling 444
Requirements 28, 87, 189, 304, 376, 453, 492, 504Second Lighting 162
Second Lighting Area 162
Requiring
Sector 184, 372, 375, 387, 453
EnergyPlus 504
region containing 399
U-values 341
Sector
Templates 399
Reselect 335
Segments 36, 38, 453
Restore 140, 159, 332, 334, 338
Selection dialog 222
Restore Component/Template Libraries 338
Selection/deselection 351
Restore Data dialog
Semi-exposed 199
see 338
use 184
Restore icon 338
Results 36, 38, 122, 147, 296, 302, 313, 326, 403, Semi-exterior 184, 199
Sensible/latent 187
404, 407, 411, 415, 418, 420, 423, 449, 464, 465,
484, 489, 492
Sensible/latent split 187
Reviewing
Sensors 160, 162
Cooling Design Output 415
Lighting 242
Simulation Output 420
Serial 491
RIGHT 356
Setpoint 273, 287
Roof 15, 64, 88, 100, 104, 118, 122, 140, 159, 198, cooling 189
199, 214, 219, 228, 307, 320, 361, 377, 378, 381,
Heating 189
395, 399, 403
Setpoints 87
wall becomes 329
Severe 517
Roof Glazing 214, 228, 381
Shade data 368
Roof overlap’ 118
Shading 361, 381
Roof slope’ 118
calcs 307, 320
Roofspace 184, 199
Shadows 307, 320, 327, 435, 436
Roofspaces 184, 199
Shape 36, 38, 61, 89, 104, 115, 116, 118, 119,
Roof-wall 140, 159, 199, 328, 329
122, 147, 158, 166, 216, 224, 229, 504
Roof-Wall Transition 140, 159, 199, 328, 329
SHGC 345
Rotate 34, 35, 41, 72, 75, 100, 163, 171
SHIFT 45, 46, 55, 64, 67, 72, 89, 104, 122, 166
-S-
© 2008 DesignBuilder Software, Ltd.
Index
543
Y-axis 41
SHIFT key
Keep 55
Z-axis 67
Press 46, 64, 89, 104, 122, 166
Solar 14, 100, 147, 178, 182, 285, 296, 301, 302,
307, 312, 313, 320, 345, 346, 349, 350, 403, 410,
pressing 45, 72
411, 418, 423, 435, 436, 464, 484
Show North Arrow 327, 435, 439
Solar Absorptance 307, 320, 346
Show shadows 436
Solar data 350
SI
Solar Heat Gain Coefficient 345
assuming 453
Solar index 350
Sidefin 361
Solar Options 307, 320
Sidefins 15, 219, 222, 361, 363
Solar Options allow 307, 320
Sidefins and/or louvres 222
Solar shading 14, 100, 435, 436
Sill 215, 223, 228, 382
Simple 67, 104, 147, 287, 296, 302, 307, 313, 320,SP2
upgrade 492
346, 361, 378, 379, 381, 387, 400, 464, 504
Spacing
215, 223, 228
Simulation 14, 15, 30, 177, 178, 181, 184, 188,
198, 214, 239, 246, 273, 282, 284, 287, 294, 296,
SpecialDayPeriods 369
302, 307, 312, 313, 320, 342, 345, 369, 391, 400,
Specification 350, 492
403, 404, 410, 415, 418, 420, 423, 464, 465, 484,
Specular 307, 320
489, 491, 504, 508, 517
Specularly 307, 320
computer during 449
Specularly reflecting if 307, 320
Simulation Calculation Options 312, 418
Standard 28, 33, 87, 182, 183, 184, 215, 223, 228,
Simulation continues 403, 410, 418
345, 368, 378, 382, 397, 489, 492, 517
Simulation hourly weather data 484
Standard Insulation 397
Simulation Output 423
Standard Output File 489, 517
Reviewing 420
Start 14, 15, 36, 55, 57, 67, 89, 120, 146, 147, 286,
Simulation Period 312, 313, 418
356, 401, 403, 410, 418
Simulation program
Heating 404
modelling 508
Start drawing 36, 67, 147
Simulation using real weather data 418
Start drawing partitions 147
Simulation Weather 177, 181, 391
Starting point 36, 55, 89
Simulation weather data 181
occupancy 401
Single 16, 27, 87, 235, 236, 237, 238, 282, 284, State-of-the-art 397
285, 356, 395, 464
State-of-the-art building 397
Single clicking 27
States 15, 171, 182, 183, 281, 338, 396, 484
Site 16, 21, 30, 86, 88, 176, 177, 178, 181, 182, Statistics 392
183, 199, 282, 296, 301, 312, 320, 325, 403, 410,
Steady 404, 407, 417
423, 446, 453, 465, 484, 528
Steady State 404, 407, 417
Visualisation 14
Steady-state 403, 407, 410
Site including 176
Stepped Control 242, 384
Sites save 30
Stick 41, 64
Sizing 287, 298
Stock 183, 397
Slab 465
Straight 36, 38, 307, 320
Slat data 367
Stretch 59, 72, 77, 100
Slope 116
Sub-hourly 15, 296, 302, 313, 418, 423, 464, 484
Sloping 140, 159
Sub-surfaces 163, 199, 214
Sloping Walls 115, 116, 140, 159
Summary 283, 345, 404, 407, 415, 417, 489
Smooth 346
Snaps 36, 40, 41, 45, 46, 55, 56, 57, 59, 61, 64, Summary Table 404, 407, 415
Summer Design Weather 177, 182, 390, 410
72, 75, 79, 89, 122, 147, 166, 320, 324, 325
Summer design weather data 182
X-axis 41
© 2008 DesignBuilder Software, Ltd.
544
DesignBuilder 1.5
Sunspaces 184
Task lighting gains 411, 423
SunZenithAngle 178
Temperature 14, 15, 87, 178, 182, 187, 189, 246,
273, 276, 287, 296, 302, 313, 345, 356, 374, 376,
Superinsulated 372
388, 390, 403, 407, 410, 411, 417, 418, 423, 465,
Support 15, 489, 528
484
Support Forum
Template Library 334, 372
Website 528
Templates 15, 16, 17, 21, 23, 30, 87, 176, 177,
Support Request Form 528
183, 184, 213, 240, 242, 280, 285, 326, 332, 335,
Surface 15, 21, 27, 30, 35, 40, 41, 59, 61, 64, 72, 337, 374, 375, 376, 377, 378, 379, 381, 382, 386,
75, 89, 100, 104, 120, 122, 163, 166, 171, 175, 178, 387, 388, 389, 390, 391, 394, 395, 396, 397, 398,
183, 187, 198, 199, 214, 215, 223, 228, 235, 236,
399, 400, 401, 453, 484, 489
237, 238, 280, 281, 294, 307, 320, 329, 346, 361,
clicking 184, 198, 214, 239, 246
367, 382, 394, 395, 400, 401, 464, 465, 504
Glazing 380, 381
coefficients depending 296, 302, 313
Introducing 372
U-values include 342
Keeping 332
Surface containing
Lighting 383, 384
openings 21
Managing 372
Surface containing the openings 21
place 334
Surface during simulations 400
Templates Library Management 334
Surface fill 35
Textures 178, 340, 342, 346, 359, 368, 369
Surface having 329
Thermal 14, 30, 147, 193, 194, 195, 196, 198, 199,
Surface Level 21, 30, 35, 100, 163, 198, 214, 215, 285, 296, 302, 313, 341, 346, 349, 369, 378, 403,
223, 228, 235, 237, 281
410, 418, 465, 508
Suspended 199, 465
Thermal Mass 199
Switch 16, 17, 45, 46, 55, 57, 61, 72, 77, 89, 119, Thermophysical 198, 346
120, 122, 162, 163, 166, 189, 220, 232, 242, 253,
Time 14, 15, 21, 31, 36, 38, 67, 72, 75, 77, 79, 87,
284, 294, 326, 366, 368, 384, 436, 439, 447, 464,
177, 182, 186, 223, 227, 235, 236, 238, 273, 283,
484, 504
285, 287, 296, 302, 313, 327, 332, 335, 340, 356,
Z-axis 67
372, 375, 380, 390, 396, 417, 446, 447, 464, 484,
Switchable 220, 232, 368
508
Synchronised 240, 242, 484
model detail 286
System 14, 15, 21, 30, 41, 183, 186, 198, 213,
Select 181
242, 248, 253, 265, 268, 286, 287, 296, 298, 301,
Time during 31
302, 313, 326, 332, 345, 378, 380, 383, 384, 386,
Tin - Tout 273
387, 407, 411, 423, 464, 492, 508
Tips 14, 15
Cooling 304
TMY2 484
System Heating/Cooling 387
Toolbar 280, 282, 332, 334, 484
System Sizing
Info Panel 16
Heating 298
Tools 14, 16, 31, 34, 35, 40, 61, 64, 67, 72, 75, 77,
System types 387, 508
79, 89, 104, 120, 122, 144, 147, 158, 166, 170, 171,
177, 184, 198, 280, 351, 404, 415, 420, 446, 447,
465
Drawing 320
Tools
menu 16, 446
Table 187, 401, 404, 407, 415, 417, 453
Tooltips 492
Target 280
Topics 15, 17, 176, 440, 443, 444, 461, 489
Target Object
Total 199, 223, 227, 235, 236, 238, 345, 387, 403,
select 280
423
Target objects to select 280
Total building 423
TARP 296, 302, 313
Total building gas 423
Task 239, 242, 296, 302, 313, 384, 411, 423, 461
Translate hourly weather data 486
Task Lighting 239, 242, 411, 423
Triangulation 464, 504
-T-
© 2008 DesignBuilder Software, Ltd.
Index
545
Trombe 296, 302, 313
TRY 484
Tutorials 14
Type 21, 59, 87, 89, 100, 141, 163, 199, 214, 215,
VAV 248, 251, 387, 464
219, 220, 223, 228, 232, 242, 248, 332, 334, 356,
Vent Components 368, 369
366, 372, 381, 382, 384, 387, 394, 397, 398, 403,
Vent opening 238, 273
440, 443, 444, 447, 489, 508
Typical 14, 23, 87, 178, 187, 248, 273, 286, 372, Vent Operation 237, 238
375, 381, 394, 397, 401, 418, 447, 484, 489
Vent Placement 238
Typical Location 489
Vent spacing 237, 238
Ventilation 15, 189, 213, 223, 227, 235, 236, 238,
253, 273, 287, 374, 376, 386, 387, 407, 411, 423
Ventilation cooling 189, 273
Vents 100, 163, 214, 215, 223, 228, 237, 238, 273,
U.S. 508
340, 368, 369, 395
Undisturbed 178
Version 1.0 21, 335, 403
Undo 36, 67, 89, 147, 175
VeryRough 346
Undo - Go 175
VerySmooth 346
Undo/Redo 175
View 17, 31, 33, 34, 35, 119, 120, 122, 178, 307,
Uninstalled 332
320, 332, 334, 335, 368, 369, 403, 404, 407, 410,
Uninsulated 183, 372, 397
415, 418, 420, 435, 436
Unitary 248, 250, 387
View Component 17, 332
Unitary multizone 248, 250, 387
View Controls 31
Unitary single zone 248, 387
View panel 332, 334
United States 484
View Rotation 31, 33, 119, 120, 122
Units 79, 186, 193, 194, 195, 196, 387, 397, 453, View Template 334
484, 508
View/edit 199
Unwound’ 89
Viewing 332, 334
Up/down 356
eplusout.dxf file 307, 320
Update 183, 296, 301, 404, 415, 418, 420, 436, Visible 17, 34, 61, 122, 307, 320, 346, 349, 350,
446, 447
449
Update button
Visible Absorptance 307, 320
press 296, 301
Visible band 346
Upgrade 332
Visible data 350
SP2 492
Visible index 350
Visit www.designbuilder.co.uk 14
Visit www.designbuilder.co.uk
US 453
upgrades 14
Usage 36, 38, 184, 189, 356, 374, 375
Visualisation 16, 100, 178, 325, 326, 327, 359,
User 16, 21, 23, 176, 183, 281, 296, 302, 313, 335,435, 491
446, 447, 449, 453, 489, 508
site 14
User Interface 16, 176, 446, 447, 453
Visualisation Display 327
U-value 341, 342, 345, 399
Visualisation Screen 16, 100, 327, 359, 435
U-values 176, 178, 342, 399
Voids 100, 199
Defines 397
Creating 158
requiring 341
U-values include
surface 342
-V-
-U-
-W-
W/m2 345, 384
W/m2/100 lux
dividing 239, 240, 242
© 2008 DesignBuilder Software, Ltd.
546
DesignBuilder 1.5
W/m2-K 345
WYEC2 484
Wall 15, 21, 67, 88, 97, 100, 104, 116, 140, 141,
147, 158, 159, 184, 198, 199, 215, 219, 223, 228,
296, 302, 307, 313, 320, 328, 329, 372, 377, 378,
395, 399, 403, 407, 411, 423
X-axis 122
Wall Thickness 97, 141, 158
snapped 41
Wall/windows 307, 320
XP SP2 492
Warmup 296, 302, 313, 418
Water Vapor Transmission Data 296, 302, 313
Weather 15, 30, 86, 176, 177, 178, 181, 182, 296,
302, 313, 389, 390, 391, 392, 403, 410, 418, 423,
465, 484, 489
Weather Data Hourly Interpolation 296, 302, 313 Y-axis 41
Weather Data Translator 418, 484
Web 528
Website 391, 508
Support Forum 528
Z-axis 77
Window opening 223, 227, 235
line 67, 89
Window shading 219, 220, 232, 307, 320
lines 41
Window spacing 215, 223, 228, 237, 238, 464
snapped 67
Windows 15, 23, 30, 34, 61, 72, 87, 100, 104, 163,
switch 67
166, 199, 214, 215, 216, 219, 220, 223, 224, 227,
Zip 15
228, 229, 232, 235, 236, 237, 238, 273, 289, 307,
Zone 15, 21, 27, 30, 40, 87, 88, 100, 146, 147,
320, 326, 340, 344, 345, 349, 360, 361, 362, 366,
160, 162, 163, 181, 183, 184, 189, 199, 223, 227,
367, 368, 382, 387, 395, 399, 410, 411, 418, 423,
235, 236, 238, 239, 242, 246, 248, 253, 273, 276,
436, 449, 484, 489, 492, 504, 508
280, 284, 285, 287, 289, 294, 296, 298, 302, 304,
number 464
307, 313, 320, 325, 326, 345, 372, 375, 387, 388,
Windows Explorer 484
401, 403, 404, 407, 410, 411, 415, 417, 418, 423,
447, 464, 465, 508
Windows XP SP1 492
Zone Block 147
Windows XP SP2 492
Zone including 184
Windspeed 296, 302, 313
Zone Level 21, 160, 163, 184, 239, 248, 280
Winter Design 177, 182, 296, 390, 403, 418
Zone making 464
Winter Design Calculations 296
Zone Time Step 296, 302, 313
Winter Design Weather 177, 182, 390, 403
Zone Type 184
Winter design weather data 182
Zone/Sys Air Temp 296, 302, 313
Wireframe 440
Zone’s 307, 320
Wire-frame 326
Within 30, 36, 38, 55, 57, 140, 147, 158, 159, 162, Zone’s surfaces 307, 320
182, 187, 276, 284, 296, 302, 313, 332, 334, 342,
Zoom 34, 35, 79, 326, 435, 440
375, 388, 389, 390, 396, 398, 399, 436, 449, 484,
Zoom Dynamic 34
508
Zoom Window 31, 34
Working 146, 160
Within Blocks 158
Working 146
Within Zones
Working 160
Workday 273, 286, 375
Working 15
within 146, 160
within Blocks 146
within Zones 160
-X-
-Y-Z-
© 2008 DesignBuilder Software, Ltd.