1
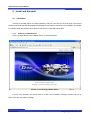
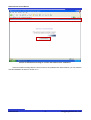
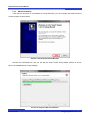
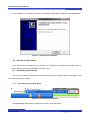
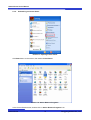
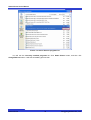
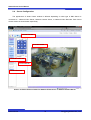
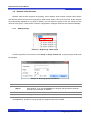
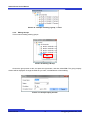
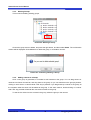
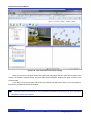
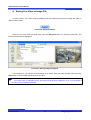
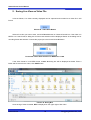
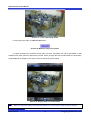
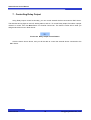
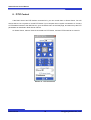
Smart Viewer User's Manual
Smart Viewer User's Manual
Version 1.0.0.8
October 26, 2010
Dongyang Unitech Co., Ltd
www.d-max.co.kr
www.cctvhome.net
Smart Viewer
1
Dongyang Unitech Co., Ltd
Smart Viewer User's Manual
Index
1.
Smart Viewer Overview .............................................................................................................. 4
1.1.
Introduction ......................................................................................................................... 4
1.2.
Key Features....................................................................................................................... 4
2.
Install and Uninstall .................................................................................................................... 5
2.1.
Installation ........................................................................................................................... 5
2.1.1.
Installing on Web Browser .......................................................................................... 5
2.1.2.
Manual Installation ...................................................................................................... 8
2.2.
Start up of Smart Viewer ..................................................................................................... 9
2.3.
Uninstalling Smart Viewer ................................................................................................... 9
2.3.1.
Uninstalling with Program Menu ................................................................................. 9
2.3.2.
Uninstalling on Control Panel .................................................................................... 11
2.4.
3.
Screen Configuration ........................................................................................................ 13
Live View Video ........................................................................................................................ 15
3.1.
Network Video Server or Network Camera Server ........................................................... 15
3.2.
Network Video Recorder ................................................................................................... 16
3.2.1.
Adding Groups .......................................................................................................... 16
3.2.2.
Editing Groups........................................................................................................... 17
3.2.3.
Deleting Groups ........................................................................................................ 18
3.2.4.
Adding cameras to a Group ...................................................................................... 18
3.3.
Fitting the Live Video to Screen ........................................................................................ 20
4.
Saving Live View as Image File................................................................................................ 21
5.
Saving Live View as Video File ................................................................................................ 22
6.
Audio Control ............................................................................................................................ 24
6.1.
Getting Audio from DNC® Server ..................................................................................... 24
6.2.
Sending Audio to DNC® Server ....................................................................................... 24
7.
Controlling Relay Output .......................................................................................................... 25
8.
P/T/Z Control ............................................................................................................................ 26
9.
FES (Flexible Extra System) .................................................................................................... 28
9.1.
How to use FES ................................................................................................................ 28
10.
Control Toolbar ......................................................................................................................... 30
11.
TROUBLESHOOTING ............................................................................................................. 31
11.1.
Installation ......................................................................................................................... 31
11.2.
Server ............................................................................................................................... 31
11.3.
Group ................................................................................................................................ 31
11.4.
Video ................................................................................................................................. 31
11.5.
Audio ................................................................................................................................. 32
11.6.
P/T/Z ................................................................................................................................. 33
11.7.
Relay Output ..................................................................................................................... 33
Smart Viewer
2
Dongyang Unitech Co., Ltd
Smart Viewer User's Manual
11.8.
Smart Viewer
Others ............................................................................................................................... 33
3
Dongyang Unitech Co., Ltd
Smart Viewer User's Manual
1. Smart Viewer Overview
1.1. Introduction
Smart Viewer is a ActiveX software for Internet Explorer, which enable users to control video and
audio functionalities over the TCP/IP network.
Smart Viewer works with DMax® Network Video Servers, Network Video Recorders, and Network
Camera Servers to watch real-time live videos and control the audio, Relay Output, and PTZ.
1.2. Key Features
•
Displays live video streams transmitted from DNC® Servers
•
Plays audio transmitted from DNC® Servers
•
Transmits audio from PC with Smart Viewer to DNC® Servers
•
Stores live video streams as image files
•
Stores live video streams as video files
•
Controls Relay Output of DNC® Servers
•
Controls the PTZ function of supported cameras
•
Supports the group mode to see specific channels (for Network Video Recorders only)
•
Displays live videos in full screen mode
•
Supports Flexible Extra System
Smart Viewer
4
Dongyang Unitech Co., Ltd
Smart Viewer User's Manual
2. Install and Uninstall
2.1. Installation
Connect to the DNC Server on Internet Explorer, and click Live View on the main page. Then Smart
Viewer will be automatically downloaded and installed. If the Internet connection is not available, it's possible
to manually install the program file in advance and connect to the DNC Server later.
2.1.1.
Installing on Web Browser
Click 'Live View' after access to DNC® Server on Internet Explorer.
Picture 1: Connecting to DNC® Server
If you're using Windows XP Service Pack 2 or later, the Information message will show up just as
below. Click the Information message.
Smart Viewer
5
Dongyang Unitech Co., Ltd
Smart Viewer User's Manual
Picture 2: Information message to confirm the Smart Viewer installation
If the Information message doesn't come out due to the problems like network failure, you can start the
manual installation as shown in section 2.1.2.
Smart Viewer
6
Dongyang Unitech Co., Ltd
Smart Viewer User's Manual
Picture 3: ActiveX Installation on the Information message
Click Install ActiveX Control, and the pop-up window will be displayed as blow. Click Install button.
Picture 4: Confirming ActiveX Installation
If the installation is successfully completed, Smart Viewer window will be displayed.
Smart Viewer
7
Dongyang Unitech Co., Ltd
Smart Viewer User's Manual
2.1.2.
Manual Installation
If the Internet connection is not available or having difficulties, you can manually download the Smart
Viewer program file and install it.
Picture 5: Smart Viewer Setup Window
Execute the downloaded file, and you will see the Smart Viewer Setup Wizard window as shown
above. Click Install button to start installing.
Picture 6: Progress Bar of Installation
Smart Viewer
8
Dongyang Unitech Co., Ltd
Smart Viewer User's Manual
If the installation is successfully completed, the following window will be displayed. Click Finish button.
Picture 7: Finishing the Installation
2.2. Start up of Smart Viewer
Once Smart Viewer is installed in your computer, you can start it by connecting to the DNC Server on
Internet Explorer and select Live View on the main menu.
2.3. Uninstalling Smart Viewer
There are two ways to uninstall Smart Viewer program from your computer. Before uninstalling, close
all the Internet Explorer windows.
2.3.1.
Uninstalling with Program Menu
Picture 8: Uninstalling Smart Viewer
Click Uninstall and the following window will be shown. Click Yes button.
Smart Viewer
9
Dongyang Unitech Co., Ltd
Smart Viewer User's Manual
Picture 9: Confirming of Uninstalling Smart Viewer
If the uninstalling is successful, the following window will be displayed. Click OK to finish.
Picture 10: Finishing the uninstalling
Smart Viewer
10
Dongyang Unitech Co., Ltd
Smart Viewer User's Manual
2.3.2.
Uninstalling on Control Panel
Picture 11: Opening Control Panel
Click Start button on the screen, then select Control Panel.
Picture 12: Add or Remove Programs
In the Control Panel window, double-click on Add or Remove Programs icon.
Smart Viewer
11
Dongyang Unitech Co., Ltd
Smart Viewer User's Manual
Picture 13: Add or Remove programs list
You will see the Currently installed programs list. Click Smart Viewer button, and then click
Change/Remove button. It will start uninstalling process then.
Smart Viewer
12
Dongyang Unitech Co., Ltd
Smart Viewer User's Manual
2.4. Screen Configuration
The appearance of Smart Viewer window is different depending on what type of DNC Server is
connected to - Network Video Server, Network Camera Server, or Network Video Recorder. Each Smart
Viewer window is shown below respectively.
Control Tool bar
Live view screen
Channel Control bar
PTZ Control bar
Audio Control bar
Picture 14: Smart Viewer window for Network Video Server or Network Camera Server
Smart Viewer
13
Dongyang Unitech Co., Ltd
Smart Viewer User's Manual
Control Tool bar
Channel Control bar
Live View screen
Server Control bar
Group Control bar
PTZ Control bar
Audio Control bar
FES Control bar
Figure 15: Smart Viewer window for Network Video Recorder
Control Tool bar
Channel Control bar
Audio Control bar
Displays or hide each control bar. Shows Group circulation and version information.
Displays or hide channels. Set up the frame rate, video pause, storing images or
video, Relay Output control, audio mute, FES data indication.
Adjust audio control of DNC® Server and volume of MIC and Speaker.
PTZ Control bar
Control PTZ function.
Live View screen
Display live view video of DNC® Server.
Server Control bar
Display the hierarchy of the network video servers and network camera servers
registered in the DNC® Server.
Group Control bar
Perform grouping, deleting, and editing of the cameras.
FES Control bar
Smart Viewer
Shows FES data if Flexible Extra System is installed.
14
Dongyang Unitech Co., Ltd
Smart Viewer User's Manual
3. Live View Video
3.1. Network Video Server or Network Camera Server
Figure 16: Control button for Live View
Channel 1
Display or hide the live view video from Channel 1
Channel 2
Display or hide the live view video from Channel 2
All Channel
Display the live view videos from all the channels
None Channel
Pause
Hide the live view videos from all the channels
Pause the live view video from the chosen channel
)
Button for displaying or hiding each channel is configured by the number of cameras supported by
the DNC® Server used.
Smart Viewer
15
Dongyang Unitech Co., Ltd
Smart Viewer User's Manual
3.2. Network Video Recorder
Network video recorder supports the grouping, which registers local modules, network video servers
and network camera servers into a single group. When Smart Viewer runs for the first time, all the cameras
are automatically registered in one group in default. You can select the group to view the videos from the
cameras in the group, or add, delete, or edit the configurations. Changes made here are saved immediately.
3.2.1.
Adding Groups
Picture 17: Registering a New Group
Click the right button of the mouse on the Group on Group Control bar. A group property window will
be displayed.
Picture 18: Entering Group information
Group Name
Region
Circulation
Circulation Period
Enter the name of the Group to add
Set up the layout of live view windows. You can set the size or position of each
video window. If you choose Dynamic, the program will allocate the windows
according to the number of cameras.
Select whether to use Group Circulation
Configure the duration of each video displayed when circulation is selected
Click OK button, and then a new group with the assigned name will be added.
Smart Viewer
16
Dongyang Unitech Co., Ltd
Smart Viewer User's Manual
Picture 19: example of adding a group, '1 Floor'
3.2.2.
Editing Groups
This is used for editing existing groups.
Picture 20: Editing a Group
Choose the group name to edit, and press the right button, and then select Edit. The group property
window will be displayed. Change the fields as you want, click OK button to finish editing.
Picture 21: Group Property window
Smart Viewer
17
Dongyang Unitech Co., Ltd
Smart Viewer User's Manual
3.2.3.
Deleting Groups
This is used for deleting existing groups.
Picture 22: Deleting a Group
Choose the group name to delete, and press the right button, and then select Delete. The confirmation
window will be displayed. Click OK button to delete the group, or click No to cancel it.
Picture 23: Confirming Deleting a Group
3.2.4.
Adding cameras to a Group
Once a new group is generated, it is needed to add cameras to the group. You can drag servers or
cameras from Server Control bar, and drop them to the group. Or you can add them to the group by doubleclicking on each server or camera while CTRL key is pressed. If you drag and drop a server to the group, all
the cameras under the server will be added to the group. In the same manner, double-clicking on a server
with CTRL key pressed will add all the connected cameras to the group.
To see the live video from the camera in the group, select the group or the camera.
Smart Viewer
18
Dongyang Unitech Co., Ltd
Smart Viewer User's Manual
Picture 24: Live View Video from '1 floor' Group
When you click on a Live View window, the caption bar will change the color from blue to purple, which
means it is focused. If double-clicked, only that video will be displayed. Double-click again to return to the
previous state.
If you drag a Live View window with CTRL key pressed and drop where other Live View window is,
then the two windows will switch the position.
)
Cameras linked to the same server are not allowed to be added to the same group. Up to 4 groups is
permitted to add for each camera.
Smart Viewer
19
Dongyang Unitech Co., Ltd
Smart Viewer User's Manual
3.3. Fitting the Live Video to Screen
There are three different ways to adjust the Live Video window to fit to screen.
Picture 25: Clicking on Toolbar button
Original
The video will be displayed as the original resolution. Use the scroll wheel of mouse
for zooming in and out. If video becomes larger than the window size, a small screen
is displayed to show location of the window in the video. Pressing the middle button
of the mouse (scroll wheel) will display the video in actual size.
(You can also use +, -, / keys for zoom-in, zoom-out, and original size)
Ratio
If video is smaller than the screen, it is displayed in the original size. If video is larger
than the screen, it is adjusted to fit to the screen with the same aspect ratio. Zooming
is not supported in this mode.
Stretch
Video will be resized to fill the entire screen. Zooming is not supported in this mode.
Smart Viewer
20
Dongyang Unitech Co., Ltd
Smart Viewer User's Manual
4. Saving Live View as Image File
In Smart Viewer, Live video currently displayed can be captured and saved as image file either in
JPEG or BMP format.
Picture 26: Snapshot Button
Select the live view video you want save, and click Snapshot button on Channel Control bar. The
following window will be displayed.
Picture 27: Storing Image Dialog Box
In this dialog box, you see the captured image to be saved. Enter the folder and file name, and click
Save button, then the image will be saved in the name.
)
If live view video is in MJPEG format, the image will be saved as JPEG file. If not, such as MPEG-4
or H.264, it will be saved as BMP file
Smart Viewer
21
Dongyang Unitech Co., Ltd
Smart Viewer User's Manual
5. Saving Live View as Video File
In Smart Viewer, Live video currently displayed can be captured and recorded as a video file in AVI
format.
Picture 28: Video Save Button
Select a live view you want to save, and click Rec Avi button on Channel Control bar. If the video is in
MPEG-4 or H.264 format, a dialog box for frame rate selection will be displayed. Below is the dialog box for
recording frame rate selection. Choose the proper fps in the list and click OK button.
Picture 29: Frame Rate Selection for MPEG-4 or H.264
If the video format is in M-JPEG format, a Save As dialog box will be displayed as below. Enter a
folder and file name for the video, click SAVE button.
Picture 30: Dialog Box
Once saving of video is started, REC is displayed on the upper right of live video.
Smart Viewer
22
Dongyang Unitech Co., Ltd
Smart Viewer User's Manual
Picture 31: A live video being saved
To stop saving the video, click Rec Avi Off button.
Picture 32: Button to stop saving video
In videos recorded from M-JPEG format video, the time information file will be generated in SMI
subtitle format, which puts time stamp every second. When you play back the recorded video, the time stamp
will be displayed as subtitle on the video screen as shown the picture below.
Picture 33: Playing back a recorded video
)
When you play back videos recorded from MPEG-4 or H.264, proper Codec’s may be required.
Smart Viewer
23
Dongyang Unitech Co., Ltd
Smart Viewer User's Manual
6. Audio Control
6.1. Getting Audio from DNC® Server
To receive an audio transmitted from DNC® Server, a microphone or audio output should be
connected to the Audio-In port of the DNC Server. Select a proper channel on Smart Viewer and you will be
able to hear the audio on the computer.
Pictures 34: Mute Audio Button
Clicking the Mute Audio button on Channel Control bar will mute the audio. Click the button again will
restore it to previous condition.
)
It is necessary to set up the audio function on the admin page in order to receive audio from DNC®
Server.
6.2. Sending Audio to DNC® Server
To send an audio to DNC® Server, first connect a microphone or other audio source to Audio Input
port of your computer. Then select a proper channel on Smart Viewer and click Connect button on Audio
Control bar.
Picture 35: Audio Transmission Button
When an audio connection is made to DNC® Server, Disconnected will change to Connected, and it
will start sending the audio from PC’s audio input port. To disconnect the audio connection, click
Disconnected button. You can use volume control slider to adjust the audio level.
)
Once a connection is made to DNC® Server, audio from it is also transmitted through same network
path. So you will get better audio quality if network traffic is not heavy.
Smart Viewer
24
Dongyang Unitech Co., Ltd
Smart Viewer User's Manual
7. Controlling Relay Output
Using Relay Output control functionality, you can control external devices connected to DNC Server.
That includes turning lights on and off, starting alarms, and etc. To control Relay Output, first select a proper
channel to control, and click Next button on Channel Control bar. The button’s name will be what you
assigned at Admin menu in DNC Server.
Picture 36: Relay Output Control Button
Click the button shown above, and you will be able to control the external device connected to the
DNC Server.
Smart Viewer
25
Dongyang Unitech Co., Ltd
Smart Viewer User's Manual
8. P/T/Z Control
If the DNC Server has PTZ devices connected to it, you can control them on Smart Viewer. You will
also be able to use a Joystick to control PTZ device if your computer has a Joystick connected to it. Connect
a PTZ-enabled camera to the DNC Server, go to the Admin menu of the Web page, and then set up the PTZ
parameters as described in DNC Server manual.
On Smart Viewer, select a channel connected to a PTZ device, and use PTZ Control bar to control it.
Picture 37: PTZ Control bar
Smart Viewer
26
Dongyang Unitech Co., Ltd
Smart Viewer User's Manual
Speed
Adjust the rate of camera motion. It can be between 1 and 16, and higher number
is faster.
Controls in 8 directions: Up, Down, Right, Left, 4 Diagonals.
Adjust zooming. '+' for zoom-in and '-' for zoom-out.
Adjust focus. '+' for focus far, '-' focus near.
Control Auto Pan for the model supporting Auto Pan feature.
Preset Call
PTZ Move Mode
Move the camera automatically to the preset position as it is configured in PTZ
control on DNC Server.
Moving cameras in two different modes: Step and Continuous modes.
Step mode: Camera moves as much as previously defined each time. This mode
is effective for remote cameras with slow network condition.
Continuous mode: Camera keeps moving while direction control buttons is
pressed. This mode is effective for local camera with fast responsiveness.
Provides an extended use of PTZ. Works only with registered Groups and Tours.
It can be used for control of camera power, light, AUX1, and AUX2.
, and run Group.
Assign group numbers at
Run Tour with Tour configured.
Control the camera power.
Turns lights On or Off.
Control AUX 1.
Control AUX 2.
)
To enable PTZ bar for use, it is required to make PTZ function active in admin page in advance.
Smart Viewer
27
Dongyang Unitech Co., Ltd
Smart Viewer User's Manual
9. FES (Flexible Extra System)
A live view video can be integrated with additional data from external devices such as access control
systems, POS terminals, intelligent video analyzer, GPS terminals, dust measuring devices, license plate
readers, and etc. FES is a way to put DNC Server and the additional data together. When FES data is
received by DNC Server, Smart Viewer can display the FES data on live view video or FES Control bar.
9.1. How to use FES
First, install FES component in the DNC Server, and install FES for PC in your computer where Smart
Viewer is running as well. Once FES is up and running, you will see FES Setup button on Channel Control
bar in Smart Viewer.
Picture 38: FES Setup Button
Fes on OSD
Turns On or Off the OSD of the FES display on Live Video of Smart Viewer, when
FES data is received by DNC Server. FES data will be displayed only for 5
seconds.
Fes on List
Turns On or Off the list display of FES data on FES Control bar of Smart Viewer,
when FES data is received by DNC Server.
Smart Viewer
28
Dongyang Unitech Co., Ltd
Smart Viewer User's Manual
Picture 39: OSD of FES Data in Live View
Picture 40: FES Control bar Displaying FES Data
Smart Viewer
29
Dongyang Unitech Co., Ltd
Smart Viewer User's Manual
10. Control Toolbar
You can use Control Toolbar to perform the functions such as displaying or hiding each control bar,
displaying live video in full screen mode, alternate displaying between groups, showing the software
information, and etc.
Picture 41: Control Toolbar
Display / Hide Server control bar. (only for network video recorders)
Display / Hide Group control bar. (only for network video recorders)
Display / Hide Channel Control bar.
Display / Hide PTZ Control bar.
Display / Hide Audio Control bar.
Display / Hide FES Control bar. (only for network video recorders with FES)
Display live view in full screen mode. (Press ESC key to return to normal mode)
Display live videos alternately between groups. (only for network video recorders)
Select the way how video is displayed on screen.
Redraw the live video after median calculation if it’s smaller than the original size.
(Turing on this feature will increase CPU usage)
Display the version information of Smart Viewer.
(FES version and type will be also shown if installed)
Smart Viewer
30
Dongyang Unitech Co., Ltd
Smart Viewer User's Manual
11. TROUBLESHOOTING
11.1. Installation
Q) I can't start installation of Smart Viewer when I connect to DNC Server and click Live View.
A) The Internet connection is not available. Manual installation is required.
Q) It stopped during the installation showing the message 'Process is being used'.
A) Close all the Internet Explorer windows running, and try installing again.
Q) 'Reboot system' message is displayed after installation is finished.
A) Smart Viewer was being used in another Internet Explorer during installation. Reboot is required.
Q) After installation is finished, it requires me to install Smart Viewer again.
A) It is the case when Smart Viewer program was updated. Install Smart Viewer again.
Q) I still can't install Smart Viewer despite the Internet connection is available.
A) It is cause by deleting any part of Smart Viewer. Uninstall and reinstall Smart Viewer.
11.2. Server
Q) It shows a message saying that “Failed to retrieve server information from Smart Viewer or
unauthorized user access”.
A) Make sure the followings:
•
The access to DNC® Server is good on Internet Explorer.
•
At least one camera is authorized for video viewing.
•
At least one remote server is registered if you’re running a network video record without a local
camera.
11.3. Group
Q) After adding a new group, I can't add any camera into a group by drag-and-drop.
A) If the camera has been already registered, it can’t be added anymore. Or if other four groups have
the camera registered, no more addition is allowed.
11.4. Video
Q) I can't see live view on screen.
Smart Viewer
31
Dongyang Unitech Co., Ltd
Smart Viewer User's Manual
A) Make sure that at least one camera is registered in groups of network video recorder. Also check
whether Channel Hide button is pressed. If so, select the channel to see.
Q) "Connecting” or “Disconnected” message is displayed during live view.
A) It may be caused by either the network is not available or DNC Server is turned off or rebooting.
Check if the network is working properly and DNC Server is turned on. If you still see the same
message while the network is good and the power is on, try rebooting the DNC Server.
Q) 'Extra users' message is displayed in live view.
A) It is displayed when there are excessive numbers of users viewing the video. You will be able to see
the video when any of current users disconnects from the server.
Q) 'No Signal' is displayed in live view.
A) Camera may be disconnected to DNC® Server. Connect a camera to DNC® Server.
Q) Frame rate of live view is getting low.
A) It is caused by slow network. Improve the network condition or cancel the real-time monitoring of
vaccine program if installed.
Q) Only live view is displayed without Internet Explorer.
A) Click ESC key to escape from Full Screen mode in Smart Viewer.
Q) I can't save images.
A) Make sure you have the permission to the folder. And check if you have enough space in hard drive.
Q) I can't save videos.
A) Make sure you have the permission to the folder. And check if you have enough space in hard drive.
Q) Video recording stopped by itself.
A) Video can be saved up to 10 minutes. It automatically stops recording if it exceed the 10 minutes. It
also stops recording when image size is modified, video codec is changed, or video input is
removed. For network video recorders, video input is removed when it is moved to other group. For
network video servers or cameras, video input is removed when the channel button is pressed.
11.5. Audio
Q) Audio is not played.
A) First check if Audio-In port is connected to an audio source, and then select the camera linked to
the Audio-In port on Smart Viewer. Check if Mute is activated. Check if the computer has the sound
card driver properly installed. Also check the level of speaker volume.
Smart Viewer
32
Dongyang Unitech Co., Ltd
Smart Viewer User's Manual
Q) I can't send audio to DNC® Server.
A) Sending audio from Smart Viewer to DNC Server is only allowed to the user who used that feature
for the first time. Any other user can only receive audio from the server. Check if the computer has
the sound card driver properly installed. Also check the level of speaker volume
11.6. P/T/Z
Q) PTZ control bar is not activated.
A) Connect to DNC Server, and make sure PTZ set up is properly done on Admin menu.
Q) Clicking PTZ buttons doesn’t work.
A) When network condition is not good enough, there may be some latency time in camera movement.
Try Step Mode if Move mode is currently set to Continuous.
Q) Advanced features for PTZ don’t work.
A) Advanced features are only available for the supported cameras. Make sure the PTZ camera in use
supports the advanced features.
11.7. Relay Output
Q) Relay Output button won’t be activated.
A) The second channel of Dual Stream can be controlled only after Primary channel is set up for Relay
Output control. Also make sure that DNC® Server is connected to the network.
A) Relay Output button won’t work.
Q) Make sure that DNC® Server is connected to the network.
11.8. Others
Q) An error occurs if Internet Explorer is closed while Smart Viewer is working.
A) It can be caused if you’re using Internet Explorer 6.0 together with Skype or FlashGet. You can
work around the issue by uninstalling Skype or FlashGet, or disable them in Internet Explorer’s
menu Tools > Manage Add-ons. Also it can be resolved by upgrading to Internet Explorer 7.0 or
later.
Smart Viewer
33
Dongyang Unitech Co., Ltd