1
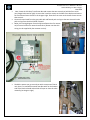
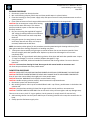
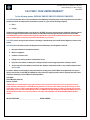
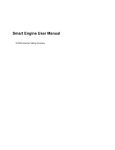
Installation & User’s Manual for Predator
Whole Building UV Water Supply
DWS-POE
PREDATOR (DWS-POE w DWS-BPA-T BYPASS)
PREDATOR
WHOLE BUILDING UV WATER DISINFECTOR
INSTALLATION GUIDE & USER’S MANUAL
Installation & User’s Manual for Predator
Whole Building UV Water Supply
DWS-POE
Your O-SO PURE Disinfection System is actually two systems in one. The first stage filter utilizes a revolutionary
NEW dual-micron, Polypropylene (spun-cotton) sediment filter. This filter is designed to reduce sand, silt, and
rust, while greatly extending the life of the second filter (½ micron carbon block). The outer portion of this
filter is a 50 micron, while the inner rap is rated at 5 microns, the second stage filter reduces organics,
pesticides, chlorine, chloramines, debris, and cleanses the water while reducing cysts and protozoa such as
cryptosporidium and giardia lamblia organisms. With the self-cleaning system, the water flows through the
sumps around the filters and out via the ball valves located at the bottom of the filter sumps. The daily flush
cycle will automatically wash away sediment and debris which can shorten the life of the filters.
BEFORE YOU BEGIN:
The main components to identify include:
The DWS-POE (Predator), with the following components in its box:
• Quartz sleeve and UV lamp (both shipped in separate labeled cardboard tubes).
• Installation Kit (a plastic bag containing parts & instructions required for installation).
• 2) 10-foot lengths of 3/8” blue polypro tubing.
• Copper Bypass w Solenoid subassembly and 24V Transformer Box (only if ordered).
• Copper ‘Cane’ for Bypass subassembly.
Your O-SO PURE system requires adequate water pressure. The unit is designed to operate within a pressure
range of 40 PSI to a maximum of 75 PSI.
CAUTION: If the water pressure exceeds 75PSI, then a pressure regulator must be used.
CAUTION: Do not install a pump on outlet side of system as damage to the quartz sleeve may occur. If
pump is required, install it on inlet side of system and verify with the system’s pressure gauges that it does not
exceed 75PSI. Higher pressures may damage equipment.
CAUTION: Prevent the UV water system from extreme heat exposure (125F max.).
CAUTION: O-So Pure recommends that only PLASTIC fittings be used for connecting the plumbing
line to the inlet/outlet ports of the system. Use of any metal male fittings inside of plastic female
-threaded sump heads voids the warranty.
CAUTION: Do not over-tighten fittings connected to inlet/outlet ports of DWS-POE system.
CAUTION: Do not install clear or translucent tubing on the outlet side of system.
NOTE: O-SO PURE highly suggests installing a bypass valve of SOME sort on this unit, be it an O-SO PURE
bypass assembly, or a 3rd party manufacturer’s.
Installation & User’s Manual for Predator
Whole Building UV Water Supply
DWS-POE
INSTALLATION PROCEDURES
We recommend a professional plumber install this system. Please READ ALL DIRECTIONS THOROUGHLY AND
REVIEW ALL PHOTOS BEFORE INSTALLING. This system is designed to filter a large volume of water for
approximately one year between filter cartridge changes. The DWS-POE should be mounted near the entry of
the water main inside of the building or near a drain in a NO-FREEZE area. If mounted outside in an ENCLOSED
BOX, be sure that the temperature will not reach freezing or below. Allow sufficient space below the unit
(approx. 24”) so that the filter sumps can be screwed on and off easily. It’s important to ensure that there is
at least 19” of clearance above the UV chamber for annual replacement of the UV bulb.
MOUNT THE DWS-POE
First find the mounting template inside of the Install Documentation folder, and choose the location
for wall-mounting the DWS-POE unit. Mark and drill the three mounting holes.
NOTE- For ease during mounting, you can reduce the weight of the system by removing the sumps and
filters prior to installing the mounting bracket. DO NOT INSTALL QUARTZ SLEEVE UNTIL UNIT HAS BEEN
MOUNTED TO WALL. Once unit has been mounted, reinstall filters and filter sumps onto unit.
INSTALLING COPPER BYPASS SUBASSEMBLY & TRANSFORMER
BOX (if this option was ordered)
Locate: the copper bypass subassembly with solenoid
attached, and the copper ‘cane’.
Install the copper ‘cane’ to the POE’s OUTPUT (i.e. righthand) SIDE as shown in photo at right.
Next, install the copper bypass subassembly to the POE’s
INPUT (i.e. left-hand) SIDE and to the OUTPUT of the cane
as shown in photo below.
Installation & User’s Manual for Predator
Whole Building UV Water Supply
DWS-POE
Next, locate the 24V Gray Transformer Box and remove the two screws that hold the front cover.
(see images below and at right). Unscrew the 3 machine screws on the POE’s front bracket and mount
the Transformer Box as shown in the image at right. Close the front cover and reinstall the two screws
that secure it.
Connect the two leads from the gray cable with red female push-on lugs to the two wires with male
push-on lugs from the black 24VAC solenoid.
Below is the wiring diagram from the 24V transformer box for remote
on/off control of the main water shutoff valve. (Please note that this
wiring is to be supplied by the customer on site).
Should the power ever go out and you wish to stop water flow to
unit, there is a small white manual override switch on the bottom
side of the black solenoid valve which will open or close the valve
manually (see image at right).
Installation & User’s Manual for Predator
Whole Building UV Water Supply
DWS-POE
INSTALLING QUARTZ SLEEVE
CAUTION: QUARTZ SLEEVE IS VERY FRAGILE! For safety, wear protective gloves provided in the POE
Installation Kit when handling quartz sleeve. Do not touch quartz sleeve or UV lamp with bare hands.
Fingerprints on either part may reduce the effectiveness of the light.
Remove far right-hand sump from UV sump head.
Wearing provided gloves, remove quartz sleeve from packing tube. (The plastic white quartz sleeve
adapter should already be attached to the quartz sleeve itself, and located on the sleeve approx.
where it needs to be after sleeve is installed).
Place a small amount of silicone-based O-ring lubricant on the outside of the open end of the quartz
sleeve that will engage the O-ring inside UV sump head.
To avoid breakage, make sure that the quartz sleeve goes in straight by pushing it with a slight twisting
motion as you insert it. (You will feel it engage the O-ring inside of the UV sump head when it is all the
way in.)
Once installed, reattach the UV sump to the sump head. (Set the elbow ball valve on bottom of UV
sump in ‘OFF’ position).
INSTALLING UV LAMP & UV CONTROL BOX
Remove UV control box and mounting screws from packaging and set aside.
Remove UV lamp from packing tube, and inspect it for any damage. DO NOT INSTALL A DAMAGED UV
LAMP.
NOTE- Hold UV lamp by ceramic ends ONLY, being sure not to touch the glass.
Connect UV lamp into four-pin socket that is connected to the bottom of the UV control box by a short
cable that allows for correct insertion depth.
Carefully insert the UV control box with UV lamp through the mounting bracket into the quartz
sleeve, making sure that the cable does not twist or curl.
Once installed, mount the UV control box on top of the mounting bracket using the four screws and
one lock washer provided (for grounding purposes).
Plug the UV control box into an electrical outlet only after the rest of system install is complete.
ATTACHING THE FILTER FLUSH CYCLE DRAIN TUBING:
If system is mounted inside a building, run one length of supplied 3/8 “ blue tubing from the O-SO PURE
UV water system to the drain via the universal DLA-G drain adapter provided.
Installation & User’s Manual for Predator
Whole Building UV Water Supply
DWS-POE
Take the red clip off of the John Guest® Inline Ball Valve and insert 3/8” tubing (located on the lower
elbow on the right side of the POE mounting bracket (see above image at right). Ensure that tubing is cut
smoothly & evenly; when done, re-insert the red clip onto the coupling.
Each filter sump (both filters & UV) is equipped with a shut-off valve. This valve is provided to allow the
filter sumps to be drained of water before removal, greatly simplifying the filter replacement and quartz
sleeve-cleaning procedures. See above image at left for the default settings.
NOTE: During normal operation, the drain valves on filter sumps 1 and 2 MUST be turned to the ON position
to allow for the automatic daily filter flush cycles to occur).
SERVICE REQUIREMENTS AND RECOMMENDED INTERVALS
CLEANING: The inside of the DWS-POE system and its quartz sleeve should be cleaned each time the filters are
changed. Clean all parts (except the filters and electronic parts) with soap and rinse them thoroughly with clean
potable water. Dry the inside of the quartz sleeve thoroughly before re-assembling system. (NOTE-The presence of
iron or general poor water quality will require frequent inspection and cleaning.)
O-RINGS: Lubricate each O-ring with a silicone-based O-ring lubricant to ensure a proper seal.
FILTER REPLACEMENT: Filters will normally last approximately 8 months to a year. Filter life will vary depending
upon your local water conditions. A reduced flow rate or deteriorating water quality indicates that the filters must
be changed.
UV LAMP REPLACEMENT: UV lamps MUST be changed every 12 months. While UV lamps rarely burn out, they do
lose their disinfection power after 9,000 hours (or approx. 375 days) of continuous use. Use only O-So Pure UV
lamps, as they are specifically designed for the DWS-POE system to deliver high-quality drinking water. (NOTEUV lamp should remain on AT ALL TIMES during use because repeated starting of UV lamp shortens lamp life, and
UV lamp requires a warm-up period of 1-2 minutes.
CLEANING, DISINFECTING, AND ROUTINE MAINTENANCE PROCEDURE
RECOMMENDATIONS
Have all components on hand and ready before beginning procedure.
A clean work area and equipment are essential to properly clean and/or disinfect the system
(i.e. clean hands, tools, work surface and containers)
EQUIPMENT NEEDED
Safety glasses
Rubber gloves, sanitary
Wash cloth, clean and lint-free
Liquid Dish Soap
Household Bleach-Unscented
Only
(5¼ % Sodium Hypochlorite)
Plastic Bucket
‘O’ Ring Lubricant, Silicone Based
Installation & User’s Manual for Predator
Whole Building UV Water Supply
DWS-POE
CLEANING PROCEDURE
1. Disconnect system from electrical outlet.
2. Mix a mild cleaning solution of dish soap and clean potable water in a plastic bucket.
3. Close the incoming (or ‘feed’) water supply valve, and open a faucet or hand-piece downstream to relieve
system pressure.
4. Close valves at bottom of each sump and disconnect the fittings shown in the image below:
CAUTION: Do not attempt to remove filter housing
sumps until the water flow stops. This reduces
pressure inside the system so that the sumps may
be safely removed.
5. One at a time using the supplied 10’ length of
3/8” tubing (w male quick-disconnect elbow on
one end), drain water from each sump down
the drain.
6. Using the spanner (or sump) wrench, remove
each sump. Remove each filter as its sump is
removed, and discard the old filters.
NOTE: Use sanitary rubber gloves for this procedure to avoid contaminating the cleaning solution or filters.
Wear gloves whenever cleaning components or handling new filters.
7. Clean quartz sleeve carefully using vinegar to remove hardness. Do not use abrasive materials. Rinse
sleeve thoroughly with clean potable water. Replace any sleeve that is damaged or will not come
completely clean.
8. Remove sump ‘O’ rings and wash with cleaning solution. Rinse them well with clean potable water. Inspect
‘O’ rings for damage (i.e. nicks or scratches). Replace damaged ‘O’ rings.
9. Clean sumps and heads, inside and outside with washcloth and cleaning solution. Do not use abrasive
materials.
CAUTION: Use care when cleaning UV head. Do not get the UV control module or connectors wet!
10. Rinse sumps and heads with clean potable water.
DISINFECTION PROCEDURE
CAUTION: WEAR SAFETY GLASSES AND SANITARY RUBBER GLOVES WHILE PERFORMING THIS PROCEDURE.
CAUTION: EXCESSIVE CONCENTRATIONS OF BLEACH WILL DAMAGE PLASTIC AND RUBBER COMPONENTS.
Rinse all parts that contact bleach thoroughly with clean potable water.
CAUTION: Read the ‘WARNINGS’ on the bleach container before using.
CAUTION: Handle sanitizing solution carefully. Avoid contact with unprotected areas.
1. Disconnect system from electrical outlet.
2. Mix sanitizing solution. Mix 1 cup of household bleach and 1 cup of clean, potable water in the bucket. Mix
solution well.
CAUTION: Use care when sanitizing UV head. Do not get the UV control module or connectors wet.
CAUTION: TIGHTEN SUMPS BY HAND ONLY. Do not use tools as they will over-tighten and may damage sump.
Take care not to cut or pinch ‘O’ rings or gaskets. Use the spanner (or sump) wrench for removal only.
3. Add sanitizing solution into the system: Add 2 cups of sanitizing solution to the sump that contains the UV
lamp.
4. Slowly open the feed water supply valve.
Installation & User’s Manual for Predator
Whole Building UV Water Supply
DWS-POE
5. Open all downstream faucets or hand-pieces. Keep all faucets or hand-pieces open until a chlorine smell is
detected at each one, then close that faucet or hand-piece.
NOTE: Water lines downstream from UV housing must be disinfected to destroy any bacteria that might
remain in the pipes.
6. Verify disinfection solution has reached every water outlet downstream of UV system. Solution must
remain in the system for at least four hours.
7. Open outlet valve and let water flow for 5 minutes to flush disinfection solution from waterlines.
ROUTINE MAINTENANCE
FILTER REPLACEMENT PROCEDURE
1. Perform CLEANING PROCEDURE, steps 1-8.
2. Install the filters into the appropriate sump (the sediment filter into the far left-hand sump, and
the carbon filter into the center sump.
CAUTION: Be sure sump with metal liner is installed onto UV head.
3. Replace each sump as each filter is installed.
4. Plug system into electrical outlet. Turn on water supply and check for leaks. Flush system for several
minutes to remove carbon fines.
UV LAMP REPLACEMENT PROCEDURE
1. Disconnect system from electrical outlet.
2. Shut off feed water supply valve and open downstream faucet or hand-piece to relieve system pressure.
CAUTION: Do not attempt to remove sumps until water flow stops. This reduces pressure inside the
System so sumps may be safely removed.
3. Remove sump from UV head and set aside.
CAUTION: Do not touch quartz sleeve or UV lamp with bare hands. Fingerprints will reduce the effectiveness
of the light.
WARNING: DO NOT ATTEMPT TO REMOVE QUARTZ SLEEVE. Damage to the system and personal injury may
occur if the sleeve is removed incorrectly. Contact your dealer or O-So Pure if quartz sleeve is broken or needs
replacement. (Part # is DWS-QSBB.)
4. Clean quartz sleeve carefully using vinegar to remove hardness. Do not use abrasive materials. Rinse
sleeve thoroughly with clean potable water. Replace any sleeve that is damaged or that will not come
completely clean.
5. Gain access to UV Lamp. Remove UV Control Module from the system’s mounting bracket by removing 4
mounting screws.
6. Remove UV lamp from system being careful not to break UV lamp or dislodge quartz sleeve. Remove UV
control module with UV lamp by lifting the control module straight up from mounting bracket. The fourpin socket is attached to the UV control module by a short cable that allows for correct insertion depth.
Grasp UV lamp and four-pin socket firmly and separate lamp from connector.
NOTE: The inside of the quartz sleeve must be completely dry before installing the replacement UV lamp. Hold
replacement UV lamp by the ceramic ends only. Do not touch the glass. Clean glass with isopropyl alcohol if
necessary.
7. Install the replacement UV lamp by reversing steps 5 and 6 of this procedure.
Installation & User’s Manual for Predator
Whole Building UV Water Supply
DWS-POE
INSTRUCTIONS FOR SETTING THE ORBIT TIMER
NOTE: THE TIME ZONE IS PRE-SET TO THE UNIT’S DESTINATION BEFORE THE DWS-POE UNIT LEAVES THE FACTORY. THE
THREE DAILY DEFAULT FACTORY PRESET FLUSH TIMES ARE 9 AM, 12 PM, AND 4PM, MONDAY-FRIDAY.
TO SET START TIMERS FOR PROGRAM ‘A’:
Turn rotary dial to (A) ‘CYCLES START TIMES’. The curser will blink at start time 1 on the display.
Press the (+ Plus or – Negative) key to advance to desired start time. Press ‘ENTER’, cursor advances to
start time 2.
If more than one start time is required, repeat step B for up to 4 start times per day.
To review start times, press ‘NEXT’. To clear start times, press ‘CLEAR’. To change start times, repeat steps
A and B.
TO SET DURATION TIMERS FOR PROGRAM ‘A’:
NOTE: STATION 1= Filter Sump #1 STATION 2= Filter Sump #2
Turn rotary dial to (A) ‘ZONE/DURATION’. The cursor will blink over STATION 1.
To select filter flush duration for STATION 1 press (+ Plus or –Negative) key to advance to desired duration
for 1-99 minutes, then Press ‘ENTER’.
Repeat Step (A) for Station 2.
To review filter- flushing durations, press ‘NEXT’: to clear a flushing duration, press ‘CLEAR’, and to modify
a flushing duration, repeat Step A.
TO SET THE DAYS FOR FILTER FLUSHING:
Turn rotary dial to ‘DAY OF WEEK’. The cursor blinks over ‘M’ for MONDAY.
To activate a day for flushing, press ‘ENTER’. The cursor advances to the next day. A flag will appear over
the days of the week indicating active flushing days. (Flushing will NOT occur on days without the flag).
Repeat steps A and B. Any or all days of week may be selected.
Once filter-flushing times have been programmed, turn rotary dial to ‘AUTO’ and programming is now
complete.
ORBIT TIMER MAINTENANCE
Battery Replacement
The AA, size alkaline battery is replaceable if necessary. Should the AA batteries go bad, slide off the front cover
and remove them. Then put in the new batteries and slide the front cover back on.
BATTERY WARNING: DO NOT DAMAGE BATTERY, RISK OF FIRE, EXPLOSION OR ELECTRIC SHOCK. REPLACE
BATTERY WITH O-SO PURE SUPPLIED SERVICE PARTS ONLY. DISPOSE OF USED BATTERY PROPERLY.
TIMER/TIMER SOLENOID VALVE TROUBLESHOOTING
SYMPTOM
POSSIBLE CAUSE
valve(s) not operating
debris in valve(s)
timer LCD screen not lit
dead AA battery
flashing battery symbol
low AA battery
SOLUTION
clean valve(s)
replace AA battery
replace AA battery
Installation & User’s Manual for Predator
Whole Building UV Water Supply
DWS-POE
DWS-POE TROUBLE SHOOTING INSTRUCTIONS
IF THE UV LAMP FAILS TO ILLUMINATE
Check to see when the original (or replacement) lamp was purchased.
Turn off ALL electrical power to the system by unplugging the power cord. Remove the UV control
module using a “Phillips” screwdriver.
Slide the old lamp out from the TOP and unplug from the UV lamp power cord. HOLD THE UV LAMP
ONLY BY THE CERAMIC ENDS AND USE THE COTTON GLOVES. Carefully discard the old lamp.
Take the new UV lamp (using the cotton gloves) and hold on to the ceramic ends; plug it into the lamp
power cord. Slide the new UV lamp into the filter housing and reattach the UV control module.
Restore the electrical power, if the UV lamp fails to illuminate, call O-SO PURE. Check for any possible
leaks.
IF THERE IS A WATER LEAK:
Shut off the water supply to the unit and unplug the power cord.
Check the status of the filter sumps; inspect both the sump and the sump caps.
Check to make sure the “O” rings are placed within the groove of the filter sumps. Be sure to
lubricate the “O” ring with silicone grease or with glycerin.
Check fittings (either brass or quick-connect) and all clamps, notice if any are damp. Most fittings can
be tightened with pliers.
If the leak is coming from inside the UV sump, completely disconnect unit and ship back for repairs.
(DO NOT RETURN THE FILTERS).
IF THERE IS LOW PRESSURE:
Check the two (2) pressure gauges located on the top of the metal bracket. The first pressure gauge
(left side facing the system) reflects the incoming water pressure. If this gauge reads below 25 PSI, call
your municipal water company regarding extremely low water pressure. The DWSPOE requires a
minimum of 40 PSI to operate properly. Now check the second pressure gauge (right side when facing the
system), if there is a pressure differential of MORE THAN 20-25 PSI, either the filters are clogged up or the
waterlines are plugged. Under normal circumstances and when the filters are fairly new, the pressure
differential between the two gauges should not exceed approx 4-6 PSI.
IF THERE IS A MAJOR PRESSURE DIFFERENCE BETWEEN THE 2 GAUGES-USE
THE FOLLOWING DIRECTIONS:
Check the installation or replacement dates-(if dates reflect more than 8 months, order new filters).
Shut off water supply to the unit and unplug the power cord.
Check the number of flushes to the unit. It is possible that the flush times may need to be increased to
a maximum of FOUR (4) flushes per day instead of preset three (3) flushes.
Check the small 50 micron screen filter, on the bottom of the first sump, if plugged with dirt unscrew
the clear lid and clean out the metal screen, then check the filter inside the first sump. If filters are
plugged, call to order replacement filters.
Installation & User’s Manual for Predator
Whole Building UV Water Supply
DWS-POE
Installation & User’s Manual for Predator
Whole Building UV Water Supply
DWS-POE
O-SO PURE 1-YEAR LIMITED WARRANTY
For the following systems: (DWS-008, DWS-DDI, DWS-POE, DWS-SADI, DWS-HERO)
O-SO PURE warrants this device to be free from defects in workmanship and material under normal usage and service from date of
purchase as follows: All components are warranted for a period of (1) year, with the following exceptions:
Filters
UV lamp
This Warranty excludes damages that, in the opinion of O-SO PURE, have been caused by improper installation, alteration, misuse,
accident or negligence. Repairs must be performed by an O-SO PURE authorized agent with parts obtained from O-SO PURE.
O-SO PURE will not warrant component parts supplied by manufacturers who provide separate warranties for their merchandise.
However, O-SO PURE will contact the representative manufacturer on your behalf.
O-SO PURE reserves the right to make revisions to the design or manufacturing of this model without obligation to owners of this
product.
O-SO PURE will not be liable to perform its obligations under this Warranty if such obligations result from:
1.
Improper installation or unauthorized alteration.
2.
Misuse or negligence.
3.
Accident or excessive wear..
4.
Damage or use with any products not intended for its use.
5.
Exposure to the elements, including: direct sunlight, excessive heat, freezing temperatures, humidity or rainfall.
6.
Are the result of (but not limited to) acts of God, labor disputes, transportation strikes, or any conditions beyond control
of O-SO PURE.
If a defect in material or workmanship is discovered within the warranty period, O-SO PURE’s sole obligation will be to repair or
replace, at its election, the unit FREE OF CHARGE on receipt of the unit (charges pre-paid if mailed or shipped) with proof of date
of purchase satisfactory to O-SO PURE at the following address:
O-SO PURE
2323 W Mescal St, Suite 204
Phoenix, AZ 85029
**IMPORTANT: It is recommended that you replace all filters once a year and the UV lamp once a year (if applicable) to insure
proper treatment of drinking water. O-SO PURE will not guarantee a kill rate above 80% without properly maintaining your filters
and UV lamp. Failure to change UV lamp and filters WILL void the manufacturer warranty, or if filters or UV lamps are purchased
from another source other than O-SO PURE, ANY and ALL CLAIMS WILL NOT BE BACKED BY THE MANUFACTURER. Should the
UV Water System fail due to use of incorrect filtration or UV lamp, O-SO PURE WILL NOT BE HELD RESPONSIBLE OR HELD
LIABLE.
DATE OF PURCHASE: ______________________________ SERIAL NUMBER:__________________________________
Installation & User’s Manual for Predator
Whole Building UV Water Supply
DWS-POE
*(this page intentionally left blank)*
Installation & User’s Manual for Predator
Whole Building UV Water Supply
DWS-POE
Certificate of Referral
Please let your professional network know how this system assists in your practice. Give them a copy of this page and they will
receive a $50 rebate on the purchase of an eligible O-SO Pure system. We’ll send you a $25 referral fee when they purchase
using this certificate.
This certificate entitles the holder to a $50 rebate on the purchase of an O-SO Pure water
system.
Purchaser Info
Referring Party Info
Name ________________________________________
Name: ____________________________________
Practice Name: _________________________________
Practice Name: _____________________________
Address: ______________________________________
Address: __________________________________
City/State/Zip: _________________________________
City/State/Zip: _____________________________
Email: ________________________________________
Email: ____________________________________
Phone: ________________________________________
Phone: ___________________________________
Redemption Instructions & Restrictions
•
•
•
Purchaser
o Fill out the Purchaser information above. This also registers you for making future referrals. We will contact
you for your SSN/TIN.
o Present this certificate to your dealer at time of order. Rebate will not be applied retroactively.
o Only one (1) certificate may be redeemed per eligible O-So Pure water system.
Dealer
o Dealer and dealer employees are not eligible for referral fee.
o When submitting your purchase order to O-SO Pure
include an image of this certificate, clearly showing the purchaser information
rebate will be sent by O-So Pure directly to the purchaser identified above.
o Certificate must be accompanied by a purchase order..
Referring party
o One (1) referral fee will be paid per eligible O-SO Pure water system.
o Referring party must own O-SO Pure equipment.
o To register,
FAX this sheet with Referring Party Information filled out.
email address is required for communication.
O-SO Pure will email IRS form W-9 to be completed and submitted.
1099 will be issued according to IRS rules in effect.
o O-SO Pure reserves the right to determine form of disbursement (e.g. check, cash, gift card).
o Disbursements will be distributed quarterly, after receipt of payment from the dealer.
o Should the purchaser return the water system for a refund, O-SO Pure reserves the right to deduct the referral
fee from future disbursements.
Disclaimer
O-SO Pure reserves the right to modify or discontinue this program upon notification to registered referring parties.
Such notification will occur via referring party’s email address. Referring party shall keep O-SO Pure informed of
registration information changes at [email protected]. Be sure to include the unique serial # on this page.
Referring party is responsible for monitoring email address on file including SPAM filter settings.