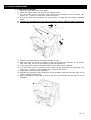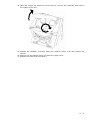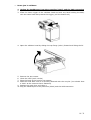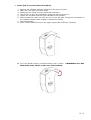
1
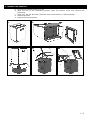
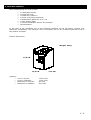
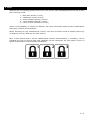
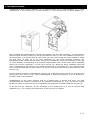
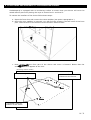
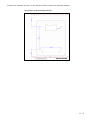
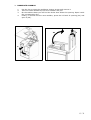
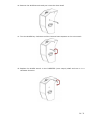
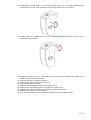
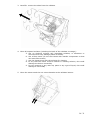
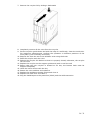
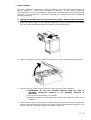
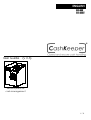
ENGLISH
CKCK-900
CKCK-900V
®
User Guide
(v 3.3)
Secure system for
cash management
1 / 32
INDEX
1. Unpack the product. . . . . . . . . . . . . . . . . . . . . . . . . . . . . . . . . . . . . . . . . . . . . . . . .
3
2. Packing list and dimensions. . . . . . . . . . . . . . . . . . . . . . . . . . . . . . . . . . . . . . . . . . . . 4
3. BOM . . . . . . . . . . . . . . . . . . . . . . . . . . . . . . . . . . . . . . . . . . . . . . . . . . . . . . . . . . . . 5
4. Keys. . . . . . . . . . . . . . . . . . . . . . . . . . . . . . . . . . . . . . . . . . . . . . . . . . . . . . . . . . .
6
5. Power line characteristics. . . . . . . . . . . . . . . . . . . . . . . . . . . . . . . . . . . . . . . . . . . . . . 7
6. Start up. . . . . . . . . . . . . . . . . . . . . . . . . . . . . . . . . . . . . . . . . . . . . . . . . . . . . . . . . . 8
7. Use instructions. . . . . . . . . . . . . . . . . . . . . . . . . . . . . . . . . . . . . . . . . . . . . . . . . . . . . 9
8. Anchorage surface positioning and assembly . . . . . . . . . . . . . . . . . . . . . . . . . . . .
10
9. Cashbox extraction and replacement. . . . . . . . . . . . . . . . . . . . . . . . . . . . . . . . . . . . . . 12
a. Coins cashbox. . . . . . . . . . . . . . . . . . . . . . . . . . . . . . . . . . . . . . . . . . . . . . . . . 12
b. Note cashbox. . . . . . . . . . . . . . . . . . . . . . . . . . . . . . . . . . . . . . . . . . . . . . . . . 13
10. Incidences management . . . . . . . . . . . . . . . . . . . . . . . . . . . . . . . . . . . . . . . . . . . . . . . 14
a. Coins jam
i. In coins validator. . . . . . . . . . . . . . . . . . . . . . . . . . . . . . . . . . . . . . . . . . 14
ii. In coins recycler. . . . . . . . . . . . . . . . . . . . . . . . . . . . . . . . . . . . . . . . .
16
b. Notes
i.
ii.
iii.
jam
In note validator. . . . .. . . . . . . . . . . . . . . . . . . . . . . . . . . . . . . . . . . . . . 18
In note recycler (manual). . . . . . . . . . . . . . . . . . . . . . . . . . . . . . . . . . . . 19
In note recycler (automatic). . . . . . . . . . . . . . . . . . . . . . . . . . . . . . . . . . 22
11. Cleaning and maintenance. . . . . . . . . . . . . . . . . . . . . . . . . . . . . . . . . . . . . . . . . . . . . 23
a. Coins validator. . . . . . . . . . . . . . . . . . . . . . . . . . . . . . . . . . . . . . . . . . . . . . . . . 24
b. Coins recycler. . . . . . . . . . . . . . . . . . . . . . . . . . . . . . . . . . . . . . . . . . . . . . . . . 26
c. Notes validator. . . . . . . . . . . . . . . . . . . . . . . . . . . . . . . . . . . . . . . . . . . . . . . . 27
d. Notes recycler. . . . . . . . . . . . . . . . . . . . . . . . . . . . . . . . . . . . . . . . . . . . . . . . 28
12. Spare parts and options. . . . . . . . . . . . . . . . . . . . . . . . . . . . . . . . . . . . . . . . . . . . . . . 29
a. Additional cashboxes . . . . . . . . . . . . . . . . . . . . . . . . . . . . . . . . . . . . . . . . . . . . 29
b. Bowlers control. . . . . . . . . . . . . . . . . . . . . . . . . . . . . . . . . . . . . . . . . . . . . . . . 29
13. Warranty. . . . . . . . . . . . . . . . . . . . . . . . . . . . . . . . . . . . . . . . . . . . . . . . . . . . . . . . . . 30
14. Technical Service and Customer Attention Service. . . . . . . . . . . . . . . . . . . . . . . . . . . . . 32
2 / 32
1. UNPACK THE PRODUCT
a. Put the box upright and turn it 90º
b. With the box in the horizontal position, open the bottom cover and remove the
protection.
c. With care, put the box back (with the device still inside) in vertical position.
d. Remove the box
e. Remove the top protector
a
b
c
d
e
3 / 32
2. PACKING CONTENT
Each CashKeeper® box shall contain:
1 CashKeeper device
3 access key sets
1 ALLEN key number 5
1 power cord (220V powerline)
1 identification labels set of in / out
1 shop window label
1 CD with installation drivers and manuals
Documentation
In the case of not containing any of the elements specified on the list above, contact your
distributor immediately. Any claim for lack of elements, will not be considered past 24 hours of
the product reception.
Product dimensions:
Weight: 30 Kg
47,5 CM
32,5 CM
37,5 CM
Capacity:
Coin in recycler:
Coins in cashkbox:
Banknotes in recycler:
Banknotes in cashbox:
1.500 units
1.000 units
80 units
500 units
4 / 32
3. PACK LIST
COIN RECYCLER
REF. R-03-BKV
BANKNOTE ASSEMBLY
REF. R-10-BSC
PAY IN LED
REF. R-17-LED
COMUNICATION BOARD
REF. R-01-PCB
DISPLAY
REF. R-02-VFD
BANKNOTE RECYCLER
REF. R-05-SPO
NOTE VALIDATOR
REF. R-04-BNV
PAY OUT LED
REF. R-18-LED
NOTE CASHBOX
REF. R-06-CBB
POWER ASSEMBLY BOX
REF. R-08-PWR
COIN CASHBOX
REF. R-2-09-CBC
MOTHERBOARD*
REF. R-2-16-PMB
*(only CK-900V)
COIN RECYCLER
REF. R-07-SMH
ANCHORAGE
INTERFACE
REF. R-14-INT
5 / 32
4. KEYS
With the aim of providing greater security for your money, each CashKeeper® device has 5 locks
and 3 security levels:
1.
2.
3.
4.
5.
Main door access (1 level)
Cashboxes access (2 level)
Notes cashbox opening (3 level)
Coins cashbox opening (3 level)
Coins recycler extraction (3 level)
There is the possibility of control the bowlers. For more information about control combinations
and prices, contact your distributor.
NOTE: According to your CashKeeper® version, each level 3 bowlers could be equals (same key)
or different (one key different per each bowler)
Even in this manual and in all the CashKeeper® relative documentation, if necessary, will be
indicated the level of security that each operation can be committed. For this reason, there is a
special nomenclature to provide this information:
6 / 32
5. POWER LINE CHARACTERISTICS
The device must be connected to a powerline with the following characteristics:
Operating voltage:
Maximum consumption:
200 – 240V 50Hz
1.1 A
The fixed installation must be equipped with disconnection power measures.
Keep the device away from water or any other liquids.
Due to the system characteristics and its security, must be optimal condition grounding.
Otherwise, do not use this device.
¡WARNING!
GROUNDING
¡¡WARNING, TO MANIPULATE ANY CASHKEEPER COMPONENT,
NEVER SHOULD HAVE POWER NEITHER USB SIGNAL!!
(otherwise you could damage the device on irreversible way)
7 / 32
6. START UP
Follow the instructions to unpack the product (with care, the empty device weight is over 25
Kg!).
Once the device is extracted from the box, make sure that the switch connector (located in the
rear of the device) is in OFF position ( O ) and with the supplied cable, connect it to the electrical
power line (see characteristics on point 5).
CK900
Insert the supplied drivers CD on your computer or use the installation method given by your
distributor.
Now connect the USB cable (A type) to the PC/POS. The system will proceed to the drivers
installation. ATTENTION: USB connexion must be 2.0 compliant.
Once installed, you could already switch the device into ON position (|)
CK900V
Switch the device ON and connect it to your ethernet o directly to the ethernet port of your
POS (depending of the type of POS, is possible that you’d need a cross ethernet cable). The
device has the DHCP active. In case it was necessary, you may change the device ethernet
configuration to make it visible on your LAN.
The device can be controlled through ‘Remote desktop’:
Device name:
User:
Password:
CKWS1
Administrator
adminck900v
… or through any internet explorer:
Address:
User:
Password:
http://ckws1 (or the default IP address of the device: 192.168.1.44)
administrator
adminck900v
AD-HOC configuración (WIFI version):
SSID:
Password:
CashKeeper
admin
8 / 32
7. USE INSTRUCTIONS
CashKeeper® has a notes validator (A), a notes recycler (B), a notes cashbox (C), a coins
validator (D), a coins recycler (E), a coins cashbox (F) , a box of coins exit (G) and a display (H).
Once enabled the CashKeeper®, through the software, for the cash reception, you will observe
that the notes entrance mouth (A) will be illuminated in blue, as the coin validator entrance (D).
At this moment, you will be able to enter notes (one by one) through the notes entrance mouth
(A) and coins (in bulk up to 30 coins maximum) by the coins validator entrance (D).
CashKeeper® will validate all the notes, storing the accepted ones into the exchange recycler (B)
or in the cashbox (C) depending on the system requirements. Also, all the coins will be validated,
storing all of them, temporary, on the coins recycler (E). While are being validated notes and
coins, CashKeeper® will inform of the introduced amount on the display (H). The rejected notes
will be returned through the same mouth (A) and the rejected coins will be returned by the coins
exit box (G).
At the payment moment, CashKeeper®, will pay the notes through the mouth (A) and the coins
through the coins exit box (G). While CashKeeper® is dealing a payment, it is not possible to
introduce cash to be validated.
CashKeeper®, at the same moment and on a parallel way of entries and exits, will send
automatically the excess of exchange to the respective cashboxes (C) y (F), as well as a small
portions of coins in case of having to compensate the proportion of those inside the recycler (E).
At the time of the collection, all the exchange or the wished part of it, will be sent to both
cashboxes (C) y (F), keeping all the amount on the secure key cashbox.
9 / 32
8. POSITIONING AND ASSEMBLY OF THE ANCHORAGE SURFACE
CashKeeper® is equipped with an anchoring surface to ensure that your device will never be
raised without previously having the keys to access level 1 and level 2.
To extract the interface of the device follow these steps:
a. Open the front door and remove the coins cashbox (see point 9 paragraph a.).
b. Once the coins cashbox is removed, you will find two screws in the two holes of the front
part. Those screws fix the machine to the surface. Remove them.
c. Now, slightly lift the front part of the device and move it forward. Notice that the
anchorage surface appears at the rear.
(Anchorage surface details)
Desk anchorage holes
Guide and fixation
element to the device
(Threaded) holes for
fixation to the device
10 / 32
To place the interface and fix it in the desired surface, follow the attached schema:
View on floor of the anchoring interface
REAR AREA
FRONT AREA
11 / 32
9. CASHBOX EXTRACTION AND REPLACEMENT
Below is the procedure of extraction, emptying and replacement of CashKeeper® cashboxes.
a. COINS CASHBOX
1. Use the key to open the cashboxes closing access and remove it
2. Once removed, with a slight movement upwards (2a), pull the cashbox (2b). You
will hear a sound while removing the cashbox indicating its closure, being
unarmed and inaccessible
3. With the key, open the cashbox and extract the coins
4. To rearm the cashbox, open the lid completely (minimum180º) and rearm the
cashbox pushing the side cam towards until hearing 'click'. If the lid is not
completely opened, it is possible that the cashbox cannot be rearmed.
4
1
2b
2a
12 / 32
b. BANKNOTE CASHBOX
1.
2.
3.
4.
Use the key to open the cashboxes closing access and remove it
Take the notes cashbox by the silver shooter and pull
On the cashbox base you will find the locker that allows the opening. Open it with
the corresponding key.
Finally, to access into the note cashbox, press the lid latch of opening (4a) and
open it (4b).
4a
4b
3
2
1
13 / 32
10. ISSUES MANAGEMENT
a. Coins jam in validator
1. Open the main door and leave aside
2. Raise the upper cover and put the anti-falling locker
3. If in this state you can accede to the reason of the incidence (coin jammed, clip,
screw, etc…) remove it and close again the device.
4. If it is not seen with evidence the jam reason, it might be and internal validator
jams.
5. Unplug the CashKeeper from the powerline (220V) and the USB connection
6. Disconnect the connection with the isolation screen and the side connector.
6
7
7
6
7. Remove the lugs that fix the metal isolation screen.
8. With the lugs out, lift the isolation screen to liberate the validator of his anchor
and, with care, move the set slightly forward and extract it.
9. Verify inside the output channels located at the base of the validator
10. If in this state you can accede to the reason of the incidence coin jammed, clip,
screw, etc…) remove it and replace and reconnect the device.
11. Otherwise, follow the next procedure…
12. Release the metallic screen fixations of the validator, opening the side legs of the
screen (handle it with care)
13. With a screwdriver help (star), remove the two screws that hold the disc lid of the
validator.
14 / 32
14. Once the screws are removed, lift the disc lid, roll the disc manually and remove
the reason of the jam.
15. Replace the validator coverage, place the isolation screen over and reinsert the
screws.
16. Remove the anti-falling locker and close the upper cover
17. Replace the main door and close it
15 / 32
b. Coins jam in recycler
1.
2.
3.
4.
5.
Unplug the CashKeeper from the powerline (220V) and the USB connection
Open the main door and leave aside
Use the key to open the cashboxes closing access and remove it
Pull the coins cashbox, the coins recycler is located behind the coins cashbox
With the key, open the locker that will allow you to remove the coin recycler
6. Rise the bottom shooter and pull the recycler forward
16 / 32
7. Remove the recycler lid, by sliding it backwards
8. Remove all the coins from the recycler
9. Firmly turn the inner plate in both directions alternately until you notice that it is
free from obstruction
10. Refill the recycler with the coins
11. Reclose the recycler lid. Make sure that it is properly closed, otherwise, the recycler
will not work
12. Replace the recycler on the support guides and push it until the end
13. Ensure that the coin recycler is located on its site, the bottom latch must be
dropped completely
14. Close the locker device with the key
15. Rearm the coins cashbox and replace it
16. Replace the cashboxes closing access and close it
17. Replace the main door and close it
18. Plug the CashKeeper to the powerline (220V) and the USB connection
17 / 32
c. Notes jam in validator
1. Unplug the CashKeeper from the powerline (220V) and the USB connection
2. Open the main door and leave aside
3. Press the lower trigger of the validator head and with one hand holding the base,
with the same hand that presses the trigger, pull the head firmly
4. Open the validator head by sliding the top flange (silver) forward and lifting the lid
5.
6.
7.
8.
Remove the jam reason
Close the head (until it clicks)
Place the back of the head on its support
Slide the head back until it is securely fastened with the recycler (You should hear
a 'clack' at the moment that is fastened)
9. Replace the main door and close it
10. Plug the CashKeeper to the powerline (220V) and the USB connection
18 / 32
d. Notes jam in recycler (manual method)
1.
2.
3.
4.
5.
6.
Remove the validator head as indicated in the previous point
Open the main door and leave aside
Disconnect the notes recycler (white top connector)
Use the key to open the cashboxes closing access and remove it
Loosen the nut that holds the note validator to the chassis
Slide forward the notes set until you see, by the left side, the ground connection of
the validator chassis (with a faston). Remove the faston.
7. Pull the assembly
8. Place a 5mm ALLEN wrench in the upper output cam shaft lace (diverter)
9. Turn the ALLEN wrench counterclockwise until it stops.
FORCE the shaft, which could cause ITS breakage.
¡¡WARNING!! DO NOT
19 / 32
10. Remove the ALLEN wrench and put it into the drum shaft
11. Turn the ALLEN key clockwise until the jammed note appears on the exit mouth.
12. Replace the ALLEN wrench in the DIVERTER (cam output) shaft and turn it in a
clockwise direction.
20 / 32
13. Replace the ALLEN wrench in the drum shaft and turn it counter-clockwise and
notice that the note goes gradually out from the mouth of the recycler.
14. Finally return the ALLEN wrench to the DIVERTER spindle and then turn counterclockwise until it stops.
15. Replace the note set in its cavity and push it back until it reaches the height of the
faston for grounding connection
16. Connect ground connection (faston)
17. Push until it stops and tighten front nut
18. Connect the top connector
19. Replace the cashboxes closing access and lock it
20. Remove the anti-falling locker and close the upper cover
21. Replace the validator head as indicated in the previous point
22. Replace the main door and close it
23. Plug the CashKeeper to the powerline (220V) and the USB connection
21 / 32
e. Notes jam in recycler (automatic method)
1.
2.
3.
4.
5.
Remove the validator head as indicated in the previous point.
Open the main door and leave aside
Plug the CashKeeper to the powerline (220V).
Locate DIP SWITCH 1 (DS1) on the back side of the note recycler
Move the DS1 to the OFF position. The recycler at this time will start an eject cycle.
6. If you need to perform the cycle again, disconnect the power supply (220V) and
return to step 3.
7. Close the device lid
8. Place the back of the head on its support.
9. Slide the head back until it is securely fastened with the recycler (You should hear
a 'clack' at the moment that is fastened)
10. Replace the main door and close it
11. Plug the CashKeeper to the powerline (220V) and the USB connection
22 / 32
11. CLEANING AND MAINTENANCE
¡¡WARNING!!
If unsure of how to perform any of the steps outlined below,
abstain from initiating the procedure and
contact the Service Centre
a. Coins validator
The coin validator is designed to run up to 500,000 cycles of reading without need to be
cleaned. However, we recommend you to plan routine cleanings on a regular periods to avoid
potential problems in coin recognition, or when you detect that the rejection of valid coins has
increased (the validator standard rejection level is less than 2% of the introduced coins) or,
ultimately, after 6 months of being used.
For the validator cleaning, perform the following steps:
1. Remove the validator and the metallic insulation screen cover as shown in
paragraph 10 a.
2. With the help of a screwdriver (star), remove the three (3) screws holding the
validator plate.
9
23 / 32
3. Carefully, remove the plate from the validator
4. Clean all exposed surfaces (including the back of the validator coverage):
5. Use an alcoholic solution 96º (agentless polishes, or abrasives or
solvents which may damage plastic or metal)
6. Use a fibre tissue (do not use tissues with metallic components or that
can leave fibre traces)
7. Use the damp tissue with the solution for cleaning
8. In any case the tissue must be soaked in cleaning solution, this could
damage the device irreversibly
9. Do not immerse in any case any parts in any type of liquid, this could
damage it irreversibly
5. Clean the sensors and the exit coins channels at the validator bottom
24 / 32
6. Let the device to air dry for five (5) minutes (aprox.)
7. Replace the plate and fasten it with the three (3) screws
8. Replace the validator in its position as indicated at the end of the point 10 a.
b. Coins recycler
1.
2.
3.
4.
5.
Unplug the CashKeeper from the powerline (220V) and the USB connection
Open the main door and leave aside
Use the key to open the cashboxes closing access and remove it
Pull the coins cashbox, the coins recycler is located behind the coins cashbox
With the key, open the locker that will allow you to remove the coin recycler
6. Rise the bottom shooter and pull the recycler forward
25 / 32
7. Remove the recycler lid by sliding it backwards
8. Completely remove all the coins from the recycler
9. Put the recycler upside down and with the help of a soft brush, clean the inside dirt.
For maximum effectiveness, perform the operation in different positions of the
inner plate (it can manually be turned)
10. Remove dirt from the two front validator exits using the brush
11. Refill the recycler with the coins
12. Reclose the recycler lid. Make sure that it is properly closed, otherwise, the recycler
will not work
13. Replace the recycler on the support guides and push it until the end
14. Ensure that the coin recycler is located on its site, the bottom latch must be
dropped completely
15. Close the locker device with the key
16. Rearm the coins cashbox and replace it
17. Replace the cashboxes closing access and close it
18. Replace the main door and close it
19. Plug the CashKeeper to the powerline (220V) and the USB connection
26 / 32
c. Notes validator
The note validator is designed to prevent damage from environmental pollution on
optical sensors or notes drag mechanisms. However, as the device operating
environments can be very variable, as well as the concentrations of dust and/or other
elements in the ambient air, preventive cleanings are recommended with a biannual
periods (minimum).
1. Unplug the CashKeeper from the powerline (220V) and the USB connection
2. Open the main door and leave aside
3. Press the lower trigger of the validator head and with one hand holding the base,
with the same hand that presses the trigger, pull the head firmly
4. Open the validator head by sliding the top flange (silver) forward and lifting the lid
5. With the help of a fibre tissue, clean the internal parts of the validator:
10. ¡WARNING! Do not use solvents cleaners with any kind of
ALCOHOL (methanol, ethanol,...), oil, abrasive cleaners or
lubricants
11. Use a mild soap solution (very dilute)
12. Slightly dampen the tissue with the solution and clean the inside of the
validator
6. Once cleaned, wipe any remaining moisture with a soft and dry cloth. Be especially
careful with optical sensors areas (rear areas covered with transparent plastic), any
rest or impurity, can cause errors in the device operation.
27 / 32
7. Close the head (until it clicks)
8. Place the back of the head on its support
9. Slide the head back until it is securely fastened with the recycler (You should hear
a 'clack' at the moment that is fastened)
10. Replace the main door and close it
11. Plug the CashKeeper to the powerline (220V) and the USB connection
d. Notes recycler
Due to design characteristics, the notes recycler is a unit sealed and totally
inaccessible, therefore, does not require maintenance cleaning because it is not
possible.
28 / 32
12. SPARE PARTS AND OPTIONS
a. Additional cashboxes
There is the possibility of having more than one notes and coins cashboxes to make
proceeds without draining them to replace them. Simply remove the cashbox full and
replace it with an empty one.
Ask your additional cashboxes and check the prices to your dealer.
Additional note cashbox
o Note cashbox
o Security lock
o Keys
Additional coins cashbox
o Coins cashbox
o Security lock
o Keys
ref. R-06-CBB (includes)
ref. R-09-CBC (includes)
b. Bowlers control
Now you can order serial bowlers to your CashKeeper ® if you don't want to have
different keys to the access to the internal device and to the cashboxes, or access to
different devices.
Ask your bowlers and consult prices to your dealer.
Additional bowler
ref. R-15-LCK (includes)
o N bowlers (where N is the bowlers ordered quantity)
o Key set per bowler
29 / 32
13. WARRANTY
Terms and Warranty Conditions
This product has been subject to the most rigorous quality controls before leaving factory.
However, if there are any problems due to assembling and/or defective parts in origin, please read
carefully these terms of guarantee and get contact your dealer.
Warranty Conditions
CashKeeper S.L. guarantees that the product you have purchased (through an authorized dealer),
does not contain any defect in its components or its functioning under normal circumstances of use
as specified within the 'User Manual' of the same.
The warranty begins on the date of the product purchase and it will least during the next 2 (two)
years.
During the warranty period, CashKeeper S.L. ...
Will repair or replace, with the client agreement, those parts that due to defects in their manufacture
or mistakes in the assembling process may cause a malfunction of the product.
The repair or replacement of components won’t have any additional charge for the client
when intervention is carried out on the CashKeeper S.L. factory (or where CashKeeper S.L.
delegate intervention), assumed by the client the transport cost of sending and returning
the product.
ATTENTION: in case the client need to send the device to a centre appointed by
CashKeeper S.L., this should be very well packed, preferably in its original packaging. The
customer is responsible for that. CashKeeper S.L. will not be responsible for any damage
caused during transport.
Where the repair or replacement of components takes place at the customer's installations, are
exempted from charge the cost of the components, but not the amount corresponding to the
workmanship of the technical service, as well as displacement or possible additional charges
resulting from the intervention, which will be paid by the customer.
All components replaced during the interventions under this warranty shall become property of
CashKeeper S.L.
The warranty will not be valid in the following cases:
This warranty covers only those defects that come as a result of normal use of the product and not
those due to:
a) The product has not been installed or used according to the manual enclosed and it has not
followed the recommendations, warnings and maintenance listed in the same.
b) The product has been modified or dismantled partially or totally; or it has been handled
carelessly.
c) The product has suffered damages attributable to the consumer, third parties (including theft) or
technical services not authorized by CashKeeper S.L.
d) The product has damage by use or conservation outside normal parameters.
30 / 32
e) Policy and product data does not match the registered or have been altered or removed from its
place.
This warranty does not cover:
a) Any kind (tangible and intangible) damage resulting from accidents such as fire or other
phenomena such as: flooding, tremors, electric shock, increases and decreases stress, theft, etc.
b) Damage resulting through use of any of its components
c) Regular cleaning services, which shall be done by the customer and will be needed to ensure the
good functioning of the product
d) Damage caused by the use of parts not manufactured or not sold by CashKeeper S.L.
e) Damage or data loss caused by malfunction of the product, from the own client computer (point of
sale) or the approved software to manage the CashKeeper operation.
Costs outside of warranty:
When the warranty has expired, the transport and repair costs are paid by the customer.
Register your product:
You can register your product sending the given documentation on the device packaging, duly
completed to:
CASHKEEPER S.L.
Apartado de correos 1
17230 Palamós (Girona)
ESPAÑA
Warranty limits
EXCEPT AS PROVIDED IN WARRANTY, UNDER NO CIRCUMSTANCE CASHKEEPER S.L. WILL BE
RESPONSIBLE FOR ANY DIRECT OR INDIRECT DAMAGES (INCLUDING, WITHOUT LIMITATION, DATA
LOSS OR PROFITS LOSS) OR FOR ANY DAMAGE OR PREJUDICE THAT IS A DIRECT CONSEQUENCE
OR INDIRECTLY COMING FROM THE USE OR MALFUNCTION OF THE PRODUCT, AT ANY BASIS FOR
THE CLAIM (CONTRACTUAL OR EXTRA-CONTRACTUAL).
31 / 32
14. TECHNICAL SERVICE AND CUSTOMER ATTENTION SERVICE
For assistance and technical support you must please contact your dealer or authorised technical
service appointed by your dealer.
CashKeeper S.L. does not provide direct customer service, unless there is a maintenance contract
between CashKeeper S.L. and the client.
32 / 32