1
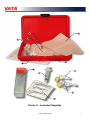
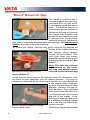
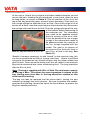
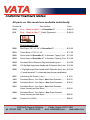
Port - “Body in a Box”™ - 5010
User’s Manual
308 South Sequoia Parkway | Canby, Oregon 97013 USA
ph. 503.651.5050 | fax 503.651.5052 | email [email protected] | www.vatainc.com
Thank you for purchasing VATA’s Port - “Body in a Box”™ Model 5010.
This compact, lightweight and easy to use model is great for teaching,
training, skills assessment and competency verification.
Please carefully read the entire User’s Manual before using the model to
insure you understand the proper care and use of this device. This will
also avoid situations that may not be covered by the warranty and enable
you get the maximum benefit from this model.
This model is made with VATA’s custom developed material,
Dermalike II™. This material, when used according to the instructions,
offers many unique and improved properties.
Some of these properties are:
• Does not have an “oily” surface.
• Reduced drag/resistance on the needle when accessing - you no longer
have to force the needle through tough material, which results in a much more realistic experience.
• Improved tear resistance, extending the useful life of the product.
• Feels and palpates like human tissue for a more realistic learning experience.
• Stain resistant.
Note: Do not place the Dermalike II™ Tissue Flap in contact with products made of vinyl or PVC for prolonged periods of time as the chemicals
in them will cause degradation of the material.
Port - “Body in a Box”™ Model 5010
Contents
1
2
3
4
5
6
7
8
9
10
11
12
13
2
Tissue Block
Tissue Flap of Dermalike II™
Port - Shown inverted in storage position
Round Insert of Dermalike II™ Used to Simulate a “Tipping” Port
Round Insert of Dermalike II™ Used to Simulate a “Floating” Port
Simulated Blood Reservoir Bag with 35cc of “Blood” –
See Photo 8 - Not visible as contained in tissue block
Needle-guard – See Photo 8 Not visible as contained in tissue block
Included supplies – See Photo 2 labeled Included Supplies
3/4” Right Angle Huber Needle with 8” Extension Set
1” Right Angle Huber Needle with 8” Extension Set
(1” needle has a red “X” on the snap clamp for easy identification)
3 Packs of Lubricating Gel Used with the “Floating” Insert
5cc Syringe
Supplies Container
www.vatainc.com
5
2
4
13
1
Photo 1 – Port - “Body in a Box”™ Model
5010
3
13
10
12
9
11
Photo 2 – Included Supplies
www.vatainc.com
3
Tissue Block and Tissue Flap
Accessing of the port can be done in the carrying case or with the tissue
block and skin flap removed from the case, see Photo 3A & 3B. The
port can be positioned anywhere on the surface of the tissue block for
accessing. This is currently the only model that comes with a real port for
practicing.
With this model, it is possible to
simulate accessing a “tipping” port,
a “floating” port and a normally
placed port. Successful access is
confirmed by a “blood” return, as
the unit has its own fluid reservoir
bag neatly tucked inside the tissue
block. The reservoir bag is supplied
with 35cc of simulated blood and
has a maximum capacity of 60cc.
Later in this manual, the technique
to remove or add air or fluid in the
bag is addressed.
Photo 3A – Accessing port in case
There are two round inserts that can be used to simulate difficult accessing placements, which is beneficial when the model is used for skills’ or
competency assessment. To vary the experience, these two inserts are
interchangeable. In addition, the tissue block can be rotated 180 degrees,
with the port catheter entering the
tissue block at the bottom instead
of the top. This orientation would
change the position of the inserts
to the opposite side for an added
variation.
Photo 3B – Accessing port out of case
The tissue flap has two thicknesses
- half of the flap is 1/4” thick and
the other half is 1/2” thick.
The 1/4” side will approximate
the feel when palpating a port at an average depth. The 1/2” side will
approximate the feel when palpating a deeply placed port. There are
port placements that are closer to the skin surface, however this model
does not address accessing these as they are more easily visualized and
accessed.
There are two different length right angle Huber needles supplied with
your model - a 3/4” for use when accessing the 1/4” thick side of the
tissue flap and a 1” for use when accessing the 1/2” thick side. There
is a red “X” on the snap clamp of the 1” needle for easy identification.
Replacement Huber needles are available from VATA. See Replacement
Parts on the back page of User’s Manual.
4
www.vatainc.com
The insert used to simulate a
“tipping” port has a deep, long
recess. The port is placed in the
insert, as shown in Photo 4, and
the tissue flap is placed over the
port. When palpating for the port,
the feel will be similar to that of a
“tipping” port. See Photo 4.
When using the dished/concave
insert, liberally apply the supplied
Photo 4 – Round insert to simulate
lubricating gel to the top and
a “tipping” port
bottom of the port, place the port
on the insert and cover with the
tissue flap, as shown in Photo 5. When the port is palpated, the feel will be
that of a “floating” port or one that was placed in adipose tissue or has
lost a couple of anchoring sutures. The port will slide around as you try
to palpate it and a three-finger
technique may be used to stabilize the port as you access.
The gel cleans up well with soap
and water. Replacement packets are available from VATA. See
Replacement Parts on the back
page of User’s Manual.
Remember that either the 1/2”
thick or the 1/4” thick side of the
tissue flap can be utilized with
the difficult inserts described
above.
Photo 5 – Round insert to simulate a
“floating” port
Note: It is important that the port be inverted and returned to the
recessed storage area molded in the tissue block, see Photo 6, when
the model is not in use as storage of the port in any other
position can cause a permanent
deformation in the Dermalike
II™ tissue flap. Should this
happen, move the port to the
proper storage position. Over
the next 72 hours you will see
most of the improvement that
is possible.
Photo 6 – Correct storage position for port
www.vatainc.com
5
“Blood” Reservoir Bag
The model is supplied with a
simulated blood reservoir bag,
containing 35cc of fluid which
is positioned inside the tissue
block. The reservoir bag has a
white needle-guard attached to
the top of the bag to minimize
the chance that a needle that
missed the port would puncture
it, causing a leak. In the unlikely
Photo 7 – Reservoir bag removal
event this did occur, remove the
bag, drain it, and order a replacement reservoir bag. See Replacement
Parts on the back of the User’s Manual.
To remove the “blood” reservoir bag, gently separate the opening on
the top of the model where the
port catheter tubing appears
to enter the tissue block. With
your index finger and thumb,
grasp the bag and needle-guard
and gently pull the bag out. See
Photo 7.
Photo 8 Reservoir bag with excess air
Note: The port and catheter
are attached to the reservoir bag and should remain
attached to the reservoir bag
as you remove it.
Under normal circumstances the reservoir bag will not require care,
but there are two conditions that will require attention. If a bulge or
hardness is observed on the tissue block surface, or if you observe air
in the syringe when withdrawing fluid, the fluid bag will need
attention. Remove the bag as
outlined before. Once removed
there are several functions that
can be performed with the fluid
bag out of the model. If the
fluid bag is “bloated” due to air
or additional fluid being infused
into it, the bag will need to be
partially drained.
Photo 9 – Correct orientation of reservoir
bag for air/fluid removal
6
With the syringe plunger pushed
www.vatainc.com
all the way in, attach the syringe to the Huber needle extension set and
access the port. Holding the accessed port in one hand, allow the bag
to hang below, as shown in Photo 9. This will position all the air at the
top of the bag permitting easy removal when aspirating. Draw back on
the syringe plunger to aspirate the air or fluid. Once the syringe is full of
excess air or fluid, close the snap clamp on the extension set, disconnect
the syringe and expel the air or fluid. Push the syringe plunger all the way
to the bottom before reattaching to
the extension set. This procedure
may need to be repeated several
times to remove all the air or fluid.
It may be beneficial to use a larger
syringe if the volume that needs to
be added exceeds the capacity of
the 5cc syringe supplied with the
model. The goal is to remove all
the excess air or fluid until there is
only 35cc of fluid in the bag. See
Photo 10 – Bag after removal of excess air
Photo 10.
Should it become necessary to add “blood” to the reservoir bag, this
can be accomplished by filling a syringe with fluid. Attach a pre-filled
syringe to the extension set, access the port with the Huber needle and
gently infuse. Take care not to infuse air as this will collect in the reservoir
bag and be observed later when withdrawing fluid. The bag should be
filled to 35cc of fluid.
Note: The bag is supplied with 35cc of fluid. The maximum capacity
of the bag is 60cc. This allows for some expansion in volume of the
bag. Having more than 60cc in the bag should be avoided as this
could result in leaking.
The bag can then be replaced into the tissue block, routing the port
catheter up through the small channel. Be sure to position the needleguard on the fluid bag, toward the top of the tissue block, to protect the
bag from needle punctures.
www.vatainc.com
7
All parts on this model are available individually.
Product #
Description
Price
5010
Port - “Body in a Box”™ of Dermalike II™....................... $184.00
5011
Port - “Body in a Box”™ Darkly Pigmented....................... $184.00
5011
Replacement Parts
5020
Skin Flap 6 7/8” X 5 1/4” of Dermalike II™.......................... $ 69.00
5021
Tissue Block 6 7/8” X 5 1/4” ............................................... $ 77.00
5022
Round Insert of Dermalike II™ to Simulate “Tipping” Port.... $ 21.00
5023
Round Insert of Dermalike II™ to Simulate “Floating” Port .. $ 21.00
5024
Simulated Blood Reservoir Bag with Needle-guard............. $ 24.00
5025
3/4” 20g Right Angle Huber Needle with 8” Extension Set (1 doz.)..$ 20.00
5026
1” 20g Right Angle Huber Needle with 8” Extension Set (1 doz.).$ 20.00
(1” needle has a red “X” on the snap clamp for easy identification)
5027
Lubricating Gel Packs (1 doz.)............................................. $ 9.00
1491
Simulated Blood - One Quart - New Stain Resistant........... $12.55
1494
Simulated Blood - One Gallon - New Stain Resistant.......... $18.95
2491
Simulated Blood - One Quart - New Stain Resistant
Same Viscosity as Real Blood............................................. $16.20
2494
Simulated Blood - One Gallon - New Stain Resistant
Same Viscosity as Real Blood............................................. $26.80
0406
Practice Port (IVAD)............................................................. $69.00
308 South Sequoia Parkway | Canby, Oregon 97013 USA
ph. 503.651.5050 | fax 503.651.5052 | email [email protected] | www.vatainc.com