1
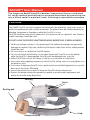
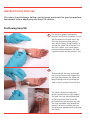
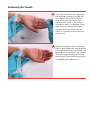
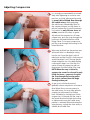
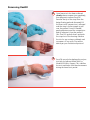
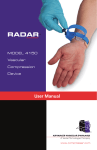
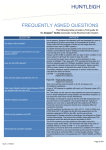
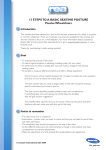
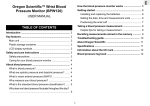
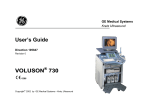
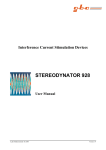
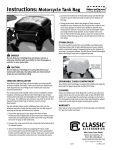
RADAR
™
EASYCLIK™
MODEL 4180
Vascular
Compression
Device
User Manual
www.compressar.com
RADAR™ User Manual
The single-use RadAR EasyClik Vascular Compression Device is indicated
for use by medical professionals to promote hemostasis at a puncture site
into a blood vessel in a patient’s arm, following a cannulation procedure.
CAUTION:
The RadAR EasyClik Vascular Compression Device must be applied by a physician, nurse or
technician experienced with vascular procedures. The patient must be checked regularly for
bleeding, hematoma or thrombosis while the EasyClik is in use.
EasyClik should be used only for hemostasis of a puncture site on a patient’s arm. Sterile or
aseptic technique should be used.
DO NOT LEAVE THE PATIENT UNATTENDED WHILE HEMOSTASIS IS BEING ACHIEVED.
• Sterility of package contents is not guaranteed if the individual packages are previously
damaged or opened. Only new, sterile EasyClik devices taken from factory-sealed pouches
should be used.
• Do not re-use or re-sterilize the EasyClik devices.
• Do not use alcohol, disinfectants, or any other liquids with EasyClik or on the patient
while the EasyClik is being applied. EasyClik must be deployed onto a dry site.
• Federal (USA) law restricts this device to sale by or on the order of a physician.
• Use caution when applying compression with EasyClik, taking care not to overtighten it on the patient’s wrist.
• Use caution if deploying EasyClik onto a patient with uncontrolled hypertension or systolic pressure of more than 180mmHg.
• Instruct the patient not to touch or bump the EasyClik during compression.
• Monitor the patient during the compression period to ensure proper deployment and
patent distal radial artery blood flow.
housing
levers
floating pad
compression pad
strap
INSTRUCTIONS FOR USE
Clinicians should always follow institutional protocols for post-procedure
hemostasis when deploying the EasyClik device.
Positioning EasyClik
1
Use sterile or aseptic technique to
remove EasyClik from the pouch. Ensure
that the puncture site and area is dry.
Place the strap around the patient’s
arm, with the levers facing laterally, i.e.
towards the radial side of the wrist. At
the user’s option, a dry sterile gauze
pad may be placed between the clear
compression pad and the patient’s skin.
2
Thread and pull the strap tip through
the housing. Position the compression
pad over the puncture site. Move the
beige floating cushion pad along the
strap so that it is placed over the ulna.
The sheath should seat under the
groove on the bottom of the compression pad. The front (distal) bleed hole
of the compression pad should be
positioned over the puncture site area.
The strap should be snug around the
patient’s wrist but occlusive pressure
should not be applied before removing
the sheath.
Removing the Sheath
3
Place your thumb over the compression
pad and begin pulling the sheath with
your opposite hand. Gently increase
the pressure over the compression
pad with your thumb as the sheath is
removed so there is no bleeding. Firmly
apply occlusive compression by pressing down with your thumb once the
sheath is completely removed from the
puncture site.
4
While pressing down firmly on the compression pad, tighten the strap by pulling
it through the housing so that there is no
bleeding from the puncture site. You may
then remove your thumb from the compression pad. There should be minimal or
no palpable distal radial pulse.
Adjusting Compression
5
It is strongly recommended that immediately after tightening to occlusive compression, an initial adjustment be made
to permit distal blood flow through
the radial artery. While palpating
the radial artery immediately distal to
the compression pad, use the levers to
release compression in small increments.
Use caution to only lift one lever at
a time, one after the other, to gradually release the compression. At lower
compression, push the strap through the
housing in the medial direction while
lifting a lever. To increase compression,
pull the strap through the housing in the
lateral direction.
6
Wipe away any blood from the puncture area
and ensure there is no bleeding or oozing
from the site. Ensure that there is a distal
radial pulse and that EasyClik is firmly secured
around the patient’s wrist. The strap may be
tucked through the slot of the beige floating
cushion pad to keep it out of the way. Use
caution to keep the compression pad over
the puncture site while tucking in the strap.
NOTE: When the strap is tucked in,
compression cannot be released by only
lifting the levers—you must also push
the strap through the housing unless
the strap is removed from the beige
floating cushion pad.
7
As per your institutional protocol,
gradually release compression to increase
distal blood flow to ensure patency in
the radial artery. You may make periodic
compression adjustments by lifting a
lever. If bleeding or oozing occurs while
compression is released, pull the strap in
the lateral direction through the housing
to tighten and ensure that radial artery
patency is achieved. When evaluating the
artery patency, occlude the ulnar artery to
validate distal radial flow.
Removing RadAR
8
9
Once hemostasis has been achieved
slowly release compression completely,
then prepare to remove EasyClik.
Remove the tip of the strap from the
beige floating pad and alternately lift
the levers until compression is released
and the strap is loose enough to pull
over the patient’s hand. If needed,
gently palpate around the compression
pad to separate it from the patient’s
skin. Then, lift up both levers and push
the strap out of the housing. Observe
the site for any oozing or rebleeds and
recompress if any occur. Discard the
device per your institutional protocol.
EasyClik may also be deployed in conjunction with the mBrace Model 4200 or
Model 4250 Wrist Support. This stabilizes
the wrist and helps avoid hand movement
during the hemostasis period.
Cautions
The RadAR EasyClik Vascular Compression Device device contains no user-repairable parts.
Contact your Advanced Vascular Dynamics representative for service and support. The EasyClik device, including its packaging, is not manufactured with natural rubber latex.
STERILE EO
Sterile symbol. This indicates that the RadAR EasyClik is sterilized
using ethylene oxide.
No re-use symbol. This indicates that the RadAR EasyClik is for single
use only and is not intended to be re-used.
Instruction symbol. This indicates that you must read the
accompanying instructions.
RADAR™ EASYCLIK™ LIMITED WARRANTY
The Advanced Vascular Dynamics RadAR EasyClik Vascular Compression Devices are warranted
against defective material and workmanship for one year following delivery of the product to
the original purchaser. If any Device or part thereof, in the judgment of Advanced Vascular Dynamics (AVD), is proven to be defective in material or workmanship during the limited warranty
period, such defects will be repaired or component or product replaced (at AVD’s option) free of
charge for parts or labor. Any replacement part may be new or refurbished and like-new parts.
This limited warranty shall not apply to any product which has not been used in accordance with
the manual, been misused, abused, altered or repaired by anyone other than AVD or its authorized representatives. This limited warranty does not cover EasyClik Devices which have been
reprocessed or re-used in any way. Use of anything other than new EasyClik Devices in previously
unopened factory sterile packaging immediately and permanently voids all warranties and AVD
shall not be liable to any person for any indirect or direct consequential damages resulting from
or caused by any defect, failure, or malfunction of such Devices or any component thereof.
This limited warranty is in lieu of, and AVD specifically disclaims, all other warranties, express
or implied, including any implied warranty of merchantability or fitness for a particular purpose, and AVD shall in no event be liable to any person for indirect, direct, incidental, special or
consequential damages of any kind or character. No person is authorized to assume for AVD any
other liability in connection with the sale of this EasyClik Device or its components. Some states
or countries do not allow the exclusion or limitation of incidental or consequential damages or
allow limitations on how long a limited warranty lasts, so the above limitations or exclusions may
not apply to you. This limited warranty gives you specific legal rights, and you may also have
other rights that vary from state to state or country to country.
To obtain factory service, contact AVD request a Returned Goods Authorization, shipping instructions, and the ship-to address. The RadAR EasyClik is to be shipped, freight pre-paid. In-warranty
products will be returned to the sender, postage pre-paid.
Advanced Vascular Dynamics
Ph) +1-503-223-2333
Fax) +1-503-223-8585
Toll-Free USA) 1-800-525-2555
[email protected] www.compressar.com
EC REP
BISPING Medizintechnik GmbH
Reutershagweg 2, 52074 Aachen, Germany
Ph) +49-241-173518 Fax) +49-241-175627
[email protected]
www.bispingmed.de
Advanced Vascular Dynamics
4252 SE International Way, Suite F
Milwaukie, Oregon 97222 USA
Ph) +1-503-223-2333 Fax) +1-503-223-8585
www.compressar.com
Semler Technologies, Inc
0470
RADAR
™
EASYCLIK™
Advanced Vascular Dynamics®, AVD™, the logos, RadAR™,
EasyClik™, and Semler Technologies are trademarks or registered
trademarks of Semler Technologies, Inc.
RadAR EasyClik User Manual. Manual number 061-4180-00 rev. A
September, 2013
Order RadAR EasyClik using part #140-0180-00.
RadAR EasyClik devices are made in the USA. Patents pending.
Copyright © 2013 Semler Technologies, Inc. All rights reserved