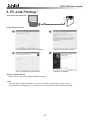
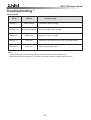
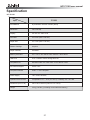
1
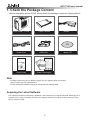
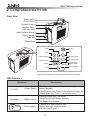
HiTi
User Manual
www.hiti.com
HiTi P110S user manual
General Information
Copyrights
All rights reserved. The information contained in this user guide is subject to change without notice. HiTi Digital,
Inc. makes no warranty with regard to the material, including, but not limited to, the implied warranties of merchantability and fitness for a particular purpose. HiTi Digital, Inc. will not be liable for errors contained herein or for
incidental or consequential damages in connection with the furnishing, performance, or use of the material.
Safety Precautions
1. Never attempt to disassemble or modify the printer. Doing so may lead to electric shock or printer malfunction.
2. Do not allow liquids near the printer, which may lead to electric shock or fire.
3. Do not use the printer if the printer body is damaged.
4. Avoid plugging the printer into a socket being used by couple appliances.
5. Do not place the printer on an unstable cart, stand, or table.
6. Make sure the printer is operated under the type of power indicated on the marking label. If you are not sure
the type of power, please consult your dealer or local power company for detail.
7. Do not block the air vents to protect the printer from overheating.
8. Do not insert or drop metallic, flammable, or other foreign substances into the machine.
9. Always unplug the printer for servicing.
10. An approved power cord greater or equal H05VV-F, 2X or 3G, 0.75mm 2 must be used.
FCC Notice
Do not make any changes or modifications to the equipment unless otherwise specified in the instruction.
This equipment has been tested and found to comply with the limits f
or a Class B digital device, pursuant to Part 15 of the FCC Rules. These limits are designed to provide reasonable
protection against harmful interference in a residential installation. This equipment generates, uses, and can
radiate radio frequency energy and, if not installed and used in accordance with the instructions, may cause harmful interference to radio communications. Hwever, there is no guarantee that interference will not occur in a particular installation. If this equipment does cause harmful interference to radio or television reception, which can be
determined by turning the equipment off and on, the user is encouraged to try to correct the interference by one or
more of the following measures:
Ȟ1ȟReorient or relocate the receiving antenna.
Ȟ2ȟIncrease the separation between the equipment and receiver.
Ȟ3ȟNever push objects into this equipment through cabinet openings, which may touch dangerous voltage points
or short out parts that could lead to a fire or electric shock.
Ȟ4ȟNever spill liquid on this equipment.
Ȟ5ȟConnect the equipment into an outlet on a circuit difference from that to which the receiver is connected.
Trademarks
Microsoft, MS-DOS, and Windows are registered trademarks of Microsoft Corporation. Adobe and Acrobat are
registered trademarks of Adobe Systems Incorporated. Mac, Macintosh, and Mac OS are trademarks of Apple
Computer, Inc., registered in the U.S. and other countries. Pentium is a U.S. trademark of Intel Corporation.
All other trademarks or registered trademarks are properties of their respective companies.
i
HiTi P110S user manual
Table of Content
General Inofrmation
i
ƦCopyrights
ƦSafety Precautions
ƦFCC Notice
ƦTrademarks
i
i
i
i
1. Check the Package Content
2
ƦAcquiring the Latest Software
2
2. Comprehend P110S
3
ƦFront view
ƦLED indicators 3
ƦBack view
ƦInternal view
ƦOptional Consumables
Photo Print Pack
ƦOptional Accessories
Battery Pack
Carrying Bag
Cleaning Kit
3
3
4
4
4
4
3. Installing P110S
5
ƦInstalling the Ribbon Cartridge
ƦLoading the Photo Paper
ƦPowering Up the Printer
Powering Up the Printer with the AC adapter
Powering Up the Printer with the Fully Charged Battery Pack(Optional)
4. Using the Battery Pack (Optional)
5
5
6
7
ƦPowering Up the Printer with the Battery Pack
ƦHandling of the Battery Pack
7
7
5. Standalone Printing
9
ƦPrint Photos Without a PC
ƦHome Menu Introduction
ƦMain Function Introduction
Quick Print
Multiple Print
Print All
ID Photo
Event Photo
Setup
10
11
11
ƦPrinter Setting
ƦPrintout Setting
ƦSpecial Function Introduction
Shortcut editing
Template setting
Cleaning mode
Print Count
PIN Code
LCD Adjustment
Color Setting
Image Adjuster & Enhancer
Power Management
18
6. PC-Link Printing
25
ƦConnecting the PC and Printer
ƦInstalling the Printer Driver
ƦInstalling the iDQuickDesiree
25
25
25
7. Troubleshooting
26
ƦIndicator Status
26
8. P110S Specification
27
9. Customer Service Information
28
ƦOnline Support
ƦGlobal Sites
28
28
1
HiTi P110S user manual
1. Check the Package Content
Before using photo printer P110S, please check the package content for following items*:
Photo Printer - P110S
Paper Cassette
Power Cord
USB Cable
Quick Guide
* Printer Cleaning Kit
Adapter
Master CD
Note
* Package content may vary in different regions. For any question about your printer,
please contact your HiTi representative
* Printer Cleaning Kit includes cleaning kit user guide and cleaning paper.
Acquiring the Latest Software
HiTi website provides the latest driver, application, user manual etc for users to download. Please log on to
www.hiti.com for more information. If there is any question toward HiTi product, please contact your local
service center for detail.
2
HiTi P110S user manual
2. Comprehend the P110S
Front View
Power Switch
2.5” LCD Panel
Function Buttons
Memory Card /
USB host Slots
Paper Cassette Button
Paper Cassette
Paper Exit
Ribbon Door
Power
EDIT
OK
ESC
Directional Pad
Directional Pad
Directional Pad
Directional Pad
Printer Status
Battery Status
Hot Key
Printing Status
Print
Note: Users are allowed to select favored ID formats as shortcuts.
LED indicators
Indications
(Printer Status)
Descriptions
Flashing red light: Error (# of blinks following the
factory standard)
Flashing green light: Power on but printer not ready yet
Steady green light: Power on and printer ready
(Battery status)
Flashing orange light: Low battery
Steady orange light: Battery charging
Off: Battery fully charged
(Printing status)
Flashing blue light: Ready to print
Steady blue light: Printing in action
Off: Not ready to print
3
HiTi P110S user manual
Back View
Internal View
Back Panel
Release Button
Battery Slot
Back Panel
Paper Guide
Door
USB Socket
Battery Lever
Power Socket
Optional Consumables
Photo Paper / Stickers*
Ribbon
x 60 sheets
x 1 cartridge
Note
1. It is recommended to load no more than 50 sheets of stickers into the cassette.
2. Do NOT roll the ribbon manually to prevent the ribbon skip.
3. Be sure to bend the perforated strip down from the printable side and then bend up to tear off completely.
(See below illustration)
A
B
Optional Accessories
ƦBattery Pack
ƦCarrying Bag
ƦCleaning Kit
4
C
HiTi P110S user manual
3. Installing the P110S
Remove the Cushion Inside the P110S Before Using the Printer
Be sure to remover
the cushion inside
P110S before
using.
Users may keep the
cushion for protection
during transportation.
Installing the Ribbon Cartridge
Open the ribbon door and install the ribbon cartridge, then close the ribbon door
Insert the ribbon
cartridge.
Open the ribbon door
Loading the Photo Paper
1. Follow the instruction marked on the plastic bag for correct paper handling
wider strip
2. Press the paper cassette button to release the paper cassette. Load photo papers into the paper cassette
and then close the cover
Load photo papers into the
paper cassette and then
close the cover, insert the
paper cassette into the slot.
Press the paper
cassette button to
release the paper
cassette.
Ɏ4”x6” photo paper and 4”x6”
sticker (1x1) are both
compatible with P110S.
It is recommended to load no
more than 50 sheets of stickers
into the cassette.
5
HiTi P110S user manual
Power up the Printer
Power up the printer with AC adapter
Connect the adapter and the power cord,
and plug into the printer and power slot.
Turn on the power.
(Optional) Power up the printer with the fully charged battery pack.
Press back panel release
button.
Insert battery into
battery slot.
Turn on the power.
Note
1. Printer will be automatically turned off when cease working for a period of time (user defined).
2. To charge the battery pack, see user manual for detail.
Caution: Please do not remove the power cord during the printing operation even
when the presence of the battery. Ribbon/Paper jam may occur.
6
HiTi P110S user manual
4. Using the Battery Pack*
Power up the Printer with the fully charged battery pack
ƦPress back panel release button.
ƦInsert battery into battery slot.
ƦTurn on the power.
* Note
1. Printer will be automatically turned off when cease working for a period of time (user defineable), see Special
Function/ Power Management for detail.
2. As to save battery energy, please refer to Special Function/ Power Management.
Handling of the Battery Pack
1. Checking the battery status
Indication
Description
Fully-charged battery.
To use the printer for a long time, we recommend using fully-charged battery or
recharging the battery before using.
Low battery power.
Operations other than printing are possible. Change it with a fully charged battery or
recharge the battery pack with the printer’s compact power adapter immediately.
The adaptor is connected.
7
HiTi P110S user manual
2. Proper Usage and Handling
1. Do not use the battery pack in products other than those recommended by HiTi.
2. Do not attempt to open the battery pack.
3. Never make the battery pack short circuited. The battery pack may be easily short-circuited by putting them on
conductive material.
4. Seal break may cause electrolyte leakage which may lead to short circuit, smoke emission, bursting and/or
ignition.
5. Store or charge the battery pack at low temperature ( below 20? is recommended, see “Specification” session
for detail ), low humidity, no dust and no corrosive gas atmosphere, not in direct sunlight or close to a heating
source.
6. It’s recommended to recharge the battery packs periodically for more than 6 months storage.
3. Charging the Battery Pack
1. Be sure to use only Hiti P110S printer or PBC-110 charger to recharge the battery pack.
2. To fully charge the battery pack, you need to insert the battery pack into P110S printer or PBC-110 charger and
plug in the compatible adapter, with continuous electricity supply, it takes approximately 3.5 hours on P110S
and 2 hours on PBC-110 charger.
ƦHiTi recommends to recharge the battery pack in a temperature of 0~+40ƫ (41~104ƭ)
ƦCharging time varies according to the ambient temperature and charge state.
ƦThis battery pack is a Li-ion battery pack, no need to discharge it completely before recharging.
3. Fully charge the battery before first use.
4. To ensure of using a fully charged battery pack, it is recommended to charge the battery pack till it’s fully
charged before using.
ƦThe battery pack discharges naturally.
5. The battery pack capacity may diminish substantially after a period of using time.
ƦAfter approximately 200 times of recharging, the fully recharged capacity may drop to 70% in normal operating
8
HiTi P110S user manual
5. Standalone Printing
Printing Photos Without a PC
1. Distinguish the type of memory card
CompactFlash
Memory Stick (MS)
Memory Stick Pro (MS Pro)
Compact Flash (CF) & Micro drive
Secure Digital (SD)
For smaller memory cards such as Memory Stick Duo, please use appropriate adapter card in order to
be used on the P110S. Please contact your memory card manufacturer for more detail.
2. Insert memory card *
SD/SDHC
MS / MS Pro
Top side facing up
CompactFlash
Top
Com
pac
tFla
sh
Bottom
For smaller memory cards such as Memory Stick Duo, please use appropriate adapter card in order to be used
on the P110S. Please contact your memory card manufacturer for more detail.
9
HiTi P110S user manual
3. Print your first photo without a PC
A. Install ribbon cartridge
(Please see ‘Installing P110S’ for detail)
B. Load photo papers
(Please see ‘Installing P110S’ for detail)
C. Power up the printer
(Please see ‘Installing P110S’ for detail)
Co
m
pac
D. Insert memory card or USB storage derie
(Please see ‘Inserting the memory card’ for detail)
E. Print photos
(Please see ‘Quick Print’ on pape 11)
10
tF
lash
HiTi P110S user manual
Home Menu Introduction
Border print on / off
eFrame selected
Date print on / off
Power saving mode on / off
DC in/ Battery
Image source/
Blue tooth detector
Quick print
Printing mode
Selected print
Setup
Setup
Description of Function
1. Quick Print
Printing one photo at a time without edition.
Quick Print
Choose Quick Print, and press
(
) to continue.
Note that Quick Print function
does not allow user to edit the
photo selected.
001
002
003
004
ESC
OK
Select a photo, and then press
(
) or (
) to start printing.
11
The image is being printed.
HiTi P110S user manual
2. Multiple Print
Batch processing for more than one image or additional copies are needed at a time.
A. Selected Print
1
Multiple print
2
3
001
003
M u lQuick
t i p l ePrint
print
ESC
SELECTED PRINT
Choose MULTIPLE PHOTO,
and press (
) to continue.
4
Select Selected Print, and then
press (
) to continue.
5
001
002
002
004
EDIT
OK
Pick a photo for output, and
then press (
) to continue
or press [EDIT] to start editing.
As to how to edit photos,
please see Special Function
Introduction for detail.
6
x01
003
01
ESC
OK
Use directional button to
determine the number of copies,
and then press (
) to go back
image navigator.
004
ESC
EDIT
OK
The number of copies chosen is
displayed at lower right corner.
Repeat step 3 and step 4, when
everything is done, please press
(
) to start printing.
The images are being printed.
B. Print All
All of the images in the memory device will be printed.
Multiple print
Sure to print all ?
: 52
M u lQuick
t i p l ePrint
print
Choose MULTIPLE PHOTO,
and press (
) to continue.
PRINT ALL
Select Print All, and then press
(
) to continue. Note that
Print All furotion does not allow
user to edit individual photo.
12
ESC
OK
Confirm the number of total prints,
and press (
) or (
) to
start printing. Or press
(
) to go back.
HiTi P110S user manual
3. ID Photo
1
2
I Quick
D p hPrint
oto
ESC
Choose ID PHOTO, and press
(
) to continue.
3
001
A A A A
002
A
A
A
A A A A
A
A
A
A A A A
A
A
A
B
B
B
B B B B
003
ESC
004
Region
Asia pacific
China
Europe
India
Middle East/Africa
North America
South America
Select a desired region and
press (
) to continue.
5 001
4
003
OK
Select an ID format, and then
press (
) to continue.
OK
Region selection currently is only
available on the printer purchased
in North America and South America.
Only ID formats for North America
and South America are available now.
More ID formats will be provided in
the future.
ESC
OK
Load images into column
highlighted.
ESC
002
004
EDIT
OK
Select an image, and then press
(
) to continue.
7
6
X03
ESC
OK
Repeat step 3 and step 4 to
finish loading images into the
second column.
ESC
OK
* When all columns are filled,
please determine the number
of copies and press
(
) to start printing.
Note
ƦIt is allowed to change images loaded before by pressing [SWAP] when the selector aims at the image.
ƦIf your printer is in Event Photo mode, please refer to the [SETUP] part to switch to ID Photo mode.
ƦP110S ID formats are saved in the internal memory of the printer. User may freely delete the undesired ID
formats from the printer and add new formats from the ID Creator application software bundled.
ƦSelection in ID Photo will be memorized and applied to overall setting. You only have to make the selection
once unless you want to change to other region.
13
HiTi P110S user manual
4. Event Photo
E v Quick
e n t pPrint
hoto
Select “Event photo”, press
(
) to continue.
001
002
003
004
ESC
OK
Select an eFrame, and then
press (
) to continue.
Event photo
eFrame mode is on.
Note
ƦIf your printer is in ID Photo mode, please refer to the [SETUP] part to switch to Event Photo mode.
ƦPlease be noted that when the eFrame mode is on, all photo will be printed with eFrame automatically.
ƦeFrame can be enabled or disabled in Event Mode.
ƦP110S eFrame are saved in the internal memory of the printer. Users can freely add new or delete undesired
eFrames from the printer.
ƦPlease create eFrame via “eFrame convertor,” see the user guide of eFrame convertor for detail.
14
HiTi P110S user manual
5. Setup
A. Printer setting
Printer Setting
Setup
Mode switch
ID mode
Te m p l a t e s e t t i n g
Power management
Language
LinkPrint
Cleaning mode
Setup
PRINTER SETTING
Choose SETUP, and press
(
) to continue.
Printer Setting: Allows users to
set modes, template, power
management, language, LinkPrint,
cleaning mode, PIN code reset,
print count, and LCD adjustment.
Press OK to continue
Mode Switch: P110S has 2 built-in
modes which users can switch
freely. When “Event mode” is
chosen, you can see the icon
(
) in main menu.
Printer Setting
Printer Setting
Printer Setting
Mode switch
ID mode
Te m p l a t e s e t t i n g
Power management
Language
LinkPrint
Cleaning mode
Mode switch
ID mode
Te m p l a t e s e t t i n g
Power management
Language
LinkPrint
Cleaning mode
Mode switch
ID mode
Te m p l a t e s e t t i n g
Power management
Language
LinkPrint
Cleaning mode
ESC
Quick Print
OK
Template Setting: Choose
Template Setting and press
(
) to continue.
As to how to select a region,
load/ browse/delete template,
please see Special Function
Introduction for detail.
ESC
OK
Power Management: Choose
Power Management and press
(
) to continue.
As to how to set the power
saving setting, please see
Special Function Introduction
for detail.
Printer Setting
Printer Setting
Mode switch
ID mode
Te m p l a t e s e t t i n g
Power management
Language
LinkPrint
Cleaning mode
Mode switch
ID mode
Te m p l a t e s e t t i n g
Power management
Language
LinkPrint
Cleaning mode
ESC
Quick Print
OK
LinkPrint: Select the behavior of
USB host by choosing (
)
to use the USB device as a mass
storage device. Select (
)
when printing directly from
a camera.
ESC
OK
Language: Accessible languages
on P110S may vary from region
to region.
Press OK to enter the language
selection. Move up/down to the
desired language and press OK
to select. Then press ESC to
save the change and exit.
Printer Setting
Reset PIN Code
Counter
LCD adjustment
Print position
About
OK
Cleaning Mode: HiTi strongly
suggest users to utilize this
function frequently to keep the
printer in optimal condition.
Please follow the instruction
of the cleaning kit to proceed
the printer cleaning.
15
ESC
ESC
OK
PIN Code: The PIN code is used
to protect the print counter
against being erased.
As to how to set the PIN code,
please see Special Function
Introduction for detail.
HiTi P110S user manual
Printer Setting
ESC
OK
ESC
OK
LCD adjustment: Choose LCD
Adjustment and press (
) to
continue. As to how to adjust
LCD, please see Special
Function Introduction for detail.
Printer Setting
Reset PIN Code
Counter
LCD adjustment
Print position
About
Quick Print
Reset PIN Code
Counter
LCD adjustment
Print position
About
Reset PIN Code
Counter
LCD adjustment
Print position
About
Counter: User can see or
erase the accumulative print
count.
The PIN will be needed to zero
the current print count.
ESC
Printer Setting
Printer Setting
Reset PIN Code
Counter
LCD adjustment
Print position
About
OK
About: It displays information
about the current printer
firmware, color table version.
16
ESC
OK
Print position: User may adjust
horizontal position of printout via
this function.
Please follow the on screen
instruction to proceed.
HiTi P110S user manual
B. Printout setting
printout setting
Setup
color setting
I2O
black/white
border print
date print
Setup
Choose SETUP, and press
(
) to continue.
Printout Setting: Allows users to
set color setting and to enable or
disable I2O, black/white, border
print, and date print.
Press OK to contiune
printout setting
Quick Print
I2O: User can enable this
function to automatically
enhance the quality of printouts.
Move up/down and press
OK to select. Then press
(
) to enable/disable the
function.
ESC
OK
Black / White: The color tone will
simply change into black and
white by enabling this mode.
Move up/down and press OK
to select. Then press (
) to
enable/disable the function.
printout setting
color setting
I2O
black/white
border print
date print
ESC
Quick Print
printout setting
color setting
I2O
black/white
border print
date print
color setting
I2O
black/white
border print
date print
OK
OK
Date Print: To display the date
information of the printout.
When “Date Print” is enabled,
you can see the icon (
) in
main menu.
17
OK
Color Setting: To modify color
setting, process into editing.
As to how to edit color setting,
please see Special Function
Introduction for detail.
printout setting
color setting
I2O
black/white
border print
date print
ESC
ESC
Printout setting
ESC
OK
Border Print: The printouts will be
framed with borders.
Move up/down and press OK
to select. Then press (
) to
enable/disable the function.
When “Border Print” is
enabled, you can see the
icon (
) in main menu.
HiTi P110S user manual
Special Function Instruction
1. Shortcut setting
001
A A A A
001
002
A A A A
A A A A
003
Setup
ESC
In the home menu, press [EDIT]
to ID format shortcut list.
001
A A A A
A A A A
003
ESC
002
A
A
A
A
A
A
OK
Repeat step 2 and step 3 to finish
shortcut editing.
Note that users can freely
define up to 4 shortcuts.
OK
To edit a shortcut, press [EDIT] to
ID format list, then use directional
buttons to pick.
Note that to re-edit shortcuts
is allowed.
A A A A
002
A
A
A
A
A
A A A A
A
A
A
B B B B
B
B
B
OK
Press (
) to select the ID
format as a shortcut.
001
A
A
A A A A
A
A
A
A A A A
A A A A
A
A
A
A A A A
B B B B
B
B
B
ESC
004
OK
To get to a certain ID format
shortcut, use directional button
to pick and press (
).
Note
ƦOnly internal ID formats can be selected as shortcuts.
18
004
ESC
A
003
004
EDIT:select
EDIT:select
001
A
A A A A
003
004
002
A A A A
B B B B
003
ESC
002
A
A
A
A
A
A
004
EDIT:select
OK
To replace a certain ID format
shortcut, use directional buttons
to pick one shortcut and press
[EDIT], follow step 2 and 3 to
replace it.
“esc edit ok”
HiTi P110S user manual
2. Template setting
Setup
Printer Setting
Mode switch
ID mode
Te m p l a t e s e t t i n g
Power management
Language
LinkPrint
Cleaning mode
Setup
PRINTER SETTING
Choose SETUP, and press
(
) to continue.
Te m p l a t e s e t t i n g
Region
Browse
Load
Delete selected
Delete all
ESC
OK
Function of 'Region':
Use directional button to
select a region.
Choose Printer Setting, and
press (
) to continue.
* Region selection currently is only
available on the printer purchased
in North America and South America.
Only ID formats for North America and
South America are available now.
More ID formats will be provided in
the future.
*Selection in SETUP will be memorized
and applied to overall setting. You only
have to make the selection once unless
you want to change to other region.
Te m p l a t e s e t t i n g
Region
Browse
Load
Delete selected
Delete all
ESC
Te m p l a t e s e t t i n g
Region
Browse
Load
Delete selected
Delete all
Region
Browse
Load
Delete selected
Delete all
OK
Function of ‘Load’: Load
templates from image devices.
ESC
OK
Function of ‘Delete selected’:
Delete selected templates.
19
OK
Function of ‘Browse’:
Use directional button to select
an template.
Te m p l a t e s e t t i n g
Te m p l a t e s e t t i n g
Region
Browse
Load
Delete selected
Delete all
ESC
Template setting: Allows users to
select a region for the display of
ID format, browse, load, delete
selected or delete all ID formats
or eFrames.*
Users can set up either ID
formats or eFrames according
to the mode selected.
ESC
OK
Function of ‘Delete all’: Delete
all loaded templates.
HiTi P110S user manual
3. Cleaning Mode
Setup
Printer Setting
Mode switch
ID mode
Te m p l a t e s e t t i n g
Power management
Language
LinkPrint
Cleaning mode
Setup
PRINTER SETTING
Choose SETUP, and press
(
) to continue.
Choose Printer Setting, and press
(
) to continue.
Select Cleaning Mode and
press (
) to continue.
Note
ƦBefore the cleaning process begins, please remove the ribbon cartridge from the printer, and empty the
paper cassette.
ƦFollow the instruction of cleaning kit to remove the protective covers on both sides of cleaning paper and
insert the cleaning paper properly. Press (
) to start the cleaning job.
4. Printer Counter *
Setup
Counter
Print count : 01749
Setup
PRINTER SETTING
Choose SETUP, and press
(
) to continue.
ESC
Select Counter and press
(
) to continue.
Counter : It shows the number
of print counts.
It allows users to erase the
print counts if needed.
PIN Code
Counter
ERASE
Counter
Current code:
Print count : 00000
0 0 0 0
Erase ?
ESC
ERASE
To erase the print count: press
(
).
ESC
OK
Key in the PIN code and press
(
).
Note
ƦThe function of print count is designed for all photo applications.
20
ESC
ERASE
Confirm the erase command,
after deleting, print count will
be reset to 0.
HiTi P110S user manual
5. PIN Code
Setup
Printer Setting
Reset PIN Code
Counter
LCD adjustment
Print position
About
Setup
PRINTER SETTING
Choose SETUP, and press
(
) to continue.
Select PIN Code and press
(
) to continue.
Again:
0 4 0 5
0 4 0 5
OK
To reset PIN code, the current
code is required.
ESC
OK
Enter the new PIN code
PIN Code
Again:
0 4 0 5
PIN chacged.
ESC
PIN Code
New code:
0 0 0 0
OK
PIN code set notice: Confirms
the new PIN code when a new
PIN code is set.
21
OK
Users may reset PIN code or
determine if PIN code is required
when the printer reboots or
when a user tries to apply
printer setting.
PIN Code
PIN Code
Current code:
ESC
ESC
ESC
OK
Confirm the new PIN code
HiTi P110S user manual
6. LCD Adjustment
Setup
Printer Setting
Reset PIN Code
Counter
LCD adjustment
Print position
About
Setup
PRINTER SETTING
Choose SETUP, and press
(
) to continue.
Select Printer Setting and
press (
) to continue.
ESC
OK
Choose LCD Adjustment and
press (
) to continue.
Note
ƦPress (
) to leave and save custom settings, or select (
to restore default settings.
)
Brightness
Choose an item for LCD
adjustment. Note that in LCD
adjustment, only the properties
of Contrast, Brightness, Color
R/G, Color B/Y, Position, and
Default Setting can be adjusted.
7. Color Setting *
Setup
printout setting
color setting
I2O
black/white
border print
date print
Printout setting
Setup
Choose SETUP, and press
(
) to continue.
001
003
ESC
Select Printout Setting and press
(
) to continue.
ESC
Choose Color Setting and press
(
) to continue.
002
004
EDIT
OK
Select a reference image saved
in the memory card for color
calibration, then press
(
) to continue.
Color R/G
Note that in color setting,
only the properties of Contrast,
Brightness, Sharpness, Color
R/G and Color B/Y can be
adjusted.
Note
ƦBefore accessing the function of color setting, please insert a memory card into the memory card slot.
ƦPress (
) to leave and save custom settings, or select (
) to restore defult settings.
22
OK
HiTi P110S user manual
8. Image adjustor & enhancer
001
003
ESC
002
004
EDIT
OK
In the image navigator, select an
image and press [EDIT] to adjust
and enhance the selected image.
Contrast
Function of ‘Contrast’: Use
directional button to adjust the
contrast of output image.
ESC
OK
Select an image editing
function and press (
) to
start editing.
Move
Function of ‘Move’: Use
directional button to adjust the
position of output image.
Color R/G
Function of ‘Color R/G’: Use
directional button to adjust the
level of red or green.
Note
ƦPress (
) to leave and save custom settings, or select (
23
) to restore default settings.
HiTi P110S user manual
9. Power management*
Setup
Printer Setting
Mode switch
ID mode
Te m p l a t e s e t t i n g
Power management
Language
LinkPrint
Cleaning mode
Setup
PRINTER SETTING
Choose SETUP, and press
(
) to continue.
Select Printer Setting and
press (
) to continue.
Power management
ESC
Power management
LCD O ff
Since Printing
10 seconds
30 seconds
1 minutes
L C D off
A u t o P o w e r off
OK
Function of “LCD off”: Select
LCD off and press (
)
to continue.
ESC
Choose Power management
and press (
) to continue.
L C D off
A u t o P o w e r o ff
OK
Function of “LCD off”: Use
directional button to define the
printer standby time. LCD turned
off automatically when the
printer cease working for the
time defined.
ESC
OK
Function of “Auto power off”:
Select LCD off and press
(
) to continue.
A u t o p o w e r off
Always on
1 minute
2 minute
5 minute
ESC
OK
Function of “Auto power off’”
Use directional button to define
the printer standby time.
Printer power off automatically
when the printer cease working
for the time defined.
Note
ƦPower management is enabled only when the printer is powered by the (optional) battery pack.
ƦWhen the printer turns off LCD automatically, users can press any button to wake it up; when the printer
turns off automatically, users can only press power switch to waken it up.
ƦDefault setting of power management is “LCD turn off automatically after cease operating for one minute,
and power off automatically after cease operating for three minute.”
24
HiTi P110S user manual
6. PC-Link Printing *
Connect the PC and Printer
Install the Printer Driver
2
1
Insert the Mater CD to run the installation.
Power on the printer to continue.
4
3
The PC is installing the printer driver.
Installation completed.
Install the IDQuickDésirée
(Please see the user guide of IDQuickDésirée for detail.)
Note
ƦThis user guide provides instructions on how to successfully install the printer driver on a PC.
For instructions on printing by a PC, please refer to the user guide of IDQuickDésirée for detail.
25
HiTi P110S user manual
Troubleshooting *
Indicator Status
Status
Blinking x 1
Blinking x 2,3
Problem
Ribbon Missing
Unsupported Ribbon
Troubleshooting
Reinstall the ribbon cartridge.
Install the proper ribbon cartridge.
Blinking x 3
Ribbon Out
Replace the ribbon cartridge
Blinking x 4
Paper Out
Reinstall the photo papers and check consumables status.
Blinking x 5
Paper Jam
Remove the jammed paper.
Note
ƦIf the problems are not listed above, please contact HiTi service center nearest to you.
ƦNote that during printer operation, it is normal for the LCD controller to become warm to touch.
26
HiTi P110S user manual
Specification
HiTi P110S
Model
P110S
Spec
Print Method
Dye Diffusion Thermal Transfer (D2T2)
Resolution
300 x 300 dpi
Display
2.5 inch TFT Color LCD
Print Size
4 x 6 inch (100 x 152 mm)
Paper Size
4 x 7 inch (100 x 178 mm)
Ribbon Cartridge
60 prints
Paper Cassette
60 sheets
Memory Card Slot
CF I / CF II / SD / SDHC / MS / MS Pro / Micro Drive
USB Host
PTP / LinkPrint / Mass Storage Devices
Compatible OS
Windows 2000 / XP / Mac OS X 10.2 or above / Vista
File Format Support
JPEG / TIFF
Computer Interface
USB 1.1 / 2.0 Full speed
Power Supply
100 ~ 240V, 50/60Hz;
Operation Environment
Temperature: 5°C ~ 40°C (41~104°F) / Humidity: 20 ~ 75% RH
Dimension (W x H x D)
250 x 100 x 185 mm (9.84 x 3.9 x7.3 inch)
Weight
2.2kg (4.85 lbs) ( excluding consumable and battery)
27
HiTi P110S user manual
Power adapter
Model
Compact AC Adapter
Spec
Input Voltage
100v-240v, 50-60 Hz
Rated Output
DC 19.0 V / 2600 mAH
Operation Environment
Temperature: 0°C ~ 40°C (32~104°F) / Humidity: 20 ~ 80% RH
Dimension (W x H x D)
134 x 58 x 32 mm (5.28 x 2.28 x1.26 inch)
Weight
Approx. 1 kg (2.20 lbs)
(Optional) P110S Li-ion Battery Pack
Model
P110S Li-ion Battery Pack
Spec
Type
Lithium ion battery
Nominal Voltage /
Capacity
DC 19.0 V / 2600 mAH
Charge Cycles
Approx. 250 times
Number of Prints
Approx. 60 sheets (4 x 6 inch)
Operation Environment
Temperature: 5°C ~ 40°C (41~104°F) / Humidity: 40 ~ 90% RH
Storage Environment*
Temperature: -20°C ~ 60°C (-4~139°F) / Humidity:
40 ~ 90% RH for 1 month storage
Temperature: -20°C ~ 45°C (-4~113°F) / Humidity:
40 ~ 90% RH for 1 month storage
Temperature: -20°C ~ 25°C (-4~77°F) / Humidity:
40 ~ 90% RH for 1 month storage
Dimension (W x H x D)
139.3 X 60.5 X 23 mm (5.48 x 2.38 x 0.9 inch)
Weight
290 g (0.64 lbs)
* The remaining capacity may vary according to the storage environment.
Note
ƦUnder HiTi internal test conditions.
ƦThe above data may vary according to the printing environment and the image to be printed.
28
HiTi P110S user manual
Customer Service Information
Online Support
For further inquires, please log on to HiTi Digital, Inc. website at www.hiti.com where users can download free
updated drivers, applications, and latest e-templates.
Global Sites
Taiwan (Headquarters)
North America
HiTi Digital, Inc.
HiTi Digital America, Inc.
9F, No.225, Sec. 3, Beixin Rd., Xindian Dist.,
New Taipei City 231, Taiwan
727 Brea Canyon Rd. Suite#2 Walnut, CA 91789, USA
Tel: +1-909-594-0099
Fax: +1-909-598-0011
www.hiti.com/us
Tel: +886-2-2912-6268
Fax: +886-2-2912-6118
www.hiti.com
Europe Russia
Latin America
HiTi Digital Europe B.V.
HiTi Digital Inc. (Mexico)
Ekkersrijt 1331, 5692 AJ Son, The Netherlands
Tel: +31 4.99.46.28.60
Fax: +31 4.99.46.12.99
www.hiti.com
Agustín González de Cossio Str. #1 int. 202 Col. Del Valle,
C.P. 03100, Mexico City, D. F. Mexico
TEL: +52-55-50253671, +52-55-50253672
FAX: +52-55-11076206
www.hiti.com/latinamerica
Middle East Africa
HiTi Digital, Inc. MEA
No. 1608, Indigo Icon Tower, JLT, Dubai - U.A.E
Tel: +971-4-3674547
Fax: +971-4-3674221
www.hiti.com
29
Hiti Digital, Inc.
2011 Hiti Digital, Inc. All Rights Reserved.
PictBridge is a trademark. All other trade names and trademarks are
properties of their respective owners.
Specifications are subject to change without prior notice.
P/N:39.P2500.E11