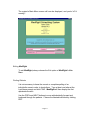
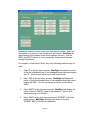
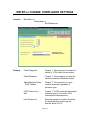
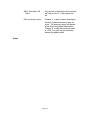
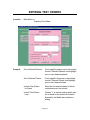
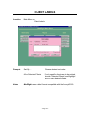
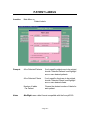
1
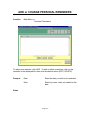
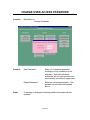
MedRight
Home Care Scheduling System
Version 4.03+
Featuring SmartCheck Technology
User Manual
Copyright 1993 - 2007 by Software Inventors Ltd
Post Office Box 551, Springville NY 14141
SPECIAL NOTICE
Year 2000
Software Inventors has tested MedRight to verify its operation in the
year 2000 and beyond. We have found the system to operate
properly and produce accurate patient schedules. In addition, the
vendor of the computer language in which MedRight is written has
indicated that the system will operate properly through the year 2100.
Software Inventors, however, makes no warranty (express or implied)
with respect to the accuracy of MedRight in the year 2000 or beyond.
It is strongly recommended that you test the system's performance to
ensure its proper operation and accuracy for your purpose.
CONTENTS
The MedRight Home Care Scheduling System User Manual is divided into 5
sections for easy reference:
Section 1
Introduction
Getting Started
Operational Overview
Using the System
Personal Reminders
Section 2
Setup Functions
Client File
Physician File
Test File
Route File
Configuration Information
Section 3
Patient & Billing Adjustment Functions
Patient Entry
Test Order Entry
Date Specific Comment Entry
Billing Adjustment Entry
Delete Outdated Orders, Comments, and
Billing Adjustments
Section 4
Reports
Scheduled Draw Lists
Testing Summary
Expiring Test Orders
Billing Statements
Patient Setup
Patient Labels
Master File Lists
Section 5
Other Features
Personal Reminders
Database Maintenance
Error Handling
- Page 1 -
INTRODUCTION
The MedRight Home Care Scheduling System version 4.0+ is the most advanced
MedRight patient scheduling system created to date! Complete with our exclusive
SmartCheck technology, version 4.0+ provides unparalleled ease-of-use and
reliability.
Designed to provide the phlebotomy service provider with a marketing and
operational advantage in the homecare marketplace, the system is a proven patient
management system which allows professional staff to spend more time caring for
patients by relieving them of tedious and error-prone paperwork.
MedRight provides the ability to record patient demographic, billing, and test order
information. Once entered, the system accurately tracks and schedules each
patient's laboratory tests. Printed test draw list and requisition forms and a variety
of reports can be generated to assist in providing superior patient care.
Incorporating one of the industry's most sophisticated and efficient scheduling
algorithms, this unique system can precisely match any testing pattern, regardless
of complexity. In addition, the system minimizes special phlebotomy trips by
scheduling tests, whenever possible, on normal phlebotomy days. The results are
a streamlined operation with increased revenues and minimized costs.
Used properly, the MedRight Home Care Scheduling System significantly
improves the quality of patient care, minimizes patient discomfort, enhances quality
assurance programs, and builds a successful and mutually beneficial relationship
between the phlebotomy service provider and clients.
- Page 2 -
GETTING STARTED
First, familiarize yourself with the basic capabilities of the MedRight Home Care
Scheduling System by reading through this manual.
In order to realize the maximum benefit from this powerful system, analyze the
current manual operation and identify all of the tasks currently being performed by
the staff. With MedRight, some of these tasks may no longer be necessary, others
may require major changes, while some will stay the same.
Try redesigning the operation from the ground up, drawing on the features and
flexibility offered by the system. Like any new tool, simply 'shoe-horning' this system
into the existing operation will be a frustrating experience with no real payoff.
Review the various reports available and identify their best use for your
marketplace. If possible, reports should be generated in a 'batch' mode for all
phlebotomy routes and clients. This will tremendously simplify operations!
The MedRight Home Care Scheduling System is a network-ready, multi-user
system - allowing multiple workstations to maintain data or generate reports
simultaneously. No processing occurs except under the control of the user and all
patient data is directly maintainable, at any time.
Functions which require heavy user interaction, such as patient entry, are designed
to provide fast response time. Likewise, complex and high-volume functions, such
as requisition generation, can be performed in a 'batch' mode. This design
approach frees personnel to attend to other tasks while the computer runs
unattended.
All of MedRight's functions are grouped, by category, onto 2 easy-to-use menus.
Commonly used functions appear on the main menu with system configuration
functions on a secondary menu. Choosing a menu option is as simple as clicking
on a menu button.
The system's exclusive SmartCheck technology constantly monitors data entry
functions, ensuring that information is reasonable. Convenient on-screen prompts
and help messages step the user through operating the functions, with a minimum
of training.
- Page 3 -
USING THE SYSTEM
Installing MedRight
MedRight version 4.0+ requires the following minimum
specifications:
Pentium processor
128mb RAM
20mb Hard Disk space
CD-ROM
Microsoft Windows 98, NT, ME, 2000, XP, or Vista
system
To install MedRight on your computer, follow these easy steps. At any time,
should you encounter any problems or have questions, feel free to contact
us at (716) 592-2397. We will be pleased to walk you through the installation
process.
1.
Insert the MedRight installation CD.
2.
If the Setup program does not start automatically:
Click on START, then RUN
Enter the command x:SETUP (‘x’ is the CD drive).
3.
Choose the default answers to the installation questions.
Starting MedRight
Following installation, locate the MedRight program group in the Start
Menu and choose the Home Care Scheduling system. If the program group
does not appear, MedRight may be started via Windows Explorer by
executing the PHL40.EXE file located in the \MedRight folder.
When the introductory MedRight screen appears, you will be asked to enter
a username and password. Use the User Code & Password which was
included with your shipment for this initial entry into the system.
IT IS STRONGLY RECOMMEND THAT THE PASSWORD SHIPPED WITH
THE SYSTEM BE MODIFIED TO PREVENT UNAUTHORIZED ACCESS TO
THE SYSTEM.
- Page 4 -
The system's Main Menu screen will now be displayed, and you're 'off &
running'!
Exiting MedRight
To exit MedRight, always choose the Exit option of MedRight's Main
Menu.
Finding Patients
It is not necessary to know the correct or complete spelling of an
individual's name in order to locate them. Type at least one letter at the
Last Name prompt and click FIND. MedRight will then display the first
alphabetical match.
Use the PREV and NEXT buttons to move alphabetically forward and
backward through the patients. Choose the desired individual by clicking
EDIT.
- Page 5 -
Alternately, patients may be located via their patient number. Either the
full number, or a portion of the number may be entered. MedRight will
then display the first patient found which matches the entry. Use the
PREV and NEXT buttons to move numerically forward and backward
through the patients.
For example, to find Robert Smith, any of the following methods may be
used:
1.
Enter 'S' at the last name prompt. MedRight will display the name
of the first individual found in the database whose last name begins
with 'S'. Use the down arrow key to find Robert Smith.
2.
Enter 'SMI' at the last name prompt. MedRight will display the
name of the first individual found in the database whose last name
begins with 'SMI'. Use the up & down arrow key to find Robert
Smith.
3.
Enter 'SMITH' at the last name prompt. MedRight will display the
name of the first 'SMITH' found in the database. Use the up &
down arrow key to find Robert.
4.
Enter 'SMITH' at the last name prompt and 'ROBERT' at the first
name prompt. MedRight will display the name of the first
'ROBERT SMITH' found in the database.
- Page 6 -
5.
Enter Robert Smith's patient number at the Patient # prompt.
Finding Clients, Tests, and Routes
When changing client, test, or route information, it is not necessary to
know the complete client number, test code, or route code. Enter at least
one letter of the number or code and press FIND. MedRight will then
display the closest match on the screen.
Use the PREV and NEXT buttons to scroll forward and backward through
the clients, tests, or routes. Choose the desired entry by pressing EDIT.
Personal Reminders
The MedRight Home Care Scheduling System provides the ability to
record various dates and related notes of which you would like to be
reminded. Each time the MedRight main menu is activated, your
personal reminder list is checked and an alarm displayed if any items are
due or overdue.
- Page 7 -
SETTING UP THE SYSTEM
Prior to entering any patient information into The MedRight Home Care
Scheduling System, the following items must be set up in the system's master
files:
Client File
Enter each client's account number, name, and address.
Optionally, two telephone numbers, a fax number, and up to
26 customized test codes may be entered.
No patient may be entered into the system for a client who
does not appear in this file.
Test File
Enter the various laboratory tests. Required information
includes the test code and name. In addition, fasting
information and a note may be entered. If desired, tests
may be grouped so that multiple requisitions are printed for
the patient. This feature allows tests such as 4pm Glucose
- Page 8 -
to appear on requisitions separate from other tests being
performed for the patient.
Physician List
This optional entry allows the creation of a master list of physicians
along with other information, which can be displayed during patient
entry and maintenance.
User Access
Create individual user codes and passwords to limit access to the
system's features.
Preferences
Form Specs
Enter the type of requisition, requisition summary, label, and
testing summary format and sort order.
Compliance Settings
Enter the Medicare compliance settings to be used by the
system when validating test orders.
Phlebotomy Service Telephone Number
Enter the desired telephone number for client calls.
- Page 9 -
ADD or CHANGE CLIENTS
Location
Main Menu #
Setup Menu #
Client Entry
To locate a specific client, enter all or part of the client’s name or number, then
press FIND. Scroll through clients by pressing the PREV and NEXT buttons. If
the last FIND was performed on a client name, PREV and NEXT scroll
alphabetically, otherwise the scroll is by client number. Click ADD to add a new
client.
Prompts
Client #
Enter the 10 character client number.
Client Name
Enter the client name, up to 30
characters.
Address
Enter the first line of the client's
address, up to 30 characters.
Address
Enter the second line of the client's
address, up to 30 characters.
- Page 10 -
Notes
Telephone #
Enter the telephone number.
Fax #
Enter the fax number.
Comment
Enter a client comment, up to 60
characters.
Print Insurance Info..
Enter Y to print patient’s insurance
information on draw lists
Phlebotomy Charges
Enter the amount, if appropriate, for
STAT and routine draws. These
amounts will be applied for each patient
drawn on a specific draw date. The
facility charge is applied just once for
each client on a specific draw date.
Customized Requisition
Tests
Enter up to 26 test codes which will
appear on the client requisitions.
Client Notes
Enter an unlimited number of notes
concerning client.
Client comments are automatically copied to the patient comment
field when entering a new patient.
Client notes may be displayed from the patient and test order
screens.
- Page 11 -
ADD or CHANGE PHYSICIAN INFORMATION
Location
Main Menu #
Setup Menu #
Physician Entry
To locate a specific physician, enter all or part of the physician’s name, then
press FIND. Scroll through physicians by pressing the PREV and NEXT buttons.
Click ADD to add a new physician.
Prompts
Notes
Physician Information
Enter the client name and other
information, up to 30 characters.
Client #
Enter the 10 character client number.
Physician entries may be displayed from the patient entry screen.
However, unlike clients and tests, a physician DOES NOT need to
be set up prior to entry on a patient screen.
Refer to ‘Update Nursing Home’ to update a MedRight Nursing
Home Scheduling system with this system’s physician information.
- Page 12 -
ADD or CHANGE TESTS
Location
Main Menu #
Setup Menu #
Test Entry
To locate a specific test, enter all or part of the test’s name or code, then press
FIND. Scroll through tests by pressing the PREV and NEXT buttons. If the last
FIND was performed on a test name, PREV and NEXT scroll alphabetically,
otherwise the scroll is by test code. Click ADD to add a new test.
Prompts
Test Code
Enter the test code, up to 10 characters
in length.
Make EZOrder Panel
Check box to create an EZOrder Panel
test.
Test Name
Enter the test name, up to 30
characters.
- Page 13 -
Fasting Specimen
Enter 'Y' if the test requires a fasting
specimen, 'S' if fasting is suggested, or
'N' if no fasting is required.
Optionally, enter the number of fasting
hours required.
Notes
Test Note
Enter an optional note, up to 60
characters.
Test Group
Enter an optional test group, up to 1
character. When scheduled
requisitions are printed, tests for a
single patient are printed on separate
requisition forms, according to their
group.
CPT4 Codes
Enter up to 10 CPT4 codes associated
with this test code.
EZOrder Panel
Components
Enter up to 10 ‘regular’ test codes which
define this EZOrder panel.
Test notes will be printed on requisitions and can be used to store
specimen collection information or to identify the components of
the test.
Use the test group feature to specify tests which should appear on
a requisition form by themselves. For example, to cause MedRight
to print 4pm Glucose tests onto a separate requisition from the
patient's morning CBC test, enter a different group for the 4pm
Glucose than that used for the CBC.
EZOrder panels are designed for convenience when ordering
multiple single tests. Create EZOrders for frequently ordered
combinations of individually-ordered tests to streamline the
laboratory's operations. When entering test orders for a patient, an
order for the EZOrder panel 'explodes' into its component tests,
with each component appearing as a separate test order. At no
time does the EZOrder test actually appear as an order for the
patient.
- Page 14 -
ADD or CHANGE PHLEBOTOMY ROUTES
Location
Main Menu #
Setup Menu #
Route Entry
To locate a specific route, enter all or part of the route’s name or code, then
press FIND. Scroll through routes by pressing the PREV and NEXT buttons. If
the last FIND was performed on a route name, PREV and NEXT scroll
alphabetically, otherwise the scroll is by route code. Click ADD to add a new
route.
Prompts
Route Code
Enter the route code, up to 5 characters
in length.
Route Name
Enter the route name, up to 20
characters.
Allow Draws On
Enter Y to allow test orders to be started
on a day, N to disallow orders to start on
a day, or O to allow orders to be started
- Page 15 -
after an override message is confirmed
by the operator.
Notes
- Page 16 -
ADD A NEW USER CODE
Location
Main Menu #
Setup Menu #
User Access
To locate a specific usercode, enter all or part of the code, then press FIND.
Scroll through users by pressing the PREV and NEXT buttons. Click ADD to add
a new usercode.
Prompts
User Code
Enter the 3-6 character code, consisting
of any characters on the keyboard.
User Name
Enter the user name, up to 15
characters.
Password
Enter a 3-6 character password,
consisting of any characters on the
keyboard. Note that alphabetic
characters are not case-sensitive and
automatically converted to upper-case.
- Page 17 -
Allow
Notes
Choose either ‘Y’ or ‘N’ if the user code
is to be allowed to perform functions
indicated by each of the categories
listed:
Patient Maintenance
Purging Outdated Information
Report Generation
Billing Functions
Master File Maintenance
User Code Maintenance
It is recommended that each staff member have a unique user
code and that the passwords for the ‘ADMIN’ and ‘ALL’ codes be
changed.
With the exception of the password and user name, the ADMIN
user code may not be modified.
IT IS STRONGLY RECOMMEND THAT THE PASSWORDS
SHIPPED WITH THE SYSTEM BE MODIFIED TO PREVENT
UNAUTHORIZED ACCESS TO THE SYSTEM.
- Page 18 -
ENTER or CHANGE FORM SPECIFICATIONS
Location
Main Menu #
Setup Menu #
Set Preferences
Prompts
Requisition Format
Enter the number of the desired format.
Print Waiver
Choose ‘Y’ to automatically print the
Medicare Beneficiary Waiver on
Medicare patient requisitions.
Barcode Patient #
If enabled on your license, choose ‘Y’ to
print a barcode on the requisition
Requisition Summary F... Enter the number of the desired format.
Test Summary Format
Enter the number of the desired format.
Expiring Test Order F...
Enter 1 for the report format, 2 for the
letter format.
- Page 19 -
Letter Salutation
Notes
Enter the phrase to be used at the start
of Expiring test order letters
MedRight systems which have been customized may ignore some
of all of these settings.
We recommend that you print samples of the various report
formats and sort orders to determine the most appropriate option
for your clients.
Settings are saved automatically when the EXIT button is pressed.
- Page 20 -
ENTER or CHANGE REQUISITION DRAW FEES
Location
Main Menu #
Setup Menu #
Set Preferences
Prompts
Code
Enter draw fee test code, up to 10
characters.
Name
Enter draw fee name associated with
code, up to 30 characters.
Notes
MedRight systems which have been customized may ignore some
or all of these settings.
Draw fees are printed on all requisitions.
Settings are saved automatically when the EXIT button is pressed.
- Page 21 -
ENTER or CHANGE COMPLIANCE SETTINGS
Location
Main Menu #
Setup Menu #
Set Preferences
Prompts
Check Diagnosis...
Choose ‘Y’ if the system is to check the
validity of ICD9 codes for test orders.
Check Medicare...
Choose ‘Y’ if the system is to verify the
medical necessity of Medicare orders.
Apply Medicare Rules
To All Patients
Choose ‘Y’ if the system is to verify
medical necessity regardless of
insurance type.
ICD9 Codes to be...
with
Choose ‘Y’ if ICD9 codes will be entered
a decimal point or N to enter ICD9
codes without decimal points.
Limit Duration of...
Enter the maximum number of months
for which standing orders may be
entered, either 6 or 12.
- Page 22 -
Notes
MedRight systems which have been customized may ignore some
or all of these settings.
Settings are saved automatically when the EXIT button is pressed.
- Page 23 -
PATIENT & TEST ORDER ENTRY
The MedRight Home Care Scheduling System stores demographic (ex.
name, birth date), billing (insurance), and test order information on patients.
Since all of a patient's information may not be available to the laboratory at the
same time, billing and test order information may be entered separately from the
demographic information.
To set up a patient, the following must be known:
Patient Number (typically, Social Security Number)
Patient Name
Gender
Attending Physician
Take caution to avoid entering the same patient under 2 different patient
numbers. This can easily occur if the home care client is prone to mix-ups and
sends 2 copies of the patient's paperwork to the laboratory. MedRight's
exclusive SmartCheck technology can notify you of patients with similar names,
birth date, and gender.
Test orders should be entered exactly as indicated by the client. There is no
need to 'translate' orders, such as changing a monthly CBC to every 4 weeks.
MedRight is flexible enough to handle any type of order requested by the
patient's physician, and should be entered as indicated to maintain a clean audit
trail.
The MedRight Home Care Scheduling System can produce reports covering
any period of time in the past or future. The ability to produce historical reports
can be valuable to clients as a means of monitoring their in-house quality
assurance / risk management activities.
Historical reporting is not possible if patient test orders are deleted from the
computer when the order is discontinued by the physician. Therefore, if
historical reporting is to be offered, do not delete test orders for patients. Rather,
indicate the appropriate 'End Date' for the test order. Likewise, if the schedule
frequency of a test order is changed, do not change the frequency within the
system. Place an 'End Date' on the old order and enter a new one with the new
frequency.
- Page 24 -
In this way the MedRight Home Care Scheduling System always 'knows' the
past test order pattern for the patient and can produce accurate historical reports
for the clients.
- Page 25 -
ADD or CHANGE PATIENTS
Billing and Demographic Information
Location
Main Menu #
Patient Entry
To locate a specific patient, enter all or part of the patient’s name or code, then
press FIND. Scroll through patients by pressing the PREV and NEXT buttons. If
the last FIND was performed on a patient name, PREV and NEXT scroll
alphabetically, otherwise the scroll is by patient code. Click ADD to add a new
patient. Click DELETE to remove a patient from the system.
Prompts
Last Name
Enter the patient's last name, up to 20
characters.
First Name
Enter the patient's first name, up to 15
characters.
Patient #
Enter the 9 digit number assigned to this
patient. Typically the patient's Social
Security Number is used.
- Page 26 -
An optional 10th character may be
entered in those rare cases where
multiple patients share a common
Social Security Number.
Client #
Enter the 10 character client number.
SS#
Enter the patient's Social Security
Number, if not used as the Patient #
Gender
Enter 'F' for female or 'M' for male.
Birth Date
Enter the patient's date of birth. If
earlier than 1900, enter the 4 digit year
(ie. 1892).
Physician
Enter the patient's physician name, up
to 30 characters.
Lab ID
Enter the laboratory client’s
identification number for this patient, up
to 30 characters.
Patient Address
Enter the street address and city of the
patient, up to 30 characters each.
Patient Telephone
Enter the telephone number of the
patient.
Route
Enter the phlebotomy route to which the
patient is assigned.
Phlebotomist Note
Enter phlebotomy notes, up to 75
characters. These appear on patient requisitions.
- Page 27 -
Medicare #
Enter the patient's Medicare Id number,
up to 14 characters.
UPIN #
Enter the attending physician's UPIN
number, up to 6 characters.
Medicaid #
Enter the patient's Medicaid Id number,
up to 20 characters.
Private
Enter the name of the patient's private
insurance company, up to 20
characters. Up to 2 private
insurances may be entered.
Policy #
Enter the patient's private insurance
policy number, up to 15 characters.
Group #
Enter the patient's private insurance
group number, up to 15 characters.
Category #
Enter the patient's category number, up
to 15 characters.
- Page 28 -
Notes
Phys ID #
Enter the license number of the
attending physician, up to 15
characters.
Relation
Choose ’1' if the patient is the insured,
‘2' if the patient is the insured's spouse,
‘3' if the patient is the insured's child, or
‘4' for any other relationship.
Insured Name Last
Enter the last name of the insured party,
up to 20 characters.
Insured Name First
Enter the first name of the insured party,
up to 15 characters.
The ‘Show All Patients for Client’ button will display a list of patients
existing in the database for the specified client.
The ‘Duplicate Patient SmartCheck’ button displays a list of
patients in the database for the specified client having similar
sounding names and the same birth date. Enter the patient name,
client, and birth date prior to running SmartCheck.
The ‘Show Draw Schedule’ button displays a list of scheduled draw
dates for the patient. The date range displayed covers the
previous 2 months and future 6 months.
The ‘Note’ button displays any notes entered for the client on the
client entry screen.
- Page 29 -
ADD or CHANGE PATIENTS
Test Orders
Location
Main Menu #
Patient Entry
To locate a specific patient, enter all or part of the patient’s name or code, then
press FIND. Scroll through patients by pressing the PREV and NEXT buttons. If
the last FIND was performed on a patient name, PREV and NEXT scroll
alphabetically, otherwise the scroll is by patient code.
To add a new order, click ADD. To edit, reinstate, or delete a specific test order,
click on the order in the displayed list, then click the desired action (EDIT,
REINSTATE, DELETE).
The EZADD option is designed to facilitate entry of multiple test orders with the
same starting & ending dates, cycle, and diagnosis. When this option if chosen,
MedRight preloads these fields based on the most recently added order for the
patient.
- Page 30 -
Prompts
Test Code
Enter the code of the test to be
performed.
Start Date
Enter the first date on which the test is
to be performed.
End Date
Enter the date on which the test order is
to be stopped.
Full Term Order
Check this box if the test order is to be
considered a full-term order by the
Expiring Test Orders function,
regardless of its actual duration.
Every #, Unit
These 2 fields define the frequency with
which the test is to be performed.
The cycle # indicates how cycle units
are to pass between tests. The cycle
unit indicates the time period. Valid
cycle units are:
D
Daily
W
Weekly
M
Monthly
Y
Yearly
T
1 Time Order
Examples:
To schedule
Enter
a test
# Unit
------------------------------------Daily
1 D
Every 5 days
5 D
Weekly
1 W
Every 2 weeks
2 W
Every 2 months
2 M
Every year
1 Y
One time only
1 T
STAT
Check this box to indicate a STAT
order.
Note
Enter an explanatory note related to the
order, if desired.
- Page 31 -
Notes
The ‘Show Draw Schedule’ button displays a list of scheduled draw
dates for the patient. The date range displayed covers the
previous 2 months and future 6 months.
Enter the Every # and Unit to correspond EXACTLY to the
physician orders. Do not ‘interpret’ the orders since this destroys
the audit trail and places the laboratory and client at risk.
A test entered with monthly (‘1M’) frequency is not the same as one
scheduled every 4 weeks (‘4W’). A ‘1M’ test is scheduled 12 times
per year while a ‘4W’ test is scheduled 13 times.
Only tests with an Every Unit of 'W' or 'T' may have a start date
during the 5th week of a month.
The End Date will be preloaded, based on the settings in the
'Compliance Settings' option.
To discard an addition or change, click QUIT before completing the
test order line.
It is recommended that test orders not be deleted, unless entered
by accident. Rather, enter an 'End Date' for the order. Once a test
is deleted, the system no longer 'remembers' that it existed.
Therefore, any reports which show the patient's historical test
schedule will be inaccurate.
Likewise, it is recommended that test orders cycles not be
changed, unless entered by accident. If the physician changes the
frequency with which a test is to be performed, enter an 'End Date'
for the existing order and then add a new order with the new cycle.
This ensures the ability to produce an accurate historical test
schedule and maintains an accurate audit trail.
When ordering an EZOrder Panel, the order 'explodes' into the
panel’s component tests, with each component appearing as a
separate test order. At no time does the EZOrder test actually
appear as an order for the patient.
- Page 32 -
ADD or CHANGE PATIENTS
Date Specific Comments
Location
Main Menu #
Patient Entry
To locate a specific patient, enter all or part of the patient’s name or code, then
press FIND. Scroll through patients by pressing the PREV and NEXT buttons. If
the last FIND was performed on a patient name, PREV and NEXT scroll
alphabetically, otherwise the scroll is by patient code.
To add a new date-specific comment, click ADD. To edit or delete a specific
comment, click on the comment in the displayed list, then click the desired action
(EDIT, DELETE).
Prompts
Date
Enter the date on which the comment is
to appear on the patient's requisition.
Add or Replace
Choose ‘A’ if this comment is to appear
on the patient requisition along with the
- Page 33 -
comment entered with the patient
demographic information.
Choose 'R' if this comment is to appear
instead of the comment entered with the
patient demographic information
Comment
Notes
Enter the comment phrase, up to 60
characters.
.
This feature allows the 'generic' patient comment appearing on the
patient demographic screen to be replaced or enhanced on the
specified date.
Date-specific comments only appear on scheduled test
requisitions.
Ensure that the date entered is an actual test date for the patient.
MedRight does not check to ensure that a requisition is scheduled
to be printed for this date.
The ‘Show Draw Schedule’ button displays a list of scheduled draw
dates for the patient. The date range displayed covers the
previous 2 months and future 6 months.
Enter the Every # and Unit to correspond EXACTLY to the
physician orders. Do not ‘interpret’ the orders since this destroys
the audit trail and places the laboratory and client at risk.
Only 1 date-specific comment may be entered for a specific date.
- Page 34 -
ADD or CHANGE BILLING ADJUSTMENTS
Increase or decrease client charges
Location
Main Menu #
Billing Adjustment Entry
To locate a specific client, enter all or part of the client’s name or code, then
press FIND. Scroll through clients by pressing the PREV and NEXT buttons. If
the last FIND was performed on a client name, PREV and NEXT scroll
alphabetically, otherwise the scroll is by client code.
To add a new billing adjustment record, click ADD. To edit or delete a specific
adjustment record, click on the adjustment in the displayed list, then click the
desired action (EDIT, DELETE).
Prompts
Date
Enter the date on which the billing
adjustment is to appear on the client's
billing statement.
Amount
Enter the dollar amount of the
adjustment. A positive amount
- Page 35 -
increases the client’s charges while a
negative amount decreases the
charges.
Reason
Enter an explanation for the billing
adjustment, up to 40 characters. This
reason appears under the patient name
column on detailed billing statements.
Notes
- Page 36 -
DELETE OUTDATED TEST ORDERS
Location
Main Menu #
Delete Old Orders
Prompts
All or Selected Clients
If only patient orders for specific clients
are to be deleted, choose ‘Selected
Clients’ and highlight one or more
desired clients.
Delete orders with END
DATE prior to
Enter the date to be used in identifying
orders considered outdated. This date is
matched against the End Date entered
for each patient test order.
Notes
Once deleted, orders cannot be 'recovered'. Ensure that the
correct End Date and Client information is entered.
IT IS STRONGLY RECOMMENDED THAT A ` OF THE SYSTEM
BE MADE PRIOR TO DELETING OLD TEST ORDERS.
- Page 37 -
DELETE OUTDATED
DATE-SPECIFIC COMMENTS
Location
Main Menu #
Delete Old Comments
Prompts
All or Selected Clients
If only comments for specific clients are
to be deleted, choose ‘Selected Clients’
and highlight one or more desired
clients.
Delete comments for
dates prior to
Enter the date to be used in identifying
comments considered outdated. This
date is matched against the date
entered for each patient date-specific
comments.
Notes
Once deleted, comments cannot be 'recovered'. Ensure that the
correct Date and Client information is entered.
- Page 38 -
IT IS STRONGLY RECOMMENDED THAT A BACKUP OF THE
SYSTEM BE MADE PRIOR TO DELETING OLD COMMENTS.
- Page 39 -
DELETE OUTDATED
BILLING ADJUSTMENTS
Location
Main Menu #
Delete Old Adjustments
Prompts
All or Selected Clients
If only adjustments for specific clients
are to be deleted, choose ‘Selected
Clients’ and highlight one or more
desired clients.
Delete adjustments for
Enter the date to be used in identifying
dates prior to
Notes
adjustment records considered
outdated.
Once deleted, adjustment records cannot be 'recovered'. Ensure
that the correct Date and Client information is entered.
IT IS STRONGLY RECOMMENDED THAT A ` OF THE SYSTEM
BE MADE PRIOR TO DELETING OLD ADJUSTMENTS.
- Page 40 -
REPORTS
The MedRight Home Care Scheduling System produces a variety of useful
operational reports.
Scheduled Draw Lists & Test Requisitions - A plain list identifying the tests
to be drawn on a specific patient. Draw Lists are sorted alphabetically
within phlebotomy route allowing for easy distribution to phlebotomists.
Optionally, MedRight can be configured to print requisitions form..
Patient Draw Summary Report - A concise report showing each patient’s
test and scheduled draw dates, arranged chronologically by patient.
Expiring Test Orders Report - An invaluable report showing all patient with
test orders due to expire within a specified range of dates. Also available
in a letter format.
Patient Setup Sheet - A 'single page' report for each patient showing the
demographic and test order information. This report is particularly useful
when reviewing patient entries for accuracy. In addition, by printing this
report for only patients whose information has been updated, this report
serves as a convenient method of confirming patient changes with the
client.
Patient Labels - Patient labels for use on generic client requisitions or
specimen collection tubes.
Insurance Report - Prints a list of patients and their insurance information
for a single client or multiple clients.
Patient List - Provides a list of patients for a single client or all clients.
This report can be used to identify patients with a specific test code
ordered, a specific physician, or insurance entries
Client List - A list of all clients in the system.
Test List - A list of all tests in the system.
Route List - A list of phlebotomy routes in the system.
Physician List - A list of all physicians in the system.
- Page 41 -
MedRight reports can be generated for any period of time (past or future) and
can be reproduced as often as required. Additionally, any report can be
previewed on the screen, allowing the option to select only specific pages for
printing.
- Page 42 -
SCHEDULED DRAW LIST
Location
Main Menu #
Scheduled Draw List
Prompts
All or Selected Patients
If only specific patients are to be printed,
choose ’Selected Patients’ and highlight
one or more desired patients.
All or Selected Routes
If only specific phlebotomy routes are to
be printed, choose ‘Selected Routes’
and highlight one or more desired
routes.
Include Test Orders
for Dates
Enter the first and last dates for which
orders are to be printed.
ONLY Orders with Draw
Date Override
Only include orders where a test order
started on a day that required the
operator to override the phlebotomy
route’s usual draw day.
- Page 43 -
ONLY Reminder Call
Tests
Only include orders where the ‘reminder
call’ flag is set to Y in the master test
list.
Print summary counts
Choose ‘Y’ to print a report showing the
number of patients drawn by date, by
route. The summary report will appear
at the end of the patient detail report.
Choose ‘N’ to skip the summary report
or ‘ONLY’ to print only the summary
without the patient detail.
Notes
- Page 44 -
PATIENT DRAW SUMMARY
Location
Main Menu #
Patient Draw Summary
Prompts
All or Selected Patients
If only specific patients are to be printed,
choose ‘Selected Patients’ and highlight
one or more desired patients.
All or Selected Clients
If only specific clients are to be printed,
choose ‘Selected Clients’ and highlight
one or more desired clients.
Include Test Orders
for Dates
Enter the first and last dates for which
orders are to be printed.
Include Comments
Choose ‘Y’ to include patient comments
on the report.
Notes
- Page 45 -
EXPIRING TEST ORDERS
Location
Main Menu #
Expiring Test Orders
Prompts
All or Selected Patients
If only specific patients are to be printed,
choose ‘Selected Patients’ and highlight
one or more desired patients.
All or Selected Clients
If only specific clients are to be printed,
choose ‘Selected Clients’ and highlight
one or more desired clients.
Include Test Orders
for Dates
Enter the first and last dates for which
requisitions are to be printed.
Include Test Orders
Less ...
Choose ‘Y’ to include testing which was
not ordered for the maximum duration
allowed by the Medicare compliance
setting.
- Page 46 -
Include 1 Time Orders
Notes
Choose ‘Y’ to include 1 time orders,
otherwise choose ‘N’.
Both report and letter formats are available.
- Page 47 -
PATIENT SETUP SHEET
Location
Main Menu #
Setup Sheet
Prompts
All or Selected Patients
If only specific patients are to be printed,
choose ‘Selected Patients’ and highlight
one or more desired patients.
All or Selected Routes
If only specific phlebotomy routes are to
be printed, choose ‘Selected Routes’
and highlight one or more desired
routes.
Last Changed From
To limit printing to only those patients
whose information was updated within a
particular period of time, enter the start
and end dates. Otherwise, leave blank.
Notes
- Page 48 -
CLIENT LABELS
Location
Main Menu #
Client Labels
Prompts
Sort By ...
Choose desired sort order.
All or Selected Clients
If only specific clients are to be printed,
choose ‘Selected Clients’ and highlight
one or more desired clients.
Notes
MedRight uses a label format compatible with the Avery #5160.
- Page 49 -
PATIENT LABELS
Location
Main Menu #
Patient Labels
Prompts
All or Selected Patients
If only specific patients are to be printed,
choose ‘Selected Patients’ and highlight
one or more desired patients.
All or Selected Clients
If only specific clients are to be printed,
choose ‘Selected Clients’ and highlight
one or more desired clients.
Number of labels
Per Patient
Choose the desired number of labels for
each patient.
Notes
MedRight uses a label format compatible with the Avery #5160.
- Page 50 -
PATIENT INSURANCE REPORT
Location
Main Menu #
Insurance Report
Prompts
All or Selected Clients
If only specific clients are to be printed,
choose ‘Selected Clients’ and highlight
one or more desired clients.
Notes
- Page 51 -
MASTER PATIENT LIST
Location
Main Menu #
Patient List
Prompts
Sort By...
Choose the desired sort order.
All or Selected Patients
If only specific patients are to be printed,
choose ‘Selected Patients’ and highlight
one or more desired patients.
All or Selected Routes
If only specific phlebotomy routes are to
be printed, choose ‘Selected Routes’
and highlight one or more desired
routes.
Limit to Patients With ...
Order For
Choose one or more tests to limit
patients to be printed to only those with
an order for the specified tests.
- Page 52 -
Notes
Test Order Cycle
Enter a test cycle to limit patients to only
those containing one or more test
orders with that cycle.
Doctor Name
Containing
Enter a name to limit patients to only
those where the specified characters
exist in the physician name field.
Insurance Containing
Enter insurance information to limit
patients to only those where the
specified characters exist in any of the
Medicare, Medicaid, or private
insurance fields.
In addition to the patient number, name, location, and physician
name, the report identifies the patient's test order status:
ACT
EXP
NO
One or more active orders exist
All test orders have expired
No test orders exist for the patient
- Page 53 -
MASTER CLIENT LIST
Location
Main Menu #
Client List
Prompts
Sort By...
Choose the desired sort order.
All or Selected Clients
If only specific clients are to be printed,
choose ‘Selected Clients’ and highlight
one or more desired clients.
Notes
- Page 54 -
MASTER PHYSICIAN LIST
Location
Main Menu #
Physician List
Prompts
Sort By...
Choose the desired sort order.
Only From ... Through
To limit the report to a range of
clients/names, enter starting and ending
clients/names.
Notes
- Page 55 -
MASTER TEST LIST
Location
Main Menu #
Test List
Prompts
Sort By...
Choose the desired sort order.
Only From ... Through
To limit the report to a range of
names/codes, enter starting and ending
names/codes.
Only without CPT4
Code
Choose 'Y' to include only tests where
no CPT4 codes have been entered.
Notes
- Page 56 -
MASTER PHLEBOTOMY ROUTE LIST
Location
Main Menu #
Route List
Prompts
Sort By...
Choose the desired sort order.
Only From ... Through
To limit the report to a range of
names/codes, enter starting and ending
names/codes.
Notes
- Page 57 -
UTILITIES
The MedRight Home Care Scheduling System contains useful utilities to
facilitate your personal time management. In addition, a facility is provided to
assist in repairing damaged databases.
Personal Reminders - Allows the entry of a list of important dates and
their related notes. MedRight checks this information whenever started
to ensure that important dates aren't forgotten.
Change Password - Allows user access password to be modified.
Fix Databases - Causes the MedRight Home Care Scheduling System
to review the information in its databases and effect simple repairs.
Purge Client - Allows all of the patients for a client to be purged from the
database in one easy step.
- Page 58 -
ADD or CHANGE PERSONAL REMINDERS
Location
Main Menu #
Personal Reminders
To add a new reminder, click ADD. To edit or delete a reminder, click on the
reminder in the displayed list, then click the desired action (EDIT, DELETE).
Prompts
Date
Enter the date you wish to be reminded.
Note
Enter key notes, tasks, etc related to the
date.
Notes
- Page 59 -
CHANGE USER ACCESS PASSWORD
Location
Main Menu #
Change Password
Prompts
New Password
Enter a 3-6 character password,
consisting of any characters on the
keyboard. Note that alphabetic
characters are not case-sensitive and
automatically converted to upper-case.
Repeat Password
Enter the new password again. This
password must match that entered
above.
Notes
A message is displayed indicating whether the password was
updated.
- Page 60 -
FIX DATABASES
Location
Main Menu #
Fix Databases
Prompts
Notes
Fixing the databases can never 'harm' the database and can be
performed as desired without danger.
This option will also repair a variety of database problems.
- Page 61 -
PURGE ALL PATIENT INFORMATION
FOR A CLIENT
Location
Main Menu #
Setup Menu #
Purge Client
Prompts
Client
Notes
This option purges ALL patient information for the selected client.
Select the desired client from the list.
For added protection, first create a copy of the patient information
using the 'Extract Client' option. Purged information cannot be
recovered!
IT IS STRONGLY RECOMMENDED THAT A BACKUP OF THE
SYSTEM BE MADE PRIOR TO MERGING PATIENT
INFORMATION.
- Page 62 -
SYSTEM PROBLEM NOTE
At what date & time did the problem occur?
What menu option was being performed?
What was the problem - Be Specific?
What error messages appeared on the screen or printer?
Was a specific client, patient, or test affected? Which one(s)?
What did you do to resolve the problem?
SCHEDULING SYSTEM BACKUP LOG
Date & Time
By W hom
Backup Set
__________
_________
__________
Type
Notes
Partial
________________________
Full
__________
_________
__________
Partial
________________________
Full
__________
_________
__________
Partial
________________________
Full
__________
_________
__________
Partial
________________________
Full
__________
_________
__________
Partial
________________________
Full
__________
_________
__________
Partial
________________________
Full
__________
_________
__________
Partial
________________________
Full
__________
_________
__________
Partial
________________________
Full
__________
_________
__________
Partial
________________________
Full
__________
_________
__________
Partial
________________________
Full
__________
_________
__________
Partial
________________________
Full
__________
_________
__________
Partial
________________________
Full
__________
_________
__________
Partial
________________________
Full
__________
_________
__________
Partial
________________________
Full
NOTE! To provide added protection, a backup should be removed from the laboratory at least
once per week.
MedRight Scheduling License Agreement
MedRight is licensed to you for your personal use. You m ay use it on any single com puter or a single local-area network
of com puters. You m ay transfer the software to another com puter or local-area network at a later tim e, provided that you
transfer all of the software’s com ponents to the new com puter (or local-area network) and rem ove all com ponents from the
‘original’ com puter or local-area network. You m ay not alter, attem pt to alter, or allow the alteration of any software
contained within MedRight without Software Inventors, Ltd express, written consent.
MedRight software is not copy protected, but you m ay m ake copies of it only as provided in this agreem ent. You are
perm itted to m ake one (1) working copy of the software solely for archival or backup purposes.
You m ay transfer the software on a perm anent basis and license it to another party if the third party agrees to accept the
term s and conditions of this agreem ent. If you transfer the software, you m ust at the sam e tim e either transfer all copies
of the software regardless of form to the sam e party or destroy any copies not transferred.
This license shall be effective from the date you open the protective envelope containing the software diskettes and rem ain
in effect for as long as you m ake lease paym ents at the then-current rate as determ ined by Software Inventors Ltd, subject
to the conditions of this agreem ent. You m ay term inate this license at any tim e by destroying all copies of the software (in
any form ). Your license term inates autom atically if you fail to com ply with the term s or conditions of this agreem ent.
The m edia on which the software is furnished is warranted to be free from defects in m aterials and workm anship for a
period of forty-five (45) days from the date of delivery to you as evidenced by a copy of your sales receipt or lease
agreem ent.
EXCEPT FOR THE LIMITED W ARRANTY SET FORTH ABOVE, THE SOFTW ARE AND ANY ACCOMPANYING DATA
IS PROVIDED 'AS IS.' SOFTW ARE INVENTORS, LTD MAKES NO OTHER W ARRANTY, EXPRESS OR IMPLIED,
W ITH RESPECT TO THE SOFTW ARE AND SPECIFICALLY DISCLAIMS THE IMPLIED W ARRANTIES OF
MERCHANTABILITY AND FITNESS FOR A PARTICULAR PURPOSE. SOFTW ARE INVENTORS, LTD DOES NOT
W ARRANT THAT THE SOFTW ARE W ILL MEET YOUR REQUIREMENTS OR THAT THE OPERATION OF THE
PROGRAM W ILL BE UNINTERRUPTED OR ERROR FREE. FURTHER, SOFTW ARE INVENTORS, LTD MAKES NO
W ARRANTY, EXPRESS OR IMPLIED, W ITH RESPECT TO ANY DATA PROVIDED FOR USE W ITH THE PROGRAM.
YOU ARE SOLELY RESPONSIBLE FOR THE SELECTION OF THE SOFTW ARE AND MAINTENANCE OF THE DATA
TO ACHIEVE YOUR INTENDED RESULTS AND FOR THE RESULTS ACTUALLY OBTAINED. Som e states do not
allow the exclusion or lim itation of im plied warranties, so the above exclusions and lim itations m ay not apply to you. This
warranty gives you specific rights and you m ay also have other rights which vary from state to state.
In the event the software fails to m eet Software Inventors, Ltd’s "lim ited warranty", Software Inventors, Ltd’s entire liability
and your exclusive rem edies shall be:
A. The replacem ent of any software not m eeting Software Inventors, Ltd's "lim ited warranty" which is
returned to Software Inventors, Ltd.
B. If Software Inventors, Ltd cannot or will not replace the software, you m ay term inate the License
Agreem ent by returning the software and all copies (in any form ) to Software Inventors, Ltd. In the case of
purchased software, your purchase price will be refunded. In the case of leased software, a pro-rated
refund reflecting the unused portion of the lease will be issued.
Under no circum stances, and notwithstanding any failure of the essential purpose of any lim ited rem edy provided for
herein, shall Software Inventors, Ltd be liable to you for any dam ages, claim s or losses whatsoever, including but not
lim ited to claim s for lost profits, lost savings or other special, incidental or consequential dam ages arising out of the use or
inability to use the program regardless of the circum stance.
EXCEPT AS EXPRESSLY PROVIDED FOR IN THE LICENSE AGREEMENT, YOU MAY NOT USE, COPY, MODIFY,
REPRODUCE, TRANSFER OR DISTRIBUTE THE PROGRAMS IN W HOLE OR IN PART, W ITHOUT FIRST
OBTAINING SOFTW ARE INVENTORS, LTD’S W RITTEN PERMISSION.
This agreem ent will be governed by the laws of the State of New York, County of Erie and all disputes, court filings,
appearances, and trials shall occur within the State of New York, County of Erie.
Software Inventors, Ltd
P.O. Box 551
Springville, NY 14141
Copyright 1993-2003 by Software Inventors, Ltd
(716) 592-2397