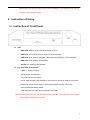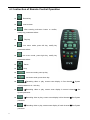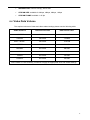
1
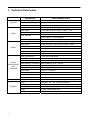
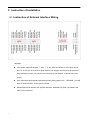
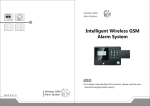
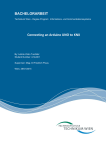
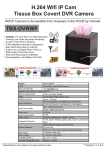
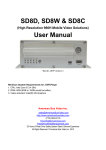
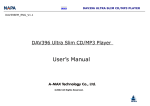
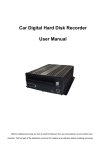
Car Digital Hard Disk Recorder User Manual Before installing and using, be sure to read the Manual, then you will properly use and protect your machine. The first part of the statement concerns the matters to be attention to before installing and using. Attention To protect your rights, before using and installing, please carefully read the contents of the manual. This product is used for car inside, in order to prevent short-circuit or the risk of electric shock, do not make the machine on the rain or humidity environment. Event of any solid or liquid into the machine, please disconnect the power of the machine immediately, and ask the qualified technical staff to check, then restart it. The product is high-tech equipment; machines can not be repaired by users even very small original part. Once failure occurs, please ask for the qualified technical personnel, or contact with the dealer. Do not repair it by users themselves. Installation Environment 8-48V DC power supply, please confirm the local power supply before power on. If the machine were not used for a long time, please completely disconnect the video’s power supply. Please select the appropriate location for the installation of the machine, where the air can flow freely around the machine to avoid overheating. Machine can not be installed near the radiators, or near the ventilation road which is near heat, or directly under sunshine, or too much dust, or near the area where the mechanical vibration or impact happens. Packing List Name Count Eight Channel HDD Recorder 1 User Manual 1 Certificate of Quality 1 Remote Control 1 Connection Port 3 PC View Soft Disk 1 Note: When the specification or parameters changes, no other announcement in addition. 1 Contents 1 Product Overview ................................................................................................ 3 2 Features ................................................................................................................ 3 2.1 Operating System .......................................................................................... 3 2.2 Video Compression Standard........................................................................ 3 2.3 Surveillance and Video Processing............................................................... 3 2.4 Playback and Search ..................................................................................... 4 2.5 Hard Drive and Backup................................................................................. 4 2.6 Control........................................................................................................... 4 2.7 Designed to Prevent Vibration...................................................................... 4 2.8 Others ............................................................................................................ 4 3 Technical Parameters ......................................................................................... 5 4 Optional Features ................................................................................................ 6 5 Instruction of Installation..................................................................................... 7 5.1 Instruction of External Interface Wiring....................................................... 7 5.2 Instruction of HDD Installation .................................................................... 8 6 Instruction of Using............................................................................................ 10 6.1 Instruction of Front Panel ........................................................................... 10 6.2 Instruction of Remote Control Operation ................................................... 11 6.3 Instruction of Menu Setup........................................................................... 12 6.4 Video Data Volume..................................................................................... 14 2 1 Product Overview The eight-channel embedded digital hard disk video recorder is designed for car safety. It uses embedded processor and embedded operating system, combined with video / audio compression / decompression, GPS, car recorder, and the capacity hard disk storage technology to confirm the high intelligence and high stability. Widely used for bus, ship, train, and other areas of security. 2 Features 2.1 Operating System Embedded Linux operating system, to eliminate the virus infection; more stable. Chinese and English menu to switch. 2.2 Video Compression Standard H.264 Video formats,excellent screen, and the best bit stream. 2.3 Surveillance and Video Processing Surveillance: 8 channels D1 video (PAL: 720 * 576, NTSC: 720 * 480) Recorder: Total resources 200PAL, 240NTSC. 8 channels CIF (PAL: 352* 288, NTSC: 352 * 240) video storage alone. Three record modes: according to car’s automotive sensor there are alarm record, motion detection record and manual record; support 8 channels video and 8 channels audio record at the same time. Video quality: eight grades to adjust. Specially design for video file system to prolong the life of hard drive. The disk storage of video& audio data can not be artificially modified, which can be as the evidence of high credibility. 3 2.4 Playback and Search Playback is according to time . Support 8 channel video and 1 channel audio playback simultaneously, or 1 channel video and audio playback amplified(use the special PC viewer software). If playback on the machine with a LCD monitor, then it can just support 1 channel video and 1 channel audio playback amplified 2.5Hard Drive and Backup Pull style of hard drive box, Support 2.5-Inch notebook computer hard drive. Apply to Samsung, Hitachi SATA series of notebook computer drives. Use the USB interface to back up or hard drive box directly connected to a computer to backup. 2.6 Control Remote control. 2.7 Designed to Prevent Vibration Non-fixed, suspended Hard Drive for shockproof protection, with excellent damping. Special SATA hard drive box connector design and reliable contact. Besides hard drive, the circuit board and the electronic components are dealt with shockproof and reinforcement. 2.8 Others USB software upgrading and simple maintenance. Password-protection keeps data away from destroy. Real-time and trigger video record to be selected. Prevent impulse voltage, low voltage supply protection. Time-lapse turn off the machine function(default: 5 seconds) Real-time clock 4 3 Technical Parameters PARAMETER SYSTEM VIDEO operation language Chinese / English operation interface graphical interfaces password control user password video input 8 channels independent input: video output 1 channel PAL/NTSC output, 1.0Vp-p,75Ω, video display 1/8 screen display video standard AUDIO DIGITAL PROCESSING AND STORAGE ALARM OTHERS 5 PERFORMANCE INDEX PAL format 1.0Vp-p,75Ω 5-25 frames/sec NTSC format 5-30 frames/sec system resources PAL: 200 frames; NTSC: 240 frames. audio input 8 channels independent input audio output single channel or 8 channel mix output basic output level 600Ω 600Ω 1.0—2.2v distortion plus noise ≤-30dB recording mode sound and image synchronization audio compression ADPCM image compression H.264 fixed code stream image format CIF(352*288) video stream 8k-48kbyte / s / channel video taking up of hard disk 28M-168Mbyte / hour / channel resolution playback Video streaming standard H.264 main profile audio bitrate 4 kbyte / s / channel audio taking up of hard disk 14Mbyte / hour / channel internal storage 1 SATA hard disk,support max 2000G hard disk image quality eight grades to choose alarm input 4 channels independent input; high voltage trigger power DC8-48V working temperature -20℃-+60℃ dimensions 213*230*65mm (with brachet) weight 2.05kg(without hard disk) clock built-in clock, calendar 1ch*352*288 pixel 5% 8w(without hard disk) 4 Optional Features Alarm record GPS module 3G module 6 5 Instruction of Installation 5.1 Instruction of External Interface Wiring Remarks: If the power supply to the port ① and ② is 12V, then the current of 12V output can be just 1A. So if there are more than 3pcs cameras, we suggest customers to get power for other cameras from the 12V vehicle power directly or use Teswell’s special car power supply. Only customers have special requirements when placing orders, the “SENSOR”port will have ALARM functions. Or this port is useless. RS485 and RS232 interface are optional interface, available only when you listed in the order for this interface. 7 5.2 Instruction of HDD Installation ① ② ③ ④ ⑤ ⑦ ⑥ ⑧ 8 ⑨ ⑩ Make sure whether power switch is turned on or turned off, if it is turned on, please use the key, turn the indentation on the “turn off” position. Pull the front panel of the hard drive box. Carry out the hard drive and drop it on the table. Set down the two screws of the hard drive by cross-screwdriver. Drop the under backer of hard drive box, and then check the line whether it is on top of the under backer or not. Bring here the SATA hard drive which needs installation; connect the line joint of hard drive box to the hard drive. Please note the heading of the line while connecting. Make sure all of the connecting is complete done. Put the hard drive in the hard drive box. The obligate line of hard drive needs longer, the line of hard drive needs to lie on the right position. Let the four white screws of the machine through the center hole of the four shockproof rubber pads. Fix hard drive on the four holes of hard drive box, do not make the screws too taut, leave a little space for hard drive to move. So it can reach a perfect effect. Insert the hard drive under backer which has hard drive to the hard drive top backer, and then, use cross screwdriver and the screw to fix the under backer and the top backer. Aimed the hard drive box towards the groove of the front board, level push. Please note the face and back while pushing. Upturn the silk-screen on the right position. Wring the lock of the front board by key. Turn the groove on the “turn on” position, lock hard drive box to prevent hard drive from moving out. Note : Hard drive fixing lock besides fixing the hard drive, also take the place of host power switch .So do this operation, make sure all lines are completely connected. Otherwise, if car‘s power have been connected with the standard input voltage, the machine should be destroyed. So while installation, if the line has not been completely connected, 9 please stop to do this step. More careful when installation. The hard drive can not roll out even it has not been locked. 6 Instruction of Using 6.1 Instruction of Front Panel LED PWR LED: lighting while work starts. Power LED on. RUN LED: LED flashing when machine is normal working. HDD LED: when records, playback, video data are backing up, LED is flashing. GPS LED: GPS working LED indicator 3G LED: 3G working LED indicator Key and Other Descriptions DEBUG:Debug interface SIM interface: 3G interface IR: infrared receiving window. LOCK: while removing the hard drive, use the key to unlock in order to remove the hard drive, unlock after machine’s auto-disconnects the power, the power auto-connect after being locked. USB: playback the video data of hard drive via USB . NOTE:Recommend to use the SanDisk brand of the USB disk , the minimum volume 256M, must support the FAT32 file system. 10 6.2 Instruction of Remote Control Operation :Record key :Lead to menu : After entering sub-menu button to confirm, modify key parameters select . :Play key : Into menu mode, press left key, modify key parameters select . :Into menu mode, press right key, modify key parameters select . :Pause :Stop :Into menu mode, press up key. :Into menu mode, press down key. :①Recording video or play, screen zoom display in first channel.② System default password: six 1 this key. :①Recording video or play, screen zoom display in second channel.② Set System password. :①Recording video or play, screen zoom display in third channel.② Set System password. :①Recording video or play, screen zoom display in fourth channel.② Set System password 11 :①Recording video or play, screen zoom display in fifth channel.② Set System password :①Recording video or play, screen zoom display in sixth channel.② Set System password :①Recording video or play, screen zoom display in seventh channel.② Set System password :①Recording video or play, screen zoom display in eighth channel.② Set System password :①Eight channels display.② Modify system’s password Other number keys: Used for change password 6.3 Instruction of Menu Setup In surveillance mode, press . If it is the first time to enter the MENU interface, system will show “ENTER THE PASSWORD”(The defaulted password is 1234). When finished, press to enter the MENU interface. In the recording mode, please press stop recording, and then press first to to enter the MENU interface. Settings: To set up items as below TIME: Set up the time of the mobile DVR. CAR LICENSE:Set up the vehicle ID number. LANGUAGE : Can select“Chinese”or“English”. When finished, please restart the machine, then this setting will be effected. VIDEO MODE:Set up the video standard, can select PAL or NTSC. When finished, please restart the machine, then this setting will be effected. DELAY TIME:This item is for time-lapse turn off function. Defaulted time is 5seconds, you can set to 5s,30s,60s,120s,300s,600s,1200s,1800s.3600s.7200s. When finished, please restart the machine, then this setting will be effected. PASSWORD : Before change the password, you need to enter into the original password. 12 NEW PASSWORD:Enter into the new password. HDD:Can setup and check the information of the hard disk. HDD OVERWRITE:Setup the rewrite function HDD TOTAL SIZE:Show the total capacity of the hard disk. HDD FREE SIZE:Show the rest capacity of the hard disk. HDD FORMAT:Enter the password, the machine will format the hard disk and delet the video files in the hard disk automatically. Record:Settings for the video files. REC RESOLUTION:CIF(unchangeable) RECORD FRAME:25frames(unchangeable) REC QUALITY:Setup the picture quality(8 grades total,LOWEST—HIGHEST) DISPLAY CH:Setup how many channels display on the LCD monitor VIDEO RECORD CH:Setup the recording video channels, Red means record AUDIO RECORD CH:Setup the recording audio channels, Red means record. REC SCHEDULE:Setup the recording mode for different time White:No recording Red:Recording S:Alarm recording Search:Playback the recorded videos. FILE LIST:Display the date of the videos, enter into the date, you can see the time list of the videos within the day. Select the time according to your needs, press “PLAY”on the remote control to playback the videos. PLAYBACK CH:Only 1 channel can be playbacked on the machine with a LCD monitor(not on the computer), this item is for selecting the playback channel. Video download: Connect USB Flash Drives or HDD to USB interface in front of the DVR Shift to "Playback menu", select target video for download by Remote control, press "OK" to start copy. After download one section, do as the same way if your want to download more. Alarm: Alarm record time: 10-90 second since alarm record. Network: 13 DOMAIN NAME: Used for 3G spy, Server domain SERVER PORT: Used for 3G spy, Server Port STREAM SIZE: available for 24kbps, 48kbps, 96kbps, 128kps STREAM FRAME: available 1~25 fps 6.4 Video Data Volume The required volumes of video and video-related settings please see the following table VIDEO QUALITY Total Record Frame Data Size Per Hour HIGHEST 200 frame 1350 MB HIGHER 200 frame 1130MB HIGH(default) 200 frame 1015 MB BETTER 200 frame 790 MB NORMAL 200 frame 680 MB LOW 200 frame 565 MB LOWER 200 frame 340 MB LOWEST 200 frame 230 MB Note: Based on users matching conditions to apply the appropriate drive and related settings. 14 15