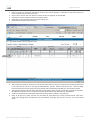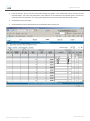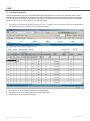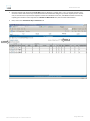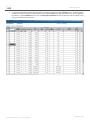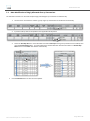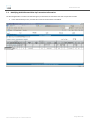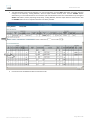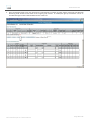
1
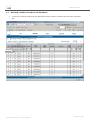
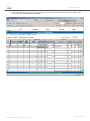
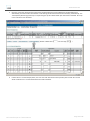
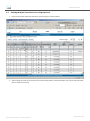
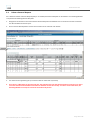
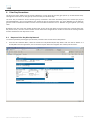
ICE Clear ACT User Guide Version 7.9 15 May 2015 This material may not be reproduced or redistributed in whole or in part without the express, prior written consent of IntercontinentalExchange, Inc. Copyright IntercontinentalExchange, Inc. 2015 All Rights Reserved. www.theice.com Date 26-Oct-11 Version 4 16-Oct-12 Description Author Initial Draft Nazareen Mahomed 6 Updates to reflect enhancement and changes relating to Platform 6.0 release Louisa Mattocks 19-Sep-14 7.6 15-May-15 7.9 Updates to reflect enhancement and changes relating to Platform 7.6 release Updates to reflect enhancement and changes relating to Platform 7.9 release Louisa Mattocks Marc MacQuarrie Page 2 of 57 ICE Clear Europe ACT User Manual www.theice.com Table of Contents 1 2 3 4 5 6 7 8 Accessing ACT ...................................................................................................................................................... 4 Allocating Give-Ups .............................................................................................................................................. 6 2.1 Allocating a Give-Up to a Single Member and Account ...............................................................................6 2.2 Allocating a number of trades to one destination .....................................................................................10 2.3 Multi-Allocate (Split ) a Give-Up Group ......................................................................................................13 Claiming a Transaction ....................................................................................................................................... 17 3.1 Claiming a Transaction into a Single Account .............................................................................................17 3.2 Claiming Multiple Transactions into a Single Account ...............................................................................23 3.3 Sub-Claim \ Claiming into Multiple Accounts .............................................................................................25 Rejecting an Allocation ...................................................................................................................................... 28 4.1 Claiming a Rejected Allocation ...................................................................................................................30 Reversals ............................................................................................................................................................ 31 5.1 Individual Same-Day Reversal Request ......................................................................................................31 5.2 Mass Same-Day Reversal Request ..............................................................................................................32 5.3 Muti-Allocated Same-Day Reversal Request ..............................................................................................33 5.4 Delete a Reversal Request ..........................................................................................................................34 5.5 Confirming Individual Reversal Request .....................................................................................................35 5.6 Confirming Mass Reversal Request ............................................................................................................36 Prior Day Corrections ......................................................................................................................................... 37 6.1 Request a Prior Day Give-Up Reversal ........................................................................................................37 6.2 Give Up/Back a Prior Day Claim ..................................................................................................................46 Modifying Transactions ..................................................................................................................................... 47 7.1 Modifying Allocation Information Single Give-up ......................................................................................47 7.2 Mass Modification of Singly Allocated Give-up Transactions ....................................................................48 7.3 Modifying Multi Allocated Give-Up Transaction Information ....................................................................49 7.4 Deleting an Unclaimed Give-up Allocation .................................................................................................51 7.5 Modifying a Claimed Give-up .....................................................................................................................54 7.6 Mass Modification of Singly Claimed Give-up Transactions.......................................................................55 7.7 Modifying a Single Give-Up Transaction Sub-Claimed into Multiple Accounts..........................................56 APPENDIX 1 – PTMS/ACT CODES ....................................................................................................................... 57 Page 3 of 57 ICE Clear Europe ACT User Manual www.theice.com Introduction ACT is a web-based application used to support give-up processing. The Member submits an executed transaction for giveup into the system, either by marking the trade for give-up through PTMS or via FIXML give-up API messages through use of a Member’s back office / middleware system (herewith the Allocating Member). Once a trade has been marked for give-up it will appear in ACT where the Allocating Member can further manage the give-up process for each transaction. Once a give-up has been allocated, the opposite member can, after reviewing the transaction in detail, can claim or reject the transaction (herewith the Claiming Member) If a give-up has not been claimed, the Allocating Member has the ability to delete the giveup mark and process the trade again. Please note for brevity, the term Member is used throughout this document to refer to both Energy Clearing Members and Exchange Members that access the ICE Clearing Systems. Each user will be issued a unique user ID and password which is used to access both PTMS and ACT. Access to the ICE Clear Europe Systems can be requested from ICE Clearing Operations – [email protected] or +44 (0)20 065 7600. Access to ICE Clear U.S. systems can be requested from ICE Clear U.S. – [email protected] or (312) 836-6718. 1 Accessing ACT ACT is a web based application and can be accessed via the following URL: ICCA: https://act.caclearing.theice.com ICEU: https://act.euclearing.theice.com ICUS: https://act.usclearing.theice.com The links can also be accessed through the respective clearing organization technology pages which are available at www.theice.com, or by clicking the applicable link below: ICCA: https://www.theice.com/clear_canada_technology.jhtml ICEU: https://www.theice.com/clear_europe_operations.jhtml ICUS: https://www.theice.com/clear_us_technology.jhtml Page 4 of 57 ICE Clear Europe ACT User Manual www.theice.com 1. 2. 3. 4. 5. 6. 7. Once the Username and Password has been authenticated, an ACT Selection Menu screen is displayed. The Current Trading Member can be ‘set as default’ in the home screen of ACT, whenever the user logs in the system remembers the Trading Member selected as default. ACT News: When there are Products expiring during the day the News section will shows the products expiring details in the news lists include the clearing date and when the products is expiring Otherwise, it shows no news found. To begin reviewing transactions for give-up/claim, choose the appropriate Trading Member within the Current Trading Member dropdown box, located in the upper left hand corner of the screen (Please note that availability of the Members in the dropdown box is restricted according to the access permission on a per user basis). Then select either the Allocate Group or Claim button for desired view/role. Also at this time, additional search/filter criteria can be entered in order to locate a specific give-up/claim transaction. A user can also select the status from this home screen too. Click the GO button to access the selected screen. Towards the bottom of the home page there is a functionality to export all Allocated and Claimed business for top day business. Users can view cleared trades from up to four prior business days by selecting the Create Prior Day Reversal/Give Ups option in the Prior Day section. Page 5 of 57 ICE Clear Europe ACT User Manual www.theice.com 2 Allocating Give-Ups 2.1 Allocating a Give-Up to a Single Member and Account From the ACT Selection Menu, select either the Allocate Group button and click the Submit button; or if already in one of the other ACT screens click on the Allocate link within the navigation bar at the top of the screen. Page 6 of 57 ICE Clear Europe ACT User Manual www.theice.com 1. 2. 3. 4. 5. 6. 7. 8. 9. Once the screen has refreshed, the Allocate Group screen will be displayed. If desired, use the search feature to locate a specific give-up group to allocate. Once in the screen the user can select the number of lines per page 10, 20, 50,100,400 Clear button to Clear the data entered in searchable fields CLR button to clear the data entered in corresponding rows Export button to export the transactions After locating the trade to be given-up, click the Fast Alloc button and enter the appropriate accepting information in the Take Up Info section on the right (Trading Member, Account, Position Account and CTI – IFUS and IFED). Please note that the Account, Position Account, Memo and CTI fields (IFUS and IFED) are not mandatory entries. The Open/Close (O/C) indicator within the take Up Info defaults from the give up side after creating the allocation. By default the O/C value is ‘O’ if the product supports Close Outs the O/C field shows an editable box. Trades can be filtered by selecting the status from the drop down including TT, O/C, B/S, P/C. Order id, AP group id, Trader, Account, Pos acct, Rate ID, Trade date, Exch, Comm, Contract Period, strike Price, Trade Price, Average Price, Rounded Price, per unit Residual, Trade Qty, TM, Account , Pos acct , CTI are searchable fields Page 7 of 57 ICE Clear Europe ACT User Manual www.theice.com 10. Now click on the Submit button. Page 8 of 57 ICE Clear Europe ACT User Manual www.theice.com 11. After the screen has refreshed, the unallocated group (UA) will display a new status of Allocated (A). If the trade has not been accepted, ACT will allow modification of the Position Account, Account Reference and CTI (IFUS and IFED only) as long as the reallocation does not result in over-allocation of the transaction. 12. Multiple allocations in allocation detail screen in the Actions section can be created from fast populate. 13. An allocated Group (not Claimed) can be under allocated by replacing the quantity, in that case A status changes to UDA. 14. A rejected allocation can be deleted or reallocated to a different firm, in reallocating to a different firm status changes from REJ to A Page 9 of 57 ICE Clear Europe ACT User Manual www.theice.com 2.2 Allocating a number of trades to one destination 1. To allocate a number of trades to the one destination, find your trades in under the ‘Allocate’ screen. Click ‘FAST POP’. Page 10 of 57 ICE Clear Europe ACT User Manual www.theice.com 2. Scroll to the right along the same dark grey line as the Fast Pop tick box and populate the allocation details in the white boxes. Click FAST POPULATE and SUBMIT. Page 11 of 57 ICE Clear Europe ACT User Manual www.theice.com 3. All of the trades that were on the screen will now be allocated to that one destination. Page 12 of 57 ICE Clear Europe ACT User Manual www.theice.com 2.3 Multi-Allocate (Split ) a Give-Up Group 1. From the Allocate Group screen, locate the group to be multi-allocated. Click on the Go link next to trade to be multi-allocated/split. Page 13 of 57 ICE Clear Europe ACT User Manual www.theice.com 2. An Allocate Detail screen will open. The top portion of the screen represents the original trade that is being multiallocated (split). The bottom portion of the screen is used to enter the different Members/accounts the trade needs to be given-up to. 3. Begin entering the Claim Member information into the first available line, using a new line for each new Claim Member and/or account detail. If you require more than the defaulted 4 lines, simply key in the number you wish in the ‘Number of Blank Rows’ box. 4. When finished, click Submit. Page 14 of 57 ICE Clear Europe ACT User Manual www.theice.com 5. Once the screen has refreshed, the status of the multiple/split give-up will update from Unallocated (UA) to Allocated (A) and if the trade is allocated to a self clearing account the status will be Claimed (C) automatically. The Total Quantity Remaining (at the top in red) for the give-up will reduce based upon the amount allocated. Give-ups in ACT cannot be over-allocated. 6. If the trade is in an allocated (A) status, the user must sub-allocate the entire quantity of the trade. ACT will not allow a trade that is in an allocated status to be under-allocated. Page 15 of 57 ICE Clear Europe ACT User Manual www.theice.com 7. Click the Close and Refresh button to close the window. 8. If only part of the give-up had been allocated, the status associated with the give-up will be “Under-allocated” (UDA). The Take-up Info section will display Multi within each claim field to show that the applicable give-up has multiple allocations associated with it. Page 16 of 57 ICE Clear Europe ACT User Manual www.theice.com 3 Claiming a Transaction 3.1 Claiming a Transaction into a Single Account 1. From the ACT Selection Menu, select the Claim button and click the Submit button or if already in one of the other ACT applications, click on the Claim link within the navigation bar at the top of the screen. Page 17 of 57 ICE Clear Europe ACT User Manual www.theice.com 2. Once the screen has refreshed, the Claim screen will be displayed. If desired, use the search feature to locate a specific trade to claim. Page 18 of 57 ICE Clear Europe ACT User Manual www.theice.com 3. After locating the trade to be claimed in, click on the Fast Claim button and populate the allocation details on the right hand side of the screen under the ‘TAKEUP INFO section (Account, Pos Acc and CTI code – IFUS and IFED only) 4. If CTI is not entered for (IFUS and IFED) CTI will default 5. Memo is not an editable field on the take up side, Groups can be filtered by selecting the status from the drop down, other filterable columns are TT, O/C,B/S,P/C 6. Order id, AP group id, Trader, Account, Pos acct, Rate ID, Trade date, Exch,Comm,Contract Period, strike Price, Trade Price, Average Price, Rounded Price, per unit Residual, Trade Qty, TM, Account , Pos acct , CTI are searchable fields 7. The user can select the number of lines per page 10, 20, 50,100,400 Page 19 of 57 ICE Clear Europe ACT User Manual www.theice.com 8. Then click on the Submit button. Page 20 of 57 ICE Clear Europe ACT User Manual www.theice.com 9. To claim an Equity trade in as a closing trade, populate the OC indicator with a ’C’ within the Takeup Info section . Page 21 of 57 ICE Clear Europe ACT User Manual www.theice.com 10. After the screen has refreshed, the unclaimed transaction (UC) will display a new status of Claimed (C). Page 22 of 57 ICE Clear Europe ACT User Manual www.theice.com 3.2 Claiming Multiple Transactions into a Single Account 1. Filter and locate the trades that need to be claimed using the necessary filters. 2. After locating the trades to be claimed, click on the Fast Pop button in the third header row. This will select all trades that are listed on the screen. Page 23 of 57 ICE Clear Europe ACT User Manual www.theice.com 3. Enter the Account, Pos Acc and CTI code (IFUS and IFED only) details in the Takeup Info section and click the Fast Populate button. This action will populate the claim detail for all the trades that are selected. Again if you wish for an equity trade to be claimed in as a closing trade, populate the O/C column within the Takeup Info section. 4. Click Submit to claim the trades. 5. All the trades will now be allocated to that one destination with a status of ‘C’ Page 24 of 57 ICE Clear Europe ACT User Manual www.theice.com 3.3 Sub-Claim \ Claiming into Multiple Accounts 1. From the Claim screen, locate the claimed trade to sub-claim and\or give-up then click on the Go link for that transaction. The Claim Detail Sub-Claim Screen will open. Page 25 of 57 ICE Clear Europe ACT User Manual www.theice.com 2. The top portion of the screen represents the original claim that had been claimed. The bottom portion of the screen is used to sub-claim the claim into multiple accounts. Additionally, the Claim Detail screen can be used to give-up the full or partial amount of the claimed claim. 3. Enter the sub claim information, using a new line to for each separate account. A claim must be fully sub-claimed. Partial sub-claims are not allowed. 4. To give up all or a portion of a sub-claimed trade, tick the “GU” button next to each applicable sub-claim. Once submitted, a give-up summary record that represents the sub-claim marked for give-up will be created and viewable within the Allocate Group where the remaining allocation instructions can be provided. 5. A claimed claim cannot be over sub-claimed. 6. Click Submit. Click the Close and Refresh button to close the window. Page 26 of 57 ICE Clear Europe ACT User Manual www.theice.com 7. The trades are now claimed and will have a ‘C’ status. Page 27 of 57 ICE Clear Europe ACT User Manual www.theice.com 4 Rejecting an Allocation The claiming Member may reject unclaimed trades allocated to them. If a trade is in a rejected state the claim Member still retains the ability to claim the trade. When the Take up firm claim the trade the REJ status changes to C on both Giveup and Take up side. When the group is sub claimed in multiple blocks, the claim screen shows multi for Claim rec id, account, pos acct, CTI, O/C and memo. 1. To reject an unclaimed trade, navigate to the Claim screen. Locate the claim to be rejected and click the Reject button that appears next to that transaction and click the Submit button. 2. Clear button to Clear the data entered in searchable fields 3. CLR button to clear the data entered in corresponding rows 4. Export button to export the transactions Page 28 of 57 ICE Clear Europe ACT User Manual www.theice.com 5. The status for the applicable claim, which will continue to be displayed on the screen, will be updated to REJ (Reject). The same status will be displayed to the allocating Member, who will now have the ability to edit the trade data and reallocate if need be. 6. If the trade remains in the REJ status at the end of the day, the trade will default to the allocating Member’s Default position account and appear in ACT as REJ and in PTMS on the Dashboard tab the next business day. Page 29 of 57 ICE Clear Europe ACT User Manual www.theice.com 4.1 1. Claiming a Rejected Allocation To claim a trade in a REJ status, navigate to the Claim screen. Locate the rejected trade to claim and click the Fast Claim button that appears next to that transaction, complete the required Claim Info to the right of the screen. 2. Click the Submit button. Once the Claim screen has refreshed the status of REJ (Reject), for the applicable claim, will be C (Claim). Page 30 of 57 ICE Clear Europe ACT User Manual www.theice.com 5 Reversals 5.1 Individual Same-Day Reversal Request Same-day reversal functionality is used to correct give-ups allocated and claimed in error. The Allocating Member is responsible for initiating the reversal request. 1. Navigate to the Allocate screen and locate the Claimed Give-Up trade to be reversed. Click the Req Rev radio button. 2. Click to the Submit button complete initiated the Reversal Request. New status RRV (Reversal Request) will be displayed. At this point the Claiming Member will be able to confirm the reversal. Page 31 of 57 ICE Clear Europe ACT User Manual www.theice.com 5.2 Mass Same-Day Reversal Request The Allocation member can simultaneously perform a mass Reversal Request on singly claimed give-up transactions. 3. 1. Use the search line feature to isolate a group of singly claimed give-up transactions to be mass reversed. 2. Check the Req Rev All box to turn on all Req Rev radio buttons or individually click applicable Req Rev radio buttons, then click the Submit button to initiate selected Reversal Requests. The status of the request will be updated to RRV (Reversal Requested). At this point the claiming Member can reconfirm the reversal request. Page 32 of 57 ICE Clear Europe ACT User Manual www.theice.com 5.3 Muti-Allocated Same-Day Reversal Request The Allocation member can initiate a Reversal Request for a give-up transaction that has been multi allocated. 3. 1. Locate the multi allocated give-up transaction to be reversed and click the applicable Go link. 2. The Allocate Detail screen will be displayed. Check the applicable Req Rev radio buttons, then click the Submit button to initiate selected Reversal Requests. The status of the request will be updated to RRV (Reversal Requested). At this point the claiming Member can confirm the reversal request. Page 33 of 57 ICE Clear Europe ACT User Manual www.theice.com 5.4 Delete a Reversal Request If it is determined that a Reversal Request (RRV) is not needed, the Reversal Request can be deleted. The allocating Member is responsible for deleting Reversal Requests. 1. Navigate to the Allocate screen and locate the Reversal Request to be deleted. Click on the Go link for that transaction. The Allocate Detail screen will open. 2. Click on the Del Rev Req button next to the transaction to be reversed. Click Submit. 3. The status for the applicable give-up transaction will be revert back C (Claimed). 4. If a trade is in a RRV status at the end of the day, the trade will clear into the claimed member’s account as if it was in a C status and will not be available in the claim or allocation screen the next day. In order to reverse the Claim, the allocating Member must request a reversal via the Prior Day Screen. Page 34 of 57 ICE Clear Europe ACT User Manual www.theice.com 5.5 Confirming Individual Reversal Request In order for the reversal process to be completed, the claiming Member needs to confirm both same day and/or prior day reversal requests. 1. Navigate to the Claim screen and locate the claim reversal to be confirmed. The status of all reversal requests are displayed as RRV. 2. 3. Click the applicable Accept Rev radio button, then click the Submit button to accept and confirm selected Reversal Request. The status of the claim transaction will be updated to CRV (Confirmed Reversal). At this point the allocating Member can re-allocate the give-up. Page 35 of 57 ICE Clear Europe ACT User Manual www.theice.com 5.6 Confirming Mass Reversal Request In order for the reversal process to be completed, the claiming Member needs to confirm both same day and/or prior day reversal requests. 2. Navigate to the Claim screen and use the search feature to locate the Reversal Requests to be confirmed. The status of all reversal requests are displayed as RRV. 3. 4. Check the Accept Rev All box to turn on all Accept Rev radio buttons, then click the Submit button to accept and confirm selected Reversal Requests. The status of the claim transaction will be updated to CRV (Confirmed Reversal). At this point the allocating Member can re-allocate the give-up. Page 36 of 57 ICE Clear Europe ACT User Manual www.theice.com 6 Prior Day Corrections The Prior Day screen allows users to reverse individual or a mass group of prior day give ups for up to two business days. Through this screen users can also give up claims from two prior business days. The Prior Day Transactions screen contains give-up transactions that were allocated (From) and claimed (To) by the associated Member. Only ‘From’ Members can initiate the give-up reversal process. The ‘From’ Member has the ability to give the trade to a different member once the reversal has been confirmed. The ‘To’ Member can give up/back a prior day claim. By default, Prior day screen has number of blank rows set to 4. If the user wants to reverse more than 4 records from prior day search screen , the main screen number of rows needs to be changed first to number of reversals the clearing member wants to intiate from Prior day search screen 6.1 Request a Prior Day Give-Up Reversal To reverse a previously cleared give-up transaction, member users will use the Prior Day feature. 1. From the ACT Selection Menu, select the Create Prior Day Reversals/Give Ups button and click the Go button or if already within the ACT application, click on the Prior Day link within the navigation bar at the top of the screen. Page 37 of 57 ICE Clear Europe ACT User Manual www.theice.com 2. Once the browser has refreshed, the Prior Day screen is displayed. To begin the T+1 or T+2 reversal processes, ACT users will use the Search Prior Day Transactions feature that automates the give-up reversal request process. Please note, If more than four as/of reversal requests need to be submitted at one time, add additional blank rows first by inputting the number of rows required in the Number of Blank Rows field, then click the Submit button. 3. Next, click on the Search Prior Day Transactions link. Page 38 of 57 ICE Clear Europe ACT User Manual www.theice.com 4. A new window will open that allows users to search for previously cleared give-ups/take-ups which are available for up to two prior clearing days. Under the cleared date column there is a drop down for you to select the date you require. The To/From column can be filtered to assist with your search criteria. All ‘TO’ trades will show fully processed take ups you accepted. The ‘FROM’ trades will show fully processed trades you gave up and were accepted by the opposite entity. Page 39 of 57 ICE Clear Europe ACT User Manual www.theice.com 5. To reverse an individual as/of give-up transaction, locate the transaction using the Search feature. Once the trade is located, the reversal process is initiated by clicking an individual Rev check box that appears next to the applicable transaction. Click the Submit button to close the Prior Day Transactions screen and load the reversal request to the main Prior Day (Instructions) screen. Page 40 of 57 ICE Clear Europe ACT User Manual www.theice.com 6. To reverse a group of as/of give-up transaction, locate the group of transactions using the Search feature. Once the as/of give-up transactions have been located, the reversal process is initiated by clicking the Rev All check box that appears at top of the Action column. Click the Submit button to close the Prior Day Transactions screen and load the reversal requests to the main Prior Day (Instructions) screen. 7. The Prior Day screen Submit action will automatically populate the Prior Day Transaction screen. At this point, the Member user has an opportunity to review the applicable previous business day give-up reversal to insure the correct record to reverse has been uploaded. Click Submit. Once processed, the as /of Reversal Request(s) will appear at the bottom of the table. Page 41 of 57 ICE Clear Europe ACT User Manual www.theice.com 8. Then on the navigation bar of the ACT selection Menu, select the Allocate button. The prior day reversal trades will be shown here with a status of RRV. 9. After Reversing of the Prior day group, RRV can be deleted from Allocation detail screen. When RRV is deleted the check box to reverse the cleared claim in the Prior day screen enables, and allows the user to reverse the transaction again 10. All the fields are searchable in Search Prior day Transaction screen 11. The quantity is editable in Prior day give-up Page 42 of 57 ICE Clear Europe ACT User Manual www.theice.com 12. The Claiming Member can now accept the reversal via the Claim Screen. Once accepted, the trade will be in a CRV status. Page 43 of 57 ICE Clear Europe ACT User Manual www.theice.com 13. Once the trade is in a CRV status the original member has the ability to allocate all or part of the volume back to the member they initially gave it to or allocate all or part of the trade to another member entirely. To do this, click the GO button and an Allocate Detail screen appears. Click the ALLOC button and complete the Alloc Qty, Trading Member and/ or Account and CTI (IFUS and IFED only) code and then click SUBMIT. Once allocated the trade status will change to A for Allocated. These will now be ready for the corresponding members to accept on the CLAIM screen in ACT in the same behavioural way as top day business. Page 44 of 57 ICE Clear Europe ACT User Manual www.theice.com 14. Once allocated the trade status will change to A for Allocated. These will now be ready for the corresponding members to accept on the CLAIM screen in ACT in the same behavioural way as top day business. Page 45 of 57 ICE Clear Europe ACT User Manual www.theice.com 6.2 Give Up/Back a Prior Day Claim 1. In the Prior Day Transactions (Instructions) screen select the GU option on the claim that is to be given up and select Submit. 2. The Prior Day screen Submit action will automatically populate the Prior Day Instruction screen. At this point, the Member user has an opportunity to review the claim that will be given up/returned. To give up/return the trade scroll to the right and populate the trading member and account columns and click submit. 3. The claiming Member can then claim the trade on the claim page just the same as if it was a top day give up. Page 46 of 57 ICE Clear Europe ACT User Manual www.theice.com 7 Modifying Transactions 7.1 Modifying Allocation Information Single Give-up The Allocating Member can edit take-up information for a single allocation that has not yet been claimed. 1. Update applicable Take-Up information 2. Once Take-up information has changed on an unclaimed allocation, the EDIT radio button for the applicable allocation automatically turns on. 3. Click the submit button to save edit. Page 47 of 57 ICE Clear Europe ACT User Manual www.theice.com 7.2 Mass Modification of Singly Allocated Give-up Transactions The allocation member can mass edit multiple singly allocated give-up transactions simultaneously. 1. 1. Use the search line feature to isolate a group of give-up transactions to be edited simultaneously. 2. Input the Take-Up Info to be updated in the applicable Fast Pop field . 3. Check the Fast-Pop All box or each individual transaction Fast-Pop box for give-up allocations to be edited, then click the Fast Populate button. This will update each checked allocation with the information in the Fast Pop field and turn on the Edit radio button automatically. Click the Submit button to save the mass updates. Page 48 of 57 ICE Clear Europe ACT User Manual www.theice.com 7.3 Modifying Multi Allocated Give-Up Transaction Information The Allocating Member can edit multi-allocated give-up information for allocations that have not yet been claimed. 1. In the Allocate Group screen, click the Go link next to the allocation to be edited. Page 49 of 57 ICE Clear Europe ACT User Manual www.theice.com 2. The Allocate Detail screen will be displayed. For current allocations, click the EDIT radio button and make necessary changes to the Quantity, Trading Member, Account and/or Position Account, then click the SUBMIT button. Alternatively, an unclaimed allocation can be further split and allocated to more than one destination by clicking the ALLOC radio button, further populating the Quantity, Trading Member, Account and/or Position Account field. Click the SUBMIT button once all requisite information has been provided. 3. Click on the Close and Refresh button to close the screen. Page 50 of 57 ICE Clear Europe ACT User Manual www.theice.com 7.4 Deleting an Unclaimed Give-up Allocation The Allocating Member can delete give-up allocations that have not yet been claimed. 1. In the Allocation Group screen, click the Go link next to group that needs an allocation to be deleted. 2. The Allocate Detail screen will open. Click the Del (Delete) button next to the allocation to be deleted, and then click on the Submit button. Page 51 of 57 ICE Clear Europe ACT User Manual www.theice.com 3. Once the Allocate Detail screen has refreshed, the allocated give-up should no longer appear and Group Total Quantity Remaining Field should increase back to the original group amount. If needed, the give-up transaction can be reallocated through use of the Allocate Detail screen at this time. Page 52 of 57 ICE Clear Europe ACT User Manual www.theice.com 4. Furthermore, once the Allocate Detail screen has been closed and refreshed, within the Allocate Group screen, the applicable give-up’s original status of A (Allocated) has been replaced with the status of UA (unallocated). If needed, the give-up group can be re-allocated through use of the Allocate Group screen at this time. Page 53 of 57 ICE Clear Europe ACT User Manual www.theice.com 7.5 Modifying a Claimed Give-up The Claiming Member can edit take-up information for a single claimed give-up. 1. Update applicable Take-Up information 5. Once Take-up information has changed on the claimed give-up, the EDIT radio button automatically turns on. 6. Click the submit button to save edit. Page 54 of 57 ICE Clear Europe ACT User Manual www.theice.com 7.6 Mass Modification of Singly Claimed Give-up Transactions The claim member can mass edit multiple singly claimed give-up transactions simultaneously. 2. 4. Use the search line feature to isolate a group of singly claimed give-up transactions to be edited simultaneously. 5. Input the Take-Up Info to be updated in the applicable Fast Pop field . 6. Check the Fast-Pop All box or each individual transaction Fast-Pop box for claimed give-ups to be edited, then click the Fast Populate button. This will update each checked allocation with the information in the Fast Pop field and turn on the Edit radio button automatically. Click the Submit button to save the mass updates. Page 55 of 57 ICE Clear Europe ACT User Manual www.theice.com 7.7 Modifying a Single Give-Up Transaction Sub-Claimed into Multiple Accounts 1. Navigate to the Claim screen. 2. Within the Claim screen, click the Go link that appears next to the applicable claim record. 3. The Claim Detail screen will open. 4. Click the Edit button next to the claim record that needs to be updated. Update applicable Account and Pos Account information. 5. Click the Submit button to save changes. Page 56 of 57 ICE Clear Europe ACT User Manual www.theice.com 8 APPENDIX 1 – PTMS/ACT CODES PTMS Code UA UAC Description Workflow Allocated Transfer Unmatched/Allocated/Challenged Transfer Create Transfer ‘To’ Member Challenges Transfer Before Acceptance MAA Matched/Allocated/Accepted ‘To’ Member Accepts Trade/Transfer MAC Matched/Allocated/Challenged ‘To’ Member Challenges Transfer After Acceptance CNL Cancelled Transaction ‘From’ Member Cancels Trade/Transfer ACT Code Description Workflow A Allocated Group is allocated/Un-claimed allocation C Claimed Claim Allocation CA Sub Claimed Sub-Claim a Claim Record CRV Confirmed Reverse UDA Under Allocated Accept a Reversal Under-allocate Group (Sum of Allocation Qty<Group Qty) UDC Under Claimed OVA Over Allocated Under-claimed Group (Sum of Claim Qty<Group Qty) Over-allocate Group (Sum of Allocation Qty>Group Qty) REJ Rejected (REJ) Reject Allocation RRV UA Initiated Reverse (RRV) Unallocated (UA) Request Reversal of a Claimed Allocation Group is un-allocated (Allocation Qty="0") ACT Code Description Workflow UC Unclaimed Un-claimed Pending Allocation Page 57 of 57 ICE Clear Europe ACT User Manual