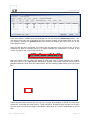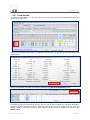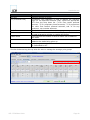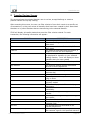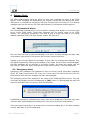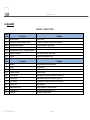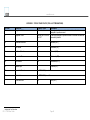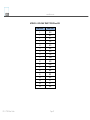
1
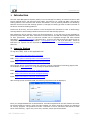
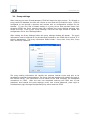
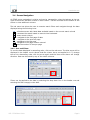
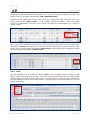
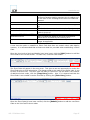
ICE Clear PTMS User Guide Version 7.6 September 2014 This material may not be reproduced or redistributed in whole or in part without the express, prior written consent of IntercontinentalExchange, Inc. Copyright IntercontinentalExchange, Inc. 2014. All Rights Reserved. www.theice.com Date 9- Sept-2011 Version 4.0 Description Initial draft 14-Nov-2011 4.1 Updates: All changes are highlighted in green Memo field is editable (Page 14) Volume of buys and Sells (Page 16, 33, 40) 5-Oct-2012 6.0 29-July-2013 6.5 30-May-2014 7.0 29-July-2014 7.5 26-Sept-2014 7.6 Updated to 6.0 release Updated to 6.5 release Updated to 7.0 release Updated to 7.5 release Updated to 7.6 release ICE – PTMS User Guide reflects enhancements and changes pertaining to the reflects enhancements and changes pertaining to the reflects enhancements and changes pertaining to the reflects enhancements and changes pertaining to the reflects enhancements and changes pertaining to the Author Nazareen Mahomed Nazareen Mahomed Marc MacQuarrie Marc MacQuarrie Marc MacQuarrie Marc MacQuarrie Marc MacQuarrie Page 2 www.theice.com Table of Contents 1 2 Introduction ............................................................................................. 4 Logon to System ...................................................................................... 4 2.1 2.2 2.3 2.4 Proxy settings ............................................................................................... 5 Log File Location settings ................................................................................ 6 Screen Layout ............................................................................................... 7 Screen Navigation .......................................................................................... 8 2.4.1 2.4.2 2.4.3 2.4.4 2.4.5 3 Trade Review Screen .............................................................................. 12 3.1 3.2 3.3 3.4 3.5 3.6 3.7 Trade Summary ........................................................................................... 14 Volume of Buys and Sells .............................................................................. 15 Single Line Update ....................................................................................... 16 Multiple Line Update ..................................................................................... 17 Mass Removal Feature .................................................................................. 19 Split Functionality ........................................................................................ 21 Give Up Functionality.................................................................................... 23 3.7.1 3.7.2 4 5 6 9 Marking a trade for Give-up .................................................................................23 Marking Trades with Destination information ..........................................................24 3.8 3.9 Average Price Functionality ........................................................................... 25 Trade Details ............................................................................................... 27 4.1 4.2 Review Details ............................................................................................. 30 Submit Group .............................................................................................. 30 5.1 5.2 5.3 5.4 5.5 Total Buys and Sells ..................................................................................... 33 Create Position Transfer ................................................................................ 34 Accepting Position Transfers .......................................................................... 36 Challenging Position Transfers ....................................................................... 37 Cancellation of a Transfer ............................................................................. 37 6.1 6.2 6.3 6.4 6.5 Search for Previously Cleared Transactions ..................................................... 39 Total Buys and Sells ..................................................................................... 41 Reversing a previously cleared Position Transfer .............................................. 42 Create an Adjustment ................................................................................... 43 Modification of Previously Cleared Trades ........................................................ 44 AP Group Review Screen ......................................................................... 28 Transfer Review Screen ........................................................................... 31 Previously Cleared Transactions ............................................................... 38 6.5.1 6.5.2 7 8 Sort and Filters ................................................................................................... 8 Column Location, Size and View ............................................................................ 9 Print .................................................................................................................10 Export ...............................................................................................................11 Ideas ................................................................................................................11 Adding Previously Cleared Transaction to AP Group .................................................44 Marking a Previously Cleared Transaction for Give Up..............................................44 Short Codes ........................................................................................... 45 7.1 7.2 7.3 Create a Short Code ..................................................................................... 45 Managing Short Codes .................................................................................. 48 Applying a Short Code .................................................................................. 48 8.1 Dashboard Functions .................................................................................... 50 9.1 9.2 Informational Alerts ..................................................................................... 51 Emergency Alerts ......................................................................................... 51 PTMS Dashboard .................................................................................... 49 System Alerts ........................................................................................ 51 10 11 Logout ............................................................................................... 52 Appendix ............................................................................................ 53 ICE – PTMS User Guide Page 3 www.theice.com 1 Introduction The Post Trade Management System (PTMS) is used to manage the clearing of trades executed on ICE Futures Canada (IFCA), ICE Futures Europe (IFEU), ICE Futures U.S. (IFUS and IFED), and ICE OTC trading platform. This document will describe how PTMS is used by Clearing Members and Exchange Members that access the ICE Clearing Systems to manage the clearing process of trades executed on the above mentioned trading platforms Please note for brevity, the term Member is used throughout this document to refer to both Energy Clearing Members and Exchange Members that access the ICE Clearing Systems. Each PTMS user will be issued a unique user ID and password. A user will have screens available for processing trades that have been executed on the ICE Futures and ICE OTC trading platforms based on their permissions. Access to ICE Clear Canada can be requested through ICE Clear Canada Operations - [email protected] or (204) 925-5017. Access to the ICE Clear Europe Systems can be requested through ICE Clearing Operations – [email protected] or +44 (0)20 065 7600. Access to ICE Clear U.S. systems can be requested through ICE Clear U.S. – [email protected] or (312) 836-6777. 2 Logon to System To log into PTMS, click on the applicable link. ICCA: https://ptms.caclearing.theice.com/client ICEU: https://ptms.euclearing.theice.com/client/ptms.jnlp ICUS: https://ptms.usclearing.theice.com/client/ptms.jnlp The links can also be accessed through the respective clearing organization’s technology pages which are available at www.theice.com, or by clicking the applicable link below: ICCA: https://www.theice.com/clear-canada/technology ICEU: https://www.theice.com/clear-europe/technology ICUS: https://www.theice.com/clear-us/technology After clicking the link to launch PTMS, the following Login Screen will be displayed: Enter your assigned PTMS User ID and Password. User IDs and passwords are case sensitive and must be entered exactly as created. Upon first login to PTMS, you will be required to change your password for security purposes. The password must be a minimum of seven characters and contain at least three of the following: upper case, lower case, numbers, and/or special characters. ICE – PTMS User Guide Page 4 www.theice.com 2.1 Proxy settings After entering your user ID and password, PTMS will begin the login process. If a firewall or proxy conflict is detected, the user will receive an error and will be unable to login. PTMS is configured to run through a browser and connect with no configuration changes for the Member. If your firm has a firewall setting or a proxy server that prevents users from accessing PTMS, the firm’s security team can configure the proxy settings allowing user access to PTMS. Click on the “Proxy Settings” link from the login screen to update the configuration file for the PTMS application. After clicking the Proxy Settings button the proxy settings window will appear. The proxy information must be entered on this window and provided by the PTMS user’s internal IT or security department. The proxy information fields include: Proxy Host, Proxy Port, Proxy User, and Proxy Password. The proxy setting information will identify the physical internal server and port to be accessed for external communications. The proxy user and password will identify the user to the internal server. This information will be saved to the local computer for subsequent connections to PTMS. After the user has completed entering the PTMS user id and password, and entered the proxy settings, proxy user id and password, press login to simultaneously login through the specified proxy server and into PTMS. ICE – PTMS User Guide Page 5 www.theice.com 2.2 Log File Location settings PTMS creates a log file to assist in the diagnosis of a user’s interaction with PTMS. By default, these log files are stored to the user’s documents folder on the C drive of the user’s computer. A typical location would be C:\Documents and Settings\username\ptms\iceclear. The location will always be the default location described above. If the user has restrictions that require this log file to be written to an alternate location, the following actions may be taken. After logging into PTMS, click the menu item PTMS on the toolbar at the top left corner of the screen. Select Preferences, and then ‘Change Logfile Location’ from the drop down menus. After selecting ‘Change Logfile Location’, PTMS will display the current destination where the logfiles are written. Using this window, select the directory and location available to your computer where you require the log files to be stored. After the location has been defined, select the [Save] button to save these preferences. After clicking [Save] PTMS will display a confirmation message identifying the location selected. Note: The user must have access to the directory selected for this function. The log files will not be directed to the new location until the next login to PTMS. If the user continues in PTMS without logging out, the files will be written to the original default location. ICE – PTMS User Guide Page 6 www.theice.com 2.3 Screen Layout The various PTMS screens are accessible via tabs at the top of each screen. Once logged in, the user will be defaulted to the last screen accessed by the user. If accessing for the first time, the Trade Review screen will be the default screen displayed. The tabs across the top right of the screen identify the screens available to the PTMS user. The screens available are as follows: 1. Trade Review – Displays all top day trades for the selected Member and management thereof. Including trade account management, marking for Give Up and Average Pricing. 2. Short Codes – Allows for the addition of user defined short codes which are used to quickly and efficiently mark trades for Give-up and allocate them. 3. Group Review – Average Price (AP) Group management screen. From this screen AP groups can be submitted to ACT for Give Up processing. 4. Transfer Review – Position Transfer management and creation screen. 5. Previously Cleared Transactions – Displays all T+1 and T+2 trades for the selected Member, including defaulted trades. Adjustments for Previous and Prior day business can be executed from this screen. 6. Dashboard – Provides Member staff with a summarized view of outstanding transactions sorted by status within both PTMS and ACT. The screen also allows the users to select a group of transactions. Once a group is selected, the user will be navigated to the applicable application and the applicable transactions will be displayed. After logging into PTMS the user can then select the applicable Exchange and Trading Member combination they wish to view trade details for. ICE – PTMS User Guide Page 7 www.theice.com 2.4 Screen Navigation All PTMS screen navigation is similar and can be managed by using the buttons at the top right of the screen and filter criteria on each column. Use the scroll bar at the bottom of the screen to view additional columns. The tab menu bar allows the user to execute search filters and navigate through the data displayed using the following icons: - refreshes screen with latest data available based on the current search criteria - executes the search based on search criteria selected - clears search criteria - navigates to the first page of data - navigates to the previous page - navigates to the last page - navigates to the page number entered - sets the number of lines per page 2.4.1 Sort and Filters To sort the data displayed in ascending order, click on the red arrow. The blue arrow will be displayed in the header row to denote that the column has a sort applied to it. To change the sort to descending order click the arrow again and the blue arrow above will change direction. Data can be sorted by any of the visible columns. Filters can be applied to the data by selecting the drop down icon in the header row and selecting the filter to apply to the data. ICE – PTMS User Guide Page 8 www.theice.com Common and/or repetitive searches can be saved for later use by right clicking on any column header and selecting ‘Save As’ and specifying a name for the filter. Saved searches can be selected by right clicking on any column header and selecting ‘Select Search’. Saved search can be deleted by clicking the column header and selecting ‘Delete Search’ 2.4.2 Column Location, Size and View The location and size of each column on all PTMS screens can be tailored to suit each user’s personal preference. To move a column, left click on the column header and hold the mouse button down, drag the column to the desired location and release the mouse button. To resize a column, place the cursor on the edge of the column heading until a double headed arrow appears. At the appearance of the double headed arrow, click the left mouse button and hold it then extend or contract the column width by moving the mouse right or left. To alter all the columns to the same size right click on the column header and select Pack Columns. ICE – PTMS User Guide Page 9 www.theice.com Additionally, unneeded columns can be hidden from a user’s view by right clicking on the top of the specific column to be hidden then selecting ‘Hide “Selected Column”. Columns that are hidden from a user’s view can be (re-) displayed by right clicking the top of any column then selecting ‘Show Column’. A list of hidden columns will appear. Select the specific column to be added back to the user’s view or choose “All Columns” to simultaneously (re-) display all hidden columns. Once a user has customised a screen layout, it can be saved by right clicking on any column header and selecting ‘Save As’ and specifying a name for the filter. Saved layouts can be selected by right clicking on any column header and selecting ‘Select Layout’. Saved layout can be deleted by clicking the column header and selecting ‘Delete Layout’ 2.4.3 Print The data displayed can be printed by selecting ‘Print’ from the toolbar above the search criteria panel. There are two options for printing: print screen and print table. Print screen will print the data currently displayed and any search criteria used to return the data set. The print table selection will print the data set only but not the search criteria. Use page setup to change the page type, size and printer designations. ICE – PTMS User Guide Page 10 www.theice.com 2.4.4 Export To export the retrieved data set, click the Export from the toolbar above the search criteria panel. PTMS will prompt the user to specify a file name for the new file, and allow the user to specify the location for the file. After entering the file name and specifying the location, click [SAVE]. The displayed data will be saved to the specified location in excel format. 2.4.5 Ideas To submit feedback to ICE Clear regarding the system functionality click the Ideas button on the right hand side of the screen. This will open up a text box where users are able to enter and submit the feedback. ICE – PTMS User Guide Page 11 www.theice.com 3 Trade Review Screen The Trade Review screen allows a user to review and manage trades that have been executed on the ICE Futures Canada, ICE Futures Europe, ICE Futures U.S., and ICE OTC trading platform. The trades can now be marked for give up, split into different accounts, or included in an Average Price Group. Through this screen, the Account and Position Account can also be added/amended on trades which have not been marked for give up. The following columns will be displayed under this tab: COLUMN Trade ID TM Buy Sell Exch Comm Cont Period Strk P/C Price TT CRS Code Acct Pos Acct CTI (IFUS and IFED) O/C (ICEU) Rate ID C3 Trader (IFUS Only) ATOM Trader (IFUS Only) Trader Opp Member Opp Trader ICE – PTMS User Guide DESCRIPTION Unique PTMS Trade Identifier Trading Member mnemonic Quantity of trade if a BUY Quantity of trade if a SELL Exchange on which the trade was executed. (View hidden initially. See section 2.4.2) The commodity symbol of the underlying instrument. The expiration month or date for the commodity The strike price (options only) for the trade Put or Call (options only) The price of the trade, or premium if an option trade Trade Type. REG (Regular), BLK (Block Trade), EFP (Exchange for Physical), EFS (Exchange for Swap), TAS (Trade at Settlement), CRS (Cross Trade), MMK (8.30 Minute Marker), AMK (4.30 Minute Marker), TASB (TAS Block) Denotes if the trade was executed as part of a broker or firm cross trade An editable field used to input a predefined short code that initiates a predefined set of instructions. Please refer to Section 7 for additional information. The account assigned to the trade. (Editable field) The position account assigned to the trade. (Editable field) (Customer Type Indicator) is used to identify the customer type for the specified customer code. Select the appropriate CTI from the drop down list. (“1”for Floor trader personal account, “2” for proprietary house accounts, “3” for executions for other floor trader’s personal accounts, and “4” for any customer, non member accounts. Open / Close indicator indicates whether trade is opening or increasing an outstanding position or closing or decreasing an outstanding position. If an Open /Close indicator is not provided at point of trade execution, the system will default indicator will be Open. (View hidden initially. See section 2.4.2) An editable field used by the execution firm that allows the executing and claiming firm to identify how the trade was executed. The rate identifier is passed through on all subsequent trade and give-up messages as well as to eGAINS. Refer to Appendix 4 for a list of valid rate identifiers. (View hidden initially. See section 2.4.2) Used to designate the third party broker mnemonic for ICUS compliance purposes. The C3 broker is provided only when a member trader executes a trade for an account of another trading member who is trading and on the floor of the exchange at the time the trade was entered. Used by to assign execution brokerage processed through ATOM from one trader to another Trader mnemonic. Opposite Member. Counterparty for BLK, TASB, CRS trades. Opposite Trader. Counterparty for BLK, TASB, CRS trades Page 12 www.theice.com Deal ID Orig Order ID Order ID Alloc Method – AP Grp ID Dest Member Dest Acct Dest Pos Acct Dest CTI (IFUS and IFED) Dest O/C (ICEU) GU Memo Price Ind Sprd Strat Link ID Strategy Code Composite Code Pub Flag Status Srce Exec Venue Aggr Ind Parent Trd Trade Date Matched Date Update User Update Time Ent Trdr ID Trader Memo User Memo ICE – PTMS User Guide Unique identifier for trade Original Order ID when transaction was entered. Filled Order ID associated with partially filled order Allocation Method. Editable field, enter G to Give Up trade, or A to include trade into Average Price Group Average Price Group ID in which the trade is to be included in Destination Member. This field is used for give ups. The user can specify here which Member they want the trade to be given up to Destination Account. For Give Ups only. The user can specify here the recipients Account Reference to be applied to the trade Destination Position Account. For Give-Ups only. The user can specify here the recipients Position Account to be applied to the trade Destination CTI. For Give Ups only. The user can specify here the recipients CTI to be applied to the trade. Destination Open / Close indicator. For Give-Ups only. The user can specify here the recipients Open/Close indicator to be applied to the trade. (View hidden initially. See section 2.4.2) Free text field in which a memo can be added to the trade being given up Price Indicator. Final – Price is Final, No – Price is not final. (Populated for AMK, MMK, TAS, TASB) Spread Indicator. Specifies if the trade is a leg of a spread trade. Strategy Link ID Strategy Code Composite Code Publish Indicator Flag The current status of the trade. Will either be ‘MAA’ (Matched, Allocated, Accepted) or ‘CNL’ (Cancelled) Source origin of a trade. E (Electronic), X (Off Exchange, e.g. Block Trade) Execution Venue for trade Aggressor Indicator - Y (Yes) if the trade hit or lifted resting orders. N (No) if the trade was a resting order and was hit or lifted The Original Trade ID before trade was split Date and time the trade was created (YYYY-MM-DD HH:MM:SS) Date and time the trade was matched (YYYY-MM-DD HH:MM:SS) Specifies the username of the last person to update this trade Date and time the trade was last amended (YYYY-MM-DD HH:MM:SS) The traders operator ID Free text field to add any additional information about this particular trade. Field can be edited in Trade Review and Trade Details screen. Field is not editable on previously cleared trades Free text field to add any additional information about this particular trade. Field can be edited in Trade Review and Trade Details screen on trades that have not been marked for give up. Field is not editable on previously cleared trades Page 13 www.theice.com 3.1 Trade Summary The trade summary is accessed via the Trade Review screen and displays trades aggregated by: Commodity; Commodity and Month; or Commodity, Month and Price. From the Trade Review tab click on Trade Summary and the following screen will appear. Trade summary can be filtered by: Trading Member, Trader, Commodity, Contract Period, Price, Account, Pos Acct, O/C, Rate ID, Dest Member, Dest Acct, Dest Pos Acct, Dest CTI, Dest O/C, Buy and Sell. Select the aggregation parameter by selecting the tick box in the header row of the trade summary screen ICE – PTMS User Guide Page 14 www.theice.com 3.2 Volume of Buys and Sells At the bottom of the Trade Review screen, PTMS displays a total volume for buys and sells for all trades displayed on the screen and for trades selected on screen: Please note that the totals do not include volume on cancelled trades (CNL). ICE – PTMS User Guide Page 15 www.theice.com 3.4 Multiple Line Update PTMS allows a user to update multiple trade records simultaneously. Enter the relevant Account, Position Account, CTI, O/C, Rate ID, C3 Trader, ATOM Trader, Allocation Method, AP Group ID, Destination Member, Destination Account, Destination Position Account, Destination CTI, Destination O/C, GU Memo, Trader Memo, and User Memo into any of the editable column header fields. Next, highlight contiguous rows by left clicking the first row of data to highlight the trade record. Hold down the Shift key (on the keyboard) and scroll to the last row of data to modify, and then click the last line with a left mouse click. All rows between the first mouse click and the second mouse click will be highlighted. After the trades have been selected and data entered into single or multiple edit boxes the user must click on the [Apply] button located on the toolbar above the data display panel. This will update all of the selected lines with the information entered into the header boxes. Once the lines have been updated the user must click the [Save] button located on the toolbar above the data display panel. Prior to clicking the Save button the trades will be shaded in yellow. This shading indicates that the trades have been altered, but the data has not been saved to the PTMS database. ICE – PTMS User Guide Page 17 www.theice.com The following standard ICE Exchange business validation rules are applied to all trade updates: For ICEU, the Position Account will be defaulted to ‘U’ (unregistered) for all trades where the Allocation Method is updated to G; When marking for Give-up, if the Destination Member is entered, it must be a valid Member. If an invalid Member is entered, the following error message will appear. When a trade is marked for Give Up and then saved, further updates can only be made when the accociated give-up group within ACT remains unallocate or unclaimed. Once partially of fully claimed, no further updates to given-up the trade will be permitted ICE – PTMS User Guide Page 18 www.theice.com 3.5 Mass Removal Feature To mass remove incorrect data from user editable fields for a group of trades, first select the group or trades to be edited. Right click on the column title for the column that data needs to be removed from. A menu of actions will be displayed. Click the [Remove “Field Name” Column Data] selection. A confirmation menu will be displayed with a notification detailing the amount of trade records to be updated. To continue with the Mass Removal of data, click [OK]. To stop the mass removal of data, click [Cancel]. ICE – PTMS User Guide Page 19 www.theice.com After selecting [OK], the trades being updated will be highlighted. Click [Save] to finalize the changes or click [Discard Unsaved Changes] to disregard the mass removal request. Data will be removed. ICE – PTMS User Guide Page 20 www.theice.com 3.6 Split Functionality The split functionality allows the user to assign/allocate portions of a trade to more than one account / Member. To engage the split feature simply double click on a trade record from the Trade Review screen. The split screen can also be invoked by clicking on a trade record to highlight the line and then clicking the [Split] button located on the toolbar above the data display panel. After double clicking the highlighted line or clicking the [Split] button, PTMS will display a popup window entitled Multiple Allocation. This screen is used to split a larger trade into one or many different accounts. The top area of the split allocation window details the original trade. The trade details include: Trade ID, Trade Date, Account, Position Account, CTI, O/C Code, Trader, Trader Memo, Buy or Sell, Trade Quantity, Exchange, Commodity, Contract Period, Put/Call and Strike. On the first line of the edit grid, the total quantity will appear in the QTY column. The Destination Member, Destination Account, Destination Position Account, Destination CTI, Destination O/C code and Destination Memo will appear along with C3 and ATOM Trader for ICE Clear US members. On the first line of the edit grid, the total quantity will be displayed; the user can change this quantity, and enter the desired quantity to be assigned to a specific account or they can update the Destination Member to another Member. This will mark that part of the split to be given up once the split is saved. Alternatively enter a quantity on the second line of the edit box (please note that the new quantity must be less than the total quantity of the original trade), the top line quantity will automatically reduce by this new amount so the total quantity remains the same. The Dest Member, Dest Acct, Dest Pos Account, C3 Trader* and ATOM Trader* will default to what the original trade values associated with the trade. If needed, these fields can be updated to as required. ICE – PTMS User Guide Page 21 www.theice.com If the user makes a mistake they may highlight the row and click the [Clear Row] button. This will remove only that row of allocation and the removed quantity will be added back to the top row quantity. Clicking the [Cancel] button will discard all changes and return the user to the Trade Review screen. After the split has been processed, the original line will remain in view on the screen, it will be highlighted in black to indicate that it is no longer available for modification. A refresh of the screen will remove the record from the screen. After the refresh, the new splits will appear as new trade lines in PTMS reflecting the updates that were input via the Split Multiple Allocationns window. The Parent Trade ID column will be populated with the Trade ID of the original trade, and the resulting splits will be given new Trade ID’s. Trades that have been marked for Give Up can no longer be managed via PTMS. The user must access ACT to manage this trade further. Trade marked for Average Pricing can also not be split; the user must remove the Average Price Indicator (Alloc Meth ‘A’) from the trade before it can be split. ICE – PTMS User Guide Page 22 www.theice.com 3.7 Give Up Functionality The allocating user can give up a trade by either marking the trade for Give-up via PTMS or via FIXML Give-up API messages through use of a Member’s back office / middle office system. Further management of the Give-up can be done via ACT. Through this screen users have the ability to mark trades for Give-up or review trades that have already been marked for give up. When marking for Give-up, the user can also add the following information: Dest Member Dest Acct Dest Pos Account Dest CTI (IFUS and IFED) Dest Open/Close (ICE Clear EU) Give-up Memo 3.7.1 Marking a trade for Give-up To mark individual trades for Give-up, the user must highlight inputs allocation method of ’G’ in the Allocation Method column or alternatively input destination member information. This will identify the trade as being marked for give up. The user must then click the [SAVE] button and PTMS will create a corresponding message for ACT. To mark multiple lines for Give-up, highlight a series of lines by simultaneously pressing [Ctrl] and individually selecting the lines. After all lines are selected, enter a ‘G’ in the column header edit field and click the [APPLY] button. This will place a ‘G’ on all of the selected trades. After the trades have been marked, click [SAVE] to finalize the changes. ICE – PTMS User Guide Page 23 www.theice.com 3.7.2 Marking Trades with Destination information If the user wishes to mark trades for give up and can provide the trading member that the trade is intended for, that information can be added in PTMS under the Dest Member column. A user can also add the Account, Position Account, Dest O/C (ICEU) and CTI (IFUS and IFED) that trade is intended for, under the columns Dest Acct, Dest Pos, Dest O/C (ICEU) and Dest CTI (IFUS and IFED) Account respectively. If a user inserts any Dest Information in the fields provided, the trade will be automatically marked for Give-up i.e. enter a ‘G’ into the Alloc Meth column. A Give-up Memo can also be added to the trade at this point. Once the user is happy with the Give-up details entered, they must click [Save] in order to submit the trades to ACT for claiming. Alternatively, if the details entered are incorrect and the user wishes to clear the Give-up details before saving, they can either delete each individual field, or simply click the [Discard Unsaved Changes] button. Please note that updates made to any trade made in ACT will not be reflected in PTMS. For further information on the give up process please refer to the act user guide. ICE – PTMS User Guide Page 24 www.theice.com 3.8 Average Price Functionality Trades that consists of Trade Type “REG”, “BRX”, and “ECR”, also containing the same Trade Date, Commodity, Contract Period, Side (buy or sell), Trader, and Position Account can be grouped together via the Average Price functionality. Please note, only one trader can be associated with an average price group and can be either the executing trader or an ATOM Trader assigned to the trade(s), with ATOM Trader taking precedence. If the grouped trades have varying prices PTMS will calculate the average price to 7 decimal places, it will also calculate the residual price per lot. PTMS allows the average price to be overwritten via the API and GUI. Trades can be marked and submitted for Average Price groups via PTMS or via the API. To mark a trade for average pricing via the GUI, the user must highlight the line, and enter an ‘A’ in the Alloc Meth column and with a user assigned ID in the AP Group ID field. To mark multiple lines for averaging, highlight a series of lines by simultaneously pressing [Ctrl] and individually selecting the lines. After all lines are selected, enter an ‘A’ and AP Group ID in the column headers and click the [APPLY] button at the top of the menu. This will place an ‘A’ and the AP Group ID in the respective columns on all of the selected trades. After the trades have been marked, click [SAVE] to finalize the changes. Trades cannot be split after they have been marked for average pricing. When a trade is marked for average pricing the following fields will become un-editable as they only apply to trades marked for Give Up: Dest Member Dest Acct Dest Pos Account ICE – PTMS User Guide Page 25 www.theice.com Dest CTI (IFUS and IFED) Dest O/C (ICEU) Give-up Memo Trades may be marked as Average Price eligible when the order is created from the front end trading platform. These trades will appear in PTMS as marked for average pricing i.e. the Alloc Meth column will be populated with ‘A’. The AP Group ID to which the trade is intended to be part of can also be specified via the front end trading platform which will reflect in the Group ID column in PTMS Trade Review screen. Users can unmark trades that have been marked for average pricing by simply removing the ‘A’ in the Alloc Meth column and clicking the [Save] button. This action this will also remove the group ID if one had been entered. Once a the AP Group ID has been added and saved, it will create the Average Price Group ready for review and submission to ACT. These Average Price Groups can be viewed in the Group Review screen. PLEASE REFER TO ‘GROUP REVIEW SCREEN’ SECTION FOR FURTHER INFORMATION. ICE – PTMS User Guide Page 26 www.theice.com 3.9 Trade Details To view the trade details of a specific trade click on the Trade ID number highlighted in blue and underlined as per below. Clicking on the above link will open an additional window which will provide the trade details for that specific trade. The full audit details of a trade are viewed by selecting the [Show Audit Details] button If a trade has not been marked for Give-up, the user will be able to update the CTI (IFUS and IFED), Account or Position Account field and/or mark the trade for give up or an AP Group via this view. Any updates made in this window must be saved before exiting the screen. Updates are saved via the [Save] option. ICE – PTMS User Guide Page 27 www.theice.com 4 AP Group Review Screen The AP Group review screen allows the Member user to review, modify and manage Average Price groups that have been created from the Trade Review screen or through FIXML messaging. This screen will display all Average Price groups that have been created by the user and the status of the group. The screen also allows the user to review and remove individual components of an average price group, and to submit groups to ACT for Give-up. Each column displayed represents the details of the Average Price group and will display the following items: COLUMN GRP ID AP Group ID Buy Sell Trading Member Exchange Commodity Contract Period Strk P/C Avg Price Rnded Price Unit Res Override Price Acct ICE – PTMS User Guide DESCRIPTION Unique ICE assigned ID ID assigned by firm used to group trades together Total quantity if buys Total quantity if sells Member mnemonic The Exchange on which the grouped trades were executed. Commodity of trade in group Expiry date of trades in group Strike price for grouped options Put or Call options System calculated Average Price of group System rounded price to nearest tick increment of commodity The residual cash difference, per contract quantity unit, between the rounded average price and the actual average price. A price submitted by the executing firm that overrides the PTMS calculated Actual Average Price for the applicable group. The Override Price becomes the new Average Price on subsequent give-up transactions associated with the group. Account Reference for group Page 28 www.theice.com COLUMN Pos Acct CTI (IFUS and IFED) Trade Date Trader Trader Memo User Memo Status DESCRIPTION Position account for group (Customer Type Indicator) is used to identify the customer type for the specified customer code. Select the appropriate CTI from the drop down list. (“1”for Floor trader personal account, “2” for proprietary house accounts, “3” for executions for other floor trader’s personal accounts, and “4” for any customer, non member accounts. Trade date of the transactions in the group Trader mnemonic associated with the AP Group. Trader value is used as grouping criteria in creating AP Groups. Free text field for brokers in which a memo can be added to the trade Free text field for back office users in which a memo can be added to the trade being given up I – In progress S- Submitted to ACT Function buttons along the top allow the user to manage the average price groups: ICE – PTMS User Guide Page 29 www.theice.com 4.1 Review Details This opens a new window with the details of each trade included in the group. This window can also be opened simply by double clicking on the group line on the main screen. Trades can be removed from the group from this window, simply highlight the trade you wish to remove from the group and click [Remove from Group]. This will remove the Group ID from this particular trade and will update the Trade Review screen accordingly. The trade will remain marked for Average Pricing (‘A’ in Alloc Meth column).The Average Price details of the group will then recalculate with the Trade removed. 4.2 Submit Group When the group is ready to be submitted to ACT for further processing, the user will need to add CTI (IFUS and IFED) and Account to the AP Group and click [Save], the option to Submit will then be available. Simply highlight the group line and click the [Submit] button. When an Average Price Group is initially created it will have a status of ‘I’ (In Progress), this will update to ‘S’ (Submitted) after the [Submit] button is clicked. When the group is in ‘S’ status, no trades can be added or removed from the group. If the group is ‘Submitted’ in error, the user will need to access ACT in order to re-open the group. Please see ACT User Manual for further information. Whether the Group has been submitted or is still in progress, it will remain on the Group Review screen for TWO days. ICE – PTMS User Guide Page 30 www.theice.com 5 Transfer Review Screen This screen allows the selected Member user to review, accept/challenge or create a position transfer for top day clearing. After accessing this screen, the user can filter criteria to focus their search to a specific set of transactions, or they can review all transfers that have been created by their associated Members or by other Members that are transferring to the selected Member. PTMS will display all transfer trades that meet the filter criteria entered. For each transaction, the following information will appear: COLUMN A C CXL Trade ID From/To TM Opp Member Trade Date QTY Buy/Sell Exch Comm Cont Period Strk P/C Price Acct Pos Acct CTI (IFUS and IFED) ICE – PTMS User Guide DESCRIPTION Select to Accept a transfer Select to Challenge a transfer in a UA or MAA status Select to cancel a transfer in a UA, UAC or MAC status The trade ID associated with the transfer, a unique id for the line item displayed The relative direction of the transfer, ‘To’ will be displayed for transfers to your selected trading member, ‘From’ will display on those transfers that you have created The Member selected to Transfer the position from. The opposite trading member associated with the transfer/adjustment The date of the transfer (defaults to current business day) Quantity of contracts being transferred Represents whether the position transfer is Long or Short Exchange on which the contract was originally traded The commodity symbol of the underlying instrument. The expiration month or date for the commodity. The strike price (options only) for the transfer The Put or Call designation (options only) for the transfer The price of the transfer The account assigned to the transfer (editable field) The position account associated to the transfer/adjustment (Customer Type Indicator) is used to identify the customer type for the specified customer Page 31 www.theice.com O/C (ICEU) C3 Trader (ICUS) User Memo Trader Opp Member Txfer Type Status Created Date Orig Trd ID Orig Order ID code. Select the appropriate CTI from the drop down list. (“1”for Floor trader personal account, “2” for proprietary house accounts, “3” for executions for other floor trader’s personal accounts, and “4” for any customer, non member accounts. Open / Close indicator indicates whether trade is opening or increasing an outstanding position or closing or decreasing an outstanding position. Used to designate the third party broker mnemonic for ICUS compliance purposes. The C3 broker is provided only when a member trader executes a trade for an account of another trading member who is trading and on the floor of the exchange at the time the trade was entered. User provided text added to the transaction Trader associated with the underlying PTMS trade (available for transfers of previous day trades). The opposite trading member associated with the transfer/adjustment A description of the type of transfer POS(ition),REV(ersal), ADJ(ustment) The current status of the transfer ”UA” (Unmatched, Allocated), “UAC” (Unmatched, Allocated, Challenged), “MAA” (Matched, Allocated, Accepted by both parties), MAC (Matched, Allocated, Challenged by receiving Member) “CNL” (Cancelled by creating Member) “REJ” (Rejected ICEU) The date the transfer was entered into PTMS Original Trade Id, the original trade id associated with the underlying PTMS trade (available for transfers of previous day trades). Original Order Id, the original order id associated with the underlying PTMS trade (available for transfers of previous day trades). For each line item, three fixed checkboxes appear on the left side of the screen. The column headings are ‘A’ Accept, ‘C’ Challenge and ‘CXL’ Cancel. These checkboxes can be active depending on the current status of a transfer and the role the Member has in relations to the transfer. If the selected Trading Member is the receiving entity (the “TO” Member) initially the ‘A’ and ‘C’ boxes will be active. If the selected Trading Member is the creator of the transfer (the ‘From’ Member) the “CXL” checkbox, unless accepted, will be active. ICE – PTMS User Guide Page 32 www.theice.com After the user has displayed the transfer transactions on the screen, various actions can be taken to affect the transactions. 5.1 Total Buys and Sells At the bottom of the Transfer Review screen, PTMS displays a total volume for buys and sells for all trades displayed on the screen and for trades selected on screen: Please note that the totals do not include volume on cancelled transfers (CNL). ICE – PTMS User Guide Page 33 www.theice.com 5.2 Create Position Transfer PTMS allows users to transfer a position from one Trading Member to another through use of the Create Position Transfer screen. This feature can be used to move positions in aggregate or individually from member to member. Position transfers can only be created at the original trade price (ICUS only) or the previous night’s settlement price. To create a position transfer, the user selects ‘Add Position Transfer’ from the toolbar at the top of the Transfer Review Screen. The following window will appear: The user inputs transfer information in the fields provided along the top of the window. The user enters the following information for each transfer: From Trading Member From Account From Position Account From CTI (IFUS and IFED) From User Memo (Optional) (Original) Trade Date Quantity Buy/Sell Commodity Contract Period (MMM-YYYY or DD-MMM-YYYY) P/C flag (Options only) Strike (Options only) Price To Trading Member To Account To Position Account To CTI (IFUS and IFED) To O/C code (ICEU) To User Memo (Optional) ICE – PTMS User Guide Page 34 www.theice.com After the information has been entered, click the [ADD] button to add the information to the main entry pane. Once the desired transfers have been added to the entry window they can still be edited by simply clicking in the cell you wish to update and then make the correction. The edit line will retain the information entered. If the user wishes to add more position transfers, they can edit any or all of the fields for the new entry. If they wish to clear the edit line, the user can click the [Clear] button located at the top of the window pane next to the ‘Add’ button. This will clear the information entered in the edit line only. If the user wishes to remove a specific entry from the window, the user must highlight the entry line within the transfer entry window and click the [Clear Entry] button at the bottom of the window. This action will remove the entry from the window. If the user has entered several transfers and wishes to copy a specific line, the user can highlight the desired line and click [Copy Entry]. The information displayed on the line item within the transfer pane will be copied to the edit line. The user can modify or edit this entry and click [Add] to add it to the entry window. After the user has entered all position transfers into the entry window, they can finalize the creation of the position transfers by clicking the [Submit] button. This will validate the entries and create the new transfers. Alternatively, if the transfers are not needed at this time, the user can simply click [Cancel] and the transfers will not be created and the ‘Add New Position Transfer’ window will close. The status of these transfers will be initially marked as ‘UA’ (unmatched, allocated) when viewed by the ‘From’ Member. The ‘To’ Member will see the trades on their transfer review screen ready to Accept or Challenge. ICE – PTMS User Guide Page 35 www.theice.com 5.3 Accepting Position Transfers If a Member is the recipient of a position transfer that they agree, whether it is from another Member or an ‘in-house’ account transfer, the user must check the Accept box for it to clear. The user can adjust the filters to display ‘To’ transfers only. This will limit the transfers displayed to just those where the user’s selected trading member needs to accept or challenge. After the transfer has been accepted the new status will be PND (Pending the clearing house authorization). If the transfer did not already have the correct account information, this can be updated before or after the transfer is accepted, they must click the [SAVE] button to finalize the change. It should be noted that transfers cannot be split between different accounts. If the transfer was accepted erroneously, the user will still have the option to challenge. And the alternative applies, if the transfer is challenged by mistake, the option to accept is still available. All position transfers in a pending status will be authorized by the clearing house. The Transfer Review screen will be monitored throughout the day, and should a position transfer require additional margining, ICE Clear Europe reserves the right to issue an intraday margin call as per current operational procedures. ICE – PTMS User Guide Page 36 www.theice.com 5.4 Challenging Position Transfers If a Member is the recipient of a position transfer that they DO NOT agree, e.g. if the quantity/side is incorrect, or they do not know the transfer altogether, the user can challenge the transaction by clicking in the checkbox marked ‘C’ (Challenge). The new status after clicking the challenge option will be ‘UAC’ (Unmatched, Allocated, Challenged). Transfers in this condition will not clear during end of day processing. The creating member must cancel the transfer. Alternatively they can leave it in the ‘UAC’ status and the transfer will remain uncleared overnight, and appear for two more business days to allow the associated Members to confer and determine if the transfer is valid. This procedure also applies to transfers where no action has been taken, i.e. neither accepted, challenged nor cancelled. At the end of the second business day the transfers will be removed from PTMS. A transfer can be challenged if the user has accepted the transfer in error. The status of the transfer will be changed to ‘MAC’ (Matched, Allocated, and Challenged). If the ‘From’ Member does not cancel the transfer by the end of the business day, the transaction WILL CLEAR at the end of the day, as if it had been accepted. Transfers that have been accepted and are subsequently challenged must then be cancelled in order to avoid the clearing cycle. ‘To’ Members are advised to contact the ‘From’ Member if they have challenged a previously accepted transfer to ensure that it is cancelled. 5.5 Cancellation of a Transfer If a transfer is created in error, the transfer may be cancelled under the following conditions: the transfer has been challenged by the opposite member; or the transfer has a status of ‘UA’ (trade has not been accepted by the opposite member). If the transaction is eligible for cancellation, the creating firm can click on the record to highlight the transaction then click in the checkbox under the column heading ‘CXL’. PTMS will display a warning message. If the user clicks ‘Yes’, the status of the trade will be set to status CNL (Cancelled). If the user clicks ‘No’ the transfer will be reset to the previous status. ICE – PTMS User Guide Page 37 www.theice.com 6 Previously Cleared Transactions The Previously Cleared Transactions screen allows the users to review and manage trades from the previous TWO business days. This will allow the users to correct and adjust trades that may have cleared in the incorrect account/position account combination. In particular it allows the user to rectify any trades that cleared in an incorrect Position Account, (D) for ICEU or (C/H) for ICUS. It also allows ICUS users to update the CTI code and ATOM trader affiliated with a trade. If need be, trades from this screen can also be given up or added to average price groups. ICE – PTMS User Guide Page 38 www.theice.com 6.1 Search for Previously Cleared Transactions PTMS maintains two previous business days of cleared trades for a user to select from. The user MUST select the Cleared Date they wish to review and then click the [Search] button. Once the data has been retrieved, the user can refine their search using the additional filters at the top of each column. This screen will not automatically refresh or load trades based on settings in your profile. If the user alters their search criteria, they must click the (Refresh) button to refresh the search. The columns displayed for each transaction are as follows: COLUMN Trade Date Trade ID TM Buy Sell Exch Comm Cont Period Strk P/C Price Account Position Account CTI (IFUS and IFED) O/C (ICEU) Rate ID ICE – PTMS User Guide DESCRIPTION The trade date of the transaction Unique PTMS Trade Identifier Trading Member mnemonic Quantity of trade if a BUY Quantity of trade if a SELL Exchange in which the trade was executed. . (View hidden initially. See section 2.4.2) The commodity symbol of the underlying instrument. The expiration month or date for the commodity The strike price (options only) for the trade Put or Call (options only) The price of the trade, or premium if an option trade The account assigned to the transaction (editable field) The position account that was recorded on the cleared transaction (Customer Type Indicator) is used to identify the customer type for the specified customer code. Select the appropriate CTI from the drop down list. (“1”for Floor trader personal account, “2” for proprietary house accounts, “3” for executions for other floor trader’s personal accounts, and “4” for any customer, non member accounts. Open / Close indicator indicates whether trade is opening or increasing an outstanding position or closing or decreasing an outstanding position. If an Open /Close indicator is not provided at point of trade execution, the system will default indicator will be Open. An editable field used by the execution firm that allows the executing and claiming firm to identify how the trade was executed. The rate identifier is passed through on all subsequent trade and give-up messages as well as to eGAINS. Refer to Appendix 4 for a list of valid rate identifiers. (View hidden initially. See section 2.4.2) Page 39 www.theice.com C3 Trader (ICUS Only) ATOM Trader (ICUS Only) TT CRS Trader Srce Alloc Meth AP GRP ID Dest Member Dest Account Dest Position Account Dest CTI (IFUS and IFED) Dest O/C (ICEU) GU Memo Strat Link ID Strategy Code Composite Code Pub Flag Exec Venue Trader Memo User Memo Opp Member Opp Trader From/To Txfer Type Orig Trade ID Original Order ID Status ICE – PTMS User Guide Used to designate the third party broker mnemonic for ICUS compliance purposes. The C3 broker is provided only when a member trader executes a trade for an account of another trading member who is trading and on the floor of the exchange at the time the trade was entered. Used by to assign execution brokerage processed through ATOM from one trader to another Trade Type. REG (Regular), BLK (Block Trade), EFP (Exchange for Physical), EFS (Exchange for Swap), TAS (Trade at Settlement), CRS (Cross Trade), MMK (8.30 Minute Marker), AMK (4.30 Minute Marker), TASB (TAS Block) Denotes if the trade was executed as part of a broker or firm cross trade The trader mnemonic associated with the transaction The source of the original transaction (Electronic ‘E’, Off Exchange ‘X’) Indicator that identifies a transaction as being part of an average price group (A) or give up transaction (G) (Allows for editing of previously cleared outright transactions). The group id associated with average price transfer (only applicable to APTs grouped and calculated by PTMS)1 The destination member assigned to a trade or transaction (Allows for editing of previously cleared outright trades) The destination account assigned to a trade or transaction (Allows for editing of previously cleared outright trades The destination position account for a trade or transaction (Allows for editing of previously cleared outright trades The destination CTI for a trade or transaction (Allows for editing of previously cleared outright trades Destination Open / Close indicator. For Give-Ups only. The user can specify here the recipients Open/Close indicator to be applied to the trade. (View hidden initially. See section 2.4.2) The give up memo associated with a Give-up transaction. (Give ups only) Strategy Link ID Strategy Code Composite Code Published Flag indicating whether this a published or unpublished trade: Y Published N Unpublished Execution Venue for trade The original memo assigned to the transaction The user text associated with the transaction The member on the opposite side of the transaction (transfers only). The trader on the opposite side of the transaction (transfers only) The relative direction of the transfer, ‘To’ will be displayed for transfers that are for the selected Trading Member to receive. ‘From’ will display on those transfers that the user has created Description of the transfer type ‘POS’(iton), ‘APT’(Average price transfer), ‘REV’(ersal), ‘ADJ’(ustment) Original Trade Id, the original trade id associated with the underlying PTMS trade (available for transfers of previous day trades). Original Order Id, the original order id associated with the underlying PTMS trade (available for transfers of previous day trades). Final status associated with previously cleared transaction Page 40 www.theice.com 6.2 Total Buys and Sells At the bottom of the Previously Cleared Transaction screen, PTMS displays a total volume for buys and sells for all trades displayed on the screen and for trades selected on screen: ICE – PTMS User Guide Page 41 www.theice.com 6.3 Reversing a previously cleared Position Transfer If the user has identified a transfer that must be reversed, the user must highlight the transaction and click the action button along the menu bar at the top of the screen titled [REVERSE]. This action will cause PTMS to display a confirmation window as shown below: If the user wishes to continue, clicking [OK] will create a transfer that can be viewed in the Transfer Review screen with Transfer Type REV, the opposite party will then need to accept this transfer for it to clear, or challenge if they do not agree the reversal. To return to the screen without creating the reversal transaction, the user can press [CANCEL]. No additional transfers will be created if the user has clicked the cancel button. ICE – PTMS User Guide Page 42 www.theice.com 6.4 Create an Adjustment If the user has isolated a previously cleared transaction that was cleared in error and needs to be corrected, the user can select or highlight the trade and click [MAKE ADJUSTMENT]. This will launch a new window with details of the selected trade displayed in the left portion of the panel (Originating side). The user has the ability to modify any of the following modifiable fields: Quantity, opposite member, opposite account, opposite position account, opposite CTI (ICUS and IFED) and opposite user text. The user must enter the corrected information onto the top entry line, they must then click [ADD] button. The new transfer details will appear in the lower pane. If the user has made adjustment to the entire trade (Originating side quantity is equal to opposite side quantity). The user must click [SUBMIT] to create the adjustment. This action will create two transactions. An identical transaction as the originally cleared transaction (Buy/Sell side will be reversed) will be created as well as a new transaction with the updated information will be created. These new transactions will appear on the Transfer Review screen for additional management. If the trading member was modified, a new transaction claiming the new member will also be generated. If the trading member on the transaction has not changed (the user is changing the account or position account on the trade) the transfers will automatically be matched, allocated and accepted when reviewed on the transfer review screen. ICE – PTMS User Guide Page 43 www.theice.com If the user wishes to modify a portion of a previously cleared transaction, the quantity entered quantity can be less than the original quantity cleared, but the user must enter an additional line item with the original clearing information to finalize the transactions. 6.5 Modification of Previously Cleared Trades If the user wishes to create an average price group from previously cleared trades, the user can highlight the trades to be added to the average price group and enter the group id (or new group ID if the trade was part of a prior day submitted AP Group) in the AP Group ID field. After clicking the [Save] button, PTMS will assign the trade to the specified group and also mark the trade as ‘A’ in the Alloc Meth indicator. 6.5.1 Adding Previously Cleared Transaction to AP Group The trade will be displayed on the Group Review screen with any other trades with the same Trade Date, Commodity, Side, Expiration, Strike (for Options), Put/Call designation (for Options), and Group ID. The user will be able to manage the Average Price Transaction from the Group review screen (See Group Review) 6.5.2 Marking a Previously Cleared Transaction for Give Up It is also possible to give up previously cleared transactions in the same way as you would a top day trade. All the same columns are available to enter Give Up details; Dest Member, Dest Acct, Dest Pos Account, Dest CTI (IFUS and IFED) and Give Up Memo. When a Previously Cleared Transaction has been marked for give up and saved it will pass the trade through to the ACT system for further processing. ICE – PTMS User Guide Page 44 www.theice.com 7 Short Codes The Short Codes screen is used by traders, clerks, and back-office users to facilitate the creation, modification, and/or removal of rules that automate account information updates as well as add Give-up allocation instructions to trades within the PTMS system. Each rule is defined and assigned a unique Short Code. When a short code is applied to a trade, the rule associated with it is automatically applied thus providing PTMS users a quick and efficient method to update the associated account information as well as provide Give-up allocation instructions. Short Codes and their rules are defined and maintained at the user level. 7.1 Create a Short Code To create a new short code click the [Create] button found at the toolbar above the data display panel. The create Short Code entry window will appear. First, if needed, input the Short Code Criteria that will be used to validate if a short code can be applied to a trade. Short Code criteria is optional, a user can decide to establish some or no criteria in creating a short code. The criteria defined for a short code must match the applicable information on trade for which the short code instructions will be applied. If the criterion does not match, the short code instructions will not be executed. The following information can be used to establish short code criteria: ICE – PTMS User Guide Page 45 www.theice.com FIELD Code Trading Member Trader DESCRIPTION A user assigned short code to be used to apply Give-up allocation instructions within the Trade Review or Split screen. The code can be a combination or alpha and numeric characters. The same customer code can be used multiple times as long as each instance of the code has unique criteria associated with it. The execution firm associated with the trade Specifies that PTMS will only apply the associated clearing information when the defined trader is present on the trade record. Commodity Specifies that PTMS will only apply the associated clearing information when the defined commodity is present on the trade record. Account Specifies that PTMS will only apply the associated clearing information when the defined account is present on the trade record. Next, define the short code details. These are the instructions that will be executed by PTMS when the Short Code has been applied to a trade. The following short code details can be used to define account information updates and if needed, further Give-up allocation instructions: FIELD Account Position Account CTI C3 Trader (ICUS) ICE – PTMS User Guide DESCRIPTION The account that the trade will clear in. The position account associated to the transfer/adjustment The relative direction of the transfer, ‘To’ will be displayed for transfers to your selected trading member, ‘From’ will display on those transfers that you have created Used to designate the third party broker mnemonic for ICUS compliance purposes. The C3 broker is provided Page 46 www.theice.com User Memo Destination Member Destination Account Destination Position Account Destination CTI (IFUS and IFED) Destination Memo Expiration Date only when a member trader executes a trade for an account of another trading member who is trading and on the floor of the exchange at the time the trade was entered. User provided text added to the transaction The destination member that the trade will be givenup. The destination account that the trade will be given-up. The destination position account of the firm that the trade is given-up. The price of the transfer User provided text added to the Give-up allocation which can be reviewed by the claiming firm. The date that the Short Code is will expire and no longer be applicable A user has the option to establish a Short Code that does not contain short code details; however, it is recommended that at least one detail be provided when establishing a Short Code. Once the short code criteria and details have been input, click the [ADD] button to add the Short Code to the review section. To start over, click the Clear button. The Short Code will appear in the entry area. This gives a user an opportunity to review the Short Code prior to final submission. If a change needs to be made to the Short code, it can be done so at this time. The short code can also be copied so it can be used in the creation of additional short codes, click the [Copy Entry] button. Also, if it is determined that the Short Code is not needed it can be removed by clicking the [Clear Entry] button. Once the Short Code(s) have been verified, click the [Submit] button to add the new Short Code to the list of active short codes. ICE – PTMS User Guide Page 47 www.theice.com 7.2 Managing Short Codes Users also can manage and update Short Codes within the Short Codes screen. A single Short Code can be updated by inputting the new Short Code details, then clicking the [Save] button. Multiple changes can be accomplished at one time. First, enter the relevant short Code details into any of the editable column header fields. Next, highlight contiguous rows by left clicking the first row of data to highlight the trade record. Hold down the Shift key (on the keyboard) and scroll to the last row of data to modify, and then click the last line with a left mouse click. All rows between the first mouse click and the second mouse click will be highlighted. After the Short Codes have been selected and data entered into the multiple edit boxes the user must click on the [Apply] button located on the toolbar above the data display panel. Short codes can also be deleted by highlighting the short code then clicking the [Remove] button. If it is determined that none the updates are required, click the [Discard Unsaved Changes] button. 7.3 Applying a Short Code Once the Short Code has been added, the instructions associated with the short code can be invoked by inputting the Short Code into the applicable trade’s code field available within the Trade Review or Split screens, then clicking the Save button. First locate the trade with matching criteria within the Trade Review or Spilt screens: Second, input applicable Short Code into the code field and click the [Save] button. The Short Codes instructions will not be automatically applied. ICE – PTMS User Guide Page 48 www.theice.com 8 PTMS Dashboard The PTMS Dashboard gives users a quick overview of all outstanding (un-matched) PTMS and ACT transactions for the user’s primary firm and if applicable division(s) in a single view. For PTMS, users will see outstanding transactions and associated count in the following categories: Unregistered Trades, Not Given-Up (ICEU) SCT Unregistered Trades, Not Given-Up (ICEU) In-progress AP Group – Group not yet submitted to ACT for Allocation Uncleared Transfers – Transfers no yet Accepted by the receiving firm For ACT, users will see outstanding transactions in the following categories: Unallocated - A group in ACT that has not yet been allocated to the take-up firm Under Allocated - A group that has been partially allocated. A remainder has yet to be allocated Outstanding Allocations – Give-ups that have been fully allocated but have yet to be claimed by the take-up firm Rejected Allocations - Give-up allocations that have been rejected by the take-up firm Pending Reversal Requests – A Give-up reversal request that has not yet been confirmed by the take-up firm SCT Top-Day Unallocated (ICEU) SCT Top-Day Under Allocated (ICEU) Give-up Perspective Take-Up Perspective Outstanding Claims - Trades given up to your firm that have not yet been claimed SCT Top-Day Outstanding Claims (ICEU) SCT Top-Day Unregistered Claims (ICEU) Pending Reversal Requests – Requested reversals not yet confirmed ICE – PTMS User Guide Page 49 www.theice.com 8.1 Dashboard Functions As users review outstanding transactions for their firm and/or division, each user can access the outstanding transactions quickly within PTMS and ACT in order to perform further management of these transactions. To do so, click the applicable hyperlink within the outstanding transactions Count column: After clicking the Count link, the user will be navigated to the PTMS or ACT, where the selected outstanding transactions will be displayed. After management of these transactions, a user can refresh the Dashboard screen so that it provides the most up to date view. This can be accomplished by clicking the [Refresh] button which is available towards the top of the screen on the right hand side. The dashboard screen will also automatically update on its own every five minutes. To determine the last time the Dashboard had been updated, the last update time is displayed and located next to the [Refresh] button. Furthermore, users can export a Give-up Activity report from the Dashboard screen. To export a Give-up Activity report, click the [Give-up Activity Report] button found at the bottom of the Dashboard screen. PTMS will prompt the user to specify a file name for the new file, and allow the user to specify the location for the file. After entering the file name and specifying the location, click [SAVE]. The Give-up activity report will be saved to the specified location in Excel Format. ICE – PTMS User Guide Page 50 www.theice.com 9 System Alerts ICE Clear administrators have the ability to send alert messages to users of the PTMS system. These messages are displayed on the screens to notify the user about PTMS news, information, or notifications concerning ICE Clear Europe and/or ICE Clear U.S. Two distinct message types can be sent by ICE Clear administrators, Informational and Emergency. 9.1 Informational Alerts The informational message alert is a small balloon message that appears in the lower right corner of the PTMS screen. These alert messages will not restrict usage of the PTMS screens. The information contained in the alert is sent to notify the user of non critical updates regarding PTMS, ICE Clear Europe, and/or ICE Clear U.S. The user does not have to react immediately to this alert. The alert message will stay fixed in the bottom right corner of the screen until the user clicks on the alert. Clicking on the alert will delete the message. If more than one message alert appears, they will appear sequentially starting at the bottom of the page. As each alert is acknowledged, the alert messages will be removed. If no action is taken, the alerts will remain until the user logs off. If the user logs in and the alert is still valid or active, it will be redisplayed. 9.2 Emergency Alerts Emergency alert messages are broadcast to users to convey critical information regarding PTMS, ICE Clear Europe and/or ICE Clear U.S. These alerts will restrict the user from any PTMS activity until the alert message has been acknowledged. The Emergency alert will be displayed in the center of the PTMS application screen. This pop up window will display the alert message and an [OK] button. To acknowledge the alert and clear the notification from the screen, click the OK button. If additional emergency notifications are sent, they will be displayed in the order they were received. After acknowledging the earliest, the next (more recent) will be displayed. If the user logs out and logs in at a later point in the same trading day, if the alert message is still a valid alert, it will be redisplayed. ICE – PTMS User Guide Page 51 www.theice.com 10 Logout To log out of PTMS click on the PTMS menu in the upper left corner of the screen and select Exit from the menu. You can also log out of PTMS by clicking the X in the upper right corner of the PTMS screen and then Yes to the Exit dialogue. ICE – PTMS User Guide Page 52 www.theice.com 11 Appendix APPENDIX 1 – PTMS/ACT CODES PTMS Code UA UAC MAA MAC PEND CNL REJ ACT Code A C CA CRV UDA UDC OVA REJ RRV UA UC Description Workflow Allocated Transfer Unmatched/Allocated/Challenged Transfer Matched/Allocated/Accepted Matched/Allocated/Challenged Matched/Allocated/Pending Clearinghouse approval Cancelled Transaction Rejected Create Transfer ‘To’ Member Challenges Transfer Before Acceptance ‘To’ Member Accepts Trade/Transfer ‘To’ Member Challenges Transfer After Acceptance Description Allocated Claimed Sub Claimed Confirmed Reverse Under Allocated Under Claimed Over Allocated Rejected (REJ) Initiated Reverse (RRV) Unallocated (UA) Unclaimed Workflow Group is allocated/Un-claimed allocation Claim Allocation Sub-Claim a Claim Record Accept a Reversal Under-allocate Group (Sum of Allocation Qty<Group Qty) Under-claimed Group (Sum of Claim Qty<Group Qty) Over-allocate Group (Sum of Allocation Qty>Group Qty) Reject Allocation Request Reversal of a Claimed Allocation Group is un-allocated (Allocation Qty="0") Un-claimed Pending Allocation ICE – PTMS User Guide ‘From’ Member Cancels Trade/Transfer Rejected by Clearinghouse (ICEU) Page 53 www.theice.com APPENDIX 2 - TOP DAY TRADE STATUS (TRS >>ACT/PTMS MAPPINGS) TRS Code UR Description Unregistered Trade PTMS/ACT Code ‘U’ Position Acct RT Registered Trade Position Acct in PTMS or C in ACT Description Unassigned position account - trade has not been allocated or assigned to a position account Trade that is assigned to a position account or has been allocated and successfully claimed UA Unmatched Allocation A Allocated (ACT) NC Not Claimed UC Unclaimed (ACT) CA Confirmed Allocation C Claimed (ACT) UC Unmatched Claim UC Unclaimed (ACT) NA Not Allocated UA Unallocated (ACT) MS Matched Split C Claimed (ACT) UP Unmatched Parent No PTMS/ACT Equivalent DE Deleted trade No PTMS/ACT Equivalent IV Invalid Instruction Err 1 Error (ACT) 1 Available for Final Transition ICE – PTMS User Guide Page 54 www.theice.com APPENDIX 3 – Rate Identifier Codes Rate Identifier Execution Type A B C D E F G H Phone Simple Phone Complex FCM – provided screen Other – provided platform Other – provided platform controlled by FCM Client – provided platform direct to exchange FCM API or FIX API Algorithmic Trading Engine Price at Execution (price added at initial order entry, trade, middle office or time of give-up) Desk Electronic Desk Pit Client Electronic Client Pit J W X Y Z ICE – PTMS User Guide Page 55 www.theice.com APPENDIX 4 - POSITION TRANSFERS (TRS >>PTMS MAPPINGS) TRS Status Code RN Description PTMS/ACT/ECS Code Description Workflow Registered notification MAA Matched/Allocated/Acc epted UN Unmatched notification UA Unmatched Allocated Transfer TRS - Status of internal position transfer PTMS – Status of internal and external transfer, where it is an external transfer it has been accepted by the opposite member Status of the position transfer in the ‘From’ Member’s screen which has not been accepted by the opposite member. NI Notification Not Input UA Unmatched Allocated Transfer MU Matched Unauthorised Notification PEND AN Authorised Notification RE Rejected Notification DN Deleted Notification ICE – PTMS User Guide Matched/Allocated/Pen ding Clearinghouse approval MAA Matched/Allocated/Acc epted REJ Rejected by the Clearinghouse 2 No PTMS/ACT Equivalent Status of alleged position transfer in ‘To’ Member’s Screen which has not been accepted. TRS – ‘To’ Member has to input opposite side of the trade to Accept the allege PTMS – Member has to select the ‘Accept’ box Status of transfer that has been submitted to Clearinghouse for approval Status of transfer that has been approved by the Clearinghouse Status of the position transfer that has been rejected by the Clearinghouse. Status of the position transfer that has been deleted by the Clearinghouse. Page 56 www.theice.com APPENDIX 5 – APPLICABLE TRADE TYPES IFEU and IFUS ICE – PTMS User Guide FIXML CODE TRADE TYPE 0 REG 1 BLK 2 EFP 3 POS 12 EFS 13 EFM 14 EOO 15 TAS 21 TASB 24 ECR 56 MMK 57 AMK 58 BRX 55 EBF 102 GDX 104 VCT 105 SCT 106 SBK Page 57