1
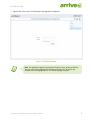
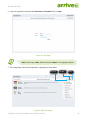
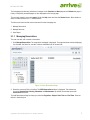
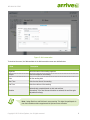
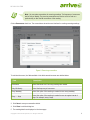
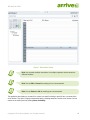
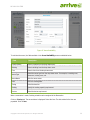
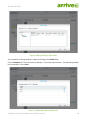
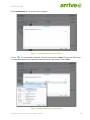
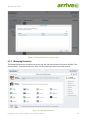
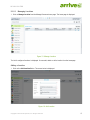
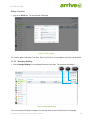
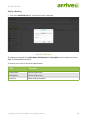
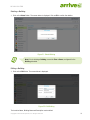
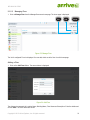
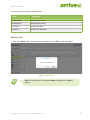
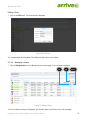
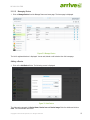
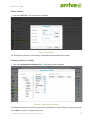
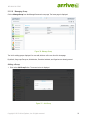
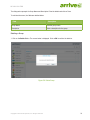
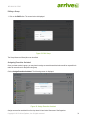
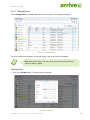
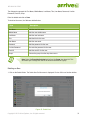
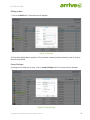
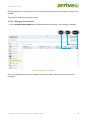
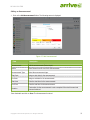
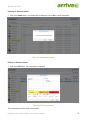
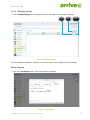
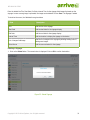
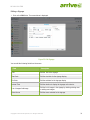
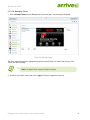
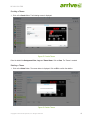
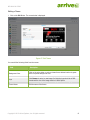
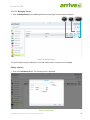
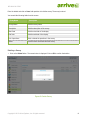
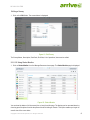
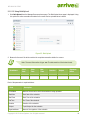
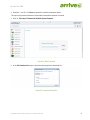
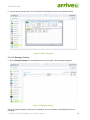
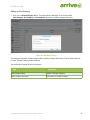
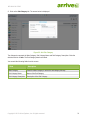
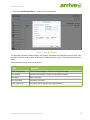
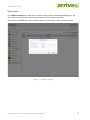
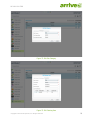
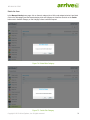
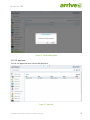
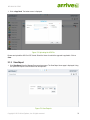
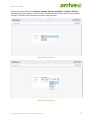
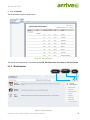
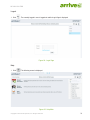
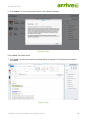
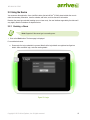
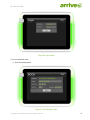
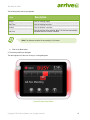
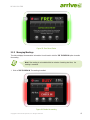
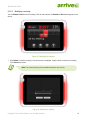
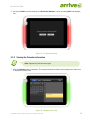
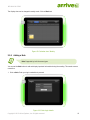
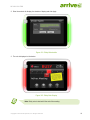
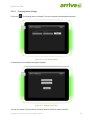
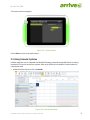
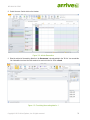
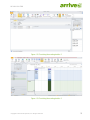
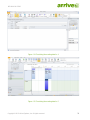
AIP-0800-801-EUM
Copyright © 2013 Arrive Systems, Inc. All rights reserved.
User Manual
1
AIP-0800-801-EUM
Contents
1.Introduction....................................................... 4
2.Using Arrive InfoPoint™ .................................... 4
2.1 Using InfoPoint Web Server........................ 4
2.1.1 Managing Reservations..................... 7
2.1.2 Managing Resources....................... 14
2.1.2.1 Managing Locations............... 15
2.1.2.2 Managing Building.................. 17
2.1.2.3 Managing Floor...................... 20
2.1.2.4 Managing a Venue.................. 22
2.1.2.5 Managing Device.................... 25
2.1.2.6 Managing Group..................... 28
2.1.2.7 Managing Users..................... 31
2.1.2.8 Managing Announcement....... 34
Arrive InfoPoint
User Manual
™
2.1.2.9 Managing Signage.................. 37
2.1.2.10 Managing Theme.................. 40
2.1.2.11 Managing Survey.................. 43
2.1.2.12 Using Status Monitor............ 45
2.1.2.13 Using Bulk Upload................ 46
2.1.2.14 Managing Catering............... 48
2.1.2.15 App Push.............................. 55
2.1.3 View Report..................................... 56
2.1.4 Miscellaneous................................. 58
2.2 Using the Device...................................... 62
2.2.1 Booking a Room............................. 62
2.2.2 Managing Meetings......................... 65
2.2.2.1 Modifying a meeting............... 66
2.2.3 Viewing the Calendar information.... 67
2.2.4 Adding a Note................................. 68
2.2.5 Retrieving Venue Information........... 70
2.2.5.1 Changing Venue Settings........ 71
2.2.6 Survey............................................. 72
2.3 Using Calendar Systems ......................... 73
Copyright © 2013 Arrive Systems, Inc. All rights reserved.
2
AIP-0800-801-EUM
Copyright Notice and Trademarks
This product incorporates copyright protection technology and other intellectual property rights owned by
Arrive®. Use of this copyright protection technology must be authorized by Arrive®, and is intended for limited
viewing uses only unless otherwise authorized by Arrive®. Reverse engineering or disassembly is prohibited.
No part of this document may be reproduced or transmitted in any form, or by any means without the prior
written permission of Arrive®. Arrive® reserves the rights to modify its products, including their characteristics,
specifications, accessories and any other information stated herein without notice. The official printout of any
information shall prevail should there be any discrepancy between the information contained herein and the
information contained in that printout. This product and related documentation are proprietary to Arrive® - By
Arrive Systems, Inc. All trademarks belong to their respective holders.
Copyright © 2013 Arrive Systems, Inc. All rights reserved.
Copyright © 2013 Arrive Systems, Inc. All rights reserved.
3
AIP-0800-801-EUM
1. Introduction
Arrive InfoPoint™ is a powerful Interactive Room Sign that simplifies room scheduling dramatically. Arrive
InfoPoint™ optimizes resource utilization and erases redundancy at low and modest operating costs. Arrive
InfoPoint™ boasts of a robust integration with calendar systems like Microsoft® Outlook® and Lotus Notes®,
an InfoPoint web server scheduler and touch enabled device placed outside the room to make the necessary
booking. The user can select any of the suitable method to book the resources on single or recurring basis. The
brilliance of Arrive InfoPoint™ lies in the simplicity of usage.
The purpose of the guide is to provide step by step guidance to get acclimatized with the product and use it
efficiently and correctly.
2. Using Arrive InfoPoint™
Arrive InfoPoint™ offers three different platforms for room reservation:
1. Web Interface
2. Interactive Device - Arrive InfoPoint™ ID 800
3. Calendar Systems
Using the product from each of the platforms is explained in detail in the below sections.
2.1 Using InfoPoint Web Server
The InfoPoint web server can be accessed from any computer on the network.
Note: The most recent Silverlight plug-in is required to access the application.
Note: The resolution of the machine hosting the InfoPoint application should be 1024
x 768 and above.
Copyright © 2013 Arrive Systems, Inc. All rights reserved.
4
AIP-0800-801-EUM
1. Type the URL of the server. The Homepage of the application is displayed.
Figure 1: InfoPoint Homepage
Note: The application supports user interface in English, French, Arabic and German.
The user can choose a language of his preference from the list. The menus and
dialogue boxes are language specific. The default language is English.
Copyright © 2013 Arrive Systems, Inc. All rights reserved.
5
AIP-0800-801-EUM
2. Login to the application using the valid Username and Password. Click on Login.
Figure 2: Login Page
Note: Default Login: admin ,Default Password: nimda1 for all language interfaces.
3. The Lounge Page of the InfoPoint application is displayed as shown below.
Log Out
Contact
Help
Figure 3: InfoPoint Lounge
Copyright © 2013 Arrive Systems, Inc. All rights reserved.
6
AIP-0800-801-EUM
The Homepage provides easy interfaces to navigate to the Previous and Next page and to Refresh the page. A
history of frequently accessed pages are also displayed on the lounge page.
The currently logged-in user can Logout, initiate the Help menu and view the Contact details. More details on
these is covered in section 2.1.4 Miscellaneous.
The three main functions that can be executed from the Homepage are:
1. Manage Reservation
2. Manage Resource
3. View Report
2.1.1 Managing Reservations
The user can add, edit or cancel a reservation.
1. Click Manage Reservation. The reservation homepage is displayed. The page has three sections displaying
the Calendar, the Room list, and the Timeline; subdivided into 30 minute slots.
Figure 4: Room Reservation Page
2. Select the room and Click on timeline. The ADD Reservation window is displayed. The window has
four tabs. Reservation, Catering, Attendees and Attachments. By default, the window opens with
Reservation tab active.
The Add Reservation dialog box helps you select the Organiser, Subject, Start Time and End Time. Enter the
details in the dialog box.
Copyright © 2013 Arrive Systems, Inc. All rights reserved.
7
AIP-0800-801-EUM
Figure 5: Add a reservation
To minimize the errors, the fields available in the Add reservation screen are detailed below.
Field
Description
Organizer
Select the name of the meeting organizer.
Subject
Enter the subject for the meeting.
Date
Set the meeting date.
Start Time
Enter the start time of the meeting.
End Time
Enter the end time of the meeting.
Duration
Automatically computed based on start and end time.
Alternatively, if the start time and duration are entered, the end time gets
adjusted accordingly.
Note: Assign Start time and End time to every meeting. This helps the participants to
plan their schedule and also supplements the optimum room utilization.
Copyright © 2013 Arrive Systems, Inc. All rights reserved.
8
AIP-0800-801-EUM
Note: You can make reservations for recurring meetings. The frequency of recurrence
can be Daily or Weekly. The recurring reservations can also be set to be end on a
particular day or after the Nth occurrence of the meeting.
Click on Recurrence check box. The screen below shows the user interface for creating recurring meetings.
Figure 6: Recurring reservation
To minimize the errors, the fields available in the Add reservation screen are detailed below.
Field
Description
Recurrence
Select the check-box if recurring meetings are needed.
Daily OR Weekly
Select the frequency of recurrence.
Every Weekday
Select this option if the meeting is needed to recur every weekday.
Every --- Days
Select this option if the meeting is needed to recur at regular interval of
days. For example, every 2 days.
3. Click Save to save your reservation details.
4. Click Close to exit the dialog box.
5. The meeting details are displayed on the home page.
Copyright © 2013 Arrive Systems, Inc. All rights reserved.
9
AIP-0800-801-EUM
Figure 7: Reservation Details
Note: You can make multiple reservations for multiple organizers and venues across
different locations.
Note: You can Edit or Cancel the meeting prior to commencement.
Note: You can Extend or End the meeting post commencement.
The application also allows you to search for a venue in a specific building or specific floor or a venue with a
set of devices. This option is highly recommended when a meeting demands a certain set of devices. You can
search for an existing venue by clicking Venue Availability.
Copyright © 2013 Arrive Systems, Inc. All rights reserved.
10
AIP-0800-801-EUM
Figure 8: Venue Availability
To minimize the errors, the fields available in the Venue Availability screen are detailed below.
Field
Description
Location Name
Select a location from the drop down menu.
Building
Select a building from the drop down menu.
Floor
Select a floor from the drop down menu.
Venue Type
Select the venue type from the drop down menu. For example, a meeting room,
classroom, training room, etc.
Venue Name
Enter the venue name.
Date
Enter the meeting date.
Timing
Select the duration.
Seating
Specify the seating capacity requirement.
Devices
Select the device requirement.
When a reservation is made, Catering schedule can be assigned to the Reservation.
Click on Catering tab. The screen below is displayed. Select the item. The data related to the item are
populated. Click on Save.
Copyright © 2013 Arrive Systems, Inc. All rights reserved.
11
AIP-0800-801-EUM
Figure 9: Adding Catering to Reservation
You can delete the catering schedule if needed, by clicking on the Delete Button.
Click on Attendees tab. The screen below is displayed. Click on the required names. The attendees get added
to the reservation. Click on Save.
Figure 10: Adding Attendees to Reservation
Copyright © 2013 Arrive Systems, Inc. All rights reserved.
12
AIP-0800-801-EUM
Click on Attachments tab. The screen below is displayed.
Figure 11: Adding Attachments to Reservation
+
Click on
. The screen below is displayed. Choose the file and click on Open. The user can select single
or multiple attachments as per requirement and use the same in the meeting. Click on Save.
Figure 12: Adding Attachments to Reservation
Copyright © 2013 Arrive Systems, Inc. All rights reserved.
13
AIP-0800-801-EUM
Figure 13: Adding Attachments to Reservation
2.1.2 Managing Resources
The Manage Resources use case allows the user to add, edit and view resources like Location, Building, Floor,
Announcements, Themes and many more. Each of them is taken up in detail in the below sections.
Figure 14: Manage Resources
Copyright © 2013 Arrive Systems, Inc. All rights reserved.
14
AIP-0800-801-EUM
2.1.2.1 Managing Locations
1. Click on Manage Location from the Manage Resources home page. The home page is displayed.
Figure 15: Manage Location
The list of configured locations is displayed. You can add, delete or edit a location from the homepage.
Adding a Location
1. Click on the Add Location Button. The screen below is displayed.
Figure 16: Add Location
Copyright © 2013 Arrive Systems, Inc. All rights reserved.
15
AIP-0800-801-EUM
The dialogue box prompts for Location Name, Description, Time Zone, Start Time, End Time, Currency Name
and Culture. Enter the details and click on Save. The Location details are stored.
You can add the following fields from the screen.
Field
Description
Location Name
Add the location name.
Description
Add the description for the location.
Time Zone
Add time zone.
Start Time
Add the Start Time
End Time
Add the End Time
Currency Name
Select the currency used at the selected location.
Culture
Select the required Culture from the list offering English, Arabic, French and
German. The device interface language is dependent on the value of this field.
Deleting a Location
1. Click on the Delete Button. The screen below is displayed. Click on OK to confirm the deletion.
Figure 17: Delete Location
Note: Prior to deleting a Location, ensure the Building->Floor->Venue, configured
for the Location is deleted.
Copyright © 2013 Arrive Systems, Inc. All rights reserved.
16
AIP-0800-801-EUM
Editing a Location
1. Click on the Edit Button. The screen below is displayed.
Figure 18: Edit Location
The Location Name, Description, Time Zone, Start Time, End Time, Currency Name and Culture can be edited.
2.1.2.2 Managing Building
1. Click on Manage Building from the Manage Resources home page. The home page is displayed.
Edit
Add
Delete
Figure 19: Manage Building
The list of configured buildings is displayed. You can add, delete or edit a building from this homepage.
Copyright © 2013 Arrive Systems, Inc. All rights reserved.
17
AIP-0800-801-EUM
Adding a Building
1. Click on the Add Building Button. The following screen is displayed.
Figure 20: Add Building
The dialogue box prompts for Location Name, Building Name and Description. Enter the details and click on
Save. The Building details are stored.
To minimize errors, each of the field is explained below:
Field
Description
Location Name
Add the location name.
Building Name
Add the building name.
Description
Addthe building description.
Copyright © 2013 Arrive Systems, Inc. All rights reserved.
18
AIP-0800-801-EUM
Deleting a Building
1. Click on the Delete Button. The screen below is displayed. Click on OK to confirm the deletion.
Figure 21: Delete Building
Note: Prior to deleting a Building, ensure the Floor->Venue, configured for the
Building is deleted.
Editing a Building
1. Click on the Edit Button. The screen below is displayed.
Figure 22: Edit Building
The Location Name, Building Name and Description can be edited.
Copyright © 2013 Arrive Systems, Inc. All rights reserved.
19
AIP-0800-801-EUM
2.1.2.3 Managing Floor
1. Click on Manage Floor from the Manage Resources home page. The home page is displayed.
Edit
Add
Delete
Figure 23: Manage Floor
The list of configured Floors is displayed. You can add, delete or edit a floor from this homepage.
Adding a Floor
1. Click on the Add Floor Button. The screen below is displayed.
Figure 24: Add Floor
The dialogue box prompts for Location Name, Building Name, Floor Name and Description. Enter the details and
click on Save. The Floor details are stored.
Copyright © 2013 Arrive Systems, Inc. All rights reserved.
20
AIP-0800-801-EUM
To minimize errors, the fields are detailed below.
Field
Description
Location Name
Add the location name.
Building Name
Add the building name.
Floor Name
Add the floor name.
Description
Add the floor description.
Deleting a Floor
1. Click on the Delete Button. The screen below is displayed. Click on OK to confirm the deletion.
Figure 25: Delete Floor
Note: Prior to deleting a Floor, ensure the Venue, configured for the Floor is
deleted.
Copyright © 2013 Arrive Systems, Inc. All rights reserved.
21
AIP-0800-801-EUM
Editing a Floor
1. Click on the Edit Button. The screen below is displayed.
Figure 26: Edit Floor
The Location Name, Building Name, Floor Name and Description can be edited.
2.1.2.4 Managing a Venue
1. Click on Manage Venue from the Manage Resources home page. The home page is displayed.
Edit
Add
Delete
Figure 27: Manage Venue
The list of configured Venues are displayed. You can add, delete or edit a Venue from this homepage.
Copyright © 2013 Arrive Systems, Inc. All rights reserved.
22
AIP-0800-801-EUM
Adding a Venue
1. Click on the Add Venue Button. The following screen is displayed.
Figure 28: Add Venue
The dialogue box prompts for Location Name, Building Name, Floor Name, Venue Type, Venue Name,
Description, Theme, Display Type, Seating Capacity and click on Save. The Venue details are stored.
To minimize the errors, the fields are detailed below.
Field
Description
Location Name
Add the location name.
Building Name
Add the building name.
Floor Name
Add the floor name.
Venue Type
Add the venue Type( meeting room, Class room)
Venue Name
Add the venue name.
Description
Enter the venue description.
Theme
Add the Theme.
Display Type
Add the display type.
Seating Capacity
Add the seating capacity.
Note: The list of rooms synchronised from the active directory cannot be edited or
deleted.
Copyright © 2013 Arrive Systems, Inc. All rights reserved.
23
AIP-0800-801-EUM
Deleting a Venue
1. Click on the Delete Button. The screen below is displayed. Click on OK to confirm the deletion.
Figure 29: Figure 23: Delete Venue
Editing a Venue
1. Click on the Edit Button. The screen below is displayed.
Figure 30: Edit Venue
The Location Name, Building Name, Floor Name, Venue Type, Venue Name, Description, Theme, Display Type,
Seating Capacity can be edited.
Copyright © 2013 Arrive Systems, Inc. All rights reserved.
24
AIP-0800-801-EUM
2.1.2.5 Managing Device
1. Click on Manage Device from the Manage Resources home page. The home page is displayed.
Figure 31: Manage Device
The list of registered devices is displayed. You can add, delete or edit a device from this homepage.
Adding a Device
1. Click on the Add Device Button. The following screen is displayed.
Figure 32: Add Device
The dialogue box prompts for Device Name, Device Icon and Device Image. Enter the details and click on
Save. The Device details are stored.
Copyright © 2013 Arrive Systems, Inc. All rights reserved.
25
AIP-0800-801-EUM
To minimize errors, the feild details are mentioned below.
Field
Description
Device Name
Add the device name.
Device Icon
Add the device icon.
Device Image
Add the device name.
Device Make
Add the device make.
Device Model
Add the device model.
Deleting a Device
1. Click on the Delete Button. The screen below is displayed. Click on OK to confirm the deletion.
Figure 33: Delete Device
Copyright © 2013 Arrive Systems, Inc. All rights reserved.
26
AIP-0800-801-EUM
Editing a Device
1. Click on the Edit Button. The screen below is displayed.
Figure 34: Edit Device
The Device Name, Device Icon, Device Image, Device Make and Device Model can be edited.
Assigning a Device to a Venue
1. Click on the Assign Devices to Venue Button. The following screen is displayed.
Figure 35: Assign Device to a Venue
The dialogue box prompts for selecting a venue and choosing device from the list. Make the right selection and
click on Save. The device is assigned to the venue.
Copyright © 2013 Arrive Systems, Inc. All rights reserved.
27
AIP-0800-801-EUM
2.1.2.6 Managing Group
Click on Manage Group from the Manage Resources home page. The home page is displayed.
Figure 36: Manage Group
The list of existing groups displayed. You can add, delete or edit a user from this homepage.
By default, the groups Everyone, Administrator, Executive Assistant, and Organizer are already present.
Adding a Group
1. Click on the Add Group Button. The screen below is displayed.
Figure 37: Add Group
Copyright © 2013 Arrive Systems, Inc. All rights reserved.
28
AIP-0800-801-EUM
The dialogue box prompts for Group Name and Description. Enter the details and click on Save.
To minimize the errors, the fields are detailed below.
Field
Description
Group Name
Add the group name.
Description
Add a description for the group.
Deleting a Group
1. Click on the Delete Button. The screen below is displayed. Click on OK to confirm the deletion.
Figure 38: Delete Group
Copyright © 2013 Arrive Systems, Inc. All rights reserved.
29
AIP-0800-801-EUM
Editing a Group
1. Click on the Edit Button. The screen below is displayed.
Figure 39: Edit Group
The Group Name and Description can be edited.
Assigning Executive Assistant
Once you have created a group, you may have to assign an executive assistant who would be responsible to
make all reservations for that particular group.
Click on Assign Executive Assistant. The following screen is displayed.
Figure 40: Assign Executive Assistant
Assign an executive assistant from the drop down list and select the name of the Organizer.
Copyright © 2013 Arrive Systems, Inc. All rights reserved.
30
AIP-0800-801-EUM
2.1.2.7 Managing Users
Click on Manage Users from the Manage Resources home page. The home page is displayed.
Figure 41: Manage Users
The list of existing users displayed. You can add, delete or edit a user from this homepage.
Note: Please note that the list of users synchronized from the active directory
cannot be edited or deleted.
Adding an User
1. Click on the Add User Button. The screen below is displayed.
Figure 42: Add User
Copyright © 2013 Arrive Systems, Inc. All rights reserved.
31
AIP-0800-801-EUM
The dialogue box prompts for First Name, Middle Name, Last Name, Title, User Name, Password, Confirm
Password, Email ID, Group.
Enter the details and click on Save.
To minimize the errors, the fields are detailed below.
Field
Description
First Name
Add the user first name.
Middle Name
Add the user middle name.
Last Name
Add the user last name.
Title
Add the title for the user.
User Name
Add the user name.
Password
Add the password for the user.
Confirm Password
Re-enter the password for the user.
Email ID
Add the email ID for the user.
Group*
Choose the group from the drop down menu.
Note: Select the Executive Assistant option from the Group drop down list. This
will enable you to assign this user as an executive assistant to a group.
Deleting an User
1. Click on the Delete Button. The Delete User Profile screen is displayed. Click on OK to confirm the deletion.
Figure 43: Delete User
Copyright © 2013 Arrive Systems, Inc. All rights reserved.
32
AIP-0800-801-EUM
Editing an User
1. Click on the Edit Button. The screen below is displayed.
Figure 44: Edit User
The First Name, Middle Name, Last Name, Title, User Name, Password, Confirm Password, Email ID, Group of
the user can be edited.
Group Privileges
A privilege can be assigned to a group. Click on Group Privileges button. The screen below is displayed.
Figure 45: Group Privilege
Copyright © 2013 Arrive Systems, Inc. All rights reserved.
33
AIP-0800-801-EUM
Select the privilege from the drop down menu and select the groups that you wish to assign the privilege. Click
on Save.
The privilege is assigned to the groups selected.
2.1.2.8 Managing Announcement
1. Click on Manage Announcement from the Manage Resources home page. The home page is displayed.
Edit
Add
Delete
Figure 46: Manage Announcement
The list of registered announcements is displayed. You can add, delete or edit an announcement from this
homepage.
Copyright © 2013 Arrive Systems, Inc. All rights reserved.
34
AIP-0800-801-EUM
Adding an Announcement
1. Click on the Add Announcement Button. The following screen is displayed.
Figure 47: Add Announcement
Field
Description
Announcement
Add the announcement.(Textual input)
Venue
Select Venue from the list for the announcement.
Announcement Type
Select the announcement type.
Start Date
Assign a start date for the announcement.
End Date
Assign a end date for the announcement.
Start time
Enter the start time for the announcement.
End Time
Enter the end time for the announcement.
Duration
The duration for the announcement is auto-computed if the start time and end
time are furnished.
Enter the details and click on Save. The Announcement is stored.
Copyright © 2013 Arrive Systems, Inc. All rights reserved.
35
AIP-0800-801-EUM
Deleting an Announcement
1. Click on the Delete Button. The screen below is displayed. Click on OK to confirm the deletion.
Figure 48: Delete Announcement
Editing an Announcement
1. Click on the Edit Button. The screen below is displayed.
Figure 49: Edit Announcement
The Announcement and the Venue can be edited.
Copyright © 2013 Arrive Systems, Inc. All rights reserved.
36
AIP-0800-801-EUM
2.1.2.9 Managing Signage
1. Click on Manage Signage from the Manage Resources home page. The home page is displayed.
Edit
Add
Delete
Figure 50: Manage Signage
The list of registered signages are displayed. You can add, delete or edit a signage from this homepage.
Adding a Signage
1. Click on the Add Signage Button. The following screen is displayed.
Figure 51: Add Signage
Copyright © 2013 Arrive Systems, Inc. All rights reserved.
37
AIP-0800-801-EUM
Enter the details like Title, Start Date, End Date, Interval Time for the signage. Add images that make up the
signage. In-case a wrong image is uploaded, the image can be deleted. Click on Save. The Signage is added.
To minimize the errors, the field details are given below
Field
Description
Title
Add the title of the signage.
Start Date
Add the start date for the signage display.
End Date
Add the end date for the signage display.
Interval Time
Add the duration to display the signage on the device.
List of Images/ Add Image
Add the list of images in the signage by deleting existing ones or
adding new images.
Select Venue
Add the venue selected for the signage.
Deleting a Signage
1. Click on the Delete Button. The screen below is displayed. Click on OK to confirm the deletion.
Figure 52: Delete Signage
Copyright © 2013 Arrive Systems, Inc. All rights reserved.
38
AIP-0800-801-EUM
Editing a Signage
1. Click on the Edit Button. The screen below is displayed.
Figure 53: Edit Signage
You can edit the following fields from the screen.
Field
Description
Title
Edit the title of the signage.
Start Date
Edit the start date for the signage display.
End Date
Edit the end date for the signage display.
Interval Time
Edit the duration to display the signage on the device.
List of Images/ Add Image
Edit the list of images in the signage by deleting existing ones
or adding new images.
Select Venue
Edit the venue selected for the signage.
Copyright © 2013 Arrive Systems, Inc. All rights reserved.
39
AIP-0800-801-EUM
2.1.2.10 Managing Theme
1. Click on Manage Theme from the Manage Resources home page. The home page is displayed.
Figure 54: Manage Theme
The list of registered themes are displayed along with the Default theme. You cannot add, delete or edit a
Theme from this homepage.
Note: The default Theme cannot be Edited or Deleted.
2. Select a theme, select a venue and click on Apply. The theme is applied to the venue.
Copyright © 2013 Arrive Systems, Inc. All rights reserved.
40
AIP-0800-801-EUM
Creating a Theme
1. Click on the Create Button. The following screen is displayed.
Figure 55: Create Theme
Enter the details like Background Color, Logo and Theme Name. Click on Save. The Theme is created.
Deleting a Theme
1. Click on the Delete Button. The screen below is displayed. Click on OK to confirm the deletion.
Figure 56: Delete Theme
Copyright © 2013 Arrive Systems, Inc. All rights reserved.
41
AIP-0800-801-EUM
Editing a Theme
1. Click on the Edit Button. The screen below is displayed.
Figure 57: Edit Theme
You can edit the following fields from the screen.
Field
Description
Background Color
Click on the color picker or enter a relevant hexa-decimal number to generate the required background color.
Logo
Click Browse to select a new image file. Note the logo should be in PNG
format and the size of the image must be 168X46 pixels.
Theme Name
Edit the name of the theme.
Copyright © 2013 Arrive Systems, Inc. All rights reserved.
42
AIP-0800-801-EUM
2.1.2.11 Managing Survey
1. Click on Manage Survey from the Manage Resources home page. The home page is displayed.
Edit
Add
Delete
Figure 58: Manage Survey
The list of existing surveys is displayed. You can add, delete or edit a survey from this homepage.
Adding a Survey
1. Click on the Add Survey Button. The following screen is displayed.
Figure 59: Add Survey
Copyright © 2013 Arrive Systems, Inc. All rights reserved.
43
AIP-0800-801-EUM
Enter the details and click on Save. Add questions to build the survey. The survey is stored.
You can add the following fields from the screen.
Fieldy Name
Description
Survey Name
Add the survey name.
Description
Add the description of the survey.
Start Date
Add the start date of the display.
End Date
Add the end date of the display.
List of questions
Add, or delete the questions in the survey.
Venue
Add the venue associated with the survey.
Deleting a Survey
1. Click on the Delete Button. The screen below is displayed. Click on OK to confirm the deletion.
Figure 60: Delete Survey
Copyright © 2013 Arrive Systems, Inc. All rights reserved.
44
AIP-0800-801-EUM
Editing a Survey
1. Click on the Edit Button. The screen below is displayed.
Figure 61: Edit Survey
The Survey Name, Description, Start Date, End Date, List of questions, Venue can be edited.
2.1.2.12 Using Status Monitor
1. Click on Status Monitor from the Manage Resources home page. The Status Monitor page is displayed.
Figure 62: Status Monitor
You can view the status of all the rooms (free or busy) from this page. The display can be narrowed down by
choosing specific options from the drop down lists and clicking on Search. This option enables you to get an
overall view of the room status.
Copyright © 2013 Arrive Systems, Inc. All rights reserved.
45
AIP-0800-801-EUM
2.1.2.13 Using Bulk Upload
1. Click Bulk Upload from the Manage Resources home page. The Bulk Upload home page is displayed. Using
this option the entire reservation schedule for the venue can be uploaded at an instance.
Figure 63: Bulk Upload
2. Browse for the excel file which contains the complete reservation details for a venue.
Note: The excel file must be of type .csv. The data must be of the below format.
RoomName
StartDate
StartTime
EndTime
Duration
Subject
OrganizerName
Each of the parameter is explained below:
Field
Description
RoomName
Name of the venue for which the schedule is being uploaded.
StartDate
Start Date of the schedule.
StartTime
Start Time of the schedule.
EndTime
End Time of the schedule.
Duration
Duration of the schedule.
Subject
Topic/Subject for the schedule.
OrganizerName
Name of the organizer of the schedule.
Copyright © 2013 Arrive Systems, Inc. All rights reserved.
46
AIP-0800-801-EUM
3. Select the ‘*.csv file’. Click Save to upload the collective reservation details.
This option also gives an interface to download the reservation schedule of a venue.
4. Click on “Click here To Download The Bulk Upload Template”.
Figure 64: Bulk Download
5. In the File Download dialog box, choose the relevant option to download file.
Figure 65: Download Dialog Box
Copyright © 2013 Arrive Systems, Inc. All rights reserved.
47
AIP-0800-801-EUM
6. You can open the file and view it. You can use the file as template to enter all the reservation details.
Figure 66: Sample Template
2.1.2.14 Managing Catering
1. Click on Manage Catering from the Manage Resources home page. The home page is displayed.
Figure 67: Managing Catering
The list of existing categories of food items are displayed. You can add, delete, or edit categories from the
homepage.
Copyright © 2013 Arrive Systems, Inc. All rights reserved.
48
AIP-0800-801-EUM
Adding an Item/Category
1. Click on the Add Item/Category Button. The screen below is displayed. There are three tabs;
Main Category, Sub Category and Catering Item. By default, the Main Category tab is open.
Figure 68: Add Main Category
The dialogue box prompts for Main Category Name and Main Category Description. Enter the details and click
on Save. The Main Category details are stored.
You can add the following fields from the screen.
Field
Description
Main Category Name
Name of the Main Category
Main Category Description
Description of the Main Category
Copyright © 2013 Arrive Systems, Inc. All rights reserved.
49
AIP-0800-801-EUM
2. Click on the Sub Category tab. The screen below is displayed.
Figure 69: Add Sub Category
The dialogue box prompts for Main Category, Sub Category Name and Sub Category Description. Enter the
details and click on Save. The Sub Category details are stored.
You can add the following fields from the screen.
Field
Description
Main Category
Select the Main Category to which the sub category belongs.
Sub Category Name
Name of the Sub Category
Sub Category Description
Description of the Sub Category
Copyright © 2013 Arrive Systems, Inc. All rights reserved.
50
AIP-0800-801-EUM
3. Click on the Add Catering Item tab. The screen below is displayed.
Figure 70: Add Catering Item
The dialogue box prompts for Main Category, Sub Category, Item Name, Item Description and Lead Time. Enter
the details, select the location where the item will be available and click on Save. The Catering Item details are
stored.
You can add the following fields from the screen.
Field
Description
Main Category Name
Select the Main Category to which the catering item belongs.
Sub Category
Select the Sub Category to which the catering item belongs.
Item Name
Name of the Item.
Item Description
Description of the item.
Lead Time in mins
The lead in mins for the item to be made available.
Copyright © 2013 Arrive Systems, Inc. All rights reserved.
51
AIP-0800-801-EUM
Edit the Items
In the Manage Catering home page, click on the main category. All the sub categories belonging to it are
listed. Click on the sub category and the items belonging to the sub category are listed.
You can click on the Edit button next to the Main Category or Sub Category or Item to edit the required.
Figure 71: Edit Main Category
Copyright © 2013 Arrive Systems, Inc. All rights reserved.
52
AIP-0800-801-EUM
Figure 72: Edit Sub Category
Figure 73: Edit Catering Item
Copyright © 2013 Arrive Systems, Inc. All rights reserved.
53
AIP-0800-801-EUM
Delete the item
In the Manage Catering home page, click on the main category item. All the sub categories below it are listed.
Click on the sub category and the items belonging to the sub category are listed.You can click on the Delete
button next to the Main Category or Sub Category or Item to edit the required.
Figure 74: Delete Main Category
Figure 75: Delete Sub Category
Copyright © 2013 Arrive Systems, Inc. All rights reserved.
54
AIP-0800-801-EUM
Figure 76: Delete Catering Item
2.1.2.15 App Push
The user can upgrade the device from the Web Application.
Figure 77: App Push
Copyright © 2013 Arrive Systems, Inc. All rights reserved.
55
AIP-0800-801-EUM
1. Click on App Push. The below screen is displayed.
Figure 78: Uploading the APK File
Browse and upload the APK file in ZIP format. Select the Venue for which the upgrade is applicable. Click on
Save.
2.1.3 View Report
1. Click View Report from the Manage Resources home page. The View Report home page is displayed. Using
this option the reports of various forms can be captured.
Figure 79: View Reports
Copyright © 2013 Arrive Systems, Inc. All rights reserved.
56
AIP-0800-801-EUM
Reports can be generated based on Organizer Schedule, Organizer Availability or Organizer Utilization.
After selecting the report type from one of the above, the interface further gives an option of narrowing down
the report. The below screen shots display the steps of report generation.
Figure 80: Report Filters-1
Figure 81: Report Filters-2
Copyright © 2013 Arrive Systems, Inc. All rights reserved.
57
AIP-0800-801-EUM
2. Click On Generate.
The screen below contains a sample report.
Figure 82: Sample Reports
The reports can be exported to 4 file formats namely PDF, Word Document, Excel Sheet or Rich Text Format.
2.1.4 Miscellaneous
Log Out
Contact
Help
Figure 83: Miscellaneous
Copyright © 2013 Arrive Systems, Inc. All rights reserved.
58
AIP-0800-801-EUM
Logout
1. Click
. The currently logged in user is logged out and the Login Page is displayed.
Figure 84: Login Page
Help
1. Click
. The following screen is displayed.
Figure 85: Help Main
Copyright © 2013 Arrive Systems, Inc. All rights reserved.
59
AIP-0800-801-EUM
2. Click on About. The screen displaying the details of the software is displayed.
Figure 86: About
Click on Close. The window closes.
3. Click on Help. The mail interface with a predefined address is displayed. The help query can be mailed to
the address.
Figure 87: Help
Copyright © 2013 Arrive Systems, Inc. All rights reserved.
60
AIP-0800-801-EUM
Contact
1. Click
. The contact details screen is displayed. Request for information can also be filled and sent.
Figure 88: Contact
Copyright © 2013 Arrive Systems, Inc. All rights reserved.
61
AIP-0800-801-EUM
2.2 Using the Device
You can access the application from a InfoPoint device (Arrive InfoPoint™ ID 800) placed outside the room to
make the necessary reservation, view the calendar, add notes, and view the venue information.
Based on the venue type selected( meeting room or class room), the user interface supported by the device will
vary slightly. Both the interfaces are depicted below.
2.2.1 Booking a Room
Note: Supported if the venue type is a meeting room.
1. Click on the Book button. The home page is displayed.
For an authorized venue:
a. Please enter the login credentials to proceed. Note that the login details are registered as Organizer
details. After successful login, enter the meeting details.
Figure 89: Login
Copyright © 2013 Arrive Systems, Inc. All rights reserved.
62
AIP-0800-801-EUM
Figure 90: Login Details
For an un-authorized venue:
a. Enter the meeting details.
Figure 91: Enter Meeting Details
Copyright © 2013 Arrive Systems, Inc. All rights reserved.
63
AIP-0800-801-EUM
The following fields need to be populated.
Description
Field
Subject
Enter the meeting subject.
Start Time
Enter the meeting start time.
Duration
Enter the duration in minutes.
End Time
Enter the end time of the meeting. Note: This field also automatically
populated when the Duration is entered.
Note: The minimum duration for any meeting is 10 minutes.
b. Click on the Book button.
2. The booking details are displayed.
The device glows red if the room is busy or or else glows green.
Figure 92: Busy Room Status
Copyright © 2013 Arrive Systems, Inc. All rights reserved.
64
AIP-0800-801-EUM
Figure 93: Free Room Status
2.2.2 Managing Meetings
The device displays the reservation information. You will need to click the TAP TO CHECK IN option to enable
the meeting.
Note: If the meeting is not enabled within ten minutes of meeting start time, the
meeting is cancelled.
1. Click on TAP TO CHECK IN. The meeting is enabled.
Figure 94: Enable the meeting
Copyright © 2013 Arrive Systems, Inc. All rights reserved.
65
AIP-0800-801-EUM
2.2.2.1 Modifying a meeting
You can Extend or End the current meeting. Click the red indicator, the Extend and End buttons appear on the
device.
Figure 95: Modifying the meeting
1. Click Extend. A time bar, showing 5 minute intervals is displayed. Drag the slider to extend your meeting.
Click Extend to proceed.
Note: The current meeting can be extended maximum upto an hour.
Figure 96: Extending a meeting
Copyright © 2013 Arrive Systems, Inc. All rights reserved.
66
AIP-0800-801-EUM
2. You can also End the current meeting. Click End on the indicator. Confirm by clicking End in the dialogue
box.
Figure 97: Ending the meeting
2.2.3 Viewing the Calendar information
Note: Supported by both the venue types.
1. Click the Calendar button on the device. The complete reservation details of the meeting room /class room
is displayed on a daily basis.
Figure 98: Calendar View- Daily
Copyright © 2013 Arrive Systems, Inc. All rights reserved.
67
AIP-0800-801-EUM
The display view can be changed to weekly mode. Click on Week tab.
Figure 99: Calendar view- Weekly
2.2.4 Adding a Note
Note: Supported by both the venue types.
You can use the Note button to add and display important information during the meeting. This needs a secure
connection.
1. Click on Note. Enter your login credentials to proceed.
Figure 100: Note Login details
Copyright © 2013 Arrive Systems, Inc. All rights reserved.
68
AIP-0800-801-EUM
2. Enter the contents for display, the duration of display and click Apply.
Figure 101: Sticky Note details
3. The note is displayed on the device.
Figure 102: Sticky Note Display
Note: Sticky note is retained till the end of the meeting.
Copyright © 2013 Arrive Systems, Inc. All rights reserved.
69
AIP-0800-801-EUM
2.2.5 Retrieving Venue Information
1. Click on Info. The venue information is displayed.
Note: Supported by both the venue types.
Figure 103: Venue Information
Note: If any of the devices are found faulty, the user can Click on Report Error.
Error will be reported through mail to the configured mail ID automatically for
rectification purpose.
Copyright © 2013 Arrive Systems, Inc. All rights reserved.
70
AIP-0800-801-EUM
2.2.5.1 Changing Venue Settings
Click on the
. The following screen is displayed. The user is required to authenticate and proceed.
Figure 104: Login Authentication
On authentication, the settings home page is displayed.
Figure 105: Settings Home Page
The user can change The Server details, the Venue details or Reboot the system from here.
Copyright © 2013 Arrive Systems, Inc. All rights reserved.
71
AIP-0800-801-EUM
2.2.6 Survey
Note: Available if the Venue-type is Classroom.
Click on the Survey Button.
Figure 106: Survey Home
The active survey is displayed. Fill in the survey and click on Finish.
Note: The image below is a test survey.
Figure 107: Sample Survey
Copyright © 2013 Arrive Systems, Inc. All rights reserved.
72
AIP-0800-801-EUM
The survey results are displayed.
Figure 108: Survey Results
Click on Back to return to the main window.
2.3 Using Calendar Systems
InfoPoint application can be integrated with MicroSoft Exchange; accessed through MS Outlook for making
reservations.This option has few pre-requistes. Refer to the InfoPoint Pre-Installation Checklist manual to
complete the same.
1. In Microsoft Outlook click on click on Calendar.
Figure 109: Calendar HomePage
Copyright © 2013 Arrive Systems, Inc. All rights reserved.
73
AIP-0800-801-EUM
2. Select the room. Double click on the timebar.
Figure 110: Initiate Reservation
3. Enter the subject of the meeting. Note that the Room name is already added to the ‘To’ list. You can add the
list of attendees to whom the invite needs to be sent out to the list. Click on Send.
Figure 111: Furnishing the meeting details -1
Copyright © 2013 Arrive Systems, Inc. All rights reserved.
74
AIP-0800-801-EUM
Figure 112: Furnishing the meeting details -2
Figure 113: Furnishing the meeting details -3
Copyright © 2013 Arrive Systems, Inc. All rights reserved.
75
AIP-0800-801-EUM
Figure 114: Furnishing the meeting details -4
Figure 115: Furnishing the meeting details -5
Copyright © 2013 Arrive Systems, Inc. All rights reserved.
76
AIP-0800-801-EUM
Warranty
Standard one year limited warranty.
Suggestions and support
Thank You for choosing us to serve you. Your suggestions for Arrive InfoPoint™ are welcome.
Please mail your comments to [email protected].
To avail technical support, mail to [email protected] or join our support email list.
Details for joining our support list are available @ www.arrivesys.com.
Copyright © 2013 Arrive Systems, Inc. All rights reserved.
77
AIP-0800-801-EUM
Arrive Systems, Inc.
6737 Katella Ave.
Cypress, CA 90630, USA
Toll Free: +1-800-256-3560 (USA / Canada)
Fax: +1-510-281-7546
Arrive Limited
P.O.Box 17723
Dubai, United Arab Emirates
Tel: +971 4 8819134
Fax: +971 4 8814914
www.arrivesys.com
Email: [email protected]
Copyright © 2013 Arrive Systems, Inc. All rights reserved.