1
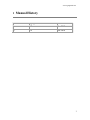
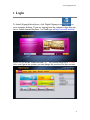
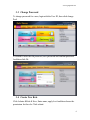
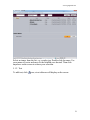
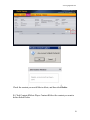
www.signagelink.com 1 www.signagelink.com Contents 1 2 3 3.1 3.2 3.3 3.4 3.5 4 4.1 4.2 4.3 5 5.1 5.2 5.3 5.4 6 6.1 6.2 6.3 6.4 Manual History ..................................................................................................... 3 Login ..................................................................................................................... 4 System Administration.......................................................................................... 5 New User Account ................................................................................................ 5 Delete User Account ............................................................................................. 5 Change Password .................................................................................................. 6 Create New Role ................................................................................................... 6 Parameter dictionary ............................................................................................. 8 3.5.1 Create Screen Resolution ........................................................................ 8 3.5.2 Component Config .................................................................................. 9 3.5.3 Edit Approval ........................................................................................ 10 3.5.4 Meeting floor settings ........................................................................... 12 Resources ............................................................................................................ 13 Video ................................................................................................................... 13 Image, Music, Text, Flash................................................................................... 15 Template ............................................................................................................. 15 Content Managements ........................................................................................ 17 Create New Contents .......................................................................................... 17 5.1.1 Image..................................................................................................... 20 5.1.2 Text ....................................................................................................... 21 5.1.3 Scroll Text............................................................................................. 23 Delete Contents ................................................................................................... 24 Schedule and Publish Contents ........................................................................... 25 5.3.1 Schedule ................................................................................................ 25 Delete Content from Players ............................................................................... 28 Player Monitoring ............................................................................................... 31 Player Information .............................................................................................. 31 Player Monitoring ............................................................................................... 32 Caption ................................................................................................................ 33 Meeting room settings......................................................................................... 34 2 www.signagelink.com 1 Manual History Manual Revision Signagelink Version Publication Date A 3.2 Dec 2012 B 3.9 Dec 2014 3 www.signagelink.com 2 Login To launch Signagelink software, click Digital Signage icon on your computer desktop. If you are logging from the computer other than the server, launch Internet Explorer 7 or 8 and type url http://serverIP/webedit There is a pre-define Admin account “sa”. The default password is 123456. After you sign in the system, you can change the password for this account. 4 www.signagelink.com 3 System Administration 3.1 New User Account To create a new user account, click Admin UserNew. Enter User ID and Name. And then choose an organization and assign appropriate roles. When you have done, click Submit. 3.2 Delete User Account To delete a user account, click Admin UserSelect UserClick Delete 5 www.signagelink.com 3.3 Change Password To change password for a user, login with the User ID, then click change Pwd You need to enter the old password, new password and confirm password. And then click Ok. 3.4 Create New Role Click Admin Role New, Enter name, apply level and then choose the permission for the role. Click submit 6 www.signagelink.com 7 www.signagelink.com 3.5 Parameter dictionary 3.5.1 Create Screen Resolution Click EditNewEnter Width and Height Save. If you click add, you can continue to add new resolutions. 8 www.signagelink.com 3.5.2 Component Config Click editConfigSelect the componentsSave,then the components will show in the content editing studio. 9 www.signagelink.com 3.5.3 Edit Approval Click EditEditChoose the approval type (default type is Level one approval)Save You can choose Level one approval、Level two approval and No approval required.If you choose No approval required, the content will be published to the player once you finish the publish settings. 10 www.signagelink.com 11 www.signagelink.com 3.5.4 Meeting floor settings Fill in the floor name and save. 12 www.signagelink.com 4 Resources Resource menus are used to maintain Video, Image, Music, Template and PDF files. The Template menu is used to maintain predefined templates and user templates. 4.1 Video To maintain files, click Resource Resource. You can upload or delete video, image,text,music,flash and app from local system. To upload a video, click Navigate to the directory where your video file is located. Select the file and then click open. If you want to upload multiple files, press the shift or ctrl key and mouse left button to select files and then click open. 13 www.signagelink.com To delete a video file, select the video file and then click Delete. . Then click OK. The file will be deleted. 14 www.signagelink.com 4.2 Image, Music, Text, Flash Follow the same steps as video files to maintain image, music, text,app files. The text file means Microsoft Word 2007, Excel 2007 and PowerPoint 2007. Word, Excel and PPT will be converted into PDF format directly, for Android system does not support Microsoft office. 4.3 Template You can create your own templates for future use. To create a new template, click Resources Template New Enter template name and resolution, After you complete the design, click . 15 www.signagelink.com 16 www.signagelink.com 5 Content Managements 5.1 Create New Contents To create content, click New Content The system will take you to Content Design Studio. 17 www.signagelink.com The Scene Name and Play Time (how long the scene will be played) are required for a scene. Enter the name for the scene and time it will play (in seconds). Then you can start your content design. Note: There are 2 editor layouts,there is a botton to switch to each other. Below is new layout. To find out the function of an icon, move the mouse pointer on the icon. The following lists are some of the icons. Insert text Insert scrolling text Insert date information Insert weather data Insert image Insert video Insert webpage Insert interact template 18 www.signagelink.com Insert hyperlink Delete hyperlink Insert live video with an url address. Insert documents(text,ppt,pptx,doc,docx,xls,xlsx,pdf) Zoom out Zoom in Below is the older layout This function supports touch screen. You can use the link to create Customer interactive scene Used to edit text on selected area Font color Set background color Load background image 19 www.signagelink.com Load Image to a selected zone Load video to a selected zone Load multiple images to a selected zone. You can set the time interval to display each image Create scroll text Insert Table Insert web page Countday Count down Display current date and time Insert custom data Insert pdf file Insert doc file Insert xls file Insert ppt file Insert weather information Insert rss 5.1.1 Image To add an image to the scene, click image icon . 20 www.signagelink.com Select an image from the list, e.g. wendys.jpg. Double click the name. Use your mouse to resize and move to the location your desired. Then click anywhere on the screen to release your selection. 5.1.2 Text To add text, click icon, a text edit area will display on the screen 21 www.signagelink.com Move the text area to any location of your choice and resize the text area. Then double click on New Content to start text edition. You can set the color, font size. The following is an example of text area. Font selection Font size Bold, Italic and underline Font color and highlight Alignment Numbering and Bullet Decrease Indent and Increase Indent When you have done, reselect the text area by click anywhere on the screen. 22 www.signagelink.com 5.1.3 Scroll Text To add scroll text, click You can choose the font and set the font size and color. You can also adjust the scroll text speed, direction and type. Then click OK. Use the mouse to select the scroll text you just created, resize and move to your desired location. You can follow the steps above for other features. After you complete your scene design, click to save the design. To add another scene, click , and then follow the steps above to create more scenes. You can preview your design by clicking . After you have completed your design, you can publish the content. 23 www.signagelink.com If you click ok, the content will be saved. If you click publish, then it will go to publish screen. Choose the online player to publish the content. At the same time, set the expiration time(the content will be deleted automatically in player) and the player mode(looping,periodically,customize),then click ok.after the content has been downloaded successfully. The content will display in the player. 5.2 Delete Contents To delete content, click Manage. Select the content you want to delete. And then click delete. 24 www.signagelink.com Click OK to confirm content deletion. The content will stop displaying in the player. 5.3 Schedule and Publish Contents 5.3.1 Schedule After you finish your content design and click publish, the system will automatically load content schedule screen. You can also navigate to this screen by click Publish. 25 www.signagelink.com After click publish, it goes publishing settings. You must set content expiration time. Select means that“The content will be continuously playing until expiration time comes”. Select means that“The content will play by weekly or monthly” 26 www.signagelink.com Select means that you can set the start date and end date; start time and end time as you like. If you check you set. You can select , it means this content has priority to play at the time in and mode. After you have finished the setting, add the player(s), click button. After it has been downloaded successfully, the content will play in the player. 27 www.signagelink.com 5.4 Delete Content from Players There are two ways to delete the content. A. To delete content from players, click PlayerPlayer information Click Player Name 28 www.signagelink.com Check the content you would like to delete, and then click Delete. B. Click ContentDelete Player ContentSelect the content you want to deleteclick Delete 29 www.signagelink.com 30 www.signagelink.com 6 Player Monitoring 6.1 Player Information To view player information, click playerplayer information You can see player information such as Player ID, Player Name, status, player IP, Organization, screen resolution, player apk version and so on. If you want to delete a player from the list, check like to delete, then click the player you would . Click OK to confirm the action. 31 www.signagelink.com 6.2 Player Monitoring To monitor player, click playerplayer Monitor. The screen shows the information about players. To view detailed information, click the link under Player Name, e.g. hero,56iq. If you want to look the current content of a player, you can click .Wait for about 10sec, you can see the screen at the right corner. If you want to reboot the player computer, click 32 www.signagelink.com Change the volume of the player, click and choose the volume. 6.3 Caption This function allows you to insert the messages. Choose the player name 33 www.signagelink.com 6.4 Meeting room settings END 34