1
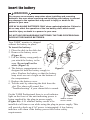
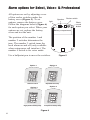
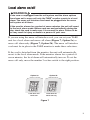
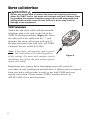
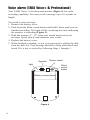
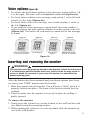
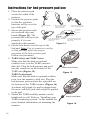
Installation Instructions TABS® Mobility Monitor 25000 series ® Mo Failu in in re to Vi jury com W TA sual or de ply w AR BS mon ath to ith th NIN Mob itorin th es G high ility g by e us e war er. R fall ning Mat es caregi sm R einser risk pe 1) may ve Pla ay ep rs resu ce ba ea t disk on not rs requ the Te ttery ted c into s; re lt with be st Mob suita ired. hi im m st ra D co rp 2) m on in re ility ble Plu rd ex U o no gula ediate indica itor af ts may Mat for g te se t ex rly fo ly. U te te all be e in r s 3) TABS cord nding with pose r pr se low each requ Mak un into cent op on TA rece from BS to ex er op ly 9V batte alar ired. e su it. er m ry of ch 4) al mon cess . ptac side re er . ka Hav disk air itors ive m ation. line baRepla le on of pa e pa is in only oist tterie ce activ botto d. tient ur TA (M s. at BS 5) m of sit odel e or flu DA Ala es sy on disk TE s 25 ids. rm st th PU is sl em eM 010 ot. T IN rem soun . To obili MO oved ds USE ty M DEL 1) rese w he __ fro Rem t al SE ate: ___/ NO m pa n pa RIA . __ this ove arm: __ LN d. tient Th ____ 2600 ___/ disk O. s e ____ body __ 0 ____ than Mob fro _ mm ____ ____ wei stan one ility M onito ght ____ ____ dard pers ate See r an ____ ____ on ca Use vinyl-t if cl n be d re Thi ____ ___ s pro us ea ol plac rM duc ___ t is anua eran ned ed to e it. ma t so prop m nuf TA act l fo ure lutio Fo BS is rm er on d for r Cu a ns. ly w itor m Se ore sto divisio nio ore ith r Tec me info r Se n of hno rm log rvice Senio ies atio , Inc , ca r Te . by ll 80 ch n on 0-8 nolog PATTEN ENT 24 your -29 ies, T PEN DIN 96 Inc . G . bilit y Ins tru cti on s THI SS IDE DO C-04 -25 00 6-A A produ ct is manu factu red for r Tech nolog PATEN ies, Inc. T PEND by ING Pad/o verlay Mattre ss Bed fram e SE rmal sensor locatio n Senio DAT E MO PUT DE IN US L E RIA NO. __ 26 ____ LN __ 10 O. __ 0 /___ __ __ _/__ __ __ __ __ __ __ __ __ __ __ __ _ __ __ __ _ This THIS DO SID NOT E FOLD UP Failure WARN injury to comply with the ING Vis or death to se war TAB ual monito the use nings r. ring S may high Mobility Ma by caregi result in ® ver Rei fall risk tes person may not s require Mobili Rep nsert disk d. ty Ma after s; restraints be suitable eated each batt tes TABS ch may be req for all Tes ery immediairp indicat alarm. For Custis a divisi 1) Pla uired. t es omer on of Senio reg DOCce Mo tely low bat Do ularly Serv . Use 04-25 bilit of ice, call r Technolog 005-A A 800-8 ies, Inc. 2) Pos mattress. y Mate acr Use not expose for proper only 9V alka tery. Rep 24-29 lace ition 96. operati with TAB to exc oss wid line batt patien Mobilit 250 ess on. th To eries. S mo Do 20). nitors ive moistu res positionts buttock y Mate und not fold only 1) Remet alarm: bands. with enc s. Secure er (Modelsre or fluid pad. ove disk 3) Pla losed Store 25010 s. ce ma from clips TAB flat. and she and 2) S mo ttre 4) Ma ets ove ss pad and Reinse nitor. r Mo ke sur rt disk The slot e disk bility Ma bed in disk 5) Ala . is in TAB te. used Mobility Ma slot. rm sou to te S mo one disk can body nito weight nds when properperson if r more be pat is rem vinyl-to ly with cleaned than oved ients from lerant standard pad. solution 90 day s. Alterna limited te warran locatio No ty n WARNING Before installing this system, please read and follow these instructions carefully. Failure to do so could result in injury or death to a person in your care. No device is a substitute for proper nursing care. Thi s pro duc t is ma nuf act ure d for Se nio r Tec hno log ies , Inc . by PAT ENT PEN DIN G 0163-044-G Contact us Thank you for purchasing your TABS® system. If you have questions about your TABS monitoring system or would like to speak to TABS Customer Service, call: TABS Mobility Monitors (U.S.): 800-824-2996 WanderGuard (U.K.) Ltd.: Freephone 0500-500-667 U.S. Patent 4,858,622, 5,066,943, 5,857,665, 6,166,644; Canadian Patent 1,275,448 Other Patents pending FCC ID: HCQ 3B6UMXF Canada: 2309 101 597 This device complies with Part 15 of the FCC rules. Operation is subject to the following two conditions: 1) this device may not cause harmful interference, and 2) this device must accept any interference received, including interference that may cause undesired operation. Changes or modifications not expressly approved by the party responsible for FCC compliance could void the user's authority to operate the equipment. FOR CANADIAN CUSTOMERS: "This digital apparatus does not exceed the Class A limits for radio noise emissions from digital apparatus as set out in the interferencecausing equipment standard entitled "Digital Apparatus" "ICES-003 of Industry Canada." TABS is a registered trademark of Senior Technologies, Inc. and a trademark of WanderGuard (UK) Ltd. Dual Lock is a registered trademark of 3M. ©2002. Table of Contents Warnings and cautions . . . . . . . . . . . . . . . . . . . . . . . . . . . . . . . . . . . 2 Installation instructions Check your shipment . . . . . . . . . . . . . . . . . . . . . . . . . . . . . . . . . . 5 How the TABS® monitor works . . . . . . . . . . . . . . . . . . . . . . . . . . 6 Low battery alert . . . . . . . . . . . . . . . . . . . . . . . . . . . . . . . . . . . . . 6 Installing your TABS monitoring system . . . . . . . . . . . . . . . . . . . . . . 6 Select a mounting location . . . . . . . . . . . . . . . . . . . . . . . . . . . . . . 6 Mount the bracket . . . . . . . . . . . . . . . . . . . . . . . . . . . . . . . . . . . . . . . 7 Mounting the bracket with screws . . . . . . . . . . . . . . . . . . . . . . . . . 7 Mounting the bracket with Dual Lock® fastener . . . . . . . . . . . . . . . 7 A word about Dual Lock® fastener . . . . . . . . . . . . . . . . . . . . . . . . . 8 Wheelchair and door applications . . . . . . . . . . . . . . . . . . . . . . . . . 8 Insert the battery . . . . . . . . . . . . . . . . . . . . . . . . . . . . . . . . . . . . . . . 9 Alarm options (Select, Voice+ & Professional) . . . . . . . . . . . . . . . . 10 Local alarm on/off . . . . . . . . . . . . . . . . . . . . . . . . . . . . . . . . . . . 11 Nurse call interface . . . . . . . . . . . . . . . . . . . . . . . . . . . . . . . . . . . 12 Voice alarm (Voice+ & Professional) . . . . . . . . . . . . . . . . . . . . . . 14 Voice options (Voice+ & Professional) . . . . . . . . . . . . . . . . . . . . . 15 Inserting and removing the monitor . . . . . . . . . . . . . . . . . . . . . . . . 15 Deterring removal of the TABS unit from the bracket . . . . . . . . . . . 16 Testing the TABS mobility monitor . . . . . . . . . . . . . . . . . . . . . . . . 16 Using the TABS mobility monitor . . . . . . . . . . . . . . . . . . . . . . . . . 17 Attaching and detaching the clip . . . . . . . . . . . . . . . . . . . . . . . . . 17 Maintaining the TABS mobility monitor . . . . . . . . . . . . . . . . . . . . . 18 Troubleshooting the TABS mobility monitor . . . . . . . . . . . . . . . . . . 18 How the TABS Sidekicks pressure pads work . . . . . . . . . . . . . . . . . 19 Instructions for bed pad use . . . . . . . . . . . . . . . . . . . . . . . . . . . . . . . 20 Instructions for chair pad use . . . . . . . . . . . . . . . . . . . . . . . . . . . . . . 22 Testing the system . . . . . . . . . . . . . . . . . . . . . . . . . . . . . . . . . . . . . . 23 To reset the alarm . . . . . . . . . . . . . . . . . . . . . . . . . . . . . . . . . . . . . . 23 Cleaning the pressure pad . . . . . . . . . . . . . . . . . . . . . . . . . . . . . . . . 24 Troubleshooting pressure pads . . . . . . . . . . . . . . . . . . . . . . . . . . . . . 24 Reorders . . . . . . . . . . . . . . . . . . . . . . . . . . . . . . . . . . . . . . . . . . . . . 25 WARNING Read and follow these Installation instructions, particularly the warnings and cautions, before using your TABS® mobility monitor. Failure to do so may result in injury or death to a person in your care. Test your TABS mobility monitor for proper operation before each use and: • inspect the cord, clip, disk, bracket and monitor for any signs of damage. • inspect the Dual Lock® fastener for any signs of wear. • inspect the disk to be sure it is free from any sticky or oily substances. • listen to the voice message to make sure it is understandable and appropriate. • replace any components with signs of wear or damage immediately. Use your monitor in conjunction with your facility’s fall management program. TABS monitors are not a substitute for proper nursing care. The effectiveness of the TABS system relies entirely on an immediate response by the caregiver to the TABS alarm. Keep the TABS cord free of all encumbrances at all times. Place the cord on top rather than under pillows. Do not place items on the bed, chair or monitoring location that may interfere with the cord assembly. Use the proper length of TABS cord. Using a length outside the caregiver’s predetermined safety zone may result in injury to a patient. Only use a TABS cord with the TABS monitor. Any other cord, particularly a cord with higher elasticity, may be unsafe and result in injury to a patient. The TABS mobility monitor will not stop a person from leaving a bed, chair, wheelchair or room. It is intended only to alert a caregiver that a person may need assistance. Other interventions may still be required for some people. The TABS mobility monitor and TABS Sidekicks pressure pads can be defeated by a cognitively aware person, a person with only a few moments of lucidity or an uncooperative person. Properly assess each individual before the TABS mobility monitor is used. Use only the Dual Lock fastener or screws that came with your shipment to mount the monitor brackets. Non-conforming fasteners may hinder the device's effectiveness. Make sure you have thoroughly read and understand the TABS mobility monitor instructions before using the pressure pads. 2 WARNING Do not open the TABS® case for any reason, or remove the four screws that hold the case together. The case is sealed and if the seal is broken, the warranty will be voided. Call TABS Customer Service if your TABS unit requires service. Visual monitoring by caregivers is required. TABS Sidekicks pressure pads may not be suitable for all high risk persons; restraints may be required for some people. When using the TABS Sidekick pressure pads, reinsert the disk after each alarm to reset the TABS mobility monitor. A 9V alkaline battery must always be installed for proper operation of the TABS Professional monitoring system. The battery must be installed for the low battery alert to sound when the battery is low and to act as a battery back-up in the event of power loss on the TABS Professional. An intermittent "chirp" indicates a low battery. Replace the battery immediately. Use only 9V alkaline batteries. The TABS monitor does not recharge batteries. TABS Sidekicks pressure pads are designed for use with TABS monitors only. Do not substitute any other fall monitoring devices. Keep the pressure pads flat at all times. If the pressure pad is folded it may not function properly. Do not use the pressure pad if it has been folded. Test the TABS monitoring system with each new resident. Resident weight may affect proper operation. Models 26000, 26100 and 26550 pressure pads are not recommended for persons weighing less than 60 lbs (27kg). Test your pressure pads and TABS monitor before each use. Make sure your TABS mobility monitor is working properly. Using the pressure pad for more than 90-days or one year (depending on model) is not recommended. If the pressure pads are no longer working discard them immediately. Do not immerse in liquid, or use the pad if it has been immersed in liquid. Discard the pad if exposed to liquids. Make sure the bed pressure pad is attached with the enclosed clips and bands. The pressure pad may not function properly if it is not attached in this manner. Do not use modular T-connectors with the TABS Professional. If modular T-connectors are used, the device will not operate properly which could result in injury or death to a person in your care. 3 WARNING Inspect the TABS monitor to make sure it is held securely to the wall or wheelchair bracket and that the bracket mount is secure. If the mount is not secure, the monitor may be damaged. Replace the disk in the disk slot immediately after an alarm and keep the disk in the disk slot at all times to prevent battery drain. Always check to be sure the nurse call interface cord is plugged into the nurse call system before each use of the TABS monitor. If the cord is unplugged and the monitor’s local alarm is off, the unit will not operate. Use care when connecting or disconnecting the TABS monitor to the nurse call system. Gently remove or connect plugs. Pulling on the cord may damage it and result in system failure. On the TABS Professional, connect only pressure pads to the jack on the right and connect only nurse call interface cords to the jack on the left on the bottom of the monitor. An alarm will sound if either item is connected to the incorrect jack. Failure to connect a pressure pad or a nurse call cord to the proper jack will cause improper operation of the monitor. The TABS Sidekick pressure pads are designed to withstand normal wear and tear for a period of 90-days or 1 year (depending on model). Beyond this time, the pad may fail and fail without warning due to prolonged use and other factors, e.g. bending, exposure to moisture, punctures, repeated cord pulls, connector damage, etc. Be certain that your protocols direct staff to log the one year (or 90day) Date Put In Use date in the blank provided on the pad itself AND in the resident’s chart. If the pad is used on more than one resident, the original Date Put In Use date must be transferred from chart to chart. If the cord is unplugged from the call system and the alarm options have been set to nurse call only, the TABS® monitor reverts to a local alarm. The nurse call interface cord must be plugged into the nurse call system at all times. If the monitor alarms for a period of seven minutes, the unit will revert to the local alarm mode. Before each use and periodically during the day, check the cord to make sure it is securely in place. Failure to do so may result in injury or death to a person in your care. 4 Read these instructions Before installing your TABS® monitoring system, read these instructions carefully. Keep the instructions in a safe place for future reference. Check your shipment You should have: ❏ One TABS mobility monitor ❏ One 9V battery ❏ One wall mount bracket with Dual Lock® fastener ❏ Four #4 x 1" long sheet metal screws ❏ Standard 30" cord assembly (or length specified at time of ordering) ❏ Four #4-8 plastic wall anchors ❏ One 2" x 21/2" piece of Dual Lock® fastener Optional items: ❏ One nurse call interface cord ❏ TABS pressure pads ❏ TABS cordless reset ❏ 12VDC power supply ❏ Wheelchair bracket If any items are missing or damaged, call TABS Customer Service at 800-824-2996. 30" cord assembly 4 screws Dual Lock fastener 4 wall anchors 9V battery Mounting bracket Nurse call interface cord (Optional) ® product is manufact ured for Senior Technolog ies, Inc. PATENT Mob by PENDING E PU DE T IN US L E RIA NO. L NO ___261 ____/_ ___00 . ___ ___ ___ ___ /____ ___ ___ ___ ___ ___ _ ___ ___ _ This Pad/o verlay Mattre ss frame DAT Bed MO al senso r locatio n THIS DO SID NOT E FOLD UP Failure WAR injury to comply NING with these Visualor death to TABS monito the user. warnin gs may ring high Mobility Matesby caregi result in vers ® Reinsefall risk require person may not Mobil Repea rt disk d. ity Mates after s; restraints be suitabl e for battery ted chirp each alarm. may TABS be requireall is a division immed indicat Test For Customer 1) Place of DOC-04-2 d. Do regularly iately. Use es low battery Mobilit Service,Senior Technolog 5005-AA of mattre call 800-824-2 y 2) Positio Use not expose for proper only 9V alkalin . Replac ies, Inc. ss. Mate across 996. with TABS to excess operat e batterie e width patien n Mobilit 25020 ion. ive monito To reset ). s. Do positio ts buttoc y Mate under rs only moisture not fold 1) Remov alarm: ks. Secure bands n with enclos (Mode or fluids. pad. 3) Place . e disk ls 25010 Store ed clips from TABS flat. and sheets mattre and 2) monito 4) Make over ss pad and Reinse r. Mobilit rt disk The slot. sure disk y Mate.bed in 5) Alarm is in TABS used Mobility Mate disk slot. one to monito disk can be body sounds weight when properperson if r more than is remove patien cleane vinyl-to ly with standa d d from ts lerant pad. solutio rd 90 day ns. Altern limited warran locatio ate Norm ty n SE TABS mobility monitor Fai in injulure to Vis ry com W TAB ual or dea ply with AR NING S Momonito th to the high bilit ring the use se war y Ma by Rei fall ning r. tes caregiv s ma 1) Rep nse risk per ma Pla rt y res y not ers req ce batt eat disk son ult the Tes ery ed ch into s; res with be uire Mo suit d. irp monito traints Do t reg imm cor 2) bilit able Plu d ext y Ma Use not ular ediately indicate r afte ma for g end y ly te in all 3) TABS cord with expose for pro. Use s low r eac be req into ing from Ma only cen h TAB to uire ke unit. rec ter 9V battery alarm. d. exc per S sur ept side of cha 4) mo ess operati alka e dis acl Hav nito ive line . Rep e on of pad ir k is e pat rs only mo on. batt lace istu act in TAB erie bot . ien tom (Mo re or s. t sit 5) ivates DAT S dis dels fluid of Ala on sys E PU k slo the 250 s. is remrm sou tem T IN 10 Mo t. . To bilit MO ove nds US y Ma DE 1) reset E ___ d from when L NO Re SER te: mo alarm pat IAL . ___ __/___ this pad ve ien The NO . 260 __/ dis : ts . ___ ______00 ___ k from bod tha Mobilit __ ___ ___ y we sta n one y Ma mo ___ ___ igh nda nito ___ ___ t rd person te can See r and ___ ___ viny Use ___ be if This __ rep produ ___ r Ma l-tolera cleane use lac ct is __ e it. nua manu man nt sol d pro d to mo ufactu facture TABS l for nito redd utio per For for for mo Custis a divis ns. ly with r mo Senio re omer ion r Techn re info echno Serv of Seni ologie logies rma ice, s, Inc. tion call or Tech bby 800- nolog PATEN on TENT 824you 2996ies, Inc.T PENDI r NG . ility Inst ruct ions THIS SID E DOC -04-2 5006 ® -AA TABS® Sidekick bed and chair pressure pads (Optional) Cordless Reset (Optional) 5 How the TABS® mobility monitors work Your TABS monitor is designed to help reduce the risk of falls by alerting caregivers when a resident is leaving a bed, chair, room or wheelchair. Operation is simple. Mount the wall bracket on a smooth, flat surface and place the monitor in the bracket. Place the disk in the disk slot on the front of the monitor and attach the clip to the resident’s garment at the back of the neck. When the resident moves beyond the length of the cord, the caregiver’s predetermined safety zone, the disk pulls from the slot and triggers the alarm. The TABS Voice+, Select and Professional monitors have four distinct alarm tones and a nurse call interface which allows a silent local alarm. TABS Voice+ and Professional also have audio recording capability. Alarm options are determined by the position of rocker switches in the battery compartment. The TABS Professional is designed for dual monitoring where you can use a pressure pad and a nurse call cord at the same time. Low battery alert All TABS monitors are equipped with a "low battery alert" (an intermittent chirping sound) which reminds you to replace the battery immediately. Listen for the alert each time you use or test your monitor. If you hear the low battery alert, replace the battery immediately. The TABS Professional must have a functional 9v alkaline battery to operate. A plug-in power supply can be used to extend the life of the battery. The low battery alert will sound when a weak 9V battery is installed or when no battery is installed even when the plug-in power supply is used. The TABS Professional will not function without a functional 9V alkaline battery installed. Installing your TABS monitoring system WARNING Do not install the bracket behind pillows or other objects that may interfere with the movement of the cord. To monitor a person in bed, mount the unit in the center of the headboard or just above the center of the bed on the wall. Failure to do so may result in injury or death to a person in your care. TABS monitors should be mounted on a surface that is smooth and flat. The location should also allow the monitor to be placed on the bracket so that the cord can be pulled from the disk slot easily. 6 Mount the bracket The TABS® wall bracket can be mounted with screws or with Dual Lock® fastener. Choose the method that is appropriate for your particular environment. See "A word about Dual Lock® fastener." Mounting the bracket with screws: You will need: ❏ level ❏ drill with 3/16" bit ❏ pencil ❏ Phillips screwdriver 1. 2. 3. 4. 5. ❏ hammer Use the level to position the bracket straight on the mounting surface. Be sure to leave enough room above the bracket for removal of the monitor. Use the bracket as a template and pencil in the screw hole positions. Drill the anchor holes with a 3/16" bit. Hammer in the plastic wall anchors until they are flush with the mounting surface. Align the holes in the bracket to the holes you have drilled and attach the bracket using four of the 4 x 1" screws. Mounting the bracket with Dual Lock® fastener 1. 2. 3. Clean the surface with rubbing alcohol and clean rag. Let it dry thoroughly before beginning your installation. Use the level to position the bracket straight on the mounting surface. Be sure to leave enough room above the bracket for removal of the monitor Peel off the film on the back of the 21/2" piece of Dual Lock® fastener. Press the fastener firmly to the wall. Line up the piece of Dual Lock® fastener on the headboard with the two pieces on the bracket (Figure 1). Fasten them together by firmly pressing. You will hear a "click" when the Dual Lock® fastener is properly mounted. Dual Lock® fastener Recessed areas Figure 1 7 A word about Dual Lock® fastener According to the manufacturer, if Dual Lock® fastener is used properly it can withstand up to 1,000 closures before replacement is necessary. Inspect each piece of Dual Lock® fastener regularly and replace each piece at the first sign of wear. A piece of film covers the adhesive on the back of each piece of Dual Lock® fastener (Figures 2 and 3). The adhesive is very strong – it was manufactured for one mount only so never reuse a piece of Dual Lock® fastener. If you remove a piece of Dual Lock® fastener from the mounting surface or bracket, replace it with a new piece of Dual Lock® fastener. Dual Lock fastener protective film (remove) Figure 2 Figure 3 To remove Dual Lock® fastener: The adhesive on Dual Lock® fastener bonds well enough to the mounting surface that there is a possibility it may damage your wall when you remove it. Gently grab a corner of the fastener and ease your fingers under it. Roll the Dual Lock® fastener slowly off the mounting surface. Wheelchair and door applications Your TABS® mobility monitor can also be used to monitor a person in a wheelchair or to monitor an interior door. Contact your TABS Representative to obtain the Wheelchair Bracket Assembly (Model 25100) or Easy-Clip Wheel Chair Bracket (Model 25300) or the Door Mount Kit (Model 24010). Connecting optional plug-in power supply for the TABS Professional Insert plug-in power supply into power supply jack on left side of unit (Figure 4a). The red indicator light on the front of the case will be on when the unit is connected to the plug-in power supply. 8 Insert the battery WARNING Do not pull on the battery snap wires when installing and removing batteries. Use care when removing and installing your battery to prevent any damage to the system that may result in injury or death to the person in your care. USE 9V ALKALINE BATTERIES ONLY when replacing batteries. Failure to do so may affect the operation of the low battery alert, which could result in injury or death to a person in your care. DO NOT USE RECHARGEABLE BATTERIES. THE TABS PROFESSIONAL DOES NOT RECHARGE BATTERIES. Your TABS® monitor is shipped without the battery in place. To insert the battery: 1. Place the disk in the disk slot. 2. Remove the battery cover (Figure 4). 3. Lift the battery snap gently as you attach the battery to the snap. Do not pull on the wires (Figure 4). 4. The battery compartment was Figure 4 designed to hold the battery snugly in place. Replace the battery so that the battery snap wires are out of sight on the bottom of the compartment. 5. Replace the battery cover. 6. Test the unit by removing the disk from the slot. The alarm will sound. See "Troubleshooting" if your alarm fails to sound. RED INDICATOR LIGHT On the TABS Professional there is a red indicator Figure 4a light on the front of the unit indicating power is INSERT POWER being supplied by the plug-in power supply SUPPLY HERE (Figure 4a). A 9v alkaline battery needs to be installed at all times even while using the plug-in power supply. This will provide a back-up if AC power is interrupted. A low battery indicator will alarm if the battery power falls below safety requirements. 9 Alarm options for Select, Voice+ & Professional All options are set by adjusting a row of four rocker switches under the battery cover (Figure 5). To set options, remove the battery cover. Follow the diagrams below (Figure 6) for each option you select. When your options are set, replace the battery cover and test the unit. Speaker Rocker switch light Black record button Battery compartment The position of the number 1 and number 2 switches determines the tone. The number 3 switch turns the local alarm on and off (only available when using nurse call interface). The number 4 switch is for voice mode. Use a ballpoint pen to move the switches. Option 1 Option 2 Repeated fast beep Standard alarm Option 4 Option 3 High-pitched steady beep Low-pitched steady beep Figure 6 10 Figure 5 Local alarm on/off WARNING If the cord is unplugged from the call system and the alarm options have been set to nurse call only, the TABS® monitor reverts to a local alarm. The nurse call interface cord must be plugged into the nurse call system at all times. If the monitor alarms for a period of seven minutes, the unit will revert to the local alarm mode. Before each use and periodically during the day, check the cord to make sure it is securely in place. Failure to do so may result in injury or death to a person in your care. If you are using the nurse call interface cord, you can set your TABS unit for a local alarm and nurse call alarm (Figure 7, Option 5a) or nurse call alarm only (Figure 7, Option 5b). The nurse call interface cord must be in place in the TABS monitor to make these selections. If the cord is detached from the monitor, the unit will automatically revert to the local alarm mode. If the monitor alarms for a period of seven minutes, the local alarm will automatically turn on. To set the nurse call only, move the number 3 rocker switch to the right position. Option 5a Local alarm and Nurse call Option 5b Local alarm off Nurse call only Figure 7 11 Nurse call interface WARNING Do not pull on the cord to remove the nurse call interface cord from either the TABS® unit or the nurse call interface wall jack. Remove them by grasping the modular telephone plug and the jack plug heads and pulling them carefully from the wall. Failure to do so may result in damage to the equipment. TABS Professional Attach the end of the cable with the modular telephone plug to the jack on the left of the TABS Professional monitor (Figure 8). Insert the other end of the cable with the 1/4" jack plug into the nurse call system wall jack. If the plug does not fit the wall jack, call TABS Customer Service at 800-824-2996. Note: If the nurse call interface cord is not in place, the local alarm will sound regardless of the settings. If a nurse call interface cord is mistakenly inserted in the jack on the right an alarm will sound. Figure 8 Regulations may require that a functioning nurse call system be accessible in each resident bed and bath area. A splitter may be required from your nurse call provider in order to use both TABS and your regular call system. Please contact TABS Customer Service at 800-824-2996 if you need assistance. 12 TABS Select and Voice+ monitors (Optional T-connector) WARNING Use only the modular T-connector provided by the manufacturer. If other modular T-connectors are used the device may not operate properly which could result in injury or death to a person in your care. Do not connect two pressure pads to the T-connector. The TABS monitoring system will not operate properly which could result in injury or death to a person in your care. Test your TABS monitoring system before each use. Failure to do so could result in injury or death to a person in your care. The modular T-connector lets you connect the TABS chair or bed pad to the TABS monitor and your nurse call system. Do not connect two pads to the T-connector. 1.Remove any cords that may be attached to the bottom of the TABS Select or Voice+ monitor. 2.Plug the modular T-connector into the bottom of the TABS Select or Voice+ monitor. 3.Plug the nurse call cable and the TABS Sidekicks cable into either of the two connections on the modular T-connector. 4.Follow the instructions in "Testing the system". The alarm should appear on your nurse call system console. If it does not, check your connections and test again. If it still does not work, call TABS Customer Service at 800-824-2996. Note: If the nurse call interface cord is not in place, the local alarm will sound regardless of the settings. 13 Voice alarm (TABS Voice+ & Professional) Your TABS Voice+ or Professional monitor (Figure 9) has audio recording capability. You can record a message up to 10 seconds in length. To record a voice message: 1. Remove the battery cover. 2. Push down the black record button and hold it down until you are finished recording. The light will be on during this time indicating the monitor is recording (Figure 9). 3. Hold the monitor 8" - 12" from your mouth and record your message. Speak slowly and enunciate your words. 4. Replace the battery cover. 5. When finished recording, review your message by pulling the disk from the disk slot. Your message should be easily understood and heard. If it is not, re-record by following Steps 1 through 3. Speaker Rocker switch light Black record button Battery compartment Figure 9 14 Voice options (Figure 10) • To silence the local alarm without voice message, push switches 3 & 4 to the right. The nurse call cord must be connected (Option 6a). • For local alarm without voice message, push switch 3 to the left and switch 4 to the right (Option 6b). • For local alarm with voice message, move both switches 3 and 4 to the left (Option 6c). • If you want the voice message to repeat itself, move the number 3 rocker switch to the right and the number 4 rocker switch to the left (Option 6d). The nurse call cord must be connected for the message to repeat. Option 6a Local and voice message off (nurse call cord connected) Option 6c Option 6b Voice message off Voice and local alarm on Option 6d Repeated voice message (nurse call cord connected) Figure 10 Inserting and removing the monitor WARNING The monitor must be properly placed in the bracket. Check to make sure it is locked into position before each use. Failure to do so may result in injury or death to a person in your care. No device is a substitute for proper nursing care. After the bracket has been mounted and your alarm options have been set, insert your TABS® monitor into the bracket. 1. Slide the monitor into the bracket. You will hear a "click" when it is properly locked into place. The front of the bracket should face the resident. 2. Check to make sure the monitor is securely in place by pulling it gently upward. To remove the monitor 1. Gently press the release lever on the bottom of the wall bracket with one hand toward the mounting surface. 2. While pushing the release lever with one hand, slide the monitor up out of the wall bracket. 15 Deterring removal of the TABS® unit from the bracket In the event the TABS unit is removed from the slide lock bracket or tampered with by residents or other non-authorized people, you may wish to make it more difficult to remove the TABS monitor from the bracket. This can be accomplished by breaking off the lower portion of the release tab. Once the release tab has been removed, a pen or similarly shaped object carried by staff will need to be inserted into the release catch before you can slide the TABS unit out of the bracket. 1. If the bracket has already been installed, remove it from the wall. 2. Firmly hold the upper portion of the release tab with one hand. 3. The release tab is scored with a mark (Figure 11). Carefully position pliers along the lower side of the score mark. 4. Bend the tab backward until it breaks off (Figure 12). Pliers Score mark Figure 11 Figure 12 Testing the TABS mobility monitor WARNING Test your TABS® mobility monitor before each use to ensure that it is working properly. Failure to do so may result in injury to a person in your care. Before each use, test your TABS mobility monitor. 1. Remove the disk from the disk slot. Listen for the alarm to sound. 2. Reinsert the disk into the disk slot, and the alarm should stop. If you hear the low battery alert (a low chirping sound) replace the battery immediately. 16 Using the TABS® mobility monitor You determine the "safety zone" – how far you want the person in your care to move before triggering the alarm – by varying the length of the cord. When selecting cord length keep in mind: • The cord must be long enough to allow the person in your care to move within your safety zone without triggering the alarm • The cord must be short enough to trigger the alarm when the person in your care moves out of your safety zone. Standard cord length is 30 inches for monitoring people in bed and 18 inches for monitoring people in wheelchairs, but other cord lengths are available: 18", 24", 30", 36", 42" or custom length. Call your TABS Representative to order additional cord lengths. Remember to only use a TABS cord. They're designed specifically for the TABS mobility monitoring system. If you use a different cord, it will not only void your warranty, but more importantly, the person in your care may be injured. Attaching the clip Attach the clip securely to the person’s garment at the top of the shoulder or close to the back of the neck (Figure 13). Make sure the garment clip does not catch the person’s skin. The clip attaches to most Figure 13 materials securely and without damage; some fragile or slick materials may prevent the proper attachment or may be damaged by the clip. Determine if the clip is appropriate for the material and if so, attach the clip and then test to make sure it is secure. If an individual continually removes the clip, put a safety pin in the garment clip hole and safety pin the clip to the individual’s clothing. Remember if the individual removes their clothing, the system will not work. (Verify your protocols allow safety pin usage.) Check the garment clip regularly to make sure it is attached correctly and is not damaged. A damaged clip may have sharp edges that may injure the person in your care. Detaching the clip Detach the clip from the garment before you help the person in your care out of the bed, chair, etc. Always keep the disk in the disk slot to prevent the alarm from being triggered. 17 Maintaining the TABS® mobility monitor • Clean soiled areas on the monitor, disk, clip, cord and bracket with a damp rag and mild detergent. Dry the clip and disk to prevent corrosion. • The Dual Lock fastener may be cleaned with most standard medical virucidal disinfectant. Spray the disinfectant on the Dual Lock® fastener and allow it to dry thoroughly. If necessary, a toothbrush may be used to gently scrub the "mushrooms." • Inspect your TABS monitor and all components including cord, clip, disk, Dual Lock® fastener and the wall bracket regularly. If there are any signs of wear or damage, replace the component immediately. Call your TABS Representative if you do not already have replacement parts on hand. • Replace the battery as soon as the low battery alert sounds. • Inspect Dual Lock® fastener regularly. Replace it at the first signs of wear or damage. Troubleshooting the TABS mobility monitor If the alarm system is not triggered when the disk is pulled from the slot on the monitor: • Check the battery. Is it installed properly? Does it need to be replaced? If the alarm delays in triggering or the system is false-alarming: • Check the cord. Is it the right length for the application and for that particular resident? • Check the bracket. Is it installed on a smooth, flat surface? • Check the monitor. Is it facing the resident? • Check the monitor. Is it "locked" into the bracket? • Check the monitor. Is it used on an uncooperative resident? The TABS mobility monitoring system can be defeated by a cognitively aware person, a person with only a few moments of lucidity or an uncooperative person. If the alarm system is not triggered when pressure is removed from the pressure pad: • Check to make sure two pressure pads are not connected to the monitor. If the pressure pads still do not work, call TABS Customer Service at 800-824-2996. 18 How the TABS® Sidekicks pressure pads work WARNING The TABS Sidekick pressure pads were designed to withstand normal wear and tear for a period of 90-days or 1-year (depending on model.) Do not use beyond this period. Beyond this period, the pad may fail and fail without warning due to prolonged use and other factors, e.g. bending, exposure to moisture, punctures, repeated cord pulls, connector damage, etc. Be certain that your protocols direct staff to log the DATE PUT IN USE in the blank provided on the pad itself AND in the resident’s chart. If the pad is used on more than one resident, the original removal date must be transferred from chart to chart. The TABS monitoring system is designed to alert caregivers when someone is leaving a bed, chair or wheelchair. TABS Sidekick pressure pads can be used alone or with an optional cordless reset in conjunction with the TABS cord disk assembly. The TABS Sidekick pressure pad is placed on a bed, chair or wheelchair according to the instructions included with the pad. The cord is connected to either the TABS Voice+, Select or Professional monitor. See “Alarm Options” in this manual to set the desired alarm option. The disk is inserted into the TABS disk slot. TABS Sidekicks pressure pads are designed for use with TABS monitors only. Do not substitute any other fall monitoring devices. TABS Sidekick pressure pads are the only pressure pads that can be used with the TABS monitor. The TABS Select, Voice+ and Professional alarm is "non-latching." The alarm will stop if the resident returns to the bed or chair. If used in conjunction with the TABS cord disk assembly, the alarm sounds when the disk is pulled from the disk slot or when pressure is removed from the pressure pad, whichever comes first. The alarm is quickly and easily reset by reinserting the disk in the disk slot or reapplying pressure to the pressure pad. For the TABS Select and Voice+, with an optional T-connector a pressure pad can be used along with a nurse call interface cord. The TABS Professional has a built-in jack so that a pressure pad can be used along with a nurse call interface cord. 19 Instructions for bed pressure pad use rubber band 1. Place the pressure pad across the width of the clip mattress. 2. Position the pressure pads so that the resident’s buttocks will be over the a. Insert band through b. Pass one loop through c. Insert loop through the clip. other and pull tight, hole in the pressure pad. making a slip knot. top of the pad. bottom ridge 3. Secure this position with of mattress pressure pad the enclosed clips and rubber band clip bands (Figure 14). The pressure pad will not work e. Place bed pressure pad flat d. Pass clip through loop on mattress. Attach clips to and pull tight making bottom ridge. properly if it is not a slip knot. attached in this manner. Figure 14 4. Put the bed sheets over the top of the bed pad. Note: Use of a mattress overlay or bed pad may affect the proper operation of the bed pressure pad. Follow test procedure. 5. TABS Select and TABS Voice+ Make sure that the disk or optional cordless reset is in the TABS® monitor disk slot. Plug the bed pressure pad cord insert cord here into the connector on the bottom of the TABS unit (Figure 15). Figure 15 TABS Professional Make sure that the disk or optional cordless reset is in the monitor’s disk slot. Plug the bed pressure pad cord into the right jack on the bottom of the TABS monitor (Figure 16). An alarm will sound if a pad is plugged into the nurse call (left) jack and weight is applied to the pad. 6. Mount the TABS mobility monitor on the insert cord here headboard or wall. Refer to “Installing your TABS monitoring system” in this manual for more detailed information on mounting the Figure 16 monitor. Mattress 20 7. The unit will “chirp” when weight is first applied to the pad to indicate the unit is armed. Test the system by pressing firmly on the pressure pad for 3 seconds. When you remove the pressure, the alarm must sound. Reset the alarm. 8. Have the resident lie normally on the mattress. The resident’s body weight activates the system. 9. The alarm must sound when the resident’s body weight is removed from the pressure pad. Mattress Alternate location Normal pressure pad location Figure 17 Testing the system Test the TABS monitoring system before each use and inspect the pressure pads and TABS monitor regularly to make sure they are not damaged. Test the pressure pads by pressing firmly on the pressure pad for 3 seconds. When you remove the pressure, the alarm will sound. Reset the alarm. To reset the alarm 1. If you are using only the pressure pad, reset the alarm by removing the disk or optional cordless reset and reinsert in the disk slot or by replacing weight on the pressure pad. 2. If you are using both the pressure pad and the TABS cord disk assembly and the disk is pulled from the disk slot, reset the alarm by reinserting the disk into the disk slot. 21 Instructions for chair pressure pad use 1. Place the pressure pad in the center of the chair seat. The side of the pressure pad with the cord on it should be at the back of the chair seat (Figure 18). Do not place the cord on top of or underneath the pressure pad. 2. Place the disk or optional cordless reset in the disk slot. 3. TABS Select and TABS Voice + Plug the TABS® Sidekick pressure pad cord into the connector on the bottom of the TABS unit (Figure 19). TABS Professional Plug the TABS® Sidekick pressure pad cord into the right jack on the bottom of the TABS unit (Figure 20). An alarm will sound if a pad is plugged into the nurse call (left) jack and weight is applied to the pad. 4. Mount the TABS unit on the wheelchair bracket (Model 25100 or 25300). For proper mounting instructions, refer to "Mounting the bracket" section. 5. The unit will “chirp” when weight is first applied to the pad to indicate the unit is armed. Test the system by pressing firmly on the pressure pad for 3 seconds. When you remove the pressure, the alarm will sound. Reset the alarm. 6. Place the resident on the pressure pad. The pressure pad should be centered under the resident’s body. 7. When the resident leaves the pressure pad, the alarm will sound. 22 Cord extends out the back Figure 18 insert cord here Figure 19 insert cord here Figure 20 Testing the system Test the TABS monitoring system before each use and inspect the pressure pads and TABS monitor regularly to make sure they are not damaged. Test the pressure pads by pressing firmly on the pressure pad for 3 seconds. When you remove the pressure, the alarm will sound. Reset the alarm. To reset the alarm 1. If you are using only the pressure pad, reset the alarm by removing the disk or optional cordless reset and reinsert in the disk slot or by replacing weight on the pressure pad. 2. If you are using both the pressure pad and the TABS cord disk assembly and the disk is pulled from the disk slot, reset the alarm by reinserting the disk into the disk slot. 23 Cleaning the pressure pad • Clean soiled areas of cord and pressure pad with a clean cloth and water or a vinyl-tolerant solution. • Do not immerse pressure pad in liquid of any kind. Troubleshooting pressure pads If the alarm does not sound when the resident leaves the chair or bed: • Check the TABS® monitor. Are you using a 9V alkaline battery and has it been installed properly? If not, remove the battery and install a 9V alkaline battery following the instructions in this manual. • Check the cord. Is it connected to the TABS monitor and is the connection secure? If not, connect the cord properly. • Is the resident under 60 pounds (27kg) and are you using only the pressure pad? If so, switch to monitoring the resident with the TABS cord disk assembly only. • Is the resident sitting properly on the pressure pad? If not, reposition the pressure pad so that it is centered under the resident’s body. • If using a TABS Professional monitor, is the pressure pad connected to the jack on the right side of the monitor. If not, reconnect the pad jack to the proper jack on the monitor. If the alarm sounds when the resident has not left the bed or chair: • Check to see that a fresh 9V alkaline battery is being used. If not, replace it. • Check to see that the pressure pad cord is attached to the TABS monitor. • Check to see that the pressure pad is positioned correctly under the patient. If the alarm sounds periodically: • Check to see if the disk has been removed from the monitor. If so, replace it. • Check the battery. The sound you hear may be the low battery alert. Replace the battery with a 9V alkaline battery following the instructions in the "Insert the battery" section. If the pressure pads still do not work, call TABS Customer Service at 800-824-2996. 24 Reorders Replacement parts and accessories TABS® Professional monitor TABS® Voice + TABS® Select monitor TABS Basic monitor TABS® Elite monitor Wheelchair bracket assembly and bungee cords Easy-Clip Wheelchair bracket Wall mount bracket Nurse call interface cord Nurse call splitter Door mount kit Chair pressure pad Bed pressure pad 15" cord (white) 18" cord (fluorescent green) 24" cord (green) 30" cord (fluorescent orange) 36" cord (yellow) 42" cord (fluorescent pink) Dual Lock® fastener (2" x 21/2") Dual Lock® fastener (2" x 1") ® Dual Lock® fastener 1 each: (21/2" x 1" and 2" x 21/2") Dual Lock® fastener (2" x 3/4") Cordless reset 12VDC plug-in power supply (U.S.) 12VDC plug-in power supply (U.K.) Modular T-connector Model/Part # 25022 25021 25011 25000 29700 25100 25300 25120 25150 0707-421 24010 26000 26100 24130 24131 24132 24135 0707-280 0400-026 0400-049 0707-322 For assistance in the United States: Call TABS at 402-475-4002 or 800-824-4490 Mailing address: TABS, P.O. Box 80238, Lincoln, NE 68501-0238 Shipping address: TABS, 1620 N. 20th, Lincoln, NE 68503-1103 For assistance in the United Kingdom: Call WanderGuard (UK) Ltd. Freephone 0500 500 667 or 020 7609 8667 Mailing and shipping address: 25 Horsell Rd. London N5 1XL 25