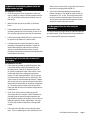
1
Troubleshooting Guide
Table of Contents
Page
#1 Corners are cut to the wrong length..................................4
#2 Machine doesn’t calibrate properly.....................................4
#3 Corners are not cut all the way through.............................4
#4 Air compressor runs frequently or continuously..............4-5
#5 While running a list of corners, and one corner
is removed, the machine will not begin the next
corner.....................................................................................5
#6 Remote is not working.......................................................6
#7 Sticks are popping off outside corners...............................6
#8 Machine is not transitioning between inside
and outside corners very well.................................................7
#9 Corners begin to feed, but will not come out of
machine.................................................................................7
#10 Mud pump will not turn after leaving the
machine idle...........................................................................7
AUTOSLAM
.
Last updated 5.25.10
Most recent version available at www.autoslam.com
Safety Guidelines
This manual contains information that is very important to know and understand. This
information is provided for SAFETY and to PREVENT EQUIPMENT PROBLEMS. To help
recognize this information, observe the following symbols.
DANGER
Indicates an imminently hazardous situation
which, if not avoided, WILL RESULT in death or
serious injury.
WARNING
Indicates a potentially hazardous situation,
which if not avoided, COULD RESULT in death
or serious injury.
CAUTION
Indicates a potentially hazardous situation!
If not avoided, MAY RESULT in minor or
moderate injury. It may also be used to alert
against unsafe practices.
NOTICE
Indicates important information , that if not
followed, may cause damage to machine.
AUTOSLAM
.
AUTOSLAM Troubleshooting Guide
Page 1
Safety Guidelines
General Safety and Warnings for AUTOSLAM
machine operation
Read manual carefully. Be thoroughly familiar with
the controls and the proper use of the machine.
Follow all local electrical and safety codes, as well
as the U.S.A., National Electrical Codes (NEC) and
Occupational Safety and Health Act (OSHA). Only
persons well acquainted with these rules should be
allowed to use the machine.
Wear safety glasses and approved hearing
protection when operating the machine.
WARNING
Structus recommends ready-mix All-Purpose joint
compound ONLY for use in the AUTOSLAM machine
when running corners or filling an automatic taping tool.
When filling boxes, use ready-mix topping.
CAUTION
DO NOT modify this machine with non-Structus
products, as modification could affect performance,
safety or durability. In addition, damage or performance
problems resulting from modification may not be
covered under warranty. AUTOSLAM is engineered to be
used with the Autoflex roll product ONLY.
CAUTION
Operate machine on dry, level surface with casters
in the lock position. DO NOT lay machine on side.
Turn off machine when not in use.
WARNING
Do not operate machine if it is wet.
WARNING
ONLY use the incorporated air compressor for
normal operation of the AUTOSLAM machine and
Structus-approved accessories. Any other use of the
air compressor will void the warranty.
WARNING
Mixing mud in the hopper can damage the screen at
the bottom of the tank. Structus recommends mixing
mud in an external bucket.
WARNING
Make certain that the machine lid is closed, and that
hands and loose clothing are clear of any moving
parts.
WARNING
Use only well-maintained equipment. Repair or
replace damaged parts at once. Maintain unit
according to this manual.
CAUTION
Keep all panels and covers securely in place.
WARNING
All visitors (especially children) should be kept at a
safe distance from the machine.
CAUTION
DO NOT use setting-type compounds in AUTOSLAM
as they will damage the machine.
AUTOSLAM is engineered to be used with the Autoflex
roll product ONLY.
WARNING
Do not manually lift machine off the ground. Use ramps
or mechanical lifts to lift the machine safely.
WARNING
If the AUTOSLAM hopper is full of joint compound,
remove the hopper assembly before maneuvering the
AUTOSLAM machine up stairs.
WARNING
DO NOT store the AUTOSLAM machine in temperatures
below 32 F.
WARNING
Do not use a grounding adapter with this machine!
DANGER
Improper use of grounding plug can result in a possible
risk of electric shock!
DANGER
All wiring and electrical connections should be
performed by a qualified electrician. Installation
must be in accordance with local codes and national
electrical codes.
WARNING
Motors, electrical equipment and controls can cause
electrical arcs that will ignite a flammable gas or vapor.
Never operate or repair in or near a flammable gas or
vapor. Never store flammable liquids or gases in the
vicinity of the compressor.
WARNING
Do not wear loose fitting clothing while operating
machine. Keep hands and loose fitting clothing away
from moving parts.
AUTOSLAM Troubleshooting Guide
Page 2
General Safety and Warnings for AUTOSLAM
onboard air compressor
WARNING
The air compressor tank drain should be used
to drain any water in the tank once a week. The
machine must be unplugged when relieving
pressure from the compressor tank or the
compressor will turn on automatically.
WARNING
Do not operate machine if compressor is damaged
during shipping, handling or use. Damage to
compressor may result in bursting and cause injury
or property damage.
NOTICE
Drain liquid from compressor tank weekly.
WARNING
Disconnect power source, then release all pressure
from the compressor system before attempting
to install, service, relocate or perform any
maintenance.
WARNING
Safety relief valve must be replaced if it cannot be
actuated or it leaks air after ring is released.
NOTICE
NOTICE
There is a safety switch that disables the pneumatic
system when the machine hood is open. Hood must
be closed for the machine to feed and cut corners
properly.
This is an oilless type compressor requiring no
lubrication.
CAUTION
This compressor is equipped with an automatic
reset thermal overload protector which will shut off
motor if it becomes overheated.
CAUTION
If the thermal overload protector is actuated, the
motor must be allowed to cool down before start-up
is possible. The motor will automatically restart
without warning if left plugged into electrical outlet
and unit is turned on.
AUTOSLAM Troubleshooting Guide
Page 3
Sticks
are are
cutcut
to to
thethewrong
#1 Corners
wrong length
length.
press 3 (ResetCalib).
NOTE: The machine should be accurate to +/- 1/8”.
•
•
•
•
•
Make sure that you are not pulling on the corners as they
are coming out of the machine. If the corner is pulled at
the moment that the cutter fires, it can cause the sticks to
come out long.
Check to see if the tape measure is accurate by
comparing it with a ruler or another tape measure. Be
sure to check the end hook on your tape measure. If the
end hook is covered with mud, is bent, or has loose rivets,
this can affect the measurements and calibration.
If the margin of error increases as the corner length
increases, calibrate the machine. Calibrate the machine
by pressing MENU, and then pressing 1 (Calibrate). For
more information, see the AUTOSLAM User Manual or
Quick Start Guide.
If the margin of error DOES NOT increase as the corner
length increases, or if the margin of error appears to be
random, this can indicate a problem with the cutter, the
length encoder or the wiring. If the cutter is not cutting the
Autoflex completely, then it could be dragging additional
Autoflex past the cutter blade as the corner is removed
from the machine. This will cause the next corner to come
out a little long.
RECOMMENDED ACTIONS:
INSPECT THE CUTTER
Disconnect the air supply from the compressor, and inspect
the cutter blades. Make sure that all the screws are tight.
Move the lower blade through its full range of motion. Make
sure that the blades overlap slightly across the width of the
blades at the full extent of lower blade travel.
After resetting, it is necessary to run the calibration
routine by pressing MENU and then pressing 1 (Calibrate).
#3 Corners are not cut all the way through.
ISSUE:
Sticks are not cut all the way through.
Make sure that the air compressor is turned on and that the
air hose is plugged in. Also, make sure that the Tank Pressure
and Output Pressure are both high enough. If necessary, press
the reset button that is located on the side of the compressor
motor.
Check the gauges on the air compressor to make sure there is
enough air pressure. The tank pressure should be 100-125 psi
and the outlet pressure should be set to at least 90 psi.
RECOMMENDED ACTIONS:
• Inspect the cutter assembly for any loose hardware (see
“Inspect the Cutter” under issue #1 in this guide).
• Check air exhaust and all the air connections for any
leaks.
#4 Air compressor runs frequently or
continuously.
Most likely air is leaking somewhere.
RECOMMENDED ACTIONS:
• Unplug the air line from the compressor. If the compressor
builds pressure without the machine plugged into it, then
the problem is a leak somewhere in the machine. Let the
INSPECTING THE LENGTH ENCODER
• Remove the Autoflex product from the machine.
• View the System Test screen by pressing Menu, then 2.
Observe the number listed as ENC1.
• Manually rotate the Feed rollers exactly 1 revolution of the
lower shaft.
• Check the number for ENC1 on the display. If the encoder
is reading correctly, this number should be exactly 400
more than the earlier reading, assuming that the bottom
shaft turned exactly one full turn.
• If the encoder is not reading correctly, it could be a
problem with wiring or the encoder itself.
#2 Machine doesn’t calibrate properly.
If an error is made during the calibration, it is possible that the
machine can get so far out of calibration that it will not be able
to run the calibration again. If this happens, press MENU, then
AUTOSLAM Troubleshooting Guide
Page 4
compressor run until it is fully changed. Then, turn off the
compressor (so that you can listen for leaks) and plug the
air line into the compressor. Look and feel around inside
the machine to try and locate the leak.
•
If the compressor does not build pressure even when
the machine is not connected to it, the problem is on the
compressor itself. Open the drain valve to drain the water,
and make sure the tank drain valve is closed. Check
the unloader valve by pinching the short loop of hose
(see photo below) on the back of the pressure switch. If
pinching the hose to the unloader valve builds up air in
the compressor, then you need to service the unloader
valve or replace the compressor.
•
As you rotate the encoder, you should hear a beep.
This is the point at which the machine is ready to run
the next corner. If you are in AUTO mode, or you have
already pressed RUN, the next corner will come out of the
machine at this time.
•
If the machine responds as described above, it indicates a
problem with the pump encoder. This could be solved one
of four ways:
1. It is best to pull the product straight out of the
machine. Moving product side to side may cause
problems.
•
Also check the pressure relief valve. If the compressor
builds pressure but runs frequently, even if the machine
is not in use, there is an air leak somewhere. Check all
the fittings and hoses to locate the leak. Also, check the
pressure relief valve and drain on the compressor.
#5 While running a list of corners, and one corner is
removed, the machine will not begin the next corner.
RECOMMENDED ACTIONS:
• With your finger, or a screwdriver, rotate the pump
encoder in the same direction that it rotates when the
AUTOFLEX is coming out of the machine. If necessary,
remove the applicator guide (black plastic shown in
photo below) in order to reach it. Do not get mud on the
encoder wheel (see photo) or guides inside the machine.
2. Calibrate the machine. During the calibration process,
the machine will adjust the parameters for the pump
encoder. This may solve the problem.
3. If the problem persists after calibration, use the
SysTest function (MENU, 2) to check the pump
encoder. Position the encoder wheel so that you can
see one of the set screws. Then make a note of the
number displayed for ENC2. Rotate the encoder wheel
1 full rotation, trying to be as exact as possible. When
you are done, check the number for ENC2 again. It
should be about 400 greater than it was before you
began, assuming that it was rotated exactly one
full turn. If it is not close to 400, there is a problem
with the encoder, or the wiring. Inspect the wiring
visually, and even pull gently on any connectors. If no
problems are found in the wiring, it is best to replace
the encoder.
4. If the encoder is reading properly, it may be that the
encoder is not touching the corners completely as
they feed past it. Loosen the two encoder mounting
screws and slide the encoder a little closer to the
center of the machine. Be careful to make this
adjustment only a little at a time (1/16” or less),
because if it is adjusted too far inward, this can cause
problems with the corners jamming or make it harder
to pull out the cut end of the stick.
AUTOSLAM Troubleshooting Guide
Page 5
folder is pressed down or in outside corner mode. If you
are unsure, you can thread the jam nut and rod end all
the way onto the cylinder rod. When finished, be sure to
tighten the jam nut against the rod end.
#6 Remote is not working.
Use the SyncRemote (MENU, 7) to make sure the machine is
recognizing the remote.
RECOMMENDED ACTIONS:
• Press (1) Add New Remote. The display will prompt,
“Searching…”
•
Press and briefly hold the remote button and wait while
the machine is looking for other remotes. If you have
more than one remote to sync, press the buttons on all of
them at this time.
•
When the machine is finished searching for remotes, it
will beep and revert to the previous screen. Press Stop to
exit the SyncRemote screen.
NOTE: When entering corners, the RUN button must be
pressed on the control panel to run the first corner. After that,
the remote can be used to start the remaining corners.
•
Check that the upper center roller assembly (below) is
not loose, or improperly adjusted.
•
With the machine set to an inside corner, loosen all four
screws that hold the upper center roller assembly (two
screws per side, as shown below). Then, lift up gently
on the center roller plates that extend toward the cutter.
While lifting on these plates, tighten the four mounting
screws. This should ensure that the rollers are creasing
the AUTOFLEX as much as possible.
•
Check that the side rollers are not loose. If the side
rollers are too loose, they will not crease the AUTOFLEX
tight enough.
Tighten the
side rollers
as much
as possible
while still
allowing
them to spin
freely.
#7 Flanges on the sticks do not stay down during
installation.
The angle on the outside sticks may not be tight enough.
RECOMMENDED ACTIONS:
• Make sure that the corners are not hitting the applicator
nozzles when they come out of the machine. If necessary,
adjust the applicator nozzles.
•
Check that the rod end is threaded onto the folder air
cylinder far enough. Under the jam nut, you should not see
more than three threads on the cylinder rod.
•
To check this, measure the top of the plastic slider and the
top of the folder plate, which should be 3 5/8” while the
AUTOSLAM Troubleshooting Guide
Page 6
that the rollers can turn freely. If the rollers don’t seem to
turn freely, try spraying them with WD-40.
#8 Machine is not transitioning between inside and
outside corners very well.
RECOMMENDED ACTIONS:
• Check the gauges on the air compressor to make sure
there is enough air pressure. The tank pressure should be
100-125 psi and the outlet pressure should be set to at
least 90 psi.
•
•
Make sure there are not any air leaks, or pinched air
hoses.
If the problem persists, try manually moving the slider
up/down by hand to see if it moves freely. In order to do
this, you must unplug the air hose from the compressor.
•
If the movement feels difficult, WD-40 or a lubricant can
be sprayed on the sliders to try and free them.
•
If all these steps do not solve the problem, it may be
necessary to disassemble the machine to inspect the
sliders. When doing this, make sure that no foreign
objects are obstructing the slider motion. It may be
necessary to loosen the screws that run through the slider
to allow them to slide freely.
•
If the corner sticks keeps hitting the pump encoder,
beware of moving it. Only adjust the pump encoder by
increments of 1/16” or less. The encoder still needs to
touch the product to read the length of the corner stick.
You can loosen two screws from the applicator location
and gently reposition the pump encoder.
#10 Mud pump will not turn after leaving the
machine idle.
This can be caused by using a setting or hybrid mud that sets
up inside the pump. Clean the pump as soon as possible and
use recommended All-Purpose joint compound.
#9 Corners begin to feed, but will not come out of
the machine.
RECOMMENDED ACTIONS:
• If the corners are jamming up inside the machine, then
it is possible that the center roller assembly is not in
the right position. Check the air pressure to see if the
air cylinder is pushing the center rollers into the correct
position and that they are pushing the product hard
enough. The tank pressure should be 100-125 psi and
the outlet pressure should be set to at least 90 psi. Also
check out any air leaks throughout the machine. Beware
with the top cover up or open, as you need to override the
safety switch for the machine to run with the compressed
air. The safety switch is located on the left side on the
folder plate with the front of the machine being where the
control panel is.
•
Check to see if the corners are hitting any specific
object while still in the machine. Use the hand wheel to
manually adjust the product through the machine and
pinpoint where it begins to hit anything. If the corners are
hitting the applicator nozzles, readjust them. See page
22 of the user manual on instructions of the applicator
nozzles.
•
If the corners are still hitting a roller assembly, tighten
them. If you are tightening up a roller assembly, be sure
AUTOSLAM Troubleshooting Guide
Page 7