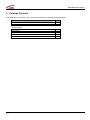
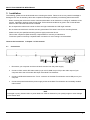
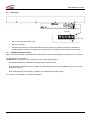
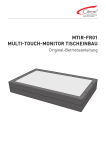
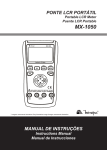
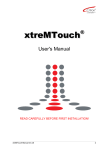
1
32’’ MULTI-TOUCH-MONITOR
MTIR-FR02-V1
Operating Manual
BETRIEBSANLEITUNG
Document Rev.
Rev.
001
Description
First issue
Author
TTHA
Date
2011-02-17
Disclaimer
The contents of this manual are for information purposes only. Citron GmbH reserves the right to change the contents of this manual without prior notice.
While reasonable efforts have been made in the preparation of this manual to assure its accuracy, errors may occur. Therefore, Citron GmbH assumes no
liability resulting from errors or omissions in this manual or from the use of the information contained herein.
Citron GmbH appreciates suggestions with regard to improvements or corrections.
This manual and the Software described herein are subject to copyright.
© 2011 CITRON GmbH, Anwaltinger Straße 14, 86165 Augsburg
Tel. ++49-821-74945-0 FAX ++49-821-74945-99
ALL RIGHTS RESERVED
Document-Information
Dateiname: h:\manuals\dreamtouch\mtir_fr02_v10-manual_en-r02.doc
Date: 27.10.2010 08:59
Document Rev.: 3
2
MULTI-TOUCH-MONITOR MTIR-FR02-V1
Contents
Introduction ..................................................................................................................................................................... 4
1 Precautions.............................................................................................................................................................. 5
1.1. General Safety ................................................................................................................................................. 5
1.2
Shipment and Transportation........................................................................................................................... 5
1.3
Operation.......................................................................................................................................................... 5
2 Package Contents ................................................................................................................................................... 6
3 Installation................................................................................................................................................................ 7
3.1
Connections ..................................................................................................................................................... 7
3.2
Setting Up......................................................................................................................................................... 8
3.3
DreaMTouch Software Driver........................................................................................................................... 8
4 Operating the OSD .................................................................................................................................................. 9
4.1
OSD-Operating-Keys ....................................................................................................................................... 9
4.2
OSD-Main-Menu .............................................................................................................................................. 9
5 Cleaning................................................................................................................................................................. 11
5.1
Cleaning of Monitor Parts............................................................................................................................... 11
5.2
Cleaning of Glass Window ............................................................................................................................. 11
6 Trouble-shooting.................................................................................................................................................... 12
7 Technical Data....................................................................................................................................................... 14
7.1
Electrical ......................................................................................................................................................... 14
7.2
LCD Screen.................................................................................................................................................... 14
7.3
Touch Function............................................................................................................................................... 14
7.4
Environmental ................................................................................................................................................ 14
7.5
Mechanik ........................................................................................................................................................ 14
8 Product Label......................................................................................................................................................... 15
9 Ordering Information.............................................................................................................................................. 15
3
BETRIEBSANLEITUNG
Introduction
The MTIR-FR02-V1 Multi-Touch-Monitor is comprised of a 32 inch Multi-Touch frame made by Citron GmbH,
Germany mounted on an LCD-monitor PD-CP32AH made by Canvys, Germany.
This operating manual describes the set-up of the Multi-Touch-Frame.
For all other aspects reference the original manual of PD-CP32AH LCD screen
WARRANTY AND ALL WARRANTY CLAIMS ARE VOID IF INSTRUCTIONS IN THIS MANUAL ARE
NOT OBEYED.
4
MULTI-TOUCH-MONITOR MTIR-FR02-V1
·
1 Precautions
Please carefully read these instructions before you
start. Failure to follow these instructions may result in
damage or personal injury
·
1.1. General Safety
The unit must be set-up by authorized and
qualified personnel only.
·
Always obey relevant local safety regulations.
·
Setting up should be performed by two persons.
·
MTIR-FR02-V1 Multi-Touch-Monitor should only
be used with the specified input voltage conditions
(see section 7.1)
·
Use only with suitably earthed mains sockets
·
Any extension leads used should be of a suitable
specification and suitably earthed
·
Modification of protective earth connectors inside
or outside the device is dangerous and not
allowed.
·
Do not use the device if it or it’s cables are
damaged in any way
·
Unplug the device before attempting any cleaning
or maintenance operations. Unplug the device
when not in use for prolonged periods
·
During cleaning do not permit liquids to enter the
device.
Please also read and follow the precautions for
the Canvys PD-CP32AH LCD-monitor .
1.2 Shipment and Transportation
Please check device for Damage and shortages
immediately upon receipt. Claims for Damages or
missing parts should be made immediately
To avoid damage, to the LCD screen or the front glass
window, always transport the device in an upright
position only.
1.3 Operation
The monitor with multi-touch functionality as described
herein may be operated in a vertical or horizontal
position.
By using appropriate stands the monitor can be on a
suitable desk or table-top, it may also be integrated
within a table, or mounted to a wall by using
appropriate mounting fixtures.
For further installation instructions please see the
original PD-CP32AH manual. When designing your
mounting please be sure to allow for sufficient
ventilation of the device
Any other use is allowed only with written permission
from the manufacturer.
If the device is modified or used in any other way all
warranty and warranty claims are void.
Do not use the device near water or other liquids,
there is a danger of electrical shock.
·
Take care to route all cables in a way that nobody
can trip or get caught.
·
Repair of MTIR-FR02-V1 by un-authorised
personnel is not allowed. Electrical works should
be undertaken by a professional electrician only.
·
.
·
The device housing should not be opened or
removed by un-authorised personnel.
Safety features on the device should not be
removed or by-passed
No modifications or alterations are allowed for
safety reasons
5
BETRIEBSANLEITUNG
2 Package Contents
The cardboard box containing your new Multi-Touch-Monitor contains the following parts:
Contents
Multi-Touch-Monitor MITR-FR02-V1
Front bezel
Accessories kit:
DVI Cable
Power lead
USB Cable A/B
Magnetic Tape 85 cm
Magnetic Tape 54 cm
6
Qty
1
1
1
1
1
2
2
MULTI-TOUCH-MONITOR MTIR-FR02-V1
3 Installation
The following guidance must be observed when mounting the device. Failure to do so may result in breakage or
damage to the unit. No warranty claims are accepted for damages caused by not following these instructions
·
When mounting the multi-touch-monitor care should be taken not to obstruct the cooling air ventilation of the
monitor. Ventilation openings must be kept clear. Environmental conditions as given in the Technical Data
section of this manual should not be exceeded.
·
Do not expose the multi-touch-monitor to direct sun light. Otherwise the LCD might overheat.
·
Do not mount the multi-touch-monitor so that it gets twisted. The same is true for it’s mounting fixtures,
·
Please use only the specified mounting points to apply mechanical forces.
·
This monitor complies to (EMC-directive). requirements for immunity to interference
To achieve optimum immunity a separate earth connection for the housing is recommended.
Observe the Precautions in Chapter 1 of this manual.
3.1
Connections
Touch
DVI
VGA
Power Supply
1. Disconnect your computer and the multi-touch-monitor from the power supply.
2. Connect a VGA- and/or DVI-video-cable (15 pin mini D-SUB / 24 pin DVI) to the video output of your
computer and to the VGA and/or DVI-input of the Multi-Touch-Monitor.
3. Connect a USB cable between the “Touch“ connector of the Multi-Touch-Monitor and a USB port of your
computer.
4. Connect the power lead with the power supply socket of the Multi-Touch-Monitor and a suitably earthed
mains socket.
HINT
Damaged or poorly inserted video or power leads can result in distorted or poor quality images or even damage
to the device itself
7
BETRIEBSANLEITUNG
3.2
Setting Up
Main Power Switch
Power Key
M
U
EN
CT
LE
SE
W
PO
ER
Operating-LED
1. Switch the main power switch “ON”
2. Start your computer
3
The Multi-Touch-Monitor is switched ON/OFF using the power key. Regular operation is indicated by a
steady green light. If there is no video input or the monitor is on stand-by mode the LED emits red light.
3.3 DreaMTouch Software Driver
Before multi-touch operation the dreaMTouch software driver must be downloaded and installed on your computer.
All downloads can be found on:
www.citron.de, “Downloads“ menu; subsection “drivers and utility programs“.
·
Download “dreaMTouch Installation and Usage Guide“ first and read it.
·
Now download “dreaMTouch Driver“ package. Please download on the day of installation to be sure to get the
latest driver version.
·
Now install the driver as described in “dreaMTouch Installation and Usage Guide“.
You computer is now ready for multi-touch operation.
8
MULTI-TOUCH-MONITOR MTIR-FR02-V1
4 Operating the OSD
4.1 OSD-Operating-Keys
(On-Screen-Display-Menue)
OSD-Menu Keys are located on the back of the Multi-Touch-Monitor. The keys have the following functionality:
T
EC
L
SE
U
EN
M
Taste
MENU
PO
W
ER
Funktion
open main-menu
Leave sub-menu / main-menu and save settings
Sub-menu selection /
Decrease values
Sub-menu selection /
Increase values
SELECT
POWER
Select function
Switch device between stand-by and operation
(only when OSD inactive)
The device is switched off/on using the “POWER“-Key. During regular operations the indicator light is green, in all
other cases it is red.
4.2 OSD-Main-Menu
OSD menu navigation, options and settings are described as follows:
Select the function groups within the six main-menu items using ▲▼- keys. The selected function group is
highlighted. Activate the sub-menu by pressing the “Select”-key.
4.2.1 Input Select
Within the main-menu item “Input Select“ you can control the choice of input channels and the PIP modes. Use the
keys “Select“, ▲▼ to navigate.
Main Input
channel
VGA
DVI
9
BETRIEBSANLEITUNG
4.2.2 Image Adjustments
Within the main-menu item “Image Adjustments“ you can control image settings like brightness, contrast, etc.
Brightness
Contrast
Backlight
Backlight mode
Use ▲▼-keys to adjust brightness
Use ▲▼-keys to adjust contrast
Use ▲▼-keys to adjust backlight brightness
Valid only with ambient light sensor
4.2.3 Color Adjustments
Within the main-menu item “Colour Adjustments“ you can control colour settings like colour temperature etc
Autom. Colour
Adjust
Switch sRGB
Colour
temperature
Automatic Adjustment of colour parameters
Simulates a CRT´s color space
Use ▲▼-keys to select predefined colour
temperature or individual settings
4.2.4 VGA Adjustments
Within the main-menu item “VGA Adjustments“ you can control the settings for the main input channel. This menu
item can be selected only when VGA video input is active.
Auto Adjust
Clock
Phase
H-Position
V-Position
4.2.5
10
Press „Select“ to start automatic adjustment
Manual fine tune of clock settings
Manual fine tune of phase settings
Adjustment of horizontal image position
Adjustment of vertical image position
System Adjustments
OSD Timeout
Duration OSD displays after last key pressed
OSD Hor.
Control horizontal OSD position
Position
OSD Vert.
Control vertical OSD position
Position
OSD Direction
Mirror and rotate OSD
Reset
Load factory settings. All individual changes are
lost!
Reset Colour
Set colour settings to nominal values
Adjustments
Reset Geometry
Set image geometry to nominal values
Sharpness
Control image sharpness
Overlap
Manual DOS mode settings
Mode Select
MULTI-TOUCH-MONITOR MTIR-FR02-V1
5 Cleaning
CAUTION:
5.1
Disconnect the Multi-Touch-Monitor from power supply before cleaning.
Wait until all parts are completely dried before re-connecting power.
Cleaning of Monitor Parts
Clean the monitor surface using a dampened cloth. Take care that no liquid enters the device. Clean the device
surfaces with a smooth, non scratching lint-free cloth. Do not use any cleaning agents or paper towels.
5.2 Cleaning of Glass Window
To clean the glass window commercially available glass cleaning agents may be used. Clean the device surfaces
with a clean, soft, non-scratching, lint-free cloth.
CAUTION:
Do not use sharp or abrasive cleaning agents or alcohol. They will destroy the surface of the
infrared multi-touch optics.
11
BETRIEBSANLEITUNG
6 Trouble-shooting
Error
Operating LED is off
Reason
- Main power switch is off
-
No image
No power supply
Corrective
- Switch on main switch
-
Check power chord
-
Check wall plug
-
cabling is missing or faulty
-
Check DVI or VGA cable
Check power chord
-
Main power switch is off
-
Switch on main switch
-
Monitor in stand-by mode
-
Switch on using „power“-key
-
Wrong input channel selected
-
Use OSD to select other input
channel
-
Image is not visible
-
Use OSD to adjust brightness
and contrast
-
No video input
-
Adjust graphics card
configuration
Check screen saver and
energy saver settings
Poor quality image
-
Bad or wrong cabling
-
-
Unsupported graphics mode
-
Check both ends of video cable
Check if graphics mode of
video cards is supported by
monitor.
Check if monitor is operated at
native resolution (1920 x 1080
at 60 Hz)
Smaller resolutions get scaled
to full size causing blur due to
interpolation. This is not a
device fault!
Further steps:
- Execute „Auto Adjust“.
- Use the OSD settings „H-Total“
and „Phase“ until image is clear
and sharp. (After a change of
graphics mode settings might
have to be repeated)
Picture is shown with wrong size or
not centered
OSD-Error “Signal out of Range“
12
-
Size or Position manipulated in
OSD
-
Unsupported graphics-mode
-
Unsupported graphics-mode
-
Check horizontal and vertical
position in OSD
-
Check if graphics mode of
video cards is supported by
monitor.
-
Check if graphics mode of
MULTI-TOUCH-MONITOR MTIR-FR02-V1
Touch is not working
-
Some cabling is missing or
loose.
Monitor has switched off
automatically
-
Touch operation unstable
-
Driver is not installed correctly
-
-
Poor USB cable quality
-
-
USB cable too long
-
video cards is supported by
monitor.
Check USB connection at the
monitor.
Check USB connection at the
PC
Remove USB cable for about
10 seconds and plug it in again
Reinstall driver, look at
“dreaMTouch Installation and
Usage Guide“
Use USB port on back side of
computer instead of front side
port
Take care not to use more than
allowed maximum of 5 m, high
quality, USB cable
13
BETRIEBSANLEITUNG
7 Technical Data
7.1
Electrical
Power Supply:
Current Consumption:
Monitor Interface:
Touch Interface:
7.2
LCD Screen
Panel Type:
Display Size:
Resolution:
Colours:
7.3
Communication Protocol:
Max. Scan Speed:
16 ms / scan ( 62 Hz)
0°C to 35°C
20% to 80% (non condensing)
Mechanik
Touch monitor dimensions:
Front bezel dimensions:
Surface finish:
Active Area:
Window
Weight
Monitor:
14
Up to 32
> 8 mm
< 2 mm
Microsoft® Windows XP® to Microsoft Windows 7® 32 bit
and 64 bit
(Linux® and Apple Macintosh® support under
development)
Driver interfaces for user applications:
• TUIO 1.1 2Dcur und 2Dblb Profiles
• Windows 7 Multitouch HID Emulation
• Windows XP Mouse Emulation
Environmental
Operating Temperature:
Humidity (operating):
7.5
AU Optronics Colour TFT LCD Panel
32 “ / 80,1cm
max. 1920 x 1080, max. 85Hz
16,2 Mio. (8 Bit)
Touch Function
Number of simultaneous touch points:
Size of touch point
Resolution:
Supported Operating Systems:
7.4
100 – 240V AC, 50 / 60Hz
4 A max.
Single Link DVI, analog VGA
USB1.1 (full speed)
796 × 486 × 125 mm
846 x 536 x 1.5 mm
Black structured powder coating (RAL 9011)
698.4 x 392.9 mm
4 mm anti-reflective, laminated security glass
~ 25 kg
PD-CP32AH
MULTI-TOUCH-MONITOR MTIR-FR02-V1
8 Product Label
9 Ordering Information
Order Number
MTIR-FR02-V1-A01
Description
32” dreaMTouch including LCD-monitor
15
MULTI-TOUCH-MONITOR MTIRFR02-V1
BETRIEBSANLEITUNG
Citron GmbH
Anwaltinger Str. 14
D - 86165 Augsburg
Telefon +49 (0)821 / 7 49 45 - 0
Fax
+49 (0)821 / 7 49 45 – 99
16
[email protected] // www. citron.de