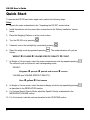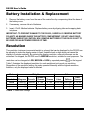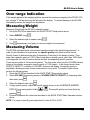
1
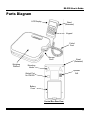
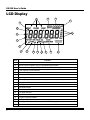
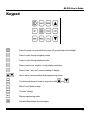
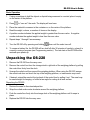
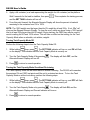
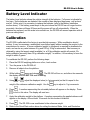
DS-220
Versatile Digital Scale
User’s Guide
DS-220 User’s Guide
Introduction
Thank you for your purchase of the AccuTools™ DS-220 Versatile Digital Scale. The DS220 is
the most accurate and precise digital scale available today with features that cannot be found
anywhere else.
With the DS-220, you can measure weight or liquid volume in both metric and English units, in
addition to using it as a parts counter. The DS-220 is also programmable, and has a built in
alarm to indicate a programmed threshold has been exceeded. Attaching the DS-220 to the CM500 Charging Module (optional, extra) allows automatic refrigerant charging for A/C systems.
Features
•
•
•
•
•
•
•
•
•
•
•
Large, high-visibility back-lit LCD display
Measures Mass and Liquid Volume in Metric and English Units
Functions as a Parts Counter
Built-in memory remembers all previous settings
Rugged, Compact Design
Long Battery Life
High Accuracy and Resolution
Programmable
Can be calibrated in the field with inexpensive reference weights
Expandable with CM-500 Charging Module
Ideal for Refrigerant Charge/Recover, Industrial, Shop, and General Home Use.
Specifications
Capacity
Accuracy
Resolution
Specific Gravity Range
Power
Battery Life
Operating Temperature
Weight
Dimensions
100 kilograms (220 Pounds)
0.5% of Reading +/- 1 Least Significant Digit
2g, 0.005 lbs., 0.1 oz, 2 ml, 0.001 gal., 0.1 fl. oz.
0.500 kg/l to 2.000 kg/liter
4 x 1.5V ‘AAA’ Alkaline Batteries (6 VDC)
30 hours continuous use
0°C – 60°C (32°F – 140°F)
2.5 kg (5.5 lbs.)
26.7 cm x 26.7 cm x 4.5 cm (10.5” x 10.5” x 1.75”)
NOTE: To prevent damage, never exceed the rated capacity of the DS-220.
1
DS-220 User’s Guide
Parts Diagram
LCD Display
Easel
(Extended)
Keypad
Coiled
Cord
Storage
Dock
Weighing
Platform
Easel
(Retracted)
Mounting
Hooks
Speaker
Grill
Optical Port
for CM-500
Battery
Cover
Control Box Rear View
2
DS-220 User’s Guide
LCD Display
C
B
A
D
F
G
E
H
I
J
K
L
M
N
Item
3
O
P
Q
R
Function
A
Measurement Mode Indicators
B
Specific Gravity Indication (only in Liquid Measurement Mode)
C
Alternate Numeric Display (for Specific Gravity or Tank Capacity)
D
Tank Capacity Percent Indication
E
Units Indicators
F
Main Numeric Display
G
Key “Beep” Indicator
H
“Floating” Negative Indicator (Indicates weight removed from platform)
I
Battery Level Indicator
J
Fast Adjustment Indicator
K
Set Mode Indicator
L
Tank Capacity Mode Indicator
M
Run Mode Indicator
N
Hold Mode Indicator
O
Program Complete Indicator
P
Calibration Mode Indicator
Q
Valve Open/Closed Indicator for use with CM-500 Charging Module
R
Resolution Indicator
DS-220 User’s Guide
Keypad
Press for power-on, press/hold for power off, press/release for backlight.
Press to cycle through weighing modes.
Press to cycle through displayed units.
Press to select low, medium, or high display resolution.
Press to tare (“zero-out”) current reading on display.
.
Use to adjust various settings and programming values.
For faster adjustments. Used in conjunction with
and
.
Starts Count Mode training.
“Freezes” display.
Starts programming mode
Activates/Deactivates stored program.
4
DS-220 User’s Guide
Quick Start
To operate the DS-220 as a basic weigh scale, perform the following steps:
Setup
1. Unpack the scale as described in the “Unpacking the DS-220” section below.
2. Install the batteries into the control box as described in the “Battery Installation” section
below.
3. Place the Weighing Platform on a firm, level surface.
4. Turn the DS-220 on by pressing
.
5. If desired, turn on the backlight by momentarily pressing
6. Select the weigh mode by repeatedly pressing
follows:
.
. The mode indicators will cycle as
WEIGHT è VOLUME è VOLUME SPECIFIC GRAVITY è COUNT.
7. In Weight or Volume mode, select the proper measurement units by repeated pressing
The units will cycle as follows for each corresponding mode:
WEIGHT:
kilograms è pounds è pounds and ounces è ounces
VOLUME (and VOLUME SPECIFIC GRAVITY):
liters è gallons è fluid ounces
8. In Weight or Volume mode, select the desired display resolution by repeatedly pressing
as described in the RESOLUTION section.
9. If in Volume Specific Gravity Mode, adjust the Specific Gravity as described in the
MEASURING VOLUME section.
10. If in Count mode, train the scale as described in the COUNTING section.
5
.
DS-220 User’s Guide
Basic Operation
1. If using a container to hold the objects or liquids being measured or counted, place it empty
on the center of the platform.
2. Press
to “zero-out” the scale. The display will read zero.
3. Place the material to measure in the container or on the center of the platform.
4. Read the weight, volume, or number of items on the display.
5. A positive number indicates the applied weight is greater than the zero value. A negative
number indicates the applied weight is less than the zero value.
6. Repeat steps 1 through 5 as necessary.
7. Turn the DS-220 off by pressing and holding
down until the scale turns off.
8. To conserve battery life, the DS-220 will turn itself off after 30 minutes of inactivity, unless it is
currently running a program (see Programming section). The last state of the DS-220 will be
restored upon power-up.
Unpacking the DS-220
1. Remove the DS-220 from the carry case.
2. Remove the control box from the storage dock in right side of the weighing platform by pulling
the control box firmly from the dock.
3. Unwrap the coiled cord from around the weighing platform. When using the DS-220, ensure
the coiled cord does not touch the top of the weighing platform, or inaccuracies may result.
4. If desired, extend the easel at the top back of the control box by pulling it out. The easel may
be used straight for hanging, or folded at an angle for resting on a level surface.
Repacking the DS-220
1. Restore the easel to the retracted position.
2. Wrap the coiled cord counter-clockwise around the weighing platform.
3. Push the control box firmly into the storage dock of the weighing platform until it snaps in
place.
4. Replace the DS-220 into the carry case.
6
DS-220 User’s Guide
Battery Installation & Replacement
1. Remove the battery cover from the rear of the control box by compressing tab at the base of
the battery cover.
2. If necessary, remove old set of batteries.
3. Insert 4 ‘AAA’ Alkaline batteries. Replace battery cover by aligning tabs and snapping back
into place.
IMPORTANT: TO PREVENT DAMAGE TO THE DS-220, CAREFULLY OBSERVE BATTERY
POLARITY AS MARKED INSIDE THE BATTERY COMPARTMENT. DO NOT LEAVE DEAD
BATTERIES INSIDE THE CONTROL BOX. REMOVE BATTERIES IF THE DS-220 IS NOT TO
BE USED FOR AN EXTENDED PERIOD OF TIME.
Resolution
The resolution (minimum incremental weight or volume) that can be displayed by the DS-220 can
be adjusted to make the display easier to read. Unstable loads or high winds can cause the
display to fluctuate erratically. By reducing the display resolution, external influences can be
minimized. As shipped, the DS-220 is set to MEDIUM resolution, suitable for most purposes. The
resolution can be changed to LOW, MEDIUM or HIGH by repeated pressing
on the keypad.
Table 1 illustrates the displayed resolution for each weight and units mode vs. resolution.
Regardless of the resolution setting, the scale operates internally with the highest resolution;
therefore, only the displayed value is affected.
Mode
Weight
Units
Pounds &
Resolution Kilograms Pounds
Ounces Ounces
0.002 kg 0.005 lbs.
0.1 oz.
0.1 oz.
HIGH
0.005 kg 0.010 lbs.
0.2 oz.
0.2 oz.
MED
0.010 kg 0.020 lbs.
0.5 oz.
0.5 oz.
LOW
TABLE 1. Resolution Settings
7
Volume
Liters
Gallons
0.002 liter 0.001 gal.
0.005 liter 0.002 gal.
0.010 liter 0.005 gal.
Fluid
Ounces
0.1 fl. oz.
0.2 fl. oz.
0.5 fl. oz.
DS-220 User’s Guide
Over range Indication
If the weight applied to the weighing platform exceeds the maximum capacity of the DS-220 (100
kg), a single “1” will be shown on the left side of the display. To prevent damage to the DS-220,
immediately remove the weight from the platform.
Measuring Weight
Measuring Weight with the DS-220 is straight forward:
1. Set up the DS-220 as described in the QUICK START Setup section above.
2. Select WEIGHT using
.
3. Select the desired units of measure using
4. Use
.
as necessary, and apply (or remove) weight to be measured.
Measuring Volume
The DS-220 calculates liquid volume based upon the weight of the liquid being measured. In
order for this calculation to be accurate, the specific gravity of the liquid must be known.
Specific Gravity is defined as the ratio of the density of the liquid to the density of water. Pure
water has a specific gravity of 1.000. Other liquids have a specific gravity other than 1.000. Refer
to the appendix for a list of common liquids and their corresponding specific gravities.
There are two modes of Volume measurement. The first mode, when only the VOLUME indicator
shows on the display, assumes a specific gravity of 1.000 (water). In the second mode, when
SPECIFIC GRAVITY, in addition to VOLUME, shows on the display, the specific gravity is
adjustable, allowing accurate volume measurement of any liquid. To measure liquid volume,
perform the following steps:
1. Setup the DS-220 as described in the QUICK START Setup section above.
2. Select VOLUME (if measuring water) or VOLUME SPECIFIC GRAVITY (if measuring other
than water) using
.
3. Select the desired units using
.
4. If using specific gravity, adjust the specific gravity shown on the ALTERNATE NUMERIC
DISPLAY by pressing and/or holding
or
. The specific gravity can be set faster by
pressing
.
5. Proceed to measure the volume as described in the QUICK START Basic Operation section
above.
NOTE: The range of specific gravity adjustment is from 0.500 to 2.000.
8
DS-220 User’s Guide
Determining Specific Gravity
It is possible to determine the specific gravity of a liquid if you already know its volume. Using a
graduated container appropriate for the liquid in question, perform the following steps:
1. Ensure the DS-220 is in VOLUME SPECIFIC GRAVITY MODE (refer to the Quick Start
section).
2. Place the empty graduated container to the center of the platform.
3. Press
to “zero-out” the weight of the container. The display will read zero.
4. Fill the container to the mark indicating the volume of the liquid in the container.
6. Adjust the specific gravity shown on the ALTERNATE NUMERIC DISPLAY by pressing
and/or holding the
or
until the displayed volume equals the known volume of liquid
in the container. The specific gravity can be changed faster by pressing
.
5. Read the specific gravity of the liquid on the ALTERNATE NUMERIC DISPLAY.
NOTE: The accuracy of the Specific Gravity calculation will be dependent upon the volume
measured. Greater volumes will result in better accuracy.
USE CARE WHEN MEASURING LIQUIDS WITH THE DS-220. DO NOT SPILL LIQUIDS
ONTO THE PLATFORM OR CONTROL BOX, AS THIS CAN DAMAGE THE SCALE.
ALWAYS USE EXTREME CARE WHEN HANDLING FLAMMABLE MATERIALS. IN
ADDITION, OBSERVE PRECAUTIONS WHEN HANDLING COROSSIVE OR TOXIC
MATERIALS, INCLUDING HOUSEHOLD OR INDUSTRIAL CHEMICALS. USE PROTECTIVE
CLOTHING, EYEWARE, AND GLOVES AS REQUIRED.
9
DS-220 User’s Guide
Counting
The DS-220 can count items of equal weight. In order to count accurately, the scale must be
“trained” to recognize the weight of the items being counted. To train the DS-220 for counting,
perform the following steps:
1. Set up the DS-220 in counting mode as described in the Quick Start Setup section.
2. Remove all objects from the weighing platform.
3. If a bin is going to be used to hold the items being counted, place the empty bin on the center
of the platform.
4. Press
. The display will flash n=###, where ### is a number from 1 to 999.
7. Press and/or hold the
or
to set the number of items being used to train the scale.
The number of items can be set faster by pressing
.
5. Count out the number of items as set on the display and place onto the center of the platform
or in the bin.
6. Wait about 5 seconds for the platform to stabilize, then press
the number of items on the platform.
. The display will now show
The DS-220 is now trained to recognize the weight of a single object as one count. This setting
will be remembered until it is trained again. Note that
to “zero-out” any existing weight applied to the platform.
can be used at any time while counting
NOTE: A single item can weigh as little as 2 grams. Training for items weighing less than 2
grams will result in “Error” being shown on the Main Numeric Display. To clear the error, retrain
the scale with objects weighing more than 2 grams. The total weight of the items being counted
at any time may not exceed the total capacity of the scale (100 kg). For best counting accuracy of
small items, train with the greatest number of items possible.
10
DS-220 User’s Guide
Hold Mode
A special feature of the DS-220 allows the emptying or replacing bins or containers used for
weighing or counting without affecting the weight shown on the display. This Hold Mode may be
used as follows:
1. In any weigh mode, allow load to settle until display is steady.
2. Press
. The HOLD indicator will turn on and current weight is now locked on the display.
3. Remove, empty, or replace objects, bins, or containers on the platform.
4. Wait 5 seconds for the new load to stabilize.
5. Press
. The HOLD indicator will turn off. Measurements will continue from where they left
off prior to initiating Hold Mode.
Programming
With the DS-220, a programmable threshold weight, volume, or count will sound an alarm. The
alarm will sound when the displayed weight (either positive for increasing weight, or negative for
decreasing weight) equals the programmed weight. To program the alarm, perform the following
steps:
1. Set up the DS-220 in the desired weigh mode, units, and resolution as described in the Quick
Start Setup section above.
2. If measuring decreasing weight, place the objects or container with the objects or material
that will be removed on the weighing platform.
3. Press
to start the SET Mode, indicated by the SET annunciator on the LCD display. The
main numeric display will flash.
4. Press and/or hold the
point faster, press
or
keys to set the desired alarm set point. To change the set
. This will activate the FAST SET mode which will change the set point
10x faster than normal. Press
again to return to the normal speed SET mode.
5. Press
. The display will automatically change to zero and the RUN indicator will show to
indicate that the program is running.
11
DS-220 User’s Guide
6. When the applied (or removed) weight exceeds the programmed amount, the alarm will
sound and the DONE indicator will flash on the display to indicate the program is complete.
7. Press any key to stop the alarm.
8. To cancel the RUN mode at any time, press the
key.
NOTE: The RUN mode can only be initiated from the SET mode. If you cancel the RUN mode by
pressing
by
, and wish to RUN again, press
(the previous set point will be restored) followed
again. The display will be zeroed when the program restarts. You may program the SET
mode without starting the RUN mode by pressing
after setting the program set point. The
can be used during the
new value will be saved until next time the SET mode is activated.
RUN mode similarly as described in the HOLD MODE section. The CM-500 Charging Module
provides additional functionality when using the RUN mode. Refer to the CM-500 Charging
Module User’s Guide for details.
Tank Capacity Mode
Sometime it is convenient to know the relative amount of material remaining in a container (tank).
The DS-220’s Tank Capacity Mode allows a continuous display of the percentage of material
remaining in a tank. In order to compute the percentage accurately, the DS-220 must be trained
to know the weights of an empty and full tank. To train the DS-220 Tank Capacity Mode, perform
the following steps:
Tank Capacity Mode Training
1. While holding
down, press
. The SET TANK indicator will turn on, and OFF will flash
on the display. This indicates that the Tank Capacity Mode is currently off.
2. Turn the Tank Capacity Mode on by pressing
. The display will flash ON, and the
Alternate Numeric Display and Percent Indicator will turn on.
3. Press
to proceed to the first step of training. 0% will flash in the Alternate Numeric
Display indicating that the weight of an empty container must be registered.
4. Apply an empty container (or a load representing the weight of an empty container) on the
platform. Wait 5 seconds for the load to stabilize, then press
. 100% will flash in the
Alternate Numeric Display indicating that the weight of a full container must be registered.
12
DS-220 User’s Guide
5. Apply a full container (or a load representing the weight of a full container) on the platform.
Wait 5 seconds for the load to stabilize, then press
and the SET TANK indicator will turn off.
. This completes the training process,
6. From this point forward, the Alternate Numeric Display will show the percent of material
remaining in the container from 0% to 100%.
NOTE: The 100% weight must be larger than the 0% weight by at least 200g. If not, “Err” will
show on the Alternate Numeric Display. To clear the error, retrain as above using a 100% weight
that is at least 200g larger than the 0% weight. During training, the ZERO key may be used to
assist in setting the 0% and 100% values. This will have no effect on the training, as the Tank
Capacity Mode relies on absolute, not relative, weights.
Turning Tank Capacity Mode Off
Perform the following steps to turn the Tank Capacity Mode Off:
down, press
. The SET TANK indicator will turn on, and ON will flash
1. While holding
on the display. This indicates that the Tank Capacity Mode is currently on.
2. Turn the Tank Capacity Mode off by pressing
Alternate Numeric Display will turn off.
3. Press
. The display will flash OFF, and the
to return to normal operation.
Turning the Tank Capacity Mode On without Re-training
The Tank Capacity Mode can be turned back on without retraining. The DS-220 will remember
the previous 0% and 100% set points until the unit is re-trained as above. To turn the Tank
Capacity Mode on without re-training, perform the following steps:
down, press
. The SET TANK indicator will turn on, and OFF will flash
1. While holding
on the display. This indicates that the Tank Capacity Mode is currently off.
2. Turn the Tank Capacity Mode on by pressing
. The display will flash ON, and the
Alternate Numeric Display and Percent Indicator will turn on.
3. Press
13
to return to normal operation.
DS-220 User’s Guide
Battery Level Indicator
The battery level indicator shows the relative strength of the batteries. Full power is indicated by
four bars. As the batteries are depleted, the number of bars displayed decreases, until no bars
are left. At this point, it is necessary to replace the batteries (refer to the Battery Installation
section above). If the battery power drops to the point where the DS-220 can no longer function
accurately, the alarm will beep 20 times and the power will turn off automatically. When the
batteries are replaced, and the scale is turned back on, the DS-220 will resume operation with all
previous setting intact.
Calibration
The DS-220 is calibrated at the factory to provide high accuracy. While recalibration should
seldom, if ever, be necessary, recalibration is performed easily without sending the product to the
manufacturer for service. A known calibration weight (in kilograms) is required to recalibrate the
scale, and can be any value between 5 kg and 100 kg. 25 kg is recommend. Best accuracy is
obtained by using the largest weight available (i.e. a 50 kg calibration weight will provide 10x
better calibration accuracy than a 5 kg calibration weight). In addition, it is necessary to know the
weight to within 2 grams.
To recalibrate the DS-220, perform the following steps:
1. Place the DS-220 weighing platform on a firm, level surface.
2. Turn the power to the DS-220 off.
3. Remove all objects from the platform.
4. While holding
, press and release
. The DS-220 will turn on, and after a few seconds
the display will show SET CAL and 25.000 kg.
5. Using
or
adjust the displayed value (in 1g increments) so that it is equal to the
weight of the reference calibration weight. Use the
6. Press
key to adjust in 1 kg increments.
. A number representing the unloaded platform will appear on the display. Press
to lock in this value. The display will read zero.
7. Apply the calibration weight to the platform. A number representing the applied reference will
appear on the display. Allow at least 10 seconds for this number to stabilize.
8. Press
. The DS-220 is now recalibrated to the reference weight.
9. Refer to the Quick Start section above for setting the desired Mode, Units, and Resolution.
14
DS-220 User’s Guide
Restoring Factory Calibration
If you make a mistake recalibrating the DS-220, you can always restore the factory calibration
(and factory defaults) of the scale.
To restore the factory settings perform the following steps:
1. Turn the power to the DS-220 off.
2. Remove any objects from the platform.
3. While holding
, press and release
The factory settings are now restored.
. The DS-220 will turn on and 10 beeps will sound.
4. Refer to the Quick Start section above for setting the desired Mode, Units, and Resolution.
NOTE: When calibrating or restoring the factory calibration,
pressing and releasing
operate.
or
must be held while
. Otherwise, the calibration or calibration restore functions will not
Sound
As delivered from the factory, the DS-220 beeps when turning on and when keys are pressed.
This sound can be muted as follows:
1. Make sure the power is on.
2. While holding
, press
. The musical symbol on the left of the display will turn off
to indicate that the sound has been muted.
Repeat steps 1 and 2 to turn the sound back on.
NOTE: The MUTE function only affects the power-on and key-beeps. It has no effect on the
alarm.
15
DS-220 User’s Guide
Applications
This section deals with specific applications for which the DS-220 may be used.
HVAC Service
Because of its high stability and accuracy, the DS-220 is ideal for automotive, commercial, and
residential A/C refrigerant charging and recovery. Its high resolution also allows accurate critical
charging of small refrigeration systems such as commercial freezers.
To use the DS-220 for refrigerant charging, perform the following steps:
1. Press
to select the WEIGHT weighing mode and
to set the desired display units.
2. If desired, set up the Tank Capacity Mode as described in the Tank Capacity Mode section.
This will allow you to know at any time the percent of refrigerant remaining in the refrigerant
cylinder.
3. Carefully set the refrigerant cylinder on the weighing platform.
4. Attach the cylinder to the charging manifold via a utility hose. Open the cylinder valve and
purge air from the hose.
5. Program the desired refrigerant charge weight as described in the Programming section.
Activate the program by pressing
.
6. Open the manifold valve(s).
7. The display will indicate the weight charged as negative, indicating refrigerant is being
removed from the charging cylinder.
8. If the refrigerant cylinder empties while charging:
a. Close all valves.
b. Press
c.
to “freeze” the display (as described in the Hold Mode Section).
Replace the empty refrigerant cylinder with a full one. Attach and purge hoses.
d. Press
to exit the Hold Mode.
e. Open manifold valve(s). Charging will continue from where it left off.
9. When charging is complete, the alarm will sound. Close all valves and press any key to
cancel the alarm.
NOTE: The CM-500 Charging Module allows for automatic charging of HVAC system. Please
refer to the CM-500 Charging Module User’s Manual for details.
16
DS-220 User’s Guide
Appendix
Specific Gravity of Common Materials
Fluid
Acetic Acid Acetone
Alcohol, ethyl
Alcohol, methyl
Alcohol, propyl
Ammonia (aqua)
Aniline
Benzene
Benzil
Butane
Caproic acid
Carbolic acid
Carbon disulfide
Carbon tetrachloride
Carene
Chloride
Chloroform
Citric acid
Creosote
Cresol
Crude oil, California
Crude oil, Mexican
Crude oil, Texas
Cumene
Decane
Dodecane
Specific
Gravity
1.052
0.787
0.789
0.802
0.826
1.022
0.876
1.084
0.601
0.924
0.959
1.265
1.589
0.860
1.560
1.469
1.665
1.070
1.027
0.918
0.976
0.876
0.862
0.728
0.757
Fluid
Ether
Ethylamine
Ethylene glycol
12
Formaldehyde
Fuel oil
Furan
Furforal
Gasoline, natural
Gasoline, Vehicle
Glycerin
Glycerol
Heptane
Hexane
Hexanol
Hexene
Hydrazine
Kerosene
Linolenic Acid
Milk
Naphtha
Napthalene
Nonanol
Octane
Oil, Castor
Specific
Gravity
0.716
0.683
1.100
1.315
0.815
0.893
1.421
1.159
0.713
0.739
1.263
1.129
0.681
0.657
0.813
0.673
0.797
0.820
0.902
1.035
0.667
0.963
0.823
0.921
0.959
Fluid
Oil, Coconut
Oil, Cotton Seed
Oil, Linseed
Oil, Olive
Palmitic Acid
Parole
Pentane
Phenol
Phytadiene
Pinene
Propane
Propylene
Propylene glycol
Pyridine
Resorcinol
Sabiname
Sea water
Silane
Sorbaldehyde
Stearic Acid
Styrene
Terpinene
Toluene
Turpentine
Water, pure
Note: For reference only. Specific Gravities may vary due to temperature.
17
Specific
Gravity
0.927
0.929
0.932
0.703
0.853
0.969
0.755
1.075
0.826
0.858
0.806
0.516
0.968
0.982
1.272
0.814
1.028
0.719
0.898
0.941
0.906
0.850
0.865
0.871
1.000
DS-220 User’s Guide
Warranty and Repair
1 Year Limited Warranty
Core Enterprises, Inc. warrants that this AccuTools™ product conforms to Core Enterprises, Inc. published
specifications and will be free from defects in material and workmanship. The duration is for a period of one year from the
date of purchase. Core Enterprises, Inc., at its option, will repair or replace this product or any component of the product
found to be defective during the warranty period. Replacement will be made with a new or remanufactured product or
component. This is your exclusive warranty.
This warranty is valid for the original retail purchaser from the date of initial retail purchase and is not
transferable. Keep the original sales receipt. Proof of purchase is required to obtain warranty performance. Core
Enterprises, Inc. dealers, service centers, or retail stores selling Core Enterprises, Inc. products do not have the right to
alter, modify or any way change the terms and conditions of this warranty.
This warranty does not cover batteries or any other normal wear of parts or damage resulting from any of the
following: negligent use or misuse of the product, damage caused by use of the product for purposes other than those for
which was designed, use contrary to the operating instructions, disassembly, repair or alteration by anyone other than
Core Enterprises, Inc. or an authorized Core Enterprises, Inc. service center. Further, the warranty does not cover: Acts of
God, such as fire, flood, lightning, hurricanes and tornadoes.
THE FOREGOING WARRANTIES ARE IN LIEU OF ALL OTHER WARRANTIES, CONDITIONS OR REPRESENTATIONS,
EXPRESS, IMPLIED, STATUTORY OR OTHERWISE, INCLUDING BUT NOT LIMITED TO THE IMPLIED WARRANTIES OF
MERCHANTABILITY AND FITTNESS FOR A PARTICULAR PURPOSE
Core Enterprises, Inc. shall not be liable for any incidental or consequential damages caused by the breach of
any express, implied or statutory warranty or condition.
Except to the extent prohibited by applicable law, any implied warranty or condition of merchantability or fitness
for a particular purpose is limited in duration to the duration of the above warranty.
Core Enterprises, Inc. shall not be liable for any damages of any kind resulting from the purchase, use or misuse
of, or inability to use the product including incidental, special, consequential or similar damages or loss of profits, or for
any breach of contract, fundamental or otherwise, or for any claim brought against purchaser by any other party.
Some states or jurisdictions do not allow the exclusion or limitation of incidental or consequential damages or
limitations on how long an implied warranty lasts, so the above limitations or exclusion may not apply to you.
This warranty gives you specific legal rights, and you may also have other rights that vary from state to state or
jurisdiction to jurisdiction.
How to Obtain Warranty and Repair Service
To obtain warranty or repair service, please call (954) 227 0781 to obtain a RMA number. For warranty service, a legible
copy of the original receipt must be sent along with the RMA Form. Any package received without this RMA number will be
refused. The returned product must be properly packaged and insured against shipping damage. Any shipping damage
resulting from improper packaging shall be the responsibility of the Purchaser. The repaired or replaced product will be
returned to Purchaser, freight prepaid via UPS ground only. Repaired or replaced units carry an additional 90 days
warranty.
© 2005 Core Enterprises, Inc. All rights reserved. AccuTools™ is a trademark of Core Enterprises, Inc.
18
3650 Coral Ridge Drive, Suite 101
Coral Springs, FL 33065
Ph: (954) 227-0781 • Fax: (954) 227-1094
www.accutools.com
AccuTools™ is a trademark of Core Enterprises, Inc.
P/N 10154 Rev. B