1
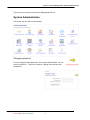
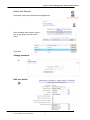
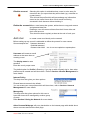
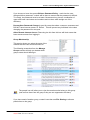
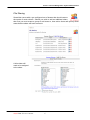
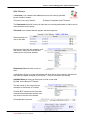
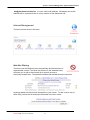
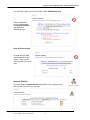
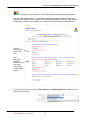
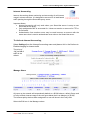
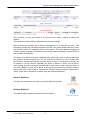
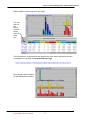
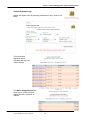
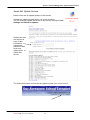
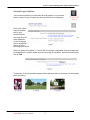
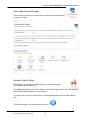
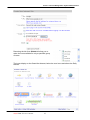
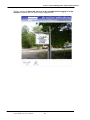
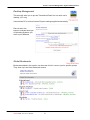
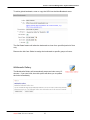
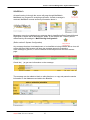
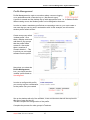
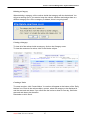
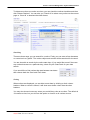
Section 4: Server Management: System Administration
SECTION 4
Server Management: System Administration
System Administration
4-2
Change password
4-2
Users and Groups
4-3
4-4
4-5
Add Users
Group Membership
File Sharing
4-6
Mail Aliases
4-7
Internet Management
Web Site Filtering
Internet Policies
Internet Accounting
Intranet Statistics
Internet Statistics
Search Internet Logs
4-8
4-8
4-9
4-11
4-12
4-12
4-14
Smart-Net Update Service
4-15
Assign Admin Permissions
4-16
Intranet Login Options
4-17
User Applications Manager
4-18
Intranet Control-Panel
4-18
Desktop Management
4-21
Global Bookmarks
4-21
Multimedia Gallery
4-22
Mailwatch
4-23
Profile Management
4-25
Daily Notices
4-26
My Notes Admin
4-30
Smart-Net 2.1 User’s Manual
1
Section 4: Server Management: System Administration
There are four sections in the Server Management Area.
System Administration
This is the one you will use most often.
Change password
If a user forgets his/her password, the system administrator can not
work out what it is. They can, however, change it so the user can
get back in.
Smart-Net 2.1 User’s Manual
2
Section 4: Server Management: System Administration
Users and Groups
Users and groups are created and managed here.
In the manage users screen, select
ALL to see a list of all the current
users
The icons:
Change password
Edit user details
Smart-Net 2.1 User’s Manual
3
Section 4: Server Management: System Administration
Disable account
Selecting this option is advisable when a user is to be away for
some time but you expect that they will be back (eg. a teacher on
a years leave).
This will lock the profile which will preventkeep any information
stored on the users Home drive or their email from being
accessed in their absence without deleting it.
Delete the account When a user leaves the system, advise them to copy and remove
and personal data first.
Deleting a user will remove all data from their Home drive and
their email account
This should be done regularly at least at the end of each year.
Add User
to create a new user identity on the network
Before setting up any users it is advisable to define the protocol for user names.
Some examples are: firstname.lastname,
firstinitial.lastname,
firstname.last initial etc do not use capitals or apostrophes
Username will create an email
address at the same time as
creating a user
The display name is case
sensitive
Enter the user’s proper name
The default option for Profile is Roaming. If you log on with a Domain log in, then other
profiles can be created and will show here. Refer to Section 4 Profile Management for
more details
Internet Policy
The drop down box gives you three options
Filtered Internet access is the default.
You can create your own policies which will show here, refer to Section 4 Internet
Management for more details
Managed by
The drop down box gives options for this user to
have their home drive managed by another group
of users.
Refer Section 2 Using the Network for more details
Allow Personal Webpage will put a placeholder on the intranet page with details about
where to access and store the web page.
Smart-Net 2.1 User’s Manual
4
Section 4: Server Management: System Administration
If you choose to have the system Enforce Password Policy , each time the user
changes his/her password, a check will be done to ensure that the password is difficult.
To comply, the password must be at least 6 characters long, have a combination of
upper and lower case letters and numbers and not be a word straight out of the
dictionary.
Prevent User Password Change is good for users that share a common username and
DO NOT have internet access. Ie. Room1. This will prevent any individual in the class
changing the password for everyone.
Allow Remote Intranet Access. Removing the tick from this box will block users that
have remote access from logging in
Group Membership
This area is where you select the parts of the
network that the user will have access to.
The following screenshot from the Manage
Groups section will help you decide which
groups users should belong to.
The people icon will allow you to view the members who belong to this group
(and remove them from the group if they are not supposed to be there)
If you have need of another group, create it here then see File Sharing to allocate
permissions to the group
Smart-Net 2.1 User’s Manual
5
Section 4: Server Management: System Administration
File Sharing
Smart-Net comes with a pre configured set of shares that should cater to
the needs of most schools. Should you wish to add an additional share,
then first you must create a group to add users to, then add a share and specify which
areas that the share will have access to.
A drive letter will
need to be assigned
to the share.
Smart-Net 2.1 User’s Manual
6
Section 4: Server Management: System Administration
Mail Aliases
A mail alias, is a created email address that has end user(s) specified
for the receipt of emails.
There are 3 set up by default:
Principal, Postmaster and ITContact.
The Postmaster alias will receive all mail that is incorrectly addressed or that is sent to
users that don’t exist (spam)
ITContact is an address that the system will send reports to
Select the edit icon
next to the alias
Remove the tick from the sysadmin user
and select a valid user to receive the
emails.sent to this email address.
Distribution lists can also be set up
here.
A distribution list set up in the mail aliases will allow the list to be used by anyone from
any internet capable computer in the world.( – not just from within the school)
Add Mail Alias will bring up the screen to enter a new alias.
Eg. bot. for the Board of Trustees.
Tick the boxes for the users that are
members of the Board of Trustees
All other BOT members can have their
external email addresses entered (one
at a time) in the box at the bottom.
Press add after each one.
Smart-Net 2.1 User’s Manual
7
Section 4: Server Management: System Administration
[email protected] is now a valid email address. Messages sent to this
address will be copied and sent to every member of the distribution list.
Internet Management
There are several icons in this area
Web Site Filtering
There are over 900,000 web sites automatically blocked because of
objectionable content. The three lists that are in the standard setup
will allow you to add to the blocked list or provide access to
previously blocked sites. The padlock indicates that the list cannot be removed.
Anything added to these lists will be specific to your school. To add a site to any of
these lists, just tick the list and enter the details in the box below
Smart-Net 2.1 User’s Manual
8
Section 4: Server Management: System Administration
You can also create your own lists here under Add Website List
Lists created here
can be incorporated
into Internet Policies
and applied to
different groups
View & Remove Sites
All sites that you add
will be specific to your
school. They can be
viewed or removed from
here.
Internet Policies
The three default Internet Policies determine if you can get to the
internet and how much you can see.
Smart-Net 2.1 User’s Manual
9
Section 4: Server Management: System Administration
The people icon will allow you to see WHO has been granted this permission.
Add you own Internet Policy . The following example will allow students to only have
access to the sites that are included in the Custom Allowed Site Lists Eg. Solar System,
Underwater creatures etc (lists that you created in the Web Site List section above)
ALLOW
access to
these lists
only
The
900,000+
blocked
sites you
don’t see
are divided
up into these
groups
To put users into this group, go to Users/Groups and Manage Users to modify a users
Internet Policy status.
Smart-Net 2.1 User’s Manual
10
Section 4: Server Management: System Administration
Internet Accounting
Internet Accounting allows monitoring and accounting for all Internet
usage in almost real time. It is designed to account for all web based
traffic passing through the Smart-Net proxy server.
Important Notes:
• Internet Accounting will only work when your Smart-Net server is setup to use
Smart-Net as the proxy.
• Only web based traffic is accounted for. It does not monitor or account for FTP or
E-mail traffic.
• Authentication from another server may be used however an account with the
same name that is used to authenticate must exist on the Smart-Net server.
To Activate Internet Accounting,
Select Settings from the Internet Accounting menu and place a tick in the first box to
Enable charging for Internet traffic
The price of
10¢ per MB of
traffic is the
default.
Manage Users
All users on the network will automatically default to a $0.00 balance, default Group and
a Policy to Block internet usage if the user goes below their Low balance (of $0.00)
The Internet policy that has been assigned to a user will show in the Policy field.
Select the Edit icon in the Manage column
Smart-Net 2.1 User’s Manual
11
Section 4: Server Management: System Administration
This is where you can add money to a users account, make a charge or adjust the
balance.
The transaction history will be updated daily at around midnight.
Internet Accounting allows group based management of all Internet accounts. The
accounting groups are completely separate from the user groups listed under the ‘Users
and Groups’ section for managing access to the server. The group based management
allows for global changes to be made to users Internet account settings, Internet Policies
and monetary transactions.
The status of an Internet account is determined by how much credit a user has and what
the minimum amount required is to use the Internet. By default if a user has less than
the minimum amount required their account status is set to ‘Low Balance’ and they will
be unable to use the Internet. Optionally an action of ‘Block’ or ‘Allow’ can be set for
each Internet account to determine what action to take when a user’s account status is
set to ‘Low Balance’. When set to ‘Block’ a user will be prevented from using the Internet
further until their credit meets or exceeds the minimum amount required. When set to
‘Allow’ a user will be allowed to continue using the Internet indefinitely.
Intranet Statistics
The reports in this section are based on activity within the Intranet
Internet Statistics
The detail in these reports are based on Internet activity.
Smart-Net 2.1 User’s Manual
12
Section 4: Server Management: System Administration
Data is added to these reports every night.
You can
click on
the
month
(in blue)
to drill
down for
more
info.
The information in these reports and graphs may often be an indicator that more
investigation is required. See Search Internet Logs
Each graph is also followed
up with detailed information
Smart-Net 2.1 User’s Manual
13
Section 4: Server Management: System Administration
Search Internet Logs
Refine the reports here by entering information in any, some or all
fields.
The information
displayed below
indicates that the user
visited Google
The Quick Usage Reports will
allow you to quickly produce
reports by user, computer or
website
Smart-Net 2.1 User’s Manual
14
Section 4: Server Management: System Administration
Smart-Net Update Service
Details of the last 20 update appears in this section
Updates are obtained nightly when you server checks in.
You can manually update the server at any time by clicking on Save
Settings and Check for updates
Schoolzone sites
are required to
enter a valid
schoolzone
username &
password and
must have
update 0154 to
enable this
service.
The Smart-Net header will indicate the update number your server is up to.
Smart-Net 2.1 User’s Manual
15
Section 4: Server Management: System Administration
Assign Admin Permissions
This very powerful tool will allow you to assign permission to users to
access the Server Management area
Select the
user from
the drop
down box.
Check
ONLY the
areas this
user will be
allowed to
have access
to.
Select Save Permissions from at the top beside the username.
Now, when the user logs on, the Server Management link will be there.
AND
The user will only see the icons that they have been
granted permission for.
Smart-Net 2.1 User’s Manual
16
Section 4: Server Management: System Administration
Intranet Login Options
This function will allow you customise the login page for your intranet.
Select a name for your intranet and choose pictures to be displayed.
Enter your school
name or another
title for your
school Intranet.
Any icons that are
to be displayed
on the front page
can be positioned
above or below
the image you select.
to
Select an image and upload it. If more than one image is uploaded, then the images will
be displayed on a random basis each time the page is refreshed. Note the maximum file
size of 3MB.
Thumbnails of all the uploaded images will be displayed here so that they can be deleted
when necessary.
Smart-Net 2.1 User’s Manual
17
Section 4: Server Management: System Administration
User Applications Manager
This function will allow you to remove the intranet icons for individuals
or groups of users.
Intranet Control Panel
Personalise your Intranet by creating links to your favourite sites.
Eg. Google, Library search etc.
In the Applications Drive, there is a folder of icons which has some of the more common
picture icons already resized to fit the intranet.
If you have your own icon, ensure that it is sized appropriately and less than 40KB in
size.
The default image (if you don’t have one) is this…
Smart-Net 2.1 User’s Manual
18
Section 4: Server Management: System Administration
Removing the tick from Global will allow you to
make the icon available for only a specified group
of users.
The icons display on the Smart-Net intranet, below the user icons and above the Daily
Notices.
Smart-Net 2.1 User’s Manual
19
Section 4: Server Management: System Administration
Ticking the box to Allow this site icon to be viewable before logging in to the
Intranet will place the icon on the Log In page as well
Smart-Net 2.1 User’s Manual
20
Section 4: Server Management: System Administration
Desktop Management
This area will allow you to put the Thunderbird Email Icon on each user’s
desktop. (PC only)
It also allows PC’s to have Internet Explorer settings applied automatically.
Place a tick in the
boxes to indicate what type
of Operating Systems you
have in your Network.
Global Bookmarks
Bookmarks added in this section can be made for ALL users or just for specific groups.
They show up in the User Bookmark section.
Smart-Net 2.1 User’s Manual
21
Section 4: Server Management: System Administration
To add a global bookmark, enter or copy the URL into the New Bookmark area.
The Set Dates feature will allow the bookmark to show for a specified period of time
only.
Remove the tick from Global to assign the bookmark to specific groups of users.
Multimedia Gallery
The Multimedia Gallery will automatically create an index every 15
minutes. If you can’t wait, then this option will allow you to update
the index immediately
Smart-Net 2.1 User’s Manual
22
Section 4: Server Management: System Administration
MailWatch
All email coming in through the server will pass through MailWatch
MailWatch is a program for analyzing mail traffic. As each message is
received, MailWatch records summary information about it.
Messages are colour coded and any message that is classified as Bad Content/infected
High Spam or Spam will be identified as “spam” in the Subject line. Delivery will be
determined by the settings in Mail Filtering Configuration
(Refer section 5 System Configuration)
Any message that has a bad attachment or is classified as being infected with a virus will
not be delivered. Mail scanner will have the message stored in quarantine.
If the message is genuine, it can be released to the recipient from the mail scanner
page.
Check the ( ) to get more information on the message.
The message can be added to black or white lists here, or copy and paste the sender
information in the Lists area and add to the Blacklist
Smart-Net 2.1 User’s Manual
23
Section 4: Server Management: System Administration
If the message should have been delivered, you can release the message here or
redirect it to a more suitable recipient.
Various reports are also available to you under the header Reports.
Message Listing will allow you to access mail older than the most recent 50
Smart-Net 2.1 User’s Manual
24
Section 4: Server Management: System Administration
Profile Management
Profile Management is used on occasions where users are logging
on to workstations with a Domain Log on. (Not Smart Logon).
A profile is created and the desktop set up with appropriate icons. ie. .A Student Profile.
When creating users, the Student profile can be assigned to that user.
In order to create a mandatory profile that we can assign users to, you must create a
new user that you can log onto a workstation with. In this example, we will create a
student profile called ‘student’.
Create a new user called
‘student.profile’. Give
them a display name and
add them to any groups
that the profile needs
access to. Also make
them a member of
‘Domain Admins’. - This
is so that you can install
software into the profile.
Now when you select the
Profile Management
icon, you should see the
‘student’ profile listed as
Unconfigured.
In order to configure this profile,
you need to log into a workstation
as the profile user you created
Set up the desktop with all of the software, icons and shortcuts that will be required for
this type of user and log off.
This will complete the configuration of the profile.
Complete the process for other groups ie.Teachers.
Smart-Net 2.1 User’s Manual
25
Section 4: Server Management: System Administration
Now, when creating new users, the
Profile section will give you the option
of selecting from the profiles you have
just created.
Daily Notices
Daily Notices show for each user when they login to the intranet area.
These are displayed in categories.
Users that have been assigned the rights to the Daily Notices section can create, modify
and delete Notices or categories here.
Notices can be created to display on one day only or on several consecutive days.
To quickly view the contents of a notice, click on the ‘Notice Subject’.
Modifying a Category
You can change the name of a category by clicking on modify icon.
Change the category name then click ‘Update’
Smart-Net 2.1 User’s Manual
26
Section 4: Server Management: System Administration
Deleting a Category
When deleting a category, all the notices inside that category will also be deleted. You
will get a warning first. If you want to keep the notices, edit them and assign them to a
different category first. Once a category is deleted, there is no going back!
Viewing a Category
To view all of the notices inside a category, click on the Category name.
To view the contents of a notice, click on the Notice subject.
Creating a Notice
To create a notice, click ‘Create Notice’. A new box will appear at the bottom of the ‘Daily
Notices’ box. Enter in the notice subject, content, select the category to be displayed in
and the start and end dates. If you would like the notice to show for one day, select the
start and end date to be the same.
Remember to click ‘Save’.
Smart-Net 2.1 User’s Manual
27
Section 4: Server Management: System Administration
Modifying a Notice
To modify a current notice, click the modify icon. The information will popup in a box
where ‘Create notice’ was. Change the required information then click save.
Deleting a Notice
To delete a notice, just click on the notices ‘Delete Notice’ icon. Confirm that you would
like to delete the notice.
Smart-Net 2.1 User’s Manual
28
Section 4: Server Management: System Administration
To delete more than one notice at a time, you can check the notices checkbox and then
click ‘Delete Checked’. You can also you ‘Check All’ to select every notice on the current
page or ‘Clear All’ to deselect the check boxes.
Searching
There are three ways you can search for a notice. Firstly you can enter a few characters
or a word such as ‘giraffe’. The notice subject and content will be searched for the word.
You are also able to search by the notice start days. If you would like to see if there are
any notices that start on a particular day, select only the ‘Start Date’ for your date
search.
If you would like to find notices that start between two dates
then choose both the ‘Start’ and ‘End’ dates.
Sorting
When notices are displayed, you are able to sort them by clicking on their column
headers. When a column is sorted, it will show as a darker colour than the other
headers.
You may also choose how many notes you would like to view at one time. The default is
10 notes at a time, but you do have the option to view 20 or all notices at once.
Smart-Net 2.1 User’s Manual
29
Section 4: Server Management: System Administration
My Notes Admin
This area works with the same principal as Daily notices, except the
notices show in the personal My Notes area.
My Notes Admin can push notes out to individual or groups of users.
Smart-Net 2.1 User’s Manual
30