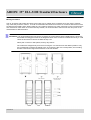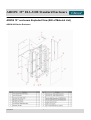
1
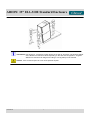
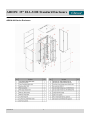
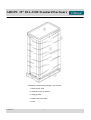
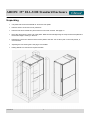
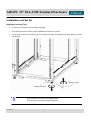
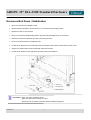
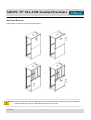
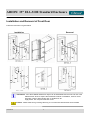
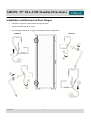
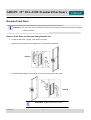
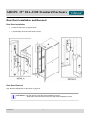
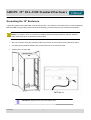
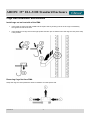
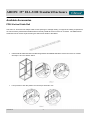
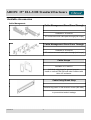
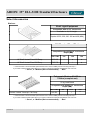
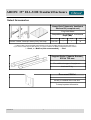
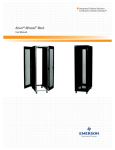
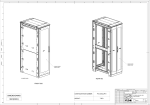
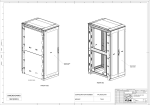
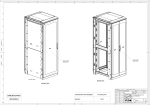
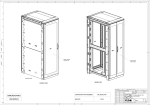
ARION: 19” EIA-310E Standard Enclosure Patents Pending: 1002000994, 1001000784, 1001000785, 1001000786, 1001000787 UL 2416 Approved Part No. TBA Publication Date: March, 2015 User Manual 1 ARION: 19” EIA-310E Standard Enclosure Contents Page Important Safety Information . . . . . . . . . . . . . . . . . . . . . . . . . . . . . . . . . . . . . . . . . . . . . . 4 Product Description Overview . . . . . . . . . . . . . . . . . . . . . . . . . . . . . . . . . . . . . . . . . . . . . . . . . . . . . . . . . . . . . . . . 8 BOM List . . . . . . . . . . . . . . . . . . . . . . . . . . . . . . . . . . . . . . . . . . . . . . . . . . . . . . . . . . . . . . . 9 Packaging Unpacking . . . . . . . . . . . . . . . . . . . . . . . . . . . . . . . . . . . . . . . . . . . . . . . . . . . . . . . . . . . . . . . 12 Site Preparation . . . . . . . . . . . . . . . . . . . . . . . . . . . . . . . . . . . . . . . . . . . . . . . . . . . . . . . . . . . 13 Installation and Set Up Adjusting Leveling Feet . . . . . . . . . . . . . . . . . . . . . . . . . . . . . . . . . . . . . . . . . . . . . . . . . . . . . 14 Enclosure Bolt Down / Stabilization . . . . . . . . . . . . . . . . . . . . . . . . . . . . . . . . . . . . . . . . . . . . 15 Side Panel Installation and Removal . . . . . . . . . . . . . . . . . . . . . . . . . . . . . . . . . . . . . . . . . . . 16 Installation and Removal Front Door . . . . . . . . . . . . . . . . . . . . . . . . . . . . . . . . . . . . . . . . . . . 18 Installation and Removal Door Hinges . . . . . . . . . . . . . . . . . . . . . . . . . . . . . . . . . . . . . . . . . . 19 Reverse Front Door . . . . . . . . . . . . . . . . . . . . . . . . . . . . . . . . . . . . . . . . . . . . . . . . . . . . . . . . 20 Rear Door Installation and Removal . . . . . . . . . . . . . . . . . . . . . . . . . . . . . . . . . . . . . . . . . . . 21 Adjusting PMA Assembly . . . . . . . . . . . . . . . . . . . . . . . . . . . . . . . . . . . . . . . . . . . . . . . . . . . . 22 Grounding the 19” Enclosure . . . . . . . . . . . . . . . . . . . . . . . . . . . . . . . . . . . . . . . . . . . . . . . . . 23 Baying Enclosure . . . . . . . . . . . . . . . . . . . . . . . . . . . . . . . . . . . . . . . . . . . . . . . . . . . . . . . . . . 24 Cage Nut Installation and Removal . . . . . . . . . . . . . . . . . . . . . . . . . . . . . . . . . . . . . . . . . . . . 25 Specifications . . . . . . . . . . . . . . . . . . . . . . . . . . . . . . . . . . . . . . . . . . . . . . . . . . . . . . . . . . . . 26 User Manual 2 ARION: 19” EIA-310E Standard Enclosure Available Accessories PDU/Vertical Cable Rail . . . . . . . . . . . . . . . . . . . . . . . . . . . . . . . . . . . . . . . . . . . . . . . . . . . . . 27 Cable Management . . . . . . . . . . . . . . . . . . . . . . . . . . . . . . . . . . . . . . . . . . . . . . . . . . . . . . . . . 28 Thermal Management . . . . . . . . . . . . . . . . . . . . . . . . . . . . . . . . . . . . . . . . . . . . . . . . . . . . . . . 29 Select Accessories Shelves . . . . . . . . . . . . . . . . . . . . . . . . . . . . . . . . . . . . . . . . . . . . . . . . . . . . . . . . . . . . . . . . . . . 30 Available Accessories . . . . . . . . . . . . . . . . . . . . . . . . . . . . . . . . . . . . . . . . . . . . . . . . . . . . . . . . 31 Warranty and Service . . . . . . . . . . . . . . . . . . . . . . . . . . . . . . . . . . . . . . . . . . . . . . . . . . . . . . . User Manual 3 32 ARION: 19” EIA-310E Standard Enclosure IMPORTANT SAFETY INFORMATION Before you begin to unpack your ARION 19” enclosure, please read the following safety information. Attention to these warnings will help prevent personal injuries and damage to the products. Caution: Indicates a potentially hazardous situation which, if not avoided, may result in property damage or personal injury. Information: Indicates necessary information which is important. Any type of internal component that has the ability to extend out of the 19” enclosure can, if incorrectly installed, cause the 19” enclosure to become unstable and tip over. In addition to the instability caused by an extended component, non-extended internal components can also present a side to side tipping hazard when improperly installed into the 19” enclosure. Before any internal component or product is installed into the 19” enclosure, read and follow the safety guidelines outlined in 19” enclosure stability on page 14 and 15. Unpack: Before unpacking, read and follow the safety guideline outline on page 12. User Manual 4 ARION: 19” EIA-310E Standard Enclosure Information: Use at least 2 - 3 people to unpack and/or set up the 19” enclosure. The shipping weight of the ARION 19” enclosure varies depending on the size and configuration. A typical ARION 19” enclosure can weigh from 108 kg to 125 kg. Ramp is not included. Caution: If the enclosure tips over it can cause personal injuries User Manual 5 ARION: 19” EIA-310E Standard Enclosure Moving on casters: The 19” enclosure with casters should be moved with care. A sudden stop, excessive force, and uneven surfaces may cause the product to overturn. It is both recommended and easier to move the 19” enclosure with the rear of the enclosure as the leading edge. When rolling the 19” enclosure and there's no load, push firmly on the front door frame and not the door mesh. If the 19” enclosure is fully loaded, it is recommended to remove front door and push on the vertical frame to desired location. Information: It is recommended when moving the enclosure the components that are installed into the enclosure are loaded accordingly as shown in the diagrams below. If the enclosure is loaded incorrectly, it could cause the enclosure to become unstable and tip over. Never push on doors or side panels, as they may deform The casters are designed only as an aid in moving the 19” enclosure into the desired position. They are not designed to support the weight of the 19” enclosure. After it is in final position, the 4 leveling feet are to be used to support the enclosure in it's final location. User Manual 6 ARION: 19” EIA-310E Standard Enclosure Lifting 19” Enclosure with Eye Bolts: The 19” enclosure can be lifted using M10 eye bolts. The eye bolts should have load rate for 180 kg/piece. We have provided four M10 eye bolts threaded inserts in the top of the 19” enclosure. When lifting the 19” enclosure, make sure to firmly tightly eye bolts and use balance cables. Information: To reduced the risk of personal injury or damage to the equipment, do not attempt to move large equipment alone. Obtain adequate equipment riggers. 19” Enclosure Stability: Any type of internal component that has the ability to extend out of the 19” enclosure, if incorrectly installed, can cause the 19” enclosure to become unstable and to tip over. In addition to the instability caused by an extended component, non-extended internal components can also present a side tipping hazard when improperly installed into the 19” enclosure. Do not, under any circumstance, install an extendable roll-out component or extendable electronic product in to 19” enclosure that is supported by casters only. Do not under any circumstance, extend more than one roll-out component at a time. Maximum load with eye bolts is 720 kg. User Manual 7 ARION: 19” EIA-310E Standard Enclosure OVERVIEW Arion 19" Enclosure Series: The 19” enclosure can be considered a basic foundation of the IT world and data centers in particular. With the current high density installations and data center requirements, selecting the right enclosure is more important than ever. It allows proper utilization of space and impacts cooling system as well as a data center's life. A well built and properly designed enclosure like our ARION 19”enclosure helps provide operational efficiency and cost effectiveness in data centers. FEATURES Thermal Management: Proper cooling continues to be one of the major challenges in data centers. 19” enclosure design plays an important role in proper airflow system. Cold air from the air conditioning system of a data center should freely pass through the 19” enclosure, the same way that hot air should be easily exhausted from it. The ARION 19” enclosure features contoured high density perforated doors that provides over 80% total open area to allow maximum airflow. This exceeds the airflow requirements specified by many major server manufacturers. Light Weight and Strong: The ARION 19” enclosure provides a rare combination of strength and light weight. It is one of the lightest enclosures in the market but has UL listed 1400 kg (3080 lbs) load capacity. Security: Doors and side panels equipped with locks. Security panels for bayed enclosures are also available. Fast and Easy Assembly: The ARION 19” enclosure takes approximately 15 minutes to assemble and with its light weight, it offers quick and convenient assembly and installation. The light weight components make handling very easy. Shipping and Storing Efficiency: A major consideration with most 19” enclosures is the cost of shipping. With its clever product and packaging design, the ARION 19” enclosure offers the advantage of reduced shipping cost and less room needed for storage. It provides around 30% space reduction and allows to ship up to 128 flat packed enclosures per standard 40' container. Environment: The ARION 19” enclosures uses around 20% less material than the standard enclosures in the market. This helps reduce environmental degradation. Product Line: The ARION 19” enclosure is available in widths of 600 mm, 750 mm and 800 mm and standard heights of 24U, 42U and 48U. The depths are 800 mm, 1000 mm and 1200 mm. Basic 19” enclosure includes 2 sets of adjustable 19” PMA's with U marking for easy location. Top panel comes with cable cut outs. Doors and side panels are lockable for security. UL listed at 1400 kg load capacity and electrical grounding. Flexibility / Expandability: ARION 19” enclosures can be bayed together at time of installation, or sometime in future, providing the user with expansion capability to match their needs. Compliance: EIA - 310E IEC – 60297 – 1, 2 UL 2416: issue No 2. , CSA 22.2 No. 60950 – 1 – 07 All materials are RoHS Compliant User Manual 8 ARION: 19” EIA-310E Standard Enclosure ARION 19” enclosure Exploded View (Bill of Material List) ARION 600 Series Enclosure User Manual 9 ARION: 19” EIA-310E Standard Enclosure ARION 800 Series Enclosure User Manual 10 ARION: 19” EIA-310E Standard Enclosure Assembled enclosure fully packaged 1 set includes: 1. Plastic stretch wrap. 2. Cardboard corner protectors. 3. Shipping pallet. 4. Pallet bolt down bracket. 5. Cover. User Manual 11 ARION: 19” EIA-310E Standard Enclosure Unpacking • Cut plastic film around the ARION 19” enclosure near pallet. • Remove all four card board corner protectors. • Remove bolt down bracket two pieces from front and rear of frame. See page 15. • Place the ramp onto the open end of the pallet. Make sure that straight edge of ramp is toward the pallet and the beveled edge is resting on the floor. • Requires 2-3 persons to lift the enclosure from pallet to the floor. Do not lift or push on the side panels, or door surfaces. • Adjusting the four leveling feet. See page 14 for details. • Rolling ARION 19” enclosure to required location. User Manual 12 ARION: 19” EIA-310E Standard Enclosure Site Preparation It is important to have a installation plan to ensure a successful installation. Here is a list of some issues to consider for the installation plan. • How the 19” enclosure and other equipment will be moved to the location where they will be installed. • How power will be routed to equipment area. • Locations of electrical power lines. • Have stable and level flooring. • Be free of dust and smoke • Have controlled temperature and airflow. The location for 19” enclosure that will provide adequate room for opening doors and side panels, and operating and servicing extended roll-out components and electronic products. The 19” enclosure must be positioned so that there is un-restricted air for all ventilated surface Floor Loading: All building and raised computer room floors are engineered to provide a specific floor loading Caution: It is the customer’s responsibility to ensure that the floor has a structural load capacity that will safely bear the weight of the enclosures system. If moving the 19” enclosure with load requires rolling it over 100 meters, stop every 100 meters for 5 minutes then continue to desired location, this will prevent the casters from over heating and possibly deforming. User Manual 13 ARION: 19” EIA-310E Standard Enclosure Installation and Set Up Adjusting Leveling Feet • Level the 19” enclosure before installing equipment. • The leveling feet at the corners provide a stable base if the floor is uneven. • Use the open ended 14 mm wrench and turn clockwise to extend the leveling feet until it makes firm contact with the floor. Information: Move the 19” enclosure to the working area first. Do not install 19” enclosure on a sloped surface. Level 19” enclosure before installing equipment. User Manual 14 ARION: 19” EIA-310E Standard Enclosure Enclosure Bolt Down / Stabilization • Move 19” enclosure to installation area. • Attach bolt down bracket in front and rear of 19” enclosure at mounting location. • Make four holes on floor surface. • Move 19” enclosure outside drilling area to prevent dust spreading inside 19” enclosure. • Drill the four holes corresponding to size of anchoring devices. • Move 19” enclosure back to installation area. • Fix bolt down bracket to front /rear frame with two M8 hex head screws and washers at each corner. • Adjust four leveling feet to match height with bolt down bracket. • Fix bolt down bracket to floor with M10 hex head screws and washers. Information: Apply 100 in.lbs for M8 hex screw. Apply 150-180 in.lbs for M10 hex screw. Secure the 19” enclosure to the floor before installing equipment. User Manual 15 ARION: 19” EIA-310E Standard Enclosure Side Panel Installation and Removal Side Panel Installation Follow steps 1-6 below for side panel installation: Information: Side panel installation should be assembled with bottom side panels first. Please be careful when installing bottom side panel by inserting the holes at bottom frame, if installed incorrectly, it can cause the part to become deformed. User Manual 16 ARION: 19” EIA-310E Standard Enclosure Side Panel Removal Follow steps 1-6 below for removing the side panels: Caution: To prevent the side panel from falling down and for security purposes, after you finish the installation, lock side panel by turning key clockwise then remove key from lock User Manual 17 ARION: 19” EIA-310E Standard Enclosure Installation and Removal of Front Door Follow the instruction in figures below Installation Removal Information: All of the available ARION door styles can be assembled both the front and rear of the ARION frame. All doors require the same basic method of installation, however some steps are unique to either single door or double door set. Apply 60 lbs. inch torques for M6 hex screw. Caution: Please make sure grounding cable ring is in contact with vertical frame when installed. User Manual 18 ARION: 19” EIA-310E Standard Enclosure Installation and Removal of Door Hinges • Install door hinges into vertical frame from figures below. • Tighten screw M6 with 60-70 in.lbs. • See “Installing Single Door” on page 18 to install front door to right frame. Installing User Manual Removal 19 ARION: 19” EIA-310E Standard Enclosure Reverse Front Door Information: The front door can be reversed so the door can be opened in the other direction by following instructions below. Remove Front Door and Reverse Swing Handle Lock • Follow the instruction on page 18 to remove front door. • Remove swing handle lock from single door as shown below in detail A. Detail A • Re-install swing handle lock into single door for door opening from left to right. Detail B Information: Tighten screws with 7 in.lbs. User Manual 20 ARION: 19” EIA-310E Standard Enclosure Rear Door Installation and Removal Rear Door Installation • Follow the instruction in figures below. • Left and Right doors have the same process. Rear Door Removal See “Remove Single Door” instructions on page 18. Information: Left and right door has the same installation process. Single door and double doors also have the same installation process. User Manual 21 ARION: 19” EIA-310E Standard Enclosure Adjusting PMA Assembly Information: To accommodate different depths of equipment, the PMA’s are adjustable at the front or rear of 19” enclosure • Loosen Nut M6 on PMA. • Slide PMA and select position of rails by using indicator label. • Tighten Nut M6 by using the torque wrench. Information: Apply 75 - 80 in.lbs to PMA. User Manual 22 ARION: 19” EIA-310E Standard Enclosure Grounding the 19” Enclosure A grounding system that complies with TIA-942 requires each 19” enclosure to bond directly to the Common Bonding Network (CBN). The grounding system should direct damaging currents away from the 19”enclosure equipment. Caution: Connection of the 19” enclosure to building Common Bonding Network is required. Failure to follow these instructions could result in serious injury. • Bond 19” enclosure using the grounding cable ring connector onto the bottom frame weld shown below • Use paint piercing washers between the ground terminal and 19” enclosure frame. • Tighten with T-30 screw M6. Information: Apply 60 in.lbs to ground cable to door. User Manual 23 ARION: 19” EIA-310E Standard Enclosure . Baying Enclosures You can expand your system of 19” enclosures by joining them together. • Remove front and rear door, see page 18 and 21. • Fix four baying plates in front and rear frame at upper and lower location as shown in picture below. Use screw torx T30 taper head M6 x 12 four pieces. • Please be sure to install the four PMA’s first. • Make sure the 19” enclosure is level. See page 14. • Baying 19” enclosure before installing equipment. • 19” enclosure can be joined with or without side panels installed. • Install the doors. Information: Joining 19” enclosures together does not provide additional stability to the 19” enclosure. Baying plate has 2 holes for baying spacing options shown in detail C. User Manual 24 ARION: 19” EIA-310E Standard Enclosure Cage Nut Installation and Removal Install cage nut on front side of the PMA • Insert cage nut from rear side of PMA into the square hole by hooking one ear of the cage nut assembly through the far side of the hole. • Insert small end of cage nut tool through square hole then put on another ear of the cage nut and pull to snap it into position. 3 Removing Cage Nut from PMA Grasp the cage nut and squeeze the sides to release it from the square hole. User Manual 25 ARION: 19” EIA-310E Standard Enclosure Specifications General specifications for the Arion 19” enclosures. For detailed dimensions and weights refer to the Arion Assembly Guides. Door perforation pattern: 80% open area Weight rating (static load): 1400 kg Weight rating (dynamic): 1000 kg Height U Height (mm) 42 1994 Depth (mm) 1000 1200 45 2127 47 2216 User Manual 26 ARION: 19” EIA-310E Standard Enclosure Available Accessories PDU/ Vertical Cable Rail The Arion 19” enclosure has multiple cable access openings to manage cabling. To support the cabling requirements, we offer accessory PDU/Vertical Cable Rail that normally installs at the rear of the 19” enclosure. The PDU/Vertical Cable Rail can be moved anywhere along the side braces similar to the PMA's. • Install Vertical Cable Rail with Post Mounting Bracket and Middle Side Brace at the rear of the 19” cabinet. See steps 1 and 2 in detail T below: • Lift up screws to lock the position and set torque at 50-60 in. lbs. User Manual 27 ARION: 19” EIA-310E Standard Enclosure Available Accessories Cable Management: Cable Management Panel Pass Through Available in 1U and 2U 19” enclosure mount cable pass through [flat hoops] Cable Management Panel Pass Through Available in 1U and 2U 19” enclosure mount cable pass through [rod hoops] Cable Hoops Available in 1U and 2U Individual cable hoop for general purpose, Install on vertical PDU Rail and other locations with Arion 19” enclosure Cable Entry Brush Strip Install at top panel or side channel covers (800 wide) to prevent dust and air leakage User Manual 28 ARION: 19” EIA-310E Standard Enclosure Available Accessories Thermal Management: Fan Tray Fan tray with 3 fans Install on top panel Top Panel Plate Available in solid or vented Top Panel Brush Strip Used to prevent dust and air leakage Blank Panel Steel Blank Panel 1U, 2U, 3U, 4U and 5U Complies with IEC-60297, EIA-310D type A User Manual 29 ARION: 19” EIA-310E Standard Enclosure Select Accessories Shelves: Shelf Light Equipment Compatible with all 19” enclosures Available in 1U, 2U height Depths of 230, 330, 390, 430 and 460 (MM) 19” Mounted Fixed Shelves Compatible with ARION 19” enclosures Depth (MM) PMA to PMA 800 1000 1200 19” Shelf Vented Fixed 650 Deep 655-685 √ o o 19” Shelf Vented Fixed 700 Deep 705-735 √ o *** PMA TO PMA : Recommended space between front and rear PMA (vertical mounting channel) *** If you want to install vertical cable rail too you need to subtract the PMA to PMA distant more 150 mm. √ : Good , o : Medium (Not recommended), : Bad Telescopic Shelves Kit 450 to 700mm (complete set) 50 kg Load Rated Compatible with ARION 19” enclosures Depth (MM) Shelves Vented Telescopic 700 Deep PMA to PMA 800 1000 1200 755-785 √ o *** PMA TO PMA : Recommended space between front and rear PMA (vertical mounting channel) *** If you want to install vertical cable rail too you need to subtract the PMA to PMA distant more 150 mm. √ : Good , o : Medium (Not recommended), : Bad User Manual 30 ARION: 19” EIA-310E Standard Enclosure Select Accessories Heavy Duty Telescopic Ventilated Shelves Kit (complete set) 75 kg Load Rated Compatible with ARION 19” enclosures Depth (MM) Shelves Vented Telescopic Heavy Duty 700 Deep PMA to PMA 800 1000 1200 755-785 √ o *** PMA to PMA : Recommended space between front and rear PMA (vertical mounting channel) *** If you want to install vertical cable rail too you need to subtract the PMA to PMA distant more 150 mm. √ : Good , o : Medium (Not recommended), : Bad Support Rails (Chassis Runner) 650 to 700 mm For additional support of equipment. Load rate 50 kg. Document Wallet Usually is installed at the rear door To keep important information User Manual 31 ARION: 19” EIA-310E Standard Enclosure Select Accessories Base Filler Panel Prevent air leakage and vermin intrusion from base. Bolt down Kit Bolt down bracket with hardware Use bolt down kit to prevent 19” enclosure from tipping over, and for transportation on a pallet. Baying Plate Baying plate with hardware Use baying plates to join the 19” enclosures. User Manual 32 ARION: 19” EIA-310E Standard Enclosure Limited Warranty Terms and Conditions Limited Warranty: Cheval warrants the Arion series 19” enclosures to be free from defects in materials and workmanship for a period of five (5) years from date of purchase. This warranty applies to the original purchaser only. Cheval's obligation is limited to repairing, replacing or issuing a credit for the original purchase price, at our sole discretion. This warranty does not apply to goods which have been damaged by incorrect assembly, use, modified or altered from their original form, improper storage or handling, incorrect installation, repair or service by non-authorized personnel or improper installation of third-party equipment. The Arion 19” enclosure is designed for indoor use only and should be stored and installed in an indoor environment only. This warranty is not transferable. Limitation of Liability: Except as provided herein, Cheval makes no warranties, express or implied, including warranties of merchantability, fitness for a specific purpose and non infringement of third party rights are expressly excluded. Except as listed here, in no event shall Cheval be liable for direct, indirect, special, incidental, or consequential damages arising from the use of this product. Cheval is not liable for loss of profits, loss of revenue, loss of software or data, loss of equipment or use of equipment, cost of replacement goods or claims by third parties. Claim Procedures: In the event you need to make a claim, please contact the dealer from whom you purchased the product and request a Return Material Authorization (RMA) number. Proof of purchase is required from the original purchaser. If a product return is authorized, the product must be packed in the original packaging or packaging at least as good as the original. Shipping damage is not covered by this warranty. Ship the defective product using reliable carrier by prepaid and insured to the address provided by the dealer. User Manual 33 ARION: 19” EIA-310E Standard Enclosure Thank you for choosing another quality product by Cheval User Manual 34