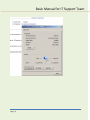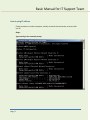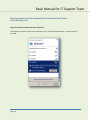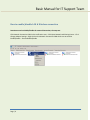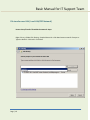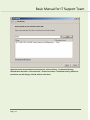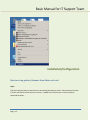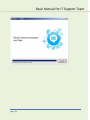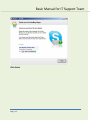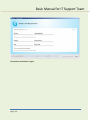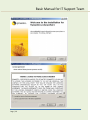
1
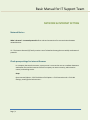
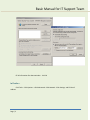
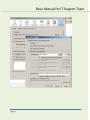
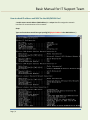
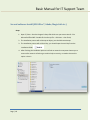
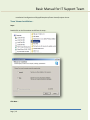
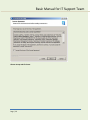
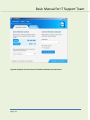
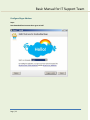
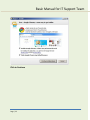
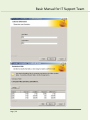
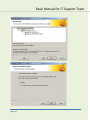
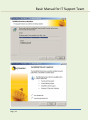
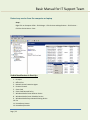
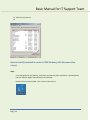
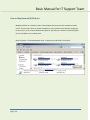
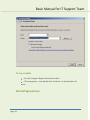
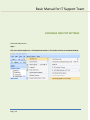
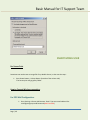
IT Basics Year - 2014 IT Support Manual PRAN-RFL Group 105, Middle Badda Basic Manual for IT Support Team NETWORK & INTERNET SETTING Network Basics – What is Protocol-: A network protocol defines rules and conventions for communication between network devices. IP -: The Internet Protocol (IP) family contains a set of related and among the most widely used network protocols. Check proxy settings for internet Browser In a company that uses the Internet, a proxy server is a server that acts as a mediator between a workstation user and the Internet so that the company can ensure security, administrative control, and caching service. StepsOpen Internet Explorer –Click Tools Menu-Click Options – Click Connection tab – Click LAN Settings, we will get the below screen - Page | 1 Basic Manual for IT Support Team Fill all information like above window - click Ok In Firefox – Click Tools – Click Options –c Click Advanced –Click Network –Click Settings and Fill the all Address. Page | 2 Basic Manual for IT Support Team Page | 3 Basic Manual for IT Support Team How to check IP address and MAC for the LAN/WLAN Card A media access control address (MAC address) is a unique identifier assigned to network interfaces for communications on the network. StepsType cmd in windows search box-type ipconfig/all (physical address is the MAC Address…) Page | 4 Basic Manual for IT Support Team For WLAN How to include/Clear manual IP address IP is a sound for Internet Protocol, Internet Protocol address is part of the systematically laid out interconnected grid that governs communication. In the same sense that someone needs your mailing address to send you a letter, a remote computer needs your IP address to communicate with your computer. StepsClick on Network connection ICON on the notification Area –Click Network and Sharing Center Click Local Area Connection 2 (In the Connect Area)- Type the IP Address/Remove if needed. Page | 5 Basic Manual for IT Support Team Page | 6 Basic Manual for IT Support Team How to ping IP address Check connection to other computer, usually we check the connection to server with our PCSteps Type ipconfig in the command prompt Page | 7 Basic Manual for IT Support Team How to connect wireless connection for internal user/Guest User/Factory User Steps to Connect/Disconnect wireless connection Click Network Connection ICON in the notification area – Click the Network Name – Choose Connect if we need. Page | 8 Basic Manual for IT Support Team How to enable/disable LAN & Wireless connection Sometimes need to Disable/Enable the network Connection, the steps areClick Network Connection ICON in the notification area – Click Open Network and Sharing Center – Click Change Adapter Settings – Right click on the Network Connection ICON which one we need to Enable/Disable – Choose Disable/Enable Page | 9 Basic Manual for IT Support Team File transfer over LAN ( Local LAN/P2P Network) How to share/Transfer file within the network- Steps- Right click on a Folder Click Sharing – People Share with –click down button arrow for Everyon or Type the Staff ID – Click Add – Click Share Page | 10 Basic Manual for IT Support Team Right Click On the Shared Folder-Click on Properties –Click on Sharing - for Advanced Sharing – Checked Share this Folder – Click Permission – Click the User Name – Click Allow or Deny ( which user permissions you will change)- Click OK, Click OK –Click Close Page | 11 Basic Manual for IT Support Team Installation/Configuration How to set up printer/Scanner from Share or Local. StepsType the Computer Name in Search box or in Run dialog Box and press enter. If the network connection ik is Ok it will show the Share Printer or Scanner – Double click on that Printer or Scanner ICON to download the Driver. Page | 12 Basic Manual for IT Support Team When it will download it will show a new Window like- What to do after printer Network jam Page | 13 Basic Manual for IT Support Team Printers Problems – PRINTER 3. Is it plugged-in? Make sure the printer is plugged into a live outlet. If it is plugged into a surge protector, make sure it is on. Try moving it from the surge protector to a known-good wall outlet. 4. Is it on? Ok, you can't print and Windows, etc. says it can't find the printer. Make sure the darn thing is turned on and there are no error lights (LEDs) lit. If there are error lights, refer to the user manual/manufacturer's web site. You should hear the print mechanism initialize when power is applied and most printers have at least one light which will be illuminated when it is on. 5. Is it on-line? Most printers have and on-line LED and button or the equivalent. The computer cannot communicate or send stuff to a printer that is not on-line; i.e., not connected to the cable between the printer and computer, and that is what "on-line" literally means. Again, I have gone to customer sites, pushed the on-line button, and charged them for my time and travel (I try to accomplish at least that much on the phone, but some...). 6. Is it beeping at you? Most printers will beep once or twice during or after initialization. If it beeps more than that or beeps constantly, the poor thing is either hurt or trying to tell you something is wrong. Look in the manual or go to the web site to learn what it is saying. Unfortunately, beep code documentation can be hard to find, the beep you hear may not listed, or the meaning of the beep is nebulous. Most, printers will beep when out of paper or out of ink and those are the most common causes for a printer turning into a road runner. 7. Does it test-print? Most printers have a built-in diagnostics program which can be very useful for troubleshooting problems and test-printing without a computer. They are usually initiated by pressing a button or two while turning on the printer. Check your user manual. If the printer test-prints OK, you have probably eliminated the mechanical print mechanism as the problem. 8. Does it have ink or toner? Is the Ink cartridge full, ribbon installed correctly, or laser cartridge full? An ink jet printer may have a black and a color cartridge. Check both of them and at least set the printer to use a cartridge with ink in it. You can usually extend the life of a laser cartridge long enough to order a new one by removing the cartridge and gently shaking it side-to-side to redistribute the tone. Sometimes you can get a ribbon going temporally by removing from the printer and manually advancing the ribbon past a worn spot by turning the sprockets. 9. Is it clean? Most ink jet printers have a simple user procedure for cleaning the print heads. You may have to clean them periodically or after the printer has been idle for a few days or weeks. If you see funny colors or print-outs are missing colors, a cartridge may be empty or a head dirty. You may have to clean a head many times to get it working again. Page | 14 Basic Manual for IT Support Team 10. Does it have paper? Be sure the paper is installed correctly and there is enough of it. Most printers have a paper-out detector. On most dot matrix printers it is a photo diode. If formfed paper is not aligned correctly (usually on the left side) the diode won't see it. DOS may indicate it has lost communications with a printer which is out of paper instead issuing a paperout error. 11. Is it jammed? Paper jams are frequently the reason my wife is able to fix many printers. She's very good at it (and she has smaller fingers than mine). Always read the manual on how to clear a jam. Don't be a "gorilla" with your printer! You can easily damage a printer (strip gear threads, etc.), or even get hurt, if you do not follow instructions and are not careful. Turn the power off--unplug it. You have 110 volts running around the inside many printers. And print heads, gears, etc. like to nip fingers. Laser printers have some very fine wires to remove static charges from the paper near the fuser mechanism which will break if you aren't very careful. Also, the fuser itself can be very hot (it fuses/melts toner to the paper). Don't move a print head unless the instructions direct it. You can damage the belt, etc. Address labels cause many paper jams and cannot always be seen. The old shirt cardboard trick can be used to dislodge them from many printers. Just feed a shirt cardboard (or cut a piece of like-sized cardboard form a file folder) through like a sheet of paper and wiggle the label loose and out. Staples, paperclips, dog hair, and cookie crumbs are among the many things we have coaxed out of printers. A staple will raise havoc with the drum in laser printers. If you see vertical lines on pages printed by a laser printer (or copy machine), the drum is probably scratched. Replacing it can be a very expensive repair, indeed. If jams persist, or the printer won't feed paper, there is a good chance that gears are stripped or rollers are worn-down or have flat spots. Fixing this sort of problem may require specialized tools and elaborate alignment procedures and is often best done at a printer repair depot. It is not usually economically feasible to send low-end ink jet and dot matrix printers, etc. to a repair depot. Sometimes roller problems can be fixed by cleaning the rollers. Changing to a different kind of paper may help. Refer to your user manual for guidance. On humid days, slightly damp paper can cause jams by sticking together causing more than one sheet to be fed at a time. Try removing the paper from its tray, etc. and fanning it. Make sure the edges or corners aren't curled and the tray is either not too empty or too full. Read the book... Then there are those printers which no one can figure-out how to dissemble without damaging them... Page | 15 Basic Manual for IT Support Team 12. Is it wedged? The printer memory could be full or there may my a glitch caused by a power spike. Turn-off the printer, wait a few seconds and turn it back on. CABLE 13. Is it connected? The printer test prints, but it won't go on line... Well, is the cable from the printer to the computer connected? Screw down the DB-25 connector at the computer end and clip the Centronics connector at the printer end (your printer and computer may have different connectors; e.g., USB). Push-in and wiggle the connectors. 14. Is it connected to the printer port? Some SCSI (Small Computer System Interface) are physically identical to the male DB-25 connectors used for standard IBM/IBM-compatible printer ports. Plugging a printer into a SCSI port can damage the SCSI host board and the printer. 15. Do you have the correct cable? Many printers now require an IEEE 1284 and BiDirectional. USB cables shouldn't be longer than 15 feet. 16. Is the cable good? Check for bent pins. Try another cable. 17. Is it connected properly? Screw the PC end down and latch the Centronics end at the printer. 18. Is there something else connected to the printer port? Disconnect it and uninstall the device drivers for it. 19. Does the printer port have a software security device on it? These devices attach to the printer port and the printer cable attaches to the device. They can break. Try printing without it. COMPUTER 20. Is the printer port set-up correctly in your computer's BIOS Setup? Try the various printer modes in your computer's CMOS Setup. ECP+EPP usually works with bi-directional printers, but others may fix the problem. 21. Is the correct printer cable/header assembly installed and is it plugged-in right? I have seen cases where a baby AT motherboard was upgraded, but the printer cable/header assembly from the old motherboard was used and caused problems, but that is very rare. Also, the cable connecting to the motherboard could be backwards or loose. Page | 16 Basic Manual for IT Support Team How to check default printer selection StepsRight Click on the Printer ICON – Click Set as Default Page | 17 Basic Manual for IT Support Team Several software Install (MS Office 7, Adobe, Magic Soft etc.) Steps1. Open F:\ Drive – Run the Program’s Setup File which one you want to Install – like Microsoft Office 2007 –Double Click on Set Up file – click Next … then Finish, 2. The installation process will ask Accept or Reject, you should choose Accept 3. The installation process will ask Serial key, you should input the serial key from the installation folder 4. After finishing the installation process it will ask to restart the computer-choose yes to restart after restart it will ask to go to online help or security, no need to choose this option –close it. Page | 18 Basic Manual for IT Support Team Installation & configuration of Skype/PCAnywhere/Team Viewer/Projector Server Team Viewer Installation – StepsDouble Click on the Teamviewer and follow the steps - Click Next – Page | 19 Basic Manual for IT Support Team Choose Accept and Click next - Page | 20 Basic Manual for IT Support Team Type the Computer ID in the Partner ID Text Box and Connect to the Partner Page | 21 Basic Manual for IT Support Team Configure Skype Address StepsStart download from internet then agree to istall Page | 22 Basic Manual for IT Support Team Click to Continue Page | 23 Basic Manual for IT Support Team Page | 24 Basic Manual for IT Support Team Click Finish Page | 25 Basic Manual for IT Support Team Fill up the form and click to I agree - Page | 26 Basic Manual for IT Support Team Type the name and password to final connect to the Skype - Page | 27 Basic Manual for IT Support Team Installation PCAnywhere – Steps – Double click on the windows and click the next … Next … Finish. Page | 28 in the Software location and follow the Basic Manual for IT Support Team Page | 29 Basic Manual for IT Support Team Page | 30 Basic Manual for IT Support Team Page | 31 Basic Manual for IT Support Team Page | 32 Basic Manual for IT Support Team Restart any service from the computer or Laptop Steps Right Click on Computer ICON – Click Mange – Click Services and Applications – Click Sevices – Click the Service Name – Start Do Not Need Services in Start Up – 1. 2. 3. 4. 5. 6. 7. 8. 9. 10. 11. 12. IP Helper Offline Files Network Access Protection Agent Parental Controls Smart Card Smart Card Removal Policy Windows Media Center Receiver Service Windows Media Center Scheduler Service Windows Media Player Network Sharing Service Fax HomeGroup Listener HomeGroup Provider Page | 33 Basic Manual for IT Support Team 13. Tablet PC Input Service 14. How to install/uninstall & connect GPRS Modem (with disconnection cause) Steps Insert the Modem at the USB Port, it will work automatically. After installation a Grameenphone Internet ICON will appear automatically on the Desktop. Double click on Grameen ICON – Click connect or disconnect Page | 34 Basic Manual for IT Support Team Page | 35 Basic Manual for IT Support Team How to Map Network (X/W) drive Mapping a folder on a network creates a shared space that anyone on the network can easily access. You can map a drive on another computer on your network to increase the storage you have access to, or to create a collaboration space for you and your coworkers. Follow this guide to turn any folder into a network drive. Open Computer – Click Map Network drive – Choose Drive and Folder –Click Finish. Page | 36 Basic Manual for IT Support Team To run scandisk Go to My Computer -Right click on the local drive Click on properties > tools tab and click ‘check now’ to check the drive for errors. Disk Defragmentation Page | 37 Basic Manual for IT Support Team Disk Defragmenter is a utility in Microsoft Windows to increase access speed by rearranging files stored on a disk and also reduces system startup times. Steps to Desk Defragmentation Click Start Button-Move Cursor-Programs-Move Cursor to Accessories-Move Cursor to System Tools-Click on Disk Defragmenter. Choose Drive-Click Defragmenter Button Page | 38 Basic Manual for IT Support Team EXCHANGE AND POP SETTINGS Download Addressbook – Steps – Click Tools Click Send/Receive –Click Download Headers in This Folder-Click OK as the below Window. Page | 39 Basic Manual for IT Support Team SMART MOBIL USER For Screen Print Sometimes we need create an Image file of my Mobile Screen, in that case the steps 1. Press Power Button + Volume Button (low side of the volume side) -The Screen print will go gallery Folder. How to Connect Wireless connection- For POP Mail Configuration1. Go to Settings –Choose Add Account -Email- Type user email address like [email protected]& Password (Mail Password) Page | 40 Basic Manual for IT Support Team 2. Select POP3 - IMAP - Exchange 3. Incoming server settingsa. Change POP3 Server name- it should be -mail.prangroup.net. the port should be 110 b. Security typenone. –Next 4. Outgoing Server Settingsa. SMTP- mail.prangroup.net. b. Port-465 c. Security Type- SSL/TLS Accept all Certificates- Next-Finish Check the email from open email ICON Page | 41 Basic Manual for IT Support Team Exchange Mail Configuration1. Settings-Add Account -Corporate- Type user email [email protected] & Password (Windows Password) 2. Manual Setup –Domain user(Property/40075) 3. Server address – prgmail.prangroup.com 4. Checked-use secure connection SSL Certificate 5. Checked-Accept all SSL Certificate – Next-Days to synchronize should be 3 days-Next… Check the email –open email ICON Delete any Account –open the settings-choose the email Account which one I want to delete. Office Suite Installation for opening the MS Office File1. Type a New Name(any Name & email [email protected] Register. Synchronize Outlook Contacts for update the mailing address 1. Copy all Global Address to Contact Folder it will update in the Mobile Address automatically. Page | 42 Basic Manual for IT Support Team Open Attached File 1. Open Mail –Load Attached File-Choose Office Suite –Choose always How to set up Wi-Fi hotspot1. 2. 3. Settings-Data Uses- More-Tethering & portable HotSpot- Choose Wi Fi Hotspot On-Setup Wi Fi Hotspot-type any Name and any password.Save You can see wireless ICON on the Top of the Mobile Menu Check now Laptop Wireless Connection-Connect-Type wireless password which you have in the Mobile. How to transfer picture/files via Bluetooth - Bluetooth on both the devices like the below way – 1. Settings- Bluetooth On-Hit on Bluetooth & make it visible 2. Open the image Folder-Open the Image –Hit on Share ICON – Bluetooth-Choose device name(Symphony 125 if we want to transfer to Symphony W125 Series Mobile) Check incoming File request from the top of the mobile Screen- and accept it. Page | 43 Basic Manual for IT Support Team How to make a conference call - 1. Call Any Person-after Receiving the call minimize the call-call others person-Hit Merge How to set up data service (connect/disconnect to internet) - 1. Settings-data uses-more-mobile network-Access point Name-Name is Banglalink- APN Name blweb (Back to the Manu)and Check the Active Button. Check the Up Manu – Data Connection-Hit for Active How to check data usage (for checking the Limits) - 1. Settings-Data uses-Mobile Data On-Choose Data uses cycle-Choose Days How can we make the best use of smart mobile? Page | 44