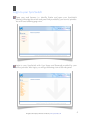
1
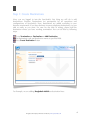
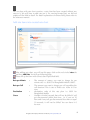
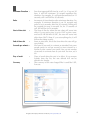
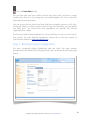
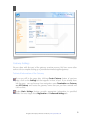
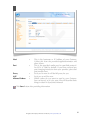
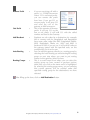
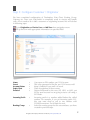
SyncSwitch
Quick Start Guide
For Making First Test Call
V 2.1
This version is a revision of V. 2.0, some gramatical mistakes has been corrected on this version. There are no major changes
between V.2.0 and V.2.1.
Table of Content
Introduction .....................................................................................3
Before You Start ............................................................................................3
Tasks covered in this document ....................................................................3
Login to your SyncSwitch.................................................................5
Step 1: Create Destinations ..............................................................6
Step 2: Creating and configuring rate chart.......................................7
Add Rate Chart ............................................................................................7
Add rate items into created rate chart...........................................................8
Step 3: Routing Group Configuration .............................................10
Step 4: Termination / provider configuration ...................................12
Add Gateway .............................................................................................12
Gateway Settings........................................................................................13
Technical Information of the Gateway .........................................................................13
Allow destinations to the gateway................................................................................15
Step 5: Configure Customer / Originator.........................................17
Step 6: Test A Call...........................................................................18
Testing a call with Soft Phone .....................................................................18
All right reserved by Synchronous. Powered by www.syncswitch.com
2
Introduction
SyncSwitch is a complete switching and billing platform for IP based
telecommunication service providers. It can work as both proxy and non proxy
mode. With capabilities like codec conversion and protocol conversion,
SyncSwitch is one of the best SoftSwitch with full proxy in the market. SyncSwitch
comes with all the features and functionalities required by modern VoIP and other
IP based telecommunication services.
SyncSwitch is an easy to use
manage everything from the
requirement of any additional
recommend Mozilla Firefox
SyncSwitch Interface.
and web based application. Users can control and
web panel from any where of the world without
software installation on the client PC or laptop. We
(any version) as web browser for best view of
Before You Start
In order to be able to log in and operate the SyncSwitch, you should have access to the
following information:
Sync Switch Login URL (i.e. http://192.168.101.100/mysyncswitch/).
Sync Switch Login username and password (i.e. user name: root, password:
******).
Sync Switch IP address. (i.e. 192.168.101.100)
Please make sure that you have all these information before you proceed to next steps.
Tasks covered in this document
Step 1: Create Destinations
What is this: Telephony destinations of your business, i.e. 88017, Bangladesh
Mobile Grameen. You will need to add destination code and destination name.
Where: Termination >> Destination >> Add Destination
Step 2: Creating and configuring rate chart
What is this: For charging your customers and to be charged by your providers,
you have to have different tariff plans / rate charts. In this section we will see
how to create and configure tariff plan / rate charts.
Where: Rates >> Add Rate Chart
All right reserved by Synchronous. Powered by www.syncswitch.com
3
Step 3: Routing Group Configuration
What is this: You need to have a routing plan or chart where you can get an
overall scenario and control how your calls are coming to your network and
how its going out. We will configure Routing Plan in this section.
Where: Routing >> Routing Group >> Add Routing Group
Step 4: Termination / provider configuration
What is this: Your customers calls / traffic need to be terminated somewhere to
any of your providers. In this section we will describe how to configure
providers/termination.
Where: Termination >> Gateway >> Add Gateway
Step 5: Configure Customer / Originator
What is this: Now, your switch is ready to accept calls from your customers. We
will configure a single customer entity in this section.
Where: Origination >> Device User >> Add User
Step 6: Test A Call
What is this: Well, here you are. You have completed the setup of the switch
and its ready for testing a live call. If your terminator is real, you can test a call
using your SyncSwitch by following steps in this section.
Where: By installing a SoftPhone in your PC you can make a test call.
All right reserved by Synchronous. Powered by www.syncswitch.com
4
Login to your SyncSwitch
Open your web browser i.e. Mozilla Firefox and open your SyncSwitch
interface following the switch web panel link provided by your service provider.
You will have following page view.
Login to your SyncSwitch with User Name and Password provided by your
service provider. After login, you will get following view of the web panel.
All right reserved by Synchronous. Powered by www.syncswitch.com
5
Step 1: Create Destinations
Now, you are logged in into the SyncSwitch, first thing we will do is add
destinations. Because Destinations are prerequisite for all operations and
configurations of SyncSwitch. Here, destinations are added according to your
business requirement. If you have business in many telephony destinations, you can
add as many as you want. For now for the sake of testing, please add the
destination where you have working termination. You can do that by following
steps.
Go to Termination >> Destination >> Add Destination
Put destination code and destination name at specified field.
Press Create Destination Button
For Example, we are adding Bangladesh Mobile as destination here.
All right reserved by Synchronous. Powered by www.syncswitch.com
6
Step 2: Creating and configuring rate chart
Rate Chart contains rate / tariff plan for various destinations. For billing and
charging customers as well as maintaining proper accounts with provider, you will
need different rate charts for your customer and provider. Customer rate chart is
your selling rate and provider rate chart is your buying rate. Buy deducting buying
rate from your selling rate, you can calculate your gross profit.
For initial setup for testing a call, we will need to create two different rate charts,
one for customers, that is selling rate, and another for suppliers/providers, that is
buying rate. For creating both of the rate charts procedures are similar.
Add Rate Chart
Go to Rates >> Add Rate Chart
Provide information in specified fields
Rate Chart Name
Based on
Rate Multiply By
Add Rate With
Assigned To
Comment
:
:
:
:
:
:
Write any name for your rate chart
Select Blank table
Leave it 1
Leave it 0
Leave it as default “–Myself-“
Here you can put description regarding the rate
chart. You can keep it blank as well.
Click Create Rate Chart Button.
All right reserved by Synchronous. Powered by www.syncswitch.com
7
We are done with rate chart creation, a rate chart has been created without any
rates in it. We will have to add rates on it. For moving forward fast, we did not
explain all the field in detail. For detail explanation of various field, please refer to
the reference manual.
Add rate items into created rate chart
After adding rate chart, you will see this page, click on the red circled rates tab
and then Add Rate. You will get following page.
Please fill up the form with correct data in specified field.
Rate per Minute
:
Rate per Call
:
Destination
:
Grace
:
The amount of money you want to charge for per
minute call, i.e. $0.035 for Bangladesh Mobile (8801).
The amount you want to charge per call regardless the
call duration. This is sort of fixed cost. Leave it 0 for
now.
destination code of this rate plan i.e. 8801 for
Bangladesh Mobile
Number of initial seconds that will not be billed if call
get disconnected within that time., i.e. if you set 10
here and if any call get disconnected less than or equal
10 seconds, it will not be billed. You can leave it 0
for now.
All right reserved by Synchronous. Powered by www.syncswitch.com
8
Minimum Duration :
Pulse
:
Start of time slot
:
End of time slot
:
Seconds per minute :
Day of week
:
Currency
:
Your least expected bill time for a call, i.e. if you set 30
here, it will bill minimum 30 second regardless the
duration. For example, if a call gets disconnected on 12
seconds, still it will bill for 30 seconds.
Increment of time duration after minimum duration. For
example, if minimum duration is set 30 seconds and
pulse is set 6 seconds, after first 30 seconds, billing will
be counted for every 6 seconds. So, for 31 seconds of
call, bill will be for 36 seconds.
The time of the day when the rate chart will come into
effect. If your server time is set to GMT as time zone,
and set 00 HR 00 MIN 00 SEC, the rate will come into
effect from GMT 0 hour. If you set anything else, it will
follow the timing exactly.
Same as start time, this is the time when the rate will go
out of effect.
We have 60 seconds in a minute as standard, but some
people prefer to set less second or more second in a
minute to take control over profit. You can set number
of seconds in a minute here as you wish. For now, set it
60.
Days of week when the rate is in effect. If you remove
Sunday from the list, the rate offered will not be
effective for Sunday.
The currency of this rate charged like it could be USD,
Euro etc.
All right reserved by Synchronous. Powered by www.syncswitch.com
9
Click on Create Rate Button.
We are done with rate item creation into the rate chart. Now you have to create
another rate chart for your buying rate or provider/supplier rate. You can do that
following the same procedure.
You can access the rate chart from Rates link from navigation menu as well. Also,
for big rate charts, you don’t need to create all rate item manually, you can upload
rate chart from *.csv format files (any spreadsheet can provide this Comma
Separated Value output).
We have provided limited explanation of various field here so we can move fast for
next section. For more detailed explanation, please refer to the user manual of
SyncSwitch available in www.syncswitch.com.
Step 3: Routing Group Configuration
We have completed adding destinations and rate chart. We have another
prerequisites to be added, that is Routing Group. We can do that by following steps
below.
All right reserved by Synchronous. Powered by www.syncswitch.com
10
From Navigation Menu go to Routing >> Routing Group >> Add Routing
Group
Fill up the form with appropriate data on specified fields.
Name
IVR Mode
:
:
Failover
:
Priority sense
:
Capacity Sense
Call Ratio Sense
Policy
:
:
:
Loss Protection
:
Connec. Time Out
:
Max Call Duration :
Comment
:
An identical name of the routing group.
For now, leave it as wholesale. Wholesale mode doesn’t
have any IVR. Calling Card and retail mode have
specific IVR which we will describe letter.
If a call fails on first route, if your failover is enabled, it
will try with 2nd route and so on. Leave it disabled for
now.
Priority sense, capacity sense and call ratio sense
together works as a traffic flow control algorithm. Leave
it 100 now. We will explain it more in user manual.
Leave it 0
Leave it 0
Policy defines call distribution algorithm, how your
calls will be distributed among various gateways you
have, it can be based on quality, it can be based on
cost or both, or you can set strict priority. Set Force
Routing as policy for now.
If your buying rate is higher than selling rate, it incurs
lose for you. If you set loss protection, SyncSwitch will
not let the routing to pass such calls which incurs loss.
For now, set it disabled to reduce complexity.
After how many seconds the call will be
disconnected if the called person does not
receive the phone. Leave it 60 for now.
Maximum duration of a connected call after which the
call will be automatically hanged up.
Any identical text that can help you to remember or
identify about this routing group.
After filling up the form, click on Create Routing Group button.
We are done with Routing Group creation.
All right reserved by Synchronous. Powered by www.syncswitch.com
11
Step 4: Termination / provider configuration
Now, we have completed setting up prerequisites. This is time to setup an active or
working supplier/provider/terminator/gateway. Adding Gateway, we will include
into routing plan where we will plan which traffic will get terminated where. We
will do these in following steps.
Add Gateway
Go to Termination >> Gateway >> Add Gateway
Fill up the form with appropriate data in specified fields.
Name
:
Protocol
:
Secret
Gateway Status
Rate Chart
:
:
:
Currency
Expiry Date
:
:
Call limit
:
Comment
:
Identical name of the supplier/provider/terminator/
gateway by which you can exactly recognize. You can
provide any name here. Avoid special characters i.e. *,
#, $, :, @, “” etc.
Protocol configured on your gateway. If your Gateway
is configured for SIP and you set here H.323, your
routing will not work and your calls will not be
succeeded. So, please confirm with your provider and
then set it here.
For now, leave it blank.
Set it enabled, if disabled, it will not work.
Select the buying/provider/supplier/terminator/gateway
rate you have created before.
Currency for billing, set it USD for now.
Expiry date of the gateway account, leave it as it is for
now.
Maximum number of concurrent call the gateway can
handle, this is equivalent to the number of active
channels/ports your gateway does have. Set the correct
number.
Any text that can help you to recognize this gateway,
you can keep it blank as well.
After filling up the form, click Create Gateway Button.
All right reserved by Synchronous. Powered by www.syncswitch.com
12
Gateway Settings
We are done with first part of the gateway creation process. We have some other
tasks to do to complete setting up a provider/terminator/supplier/gateway.
Technical Information of the Gateway
If you are still in the page after clicking Create Gateway button of previous
page, click on the Settings tab that appears in front of you. If you already have
left the page, you can browse from navigation menu Termination >> Gateway
>> All Gateway and locate the gateway name that you just have entered and
click on that.
Under Basic Settings Section, provide appropriate information in specified
fields. For now, forget about Registration and Advanced Settings tab.
All right reserved by Synchronous. Powered by www.syncswitch.com
13
Host
:
Port
:
Proxy
NAT
Allowed Codecs
:
:
:
This is the hostname or IP Address of your Gateway.
Collect this from the provider/supplier/terminator and
place it here.
This is the specified media port for specified protocol.
For SIP it is 5060 by default. If you have received any
port changing instruction form your provider, place that
port number here.
Set it yes for now. It will do full proxy for you.
Set it yes as well for now.
Which codec do you want to send to your Gateway.
You can leave it as it is for now. We will describe these
things in detail in SyncSwitch Manual
Click Save Button after providing information
All right reserved by Synchronous. Powered by www.syncswitch.com
14
Allow destinations to the gateway
Now, we have completed adding gateway and providing technical information of
the gateway. Only one thing left is, which destinations are supported by this
gateway. Any specific gateway can terminate one or more destination. Or you
might want this gateway will terminate only one destination. You can control
destinations by following steps below.
If you are at the same page after adding technical information to the gateway,
click on the destinations tab that appears in front of you, and then Add
Destination. If you already have left that page, browse Termination >> Gateway
>> All Gateway and locate the gateway we have added. Click on the name of
the gateway and click destinations tab and Add Destination from there. The
page will look like the above image.
Provide appropriate information in specified fields
Destination
:
This field is an auto complete field, put first few digit of
your desired destination code, it will automatically
suggest available codes. Example is in the image above,
I have putted 880 on the field and it have suggested me
all codes available starting with 880. Select the desired
code with mouse and click on that.
All right reserved by Synchronous. Powered by www.syncswitch.com
15
Remove Prefix
:
Out Prefix
:
Add Breakout
:
Auto Routing
:
Routing Groups
:
If you are receiving call with a
prefix, i.e. 2228801xxxxxxxxx
where 222 is technical prefix,
you can remove this prefix
from here. If you put 222 as
remove prefix, it will strip 222
and send the call to the
gateway as 8801xxxxxxxxx.
This is the opposite of Remove
prefix. If you put 333 on the
box as out prefix, it will add 333 with the called
number and send to the Gateway.
Breakout are sub codes for a destination, for example
880 is country code for Bangladesh, and Bangladesh
have many other codes like 8801 Bangladesh Mobile,
8802 Bangladesh Dhaka etc. 8801 and 8802 is
breakout for 880. If you set yes, it will add all codes to
the gateway started with the specified code, on this
example 880. Set it no for now.
You can add this gateway directly to a routing group by
selecting the Auto Routing yes and selecting the routing
group on next step where you want to put routing
entries for this gateway. Select Yes here.
This is a scrawl menu from where you can select the
routing group we have created in previous section.
Make sure you click on the name and it is highlighted.
By selecting the routing group name, you are ensuring
that current gateway will be enlisted under that
specified routing group for the destination(s) we have
selected.
After filling up the form, click on Add Destination Button.
All right reserved by Synchronous. Powered by www.syncswitch.com
16
Step 5: Configure Customer / Originator
We have completed configuration of Destination, Rate Chart, Routing Group,
Gateway etc. Now your SyncSwitch is completely ready to receive and handle
calls. All we need to do is add a customer or originating account. We will do that
in following steps.
Go to Origination >> Device User >> Add User from navigation menu
Fill up the form with appropriate information on specified field.
Name
Secret
Account Status
Expiry Date
Protocol
:
:
:
:
:
Incoming Prefix
:
Routing Group
:
User name or PIN number, put 1234 for now.
This is the password of the pin, put 1234 here as well.
Keep it Enabled if you want it to work.
Date of expiration of the account.
Protocol followed by the user, SIP, H323 or IAX2, put
SIP for now because we are going to test a call using a
SIP Dialer.
Incoming prefix is a number added before the called
number. For example, if you set incoming prefix 222,
this user must need to call to any number with
2228801xxxxxxxxx. Put it blank for now.
Select the routing group for this account/user, you have
created in previous steps.
All right reserved by Synchronous. Powered by www.syncswitch.com
17
Rate Chart
:
Starting Credit
:
Credit Limit
:
Min Balance
:
Currency
Call Limit
:
:
Select the Customer Rate or Selling Rate chart for this
account/user, you have created in previous steps.
The amount of money credited to particular originator.
This is the amount up to which he will be able to
consume by calling. For now put $1.00.
Credit Limit is the maximum negative balance of
account that is allowed. Put it 0.
The minimum amount need to be credited in the
account to continue call. Put it 0 as well.
Currency for the account/user, here USD.
Highest number of concurrent calls that are allowed
from this account/user, put 1 here for now.
Click on Create User button to create the user account.
Step 6: Test A Call
Now, we are done with SyncSwitch initial configuration to make a successful test
call. Remember, success of the test call greatly depends on the availability of your
termination gateway. If that is not active or you are not properly authenticated, your
calls will not be successful.
There are many ways to test a call. We will elaborately describe one of them. You
can test with other methods with the help of other documents and our support
team.
Testing a call with Soft Phone
You can test a call using a SoftPhone. Download any configurable soft phone and
configure it with user you have created.
D ow n l o a d a ny c o n fi g u ra b l e s o f t p h o n e f o r t h e w e b , i . e . h t t p : / /
www.counterpath.com/ you can download X lite from here and configure for
testing.
Install it following standard installation procedure for your operating system.
Open the dialer
Use the user name, password and Switch IP address, configure and register the
dialer with your SyncSwitch
Dial a number and make call.
Fo r a ny k i n d o f h e l p a n d s u p p o r t , p l e a s e s e n d a n e m a i l t o
[email protected] and schedule a training. Someone from our team will
be online with Windows Live, Yahoo or Gmail account to help you live. Enjoy the
quality service of SyncSwitch and best of luck!!
All right reserved by Synchronous. Powered by www.syncswitch.com
18