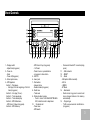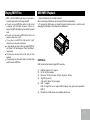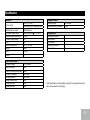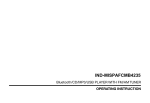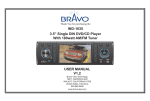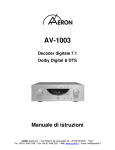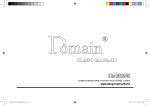
1
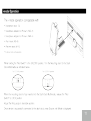
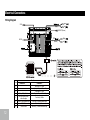
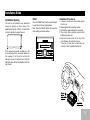
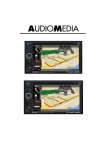
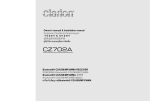
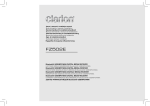
Safety Information Thank you for purchasing this product. Please read through these operating instructions so you will know how to operate your model properly. After you have finished reading the instructions, keep this manual in a safe place for future reference. PRECAUTIONS Use only in a 12-volt DC negative-ground electrical system. Disconnect the vehicle's negative battery terminal while mounting and connecting the unit. When replacing the fuse, be sure to use one with an identical amperage rating. Using a fuse with a higher amperage rating may cause serious damage to the unit. DO NOT attempt to disassemble the unit. Make sure those pins or other objects do not get inside the unit, they may cause malfunctions, or create safety hazards such as electrical shock or laser beam exposure. If you have parked the car for a long time in hot or cold weather, wait until the temperature in the car become normal before operating the unit. Keep the volume at a level at which you can hear outside warning sounds (horns sirens, etc.). Stop the car before performing any complicated operation. FCC STATEMENT 1.This device complies with Part 15 of the FCC Rules. Operation is subject to the following two conditions: (1) This device may not cause harmful interference. (2)This device must accept any interference received, including interference that may cause 2 Contents undesired operation. 2. Changes or modifications not expressly approved by the par ty responsible for compliance could void the user's authority to operate the equipment. NOTE: This equipment has been tested and found to comply with the limits for a Class B digital device, pursuant to Part 15 of the FCC Rules. These limits are designed to provide reasonable protection against harmful interference in a residential installation. This equipment generates uses and can radiate radio frequency energy and, if not installed and used in accordance with the instructions, may cause harmful interference to radio communications. However, there is no guarantee that interference will not occur in a particular installation. If this equipment does cause harmful interference to radio or television reception, which can be determined by turning the equipment off and on, the user is encouraged to try to correct the interference by one or more of the following measures: Reorient or relocate the receiving antenna. Increase the separation between the equipment and receiver. Connect the equipment into an outlet on a circuit different from that to which the receiver is connected. Consult the dealer or an experienced radio/TV technician for help. FCC Radiation Exposure Statement This equipment complies with FCC radiation exposure limits set forth for an uncontrolled environment. This equipment should be installed and operated with minimum distance 20cm between the radiator & your body Safety Information.......................................... 2 Panel Controls................................................ 3 General Operation.......................................... 4 Steering Wheel Control.................................. 4 Tuner Operation............................................. 5 RDS............................................................. 5-6 Playing MP3 Files........................................ 6-7 USB MP3 Playback........................................ 7 Bluetooth® Operation................................... 8-9 System Menu............................................ 9-10 iMode operation............................................ 11 Electrical Connections.................................. 12 Installation Guide.......................................... 13 Troubleshooting............................................ 14 Specifications............................................... 15 CAUTION Please power off this unit at once and send it back to the after-sales service center or the dealer /distributor you purchased from if one of the following symptoms is found: (1) Water or other obstacle enters the unit; (2) Smoking; (3) Peculiar smell. To provide a clear demonstration and an alternative for easy understanding of the operation of this unit, graphic illustration was used. However, this illustration is not necessary printed as the actual image found on the unit. Panel Controls 15 5 1.- Display switch -.Adjust time(long press) 2.- Power on - Mute - Power off(long press) 3.- Enter system menu, 4.- MP3 playback Button 1: - Play/pause -Start play from the beginning of the first track.(long press) Button 2: - Intro play (10 sec.) Button 3: - Track repeat play Button 4: - Track random play Button 5: - MP3 folder down - MP3 track -10 down (long press) Button 6: - MP3 folder up 6 - MP3 track +10 up (long press) - 1-6 Preset: - Press to tune in a preset station. - Long press to store station. 5.- MIC FR 6.- Aux-in jack 7.- Dial number - Answer phone - Redial number.(long press) 8.- Radio tune - Track seek 9.- Rotate to adjust volume -Push to select VOL/BAS/MID/TRE/BAL/ FAD, rotate the knob to adjust level. 10. - Terminate call - Preset scan - MP3 search -Disconnect Bluetooth® connection(long press) 11. - USB connector 12. - RESET 13. - Radio - USB (when USB connected) - AUX in - I-MODE - BT Music 14. - Band select -Radio mode, long press to search and store strongest stations in the memory automatically. 15 - Program type -Traffic announcements identification. (long press) 33 General Operation Steering Wheel Control Power On/Off Button Auxiliary Input Press the [ ] button to turn the unit on when the vehicle ignition switch is on. Press and hold the button to turn the unit off. To access an auxiliary device: 1.C onnect the portable audio player to the AUX interface on the front panel of the unit. 2.Press the [ SRC ] button to select Aux-In mode. Press [ SRC ] again to cancel Aux-In mode and go to the next mode. Mode Button (SRC) Press the SRC button to change between Radio, USB (when USB is connected), AUX play, I-MODE or BT Music (when bluetooth® connected). Audio Mute Press the [ ] button to mute the volume from the system. “MUTE” will appear on the display panel and the volume will be muted. Press the [ ] button again, or rotate or press the knob to return the volume level to the setting in use before the Mute function was activated. Display Selector (DISP) The user has the choice to display one of the following: 1.Clock 2.Station frequency with RDS information 3.PTY with RDS information. Each time the [DISP] button is pressed the unit display will switch between showing Clock only or PTY with RDS information or FM frequency with RDS information. Setting the Time Audio Controls To adjust the bass, middle, treble, balance and fader, press the knob repeatedly until the appropriate audio control appears on the display panel. Within five seconds, rotate the knob to adjust the audio settings for the selected function. 4 The [DISP] button is also used to set the clock time. Press and hold the [DISP] button for more that 2 seconds to put the Dash Dock into clock setting mode. The time will begin flashing, rotate the center knob to the desired hour and then press the center knob. The display will switch to minutes, rotate the knob to the desired minute and press the center knob to set. Press [ MENU ] button to enter system menu, continue pressing [ MENU ] key until SWC SET is displayed. 1.At SWC menu, Rotate the knob to select a function, then press and hold a button on the steering wheel (if your steering wheel support the function) until the SAVE OK is shown and the unit will return to normal mode. Now the function is saved in the button. 2.Repeat step 1 to set functions of other steering wheel buttons. 3.Exit the setting menu and you can operate the player by the buttons on the steering wheel. 4.If you want to change the setting, enter the SWC setting menu, select a function on the screen, press and hold a button on the steering wheel more than 2 seconds, then the function is saved into the button on steering wheel. At the same time, all other steering wheel settings are clear, you must reset them.( Setting blank buttons will not affect other buttons. ) Tuner Operation RDS (Radio Data System) FM/AM(MW) Band RDS service availability varies with areas. Please understand if RDS service is not available in you area, the following service is not available. ———————————————————— During radio play, press the [ BAND ] button to choose between three FM and two AM(MW) bands. The indication “AM(MW)” or “FM” appears on the display panel according to your selection. ————————————————————— Up Tuning Press the Seek up [>>] button to tune to the next available station higher than present station. Press and hold the Seek up [>>] button to enter manual tuning. Rotating the center knob will change the frequency. Pressing the center knob will select the current frequency shown on the display. ————————————————————— Down Tuning Press the Seek down [<<] button to tune to the next available station lower than present station. Press and hold the Seek down [<<] button to enter manual tuning. Rotating the center knob will change the frequency. Pressing the center knob will select the current frequency shown on the display. ————————————————————— Auto Memory Store Press and hold the [ BAND ] button to scan preset stations 1-6. Hold it to automatically select six strong stations and store them in the all band. The new stations replace stations already stored in that band. RDS Basics AF (Alternative Frequency): When the radio signal strength is poor, enabling the AF function will allow the unit to automatically search another station with the same PI (Program Identification) as the current station but with stronger signal strength. PS (Program Service name): The name of station will be display instead of frequency. AF Mode: Turn AF function on in the setting menu (see <system menu> ). AF on: AF function is activated. AF off: AF function is disabled. Remark: AF indicator on LCD will flash until RDS information is received. If RDS service is not available in your area, turn off the AF mode. REG Mode: Turn REG function on in the setting menu (see <system menu> ). REG on: AF function will implement the regional code (of the PI) and only stations in the current region can be tuned automatically. REG off: AF function will ignore the regional code(of the PI) and stations in the other regions can also be tuned automatically. Traffic Announcements Some RDS FM stations periodically provide traffic information. TP (Traffic Program Identification) Broadcasting of traffic information. TA (Traffic Announcements Identification) Radio announcements on traffic conditions. TA Mode: Press [ PTY/TA ] button for more than 2 seconds to switch TA mode on and off. When TA mode is turned on, the TA indicator will blink. When traffic announcement is received, the TA indicator will display. The unit will temporarily switch to the tuner mode (regardless of the current mode) and begin broadcasting the announcement at TA volume level. After the traffic announcement is over, it will return to the previous mode and volume level. When TA is turned on, SEEK, SCAN, AMS function can only be received or saved when traffic program identification (TP) code is received.. EON (Enhanced Other Networks) When EON data is received, the EON indicator lights and the TA and AF functions are enhanced. 55 RDS (Radio Data System) Playing MP3 Files TA: Traffic information can be received from the current station or stations in other network. AF: The frequency list of preset RDS stations is updated by EON data. EON enables the radio to make fuller use of RDS information. It constantly updates the AF list of preset stations, including the one that currently tuned into. If you preset a station around the area at your home, you will later be able to receive the same station at an alternative frequency, or any other station serving the same program, EON also keeps track of locally available TP stations for quick reception. Display Information Searching Folders/Files During playback, ID3 tag information display scrolling on the screen: FOLDER, FILE, ALBUM, TITLE, ARTIST and Track Number/ Elapsed Time. 1.Press the [ APS ] button twice and press the knob to access the “FILE SCH” option. 2.R otate the knob to select the desired directory/song. 3.Press the knob to view the files inside the selected directory. 4.Rotate the knob to select the song/file. Press the knob to play the selected song/file. PTY Reception ( Program Type ) RDS FM stations provide a program type identification signal. Example: news, rock, info, sport, etc. PTY Type Preset Press [ PTY/TA ] button once to enter the PTY mode. Then rotate the knob to select the desired program type. The selected PTY type is shown and searching starts if no other function is selected for 2 seconds. If there is no corresponding program type, NO PTY is shown and the unit will return to normal mode. 6 ———————————————————— Folder Up/Down Press the [ 5 ] button to go to the previous folder. Press the [ 6 ] button to go to the next folder. ———————————————————— Direct Song/File Access 1.Press the [ APS ] button once and press the knob to enable direct track searching. 2.Rotate the knob to select a digit at the units position. 3.Press the knob to confirm entry and the tens digit will flash. 4.Rotate the knob to select the tens digit. 5.Repeat above steps to enter the hundreds and thousands digit, if necessary. NOTE: The unit will only allow the selection of digits that correspond with the number of files on the media you are searching. 6.O nce the track number appears on the screen, press the knob to play the selected song/file. Playing MP3 Files MP3 is short for MPEG Audio Layer 3 and refers to an audio compression technology standard. The unit can read MP3 files written in the format compliant with ISO 9660. However it does not support the MP3 data written by the method of packet write. The unit can not read an MP3 file that has a file extension other than “.mp3”. If you play a non-MP3 file that has the “.mp3” extension, you may hear some noise. In this manual, we refer to what are called “MP3 file” and “folder” in PC terminology as “Track” and “Album”, respectively. The unit may not play tracks in the order of track numbers. The unit plays only the audio tracks if contains both audio tracks and MP3 files. USB MP3 Playback 1. Insert a USB device into the USB connector. When connecting a USB device, the unit will read the files automatically. 2. To remove the USB device, you should first select another source, in order to avoid damaging the USB device. Then take out the USB device. USB Notes USB functions (flash memory type) MP3 music play (1) USB flash memory 2 in 1 support (2) Fat 16 / fat 32 is possible (3)File name : 32 byte / dir name : 32 byte / tag name : 32 byte (4) Tag (ID3 tag ver 2.0) - title / artist / album : 32 byte support (5) USB 1.1 support USB 2.0 support (It can not support USB 2.0 speed. Just, get be same speed with USB1.1) (6)Not all kinds of USB devices are compatible with the unit. 77 Bluetooth® Operation Note: For your safety, avoid talking on the phone as much as possible while driving. Bluetooth ® is a wireless transmission way for short distance. The built-in Bluetooth ® can connect with the mobile phones having Bluetooth® function. After connecting, you can control your mobile phone through the unit. ———————————————————— Pairing Pairing Use this function to establish a connection between the Dash Dock radio and your Bluetooth® device. 1. Turn the Dash Dock radio on. 2.Turn on Bluetooth ® function on your Bluetooth ® accessory (ie. smart phone, Tablet, etc.) and start scanning for new Bluetooth® devices. 3.Press the [SCR] button on the Dash Dock unit the display shows either BT Disconnected or BT Music. 4.Press and hold the [SCR] button until display changes to ‘Pairing”. 5.From the Bluetooth ® accessory select ‘inCarBite’ from the list. 6.When prompted for passcode enter 1234 and the Bluetooth ® Pairing will occur. If your device instructs you to connect or disconnect please select connect. 8 Exit Pair After pair successfully, if you want to button to disconnect, press and hold disconnect Bluetooth® connection. ———————————————————— Make a call (After Paired) 1.In any mode, Press button. 2.Rotate the knob to select DIAL NUML, Press the knob to confirm the selection. 3.Rotate and press the knob to select phone number. ] button to delete a digit - P ress [ inputted. - Press button to reset entered number. 4.Press to dial out. 5.While a call is in progress, Rotate the knob to adjust call volume. button to hang up. 6.Press 7.In the BT mode, press and hold button to initiate a redial of last number called. Receive 1.After pair successfully, if there is a call incoming, the unit switch to BT mode automatically. 2.Press button to receive. button to hang up. 3.Press Call Transfer During talking, press button to transfer audio from the unit to your mobile phone. Note: Some mobile phones will transfer audio from the unit to themselves once the incoming call is answered. ———————————————————— BT Audio To listen to audio from a bluetooth® device and control playback with the unit. 1.Press [ SRC ] button repeatedly until BT MUSIC is displayed. 2. To play or pause, press [ 1 ]. 3.Press the [ ] button to move the to beginning of the previous track. Press the [ ] button to move to the beginning of the next track. 4.Press and hold the [ 1 ] button to stop playback. Bluetooth® Operation Music Mode A2DP A2DP is short for Advanced Audio Distribution Profile. The mobile phones supporting this function can transmit stereo audio, whereas the ones not supporting this function can transmit mono audio only. ———————————————————— General Notes for Bluetooth® 1.For some types of mobile phones, during our test, after the mobile phones appear connection successful, the unit still appear waiting for pairing. At this time you must find the unit’s Bluetooth ® module name “inCarBite” on the pairing list on your mobile phone and select connecting in the submenu, then the unit will appear CONNECT. Otherwise, there is no voice coming out when communicating, though the mobile phone has already displayed CONNECT. Some mobile phones, when it play back A2DP, you must find the unit name in the phone’s menu and reconnect (check your mobile phone whether has the A2DP & AVRCP functions). 2.When pairing, some types of mobile phone hint that how to operate, for example, when you make a phone call by the unit, if the mobile phone voice dosn’t be transferred to the unit, no voice comes out. System Menu 3.Depending on the mobile phone, if private mode is selected, when you make a phone call by the unit, or receive, the voice would be transferred to the mobile phone. But sometime the Bluetooth® maybe disconnect till the communication ends, then connects your mobile phone to the unit automtically. Some mobile phones maybe need pair again. 4.For mobile phone, the Bluetooth® device name must be primary symbols or numbers. Otherwise, some unpredictable issues may occur during the Bluetooth® devices connecting and making phone call. 5.After CONNECT, if no sound produced, please check whether the Bluetooth® stereo audio on the phone switched ON. Press [ MENU ] button to enter system menu, then each press changes the mode as follows: ———————————————————— TA mode Rotate the knob to choose TA ALARM or TASEEK mode. If the TA (Traffic Announcements) is turned on and there is no traffic program identificationcode received in the specified time, no TA/TP will display and either TA ALARM or TA SEEK will be activated. TA ALARM mode : Alarm is turned on. TA SEEK mode: TA SEEK is automatically activated. ———————————————————— AF ON/OFF Rotate the knob to choose AF on or off. ———————————————————— REG ON/OFF Rotate the knob to choose REG on or off. ———————————————————— TA VOL mode Rotate the knob to choose TA volume. ———————————————————— RETUNE mode RETUNE mode: Rotate the knob to choose 99 System Menu RETUNE-S or RETUNE-L. RETUNE-S or RETUNE-L is time length selection of TA SEEK retune interval. RETUNE-S: Short, TA SEEK retune interval is 45 seconds. RETUNE-L: Long, TA SEEK retune interval is 180 seconds. Remark: RETUNE mode functions for TA during TA SEEK mode only. ———————————————————— DSP mode: Rotate the knob to choose DSP sound effect: OFF->POP->ROCK->CLASSIC->FLAT ———————————————————— LOUD mode When listening to music at low volumes, this feature will boost the bass and treble ranges to compensate for the characteristics of human hearing. ———————————————————— WOOF ON/OFF Rotate the knob to choose WOOF ON or OFF. Rotate the knob to choose WOOF ON mode, press to enter SWVOL mode, then rotate the knob to adjust level. BEEP ON/OFF ———————————————————— the turn on volume level is the volume level of latest power off. Rotate the knob to choose VOL ADJUST mode, press to enter A-VOL mode, then rotate the knob to set the turn on volume level. STEREO/MONO (RADIO mode) ———————————————————— Rotate the knob to choose FM stereo or mono. 12/24 HOUR mode ———————————————————— Rotate the knob to select 12 or 24 HOUR time format. Rotate the knob to choose button beep sound on or off. LOCAL/DX (RADIO mode) Rotate the knob to choose radio local or distant. LOCAL: Only stations with strong signal can be broadcast. DX: Stations with strong and weak signals can be broadcast. ———————————————————— ROLL ON/OFF ROLL ON: the LCD will display ID3 TAG information cyclely, e.g: TRACK- >FOLDER>FILE->ALBUM->TITLE->ARTIST>TRACK->... ROLL OFF: the LCD will display one of the ID3 TAG information, the default is TRACK, but user can adjust it to other ID3 TAG information by press [BAND] button. ———————————————————— VOL LAST/ADJ mode Rotate the knob to choose VOL LAST mode, 10 ———————————————————— MIC FR Rotate the knob to choose Fornt MIC or Rear MIC . ———————————————————— AUTO ON/OFF Rotate the knob to choose AUTO ON or OFF. AUTO ON: the unit connects to last bluetooth® device automatically. AUTO OFF: The unit does not connect automatically. ———————————————————— SWC SET Rotate the knob to choose POWER, MUTE, SOURE, VOL UP, VOL DN, SEEK UP, SEEK DN or BAND, saved in the steering wheel buttons. Electrical Connections Wiring Diagram Right SWC (Gray) Left SUB OUT(Green) Front MIC RR Location 1 2 3 4 5 6 7 8 12 (Brown) Function Connector A Battery 12V(+) / Yellow ANT/AMP control / Blue with white stripe ILLUMI / Orange/White Stripe ACC+ / Red Ground / Black Connector B Rear Right (+) / Purple Rear Right (-) / Purple with Black Stripe Front Right (+) / Gray Front Right (-) / Gray with Black Stripe Front Left(+) / White Front Left(-) / White with Black Stripe Rear Left (+) / Green Rear Left (-) / Green with Black Stripe Right Left Installation Guide Installation Opening Reset This unit can be installed in any dashboard having an opening as shown below. The dashboard should be 4.75mm - 5.56mm thick in order to be able to support the unit. Press the RESET button with a pointed object to reset the unit to the original status. Note: Press the RESET button will erase the clock setting and stored stations. 102mm Installation Procedures 182mm If the opening is too small, carefully cut or file as necessary until the unit easily slides into the opening. Do not force the unit into the opening or cause it to bend or bow. Check for sufficient space behind the dashboard for the unit chassis. 1.If relevant, remove any other audio system from the car. 2.Fastening the bolt and rubber cushion. 3.Perform the required electrical connections. 4.T hen check that everything works before installing the main unit. 5.R emove the two screws on the top of the unit, otherwise, the unit will not work. *If you are not sure how to install this unit correctly, contact a qualified technician. Reset 1313 Troubleshooting The following checklist can help you solve some problems which you may encounter when using the unit. Before consulting it, check the connections and follow the instructions in the user manual. Do not use the unit in abnormal condition, for example without sound, or with smoke or foul smell can cause fire or electric shock, immediately stop using it and call the store where you purchased it. Problem General The unit will not switch on. No sound The unit or screen does not work normally. TUNER mode Unable to receive stations. Poor quality reception of radio station. Preset stations are lost. Possible cause Solution Car ignition is not on. Turn your car key in the ignition. Cable is not properly connected. Check cable connection. Fuse is burnt. Replace fuse with a new fuse of the same capacity. Volume is set at minimum or the mute Check the volume or switch the mute function off. function is on. The unit system is unstable. Press the RESET button. The antenna is not connected properly. Connect the antenna properly. The antenna is not fully extended or it is Fully extend the antenna and if broken, replace it with a broken. new one. Connect the permanent live on the unit to the permanent The battery cable is not properly connected. live on the vehicle. USB mode Unable to insert USB device. The USB device cannot be read. 14 The USB device has been inserted the Insert it the other way around. wrong way round. Check that the file system is in FAT or FAT32 format. Due NTFS format is not supported. to different formats, some models of storage devices or MP3 players may not be read. Specification General Power supply: Maximum power output: Continuous power output: Suitable speaker impedance: Pre-Amp output voltage: Fuse: Dimensions(WxHxD): Weight: Aux-in Sub-out AM(MW) Radio 12V DC (11V-16V) Test voltage 14.4V, negative ground 50Wx4 channels 25Wx4 channels (4 ,10% T.H.D.) 4-8 ohm 5.0V 15A 180*100*167 mm 1.96kg ≥300mV 5V Frequency range: Usable sensitivity(S/N=20dB): 22-1620KHz 5 30dBμ Components Mounting bolt (50mm) Mounting collar Wire connector Operating instructions Rubber cushion 1 1 1 1 1 FM Stereo Radio Frequency range: Usable sensitivity: Quieting sensitivity(S/N=50dB): Frequency response: Stereo separation: Image response ratio: IF response ratio: Signal/noise ratio: 87.5-108.0MHz 8dBμ 12dBμ 30Hz-15kHz 30dB (1kHz) 50dB 70dB 55dB Note: Specifications and the design are subject to change without notice due to improvements in technology. 1515 PN:127075014960