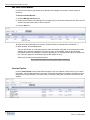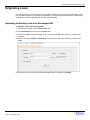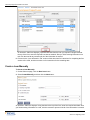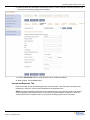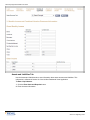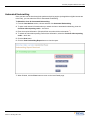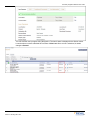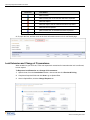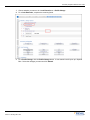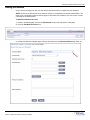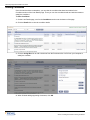
1
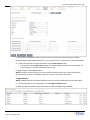
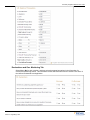
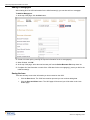
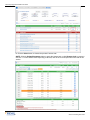
Paramount Residential Mortgage Group, Inc. Third Party Origination Website User Guide 8.19.2015 Third Party Origination Website User Guide Copyright Statement Equal Housing Lender. NMLS #: 75243 © 2009, Paramount Residential Mortgage Group, Inc. Some products may not be available in all states. This is not a commitment to lend. Restrictions apply. All rights reserved. © 2012 Encompass® and Encompass360® are trademarks or registered trademarks of Ellie Mae, Inc. or its subsidiaries. All rights reserved. Other company and product names may be trademarks of their respective owners. Products, services and programs are subject to change without notice. 2 Introduction Table of Contents Introduction ........................................................................................................................................................................... 4 Introduction ......................................................................................................................................................................... 5 Getting Started ...................................................................................................................................................................... 6 Getting Started .................................................................................................................................................................... 7 Gaining Initial Access to the Website ............................................................................................................................. 7 Start Using the Website Tools ........................................................................................................................................ 7 Originating Loans ............................................................................................................................................................... 10 Originating Loans .............................................................................................................................................................. 11 Uploading an Existing Loan from Encompass360 ....................................................................................................... 11 Create a Loan Manually ............................................................................................................................................... 12 Working with Loans ............................................................................................................................................................ 22 Working with Loans........................................................................................................................................................... 23 Import Additional Data .................................................................................................................................................. 23 Order/Reissue Credit .................................................................................................................................................... 24 Product & Pricing .......................................................................................................................................................... 24 Automated Underwriting ............................................................................................................................................... 27 Submit Loan ................................................................................................................................................................. 28 Re-Submit Loan ............................................................................................................................................................ 30 Changed Circumstance ................................................................................................................................................ 30 Lock Request – Optimal Blue ....................................................................................................................................... 30 Lock Extension and Change of Circumstance ............................................................................................................. 32 Adding Documents & Viewing Conditions ....................................................................................................................... 34 Adding Documents ....................................................................................................................................................... 35 Viewing Conditions ....................................................................................................................................................... 38 Archiving Loans .................................................................................................................................................................. 39 Introduction 3 Third Party Origination Website User Guide Introduction 4 Introduction Introduction This guide is intended to help you work with our company’s website, which connects directly to our loan origination system (LOS). The website provides a central online location where you can originate, process, and monitor loans. After logging into the website, you can originate new loan files or import loan files created from your own LOS. Once the loan is added to our website, you can submit the loan or take actions such as ordering a credit report or searching for product and pricing options. You can also use the website to monitor the loan’s status. At the same time we can monitor the loan activity in our LOS and ensure we are receiving all the necessary information we need. Changes made to the loan file on the website are reflected in the loan when opened in our LOS and vice versa. This guide provides all of the instructions necessary to log into the website and start originating and processing loans. Introduction 5 Section 1 Getting Started Third Party Origination Website User Guide Getting Started This section explains how you can start using the website and includes a brief description of the main tools available on the website. Gaining Initial Access to the Website Once approved by our company, we will assign a manager from your company to be the website administrator (i.e., the one who will manage user accounts, update company information, and add new users). The manager will receive an email from us that provides a link to the website, along with a log in name (the manager’s email address) and a temporary password. The manager will then complete the following steps to gain access to the website. To Gain Initial Access to the Website: 1 Click the link provided in the email to open the website. 2 Log in to the website using your email address and the temporary password provided in the email. 3 On the Change Password page, create a new password. NOTE: Be sure to keep track of your new password. Our company will not have access to it. Start Using the Website Tools Once logged in, the manager can grant users access to the site and update their account information. Section 1: Getting Started 7 Third Party Origination Website User Guide Add Users to the Website In order for other users to gain access to the website, the manager must create a contact record for each user. To Create a Contact Record: 1 Click the Manage Account button. 2 Scroll near the bottom of the Manage Account page until you locate the Contacts section. Here you will add the users who will be able to use the website. 3 Click the Add icon. 4 Enter the required information for the user. (Required fields are marked with a red asterisk. *) 5 When finished, click the Save button. The user will receive an email that provides a link to the website, along with a log in name (their email address) and a temporary password. The user can log in to the website, however their licensing information needs to be submitted to, and then approved by, our company before they can submit loan files. (This rule applies to branches that will use the website as well.) Submit user or branch licensing information to: Add contact information for licensing information reviewer(s) View the Pipeline Click the View Pipeline button on the Welcome page to view your pipeline of loans. Here you can check loan status, view conditions attached to the loan, and upload required documentation. Depending on your assigned role and permissions, you may be able to view all the loans that your team has entered on the website. 8 Section 1: Getting Started Third Party Origination Website User Guide Start a New Loan Click the New Loan button on the Welcome page to start a new loan. You can enter a loan manually or upload loan files from Encompass360 or other loan origination systems and formats. Get Product and Pricing Click the Product & Pricing button to run your loan scenario through the product and pricing engine. When you submit a product and pricing search request, the provider returns a list of programs, rates, and prices matching the loan details. After selecting a program/rate/price combination, follow the provider’s instructions to update the loan file with the selected product. NOTE: All of these items are discussed in detail later in this guide. Section 1: Getting Started 9 Section 2 Originating Loans Third Party Origination Website User Guide Originating Loans You can originate a loan on the website by uploading an existing loan file from Encompass360 or other loan origiantion system or by creating a loan manually. This section provides the steps for uploading an existing loan from Encompass360 and creating a loan manually. Uploading an Existing Loan from Encompass360 To Upload a Loan From Encompass360: 1 On the Welcome page, click the New Loan button. 2 Select Encompass, and then click the Next button. 3 On the Encompass Import Loan page, enter your Encompass360 Login Name (i.e., user ID) and Password. 4 Select a connection (Offline or Networked), enter the Server name (if necessary), and then click Login. 5 Select the loan to import from the Encompass360 Pipeline, and then click Submit. Section 2: Originating Loans 11 Third Party Origination Website User Guide An electronic 1003 form displays, populated with data from the loan you imported. Using the tabs at the top of the form, enter the required loan data as needed. After you finish entering information on a tab, click the next tab to proceed until all of the information is entered. 6 Proceed to the “Loan Information Tab” section of this document for instructions for completing the first section of the 1003, and then continue on for instructions for the remaining tabs. Create a Loan Manually To Create a Loan Manually: 1 On the Welcome page, click the New Loan button. 2 Select Create Manually, and then click the Next button. An electronic 1003 form displays. Using the tabs at the top of the form, enter the required loan data. After you finish entering information on a tab, click the next tab to proceed until all of the information is entered. 12 Section 2: Originating Loans Third Party Origination Website User Guide Loan Information Tab The Loan Information tab includes the information around the type of mortgage and loan terms, property information, and title information. This is the information contained in Sections I and II of the Uniform Residential Loan Application form. Borrower Information Tab The Borrower Information tab includes the information around the borrower and their residency. Here you can also order or reissue your credit report and import credit data. Note that when reissuing the credit report, you need to provide the Credit Reference Number. To Order or Reissue the Credit Report: 1 Click the Order/Reissue Credit button. Section 2: Originating Loans 13 Third Party Origination Website User Guide 2 When prompted, click Yes to save the loan file. 3 On the Review Credit Order/Reissue page, enter the required information, and then click the Next button. 4 Once the credit report is received, the Credit Report Received page displays, where you can then click the Import Liabilities button to import liabilities. The liabilities automatically populate the liens in Section VI of the Uniform Residential Loan Application form. 5 When finished, click the Done button. 6 On the Loan Details page, click the 1003 button to return to the electronic 1003 form where you can continue entering loan data. Employment History Tab Use this tab to enter the borrower and co-borrower’s employment information. To Enter Employment Information: 1 Click the Enter Employment Information button. 14 Section 2: Originating Loans Third Party Origination Website User Guide 2 Indicate whether this information is about the borrower’s current employer or previous employer, and then enter the remaining employment information. 3 Click the Add Another button to add information about a different employer. 4 When finished, click the Done button. Income and Expenses Tab Enter the monthly income and housing expenses for the borrower. This information correlates to the information in Section V of the Uniform Residential Loan Application form. NOTE: A proposed monthly payment will not be calculated until you submit the loan file to the product and pricing engine (discussed in Section 3) and select a program/rate/price combination. Once the selected interest rate is applied to the loan, a proposed monthly payment will be calculated. Section 2: Originating Loans 15 Third Party Origination Website User Guide Assets and Liabilities Tab Use the Assets and Liabilities tab to enter information about asset accounts and liabilities. This information is reflected in Section VI of the Uniform Residential Loan Application. To Enter Liquid Assets: 1 Click the Enter Cash and Deposits button. 2 Enter the asset information. 16 Section 2: Originating Loans Third Party Origination Website User Guide 3 In the Account Information section, select an account or asset type, and then provide its details. 4 Repeat Step 3 to add additional accounts. You can add up to four accounts for one financial institution. 5 To add a new asset and account information, click the Add Another button. You can also click the Add Another button to continue adding accounts to the current asset, but you will need to re-enter the asset information as well. 6 When finished, click the Done button. NOTE: In addition to liquid assets, you can also enter information about other assets including cash deposits toward purchase, automobiles owned, life insurance, and stocks and bonds. To Add Liabilities: NOTE: Liabilities listed in the General Liabilities section are usually the liabilities from the credit report. 1 To import liabilities from the credit report, click the Import Liabilities button 2 When prompted, click Yes to save the loan file, and then click OK to import liabilities. Section 2: Originating Loans 17 Third Party Origination Website User Guide 3 Click the Add Liabilities button (located at the bottom of the list) to enter additional liabilities. 4 Enter the liability details. Select the Exclude from URLA Page 2 Liabilities Total check box to exclude the payment from the ratios. Select the Mortgage liability will remain on subject property check box to indicate the liability is being paid off through the transaction. 5 To add a new liability, click the Add Another button and enter the liability details. 6 When finished, click the Done button. 7 To modify a liability, click the Edit link at the right of the liability. To Enter Alimony, Child Support, and Job Related Expenses: Use the Alimony, Child Support, and Job Related Expenses section on the Assets and Liabilities tab to enter applicable payment details. To Enter Real Estate Holdings: 1 Click the Enter Real Estate Information button. 2 Enter information about the real estate owned by the borrower, including any outstanding liens. 3 Click the Add Another button to add information about an additional real estate holding. 4 When finished, click the Done button. Trans. Details Tab Use the Trans. Details tab to enter the subject property’s purchase price and other transaction details. When creating a loan manually, you will have access to the following fields: Purchase Price Alterations Land Subordinate Financing Line I Credits PMI, MIP, Funding Fee Financed NOTE: When working with a loan you imported to the website, the fields on the Trans. Details tab will be automatically populated with applicable information from the loan file. 18 Section 2: Originating Loans Third Party Origination Website User Guide Declarations and Gov. Monitoring Tab Select Yes or No for each question, and then select the appropriate options in the Information for Government Monitoring section. This information reflects the information found in Sections VIII and X of the Uniform Residential Loan Application. Section 2: Originating Loans 19 Third Party Origination Website User Guide Adding Co-Mortgagors After entering all of the 1003 information for the initial borrower(s), you can then add a co-mortgagor. To Add Co-Mortgagors: 1 At the top of the page, click the New button. 2 Create a borrower pair by entering the required information for the co-mortgagor(s). 3 When finished, click OK. 4 At the top of the page, select the new borrower pair from the Select Borrower Pair drop-down list. 5 Complete all of the information on each of the 1003 tabs for the co-mortgagor(s), just as you did for the initial borrower(s). Saving the Loan There are two ways to save the information you have entered on the 1003: 20 Click the Save button. The 1003 form remains open and you can continue adding data. Click the Save and Close button. The 1003 page will close and you will be taken to the Loan Details page. Section 2: Originating Loans Third Party Origination Website User Guide Section 2: Originating Loans 21 Section 3 Working with Loans Third Party Origination Website User Guide Working with Loans Once you have completed and saved all of the information on the 1003, you can work with the loan or perform loan actions such as ordering a credit report, submitting the loan, or submitting a lock request. To perform an action, click any of the Loan Action buttons at the top of the Loan Details page (or the 1003), and then select an action. NOTE: The actions that are listed under the Loan Actions button are determined by our company’s website administrator. Therefore you may not have access to some of the actions discussed in this section. The administrator may also disable a loan action once another loan action is completed. Import Additional Data If you originated a loan on the website by importing the file from another LOS and changes have since been made to the file in the LOS, use the Import Additional Data action to import the changes to your file on the website. To Import Additional Data: 1 From the Loan Actions section, choose and then click Import Additional Data. 2 Select the LOS or file format to import from, and then select which fields to import and how to manage existing lists (such as liabilities). Section 3: Working with Loans 23 Third Party Origination Website User Guide 3 Click the Next button, and then follow the on-screen instructions to locate the loan file and import the data. Order/Reissue Credit Using the Order/Reissue Credit action, you can order or reissue your credit report and import credit data. To Order or Reissue the Credit Report: 1 From the Loan Actions section, choose and then click Order/Reissue Credit. 2 On the Review Credit Order/Reissue page, confirm that the order information is correct, and then click the Next button to submit the order. 3 Once the credit report is received, the Credit Report Received page displays, where you can then click the Import Liabilities button to import liabilities. NOTE: For more information and sample screens, refer to the Borrower Information Tab section in Section 2 – Originating Loans. Product & Pricing Use the Product & Pricing action to run your loan scenario through the product and pricing engine. To Request Pricing 1 From the Loan Actions section, choose and then click Product & Pricing. 2 Enter the required information. (Required fields are marked with a red asterisk. *) 24 Section 3: Working with Loans Third Party Origination Website User Guide 3 At the bottom of the screen, enter a Target Rate or a Target Price. 4 Click the Next button. 5 Click an eligible program’s Show link to view the product details. Section 3: Working with Loans 25 Third Party Origination Website User Guide 6 Click the Select button to choose the product’s interest rate. NOTE: Click the Update Encompass button to apply the interest rate or click Request Lock to request a rate lock.. For more details about requesting a rate lock, refer to the Lock Request discussion later in this section. 26 Section 3: Working with Loans Third Party Origination Website User Guide Automated Underwriting Once you have run the loan through the product and pricing engine (and applied an eligible interest rate to the loan), you can submit the loan for Automated Underwriting. To Submit the Loan for Automated Underwriting: 1 From the Loan Actions section, choose and then click Automated Underwriting. 2 To pass credit reissue information when you submit the loan to automated underwriting, clear the Continue without passing credit… check box. 3 Enter the required information. (Required fields are marked with a red asterisk. *) 4 To submit the loan without passing credit reissue information, select the Continue without passing credit… check box. 5 Click the Next button. 6 Click the View Underwriting Report button to view the report. 7 When finished, click the Done button to return to the Loan Details page. Section 3: Working with Loans 27 Third Party Origination Website User Guide Submit Loan Once you have completed the loan and run it through the product and pricing engine (and applied an eligible interest rate to the loan), you must use the Submit Loan action (or the Automated Underwriting action discussed earlier) to ensure that the loan is submitted to the underwriter. To Submit the Loan to the Underwriter: 1 From the Loan Actions section, choose and then click Submit Loan. 2 Ensure that all of the required information has been entered and the required documents have been attached, and then click the Submit Loan button. (Required fields are marked with a red asterisk. *) 3 After the loan is submitted, you can take additional actions with the loan, such as requesting a rate lock. NOTE: You can request a rate lock before you submit the loan or at the same time that you submit the loan to the underwriter. For more information, refer to the Lock Request discussion later in this section. 28 Section 3: Working with Loans Third Party Origination Website User Guide You can track the loan’s progress using the pipeline. The loan’s status is displayed in the Status column. Loans that have not been submitted have a status of New Loan. Once a loan is submitted, its status changes to Started. Section 3: Working with Loans 29 Third Party Origination Website User Guide Re-Submit Loan After submitting the loan, you may have to add more required loan data. Once you have added this new information on the Re-Submit page, you can use the Re-Submit action to ensure that the loan is submitted to the underwriter. To Re-Submit the Loan to the Underwriter: 1 From the Loan Actions section, choose and then click Re-Submit. 2 Ensure that all of the required information has been entered and the required documents have been attached, and then click the Re-Submit Loan button. (Required fields are marked with a red asterisk.*) Changed Circumstance After submitting the loan, you may need to change loan information. When certain loan information changes, such as the loan type or loan program, a new disclosure is required. Use the Changed Circumstance action to re-submit the updated loan to the underwriter. To Re-Submit the Loan to the Underwriter Due to a Changed Circumstance: 1 From the Loan Actions section, choose and then click Changed Circumstance. 2 On the Changed Circumstance page, select a description of the circumstance from the Changed Circumstance drop-down list. 3 Ensure that all of the required information has been entered and the required documents have been attached, and then click the Changed Circumstance button. (Required fields are marked with a red asterisk.*) Lock Request – Optimal Blue If you are using a TPO WebCenter site where Optimal Blue is the product and pricing provider, you do not have the option to submit a rate lock request from the site. Instead, you must first submit the loan scenario through the Optimal Blue product and pricing engine on the site and then submit a rate lock request on Optimal Blue’s Product and Pricing Result page. To Submit a Lock Request: 1 From the Loan Actions section, choose and then click Product and Pricing. 2 Enter the required information in each section of the Product and Pricing Search page, and then click Next. NOTE: If one or more fields or documents in the Additional Fields for Lock Request section are empty or missing when you click Next, a warning message displays stating “All of the required information needed to request a lock is not available. If you continue, you can view the results, but will not be able to place a lock request.” Click Cancel to return to the Product and Pricing Search page and enter the missing information. 3 30 On the Product and Pricing Result page, click Show to view the program’s interest rate and other details. Section 3: Working with Loans Third Party Origination Website User Guide 4 Click the Lock Form icon for the rate you are requesting. 5 Click the Request Lock button. NOTE: If you did not provide all of the required fields or documents in step 2, but chose to continue and view the search results anyway, this button will be disabled and you will not be able to submit the rate lock request. The request is submitted. Once the submission is processed, you are returned to the Loan Details page. A message confirming that your request has been submitted is displayed near the top of the page. To View the Status of the Lock: You can view the status of the lock by viewing the Pipeline or by opening the loan file and viewing the Loan Details page. 1 On the Welcome page, click the View Pipeline button. A Lock icon is displayed for each loan. Section 3: Working with Loans 31 Third Party Origination Website User Guide Lock Icon Lock Status Rate is locked Rate is locked, but a new rate lock has been requested Rate has expired Rate has expired, but an extension has been requested Rate has been requested Rate is locked, but an extension has been requested Rate is unlocked 2 Or, open the loan, and then scroll to the Lock Information section on the Loan Details page. Lock Extension and Change of Circumstance When enabled on your TPO site, TPOs can request lock extensions for loans when the lock is confirmed, but not expired. To Request a Lock Extension or a Change of Circumstance: 32 1 Open the loan, from the Loan Actions section, choose and then click Product & Pricing. 2 Complete all required fields and click Next to go to Optimal Blue. 3 Once in Optimal Blue, click the Change Request icon. Section 3: Working with Loans Third Party Origination Website User Guide 1 Choose whether you want to do a Lock Extension or a Profile Change 2 For a Lock Extension, complete the remaining fields. 3 For a Profile Change, click the Profile Change button. A new search box will open up in Optimal Blue. Select the changes you want and click Submit. Section 3: Working with Loans 33 Section 4 Adding Documents & Viewing Conditions Third Party Origination Website User Guide Adding Documents As you work to process your loan, you will need to add documents to complete the loan package. NOTE: Access to the Documents and Conditions section is controlled by the website administrator. The actions you are allowed to perform and the types of documents and conditions you can access are also controlled by the administrator. To Add Documents to the Loan: 1 On the Loan Details page, scroll to the Documents section near the bottom of the page. 2 Click the Add New Document icon. 3 On the New Document Details page, select a document from the Document Name drop-down list. Section 4: Adding Documents & Viewing Conditions 35 Third Party Origination Website User Guide 4 On In the Attached Files section, click the Browse button to select the document. 5 Add comments in the New Comments section if necessary, and then click the Save button. 36 Section 4: Adding Documents & Viewing Conditions Third Party Origination Website User Guide The document is now included in the Documents list on the Loan Details page. Section 4: Adding Documents & Viewing Conditions 37 Third Party Origination Website User Guide Viewing Conditions Once the loan has been underwritten, you can view the conditions that have been added in the Conditions section of the Loan Details page. There you can view condition details and add documents to satisfy the conditions. To View Conditions: 1 On the Loan Details page, scroll to the Conditions section near the bottom of the page. 2 Click the Details link to view the condition details. 3 Click the Assign Doc link to add a document from the Documents list or a file from your computer to satisfy the condition. 4 When finished adding supporting documents, click OK. 38 Section 4: Adding Documents & Viewing Conditions Section 5 Archiving Loans Third Party Origination Website User Guide Archiving Loans Keeping your pipeline current is the best way to stay on top of your loans. The Archiving function allows you to remove loans that are stagnant or have funded out from your current pipeline view. To Archive a Loan: 1 On the Welcome page, click the View Pipeline button. 2 Select the check box for the loan you want to archive. 3 Click the Archive button (located in the upper-right corner of the pipeline) to remove the loan from the pipeline and add it to the Archived pipeline. Click the Archived tab to view the Archived pipeline. To bring the loan back to your current pipeline from the Archived pipeline, select the check box for the loan, and then click the Undo Archive button (located in the upper-right corner of the pipeline). Loan applications that have been denied are highlighted in pink. An alert icon (red flag) also displays next to loans that have been suspended or denied by the underwriter. Click this icon to view the date in which the loan was suspended or denied by the underwriter. 40 Section 5: Archiving Loans